
Android always projected its open source nature in many ways. On Android, you can mod your icons, themes, boot logo and even install custom ROMs at your will. We have seen much development past years like Multi ROMs and even running few Linux distros on Android.
Android even managed to run early versions of Windows 95 and Windows XP, though it was lagging and inefficient it did well. Just a few days back XDA member ycavan came with amazing development. He managed to run Windows 7 on his Asus Zenfone 2 with the Intel-based processor. The nature of the Intel Atom’s architecture ensures that the OS runs at near-native speeds.
In his post, ycavan outlines every step required for the installation, the gist of which is that interested Zenfone 2 users must unlock their bootloader, flash a specific kernel, partition their SD card and run a host of terminal commands, upon completion of which, the Windows installation will begin in a virtual machine. The installation process is bit complex but nothing to worry, today we will present you the simplest guide to run Windows on your Asus Zenfone 2
Prerequisites
- Download KVM enabled kernel from here.
- Install following apps from the Play Store.
[googleplay url=”https://play.google.com/store/apps/details?id=ru.meefik.linuxdeploy”]
[googleplay url=”https://play.google.com/store/apps/details?id=com.iiordanov.freeaSPICE”]
[googleplay url=”https://play.google.com/store/apps/details?id=jackpal.androidterm”]
[googleplay url=”https://play.google.com/store/apps/details?id=sk.vx.connectbot”]
[googleplay url=”https://play.google.com/store/apps/details?id=stericson.busybox”]
- Any Windows ISO image file (Windows 7/8/8.1)
Optional
- A decent sized SDcard of 128GB.
- Install SDcard partitioner from Play Store.
[googleplay url=”https://play.google.com/store/apps/details?id=com.sylkat.AParted”]
Procedure
- Flash the 2.19 kernel.img using fastboot or through custom recovery and reboot.
- Start Terminal Emulator
- Type su (For superuser permissions)
- Grant superuser permissions when prompted. (Select Always)
- Type Ismod and verify kvm.ko and kvm-intel.ko are active. If they are not active use; insmod /lib/modules/kvm.ko and insmod /lib/modules/kvm-intel.ko to activate them
- Exit the Terminal Emulator completely.
- Use Linux Deploy to install your favorite Linux distro. Only use SSH, you won’t need framebuffer or X access. This could take upwards of half an hour. (Light Linux distros are recommended like alphaOS)
- After Linux Deploy has installed your Linux distro, click Start to start up the chroot.
- Use an SSH client to connect to your Linux distro. VX ConnectBot is suggested as you won’t be PC dependable to boot every time.
- Use the package manager to install qemu-kvm for your distro. Most Debian & Ubuntu distros use apt-get, pacman, and other command lines.
- It is recommend creating a shell script to start up qemu-kvm because it can be a painful to remember all of the switches alike.
qemu-system-x86_64 -full-screen -m 1G -enable-kvm -cpu host \
 -drive file=/mnt/0/machine1.img,format=raw -boot menu=on \
 --usbdevice tablet -smp 4 -vga qxl -monitor stdio -balloon virtio \
 -soundhw hda -net nic,model=virtio \
 -net user,smb=/mnt/MicroSD \
 -spice port=5900,addr=127.0.0.1,disable-ticketing $@
8. Your script file must look like this
#!/bin/bashqemu-system-x86_64 -full-screen -m 1G -enable-kvm -cpu host \ -drive file=/mnt/0/machine1.img,format=raw -boot menu=on \ --usbdevice tablet -smp 4 -vga qxl -monitor stdio -balloon virtio \ -soundhw hda -net nic,model=virtio \ -net user,smb=/mnt/MicroSD \ -spice port=5900,addr=127.0.0.1,disable-ticketing $@Use chmod +x start_win7.sh to make it executable
9. Start up the qemu-kvm virtual machine referencing the location of your windows 7 install cd
./start_win7.sh -cdrom /mnt/MicroSD/Vcd/en_windows7.iso
10. Qemu will start up and then show you this:
QEMU 2.3.0 monitor – type ‘help’ for more information
(qemu)
11. Start up aSPICE.
12. Click the OFF button to the left of Show Advanced Settings and Make sure Enable Sound is checked.
13. The default connection is 127.0.0.1:5900, so on seeing this tap Connect.
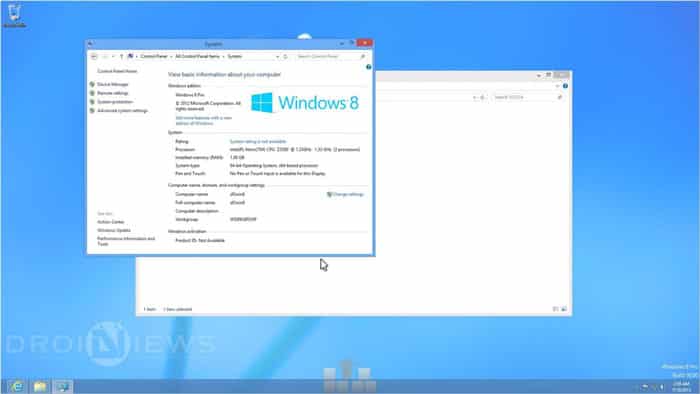
Now the real magic begins. You will see Windows loading. Hurrah !
The installation of drivers and parting SDcard are omitted from this guide to make this guide simple. Anyhow if you have queries regarding drivers do reach us through comments below. Don’t forget to share your experiences with Windows on you Asus Zenfone 2.
Reader Interactions
You should upgrade or use an alternative browser.
Windows 10 native Installation on Zenfone 2, Dualboot with Android
-
Thread startersteinwayer
-
Start date
-
#1
This argument has been discussed a couple times in this forum, but i wanted to address it once more since i believe it’s one of the most interesting.
So, i am looking to install natively Windows 10 (desktop version, not mobile) and Android in dualboot on the ZF2.
In theory, as specified many times by other users, is possible. Since the soc of the ZF2 is Intel x86/64.
Let’s proceed with order.
1) The main issue, is to find out how to run the windows installer, completely outside the Android environment. Now i know Asus released an official Bootloader for the ZF2, but we have to figure out if it’s loaded outside of the Android environment or not. If it is, that would be a great kickstart.
2) The drivers then would be another issue, even though, the Z3580 is an Atom and should share a lot of with its bigger brothers for tablets that already run Windows 10.
3) FIgure out how to dualboot it. Windows 10 Desktop version is not currently equipped with dialing functions and even though there are some third party software, it would not be very comfortable to use as main OS on such a small screen. So Android is a must here.
4) Last but not least, figure out a way (not wirelessly, just because it does not work very well) to cast the screen of the Windows 10 Asus ZEnfone2, to a larger monitor.
I own a Lumia 950 and as many of you know, it comes with the Continuum feature. It is a pretty interesting function even though in the current state is very limited. (can run only UWPs and nothing more, with limited functionalities).
For those of you guys wondering if it’s even possible to solve the problem n.1 i can tell you it definitely is. A couple years ago, Elephone was working on a Dual Boot Phone, called vowney Pro with the exact same soc of the ZF2, capable of running both Windows 10 (desktop, even though some blogs mistakenly reported windows 10 mobile. It was the desktop version, i spoke with the company) and Android.
That project never came to life, the company would not share with me the reason why.
Just think about how cool would be to have a 2 in 1 device capable of running full Windows 10 natively. It would really be the first of its kind and turn out to be super useful in a lot of situations.
Any of you ever tried ?
Thanks in advance to all of you guys!!
-
#2
-
#3
Hello everyone!!
This argument has been discussed a couple times in this forum, but i wanted to address it once more since i believe it’s one of the most interesting.So, i am looking to install natively Windows 10 (desktop version, not mobile) and Android in dualboot on the ZF2.
In theory, as specified many times by other users, is possible. Since the soc of the ZF2 is Intel x86/64.
Let’s proceed with order.1) The main issue, is to find out how to run the windows installer, completely outside the Android environment. Now i know Asus released an official Bootloader for the ZF2, but we have to figure out if it’s loaded outside of the Android environment or not. If it is, that would be a great kickstart.
2) The drivers then would be another issue, even though, the Z3580 is an Atom and should share a lot of with its bigger brothers for tablets that already run Windows 10.
3) FIgure out how to dualboot it. Windows 10 Desktop version is not currently equipped with dialing functions and even though there are some third party software, it would not be very comfortable to use as main OS on such a small screen. So Android is a must here.
4) Last but not least, figure out a way (not wirelessly, just because it does not work very well) to cast the screen of the Windows 10 Asus ZEnfone2, to a larger monitor.
I own a Lumia 950 and as many of you know, it comes with the Continuum feature. It is a pretty interesting function even though in the current state is very limited. (can run only UWPs and nothing more, with limited functionalities).
For those of you guys wondering if it’s even possible to solve the problem n.1 i can tell you it definitely is. A couple years ago, Elephone was working on a Dual Boot Phone, called vowney Pro with the exact same soc of the ZF2, capable of running both Windows 10 (desktop, even though some blogs mistakenly reported windows 10 mobile. It was the desktop version, i spoke with the company) and Android.
That project never came to life, the company would not share with me the reason why.Just think about how cool would be to have a 2 in 1 device capable of running full Windows 10 natively. It would really be the first of its kind and turn out to be super useful in a lot of situations.
Any of you ever tried ?
Thanks in advance to all of you guys!!
please follow this topic
https://xdaforums.com/zenfone2/general/zf2-running-windows-7-using-kvm-t3153299
-
#5
This has been done and deemed not worth the time and effort.
1. No drivers for Mali.
3. Win OS has no phone support until late 2017.
If you have the technical skills please do try yourself, but don’t expect others to do the work.
I recommend waiting until fall 2017 when x86 emulation on Snapdragon launches. A plethora of new handsets with desktop Win OS and phone support will be launched. And this project will be redundant.
Last edited:
-
#6
I didn’t know that people tried here. I tried searching in the whole forum but sadly i didn’t find anything.
Yes i know that Windows on Arm will launch sometime this year, but i don’t think this will be redundant. Windows on Arm will let you have a windows handset capable of running x86 apps. No Android.
This on the other hand would let you enjoy both worlds, and on top of that, is the ability to dual boot two different operating systems on a smartphone that intrigues me (not linux based ofc)
I don’t expect the others to do it for me, i am stuck sadly on the first issue with having a bootloader capable of booting an OTG image of Windows.
But if anyone found a way to do that and got stuck on the next step, i would be more than happy to try myself
Do you happen to have any threads to address me to?
Thanks in advance
-
#7
Anyway ontopic.
I will skip 1 till the last since this is the main issue and start off with 2
2 The drivers are not an issue YET. The intel HD series GPU’s have used the specific model of powerVR GPU that is in use so it is a problem that can be fixed. Most of the rest of the drivers are not directly a problem as the first problem is to get windows running natively.
3 Dualboot. In first place this is not neccisary, however this is possible but will require the work from 1 listed bellow first. Let me say from the start that you can forget hotswitching to android… That will be a full reboot and I dont know about your zenfone 2 but mine takes a while to boot…
4 As long as the wifi is running lots of options there…
Now the culprit 1
You can not run the windows installer in the current bootloader, however happy news for you this specific CPU supports UEFI. For this purpose I was reverse engineering the bootloader on my pc and altering the UEFI of that of a tabled with a similair CPU of the same series. However my screen got broken, so I lost motivation, had it repaired after which half my phone died again (there is another topic floating around where I tried to flash the ori bootloaders as I thought that may had something to do with the issues of my phone dieing) so I bought a lumia 950 aswell, and now I just have it back again.
This project is stalled. One of the reasons is stated here, the other one is that I don’t have the knowledge to continue right now. Reading in and learning takes a lot of time and I don’t have time at the moment and as said before I am for the moment not very happy with the amount of times the zenfone just without damage just died on me…
I am happy to share all I have found on the internet to someone who knows how to do it, but if you need to learn in as I do this will take years…
Thinking about you MIGHT have a shot just flashing one of the tablets UEFI bioses, but this very well may be a one shot chance after which a perma brick can occur…
-
#8
I was talking about the recent Windows on ARM, not Windows 10 Mobile. For instance, this:
https://www.youtube.com/watch?v=A_GlGglbu1U
Even though there is no single definitive proof that they ditched Intel for the Surface Phone project, the video I shared seems to be a pretty clear statement eheh, and yes, i totally agree with you, it will be a shame.
Thank you so much for the infos you gave me! That’s super helpful! I suspected the stock bootloader would have not been capable of doing that, so i was looking (like i guess you did long before me) for answers about the chances of flashing UEFI on it.
Dualboot, at least for the beginning would be necessary, if used as the primary phone, Android would be needed for all phone-related tasks.
I will try to see if i manage to flash UEFI on the ZF2. After that it should be a a lot simpler! And it would open a WHOLE NEW WORLD of possibilities with that phone
About the hotswitching, i know, it will be impossible. But the way i see it, the wait time for a full reboot would be worth it, especially in case after solving all the problems, we could manage also to solve the point 4
Will keep you posted!!
Last edited:
-
#9
Nobody ever said the x86 emulator is coming to phones. It’s just Windows RT 10 with 3rd party Win32 app support. It’s for larger devices like tablets and laptops.
From what I’ve seen, I think the Zenfone 2 (and 5) will be relevant for many years to come. Nobody is offering something that runs full Windows 10 on the phone’s screen like the Zenfones with KVM. There is also no performance hit like an emulator.
If anything, MS MIGHT integrate it into W10M’s Continuim but I doubt they will let you run Photoshop on the phone’s screen.
-
#10
XPphone, Eking m5 (also MI15), DOCOMO Fujitsu LOOX F-07c,
Non phone capable (or only via usb) Ockel Sirius, GPD WIN
In development: Graalphone, Palmputer
So yes there are devices…
No an emulator wont do the trick for me, No a KVM does not do the trick for me. I need DIRECT acess to the GPU for proprietary programs which I want to use the phone for.
-
#11
There have been multiple devices in the past, and there are devices for sale now and there are devices that are in developent. Criteria below 6″, pocketable and full X86.XPphone, Eking m5 (also MI15), DOCOMO Fujitsu LOOX F-07c,
Non phone capable (or only via usb) Ockel Sirius, GPD WIN
In development: Graalphone, Palmputer
So yes there are devices…
No an emulator wont do the trick for me, No a KVM does not do the trick for me. I need DIRECT acess to the GPU for proprietary programs which I want to use the phone for.
Well i always thinking the EASIEST way to enable 3D acceleration with acceptable performance.The only software that could enable 3D acceleration and runs windows software on android is Crossover from codeweavers.It’s wine commercial version which compatibility layer that enables you to run windows software on linux.Maybe you’re very familiar it if you playing around with linux for some time.The only problem is the compatibility.its still in alpha stage and still doesn’t run much software perfectly.Considering it’s opensource,it has the source code available on their site.If we have developers that expert at modifying .apk and port the qemu kvm,we’ll be able to solve that.We have qemu on android name limbo pc emulator and it always up to date recently which now based on qemu 2.9.0.The only matter is how we modified the apk to sync with limbo pc emulator so that it has 3D virtual gpu available.How the virtual gpu works,is translate OPENGLES into directX,though its limited to 9.0.Maybe little tweak can make it work on limbo.Hope the source code containts that Vgpu code.I am noob for porting apks,etc.But i know some basic about it.Hope you guys can make it works.Once we make it work,we’ll be able to launch CStrike 1.6 on our amazing ZF2
———- Post added at 07:36 AM ———- Previous post was at 07:31 AM ———-
Crossover has it’s virtual GPU into it,which makes 3D acceleration working.it’s use OpenGLES and translate it to directX.if we can implemented it on limbo pc emulator,we’ll be able to enable hardware acceleration into windows guest
-
#12
Its unbelievable enough, that you can’t install Linux on ARM.
Cant install on a x86 cpu device, it seems impossible !!!
2019… nothing yet ?
-
#13
Man I’m with you
Its unbelievable enough, that you can’t install Linux on ARM.
Cant install on a x86 cpu device, it seems impossible !!!
2019… nothing yet ?
Researching, +1
-
#14
I was modifying that bios to increase the chances, but ran out of my expertise, lack time, and am using my zenfone as daily driver
MLX
Senior Member
-
#15
-
#16
-
#17
The Intel atom z3530 CPU in my Z00AD is an ARM CPU?
Tnankx in avance for ur help!
MLX
Senior Member
-
#18
O only have a Question :
The Intel atom z3530 CPU in my Z00AD is an ARM CPU?Tnankx in avance for ur help!
No, it’s an x86_64 (64-bit) SoC. Any Intel Atom processor is x86 or x86_64
Similar threads
На смартфон Asus ZenFone 2 можно установить Windows 7
Компания Intel уже не первый год пытается продвигать в мобильном сегменте свои собственные платформы x86. К примеру, новейший Asus ZenFone 2 основан на SoC Atom Z3580 поколения Moorefield.
Одному из участников сообщества сайта XDA, скрывающемуся под псевдонимом ycavan, удалось установить на такой смартфон полноценную ОС Windows 7. Процедура достаточно сложная и проделать все необходимые манипуляции могут только те пользователи, которые хорошо понимают, что именно необходимо делать.

По этой причине мы не будем описывать сам процесс. По ссылке у источника можно найти всю необходимую информацию.
К слову, ycavan утверждает, что аналогичным образом на смартфон можно установить Windows 8.1 и даже Windows 10.
-
By
admin -
No Comments -
Updated On April 17, 2021 — 11:39 PM
TWRP recovery opens the doors to gain custom rom access on your Asus ZenFone 2 (ZE551ML) Z00AD Z00A and more.

When you decide to make unofficial changes to your Asus ZenFone 2 (ZE551ML) Z00AD Z00A, one of the first processes to go through on the way is to install a custom recovery. If you are a android user, you may already be aware of TWRP Recovery.
Team Win Recovery Project (TWRP) is a custom recovery image of open-source software for Android-based devices. It provides a touchscreen-enabled interface that allows users to perform various tasks including installing third-party custom ROMs, mods, kernels, taking a backup, and more.
In this article, we tell you how to install TWRP custom recovery in your Asus ZenFone 2 (ZE551ML) Z00AD Z00A, what exactly it means, and what steps you need to take to do it.
- What is TWRP Custom recovery?
- Which one is the best? TWRP or CWM!
- Benefits of Installing TWRP on Asus ZenFone 2 (ZE551ML)
- Prerequisites
- Steps to install TWRP Custom recovery in Asus ZenFone 2 (ZE551ML) Z00AD Z00A?
- Magisk installation using TWRP in Asus ZenFone 2 (ZE551ML).
- Finalizing – Magisk Installation Guide On ZenFone 2 (ZE551ML) Z00AD Z00A
What is TWRP Custom Recovery?
In addition to the clockwork mod developer solution, there are other modified recovery environments. One of the most functional solutions of this type is TeamWin Recovery Project (TWRP).
It is necessary to indicate that manufacturers limit the possibilities of pre-installed recovery. Many experienced users want to make use of the features of the hardware components as much as possible, and therefore there is so-called custom recovery, available for installation on a large list of Android devices. Such a solution is quite seriously expandable: the possibility of adding new features to the firmware and the fine configuration of the Asus ZenFone 2 (ZE551ML) Z00AD Z00A.
Now you can install TWRP recovery in your Asus ZenFone 2 (ZE551ML) Z00AD with this Guide.
Which one is the best, TWRP or CWM?
For those who have already get into the world of modding, these are both well-known names. CWM pioneered custom recovery, even though it lost many users to the Team Win Recovery Project. The TWRP is the most recent, much more used in recent years by developers because it supports a greater number of models. As we all know no product is better than the other but for the reasons listed here, I recommend you to use TWRP instead of CWM.
Features of TWRP recovery
In TWRP recovery, the interface of it is so advanced for all kinds of people. All the options in TWRP are button featured, so very easy to handle TWRP instead of others.
Some more features are listed below:
- Install custom ROMs using TWRP recovery in your Asus ZenFone 2 (ZE551ML) Z00AD. You can easily Install Custom Rom like Lineage OS on your Asus ZenFone 2 (ZE551ML) Z00AD Z00A.
- Flash modded zip files to personalize your ZenFone 2 (ZE551ML) Z00AD Z00A.
- Easy to use Xposed modules.
- Easy to Root and Unroot via TWRP Recovery by installing Magisk On Your Asus ZenFone 2 (ZE551ML) Z00AD Z00A.
- You can always perform NANDROID backup in case of modifications or installations of modded files in your Asus ZenFone 2 (ZE551ML) Z00AD.
- Easy access & restore android Backup.
- Flash the image file using TWRP recovery.
- Your can remove all bloatware on your Asus device using TWRP recovery.
- For underclock and overclock.
- Wipe, Cache and Data can be cleaned.
Disclaimer:
TweakDroid team or the author of this guide is not responsible for any failure during the process. If you wish to go forward, please do it your own risk. As a precaution, read this entire file at least once before you start!
Prerequisites:
- There should be 90% battery charge on yourZenFone 2 (ZE551ML) Z00AD Z00A to perform the TWRP installation process. If not, charge and then proceed.
- Make a full backup of your device which allows you to recover in case of problems.
- Download and Install the ADB Fastboot drivers on your PC. On the installation, you have a choice to install USB drivers, so you can install drivers at the right time. You may reach any error at the time of installing custom recovery about install drivers you have to download and install drivers for your ZenFone 2 (ZE551ML) Z00AD Z00A in your PC. Find the download link in below.
- Enable the USB Debugging and Developer Options on your MIUI device. (EMUI, more)
- Enable the developer option on your ZenFone 2 (ZE551ML) Z00AD.
- On ZenFone 2 (ZE551ML) Z00AD Z00A go to Settings ->
- Scroll down to find About Device/Phone and tap on it.
- Locate MIUI Version and tap several times on it.
- Enable the USB debugging option on your Asus ZenFone 2 (ZE551ML) Z00AD Z00A device.
- Go to Settings
- Additional Settings-> Developer options to enable it.
- Find the USB Debugging option and enable it.
- Make sure your Asus ZenFone 2 (ZE551ML) Z00AD Z00A’s bootloader is unlocked.
- Download and Install the ADB Fastboot drivers on your PC.
Read More Articles On Asus ZenFone 2 (ZE551ML) Z00AD Z00A
-
Lineage OS 17.1: List Of Supported Devices and Features
- How to Root Asus ZenFone 2 (ZE551ML) Z00AD Z00A Without PC [Easy Rooting Guide]

Install TWRP custom recovery on Asus ZenFone 2 (ZE551ML) Z00AD Z00A.
- Download the TWRP recovery file and rename it to recovery.img and paste it into the Fastboot folder.
- Now you need to open the CMD window inside that folder. To do this, Shift + right-click on an empty blank space inside the folder and then select Open command window here.
- Enter to Fastboot mode in your Asus ZenFone 2 (ZE551ML) Z00AD by following steps:
After shutting down your Asus ZenFone 2 (ZE551ML) Z00AD Z00A, press and hold the power button and the volume down button at the same time. - Take a USB cable and connect theAsus ZenFone 2 (ZE551ML) Z00AD to the PC.
- Enter the following in the command window to boot the ZenFone 2 (ZE551ML) Z00AD Z00A into bootloader / fastboot mode.
“Making sure you have enabled USB Debugging mode on Asus ZenFone 2 (ZE551ML) Z00AD Z00A as shown above.”
fastboot devicesOnce you enter this command it will execute the device. after entering the command press enter to execute the command.
adb reboot bootloaderOnce theAsus ZenFone 2 (ZE551ML) Z00AD Z00A has booted into quick boot mode, type in the command window:
fastboot flash recovery recovery.img“This command will start installing TWRP recovery on the device.”
- Once TWRP is installed, enter the final command to reboot the device.
fastboot reboot - You should now have successfully installed TWRP recovery on your Asus ZenFone 2 (ZE551ML) Z00AD.
Download Required Files Below
- Download TWRP Custom Recovery img
- How to Download & Install USB Driver For Asus ZenFone 2 (ZE551ML) Z00AD Z00A
The function of TWRP Custom recovery
The TWRP is a “custom recovery” method to offer so many more functions than a stock recovery. The main feature of TWRP is to be totally “touch” (It also has a keyboard), and therefore the operations to be carried out are extremely easy and intuitive. Furthermore, it avoids stressing the few physical buttons on our terminal, helping to increase life expectancy.
Some of the functions are below:
INSTALL
Here we could flash (install) any ROM, MOD, or Kernel in your Asus ZenFone 2 (ZE551ML) Z00AD.
Note that it is possible to select a sequence of files to flash, so we can decide to flash in succession (ordered) ROM, Kernel, and MOD in one shot, which is a great convenience.
WIPE
Here we can perform the various wipes of the memory to prepare the ZenFone 2 (ZE551ML) Z00AD Z00A for a ROM flash or clean.
Here we will find:
– Wipe Data, which allows you to delete all application data in your Asus ZenFone 2 (ZE551ML) Z00AD device
– Wipe system, which allows you to delete the currently installed ROM on your ZenFone 2 (ZE551ML) Z00AD Z00A device.
– Wipe Cache, which allows you to clear the device cache.
– Wipe Dalvik cache, which allows you to clear the Dalvik virtual machine cache.
– Wipe internal storage, deletes all internal memory (all files, photos, videos, etc.)
BACKUP
Typically also called Nandroid Backup, it is the section that an expert modder must know and use often. It allows us to make a TOTAL Backup of the ROM currently installed in your Asus ZenFone 2 (ZE551ML) Z00AD device (excluding the files in the internal memory).
We can backup:
System, which contains the operating system
– Data, which contains the application data
– Cache, which contains the device cache
– Boot, which contains the boot partition of the device
– EFS, contains all the network settings files of the device, including the IMEI, so I recommend making a backup at least once. It happens that sometimes you can delete this partition losing all connectivity, even cellular.
RESTORE
To restore a backup, You can choose this function on your ZenFone 2 (ZE551ML) Z00AD Z00A. It can only be used if we have previously made a backup present on the redmi device or external device.
It allows us to restore the ROM completely. When the device restarts, we will restart from the point where the ROM situation occurs at the backup time.
MOUNT
Here we can mount the partitions present in the ZenFone 2 (ZE551ML) Z00AD device to be able to perform operations through the ADB sideload
SETTINGS
Here we can set different recovery settings.
I advise you to set:
– Zip signature verification, which adds a level of security when installing zip files on your ZenFone 2 (ZE551ML) Z00AD Z00A.
– Enable MD5 verification of backup files prevents you from flashing corrupt (and therefore not working) backups.
– Timezone, usually wrong, then it will mark the wrong time.
Restore default must be used at each recovery update to avoid problems during the flash of the new version.
ADVANCED
Here we find a wide variety of additional functions that allow us to perform more complex operations, including:
– Fix permission to be used in case we have several apps that have frequent crash problems
– ADB sideload us to connect the device to our PC to perform operations on apps with which sideloading is possible. Typically it is used to replace the current system with a modified version.
– File Manager allows us to access the files stored on the device
REBOOT
Allows us to restart the device in various ways:
– System will restart the ZenFone 2 (ZE551ML) Z00AD Z00A device.
– Power off, turn off the ZenFone 2 (ZE551ML) Z00AD device.
– Recovery, restart the Asus ZenFone 2 (ZE551ML) Z00AD device in recovery.
– Bootloader, restart the device in the bootloader.
Magisk installation using TWRP in your Asus ZenFone 2 (ZE551ML) Z00AD Z00A.
Magisk has been updated to stable version 15.0. This is great news for Android phone owners who can get root permissions using this rooting tool, which is becoming more and more popular (after SuperSU) called Magisk v15.0. The latest version of Magisk is now out of beta with many improvements to the Super User libraries. Magisk v15.0 is now available for official download for all Android users. Now you are on the stage of installation of twrp recovery, You can also install magisk by flashing magisk in the recovery stage.
Read More Here: How to Install Magisk On Asus ZenFone 2 (ZE551ML) Z00AD Z00A.
Conclusion
Finally, a way is available to be able to install twrp recovery and use many services and applications that, thanks to many who make the TWRP recovery an incorrect use towards other users and the companies themselves, tend not to want to support modified firmware.
What next? Try Custom ROM: List of Custom ROMs for Asus ZenFone 2 (ZE551ML) Z00AD Z00A
Leave a Reply
Recent Posts
- How to Screen Record on Android Device
- Backup & restore your Android – Complete guide
- Take screenshots on an Android device with or without a power button
- Google Camera [GCam] APK for Android 11: How to Install and Use
- Free video editing software for windows 7 [Top 5]
Android always projected its open source nature in many ways. On Android, you can mod your icons, themes, boot logo and even install custom ROMs at your will. We have seen much development past years like Multi ROMs and even running few Linux distros on Android.
Android even managed to run early versions of Windows 95 and Windows XP, though it was lagging and inefficient it did well. Just a few days back XDA member ycavan came with amazing development. He managed to run Windows 7 on his Asus Zenfone 2 with the Intel-based processor. The nature of the Intel Atom’s architecture ensures that the OS runs at near-native speeds.
In his post, ycavan outlines every step required for the installation, the gist of which is that interested Zenfone 2 users must unlock their bootloader, flash a specific kernel, partition their SD card and run a host of terminal commands, upon completion of which, the Windows installation will begin in a virtual machine. The installation process is bit complex but nothing to worry, today we will present you the simplest guide to run Windows on your Asus Zenfone 2
Prerequisites
- Download KVM enabled kernel from here.
- Install following apps from the Play Store.
[googleplay url=”https://play.google.com/store/apps/details?id=ru.meefik.linuxdeploy”]
[googleplay url=”https://play.google.com/store/apps/details?id=com.iiordanov.freeaSPICE”]
[googleplay url=”https://play.google.com/store/apps/details?id=jackpal.androidterm”]
[googleplay url=”https://play.google.com/store/apps/details?id=sk.vx.connectbot”]
[googleplay url=”https://play.google.com/store/apps/details?id=stericson.busybox”]
- Any Windows ISO image file (Windows 7/8/8.1)
Optional
- A decent sized SDcard of 128GB.
- Install SDcard partitioner from Play Store.
[googleplay url=”https://play.google.com/store/apps/details?id=com.sylkat.AParted”]
Procedure
- Flash the 2.19 kernel.img using fastboot or through custom recovery and reboot.
- Start Terminal Emulator
- Type su (For superuser permissions)
- Grant superuser permissions when prompted. (Select Always)
- Type Ismod and verify kvm.ko and kvm-intel.ko are active. If they are not active use; insmod /lib/modules/kvm.ko and insmod /lib/modules/kvm-intel.ko to activate them
- Exit the Terminal Emulator completely.
- Use Linux Deploy to install your favorite Linux distro. Only use SSH, you won’t need framebuffer or X access. This could take upwards of half an hour. (Light Linux distros are recommended like alphaOS)
- After Linux Deploy has installed your Linux distro, click Start to start up the chroot.
- Use an SSH client to connect to your Linux distro. VX ConnectBot is suggested as you won’t be PC dependable to boot every time.
- Use the package manager to install qemu-kvm for your distro. Most Debian & Ubuntu distros use apt-get, pacman, and other command lines.
- It is recommend creating a shell script to start up qemu-kvm because it can be a painful to remember all of the switches alike.
qemu-system-x86_64 -full-screen -m 1G -enable-kvm -cpu host \
 -drive file=/mnt/0/machine1.img,format=raw -boot menu=on \
 --usbdevice tablet -smp 4 -vga qxl -monitor stdio -balloon virtio \
 -soundhw hda -net nic,model=virtio \
 -net user,smb=/mnt/MicroSD \
 -spice port=5900,addr=127.0.0.1,disable-ticketing $@
8. Your script file must look like this
#!/bin/bashqemu-system-x86_64 -full-screen -m 1G -enable-kvm -cpu host \ -drive file=/mnt/0/machine1.img,format=raw -boot menu=on \ --usbdevice tablet -smp 4 -vga qxl -monitor stdio -balloon virtio \ -soundhw hda -net nic,model=virtio \ -net user,smb=/mnt/MicroSD \ -spice port=5900,addr=127.0.0.1,disable-ticketing $@Use chmod +x start_win7.sh to make it executable
9. Start up the qemu-kvm virtual machine referencing the location of your windows 7 install cd
./start_win7.sh -cdrom /mnt/MicroSD/Vcd/en_windows7.iso
10. Qemu will start up and then show you this:
QEMU 2.3.0 monitor – type ‘help’ for more information
(qemu)
11. Start up aSPICE.
12. Click the OFF button to the left of Show Advanced Settings and Make sure Enable Sound is checked.
13. The default connection is 127.0.0.1:5900, so on seeing this tap Connect.
Now the real magic begins. You will see Windows loading. Hurrah !
The installation of drivers and parting SDcard are omitted from this guide to make this guide simple. Anyhow if you have queries regarding drivers do reach us through comments below. Don’t forget to share your experiences with Windows on you Asus Zenfone 2.
Reader Interactions
На смартфон Asus ZenFone 2 можно установить Windows 7
Компания Intel уже не первый год пытается продвигать в мобильном сегменте свои собственные платформы x86. К примеру, новейший Asus ZenFone 2 основан на SoC Atom Z3580 поколения Moorefield.
Одному из участников сообщества сайта XDA, скрывающемуся под псевдонимом ycavan, удалось установить на такой смартфон полноценную ОС Windows 7. Процедура достаточно сложная и проделать все необходимые манипуляции могут только те пользователи, которые хорошо понимают, что именно необходимо делать.
По этой причине мы не будем описывать сам процесс. По ссылке у источника можно найти всю необходимую информацию.
К слову, ycavan утверждает, что аналогичным образом на смартфон можно установить Windows 8.1 и даже Windows 10.
Содержание статьи:
- Загрузочная флешка на Android: от А до Я
- ШАГ 1
- ШАГ 2
- ШАГ 3
- ШАГ 4
- Вопросы и ответы: 18
Народная мудрость: «На все руки от скуки?».
*
Приветствую всех!
Если у вас «полетела» ОС Windows на компьютере, а под-рукой нет ни второго работающего ПК ни загрузочной флешки с Windows — не спешите отчаиваться, ведь подготовить установочную флешку можно даже на телефоне (Android)!
Я сам столкнулся с нечто подобным, когда был на выходных за городом. Как назло, пошел проливной дождь и планы резко поменялись — решил «оживить» один старый компьютер на чердаке: с собой был только брелок-флешка и телефон — однако за неск. часов «колдовства» удалось подготовить загрузочную флешку и установить Windows. 😉
Собственно, о том, как «это» всё сделать на практике — и будет сегодняшняя заметка! 👌 (разумеется, чтобы в будущем ничем «подобным» не заниматься — лучше носить с собой аварийную флешку с LiveCD)
*
Загрузочная флешка на Android: от А до Я
ШАГ 1
Для начала следует сказать «пару слов» о том, как можно подключить флешку к телефону (если вы этого не сделаете — все остальное в этой заметке не имеет смысла):
- лучший вариант: иметь под-рукой универсальную флешку с двумя выходами — USB Type-С (/Micro USB) и классический USB 3.0. Ее можно подключить и к телефону, и к ПК (удобна для передачи файлов). Я такую ношу с собой, как брелок. 😉 Приобрести можно 📌в компьютерных магазинах;
- чуть менее удобный вариант: использовать спец. переходники с USB Type-C на USB 3.0 (см. скрины ниже). Благодаря им можно подключить к телефону любую самую обычную флешку (или даже внешний HDD).
*
👉 В помощь!
Как подключить флешку к телефону (планшету) на Android через Micro USB порт.

Флешка подключена к телефону
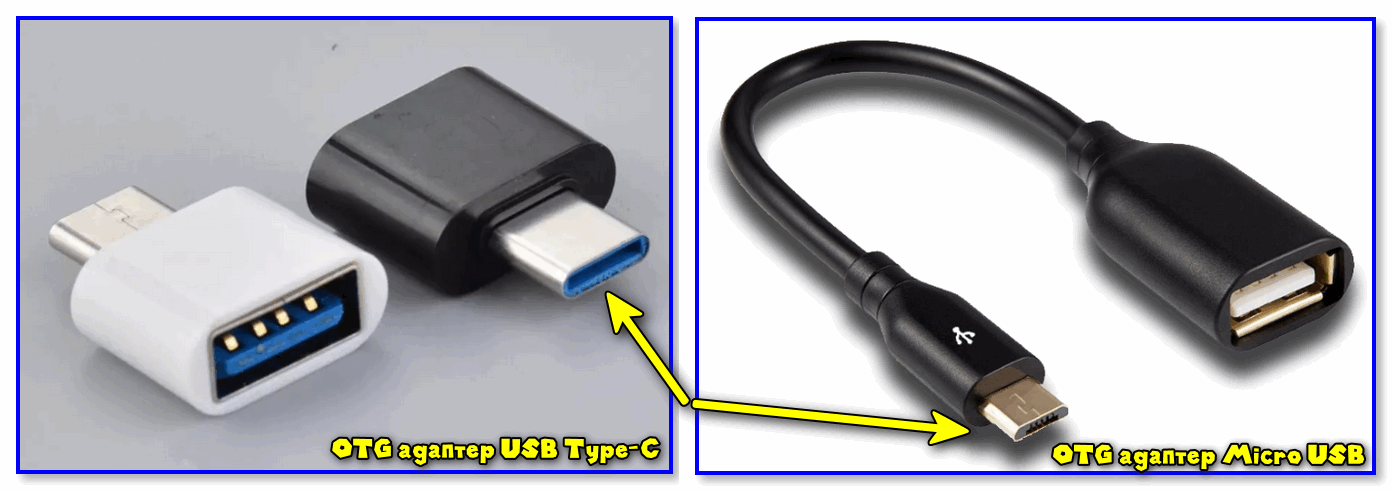
OTG-адаптеры
*
ШАГ 2
Далее на телефон нужно загрузить установочный ISO-образ с Windows. С сегодняшним мобильным интернетом — это сделать совсем не сложно. Даже я за городом смог загрузить за неск. часов ISO на 4 ГБ! (хотя, тут нельзя зарекаться, ведь многое зависит от вашего месторасположения — в нашей стране возможно всё…)
Важно! С образами больше 4 ГБ могут быть сложности у многих утилит при записи. Используйте первый вариант (предложенный мной ниже), если у вас такой образ!
Ссылку на свою статью, по которой можно загрузить офиц. ISO с Windows 10/11 — оставляю ниже (откуда и что загружать — каждый выбирает сам…).
📌 В помощь!
1) Как скачать Windows 10/11 на русском языке (официальные ISO-образы).
2) Как настроить и использовать торрент на Андроиде (или как скачивать торрент-файлы с телефона).
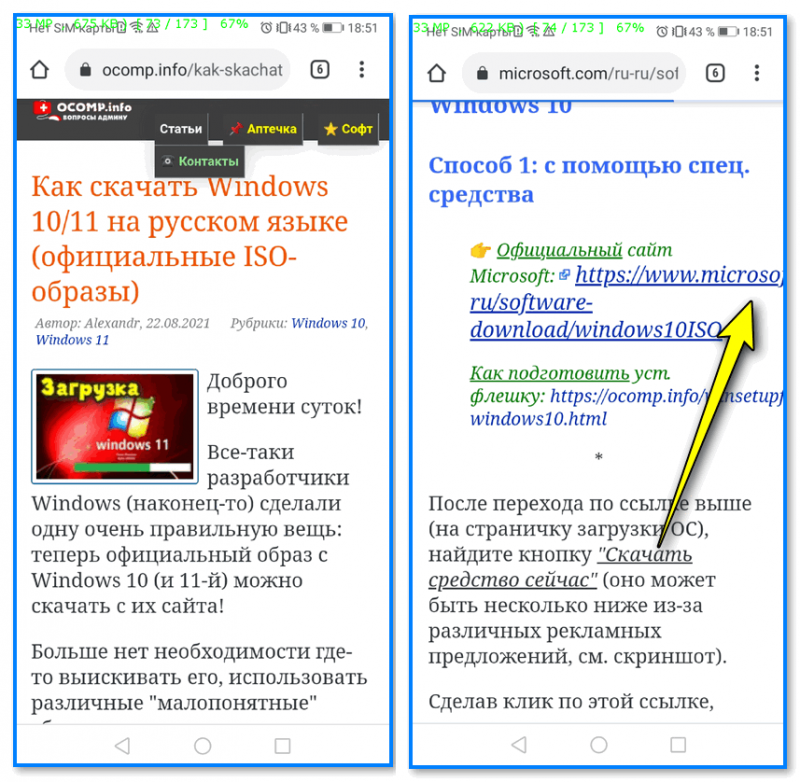
Переходим на офиц. сайт для загрузки ISO
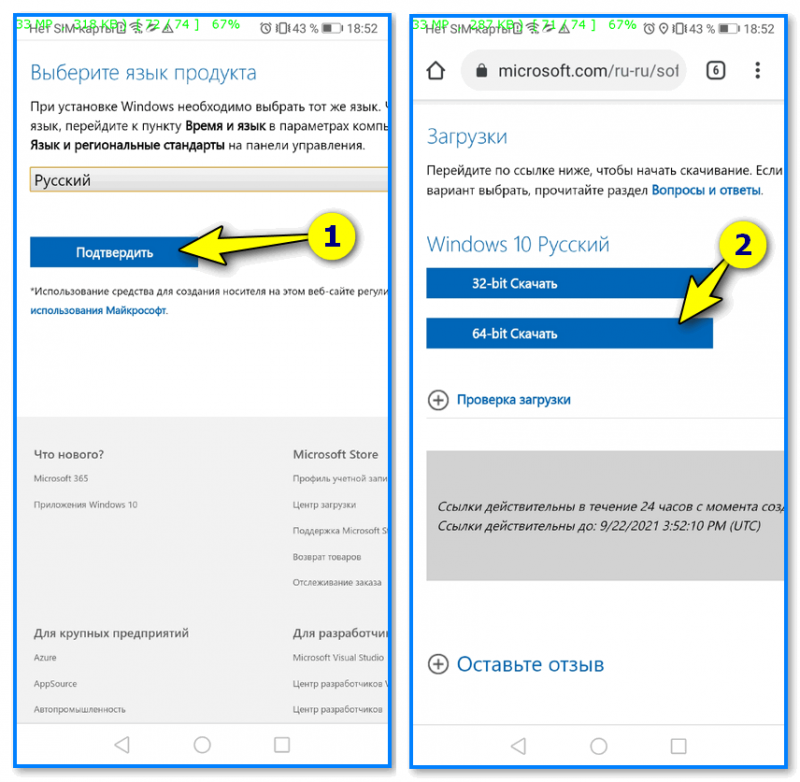
Загрузка ISO
*
ШАГ 3
Все способы ниже не требуют ROOT-прав (где нужен ROOT — я просто не брал в обзор)!
Вариант 1
Первый вариант я рассматриваю как приоритетный — он подходит для подготовки и GPT, и MBR флешек (и справляется с ISO-файлами разных размеров).
Для работы нам понадобиться приложение 📌 Ventoy (ссылка на Play Market).
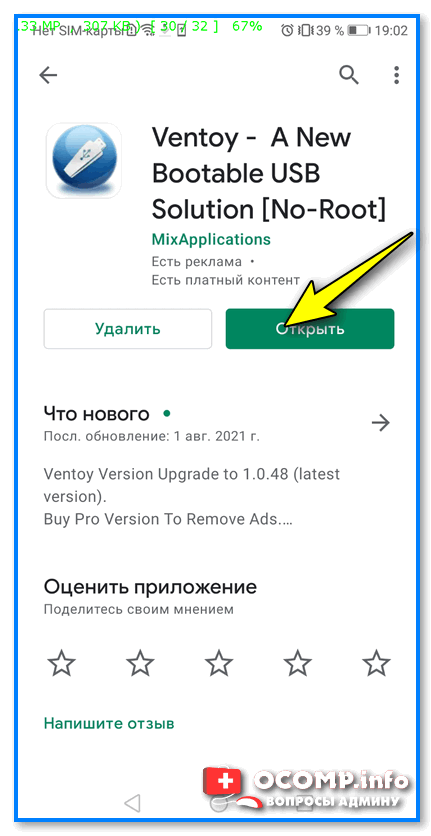
Ventoy на телефон
После запуска Ventoy: подключите флешку, установите переключатель на MBR/GPT и нажмите кнопку Install (важно! Все данные с флешки будут удалены, перепроверьте, нет ли на ней нужных файлов!).
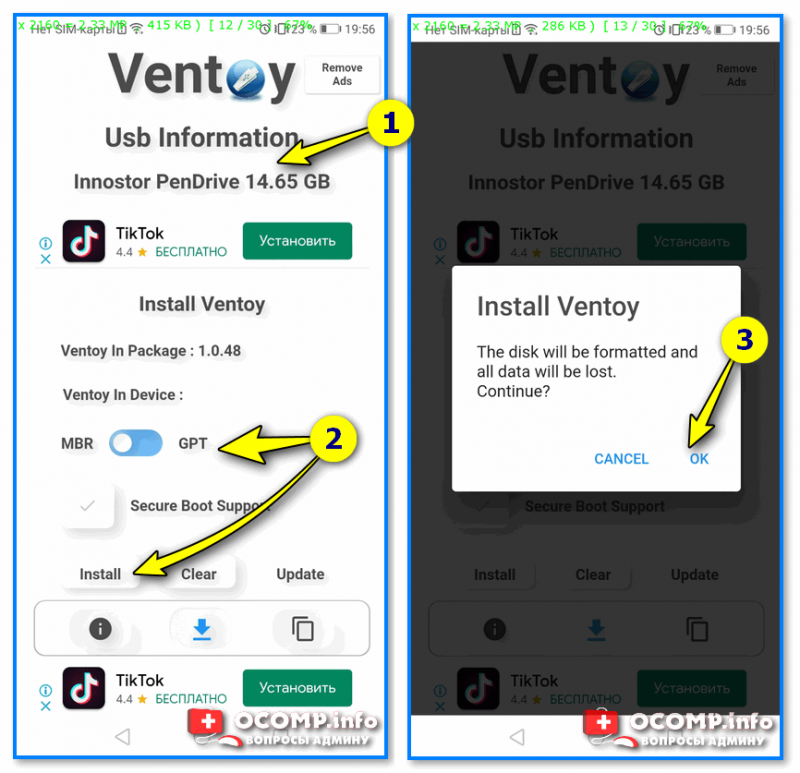
Ventoy — форматируем флешку
Когда флешка будет отформатирована в Ventoy: отсоедините ее от телефона, затем снова подключите и скопируйте на нее ISO-файл (без распаковки, просто копирование! Подобно тому, как вы это делаете с фотографиями или документами).
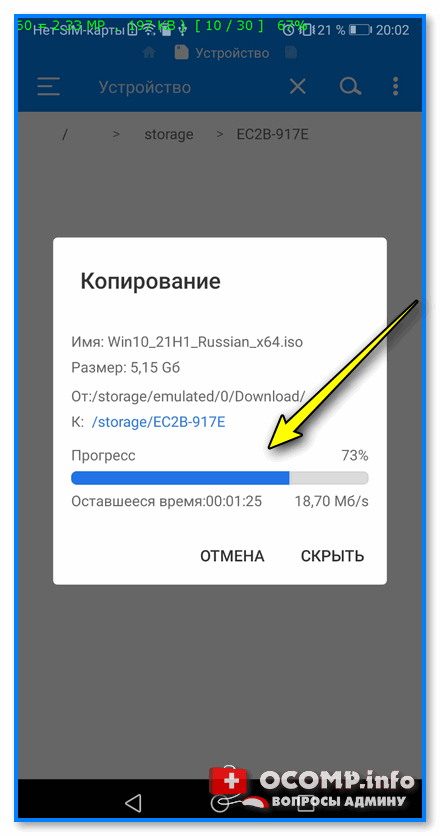
Копируем ISO на флешку
Когда ISO будет скопирован — флешку можно отключать от телефона и подключать к компьютеру для установки Windows! 👌
*
Вариант 2
Этот вариант подойдет только для современных ПК с UEFI («обновл.» версией BIOS).
Для начала на телефоне нам понадобиться WinRAR // ссылка на Play Market (это приложение поможет нам разархивировать ISO-образ как обычный архив).
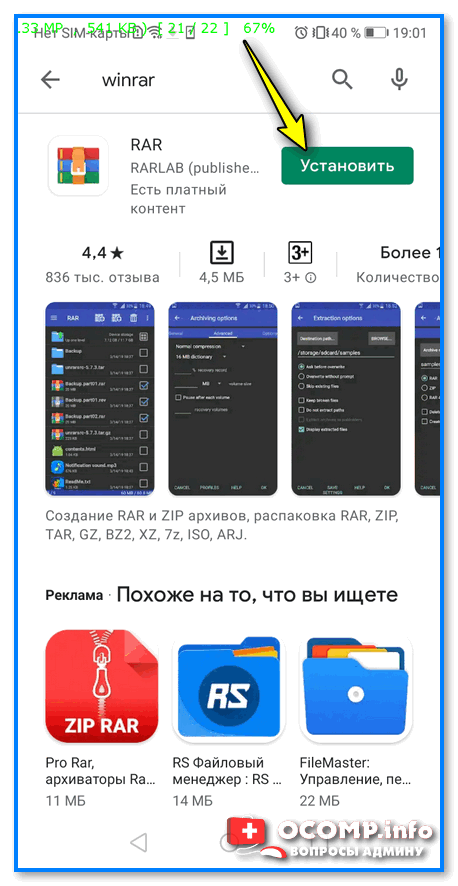
WinRAR — установка
Далее нужно будет зайти в настройки Android, открыть раздел с накопителями и отформатировать подключенную флешку (если флешка уже отформатирована — этот шаг можно пропустить).
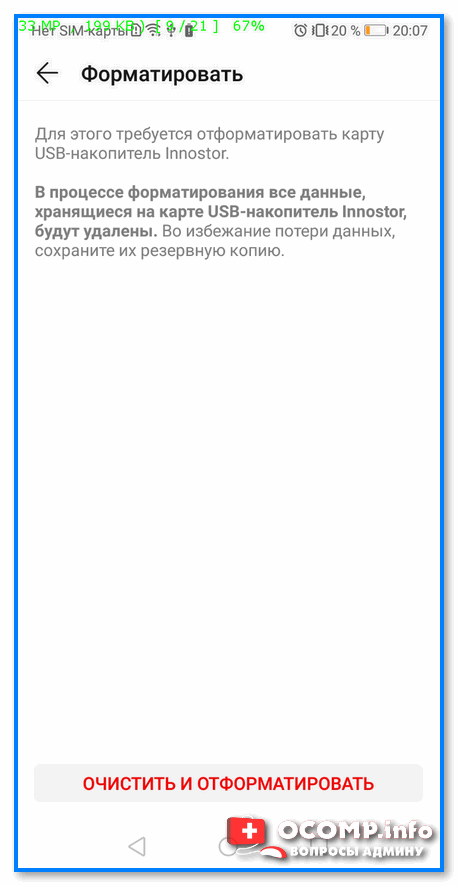
Очистить и форматировать
Затем нужно запустить WinRAR, открыть в нем ISO-файл с Windows и запустить его распаковку на флешку (см. кнопку «Путь назначения»). 👇
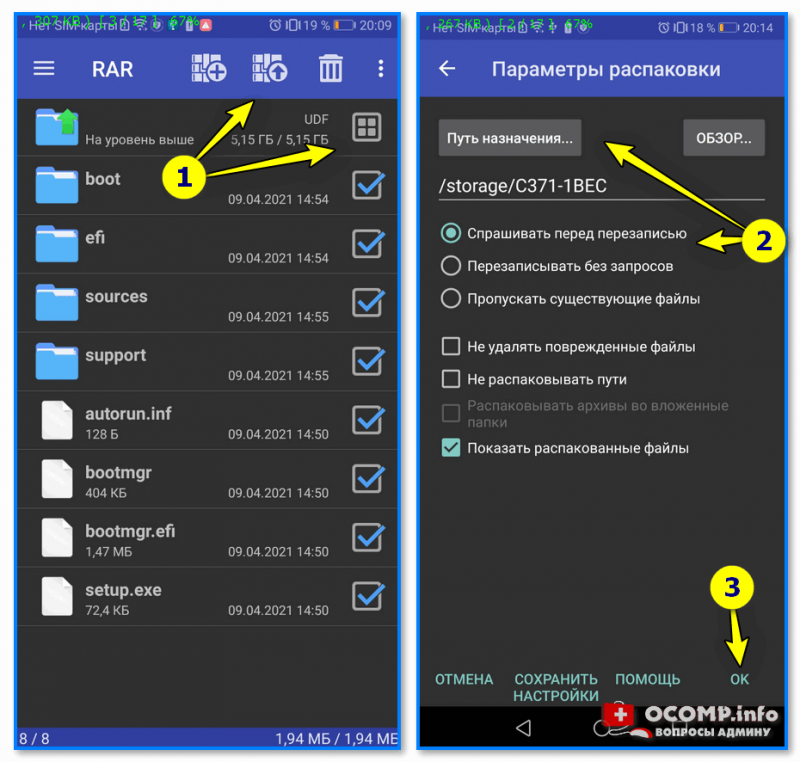
Параметры распаковки (ISO на флешку)
После распаковки, флешку можно подключать к ПК и проверять запустится ли установка ОС…
*
Вариант 3
EtchDroid (ссылка на Play Market) — хорошее приложение для подготовки загрузочных флешек (больше подходит для записи Linux образов на флешку, чем для Windows). Для подготовки накопителей с Windows тоже годится, однако, приложение «справляется» не со всеми ISO (определяется экспериментально)!
Как пользоваться: подключаете флешку, запускаете EtchDroid и выбираете в меню функцию «Записать raw-образ или ISO». 👇
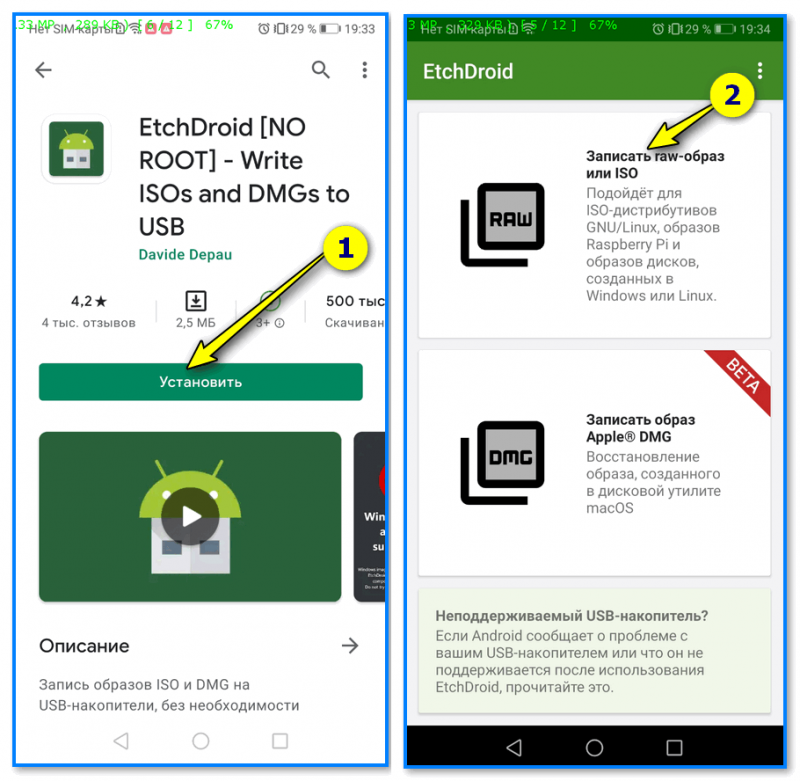
EtchDroid — записать ISO
Далее нужно будет выбрать флешку, указать ISO-образ и нажать на кнопку «со стрелочкой». Запустится процесс записи: минут 10-20 придется подождать… По завершению (если все прошло гладко) — увидите сообщение о успешной записи — теперь флешка готова! 😉
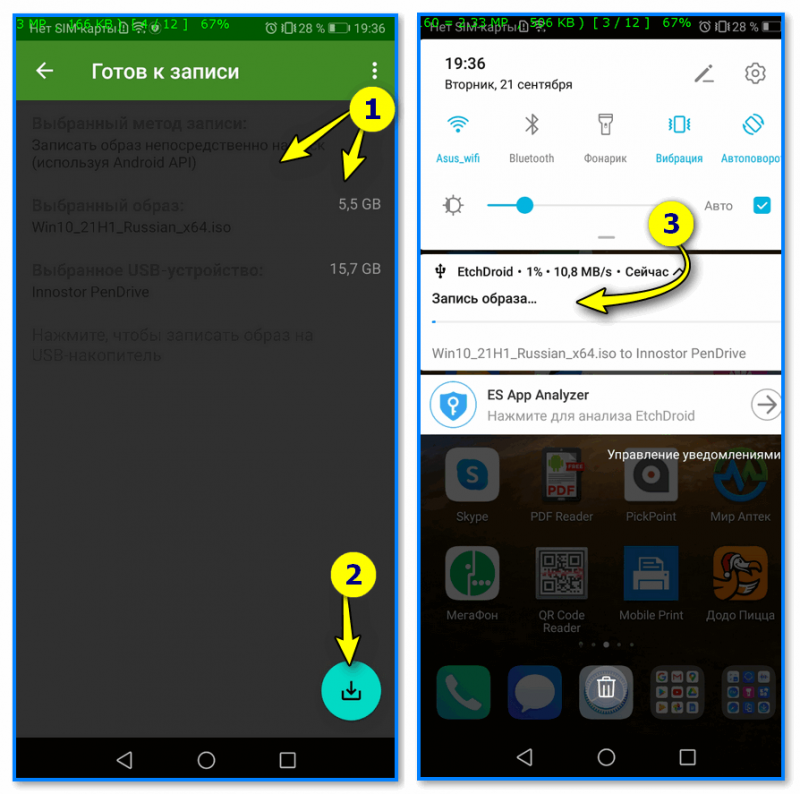
Запись
*
ШАГ 4
Во-первых, сразу ссылка в помощь на то, как загрузиться с установочной флешки (в своем примере я подготавливал флешку в Ventoy по первому варианту — загружаться с нее можно обычным образом!).
Во-вторых, обратите внимание, что у вас в BOOT-меню может отображаться 2 пункта с одной и той же флешкой: проверяйте оба!
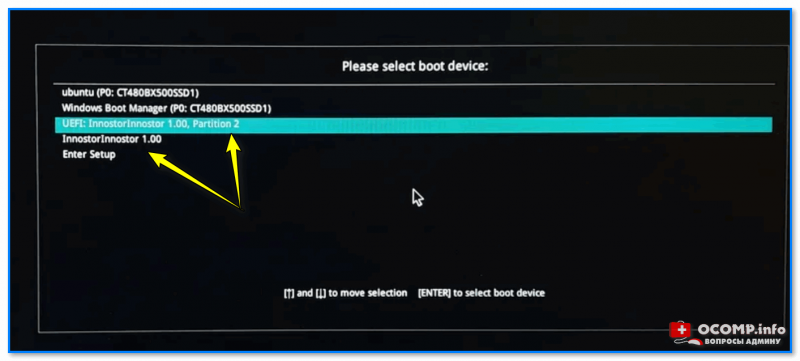
Проверьте оба варианта
В моем случае все прошло штатно: появилось меню Ventoy, далее запустилась установка Windows.
Если у вас «вылетят» ошибки (установка завершится синим экраном и т.д. и т.п.) — попробуйте подготовить флешку другим способом (еще лучше, сделать это на ПК… 😉).
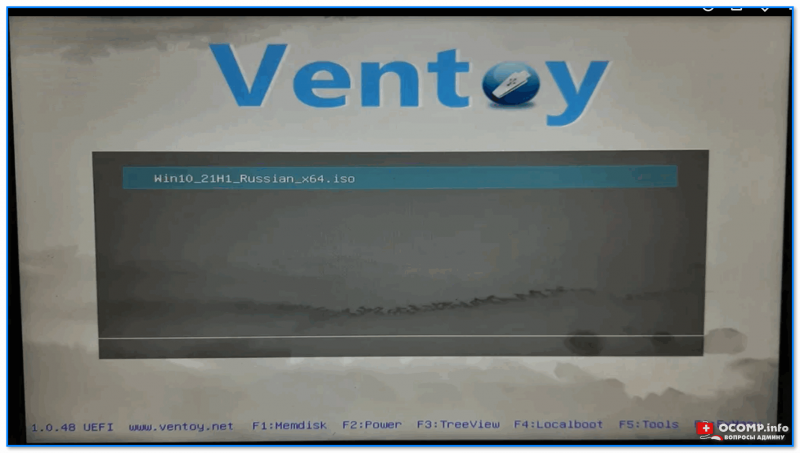
Ventoy — флешка работает
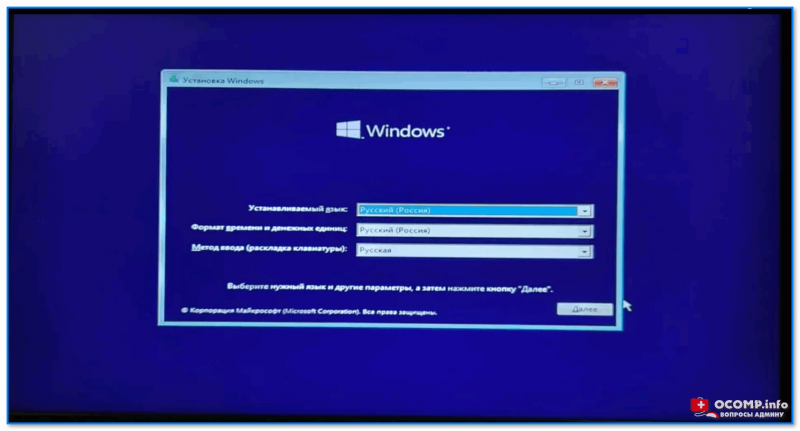
Установка пошла…
*
📌 Важно!
Если образ с Windows не удается записать на телефоне — можно попробовать записать образ с Linux. Если удастся его установить с этой флешки (а вероятность этого выше!) — то уже в Linux можно и флешку подготовить, и запустить виртуальную машину с Windows…
*
Дополнения и иные мнения — приветствуются в комментариях!
Успехов!
👋
В этой инструкции о том, как создать загрузочную флешку или карту памяти (которую, подключив к компьютеру с помощью кард-ридера, можно использовать как загрузочный накопитель) прямо на устройстве Android из ISO образа Windows 10 (и других версий), Linux, образов с антивирусными утилитами и инструментами, всё это без root-доступа. Такая возможность будет полезна, если единственный компьютер или ноутбук не загружается и требует экстренных мер по восстановлению работоспособности.
Многие при появлении проблем с компьютером забывают о том, что у большинства из них в кармане есть почти полноценный компьютер на Android. Отсюда порой недовольные комментарии к статьям на тему: как же я скачаю драйверы на Wi-Fi, утилиту для очистки от вирусов или что-то ещё, если я как раз и решаю проблему с Интернетом на компьютере. Легко скачаете и по USB передадите на проблемное устройство, если у вас есть смартфон. Более того, Android можно использовать и для создания загрузочной флешки, к чему и приступим. См. также: Нестандартные способы использования Android смартфона и планшета.
- Что нужно, чтобы сделать загрузочную флешку на телефоне
- Создание загрузочной флешки Windows на Android
- Видео инструкция: Загрузочная флешка Windows 10 на Android телефоне
Что потребуется для создания загрузочной флешки или карты памяти на телефоне
Прежде чем начать, рекомендую озаботиться следующими моментами:
- Зарядите ваш телефон, особенно если у него не слишком емкая батарея. Процесс может продлиться долго и достаточно энергозатратен.
- Убедитесь, что у вас есть флешка нужного объема без важных данных (она будет отформатирована) и вы её можете подключить к смартфону (см. Как подключить флешку к Android). Можно использовать и карту памяти (данные с неё также будут удалены), при условии, что имеется возможность подключить её к компьютеру для загрузки в дальнейшем.
- Загрузите нужный образ на ваш телефон. Например, вы можете скачать ISO образ Windows 10 или Linux прямо с официальных сайтов. Большинство образов с антивирусными инструментами также созданы на базе Linux и будут успешно работать. Для Android существуют и полноценные торрент-клиенты, которые можно использовать для загрузки.
По сути, это всё, что потребуется, чтобы сделать загрузочную флешку на телефоне Android, Можно приступать к записи ISO образа на USB.
Примечание: при создании загрузочной флешки с Windows 10, 8.1 или Windows 7, учитывайте, что она будет успешно загружаться только в режиме UEFI (не Legacy). Если используется образ 7-ки, на нем должен присутствовать EFI-загрузчик, а в БИОС компьютера или ноутбука потребуется выставить соответствующие параметры загрузки (если включена загрузка только Legacy/CSM).
Процесс записи загрузочного ISO образа на USB флешку на Android
В Play Маркет доступны несколько бесплатных приложений, позволяющих выполнить распаковку и запись ISO образа на USB флешку или карту памяти:
- Ventoy — удобное приложение, позволяющее создать загрузочную или мультизагрузочную флешку простой записью образов ISO на накопитель. Подробнее об использовании в отдельной инструкции: Загрузочная флешка на телефоне в Ventoy для Android.
- ISO 2 USB — простое бесплатное приложение, работающее без root. В описании нет четких указаний о том, какие образы поддерживаются. Отзывы говорят об успешной работе с Ubuntu и другими дистрибутивами Linux, я в своем эксперименте (о чем далее) записал Windows 10 и загрузился с него в EFI-режиме (в Legacy загрузка не происходит). Похоже, не поддерживает запись на карту памяти.
- EtchDroid — еще одно бесплатное приложение, работающее без root, позволяющее записывать как ISO так и DMG образы. В описании заявлена поддержка образов на базе Linux, на приложение принимает и образы Windows.
- Bootable SDCard — в бесплатной и платной версии, требует root. Из особенностей: доступна загрузка образов различных дистрибутивов Linux прямо в приложении. Заявлена поддержка образов Windows.
Насколько я могу судить, приложения очень похожи между собой и работают почти одинаково. В своем эксперименте я использовал ISO 2 USB, приложение можно скачать из Play Маркет здесь: https://play.google.com/store/apps/details?id=com.mixapplications.iso2usb
Шаги по записи загрузочного USB будут следующими:
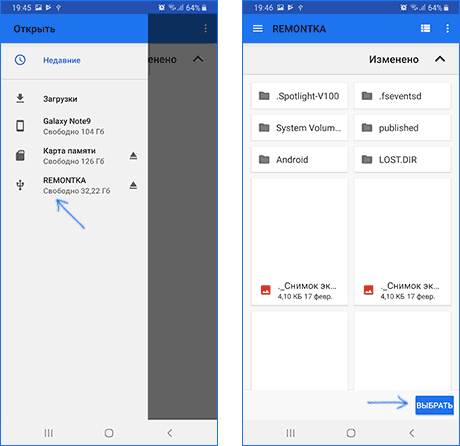
- Подключите флешку к Android устройству, запустите приложение ISO 2 USB.
- В приложении напротив пункта Pick USB Pen Drive нажмите кнопку «Pick» и укажите флешку. Для этого откройте меню со списком устройств, нажмите по нужному накопителю, а затем нажмите «Выбрать».

- В пункте Pick ISO File нажмите кнопку и укажите путь к образу ISO, который будет записан на накопитель. Я использовал оригинальный образ Windows 10 x64.
- Оставьте включенным пункт «Format USB Pen Drive» (форматировать накопитель).
- Нажмите кнопку «Start» и дождитесь завершения создания загрузочного USB накопителя.

Некоторые нюансы, с которыми я столкнулся при создании загрузочной флешки в этом приложении:
- После первого нажатия «Start» приложение зависло на распаковке первого же файла. Последующее нажатие (без закрытия приложения) запустило процесс, и он успешно прошел до конца.
- Если подключить записанный в ISO 2 USB накопитель к работающей системе Windows, она сообщит о том, что с накопителем не всё в порядке и предложит исправить это. Не исправляйте. По факту флешка рабочая и загрузка/установка с неё происходит успешно, просто Android форматирует её «непривычно» для Windows, хотя и использует поддерживаемую файловую систему FAT Такая же ситуация может возникать и при использовании других подобных приложений.
Загрузочная флешка Windows 10 на Android — видео инструкция
На этом всё. Основная цель материала — не столько рассмотреть ISO 2 USB или другие приложения, позволяющие сделать загрузочную флешку на Android, сколько обратить внимание на само существование такой возможности: не исключено, что однажды это принесёт пользу.
Функциональные возможности операционной системы Android крайне богаты, однако до таковых в компьютерной версии Windows 10 они все равно сильно недотягивают. Именно поэтому разработчик Бен Имбушуо на протяжении последних месяцев пытался запустить полноценную «винду» на своем мобильном устройстве, коим выступила Lumia 950 XL. Сегодня, 14 мая 2018 года, он сообщил об успехе всей своей затеи, а также поделился инструкцией о том, как установить компьютерную Windows 10 на любой смартфон. Стоит учитывать, что этот процесс достаточно сложен.
Разработчику удалось добиться даже запуска сторонних приложений на Windows 10, в том числе веб-браузера Chrome, офисного пакета Microsoft Office, а также всех UWP-приложений, доступных для загрузки из фирменного магазина программного обеспечения. Единственное, что пока что по-прежнему не работает – беспроводная сеть, то есть мобильное устройство отказывается подключаться к Wi-Fi, потому как данный модуль попросту не распознается системой.

Пользователь ADeltaX с форума Reddit уже воспользовался опубликованной разработчиком инструкцией и установил на свой смартфон операционную систему Windows 10, пускай и сборку для ARM-устройств. Она ничем не отличается по функциональным возможностям от простой «винды», кроме незначительных ограничений. Нельзя не заметить, что пользоваться компьютерной ОС на смартфоне все же можно, потому как она поддерживает масштабирование.
В операционной системе Windows 10, установленной на телефон, имеется даже поддержка функции поворота экрана. Судя по всему, «винда» считает мобильное устройство планшетом, но с маленькой диагональю дисплея. Вся система работает достаточно быстро и без каких-либо проблем, однако произвести ее установку достаточно сложно. По словам разработчика, установить ОС можно на любой смартфон, оснащенный процессором ARM, однако для этого нужно настраивать загрузчик.
Сам же разработчик выложил в сеть все файлы для установки Windows 10 на смартфон Lumia 950, благодаря чему его владельцам достаточно лишь следовать инструкции, которая была опубликована в репозитории разработчика на GitHub. В ближайшем будущем процесс установки «винды» может быть упрощен, а в сеть выложит подробные видео, которое позволит облегчить этот процесс.
Ранее стало известно о том, что получить лицензионный ключ для Windows 10 Pro можно не за 14 000 рублей, сколько за него просят в магазине Microsoft Store в России, а более чем в 40 раз дешевле – всего за 300 рублей.
Источник изображений: «Яндекс Картинки»
Присоединяйтесь к нам в Google News, Twitter, Facebook*, Instagram*, ВКонтакте, YouTube и RSS чтобы следить за новостями и оперативно получать интересные материалы.
* Сервисы признаны судом экстремистскими и запрещены в России.