
PassFab FixUWin
Fix 200+ Windows related issues, such as Windows blue/black screen, Windows won’t boot, PC keeps crashing and etc.
Are you facing errors in your ASUS Windows 8 system? Do you want to resolve them yourself? If yes, the ASUS recovery disk is what you need.
The ASUS recovery disk, generally known as the ASUS recovery partition, is used to restore your system to factory settings. With a recovery disk, you can easily troubleshoot and eliminate errors in your Windows 8/8.1 system.
In this article, you will learn how to get a free ASUS recovery disk download Windows 7/8/8.1.
Part 1: Overview of ASUS Recovery Disk Windows 8/8.1 Download
ASUS recovery disk is a special bootable disk that allows users to restore their system to factory settings or reinstall Windows. It also comes in handy to restore data after a system crash.
ASUS recovery disk Windows 8/8.1 configures the pre-installed Windows to restore it to the default settings in your computer. This recovery partition proves beneficial when the user faces any issue in the system like a malware attack, booting or blue/black screen errors, Windows update problems, etc.
Part 2: Things to Do Before you Download ASUS Recovery Disk Windows 8/8.1
Please mind the following things before you download ASUS Recovery Disk Windows 8/8.1:
- Back up your Data-Create a backup of all your data to an external drive with data recovery software.
- Stable Network-Your PC must have a stable and good internet connection.
- Hardware Requirement- You must have at least 6 GB free space on your hard disk or USB.
Part 3: ASUS Recovery Disk Download Windows 7/8/10/11 Free
Following are some methods that will help you to get ASUS Windows 8.1 recovery disk download:
Method 1: Download the ASUS recovery disk for Windows 7/8/10/11 FreeFREE
You can create an ASUS laptop recovery disk Windows 8 download with the help of the PassFab FixUWin. It is a Windows repair tool that allows you to create a recovery disk even if you can’t access your system. It consists of an excellent interface that lets you make a bootable disk in a couple of clicks.
Step 1. Install and launch the PassFab FixUWin on any accessible computer.
Step 2. Put a USB drive in a USB port and then click Create boot disk Now button.
Step 3. Now, select the USB and click Next.
Wait until the system copies the bootable instructions onto the USB drive. This way, you will get an ASUS recovery disk to repair your faulty system.
Method 2: Download the ASUS recovery disk with Windows Built-in Tool
If you do not want to use any third-party tool to create ASUS Windows 8.1 recovery disk download, you can use Windows built-in tool. It is a specialized tool to help you create a recovery disk for later use.
Step 1. First, insert a USB into your PC, open the search box, and type “Recovery Disk.” And then choose Create a recovery drive.
Step 2. Select Backup system files to the recovery drive, and click Next.
Step 3. Now, choose the USB, and hit Next.
Note:
- The USB must have a capacity of at least 8GB.
- Any data on the USB will be removed in the process, so it is recommended to back up crucial data before creating the ASUS recovery drive.)
Step 4. Select the Create button to begin the creation of the recovery disk.
Step 5. Lastly, click Finish when “The recovery drive is ready” appears on the screen.
The ASUS recovery disk Windows 8/8.1 download has been created successfully.
Part 4: Extra Tips: How to Resolve Windows 8/8.1/10 System Error?
If your Windows PC is not working properly, it might be due to a corrupt Windows system. Therefore, you can follow the steps below to recover Windows 8/8.1/10 system:
Step 1. Go to Settings and select Update and Security.
Step 2. Click on Restore and then Advanced Startup.
Step 3. Choose your keyboard layout.
Step 4. Choose Troubleshoot in the following screen.
Step 5. Now, choose Reset your PC.
Step 6. Reset your PC window will appear on the screen, click Next.
Step 7. Next up, you will see two options:
1. Only the drive where Windows is installed will remove the data from C drive only, and the rest of the drives will remain intact.
2. All Drive – This will delete data from all the drives.
It is recommended to back up all the important data to ASUS Webstorage or any other external drive so you can recover it in case of data loss.
Step 8. Now, select Just Remove my files and wait patiently as it might take 2 to 4 hours to complete.
Step 9. Click Reset.
The system recovery process will start. The time it takes to recover your system may vary based on system specifications, so wait until the process is complete.
FAQs
1. How to install Windows 8.1 without a recovery disk?
As Windows 8.1 has built-in characteristics to reinstall a clean version of Windows, there is no need for a recovery disk to install Windows 8.1. You can easily install them by selecting the “Refresh your PC” or “Reset your PC” options in the settings.
- Click the Start button -> Settings.
- Choose Update and Security -> Recovery.
- Click Get Started, which you will see under the Reset this PC option.
- Select Remove Everything -> Remove files and clean the drive.
- Now, initiate the installation of Windows by selecting the Reset option.
2. How to create a recovery disk for ASUS at100 Windows 8.1?
You can create an ASUS recovery disk for Windows 8.1 with the help of third-party recovery software or a Windows built-in tool, as described in this article.
3. How to repair Windows 8 without a recovery disk?
The following instructions will help you to repair Windows 8 without a recovery disk:
- Open the Command Prompt and run it as an administrator; type “cmd” and press the CTRL+ Shift+ Enter keys.
- Type the following command and hit Enter to execute it.
“HKLM\System\CurrentControlSet\Services\atapi\Controller0” /f /v EnumDevice1 /t REG_DWORD /d 0x00000001.
- Now, restart your PC.
4. What is the ASUS x551m recovery partition?
ASUS Recovery Partition is an unseen partition with a pre-load OS, and it can potentially bring your system back to its factory settings.
RELATED ARTICLES
- How to Create a Recovery Disk and System Repair Disk in Windows 10/11
- How to Create a Windows 7 Recovery Disk?
- 3 Easy Ways to Create Lenovo Recovery Disk Windows 8
COMMENT
ASUS
Windows 7 Recovery Media for Windows 7 Products (Disc 1 of 1)
The software included on this Recovery DVD was preinstalled on your hard disk drive at the factory and may only be used for the backup and recovery of your ASUS system.
MICROSOFT
This disc contains 64-bit software only Recovery DVD, Disc 1 of 1, N3434 V1.0, English, Spanish, German, French, Italian, Dutch, Portuguese, Chinese Traditional, Greek, Hebrew.
15G3563963K0
1535-037L000
Portions 2009 Microsoft Corporation.
All Rigths Reseved.
(C) 2009 ASUSTek Computer Inc.
__________________________________________________________________________
ASUS
Driver&Utility Ver 1.0
N61V/PRO64V/X64V
This disc supports Windows 7 32/64-bit.
This DVD runs automatically if AUTORUN is enabled. Otherwise, run SETUP.exe
N3379
15G356390000
1535-02WR000
Copyright 2009 ASUS Communications Corporation. All rights reserved.
/Guides /Asus Recovery Disk – Guide for Windows XP, Vista, 7, 8
This is a guide about Asus recovery disks for the following versions of Windows: Windows XP, Windows Vista, Windows 7 or Windows 8.
A recovery disk is also known as a restore disc, repair disc, boot disc or rescue disk.
Looking for a recovery disk for Asus? Download Easy Recovery Essentials (our recovery and repair disk for Asus).
Download alternative recovery disk for Asus
If your Asus computer no longer has the recovery partition needed to restore the computer, you can use an alternative recovery disk to access and backup your files.
You can download Easy Recovery Essentials, our recovery and repair disk. It’s an ISO download image ready to be burned directly to a CD, DVD or a USB flash drive.
Easy Recovery Essentials is compatible with all Asus computers and with the following Windows versions:
- Microsoft Windows 8 (read more on our Windows 8 Recovery Disk and Repair Disc Download article)
- Microsoft Windows 7 (read more on our Windows 7 Recovery Disk and Repair Disc Download article)
- Microsoft Windows Vista (read more on our Windows Vista Recovery Disk and Repair Disc Download article)
- Microsoft Windows XP (read more on our Windows XP Recovery and Repair Disk article)
- Microsoft Windows Server 2003, 2008 and 2012 (read more on our Windows Server 2008 and 2012 Recovery Discs Download article)

Note: Easy Recovery Essentials can not be used to install or reinstall Windows.
Features of Easy Recovery Essentials for your Asus computer include:
- Automatically find and fix boot errors
- Works even when you can’t get into Windows
- Recover from virus infections
- Restore your PC to a working state
- Access and backup your important data
- Advanced tools for IT experts
With Easy Recovery Essentials you can:
- Find and fix errors automatically with Automated Repair
- Recover your PC from infections with the built-in antivirus
- Restore your PC to a working state
- Access and backup your most important data (like documents, pictures, music, videos and so on)
It’s compatible with Asus computers (laptops, desktops etc.) and with the following Windows versions: XP, Vista, 7 or 8.
Download Easy Recovery Essentials for Asus computers from here
Windows XP users
Easy Recovery Essentials can be used as an alternative recovery disk for computers from Asus with Windows XP installed, including the full list of Windows XP editions with Service Packs installed:
- Microsoft Windows XP SP1 (Service Pack 1)
- Microsoft Windows XP SP2 (Service Pack 2)
- Microsoft Windows XP SP3 (Service Pack 3)
It’s compatible with both the Home and Professional editions of Windows XP:
- Microsoft Windows XP Home
- Microsoft Windows XP Professional
Download Easy Recovery Essentials for Asus with Microsoft Windows XP
Windows Vista users
You can use Easy Recovery Essentials as an alternative recovery disk for Asus computers, if you have Windows Vista installed.
Easy Recovery Essentials supports x86 and x64 platforms and all Windows Vista editions, including the 32-bit and 64-bit editions:
- Microsoft Windows Vista Ultimate (32-bit and 64-bit editions)
- Microsoft Windows Vista Enterprise (32-bit and 64-bit editions)
- Microsoft Windows Vista Business (32-bit and 64-bit editions)
- Microsoft Windows Vista Home Premium (32-bit and 64-bit editions)
- Microsoft Windows Vista Home Basic (32-bit and 64-bit editions)
- Microsoft Windows Vista Starter (32-bit edition; Starter edition doesn’t have a 64-bit edition)
It’s compatible with any of the available Service Packs of Windows Vista:
- Microsoft Windows Vista Service Pack 1 (SP1)
- Microsoft Windows Vista Service Pack 2 (SP2)
Download Easy Recovery Essentials for Asus with Microsoft Windows Vista
Windows 7 users
Easy Recovery Essentials can be an alternative recovery disk for Asus computers with Windows 7.
Easy Recovery Essentials supports both x86 and x64 platforms and is compatible with the full list of Windows 7 editions, including the 32-bit and the 64-bit:
- Microsoft Windows 7 Ultimate (32-bit and 64-bit editions)
- Microsoft Windows 7 Enterprise (32-bit and 64-bit editions)
- Microsoft Windows 7 Professional (32-bit and 64-bit editions)
- Microsoft Windows 7 Home Premium (32-bit and 64-bit editions)
- Microsoft Windows 7 Home Basic (32-bit and 64-bit editions)
- Microsoft Windows 7 Starter (32-bit edition) (Starter is available only in 32-bit)
It’s compatible with SP1 of Windows 7:
- Microsoft Windows 7 Service Pack 1 (SP1)
Download Easy Recovery Essentials for Asus with Microsoft Windows 7
Windows 8 users
Easy Recovery Essentials can be used as an alternative recovery disk for Asus computers with Windows 8 installed.
It supports the x86 and x64 platforms and all the Microsoft Windows 8 editions (8 and 8.1), including the 32-bit and the 64-bit editions:
- Microsoft Windows 8 (32-bit and 64-bit editions)
- Microsoft Windows 8.1 (32-bit and 64-bit editions)
Download Easy Recovery Essentials for Asus with Microsoft Windows 8
Recover Asus computers using the recovery disk or recovery partition
Asus computers have a recovery partition, named “RECOVERY” that you can use to restore your Windows. Various models (not all) from Asus have a recovery DVD that can be used for the same recovery and restore process.
If you do not have a recovery DVD or a partition called “RECOVERY”, go to Download an alternative recovery disk for Asus.
How to access the recovery partition
The recovery partition is available only if your partition is undamaged! If the partition is corrupt, use the recovery DVDs instead.
- Restart your computer
- Press F9 repeatedly before the Windows logo appears, right after the Asus logo appears
- Select Windows Setup [EMS Enabled]
- Follow the wizard steps
How to access the recovery DVDs
- Restart your computer
- Boot into BIOS by pressing F2
- Go to the Boot tab
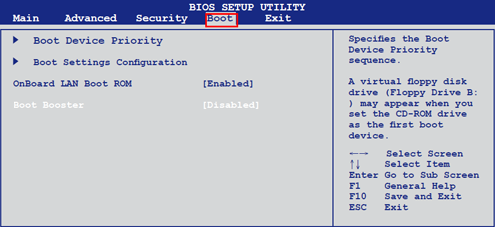
- Make sure Boot Booster is [Disabled]. Eee PC models have this option.
- Press F10 to save the changes and exit BIOS
- Insert the recovery DVD in the disk tray
- Restart your computer
- When the “Please select boot device:” screen appears, select the DVD. It may be marked with “USB:“, but it’s usually the last item from the list
- Press Enter to select the option
- When the “Press any key to boot from CD…” screen shows up, press any keyboard key to continue
- Follow the wizard steps
Recover Windows XP with the disk or the partition
Windows XP users can restore their Asus computer using the “RECOVERY” partition installed on their hard drive or using the recovery DVD. If you no longer have the “RECOVERY” partition intact, go to Download alternative recovery disk for Asus.
Instructions when using the recovery partition:
Personal data will be lost during the recovery process. Backup your computer!
- Restart your computer
- Press F9 before or when the Asus logo appears
- When the Windows Boot Manager screen appears, select Windows Setup
- When the Recovery System screen shows up, click on Recovery
- Follow the wizard steps
Instructions when using the recovery DVD:
All data will be lost during the recovery process. Backup your computer!
- Restart your computer
- Press F2 multiple times to boot into BIOS
- Go to the Boot tab
- Check if there is a “Boot Booster” option. If your computer has this option, select it and make sure it’s [Disabled]

- Press F10 to save the changes, if any
- Insert the recovery DVD
- Restart your computer
- When the “Please select boot device” screen is being displayed, select your DVD drive from the list. It’s usually the last one from the list.
- Press any key when the “Press any key to boot from CD…” screen appears
- The Asus Recovery CD/DVD window will now appear and you have 2 options: Recover system to a partition or Recover system to entire HD.
The Recover system to a partition option allows you to keep other partitions and only delete the one you choose.
The Recover system to entire HD option will delete all partitions from your hard disk.
- Select your partition, if you opted for Recovery system to a partition
- Click Next
- Follow the instructions to complete the process
- When the “Recovering finished. Please remove the DVD from DVD-ROM” screen shows up, click OK to restart your computer.
Recover Windows Vista with the disk or the partition
Users of Asus computers with Windows Vista installed can either use the recovery partition or the recovery DVD. If you no longer have the “RECOVERY” partition intact or the DVD, go to Download alternative recovery disk for Asus.
Instructions when using the recovery partition:
All data will be lost during the recovery process. Backup your computer before you continue!
- Restart your computer
- Press F9 during booting – before or when the Asus logo appears on your monitor
- Press Enter and select Windows Setup [EMS Enabled]
- At the ASUS Preload Wizard screen, click Next
- Select a partition and then click Next.
You have 3 options at this step: Recover Windows to first partition only, Recover Windows to entire HD or Recover Windows to entire HD with 2 partitions.
The Recover Windows to first partition only option will delete only the first partition and you can keep the other partitions.
The Recover Windows to entire HD option will delete all your partitions.
The Recover Windows to entire HD with 2 partitions option will delete all partitions and create 2 new partitions: C and D.
- Follow the instructions on the next screen to complete the process.
Instructions when using the recovery DVD:
All data will be lost during the recovery process. Backup your computer before you continue!
Before you start:
- If your computer uses a secondary hard disk drive, remove it. Windows Vista may setup incorrectly on the wrong disk drive.
The instructions are:
- Insert the recovery DVD in the disk tray
- Restart your computer
- Press Esc during booting and select your optical drive to boot from: CD/DVD
- When CD/DVD option is selected, press Enter
- Select your option and then click Next.
Similar to the recovery partition’s instructions above, you have 3 options at this step:
Recover Windows to first partition only: this option will delete only the first partition and you can keep the other partitions.
Recover Windows to entire HD: this option will delete all your partitions.
Recover Windows to entire HD with 2 partitions: this option will delete all partitions and create 2 new partitions: C and D.
- Follow the next steps to complete the process
Recover Windows 7 with the disk or the partition
Windows 7 users can use the recovery partition or the recovery DVD to recover an Asus computer. If you no longer have the “RECOVERY” partition intact or the DVD, go to Download alternative recovery disk for Asus.
Instructions when using the recovery partition:
All data will be lost during the recovery process. Backup your computer before you continue!
- Restart your computer and start pressing F9 during booting
- Select Windows Setup [EMS Enabled]
- Select the language
- Click Next
- When the ASUS Preload Wizard screen appears, click Next
- Select the partition you want to delete and use for the recovery process and click Next.
You have 3 options at this step:
Recover Windows to first partition (this will delete only the first partition and you can keep the other partitions), Recover Windows to entire HD (this will delete all your partitions from the hard drive) and Recover Windows to entire HD with 2 partitions (this will delete all your hard drive partitions and create 2 new ones: C and D)
- Follow the instructions on the screen to complete the process.
Instructions when using the recovery DVD:
All data will be lost during the recovery process. Backup your computer before you continue!
- Insert the Recovery DVD in your computer’s optical drive
- Restart your PC
- Press Esc during booting and select the CD/DVD option to boot from the DVD
- Once the CD/DVD option is selected, press Enter
- Click OK to start the restore process
- Click OK to confirm the process (the process will overwrite your hard drive and remove all personal files)
- Follow the instructions to complete the recovery process
If you don’t have a Recovery DVD from Asus for Windows Vista, you can create yours if:
- You have the recovery partition intact
- You have the AI Recovery Burner icon on your desktop
If you have the AI Recovery Burner on your desktop, follow these instructions to create a Recovery DVD:
- Remove any external hard drives from your computer
- Click on AI Recovery Burner
- Insert your DVD (must be blank) and select it from the list once it appears
- Click OK
- Follow the next steps to complete the process
Recover Windows 8 with disk or partition
Windows 8 users can use the recovery partition or the recovery DVD to recover an Asus computer. If you no longer have the “RECOVERY” partition intact or the DVD, go to Download alternative recovery disk for Asus.
Instructions when using the recovery partition:
All data will be lost during the recovery process. Backup your computer before you continue!
- Restart your PC
- Press F9 during booting
- When the “Choose an option” screen of Windows 8 appears, go to Troubleshoot
- Click on Advanced Options
- Select System Image Recovery
- Choose an account you want to use
- Type in the account’s password
- Click Continue
- Select Use the latest available system image (recommended) option and then click Next
- Follow the wizard steps to complete the process.
Instructions when using the recovery DVD:
All data will be lost during the recovery process. Backup your computer before you continue!
- Restart your PC and start pressing the F9 key during booting
- Wait for the Choose an option screen to show
- Go to Troubleshoot
- Click on Advanced Options
- Select System Image Recovery
- Choose an account you want to use and type in the password
- Click Continue
- Select Select a system image, as you have the Recovery DVD. If you don’t have the DVD, use the other option
- Follow the wizard steps to complete the process.
More Information
Support Links
- Easy Recovery Essentials for Windows – our repair and recovery disk.
It’s an easy-to-use and automated diagnostics disk. It’s available for Windows 8, Windows 7 and Windows Vista. It’s also available for Windows XP and Windows Server.
Read more at Windows Recovery Disks.
- The NeoSmart Support Forums, member-to-member technical support and troubleshooting.
- Get a discounted price on replacement setup and installation discs: Windows XP, Windows Vista, Windows 7, Windows 8.
Applicable Systems
This Windows-related knowledgebase article applies to the following operating systems:
- Windows XP (all editions)
- Windows Vista (all editions)
- Windows 7 (all editions)
- Windows 8 (all editions)
- Windows 8.1 (all editions)
- Windows Server 2003 (all editions)
- Windows Server 2008 (all editions)
- Windows Server 2012 (all editions)
Applicable Models
This Asus-related knowledge base article applies to the following computer models:
- All Asus series: CG8270, CG8480, G50AB, CG8565, CG8580, G10AC, G70AB, CG8265, CG8890, G30AB, CM6630, CM6431, CM1745, CM1855, M11BB, M70AD, P30AD, CM1831, CM6330, CM6340, M11AA, M51BC, M31AD, CM6870, CM6331, CM1435, M51AC, M11AD, M51AD, CP6130, CM6731, K5130, CP6230, CP3130, K30AD, CM1740, CM1735, UL50At, U35F, U30SD, U46E, U44SG, U47VC, S56CM, U24A, UX42VS, S46CB, UL30Jt, U31JG, U53SD, U36SD, U32U, S56CA, U38N, X201E, U32VJ, S56CB, U45Jc, U41JF, U40SD, U56E, U24E, U82U, U32VM, U38DT, N71Ja, N61Jv, N53Jn, N53Jg, N73Jf, N53JL, N53SN, N75SF, N55SF, N56VM, N76VM, N76VJ, N56VB, N550JV, N46JV, N541LA, N71Jq, N82Jv, N73Jg, N43JQ, N61DA, N73SV, N43SL, N53DA, N53SM, N56VZ, N76VZ, N56VJ, N56DY, N750JV, N56VV, N550JA, N71Jv, N82Jq, N73Jn, N43Jf, N82Jg, N53SV, N43SN, N43SL, N45SL, N46VM, N56DP, N76VB, N46VB, N550LF, N56JR, G60J, G51Jx, G53Jw, G74SX, G55VW, G750JX, G51J, G51Jx, G53SW, G53SX, G75VX, G51J, G60Jx, G73SW, G75VW, G750JW, U53Jc, U43SD, NX90Jq, NX90Jn, K72JU, K43TA, K53SD, K53TK, X54HR, K73TK, K55VM, K75VM, K73BR, X55U, X501A, X75A, X55VD, S46CA, S56CM, K56CA, K95VJ, 1015E, X75VC, X450VC, X550VC, K46CB, X750JB, X550VB, X450VE, X451CA, X550LC, F450CA, X552EA, X552VL, X450LC, X550CL, X450LD, X550LN, X551MA, K72DY, K53U, K52JK, X44L, X54HY, K73SJ, K62F, K52JT, K42JP, A52JU, A42JY, K53SJ, A72JK, K42JK, A42JV, A52JB, K42DE, A52F, K42Jr, A42F, K42JA, K72DR, A42JE, K53TA, X54L, K53BR, K73SD, K55A, K55DR, K75DE, X55A, X301A, X401U, X75VD, X45VD, K46CM, S56CA, K45VS, K73BE, X402CA, X450CA, X550CA, X75VB, X550DP, X450JF, X102BA, K95VB, X550LA, X750LA, X452EA, X552EP, X450LA, X452CP, X450LN, F200MA, K43BY, K53SC, K52JB, X44LY, X44H, X44C, K62Jr, A72DR, K52JU, K52JV, A42JZ, K53E, K42JB, A42JB, A52JC, A42JC, K52F, K72F, A52N, K42JE, A52JE, A42DE, K73TA, K43BR, K42DY, X54C, K55VD, K73SM, K45A, K95VM, X55C, X501U, X401A, X45A, S46CM, K46CA, K56CM, K75VJ, X201E, X502CA, X450CC, X550CC, K56CB, X750JA, X450VB, X200CA, X551CA, X550LB, X750LB, X452EP, X552CL, X450LB, X550VL, X452VP, X550LD, X451MA, X200MA, K43U, K93SV, K53BY, X54H, X44HY, X44HR, K42JY, K42JZ, A52JT, K52DY, K53SV, K73E, K42JC, A42JK, A52JK, K42DR, A52Jr, A72F, A42Jr, A42N, K52DE, A42JA
- Essentio series: CG5290, CG8250, CG1330, CG8350, CM1530, CM1730, CM1630, CM6830, CM6650, CM6850, CP1130, CS6110, CM6730
- Asus Eee PC series: 1015BX, 1011CX, 1016P, 1015P, 1015PEM, 1015T, 1015PX, 1215N, 1015PE, X101, 1025C, 1225B, 1015CX, 1001PX, 1015PED, 1215T, 1011PX, X101CH, T101MT, X101H, 1025CE, 1215P, 1001PQ, 1015PD, 1001PXD, 1215B, 1015PN, 1015B, 1225C
- Zenbook series: UX21E, UX32VD, UX31LA, UX302LG, UX31E, UX21A, UX32A, UX31A, UX301LA, UX31A, U500VZ, UX302LA
- VivoBook series: S551LA, S500CA, S550CA, S300CA, S301LA, S200E, S451LB, S301LP, S400CA, S550CM, S550CB, S551LB, F200CA, S451LA, F450CC, F200LA
- Taichi series: 31, 21
Propose an edit
Related Articles
-
Disable Legacy Boot Mode and Enable UEFI
-
How To Reinstall Windows 10
-
Remove Dual Boot Menu – Fix for Windows
-
Windows won’t start – Guide for Windows XP, Vista, 7, 8, 10
-
Fix slow boot – Guide for Windows XP, Vista, 7, 8, 10
-
How to Reset PC BIOS/CMOS
- Операционная система
-
- Windows 10
- Windows 8.1
- Windows 8
- Версия
-
V3.0.0.1
32-bit
64-bit
Вы нашли то, что искали?
Дополнительная информация
ASUS Recovery
1.It only support ASUS notebook.
2.It only support that When you have upgraded from Windows 8 to Windows 10 or Windows 8.1 to Windows 10.
3.It only supports when recovery function fails after updating to Windows 10.
4.Before used, please don’t modify the partition of form (include hidden partition)
5.It only support English version.

Это Windows PE с автоматическим запуском программы восстановления ImageX , которую использует фирма Asus для создания резервных копий Windows. Эти копии хранятся на недоступном скрытом разделе RECOVERY. Чтобы активировать восстановление обычно достаточно всего лишь нажать кнопку F9 при загрузке и выбрать в меню запуска системы пункт Windows Install (EMS Enabled). Этот же диск предназначен для тех пользователей, у которых по каким-либо причинам НЕ ЗАПУСКАЕТСЯ ВОССТАНОВЛЕНИЕ ПО F9.
1) Скачиваете данный диск. В корне есть папка sources . В ней лежит файл boot.wim В Вашей же винде на диске C:/ в папке Recovery лежит подобный ( но именно под Вашу систему) boot.wim , который нужно запаковать в наш финальный образ. Его и подсовываете в UltraIso на замену тому, что уже есть. Сохраняете.
2) Записываете на болванку. Грузитесь с диска.Дальше и сами уже знаете что делать.Простите за крупный шрифт- это чтоб заметно было и за немного кривые объяснения-лучше не умею.
Подходит для ОС: Windows 7 и 8
Пароль на архив: «votproga», вводим без кавычек