
Windows 10: Asus U43J Windows 10 won’t install
Discus and support Asus U43J Windows 10 won’t install in Windows 10 Installation and Upgrade to solve the problem; I am having an issue with Windows 10 on my laptop. I have installed Windows 10 on various machines from laptops to desktops without any issues. I have…
Discussion in ‘Windows 10 Installation and Upgrade’ started by 99taws6, Jan 15, 2016.
-
Asus U43J Windows 10 won’t install
I am having an issue with Windows 10 on my laptop. I have installed Windows 10 on various machines from laptops to desktops without any issues. I have used USB and DVD media as well as done clean installs and upgrades. This is the first problem like this I have run into and it’s really frustrating and all the Google-Fu I have used is not working on this issue.
The install begins just fine and when it goes to reboot the first time the laptop reboots to the Windows 10 logo, the loading graphic spins at the bottom for around 10 seconds and then it shuts off completely. When the laptop is restarted it restores itself backs to Windows 7 after giving the BSOD error of the SAFE_OS error.
I have tried to uninstall all unneeded drivers, wifi, network, software, clean install of 7, wiped hard drive and clean install of 10, no partitions on hard drive, bios is updated, jumping into bios at startup and shutting down then restarting, various install media, old and new versions of Windows 10, 32 and 64 but versions.
Can anyone help as this really is frustrating me. The laptop is an I5 w/16gb factory RAM and nvidia graphics m310 (I think).
Thanks in advance.

-
Not able to upgrade from windows 7 Home Premium to Windows 10 Home. Error 1900101-20017
Hi Team MSW
I have a laptop Asus U43j with genuine MSW 7 Home Premium. I have downloaded the windows 10 upgrade and it prompted me to install update . After configuring windows 10 100% system got rebooted but within seconds, a message flashed out that» windows
could not be installed and we are restarting the system(There was an error related to THREAD).After that i again landed at windows 7 home premium and following dialog box was there to irritate me.
It is very frustrating to invest number of hours which leads you nowhere.
Please help.
-
lose cursor and mouchpad doesnt work
hi after installing windows 10 my pad and cursor won’t work it becomes frozen. I have an ASUS laptop
-
Asus U43J Windows 10 won’t install
Hi.
Failure that early is a driver issue of some sort.
Have a read of this post; maybe it will help:
Solved Error 0xC1900101 — 0x20017 When Upgrading to Build 10162 — Windows 10 Forums
I would use the ISO from MS TechBench for your install. People seem to have the best luck with that over the Media Creation Tool, when they’re having problems.Good luck, and please post your results for us.
-
I will give that version a try but answer me this, how can it be a driver issue when I’m doing a clean install from a totally wiped hard disk unless you are saying its a driver on Windows 10 installation media?
Thanks
-
Well, I know the 310m was a big problem for W10 for quite a while. W10 looks for the drivers of your devices during install. So, if it’s having problems with your devices’ drivers, it will fail at the first boot. Try the clean install while disconnected from the internet. Do not let it check for updates during installation. That might help. I had to do that on one system. It ended up needing an audio codec when it was finished in order to get sound. And, I had to fiddle with graphics drivers until I found something acceptable. Some people have even disabled components in the BIOS to get a successful install.
-
Ok I’ll try it with the install you posted. It was not connected to the Internet and the drivers for the 310m were not installed as the drive was totally wiped so it would have only been using generic display adapters for Intel. It’s really frustrating but I hope to get it figured out soon I hope. Thanks again.
-
Asus U43J Windows 10 won’t install
You’re welcome. Good luck. It’s a bugger sometimes!
There’s another option we haven’t discussed yet….it’s called SysPrep. Basically, you load W10 onto another machine, then strip it down to bare metal and prepare it to install on another machine. Might be something to look at if this doesn’t work. I’d have to get another member involved for that, as I’m not too well-versed on it.

Asus U43J Windows 10 won’t install
-
Asus U43J Windows 10 won’t install — Similar Threads — Asus U43J won’t
-
Windows 10 won’t install
in Windows 10 Gaming
Windows 10 won’t install: I have windows installation media on a USB flash drive. I plugged it into my computer and turned it on but there is just this screen: My laptop model is Samsung RV511… -
Windows 10 won’t install
in Windows 10 Installation and Upgrade
Windows 10 won’t install: I have tried to install and upgrade from Windows 8 to Windows 10 four times It goes through the lengthy process then gives an error sayinginstall failed. I am a senior citizen, fairly computer savvy and this just is working for me. Does anyone know how to contact Microsoft?I… -
Windows 10 won’t install
in Windows 10 Gaming
Windows 10 won’t install: I have tried to install and upgrade from Windows 8 to Windows 10 four times It goes through the lengthy process then gives an error sayinginstall failed. I am a senior citizen, fairly computer savvy and this just is working for me. Does anyone know how to contact Microsoft?I… -
Windows 10 won’t install
in Windows 10 Software and Apps
Windows 10 won’t install: I have tryed 3 different drives 2 1tb hdd and 1 500gb ssd brand new and the installer keeps telling me I dont have enough spacehttps://answers.microsoft.com/en-us/windows/forum/all/windows-10-wont-install/7ca4cfc7-865f-4a47-8a2f-39422abc6c33
-
Windows 10 won’t install
in Windows 10 Installation and Upgrade
Windows 10 won’t install: I have tryed 3 different drives 2 1tb hdd and 1 500gb ssd brand new and the installer keeps telling me I dont have enough spacehttps://answers.microsoft.com/en-us/windows/forum/all/windows-10-wont-install/7ca4cfc7-865f-4a47-8a2f-39422abc6c33
-
windows 10 won’t install
in Windows 10 Installation and Upgrade
windows 10 won’t install: I have tried twice to install Windows 10. Both times it seems to have downloaded ok, but won’t install.https://answers.microsoft.com/en-us/windows/forum/all/windows-10-wont-install/8f2318b2-73f8-41a9-801c-447fa013a55f
-
Windows 10 installation on Asus transformer
in Windows 10 Installation and Upgrade
Windows 10 installation on Asus transformer: Hello,I have windows 10 on a USB key, I want to install windows 10 on an ASUS tranformer T200TA, but I can not do it, even by changing the settings in the bios. my question is how to get there if it’s possible thank you in advance132314
-
Windows 10 won’t install
in Windows 10 Installation and Upgrade
Windows 10 won’t install: I have used the Windows Media Creation Tool (MediaCreationTool1809.exe) to create a bootable USB from it using the recommended settings.After I was done I rebooted the PC and clicked install. Created the Primary Partition and Formatted it (therefore removing all data from…
-
Windows 10 won’t boot after fresh installation on Asus Vivobook F510UA
in Windows 10 Installation and Upgrade
Windows 10 won’t boot after fresh installation on Asus Vivobook F510UA: I feel like I am running out of options here.I have an Asus Vivobook F510UA-AH51 with a newly installed Crucial M.2 SATA model MX500 (CT250MX500SSD4). I removed the originally installed SATA hard drive and am only running the installation with a single stick of RAM (the…
Users found this page by searching for:
-
asus u43j windows 10
By registering your device, you can easily manage your product warranty, get technical support and keep track of your repair status.
Register Product
Driver & Tools
- Driver & Tools
- BIOS & FIRMWARE
Please select OS
Windows 7 32-bit
Windows 7 64-bit
Others
- Products certified by the Federal Communications Commission and Industry Canada will be distributed in the United States and Canada. Please visit the ASUS USA and ASUS Canada websites for information about locally available products.
- All specifications are subject to change without notice. Please check with your supplier for exact offers. Products may not be available in all markets.
- Specifications and features vary by model, and all images are illustrative. Please refer to specification pages for full details.
- PCB color and bundled software versions are subject to change without notice.
- Brand and product names mentioned are trademarks of their respective companies.
- The terms HDMI, HDMI High-Definition Multimedia Interface, HDMI Trade dress and the HDMI Logos are trademarks or registered trademarks of HDMI Licensing Administrator, Inc.
I am having an issue with Windows 10 on my laptop. I have installed Windows 10 on various machines from laptops to desktops without any issues. I have used USB and DVD media as well as done clean installs and upgrades. This is the first problem like this I have run into and it’s really frustrating and all the Google-Fu I have used is not working on this issue.
The install begins just fine and when it goes to reboot the first time the laptop reboots to the Windows 10 logo, the loading graphic spins at the bottom for around 10 seconds and then it shuts off completely. When the laptop is restarted it restores itself backs to Windows 7 after giving the BSOD error of the SAFE_OS error.
I have tried to uninstall all unneeded drivers, wifi, network, software, clean install of 7, wiped hard drive and clean install of 10, no partitions on hard drive, bios is updated, jumping into bios at startup and shutting down then restarting, various install media, old and new versions of Windows 10, 32 and 64 but versions.
Can anyone help as this really is frustrating me. The laptop is an I5 w/16gb factory RAM and nvidia graphics m310 (I think).
Thanks in advance.
Hi.
Failure that early is a driver issue of some sort.
Have a read of this post; maybe it will help:
Solved Error 0xC1900101 — 0x20017 When Upgrading to Build 10162 — Windows 10 blog
I would use the ISO from MS TechBench for your install. People seem to have the best luck with that over the Media Creation Tool, when they’re having problems.Good luck, and please post your results for us.
I will give that version a try but answer me this, how can it be a driver issue when I’m doing a clean install from a totally wiped hard disk unless you are saying its a driver on Windows 10 installation media?
Thanks
I will give that version a try but answer me this, how can it be a driver issue when I’m doing a clean install from a totally wiped hard disk unless you are saying its a driver on Windows 10 installation media?
Thanks
Well, I know the 310m was a big problem for W10 for quite a while. W10 looks for the drivers of your devices during install. So, if it’s having problems with your devices’ drivers, it will fail at the first boot. Try the clean install while disconnected from the internet. Do not let it check for updates during installation. That might help. I had to do that on one system. It ended up needing an audio codec when it was finished in order to get sound. And, I had to fiddle with graphics drivers until I found something acceptable. Some people have even disabled components in the BIOS to get a successful install.
Ok I’ll try it with the install you posted. It was not connected to the Internet and the drivers for the 310m were not installed as the drive was totally wiped so it would have only been using generic display adapters for Intel. It’s really frustrating but I hope to get it figured out soon I hope. Thanks again.
Ok I’ll try it with the install you posted. It was not connected to the Internet and the drivers for the 310m were not installed as the drive was totally wiped so it would have only been using generic display adapters for Intel. It’s really frustrating but I hope to get it figured out soon I hope. Thanks again.
You’re welcome. Good luck. It’s a bugger sometimes!
There’s another option we haven’t discussed yet….it’s called SysPrep. Basically, you load W10 onto another machine, then strip it down to bare metal and prepare it to install on another machine. Might be something to look at if this doesn’t work. I’d have to get another member involved for that, as I’m not too well-versed on it.
Доброго времени суток.
Не так давно ко мне попал один компактный ноутбук, с жалобой о невозможности установки ОС Windows 10 (вылетала ошибка «Установка Windows на данный диск невозможна. Возможно оборудование данного компьютера…»). Что же, пришлось разбираться…
На самом деле, проблема была (я так думаю) связана с тем, что пользователь неправильно создал загрузочный носитель и пытался с него установить систему. Хотя, сразу отмечу, что в некоторых случаях виной могут быть и неверные настройки BIOS/UEFI.
В этой статье я покажу на пошаговом примере установку ОС на ноутбук ASUS ZenBook UX310UA (добавлю, что на многих ноутбуках ASUS, тем более из этой линейки – действия будут аналогичны).
Итак…
*
Установка Windows 10 на ноутбук ASUS
❶
Создание загрузочной флешки
Для работы необходима утилита Rufus и загрузочный образ с ОС Windows 10.
1.Rufus
Сайт: http://rufus.akeo.ie/?locale=ru_RU
Маленькая, но очень многофункциональная утилита для создания загрузочных накопителей. Позволяет создавать флешки для BIOS и UEFI (для GPT и MBR дисков), с разными ОС (Windows 10 поддерживается!). К тому же, она полностью бесплатна, и поддерживает русский язык.
2. Образ ISO с Windows 10
Требования: образ нужен, размер которого не превышает 4 ГБ. Во-вторых, отбросьте сразу различные «20 в 1» — нужен простой вариант, например, «Windows 10 x64 home» — т.е. в образе одна конкретная система (т.е. не использовать никаких «Win 10 home/Pro/Ent x32 + x64, 5 in 1»). Таких образов в сети достаточно много… (например, можно скачать на официальном сайте Microsoft).
Итак, вставляем флешку и запускаем Rufus (Важно! все данные на флешке будут удалены, поэтому скопируйте всё нужное с неё).
Далее, укажите образ ISO (рекомендованный к установке выше), затем выберите вариант «GPT для компьютеров с интерфейсом UEFI» (файловая система — FAT 32), «Стандартная установка Windows». Нажмите кнопку «Старт» (настройки представлены на скрине ниже).
Настройки Rufus 2.1
Обновление от 24.01.2019 (т.к. программа Rufus несколько обновилась, и у нее изменился дизайн — приведу еще один скрин для версии 3.4, чтобы никто не путался).
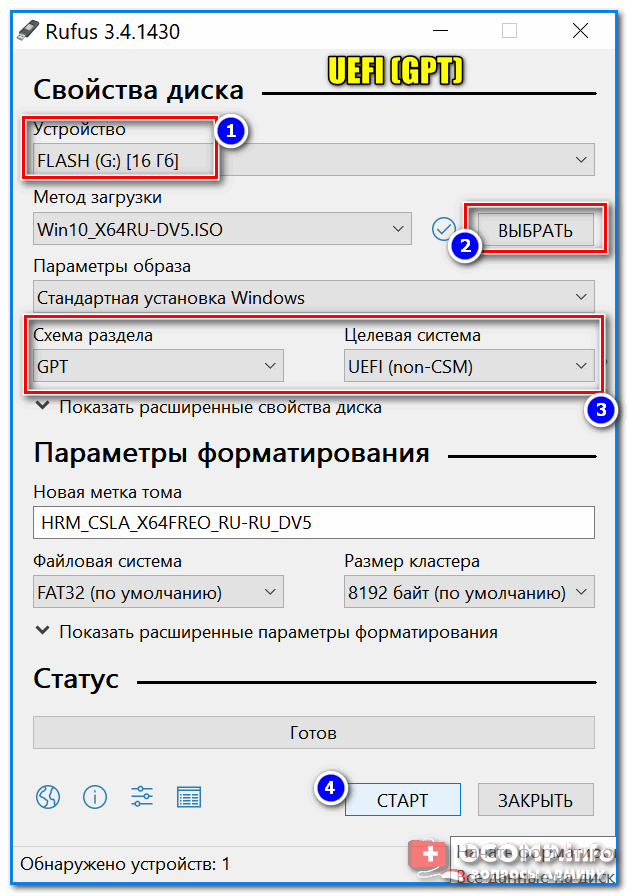
Rufus — создание флешки под UEFI (GPT)
В общем-то, флешка готова, можно идти дальше…
👉 Дополнение!
Как создать загрузочную UEFI GPT флешку с Windows 10, или почему при установке системы на новый ноутбук (ПК) возникают ошибки – инструкция для начинающих.
*
❷
Загрузка оптимальных настроек в BIOS – входим в загрузочное меню.
Не всегда настройки BIOS выставлены по умолчанию (дефолтные). Поэтому, прежде всего рекомендую зайти в BIOS и восстановить их.
Кстати, предварительно сразу же можете подключить созданную в предыдущем шаге загрузочную флешку. Рекомендую подключать к порту USB 3.1 (установка пройдет быстрее, особенно, если ваша флешка поддерживает сей стандарт).
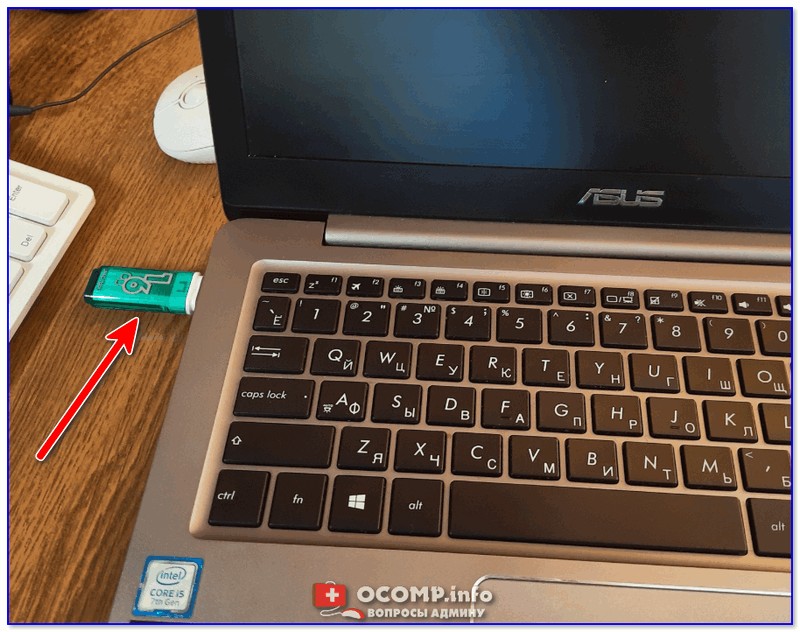
Подключаем флешку к USB 3.1 порту (установка пройдет быстрее!)
Чтобы войти в BIOS, сразу же после включения ноутбука (должен появиться фирменный логотип ASUS) нажимайте клавишу F2 (лучше несколько раз, чтобы наверняка…).
👉 Ремарка!
На всякий случай привожу ссылку на статью о том, как войти в BIOS на компьютере (или ноутбуке)
В BIOS (UEFI): первым делом зайдите в Advanced Mode (клавиша F7) — см. нижнюю часть окна. 👇
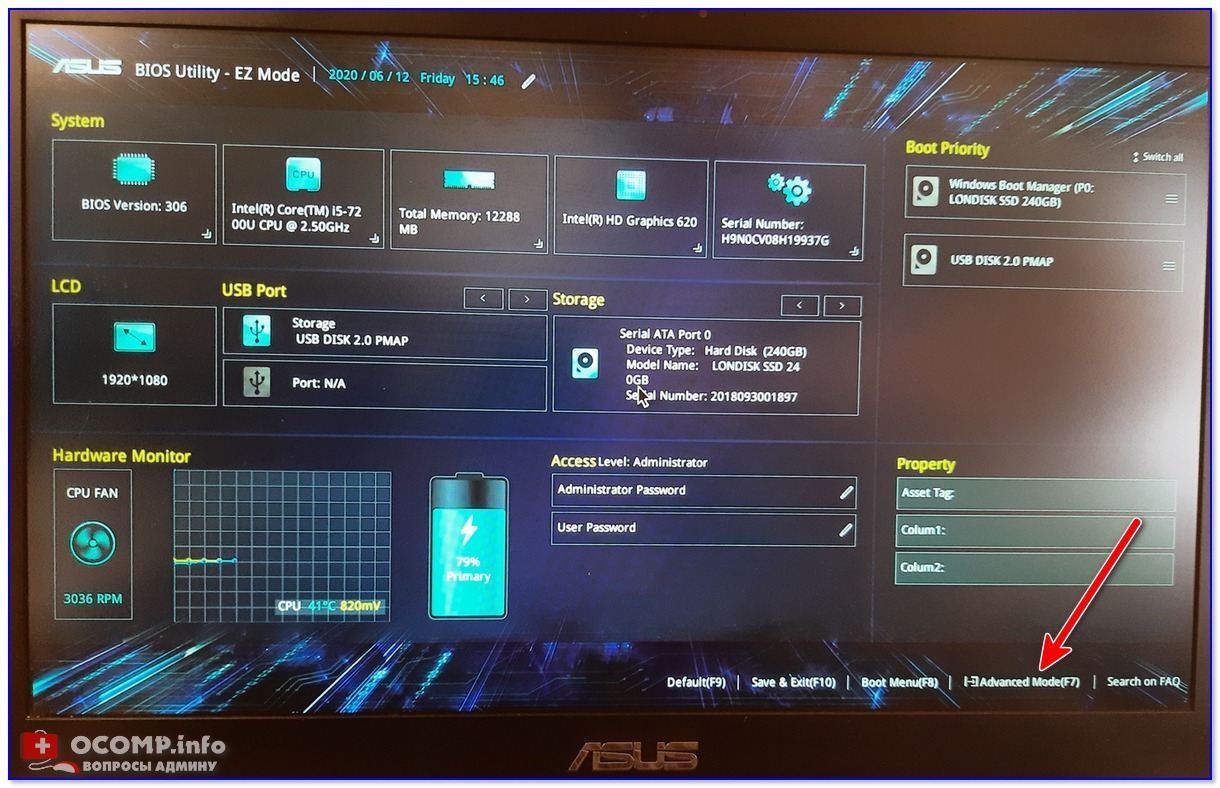
Advanced Mode (клавиша F7)
В разделе «Save & Exit» выберите функцию «Restore Defaults» (восстановление настроек по умолчанию). Затем сохранить изменения — кнопка «Save Changes» (можно просто нажать кнопку F10 — после чего все изменения будут сохранены и ноутбук уйдет на перезагрузку — снова войдите в BIOS клавишей F2).
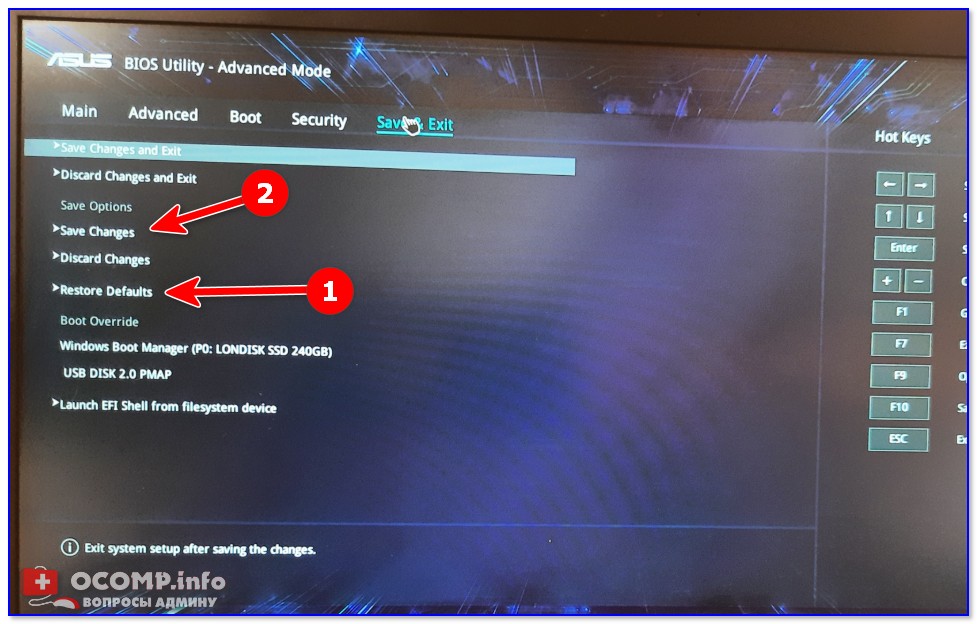
Restore Defaults — восстанавливаем настройки на по умолчанию
После восстановления настроек, войдя снова в главное окно BIOS (UEFI), нажмите кнопку F8 (вход в Boot Menu). В нем вы должны увидеть нашу флешку – выбираем ее и жмем Enter.
Примечание: в загрузочном меню у вас (вероятнее всего) должно отображаться 2 строчки с названием установочной флешки. Нужно выбрать ту, напротив которой значится «UEFI OS» (👇).
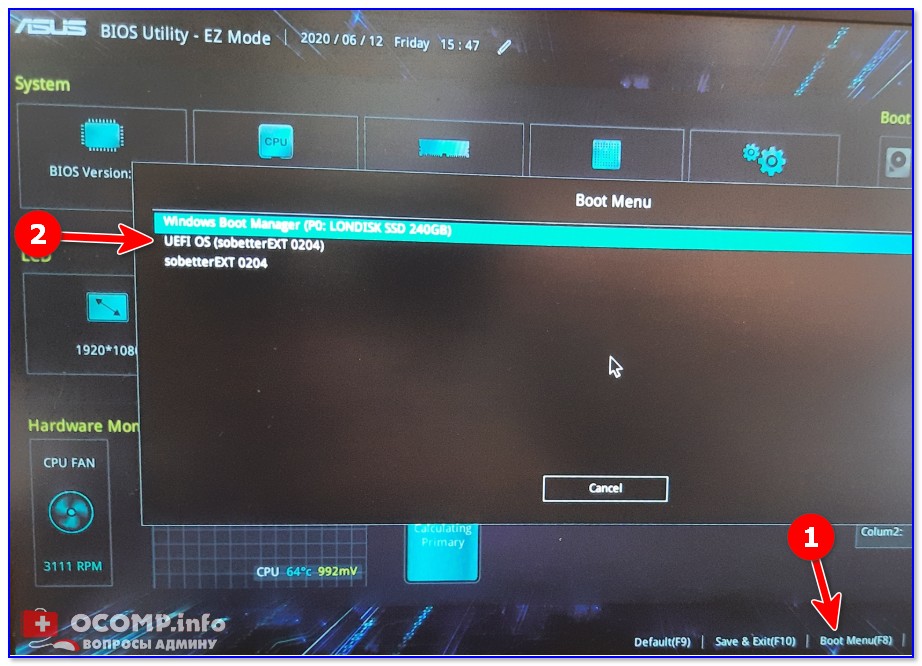
Boot Menu — выбираем загрузочный носитель
Далее ноутбук обязан начать установку Windows – по центру экрана должен забегать «кружок»…
Если установки не происходит – проверьте, правильно ли вы записали установочную флешку, и задали настройки UEFI.
*
❸
Процесс установки Windows 10
Первое окно – это приветствие с выбором языка (его я опустил, просто нажмите Enter). В следующем окне — нажмите кнопку «Установить».
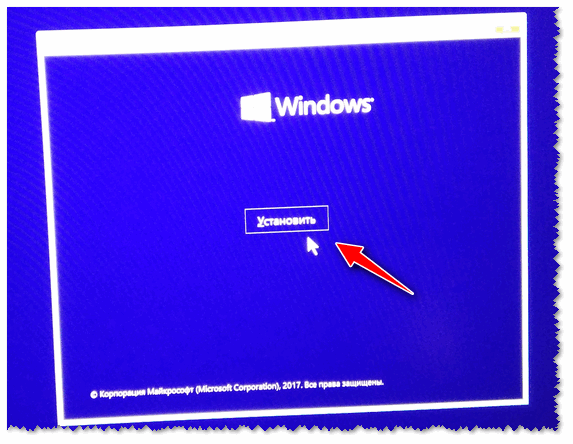
установить
Далее появится окно с условиями лицензии — соглашаетесь и жмете «далее».
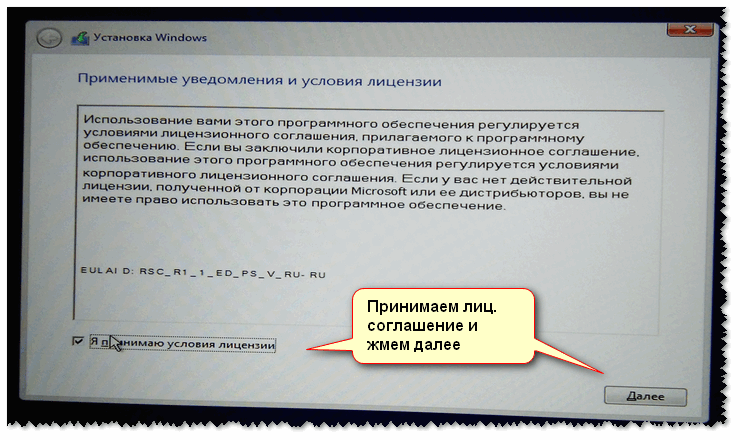
Лицензионное соглашение
В окне с выбором варианта установки укажите «Выборочная: только установка Windows (для опытных пользователей)».
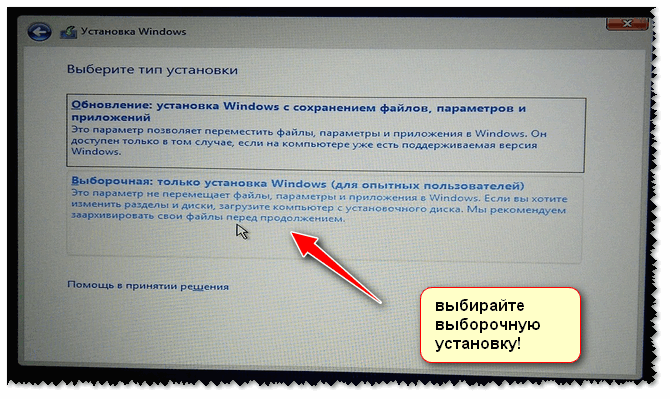
выборочная установка
Далее самое важное окно — где задается диск под установку Windows. Вообще, я рекомендую удалять полностью все что есть на диске (все, что шло с магазина), и производить чистую установку Windows 10.
Примечание!
В некоторых случаях переустановка ОС может быть причиной в отказе гарантийного обслуживания (хотя, это довольно редко, но все же… Чаще всего, гарантия дается на «железо», а ПО можно ставить любое…).
удаление всех разделов на жестком диске
*
📌 Важно! (обновление от 2022г.)
На новых ноутбуках в окне выбора накопителя для установки ОС — можно не увидеть ни одного диска! В этом случае можно попробовать отключить Secure Boot и VMD в настройках BIOS (+ загр. драйверы). Об этом подробнее в нижеприведенной статье.
https://ocomp.info/pri-ustanovke-windows-ne-vidit-hdd.html
*
После чего, на весь диск можно создать один раздел и произвести в него установку (некоторые рекомендуют создавать два раздела — один под установку ОС Windows, другой — под пользовательские данные). Если создадите два раздела — то под Windows рекомендую выделить места, как минимум, на 100 ГБ.
В своем случае, я просто создал один раздел на весь диск (931,5 ГБ) и нажал «Далее».
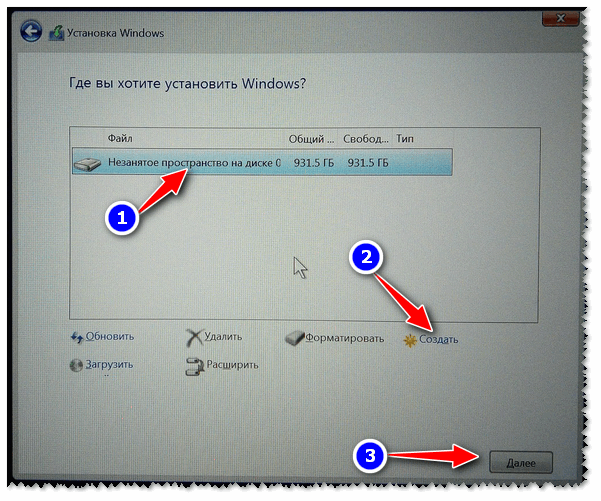
Создание раздела для Windows
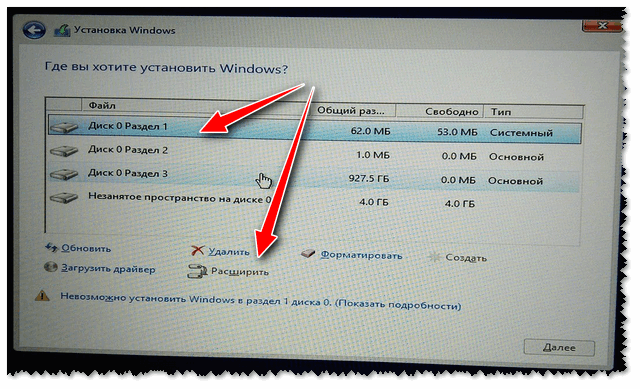
Boot Menu — выбираем загрузочный носитель, если на этом шаге вы увидите ошибку, что «установка Windows на данный диск невозможна…» (см. скрин ниже) — то вы, скорее всего, неправильно создали загрузочную флешку (см. первую часть этой статьи). Также возможно, что вы скачали «некорректный» образ ISO с системой.
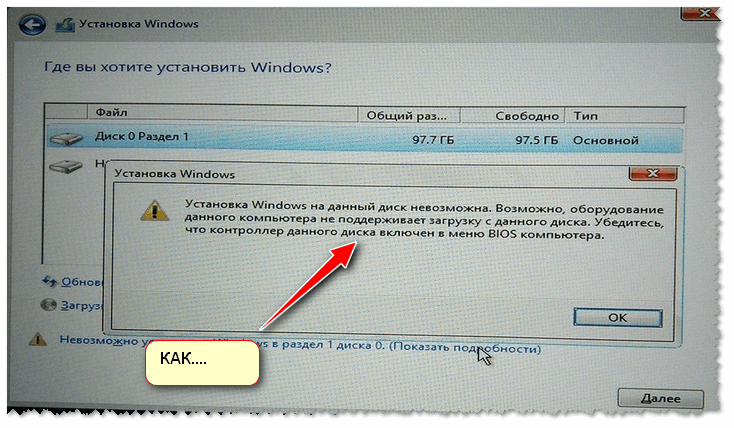
ошибка о невозможности установки
Собственно, если все хорошо — должна начаться установка Windows. Здесь нужно просто ждать, пока буду копироваться файлы (если подключили флеш-накопитель к USB 3.1 — то ждать недолго, минут 5-6).
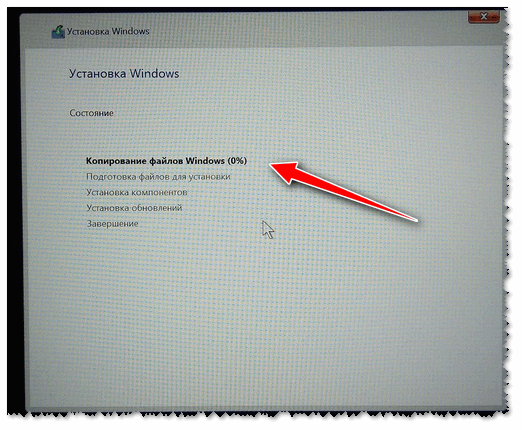
Пошло копирование файлов
Когда файлы будут скопированы, ноутбук перезагрузится и установка будет продолжена. Перед вами появится несколько окон: но в них нет ничего интересного, нужно будет ввести имя пользователя, задать настройки сети (также можно пропустить все шаги и сделать это после).
Все эти окна я опустил, т.к. практического интереса они не представляют, и думаю, что с ними все справятся и самостоятельно…
👉 Ремарка!
Если кому-то нужна полная версия со всеми шагами, то вот инструкция по установке Windows (общий случай, представлены все действия)
Собственно, на этом установка завершена. Дальше можно приступать к установке драйверов (в моем случае было достаточно зайти на официальный сайт вот на эту страничку: https://www.asus.com/ru/Laptops/ZenBook-Classic-Series-Products/).
Но честно говоря, я на всякий случай также прибегнул к Drive Booster и за доп. 5 минут обновил не только драйвера, но и всякие библиотеки: DirectX, Visual C++, Net FrameWork и пр. (никуда не входя и ничего не ища ).
Установка завершена…
Небольшое видео с последовательностью установки Windows на устройство от ASUS.
*
На этом пока всё…
Дополнения в комментариях – приветствуются.
Удачи!
👣
Первая публикация: 06.01.2019
Корректировка: 24.12.2022
Ноутбук Asus (11-ое поколение Intel) не видит SSD/HDD при установке Windows
Все пользователи Asus с процессорами Intel 11-го поколения сталкиваются с проблемой отсутствия SSD/HDD при установке Windows 11 / Windows 10. Поколение распознается следующим образом, например у вас процессор Intel Core i5-1135G7, где первые две цифры (11) после тире обозначают поколение.
То есть, покупатель приобретает ноутбук, к примеру, Asus Vivobook 15 K513 (11th gen Intel) без операционной системы, приходит домой, начинает инсталляцию виндовс, но компьютер не отображает носители, на которые можно было бы установить ОС (см. скриншот ниже).
При этом, в BIOS SSD NVME или HDD корректно отображаются. Забегая вперед, отмечу, что проблема не аппаратная, повода для переживания нет.
Ниже описан пошаговый мануал с иллюстрациями, поэтому не должен вызвать сложности при решении проблемы по отображению носителей для хранения данных. Всего два способа исправить ситуацию с неопределением SSD в ноутбуках с 11-ым поколением Intel. Перед тем, как приступить к решению проблемы, обязательно прочитайте статью до конца, это позволит сэкономить ваше время и выбрать наиболее подходящий метод.
Способ 1. Установка драйвера Intel RST VMD Controller
С помощью другого компьютера откройте сайт производителя asus.com. В правом верхнем углу выберите Поддержка — Центр загрузок (см. скриншот ниже).
Введите в строку модель вашего ноутбука, например, FX506HCB и кликните по предложенному варианту
Справа кликните по ссылке «База знаний«.
В левой колонке «ФИЛЬТР ПО» поставьте галочку перед HDD/SSD хранилища.
Выберите «[Ноутбук]Устранение неполадок — Как решить проблему отсутствия дисков при установке Windows 11/10«.
То. как расписана эта проблема — я уверен, Вас порадует. Но тогда мы можно было простокинуть ссылку на нее и не писать это все. Но не все так просто. Драйвера, которые описаны там — устарели. То есть при установке на новое железо — они не находятся. Вот что сделал я дальше:
Пролистав страницу до:
Скопировав название драйвера, который они предложили. Вбиваем его в поиск:
Нас интересует ответ ИМЕННО: Intel® Rapid Storage Technology Driver Installation Software…
Открываем и выбираем вариант, указанный стрелочкой (см. скриншот ниже):
Скачиваем его. Распаковываем и переносим сразу на флешку с Windows.
После того как флешка готова, подключаем ее к ноутбуку и начинаем установку. Доходим до шага, где нам дают понять что драйверов нет, и нажимаем на «Загрузить драйвер» (анг. Load driver) (см. скриншот ниже)
На следующем шаге нажимаем ОК. (см. скриншот ниже)
Затем опять ОК. (см. скриншот ниже)
Нажмите кнопку «Обзор«, выберите папку F6flpy-x64 (Intelо VMD), подтвердите нажав ОК. Внимание: если драйверы не найдены, то попробуйте открыть папку с драйверами и нажмите ОК. (см. скриншот ниже)
Отметьте Intel RST VMD Controller 9A08 (TGL), кликните Далее. (см. скриншот ниже)
Ну вот. Теперь у Вас появились диски, на которые можно установить систему. Поздравляю.
Можно смело устанавливать систему.
Способ 2. Отключение контроллера VMD в BIOS (Не везде есть возможность отключить)
Если с первым методом справиться не получилось, то переходим ко второму. Можно сразу использовать второй способ, минуя первый, это уже каждый решает для себя сам. Первый метод работает при поддержке VMD, второй — минуя его. Разъясню более подробно, после чего можете принять собственное решение.
Технология Intel Volume Management Device (Intel VMD) встроена в процессоры 11-го поколения Intel, она дает возможность использовать:
- загрузочный RAID массив
- горячее отключение/подключение дисков SSD NVMe.
Большинству обычных пользователей данные функции не нужны, если вы из их числа, то отключите VMD. Для этого войдите в биос, откройте вкладку Advanced, откройте VMD setup menu, в строке Enable VMD controller выставьте Disabled. Сохраните настройки перед выходом из BIOS. К сожалению, возможность отключить данную функцию присутствует не на всех устройствах и/или путь может отличаться, так как версии биос могут сильно разнятся.
Следуя данной инструкции вы сможете установить Windows 11/10 на свой компьютер или ноутбук, так как проблем с определением дисков у вас больше не будет.