

By registering your device, you can easily manage your product warranty, get technical support and keep track of your repair status.
Register Product
Driver & Tools
- Driver & Tools
- BIOS & FIRMWARE
Please select OS
Windows 8 32-bit
Windows 8 64-bit
Windows 7 32-bit
Windows 7 64-bit
Others
- All specifications are subject to change without notice. Please check with your supplier for exact offers. Products may not be available in all markets.
- PCB color and bundled software versions are subject to change without notice.
- Brand and product names mentioned are trademarks of their respective companies.
- Ultrabook, Celeron, Celeron Inside, Core Inside, Intel, Intel Logo, Intel Atom, Intel Atom Inside, Intel Core, Intel Inside, Intel Inside Logo, Intel vPro, Itanium, Itanium Inside, Pentium, Pentium Inside, vPro Inside, Xeon, Xeon Phi, and Xeon Inside are trademarks of Intel Corporation or its subsidiaries in the U.S. and/or other countries.
- Product specifications may differ from country to country. We recommend that you check with your local dealers for the specifications of the products available in your country. Colors of products may not be perfectly accurate due to variations caused by photography and monitor settings.Due to photographic variables and conditions, actual product appearance may differ from images shown on this site.Although we endeavor to present the most accurate and comprehensive information at the time of publication, we reserve the right to make changes without prior notice.
- The terms HDMI and HDMI High-Definition Multimedia Interface, HDMI trade dress and the HDMI Logos are trademarks or registered trademarks of HDMI Licensing Administrator, Inc. in the United States and other countries.
*ASUS will not be responsible for customer induced damage to the product, or to user-added materials applied to the product.
CentOS 8 or any other of its version is not officially available on Windows 10 App store for WSL- Windows subsystem for Linux, however, you can still install and use it.
requirementsStep 1: Enable WSL on your SystemStep 2: Download CentOS 8 WSL filesStep 3: Unzip CentOS8.zipStep 3: Install CentOS 8 on WSLStep 4: Run the Linux app Uninstall CentOS 8 from WSL (optional)
Microsoft has continuously shown its love towards Linux and that can be seen in WSL. With the latest Windows 10 May update, the WSL 2, an upgraded version of the previous WSL 1 will be available for regular users. The benefit of that is, now we will have a full-fledged Linux kernel to operate various Linux distros such as Ubuntu, Debian Kali, SUSE, and more… Recently, Ubuntu 20.04 LTS, the latest version of this Linux is available to download and install on Windows 10 for WSL but sorry to say, we don’t have popular CentOS server Linux there. Perhaps, it is because of CentOS’s less popularity among standard Desktop Linux users. However, if you are a developer or just a Linux enthusiast and want to use CentOS 8 on Windows 10 WSL, here is the tutorial on that.
requirements
- WSL on Windows 10
- Internet connection to download the required files.
Step 1: Enable WSL on your System
If you already have Windows subsystem for Linux enabled on your system then you can move to the next step. However, those yet need to Turn it ON, simply start the Powershell as Administrator and copy-paste the below command in it. Once the process gets completed, restart your system.
Enable-WindowsOptionalFeature -Online -FeatureName Microsoft-Windows-Subsystem-Linux
Step 2: Download CentOS 8 WSL files
Well, to get the CentOS WSL Linux app, we don’t need to visit Windows 10 store because it is not there, instead of that it is available on Github as an open-source project developed by some Japanese developer, named yuk7 (profile name). Therefore go to his Github project page and under the CentOS WSL release, you will get the latest 8.1 version. But remember to use this release you should be on the latest Windows 10 May update 2004 or later. Otherwise, you can run the CentOS 7 WSL app.
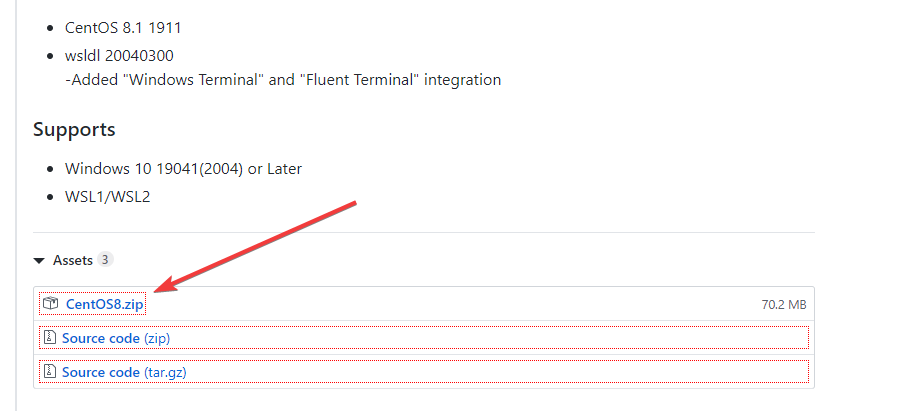
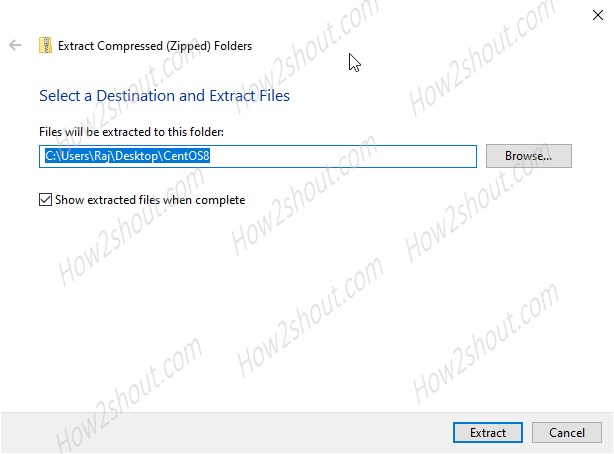
Step 3: Unzip CentOS8.zip
The downloaded file will be in zipped format, thus simply right-click and unzip it somewhere you won’t delete the file accidentally.
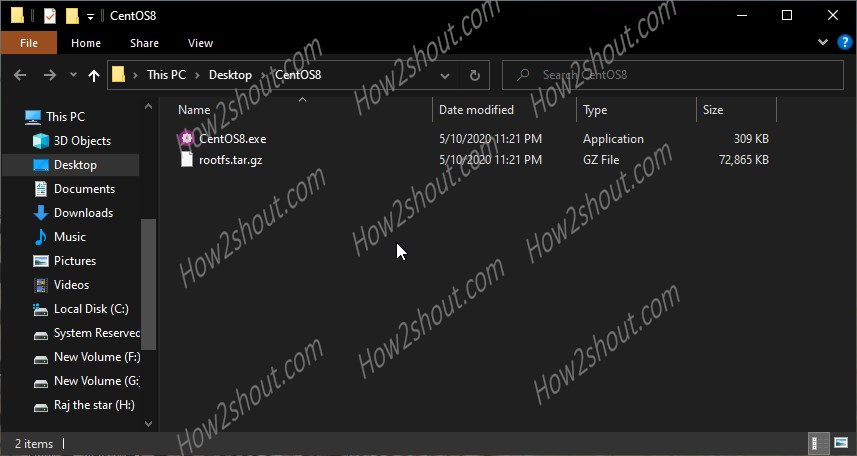
Open the extracted folder and run the CentOS8.exe file. If Windows shows some suspicion on that, just select the option “Run Anyway”.
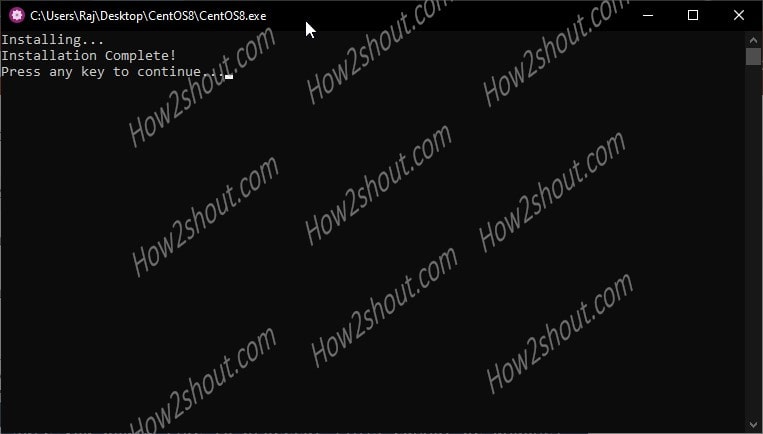
In a few minutes, it will register this new Linux app under the WSL feature of Windows 10.
Step 4: Run the Linux app
Now, again run the same CentOS8 executable file present inside the extracted folder, but this time you will see the command line with the root user. Or Simply in the windows 10 search box type CentOS.
To test everything is working fine, we ran a system update command. You can do the same as well.
dnf update
By default, the root user is without any password and if you want, you can set one.
Furthermore, those who want to run it under WSL 2, can see this tutorial: how to run a Linux app on WSL 2.

Uninstall CentOS 8 from WSL (optional)
In the future, if you want to delete this Linux app then don’t just delete the CentOS 8 unzipped folder directly otherwise it will create a problem in reinstalling the same, thus properly deregister and then delete the files.
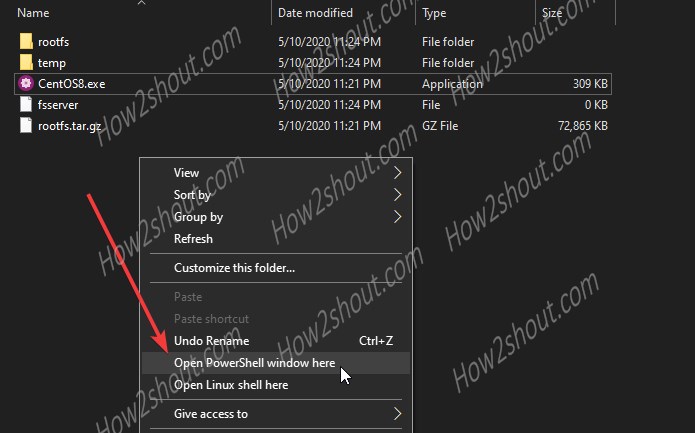
- Open its folder and press & hold shift and right-click inside that folder.
- Select Open Powershell window here.
- Run command:
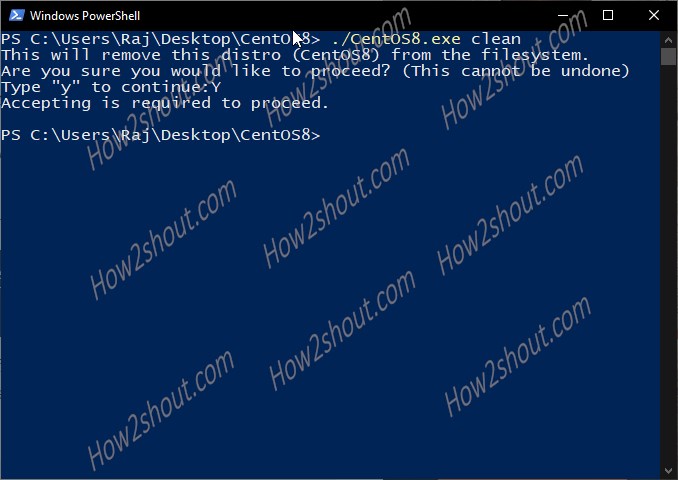
./CentOS8.exe clean
The output for the above command:
PS C:\Users\Raj\Desktop\CentOS8> ./CentOS8.exe clean
This will remove this distro (CentOS8) from the filesystem.
Are you sure you would like to proceed? (This cannot be undone)
Type "y" to continue:Y
Accepting is required to proceed.
So, this was a simple tutorial on running CentOS 8 server on Windows 10 WSL.
Note: If you get this error in the future-
RPM: error: db5 error(-30969) from dbenv->open: BDB0091 DB_VERSION_MISMATCH: Database environment version mismatch
RPM: error: cannot open Packages index using db5 - (-30969)
RPM: error: cannot open Packages database in /var/lib/rpm
The downloaded packages were saved in cache until the next successful transaction.
You can remove cached packages by executing 'dnf clean packages'.
Error: Could not run transaction.
Then simply run-
sudo rm /var/lib/rpm/.rpm.lock
Note: If you get an error:
Failed to download metadata for repo ‘AppStream’ [CentOS]
Then follow the below-given steps:
cd /etc/yum.repos.d/
sudo sed -i 's/mirrorlist/#mirrorlist/g' /etc/yum.repos.d/CentOS-*
sudo sed -i 's|#baseurl=http://mirror.centos.org|baseurl=http://vault.centos.org|g' /etc/yum.repos.d/CentOS-*
sudo yum update -y
В этой статье мы рассмотрим чистую установку с нуля и в базовую настройку сервера CentOS 8 в минимальной конфигурации.
Содержание:
- Что нового в CentOS 8?
- Установка CentOS 8 с помощью ISO-образа
- Базовая настройка CentOS 8 после установки
- Cockpit: Веб-интерфейс управления сервером в CentOS 8
Что нового в CentOS 8?
24 сентября 2019 года, вышел релиз 8-ой версии CentOS. CentOS — дистрибутив Linux, основанный на коммерческом Red Hat Enterprise, компании Red Hat и совместимый с ним.
Рассмотрим наиболее крупные изменения в релизе CentOS 8:
- Используется ядро Linux kernel 4.18.
- Переход с пакетного менеджера yum на dnf. В данный момент yum существует как алиас к dnf.
- Выполнено разделение основного репозитория на 2 — это BaseOS и AppStream. Сделано это для того, чтобы у пользователя появилась возможность устанавливать разные версии пакетов на сервер. BaseOS работает как и раньше.
- Обновилось все ПО, в том числе и ядро. В базовом репозитории теперь устанавливается php версии 7.2 (наконец-то).
- Замена iptables на nftables. Лично я пока еще со вторым не работал напрямую, поэтому не могу сказать, хорошо это или плохо. Единственный момент, если нужно будет переносить какие-то проекты на новую ОС, придется разбираться с правилами, так как есть сервера с чистым iptables.
- network-skripts не используются по умолчанию для настройки сети, теперь управления сетью возложено на Network Manager.
- По умолчанию устаналивается веб-интерфейс управления сервером cockpit (удобно для новичков).
- Для управления контейнерами используется podman (вместо docker и mobdy).
- Новая версия стека TCP/IP 4.16 с улучшенной производительностью и поддержкой алгоритмов контроля BBR и NV.
- Новые версии дситрибутивов:
Установка CentOS 8 с помощью ISO-образа
Так как я проводил установку операционной системы на виртуальной машине KVM, предварительно я скачал установочный ISO-образ с одного из официальных зеркал (https://www.centos.org/download/mirrors/) и примонтировал его для установки на виртуальном сервере (при установке на физический сервер залейте установочный образ СentOS на USB флешку). Сразу скажу, процесс установки CentOS 8, не отличается от установки предыдущей версии и данная статья рассчитана на то, что будет служить помощником для пользователей, которые выполняют подобное впервые.
В рекомендуемых требования указано, что для установки CentOS 8 необходимо минимум 10 Гб места на диске и 512 Мб RAM на одно ядро процессора
Перезапустив виртуальную машину с примонтированным образом, я вошел в VNC-консоль. Первым шагом, вам будет предложено выбрать дальнейшие действия. Так как вы выполняем установку, нам интересен первый пункт меню:
Install CentOS Linux 8.0.1905
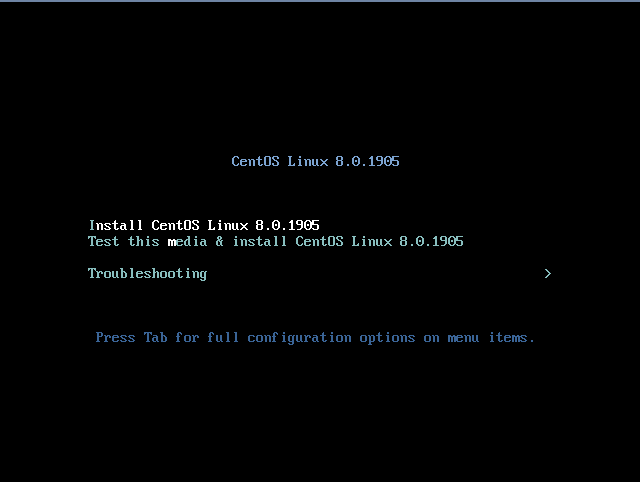
Выбрав его, у вас запустится процесс установки:
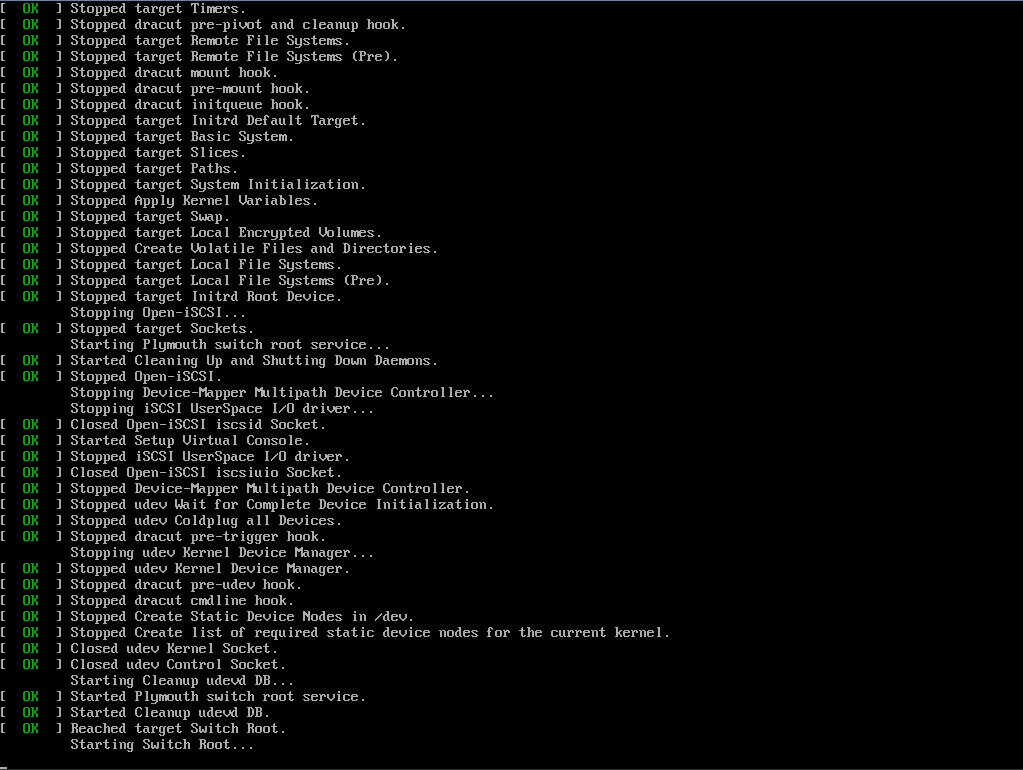
В процессе пока все необходимое ПО загружается, можно просто наблюдать за процессом, от вас не требуется никаких действий.
И когда черный экран сменится на интерактивный с логотипом CentOS, пора брать в руки мышь и клавиатуру.
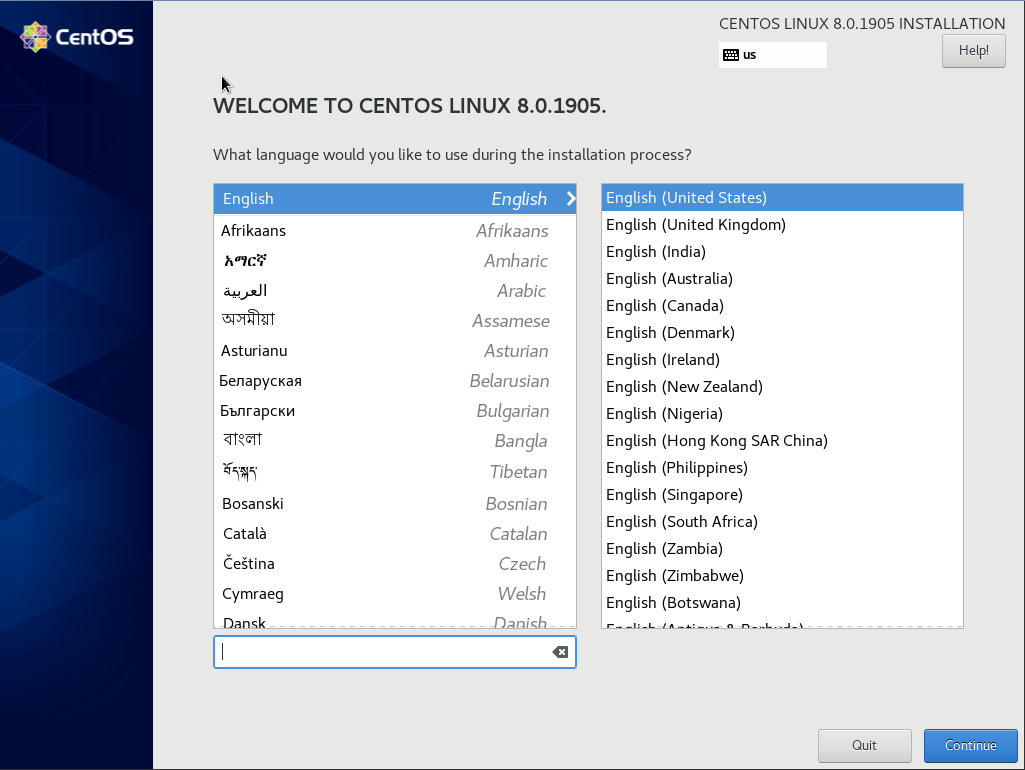
В приветствии, система попросит вас выбрать язык, я всегда ставлю English (английский), потому что мне так удобнее работать (да и не понимаю, зачем вообще ставить русский язык на сервере). Нажмите кнопку “Continue”. В следующем меню нужно выбрать основные настройки для установки CentOS.
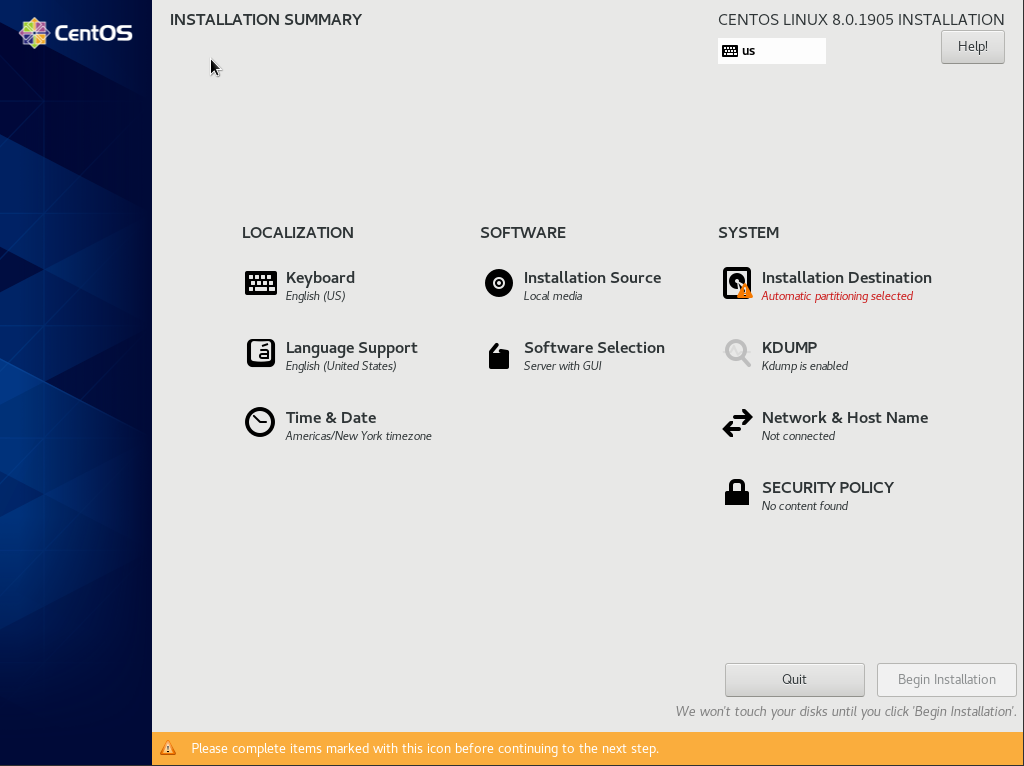
Для запуска установки, обязательно настроить только один пункт “Installation Destination”, там вы указываете разбивку диска, но я предпочитаю так же, сразу настроить сеть и дату со временем.
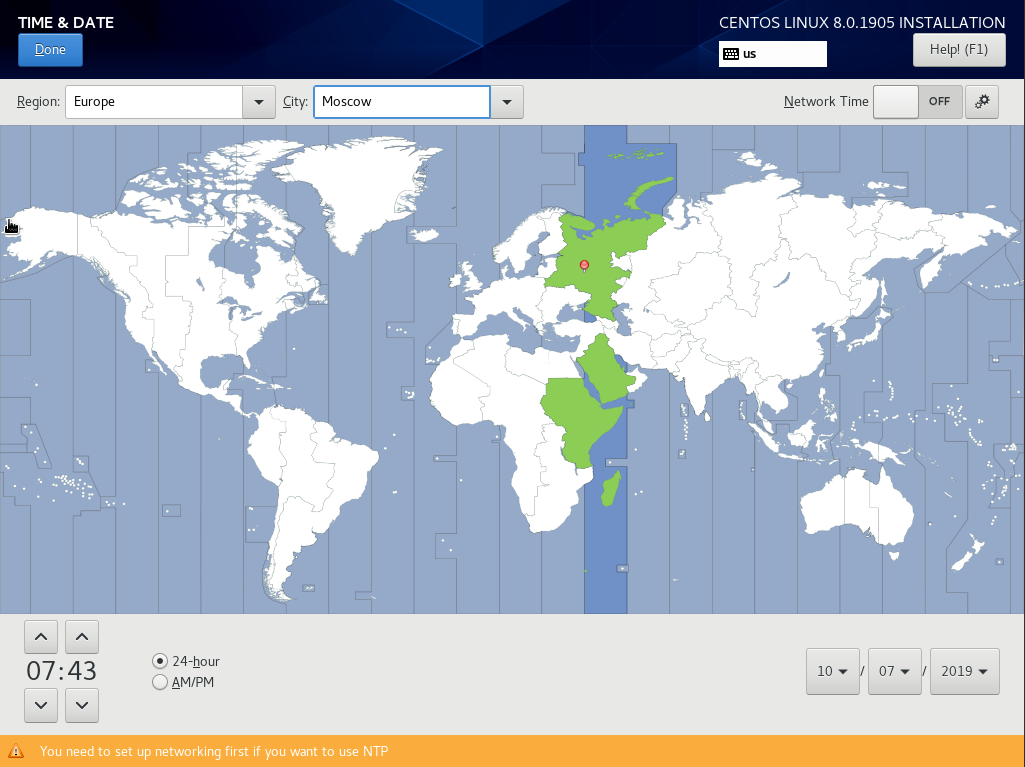
В зависимости от вашего часового пояса, вы устанавливаете свои параметры, для меня это Москва.
Чтобы настроить сеть, переходим в пункт “Network & Host Name”
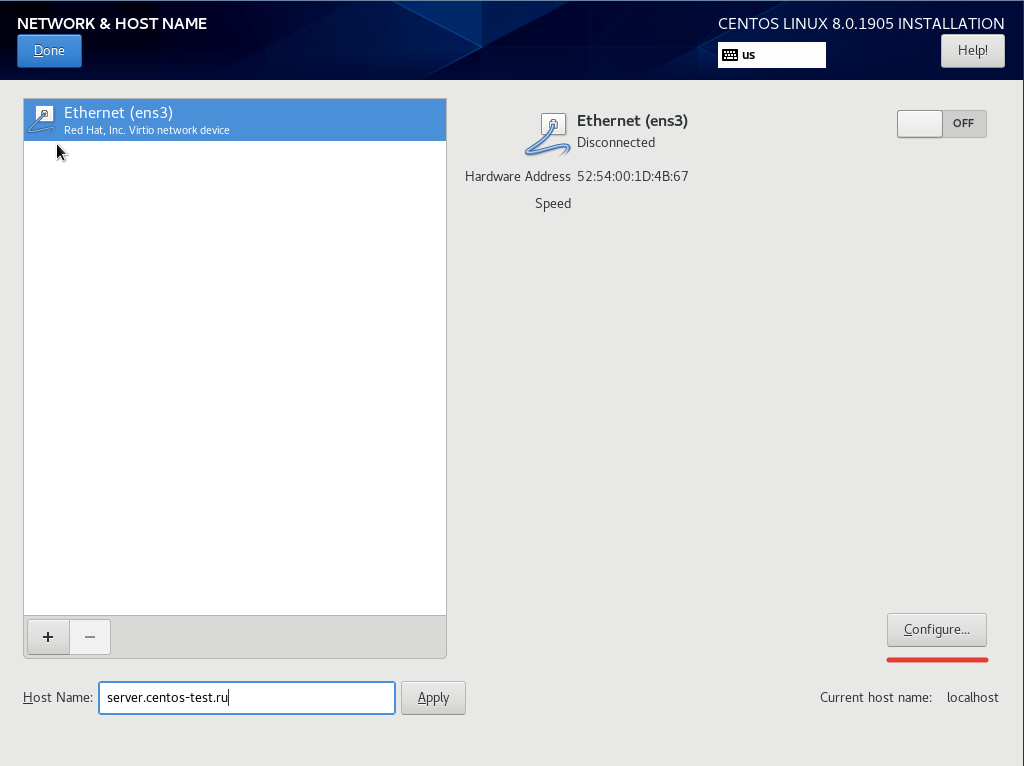
В поле “Host Name” указываем имя сервера и для конфигурации сетевых интерфейсов нажимаем “Configure”
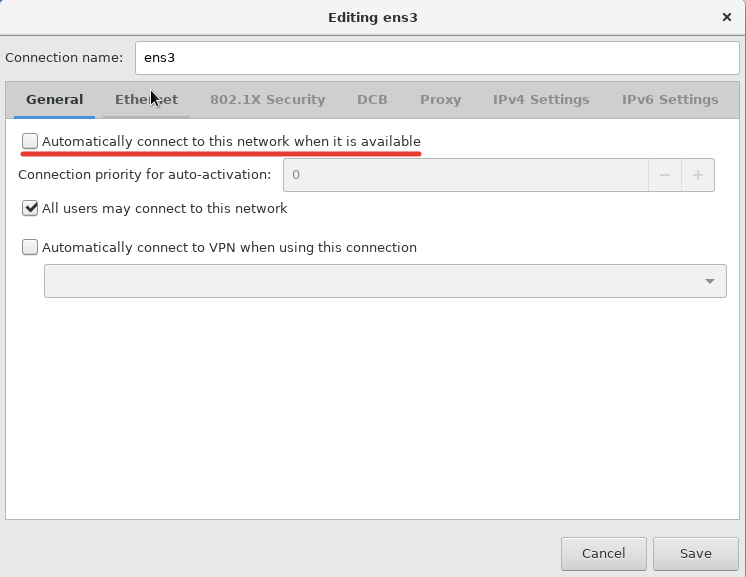
В главной вкладке, нужно отметить галочкой “Automatically connect to this network when it is available”, это нужно для того, чтобы сетевой интерфейс поднимался автоматически.
Перейдите во вкладку “IPv4 Settings” (либо IPv6 если вы используете данный протокол) настройте IP-адрес, маску подсети и шлюз:
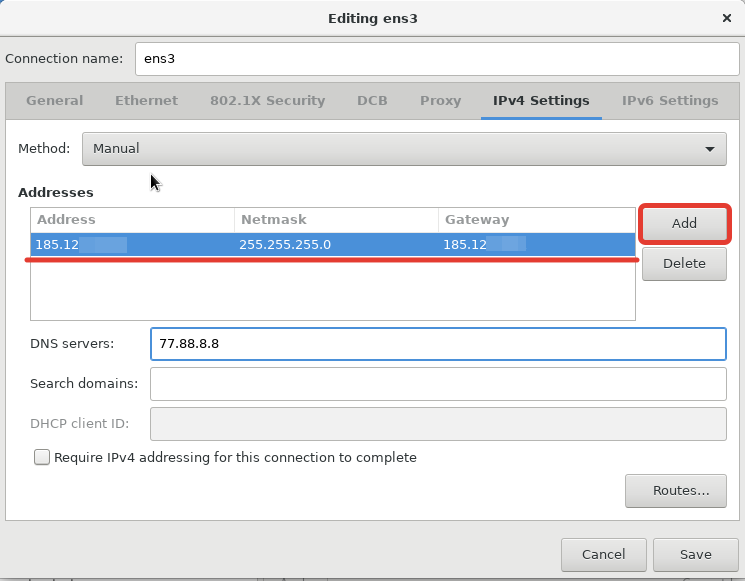
Для ввода конкретного IP, нужно выбрать метод “Manual” и нажать кнопку “Add”, после чего у вас появится возможность ввести нужные данные. Сохранив все, мы вернемся к начальному окну настроек сети
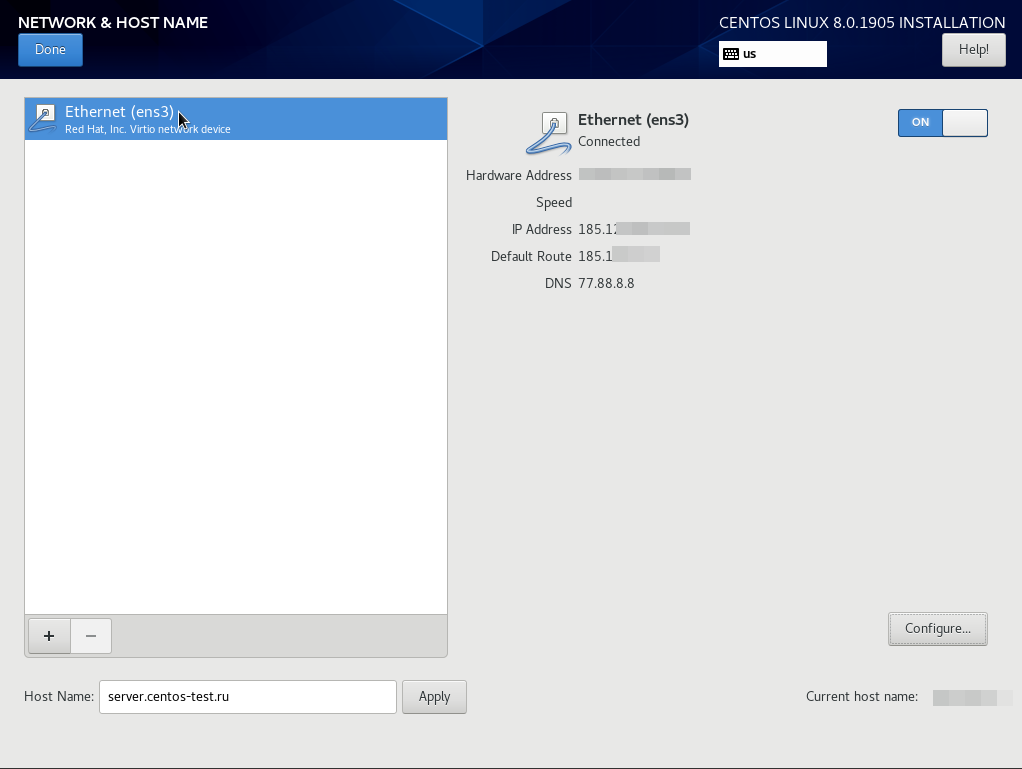
Как можно увидеть на скриншоте, IP адрес добавился и сетевой интерфейс уже поднят (состояние Connected).
Следующим шагом мы перейдем к разбивке диска:
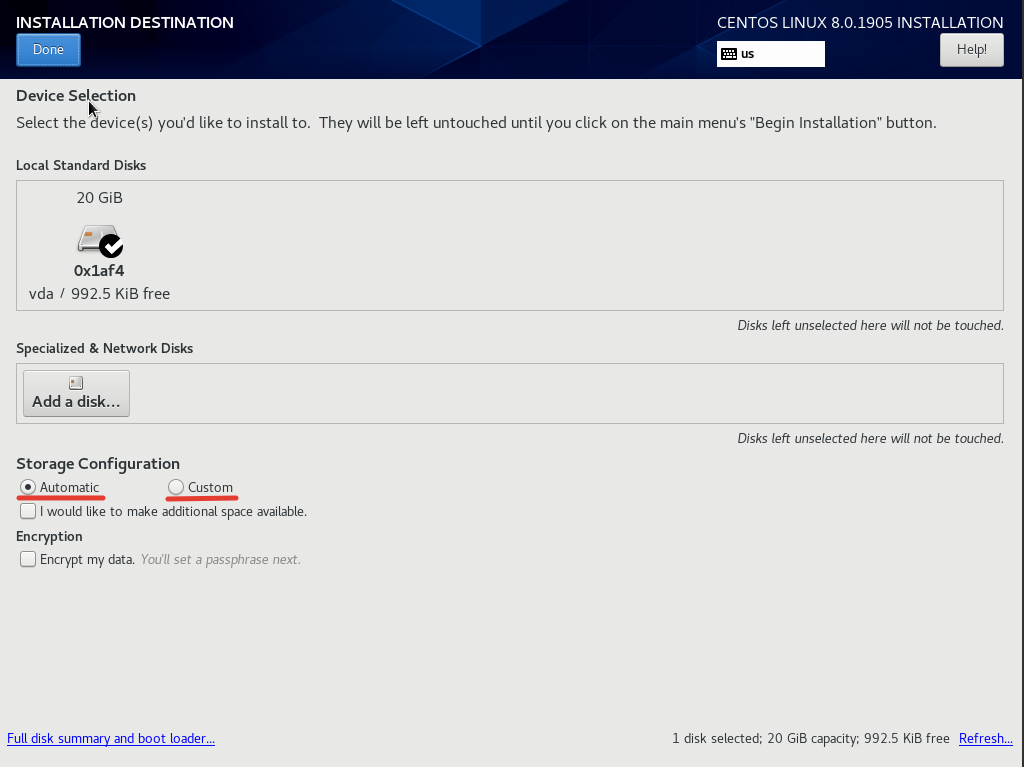
Для примера установки я воспользовался автоматической разбивкой от разработчиков CentOS. Если вы хотите разбить диск по-своему, нужно выбрать пункт “Custom”.
Так как на моей виртуальной машине, ранее была установлена ОС, система установки увидела это. Я удалил разделы предыдущей операционной системы в последующих открывающихся меню:
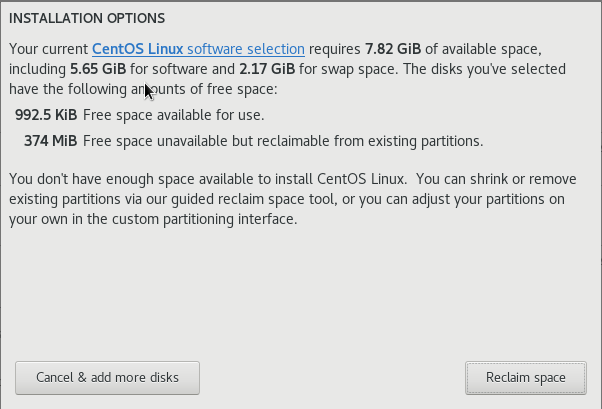
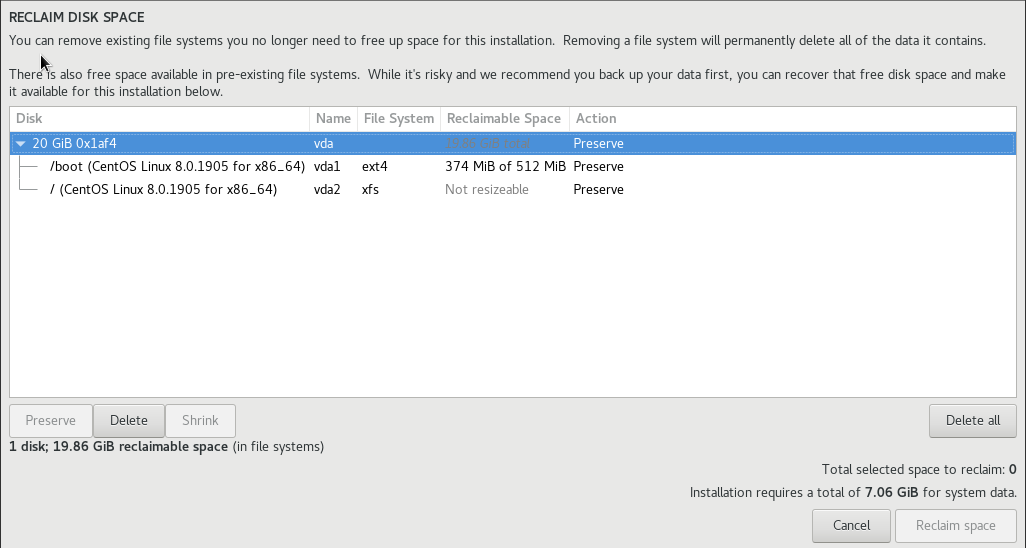
Удалить разделы можно кнопкой “Delete all”, после чего потребуется нажать кнопку “Reclaim space”, чтобы размер дискового пространства стал актуальным.
Список пакетов для установки выбирается в пункте Software Selection. Если вы планируете использовать CentOS 8 в качестве сервера, достаточно выбрать Minimal Install, а из добавлений Standard и Guest Agents (если вы ставите гостевую ОС в виртуальной машине).
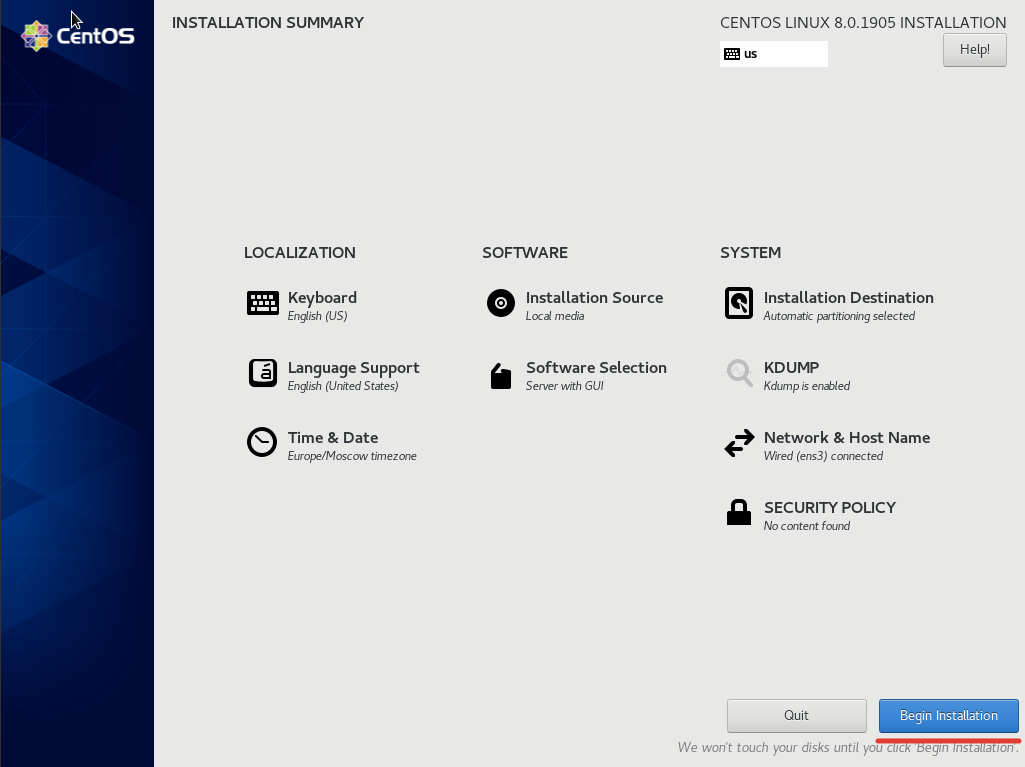
После вышеописанных действий, можно запускать установку кнопкой “Begin Installation”
В процессе уже самой распаковки и установки необходимых компонентов, вам потребуется указать пароль для root-пользователя и можно создать дополнительного пользователя, но это не обязательный пункт.
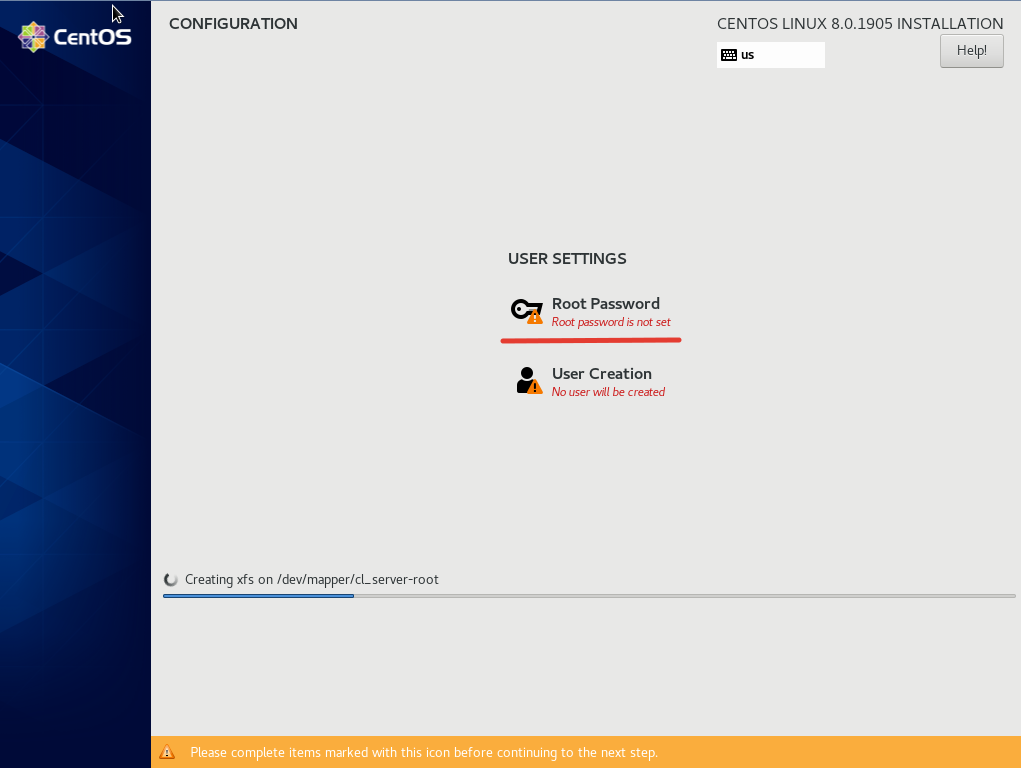
Нажмите на кнопку “Root Password”, введите и повторите пароль и нажмите “Done”, чтобы вернуться к установке:
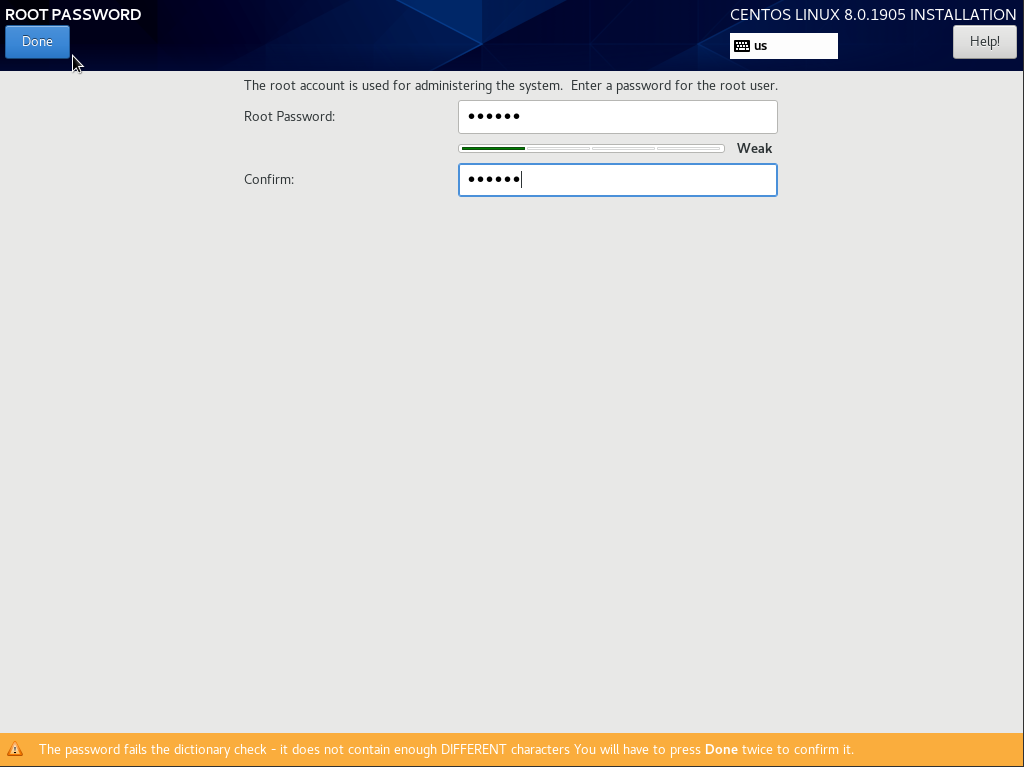
Изначально я задаю простой пароль, чтобы в случае проблем с сетью, я мог легко его ввести в VNC-консоли и исправить проблемы. После того, как система будет установлена, пароль рекомендуется изменить на более сложный. Установка CentOS 8 у меня заняла порядка 5-7 минут и когда в окне установки загорится кнопка “Reboot”, это означает, что все было установлено и нужно перезапустить сервер.
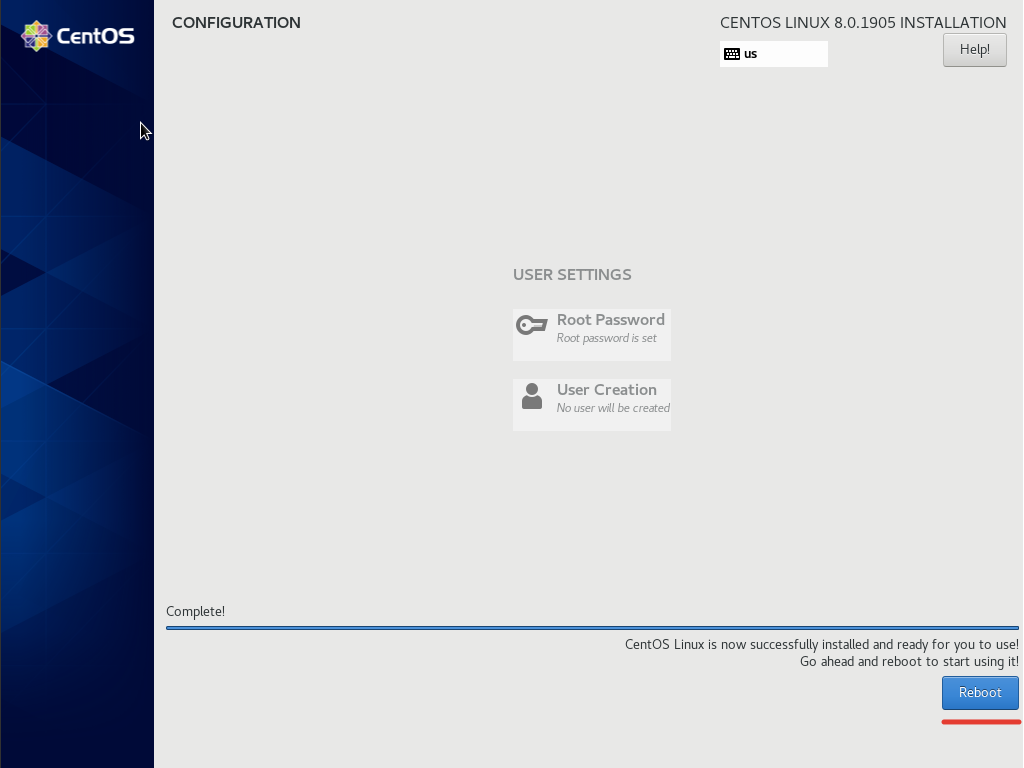
На этом установка CentOS 8 завершена.
Базовая настройка CentOS 8 после установки
Базовая настройка CentOS 8 практически не отличается от настройки CentOS, я делаю базовые настройки одинаковые на всех серверах.
CentOS 8: Установка обновлений и инструментов администратора
Как уже отмечалось ранее, в CentOS 8 на замену yum, пришел dnf.
Dnf – это следующее поколение приложения YUM, менеджер пакетов для дистрибутивов Linux на основе RPM-пакетов. Ранее dnf использовался в дистрибутивах Fedora, а теперь и в CentOS 8.
Первое действие, которое я выполняю на вновь установленном сервере, это обновление системы:
dnf update -y
Если образ свежий, то скорее всего у вас не будет пакетов для обновлений как в моем случае:
[root@centos var]# dnf update
Last metadata expiration check: 0:21:47 ago on Wed 09 Oct 2019 02:36:45 PM +06.
Dependencies resolved.
Nothing to do.
Complete!
Если у вас обнаружатся обновления, обязательно их установите.
Следующим шагом, подключим репозиторий EPEL и установим необходимые утилиты для удобного администарирования сервера:
dnf install epel-release -y
dnf install mc wget screen nano net-tools bind-utils curl lsof vim -y
Мне для комфортного администрирования хватает этого набора утилит, вы можете установить свои привычные утилиты.
Автоматическое обновление системы я не включаю, так как всегда устанавливаю необходимые обновления вручную. Если вы хотите настроить автоматическое обновление, установите пакет dnf-automatic:
dnf install -y dnf-automatic
Чтобы проверить активные задания на обновления системы введите:
systemctl list-timers *dnf-*
Отключение SELinux
На начальном этапе я всегда отключаю SELinux (для применения изменения нужно перезагрузить сервер):
nano /etc/sysconfig/selinux
reboot
Отключение SELinux налету, можно выполнить командой:
setenforce 0
Настройка сети в CentOS 8
Так как сеть я настроил на этапе установки системы, настройка ее в данный момент не требуется (подробная статья по настройке сети в CentOS). Хочу лишь сказать, что в CentOS 8, сеть управляется только через Network Manager и утилиту nmcl. Network-scripts по умолчанию не поддерживаются. Если честно, в своей работе я всегда отключал NM и не использовал, для меня это не удобный инструмент, теперь придется разбираться и с ним.
Проверка статуса сети:
[root@server ~]# systemctl status NetworkManager
● NetworkManager.service - Network Manager
Loaded: loaded (/usr/lib/systemd/system/NetworkManager.service; enabled; vendor preset: enabled)
Active: active (running) since Mon 2019-10-07 08:23:11 MSK; 3h 37min ago
Docs: man:NetworkManager(8)
Main PID: 870 (NetworkManager)
Tasks: 3 (limit: 5060)
Memory: 4.7M
CGroup: /system.slice/NetworkManager.service
└─870 /usr/sbin/NetworkManager --no-daemon
Установка и смена hostname
Если вы не задали корректный hostname сервера при установке или просто хотите изменить, это можно выполнить несколькими способами. Измените его в файле /etc/hostname или поменяйте с помощью команды:
hostnamectl set-hostname нужный_хостнейм
Настройка firewalld в CentOS 8
Добавим в доверенные зоны на firewalld, нужные для начальной работы сервисы (SSH и HTTP/HTTPS):
firewall-cmd –-add-service=ssh
firewall-cmd --permanent –-add-service=http
firewall-cmd --permanent –-add-service=https
Настройка времени и часового пояса (time-zone)
Чтобы посмотреть текущее время и time-zone, нужно ввести команду date:
[root@centos var]# date
Wed Oct 9 13:03:00 MSK 2019
Мы указали time-zone при установке самой системы, поэтому у нас время по Москве. Чтобы поменять time-zone, нужно воспользоваться соответствующей командой:
timedatectl set-timezone Europe/Moscow
Где вместо Europe/Moscow вы можете указать свой вариант, например:
[root@server network-scripts]# date
Mon Oct 7 12:46:09 MSK 2019
[root@server network-scripts]# timedatectl set-timezone Asia/Almaty
[root@server network-scripts]# date
Mon Oct 7 15:46:22 +06 2019
Для синхронизации времени используется chronyd, мы включим его и добавим в автозагрузку через systemctl:
systemctl start chronyd
systemctl enable chronyd
[root@server network-scripts]# systemctl status chronyd
● chronyd.service - NTP client/server
Loaded: loaded (/usr/lib/systemd/system/chronyd.service; enabled; vendor preset: enabled)
Active: active (running) since Mon 2019-10-07 16:13:48 +06; 9s ago
Docs: man:chronyd(8)
man:chrony.conf(5)
Main PID: 31700 (chronyd)
Tasks: 1 (limit: 5060)
Memory: 1.1M
CGroup: /system.slice/chronyd.service
└─31700 /usr/sbin/chronyd
Настройка истории команда в bash_history
Для удобного просмотра истории, я всегда добавляю пару строк в .bashrc, чтобы в последствии можно было легко ориентироваться в отчетах.
При настройке по умолчанию, вывод history выглядит следующим образом:
[root@centos ~]# history
1 dnf repolist
2 dnf install epel-release
То есть мы видим, что выполнялось на сервере, но не видим время и точную дату, для меня это критично, так как доступ к серверам могут иметь несколько специалистов. Поэтому приведем history к приятному виду:
Откроем файл /root/.bashrc и добавим в него нужные строки:
nano /root/.bashrc
export HISTSIZE=10000
export HISTTIMEFORMAT="%h/%d/%y - %H:%M:%S "
Теперь при проверке history, мы видим точное время выполнения той или иной команды:
[root@centos ~]# history
1 Oct/07/19 - 16:16:29 dnf repolist
2 Oct/07/19 - 16:16:29 dnf install epel-release
Cockpit: Веб-интерфейс управления сервером в CentOS 8
Как мы уже упоминали, в CentOS 8 предустановлен веб-интерфейс управления сервером cockpit. Он также управляется через systemctl. Вы можете запустить его и добавить в автозгрузку:
# systemctl enable cockpit.socket
# systemctl start cockpit.socket
По–умолчанию веб сервер Cockpit слушает на порту 9090. Добавьте этот порт в разрешенные:
# firewall-cmd --get-active-zones
# firewall-cmd --add-port=9090/tcp --zone=MY_ACTIVE_ZONE --permanent
# firewall-cmd --reload
Для доступа к веб-интерфейсу Cockpit, откройте в браузере URL адрес https://your-CentOS8-IP:9090 и авторизуйтесь.
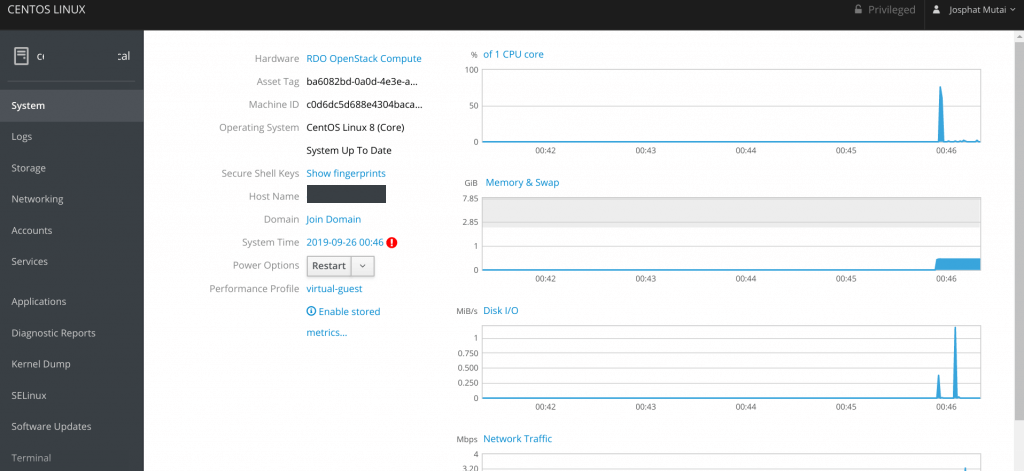
С помощью веб-интерфейса Cockpit вы можете смотреть загрузку своего сервера, управлять сетями и хранилищами, контейнерами, смотреть логи.
На этом моя типовая настройка CentOS сервера закончена, далее я выполняю настройки согласно технического задания по различным проектам и обычно они отличаются.
Join TipsMake.com to find a simple way to manually install CentOS on Windows 10 Subsystem for Linux and run commands in RHEL’s YUM or RPM repository.
Join TipsMake.com to find a simple way to manually install CentOS on Windows 10 Subsystem for Linux and run commands in RHEL’s YUM or RPM repository.
Windows Subsystem for Linux is an advanced feature for Windows users. Windows Subsystem for Linux allows you to practice and learn Linux operating system commands directly on Windows 10 systems without using virtual machine software like VirtualBox.
Windows Subsystem for Linux, also short for WSL, is deployed by Microsoft in Windows 10 and Windows Server 2019 operating systems, to provide compatibility and execution of Linux binary files.
In order to install the Linux Distro image in general, users must depend on Microsoft Store, where there are a number of compact images that are pre-compiled. Currently, the Linux WSL image is available as Ubuntu, Kali Linux, Debian, AlpinLinux, OpenSUSE and SUSE Enterprise Server. Therefore, if you want to try out some Linux operating systems such as CentOS / RHEL (Red Hat Enterprise Linux) and Arch Linux, install them on Windows 10 Subsystem for Linux yourself. Today’s article will show you how to do it.
Note : Before installing CentOS on WSL, you must activate Windows Subsystem for Linux. If you don’t know how to do that, read the article: Running Linux on Windows 10 does not require a virtual machine, here are 18 things you should know for more details.
How to install CentOS on Windows 10 Subsystem for Linux
Step 1: Download CentOS WSL
The first thing to have is a CentOS on WSL (Windows 10 FCU or above), based on WSldl. Basically, it’s a zip file containing rootfs and some other files. CentOS as WSL Instance is an open source project available on Github, so download it here.
The latest version at the time of writing is CentOS 7.6.

Step 2: Unzip the WOS CentOS 7.x folder
The size of the downloaded folder will be about 300MB and after downloading, right-click to unzip this folder. Here, the article is using WinRAR to extract files. However, you can use the default Windows program or any other option to extract it.

Step 3: Run CentOS.exe to install CentOS on Windows 10 Subsystem for Linux
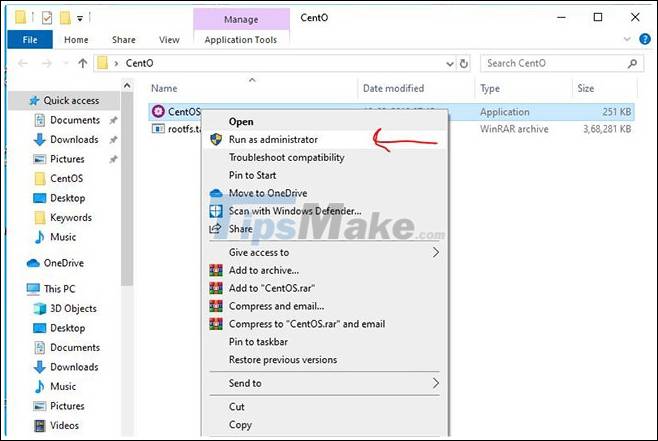
After extracting the directory, you will see two files in it: The first file is rootfs.tar.gz and the second file is CentOS.exe. You need to run CentOS.exe to extract the files and register them on WSL. Right-click on the file and select Run as administrator .
Step 4: Complete the installation
After the installation is complete, you will receive a message on the CentOS command screen. Now, press the Enter key to exit the setup.

Step 5: Run CentOS 7 on WSL
To run CentOS 7, again go to the unpacked folder of CentOS for WSL and this time, you will see 4 files. Again, right-click Centos.exe and select Run as administrator .

Finally, the Linux subsystem installed manually for CentOS has appeared here.

Step 6: CentOS update command on WSL
You can run any command you want to execute on CentOS, just to see if it works well. Example running CentOS update command with YUM.
yum -y update 
Step 7: Uninstall CentOS 7 WSL
If in the future you accidentally delete the CentOS WSL folder and want to reinstall, first, delete the existing settings first.
To uninstall CentOS 7 WSL, just use the menu command below:
CentOS.exe clean Then again extract the files from the compressed folder of CentOS that you downloaded above and then run Windows 10 PowerShell with admin rights, navigate to the unzipped folder and run the command below:
./CentOS.exe clean

To reinstall, run the executable file CentOS.exe in the same extracted folder to register the files to Windows 10 Subsystem for Linux.
Hope you are succesful.
5 stars4 stars3 stars2 stars1 star4 ★ | 656 Vote
A brief introduction about CentOS
CentOS is a Community-based Enterprise Operating System, with a free support platform which uses the source code of Red Hat Enterprises Linux (RHEL) distribution. The advantage of using CentOS is that it is completely free to install on any 64-bit x86 system. Most of the Web Hosting companies are using this free community enterprise edition on their servers. Each version of CentOS comes with a 10-year supported life cycle, more than any other OS in the market.
Nowadays, installing Linux operating systems is not big rocket science. As most distros come with very user-friendly wizard designs. Each installation window that appears on the screen can be used in a single mouse click. However, the only portion stuck by the newbie is on creating the disk partitions. For example, the calculation methods used for each partition, (boot,swap,/home,/var,/,etc). This guide is prepared only for beginners or the first time CentOS installer.
In this article, we will see the step by step (using screenshot) installation on CentOS-8, which will help you to understand very easily. The new version of CentOS -8 brought several changes and additions. Those major changes will be, looked into in the upcoming articles.
Prerequisites :
HDD minimum : 20 GB
RAM minimum : 2 GB (Recommended 4 GB)
System Type : 64-bit x86 System
Installation kit : Bootable DVD/USB/.iso
Note:
For the demonstration, I will be using a virtual environment (VMware Workstation 15.5.2). This guide assumes that you have your own virtual or standard machine that is ready to install the CentOS-8.
Step-1: Download the latest CentOS-8
From the following link, you can directly download the iso file from centos official site
Download CentOS 8 ISO file https://www.centos.org/download/
Step-2: Bootable DVD/USB
Note:
To install OS on standard servers, we need either a bootable DVD/USB. To install the OS in a virtual environment, then use the .iso file. In our case, we are going with a virtual environment. For any difficulties creating a bootable USB, here is a step-by-step guide on how to create a bootable USB.
Step-3: Let’s start the CentOS-8 Installation
Note:
The following screen will appear when you boot the system with either «.iso or bootable media» kit for CentOS 8 for the first time. Choose either «Install CentOS Linux 8» OR «Test this media & Install CentOS Linux 8 «and hit the enter key to proceed. If you are using the CentOS 8 media kit for the first time, then I would recommend going with the 2nd option.

Step-4: Language selection screen
Note:
On this screen you can choose your preferred language, in our case we will go with English United States and click on Continue.

Step-5: Configure Installation summary
Note:
We need to configure the respective options to customize the installation based on our requirements on the following screen:

- System (Installation Destination)
- Software Selection
- Kdump
- Date & Time
- Network & Host Name
- Security Policy
Note:
As you can see, a few options are on the above screen filled/picked by default. The rest of the above-listed options are manually configured based on our requirements. Here I am going to start with customizing the partition (Installation Destination).

Note:
On the above screen, you can see a 20GB virtual disk is available to install CentOS 8. Here, we have two options (Automatic and Custom) to configure the disk partition. The Automatic option will create all the partitions by the system itself. To configure the partition manually, we need to select the «custom option». In our case, I will go with the custom partition based on my requirements. Click on Done to proceed.

Note:
In the above screen, we have the choice of selecting three different mount partition schemes, which are Standard, LVM, and LVM Thin Provisioning. By default, LVM is selected, to change the scheme, click the drop-down list then select the option based on your requirement. Here, I choose the standard partition option.

Note:
Disk partitioning is a very important task for every Linux admin. As we need to be very calculative about our requirement of using the server and configure the partition accordingly. As we know, most of the newbies or experienced Windows users who migrated to Linux, use the wrong practice of choosing the partition scheme. They generally configure only tree partitions (/boot,/, swap) maybe this combination is good with a home or a desktop machine. However, on the production servers, it is not recommended as it will affect the performance and other related issues. Hence, it is recommended to go with the following partition scheme.
- /boot – 1 GB with ext4 filesystem
- / – 8 GB with xfs filesystem
- /home — 7 GB with xfs filesystem
- /var — 2 GB with xfs filesystem
- Swap – 2 GB with swap filesystem
Note:
Here, I go with 1GB size of (boot) partition. You can enter the desired size based on your requirement, mostly 1 or 2 GB is fair enough for the boot partition. Then click «Add mount points» to continue.

Note:
Next, create the «/ » (parent) partition which is called «root» partition. Here, I am going to use an 8GB size for this partition. Then click «Add mount points» to continue.

Note:
Similarly, we can use the same method to create remaining partitions (/home, /var, and Swap).


Note:
Once you have completed the disk partition, click «Done» to proceed, as shown below:

Note:
In this screen, we are going to click on “Accept Changes“ to fulfill the summary changes that the changes made in the disk, it will write all the partitions.

Note:
Next, click “Software Selection“. Here you have a choice of 6 different options to install your server. In our case, I am going with the “Server with GUI” option and if you need only the minimal installation, then select “Minimal Install“. Once you have selected it, click «Done» to move to the next step.

Note:
The next Kdump option is enabled by default if you want to disable it, just click the option and remove the tick mark, but it is recommended to always enable it, as it will help to debug in case of any crashes at the kernel level. To learn more about the kdump, click here.

Note:
To configure “Network & Host Name” during the installation time, just click the respective option and enable the Ethernet connection «On» and it will assign the IP address automatically (DHCP) and you add the hostname as well. Click «Done» to proceed as shown below:

Note:
If you wish to change the Date and Time settings based on your zone, click the respective icon and just select the region and city from the map as shown below:

Step-6: Click «Begin Installation»
Note:
Once, we have customized all the respective options based on our requirement, then hit the “Begin Installation” tab from the Installation Summary screen to start the installation process as shown below:

Note:
During the installation process, it will ask you to set the root password and the option to create a normal user.

Note:
First set the root password as shown below

Note:
Second, create a local user as shown below

Note:
On the following screen, you will see the installation process is going on, once it is completed, you will be notified to reboot the system.

Step-7: System Reboot
Note:
Once the installation is finished, it will prompt you to reboot the system. Click on Reboot.

Note:
After the reboot, remove the installation media kit and set the boot option from the disk.
Step-8: Fresh CentOS 8 box and Accept License
Note:
Select the first option from the grub to boot CentOS 8 as shown below

Note:
Activate the License information on CentOS 8


Note:
Finally, click the “Finish Configuration” to complete the initial phase of the CentOS 8 installation.

Step-9: Login Screen
Note:
Once we have completed the initial setup, you will be redirected to the following Login Screen: Here, enter the password you assigned to the particular user that is displayed on your screen.

Note:
On the Welcome Screen, you have the option to choose the language for your OS. Here, I go with the English United States and click Next

Note:
On the following screen, you can select your keyboard layout, I go with the default option and click Next


Finally, click on:
Start Using CentOS Linux

Conclusion
That’s the end of the CentOS 8 installation part! Thank you for taking the time to read! I hope this article will help you to understand the CentOS 8 Installation. Drop me your feedback/comments. If you like this article, kindly share it and it may help others as well.
Thank you!
To find all the CentOS 7 articles, click here
Support My Work
Thank you for your support and for being a part of my journey, I would be very grateful if you could consider buying me a coffee. The contributions you make will help me to continue to produce quality content and enhance my readers’ experience.