
FAQ
How to update BIOS in Windows
Applicable Products: Notebook, Desktop, All-in-One PC, Gaming Handheld, MiniPC
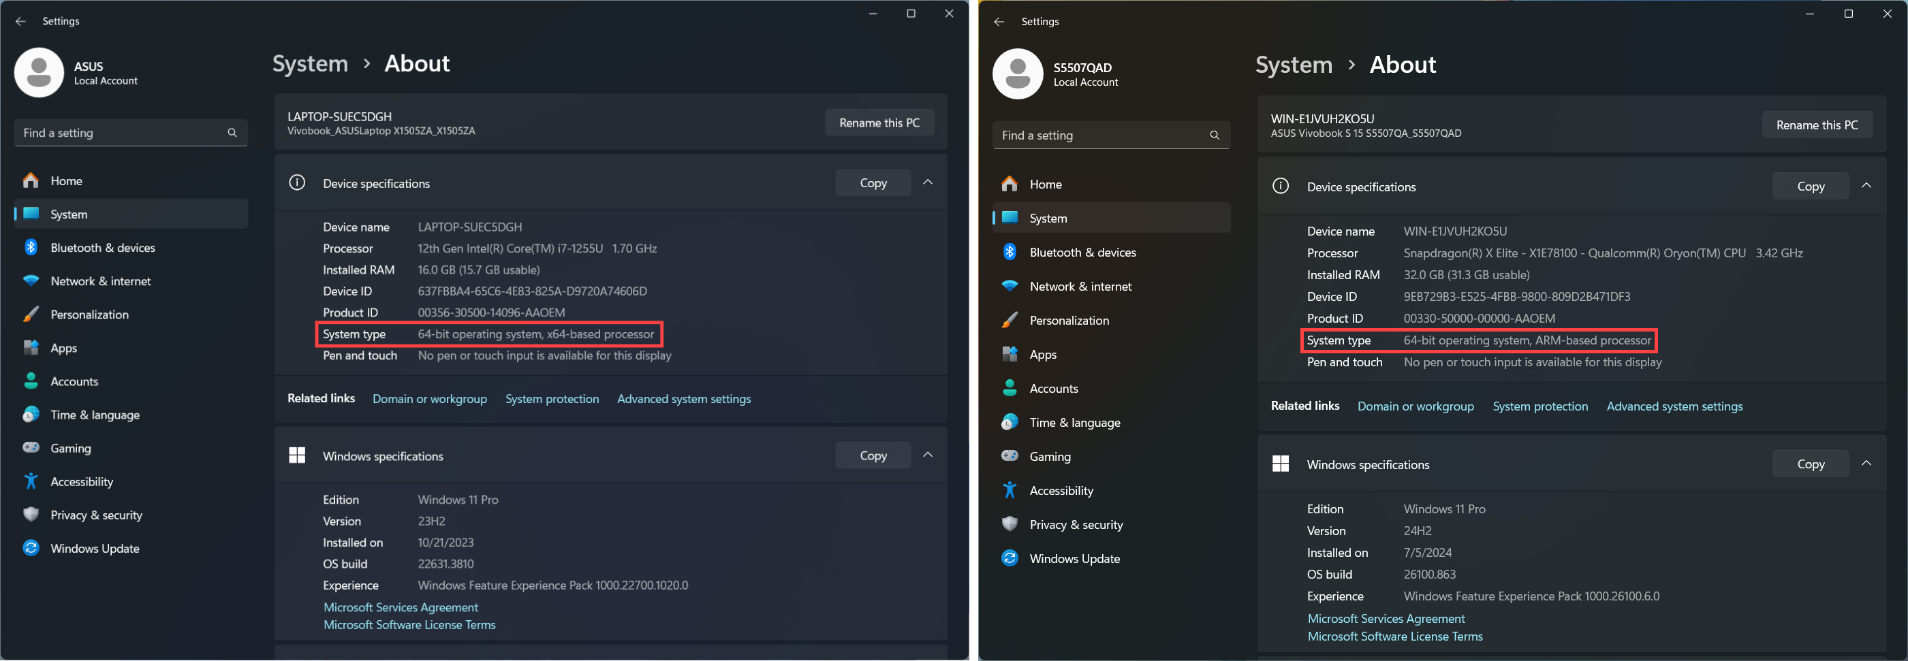
Note: The following update method is exclusively applicable to devices with x86/x64 architecture. For devices with ARM architecture (such as the Qualcomm® CPU platform), please Click Here to learn How to update the BIOS for ARM-based devices.
Note: How to determine the architecture of your device
Navigate to Windows Settings > System > About. Here, you can view the architecture of your device under System type. (The image on the left shows an x64 architecture; the image on the right shows an ARM architecture.)
There are two operating environments to update BIOS:
- Update BIOS in Windows
- Update BIOS in BIOS Utility (by using EZ Flash tool)
Since it is a little complicated to enter BIOS Utility for updating BIOS, this article will only introduce how to update BIOS in Windows.
To provide you more detailed instruction, you can also click ASUS YouTube video link below to know more about How to Update BIOS in Windows.
You can download and update the BIOS from MyASUS or the official ASUS website. Please refer to the following steps for each method:
Note: If you encounter any issues during the BIOS update process, please contact ASUS service center.
Method 1: Update BIOS via MyASUS
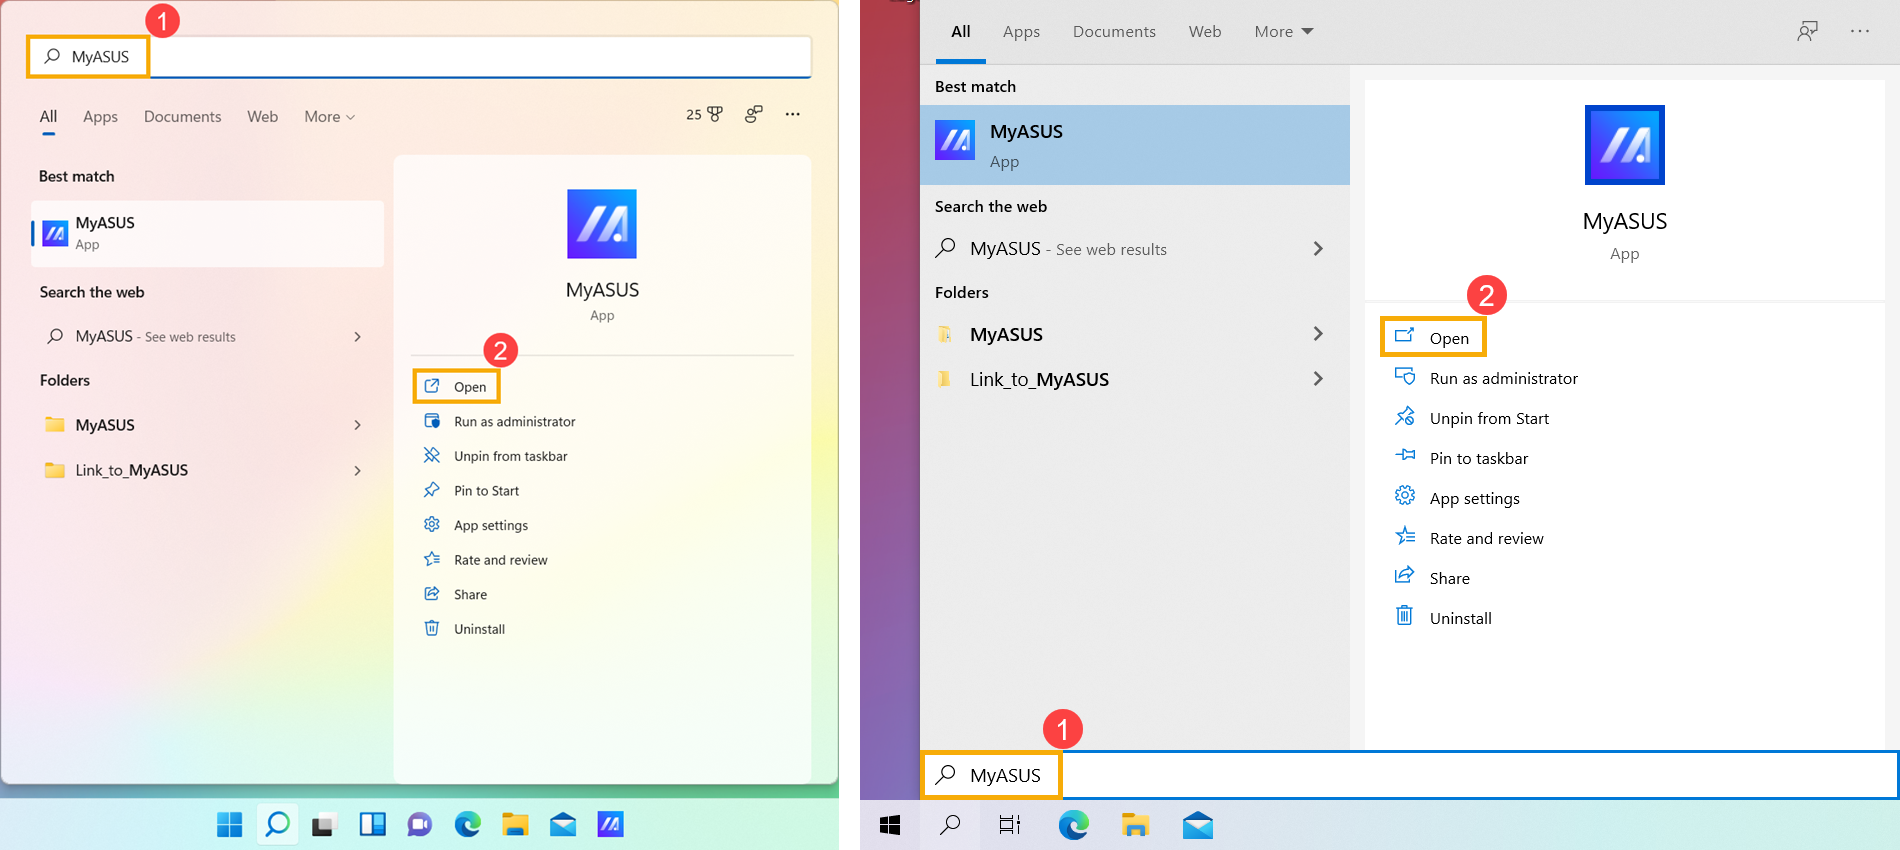
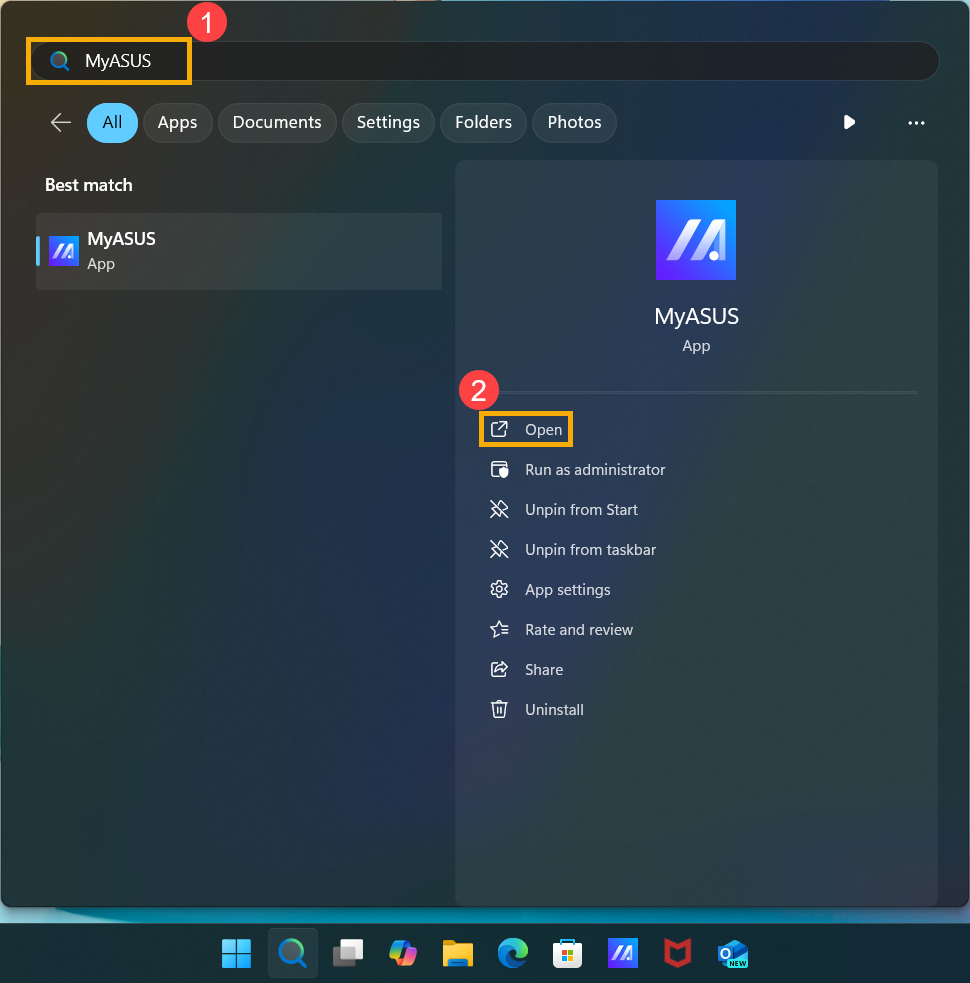
- Type and search [MyASUS] in the Windows search bar①, then click [Open]②. (The left-side search illustration below is in Windows 11, and the right-side is Windows 10.)
Note: If there is no result searched, it means your device may not install it, and please refer to How to install MyASUS.
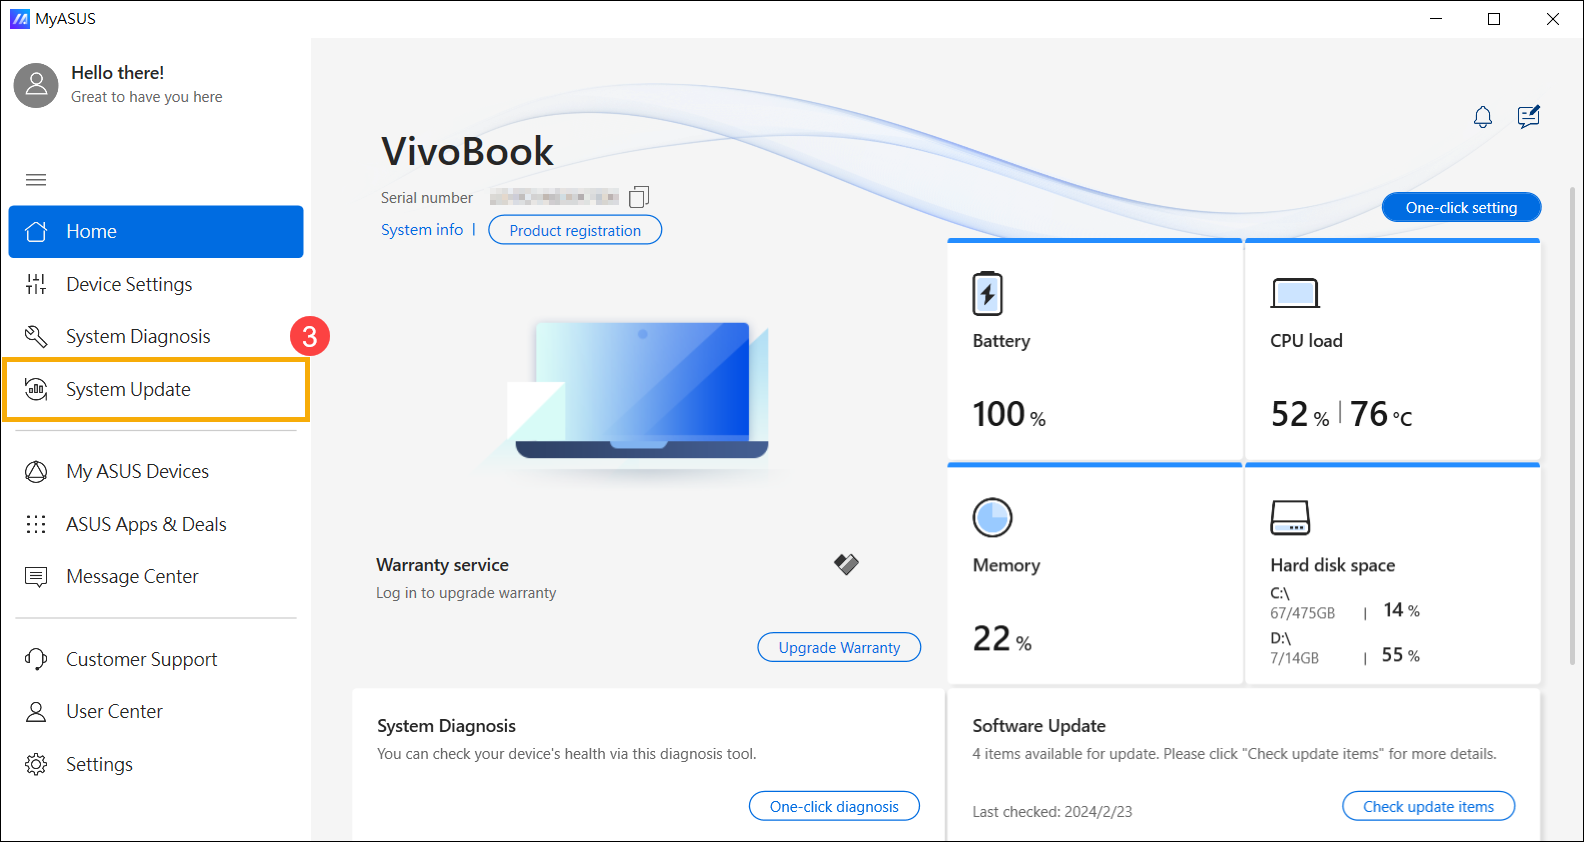
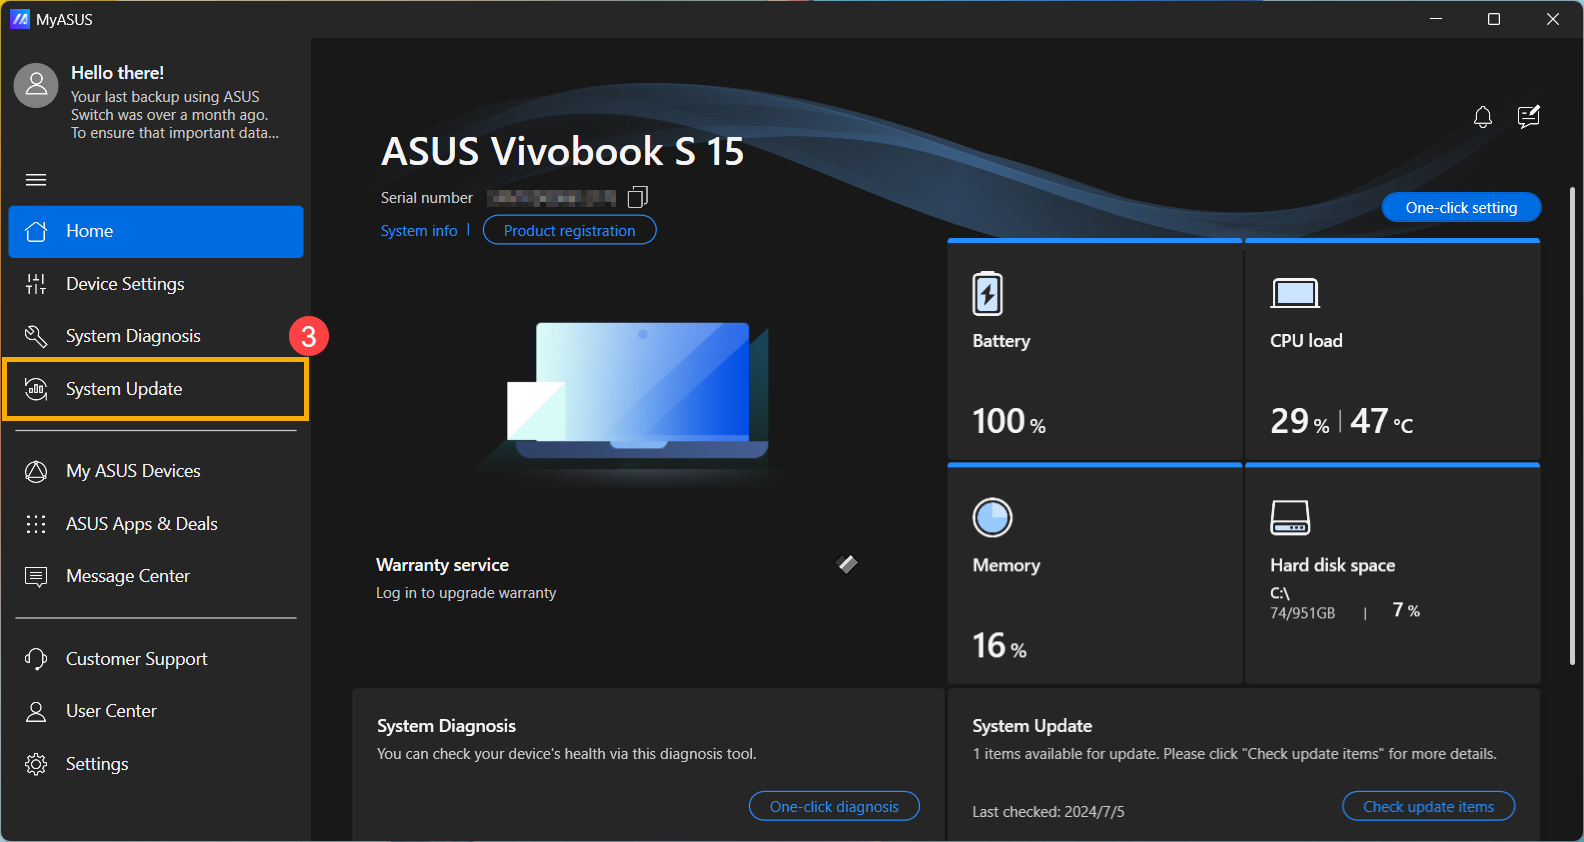
- In the MyASUS window, click [System Update]③.
Note: If your device does not display the System Update tab, it means your device does not support this feature. You can use Method 2: Download and update BIOS via the ASUS support site. Learn more about Why can I only see the partial features in the MyASUS app.
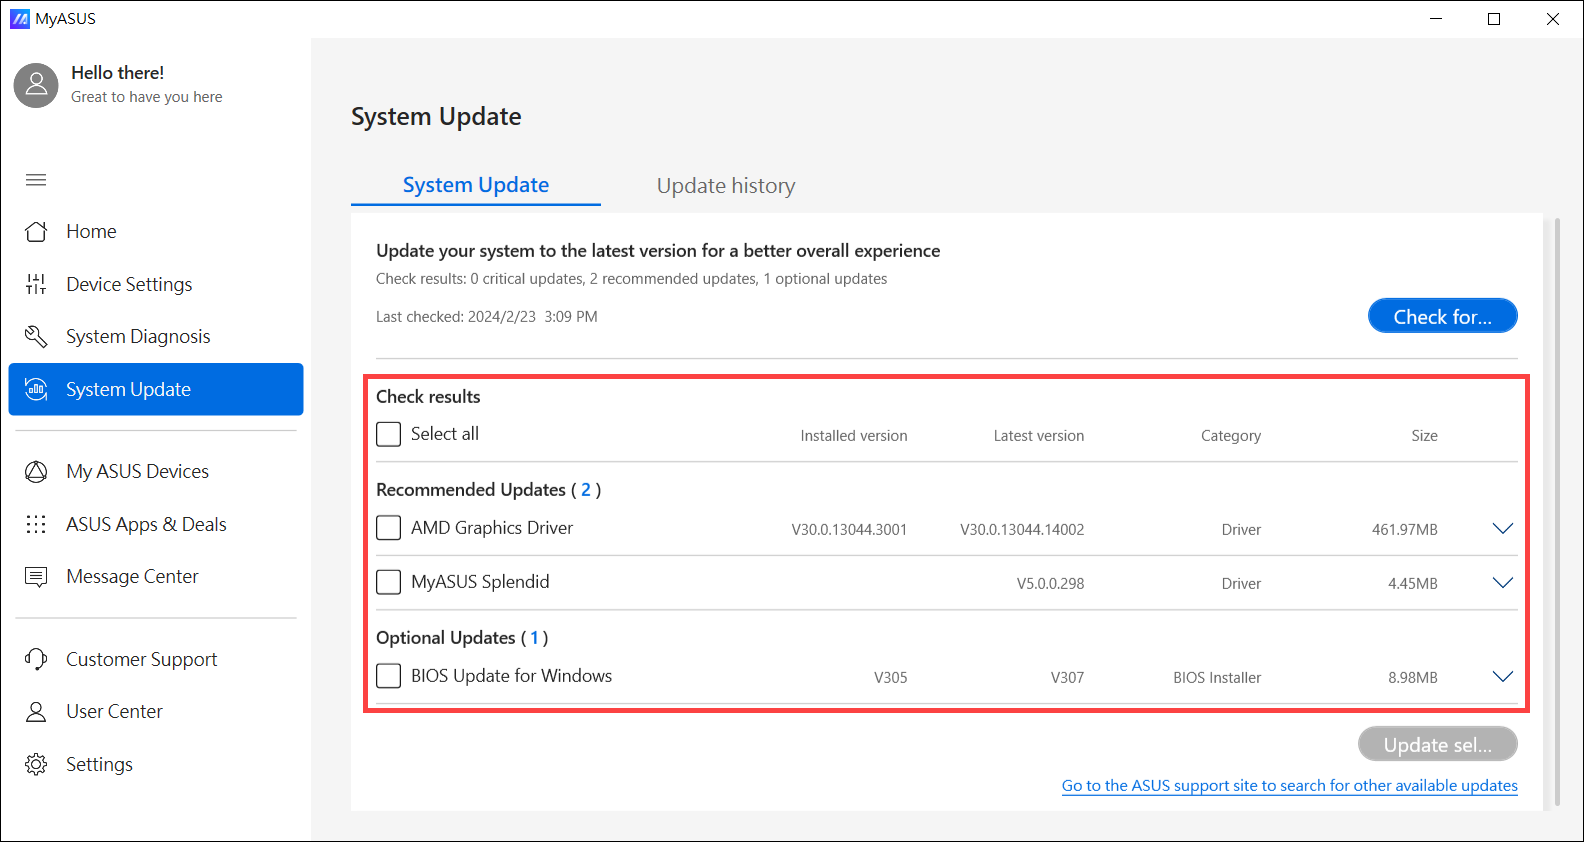
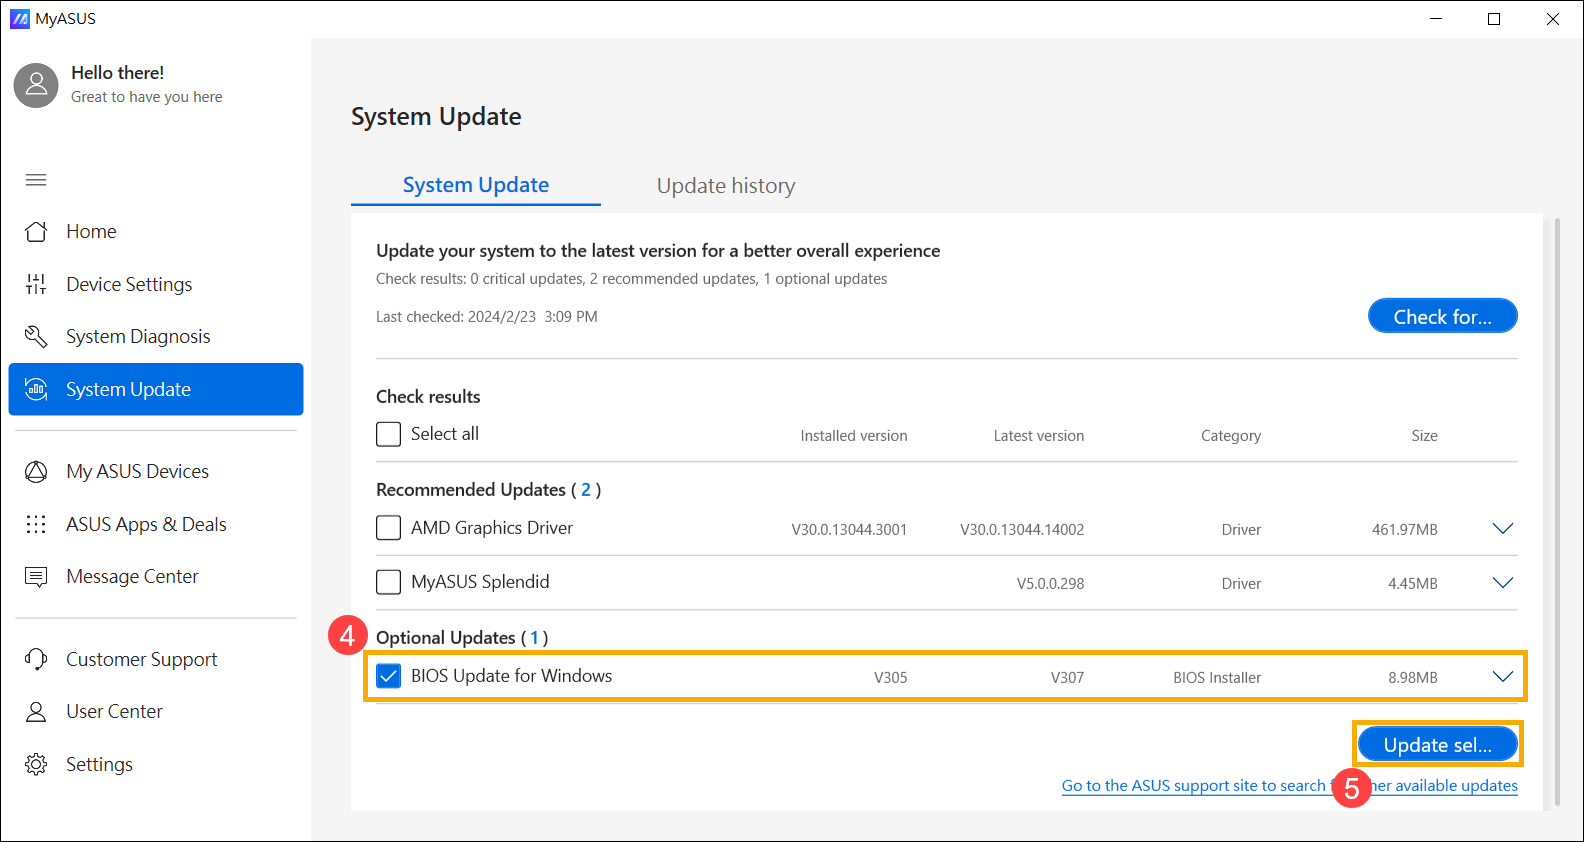
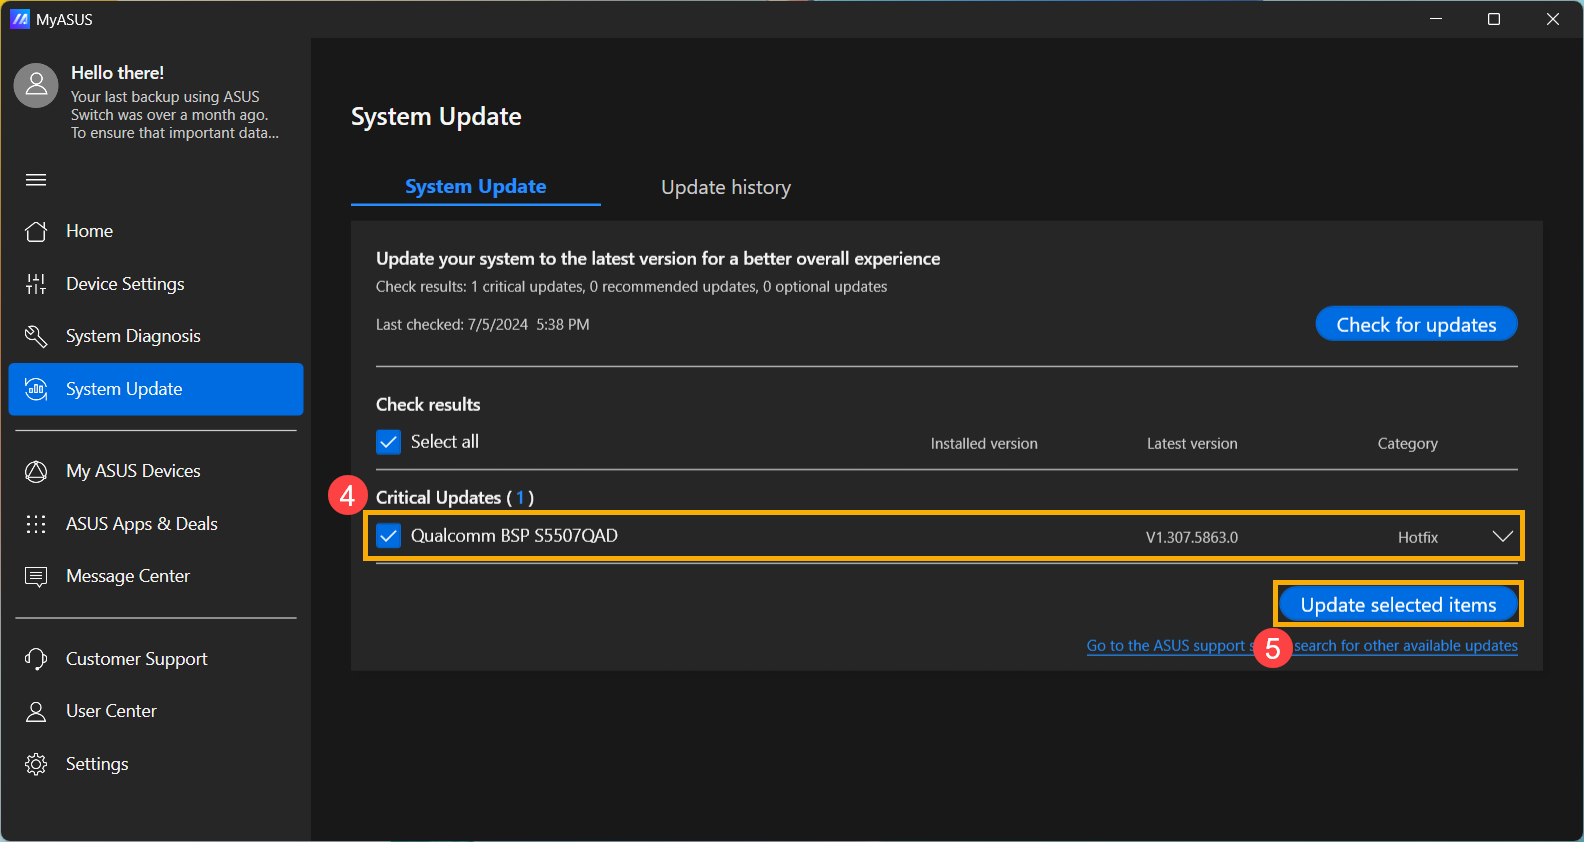
- When entering the System Update page, MyASUS will automatically check and list the items that need updating for your system.
Note: If no update items are displayed on this page, it means your system is already up to date.
- Select [BIOS Update for Windows or BIOS Installer for Windows]④, then click [Update Selected Items]⑤.
Note: If you do not see 「BIOS Update for Windows」 or 「BIOS Installer for Windows」, since some models may not support updating BIOS in Windows, please refer to How to use EZ Flash to update BIOS.
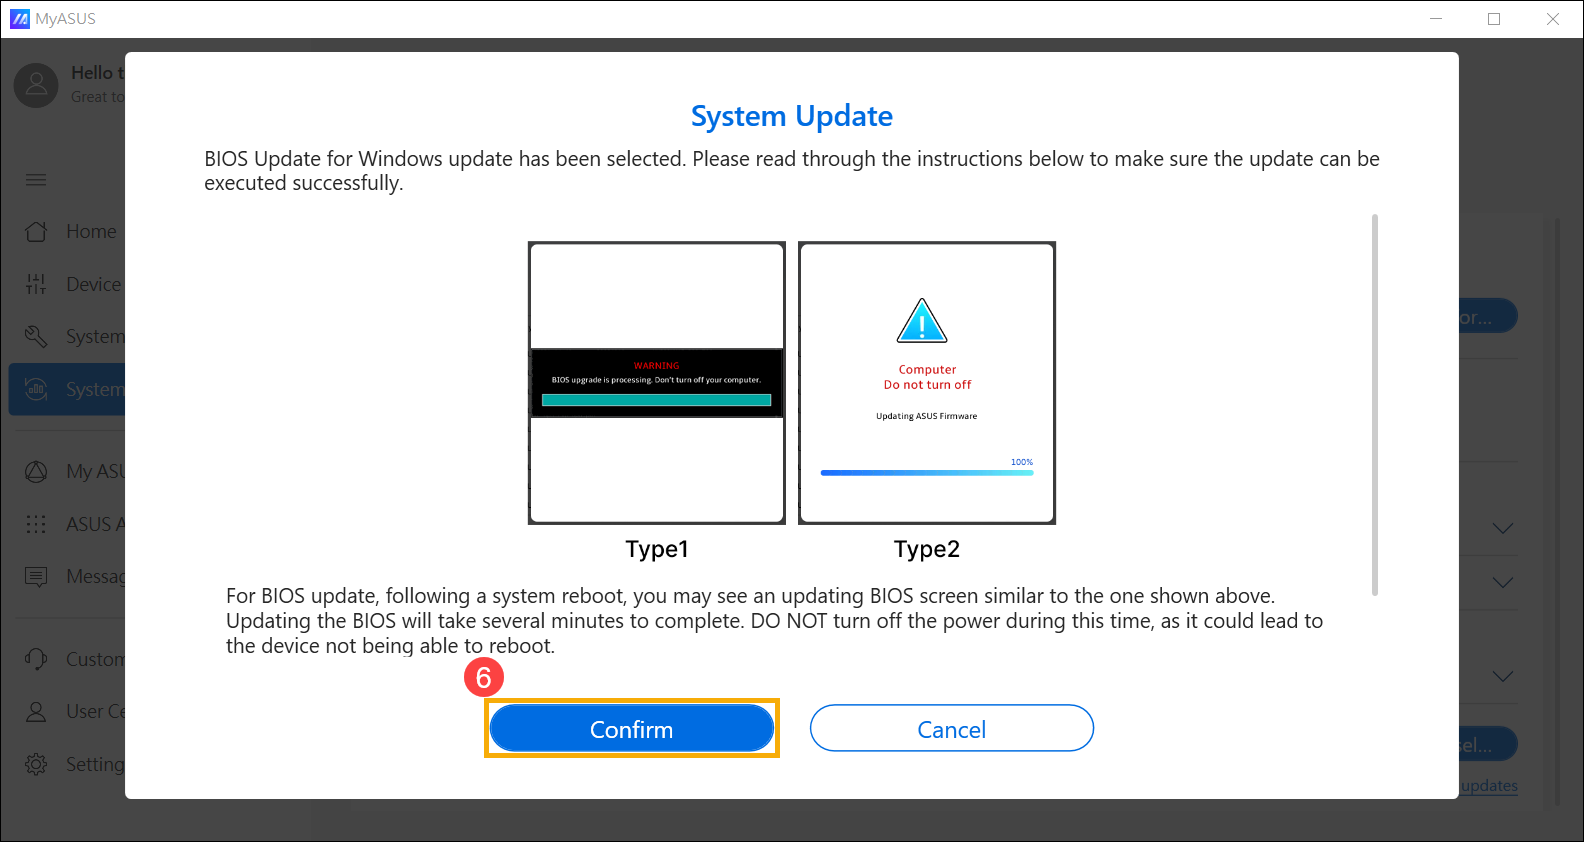
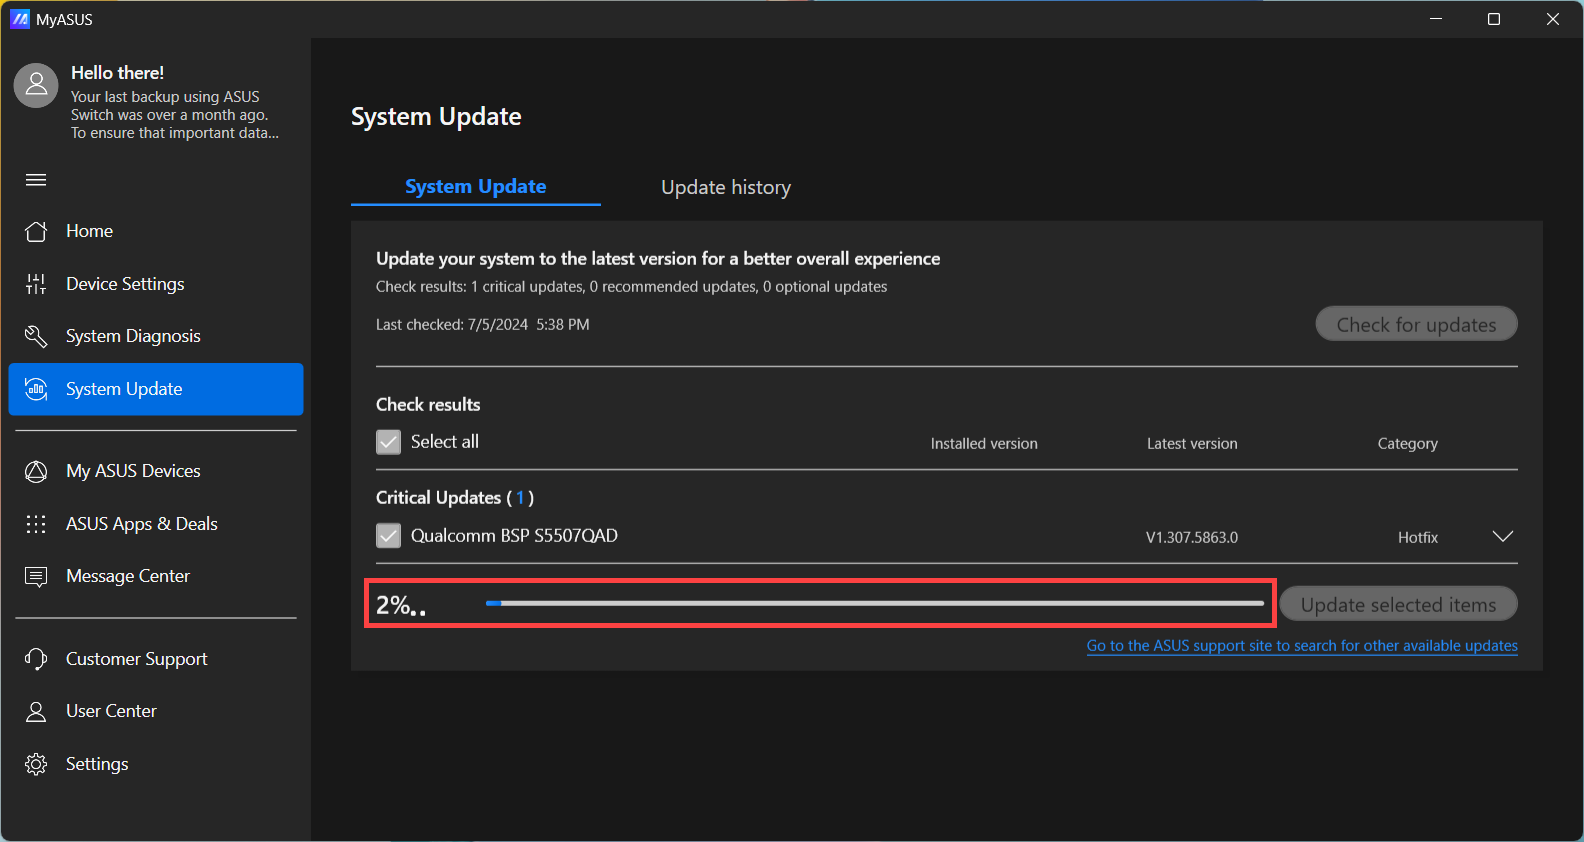
- Review the BIOS update details, then click [Confirm]⑥ to start downloading the BIOS file.
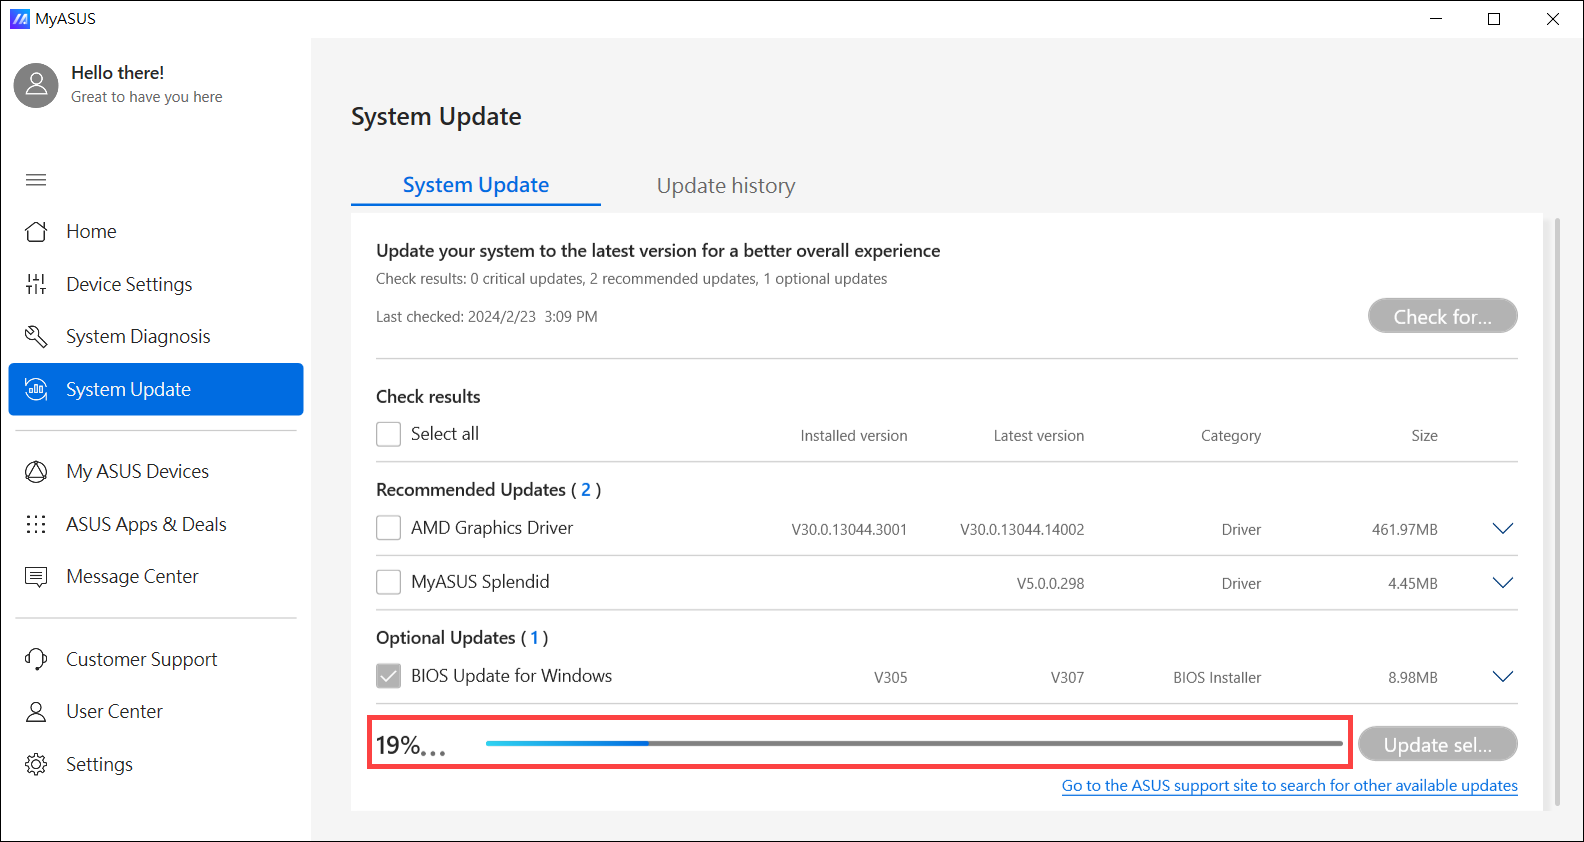
- MyASUS will begin downloading the BIOS file.
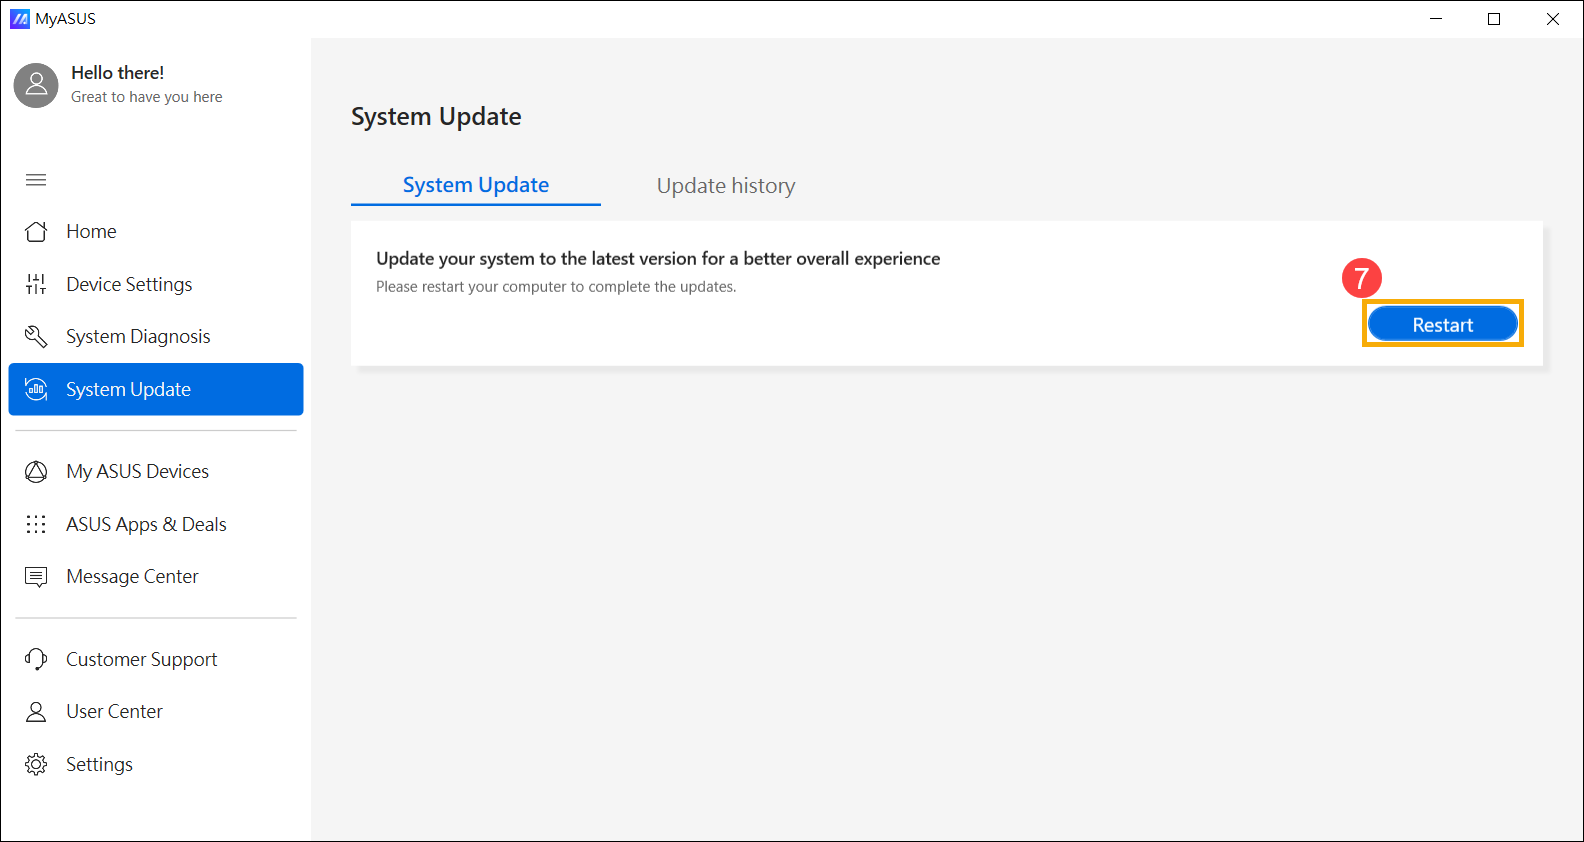
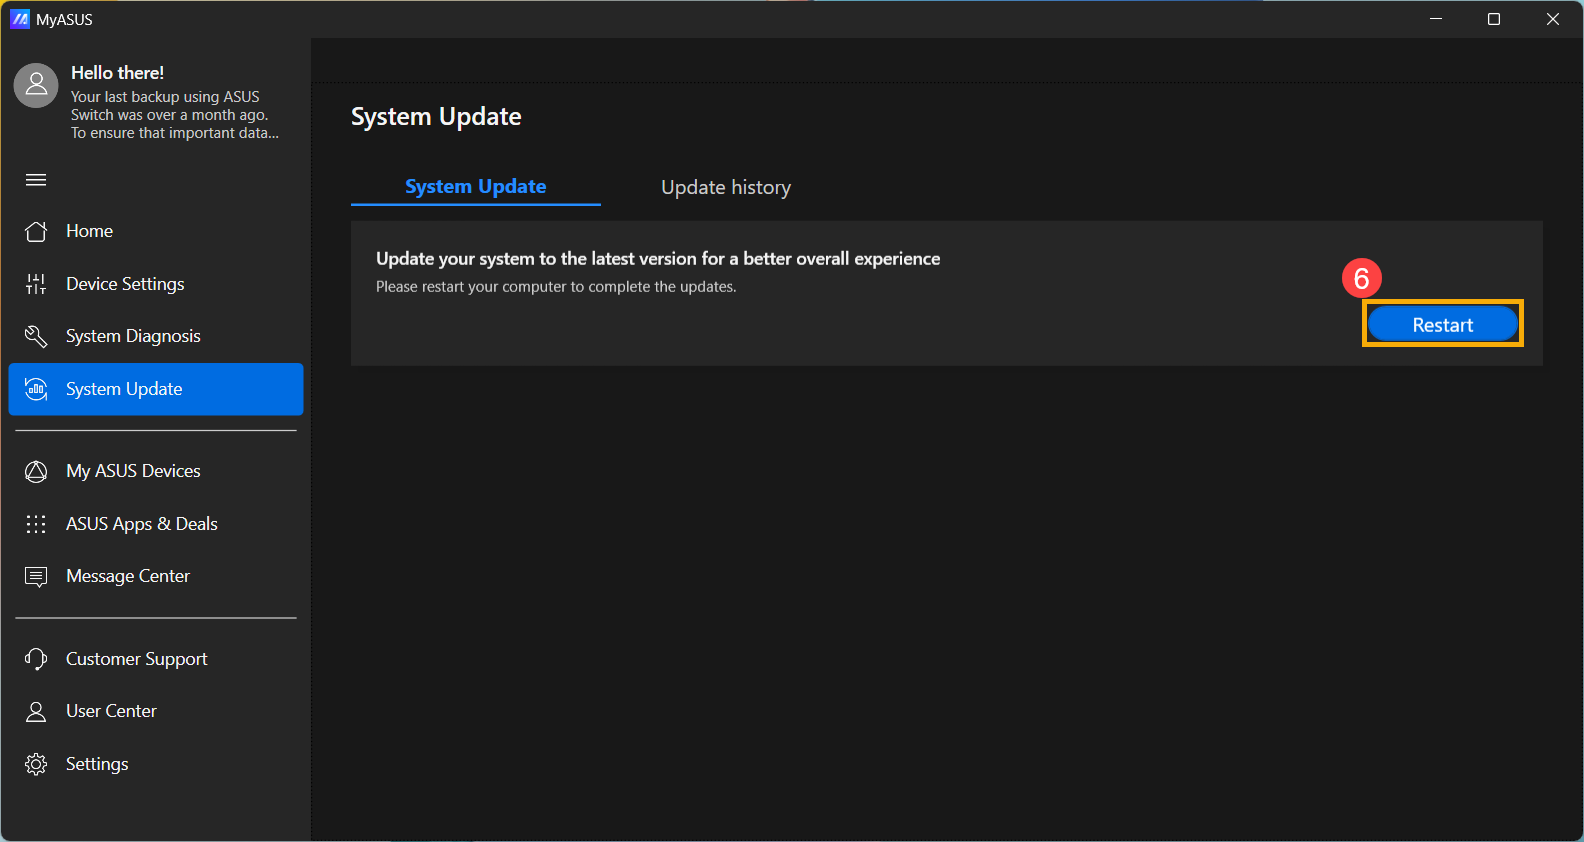
- After the BIOS file download is complete, click [Restart]⑦ to initiate the BIOS update.
- The device will restart and enter the BIOS update screen. Please refer to your BIOS interface for the subsequent steps:
Note: The BIOS update screen below may vary slightly depending on the model.
UEFI interface
- Click [Yes]⑧ to begin the BIOS update.
Note: Ensure that the device is connected to power and do not force shutdown during the BIOS update to prevent any abnormal issues.
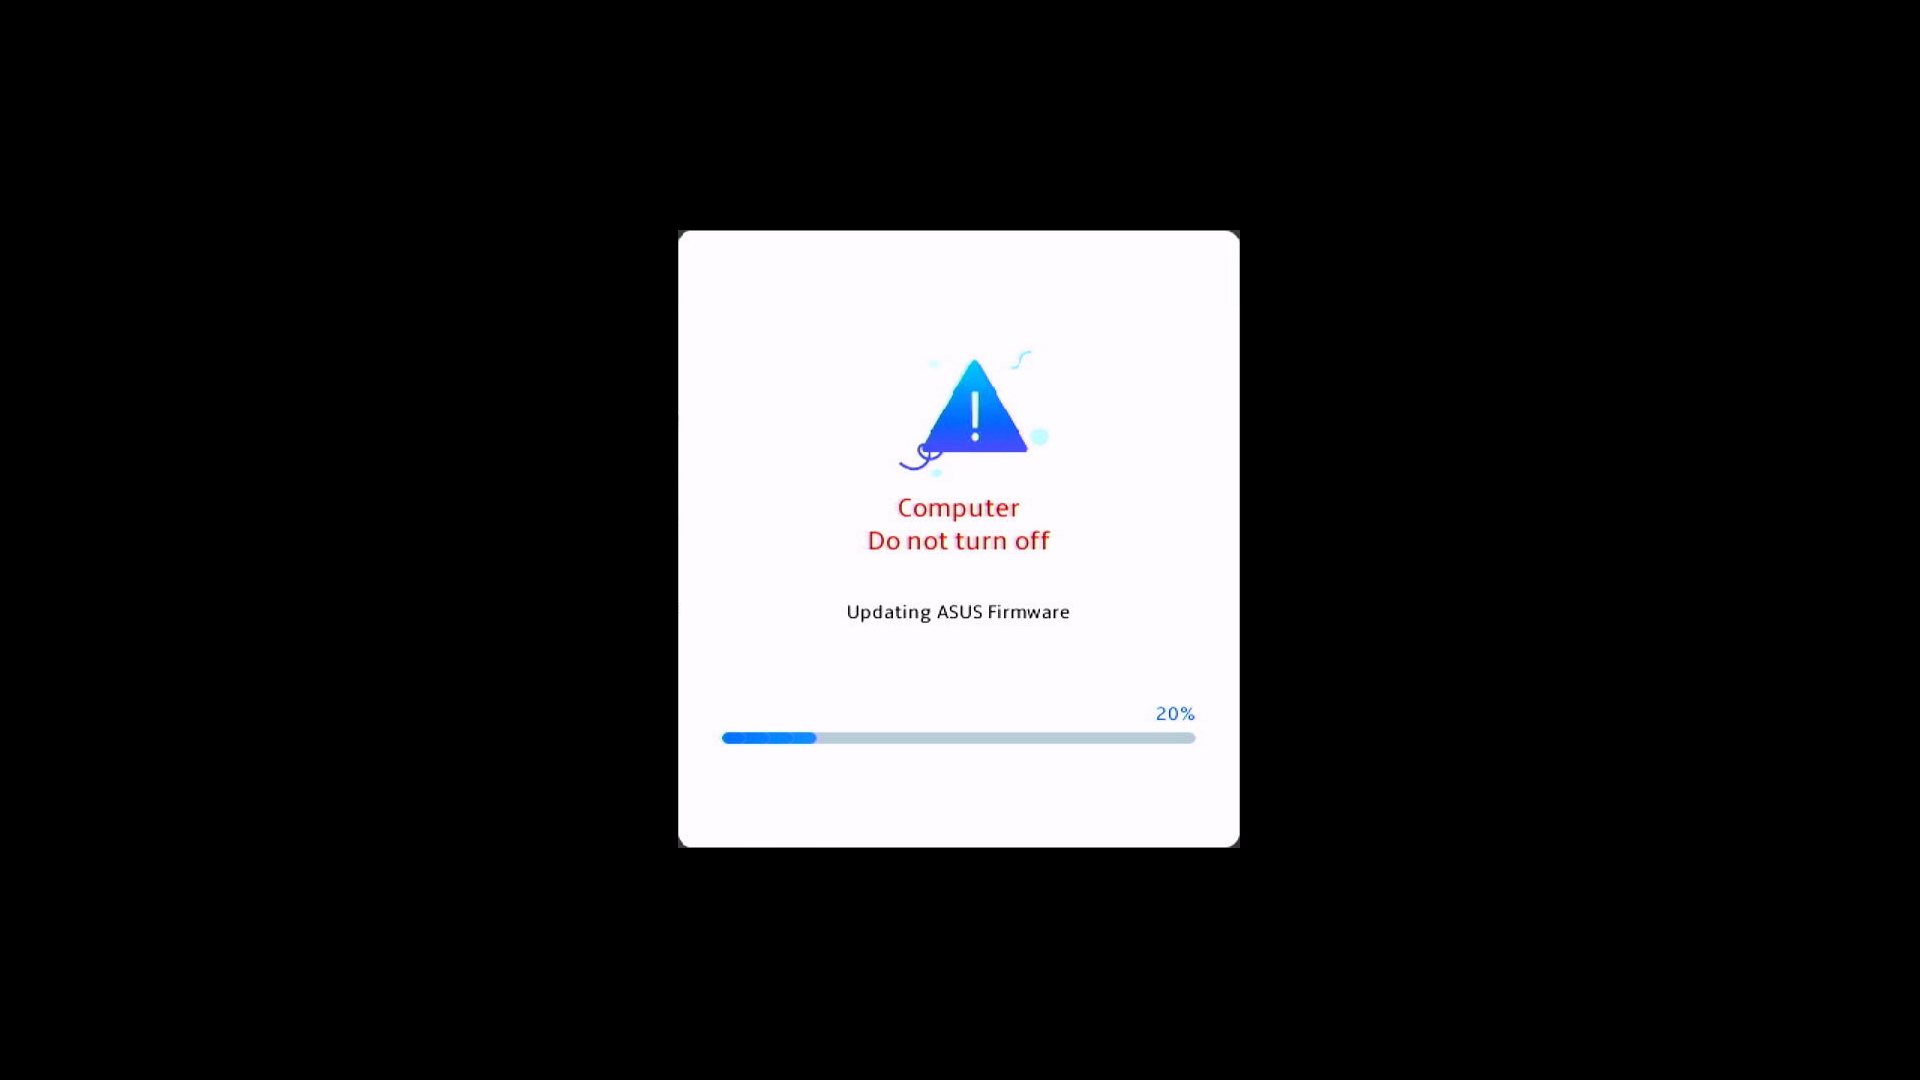
- The device is now performing the BIOS update. Please wait patiently for the BIOS update to complete.
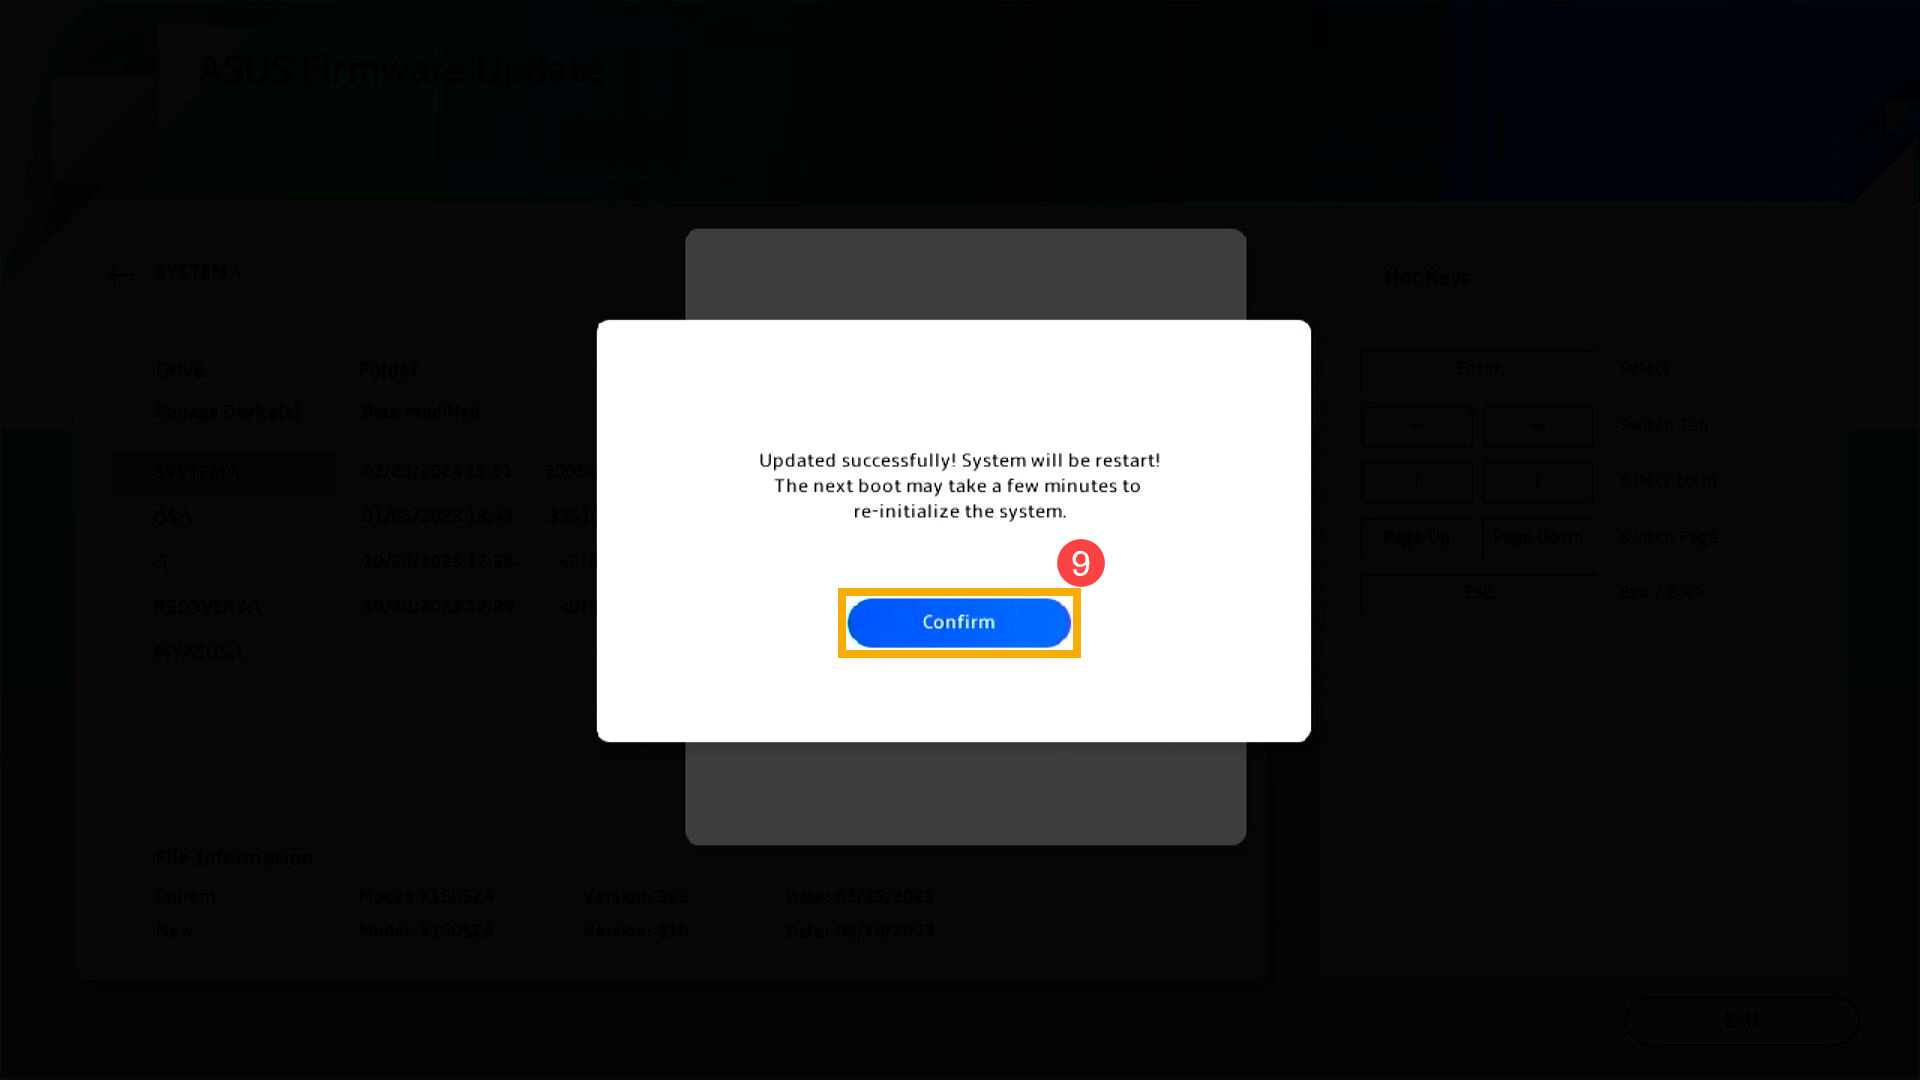
- Once the following screen appears, it indicates that your device has completed the BIOS update. Click [Ok]⑨, and the device will restart into the Windows operating system.


MyASUS in UEFI
- Click [Confirm]⑧ to begin the BIOS update.
Note: Ensure that the device is connected to power and do not force shutdown during the BIOS update to prevent any abnormal issues.
- The device is now performing the BIOS update. Please wait patiently for the BIOS update to complete.
- Once the following screen appears, it indicates that your device has completed the BIOS update. Click [Confirm]⑨, and the device will restart into the Windows operating system.

Method 2: Download and update BIOS via the ASUS support site
- Go to the ASUS support site with your device’s model name, here you can learn more about How to search and download BIOS.
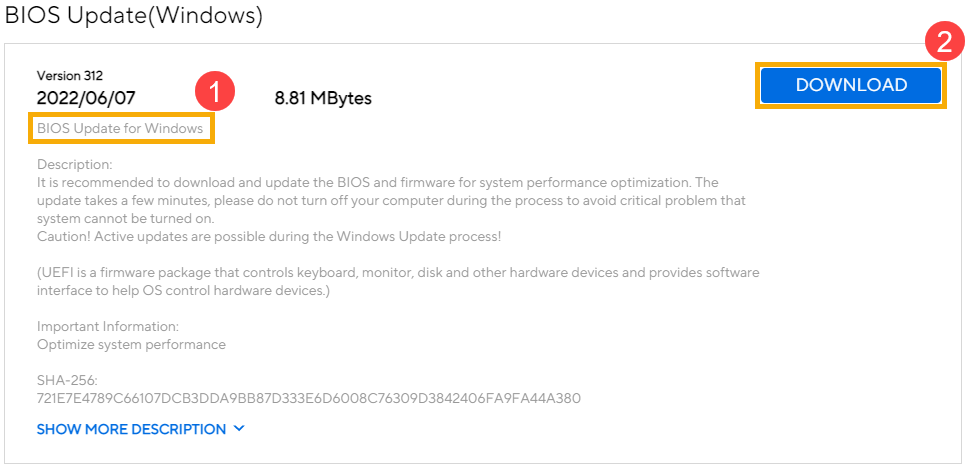
Note: To download the corresponding BIOS file, please refer to How to check the model name. - In the support page, please search for [BIOS Update for Windows or BIOS Installer for Windows] which is located in the BIOS Update(Windows) category①. If you are able to see the file, please click [Download]②.
Note: If you do not see 「BIOS Update for Windows」 or 「BIOS Installer for Windows」, since some models may not support updating BIOS in Windows, please refer to How to use EZ Flash to update BIOS.
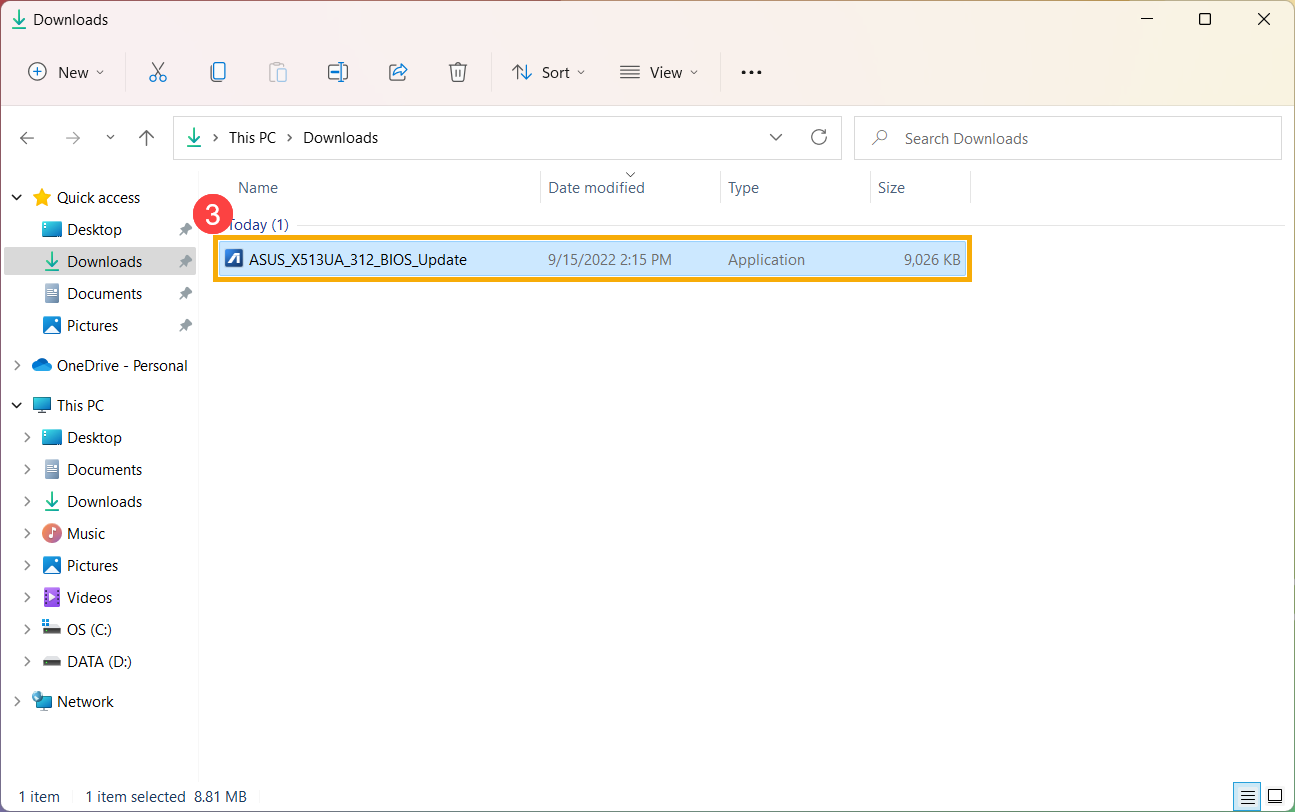
- After downloading the BIOS Update for Windows file, double-click the BIOS Update application to start updating BIOS③.
If the type of the downloaded file is Compressed (Zipped), please right-click the file > select Extract All.
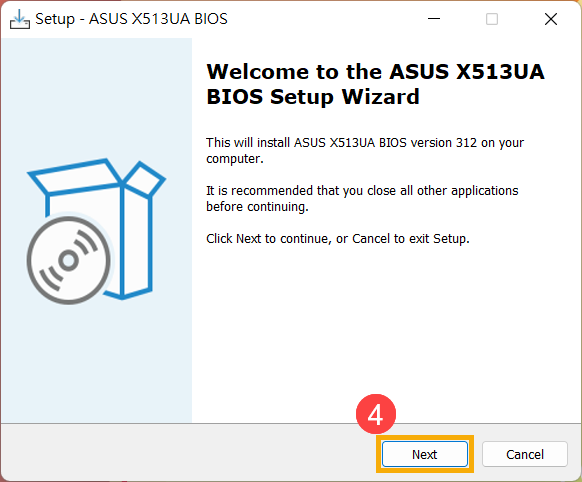
- The setup wizard will guide you to start the BIOS update process, click [Next]④.
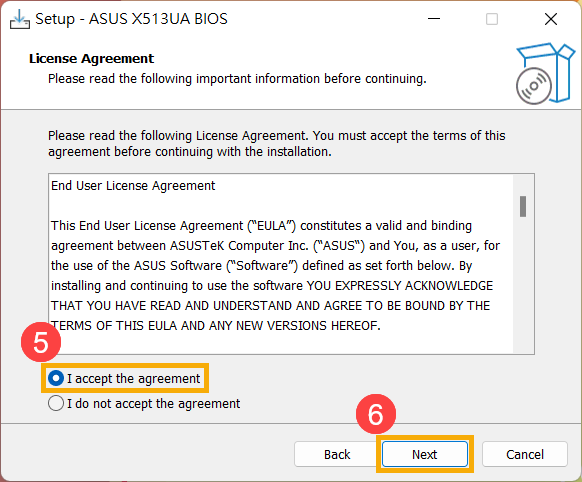
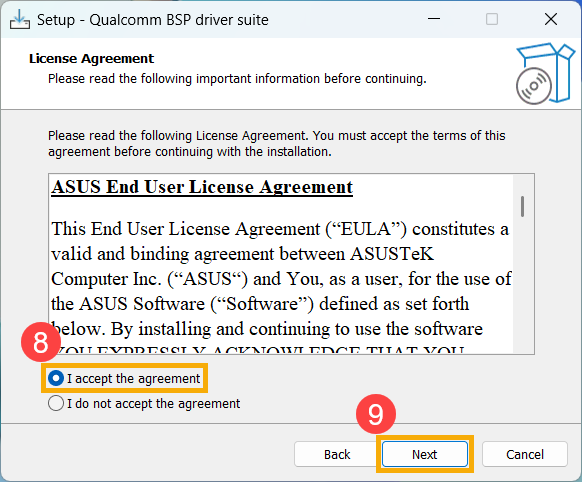
- Please read the License Agreement, and check the box to [I accept the agreement]⑤ and then select [Next]⑥.
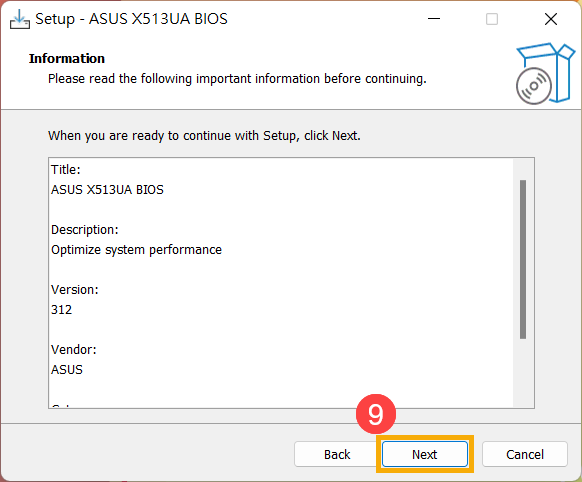
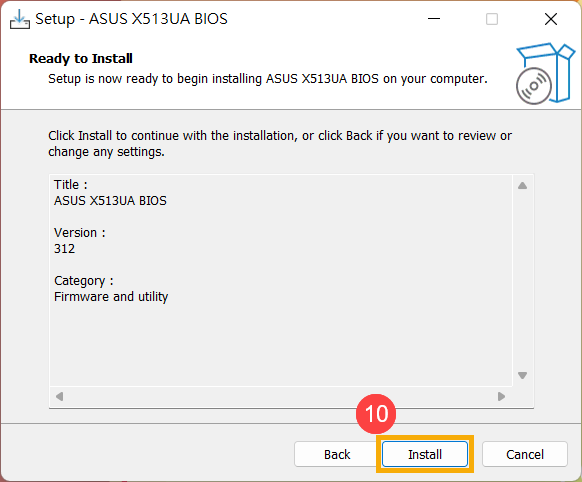
- Follow the indicator to process the BIOS update installation.
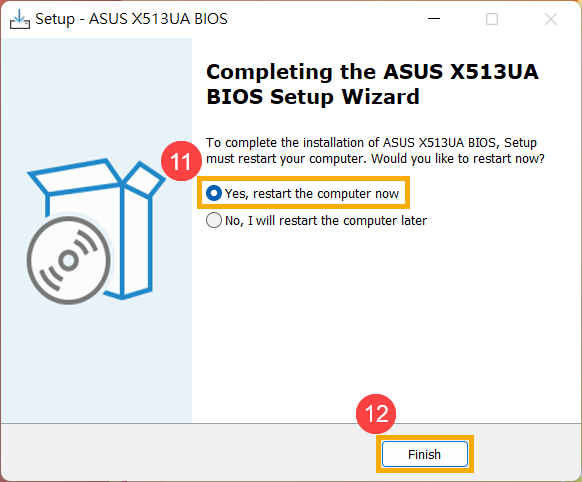
- Select [Yes, restart the computer now]⑪, then click [Finish]⑫. The device will restart and enter the BIOS update screen.
Note: Before restarting the device, please ensure to save your work to prevent any data loss.
- The device will restart and enter the BIOS update screen. Please refer to your BIOS interface for the subsequent steps:
Note: The BIOS update screen below may vary slightly depending on the model.

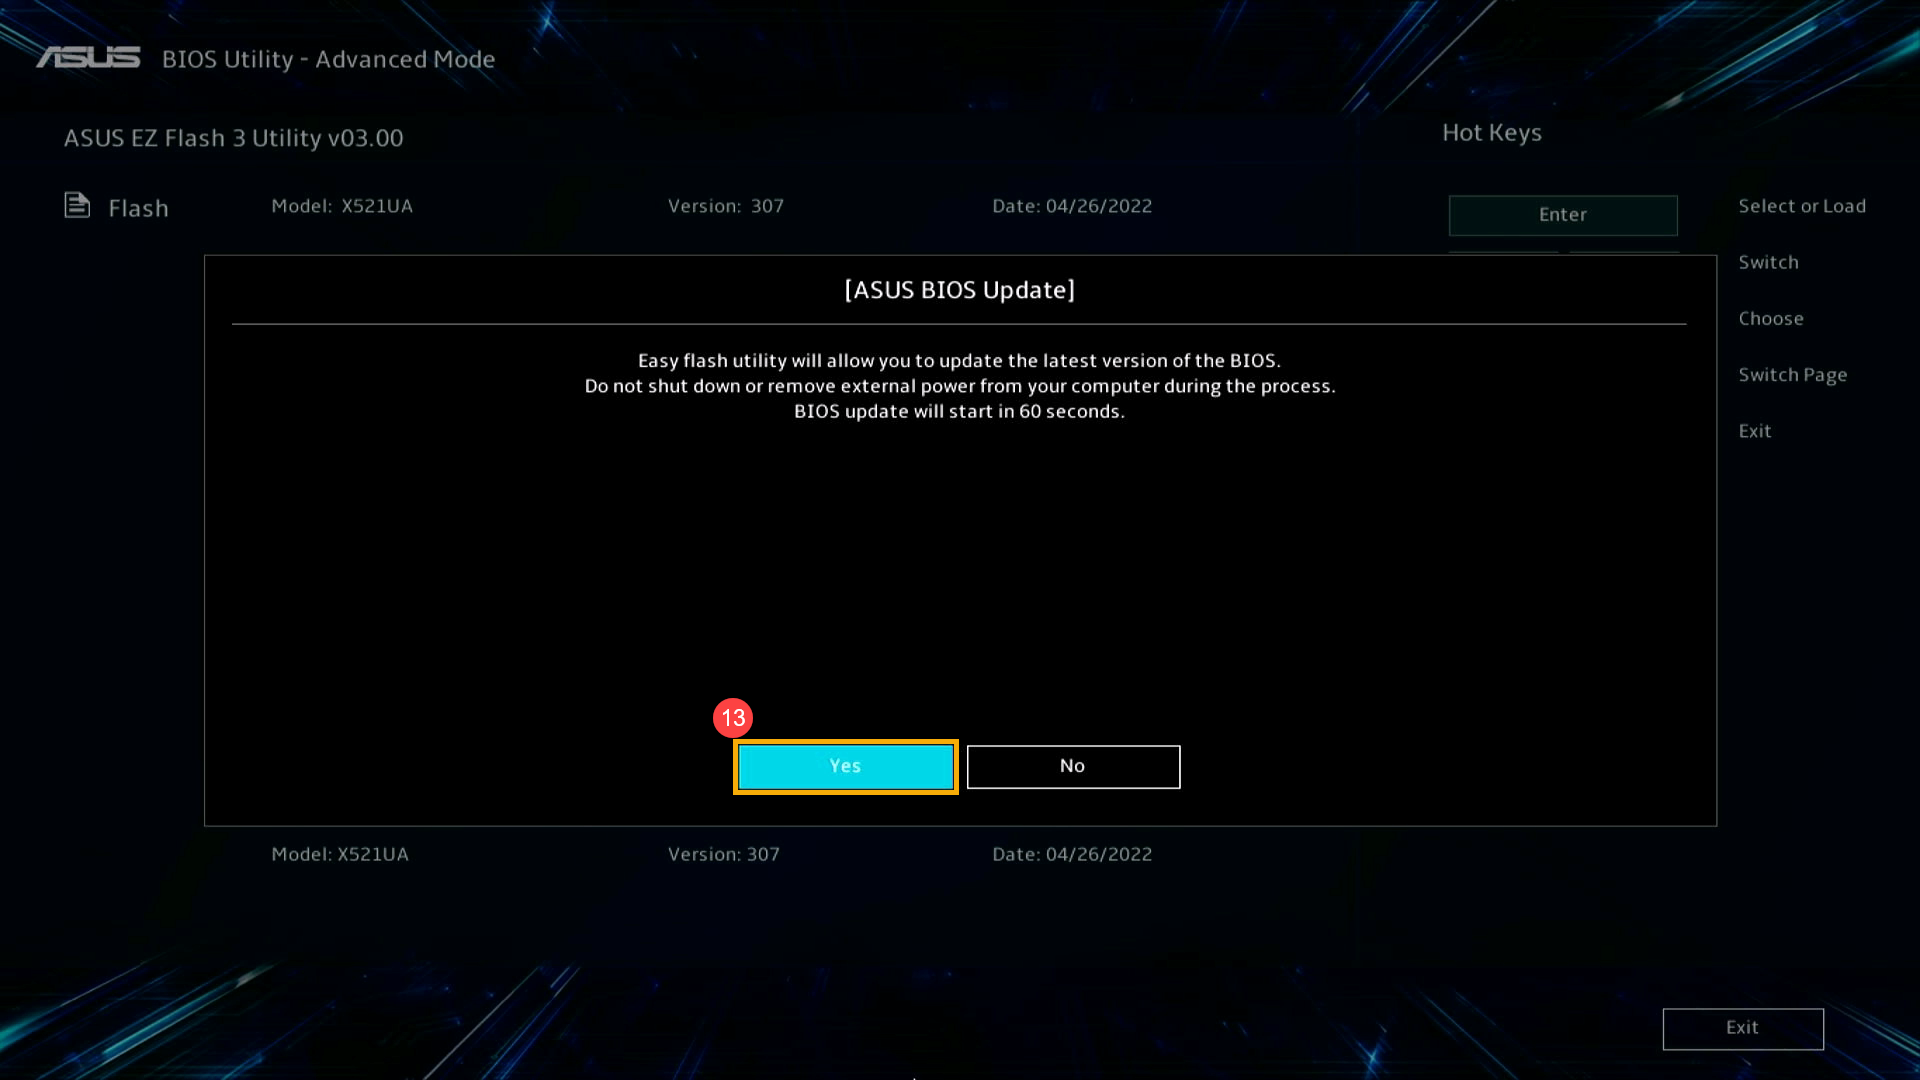
UEFI interface
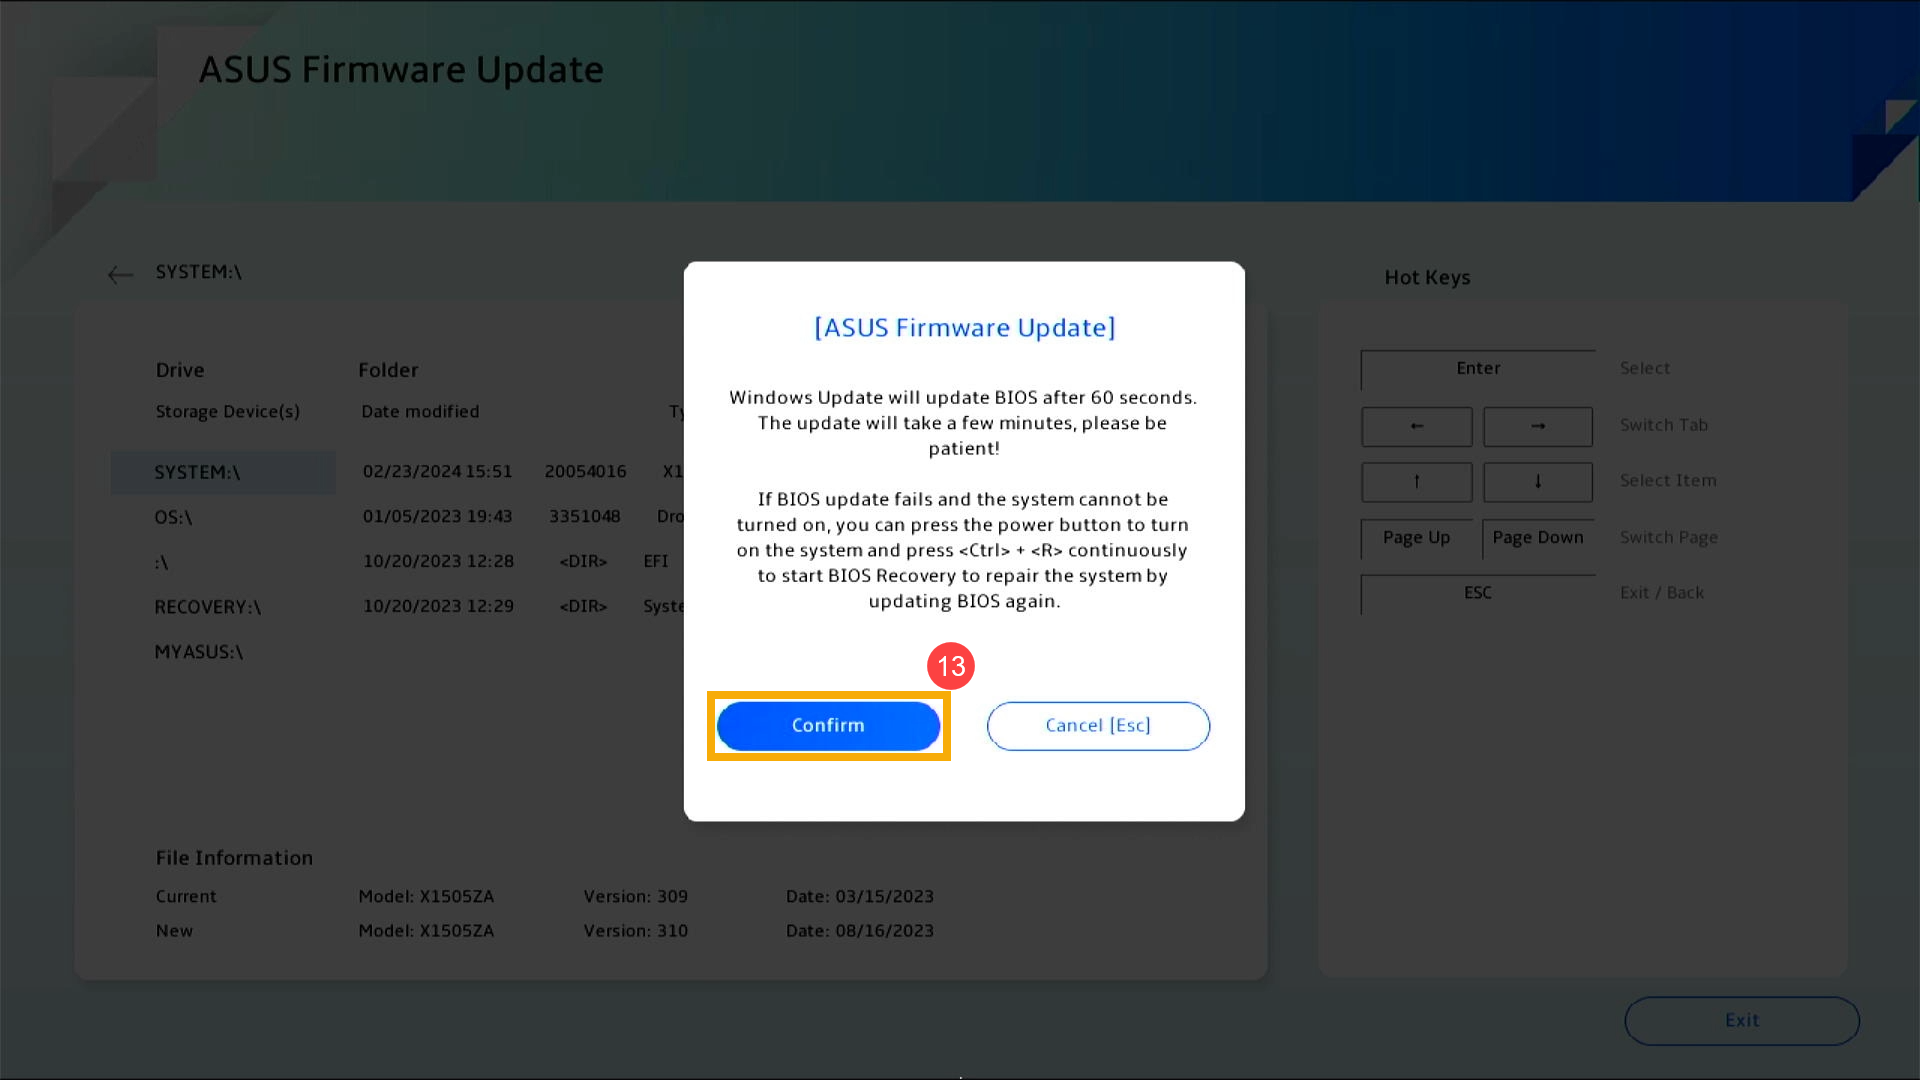
- Click [Yes]⑬ to begin the BIOS update.
Note: Ensure that the device is connected to power and do not force shutdown during the BIOS update to prevent any abnormal issues.
- The device is now performing the BIOS update. Please wait patiently for the BIOS update to complete.
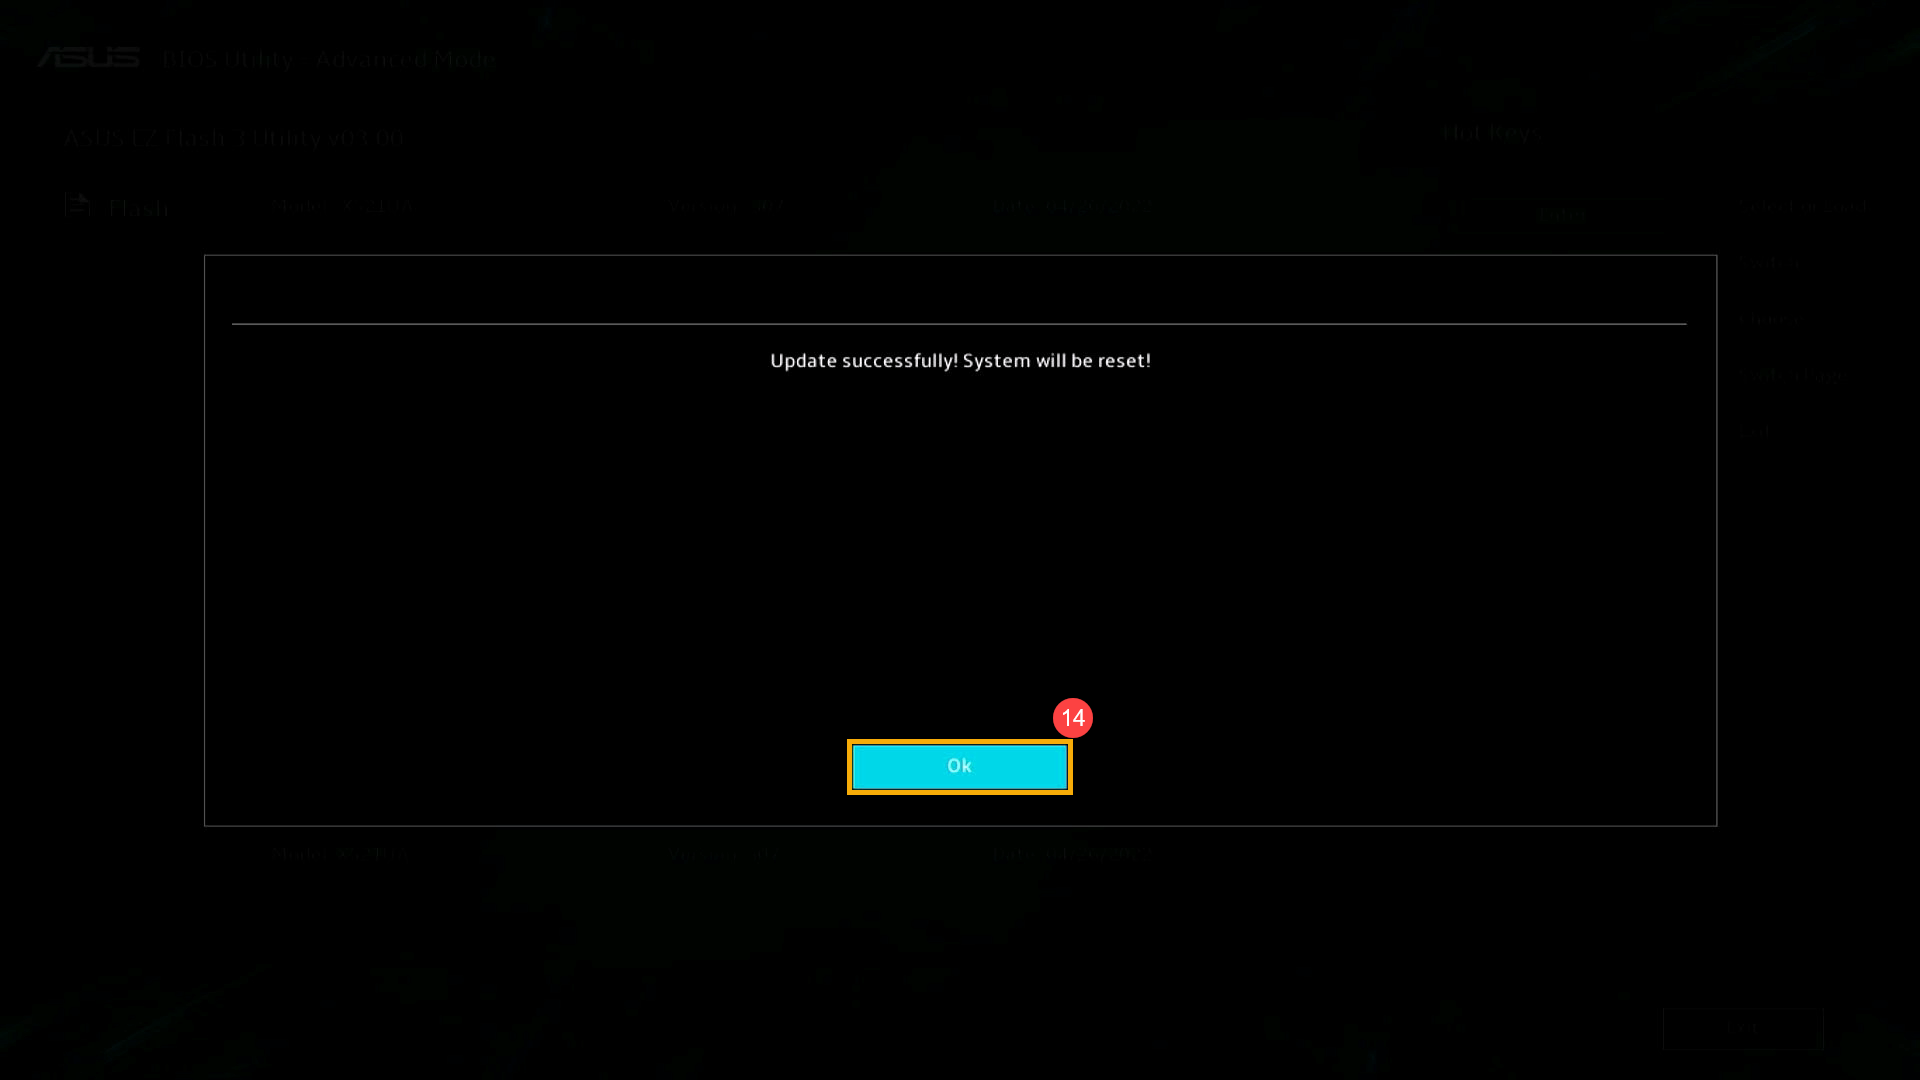
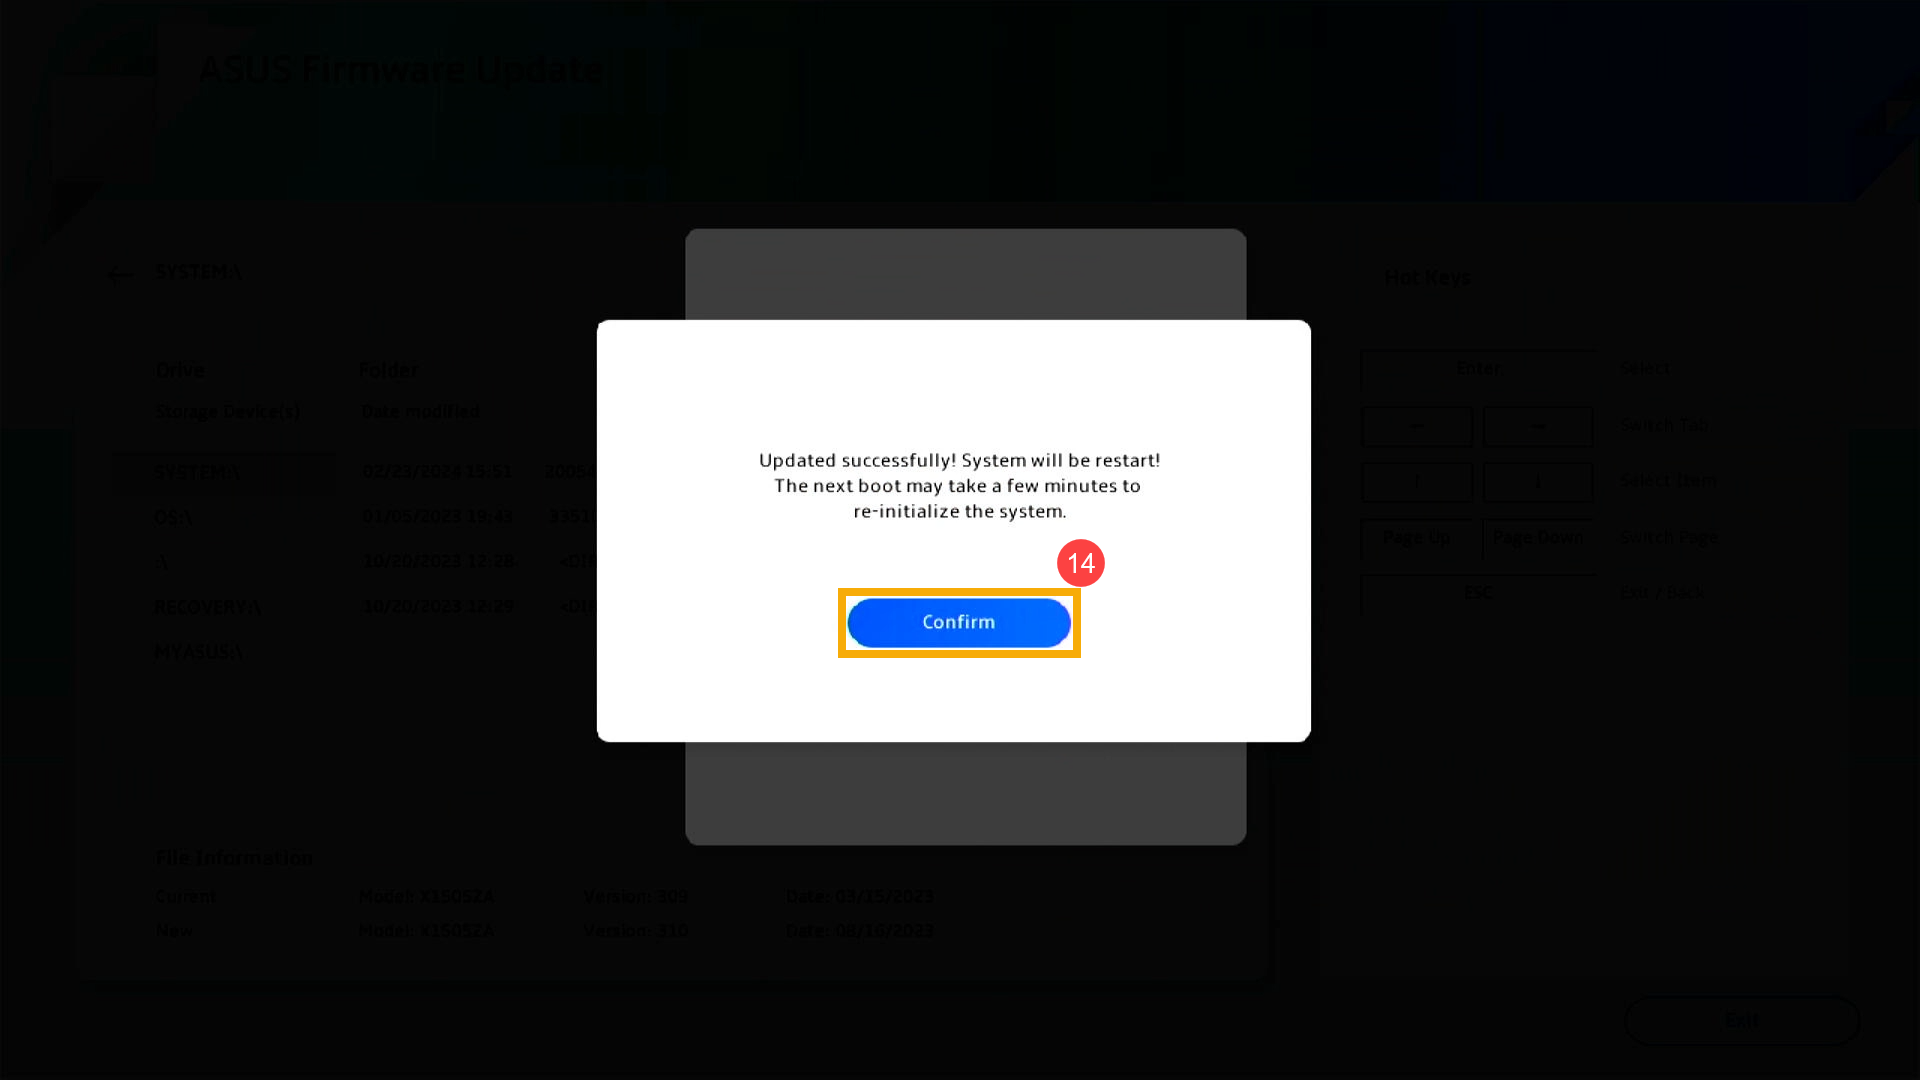
- Once the following screen appears, it indicates that your device has completed the BIOS update. Click [Ok]⑭, and the device will restart into the Windows operating system.
MyASUS in UEFI
- Click [Confirm]⑬ to begin the BIOS update.
Note: Ensure that the device is connected to power and do not force shutdown during the BIOS update to prevent any abnormal issues.
- The device is now performing the BIOS update. Please wait patiently for the BIOS update to complete.
- Once the following screen appears, it indicates that your device has completed the BIOS update. Click [Confirm]⑭, and the device will restart into the Windows operating system.
How to update the BIOS with ARM-based devices
You can download and update the BIOS from MyASUS or the official ASUS website. Please refer to the following steps for each method:
Note: If you encounter any issues during the BIOS update process, please contact ASUS service center.
Method 1: Update BIOS via MyASUS
- Type and search [MyASUS] in the Windows search bar①, then click [Open]②.
Note: If there is no result searched, it means your device may not install it, and please refer to How to install MyASUS.
- In the MyASUS window, click [System Update]③.
- When entering the System Update page, MyASUS will automatically check and list the items that need updating for your system.
Note: If no update items are displayed on this page, it means your system is already up to date. - Select [BSP] package④, then click [Update Selected Items]⑤.
Note: This package includes BIOS, System, Multimedia, Peripherals and Connectivity drivers. Utilizing this package will update both the BIOS and drivers to the latest versions.
- MyASUS will begin downloading the BSP package file.
- After the BSP package file download is complete, click [Restart]⑥ to initiate the update.
- The device is currently undergoing an update.
Note: Ensure that the device is connected to power and do not force shutdown during the update to prevent any abnormal issues.
- Upon completion of the update, the device will automatically reboot into the Windows operating system.
Method 2: Download and update BIOS via the ASUS support site
- Go to the ASUS support site with your device’s model name, here you can learn more about How to search and download BIOS.
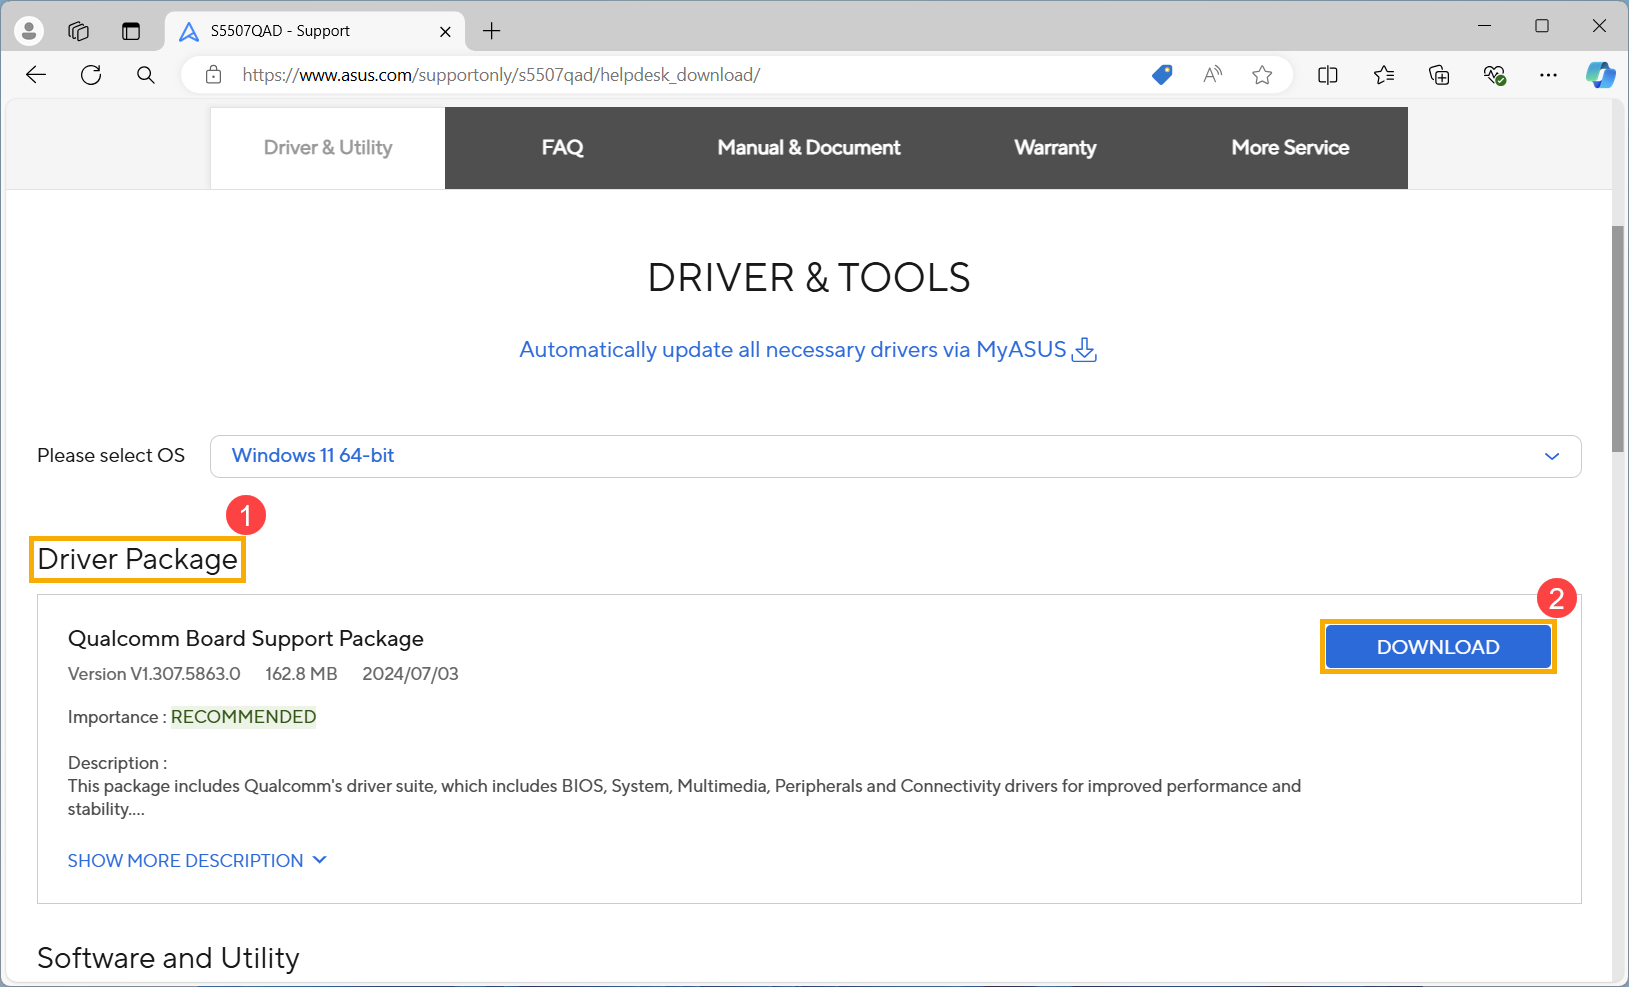
Note: To download the corresponding BIOS file, please refer to How to check the model name. - After accessing the product support download page, locate the latest version of the Board Support Package① under the Driver Package category, and then click [Download]②.
Note: This package includes BIOS, System, Multimedia, Peripherals and Connectivity drivers. Utilizing this package will update both the BIOS and drivers to the latest versions.
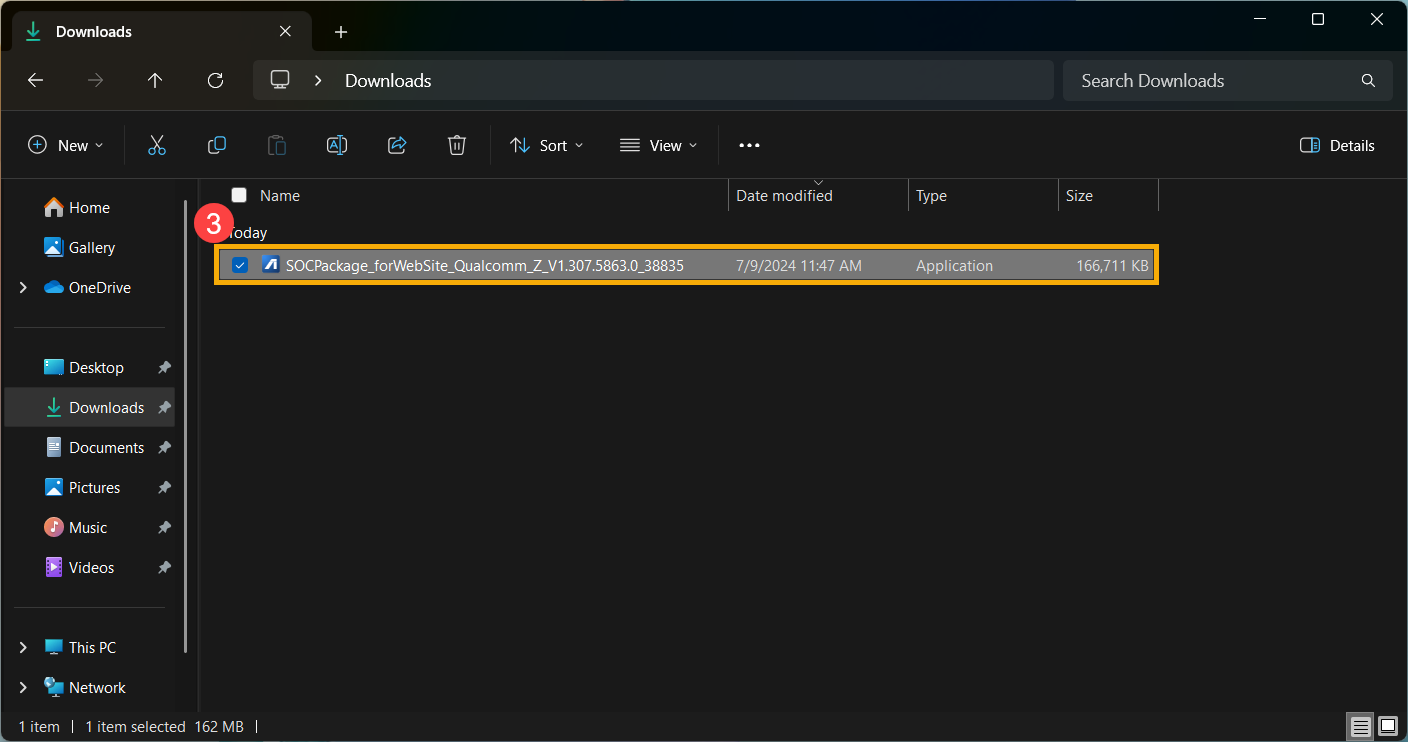
- After downloading, double-click the file you just downloaded to begin the BSP update process③.
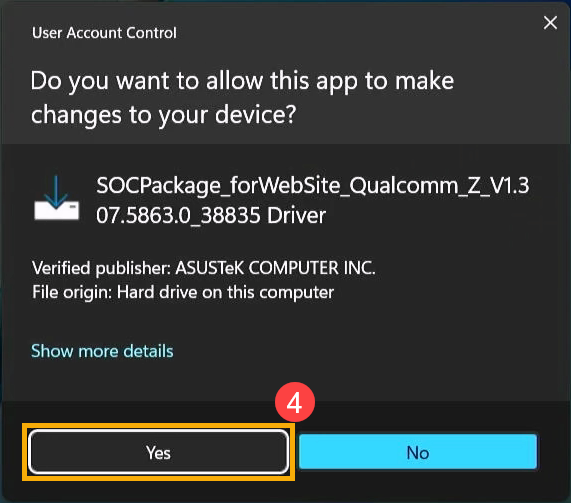
- If a User Account Control window appears, click [Yes]④.
- Choose the language you want to use in the installation program⑤, then click [OK]⑥.
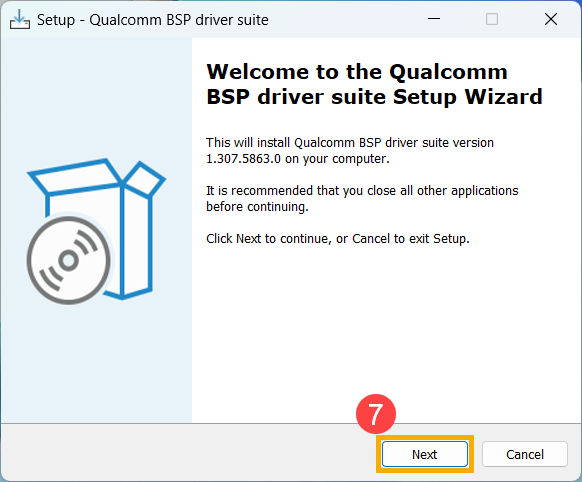
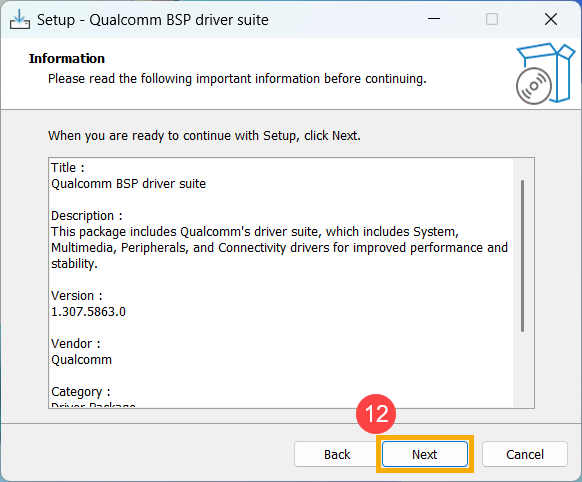
- The setup wizard will guide you to start the BSP update process, click [Next]⑦.
- Please read the License Agreement, and check the box to [I accept the agreement]⑧ and then select [Next]⑨.
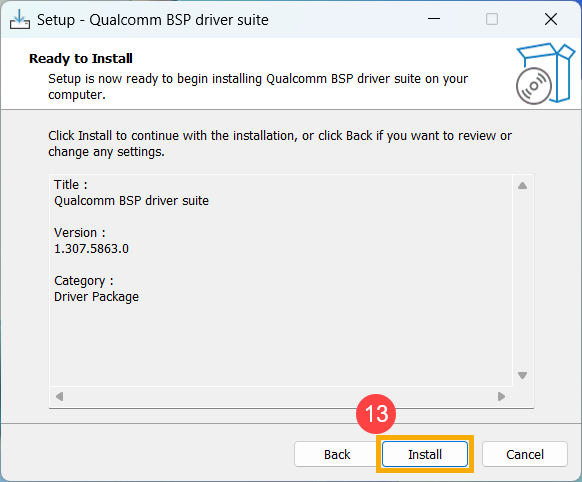
- Follow the indicator to process the BSP update installation.
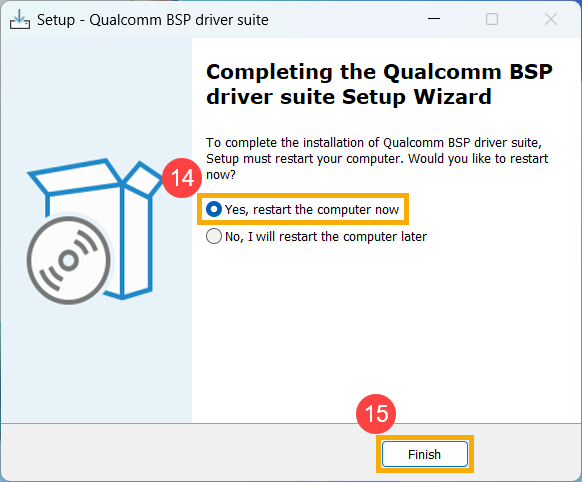
- Select [Yes, restart the computer now]⑭, then click [Finish]⑮. The device will restart and enter the update screen.
Note: Before restarting the device, please ensure to save your work to prevent any data loss.
- The device is currently undergoing an update.
Note: Ensure that the device is connected to power and do not force shutdown during the update to prevent any abnormal issues.
- Upon completion of the update, the device will automatically reboot into the Windows operating system.
Was this information helpful?
Yes
No
- Above information might be partly or entirely quoted from exterior websites or sources. please refer to the information based on the source that we noted. Please directly contact or inquire the sources if there is any further question and note that ASUS is neither relevant nor responsible for its content/service
- This information may not suitable for all the products from the same category/series. Some of the screen shots and operations could be different from the software versions.
- ASUS provides the above information for reference only. If you have any questions about the content, please contact the above product vendor directly. Please note that ASUS is not responsible for the content or service provided by the above product vendor.
- Brand and product names mentioned are trademarks of their respective companies.
ASUS BIOS Update
для Windows
ASUS BIOS Update — фирменная утилита для обновления BIOS материнских плат ASUS через интернет. Позволяет проверить в режиме реального времени наличие новой версии, скачать ее и прошить прямо в среде операционной системы Windows.
ТОП-сегодня раздела «Обновления, патчи»
ASUS BIOS Update 7.18.03
ASUS BIOS Live Update — Фирменная утилита для обновления BIOS материнских плат ASUS через интернет…
Отзывы о программе ASUS BIOS Update
Иван про ASUS BIOS Update 7.18.03 [07-12-2024]
Отличная программа. Обновил биос с файла на диске.
| | Ответить
SAIMON999 про ASUS BIOS Update 7.18.03 [14-09-2024]
Здравствуйте. Возможно мне повезло , но у меня получилось с первого раза обновить биос на ASUS A8N32-SLI Deluxe на версию 1405 из под Windows 7 64 bit. Минуту обновлял примерно, потом перезагрузил и всё заработало. Спасибо!
| | Ответить
Сова про ASUS BIOS Live Update 7.17.11 [05-01-2021]
Win7, синий экран через раз при клике на файл установки!
4 | 19 | Ответить
Krot в ответ Сова про ASUS BIOS Live Update 7.17.11 [05-01-2021]
Надо запускать от имени администратора!
10 | 19 | Ответить
Сергей про ASUS BIOS Live Update 7.17.11 [16-07-2019]
Чего я не прочитал отзывы? Синий экран после клика Сетап.
16 | 16 | Ответить
Антон про ASUS BIOS Live Update 7.17.11 [05-09-2017]
Народ не качайте эту лажу.У меня биос из за нее слетел начисто пришлось мамку менять. Кто не верит гуглите asus update сбой на 3 этапе.
15 | 15 | Ответить
Home
Hardware
By
Bhishu Acharya
ASUS BIOS updates usually come with security patches, bug fixes, compatibility enhancement, and in some cases, new features!
Unless you absolutely require security and hardware improvements, updating BIOS is not necessary as the risk-to-reward ratio is far too high.
ASUSTek offers five different methods and each serves a unique purpose:
- EZ Flash: Upgrade to a new version directly from the BIOS interface
- EZ Update: For users who seek to run the BIOS update from AI Suite
- Windows BIOS Flash: A dedicated Windows app to perform BIOS updates
- USB BIOS Flashback Button: Updates the BIOS without a CPU or RAM
- BUPDATER: Run the update in FreeDOS Prompt
No matter which method you’re going to follow, it’s essential to be extra cautious when updating the BIOS. This detailed guide should help you install the latest firmware version on any ASUS motherboard
Before You Begin
First, it’s important to confirm whether your ASUS motherboard requires a BIOS update. Only then should you download the compatible file.
In some scenarios, you might require copying it to a storage drive. And don’t forget to take precautions before starting the process as I stated earlier. Let’s cover each of them in brief.
Check and Compare BIOS Version
First of all, I recommend following my other guide to check the current version and then compare it with the latest one available online.
This is possible from both the official ASUS website and the MyASUS application. For demonstration, I’m going with the first approach:
- On the ASUS home page, search for your motherboard model and select it.

- Switch to its Support section.
- Now, select Driver & Utility > BIOS & FIRMWARE.
- The latest BIOS file will be shown at the top. If you want to get a quick overview of all the other versions, press Expand All.
- Now, compare the Version field with your motherboard’s current BIOS version.


Download the BIOS File and Transfer to USB Flash Drive
Well, I’m currently running the 3211 version on PRIME B450-PLUS but the latest one online is 4204. Since I’m seeking system performance improvement, a BIOS update should help me out.
That said, you should only perform such upgrades if absolutely required. If you have a specific reason and are 100% ready to go for a firmware update, here’s what to do next:
Note: It’s best to go with the latest version as shown earlier. However, I suggest skipping the one that’s mentioned ‘beta’ as it’s not tested properly by the manufacturer.
- Hit the Download button and the zip file should be saved to your PC.
- Extract the content inside it. The special thing about ASUS is that you’re going to find two files – BIOS Renamer and the
.CAPfile.
- Run the Renamer file and your BIOS file should be renamed automatically.


If you’re planning to use the EZ Update utility on AI Suite 3, you’re now good to go.
However, users who are trying to update via EZ Flash Utility (using the Storage method) need to copy the file to a FAT32-formatted drive. Note that the NTFS and exFAT file systems aren’t supported in the firmware interface.
Things to consider
- Since there’s a risk of boot-related issues, always back up your important data and files before proceeding to update the BIOS.
- Do not turn off the PSU when the update is in progress. For users who might be experiencing frequent power cuts, I highly recommend connecting your PC to a UPS.
ASUS laptop users are suggested to keep the power adapter plugged in throughout the process. - Also, it’s best to avoid pressing any keys or unplugging the connected USB flash drive. This might cause interruption and may lead to boot failure.
- If you’re performing an update via the internet, opt for a wired connection. And most importantly, make sure you don’t face any network issues during the process.
- While it’s best to go with the latest BIOS version, some might require a previous update to be compatible. Kindly check out for such exceptions from the description.
- Also, ASUS recommends loading optimized defaults after the update to ensure the system is stable.
Use EZ Flash Utility in ASUS BIOS
The standard way to update your motherboard’s firmware is through the BIOS interface itself. ASUS offers the EZ Flash Utility and the latest one (EZ Flash 3) allows you to do so using an external storage device or even directly via the Internet.
Well, the involved steps slightly vary on UEFI and Legacy modes. Since most systems are equipped with the modern UEFI interface today, I will be emphasizing the same. Nonetheless, I have provided the just general steps for the other mode below.
Key Steps for Legacy BIOS users:
- Enter ASUS BIOS > Advanced tab > ASUS EZ Flash [2 or 3].
- Now, insert the storage device, and pick the appropriate file from Text Mode.
- Hit Yes to confirm the BIOS update and wait for about 5 to 10 minutes.
Via Storage Device
This method involves inserting the FAT32-formatted USB drive you prepared earlier and manually initiating the process.
Just a few months back, my PRIME B450-PLUS model was experiencing random stuttering after enabling TPM. The final option to resolve my problem was updating BIOS.
Even though the 3802 version could resolve this problem, I decided to go for the latest one (which was 4202 at that time).
The process was fairly easy and completed in less than 5 minutes. Based on this experience, I’ve compiled the essential steps that you should carry out:
- First, start/restart your computer and use the Del/F2 key to enter ASUS BIOS.
- Use F7 to quickly switch from EZ to Advanced mode.
- Navigate to the Tool tab.
- Here, select ASUS EZ Flash 2 Utility or ASUS EZ Flash 3 Utility, depending on the motherboard.
- Pick the via Storage Device(s) option, if asked.
- Select the thumb drive and pick the
.CAPfile that you had renamed earlier.
- A dialogue box should pop up. Press Yes to continue.
- Now, a final confirmation appears with the new version that will be flashed. Again, select Yes.
- It’s time to wait for the BIOS update to complete.
- Once done, you’ll likely get this message, “Update successful! System will be reset”. You may hit OK or the computer will automatically reboot.
- Now, the AMIBIOS screen should appear asking you to set up your BIOS to recover the settings. Press F1 to continue.
- For final confirmation, you can get back to the ASUS UEFI Utility and check the updated version.


Via Internet
This is a new feature integrated on only some models that support ASUS EZ Flash 3. Do note that it’s not available on every BIOS.
In our office, both the PRIME B450-PLUS and ROG STRIX B450-I GAMING didn’t provide this option even though they supported the third revision of the EZ flash utility.
However, it was available on the ROG STRIX 450-I GAMING. Our team was eager to test how it worked out. We decided to go for the BIOS update, which has indeed helped improve the system performance.
Here are the required steps for this process:
- First, get to BIOS and switch to the Advanced mode.
- Select Tool and pick ASUS EZ Flash 3 Utility.
- Then, choose the ‘via Internet’ option and hit Next.
- Then, select one of these options – DHCP, PPPoE, or Fixed IP, based on your Internet method.
- The BIOS will now prompt you to the confirmation download screen. Identify the version before hitting OK.
- Wait for the download to complete. This should take no longer than a minute but may vary if you have a slower internet connection.
- Now, you will be taken to a similar confirmation window as with the storage media method. Select Yes to proceed.
- The update process will begin. Now, all you need is patience! Once this is complete, your ASUS system should restart automatically.


Via EZ Update in AI Suite
For ASUS users who wish to run the BIOS update directly from their operating system, AI Suite is the tool you’re looking for. The latest version is AI Suite 3 but note that only the newer boards support it.
Along with fan speed customization, hardware monitoring, and a plethora of other features, you’ll find the EZ Update option within the application itself. Like the previous method, it also offers performing BIOS updates online or via the storage method.

If you haven’t downloaded AI Suite already, look for it under Driver & Utility on your model’s support page. It should be in the Software and Utility section as demonstrated in the above screenshot.
Manual Update
Let’s look into the manual process first. As I mentioned earlier, you do not require a USB flash drive in this case. Just download the file via the MyASUS application or the official Support website.
Recently, ASUS came up with the 4204 version for my PRIME B450-PLUS motherboard. While this update wasn’t absolutely necessary, it did resolve the potential security vulnerabilities.
This time, I tried the EZ Update utility from the Windows environment and I didn’t find much difference as compared to the earlier method. The only advantage here is you do not need to prepare a USB drive.
Having said that, you can go for either of the two methods as they work the same. Here are the general steps you need to follow:
- First, launch the ASUS AI Suite Utility.
- Click on the hamburger button on the left side of the application.
- Once the menu appears, pick EZ update.
- From the ‘Manually update Boot logo or BIOS’ section, press the meatball menu icon.
- Now, you can browse for the renamed file and select it.
- Wait for a few seconds and two separate buttons should appear – MyLogo and Update. Pick the second option.
- Now, click the Flash button.
- A confirmation dialogue box should pop up. Hit OK and you’ll be taken to the EZ Flash screen.
- Wait until the update gets completed and the PC should restart.


Check Updates From the Internet
A much quicker option is to detect the available BIOS version online and proceed only if necessary. It’s identical to the Internet method in the EZ Flash.
I did try this on PRIME B450-PLUS but it didn’t show the latest 4204 version I was looking for. That’s the reason I opted for the previous method.
Here’s what to do:
- In the ASUS AI Suite utility, get to the EZ update section first.
- Hit the Check Now! button as shown below.
- Click on Connect to search if there’s an update available.
- For some reason, I got the “There’s no need to update the environment” message. This meant that the app couldn’t find a compatible version for my system.
- But if you get one, simply pick the latest version and hit the Update button.
- Once the dialogue box pops up, press OK and this takes you to the EZ Flash screen.
- After the update completes, your PC will restart. Enter the setup page and load the optimized defaults and you should be good to go.


Run Windows BIOS Flash Utility
Some models come with a dedicated Windows utility for updating BIOS. This is especially the case with ASUS laptops.
Look for Windows BIOS Flash Utility or BIOS Installer for Windows on your model’s support page. If you have installed the MyASUS app, check if there’s a BIOS Update for Windows section available.
Even recently, I flashed the latest BIOS version (317) on my Vivobook Pro 15 (X580VD) laptop using Windows BIOS Flash Utility.
The following instructions are based on my experience. The exact process might vary depending on your model.
- First, download the installation file from the Driver & Tools / BIOS & FIRMWARE page.
- Run the execution file, complete the setup, and open the WinFlash utility.
- The first window usually checks for the network, adapter, and battery power. If there’s anything faulty, it should display some form of message. In case everything is fine like below, hit Next.
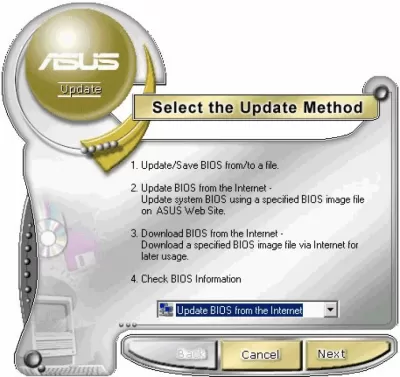
- Select any one of the two methods – Get BIOS from the Web or Get BIOS from Device.
- Check the BIOS information and hit the Update button to start the process.


Use USB BIOS Flashback
Ever wondered what the marked USB-A port on the motherboard implies? If you take a closer view, you’ll also notice a button next to it labeled ‘BIOS’.
This is the USB BIOS Flashback feature but it’s only available on some modern ASUS boards. It’s mainly used to add compatibility to a new component (especially the processor).
While this feature can be used to update BIOS even without installing a CPU or RAM, that’s not always the case. Some ASUS models might ask you to mount at least an older compatible processor to complete the process. Take a peek at your user manual to confirm this.
Sharing my experience, when I tried installing Ryzen 5 4500 on the ROG STRIX B550-I GAMING motherboard (running the 2407 version), it didn’t work. I had to update it to the latest version as this processor has only been supported since the 2603 version.
This activity also involves using a USB flash drive containing the compatible BIOS version. If you’re having boot-related issues on your PC, you can utilize another working computer for this purpose. Make sure only the CAP file is present on the stick.
Once this is prepared, go through the following instructions:
- First, completely shut down your PC but do not unplug the power cable.
- Insert the flash drive containing the BIOS file and press the dedicated button for about three seconds.
- You’ll see that the LED starts flashing which indicates the BIOS update has initiated. After a few short blinks, the process will be rapid.
- Wait until the LED stops flashing. Once you’ve reached the stage, turn on the PC.
- You may notice the “BIOS is updating LED firmware” message like the one below. Just wait for a few seconds and your ASUS computer should start the POST.
- After you get the AMIBIOS screen, press F1 and load the optimized defaults. Save changes and restart your PC.
- You can now install the new components (if you haven’t already) and check if your PC can boot to BIOS or not.


In FreeDOS Prompt

Using DOS utilities to update BIOS is definitely not the standard method. But if you’re someone who likes to have hands-on experience with everything, I’d say this is worth a try!
BUPDATER also called the ASUS BIOS Updater requires a DVD optical drive as well as a flash drive containing the CAP file. Also, you’ll need to have basic knowledge of the DOS environment and its commands.
Key Steps:
- Use F8 to launch the Boot Menu window.
- Set the boot device priority to the DOS-supported DVD.
- In the command-line interface, use <driveletter>: (eg. E:) to quickly switch to the USB drive.
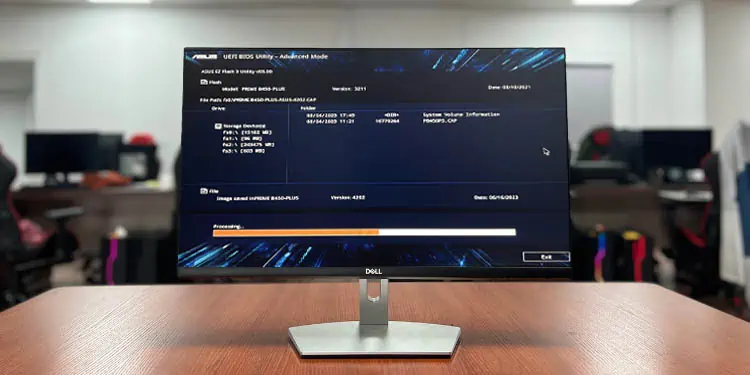
- Execute the bpudater /g and this should take you to the Text Mode (slightly similar to Legacy BIOS).
- Select the BIOS update file (as demonstrated in the screenshot on the top).
- Hit Yes in both the successive dialogue boxes and wait for the update to complete.
What to Do if BIOS Update Fails?
BIOS is your motherboard’s firmware and it isn’t something to tinker with frequently. As aforementioned, updates are required only when absolutely necessary!
Also, you have probably heard this saying – “failure or interruption in BIOS update will render the motherboard useless”.
Well, that’s true to some extent as most ASUS boards now come with a variety of failsafe features. So, BIOS updates aren’t as scary as in previous days!
I’ve already provided a detailed walkthrough on one of the recovery methods – USB BIOS Flashback. Other than that, here are some other methods that should help recover your presumably ‘bricked’ motherboard:
- ASUS CrashFree Utility
- Dual BIOS
- Reprogramming BIOS using specialized tools (for advanced users only)
- Replacing BIOS chip (for advanced users only)
Don’t worry! I’ve already covered a detailed explanation of how these techniques work in the following guides:
- ASUS BIOS Recovery
- What to do when BIOS update fails
Характеристики
Описание
Версии
Обновлено
Совместимость
Windows XP, Windows Vista, Windows 7
Описание
ASUS Update — это программа, которая показывает информацию о технических характеристиках материнской платы и BIOS. Сопроводительный документ утилиты напоминает о востребованности и популярности материнских плат ASUS. Отличительными особенностями продукции называют устойчивость к сбоям в работе, быстродействие и надежность, наличие разъемов для подключаемых устройств. Для результативного потребления ресурсов ПК и перенастройки прошивки используют ASUS Update для Windows.
Для работы с BIOS приложение позволяет
- создавать резервные копии установленной BIOS;
- в автоматическом режиме проверять обновления;
- обновлять установленный BIOS через сетевые ресурсы и с жесткого диска;
- загрузить ASUS Update в новой вариации;
- реализовать тонкую настройку системы;
- отобразить информацию о BIOS.
Преимущества программы
- повышение работоспособности и скорости;
- безопасность инсталляции;
- возможность загрузить утилиту в автоматическом и ручном режиме;
- обновление прошивки;
- постоянное совершенствование алгоритмов;
- поддержка наибольшей производительности устройства;
- корректное функционирование;
- понятный интерфейс;
- шанс скачать файл бесплатно.
На сайте пользователь вправе скачать бесплатно асус апдейт для компьютера с ОС Windows с русским и английским интерфейсом.
Версии
Нет официального представителя разработчика на сайте
Нажмите, для быстрой оценки
Оставить отзыв
При запуске сетап синий экран через раз,а если запустилось,то не видит свою ASUS материнку-полный отстой
Не советую этой программой пользоваться. У меня биос слетел а новый не встал и в результате я купил новую мамку. Если б мамка была дорогой пришлось бы в сервис тащить и менять саму плату биоса.Кто не верит погуглите asus update сбой на 3 этапе[:+1:]
Та же ерунда.. Установка зависает при первом нажатии NEXT (Windows 7 32 bit)
Программа установки зависает при первом нажатии Далее (Windows 7 64 bit)
Похожие приложения
Актуальные статьи
Download Windows Speedup Tool to fix errors and make PC run faster
ASUS BIOS Update utility allows you to update the BIOS firmware of an ASUS computer easily. Generally, updating BIOS can be a little problematic, but ASUS tries to make it as simple as possible using their in-house utility. In this post, we will see how to download and install it and update BIOS using the ASUS BIOS Update utility.
What is the ASUS BIOS Update utility?
ASUS BIOS Utility is a great tool for ASUS users as it allows one to download the correct file from ASUS’s official website and then run it to update the BIOS easily. Unlike some other methods, here, you won’t have to boot into BIOS to install the update; the utility will do that for you.
ASUS BIOS Update utility for Windows computers
The ASUS BIOS Update utility lets you easily download, install, and update BIOS. All you need to do is follow the steps mentioned below, and you will be good to go.
Download ASUS BIOS Utility for Windows PC

First of all, we need to download the ASUS BIOS Utility from ASUS’s official website.
- Once there, click on Laptop or Motherboard, and select the correct model.
- You will be redirected to that device’s page, where you must click Drive & Utility.
- Now, click on BIOS & FIRMWARE, look for BIOS Update for Windows or BIOS Installer for Windows, and then click on the corresponding Download button to get that tool.
Once you have downloaded it, run it.
Use ASUS BIOS Utility to update your BIOS

Now that we have the ASUS BIOS Utility let’s update your firmware using it. To make it easier for you, we have jotted down a step-by-step process to update your BIOS using the utility.
- Open File Explorer and go to Downloads.
- Run the utility we downloaded earlier. If it’s in a ZIP folder, you first need to extract it.
- Once the setup launches, click on the Next button to start the installation process.
- Check the I accept the agreement and click on Next.
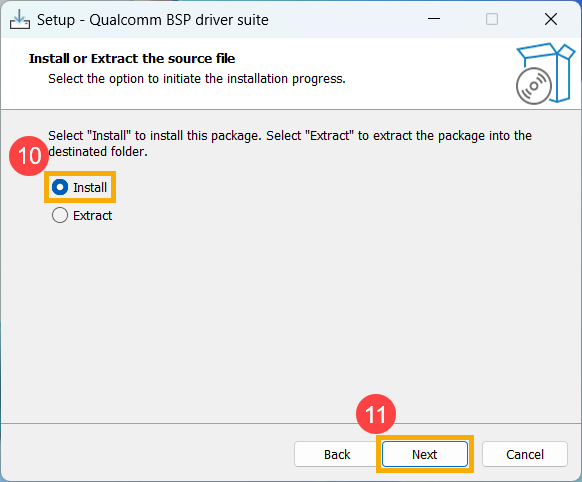
- Click on Install > Next.
- Follow the on-screen instructions until you are prompted to restart, tick Yes, restart the computer now, and then click on Next.
Your computer will restart and start updating BIOS. Once the BIOS is updated, it will display Update successfully! System will be reset!
This means your BIOS has been updated, and the system will restart once. However, this time, the system will start normally and not enter the BIOS.
Read: You need to restart your PC to finish installing a firmware update
How do I update ASUS BIOS using utility?
To update BIOS using your ASUS BIOS utility, you need to first visit the official website of ASUS, get the correct BIOS update utility for your system, and then run it. Since we are talking about BIOS, it is better to follow the instructions mentioned earlier when updating it.
Read: How to download and use MyASUS app on ASUS computers
How to install BIOS update ASUS without USB?
You don’t need a USB to update your BIOS, just go to the official website, find our model, and install the BIOS Update Utility. All you need to do is run the tool and it will automatically update the BIOS firmware of your ASUS computer.
Also Read: Fix Firmware update failed in Windows.
Yusuf is an Engineering graduate from Delhi. He has written over 1000 technical articles and has knowledge of programming languages including Java, and C++, and technologies such as Oracle 12C and MsSQL. Troubleshooting Windows is his favorite past-time.