
Все способы:
- Обновление BIOS на ASRock
- Этап 1: Определение установленной версии БИОС
- Этап 2: Загрузка прошивки с сайта производителя
- Этап 3: Обновление прошивки
- Заключение
- Вопросы и ответы: 19
Продукция компании ASRock пользуется популярностью у пользователей, которые ориентируются на соотношение «цена-качество». Материнские платы этой компании хороши в том числе и легкостью обновления BIOS, если в этой процедуре появится нужда. Сегодня мы хотим познакомить вас с алгоритмом установки обновлений микропрограммы для плат этой компании.
Обновление BIOS на ASRock
Первым делом напомним, что обновлять БИОС следует только в случае необходимости – например, предполагается установка CPU, видеокарты или модулей ОЗУ, которые не поддерживаются текущей версией микропрограммы либо с ней наблюдаются проблемы.
Непосредственно процедура обновления состоит из нескольких этапов: определения версии установленного варианта прошивки, загрузки обновлений с сайта производителя и установки.
Этап 1: Определение установленной версии БИОС
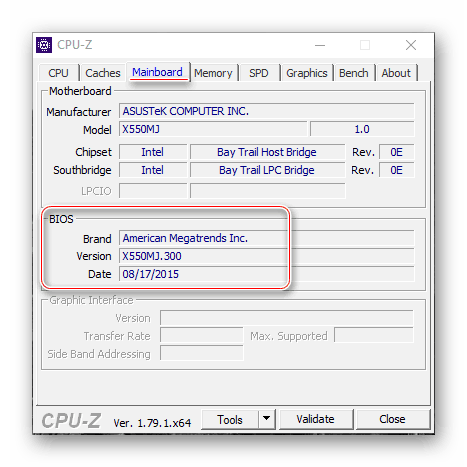
Перед тем как заниматься обновлением, следует узнать, какой вариант микропрограммы в текущий момент используется на материнской плате – это нужно для выбора новейшего варианта. Кроме того, по номеру версии можно найти заметки производителя, в которых указаны возможные неполадки. Определить вариант BIOS можно несколькими методами – подробности процедуры описаны в отдельном руководстве.
Урок: Как узнать версию BIOS
Этап 2: Загрузка прошивки с сайта производителя
После определения изначальной версии BIOS необходимо загрузить на компьютер новый вариант. Делать это следует с сайта ASRock — только в этом случае гарантируется совместимость и работоспособность микропрограммы.
Внимание! Загрузка файлов BIOS из неофициальных источников и попытка их установки может закончиться поломкой материнской платы!
Перейти на сайт ASRock
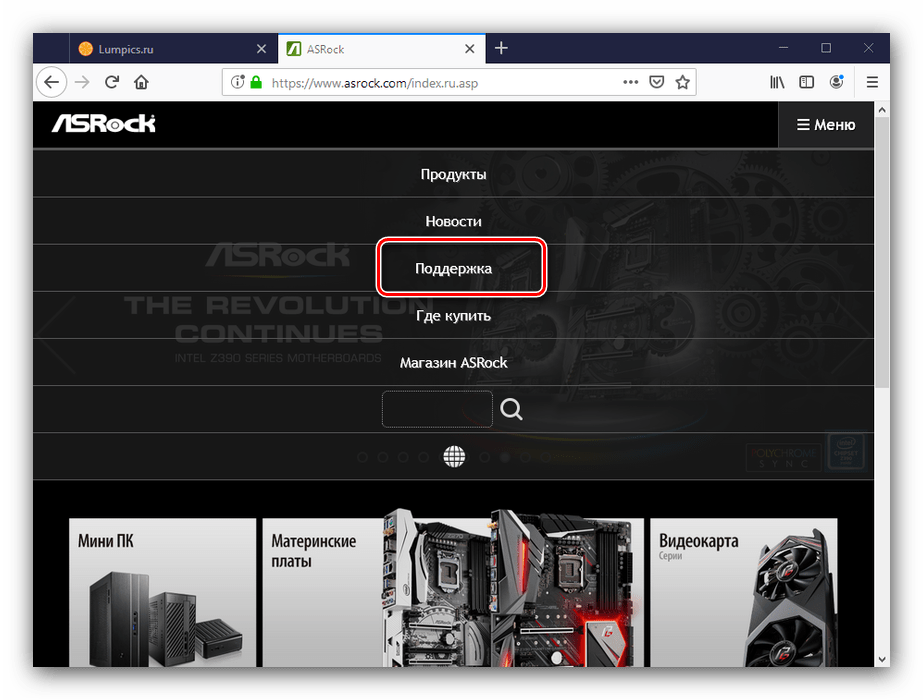
- Воспользуйтесь любым браузером, чтобы перейти к сайту производителя. После открытия страницы задействуйте пункт «Поддержка» в главном меню.
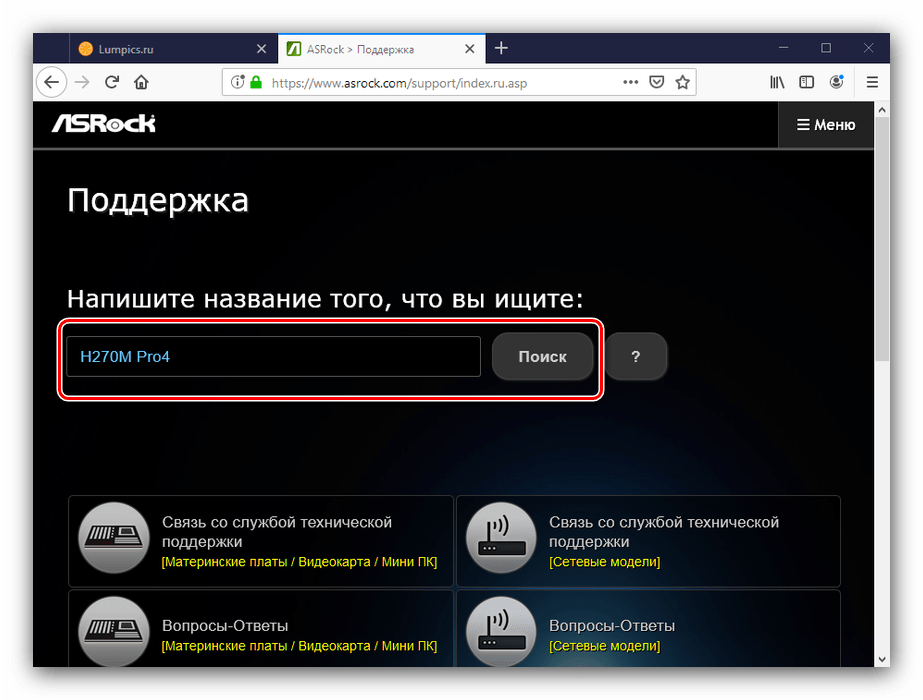
- Введите в поисковой строке название модели вашей «материнки» и нажмите на кнопку поиска. Если вы не знаете точное название модели платы, руководство далее поможет вам в решении этой задачи.

Урок: Как узнать модель материнской платы
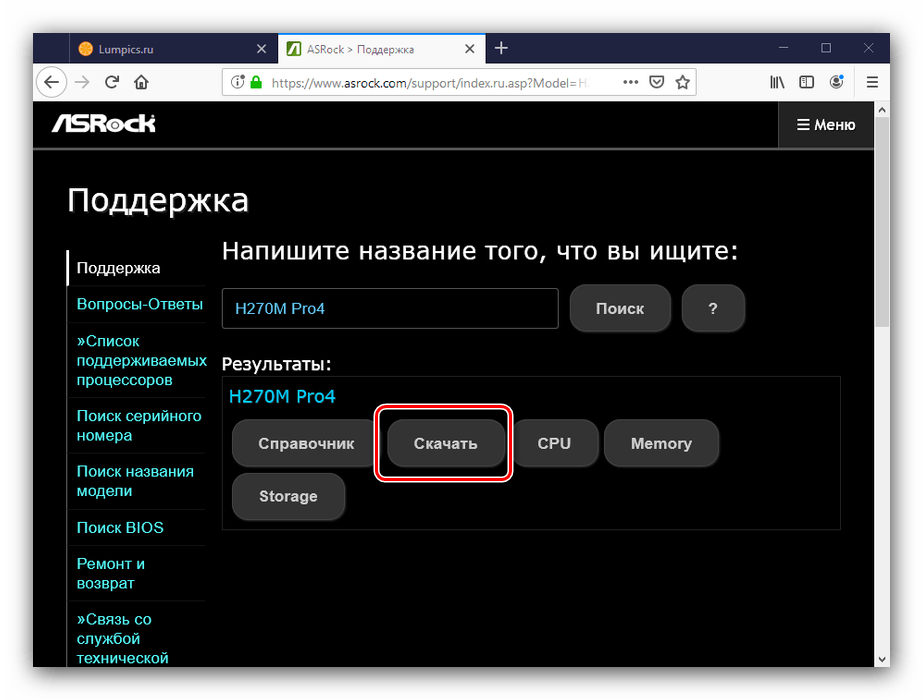
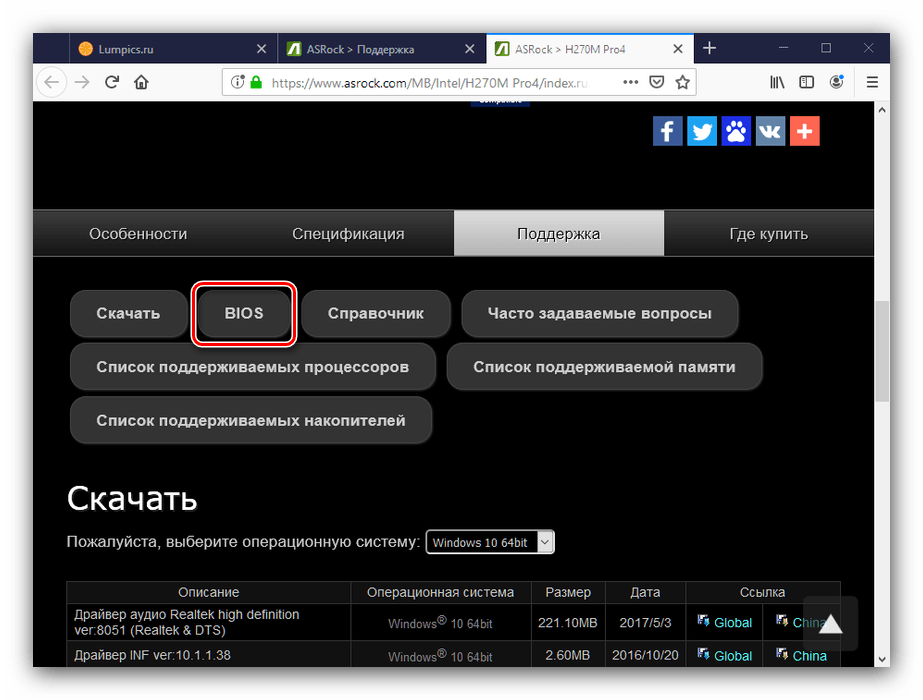
- В результатах поиска используйте кнопку «Скачать».
- Далее кликните по кнопке «BIOS».
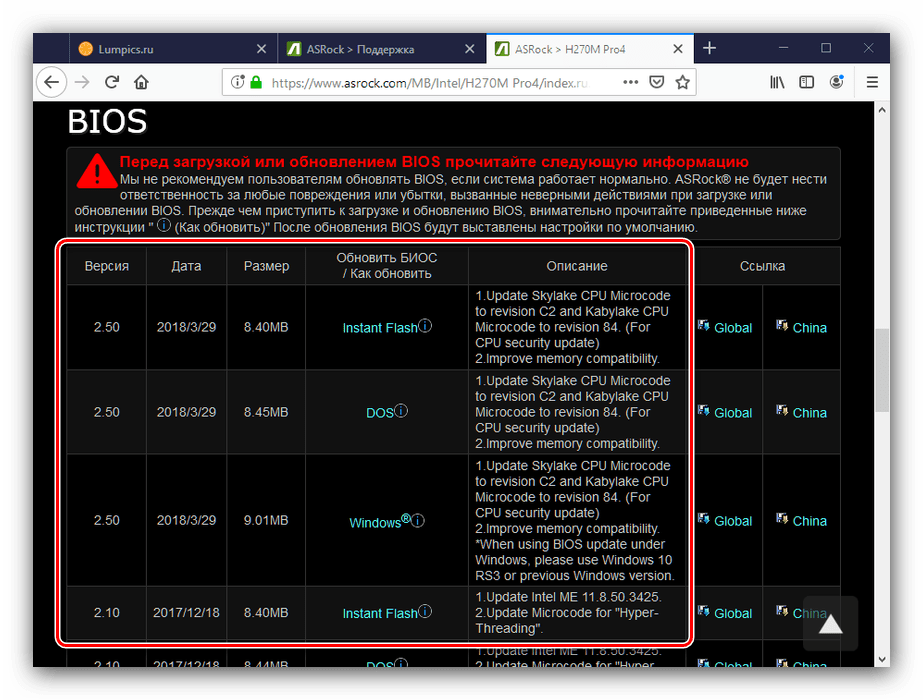
Появится список доступных прошивок. Ориентируйтесь на номер версии и на дату выпуска ПО.
Особое внимание следует обратить на третью колонку таблицы, «Обновить БИОС / Как обновить» – в ней указан метод, которым следует прошивать соответствующий вариант обновления микропрограммы:
Метод обновления Описание Instant Flash Предполагает использование прошивальщика, встроенного в BIOS DOS Прошивать обновления следует из-под специальной DOS-оболочки Windows ® Обновление поставляется в виде файла, который следует запускать в ОС Windows Об особенностях установки каждого из вариантов мы поговорим на третьем этапе.
- Скачать выбранный вариант прошивки можно в столбце «Ссылка», позиция «Global».
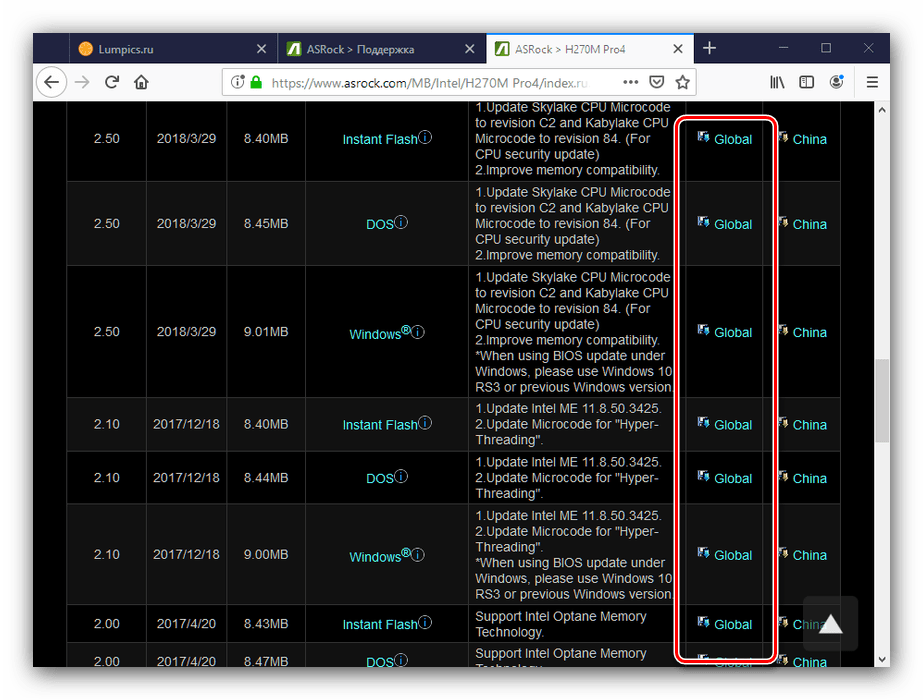
Загрузите прошивку в любое место на жестком диске компьютера и переходите к следующему этапу.
Этап 3: Обновление прошивки
После того как нужные файлы загружены, можно переходить к апдейту встроенного в плату ПО. Процедура может проводиться тремя разными методами, о чём мы упоминали выше. Начнём с самого универсального.
Внимание! Все дальнейшие действия вы совершаете на свой страх и риск!
ASRock Instant Flash
Обновлять БИОС на рассматриваемых платах проще всего через специальную утилиту, встроенную в микропрограмму. Алгоритм следующий:
- Подготовьте флеш-накопитель – объём не более 4 Гб, формат файловой системы FAT32.
Читайте также: Как отформатировать флешку
- Скопируйте файл прошивки в корневую папку используемого накопителя.
- Выключите целевой компьютер, затем подключите подготовленный USB-носитель к одному из портов.
Внимание! Используйте только порты USB 2.0, поскольку с третьей версией протокола процедура может работать нестабильно!
- Включите компьютер, и на этапе первоначальной загрузки нажмите клавиши F2 или Delete для входа в БИОС.
- Перейдите ко вкладке «Smart», на которой выберите «Instant Flash».
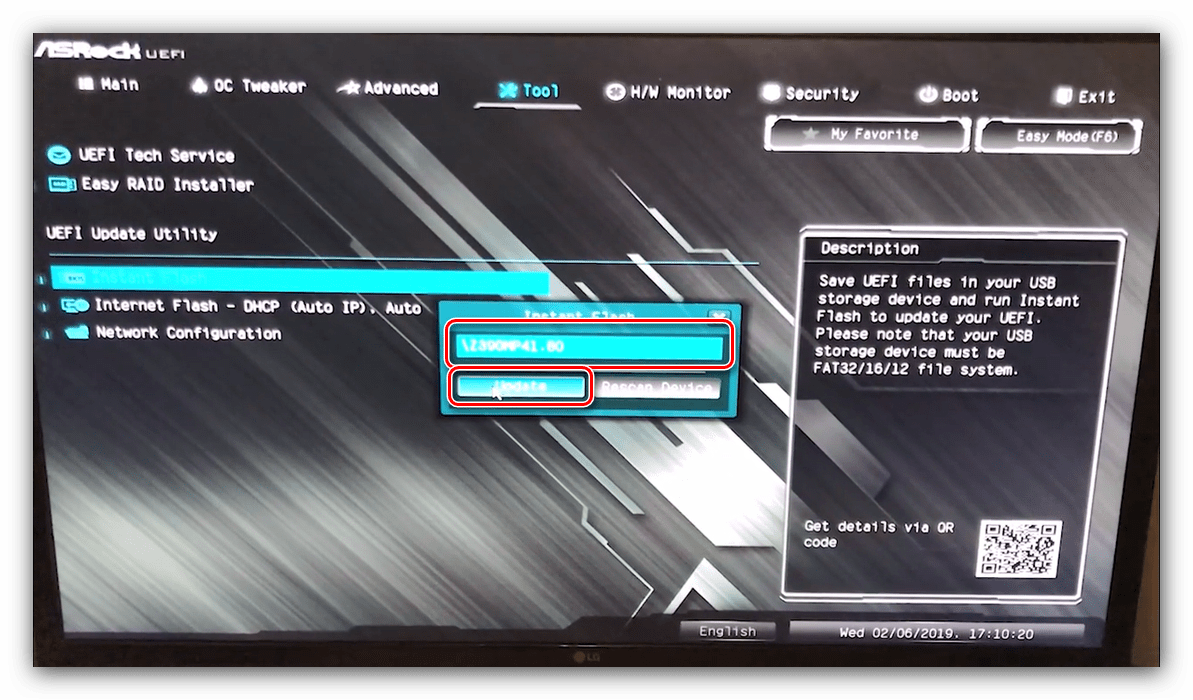
- Подождите, пока утилита проверит подключённый накопитель и записанные на нём версии обновлений. Выберите подходящий и кликните по кнопке «Update».
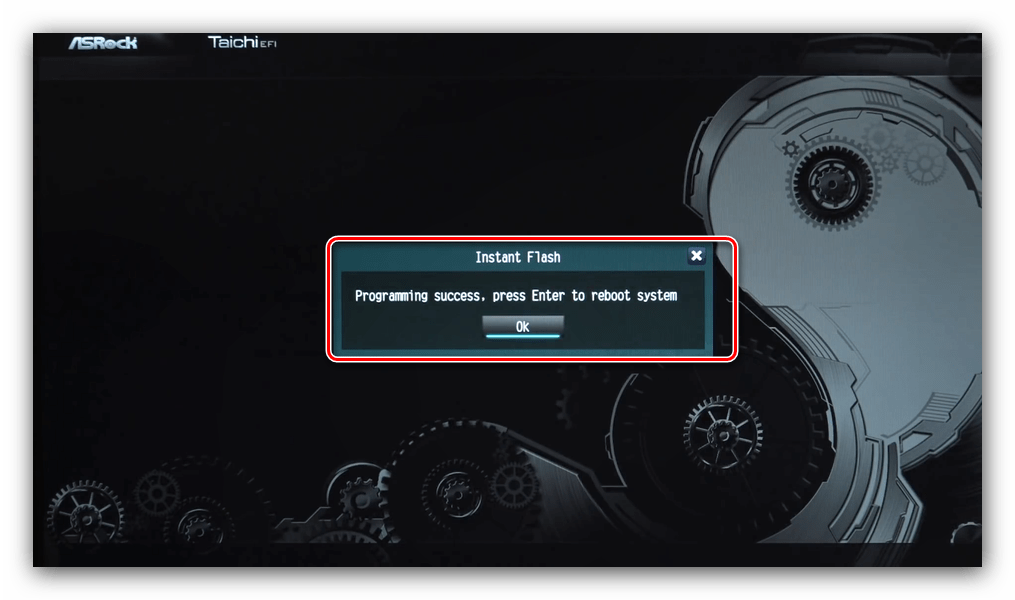
- Дождитесь окончания процедуры обновления, после чего перезагрузите компьютер.
Если всё проделано правильно, у вас будет установлена новейшая версия микропрограммы.
DOS-оболочка
Этот вариант самый сложный из представленных, поэтому использовать его следует только тогда, когда все остальные не подходят.
- Как и в случае с первым методом, сделайте загрузочный накопитель в виде пустой флешки, отформатированной в FAT32.
- Скопируйте в корень накопителя файлы из архива с обновлениями.
- Выключите компьютер и перейдите в BIOS, где настройте загрузку с флешки.
Подробнее: Как настроить БИОС для загрузки с USB
- Выключите компьютер, после чего подсоедините к нему подготовленный накопитель – помните про правило насчёт USB 2.0.
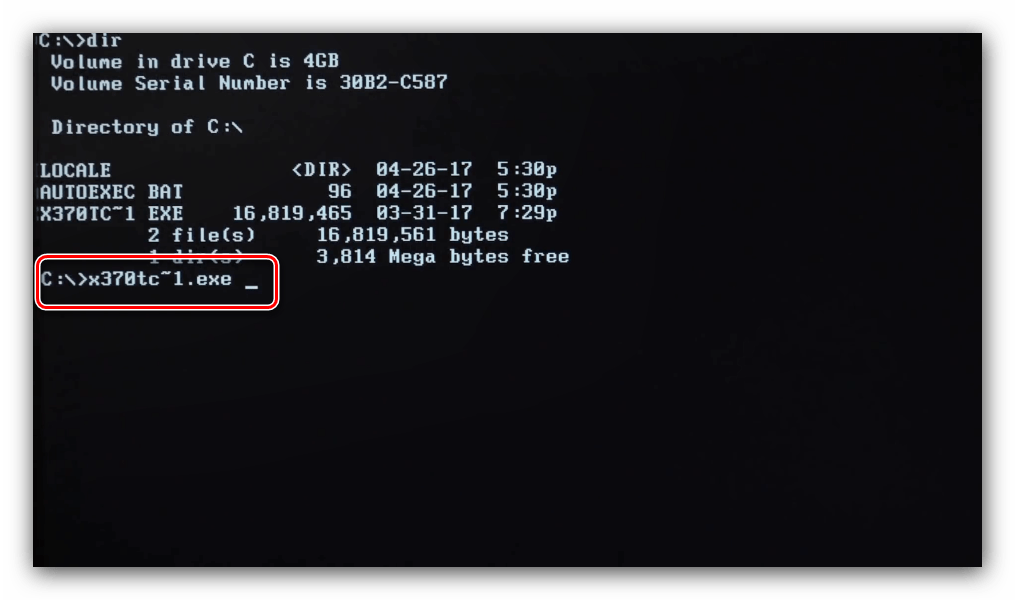
- Включите машину и дождитесь, пока появится интерфейс оболочки. В текстовой строке введите название EXE-файла с прошивкой (формат файла тоже нужно вводить), и нажмите Enter.
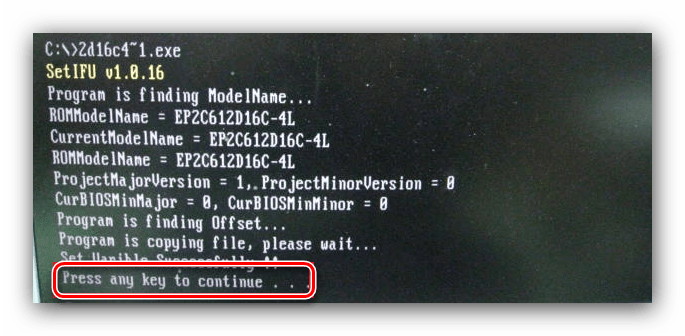
- Подождите, пока система определит совместимость выбранной версии. Если проблем не возникло, интерфейс предложит нажать любую кнопку для перезагрузки.
- После перезагрузки начнётся процесс обновления. Дождитесь, пока он завершиться. По окончании получите сообщение с предложением нажать Enter, проделайте это.
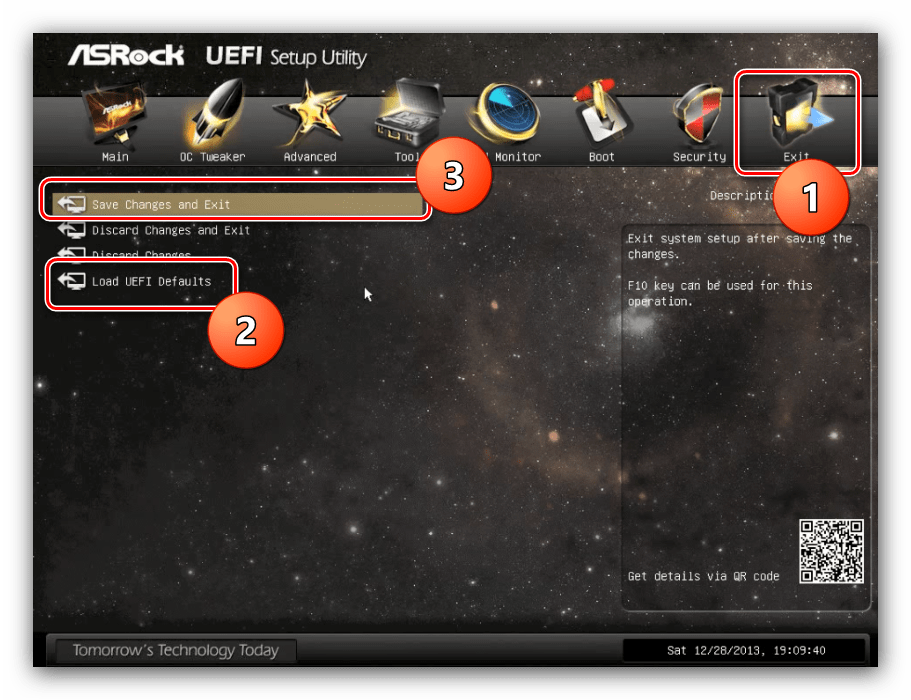
- Во время перезагрузки войдите в БИОС. В нём перейдите на вкладку «Exit», в которой задействуйте последовательно опции «Load Defaults» и «Exit Saving Changes».

Снова перезагрузите компьютер.
Windows
Вариант с обновлением из-под системы подобен предыдущему, но в некоторых случаях удобнее.
Обратите внимание! Обновление BIOS из-под Виндовс доступно только для версий Windows 10 RS3 и старше – новейшие варианты этой ОС возможность такого метода апдейта не поддерживают!
- Распакуйте архив с обновлениями в любую папку хранилища целевого компьютера. Найдите EXE-файл с обновлениями и запустите его от имени администратора.
- Подождите, пока файл подготовит обновления. Через некоторое время появится предложение закрыть все программы, нажмите «ОК».
- Далее понадобится сделать рестарт для установки апдейтов, нажмите на клавишу Y на клавиатуре.
- Компьютер перезагрузится и начнётся процедура обновления. По её окончании повторите шаги 6-7 предыдущей инструкции.
Технически этот метод подобен обновлению через DOS-оболочку, но не требует использования внешнего носителя. С другой стороны, существует ограничение совместимости по операционной системе, поэтому универсальным этот способ не назовёшь.
Заключение
Мы рассмотрели поэтапное выполнение процедуры обновления BIOS на материнских платах ASRock. Эта операция, как и подобные манипуляции с микропрограммой основной платы, требуют внимательности от пользователя и тщательного следования предложенным инструкциям.
Наша группа в TelegramПолезные советы и помощь
When it comes to the world of technology, innovation knows no bounds. And Asrock Instant Flash Without CPU is a prime example of just that. This groundbreaking feature allows users to update their BIOS without even needing a CPU. Now, that’s a game-changer! Gone are the days of complex and time-consuming BIOS updates. Asrock Instant Flash Without CPU simplifies the process, making it faster, more efficient, and hassle-free.
With Asrock Instant Flash Without CPU, users can enjoy the benefits of BIOS updates without the need for a compatible CPU. This feature has revolutionized the way we update and optimize our computer systems. No more waiting for CPU compatibility or worrying about potential issues during the update process. Asrock Instant Flash Without CPU provides a seamless solution that saves time and effort. It’s no wonder that this feature has gained popularity among professionals and tech enthusiasts alike.
Asrock Instant Flash is a convenient and efficient tool for updating BIOS without a CPU. It allows users to update the firmware directly through the motherboard’s USB port, eliminating the need for a processor. This feature is incredibly useful for troubleshooting issues or upgrading to the latest BIOS version. With Asrock Instant Flash, users can easily ensure their systems are up to date and performing optimally, all without needing a CPU. Experience hassle-free BIOS updates with Asrock Instant Flash.

Introduction to Asrock Instant Flash Without CPU
Asrock Instant Flash is a tool commonly used by PC enthusiasts and professionals to update the BIOS firmware on Asrock motherboards. However, a unique aspect of Asrock Instant Flash is the ability to perform BIOS updates without a CPU. This feature comes in handy when building a new system or updating an existing one, as it eliminates the need to have a functioning CPU installed. In this article, we will explore the details of Asrock Instant Flash and how it enables users to update their motherboard BIOS without a CPU.
The Importance of BIOS Updates
Before delving into the details of Asrock Instant Flash Without CPU, it is essential to understand why BIOS updates are crucial for a PC’s performance and stability. The BIOS (Basic Input/Output System) is responsible for initializing hardware components and facilitating communication between the hardware and the operating system. Regular BIOS updates can improve system compatibility, enhance performance, provide new features, and address security vulnerabilities.
Typically, updating the BIOS requires a working CPU as it involves flashing the firmware on the motherboard. However, Asrock Instant Flash eliminates this dependency, making it a valuable tool for PC builders and enthusiasts. Let’s explore how it works.
How Asrock Instant Flash Without CPU Works
The conventional method of updating the BIOS involves booting into the BIOS interface using a working CPU, downloading the updated firmware from the manufacturer’s website, and flashing it onto the motherboard. However, with Asrock Instant Flash Without CPU, the process is simplified.
When using Asrock Instant Flash Without CPU, users need to prepare a USB flash drive and follow a few simple steps. First, they download the BIOS firmware update from the Asrock website, ensuring that it’s compatible with their specific motherboard model. Then, they format the USB flash drive to FAT32 and copy the BIOS update file onto it. After inserting the USB flash drive into the designated port on the motherboard, they can initiate the update process without needing a CPU.
Once the system is powered on, users can enter the BIOS setup utility and navigate to the Instant Flash option. From there, they can select the USB flash drive and the BIOS update file, initiating the update process. The motherboard’s built-in Instant Flash technology enables it to read the BIOS update file directly from the USB flash drive and write it to the motherboard’s firmware, all without requiring a functional CPU.
Benefits of Asrock Instant Flash Without CPU
The ability to update the BIOS without a CPU offers several benefits for PC builders and enthusiasts. Here are some notable advantages:
- Saves time: Asrock Instant Flash Without CPU eliminates the need to install a CPU temporarily, saving time during system assembly or troubleshooting processes.
- Easier troubleshooting: When encountering compatibility issues or system instability, users can update the BIOS without the hassle of having to remove and reinstall the CPU.
- Cost-effective: Avoiding the need to have a CPU for BIOS updates can be cost-effective for users who regularly upgrade their systems or work with multiple motherboards.
- User-friendly: Asrock Instant Flash Without CPU is designed to be user-friendly, with a simple process that can be easily followed by both professionals and DIY PC builders.
Considerations for Using Asrock Instant Flash Without CPU
While Asrock Instant Flash Without CPU provides a convenient solution for BIOS updates, there are a few considerations to keep in mind:
Compatibility: Ensure that the BIOS update file downloaded from the Asrock website is specifically intended for your motherboard model. Using an incompatible BIOS file can result in system instability or even permanent damage to the motherboard.
Power supply: It is crucial to maintain a stable power supply during the BIOS update process. Any interruption or power fluctuation can lead to a failed update and potential damage to the motherboard. Using a UPS (uninterruptible power supply) or ensuring a reliable power source is recommended.
No CPU-dependent tasks: While Asrock Instant Flash Without CPU allows for BIOS updates, it does not enable other CPU-dependent tasks, such as accessing the operating system or running software. It is important to remember that this feature is solely for updating the BIOS firmware.
Exploring Another Dimension of Asrock Instant Flash Without CPU
Now that we have covered the main aspect of Asrock Instant Flash Without CPU, let’s explore another dimension related to this tool.
Compatibility with Different Asrock Motherboard Models
Asrock Instant Flash Without CPU is compatible with a wide range of Asrock motherboard models. This feature is found in various Asrock motherboard series, including the mainstream «Phantom Gaming,» «Taichi,» and «Steel Legend» series, among others. Users can check the Asrock website or their motherboard’s user manual to verify if their specific model supports the Instant Flash Without CPU feature.
Since motherboard models and firmware versions can vary, it is crucial to ensure that the downloaded BIOS update file matches your specific motherboard’s model and revision. Using an incorrect firmware file can lead to compatibility issues and potentially damage the motherboard.
Keeping Up with the Latest BIOS Updates
Asrock, like many other motherboard manufacturers, regularly releases BIOS updates to address hardware compatibility issues, improve performance, and introduce new features. Keeping up with the latest BIOS updates can help users maximize the stability and functionality of their systems.
Asrock provides user-friendly tools and resources for users to find and download the latest BIOS updates for their motherboards. The Asrock website offers a dedicated support section where users can search for their specific motherboard model and access the available BIOS updates. Users can also sign up for email notifications or subscribe to RSS feeds to stay informed about new BIOS releases for their Asrock motherboards.
Additional Tools and Features
In addition to the Instant Flash Without CPU feature, Asrock motherboards offer various other tools and features to enhance the user experience. These may include overclocking utilities, RGB lighting control, network optimization tools, and more. Users can explore the specific features and capabilities of their Asrock motherboard models through the product documentation and the manufacturer’s website.
Conclusion
Asrock Instant Flash Without CPU is an innovative feature that simplifies the BIOS update process for users. By removing the dependence on a functioning CPU, it saves time, streamlines troubleshooting, and offers a cost-effective solution. It is important to follow the proper procedures, ensure compatibility, and maintain a stable power supply when using Asrock Instant Flash Without CPU. By doing so, users can keep their motherboard’s firmware up to date, improving system performance and stability.

Asrock Instant Flash Without CPU
Asrock Instant Flash is a utility that allows users to update the BIOS firmware of their Asrock motherboards. Traditionally, updating the BIOS required a CPU to be installed in the motherboard. However, Asrock has introduced a new feature that allows users to update the BIOS without a CPU.
This innovative feature simplifies the BIOS updating process and eliminates the need for a compatible CPU. Users can now update the BIOS using only a USB flash drive and power supply connected to the motherboard. This is particularly useful for users who want to upgrade to a new CPU but need to update the BIOS first.
To use this feature, users need to download the latest BIOS firmware file from the Asrock website onto a USB flash drive. They then connect the flash drive to the motherboard’s dedicated USB port and press the «Instant Flash» button. The motherboard will automatically detect the BIOS file on the flash drive and update the firmware without requiring a CPU.
Overall, Asrock Instant Flash without CPU is a convenient and efficient method for updating the BIOS firmware of Asrock motherboards. It saves time and effort for users and ensures compatibility with the latest hardware technologies.
Key Takeaways — Asrock Instant Flash Without CPU
- Asrock Instant Flash allows you to update your BIOS without a CPU.
- Updating your BIOS is important for optimal performance and compatibility.
- With Asrock Instant Flash, you can update your BIOS using a USB drive.
- Make sure to download the correct BIOS version for your motherboard.
- Follow the instructions carefully to avoid any issues during the update process.
Frequently Asked Questions
Here are some common questions about Asrock Instant Flash without CPU:
1. Can I use Asrock Instant Flash without a CPU?
Unfortunately, Asrock Instant Flash requires a CPU to function. This feature allows users to update the BIOS of their Asrock motherboard easily. Without a CPU, the system cannot perform any operations and, therefore, cannot run the Instant Flash utility.
However, if you require a BIOS update and do not have a compatible CPU at hand, you may consider contacting Asrock’s customer support for alternative solutions or options.
2. What is the purpose of Asrock Instant Flash?
Asrock Instant Flash is a utility provided by Asrock for their motherboards. It allows users to update the motherboard’s BIOS (Basic Input/Output System) easily and conveniently. The BIOS is responsible for initializing hardware components and starting the system when the computer is powered on.
By updating the BIOS using Asrock Instant Flash, users can ensure their motherboard is running the latest firmware, which may include bug fixes, performance improvements, or compatibility enhancements with newer hardware or software.
3. How do I use Asrock Instant Flash?
To use Asrock Instant Flash, follow these steps:
1. Download the latest BIOS file for your specific Asrock motherboard model from the official Asrock website.
2. Save the BIOS file to a USB flash drive formatted in FAT32 format.
3. Connect the USB flash drive to the USB port on the rear I/O panel of your Asrock motherboard.
4. Power on your computer and enter the BIOS setup by pressing the designated key (usually DEL or F2) during startup.
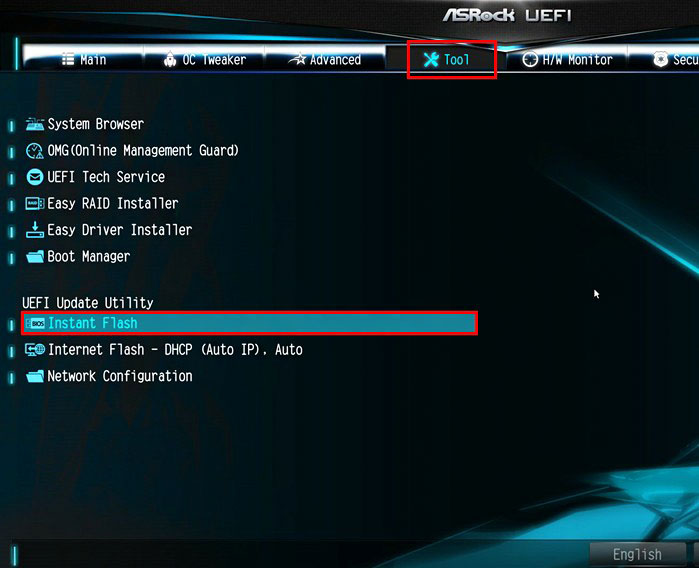
5. In the BIOS setup, navigate to the «Tools» or «Instant Flash» section.
6. Select the USB flash drive as the source for the BIOS update.
7. Follow the on-screen instructions to initiate the BIOS update using Asrock Instant Flash.
8. Once the update process is complete, restart your computer to apply the new BIOS firmware.
4. Is it possible to update the BIOS without a CPU?
No, it is not possible to update the BIOS without a CPU. The CPU is a crucial component in a computer system and is required for any operations to take place, including BIOS updates. Without a CPU, the system will not be able to execute the necessary instructions to update the BIOS firmware.
In order to update the BIOS, a compatible CPU must be installed in the motherboard. If you do not have a compatible CPU, you may need to seek assistance from a professional technician or consider purchasing a CPU that is compatible with your motherboard model.
5. Can I use Asrock Instant Flash to downgrade the BIOS?
Yes, Asrock Instant Flash supports downgrading the BIOS on Asrock motherboards. However, it is important to note that downgrading the BIOS carries some risks and should be done with caution.
Prior to downgrading the BIOS, it is recommended to carefully read the release notes or documentation provided by Asrock to understand the implications and potential issues associated with the specific BIOS version you are planning to downgrade to.
To conclude, the use of Asrock Instant Flash without a CPU is a convenient and time-saving feature for users. The ability to update the BIOS without the need for a CPU provides a hassle-free experience and eliminates the need for additional components.
This feature is particularly useful when building a new system or troubleshooting an existing one. Asrock Instant Flash allows users to update their BIOS directly from a USB drive, making the process quick and efficient. Overall, the inclusion of this feature in Asrock motherboards offers a seamless and user-friendly experience for individuals looking to update their BIOS without a CPU.
The BIOS/UEFI is your system’s firmware. It’s a low-level software interface that facilitates communication between the hardware and OS.
If your system isn’t detecting some hardware components or a recently released BIOS update has added some new functionality, then you may want to update the BIOS version.
ASRock provides two ways to install such updates – the Instant Flash utility and UpdateCapsules to update from Windows.
Before You Begin
Before updating the BIOS, it’s important to confirm that the update is actually required. Some valid reasons include:
- Hardware incompatibility (e.g., new CPU doesn’t work due to old BIOS version)
- BSODs and boot errors
- Update introduces security patches, new features, or performance upgrades
If your system is running fine and there’s no real reason to update, then you should stick with your current BIOS version for now. There’s no point in risking potential issues that the new version might cause.
But if you do have valid reasons to update, keep a few things in mind before proceeding:
- Make sure the BIOS update isn’t interrupted as that could brick your motherboard. A power-backup source like a UPS can help with this.
- Download the update files from the official source and use the official methods to update the BIOS as we’ve done in this article. There’s no guarantee that third-party flashing tools are safe.
- It’s also important to make sure the file was downloaded completely without interruption as a corrupt file can lead to a failed update, or even a bricked motherboard in the worst case.
Check Motherboard Model & BIOS Version
You’ll need your motherboard model name to search for the available BIOS updates. It’s also a good idea to note the current BIOS version for comparison.
- Press Win + R, type
msinfo32, and press Enter. - In the System Summary page, check the BIOS Version/Date and BaseBoard Product entries.


As you can see, I’m using a Z370M-ITX/ac board. The firmware version is P1.50, installed on 11/16/2017.
Check Available BIOS Versions Online
Go to the ASRock Support page and search for your motherboard model. Multiple versions of the model (gaming, pro, mini, etc.) may be listed there, so make sure you find the exact match.

On the motherboard’s product page, expand Support > BIOS.
The available BIOS updates for your motherboard will be listed here, sorted by version. If you’re unsure which update to install, read their description. The main changes like added features or compatibility upgrades should be listed there.

Some updates are non-revertible, meaning you won’t be able to flash older BIOS versions after updating. Others may require specific OS versions (e.g., Windows 10 RS3 or older). Such warnings and instructions will be mentioned in the description section, so it’s important to read everything carefully.
Once you pick the update to install, I recommend using Instant Flash to update the BIOS. UpdateCapsules are a viable alternative if you want to update directly from Windows.
In either case, if you click on the method hyperlink, you’ll find step-by-step instructions for your chosen method. If you find the steps there confusing, you can follow along with our guide instead.
Download the file from the Global hyperlink and continue the steps from the appropriate section below.
Method 1: Instant Flash
Instant Flash is ASRock’s proprietary BIOS flashing utility. You’ll have to move the update files to a USB and select this USB with Instant Flash to update the BIOS.
- Connect a USB drive to your PC and format it as FAT32.

- Right-click the downloaded zip file and select Extract all. Move the extracted ROM file(s) to the USB.

- Reboot your PC and press F2 or Del as indicated on-screen to enter BIOS Setup. With some motherboards, you can also press F6 to directly access Instant Flash.
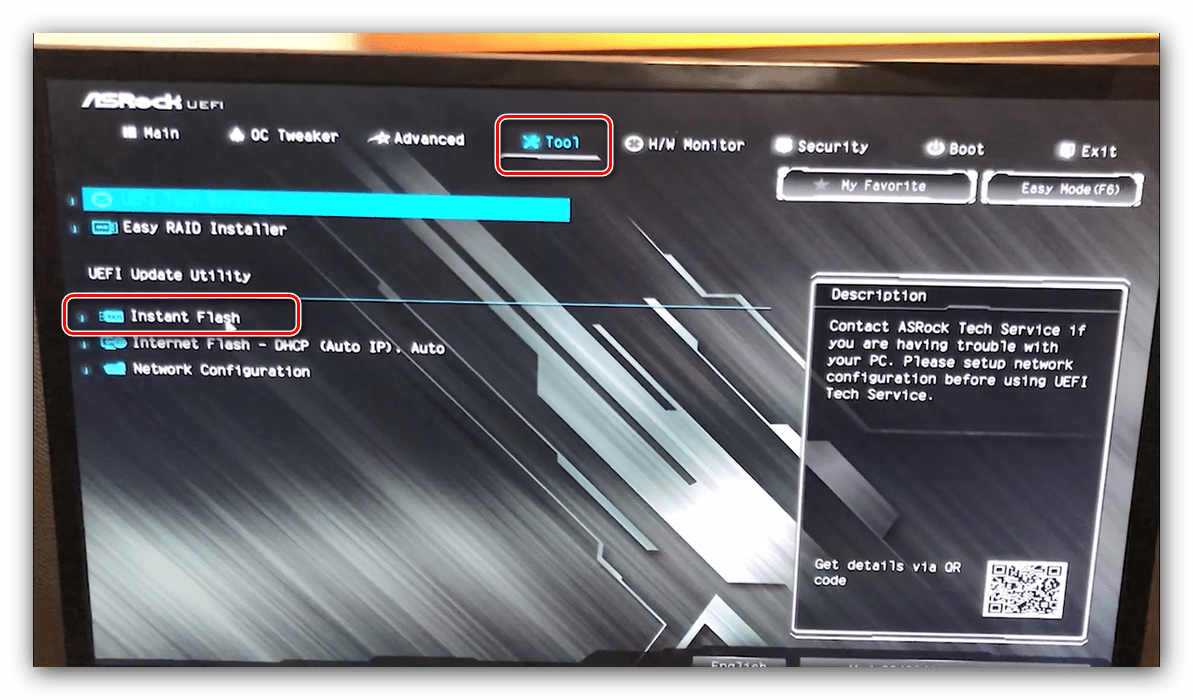
- Select Instant Flash from the Tools menu.

- Instant Flash will list all compatible BIOS versions. Select the BIOS version to flash and click on Yes.

- The system will flash the BIOS now. Make sure the process isn’t interrupted. After it completes, press Ok to reboot the system.

- When rebooting, press F2/Del to enter BIOS Setup again.
- Switch to the Exit menu and select Load UEFI Defaults, then Save Changes and Exit. You’ll boot with the new BIOS upon restarting.


Method 2: UpdateCapsule
Windows supports servicing firmware updates as a driver package using the UEFI UpdateCapsule function. The upside to this is that you can install the update directly from Windows, and the process is mostly automated.
The downside is that this method is only supported on certain boards and requires specific OS versions (Windows 10 Version 1709 or older in my case).
If your board and OS are supported, you can follow the steps listed below to update the BIOS with this method:
- Right-click the downloaded zip file and select Extract all > Extract.
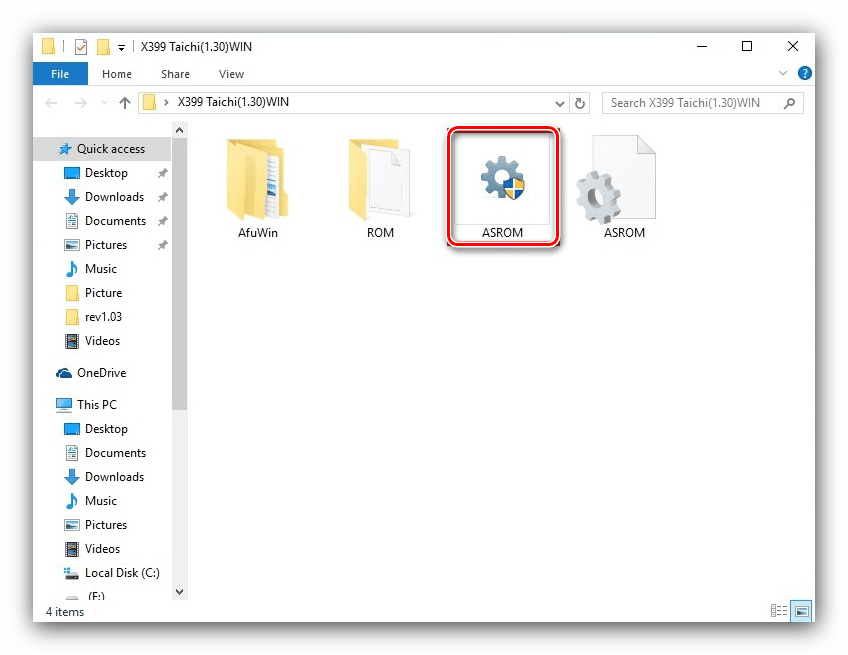
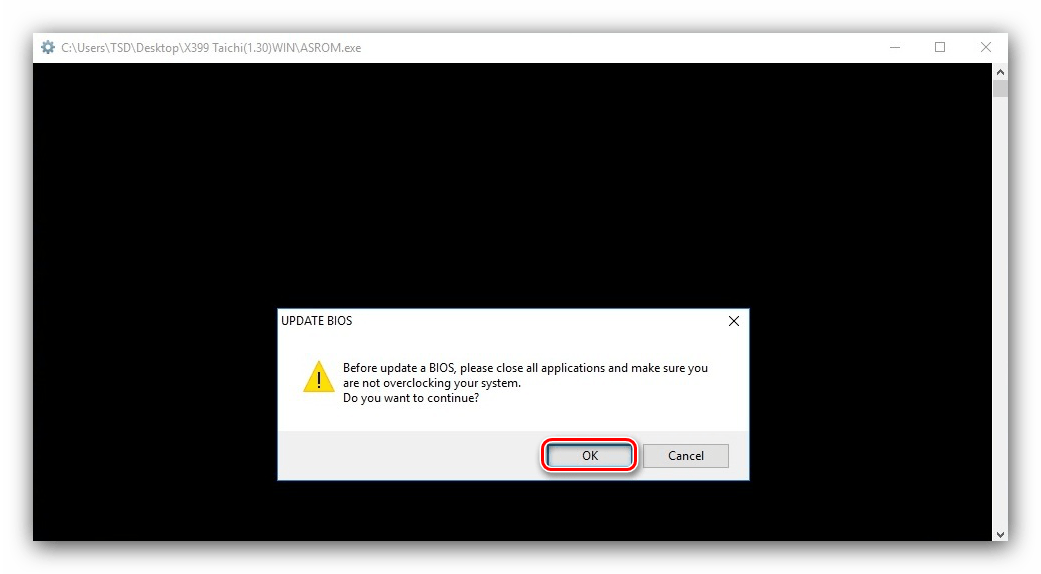
- Launch the extracted ASROM app and accept the prompt to continue.

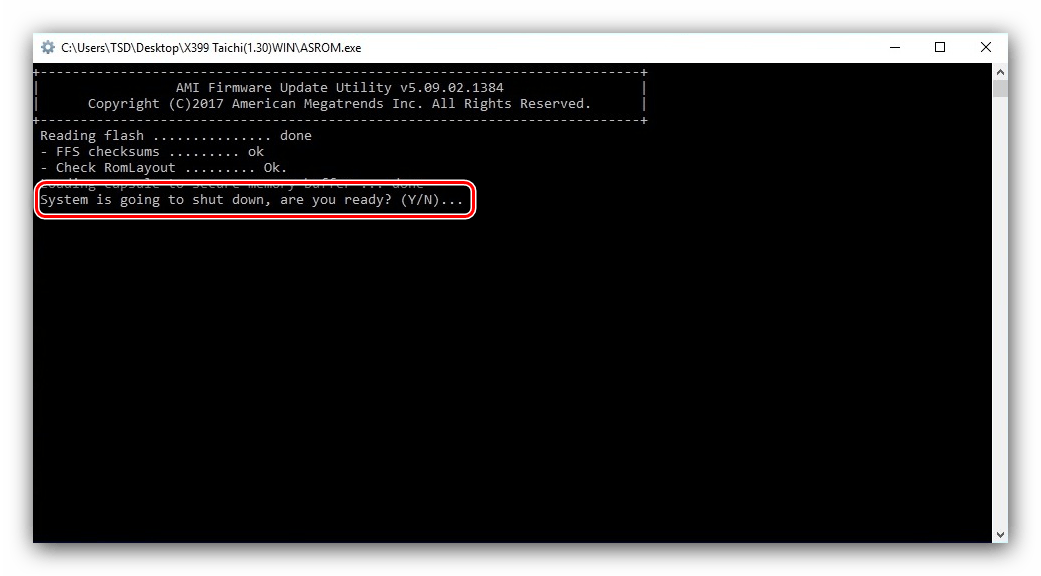
- The system will prompt you to reboot after loading the capsule to the secure memory buffer. Enter Y at this point.

- After restarting, the BIOS update will start automatically.
- Once the update completes, the PC will restart again. Press F2/Del to enter BIOS Setup when this happens.
- Switch to the Exit menu and select Load UEFI Defaults, then Save Changes and Exit. You’ll boot with the updated BIOS upon restarting.


Всем привет! В своей прошлой статье я написал о разгоне процессора и оставил один небольшой пробел, касательно обновления БИОСа, который мне хотелось бы заполнить. Сегодня я расскажу вам об общих принципах данной тематики и разберу пример непосредственно на моей материнской плате Asrock Z170m Pro4s. Вообще при обновлении БИОСа всегда присутствует риск того, что произойдет какой-либо сбой, и последствия далеко не всегда можно будет исправить в два клика. Поэтому здесь очень актуально одно из правил хорошего сисадмина: «не трогай то, что и так работает”. Но если вы настроены решительно и апгрейд вам просто необходим, то будьте очень внимательны, запаситесь терпением и хорошим источником бесперебойного питания. Да, да, вы не ослышались. Если в процессе обновления произойдет внезапное отключение электроэнергии, возможно все, вплоть до полного выхода оборудования из строя. Делайте все на свой страх и риск.
Автор Денис Михайлов!
Итак, первое, что нам нужно сделать, это узнать ревизию нашей материнки и версию установленного на нее БИОСа. Это необходимо для дальнейших наших действий. Хочу заметить, что ревизия нужна для обновления БИОСа устаревших материнских плат, а для обновления новых материнок достаточно знать версию BIOS.
Как правило, ревизия указывается на самой материнской плате, в зависимости от модели находиться она может в разных местах. В любом случае ищем надпись rev.0.1 или аналогичную.
Она в большинстве случаев присутствует и на коробке и на документации, прилагающейся к материнской плате.
Для того, чтобы узнать текущую версию БИОСа нажимаем на клавиатуре комбинацию клавиш windows + R и в открывшемся поле вводим команду msinfo32.


Теперь, когда мы вооружились необходимой информацией, переходим на сайт производителя нашей материнки. Далее действия, как правило, одинаковые, либо очень схожи между собой.
А именно: находим нашу материнскую плату и заходим в раздел «скачать”, ”загрузить” или аналогичный.
Дальнейшие действия будут отличаться между собой в зависимости от того, каким способом вы хотите провести обновление. Всего их три.
На мой взгляд, является самым простым и понятным. И если вы не хотите заморачиваться, то я советую вам именно его. Сам метод заключается в том, что вы скачиваете либо уже готовый файл с обновленной версией БИОС, просто его запускаете и следуете дальнейшим инструкциям, либо делаете это с помощью фирменной утилиты (MSI Live Update, ASUS Update и тд), которая делает то же самое без вашего участия.
Происходит благодаря созданию загрузочной флешки с файлом прошивки, который скачивается опять же на сайте производителя. Данный способ, как по мне, является самым каверзным и запутанным, поэтому я его не рекомендую.
Способ, о котором я и собирался рассказать. Заключается в том, что апгрейд происходит благодаря встроенным утилитам самого БИОС. В моем случае это Instant Flash от компании Asrock.
Итак, как я уже писал выше, первым делом заходим на сайт производителя нашей материнской платы и вводим в поле поиска название материнки, жмём «Поиск»:
http://www.asrock.com/index.ru.asp

Download

Загрузка BIOS

Скачиваем последнюю прошивку (Instant Flash).

Далее берем флешку формата fat32 (обязательно) и закидываем на нее файл, который мы ранее скачали. Перезагружаемся, заходим в БИОС.
Следуем во вкладку Tool и видим нашу утилиту (Instant Flash).
Жмем на нее, после чего программа проверяет все носители, на которых может быть найден файл с обновлением, проверяет, походит ли данная версия прошивки для нашего БИОСА и после нашего согласия запускает сам процесс обновления. И если все пройдет по плану, компьютер перезагрузится, и мы будет иметь обновленный БИОС.
Так же хочу отметить, что на некоторых БИОСах присутствуют утилиты для поиска и загрузки прошивок через интернет. В моем случае это Internet Flash.

Делает эта утилита все, то же самое, что и предыдущая, только еще может скачать необходимые файлы обновления при наличии доступа к интернету. Инструкция по применению точно такая же.
И напоследок хотелось бы добавить, что обновление БИОСа это серьезный шаг и перед началом не забудьте ознакомиться с инструкцией и документацией. В них могут быть указаны определенные нюансы и тонкости вашей материнской платы, пренебрежения которыми могут стоить вам материнки. На этом все, спасибо за внимание!
Статьи по этой теме:
- Как обновить БИОС на материнской плате ASUS
- Восстановление повреждённой прошивки BIOS на ноутбуке программатором, в случае, если ноутбук не загружается. Часть 1. Разборка ноутбука Acer Aspire E1-532 и извлечение материнской платы
Есть множество причин, по которым порой требуется обновить версию BIOS. Я уже описывал как это сделать на материнских платах Asus, Gigabyte. Теперь опишу как обновить биос ASRock. Именно ей посвящена данная инструкция.
В обновлении биоса Asrock нет ничего сложного, следуя рекомендациям этой статьи, с этим справится любой пользователь.
В момент прошивки BIOS Asrock ни в коем случае не прерывайте процедуру обновления микрокода, это приведет к неисправности компьютера, придется везти его в сервисный центр для прошивки биоса через программатор.
Прилагаю два варианта инструкции, видео и текстовый, каким удобнее, тем и пользуйтесь.
Текстовый вариант инструкции
Для начала включите компьютер и как только появится первая картинка на экране нажмите F2 чтобы войти в биос.

Вам необходимо определить вашу версию биос и наименование материнской платы (модель платы можно посмотреть также открыв системный блок или на коробке, что шла при покупке), чтобы это было легче сделать, отметил на фото ниже.

Запомните или запишите версию микрокода и модель матплаты. Далее открываем официальный сайт производителя asrock.com, через поиск находим модель вашей материнской платы.

Если в результате поиска несколько моделей с разными ревизиями, то выберите согласно вашей.

Перейдите в категорию «Поддержка«, выберите «BIOS«.

Далее в статье небольшая развилка, так как опишу два способа как обновить микрокод биос на ASRock, разделил на два подзаголовка.
Обновление BIOS ASRock через Instant Flash
На открывшейся странице вы увидите список доступных версий биоса для обновления. Возле каждой присутствует описание внесенных изменений. Скачать можете любую более свежую версию, но рекомендую последнюю, она несет в себе более широкую функциональность и исправление обнаруженных ошибок. Не скачивайте Бета-версии! И так, нас интересует микрокод со строкой «Instant Flash«, кликаем по «Global» (мультиязычная версия).

Скачанный файл находится в архиве, извлеките его и скопируйте в корень флешки с файловой таблицей FAT32. О том, как отформатировать в FAT32 я уже писал.
Перезагрузите компьютер, при включении нажмите F6 чтобы попасть в интерфейс Instant Flash и обновить биос на материнской плате asrock.
Утилита автоматически просканирует носители и определит подходящий файл для апдейта, нажмите «Обновление«, во всплывающем окне подтвердите действие — Yes, дождитесь завершения процедуры, по окончанию компьютер перезагрузится и запустится в обычном режиме. При перезагрузке изображение может отсутствовать до 30 секунд, ничего не предпринимайте.
Если по какой-то причине клавиша F6 не срабатывает, то необходимо зайти в биос ASRock с помощью клавиши F2 при запуске ПК.
Чтобы попасть в более широкие настройки кликните по кнопке «Advanced Mode» или нажмите клавишу F6.

Выберите вкладку «Средство«, кликните «Instant Flash«. После того, как программа найдет подходящую прошивку, нажмите «Обновление«, подтвердите нажав «Да«, дождитесь окончания.

Обновление BIOS ASRock через файл .exe
Есть еще один метод обновить прошивку микрокода – из-под Windows. Возвращаемся к выбору версий биоса, только на этот раз скачиваем кликнув «Global» в строке Windows.

Распакуйте скачанный .exe файл, запустите его с правами администратора, кликнув по нему правой кнопкой мыши и выбрав соответствующую строку – «Запуск от имени администратора». Подтвердите действие нажав «Yes». Компьютер перезагрузится, дождитесь завершения.
Вот и все, а чтобы убедится, что у вас обновленная версия, зайдите в BIOS и посмотрите.
