
Время на прочтение7 мин
Количество просмотров8.1K
Для начала расскажу, что приложение, которое я разрабатывал, долго существовало на небольшом «подстольном» сервере в виде прототипа, которым в работе пользовалось небольшое число сотрудников. По прошествии некоторого времени, руководство приняло решение тиражировать это приложение в пром – с переносом на пром-сервер и организацией доступов к нему сотрудникам всего структурного подразделения.

Естественно, как это всегда бывает, сопровождение выдало нам список требований, которым должны соответствовать приложения, размещаемые на пром-серверах. Одним из таких требований было реализация авторизации по учетной записи Windows, а старую авторизацию по логину/паролю использовать было нельзя. О том, с какими подводными камнями мы столкнулись в ходе реализации такой, казалось бы, простой фичи, и как мы их решили, и пойдет речь в этом посте. Как я и упомянул ранее, в начальной точке этой истории у нас было классическое MVC-приложение. Информация о пользователях, их ролях (Admin, Common) и доступах к определенным действиям и процедурам хранилась в БД MS SQL. Упрощенно структуру этого сегмента БД можно представить вот так:

По названию таблиц можно догадаться, что в самом приложении эта связка таблиц захватывалась Entity Framework 6, а после использовалась подсистемой ASP.NET Identity. В начале сессии пользователю выводилась форма для входа, в которую он вводил свои учетные данные, после чего происходил редирект на домашнюю страницу приложения. Далее, исходя из того, какие доступы у данного пользователя прописаны в БД, и какими привилегиями он обладает, система подстраивала UI под эти данные.
Авторизация была реализована с помощью HTML-форм путём применения стандартного хелпера Html.BeginForm, отсылающего введенные данные по нажатию кнопки Submit. Вот как это выглядело с точки зрения кода:
@using (Html.BeginForm("Login", "Auth", FormMethod.Post, new { @class = "form-signin" }))
{
    @Html.AntiForgeryToken()
    <div class="form-group form-ie">
        <span class="oi oi-person"></span>
        @Html.TextBoxFor(x => x.Login, new { @class = "form-control", @placeholder = "Логин", @id = "username" })
        @Html.ValidationMessageFor(x => x.Login)
    </div>

    <div class="form-group form-ie">
        <span class="oi oi-lock-locked"></span>
        @Html.PasswordFor(x => x.Password, new { @class = "form-control", @placeholder = "Пароль", @id = "inputPassword" })
        @Html.ValidationMessageFor(x => x.Password)
    </div>
    <input type="submit" class="btn btn-mybtn-lg btn-my btn-block text-uppercase" value="Войти" />
}
Далее логин с паролем передавались в контроллер авторизации AuthController, который в себе хранил UserManager, SignInManager и AppDbContext (пронаследованный от IdentityDBContext) из ASP.NET Identity. Вот как выглядел код этого контроллера.
[AllowAnonymous]
[RoutePrefix("Auth")]
public class AuthController : Controller
{
	private AppDbContext _dbContext;
	private ApplicationSignInManager _signInManager;
	private ApplicationUserManager _userManager;
	public ApplicationSignInManager SignInManager
	{
		get
		{
			return _signInManager ?? HttpContext.GetOwinContext().Get<ApplicationSignInManager>();
		}
		private set
		{
			_signInManager = value;
		}
	}

	public ApplicationUserManager UserManager
	{
		get
		{
			return _userManager ?? HttpContext.GetOwinContext().GetUserManager<ApplicationUserManager>();
		}
		private set
		{
			_userManager = value;
		}
	}

	public AppDbContext DbContext
	{
		get
		{
			return _dbContext ?? HttpContext.GetOwinContext().Get<AppDbContext>();
		}
		private set
		{
			_dbContext = value;
		}
	}

	public AuthController()
	{
	}

	[HttpGet]
	public ActionResult Index()
	{
		return View(new AuthViewModel());
	}

	[HttpPost]
	[ValidateAntiForgeryToken]
	public async Task<ActionResult> Login(AuthViewModel model)
	{
		var result = await SignInManager.PasswordSignInAsync(model.Login, model.Password, false, false);
		if (result == SignInStatus.Success)
		{
			return RedirectToAction("Index", "Home");
		}
		Log.Warning("Ошибка авторизации: Неправильный логин или пароль");
		ModelState.AddModelError("Password", "Неправильный логин или пароль");
		return View("Index", model);
	}

	private IAuthenticationManager AuthenticationManager
	{
		get
		{
			return HttpContext.GetOwinContext().Authentication;
		}
	}

	[HttpGet]
	[ValidateAntiForgeryToken]
	public ActionResult LogOff()
	{
		AuthenticationManager.SignOut(DefaultAuthenticationTypes.ApplicationCookie);
		return RedirectToAction("Index", "Auth");
	}
}
Сам факт авторизации в системе в других контроллерах проверялся посредством применения фильтра-нотации [Authorize], а принадлежность к роли – посредством применения [Authorize(Roles = “role1”)].
[Authorize]
public class HomeController : Controller
{
	private AppDbContext _dbContext;

	public AppDbContext DbContext
	{
		get
		{
			return _dbContext ?? HttpContext.GetOwinContext().Get<AppDbContext>();
		}
		private set
		{
			_dbContext = value;
		}
	}

	public HomeController()
	{
	}

	[Authorize(Roles = "Common, Admin")]
	public ActionResult Index()
	{
		///something is happening
		return View();
	}
}
Как заметит знакомый с вышеописанным стеком человек, не происходит вообще ничего необычного – это базовые элементы, знакомые каждому ASP.NET-разработчику.
Итак, после получения требования об изменении порядка авторизации, мы стали менять его. Для тех, кто с этим не знаком — в ASP.NET существуют следующие типы авторизации, которые можно поставить как с конфига, так и с помощью шаблона Visual Studio при создании проекта:
-
Без авторизации;
-
Авторизация на основе отдельных учётных записей (логин+пароль, классика)
-
Авторизация с помощью Active Directory, Microsoft Azure или Office 365.
-
Авторизация с помощью учётной записи Windows.
Так как у нас нет возможности использовать Active Directory ввиду требований сопровождения, остаётся один вариант – авторизация с помощью УЗ Windows.
Поигравшись немного со сменой способа авторизации в пустых приложениях и убедившись, что в них всё работает, я сделал то же самое с нашим приложением, заменив authentication mode на «Windows» в web.config.
Итак, настало время прогона. Изначально я предполагал, что после изменения авторизации можно будет подгонять логин пользователя в SignInManager, после чего проводить авторизацию по-старому (только без пароля) – т.е., что SignInManager будет маппить логин с таблицей AspNetUsers и вносить в контекст текущей пользовательской сессии соответствующий AspNetIdentity. Для чистоты эксперимента я удалил себя из таблицы с пользователями. Иии…я все равно спокойно авторизовался. Покопавшись в переменных, я понял, что при смене authentication mode на «Windows» используется другой вид Identity: не AspNetIdentity, а WindowsIdentity. При использовании WindowsIdentity любой пользователь, который вошёл в Windows – априори авторизован, причем автономно – никакой связи с БД и EF не наблюдалось. Это означало, что если ничего не исправить, то…

Ну вы поняли ?
Так как Active Directory мы использовать не могли, текущий вариант не работал, а опыта в написании и модификации систем авторизации у меня не было – плюс, на эту фичу было отведено мало времени – я закопался в документацию по ASP.NET Identity и Windows Identity. Как оказалось – это было правильное решение.
Итак, как можно подружить ASP.NET Identity + EF и Windows Identity:
-
Сделать еще один класс – назовем его CustomAuthenticationFilter — и пронаследовать его от ActionFilterAttribute и IAuthenticationFilter.
В AuthorizeAttribute содержится метод OnAuthentication который можно переопределить в дочернем классе. В нём мы захватываем логин пользователя из Windows Identity, прикрепленного к контексту AuthenticationContext – затем с помощью контекста Entity Framework получаем доступ к таблице с пользователями и проверяем, есть ли пользователь в списке. Если его нет – в методе вернуть false.
Затем из AuthorizeAttribute в нашем классе необходимо переопределить обработчик событий OnAuthenticationChallenge, который позволяет задать реакцию системы в случае, если метод OnAuthentication, переопределенный ранее выдаст false. В нашем случае мы будем перенаправлять пользователя на страницу, где сообщим ему, что к приложению необходимо получить доступ (401).
public class CustomAuthenticationFilter : ActionFilterAttribute, IAuthenticationFilter
{
	public void OnAuthentication(AuthenticationContext filterContext)
	{
		var dbContext = filterContext.HttpContext.GetOwinContext().Get<AppDbContext>();

		var username = filterContext.HttpContext.User.Identity.Name;

		var userMatches = dbContext.Users.Where(x => x.UserName == username);

		if (string.IsNullOrEmpty(username) || userMatches.Count() != 1)
		{
			filterContext.Result = new HttpUnauthorizedResult();
		}
	}

	public void OnAuthenticationChallenge(AuthenticationChallengeContext filterContext)
	{
		if (filterContext.Result == null || filterContext.Result is HttpUnauthorizedResult)
		{
			filterContext.Result = new RedirectToRouteResult(
				 new RouteValueDictionary{
					 { "controller", "Error" },
					 { "action", "NotAuthorized" }
			});
		}
	}
}-
Для того, чтобы сделать вариант, предполагающий дополнительную проверку роли, помимо проверки факта наличия пользователя, необходимо в том же или новом классе пронаследоваться от AuthorizeAttribute. Для упрощения чтения я сделал новый класс.
Идеология здесь следующая:
Делаем конструктор, в который извне передаем список разрешенных ролей, например, { “Admin”, “Common”}.
Переопределяем метод AuthorizeCore, в котором реализуем поиск пользователя по образцу предыдущего класса, а потом через тот же контекст EF достаем список ролей пользователя и матчим его с тем списком, который прилетает через конструктор. Если матч есть – пользователь «достоин».

-
Далее переопределяем обработчик HandleUnauthorizedRequest, где мы выдаем пользователю стилизованную ошибку 403.
public class CustomAuthorizeAttribute : AuthorizeAttribute
{
	private readonly string[] allowedRoles;
	public CustomAuthorizeAttribute(params string[] roles)
	{
		allowedRoles = roles;
	}
	protected override bool AuthorizeCore(HttpContextBase httpContext)
	{
		var dbContext = httpContext.GetOwinContext().Get<AppDbContext>();

		var username = httpContext.User.Identity.Name;
		var userMatches = dbContext.Users.Where(x => x.Name == username);

		if (!string.IsNullOrEmpty(username) && userMatches.Count() == 1)
		{
			var userId = userMatches.First().Id;
			var userRole = (from u in dbContext.Users
							join r in dbContext.Roles on u.Roles.FirstOrDefault().RoleId equals r.Id
							where u.Id == userId
							select new
							{
								r.Name
							}).FirstOrDefault();

			foreach(var role in allowedRoles)
			{
				if (role == userRole.Name) return true;
			}
		}

		return false;
	}

	protected override void HandleUnauthorizedRequest(AuthorizationContext filterContext)
	{
		filterContext.Result = new RedirectToRouteResult(
			new RouteValueDictionary
			{
				{ "controller", "Home" },
				{ "action", "AccessDenied" }
			});
	}
}
А теперь магия – я думаю, вы уже догадались, что с помощью этих двух классов мы разработали фильтры, аналогичные [Authorize] и [Authorize(Roles = “role1”)].
Таким образом, изначально столкнувшись с невозможностью ASP.NET Identity и Windows Identity работать из коробки вместе, я переопределил сами фильтры, отредактировав их логику до той, что мне требуется. Надеюсь, вам поможет информация из этого поста, если вы столкнетесь с аналогичной ситуацией. Удачи!
Windows Authentication in ASP.NET Core
Last Modified: 2017-03-28
Using Windows Authentication in ASP.NET Core Web Applications
ASP.NET Core Windows Authentication
Note that some of the content does not apply to RC1 or earlier versions and may not apply to later versions either.
General
- https://docs.asp.net/en/latest/security/authentication/index.html
- https://blogs.msdn.microsoft.com/webdev/2016/03/11/first-look-authentication-in-asp-net-core/
- https://docs.asp.net/en/latest/fundamentals/servers.html
- https://docs.asp.net/en/latest/publishing/iis.html
- https://github.com/aspnet/Announcements/issues/204
Enable Windows Authentication
The server running the application must be configured to enable windows authentication and disable anonymous authentication.
If anonymous authentication is enabled, then it will be used by default and no user information is collected or required.
Hosting Options
- IIS + Kestrel: Windows authentication is configured in IIS (or
Properties\launchSettings.jsonwhen debugging with Visual Studio and IIS Express). - WebListener: Windows authentication is configured in web host builder programmatically.
At the time of writing, windows authentication only works when the server is hosted on the Windows platform (IIS and WebListener are Windows-only).
Take a look at ASP.NET Core Hosting for setting up either hosting option.
Sources:
- https://docs.asp.net/en/latest/fundamentals/servers.html
WebListener
When using WebListener, you need to set up the authentication scheme in WebListener options in Program.cs:
using System.IO;
using Microsoft.AspNetCore.Hosting;
using Microsoft.Extensions.Configuration;
using Microsoft.Net.Http.Server;

public static void Main(string[] args)
{
	var host = new WebHostBuilder()
		.UseWebListener(options =>
		{
			options.ListenerSettings.Authentication.Schemes = AuthenticationSchemes.NTLM; // <--
			options.ListenerSettings.Authentication.AllowAnonymous = false; // <--
		})
		.UseStartup<Startup>()
		.Build();

	host.Run();
}
Note: installing package Microsoft.Net.Http.Server from NuGet is required for accessing the AuthenticationSchemes class.
Sources:
- https://github.com/aspnet/Announcements/issues/204
- http://stackoverflow.com/questions/37694211/windows-authentication-with-asp-net-core
IIS Integration
When using IIS Integration (Express or not), there are some configuration options that you can tweak.
Add configuration in Startup.cs in the ConfigureServices method:
services.Configure<IISOptions>(options => {
	//options.AuthenticationDescriptions holds a list of allowed authentication schemes
	options.AutomaticAuthentication = true;
	options.ForwardClientCertificate = true;
	options.ForwardWindowsAuthentication = true;
});
All three options default to true at least when running on IIS Express through Visual Studio.
Source: https://docs.asp.net/en/latest/fundamentals/servers.html
IIS Express (when Debugging from Visual Studio)
In visual studio, right-click into the project properties and select the Debug tab.
Check “Enable Windows Authentication” and uncheck “Enable Anonymous Authentication”
The values are stored in Properties\launchSettings.json:
{
  "iisSettings": {
    "windowsAuthentication": true,
    "anonymousAuthentication": false,
    ...
  },
  ...
}
Making this change also forces forwardWindowsAuthToken to true in web.config (aspNetCore-element under system.webServer) each time you start the app in debug mode.
IIS
Enable windows authentication in IIS application host configuration file which can be found in the system32\inetsrv directory.
NOTE: IIS Express application configuration file lives in $(solutionDir)\.vs\config\applicationhost.configsource when using Visual Studio 2015 (or %userprofile%\documents\iisexpress\config\applicationhost.config or somewhere else when using an earlier version).
TODO not verified using IIS Express directly. The configuration does not affect the behaviour of IIS Express when debugging through Visual Studio.
The correct section can be found in configuration -> system.webServer -> security -> authentication -> windowsAuthentication.
The configuration should look as follows.
<windowsAuthentication enabled="true">
    <providers>
        <add value="Negotiate" />
        <add value="NTLM" />
    </providers>
</windowsAuthentication>
TODO May have to remove the Negotiate provider as per http://stackoverflow.com/questions/36946304/using-windows-authentication-in-asp-net?
Windows authentication can also be enabled using the Internet Information Services Manager:
Go to the site’s Authentication settings, enable Windows Authentication and disable Anonymous Authentication.
Make sure that the forwardWindowsAuthToken is set to true in web.config (aspNetCore-element under system.webServer).
Sources:
- https://docs.asp.net/en/latest/publishing/iis.html
- http://www.codeproject.com/Tips/1022870/AngularJS-Web-API-Active-Directory-Security
- http://stackoverflow.com/questions/4762538/iis-express-windows-authentication
- http://stackoverflow.com/questions/36946304/using-windows-authentication-in-asp-net
- http://www.danesparza.net/2014/09/using-windows-authentication-with-iisexpress/
Identity Impersonation
TODO For accessing further resources such as an SQL DB or other APIs with windows authentication.
Sources:
- http://stackoverflow.com/questions/35180871/asp-net-core-1-0-impersonation
- https://aleksandarsimic.wordpress.com/2016/07/21/asp-net-core-1-0-iis-impersonation/
Accessing User Information
CSHtml
You can access user identity in .cshtml files by using, for example:
<pre>@Html.Raw(Json.Serialize(User, new Newtonsoft.Json.JsonSerializerSettings() { ReferenceLoopHandling = Newtonsoft.Json.ReferenceLoopHandling.Ignore }))</pre>
<p>Name: @User.Identity.Name</p>
<p>Authenticated: @User.Identity.IsAuthenticated</p>
If you need to access the HttpContext, you need to add the HttpContextAccessor service in Startup.cs:
public void ConfigureServices(IServiceCollection services)
{
  ...
  services.AddSingleton<IHttpContextAccessor, HttpContextAccessor>();
  ...
}
And in cshtml:
@inject IHttpContextAccessor httpContextaccessor

<pre>@Html.Raw(Json.Serialize(HttpContextAccessor.HttpContext.User.Identity, new Newtonsoft.Json.JsonSerializerSettings() { ReferenceLoopHandling = Newtonsoft.Json.ReferenceLoopHandling.Ignore }))</pre>
Source: http://stackoverflow.com/questions/38945678/access-cookie-in-layout-cshtml-in-asp-net-core
In MCV or WebAPI Controllers
var userId = User.FindFirstValue(ClaimTypes.NameIdentifier);
var userName = User.FindFirstValue(ClaimTypes.Name);
var userName2 = User.Identity.Name;
Requires package Microsoft.AspNetCore.Identity
Sources:
- http://stackoverflow.com/questions/30701006/how-to-get-the-current-logged-in-user-id-asp-net-core
JavaScript
There is no way that I came across to get at the windows user information directly in JavaScript, except by injecting through script tags and cshtml.
Source: http://stackoverflow.com/questions/3013692/getting-windows-username-with-javascript
Calling API Methods from JavaScript
Make sure you include credentials in calls, e.g. with fetch:
fetch("/api/SampleData/WeatherForecasts", { credentials: 'include' })
  .then(response => { ... });
Local groups:
- Local groups are written without the domain part or prefixed with the host name:
<group>or<hostname>\<group>. - Built-in local groups (e.g.
BUILTIN\Administrators) are not recognized by name.
You have to write the corresponding SID instead. - You can find out the SIDs by using the
PsGetSidtool: https://technet.microsoft.com/en-us/sysinternals/bb897417. - The
BUILTIN\Administratorsgroup is not recognized even when using the correct SID.
Group membership shows as role membership in ASP.NET Core.
You can enforce group membership directly with the Authorize attribute, with an authorization policy, or programmatically in the controller methods.
Authorize Attribute
Add [Authorize(Roles = @"<domain>\<group>")] attribute (or [Authorize(Roles = @"<domain>\<group1>,<domain>\<group2>")] for multiple allowed roles) to the controller or method.
Sources:
- https://docs.asp.net/en/latest/security/authorization/roles.html
Authorization Policy
Add a new policy to service configuration in ConfigureServices method in Startup.cs:
services.AddAuthorization(options =>
{
  options.AddPolicy("RequireWindowsGroupMembership", policy => policy.RequireRole(@"<domain>\<group>"));
});
To get the required group name from settings, add the group name into appsettings.json (note the double backslashes):
{
  "Logging": {
    ...
  },
  "WindowsGroup": "<domain>\\<group>"
}
Then read it in when configuring authorization:
services.AddAuthorization(options =>
{
  var windowsGroup = Configuration.GetValue<string>("WindowsGroup");
  options.AddPolicy("RequireWindowsGroupMembership", policy =>
  {
    policy.RequireAuthenticatedUser(); // Policy must have at least one requirement
    if (windowsGroup != null)
      policy.RequireRole(windowsGroup);
  });
});
Use a comma-separated string for multiple allowed roles: <domain>\<group1>,<domain>\<group2>.
Finally, add the authorize-attribute on the controller or method: [Authorize(Policy = "RequireWindowsGroupMembership")]
Sources:
- https://docs.asp.net/en/latest/security/authorization/roles.html
The policy syntax allows for more elaborate authorization scenarios with custom requirements, such as activity/permission-based authentication
- https://docs.asp.net/en/latest/security/authorization/policies.html
- https://lostechies.com/derickbailey/2011/05/24/dont-do-role-based-authorization-checks-do-activity-based-checks/
- http://benjamincollins.com/blog/practical-permission-based-authorization-in-asp-net-core/
- http://benfoster.io/blog/asp-net-identity-role-claims
Programmatically
Check for role membership in controller method and return 403 Forbidden status code if not authorized.
[HttpGet("[action]")]
public IActionResult SomeValue()
{
  if (!User.IsInRole(@"Domain\Group")) return StatusCode(403);
  return Ok("Some Value");
}
Note that the return type of the method must be IActionResult.
Browser Settings
If you need automatic windows authentication, then you may have to enable it specifically in the client browser
- IE (TODO verify same works in EDGE)
- Advanced -> Enable Integrated Windows Authentication in Internet Options
- Security -> Local intranet -> Custom level -> User Authentication -> Automatic logon / Prompt for user name and password
- Chrome
- Chrome uses settings in Windows’ internet options so the IE options should sufficesource
- Firefox
- about:config -> network.automatic-ntlm-auth.trusted-uris -> add url of application
Sources:
- http://www.codeproject.com/Tips/1022870/AngularJS-Web-API-Active-Directory-Security
- http://stackoverflow.com/questions/36946304/using-windows-authentication-in-asp-net
Different Domain or No Domain Binding
TODO I did not get this to work from a remote site, with or without VPN connection (flashes a new console window and dies instantly, unable to capture error message)
If you are developing on a computer that is not bound to a domain, or is bound to a different domain that the app should authenticate against, you can run the server like so:
runas /netonly /user:<user> "<command> <args...>"
where <user> is domain\username or username@domain.
IIS: you must establish trust between the two domains to be able to run app pools under a user in different domain than the server.
IIS: does this work at all when running as network service??
Sources:
- http://codebetter.com/jameskovacs/2009/10/12/tip-how-to-run-programs-as-a-domain-user-from-a-non-domain-computer/
- http://stackoverflow.com/questions/4762538/iis-express-windows-authentication
- http://stackoverflow.com/questions/5331206/how-to-run-iisexpress-app-pool-under-a-different-identity
- http://stackoverflow.com/questions/22058645/authenticate-against-a-domain-using-a-specific-machine/22060458#22060458
- https://forums.iis.net/t/1213147.aspx?How+I+can+run+IIS+app+pool+by+domain+account+
- https://blogs.msdn.microsoft.com/ssehgal/2009/06/23/running-iis6-app-pools-under-a-domain-account-identity/
Probably almost all of you have developed or are developing ASP.NET applications that allow users to manage their own data and resources in a multi-user environment. These will require that each user has his own user name and password, which he uses to log into the web application, and access his information.
To accomplish this, you may be using, or have used, ASP.NET Forms authentication. The user enters his username and password in the login page and, after they are authenticated against some database tables, he is ready to operate.
In this article I would like to propose a different schema that relies on users’ Windows accounts rather than Forms authentication, and show the benefits that this approach can offer.
We will consider only those ASP.NET applications that are owned by an organization in which all users have their own Windows account, maybe stored in the company’s Active Directory.
Authentication and Authorization
When we create a web application, we want to expose the application’s users to information. This might be text, data, documents, multimedia content, and so on. Sometimes, we also need to manage access to this information, restricting certain users’ access to some of them. This is where authentication and authorization come in.
Before presenting this Windows account authentication and authorization proposal, I would like to define what authentication and authorization mean, the difference between the two and how the .NET Framework manages them. If you are already confident with these concepts you can skip to the next section.
Authentication
Generally speaking, Authentication is the ability to identify a particular entity. The need for authentication occurs when we have some resources that we want to make available to different entities. We store these resources in a centralized place and instruct the system that manages them to prevent entities that we don’t recognize from having access. Anonymous authentication refers to a situation in which we grant access to resources to all users, even if we don’t know them.
In web applications, we expose resources to users. We authenticate each user by requesting his credentials, normally a username and password, that we have assigned to him, or that he got during what we call the registration process.
The .NET Framework uses the following authentication terminology:
- Principal: this represents the security context under which code is running. Every executing thread has an associated principal.
- Identity: this represents the identity of the authenticated user. Every Principal has an associated identity.
It also defines the following classes, contained in the System.Security assembly:
- GenericPrincipal, WindowsPrincipal
- GenericIdentity, WindowsIdentity
As their names suggest, WindowsPrincipal and WindowsIdentity are related to Principals and Identities associated with a Windows account, while GenericPrincipal and GenericIdentity are related to generic authentication mechanisms. GenericPrincipal and WindowsPrincipal implement the IPrincipal interface, while GenericIdentity and WindowsIdentity implement the IIdentity interface.
Authorization
Authorization is the ability to grant or deny access to resources, according to the rights defined for the different kinds of entities requesting them.
When dealing with Windows Operating System, and its underlying NTFS file system, authorizations are managed by assigning to each object (files, registry keys, cryptographic keys and so on) a list of the permissions granted to each user recognized by the system.
This list is commonly called the “Access Control List” or ACL (the correct name is actually “Discretionary Access Control List” or DACL, to distinguish it from the “System Access Control List” or SACL). The ACL is a collection of “Access Control Entries” or ACEs. Each ACE contains the identifier for a specific user (“Security Identifier” or SID) and the permissions granted to it.
As you probably already know, to view the ACL for a specific file, you right-click the file name, select Properties and click on the Security tab. You will see something like this:
Figure 1: ACL editor for a demo file.
The “Group or user names” section lists all the users and groups, by name, which have at least one ACE in the ACL, while the “Permissions” section lists all the permissions associated with a specific group or user (or, rather, with its SID). You can modify the ACL by pressing the Edit button.
To view the ACL of a specific file using the .NET Framework, you can use the FileSecurity class that you can find under the System.Security.AccessControl namespace. The following example shows how to browse the ACL of a file named “C:\resource.txt”:
|
FileSecurity f = File.GetAccessControl(@»c:\resource.txt»); AuthorizationRuleCollection acl = f.GetAccessRules(true, true, typeof(NTAccount)); foreach (FileSystemAccessRule ace in acl) { Console.WriteLine(«Identity: « + ace.IdentityReference.ToString()); Console.WriteLine(«Access Control Type: « + ace.AccessControlType); Console.WriteLine(«Permissions: « + ace.FileSystemRights.ToString() + «\n»); |
By running this code in a console application, you get the following output:
Figure 2: Output of a console application that lists the ACEs of a demo file.
Authentication in IIS 7 and 7.5
With definitions out the way, we’re ready to see how to setup a Windows account authentication and authorization schema in an ASP.NET application. First, we’ll look at how authentication with Windows accounts works.
It’s important to note that this type of authentication doesn’t involve the ASP.NET engine. It works at the Internet Information Server (IIS) level instead, so all that’s required is the correct IIS configuration. The authentication types available in IIS can be viewed by using the IIS Manager:
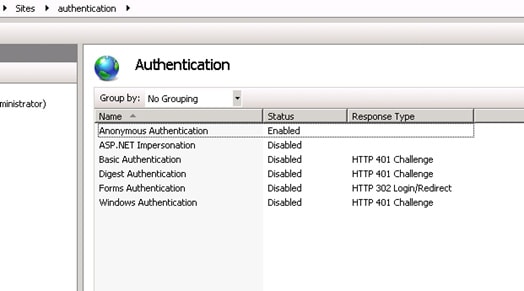
Figure 3: List of all authentication methods implemented in IIS 7.0 and 7.5.
Anonymous Authentication: this is the most commonly used type of authentication. With it, all users can access the web site.
ASP.NET Impersonation: this is not really an authentication method, but relates to authorizations granted to a web site’s users. We will see later how impersonation works.
Basic Authentication: this is a Windows account authentication, in the sense that the user needs to have a username and password, recognized by the operating system, to use the application. When the user calls a web page, a dialog box asking for his credentials appears. If the user provides valid credentials for a valid Windows account, the authentication succeeds. This type of authentication is not considered secure because authentication data is transmitted to the server as plain text.
Digest Authentication: this is similar to Basic Authentication, but more secure. Authentication data is sent to the server as a hash, rather than plain text. Basic Authentication and Digest Authentication are both standardized authentication methods. They are defined in RFC 2617.
Forms Authentication: this is ASP.NET’s own authentication, based on the login page and the storage of users’ credentials in a database, or similar location.
Windows Authentication: this type of authentication uses the NTLM or Kerberos Windows authentication protocols, the same protocols used to log into Windows machines. As for Basic Authentication and Digest Authentication, the credentials provided by the user must match a valid Windows account.
There are two other authentication methods that I have not mentioned here: Active Directory Client Certificate Mapping Authentication and IIS Client Certificate Mapping Authentication. Both use the X.509 digital certificate installed on the client; how they work is outside the scope of this article.
For the purpose of this article, we can use Basic Authentication, Digest Authentication or Windows Authentication, each of which relies on Windows accounts. When they’re used, the current executing thread is associated with a Principal object that is able to give us information about the authenticated user. I wrote a simple application that shows you how to do that. Its source code is available at the top of this article as a zip file.
The application defines a method, called WritePrincipalAndIdentity(), which give us the following information:
- The name of the authenticated user.
- The user’s role, by checking its role membership.
- The type of authentication performed.
The method’s body is given by:
|
/// <summary> /// Explore the authentication properties of the current thread. /// </summary> public void WritePrincipalAndIdentity() { IPrincipal p = Thread.CurrentPrincipal; IIdentity i = Thread.CurrentPrincipal.Identity; WriteToPage(«Identity Name: « + i.Name); WriteToPage(«Is Administrator: « + p.IsInRole(@»BUILTIN\Administrators»)); WriteToPage(«Is Authenticate: « + i.IsAuthenticated); WriteToPage(«Authentication Type: « + i.AuthenticationType); WriteToPage(« »); } |
Where the WriteToPage() method is a helper method that encapsulates the logic needed to write text inside the page.
Rather than using Thread.CurrentPrincipal, we could use the User property of the Page object to achieve the same result. I prefer to use the Thread.CurrentPrincipal, to point out that the principal is always associated with the executing thread. The importance of this will be clearer in the Role-Based Security Paragraph.
When we run this application, using, for example, digest authentication (remembering to disable the anonymous authentication) the logon window ask us for our credentials.
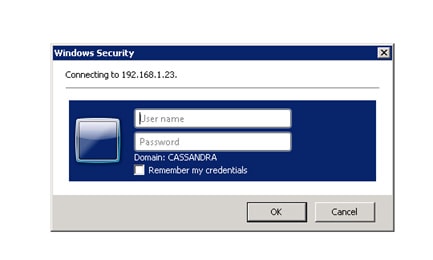
Figure 4: Logon dialog box. To access the web site we need a valid account defined in a domain named CASSANDRA.
If we provide a valid account defined in the CASSANDRA domain we will able to log on to the application. Once we’ve provided it, we obtain something like this:
Figure 5: Demo web application’s output.
Figure 5 shows that the identity of the user who performed the request has been authenticated. It also shows his user name is “CASSANDRA\matteo”, the domain account used to perform the request, that the authentication method used was “Digest Authentication”, and that the user is not an administrator.
Suppose that we need to write a web application that associates the user with his own data, for example a list of contacts or some appointments. It easy to see that, at this stage, we have all the information needed to manage all the data (contacts or appointments) related to a single user. If we save all of them in a database using the username (or better a hash of it) provided by the authentication stage as the table key, we are able to fill all the application’s web pages with only the user’s specific content, as we do with Forms authentication. This is possible without having to write any lines of code.
Another important advantage comes from the fact that, by using the Principal object, we are able to check if an authenticated user belongs to a specific security group. With this information, we can develop applications that are “role-enabled”, in the sense that we can allow a specific user to use only the features available for his role. Suppose, for example, that the web application has an admin section and we want to allow only administrators to see it: we can check the role of the authenticated user and hide the links to the admin page if the user is not an administrator. If we use Active Directory as container for users’ credentials, we can take advantage of its ability to generate group structures flexible enough to generate role-based permissions for even very heterogeneous kinds of users.
However, from a security point of view, authentication alone is not enough. If, for example, we hide the link to the admin page for non-administrator users, they can nonetheless reach the admin page using its URL, breaking the security of the site. For this reason, authorization plays a very important role in designing our application. We will now see how to prevent this security issue occurring.
Authorization in ASP.NET Applications
Suppose that we have a file, “resource.txt”, inside the web application root that we want to make available only to administrators. We can prevent users who aren’t administrators from accessing the file by setting up its ACL properly. For simplicity, let’s say we want to prevent “CASSANDRA\matteo” accessing it. Figure 6 shows how to do that:
Figure 6: ACL for the CASSANDRA\matteo user with denied permissions.
We have denied the Read and Read & execute attributes to the CASSANDRA\matteo account, but we want to see what happens when our demo application tries to open the file. To do so, we add a new method to it:
|
1 2 3 4 5 6 7 8 9 10 11 12 13 14 15 16 17 18 19 20 21 |
/// <summary> /// Check if a resource can be loaded. /// </summary> public void CanLoadResource() { FileStream stream = null; try { stream = File.OpenRead(Server.MapPath(«resource.txt»)); WriteToPage(«Access to file allowed.»); } catch (UnauthorizedAccessException) { WriteException(«Access to file denied.»); } finally { if (stream != null) stream.Dispose(); } } |
The CanLoadResource() method tries to open resource.txt, in order to read its content. If the load succeeds, the “Access to file allowed.” message is written on the page. If an UnauthorizedAccessException exception is thrown, the message “Access to file denied.” is written on the page, as an error. The WriteException() method is a helper method used to write an exception message on the page.
Now we launch our application with authorizations set as in Figure 6 and use “CASSANDRA\matteo” to log into the application. Doing that, we obtain something that should sound strange:
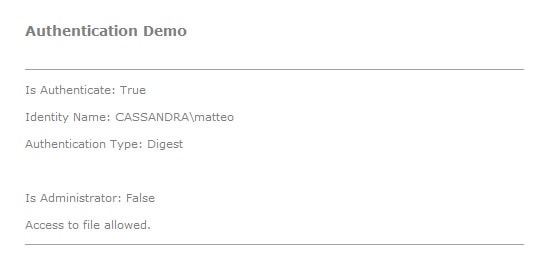
Figure 7: Logon with user CASSANDRA\matteo with permissions as in Figure 6.
As you can see in the Figure 7, resource.txt can be loaded by the application even if the credentials provided for the login refer to an account that has no permissions to access it.
This happens because, in this case, the Application Pool associated with the web application works in Integrated mode, which relates authentication and authorization to different users. Specifically, authentication involves the user identified by the credentials provided, while authorization involves the user account used by the Application Pool associated with the application. In our example, the Application Pool uses the NETWORK SERVICE account, which has permission to access the file.
We’ll try to deny these permissions by modifying the ACL of the resources.txt file:
Figure 8: ACL for the NETWORK SERVICE account with denied permissions.
If we launch our application, we now obtain:
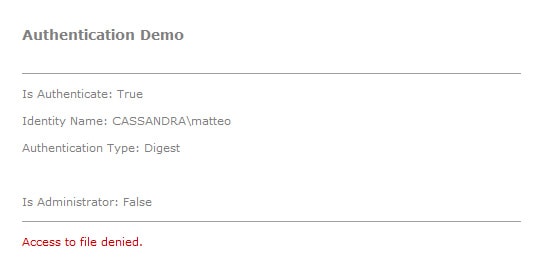
Figure 9: Logon with user CASSANDRA\matteo, still with the permissions in Figure 8.
As you can see, the file is no longer available, demonstrating that the authorization process involves the NETWORK SERVICE account.
To use authorization at the authenticated user level, we need to use Impersonation. With impersonation, we are able to allow the Application Pool to run with the permissions associated with the authenticated user. Impersonation only works when the Application Pool runs in Classic Mode (in Integrated mode the web application generates the “500 – Internal Server Error” error). To enable impersonation, we need to enable the ASP.NET Impersonation feature, as noted in Figure 3 and the discussion that followed it.
If we switch our Application Pool to Classic Mode (enabling the ASP.NET 4.0 ISAPI filters, too) and enable ASP.NET impersonation, the demo application output becomes:
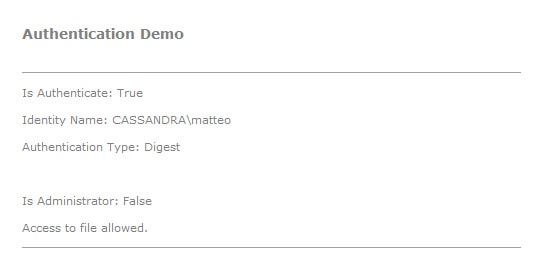
Figure 10: Logon with user CASSANDRA\matteo, with permissions as in Figure 8 and Application Pool in Classic Mode.
We are now able to load resource.txt even if the NETWORK SERVICE account has no permissions to access it. This shows that the permissions used were those associated with the authenticated user, not with the Application Pool’s identity.
To take advantage of Integrated mode without having to abandon impersonation, we can use a different approach: running our application in Integrated mode and enabling impersonation at the code level when we need it. To do so, we use the WindowsImpersonationContext class, defined under the System.Security.Principal namespace. We modify the CanLoadResource() method as follows:
|
1 2 3 4 5 6 7 8 9 10 11 12 13 14 15 16 17 18 19 20 21 22 23 24 25 26 27 28 29 30 31 32 33 |
/// <summary> /// Check if a resource can be loaded. /// </summary> public void CanLoadResource() { FileStream stream = null; WindowsImpersonationContext imp = null; try { IIdentity i = Thread.CurrentPrincipal.Identity; imp = ((WindowsIdentity)i).Impersonate(); stream = File.OpenRead(Server.MapPath(«resource.txt»)); WriteToPage(«Access to file allowed.»); } catch (UnauthorizedAccessException) { WriteException(«Access to file denied.»); } finally { if (imp != null) { imp.Undo(); imp.Dispose(); } if (stream != null) stream.Dispose(); } } |
With the modification added, we can force the application to impersonate the authenticated user before opening the file. To achieve this, we have used the Impersonate() method of the WindowsIdentity class (the class to which the Identity property belongs). With it, we have created a WindowsImpersonationContext object. This object has a method, Undo(), that is able to revert the impersonation after the resource has been used.
If we try to run our application with permissions as in Figure 8, we see that we are able to access resource.txt even if the Application Pool is working in Integrated Mode.
Now we can resolve the security issue presented earlier. If we want to use Windows accounts to develop a “role-based” application, we can use authentication to identify the user requesting resources and we can use authorization, based on the user’s identity, to prevent access to resources not available for the user’s role. If, for example, the resource we want to protect is a web page (like the admin page), we need to set its ACL with the right ACEs, and use impersonation to force the Application Pool to use the authenticated user’s permissions. However, as we have seen, when the Application Pool uses Integrated mode, impersonation is available only at code level. So, although it’s easy in this situation to prevent access to resources (like the resource.txt file) needed by a web page, it’s not so easy to prevent access to a web page itself. For this, we need to use another IIS feature available in IIS Manager, .NET Authorization Rules:
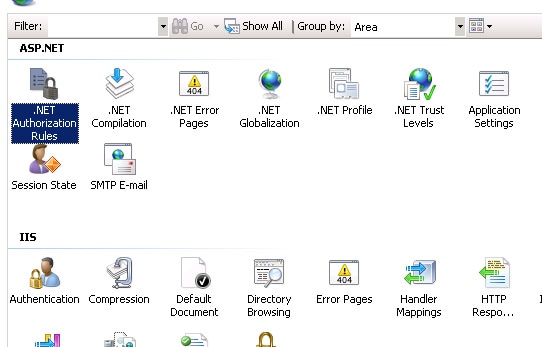
Figure 11: .NET Authorization Rules feature of IIS7 and IIS7.5.
.NET Authorization Rules is an authorization feature that works at ASP.NET level, not at IIS or file system level (as for ACLs). So it permits us to ignore how IIS works and use Impersonation both in Integrated Mode than in Classic Mode.
I leave you to test how it works.
Role-Based Security
A further advantage of using Windows account authentication is the ability to use a .NET Framework security feature called Role-Based Security.
Role-Based Security permits us to protect our resources from unauthorized authenticated users. It relies on checking if an authenticated user belongs to a specific role that has authorization to access a specific resource. We have already seen how to do that: use the IsInRole() method of the thread’s Principal object.
The .NET Framework security team decided to align this type of security check to Code Access Security (which I wrote about in previous articles) by defining a programming model similar to it. Specifically, a class named PrincipalPermission, found under the System.Security.Permissions namespace, has been defined. It permits us to check the role membership of an authenticated user both declaratively (using attributes) and imperatively (using objects), in the same manner as CAS checks.
Suppose that we want resource.txt to be readable only by administrators. We can perform a declarative Role-Based security check in this way:
|
/// <summary> /// Load a resource /// </summary> [PrincipalPermissionAttribute(SecurityAction.Demand, Name = «myname», Role = «administrators»)] public void LoadResource() { ..... |
where “myname” is the username that we want to check.
If declarative Role-Based security is not what we need (because, in this case, we need to know the identity of the user first), we can use an imperative Role-Based security check:
|
1 2 3 4 5 6 7 8 9 10 11 12 13 14 15 16 17 18 19 20 21 22 23 |
/// <summary> /// Load a Resource /// </summary> public void LoadResource() { try { // Create a PrincipalPermission object. PrincipalPermission permission = new PrincipalPermission(Thread.CurrentPrincipal.Identity.Name, «Administrators»); // Demand this permission. permission.Demand(); ..... } catch (SecurityException e) { ..... } } |
In both cases, if the user does not belong to the Administrators group, a security exception is thrown.
The PrincipalPermission class doesn’t add anything to our ability to check the permission of an authenticated user. In my opinion, the IsInRole() method gives us all the instruments we need, and is simpler to use. Despite this, I’ve included PrincipalPermission in this discussion for completeness. Maybe this is the same reason that the .NET development team added this type of class to the .NET Framework base classes.
I end this section by mentioning that Role-Based Security can even be implemented in desktop applications. In this case, the authenticated user is a user that logs into the machine.
When a desktop application starts, by default, the identity of the authenticated user is not “attached” to the executing thread. The Principal property of the current thread and the Identity property of the Principal property are set to GenericPrincipal and GenericIdentity respectively, and the Name property of the Identity property is empty.
If we launch the following code in a Console application:
|
static void Main(string[] args) { Console.WriteLine(«Type of Identity: « + Thread.CurrentPrincipal.Identity.GetType()); Console.WriteLine(«Identity Name: « + Thread.CurrentPrincipal.Identity.Name); } |
We get:

Figure 12: Default Identity in a Console Application.
So we see that the application is not able to recognize the user who has logged-in.
This is, however, a feature we can turn on. We need to modify the previous code as follows:
|
static void Main(string[] args) { AppDomain.CurrentDomain.SetPrincipalPolicy(PrincipalPolicy.WindowsPrincipal); Console.WriteLine(«Type of Identity: « + Thread.CurrentPrincipal.Identity.GetType()); Console.WriteLine(«Identity Name: « + Thread.CurrentPrincipal.Identity.Name); } |
Launching the application, we now get:

Figure 13: Identity in a Console Application.
As you can see from Figure 13, Identity has been initialized with a WindowsIdentity object and the reference to the logged user has been added. We are now able to use Role-Based Security even in desktop applications.
Conclusion
In this article we have seen how Windows accounts can be used to implement authentication and authorization in ASP.NET applications. Even if this type of approach is rarely used, Forms Authentication being the commonly adopted solution, it can have a lot of advantages:
- Less code to develop and maintain. Authorization and authentication with Windows accounts does not require the developer to write specific code for the management of user credentials, authorizations, password recovery and so on.
- Centralization of user credentials, access rights, password policies, role-based policies and identity management in general. All the security information related to a specific user is stored in a centralized place, Active Directory. When a new employee arrives at an organization, permissions have to be added only in the Directory structure, not in each web server used by the company, making the authorization process simpler to manage.
- More security. In a decentralized security environment, sometimes users have to remember more than one username and password. Sometimes they are forced to write them down to remember them. Security experts think this is one of the most dangerous security issues. Moreover, if an employee with, say, ten accounts for ten different applications, stored in ten different places, leaves an organization, it’s easy to forget to remove all their credentials, allowing them to access, or even steal confidential data.
Title: ASP.NET Core Web API Windows Authentication
In this article, we will learn how to secure an ASP.NET Core Web API with Windows authentication. We will cover the following topics:
- What is Windows authentication?
- How to configure Windows authentication in ASP.NET Core
- How to protect endpoints with Windows authentication
- How to test Windows authentication
By the end of this article, you will be able to secure your ASP.NET Core Web API with Windows authentication and protect your endpoints from unauthorized access.
| Header 1 | Header 2 | Header 3 |
|---|---|---|
| Data 1 | Data 2 | Data 3 |
| Data 4 | Data 5 | Data 6 |
****
In this tutorial, you will learn how to enable Windows authentication in an ASP.NET Core web API. Windows authentication is a type of authentication that uses the Windows NTLM or Kerberos protocols to verify a user’s identity. It is a built-in feature of ASP.NET Core and does not require any additional configuration.
By the end of this tutorial, you will be able to:
- Enable Windows authentication in an ASP.NET Core web API
- Protect your API endpoints with Windows authentication
- Test your API with Windows authentication
**What is Windows Authentication?**
Windows authentication is a type of authentication that uses the Windows NTLM or Kerberos protocols to verify a user’s identity. It is a built-in feature of Windows operating systems and is used by many applications and services.
When a user attempts to access a Windows-authenticated resource, their browser will send a NTLM or Kerberos token to the server. The server will then use this token to verify the user’s identity. If the user is authenticated, they will be granted access to the resource.
Windows authentication is a secure authentication protocol that is widely used. However, it is not as secure as other authentication protocols, such as OAuth 2.0 or OpenID Connect. This is because Windows authentication does not require the user to provide a password.
**How to enable Windows Authentication in ASP.NET Core**
To enable Windows authentication in ASP.NET Core, you can use the following steps:
1. In your Startup.cs file, add the following using statements:
c
using Microsoft.AspNetCore.Authentication.WindowsAuthentication;
using Microsoft.AspNetCore.Authorization;
2. In your ConfigureServices method, add the following code:
c
services.AddAuthentication(options =>
{
options.DefaultScheme = CookieAuthenticationDefaults.AuthenticationScheme;
options.DefaultChallengeScheme = WindowsAuthenticationDefaults.AuthenticationScheme;
});
services.AddAuthorization(options =>
{
options.AddPolicy(“RequireWindowsAuthentication”, policy =>
{
policy.RequireClaim(“WindowsAccountName”);
});
});
3. In your Configure method, add the following code:
c
app.UseAuthentication();
app.UseAuthorization();
4. Restart your application.
Now, when a user attempts to access your API, they will be prompted to authenticate with Windows. If they are authenticated, they will be granted access to the API.
Protecting your API endpoints with Windows authentication
You can protect your API endpoints with Windows authentication by using the [AuthorizeAttribute](https://docs.microsoft.com/en-us/aspnet/core/security/authorization/authorizeattribute?view=aspnetcore-6.0). For example, the following code will protect the `/api/products` endpoint with Windows authentication:
c
[Authorize(“RequireWindowsAuthentication”)]
public async Task GetProducts()
{
return Ok(new List());
}
When a user attempts to access the `/api/products` endpoint, they will be prompted to authenticate with Windows. If they are authenticated, they will be able to access the endpoint.
Testing your API with Windows authentication
You can test your API with Windows authentication by using the following steps:
1. Open a command prompt and run the following command:
cmd
net user testuser testpassword /add
This will create a new user account with the username `testuser` and the password `testpassword`.
2. Log in to your computer as the `testuser` account.
3. Open a browser and navigate to the URL of your API.
4. You should be prompted to authenticate with Windows. Enter the username `testuser` and the password `testpassword`.
5. If you are authenticated successfully, you will be able to access your API.
In this tutorial, you learned how to enable Windows authentication in an ASP.NET Core web API. You also learned how to protect your API endpoints with Windows authentication and how to test your API with Windows authentication.
By following these steps, you can secure your ASP.NET Core web API with Windows authentication.
ASP.NET Core Web API is a powerful framework for building RESTful APIs. It is designed to be lightweight and easy to use, and it can be used to create APIs for a variety of purposes, including internal applications, public-facing websites, and mobile applications.
Windows authentication is a security mechanism that is built into the Windows operating system. It allows you to restrict access to resources based on the user’s Windows account. This can be a very effective way to protect your API from unauthorized access.
In this tutorial, we will show you how to enable Windows authentication for an ASP.NET Core Web API. We will cover the following topics:
- Configuring Windows authentication in your application
- Authenticating users with Windows authentication
- Authorizing users to access resources
Configuring Windows Authentication
The first step is to configure Windows authentication in your application. To do this, you need to add the following middleware to the `Configure` method in your `Startup` class:
c
app.UseAuthentication();
This middleware will automatically authenticate users who are logged into Windows. If a user is not logged into Windows, they will be redirected to the login page.
Authenticating Users
Once you have configured Windows authentication, you need to authenticate users when they attempt to access protected resources. To do this, you can use the `HttpContext.User` property. This property provides access to the current user’s Windows account information.
For example, the following code snippet checks to see if the current user is an administrator:
c
if (HttpContext.User.IsInRole(“Administrator”)) {
// The current user is an administrator.
} else {
// The current user is not an administrator.
}
Authorizing Users
Once you have authenticated a user, you need to authorize them to access the resources that they requested. To do this, you can use the `Authorize` attribute. This attribute can be applied to controllers, actions, and methods.
For example, the following code snippet authorizes users to access the `GetProducts` action on the `ProductsController` controller:
c
[Authorize]
public async Task GetProducts() {
// Get the list of products.
var products = await _productService.GetProductsAsync();
// Return the list of products.
return Ok(products);
}
**
In this tutorial, we showed you how to enable Windows authentication for an ASP.NET Core Web API. We covered the following topics:
- Configuring Windows authentication in your application
- Authenticating users with Windows authentication
- Authorizing users to access resources
We hope that this tutorial has been helpful. For more information on ASP.NET Core Web API, please refer to the following resources:
- [ASP.NET Core Web API Documentation](https://docs.microsoft.com/aspnet/core/web-api/)
- [ASP.NET Core Web API Tutorials](https://docs.microsoft.com/aspnet/core/tutorials/web-api/)
- [ASP.NET Core Web API Samples](https://github.com/aspnet/samples/tree/master/aspnetcore/webapi)
Q: What is Windows authentication?
A: Windows authentication is a security mechanism that allows users to access resources on a Windows server by using their Windows credentials. When a user attempts to access a resource that is protected by Windows authentication, the server will authenticate the user by checking their username and password against the Active Directory database. If the user is authenticated, they will be granted access to the resource.
Q: How do I enable Windows authentication in ASP.NET Core Web API?
A: To enable Windows authentication in ASP.NET Core Web API, you can use the following steps:
1. In your Startup class, add the following middleware to the `ConfigureServices` method:
c
services.AddAuthentication(options =>
{
options.DefaultScheme = CookieAuthenticationDefaults.AuthenticationScheme;
options.DefaultChallengeScheme = “Bearer”;
});
2. In your Startup class, add the following middleware to the `Configure` method:
c
app.UseAuthentication();
3. In your controller, add the following attribute to the action method that you want to protect:
c
[Authorize]
public async Task Get()
{
// Get the user from the context
var user = HttpContext.User;
// Return a response
return Ok(user);
}
Q: What are the benefits of using Windows authentication?
A: There are several benefits to using Windows authentication, including:
- Simplicity: Windows authentication is a simple and straightforward security mechanism to implement.
- Robustness: Windows authentication is a robust security mechanism that is well-tested and has been used for many years.
- Centralized management: Windows authentication can be centrally managed through Active Directory.
Q: What are the drawbacks of using Windows authentication?
A: There are a few drawbacks to using Windows authentication, including:
- Performance: Windows authentication can be more computationally expensive than other security mechanisms, such as token-based authentication.
- Limited cross-platform support: Windows authentication is only supported on Windows servers.
- Single sign-on: Windows authentication does not support single sign-on across multiple applications.
Q: What are some alternatives to Windows authentication?
There are a number of alternatives to Windows authentication, including:
- Token-based authentication: Token-based authentication is a security mechanism that uses tokens to authenticate users. Tokens are typically issued by a central authority and are used to access resources on different servers.
- OAuth 2.0: OAuth 2.0 is a popular authorization framework that can be used to implement token-based authentication.
- OpenID Connect: OpenID Connect is an identity layer built on top of OAuth 2.0. It provides additional features, such as user profile information and single sign-on.
Q: Which authentication mechanism should I use?
The best authentication mechanism for your application will depend on your specific requirements. If you need a simple and robust security mechanism that is well-supported, then Windows authentication is a good option. If you need a more performant or cross-platform solution, then you may want to consider an alternative authentication mechanism.
In this article, we have discussed how to implement Windows authentication in ASP.NET Core Web API. We first looked at the different authentication schemes available in ASP.NET Core and how to configure them. Then, we discussed how to implement Windows authentication using the `IdentityServer4` library. We also covered how to protect your API endpoints with Windows authentication and how to allow unauthenticated users to access some endpoints.
We hope that this article has been helpful and that you are now able to implement Windows authentication in your ASP.NET Core Web API applications.
Here are some key takeaways from this article:
- Windows authentication is a secure authentication scheme that can be used to protect your ASP.NET Core Web API applications.
- To implement Windows authentication, you can use the `IdentityServer4` library.
- You can protect your API endpoints with Windows authentication by using the `Authorize` attribute.
- You can allow unauthenticated users to access some endpoints by using the `AllowAnonymous` attribute.
Author Profile
-
Hatch, established in 2011 by Marcus Greenwood, has evolved significantly over the years. Marcus, a seasoned developer, brought a rich background in developing both B2B and consumer software for a diverse range of organizations, including hedge funds and web agencies.
Originally, Hatch was designed to seamlessly merge content management with social networking. We observed that social functionalities were often an afterthought in CMS-driven websites and set out to change that. Hatch was built to be inherently social, ensuring a fully integrated experience for users.
Now, Hatch embarks on a new chapter. While our past was rooted in bridging technical gaps and fostering open-source collaboration, our present and future are focused on unraveling mysteries and answering a myriad of questions. We have expanded our horizons to cover an extensive array of topics and inquiries, delving into the unknown and the unexplored.
Latest entries
To set up Windows Authentication in an ASP.NET Core application, you need to configure your project to use the appropriate authentication middleware. This process involves several key steps that ensure your application can authenticate users based on their Windows credentials.
Step 1: Configure the Project
First, ensure that your project is set up to use Windows Authentication. You can do this by modifying the launchSettings.json file in the Properties folder of your project. Set the iisSettings to enable Windows Authentication:
"iisSettings": {
  "windowsAuthentication": true,
  "anonymousAuthentication": false,
  "iisExpress": {
    "applicationUrl": "http://localhost:5000",
    "sslPort": 44300
  }
}
Step 2: Update Startup.cs
Next, you need to update the Startup.cs file to include the authentication services. In the ConfigureServices method, add the following code:
public void ConfigureServices(IServiceCollection services)
{
    services.AddAuthentication(NegotiateDefaults.AuthenticationScheme)
            .AddNegotiate();
    services.AddControllersWithViews();
}
In the Configure method, ensure that you call UseAuthentication() and UseAuthorization():
public void Configure(IApplicationBuilder app, IWebHostEnvironment env)
{
    if (env.IsDevelopment())
    {
        app.UseDeveloperExceptionPage();
    }
    else
    {
        app.UseExceptionHandler("/Home/Error");
        app.UseHsts();
    }
    app.UseHttpsRedirection();
    app.UseStaticFiles();
    app.UseRouting();
    app.UseAuthentication();
    app.UseAuthorization();
    app.UseEndpoints(endpoints =>
    {
        endpoints.MapControllerRoute(
            name: "default",
            pattern: "{controller=Home}/{action=Index}/{id?}");
    });
}
Step 3: Configure IIS
If you are hosting your application in IIS, you need to ensure that Windows Authentication is enabled in the IIS settings. Open the IIS Manager, select your application, and under the Authentication feature, enable Windows Authentication and disable Anonymous Authentication.
Step 4: Testing the Configuration
Once you have completed the above steps, run your application. You should be prompted to log in using your Windows credentials. If configured correctly, the application will authenticate the user based on their Windows account.
Additional Considerations
- Ensure that your application is running in an environment that supports Windows Authentication, such as a Windows Server.
- If you encounter issues, check the Event Viewer for any authentication-related errors.
- For more detailed information, refer to the official documentation on Windows Authentication in ASP.NET Core.
By following these steps, you can successfully implement Windows Authentication in your ASP.NET Core application, allowing for secure access based on Windows user accounts.