
Универсальный драйвер Windows ASIO
Руководство по эксплуатации
-
Первые шаги

Настройка вашего аудио ПО Для того, чтобы использовать ASIO4ALL, вам необходимо настроить ваше аудио ПО соответствующим образом. Как вы это сделаете, зависит от вашего конкретного программного приложения. Как правило, вы всегда входите в меню аудио конфигурации и выбираете ASIO -> ASIO4ALL v2. Теперь должна быть кнопка для запуска…
больше
-
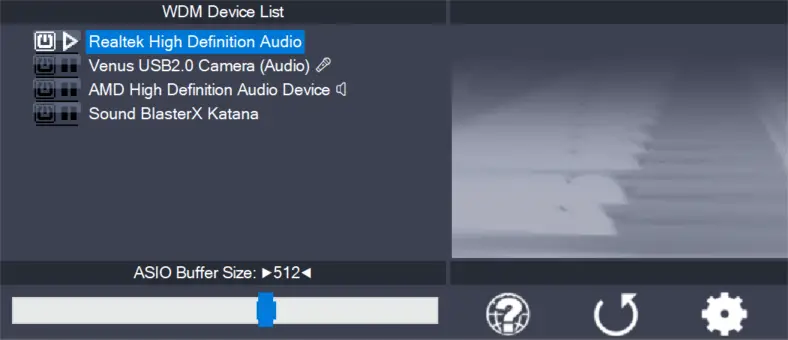
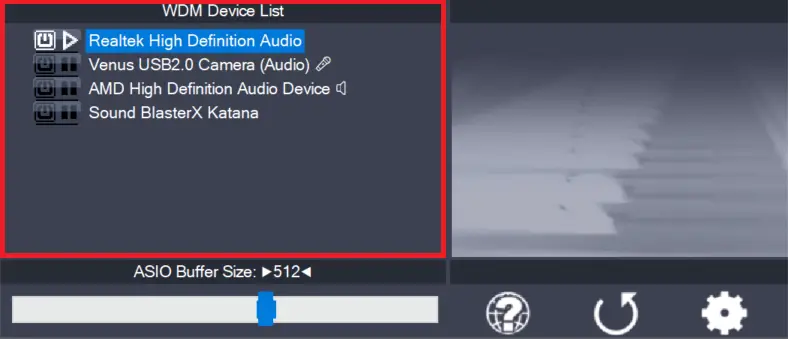
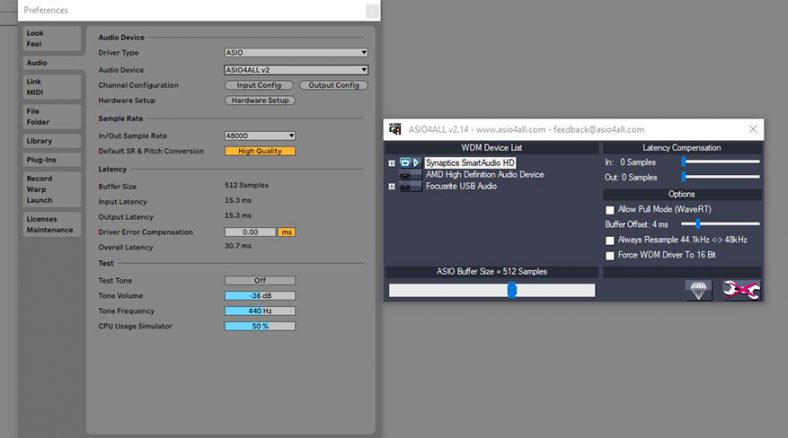
Список устройств WDM

Это список аудиоустройств, найденных в вашей системе. Выделите устройство, в которое вы хотите внести изменения. Примечание: все изменения параметров всегда применяются только к выделенному в данный момент устройству! Активируйте устройство, которое вы хотите использовать, нажав на кнопку рядом с именем устройства! На рисунке выше…
больше
-
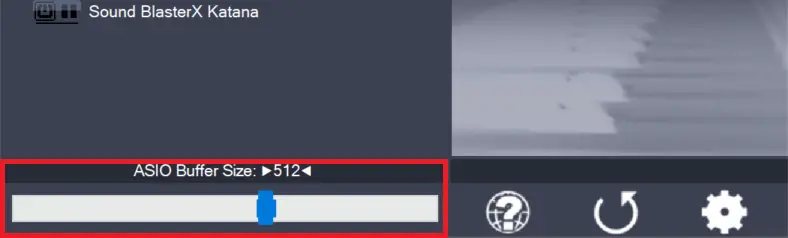
Размер буфера ASIO

Используйте ползунок, чтобы настроить размер буфера ASIO для текущего выделенного устройства. Меньший размер буфера означает меньшую задержку. Как только вы услышите потрескивание или звук начнет искажаться, вам нужно увеличить размер буфера. Размер буфера ASIO напрямую связан с задержкой звука. Таким образом, вы хотите получить здесь довольно маленькое значение. Вы можете…
больше
Если вы ценитель чистого и качественного звука, как и я, то вам определённо нужно настроить вывод звука на всех плеерах напрямую на свои колонки и наушники через ASIO — Audio Stream Input/Output (ASIO), «ввод-вывод потоковых аудиоданных» — протокол передачи данных с малой задержкой.
Для использования вывода при помощи ASIO в одних только аудиоплеерах достаточно установить лишь саму основу — ASIO4ALL.
Для задействования ASIO в видеоплеерах нужно дополнильно установить примочку Multichannel DirectShow ASIO Renderer.
Рассматриваем Windows 7 (в Windows 10 всё должно работать/настраиваться аналогично).
0) Качество выходного потока звука.
Не забываем настроить колонки и наушники в Панели управления на максимальное качество потока. Это не влияет на ASIO, но влияет на все остальные источники звука — браузеры, игры и плееры, не поддерживающие вывод звука через ASIO:

а) — в настройках колонок (кнопка Настроить) ставим галочку о том, что они широкополостные (то есть не будут обрезатся самые низкие и высокие частоты (это нужно только на самых простеньких динамиках дешёвых ноутбуков):

б) далее уже в свойствах колонок (кнопка Свойства) в правой вкладке Дополнительно выбираем самую нижнюю строчку (максимальное качество):

1. ASIO4ALL — http://www.asio4all.org/
Качаем версию 2.13 — http://www.asio4all.org/downloads_11/ASIO4ALL_2_13_Russian.exe
Устанавливаем.
После успешной установки в аудиоплеерах появится соответствующая строчка при выборе устройства вывода (помимо наушников/динамиков и прочих WASAPI):
1) AIMP — http://www.aimp.ru/
Качаем с сайта Programki.net тут — http://www.aimp.ru/?do=download&os=windows
а) В Меню — Настройки самая первая вкладка — Воспроизведение


б) Выбираем выход через ASIO: ASIO4ALL v2

Теперь при первом старте воспроизведения должно появится сообщение об успешном начале работы ASIO4ALL

2) foobar2000 — http://www.foobar2000.org/
качаем стабильную версию 1.4.1 — http://foobar2000.org/getfile/25891646c05a0b038fabb2c06c03368a/foobar2000_v1.4.1.exe
Качаем с сайта Audiophile’s Software плагины:
- ASIO support (foo_out_asio.dll) 2.1.2 — Добавляет возможность вывода звука через ASIO.
- Bauer Stereo-to-Binaural (foo_dsp_bs2b.dll) 3.1.0 — Предназначен для улучшения прослушивания аудио стерео программ в наушниках (!).
- Resampler DSP (SSRC X) (foo_dsp_ssrcX.dll) 0.57 — Высококачественный DSP ресемплер для foobar2000.
Устанавливаем плеер.
Распаковываем содержимое (а именно сами dll и exe) скачанных плагинов в каталог —
C:\Program Files (x86)\foobar2000\components
а) Запускаем и лезем в Настройки (File — Preferences) и выбираем вывод через ASIO:

б) Лезем в DSP Manager и добавляем/настраиваем плагины:

в) в настройках (кнопка
многоточее
) SSRC X выбираем профиль Otachan Ultra и Sample rate поставить 192000:

г) плагин Bauer Stereo-to-Binaural нужен при прослушивании музыки в
наушниках
(если это не специально записанная музыка для этого).
а) включаем все форматы на входе и на выходе:


б) включаем и настраиваем ресемплирование звука:


1) MPC-HC
Качаем либо сам плеер — https://mpc-hc.org/downloads/
или пак, содержащий его и все-все кодеки для вопсроизведения вадеофайлов — http://www.codecguide.com/download_k-lite_codec_pack_mega.htm
Или вообще качаем SVP — SmoothVideo Project (в него входит последняя версия MPC-HC 64 bit) — — https://www.svp-team.com/wiki/Main_Page
а) Запускаем, лезем в Настройки

б) Переходим в Воспроизведение -> Вывод и выбираем в выпадающем списке Рендер аудио нужный нам Multichannel ASIO Renderer Filter

в) при начале воспроизведения также появляется сообщение от ASIO4ALL

г) для изменения настроек данного плагина-фильтра кликаем правой кнопкой по области вопсроизведения (или лезем в меню) и находим там в Фильтрах нужный нам Multichannel ASIO Renderer Filter

д) и меняем качество дескритизации на максимальную:

е) предварительно не забываем также
И вот тут-то мы наконец и получаем ачишуительный звук в фильмах.
Last Updated:
March 8, 2024
ASIO4All is a free Windows tool that provides a generic high-performance audio driver for professional audio production in the absence of an audio interface with a dedicated driver.
If you are a Windows user and you are not using a dedicated audio interface (such as a Focusrite Scarlett 4i4), then you should download and install ASIO4All. Your audio performance will be significantly better than using native Windows audio drivers.
When you’re producing music on a computer using a DAW (such as Ableton Live, FL Studio, Reaper, etc), your computer needs a way to efficiently interface with your hardware.
This can include your microphones, instruments, speakers, headphones, etc. These all communicate with your audio and recording software. The piece of software that manages this communication in a computer is called an audio driver.
In the absence of a dedicated audio driver for windows, then ASIO4All is the next best thing!
Contents
- The Problem – The Windows Native Audio Driver is Not Efficient Enough
- The Solution
- Downloading and Installing ASIO4All on Windows 10
- ASIO4All for Mac?
- Should You Use ASIO4All with Dedicated Audio Interfaces?
- Pros of ASIO4All
- Cons of ASIO4All
- Summary
The Problem – The Windows Native Audio Driver is Not Efficient Enough
In Windows, the native audio driver that controls communication with your onboard soundcard is not optimized for professional audio production.
Pro audio demands that there be very little lag or ‘latency’ in the communication between audio devices and software. For example, if you play a note on your MIDI keyboard connected to a VST plugin, you should hear the output almost instantaneously with no perceptible delay.
The Windows native audio driver produces significant latency because it involves the software commands having to traverse several software layers to access the soundcard, making it unsuitable for audio production.
The Solution

ASIO
To overcome this problem with native Windows drivers, Steinberg introduced a proprietary driver called Audio Stream InputOutput or ASIO.
The ASIO driver bypasses all the software layers that the native Windows driver would have to go through, and instead connects directly with the soundcard. This enables far less latency and makes real-time professional-grade audio production possible.
ASIO has become the standard for professional audio production on Windows systems. Since Windows doesn’t provide an ASIO driver natively, audio interface manufacturers implement their own ASIO drivers for their products which must be downloaded and installed separately to make use of the interface.
What is ASIO4All?
ASIO4All is a free tool that provides a generic ASIO driver within Windows for your audio hardware and software to utilize instead of the native Windows driver.
If you don’t have an audio interface and still want to experiment with audio production, or if you’re traveling and only have the option of using your headphones with your laptop’s headphone jack for monitoring, then ASIO4All will meet your needs.
ASIO4All is essentially a ‘driver wrapper’; it packages the native Windows audio drivers to appear as an ASIO driver, thus enabling it to bypass the additional software layers and connect directly to the onboard soundcard.
Downloading and Installing ASIO4All on Windows 10
- Download ASIO4All for your system architecture from http://www.asio4all.org/
- Click on the downloaded file and install ASIO4All. Once installed you should see a triangle symbol appear in the taskbar for the ASIO4All settings. Click and open it.
- You should be presented with an interface that lists all the available audio devices on your system with a power button next to them. Audio devices that are unavailable (typically because they’re already in use by some other program) have a cross mark next to them.
- Set the power button to ‘on’ for all the devices you want to use with ASIO4All. For example, if you want to use your laptop’s inbuilt microphone and headphone jack, you may find their entry under the name of the soundcard manufacturer for your laptop (e.g. Realtek, Beats, etc.) marked as input and output.
- A slider at the bottom controls the buffer size. The buffer size essentially controls your latency, with a lower buffer size meaning lower latency but higher performance demands on your CPU. Experiment with the lowest buffer size you can achieve before your audio starts to crackle or glitch.
- On your DAW (or other audio application), to the settings to select the driver and audio device. Set the driver type to ASIO and set the device as ASIO4All. Select the inputs and outputs you had enabled in the ASIO4All settings. You should be good to go!
Note: ASIO4All cannot use an audio device if it’s already being used by some other program, like a browser or media player. Similarly, if a device is used by ASIO4All, it cannot be simultaneously used by some other program. Therefore, make sure to free up your devices in case you cannot access them with ASIO4All.
ASIO4All for Mac?

Instead of ASIO, Mac systems utilize Apple’s CoreAudio engine and driver system, which is built from the ground up keeping high-performance audio production in mind, so there is no need for any third-party driver to work with audio on Mac systems.
Even professional audio interfaces do not need any proprietary drivers to work with Mac. CoreAudio handles everything natively. Therefore ASIO4All or a similar equivalent isn’t necessary for Mac systems.
Should You Use ASIO4All with Dedicated Audio Interfaces?
If you have a dedicated audio interface like one from a manufacturer like Focusrite or Steinberg, they almost invariably come with their proprietary implementations of ASIO drivers which can be installed from a CD or downloaded from the internet. (For Mac systems, nothing needs to be downloaded.
Interfaces are designed to work with their own drivers. Either these are ‘plug and play’ or you download and install these when you are setting up your system for use with the audio interface.
In this case, there is no point in using ASIO4All over the included proprietary driver. ASIO4All will almost certainly have higher latency due to the overhead of driver wrapping and might conflict with the interface which is designed to work with its own drivers.
The purpose of ASIO4All is to provide an alternative in the absence of a dedicated soundcard and driver, so it becomes redundant to use one when you have a soundcard.
Pros of ASIO4All
- Far better performance than native Windows drivers with low latency.
- Doesn’t need a dedicated audio interface to make a Windows machine audio production capable.
- Useful for when you’re traveling and don’t have your soundcard with you.
Cons of ASIO4All
- Performance doesn’t match up to dedicated audio interfaces and drivers.
- Requires exclusive access of audio devices i.e. another program cannot use a device if it’s already being used by ASIO4All. So you cannot use your headphone jack to monitor your DAW while simultaneously playing a video on YouTube.
- ASIO4All is redundant if you have an audio interface with a dedicated ASIO driver.
Summary
In the absence of native support from Microsoft for high-performance audio drivers in Windows, ASIO4All is a great free tool to enable professional-grade audio production in any PC without immediately committing to buying a dedicated audio interface.
While in the long run, it is definitely recommended to get a dedicated audio interface (such as a
Focusrite Scarlett 4i4
) with its own optimized ASIO drivers, ASIO4All is a great alternative for those getting started with audio production, or to save time in a pinch.
В наши дни запись звука становится все более доступной. Будь то профессиональная студия или домашняя обстановка — каждый может создавать аудиоконтент высокого качества. В этом процессе важную роль играют специализированные программы и драйверы, одной из которых является wikisound. Но среди всех решений, одно из них выделяется своим удобством и универсальностью — asio4all.
Asio4all представляет собой универсальный аудиодрайвер, который позволяет пользователям обойти ограничения стандартных звуковых карт Windows. С его помощью можно работать с самыми разными аудиоустройствами и программами, будь то музыкальные редакторы или программы для звукозаписи. Возникает новый уровень возможностей благодаря минимальным задержкам и высокой стабильности работы звука.
Часто начинающие музыканты и звукорежиссеры сталкиваются с проблемами настроек звуковых интерфейсов в студийных программах. Asio4all помогает устранить эти препятствия, предоставив интуитивный интерфейс и гибкие настройки. Так можно сфокусироваться на креативном процессе, не тратя время на технические заминки. В этой статье мы подробно рассмотрим основные возможности и преимущества использования данного драйвера, а также его настройки и оптимизацию для различных программ.
Asio4all: Основные понятия
Вопрос качественной звукозаписи привлекает внимание как профессионалов, так и любителей музыки. Программа Asio4all предлагает решение проблемы ограничения стандартных звуковых драйверов. Она предоставляет возможность использовать интерфейс ASIO даже для звуковых карт, не поддерживающих его напрямую. Это особенно важно в условиях, когда требуется минимизация задержек и максимальная точность передачи звука.
Прежде чем погрузиться в мир Asio4all, важно понимать, что ASIO (Audio Stream Input/Output) представляет собой технологию, разработанную для обеспечения низкой латентности и высокого качества звукового воспроизведения. Стандартные драйверы, поставляемые с операционной системой, часто не обеспечивают достаточной производительности для сложных задач звукозаписи. ASIO позволяет получить прямой доступ к звуковой карте, обходя системные мешающиеся драйверы.
Программа Asio4all, в свою очередь, служит мостом между стандартными звуковыми картами и профессиональными аудио приложениями, использующими ASIO. Она эмулирует работу ASIO на звуковых картах, которые изначально не могут поддерживать этот интерфейс. Такой подход позволяет существенно улучшить качество звука и уменьшить задержки, что критично в процессе записи музыки или при работе с виртуальными инструментами.
Рассмотрение принципов работы этого программного обеспечения включает в себя понимание взаимодействия между оборудованием и программными средствами. Asio4all действует как прослойка между аудиопрограммой и звуковой картой, обеспечивая точное и быстрое воспроизведение каждого звукового сигнала. Это существенно повышает эффективность работы звукорежиссёров, музыкантов и создателей мультимедиа контента.
Кроме технических аспектов, важно отметить, что решение, предлагаемое Asio4all, является доступным и бесплатным, что делает его привлекательным даже для тех, кто только начинает свой путь в звукорежиссуре. Программа поддерживает широкий спектр устройств и совместима с различными версиями операционных систем Windows.
Сайт wikisound предоставляет множество полезной информации для тех, кто хочет глубже разобраться в данном софте. Инструкция по установке и настройке поможет быстро начать работу, а форумы и обсуждения дадут возможность получить ответы на возникающие вопросы от сообщества пользователей.
Настройка и установка
Корректная настройка и установка этого программного обеспечения имеет ключевое значение для успешной работы со звуком на ПК, особенно при звукозаписи. Данный процесс позволяет оптимизировать работу звуковых устройств и обеспечить максимально низкую задержку.
Прежде чем приступить к инсталляции драйвера, важно удостовериться, что ваша система соответствует всем минимальным требованиям. Рекомендуется посетить такие ресурсы, как wikisound, чтобы получить дополнительную информацию о совместимости. Возможны конфликты между различными звуковыми драйверами, поэтому предварительно стоит отключить или удалить ненужные.
Процесс установки:
1. Скачайте последнюю версию программы с официального сайта разработчика или надежного источника.
2. Запустите установочный файл и следуйте инструкциям на экране. Обычно процесс включает простое нажатие на кнопку «Далее», однако, могут возникнуть ситуации, когда потребуется выбрать дополнительные параметры. Например, установка более старой версии драйвера для совместимости с конкретным программным обеспечением звукозаписи.
3. По завершению установки перезагрузите компьютер, чтобы изменения вступили в силу. Данная мера способствует правильному функционированию ASIO-драйвера и предотвращает потенциальные сбои.
Настройка драйвера:
1. После перезагрузки, откройте панель управления ASIO-драйвера. Обычно она доступна из меню Пуск или системного трея.
2. В параметрах панели управления выберите используемое звуковое устройство. Убедитесь, что оно правильно отображается и активно.
3. Настрока латентности – важный момент. Чем ниже значение буфера, тем меньше задержка, но при очень низких значениях могут возникнуть искажения. Найдите оптимальное значение исходя из возможностей вашего оборудования и требований вашей деятельности.
4. Проверьте параметры звука в программе для звукозаписи. В разделе настроек аудио интерфейса убедитесь, что выбрано правильное ASIO устройство. Это действие обеспечит корректное распознавание драйвера вашим программным обеспечением.
Теперь ваше звуковое окружение оптимизировано для качественной и беспроблемной работы. При необходимости обратитесь к документации на wikisound для получения дополнительных советов и рекомендаций.
Преимущества использования
В мире профессиональной звукозаписи и музыкального производства качество и стабильность звучания имеют первостепенное значение. Программа ASIO, хорошо известная среди специалистов, помогает достичь высокого уровня точности аудиовоспроизведения и улучшения качества записи на персональном компьютере.
Одним из ключевых преимуществ использования ASIO является минимизация задержки звука или latency. Это позволяет музыкантам и звукорежиссерам работать в реальном времени без ощутимых задержек, что особенно важно при записи и редактировании звука. Высокая скорость отклика системы позволяет точно синхронизировать звуковые дорожки, добиваясь максимального качества звучания.
Кроме того, ASIO защищает рабочую среду от перегрузки процессора, распределяя ресурсы таким образом, чтобы они не мешали основным задачам. Это обеспечивает стабильную работу приложений для звукозаписи, что существенно повышает общую производительность и надежность системы. Пользователи могут сосредоточиться на творческом процессе, не отвлекаясь на технические неисправности.
На ресурсе wikisound можно найти множество положительных отзывов об ASIO от музыкантов и звуковиков. Они отмечают, что данная программа способствует улучшению качества записи в домашних студиях и профессиональных студийных комплексах. Пользователи отмечают легкость настройки и интеграции ASIO с различными аудиоприложениями.
Для многих музыкальных коллективов и отдельных исполнителей ASIO служит не просто утилитой, а настоящим спасением, позволяя реализовать свои идеи на профессиональном уровне. Ее использование делает процесс звукозаписи более эффективным, что особенно важно в условиях современного музыкального производства.
Таким образом, ASIO является неотъемлемым инструментом для всех, кто стремится к созданию качественного звука, будь то домашняя студия или крупный продакшн. Интеграция ASIO способствует существенному улучшению всех аспектов звукового продакшна, от записи до финального мастеринга.
Совместимость с разными устройствами
Вопрос совместимости звуковых драйверов с разнообразными устройствами играет ключевую роль в звукозаписи и аудиопроизводстве. Важно, чтобы система могла работать с широким спектром звукового оборудования, обеспечивая стабильность и качественное звучание. Это особенно актуально для пользователей, которые не ограничиваются одной звуковой картой, а имеют в своем арсенале различные аудиоинтерфейсы и периферийные устройства.
Поддержка множества устройств гарантирует, что звукозаписывающая студия или домашняя звуковая установка смогут адекватно функционировать независимо от используемого оборудования. Микрофоны, наушники, аудиоинтерфейсы — все это должно работать в гармонии, создавая оптимальные условия для работы с аудиоконтентом. Благодаря универсальным драйверам, такими как ASIO, достигается высокая производительность и минимизация задержек, что критично для профессиональной работы с аудиозаписями.
Многие энтузиасты и профессионалы сталкиваются с проблемой совместимости, когда стандартные драйверы оборудования не справляются или недостаточно оптимизированы для их задач. Здесь на помощь приходят альтернативные решения, позволяющие свести к минимуму задержки и улучшить стабильность работы с аудиоустройствами. Поддержка драйверов типа ASIO позволяет использовать одно программное обеспечение для работы с разными устройствами, обеспечивая универсальность и гибкость в повседневной работе.
Платформа wikisound подробно освещает проблемы, связанные с загрузкой и использованием универсального драйвера для аудиоустройств, предлагая решения и советы по оптимизации системы. Успешная интеграция всех компонентов звуковой студии позволяет добиться высокого качества записи, минимизировать технические трудности и сосредоточиться непосредственно на творческом процессе. Независимо от используемого оборудования, правильные настройки и грамотный подход к выбору драйвера играют решающую роль в достижении нужного результата.
Ошибки и решения
Проблема: Отсутствие звука при записи
Одна из наиболее частых трудностей – отсутствие звука при звукозаписи. Часто это связано с неправильно настроенными входами и выходами. Проверьте настройки вашего программного обеспечения для записи и убедитесь, что выбран корректный звуковой вход и выход. Обратитесь к документации wikisound вашего оборудования для получения подробных инструкций.
Решение: Перейдите в панель управления аудиокартой и убедитесь, что драйвер ASIO активен и правильно настроен. В софте для звукозаписи убедитесь, что выбран именно ASIO драйвер в настройках устройств.
Проблема: Высокая задержка звука
Еще одна распространенная проблема – высокая латентность или задержка звука. Эту проблему можно решить, изменив буфер аудиокарты в настройках драйвера ASIO.
Решение: Откройте панель настроек ASIO, уменьшите размер буфера и проверьте, уменьшилась ли задержка. Если проблема сохраняется, попробуйте обновить драйвер аудиокарты до последней версии.
Проблема: Конфликт с другими аудиодрайверами
Иногда существуют конфликты между ASIO и другими установленными аудиодрайверами. Это может вызвать сбои в работе программ для звукозаписи.
Решение: Отключите или удалите другие аудиодрайверы, если они не используются. Постарайтесь использовать один основной драйвер для всех аудиоприложений, чтобы избежать конфликтов.
На практике встречается множество других специфических ошибок и сбоев. Отдельное внимание также стоит уделить регулярному обновлению драйверов и программного обеспечения, чтобы минимизировать риск появления новых проблем.
Обновления и поддержка
Asio-драйверы регулярно претерпевают изменения для улучшения производительности, устранения багов и добавления новых функций. Это делает их незаменимыми инструментами для музыкантов, продюсеров и звукоинженеров.
- Регулярные обновления: Один из ключевых аспектов успешной работы драйвера заключается в регулярных обновлениях. Они включают в себя исправления ошибок, улучшения производительности и новые функции, что обеспечивает пользователям стабильность и более высокое качество звукозаписи.
- Поддержка сообщества: Платформы, такие как wikisound, предоставляют ценную поддержку пользователям asio-драйверов. На этих ресурсах можно найти руководства по установке, настройке и устранению неполадок, что особенно полезно для начинающих пользователей.
- Форумы и обсуждения: Одна из лучших форм поддержки – это активное сообщество пользователей. Современные онлайн-форумы позволяют обмениваться опытом, делиться советами и быстро находить решения возникающих проблем. Такие форумы часто становятся источником свежей информации о последних обновлениях и новинках.
- Обратная связь: Производители драйверов активно вкладываются в обратную связь с пользователями. Это позволяет им оперативно реагировать на возникающие проблемы и адаптировать свои продукты под реальные нужды музыкантов и студий звукозаписи.
Постоянный процесс обновления и качественная поддержка позволяют пользователям asio-драйверов идти в ногу с технологическим прогрессом и творчески реализовывать свои идеи с наивысшим качеством звука.
ASIO4ALL is particularly valuable for those using digital audio workstations (DAWs), virtual instruments, or applications requiring high-quality audio performance. Its primary advantage lies in its ability to deliver lower latency than standard Windows audio drivers, which can significantly improve real-time audio processing and reduce the lag between input and output.
However, proper configuration is crucial to fully harnessing the power of ASIO4ALL. Incorrect settings can lead to audio dropouts, increased latency, or device conflicts. This guide provides a comprehensive overview of configuring ASIO4ALL settings to optimize your audio experience. Whether you’re a musician, audio engineer, or simply a music enthusiast, understanding and fine-tuning ASIO4ALL can make a substantial difference in the quality of your audio work.
Configuring ASIO4ALL Settings
Accessing the ASIO4ALL Control Panel
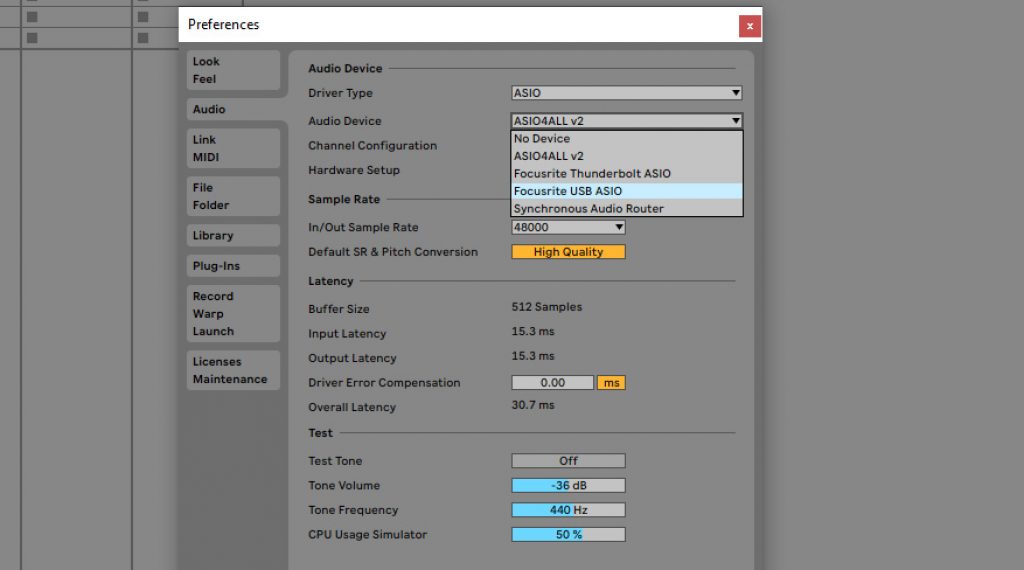
- Open Your Audio Software: Launch your digital audio workstation (DAW) or any other audio application you plan to use. This is the software where you’ll be routing your audio through ASIO4ALL.
- Locate ASIO Settings: Within your DAW or audio application, navigate to the audio settings or preferences. This is typically found in a menu labeled “Preferences,” “Options,” or “Audio Settings.” Look for a section dedicated to audio drivers or devices.
- Open ASIO4ALL Control Panel: Select ASIO4ALL as your audio driver from the list of available drivers. Once selected, you should see an option to open the ASIO4ALL Control Panel. Click on this to access the ASIO4ALL configuration interface.
Adjusting Buffer Size and Latency
- Buffer Size: The buffer size is a crucial setting that affects how audio is processed. It determines the amount of data collected before the audio driver processes it.
- Smaller Buffer Size: Reduces the delay between when you act (like playing a note) and when you hear the result. This results in lower latency, ideal for real-time applications such as live recording or monitoring. However, setting the buffer size too small may cause audio dropouts or glitches because the system might be unable to process the audio data quickly enough.
- Larger Buffer Size provides more time for the system to process the audio data, which can enhance stability and reduce the likelihood of dropouts. This is beneficial for tasks that are less time-sensitive, such as mixing or playback, where lower latency is not critical.
- Latency: Latency is the time delay between when an audio signal is generated and when it is heard through your speakers or headphones.
- Lower Latency: Achieved by using a smaller buffer size. This setting is crucial for live recording or situations where immediate feedback is necessary. Lower latency ensures your actions and audio playback are closely aligned in real time.
- Higher Latency: Results from using a larger buffer size. While this increases the delay, it can be acceptable for playback and editing tasks where immediate response is less critical. It allows the system to handle audio processing more smoothly and with fewer interruptions.
Selecting Audio Devices
- Choose Your Audio Interface: The ASIO4ALL Control Panel shows a list of available audio devices. Select the audio interface(s) you want to use. This could be an external audio interface, built-in sound card, or other hardware.
- Enable/Disable Devices: You can toggle individual devices on or off depending on your needs. For example, suppose you are using a USB audio interface. In that case, you may want to deactivate your computer’s built-in sound card to prevent conflicts and ensure all audio is routed through the selected interface.
Managing Inputs and Outputs
- Configure Inputs: Set up your audio inputs by selecting the appropriate channels from your audio interface. This might involve choosing which physical inputs (e.g., microphones, instruments) are active and adjusting their levels within the ASIO4ALL Control Panel.
- Configure Outputs: Similarly, select and configure the output channels to route audio to your speakers or headphones. Ensure the output channels correspond to your monitoring setup to avoid routing issues.
Optimizing Performance for DAWs and Other Applications
- Adjust Settings for Specific Software: Different DAWs and audio applications may have varying requirements and preferences for audio performance. Customize your ASIO4ALL settings to match the specific needs of the software you are using. For example, some DAWs might require a different buffer size or latency setting than others.
- Monitor Performance: Continuously monitor the performance of ASIO4ALL during your audio work. Check for issues such as latency, dropouts, or device conflicts regularly and make adjustments as needed to maintain smooth and efficient audio processing.
By following these steps and understanding the impact of each setting, you can effectively configure ASIO4ALL to suit your audio needs and achieve optimal performance in your digital audio environment.
Troubleshooting Common Issues with ASIO4ALL
Latency and Audio Dropouts
Latency refers to the delay between the input of an audio signal and its output. Audio dropouts occur when audio playback or recording is interrupted or skipped. Both issues can negatively impact your audio experience, so it’s crucial to address them promptly.
Increase Buffer Size:
- What It Is: Buffer size is the amount of data the audio driver processes simultaneously. Smaller buffer sizes reduce latency but increase the risk of audio dropouts, while larger buffer sizes increase latency but improve stability.
- How It Helps: Increasing the buffer size allows the driver more time to process the audio data, reducing the likelihood of dropouts and improving overall stability. This is especially useful in scenarios where real-time processing is not critical.
- How to Adjust: In the ASIO4ALL control panel, locate the buffer size slider or setting. Gradually increase the buffer size and test your audio performance until you balance acceptable latency and stable audio playback.
Update Drivers:
- What It Is: Audio drivers are software components that facilitate communication between audio hardware and the operating system. Outdated drivers can lead to compatibility issues and reduced performance.
- How It Helps: Updating your audio drivers and ASIO4ALL ensures you have the latest fixes, improvements, and compatibility enhancements. This can resolve issues related to latency and dropouts.
- How to Update: Visit the manufacturer’s website for your audio hardware and download the latest drivers. Similarly, check for updates for ASIO4ALL on its official website and install them.
Device Conflicts and Errors
Check Device Settings:
- What It Is: Device settings refer to the configurations of your audio hardware, such as input and output channels, sample rates, and other parameters.
- How It Helps: Incorrect or conflicting settings can cause errors and affect audio performance. Ensuring that your audio devices are configured correctly and are compatible with ASIO4ALL can help prevent such issues.
- How to Check: Open the ASIO4ALL control panel and verify that the correct devices are selected. Check your system’s audio settings to ensure no other applications or drivers conflict with ASIO4ALL.
Restart Audio Services:
- What It Is: Audio services manage your computer’s audio hardware and software interactions.
- How It Helps: Restarting audio services or rebooting your system can resolve temporary issues and conflicts by resetting the audio environment. This can also help if ASIO4ALL or other audio drivers are not functioning correctly.
- How to Restart: In Windows, you can restart audio services through the Task Manager or Services console. Alternatively, a complete system reboot can also clear up issues.
Tips for Resolving Common Problems
Consult Documentation:
- What It Is: Documentation includes user manuals, FAQs, and troubleshooting guides provided by the software or hardware manufacturer.
- How It Helps: Official documentation often includes solutions to common issues, detailed instructions, and best practices for resolving problems effectively.
- How to Use: Refer to the ASIO4ALL official documentation and support pages for troubleshooting tips and guidance specific to your issue.
Seek Support:
- What It Is: Support refers to assistance from online communities, forums, and customer support services.
- How It Helps: Engaging with forums and communities can provide additional insights and solutions from other users who may have experienced similar issues. Customer support can offer personalized help and troubleshooting based on your specific situation.
- How to Seek Support: Join online forums or user communities related to ASIO4ALL and audio production. Post your issue and search for similar problems that others may have resolved. Contact customer support if needed for more direct assistance.
Following these troubleshooting steps can effectively address common issues with ASIO4ALL and enhance your audio performance.
Advanced Configuration Tips for ASIO4ALL
How to Create Profiles
Open the ASIO4ALL Control Panel:
- Launch your digital audio workstation (DAW) or audio application that uses ASIO4ALL.
- Access the ASIO4ALL control panel from the application’s audio settings or preferences.
Configure Settings for Your Application:
- Adjust buffer size, latency, and device selection according to the application requirements you’re working with.
- Make sure to configure inputs and outputs based on the specific needs of the project or software.
Save Your Profile:
- Some DAWs or audio applications allow you to save and load ASIO4ALL settings as profiles. Check your application’s documentation for details on how to save and manage profiles.
- Alternatively, you can manually record and recreate your settings for each application as needed.
Benefits of Using Profiles:
- Efficiency: Quickly switch between different configurations tailored for specific applications or projects.
- Consistency: Maintain consistent settings for similar types of work, reducing setup time and minimizing errors.
- Customization: Tailor your setup to the unique demands of each application, ensuring optimal performance and compatibility.
Benefits of Aggregating Devices:
- Increased I/O Capability: Expand the number of available audio inputs and outputs for more complex setups.
- Flexibility: Use different audio interfaces for specific tasks, such as recording and monitoring.
- Redundancy: Improve system reliability by using multiple interfaces, reducing the risk of single points of failure.
Benefits of System Optimization:
- Reduced Latency: Achieve lower audio latency for real-time monitoring and processing.
- Improved Stability: Minimize audio dropouts and glitches for a smoother experience.
- Enhanced Performance: Ensure that your system operates efficiently, maximizing the capabilities of ASIO4ALL and your audio applications.
Advanced Configuration Tips
Understanding Profiles
What Are Profiles? Profiles are saved configurations within ASIO4ALL that store different settings for various applications or tasks. This lets you quickly switch between different setups without manually reconfiguring each time.
Why Use Profiles? Different audio applications may require different settings. For instance, a recording setup might need lower latency and specific input settings, while a mixing setup might prioritize stability over latency.
Creating Profiles
Open the ASIO4ALL Control Panel: Open the ASIO4ALL control panel from your audio application’s settings or your system tray.
Configure Settings: Adjust the buffer size, latency, and device selections according to the specific application’s needs.
Save Profile: After configuring the settings, save them as a new profile. Look for an option to save or export your configuration within the ASIO4ALL control panel.
Switching Profiles: When you change applications, you can switch profiles by loading the desired profile from the ASIO4ALL control panel.
Managing Profiles
Organize Profiles: To quickly identify your profiles, name them descriptively, such as “Recording,” “Mixing,” or “Live Performance.”
Update Profiles: As your needs change or you optimize settings, update your profiles to reflect these adjustments.
Benefits
- Efficiency: Quickly switch between optimized setups for different tasks.
- Consistency: Maintain consistent performance and settings tailored to specific applications.
Using ASIO4ALL with Multiple Audio Interfaces
Understanding Aggregation
What Is Aggregation? Aggregation involves combining multiple audio interfaces into a single virtual device, allowing your audio application to access all interfaces simultaneously.
Why Aggregate? Combining interfaces can provide additional channels, increased connectivity, and flexibility in audio routing.
Configuring Aggregation
- Access ASIO4ALL Control Panel: Open the ASIO4ALL control panel from your audio application or system tray.
- Select Devices: In the control panel, check the boxes following the devices you want to aggregate. Ensure that all selected devices are compatible and properly connected.
- Adjust Settings: Configure the buffer size, latency, and other settings to suit the aggregated setup. Be mindful of potential conflicts or performance issues.
Managing Aggregated Devices
- Check Synchronization: Ensure the aggregated devices are synchronized to avoid timing issues.
- Monitor Performance: Regularly check for performance issues or conflicts and adjust settings.
Benefits
- Increased Connectivity: Gain access to more inputs and outputs for complex setups.
- Flexibility: Adapt to different recording or performance scenarios with a versatile setup.
Enhancing Performance with ASIO4ALL
System Optimization
- Update Drivers: Ensure that all audio and system drivers are up to date. This includes graphics, network, and other peripheral drivers.
- Adjust Power Settings: Set your computer’s power plan to “High Performance” to prevent power-saving features from interfering with audio processing.
System Configuration
- Disable Unnecessary Background Processes: Close or turn off applications and processes that are not needed during audio work. This reduces system load and prevents conflicts.
- Adjust Audio Settings: Configure your system’s audio settings to use ASIO4ALL as the default audio driver. This can prevent conflicts with other drivers.
Performance Tweaks
- Adjust Buffer Size and Latency: Experiment with buffer size and latency settings in ASIO4ALL to find the optimal balance between performance and stability.
- Check for Interference: Look for and address any sources of interference, such as conflicting software or hardware issues.
Monitoring and Maintenance
- Regular Checks: Periodically check and adjust settings to maintain optimal performance.
- Consult Documentation: Refer to ASIO4ALL’s documentation and online resources for additional performance tips and updates.
Benefits
- Improved Latency: Achieve lower latency and better responsiveness in audio applications.
- Increased Stability: Ensure stable and reliable audio performance for professional applications.
Following these advanced configuration tips, you can customize ASIO4ALL for your specific needs, aggregate multiple audio interfaces for expanded capabilities, and optimize your system settings for enhanced performance. This will help you achieve a more efficient and effective audio setup.
Conclusion
ASIO4ALL settings are essential for achieving optimal audio performance in your digital audio setup. By understanding the fundamental aspects of ASIO4ALL, such as its functionality and benefits, you can tailor the driver settings to meet your specific needs. Adjusting buffer sizes and latency, selecting the appropriate audio devices, and managing inputs and outputs are crucial steps in fine-tuning your audio experience. Regularly updating ASIO4ALL and maintaining your system’s compatibility with the driver ensures that you can enjoy smooth, low-latency audio processing. Additionally, exploring advanced configuration tips and best practices will help you optimize performance and resolve any issues that may arise.