
Have you ever been curious about pixel art and wondered if you can get started in this world without any sophisticated software? The answer is closer than you think, because Microsoft Paint, that classic editor that comes integrated into Windows, is more than enough to take your first steps in this very particular digital art form.
Pixel art, also known as pixel art, has gained tremendous popularity in recent years, not only as a nostalgic representation of the video games retro, but also as a form of artistic expression. With basic Paint tools and a little patience, it is entirely possible to create eye-catching and creative works. without having to resort to Photoshop or similar programs. Let’s see how to do it step by step and in great detail.
What is pixel art and why is Paint a good choice?
Before you jump into creating your own pieces, it’s a good idea to understand what makes pixel art special. This style is characterized by images created pixel by pixel, with an intentionally «grid» aesthetic. Although it was originally a product of technological limitations, Today it is a valued artistic style that requires precision and creativity.
And why use Paint? Although there are more complex tools dedicated exclusively to pixel art, Paint offers simplicity, speed and universal accessNot everyone has a graphics tablet, but Paint is available with almost any Windows PC. Plus, it’s great for getting started without being overwhelmed by hundreds of options. If you need to explore other options, you can check out how to use Paint. Improve a pixelated image in Photoshop.
Pixelate entire images or specific areas in Paint
A very useful and simple technique to pixelate parts of an image (for example, a face or personal information that we do not want to show) is to reduce the size of the area and then enlarge it againThis trick makes pixels more noticeable and creates a pixelated visual effect without the need for external filters.
To make it:
- Open the image in Paint by right-clicking on it and choosing “Edit”.
- Using the “Select” tool, mark the area you want to pixelate.
- Reduce its size by dragging from a corner.
- Then, enlarge that same area again so that it returns to its original size.
This simple process forces Paint to invent the missing pixels, resulting in a blurry, pixelated area. The more times you repeat this process, the greater the effect will be.This trick is especially useful for hiding sensitive data like browser tabs, usernames, or private areas from a screenshot. If you’re interested in other methods for pixelating photos, you can check out this article on pixelate photos with Paint.
Pixelate a complete image step by step
If the intention is to pixelate the entire image (be it a photo, drawing or capture), a variant of the previous trick can be applied:
- Note the original dimensions of the image.
- Click «Resize» and select «Percentage.» Reduce the size to 10% or less.
- Save that image with a new name.
- Resize the image back to its original size using “Pixels” this time.
The effect will be a completely pixelated image, with hard edges and sharply defined blocks of color. It is ideal for creating retro images or giving a nostalgic air to your designs.If you’re interested in learning more about how to do this type of work, there are guides that can help you with different programs.
Create pixel art manually with Paint
Paint also allows you to work pixel by pixel as if it were a grid table. For this, it is advisable to zoom in up to 800%. and use the «Pencil» tool. This way you can paint each pixel with great precision. This method is ideal when you want to create a drawing from scratch, such as icons, characters, or scenes. Although it takes more time, the level of detail and control is maximum.
What tools to use in Paint and how to configure them
To work efficiently with pixel art in Paint, there are a few key settings to keep in mind:
- Disable any anti-aliasing options: Antialiasing smooths edges with extra pixels, which is not important in pixel art.
- Use the “Pencil” instead of the brush, since allows you to paint a single pixel without applying anti-aliasing.
- Work with a small canvas, for example, 64 x 64 pixels.
Additionally, you can activate a visual grid to help you better see individual pixels. Some users also recommend create a subview of the canvas to see a thumbnail of the result as you progress.
How to make a pixel-by-pixel portrait from scratch
A great way to learn is to create an avatar-style portrait. You can start with a 64 x 64 pixel canvas. Use the Symmetry Ruler tool (if your Paint version or alternative supports it) to work more evenly and automatically duplicate the design.
After:
- Draw a sketch in blue (or any other color that will help you differentiate it later).
- Corrects curves by removing duplicate pixels to smooth lines manually.
- Fill areas with flat colors.
It’s fundamental maintain a logical progression when forming curves, for example, a 1-2-3 pixel sequence instead of a jumbled 3-2-1-4 one.
Color palettes and shading in pixel art
In pixel art, less is more. Use a simple palette It forces you to be more precise in your choices. The NES, for example, used a palette of only 56 colors. Limiting your palette helps achieve visual coherence and train the artistic eye..
Once you have your line art finished, you can apply shadows and highlights using the same palette. You can also apply a top layer in «Color» mode filled with black to visualize the luminosity values in grayscale. If you’d like to learn more about effective shading, there are helpful resources to guide you.

Related article:
How to Create a Letterhead in Word – Complete Guide
Advanced Effects: Manual Blurring and Textures
A very useful technique is dithering, which consists of interspersing pixels of different colors to create a gradient effect without adding new colorsThis technique adds depth without breaking the pixelated aesthetic. Apply this technique to clothing, backgrounds, or areas that simulate texture. However, for areas like the face, it’s best to maintain more defined edges.
Export your work correctly
Once your pixel art piece is finished, it’s vital to export it properly to preserve its quality. Avoid saving in JPEG format, as this file type adds compression that can ruin the detail of the pixel art. Prefer PNG or GIF, which don’t alter the original image.
Also, be careful when uploading your work to social media, as many platforms automatically compress images. Twitter, for example, is more lenient if the image is exactly 506 pixels wide and in PNG format.
Inspiring cases: the example of Concha García Zaera
A prominent figure in the world of pixel art created in Paint is Concha García Zaera, a Valencian woman over 80 years old who surprised the world with her works created with this modest program. Without using advanced versions or professional tools, he has achieved an impressive level of detail., drawing pixel by pixel with enormous dedication.
Concha proves that what matters isn’t the tool, but rather the technique, patience, and passion. Her works are inspired by postcards and photographs she received from her husband. She has even gained fame on social media, where her grandson created a profile for her so she could share her creations.
These stories remind us that Creativity has no age, and Paint remains a gateway to digital art for anyoneMicrosoft Paint, despite being a basic tool, has enough potential to allow you to delve into the world of pixel art. From pixelating photographs to creating original portraits from scratch, this program offers many possibilities when combined with a proper technical approach and some practice. The best part is that it’s completely accessible for beginners, and with dedication, you can achieve truly amazing results.

Related article:
Project Zomboid on Android: Can you play it on mobile?
Passionate writer about the world of bytes and technology in general. I love sharing my knowledge through writing, and that’s what I’ll do on this blog, show you all the most interesting things about gadgets, software, hardware, tech trends, and more. My goal is to help you navigate the digital world in a simple and entertaining way.
Do you want to create amazing artwork with just a few words? Try Image Creator in Microsoft Paint, a new feature that lets you collaborate with a powerful AI model called DALL-E. DALL-E can generate diverse and realistic images from any text description you enter. Whether you want to draw a dragon, a unicorn, or anything else, Image Creator will help you unleash your creativity and make your own artworks with the help of AI.
Note: This feature was recently renamed to Image Creator, and the update is being gradually rolled out to users. Once it’s available on your device, you will start seeing the new name.
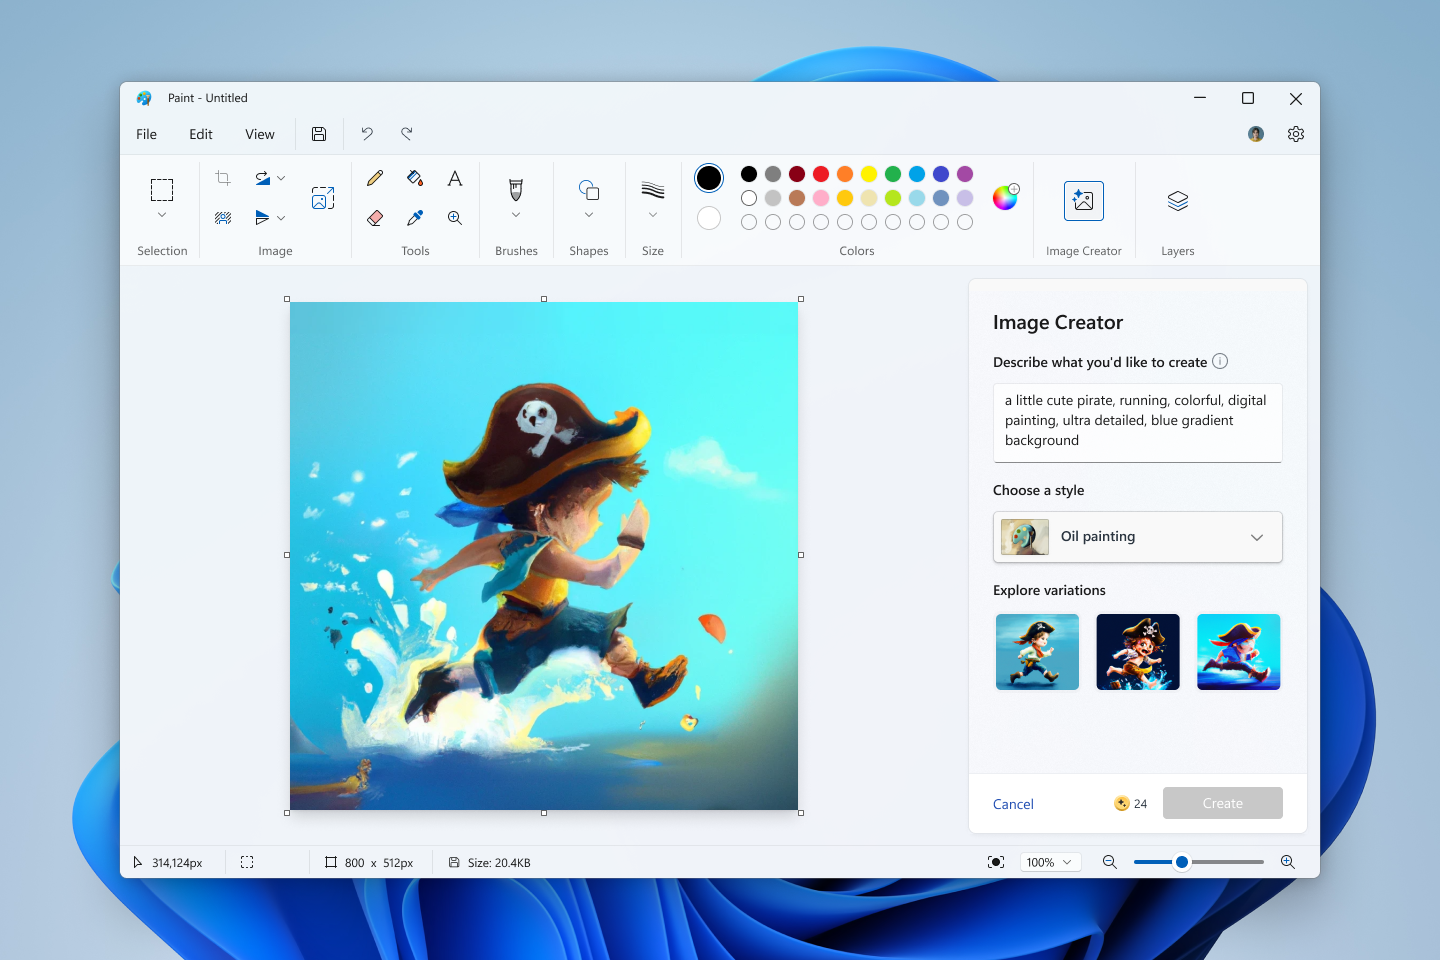
Using Image Creator
To use Image Creator, open Microsoft Paint and select the Image Creator icon on the toolbar to see the side panel. In the text box, enter a description of the image you want to create. For example, you can type «a blue cat with a red hat» or «a landscape with mountains and a lake». Be as descriptive as possible to generate results matching your expectations.
Tip: If you don’t have Microsoft Paint installed, you can get Paint from the Microsoft Store.
After you enter the text, choose a style in which you want to create your image and then select the Create button. Image Creator will generate three different variants of the image you requested, you can click on any of the variants to apply that image to Paint canvas and start creating.
Important: To use Image Creator, you need to sign in with your Microsoft account. Image Creator uses a cloud-based service that requires authentication and authorization. Signing in with your Microsoft account also allows you to access your credits, which are needed to generate images with DALL-E.
AI credits
Credits are the currency that you use to generate images with Image Creator. Each time you generate a set of images, you spend one credit.
Microsoft 365 Personal and Family subscribers, as well as Copilot Pro subscribers, can use AI credits for Image Creator in Paint. Microsoft 365 Personal and Family Subscribers get 60 AI credits per month, while Copilot Pro Subscribers receive extensive usage of AI features. Notifications are sent when credits are running low (5 credits remaining) and when they are exhausted. Credits for Microsoft 365 subscribers are automatically replenished at the beginning of each month. If you use all your monthly AI credits, you can purchase additional AI credits by subscribing to Copilot Pro. Learn more about AI credits.
Content filtering
Microsoft is committed to responsible AI practices and ethical use of technology. When you use Image Creator, we apply content filtering to prevent the generation of images that may be harmful, offensive, or inappropriate. Content filtering is based on a set of criteria that reflect our values and standards, such as human dignity, diversity, and inclusion. Content filtering is not perfect and may not catch all cases of undesirable images. If you encounter an image that is inappropriate or unexpected, report it using the Give feedback button in the Image Creator pane.
You are responsible for using Image Creator in a respectful and lawful manner. You should not use Image Creator to create or share images that may infringe on the rights or privacy of others, or that may violate any laws or regulations in your jurisdiction. You should respect the intellectual property and copyright of others, and not use Image Creator to create or share images that may infringe on their ownership or attribution. You should also be mindful of the potential impact and consequences of your images, and not use Image Creator to create or share images that may cause harm, distress, or confusion to others.
Content Credentials
We have implemented content credentials, provenance based on the C2PA standard, to help users identify AI generated Images. Images generated with Image Creator, or any other AI feature in Paint, will contain C2PA manifest helping users identify that it is an AI generated image.
Privacy
Microsoft values your privacy and data security. We acknowledge the safety risks of AI generated images and hence we run Azure online services to help ensure the safe and ethical use of AI.
The Azure online services perform content filtering to prevent the generation of harmful, offensive, or inappropriate content. Microsoft collects attributes such as device and user identifiers, along with the user prompts, to facilitate abuse prevention and monitoring.
Microsoft does not store your generated images.
Need more help?
Want more options?
Explore subscription benefits, browse training courses, learn how to secure your device, and more.
Regarding this,can you make good art with microsoft paint?
You don’t need complex software like Photoshop to make great art! MS Paint, which comes with all copies of Microsoft Windows, is a perfectly capable program which you can use to make fun drawings.
Subsequently, question is,how do i create abstract art in ms paint? Open Microsoft Paint. Click on “all programs” (may just say “programs”) and another screen should appear. Go to “Accessories” and go down to “Paint”. Click on it. You are now in MS paint.
Keeping this in view,how do you make windows art?
The best digital art software available now
- Photoshop. Still the best digital art software overall, for many good reasons.
- Affinity Photo. The best alternative to Photoshop.
- Corel Painter 2022. Painter’s annual update offers plenty of improvements.
- Rebelle 4.
- Procreate.
- Clip Studio Paint Pro.
- Artweaver 7.
- ArtRage 6.
How do you draw in 3D paint?
What to Know
- Choose Canvas on the menu bar and turn on the Transparent canvas slider. Select 3D Shapes in the menu bar.
- Choose either the sharp edge or soft edge 3D doodle tool. Draw a closed shape that begins and ends at the same place.
- Use the tools that appear automatically to manipulate the shape and rotate it.
Things to consider
Below are some things to consider when trying to figure out how to make art with microsoft paint.
What is MS Paint good for?
How to Make 3-D Art With Paint : Digital Art & MS Paint
Microsoft Paint or ‘MS Paint’ is a basic graphics/painting utility that is included in all the Microsoft Windows versions. MS Paint can be used to draw, colour and edit pictures, including imported pictures from a digital camera for example. MS Paint is found in the Windows Start menu within the Accessories Folder.
Can we do digital art in paint? Instead of painting on canvas or paper, digital painting allows you to paint directly onto a computer, which has a number of amazing advantages: It’s a lot less messy, and you can do it in even the smallest spaces – as long as you’ve got space to set up your tablet (and possibly a computer), you’re good to go!Mar 6, 2019
What step and tools are used in preparing paintings using Microsoft Paint software?
How to Use Microsoft Paint in Windows
- Opening Paint.
- Drawing and Erasing.
- Creating a Shape.
- Adding Text.
- Opening an Image.
- Cropping and Rotating an Image.
- Resizing an Image.
- Saving Your Project.
What is meant by abstract painting? Abstract art is art that does not attempt to represent an accurate depiction of a visual reality but instead use shapes, colours, forms and gestural marks to achieve its effect. Wassily Kandinsky. Cossacks 1910–1. Tate.
What kind of paint do window painters use?
The most common paint used for window painting is tempera paint, commonly called “poster paint”. Window chalk has been used but it is very difficult to clean off and, at times, requires power washing and extensive scraping. Tempera paint is frequently mixed with liquid soap or soap flakes to ease in cleanup.
Is Corel Painter free? A full 15-day free trial of this drawing software. No credit card required.
Is paint 3D free?
Paint 3D is a free program from Microsoft that includes both basic and advanced art tools, and it’s available only in Windows 10. Not only can you use brushes, shapes, text, and effects to create unique 2D art, but you can also build 3D objects.
How do I use window paint? How to use Microsoft Paint in Windows 10. To open the Paint application, click on the START button > Windows Accessories > Paint OR type Paint in the search box on the Taskbar and then select the Paint application from the results. The following window will open on your screen. This is how the Paint canvas looks like.
How do I make clip art in Word?
Select Insert > Picture > From Online. In the Online Pictures dialog box, type words describing the kind of picture you want (such as roses), and then press Enter. and then select Clipart under the Type category. Select the image you want to insert, then click the Insert button.
How can I get clip art for free? 15 Best Free Clipart Sites to Level up Your Designs
- Fotor.com – Best Friendly Clipart Website.
- Freepik.com – Best Overall Clipart Website.
- Etc.usf.edu – Best Educational Clipart Website.
- 4.Vecteezy.com – Best Vector Graphics Website.
- All-free-download.com – Best Commercial Use Clipart Website.
Does Microsoft Paint have pressure sensitivity?
The MS Paint code base is way too old to have pen pressure support. It actually does not even support the pen and thinks it’s your mouse.
Does Wacom work with MS Paint? It works great with any software your mouse does and runs on both PCs and Macs.” Now I am sure some of the advanced features like pressure sensitivity does not work, but as far as using it to draw I would imagine its just like a mouseit works with everything.
Is MS Paint good for beginners?
It’s a great place to start drawing or, in my case, a great place to build your artistic style. It’s a wonderfully basic yet deeply complex program.
Is MS paint a software? Microsoft Paint is a simple raster graphics editor that has been included with all versions of Microsoft Windows.Microsoft Paint.
| Paint on Windows 11 | |
|---|---|
| Other names | Paintbrush (1985-1995) |
| Developer(s) | Microsoft |
| Stable release | 11.2110.0.0 / October 4, 2021 |
| Operating system | Microsoft Windows |
What are the tools in Microsoft Paint?
paint.net
- Tools Window.
- Selection Tools. Magic Wand Tool.
- Move Tools.
- View Tools.
- Fill Tools. Paint Bucket Tool. Gradient Tool.
- Drawing Tools. Paintbrush Tool. Eraser Tool. Pencil Tool.
- Photo Tools. Color Picker Tool. Clone Stamp Tool. Recolor Tool.
- Text Tool. Line/Curve Tool. Shapes Tool.
What app is good for digital art? To help you choose, we have compiled a list of our favourite drawing apps for digital art.
- Adobe Photoshop Sketch. Available on iOS, Windows.
- Procreate. Available on iOS.
- Clip Studio Paint. Available on iOS, Android, Windows.
- Autodesk Sketchbook. Available on Mac, Windows.
- Affinity Photo. Available on Windows, Mac, iOS.
- Krita.
What is the best app for digital art?
Autodesk SketchBook
- Art Set.
- Inkist.
- ArtStudio.
- Brushes Redux.
- Pixaki.
- Infinite Painter.
- ArtFlow Studio. Artflow is a feature-rich, ambitiously designed Android art app.
- Paper Color. Paper Color (previously known as Paper Draw) is one of those good drawing apps for Android that does the basics well.
Does MS paint still exist? Paint is still part of Windows. In addition to the new 3D capabilities, many of the classic 2D features from Microsoft Paint are available to use.
What is paint button in MS Paint?
The first button to the left of the ribbon is the paint button. Explanation. Clicking on paint button opens a menu. It contains a list o previously saved pictures in the paint.
What happened to MS Paint? Microsoft Paint app is not going away and it will now receive improvements or updates via the Windows 10’s app store. In the future, Microsoft will offer MS Paint in the Windows Store for free and still maintain the Paint 3D app to ensure that all tools for creators are available in one place.Apr 8, 2021
Загрузить PDF
Загрузить PDF
Чтобы создать произведение искусства, не обязательно иметь сложное программное обеспечение вроде Photoshop! MS Paint, который есть во всех версиях Microsoft Windows, — вполне подходящая для этого программа, с помощью которой вы можете создавать интересные картинки. Эта статья wikiHow расскажет вам, как использовать старые и новые версии этой программы, а также даст несколько полезных советов. Итак, начнем с Шага 1!
-

Используя инструмент Карандаш, сделайте набросок вашего рисунка. Будет лучше, если вы будете использовать любой цвет, кроме черного.
-
Используя карандаш, нарисуйте основные линии вашего рисунка. Можно сделать это схематически или постараться и придать им окончательный вид.
-
Используя инструмент Заливка, закрасьте ваш рисунок основным цветом. Возможно, вам придется увеличивать некоторые участки рисунка, чтобы увидеть и закрасить все возможные небольшие пустоты.
- Значок инструмента Заливка выглядит как выливающееся ведро краски.
-
Используйте Карандаш, чтобы нарисовать линии, которые будут ограничивать зоны затенения. Ничего страшного, если она чуть-чуть пересечется с черными краями. Это потом можно будет легко поправить. Цвет, которым вы рисуете эти линии, должен быть таким же, какой вы будете использовать для зон затенения и подсветки.
-
Используйте Заливку, чтобы закрасить зоны затенения, при этом используйте цвет чуть темнее основного.
-
Используйте Заливку, чтобы закрасить зоны подсветки, при этом используйте цвет чуть светлее основного.
-
Вы можете добавить больше деталей и текстур, но это основа процесса. Продолжайте практиковаться!
Реклама


-
Так как MS Paint работает с пикселями, если вы хотите создать по-настоящему хороший рисунок, вам следует увеличить размер холста. Это можно сделать, нажав на кнопку изменения размера и установив размеры больше 2000 пикселей.
-
Процесс будет намного быстрее, если вы сделаете настоящий набросок рисунка и отсканируете или сфотографируете его, чтобы отправить его на компьютер. Вы также можете сделать набросок в самом MS Paint, но в таком случае лучше это делать светло-серым цветом.
- Если у вас есть возможность отсканировать ваш набросок, просто откройте файл в программе MS Paint, чтобы доработать его до классного рисунка, но убедитесь, что у вас где-то сохранилась и копия отсканированного варианта (на случай, если вы ошибетесь, и вам нужно будет начать заново).
-
Используя инструмент Кривая линия, сделайте основные линии рисунка, используя черный цвет. Найдите значок с длинной кривой линией (похожей на брови) и кликните на начале и конце линии. Затем, используя мышь, захватите полученную ровную линию и выгните ее в дугу в соответствии с вашим наброском. Повторяйте действия, пока ваш набросок не будет полностью воспроизведен в черном цвете.
- Использование именно черного цвета очень важно. Вы всегда сможете изменить цвет этих линий обводки потом, но пока делайте их черными.
-
Пора избавиться от линий первоначального наброска! Нажмите Выделить, щелкните правой кнопкой мыши на рисунке и затем выберите Инвертировать цвета. Затем переключите из цветного в черно-белый формат, выбрав Файл → Свойства. Нажмите OK, пусть переключится режим, а затем таким же способом верните рисунок в цветной режим. Теперь еще раз инвертируйте рисунок, и у вас получится чистая картинка.
- Может быть полезным сохранить копию, на которой просто черные линии, особенно если вы потом допустите ошибку и вам нужно будет эти линии восстановить.
-
Используя инструмент Заливка, закрасьте ваш рисунок основным цветом. Убедитесь, что закрасились крошечные участки, которые могут находиться между близко расположенными или пересекающимися под углом линиями.
-
Теперь самое интересное. Выделите все и скопируйте ваш рисунок в таком виде, какой он сейчас есть. Затем выберите участок, который вы хотите затенить (скажем, волосы). Выберите основной цвет этого участка и установите его для Цвета 2. Затем сделайте Цветом 1 цвет затенения. Для отрисовки границы затенения используйте любой понравившийся инструмент. Не беспокойтесь о том, что выйдете за пределы черных линий! Просто обведите область (которая закрашена основным цветом).
-
Теперь время избавиться от цветов, которые выходят за границы линий! Уменьшите масштаб так, чтобы видеть весь рисунок, Нажмите Выделить, щелкните правой кнопкой мыши на рисунке и вставьте рисунок, скопированный ранее. А теперь немного магии. Нажмите на стрелочку под кнопкой Выделить. Затем установите галочку Прозрачное выделение. Та-дам!
-
Повторяйте этот процесс для каждого участка и каждой тени, пока не станете довольны результатом!
Реклама


-
Вы должны помнить, что MS Paint — это не Photoshop. Не ждите, что ваши рисунки будут выглядеть как нарисованные в Photoshop. Вы можете создавать красивые картинки, но они выглядят вполне определенным образом. Примите это как есть. Вам также следует помнить, что файлы сохраняются с худшим качеством, чем в таких программах как Photoshop, поэтому не ждите, что их можно будет распечатать в высоком разрешении и с хорошим качеством.
-
Знайте, какие изменения вы можете сделать в таком существующем изображении, как фотография. MS Paint — это не Photoshop, но с его помощью можно сделать некоторые хитрости. Например, вы можете сделать следующее:
- Обрезать изображение. Обрезка в MS paint на самом деле намного проще, чем в других программах, так как вам нужно всего лишь перетащить углы изображения.
- Скрыть небольшие проблемы. Копирование и вставка небольших выделенных кусочков изображения поможет легко «залепить» некоторые небольшие недостатки изображения, если вы, конечно, достаточно терпеливы.
- Откорректировать эффект красных глаз. Если у вас есть небольшие участки с темными пикселями, вы можете просто скопировать и вставить, или если вы чувствуете, что можете это сделать инструментами для рисования, то избавление от эффекта красных глаз вполне выполнимая задача в таких программах как MS Paint.
-
Если вы используете MS Paint просто потому, что думаете, что не сможете достать лучшую программу, не беспокойтесь. Есть несколько вариантов. Обязательно проверьте вот эти варианты, которые могут помочь вам на вашей дороге к мастерству рисования:
- Одна из программ, которая может быть вам полезна — это бесплатная программа Oekaki. По виду она напоминает MS Paint, но имеет больше возможностей. Вам даже не обязательно что-то скачивать. На многих сайтах Oekaki работает как апплет, запускаемый на вашем браузере. Эта программа позволит вам создавать настоящие слои, как в Photoshop, а это означает, что вы сможете создавать более красивые картины.
- Если вы хотите использовать более мощную программу, но не хотите платить за Photoshop, есть и другие варианты. Paint Tool Sai, Manga Studio и многие другие программы, которые схожи с Photoshop, можно купить всего за $20-50 (700 — 1800 руб).
Реклама


Советы
- Сохранение в формате GIF подойдет для ровных цветов (т.е. для рисунков без затенений) и анимации, PNG лучше всего подходит для работ с затенениями, а JPEG лучше всего для фотографий. Использовать BMP не рекомендуется, потому что вы скорее всего потеряете в качестве цвета. Имейте это в виду, когда будете сохранять свои рисунки.
- Попрактикуйтесь и побалуйтесь с другими инструментами, пока вы их не освоите.
- Вы можете увеличивать и уменьшать масштаб, если вам неудобно работать с рисунком, просто нажав «Вид» и затем «Масштаб» в левом верхнем углу экрана.
- При использовании инструмента Заливка убедитесь, что все пиксели одного цвета соединены между собой. Использование заливки в случае пробелов в граничной линии приведет к тому, что закрасятся и другие участки.
- Повторение — мать учения!
Реклама
Что вам понадобится
- Microsoft Paint
Об этой статье
Эту страницу просматривали 26 877 раз.
Была ли эта статья полезной?
Paint — это одна из самых простых программ для рисования на компьютере. В ней можно создать полноценный рисунок, а
также обработать фотографию: уменьшить размер, обрезать, сделать надпись. Сейчас мы научимся работать с основными
инструментами и цветами в этом приложении.
Чтобы открыть программу, нужно нажать на «Пуск» в нижней части экрана слева. В списке щелкнуть по пункту
«Стандартные-Windows» и выбрать Paint.
Загрузится приложение. Выглядит оно примерно так:
Окно состоит из нескольких частей. Самая важная — белый прямоугольник посередине. Это и есть наш лист, то есть то
место, где мы будем рисовать.
Следующая, не менее важная часть, — инструменты. Это то, чем мы будем рисовать.

Также нам понадобятся цвета. Они находятся рядом.

Цвета
Для того чтобы выбрать цвет, нужно всего лишь щелкнуть по нему левой кнопкой мышки. Кстати, обратите внимание на
два квадратика.
Если Вы нажмете на какой-нибудь цвет, то он появится в первом (переднем) квадратике. Это означает, что он выбран,
и им можно рисовать.
А задний квадратик — это тот цвет, которым Вы будете стирать нарисованное. По умолчанию он белый. Лучше его не
менять.
Кстати, это далеко не вся палитра. Есть еще много других оттенков. Для добавления цветов нужно щелкнуть по пункту
«Изменение цветов».
Инструменты
А сейчас самое интересное — рисование. Все инструменты находятся в верхней части приложения.

Начнем с Карандаша. Выглядит он вот так:
Рисует тонкой линией. Для этого выберите «Карандаш», кликнув по нему левой кнопкой мыши, укажите цвет. Затем
наведите курсор на белое, нажмите на левую кнопку мыши и, не отпуская ее, двигайте мышкой.
Следующий популярный инструмент — Кисть. Выглядит он вот так:
Рисует более толстой линией, чем «Карандаш».
Чтобы изменить толщину и тип линии, нужно нажать на иконку со стрелочкой прямо под инструментом «Кисть».
Ластик — вытирает то, что нарисовали.
Заливка — заполняет цветом объединенную область.
Для того, чтобы это попробовать, нарисуйте круг кисточкой или карандашом. Щелкните левой кнопкой мыши по заливке
и выберите другой цвет.
Наведите внутрь круга и щелкните левой кнопкой мыши один раз. Внутренняя часть круга заполнится.
Масштаб — увеличивает часть рисунка.
Для увеличения щелкните по инструменту «Масштаб» и нажмите на то место рисунка, которое хотите увеличить, левой
кнопкой мышки. Для возврата обратно, то есть уменьшения, щелкните правой кнопкой мышки по увеличенной части. Если
это не сработало, то снова выберите «Масштаб» и щелкните по рисунку левой кнопкой мышки.
И напоследок поговорим еще об одном инструменте, который, по сравнению с предыдущими, не так часто используется.
Пипетка
Нужна для того, чтобы определить цвет. Для этого наведите «Пипетку» на определенную часть рисунка и нажмите один раз левой кнопкой мышки. После чего посмотрите на установленный цвет. Он поменяется. При помощи «Пипетки» можно выбрать цвет в определенном месте (точке) рисунка.
Только что мы рассмотрели самые часто используемые инструменты программы Paint. Попробуйте нарисовать похожий
рисунок, используя их.
Другие возможности приложения мы рассматриваем в следующих уроках.