
Provide feedback
Saved searches
Use saved searches to filter your results more quickly
Sign up
Scanning for IP address lets you have better control over your network. With 1-2 commands, you can quickly map out the devices in your network and the IP addresses that they are using. But to understand how to scan a network, first, you need to understand how are IP addresses assigned.
Follow these four simple steps to scan your network for IP addresses in use:
- Open a Command Prompt window.
- On Windows or macOS type ipconfig or on Linux type ifconfig. Press return. Note down the subnet mask, the default gateway, and your own computer’s IPv4 address.
- Enter the command arp -a to get a list of all other IP addresses active on your network.
- Enter the command ping <IP_address> giving any of the addresses returned by ARP in order to test the response times to that node – don’t include the angle brackets that are shown in that example.
DHCP (Assigning IPs Dynamically)
An automated process in networking, called DHCP (Dynamic Host Configuration Protocol), assigns IP dynamic addresses to hosts as soon as they enter the network. In a home or small network, the DHCP server is usually a part of the router. When you come into the network, the router will look for an available IP address in its pool and assign it to you, so that your device can communicate with others without any conflict.
Dynamic allocation of IP addresses is a great advantage for both end-users and network admins. But sometimes you would need to have some control in order to manage and troubleshoot your network more efficiently.
Related post: Find device or IP with MAC
Related Post: PowerShell Kill Process Command
If you are here for free tools and trials, here is our list of the four best tools for discovering IP addresses on a network:
- ManageEngine OpUtils – FREE TRIAL A suite of network address monitoring tools that covers IP addresses, MAC addresses, and port numbers with a cut-down free version also available. Installs on Windows Server and Linux.
- Angry IP Scanner A free network scanner that identifies all connected devices and lists their IP addresses plus connection response speeds. Available for Windows, macOS, Linux.
- SolarWinds Engineer’s Toolset Ping Sweep This utility scans a network and records every IP address that is in use. The Engineer’s Toolset also includes subnetting tools for DHCP management and the Open Port Scanner. Runs on Windows Server.
- MyLAN Viewer A network scanner that identifies all connected devices and lists their IP addresses and MAC addresses. Runs on Windows.
Download Remote Shutdown and Reboot Cheat Sheet
What will you learn in this Tutorial
In this tutorial, you will learn the basic networking skills on how to scan a network for IP addresses. We will scan a network with native OS commands, find which addresses were assigned dynamically, which statically, and test their connectivity.
In the end, we will compare some free IPAM tools aka IP address scanning tools that can give you additional information. To improve your IP addressing insights, even more, we will show you some tools that allow you to track IP addresses and even manage them.
Simple IP Scanning
Operating Systems, like Windows and Linux, come with their own native simple networking set of tools. Commands such as “ipconfig”, “arp -a”, or “ping” allow simple scanning and troubleshooting.
The simplest way to get a quick list of IP addresses and their devices connected to your network is with those OS native commands found in the command line. With a list of the assigned IP address and their devices, you can easily find the devices that are causing the most problems.
- ipconfig This command displays all network settings assigned to one or all adapters in the computer. You can find information such as your own IP, subnet, and Gateway. For Linux and MacOS is “ifconfig”.
- arp -a When you issue the “arp -a”, you’ll get IP-address-to-mac conversion and the allocation type (whether dynamic or static) of all devices in your network.
- PingIt helps determine connectivity between two hosts and find the IP address of a hostname.
Related Post: Best IP & Port Scanners
Reading The Output
Finding your own network adapter configuration
In the following screenshot, you’ll see the output from the ipconfig command. On a Windows, the ipconfig command can be entered through the Command line.
Go to Run > type cmd > type ipconfig
- This Windows computer has 5 network adapters, but the last one (Wireless LAN adapter Wi-Fi) is the only one connected to a network. The rest are disconnected.

- In this network, the router (or Default Gateway) is playing the role of the DHCP server. It is assigning the IP address dynamically and giving access to the Internet.
- You are reading two of the most important IP addresses for your device; Your own device’s IP (IPv4 and IPv6) and your Gateway. The Subnet Mask is also very important, it shows that you are on the same subnet as the gateway.
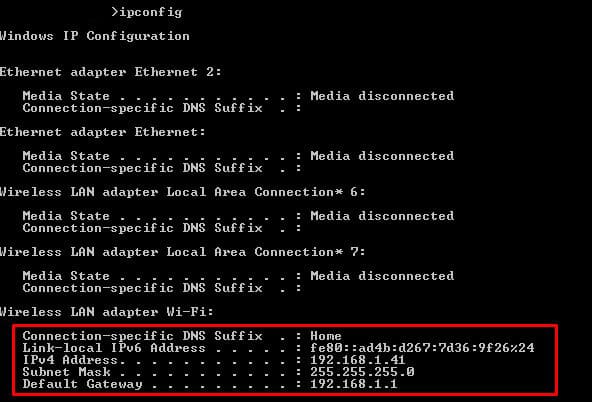
Now you know your subnet, which in this case is 192.168.1.0/24 (using the CIDR range). Now you need to find the rest of the IP address in your network.
Scanning your Network
The job of the ARP protocol is to map IPs to MAC addresses. It provides a method for hosts on a LAN to communicate without knowing any address and create a cache of information. When a new computer enters the LAN, it receives an IP and updates its ARP cache with the Gateway information. This ARP cache can be found using the “arp-a” command.
- Use the command line to enter the “arp -a” command.

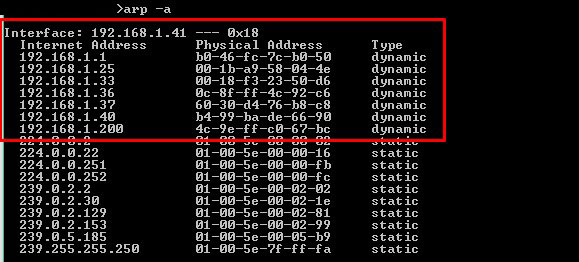
- This computer has been connected for some time into the LAN, so its ARP cache is very precise and complete. The first IP address shown in the display is the Gateway (the same we found through the ipconfig command).
- The output shows the IP, the MAC addresses, and their assignation type. The addresses displayed here were dynamically assigned by the DHCP server in the LAN. All of these IPs are devices connected to the LAN (192.168.1.0/24). The other static addresses are reserved for Multicasting.
- With the MAC information, you can know the vendor. Try searching for vendor prefixes or use an automatic online tool such as MACvendors.
Testing Connectivity
Finally, with some information, you can test connectivity. In the following test, we tried an extended ping with “ping -t” to the gateway. With this, you can learn some simple insights about delay and latency.
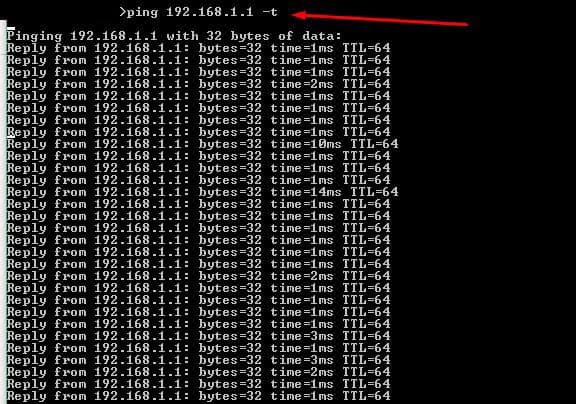
From the list generated by the ARP command, you could ping all the live hosts. Or you can go beyond and ping the entire subnet to find hosts not found by the ARP (but that would be too much manual work…). Later, we’ll discuss how to automatically ping entire subnets at once.
Enhancing IP Scanning
Although having a list of devices and their allocated IP address will give you good insights, the information will not be enough when your network scales. Manual IP scanning in multiple subnets and BYOD (Bring-Your-Own-Device) scenarios is nearly impossible. As the network scales, problems will scale too.
Larger networks demand more results, flexibility, and easy-to-read set of commands.
An IP Address Scanner tool helps you with larger demands. These tools are able to map the entire local network, finds live hosts, and to provide the results of the “arp-a” in a clearer format. Other IP Scanners do not depend on ARP but they operate using repeated ping tests. A Ping Sweep tool lets you ping entire subnets and find live hosts just with one button.
Some other IP Scanners go the extra mile and give more information such as Port number, DNS, DHCP, etc. All of this data is also presented in the most visual and easy-to-read format. They also allow users to save all results and present them in detailed reports.
The best IP Address discovery tools
Our methodology for selecting a third-party tool to scan for IP addresses
We reviewed the market for IP address discovery tools and analyzed options based on the following criteria:
- A service that can be run on demand, on a schedule, or continuously
- Scans of the entire network or the option to limit searches to an address range
- DNS resolution
- Mapping from MAC addresses to IP addresses
- A system that can also provide availability and response time tests
- A free trial that provides a no-cost opportunity to assess the package or a free tool
- Value for money from a system that is offered at a fair price or a free tool that is worth installing
With these selection criteria in mind, we identified a number of network scanners that will discover IP addresses and identify the devices to which they have been allocated by mapping to MAC addresses.
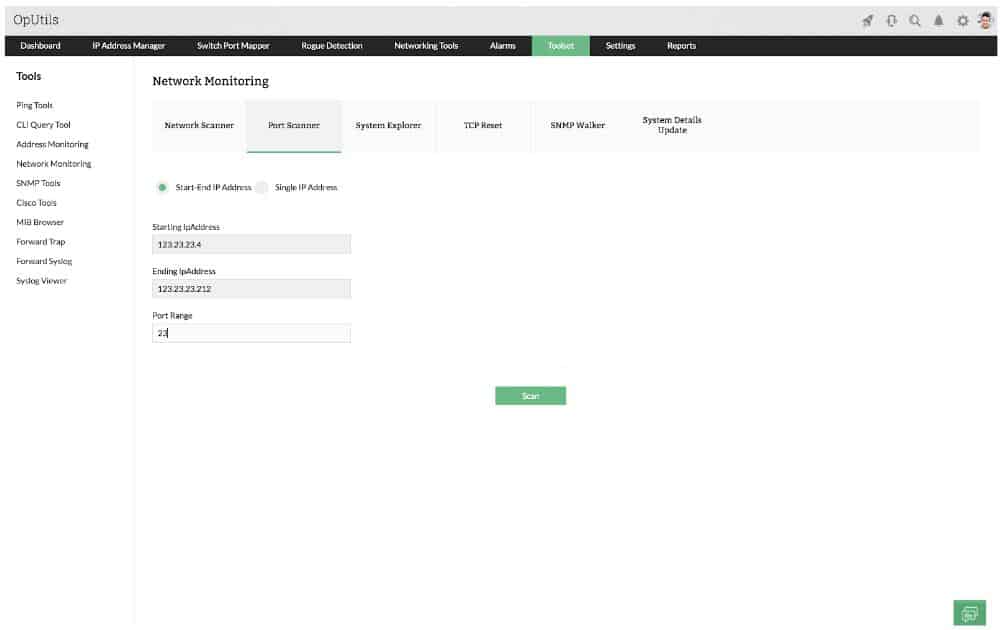
ManageEngine OpUtils combines an IP address manager, a switch port mapper for MAC address discovery, and a port scanner to identify open TCP and UDP ports on all devices. This combination delivers all address-related functions that you will need in order to fully manage your network.
Key Features:
- IP Address Manager: OpUtils IP address manager, provides users with a centralized tool for efficient management and organization of IP addresses within the network.
- Subnet Planner: The subnet planner feature assists in planning and optimizing network subnets. This helps network administrators allocate and manage IP address spaces more effectively.
- Identification of Abandoned Addresses: This functionality aids in reclaiming and optimizing IP resources.
- Robust Utilities Suite: This feature ensures that OpUtils provides a holistic solution for address-related functions in network management.
Feature Distinction
The uniqueness of OpUtils is its robust suite of utilities. It includes an IP address scanner, subnet planner, tools for identifying abandoned addresses, and advanced configuration and diagnosis features.
Why do we recommend it?
We recommend ManageEngine OpUtils for its efficient network management capabilities. OpUtils offers an IP address manager as part of its utility suite, so you can discover all connected devices, and their associated IP addresses, and then manage them from a single console.
The IP address manager is, in itself, a suite of utilities. This group of services includes an IP address scanner. This will discover all of the devices connected to your network and list the IP addresses allocated to them. The IPAM is able to produce IP address reconciliation reports that will enable you to update your native DHCP server in case it fails to notice expired address leases.
The IP address tracker service in the bundle can produce a hierarchical view of your network, enabling you to identify subnets and the allocation of addresses to each. DHCP management tools in the pack let you manage subnet address pools. The switch port mapper identifies each device by MAC address and switch port number. The port scanner in OpUtils lets you see which TCP and UDP ports on each device are open.
OpUtils is available for Windows Server and for Linux.
Who is it recommended for?
ManageEngine OpUtils is recommended for various-sized networks, from SMBs to large enterprises. The solution is designed for any network admin or IT professional within those networks, looking for a complete IP address management solution.
Pros:
- Support for IP Management and Switch Port Monitoring: This dual functionality allows for comprehensive network management, addressing both IP-related tasks and monitoring the status of physical switch ports.
- Built-in Troubleshooting Tools: The inclusion of built-in troubleshooting tools enhances the diagnostic capabilities of OpUtils.
- Compatibility with CISCO and SNMP Tools: OpUtils supports CISCO and SNMP tools, providing compatibility with widely used networking technologies.
- Suitability for Sysadmins: OpUtils is designed to meet the specific needs and preferences of sysadmins, making it potentially more user-friendly for individuals in this role.
Cons:
- Advanced Features Not Suited for SOHO: OpUtils advanced features and options may be considered a drawback for small home networks, where simpler and more basic tools may be more appropriate.
OpUtils is available in a Free version, which includes a port scanner and Ping utilities. Contact the ManageEngine sales team for a quote on the paid version. The paid version of OpUtils can be downloaded as a 30-day free trial.
ManageEngine OUtils
Download a 30-day FREE Trial
2. Angry IP Scanner
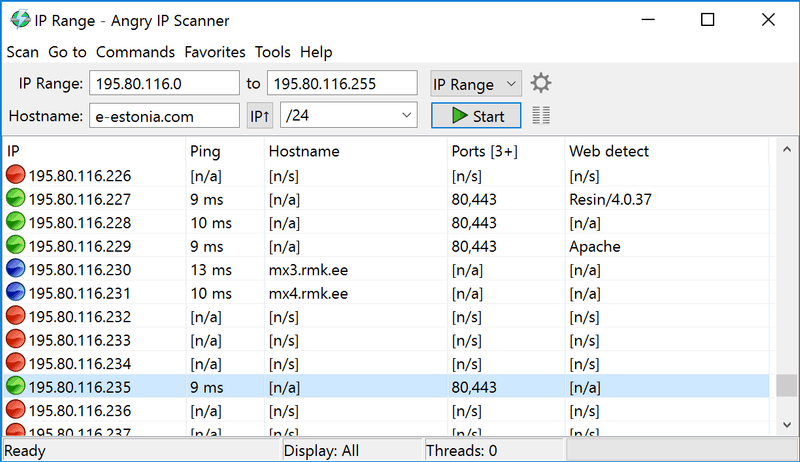
Angry IP Scanner is one of the most popular scanners on the web, with over 29 million downloads. It is open-source, free, and available for Windows, MacOS, and Linux. It can let you scan your local network or the Internet-facing IP addresses.
Key Features:
- On-Demand Ping Sweeps: With this feature, users can initiate scans at their convenience, allowing for flexibility in assessing and discovering devices within the network or specified IP ranges.
- Tabulated Results: This feature enhances the user experience, providing a quick overview of the scanned data.
- Save to File: This feature is valuable for record-keeping, analysis, and documentation purposes. Users can store and reference the scan data at a later time, facilitating further analysis or sharing of findings.
Why do we recommend it?
Angry IP Scanner is recommended for being one of the most used and relied-on open-source tools. If IP address scanning is all you need, Angry IP Scanner is easy to use and quite efficient in scanning both local and Internet-facing IP addresses.
This tool is not only capable of scanning IP addresses but also ports. When you define an IP address range, you can also specify a number of the port, and see if a device in your network is using a specific service (defined by the port). Angry IP Scanner also lets you save all the scan results into multiple formats, such as TXT, XML, CVS, etc.
When you scan, you’ll know what hosts are alive, their response time, hostname, MAC address, etc. If you want even more information, you can extend results by developing Java plugins.
Who is it recommended for?
Angry IP Scanner is recommended for one-off scans of smaller networks. It works very well in uncomplicated situations and small networks where network admins require a fast and simple way to scan networks. Angry IP Scanner does not scale well on larger networks.
Pros:
- User-Friendly: Its user-friendly interface ensures that both beginners and experienced users can quickly initiate and perform scans without extensive training.
- One-Off Scans: Its simplicity and efficiency make it particularly useful for quick network assessments and discovery tasks in smaller environments.
- Open Source and Free: Angry IP Scanner is open source and 100% free. This cost-free nature makes it an attractive option for users with budget constraints.
Cons:
- Lacks Advanced Features: Angry IP Scanner lacks advanced features such as DHCP reconciliation and rogue DHCP identification. This limitation may be a drawback for users requiring more for in-depth network analysis and troubleshooting.
- Limited Scalability: The tool may not scale well in large environments or when tasked with scanning extensive networks, potentially leading to performance issues.
- Lacks Detailed Reporting: For organizations requiring comprehensive and detailed insights into their network infrastructure, the absence of advanced reporting capabilities may be a limitation.
Open Source and 100% free. Get Angry IP from its official site.
3. SolarWinds Engineer’s Toolset Ping Sweep
Tested on: Windows & Windows Server
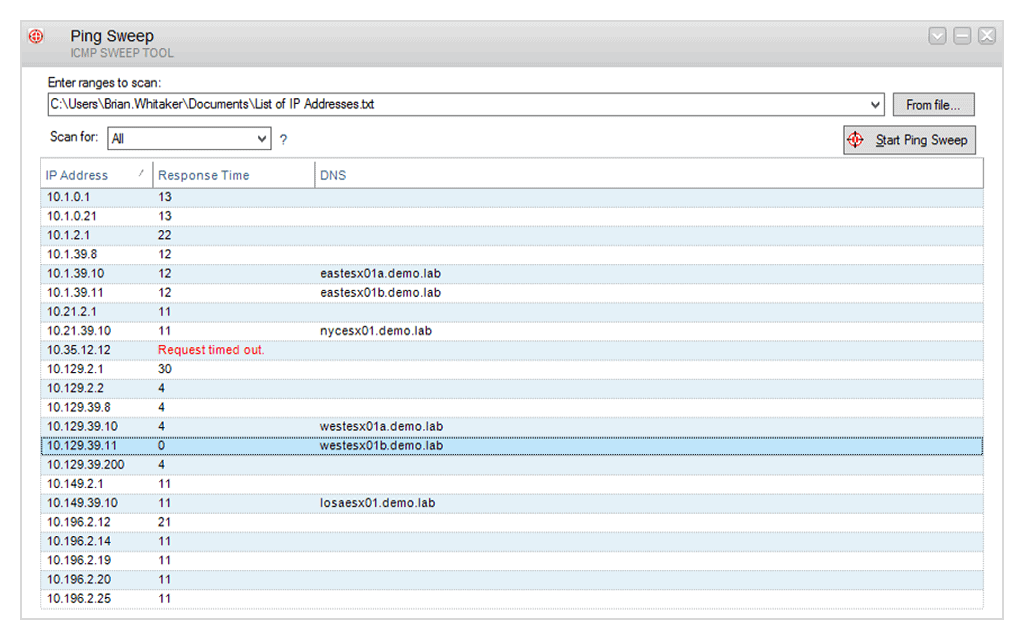
SolarWinds Engineer’s Toolset Ping Sweep is one of more than 60 network management systems in the Engineer’s Toolset. The package provides systems for monitoring networks but it is mainly a bundle of network troubleshooting tools.
Key Features:
- Network Device Discovery: The Ping Sweep tool facilitates the discovery of network devices, allowing users to identify and locate devices connected to the network.
- IP Address Recording: Users can record and keep track of IP addresses currently in use within the network, aiding in the management and organization of IP allocations.
- Address Range Scanning: The tool enables scanning across a specified range of IP addresses, providing a comprehensive overview of devices within that range and helping to identify potential issues.
- Hostname Visualization: Users can easily view hostnames associated with the discovered devices, enhancing the ability to recognize and manage network entities efficiently.
- Response Time Metrics: Ping Sweep provides response time metrics for the discovered devices, offering insights into the network’s responsiveness and performance.
Feature Distinction
This package is part of a bundle of systems for network troubleshooting. It is available for on-demand network scanning to discover which devices are on the network and which IP addresses are available.
Why do we recommend it?
The Ping Sweep tool is part of the SolarWinds Engineer’s Toolset. This package provides a single dashboard for many tools, so you don’t have to go looking around your desktop to find this or any of the other utilities when you need them. The package is for Windows Server but you can also install it on a Windows PC.
The GUI interface includes a field where the user can enter a range of IP addresses to scan. The field can also take a non-sequential list, and if that list is long, you can write it into a text file and put the path and file name in the IP address range field instead of the actual addresses.
The interface makes the output easy to read and it shows a line for each address in the given range or list. You can select a setting that will restrict the output to only show those addresses that responded. The record for a discovered IP address shows the response time of the Ping test to that node and the utility will also check in the local DNS file to show the hostname for the discovered device.
As well as viewing the results in the Engineer’s Toolset dashboard, you can store results to a text file or a CSV for further analysis. The system doesn’t provide the option to run continuously, so you would use this tool for on-demand address testing. The Engineer’s Toolset also includes facilities for managing DNS and DHCP servers and there are a number of subnetting utilities in the package.
After discovering all devices with the Ping Sweep tool, network managers can switch to the Open Port Scanner to examine which ports are open on each device or run through a list of devices to see all results in one list.
Who is it recommended for?
This is a useful package for network troubleshooting on a large or mid-sized network or for network monitoring on a small network. The Engineer’s Toolset also provides utilities to examine DNS and DHCP servers and it provides other OIP address management utilities. You can also use facilities in the package to check on the ports on each endpoint on your network.
Pros:
- On-Demand Network Scanner: Users have the flexibility to initiate network scans on-demand, providing control over when the tool assesses the network.
- DNS Server Testing: Ping Sweep includes the capability to test the local DNS server. This allows users to verify the performance and reliability of the DNS server, ensuring smooth domain name resolution within the network.
- Response Time Metrics: This enables you to assess the efficiency and performance of network-connected devices, aiding in the identification of potential latency issues.
- Identification of IP Address Gaps: Assists network administrators in optimizing IP allocations and preventing potential conflicts or overlaps in addressing.
- Record Storage for Further Analysis: The ability to store scan records to a file allows for in-depth analysis and documentation.
Cons:
- Non-Continuous Operation: The tool doesn’t run continuously, meaning it needs manual initiation for each scan.
The Engineer’s Toolset is a single package for all 60 utilities, including the Ping Sweep tool. The software package runs on Windows Server or Windows. You can examine the package by accessing a 14-day free trial.
IP Address Tracker Tools
Having a map of IP addresses, MAC addresses, used ports, etc, is great for networking inventorying and may help with some troubleshooting cases. But a list can not control and display real-time results.
An IP address Tracker is a good upgrade to our set of tools and commands described so far. It does allow scanning multiple subnets and displaying results, but it also allows you to keep track of one or more IP addresses.
An IP Address Tracker will notice when an IP address is released. This can be either because the device lost connectivity or it changed IP address. It will help you minimize IP addressing conflicts (when two devices are trying to take the same IP) and reduce DNS errors.
MyLAN Viewer
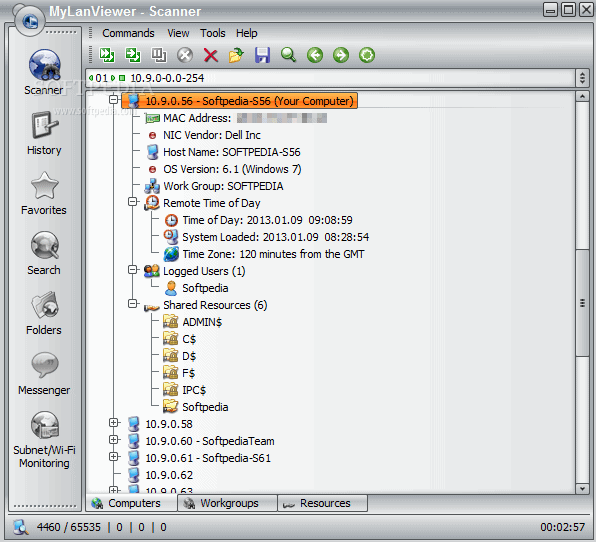
MyLAN Viewer is a NetBIOS and IP address scanner for Windows systems. Just like the IP Scanners shown above, this tool will scan a network and show devices in an easy-to-read format.
Key Features:
- Continuous Scans: Continuous scanning ensures that the information remains up-to-date and reflects any changes in the network.
- Alerts for IP Address Profile Changes: This feature is valuable for immediate awareness of any alterations in the network configuration or device characteristics.
- Device Details: Users can access comprehensive device details, enhancing their ability to understand and manage the devices within the network.
Why do we recommend it?
MyLAN Viewer is recommended for its dedicated IP scanning capabilities. It provides advanced IP scanning, including continuous scans, schedules, and alerts for IP address profile changes. Also, if you are looking for a comprehensive network data collection (aside from IP addresses), MyLAN Viewer is a great option.
But MyLANViewer goes beyond, and not only shows computer name, IP, and MAC, but also NIC, OS version, logged users, shared folders, and much more.
This tool is able to track specific IP addresses and show notifications when their state change. With it, you can also keep track of network security by showing port information and detecting rogue DHCP servers. MyLAN Viewer tracks all devices in the subnet including hidden, and displays alerts when new devices enter the network, and others go.
This tool can also display the following metrics as well:
Display Whois data.
Perform traceroute.
Manage “Remote Shutdown and Wake On LAN (WOL)”.
Monitor wireless networks.
Who is it recommended for?
MyLAN Viewer is recommended for network admins working with Windows-based networks and who need detailed information about connected devices. It does not scale well on large networks, thus it is better to use MyLAN Viewer on smaller networks.
Pros:
- Diverse Network Tools: Additional network tools, such as whois, traceroute, Wake-On-LAN , and remote shutdown options makes it a valuable solution for small networks.
- File Management Features: This enhances collaborative efforts and simplifies file-sharing processes within smaller network environments.
- Effective for SOHO: MyLAN Viewer ability to detect rogue DHCP servers and address IP conflicts, is well-suited for the specific needs of smaller-scale network configurations.
Cons:
- Cluttered Interface: The interface of MyLAN Viewer can feel cluttered in large networks.
- Reporting and Monitoring: For organizations requiring in-depth insights and reporting features for large-scale network analysis, the absence of these capabilities may be a limitation.
- Limited Platform Compatibility: The tool is only available for Windows systems, a drawback for users operating on different operating systems.
Price: Free, but only available for Windows systems.
Download: Get MyLAN Viewer from its official site.
Related Post: Best Wake On LAN Tools
IP Address Management (IPAM)
Basic IP Address Scanning should be enough to manage small networks. But when networks scale they depend on multiple subnets and detailed management requirements.
Sometimes large-scale networks have standalone DHCP and DNS Servers in order to assign addresses to multiple subnets. But IP conflicts occur and it is really challenging to manage them manually. An IP Address Management or “IPAM” is a piece of software able to actively control DHCP and DNS. It also gives you the ability to manage multiple subnets.
IP address scanning FAQs
How do I find a network name from an IP address?
To get the network name of a host from an IP address you need to query the DNS server. Open a Command Prompt window and enter nslookup <IP_address> putting in the IP address you have instead of <IP_address>.
How do I identify an unknown device on my network?
To see all of the devices connected to your network, type arp -a in a Command Prompt window. This will show you the allocated IP addresses and the MAC addresses of all connected devices. To get the hostname of each IP address you see in the list, use nslookup <IP_address> putting in the IP address you have instead of <IP_address>.
How can I tell what device is at an IP address?
To get deeper information on devices connected to your network rather than just an IP address or MAC address, use a network monitor that scans for details with SNMP – the SolarWinds Network Performance Monitor is one example.
Linux
arping is the ultimate tool for finding out if an IP is actively used or not. It uses ARP to detect an IP.
Since it uses ARP it has to be run in the same broadcast domain (VLAN) as the target IP.
# arping -I eth0 -c 3 208.x.x.x
# arping -q -c 3 -U -I eth0 192.168.x.x
arp-scan runs the arping over a range of IPs
Default timeout is 500 ms it is better to change it to 1000 ms or more to get more accurate results.
-t 1000
Sorting IPs and eliminate duplicates
# arp-scan 199.x.x.x -199.x.x.x | sort -u -k1,1
# arp-scan -I eno1 199.x.x.x/23
# arp-scan 199.x.x.x 208.x.x.x 208.x.x.x
Windows
arp-ping
http://www.elifulkerson.com/projects/arp-ping.php
SoftPerfect Network Scanner
https://www.softperfect.com/products/networkscanner/
——————————————————————————-
How to install arp-scan on CentOS ?
(This has been tested on CentOS 7)
# rpm -Uvh rpmforge-release*rpm
3. Install arp-scan rpm package:
# yum install arp-scan
Большинство рассматриваемых сетевых утилит для полноценной работы
требуют наличия административных привилегий. Для операционных систем
семейства Windows 2000/XP достаточно того, чтобы пользователь работал под учетной
записью члена группы администраторов. Интерпретатор командной строки
cmd.exe можно запустить с использованием меню Пуск — Выполнить — cmd.exe.
В среде операционных систем Widows Vista/Windows 7 интерпретатор
cmd.exe должен быть запущен для выполнения с использованием пункта контекстного
меню «Запустить от имени администратора». Командные файлы, в которых используются
сетевые утилиты, также должны выполняться в контексте учетной записи с привилегиями
администратора.
В списке представлены сетевые утилиты командной строки для получения
информации о сетевых настройках, выполнения операций по
конфигурированию и диагностике сети.
В описании команд используется
< текст > — текст в угловых скобках. Обязательный параметр
[ текст ] — текст в квадратных скобках. Необязательный параметр.
( текст ) — текст в круглых скобках. Необходимо выбрать один из параметров.
Вертикальная черта | — разделитель для взаимоисключающих параметров. Нужно выбрать один из них.
Многоточие … — возможно повторение параметров.
Краткое описание и примеры использования сетевых утилит командной строки
Windows:
ARP
IPCONFIG
GETMAC
NBTSTAT
NETSH
NETSTAT
NET
NSLOOKUP
PATHPING
PING
ROUTE
TELNET
TRACERT
Примеры практического использования.
Утилита ARP.EXE
Утилита командной строки ARP.EXE присутствует во всех версиях Windows и имеет один и тот же синтаксис.
Команда
ARP позволяет просматривать и изменять записи в кэш ARP (Address Resolution Protocol — протокол разрешения адресов), который представляет собой таблицу соответствия IP-адресов аппаратным адресам сетевых устройств. Аппаратный адрес — это уникальный, присвоенный при изготовлении, 6-байтный адрес сетевого устройства, например сетевой карты. Этот адрес также
часто называют MAC-адресом (Media Access Control — управление доступом к среде) или Ethernet-адресом. В сетях Ethernet передаваемые и принимаемые данные всегда содержат MAC-адрес источника (Source MAC) и MAC-адрес приемника (Destination MAC). Два старших бита MAC-адреса используются для идентификации типа адреса:
— первый бит — одиночный (0) или групповой (1) адрес.
— второй бит — признак универсального (0) или локально администрируемого (1) адреса.
Следующие 22 бита адреса содержат специальный код производителя MFG или OUI — универсальный код организации.
Другими словами, любое сетевое устройство имеет аппаратный адрес, состоящий из 2- х частей. Старшую часть MAC — адреса, централизованно выделяемую по лицензии каждому производителю сетевого оборудования. Например, 00:E0:4C — для сетевых устройств REALTEK SEMICONDUCTOR CORP. Крупным производителям сетевого оборудования обычно принадлежит несколько диапазонов OUI . И младшую часть MAC-адреса, которая формируется при производстве оборудования, и уникальна для каждого экземпляра устройства.
Отображение IP-адресов (формируемых программным путем), в аппаратные адреса, выполняется с помощью следующих действий:
— в сеть отправляется широковещательный запрос (ARP-request), принимаемый всеми сетевыми устройствами. Он содержит IP и Ethernet адреса отправителя, а также, целевой IP-адрес, для которого выполняется определение MAC-адреса.
— каждое устройство, принявшее запрос проверяет соответствие целевого IP-адреса, указанного в запросе, своему собственному IP-адресу. При совпадении, отправителю передается ARP-ответ (ARP-Reply), в котором содержатся IP и MAC адреса ответившего узла. Кадр с ARP-ответом содержит IP и MAC адреса как отправителя, так и получателя-составителя запроса.
— информация, полученная в ARP-ответе, заносится в ARP-кэш и может использоваться для обмена данными по IP-протоколу для данного узла. ARP-кэш представляет собой таблицу в оперативной памяти, каждая запись в которой содержит IP, MAC и возраст их разрешения. Возраст записи учитывается для того, чтобы обеспечить возможность повторного выполнения процедуры ARP при каком либо изменении соответствия адресов.
Синтаксис ARP.EXE:
arp[-a [InetAddr] [-NIfaceAddr]] [-g [InetAddr] [-NIfaceAddr]] [-dInetAddr [IfaceAddr]] [-sInetAddr EtherAddr [IfaceAddr]]
-a[ InetAddr] [ -NIfaceAddr] — ключ -a — отображает текущую таблицу ARP для всех интерфейсов. Для отображения записи конкретного IP-адреса используется ключ -a с параметром InetAdd , в качестве которого указывается IP-адрес. Если узел, отправляющий ARP-запрос имеет несколько сетевых интерфейсов, то для отображения таблицы ARP
нужного интерфейса, можно использовать ключ -N с параметром IfaceAddr, в качестве которого используется IP-адрес интерфейса.
-g[ InetAddr] [ -NIfaceAddr] ключ -g идентичен ключу -a.
-d InetAddr[ IfaceAddr] — используется для удаления записей из ARP-кэш. Возможно удаление по выбранному IP или полная очистка ARP кэш. Для удаления всех записей, вместо адреса используется символ * Если имеется несколько сетевых интерфейсов, то очистку можно выполнить для одного из них, указав в поле IfaceAddr его IP .
-s InetAddr EtherAddr [ IfaceAddr] — используется для добавления статических записей в таблицу ARP. Статические записи хранятся в ARP-кэш постоянно. Обычно, добавление статических записей используется для сетевых устройств, не поддерживающих протокол ARP или не имеющих возможности ответить на ARP- запрос.
/? — получение справки по использованию arp.exe. Аналогично — запуск arp.exe без параметров.
Примеры использования ARP:
arp -a — отобразить все записи таблицы ARP.
arp -a 192.168.0.9 — отобразить запись, соответствующую IP-адресу 192.168.0.9
arp -a 192.168.1.158 -N 192.168.1.1 — отобразить таблицу ARP для адреса 192.168.1.158 на сетевом интерфейсе 192.168.1.1
arp -a -N 10.164.250.148 — отобразить все записи таблицы ARP на сетевом интерфейсе 10.164.250.148 .
arp -s 192.168.0.1 00-22-15-15-88-15 — добавить в таблицу ARP статическую запись, задающую соответствие IP — адреса 192.168.0.1 и MAC-адреса 00-22-15-15-88-15
arp -s 192.168.0.1 00-22-15-15-88-15 192.168.0.56 — то же самое, что и в предыдущем случае, но с указанием сетевого интерфейса, для которого выполняется добавление статической записи.
arp -d 192.168.1.1 192.168.1.56 удаление записи из таблицы ARP для IP-адреса 192.168.1.1 на сетевом интерфейсе 192.168.1.56
arp -d * — полная очистка таблицы ARP. Аналогично — arp -d без параметров. Если имеется несколько сетевых интерфейсов, то очистка может быть выполнена только для одного из них — arp -d * 192.168.0.56.
Некоторые замечания по практическому использованию команды ARP:
— разрешение адресов по протоколу ARP выполняется только при операциях передачи данных по протоколу IP .
— время жизни записей в таблице ARP ограничено, поэтому, перед просмотром ее содержимого для конкретного адреса нужно выполнить ping на этот адрес.
— если ответ на ping не приходит, а запись для данного IP-адреса присутствует в таблице ARP, то этот факт можно интерпретировать как блокировку ICMP-пакетов брандмауэром пингуемого узла.
— невозможность подключения к удаленному узлу по протоколам TCP или UDP при наличии записей в таблице ARP для целевого IP, может служить признаком отсутствия служб обрабатывающих входящие подключения, или их блокировки брандмауэром (закрытые порты).
— ARP протокол работает в пределах локального сегмента сети. Поэтому, если выполнить ping на внешний узел ( например ping yandex.ru ), то в таблице ARP будет присутствовать запись для IP — адреса маршрутизатора, через который выполняется отправка пакета во внешнюю сеть.
При использовании команды ARP для отображения таблицы, не помещающейся на экране, удобно пользоваться командой постраничного вывода more или перенаправлением стандартного вывода в файл:
arp -a | more
arp -a > C:\myarp.txt
Утилита IPCONFIG .
Утилита командной строки IPCONFIG присутствует во всех версиях Windows. Некоторые параметры командной строки не поддерживаются в версиях предшествующих Windows Vista/Windows 7
Команда IPCONFIG используется для отображения текущих настроек протокола TCP/IP и для обновления некоторых параметров, задаваемых при автоматическом конфигурировании сетевых интерфейсов при использовании протокола Dynamic Host Configuration Protocol (DHCP).
Синтаксис:
ipconfig [/allcompartments] [/all] [/renew[Adapter]] [/release[Adapter]] [/renew6[Adapter]] [/release6[Adapter]] [/flushdns] [/displaydns] [/registerdns] [/showclassidAdapter] [/setclassidAdapter [ClassID]]
Параметры:
/? — отобразить справку по использованию IPCONFIG
/all — отобразить полную конфигурацию настроек TCP/IP для всех сетевых адаптеров. Отображение выполняется как для физических интерфейсов, так и для логических, как например, dialup или VPN подключения.
/allcompartments — вывести полную информацию о конфигурации TCP/IP для всех секций. Применимо для Windows Vista/Windows 7 .
/displaydns — отобразить содержимое кэш службы DNS — клиент.
/flushdns — сбросить содержимое кэш службы DNS — клиент.
/registerdns — инициировать регистрацию записей ресурсов DNS для всех адаптеров данного
компьютера. Этот параметр используется для изменения настроек DNS сетевых подключений без перезагрузки компьютера.
/release[Adapter] — используется для отмены автоматических настроек сетевого адаптера, полученных от сервера DHCP. Если имя адаптера не указано, то отмена настроек выполняется для всех адаптеров.
/release6[Adapter] — отмена автоматических настроек для протокола IPv6
/renew[Adapter] — обновить конфигурацию для сетевого адаптера настроенного на получение настроек от сервера DHCP. Если имя адаптера не указано, то обновление выполняется для всех адаптеров.
/renew6[Adapter] — как и в предыдущем случае, но для протокола IPv6
/showclassid Adapter и /setclassid Adapter[ ClassID] — эти параметры применимы для Windows Vista / Windows 7 и используются для просмотра или изменения идентификатора Class ID, если он получен от DHCP — сервера при конфигурировании сетевых настроек.
Изменение сетевых настроек с помощью команды IPCONFIG, в основном, применимо к тем сетевым адаптерам, которые настроены на автоматическое конфигурирование с использованием службы динамической настройки основных параметров на сетевом уровне DHCP (Dynamic Host Configuration Protocol) или службы автоматической настройки приватных IP — адресов APIPA (Automatic Private IP Addressing) .
Если в параметрах командной строки IPCONFIG используется имя адаптера, содержащее пробелы, то оно должно заключаться в двойные кавычки. Если имя содержит символы русского алфавита, то оно должно быть представлено в DOS-кодировке.
Для имен адаптеров применимо использование символа * в качестве шаблона:
* — любое имя
Локальн* — имя адаптера начинается с » Локальн «
* сети * — имя адаптера содержит строку » сети »
Примеры использования:
ipconfig — отобразить базовые сетевые настройки для всех сетевых адаптеров. BR>
ipconfig /all — отобразить все сетевые настройки для всех сетевых адаптеров.
ipconfig /renew «Подключение по локальной сети 2» — обновить сетевые настройки, полученные от DHCP — сервера только для адаптера с именем » Подключение по локальной сети 2″
ipconfig /dysplaydns — вывести на экран содержимое кэш службы разрешения имен DNS
ipconfig /showclassid «Подключение по локальной сети» — отобразить все допустимые для этого адаптера идентификаторы классов DHCP.
ipconfig /setclassid «Local Area Connection» TEST — установить для адаптера с именем «Local Area Connection» идентификатор класса DHCP «TEST». Если идентификатор класса DHCP не указан, то он будет удален.
Пример отображаемой конфигурации сетевого адаптера :
Ethernet adapter Подключение по локальной сети : — имя адаптера
DNS-суффикс подключения . . . . . :
— DNS-суффикс из настроек сетевого подключения
Описание. . . . . . . . . . . . . : Realtek 8139d Adapter #2 — описание адаптера.
Физический адрес. . . . . . . . . : 00-14-02-7B-ED-67 — MAC- адрес данного адаптера.
DHCP включен. . . . . . . . . . . : Да
— признак использования DHCP для конфигурирования сетевого адаптера
Автонастройка включена. . . . . . : Да — признак автоматической настройки параметров адаптера с использованием функции автоматического назначения адресов (APIPA) при отсутствии сервера DHCP. Режим определяется значением ключа реестра
HKEY_LOCAL_MACHINE\System\CurrentControl
Значение 0 (тип DWORD) параметра IPAutoconfigurationEnabled отключает APIPA. Если значение этого параметра равно 1 , или параметр отсутствует в реестре, APIPA активируется.
Автонастройка IPv4-адреса . . . . : 169.254.254.18(Основной) — автоматически полученный локальный адрес, если используется APIPA
Локальный IPv6-адрес канала . . . : fe80::7c22:e7f8:3a71:8249%16(Основной) — локальный IPv6 адрес, если используется адресация IPv6
IPv4-адрес. . . . . . . . . . . . : 10.10.11.77(Основной) — используемый для данного адаптера IPv4 — адрес.
Маска подсети . . . . . . . . . . : 255.255.224.0 — маска подсети.
Аренда получена. . . . . . . . . . : 2 марта 2012 г. 22:44:48 — дата и время получения сетевой конфигурации от сервера DHCP
Срок аренды истекает. . . . . . . . . . : 3 марта 2012 г. 2:31:27 — срок истечения аренды сетевых настроек. Определяется сервером DHCP.
Основной шлюз. . . . . . . . . : 10.10.11.1 — IP — адрес маршрутизатора, используемого в качестве шлюза по умолчанию.
Код класса DHCPv4. . . . . . . . . . : TEST — код класса DHCP, если он существует.
DHCP-сервер. . . . . . . . . . . : 10.10.11.11 —
— IP-адрес DHCP-сервера, от которого получена сетевая конфигурация.
Следующие 2 параметра (идентификатор участников DHCP — DUID и идентификатор арендованного адреса IAID) присутствуют при автоматическом конфигурировании настроек протокола IPv6 . В крупных сетях могут присутствовать несколько серверов DHCPv6. При автоматическом конфигурировании сетевого адаптера, все они получают от клиента специальный запрос DHCP REQUEST. Каждый из них проверяет, ему ли был направлен запрос. Сервер не приступает к обработке пакетов с DUID, отличающимся от его собственного. При совпадении DUID, сервер помечает адрес как присвоенный и возвращает ответ DHCP REPLY. На этом обработка запроса завершается.
IAID — это специальный идентификатор арендуемого IPv6-адреса длиной 4 байта. Клиенту выделяется адрес на время, определенное сервером (срок аренды). Когда предпочитаемый срок действия адреса заканчивается, клиент отправляет серверу пакет DHCP RENEW с запросом на продление этого срока. В сообщение включается идентификатор IAID, код которого также хранится в базе данных DHCP сервера. Если сервер готов продлить срок действия адреса, он отправляет ответ DHCP REPLY и клиент получает возможность использования арендованного адреса без повторного получения настроек.
IAID DHCPv6 . . . . . . . . . . . : 234890384 — идентификатор арендованного адреса IAID
DUID клиента DHCPv6 . . . . . . . : 00-01-00-01-14-E2-78-C0-00-0C-1E-7C-29-E
DNS-серверы. . . . . . . . . . . : 94.25.128.74
94.25.208.74
— адреса DNS — серверов, используемых для разрешения имен в IP-адреса узлов.
NetBios через TCP/IP. . . . . . . . : Включен — режим использования NetBios через протокол TCP/IP.
Утилита GETMAC .
Утилита командной строки GETMAC присутствует в версиях Windows XP и старше. Используется для получения аппаратных адресов сетевых адаптеров (MAC-адресов) как на локальном, так и на удаленном компьютере.
Синтаксис:
GETMAC [/S <система> [/U <пользователь> [/P <пароль>]]] [/FO <формат>]
[/NH] [/V]
Параметры:
/S <система> — имя или IP-адрес удаленного компьютера.
/U [<домен>\]<пользователь> Имя пользователя. Если не задано, то используется текущая учетная запись.
/P [<пароль>] — Пароль. Если задан параметр /U и не задан пароль, то он будет запрошен.
/FO <формат> — Формат, в котором следует отображать результаты запроса. Допустимые форматы: «TABLE» (таблица), «LIST» (список), «CSV» (разделяемые запятыми поля). Если параметр не задан, то используется вывод в виде таблицы (TABLE) .
/NH — Указывает, что строка заголовков столбцов не
должна отображаться в результирующем файле.
форматов TABLE и CSV.
/V — Отображение подробной информации. В отображаемой информации присутствует имя сетевого подключения и название сетевого адаптера.
/? — Вывод справки по использованию команды.
Примеры:
GETMAC /? — отобразить краткую справку об использовании GETMAC.
GETMAC /FO csv — выдать информации о MAC-адресах всех существующих на локальном компьютере сетевых адаптеров в формате CSV (полей с разделителями в виде запятой)
GETMAC /S COMPUTER /NH /V — получить MAC адреса сетевых адаптеров для удаленного компьютера COMPUTER, не отображать заголовки столбцов в таблице и использовать отображение подробной информации. Для подключения к удаленному компьютеру используется текущая учетная запись пользователя.
GETMAC /S 192.168.1.1 /NH /V — то же самое, но вместо имени компьютера задан его IP-адрес.
GETMAC /S COMPUTER /U user /P password — получить MAC — адрес адаптеров удаленного компьютера COMPUTER. Для подключения к нему используется имя пользователя «user» и пароль «password»
GETMAC /S COMPUTER /U mydomain\user — для подключения к удаленному компьютеру используется учетная запись пользователя «user» в домене «mydomain». Пароль пользователя вводится по запросу.
GETMAC /S COMPUTER /U mydomain\user /P password — то же самое, что и в предыдущем случае, но пароль задан в командной строке.
Пример выводимой информации по GETMAC без параметров:
Физический адрес Имя транспорта
=================== ========================================
00-00-DB-CE-97-9C \Device\Tcpip_{85E2B831-859B-45D4-9
00-2E-20-6B-0D-07 \Device\Tcpip_{158A50DF-F6F2-4909-8F15-D
По имени транспорта можно найти в реестре записи, связанные с данным сетевым адаптером.
http://ab57.ru/cmdlist.html
(Image credit: Future)
Windows 10 makes it easy to connect to a network and the internet using a wired or wireless connection. However, sometimes, you may still need to manually manage settings or troubleshoot connectivity problems, which is when the built-in command-line tools can come in handy.
Regardless of the issue, Windows 10 will likely have a Command Prompt tool to help you resolve the most common problems. For instance, ipconfig and ping are among the most important tools for viewing network settings and troubleshooting connectivity issues. If you are dealing with a routing problem, the route command can display the current routing table to examine and determine related problems, and with the nslookup tool, you can diagnose DNS problems.
You also have tools like arp to troubleshoot switching problems and determine the MAC address from an IP address. The netstat command-line tool allows you to view statistics for all the connections. And you can use the netsh tool to display and change many aspects of the network configuration, such as checking the current configuration, resetting settings, managing Wi-Fi and Ethernet settings, enabling or disabling the firewall, and a lot more.
This guide highlights eight Command Prompt tools that should help you manage and troubleshoot networking problems on your device and across the network.
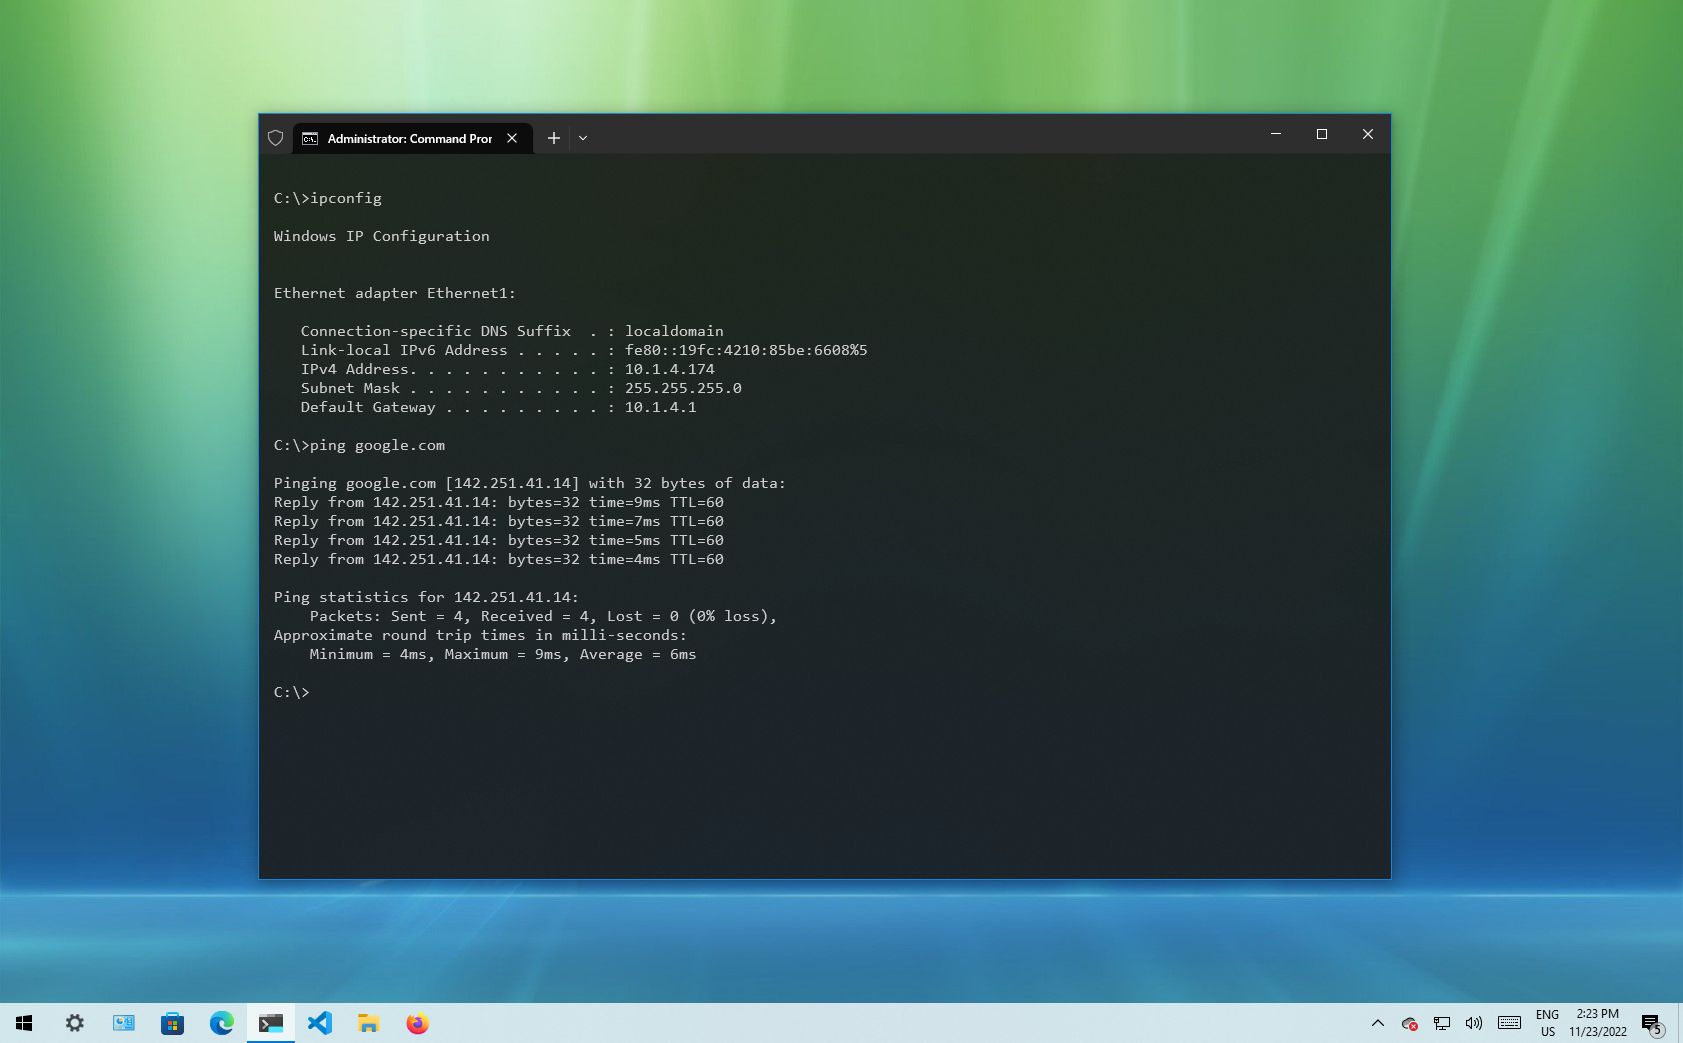
1. IPConfig
On Windows 10, ipconfig (Internet Protocol configuration) is among the most common networking tools that allow you to query and show current TCP/IP (Transmission Control Protocol/Internet Protocol) network configuration. The command also includes options to perform different actions, such as refreshing Dynamic Host Configuration Protocol (DHCP) and Domain Name System (DNS) settings.
Display network configuration
To get started with ipconfig on Windows 10, use these steps:
All the latest news, reviews, and guides for Windows and Xbox diehards.
- Open Start.
- Search for Command Prompt, right-click the top result, and select the Run as administrator option.
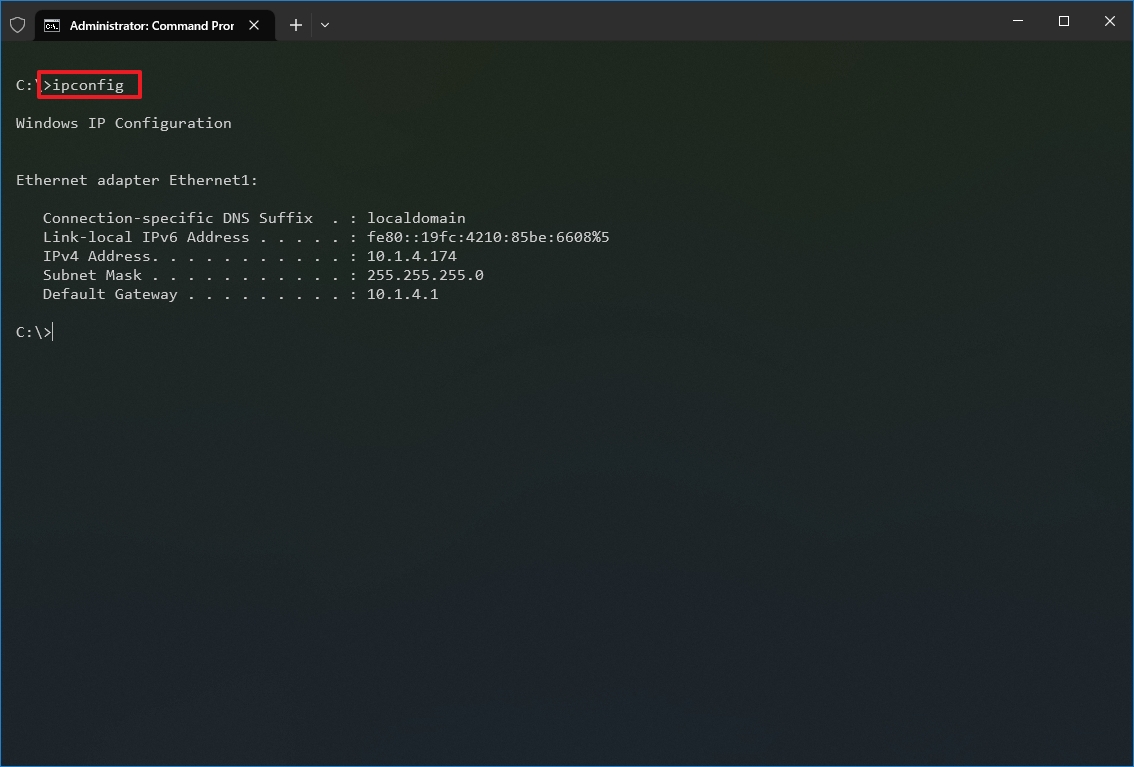
- Type the following command to view a summary of the TCP/IP network configuration and press Enter: ipconfig
- Quick tip: In Command Prompt, you can use the CLS command to clear the screen after you no longer need the information to continue running commands without clutter.
- Type the following command to view the complete TCP/IP network configuration and press Enter: ipconfig /all
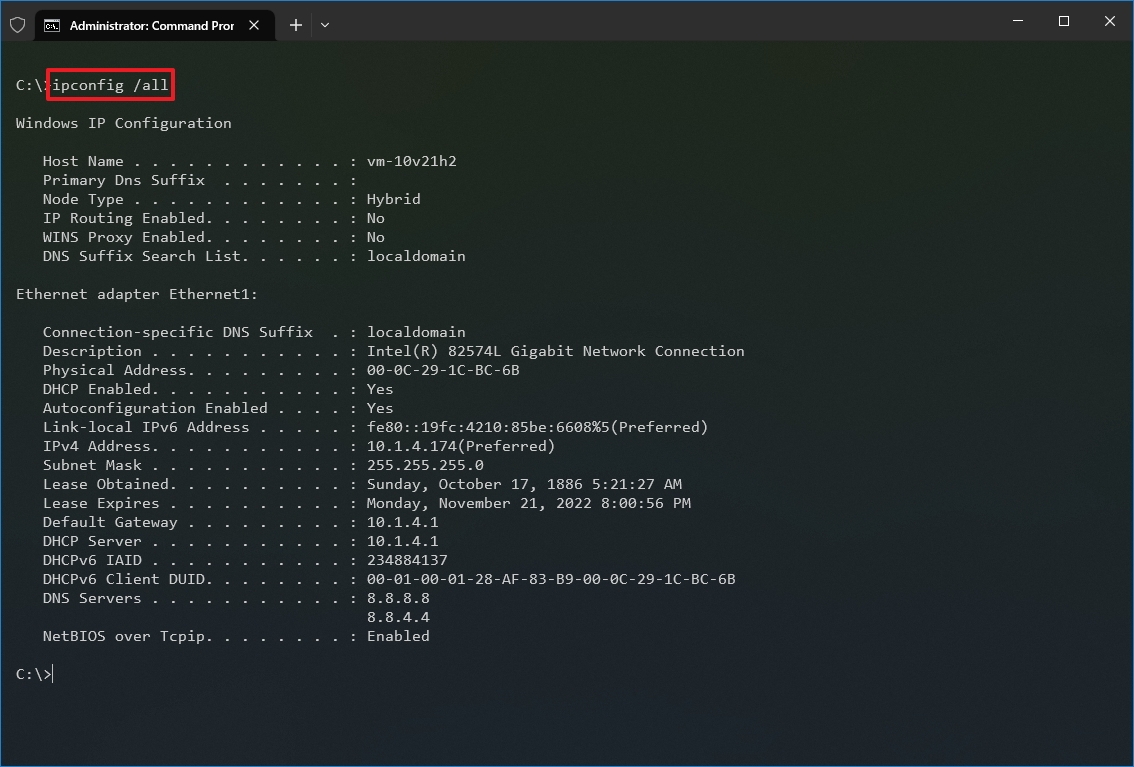
Once you complete the steps, you will have an overview of the PC’s entire TCP/IP configuration.
Refresh network settings
To release and renew the network configuration with Command Prompt, use these steps:
- Open Start.
- Search for Command Prompt, right-click the top result, and select the Run as administrator option.
- Type the following command to remove the current network configuration and press Enter: ipconfig /release
- Type the following command to reconfigure the network configuration and press Enter: ipconfig /renew
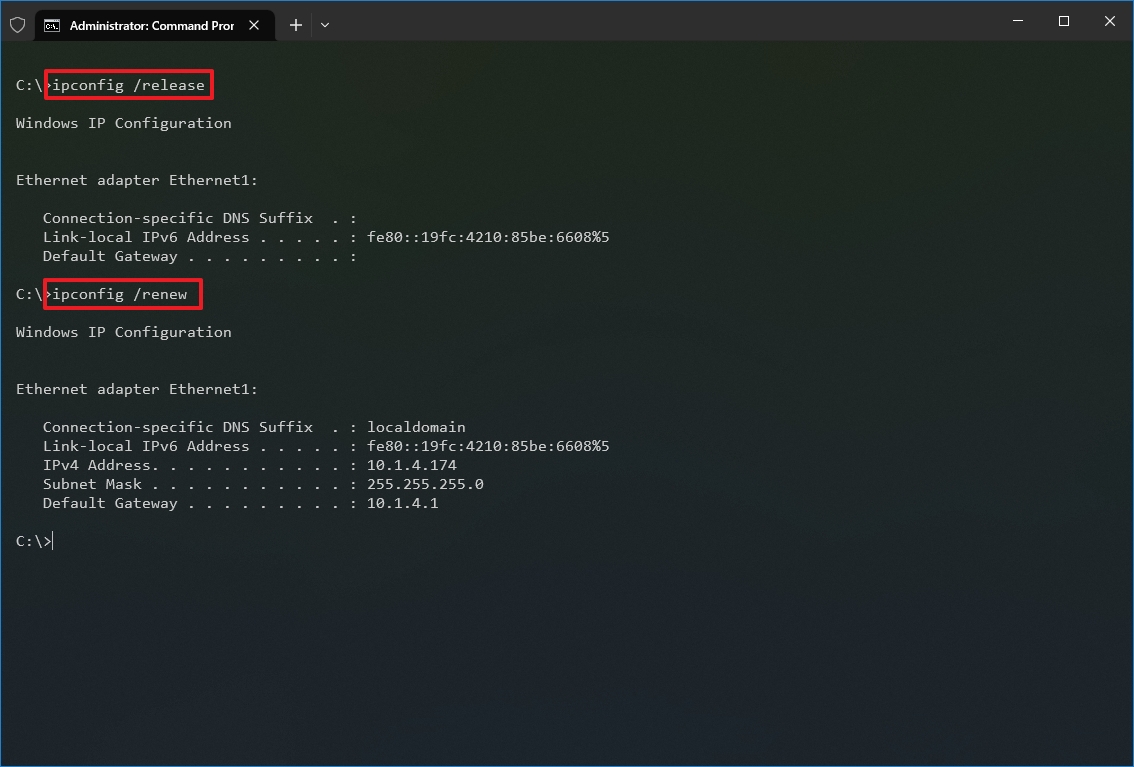
After you complete the steps, the first command will clear the current configuration, and the second command will fetch new settings from the DHCP server to resolve connectivity issues. If the dynamically assigned settings have not expired in the server, it is common to see the same IP address reconfigured on the device.
Refresh DNS settings
To flush and rebuild the current DNS cache entries on Windows 10, use these steps:
- Open Start.
- Search for Command Prompt, right-click the top result, and select the Run as administrator option.
- Type the following command to clear the DNS system cache on the device and press Enter: ipconfig /flushdns
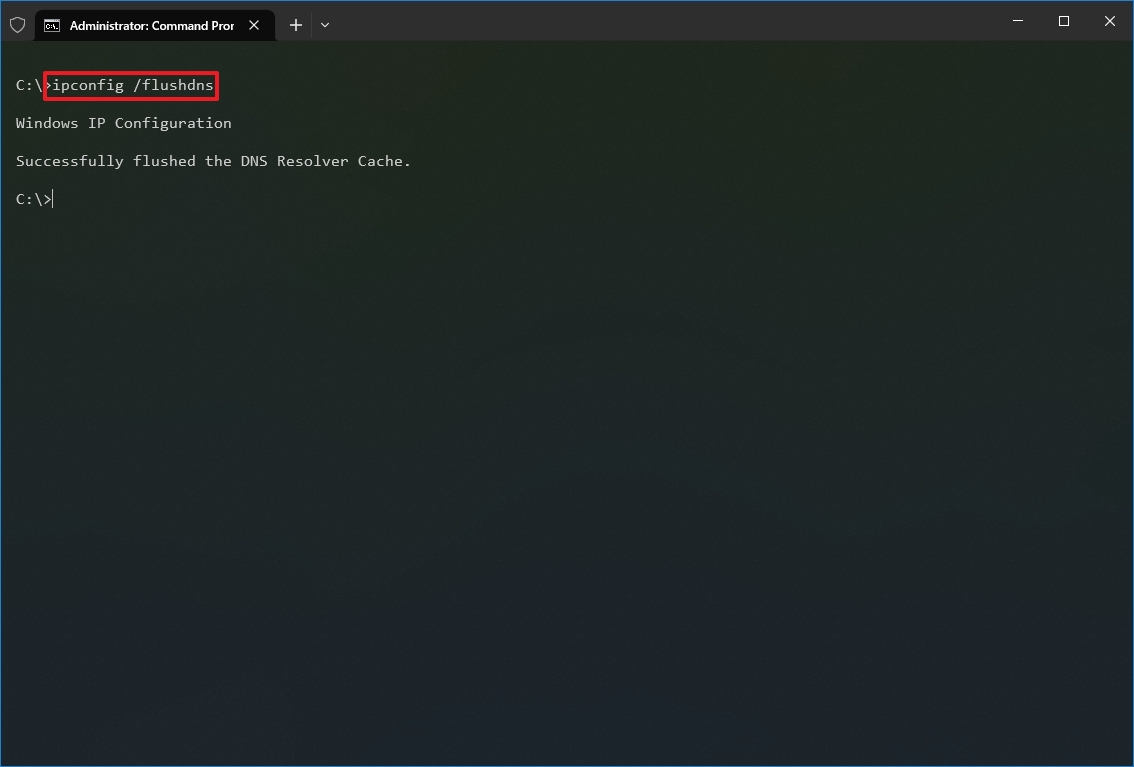
Once you complete the steps, the entries stored in the DNS cache of Windows 10 will be deleted and refreshed. Usually, this command will come in handy when you cannot connect to another computer or website using the host or domain name due to outdated information in the local cache.
2. Ping
Ping is another essential networking tool because it allows you to send ICMP (Internet Control Message Protocol) echo request messages to test the IP connectivity with other devices, whether it is another computer in the network or internet service.
Test device connectivity
To test the network connectivity with the ping command on Windows 10, use these steps:
- Open Start.
- Search for Command Prompt, right-click the top result, and select the Run as administrator option.
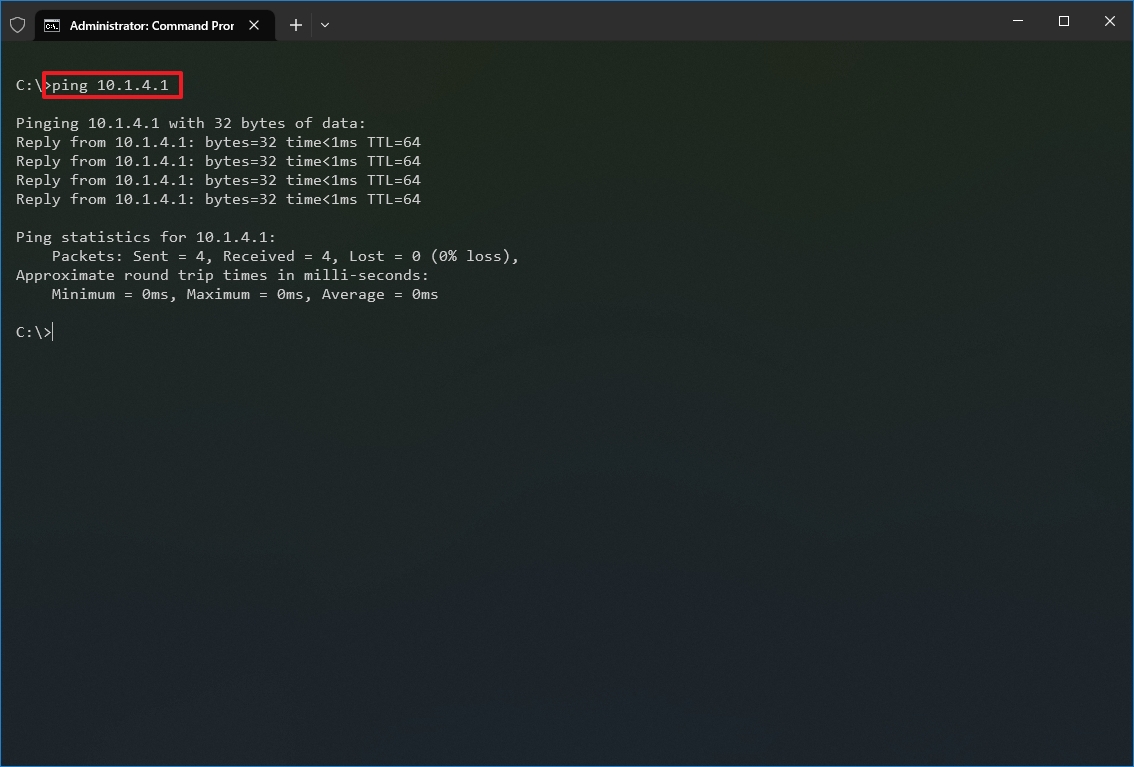
- Type the following command to send ICMP echo requests to test connectivity and press Enter: ping IP-OR-DOMAIN
In the command, replace IP-OR-DOMAIN with the actual IP address or domain name of the computer or service you want to test. For example, this command tests the communication between the local device and router: ping 10.1.4.1
- Quick tip: If you use the -a option (for example, ping -a 10.1.4.1), the command will also resolve the address to a hostname.
- (Optional) Type the following command to test the local computer networking stack and press Enter: ping 127.0.0.1 or ping loopback
- Quick note: The 127.0.0.1 is a well-known address, and it is referred to as the loopback address. When you run the command, if you get a reply, it means that the networking stack on Windows 10 is up and running. This is the same as pinging the device using its own network address.
Once you complete the steps, receiving four successful echo replies from the destination means the device can talk with the remote host. If the request times out, there is a problem between the host and the remote device.
If you are dealing with connectivity problems, start pinning the local computer to ensure the network stack is working. Then test the router’s connection to ensure the issue is not in the local network. Then try to ping a website to find out whether there is a problem with the internet connection or the remote host.
You should also know that the ping command will always time out if the remote device or service blocks the ICMP protocol.
Diagnose packet loss activity
The ping command includes many options that you can access with the «ping /?» command, and one of these options is the ability to set the time you want to run the tool, which can come in handy to examine packets lost when you are troubleshooting connectivity problems.
To run the ping command for a specific period, use these steps:
- Open Start.
- Search for Command Prompt, right-click the top result, and select the Run as administrator option.
- Type the following command to continue pinging until stopped and press Enter: ping IP-OR-DOMAIN -t
In the command, replace IP-OR-DOMAIN with the actual IP address or domain name of the computer or service you want to test. For example, this command tests the communication between the local device and router: ping 10.1.4.1 -t
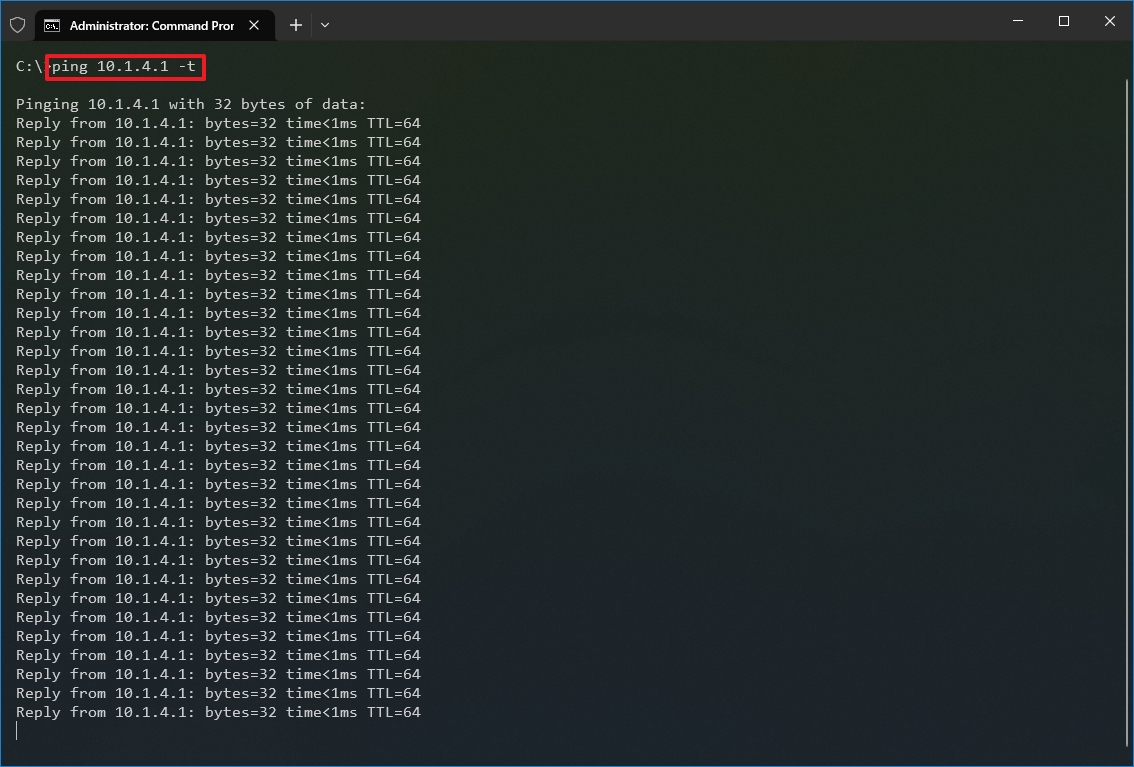
- Use the «Control + C» keyboard shortcut to stop the ping.
After you complete the steps, you will be able to see the successful and lost requests that can give you a clue on how to continue troubleshooting and resolving the connectivity problem. Administrators usually use the ping command in a local network to find out when a service goes down quickly. Also, the tool can be used as a quick way to know when the server is up and running again when restarting a server remotely.
3. Tracert
Windows 10 also includes tracert (Trace Route), a diagnostic tool to determine the network path to a destination using a series of ICMP echo requests. However, unlike the ping command, each request includes a TTL (Time to Live) value that increases by one each time, allowing to display of a list of the route the requests have taken and their duration.
To trace the route to a destination with Command Prompt on Windows 10, use these steps:
- Open Start.
- Search for Command Prompt, right-click the top result, and select the Run as administrator option.
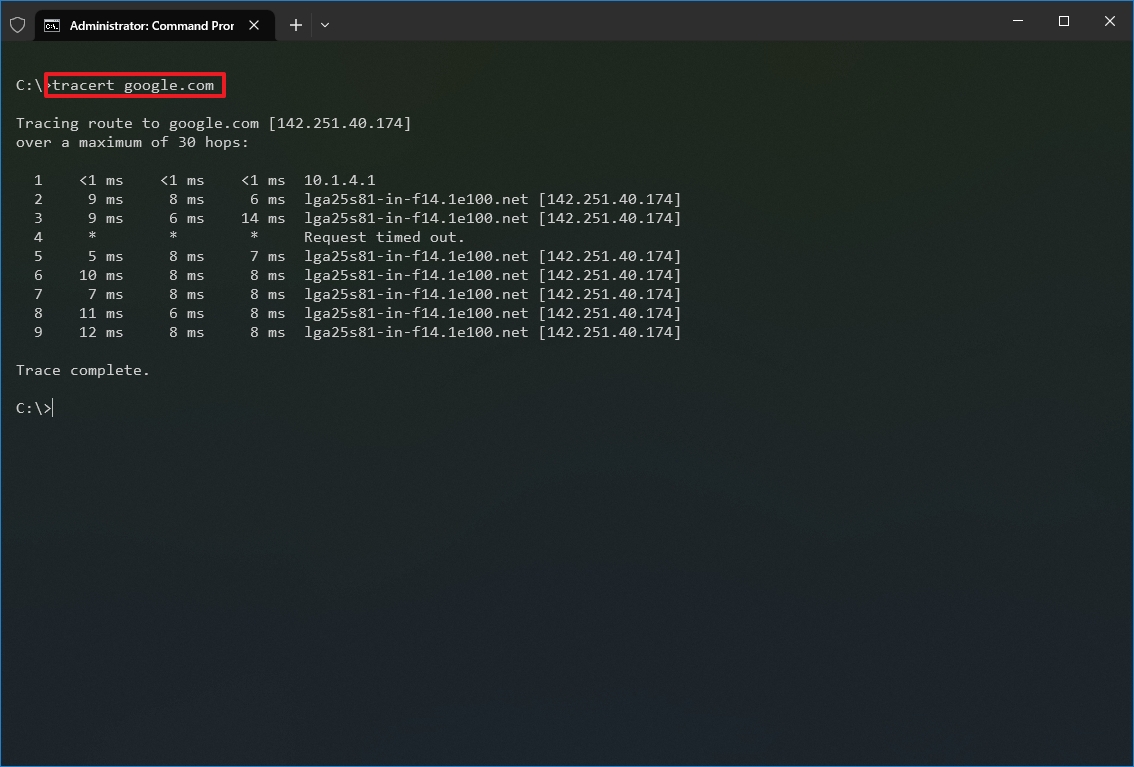
- Type the following command to understand the path taken to the destination and press Enter: tracert IP-OR-DOMAIN
In the command, replace IP-OR-DOMAIN with the actual IP address or domain name for the destination you want to troubleshoot. For example, this command allows you to view the path the packets are taking to reach Google.com: tracert google.com
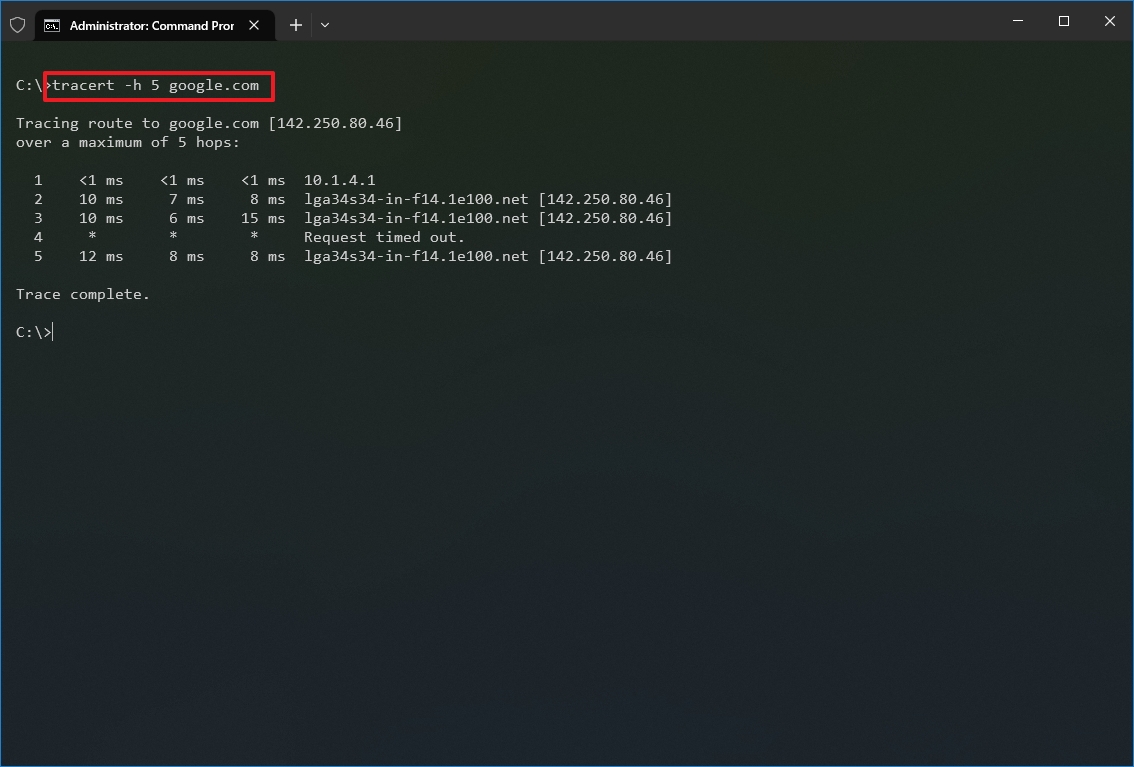
- (Optional) Type the following command to adjust the hop counts to the destination and press Enter: tracert -h HOP-COUNT IP-OR-DOMAIN
In the command, replace IP-OR-DOMAIN with the actual IP address or domain name for the destination you want to troubleshoot and HOP-COUNT for the number of hops you want to trace. For example, this command puts the limit of 5 hops (nodes) to the destination: tracert -h 5 google.com
Once you complete the steps, you will know if the destination is reachable or if there is a networking problem along the way.
Similar to the ping tool, tracert includes several options, which you can view with the «tracert /?» command.
4. NSLookup
The nslookup (Name Server Lookup) tool can show valuable details to troubleshoot and resolve DNS-related issues. The tool includes an interactive and non-interactive modes. However, you will be using the non-interactive mode more often than not, which means you will type the full command to obtain the necessary information.
You can use this command to display the default DNS name and address of the local device and determine the domain name of an IP address or the name servers for a specific node.
To get started with nslookup on Windows 10, use these steps:
- Open Start.
- Search for Command Prompt, right-click the top result, and select the Run as administrator option.
- Type the following command to look up the local DNS name and address and press Enter: nslookup
- Quick note: This command also happens to open the nslookup interactive mode.
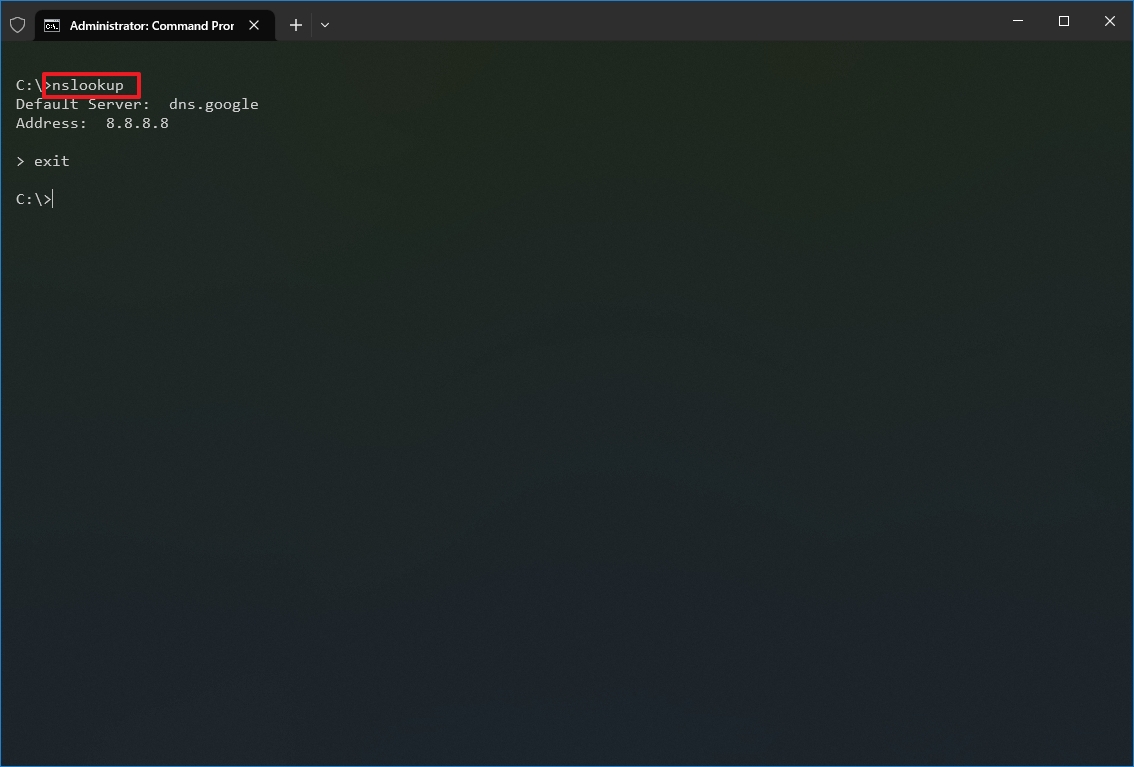
- Confirm the current DNS information.
- Type the following command to exit the interactive mode and press Enter: exit
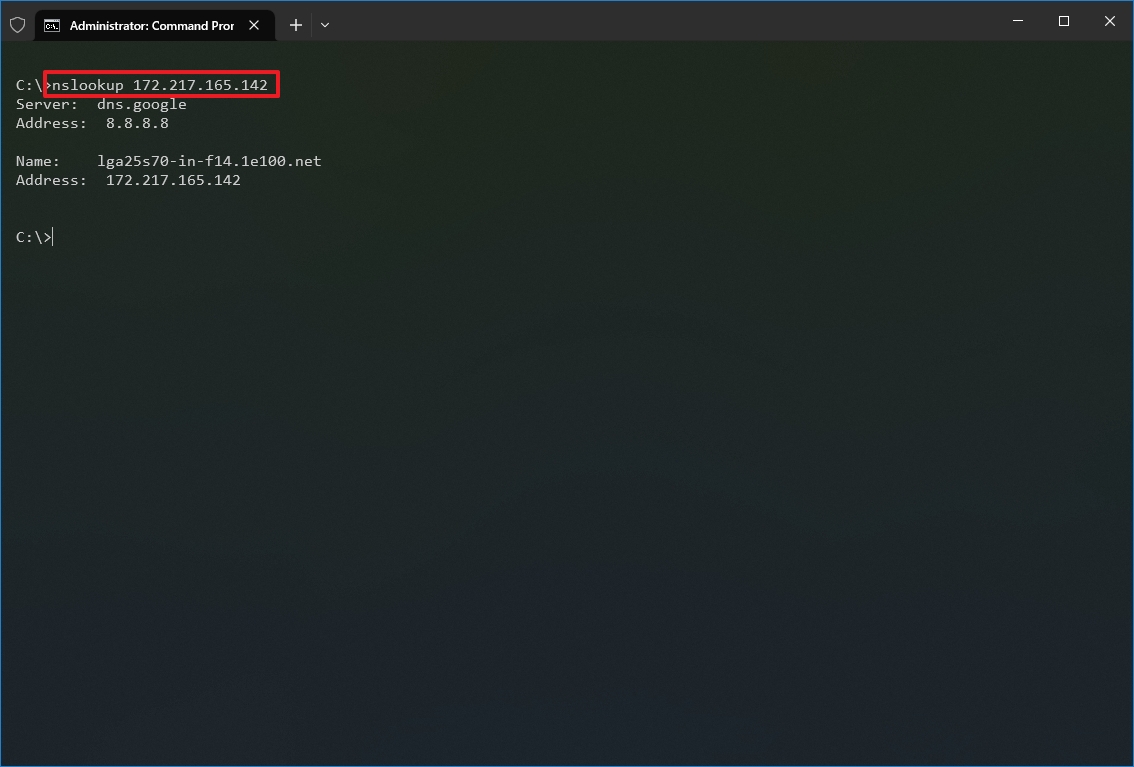
- Type the following command to determine the name and address of a specific server and press Enter: nslookup IP-ADDRESS
In the command, replace the IP-ADDRESS with the address of the remote device. For example, this command looks up the IP address 172.217.165.142 address: nslookup 172.217.165.142
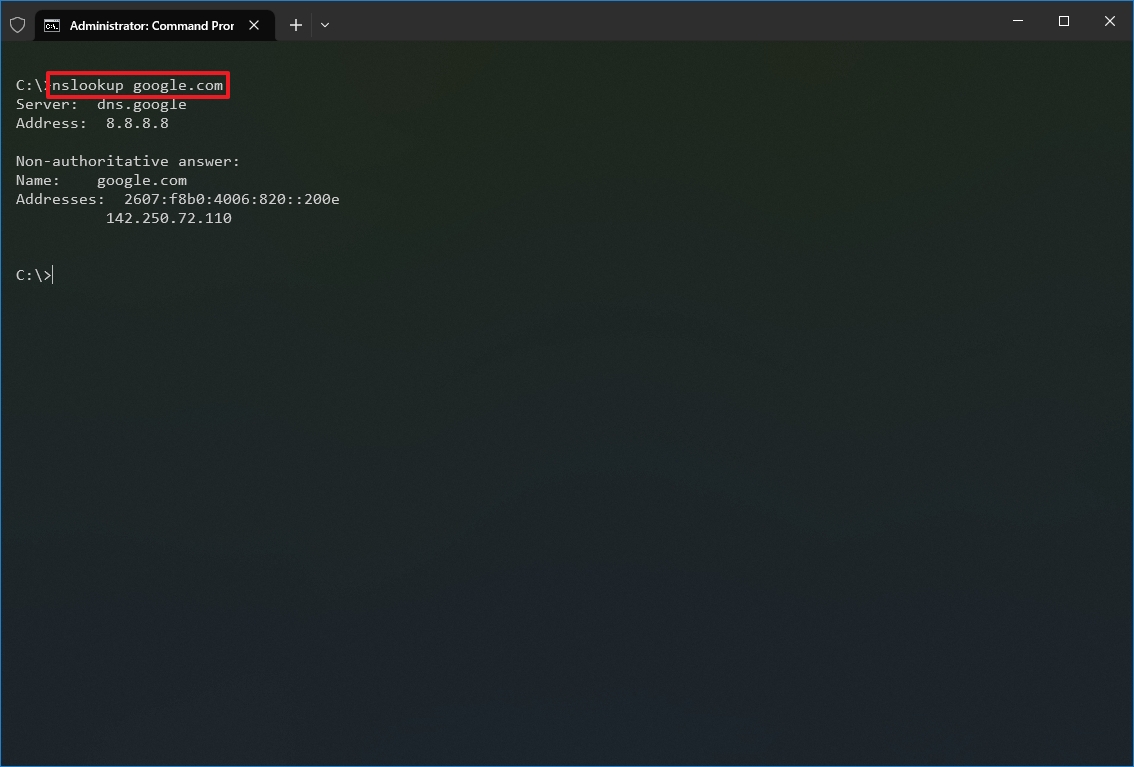
- Type the following command to determine the address of a specific server and press Enter: nslookup DOMAIN-NAME
In the command, replace the DOMAIN-NAME with the address of the remote device. For example, this command looks up the IP address Google.com address: nslookup google.com
After you complete the steps, depending on the command, you will know whether the device has a DNS resolver and the IP address or domain and vice versa of the remote host.
5. NetStat
The netstat (Network Statistics) tool displays statistics for all network connections. It allows you to understand open and connected ports to monitor and troubleshoot networking problems for Windows 10 and apps.
When using the netstat tool, you can list active network connections and listening ports. You can view network adapter and protocol statistics. You can even display the current routing table and much more.
To get started with netstat, use these steps:
- Open Start.
- Search for Command Prompt, right-click the top result, and select the Run as administrator option.
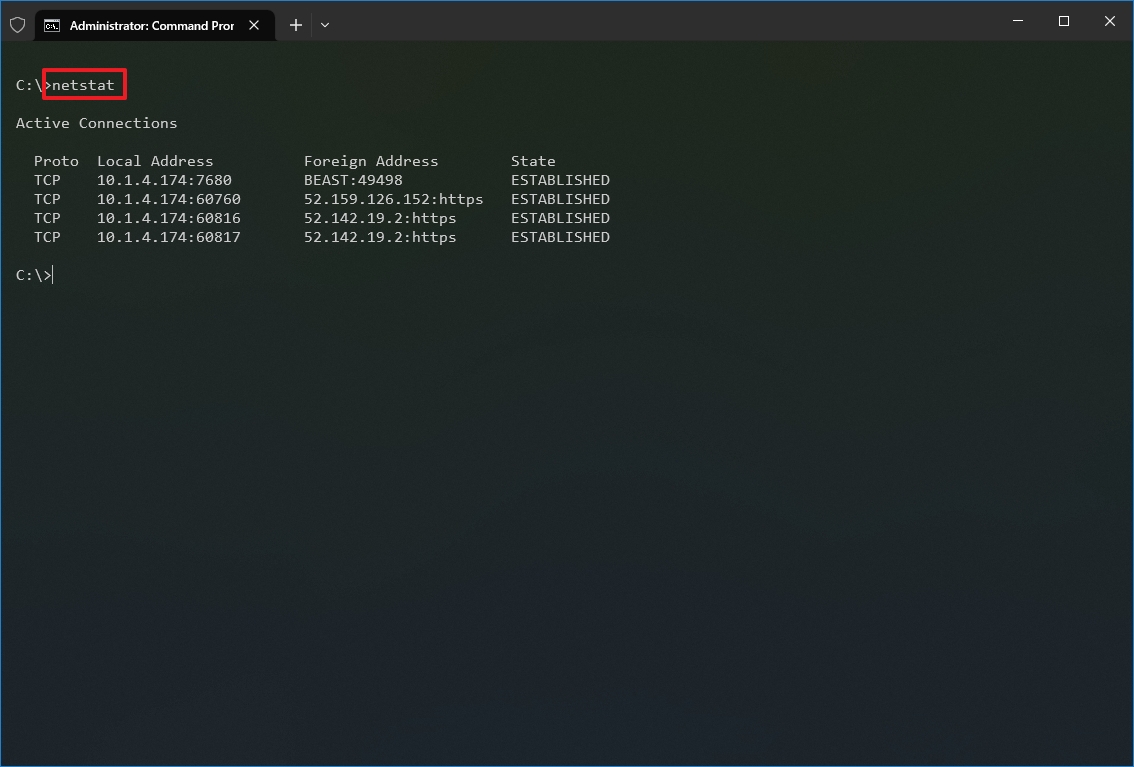
- Type the following command to show all active TCP connections and press Enter: netstat
- (Optional) Type the following command to display active connections showing numeric IP address and port number instead of trying to determine the names and press Enter: netstat -n

- (Optional) Type the following command to refresh the information at a specific interval and press Enter: netstat -n INTERVAL
In the command, make sure to replace INTERVAL for the number (in seconds) you want to redisplay the information. This example refreshes the command in question every five seconds: netstat -n 5
- Quick note: When using the interval parameter, you can terminate the command using the «Ctrl + C» keyboard shortcut in the console.
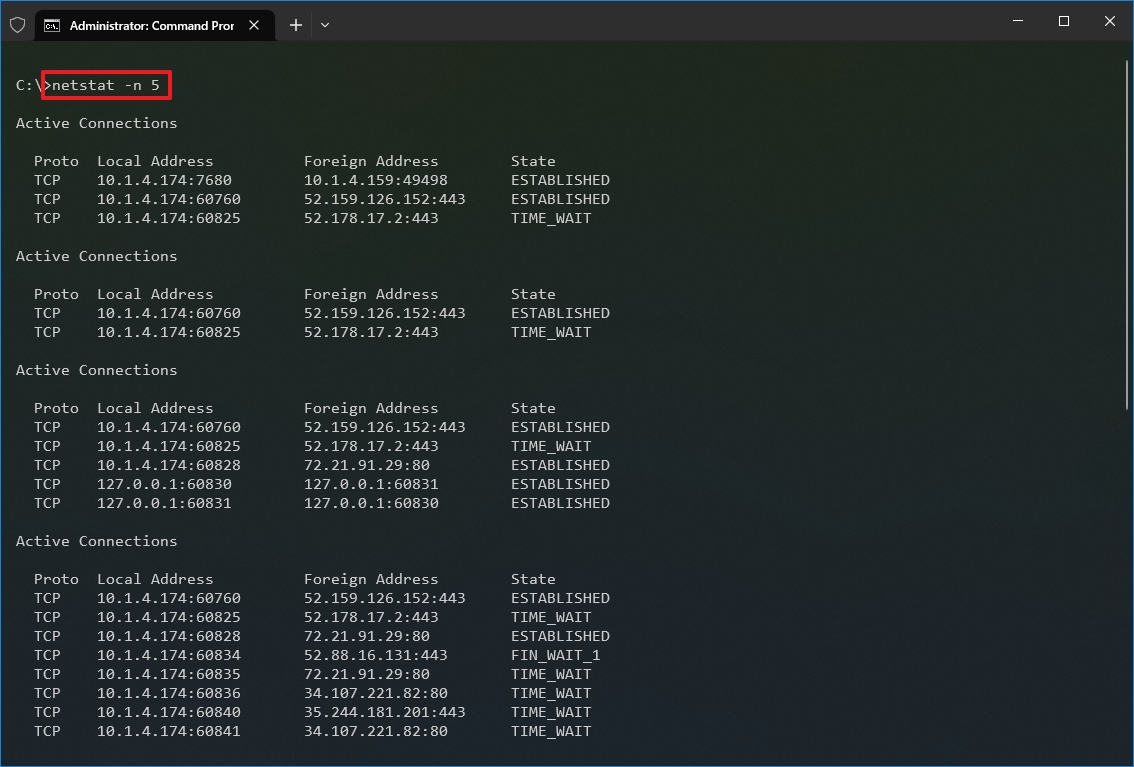
Once you run the command, it will return a list of all active connections in four columns, including:
- Proto: Displays the connection protocol, including TCP or UDP.
- Local Address: Displays the device’s IP address followed by a semicolon with a port number of the connection. The double-semicolon inside brackets indicates the local IPv6 address. The «0.0.0.0» address also refers to the local address.
- Foreign Address: Shows the remote computer’s IP (or FQDN) address with the port number after the semicolon port name (for instance, https, http, microsoft-ds, wsd).
- State: Shows whether the connection is active (established), if the port has been closed (time_wait) and if the program has not closed the port (close_wait). Other statuses available include closed, fin_wait_1, fin_wait_2, last_ack, listen, syn_received, syn_send, and timed_wait.
6. ARP
Windows 10 maintains an arp (Address Resolution Protocol) table, which stores IP to Media Access Control (MAC) entries that the system has resolved. The arp tool lets you view the entire table, modify the entries, and use it to determine a remote computer’s MAC address.
Usually, you do not need to worry about MAC addresses, but there are scenarios when this information may come in handy. For example, when troubleshooting network problems at the data link layer (switching) or when restricting access or filtering content through the network for specific devices.
To get started with arp on Windows 10, use these steps:
- Open Start.
- Search for Command Prompt, right-click the top result, and select the Run as administrator option.
- Type the following command to view the current arp table cache on Windows 10 and press Enter: arp -a

- Type the following command to determine the MAC address of a remote device and press Enter: arp -a IP
In the command, make sure to replace IP with the address of the destination. For example, this command reveals the physical address of the 10.1.4.120 destination: arp -a 10.1.4.120

- Confirm the MAC (physical) address for the remote device.
After you complete the steps, you will be able to view the entire arp table and MAC address of a specific IP address.
If you want to know all the available options, use the «arp /?» command to list the available options with their corresponding descriptions.
7. Route
The route tool displays the routing table that allows Windows 10 to understand the network and communicate with other devices and services. The tool also offers some options to modify and clear the table as needed.
Like the arp tool, you typically do not have to worry about the routing table, but the command-line tool will come in handy when troubleshooting related problems.
To view or flush the routing table available on Windows 10, use these steps:
- Open Start.
- Search for Command Prompt, right-click the top result, and select the Run as administrator option.
- Type the following command to view the routing table known to Windows 10 and press Enter: route print

- Confirm the routing table information.
- (Optional) Type the following command to clear the routing table and press Enter: route -f
- Quick note: When running this command, the device will lose network connectivity since the system no longer understands the network topology. After running the command, restart the machine to allow the networking stack to rebuild the routing table. Usually, you should not have to clear the table unless you modify some of the entries and you need to reset the table.
Once you complete the steps, you will understand the routing table and how to clear the information.
You can also use the «route /?» command to view a list of available options, including options to change networking metrics, specify a gateway, add a new route, and much more. However, modifying these settings is usually not recommended unless you understand how the network works.
8. Netsh
On Windows 10, netsh (Network Shell) is a legacy command-line tool that allows you to display and change virtually any network configuration. For instance, you can use the tool to view the current network configurations, manage wireless connections, reset the network stack to fix most common problems, enable or disable the firewall, and a lot more.
To get started with the netsh command-line tool, use these steps:
- Open Start.
- Search for Command Prompt, right-click the top result, and select the Run as administrator option.
- Type the following command to view a list of the available commands (contexts) and press Enter: netsh /?
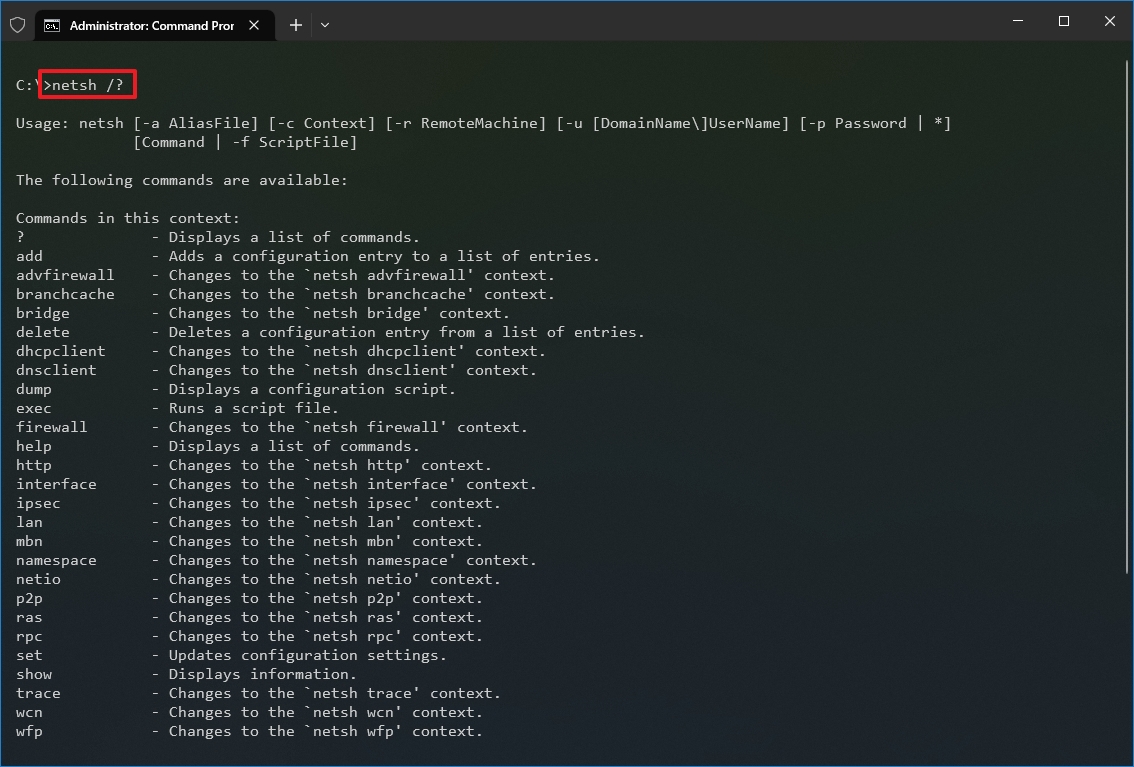
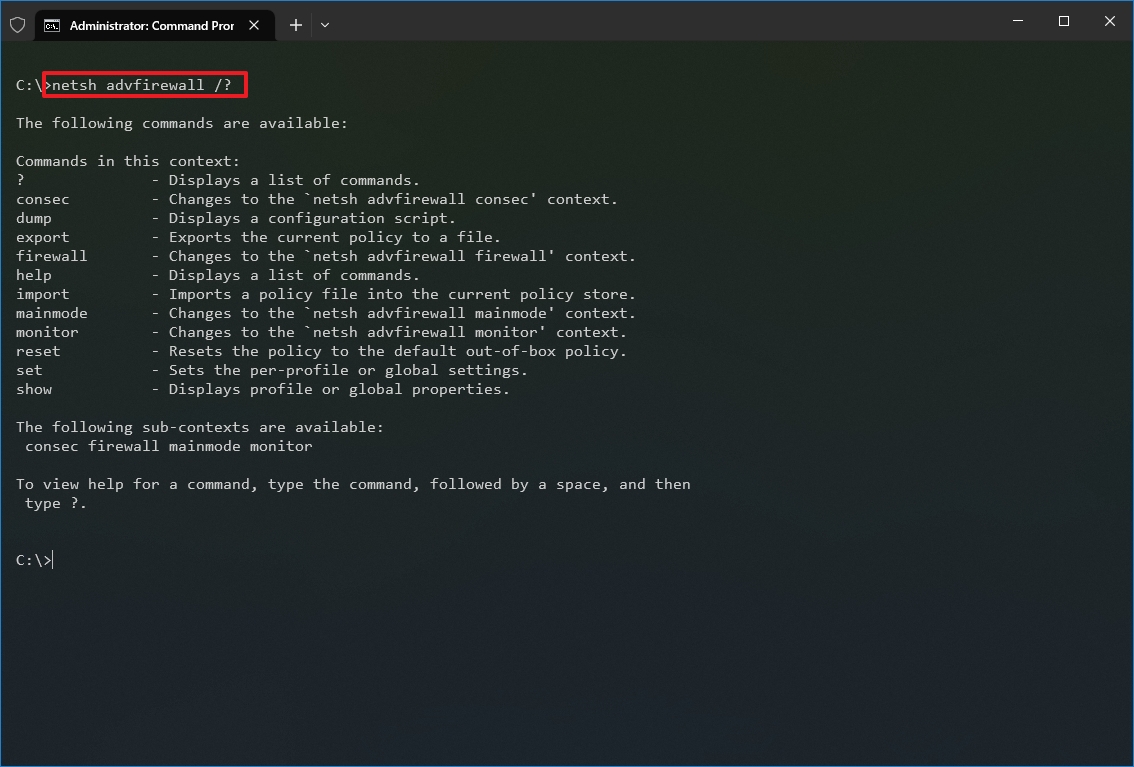
- Type the following command to view the list of available subcommands (subcontexts) for a specific option and press Enter: netsh CONTEXT-COMMAND
In the command, change the CONTEXT-COMMAND for the command that includes additional options. For example, this command shows the commands available to manage the firewall with netsh: netsh advfirewall /?
Once you complete the steps, you will know how to navigate the netsh contexts and subcontexts command to manage networking settings.
Reset system network stack
To reset the network stack to resolve common connectivity problems, use these steps:
- Open Start.
- Search for Command Prompt, right-click the top result, and select the Run as administrator option.
- Type the following command to reset the winsock stack and press Enter: netsh winsock reset
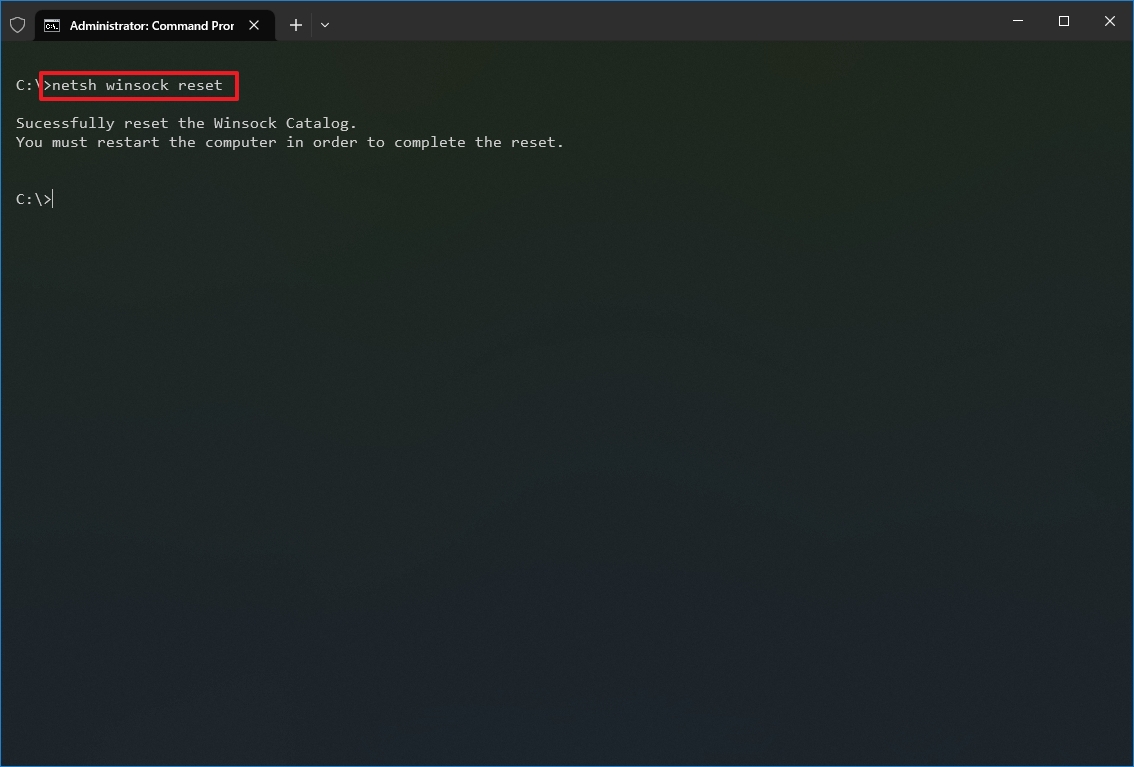
- Restart your computer.
After you complete the steps, the winsock configuration will reset, hopefully fixing the problems connecting to a network and the internet.
Export and import network configuration
To export the network configuration with netsh on Windows 10, use these steps:
- Open Start.
- Search for Command Prompt, right-click the top result, and select the Run as administrator option.
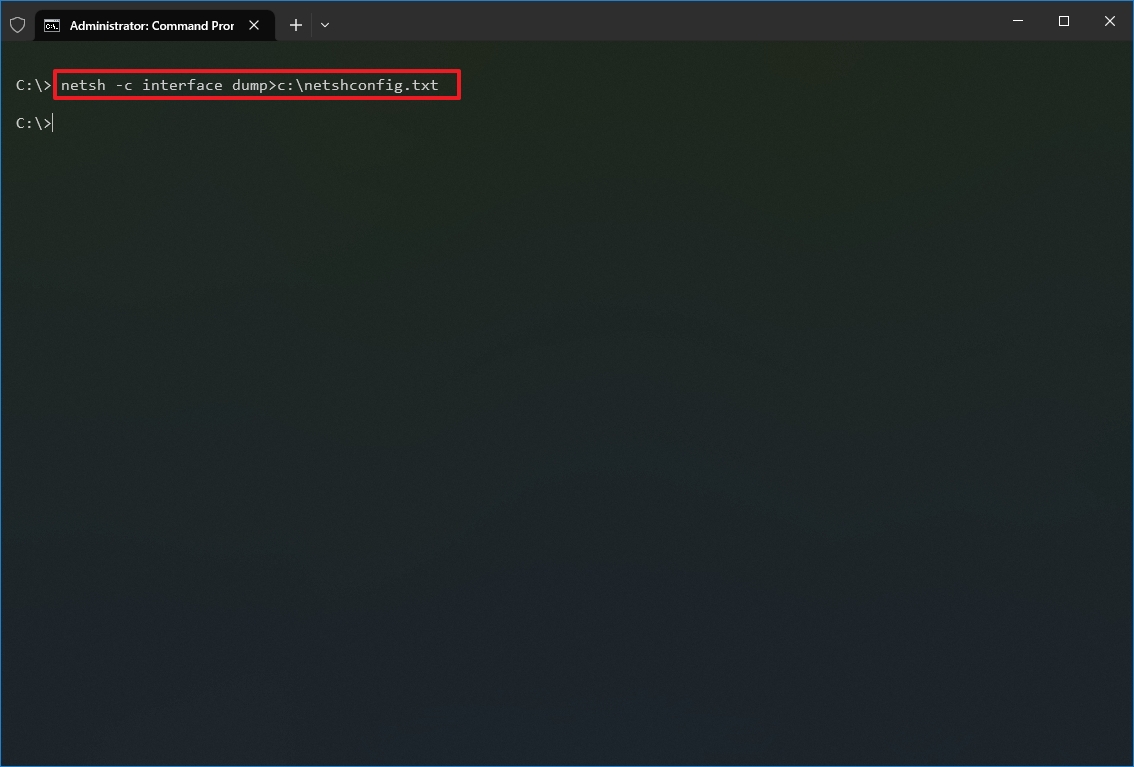
- Type the following command to export the current configuration for all the network adapters and press Enter: netsh -c interface dump>PATH\TO\EXPORTED.txt
In the command, replace the PATH\TO\EXPORTED.txt with the path and name of the file to store the configuration. For example, the following command exports the settings to the netshconfig.txt file: netsh -c interface dump>c:\netshconfig.txt
Once you complete the steps, you can open the file with any text editor to view the exported configuration.
Import network configuration
To import the network configuration settings with netsh, use these steps:
- Open Start.
- Search for Command Prompt, right-click the top result, and select the Run as administrator option.
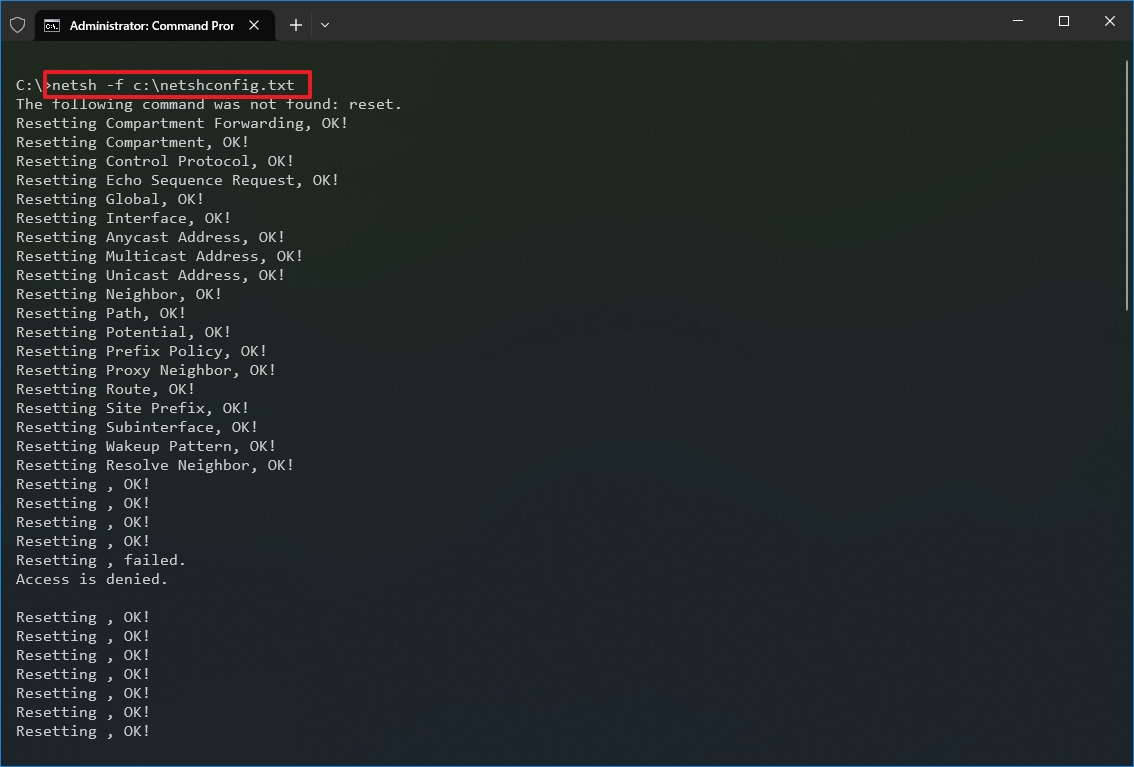
- Type the following command to import the network configuration and press Enter: netsh -c interface dump>PATH\TO\IMPORTED.txt
In the command, replace the PATH\TO\EXPORTED.txt with the path and name of the file you want with the exported configuration. For example, the following command imports the settings from the netshconfig.txt file: netsh -f c:\netshconfig.txt
After you complete the steps, the new networking configuration will be imported and applied to Windows 10.
Enable and disable firewall
To enable the Windows 10 firewall with netsh, use these steps:
- Open Start.
- Search for Command Prompt, right-click the top result, and select the Run as administrator option.
- Type the following command to enable the default firewall and press Enter: netsh advfirewall set currentprofile state on
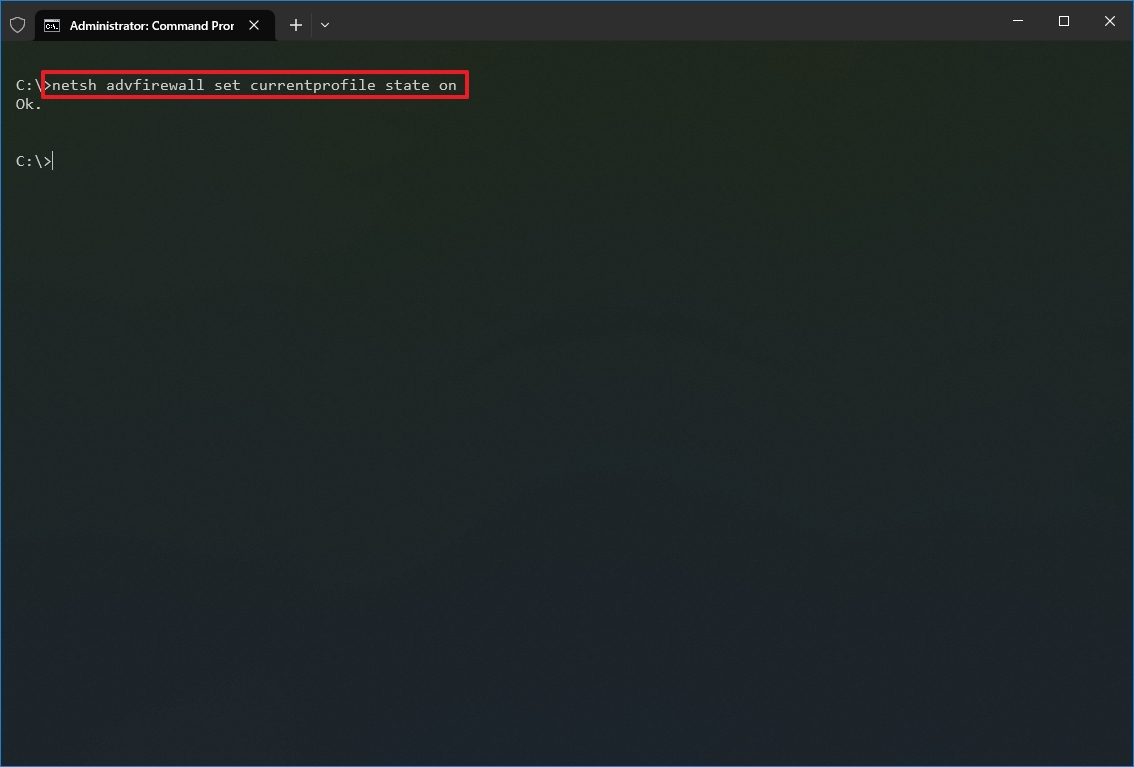
Once you complete the steps, the Windows Defender Firewall will enable on the device.
Disable firewall
To disable the Windows 10 firewall with netsh, use these steps:
- Open Start.
- Search for Command Prompt, right-click the top result, and select the Run as administrator option.
- Type the following command to disable the default firewall and press Enter: netsh advfirewall set currentprofile state off

Once you complete the steps, the Windows Defender Firewall will be disabled on the device.
On Windows 10, there are many tools you can use to change settings and troubleshoot networking issues using Command Prompt, PowerShell, and graphical applications. However, in this guide, we only focus on getting you started with some of the most common tools available in Command Prompt.
More resources
For more helpful articles, coverage, and answers to common questions about Windows 10 and Windows 11, visit the following resources:
- Windows 11 on Windows Central — All you need to know
- Windows 10 on Windows Central — All you need to know
Mauro Huculak has been a Windows How-To Expert contributor for WindowsCentral.com for nearly a decade and has over 15 years of experience writing comprehensive guides. He also has an IT background and has achieved different professional certifications from Microsoft, Cisco, VMware, and CompTIA. He has been recognized as a Microsoft MVP for many years.