
Простые и бесплатные способы поставить пароль на папку — от архивации и специальных программ до шифрования виртуального диска.

Один из лучших способов защитить конфиденциальную или просто важную информацию от посторонних — установить пароль на папку. Часто на компьютере хранятся отсканированные копии документов, заявления, финансовая информация, фотографии и многие другие личные файлы, которые представляют ценность. Лучше позаботиться о безопасности заранее и обезопасить свои файлы. Сделать это можно как стандартными средствами, так и при помощи сторонних программ. В этом материале мы не будем рассматривать платные решения, а расскажем только о бесплатных способах.
Это не совсем то же самое, что запаролить папку, но зато просто, надежно и безопасно. В первую очередь мы рекомендуем воспользоваться именно этим способом, и только если он по каким-то причинам не подходит, переходить к другим вариантам.
Любой современный архиватор может создавать архив, защищенный паролем. Например, это можно сделать с помощью WinRAR или 7-Zip. Мы рассмотрим процесс создания архива с паролем на примере бесплатного 7-Zip.
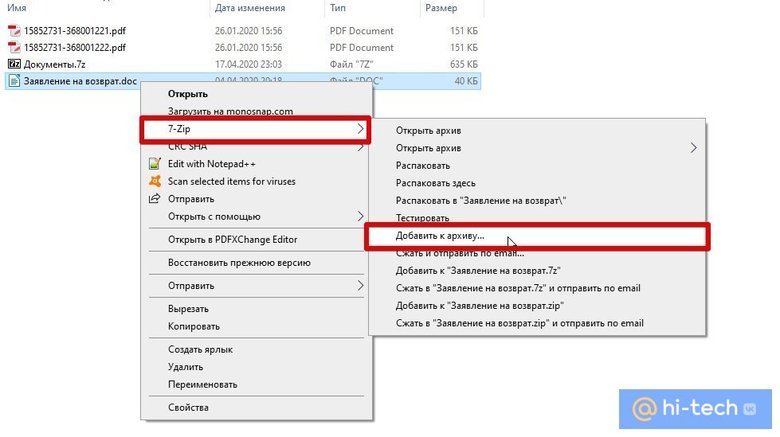
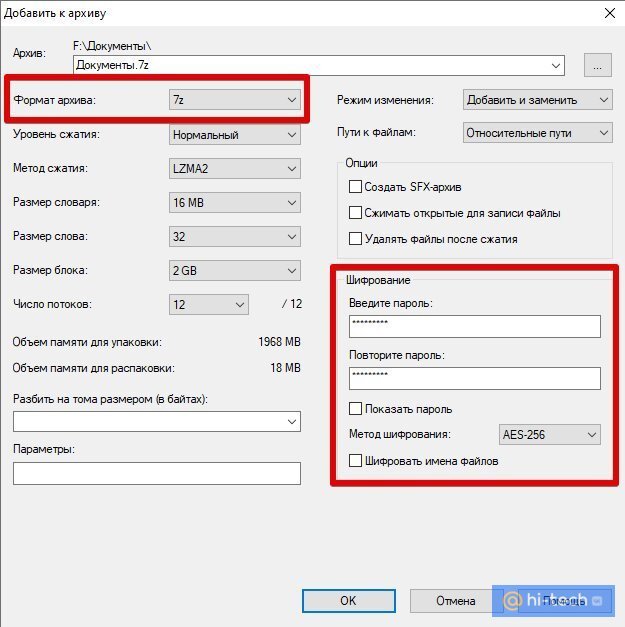
Выберите папку с нужными файлами или сами файлы и кликните правой кнопкой мыши. Далее в контекстном меню 7-Zip кликните на «Добавить к архиву». В открывшемся окне вы можете ввести название архива, выбрать его формат и определить параметры шифрования. Формат поставьте собственный — 7z, метод шифрования доступен лишь один. Введите пароль и по желанию отметьте галочку в пункте «Шифровать имена файлов», если не хотите, чтобы они были видны без ввода пароля.
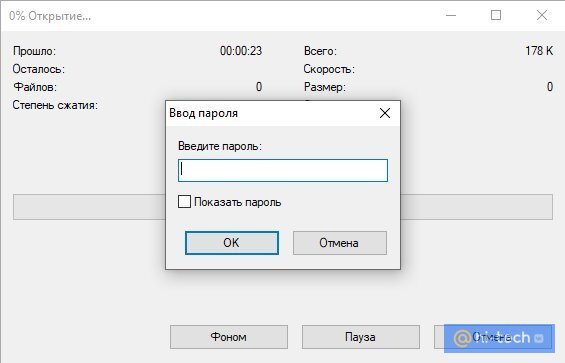
После этого нажмите «ОК» и дождитесь завершения архивации. Попробуйте открыть архив и ввести пароль. Если все получилось, то файлы можно удалить, оставив на диске только сам архив.
Недостаток этого способа в том, что работать с архивом не так удобно, как с обычной папкой. Вы можете добавлять и изменять файлы, при этом архиватор предложит обновить данные. Но, возможно, будет удобнее просто распаковать архив и затем создать его заново.
Кроме того, такой архив можно даже отправить по почте или через сообщения в мессенджерах. Разумеется, это не дает 100-процентной гарантии от взлома, но все равно так гораздо безопаснее, чем отправлять документы в открытом виде.
Программа Anvide Seal Folder
Простая бесплатная программа с русскоязычным интерфейсом. Можно скачать как установочный файл, так и портативную версию в zip-архиве.
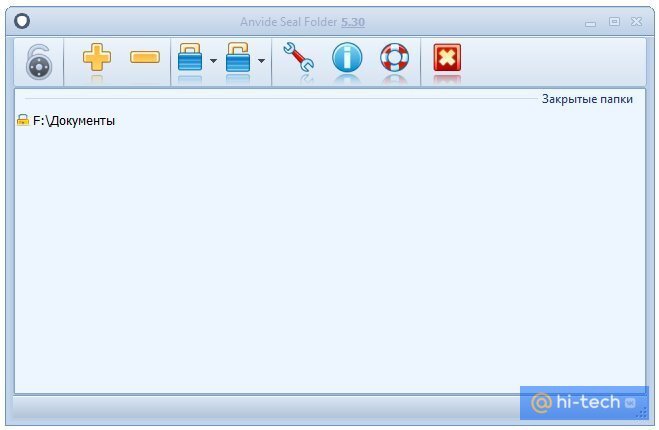
Чтобы начать работу, нажмите на значок плюса и выберите нужную папку. Выделите ее мышкой в окне и нажмите на закрытый замок на панели инструментов или клавишу F5. Введите пароль и подтвердите. В итоге папка просто пропадет, и никто не сможет ее найти без запуска программы. Разблокировать ее можно так же. В программе выделите нужную папку и нажмите на значок открытого замка или клавишу F9.
Кроме того, чтобы скрыть сами папки, чтобы никто не знал, что именно и где у вас зашифровано, можно установить пароль и на запуск программы. Нажмите на значок замка в левом верхнем углу.
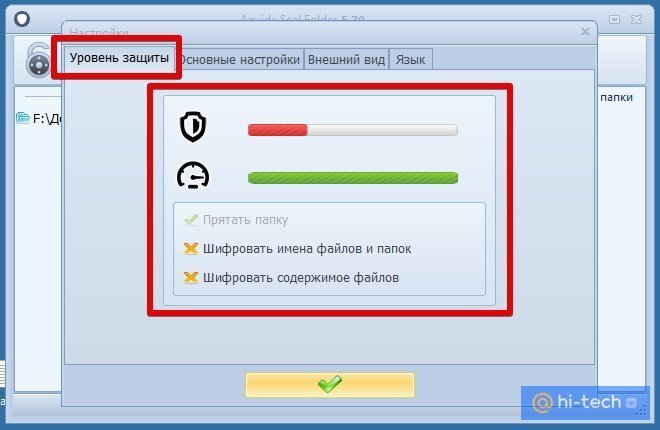
Также в настройках программы можно повысить степень защиты, установив шифрование имен файлов и их содержимого. Обратите внимание, что это может замедлить процесс скрытия папки.
Если вы соберетесь переустанавливать Windows, то доступ ко всем папкам нужно будет открыть, иначе информацию можно потерять.
Зашифрованный виртуальный диск
Этот способ не требует сторонних программ, но работать он будет только на версиях Windows «Профессиональная», «Корпоративная» и «Максимальная». Суть в том, чтобы создать виртуальный жесткий диск, а затем зашифровать его. Вы сможете работать с ним как с обычным жестким диском, но данные будут надежно защищены.
Сначала нужно создать виртуальный диск. Он будет физически находиться на одном из ваших накопителей, но в системе распознаваться как отдельный диск.
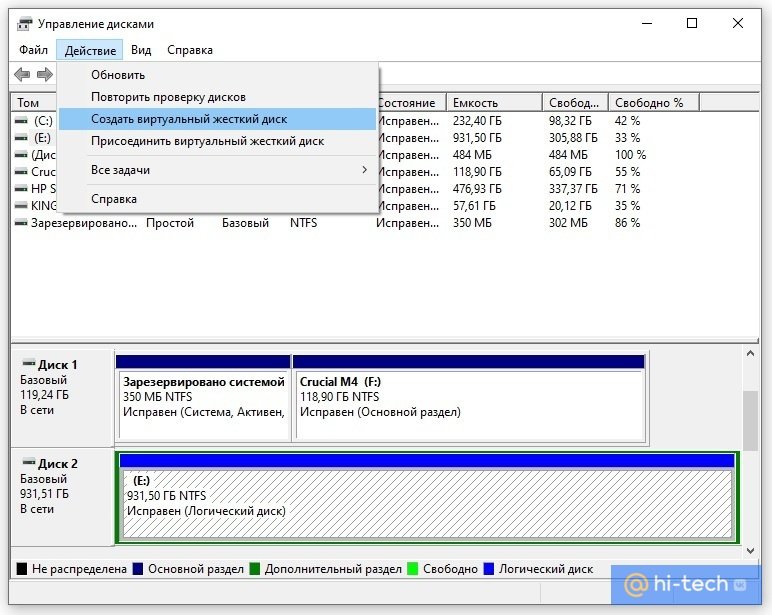
Нажмите правой кнопкой мыши на меню «Пуск» и выберите пункт «Управление дисками». Далее нажмите «Действия», «Создать виртуальный жесткий диск».
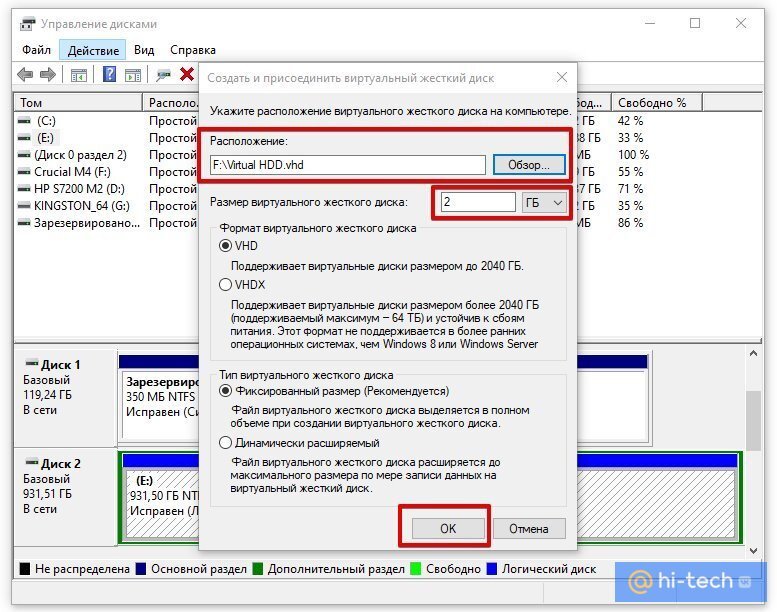
В открывшемся окне задайте расположение вашего диска. Выглядеть он будет как файл-образ диска. Такой же, как образ оптического диска формата iso. Его можно монтировать и извлекать, перемещать и переименовывать. Задайте желаемый размер диска. Остальные пункты оставьте без изменений, как на скриншоте.
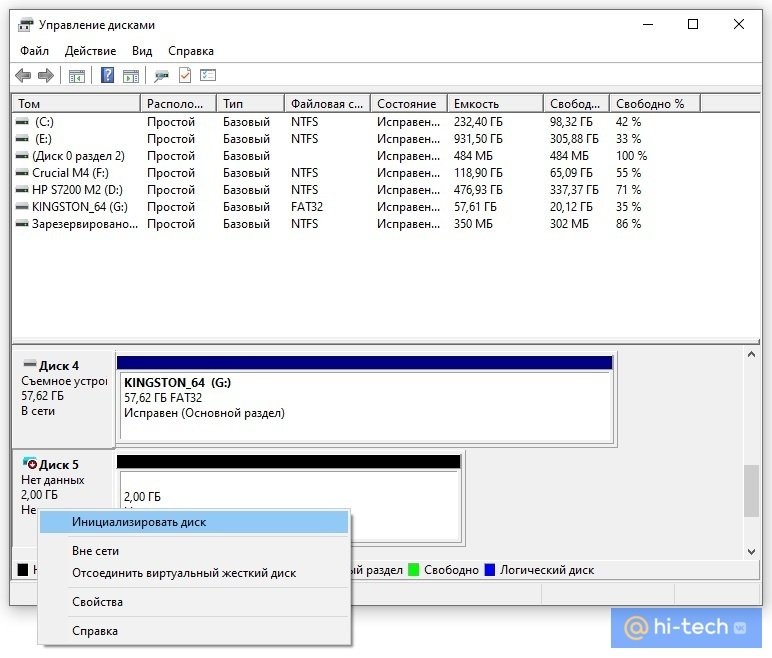
Теперь вы можете видеть ваш образ в утилите «Управление дисками». Однако он пока не готов к работе. Сначала его нужно инициализировать. Нажмите правой кнопкой в левой колонке, где написано «Не инициализировано» и выберите команду «Инициализировать диск».
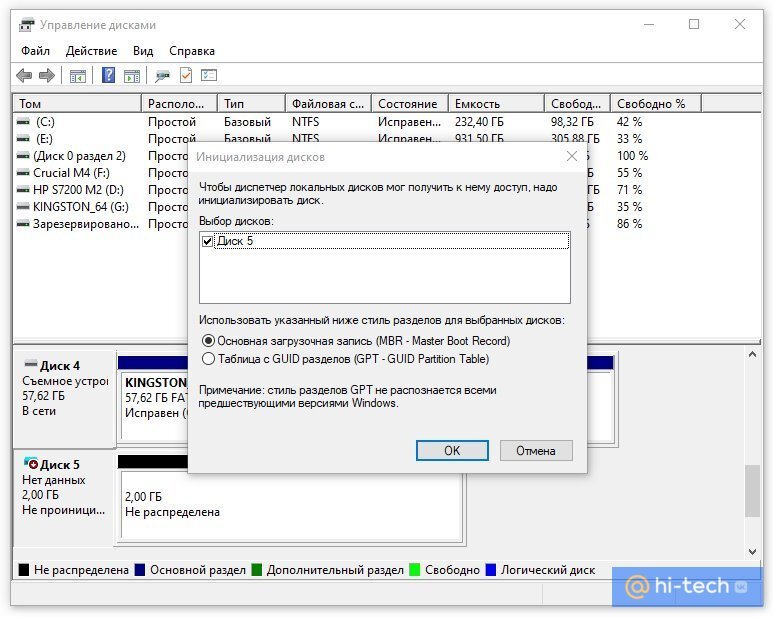
Оставьте все параметры по умолчанию: галочку на самом диске и MBR в качестве стиля раздела. Когда все будет готово, вы снова окажетесь в окне утилиты.
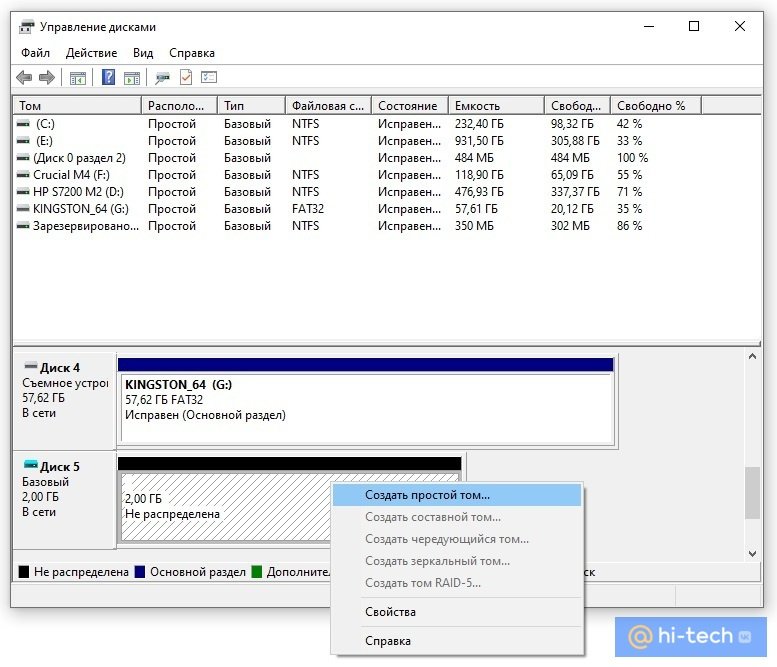
Теперь вам нужно только создать том, кликнув правой кнопкой мыши на диске и выбрав соответствующую команду. В последующих диалоговых окнах трогать ничего не нужно. Оставляйте все по умолчанию и переходите далее.
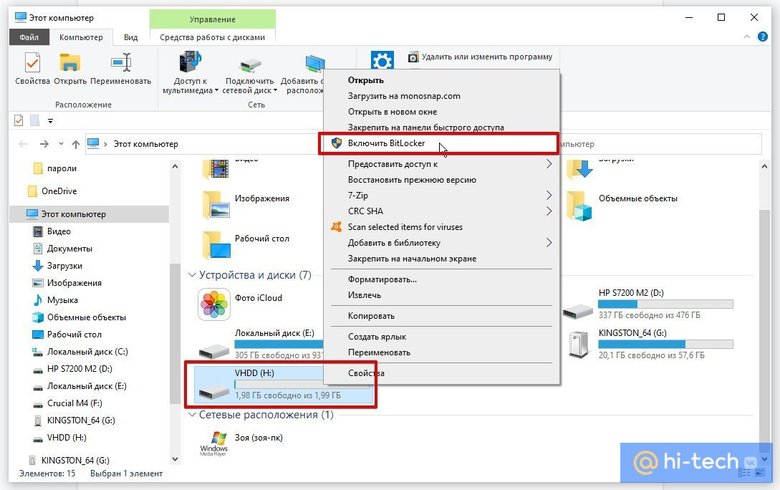
Таким образом, вы создали виртуальный диск, который теперь отображается в проводнике. Пора приступать к шифрованию. Кликните на виртуальном диске правой кнопкой мыши и выберите «Включить BitLocker».
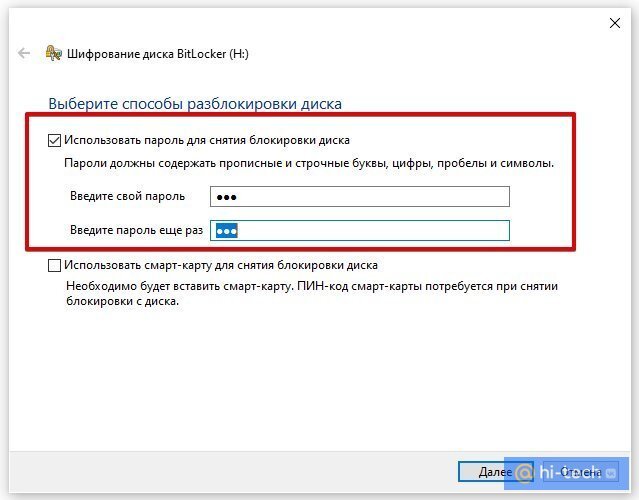
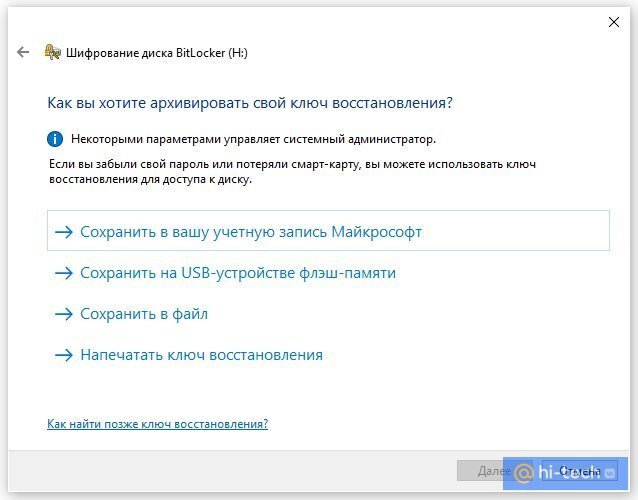
Откроется окно с выбором способа разблокировки диска. Проще всего — установить пароль. Именно этот пункт и выберите, затем придумайте надежный пароль и введите его в оба поля.
На следующем этапе нам предложат выбрать способ восстановления, если вы забудете пароль. Выберите способ, который подходит вам. В нашем случае ключ для разблокировки был скопирован на флешку.
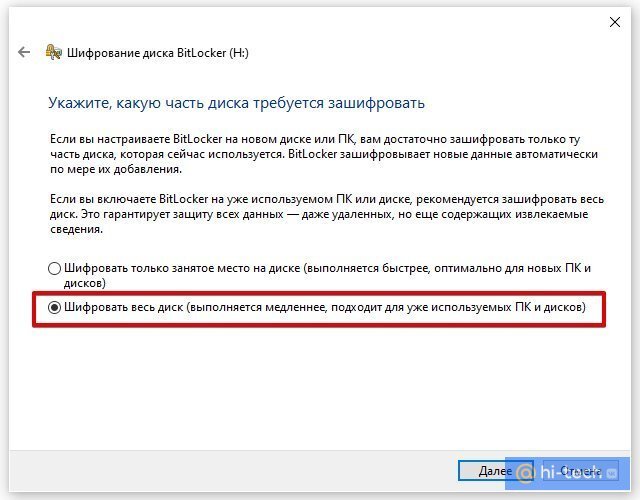
Далее можно выбрать любой из пунктов в зависимости от ваших потребностей. На всякий случай зашифруйте весь диск сразу.
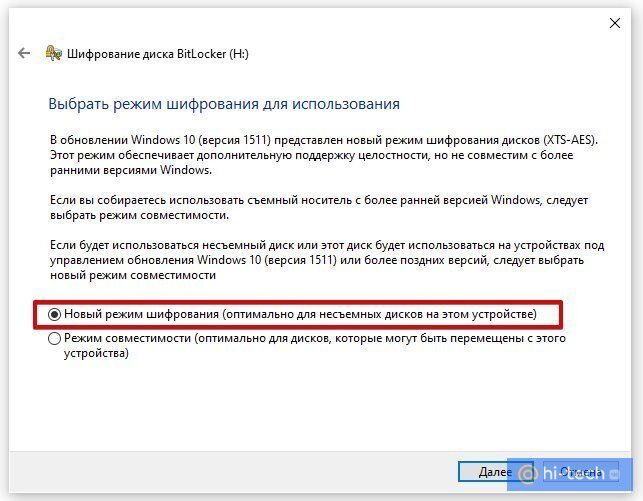
Выбор режима шифрования зависит от того, как вы будете использовать диск. Если нужно будет открывать его на другом компьютере с более ранней версией Windows, то укажите «Режим совместимости». В нашем случае диск будет использоваться только на одном компьютере, поэтому выбираем «Новый режим шифрования».
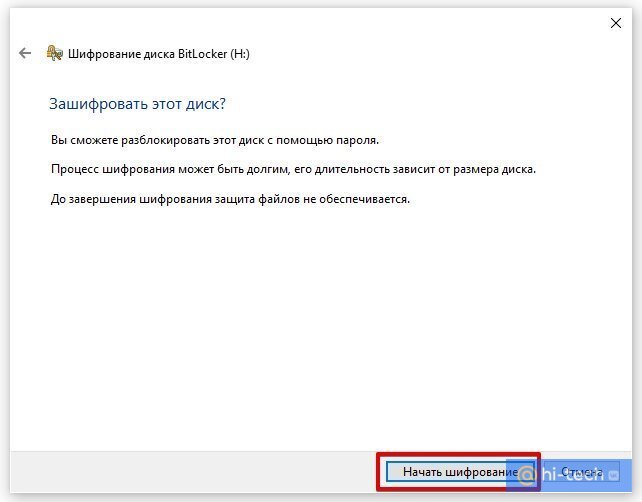
После этого останется только нажать на кнопку «Начать шифрование» и дождаться окончания процедуры. Теперь вы можете скопировать на диск важные данные и не беспокоиться об их сохранности.
После того как вы закончилди работу с диском, его можно извлечь. В следующий раз просто найдите файл образа и запустите его, чтобы смонтировать.
- Как узнать, какая версия Windows установлена на компьютере
- 4 простых способа освободить место на жестком диске в Windows 10
Have you ever wanted to keep your sensitive files and documents safe and secure? One way to achieve this is by password-protecting your ZIP files before saving or sharing them with someone. In this article, we will guide you on how to password-protect a ZIP file on Windows 11 and 10.
Password-protecting a ZIP file is a great way to keep your files secure and hidden from others who may have access to your computer. If not, anyone can easily unzip files on Windows. That said, let’s begin with the article.
Method 1: How to Lock a ZIP File using Windows Encrypting File System (EFS)
Windows natively provides an encryption feature that helps protect your files and folders, including ZIP files, on your Windows PC. However, you must have Windows Pro, Education, or the Enterprise version for the method to work. With that said, follow the steps below.
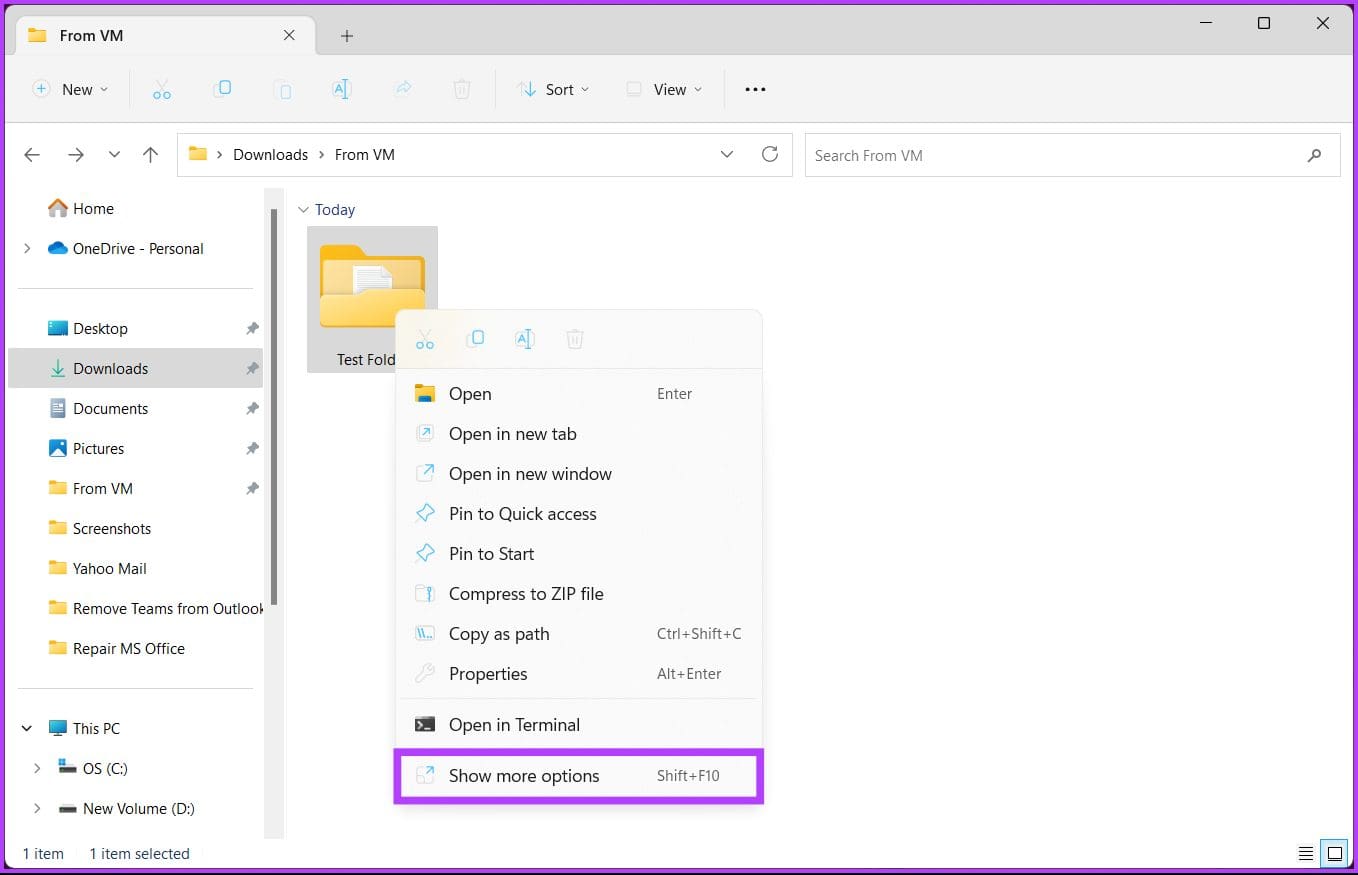
Step 1: Go to the file or folder you want to ZIP secure, right-click on it, and select ‘Show more options’ in the context menu.
Step 2: From the menu, choose Send to and click on the ‘Compressed (zipped) folder’ option.
This will create a ZIP folder at the exact location of your original folder.

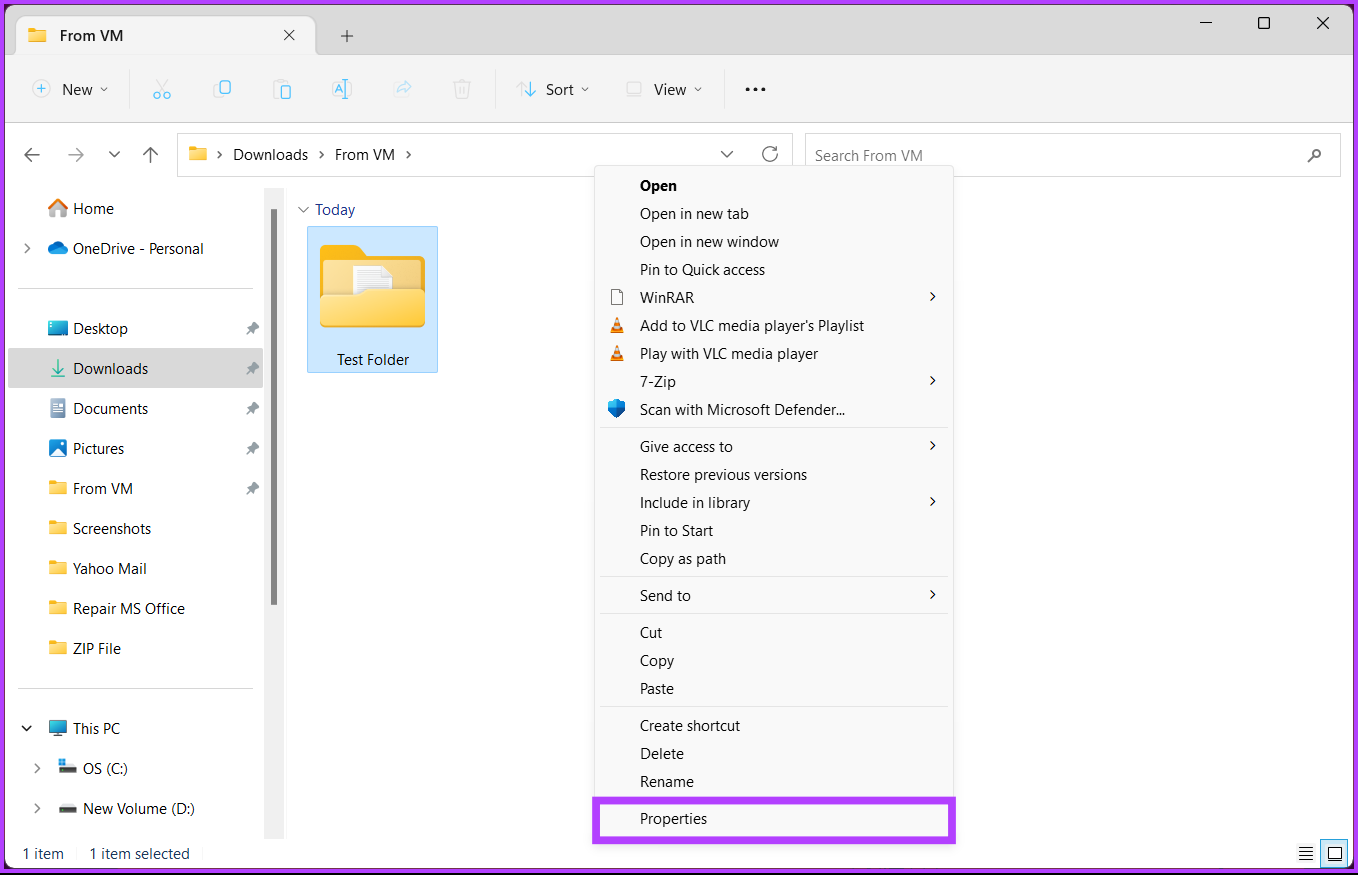
Step 3: Now, right-click on the ZIP folder you want to protect, and from the context menu, select Properties.
Step 4: In the Properties window, go to Advanced.
Step 5: Under the Advanced Attributes window, check ‘Encrypt contents to secure data’ and click OK.
Step 6: In the Encryption Warning window, choose ‘Encrypt the file and its parent folder (recommended)’ or ‘Encrypt the file only,’ and click OK.
Step 7: Now, click and save the decryption key from the pop notification.
Note: If this key is lost, there’s no way to decrypt the file or folder, and you can never see the content of the file or folder.
That’s it. You have locked the ZIP file and folders on your Windows machine. Note that this free Windows method to lock a ZIP file isn’t designed for sending the file but rather to safeguard it in a single location.
If the above steps and saving up a decryption key are too complicated or you are running on a Windows Home machine that is not activated or looking for some advanced-level features, move to the following method.
Method 2: Add Password to Your ZIP File Using 7-Zip
7-Zip remains a widely-used and effective archiving tool that provides exceptional compression and supports a broad range of formats, all while remaining completely free and open-source. Follow the instructions below.
Step 1: Firstly, download and install the 7-Zip program on your Windows system.
Download 7-Zip
Once you install and are all set, move to the next step.

Step 2: Select the files you want to add to a ZIP archive, right-click on any of the files and select ‘Show more options’.
Step 3: From the context menu, choose 7-Zip and select ‘Add to archive.’

Step 4: In the ‘Add to Archive’ window, type the password you want to use under Encryption and re-enter the password.
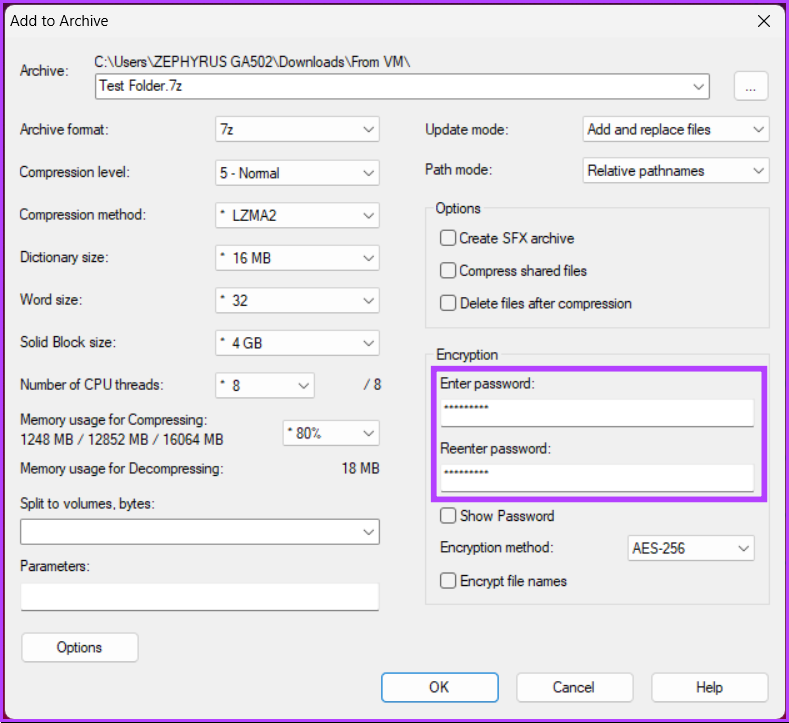
Step 5: Open the drop-down menu next to Encryption method, choose AES-256, and click OK.
Tip: The AES-256 encryption method is so secure that even the US government uses it to protect classified information.
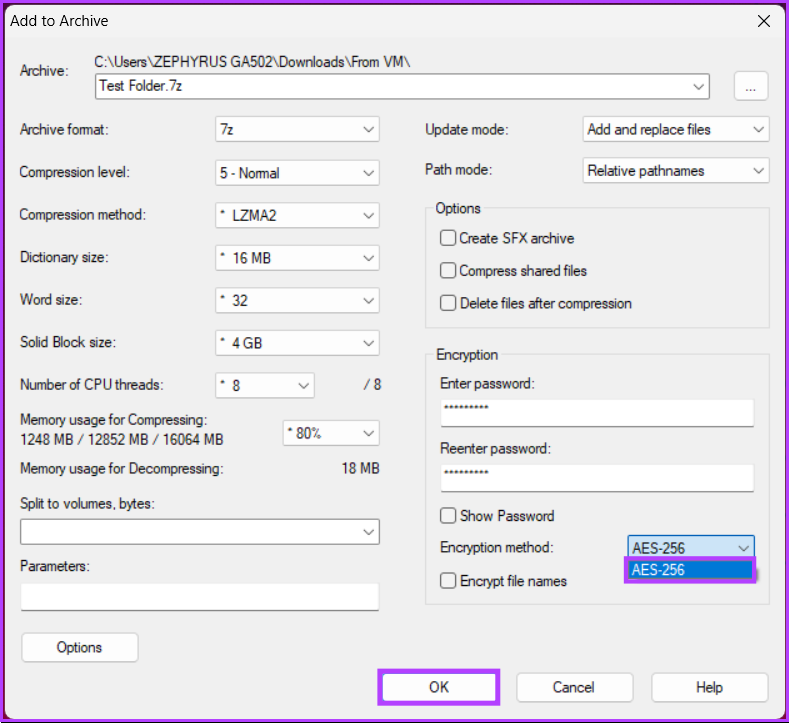
With this, 7-Zip will create a password-protected Zip archive in the same folder you selected the files from. You will be asked to enter the password when this file is shared.
That said, if you are zipping a larger file, 7-Zip can get slower for you and may also restrict using some advanced features. In this case, the next method can significantly help you.
Also read: 5 best tools to extract RAR files on Windows 11
Method 3: Encrypt a ZIP Archive Using WinRAR
WinRAR is another popular tool with a good user interface, better compression speed, and some advanced features, such as creating self-extracting archives and repairing damaged archives, which may be helpful for some users.
On the flip side, the only drawback of WinRAR is that it only supports a limited range of formats when compared to 7-Zip. With that said, follow the below-mentioned steps.
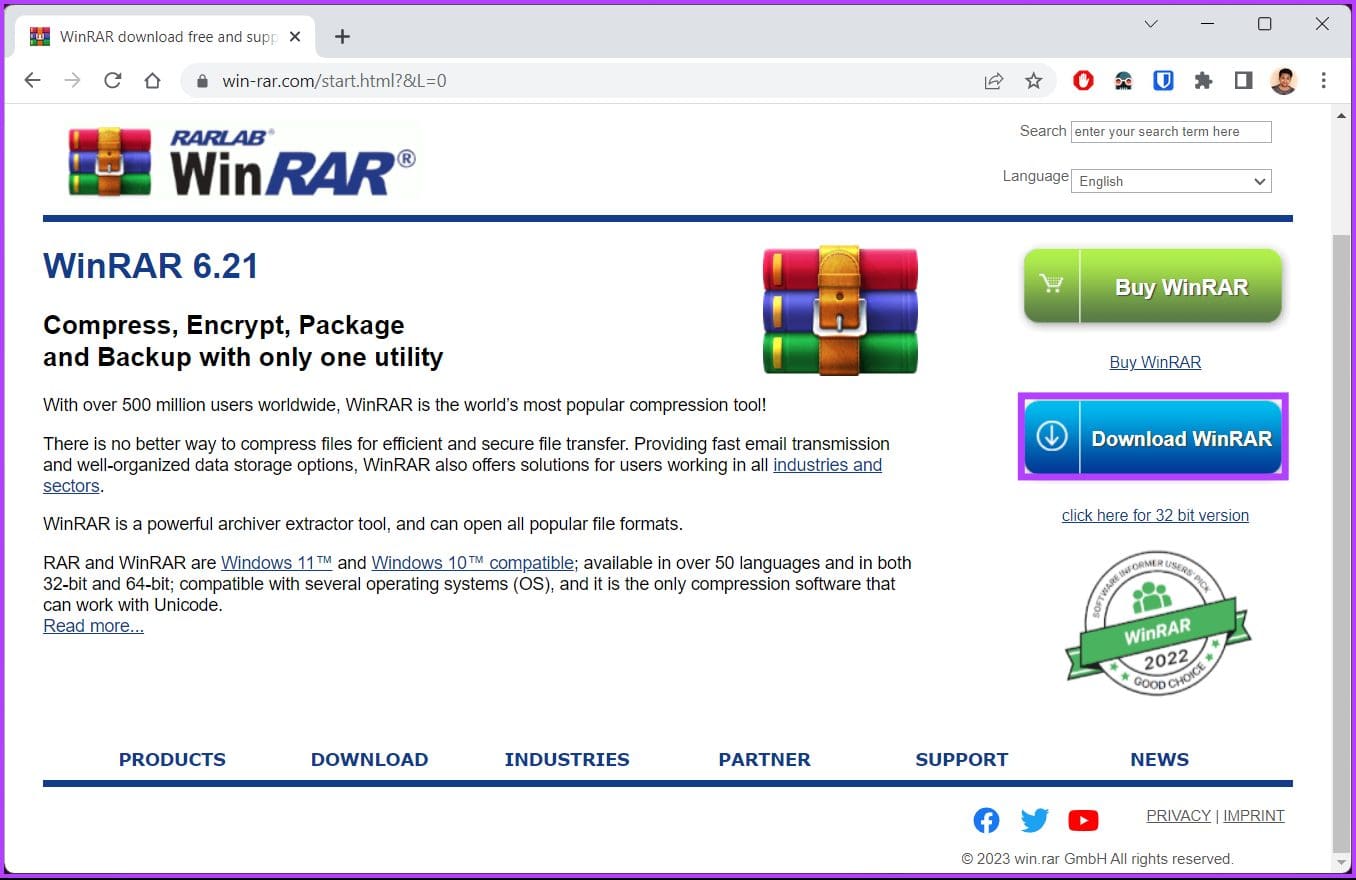
Step 1: Firstly, download and install the WinRAR program on your Windows machine.
Download WinRAR
Once you install and are all set, move to the next step.
Step 2: Select the files you want to add to a ZIP archive, right-click on any of the files, and choose ‘Add to Archive’ from the context menu.

Step 3: In the ‘Archive name and parameters’ window, click on Set password.

Step 4: Select the Enter Password field and type your password. Type the same password in the ‘Reenter password for verification’ field and click OK.
Note: Additionally, you can encrypt the file names too.

Step 5: In the ‘Archiving with password’ window, select the Archive format to ZIP and click OK.

There you have it. WinRAR will make a new ZIP archive, which, when shared, will ask for the password to extract the file.
If you have any questions we missed addressing in the article, check out the FAQ section below.
FAQs for Password Protecting a ZIP File on Windows
1. Are ZIP files automatically encrypted?
ZIP files are not automatically encrypted. However, you can encrypt a ZIP file’s contents using a password. This can be the right way to protect sensitive files or data you don’t want easily accessible to others.
2. What password algorithm do ZIP files use?
ZIP files use the ZipCrypto password algorithm. However, it is essential to note that this algorithm is relatively weak. So, we recommend using the AES encryption algorithm when encrypting ZIP files.
3. What is the risk of opening ZIP files?
ZIP files may contain malware or viruses that can infect your computer or device. Cybercriminals may also use ZIP files to deliver phishing emails or spam messages. Additionally, opening ZIP files from unknown or untrusted sources can lead to installing unwanted software or stealing sensitive information.
ZIP Lock Your Files and Folders
Whether sharing important documents with colleagues or storing personal information on your computer, adding a password to your ZIP files can provide an extra layer of security and peace of mind. Now that you know how to password-protect a ZIP file on Windows 11 and 10, you can quickly and effectively keep your sensitive data safe from prying eyes.
Was this helpful?
Thanks for your feedback!
The article above may contain affiliate links which help support Guiding Tech. The content remains unbiased and authentic and will never affect our editorial integrity.
To password protect a Zip file in Windows 10, first, gather the files or folders you want to include in the archive. Then, select them, right-click, and choose “Send to” > “Compressed (zipped) folder.” Rename the Zip file if needed. Double-click to open it, click “File,” and select “Add a password.” Set a strong password and optionally encrypt file names. Confirm the password and save. Now, your Zip file is protected. To open it, you’ll need to enter the password.
Recommended Tool to Password Protect a Zip File in Windows 10: https://www.newsoftwares.net/folderlock/
Why Password Protect a Zip File?

- Data Security: Password-protecting a Zip file adds more security to your data. Even if someone gains access to the Zip file, they won’t be able to open it without the correct password.
- Confidentiality: If you deal with sensitive information like financial records, personal documents, or business reports, password protection ensures that only authorized individuals can view the contents.
- Data Compression: Zip files secure and compress your data, saving storage space and making it easier to transfer over the internet or via email.
- Organized Storage: Zip files allow you to consolidate multiple files or folders into a single archive, helping you organize your data.
How To Password Protect A Zip File In Windows 10?
To password-protect a zip file in Windows 10, you can use the built-in compression utility, which allows you to create a password-protected zip archive.

Step 1: Prepare Your Files
Before creating a password-protected Zip file, gather the files or folders you want to include in the archive. Ensure you have all the data you want to protect in one location.
Step 2: Select the Files/Folders
Navigate to the location of your files or folders. Press the ‘Ctrl’ key to select multiple items while clicking on each file or folder. Alternatively, to select all items in a folder, press ‘Ctrl + A.’
Step 3: Right-click and Choose ‘Send to’
After selecting your files or folders, right-click on one of them. In the context menu that appears, hover over the ‘Send to’ option, and a submenu will appear.
Step 4: Select ‘Compressed (zipped) folder’
From the ‘Send to’ submenu, select ‘Compressed (zipped) folder.’ This action will create a new Zip file in the same location as your original files or folders.
Step 5: Rename the Zip File
By default, Windows will name the Zip file based on the first file or folder you selected. To rename the Zip file, right-click on it, select ‘Rename,’ and enter the desired name.
Step 6: Open the Zip File
Double-click on the newly created Zip file to open it. Windows will display the contents of the Zip archive, which should contain your selected files or folders.
Step 7: Add a Password
To password protect this Zip file, click the ‘File’ menu at the window’s top-left corner and select ‘Add a password.
Step 8: Set a Password
In the ‘Add a password’ window, you will be prompted to enter and confirm a password for the Zip file. Choose a unique password that combines letters, numbers, and special characters for added security.
Step 9: Optional Encryption
You have the option to encrypt the file names inside the Zip archive. While this is not mandatory, it can enhance the security of your data. To enable this option, check the box that says ‘Encrypt file names,’ then click ‘OK.’
Step 10: Confirm the Password
Windows will ask you to confirm the password by entering it again. Ensure you type it correctly, as this will be the key to accessing the Zip file’s contents. Once confirmed, click ‘OK.’
Step 11: Save and Close
Your Zip file is now password-protected. Save and close the archive. You will notice a small padlock icon on the Zip file, indicating password-protected.
Step 12: Test the Zip File
To ensure that the password protection is working as intended, try to open the Zip file. Windows will prompt you to enter the password before granting access to the contents.
Tips for a Secure Password:
- Use a combination of upper and lower-case letters.
- Include numbers and special characters (!, @, #, $, etc.).
- Avoid using easily guessable information like birthdays or names.
- Make it at least eight characters long.
Conclusion:
Password-protecting a Zip file in Windows 10 is a simple yet effective way to safeguard sensitive data. By following the steps outlined in this guide, you can ensure that only authorized individuals can access the contents of your Zip archives. Remember to use strong passwords and consider encrypting file names for an added layer of security. With these precautions, you can confidently share or store your important files while maintaining confidentiality.
FAQs
Can I password-protect a Zip file without using third-party software in Windows 10?

Yes, Windows 10 has built-in functionality to create password-protected Zip files. You don’t need third-party software for this task.
How do I create a Zip file in Windows 10?
You can create a Zip file by selecting the files or folders you want to include, right-clicking, choosing ‘Send to,’ and selecting ‘Compressed (zipped) folder.’
What makes a strong password for a password-protected Zip file?
A strong password should be at least eight characters long and include a combination of upper and lower-case letters, numbers, and special characters. Avoid easily guessable information like birthdays or names.
Can I change the password of an existing password-protected Zip file?
No, Windows does not provide a built-in option to change the password of an existing Zip file. To change the password, you must create a new Zip file with the desired password and copy the contents from the old one.
What if I forget the password for a password-protected Zip file?
If you forget the password for a password-protected Zip file, there is usually no way to recover it. It’s crucial to keep the password in a secure place or use a password manager to avoid losing access to your files.
Are password-protected Zip files compatible with other operating systems?
Password-protected Zip files can be opened on various operating systems, including Windows, macOS, and Linux. However, opening them may vary slightly depending on the software used.
1 Is the software available for creating password-protected Zip files in Windows 10?
Windows 10 has built-in functionality to create password-protected Zip files, as the guide explains. However, there are also third-party Zip file compression tools available that offer additional features and options for encryption.
You are here:
Home » Windows 10 » How To Create Zip File With Password In Windows 10/8/7
Users who had used now “half-dead” Windows XP operating system before switching to Windows 10/8/7 have probably observed that in Windows 7 and above versions one cannot create a zip file with password without the help of third-party utilities.
In Windows XP (not sure if the feature was present in Vista), we could create a zip file and lock up it with a password by right-clicking on a zip file and then clicking Add a password option. In short, we didn’t need a third-party file compressing utility like 7-Zip in order to create a password protected zip file in Windows XP.
Even though Windows 10, Windows 8 and Windows 7 allow you create a zip file, you can’t create a zip file with password without the help of third-party tools.
Luckily, there are plenty of free tools out there to create a password protected zip file. In this guide, we will show you how you can use two popular tools WinRAR and 7-Zip (free) to create a zip file with password.
IMPORTANT: If you use the 7-Zip to extract a password protected ZIP file, it won’t ask for the password to view the content of the archive. However, it won’t let you open or view files inside the archive without entering the password.
Step 1: If 7-Zip isn’t already installed, visit this page to download the same and then run the setup file to get it installed. As you likely know, 7-Zip is a free software. Separate setup file available for both 32-bit and 64-bit Windows at the download page. If you’re not sure what to download, download the one available for 32-bit.
Step 2: Now that 7-Zip is installed, right-click on the file that you would to create an archive and add password protection, click 7-Zip, and then click Add to archive option. This will open Add to archive dialog.

Step 3: Here, enter a name for your archive (or you can go with the default name), and then select archive format as Zip by clicking the drop down menu next to Archive format.

Step 4: In order to protect it with a password, move to the Encryption section, enter a password, re-enter the same, and finally, click OK button. This zip file will appear in the same folder where your original file is located.

Note that 7-Zip uses ZipCrypto as the default encryption method, but you can choose AES-256 by expanding the drop-down menu next to Encryption method under Encryption section. Also note that 7-Zip doesn’t automatically delete the original after creating an archive out of it. So, if the file is very confidential, you better delete it after creating a password protected archive out of it.
Using WinRAR to create password protected zip file
Step 1: Download WinRAR from here and install the same by double-clicking on the downloaded setup file and then following dead-simple on-screen instructions.
Step 2: Once installed, right-click on the file that you would like to password protect, and click Add to archive option to see Archive name and parameters dialog.

NOTE: If the above mentioned option isn’t appearing in the context menu (right-click), please follow our how to restore missing WinRAR entries guide.
Step 3: Here, Enter a name for your archive (password protected file in this case), and select ZIP as archive format. Be sure to select ZIP as archive format as WinRAR uses its .RAR as archive format with default settings.

Step 4: Finally, click on the Set password button to enter a password to protect your file. Once entered, re-enter the password for verification before hitting OK button.
That’s it!
Applies ToWindows 11 Windows 10
Шифрование — это процесс преобразования данных в код для предотвращения несанкционированного доступа. В Windows этого можно добиться с помощью встроенных средств, которые позволяют шифровать файлы и папки, гарантируя, что доступ к содержимому могут получить только пользователи с правильным ключом расшифровки.
Примечание: Шифрование файлов недоступно в выпуске Home windows.
Чтобы зашифровать файл или папку, выполните следующее:
-
Щелкните правой кнопкой мыши файл или папку и выберите пункт Свойства.
-
Выберите Дополнительно…
-
Установите флажок Шифрование содержимого для защиты данных проверка
-
Нажмите кнопку ОК , чтобы закрыть окно, нажмите кнопку Применить, а затем нажмите кнопку ОК.
Нужна дополнительная помощь?
Нужны дополнительные параметры?
Изучите преимущества подписки, просмотрите учебные курсы, узнайте, как защитить свое устройство и т. д.