
This tutorial demonstrates how to configure Device Portal on Windows 10 and Windows 11 devices. It includes information about what Windows Device Portal is and what it’s used for. It also explains the security and functionality implications of enabling or disabling Windows Device Portal for software development and system administration purposes.
What is the Windows Device Portal (WDP)?
Windows Device Portal (WDP) is a feature of Windows 10 and Windows 11 that is intended for software developers to configure a device via a USB or Ethernet connection (or locally for devices that have a web browser). This service is provided by a web server that provides a web page for configuring and managing your Windows device, as well as exposing APIs for programmatic access.
Windows Device Portal also provides diagnostic tools for troubleshooting and assists developers in debugging their applications.
Prerequisites for using the Device Portal in Windows 10 and Windows 11
Windows Device Portal is only supported on Windows 10 and Windows 11 Pro, Enterprise, Education, and IoT Core/Enterprise editions. It is also supported on Windows Server editions where the desktop environment is enabled.
To Enable Windows Device Portal, you must be an administrator, and be able to access the device using a web browser (either locally, over USB, or over a network).
As Windows Device Portal provides administrative access to your Windows PC, you should only enable it when it is needed. You should make sure that it is turned off when connected to untrusted networks, as well as restricting access to only trusted devices using the Windows Firewall.
You should also use strong passwords for remote access to the Windows Device Portal (that are different from your usual Windows, domain, or Microsoft Account logins), and make sure you’re accessing it using an encrypted connection if working remotely (for example, using an encrypted VPN or tunnel). If possible, you should provision Windows Device Portal with an HTTPS certificate for the best security.
Step-by-step guide: turning on Device Portal in Windows 10 and Windows 11
To enable the Windows Device Portal, follow these steps:
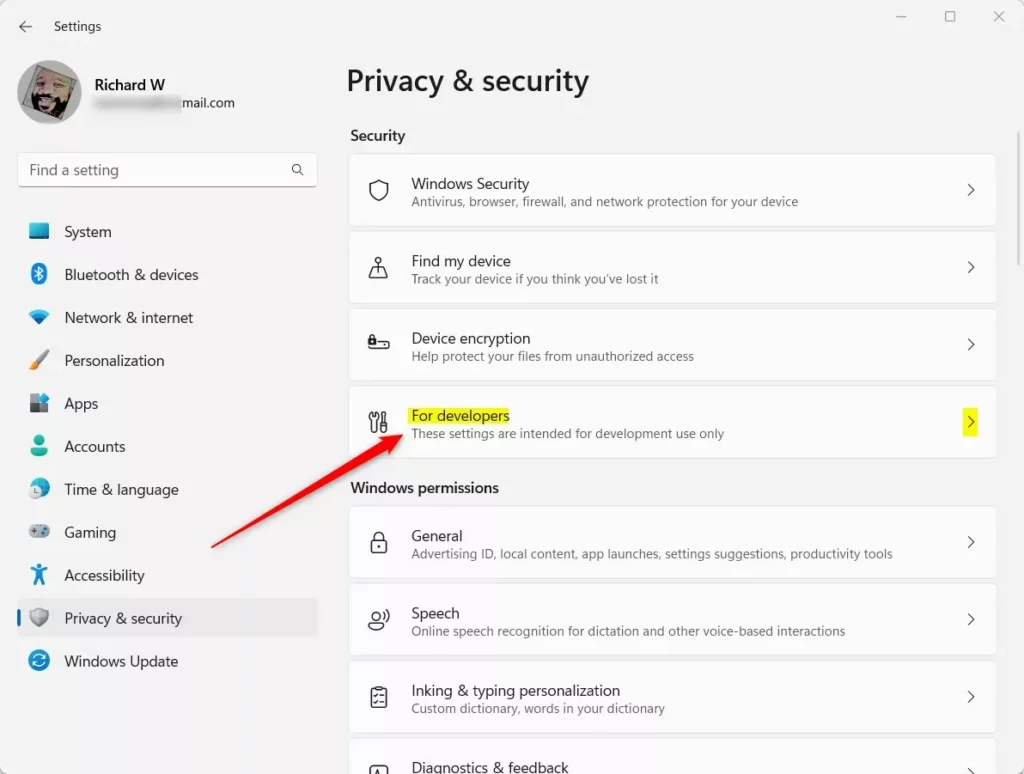
- Right-click on the Start button and click Settings
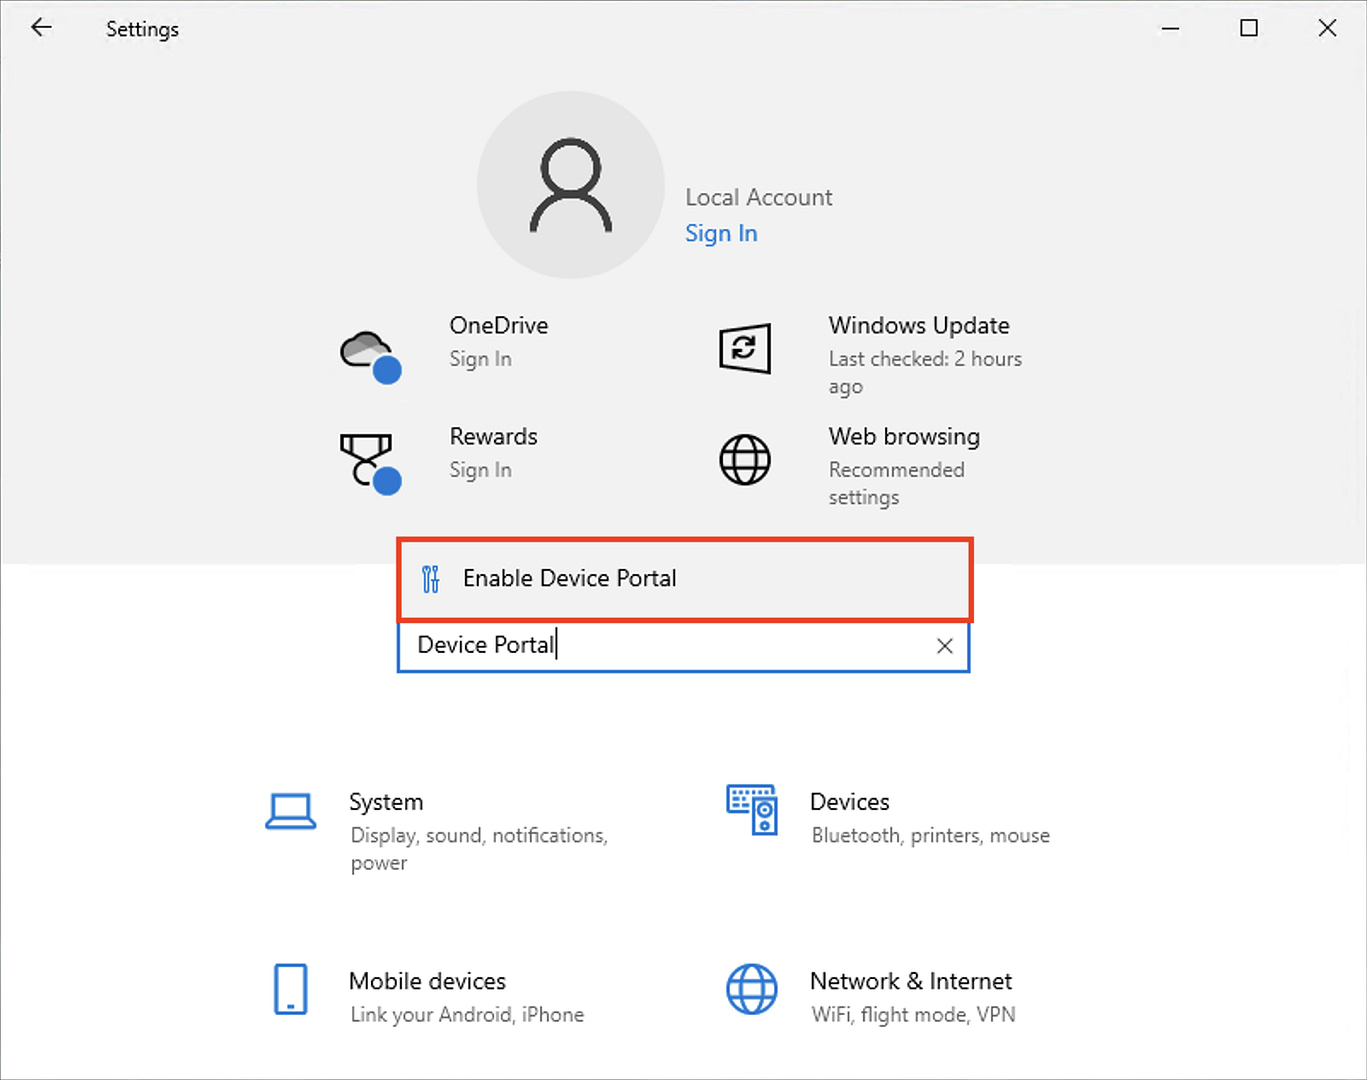
- In the Find a setting search box, enter “Device Portal”
- Click on the Enable Device Portal search result
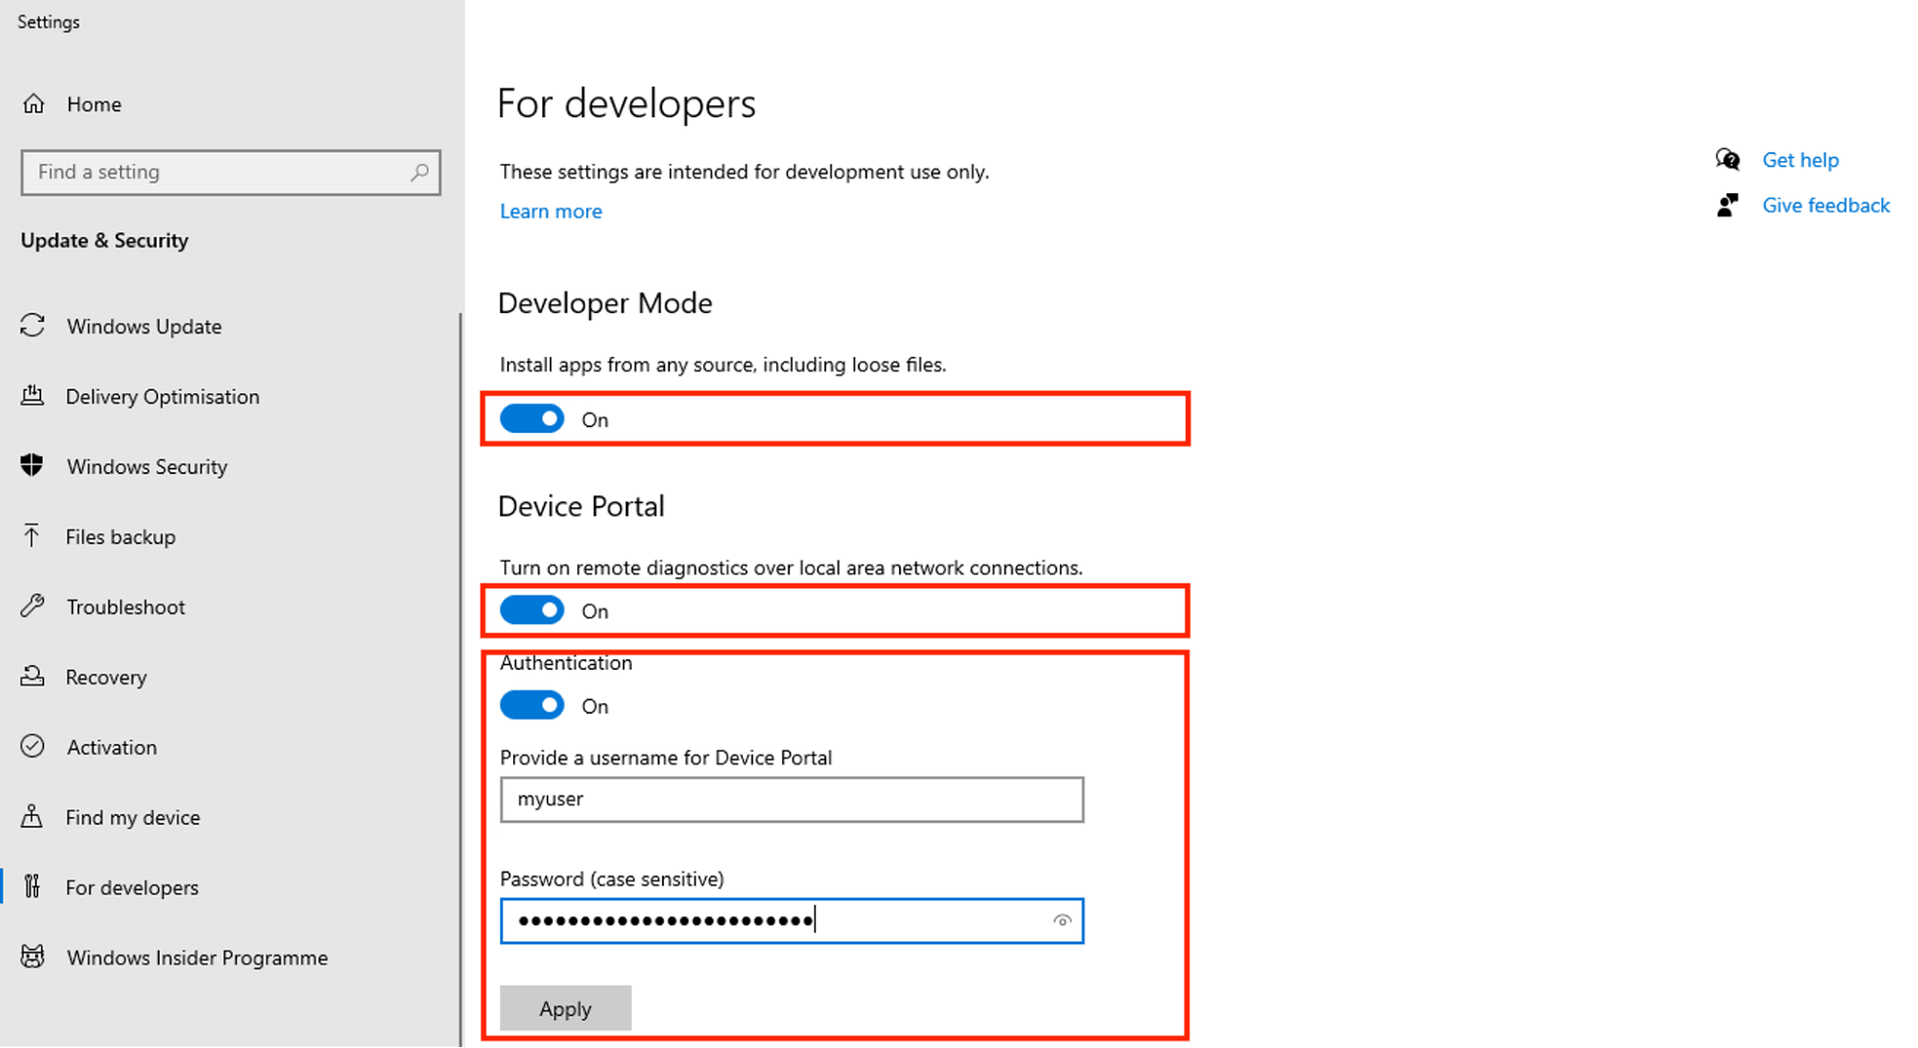
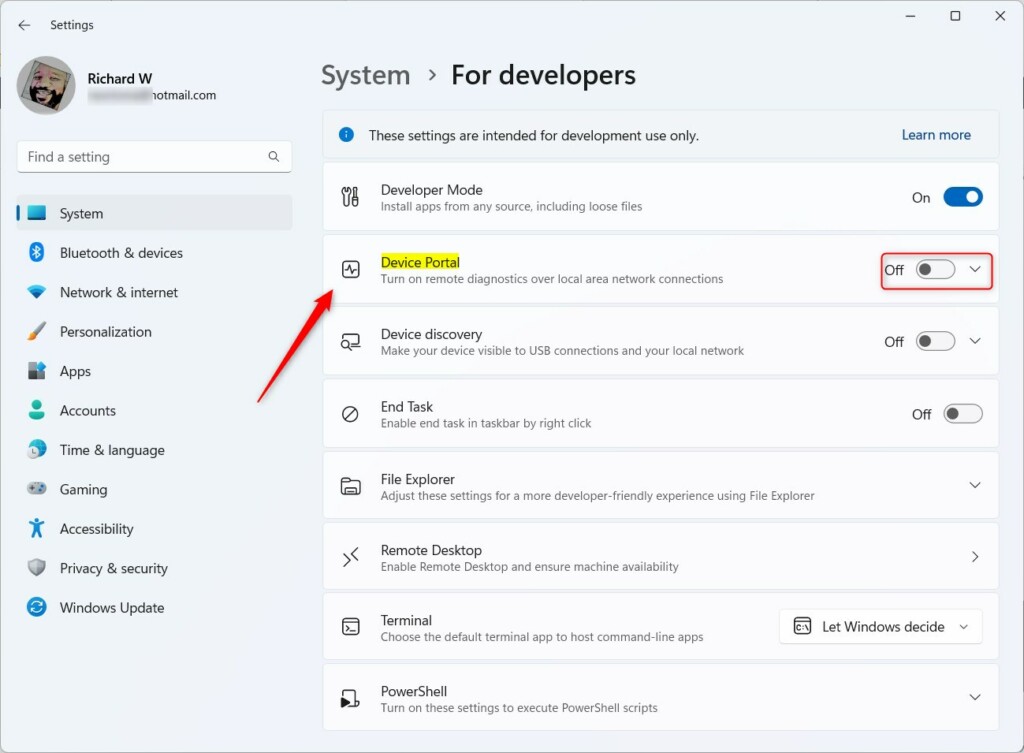
- On the For developers Settings screen, toggle Developer Mode to on (you may need to accept a warning about this affecting the security of your device)
- When Developer Mode is enabled, you will be able to toggle Device Portal to on
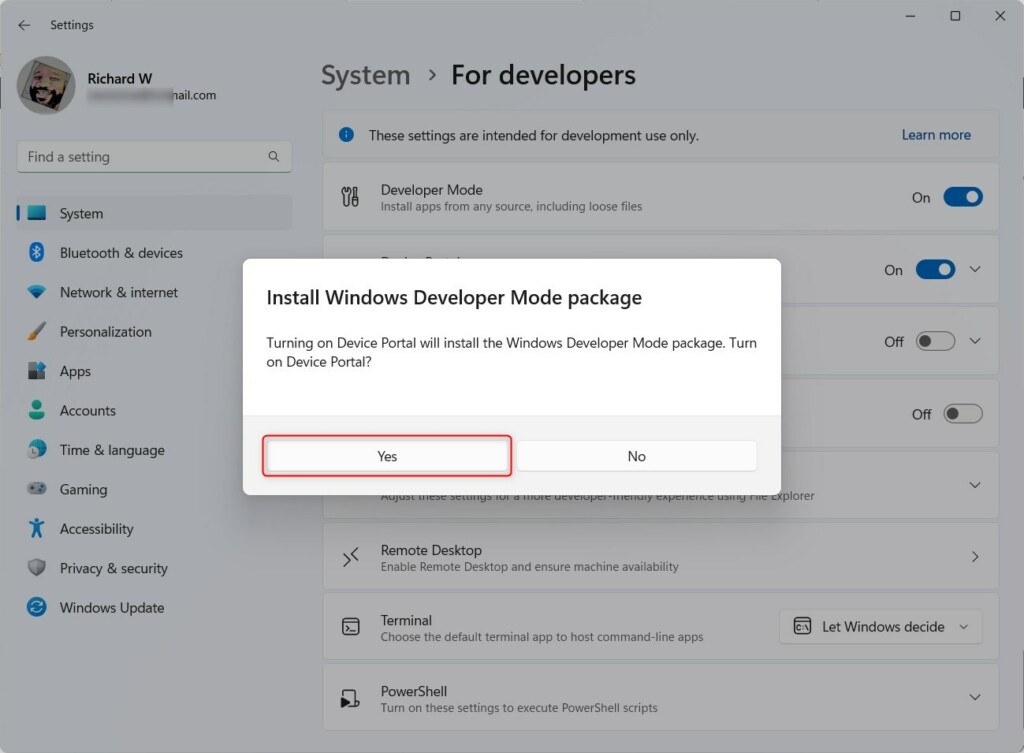
- You may need to accept the prompt to install the Windows Developer Mode package
Once the Windows Developer Mode package has been installed and the Device Portal has been enabled, you should perform some additional configuration to secure it:
- Ensure that Authentication is toggled on
- Provide a unique, secure, and strong username and password
- Click Apply to save the new credentials and then confirm the change
Not setting a secure password (especially if you forget to turn Windows Device Portal off and then connect to an insecure or shared network) leaves your PC vulnerable to cyberattack.
Step-by-step guide: turning off Device Portal in Windows 10 and Windows 11
When you have completed troubleshooting your device or debugging your software using the Windows Device Portal, you should immediately disable it by following these steps:
- Right-click on the Start button and click Settings
- In the Find a setting search box, enter “Device Portal”
- Click on the Enable Device Portal search result
- Toggle Device Portal to off
It’s worth reiterating that you should not leave Windows Device Portal enabled when it’s not required. If you have been using it, ensure that you remember to turn it off before connecting to untrusted or shared networks outside your home or workplace. Unauthorized access to the Device Portal could be used to compromise or damage your system and vital data, or further a larger cyberattack against your organization’s IT infrastructure.
Accessing the Windows Device Portal
To access the Windows Device Portal once it has been enabled, use one of the addresses provided on the Settings Screen, below the Device Portal authentication settings.
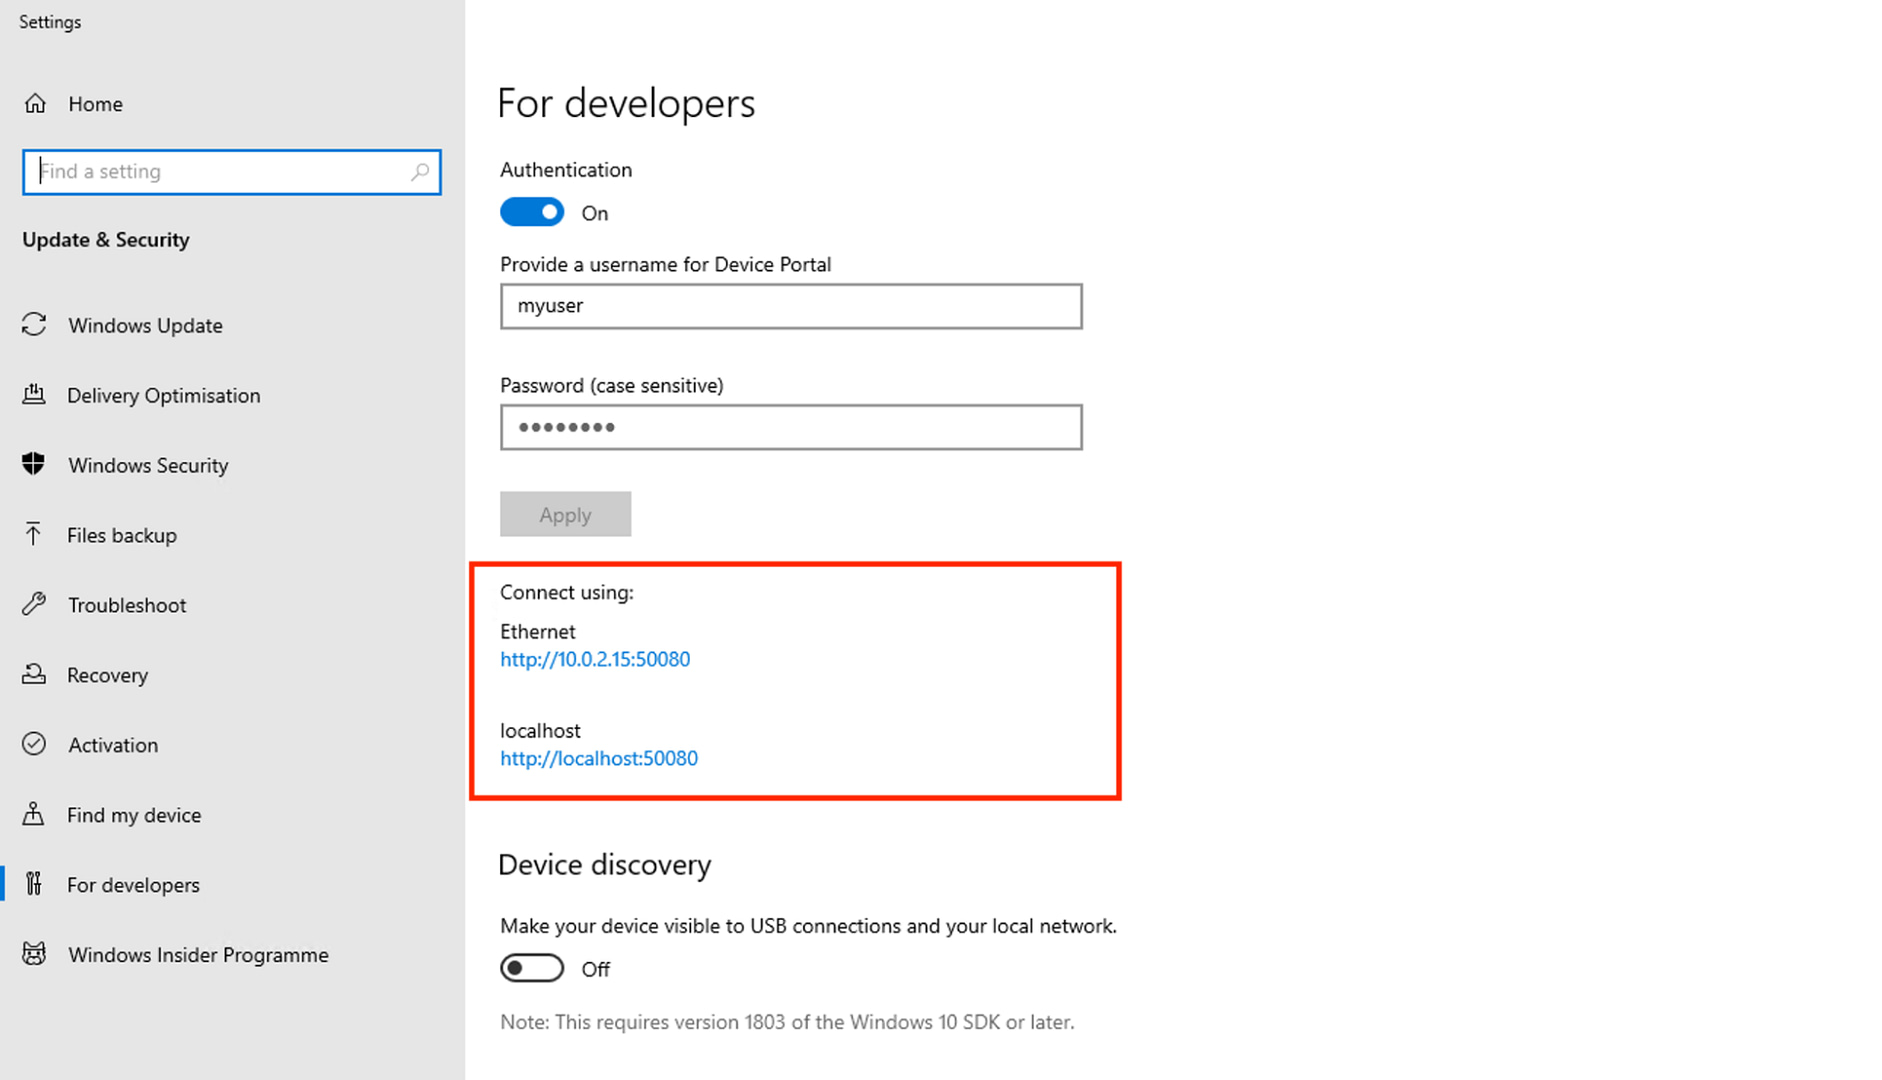
If you are accessing the Windows Device Portal from the current machine, use the localhost address. If you are accessing it over the network, use the address provided for the network interface connected to your network.
What can you do in Windows Device Portal?
Windows Device Portal provides functionality for developers and system administrators to troubleshoot systems and debug software through a web-based interface or using a REST API. This includes:
- Device management: View your Windows device’s hardware and software details, view running processes, install applications, and change Windows settings (including network, power, and other system settings).
- Application deployment: Install and uninstall Universal Windows Platform (UWP) apps to your device via the web console.
- Debugging: Access real-time program output as well as crash and diagnostic information. You can also simulate poor network conditions like high latency or packet loss for testing applications.
- Monitoring: Monitor device CPU and memory usage, as well as network traffic.
- Troubleshooting: Access Windows system logs to identify and troubleshoot issues.
- GPIO control for IoT devices: Windows IoT devices can be controlled using Windows Device Portal for industrial use cases or hobbyist projects.
- Explore files: Windows Device Portal lets you browse files on the target device.
- Shutdown and reboot devices: Manage the power of remote devices by shutting down and rebooting them to troubleshoot issues or complete the deployment of new configurations or software.
The REST API provided by Windows Device Portal can be leveraged by developers to automate almost any task. This commonly includes the retrieval of logs and crash reports, automatically checking the health of systems, and automatically testing new software updates. It can also be used as the basis for custom user interfaces for interacting with Windows IoT devices.
Device Portal common issues and troubleshooting tips
If you cannot connect to the Windows Device Portal, check that you’re using the correct network address. You should also confirm that you are using the correct credentials. Windows Firewall may also need to be configured to allow remote access to Windows Device portal on trusted networks.
FAQ
What is the Windows Device Portal used for?
Windows Device Portal is a Windows 10 and Windows 11 feature that lets developers and IT administrators configure and troubleshoot Windows PCs and IoT devices.
Is enabling the Windows Device Portal safe?
Turning on Windows Device Portal is safe, provided you are connected to a trusted network (for example, at home, or on a secure test network). It is not safe to enable Windows Device Portal on shared or untrusted networks, as it poses a cybersecurity risk.
Can Windows Device Portal be used on non-enterprise machines?
Yes, Windows Device Portal can be used on consumer Windows devices running Windows 10 Pro or Windows 11 Pro. Home versions are not supported.
Managing and configuring fleets of Windows devices remotely
Troubleshooting Windows PCs using Windows Device Portal makes sense for software developers and small-scale testing and troubleshooting in controlled environments for system administrators, but is insecure and inefficient at scale.
Attempting to use Windows Device Portal to remotely manage and configure multiple Windows 10 and Windows 11 machines in an enterprise environment opens a severe vulnerability to cyberattack: stolen credentials, or an insecure connection would quickly lead to compromised machines, damaged infrastructure, and potential data breaches impacting both critical business data and protected customer and employee information.
Endpoint management by NinjaOne provides a secure, unified interface for monitoring and configuring Windows PCs remotely without exposing Windows Device Portal as a potential attack vector. NinjaOne lets system administrators remotely troubleshoot issues, deploy patches, reconfigure devices, and deploy security policies to Windows, Apple, and Android, as well as Linux devices, wherever they are located.
Enable Device Portal in Windows 10 – Microsoft encourages the professionals involved in development activities and renders surplus tools nowadays. In this respect, Windows 10 has gained an additional stuff Device Portal in build 1607. Device Portal is accessible from For developers within Update & Security category of the Settings application. This feature provides to systematize configuration and handle devices remotely over a local network or USB.
Device Portal facilitates advanced diagnostic tool and enables you to examine the performance of devices live. If the device’s performance does not satiate your satisfaction level you can anytime troubleshoot. Anyway, How to Enable Device Portal in Windows 10 is the topic here for which we are writing steps further.
Steps to Enable Device Portal in Windows 10
Step 1 – Click/Tap Win & I keys simultaneously and let the Settings application outspread on your screen.
Step 2 – The expanded app will exhibit various categories, click or tap the last one labeled Update & security.
Step 3 – On the subsequent interface, look at the left sidebar and click or hit the For Developers tab.
Step 4 – Navigate towards the right direction and locate a heading entitled Enable Device Portal.
Step 5 – Now, turn On the setting that reads as Turn on remote diagnostics over local area network connections.
Furthermore, developer attribute is accessible on desktop, beginning with Windows 10, build 1607. Nonetheless, the feature is only obtainable when the Developer Mode remains in On condition. Device Portal in Windows 10 facilitates to execute the underneath listed activities –
1. Observe and handle a list of ongoing processes on your machine.
2. Eliminate, Install, launch moreover terminate applications.
3. Alter WiFi profiles, view signal intensity and see ipconfig.
4. View graphical presentation of CPU, memory, I/O, network, and GPU usage in live status.
5. Gather and compile process dumps.
6. Accumulate ETW traces.
7. Handle the unusual storage of sideloaded apps.
The awesome attribute, Windows Device Portal is Extant on all the device family. However, the specific factors and setup procedure differs and the difference is dependant upon the device’s conditions. The fundamental and common steps required by each device of the family to connect Device Portal are –
1. Enable Developer Mode moreover Device Portal on your device.
2. Attach or link the device and PC via either local network or USB.
Closure
Device Portal is an advantage for the developers as they can maintain abundant activities staying far from his desktop or Mobile Phone. They will experience the convenience to accelerate their Development appurtenant functions. If you are included in them, Enable Device Portal in Windows 10 without trouble with the help of the above-presented tips.

Установка приложений на Windows Mobile через Windows Device Portal является простым и удобным процессом. В этой статье мы рассмотрим шаги, необходимые для установки приложений с помощью Windows Device Portal.
Шаг 1. Подключение устройства
Первым шагом в установке приложений через Windows Device Portal является подключение вашего устройства Windows Mobile к компьютеру. Убедитесь, что ваш компьютер и устройство находятся в одной сети Wi-Fi.
Шаг 2. Настройка Windows Device Portal
На вашем устройстве Windows Mobile откройте раздел «Параметры» и перейдите в раздел «Обновления и безопасность» далее «Для разработчиков» и включаем режим разработчика
Потом спускаемся ниже находим «Обнаружение устройства« и включаем переключатель
Там же включаем «Портал устройства» должен появиться ip адрес вашего смартфона запоминаем его.
Шаг 3. Открытие Windows Device Portal
Откройте веб-браузер на вашем компьютере и введите IP-адрес вашего устройства Windows Mobile в адресной строке.

Если появляется ошибка попробуйте зайти в «Параметры» на устройстве, затем выберите «Сеть и Интернет» и «Wi-Fi». Найдите свое подключение Wi-Fi и нажмите на него, чтобы отобразить подробную информацию, включая IP-адрес посмотрите совпадают ли ip адреса.
Шаг 4. Вход в Windows Device Portal
После ввода IP-адреса вашего устройства Windows Mobile в адресной строке вашего веб-браузера нажмите клавишу «Ввод». Это откроет страницу Windows Device Portal. Вам может потребоваться ввести логин и пароль для входа. Если вы не устанавливали пароль для Windows Device Portal, оставьте поле пароля пустым.
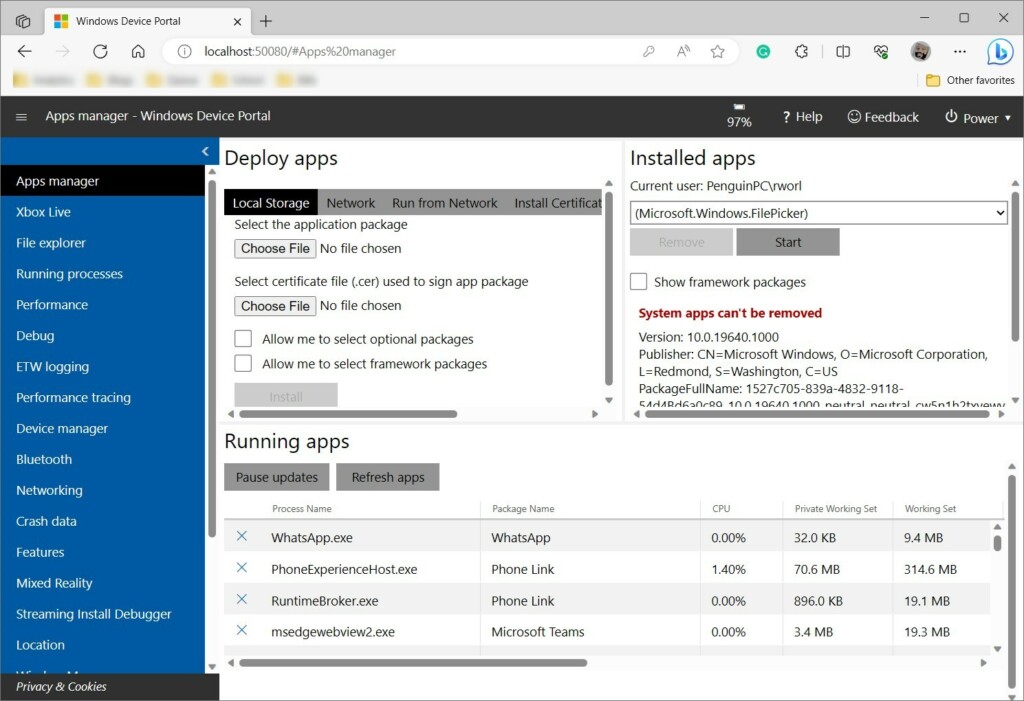
Шаг 5. Нажмите «Приложения или Apps manager»
На главной странице Windows Device Portal вы увидите различные вкладки и опции. Чтобы установить приложения, выберите вкладку «Приложения».
Шаг 6. Выбор приложения
На странице «Приложения» вы увидите список всех установленных на вашем устройстве приложений. Чтобы установить новое приложение, щелкните на кнопку «Выберите обзор» и выберите нужное приложение на вашем компьютере.
Шаг 7. Нажмите «Установить или Go»
После выбора приложения на вашем компьютере нажмите кнопку «Go» на странице Windows Device Portal. Процесс установки может занять некоторое время в зависимости от размера приложения и скорости вашей сети Wi-Fi.
Шаг 8. Установка завершена
Когда установка завершится, в столбце «Состояние» на странице «Приложения» появится надпись «Установлено». Теперь вы можете открыть установленное приложение на вашем устройстве.
Теперь вы знаете, как устанавливать приложения через Windows Device Portal. Этот инструмент позволяет удобно управлять приложениями на устройствах Windows Mobile и облегчает работу разработчикам.
- Добавить свои
Оставьте свой комментарий
This article explains how to turn Windows Device Portal (WDP) on or off in Windows 11.
WDP is a feature in Windows that lets you configure and manage the settings for the device over a network or USB connection or locally via a web browser. You can turn on Windows Device Portal to provide advanced diagnostic tools for troubleshooting and viewing the real-time performance of your Windows device.
Using WDP, one can perform the following actions:
You can use the WDP for the following:
- Manage device settings (similar to the Windows Settings app).
- See and manipulate a list of running processes
- Install, delete, launch, and terminate apps
- Change Wi-Fi profiles, view signal strength, and see ipconfig details
- View live graphs of CPU, memory, I/O, network, and GPU usage
- Collect process dumps
- Collect ETW traces
- Manipulate the isolated storage of sideloaded apps
You may want to turn it on to access and manage your Windows 10 device remotely. On the other hand, you may want to turn it off if you don’t need remote access and want to ensure that your device is inaccessible from the internet.
Enable or disable Windows Device Portal (WDP)
As described above, users can turn on Developer Mode in Windows and use Windows Device Portal (WDP) to provide advanced diagnostic tools for troubleshooting and viewing the real-time performance of their Windows device.
Here’s how to turn on WDP in Windows 11.
First, you must turn on Developer Mode in Windows. To do that, read the post below.
Turn on or off Developer Mode in Windows 11
Once Developer Mode is turned on, open the Windows Settings app.
You can do that by clicking on the Start menu and selecting Settings. Or press the keyboard shortcut (Windows key + I) to launch the Settings app.
When the Setting app opens, click the Accessibility button on the left.
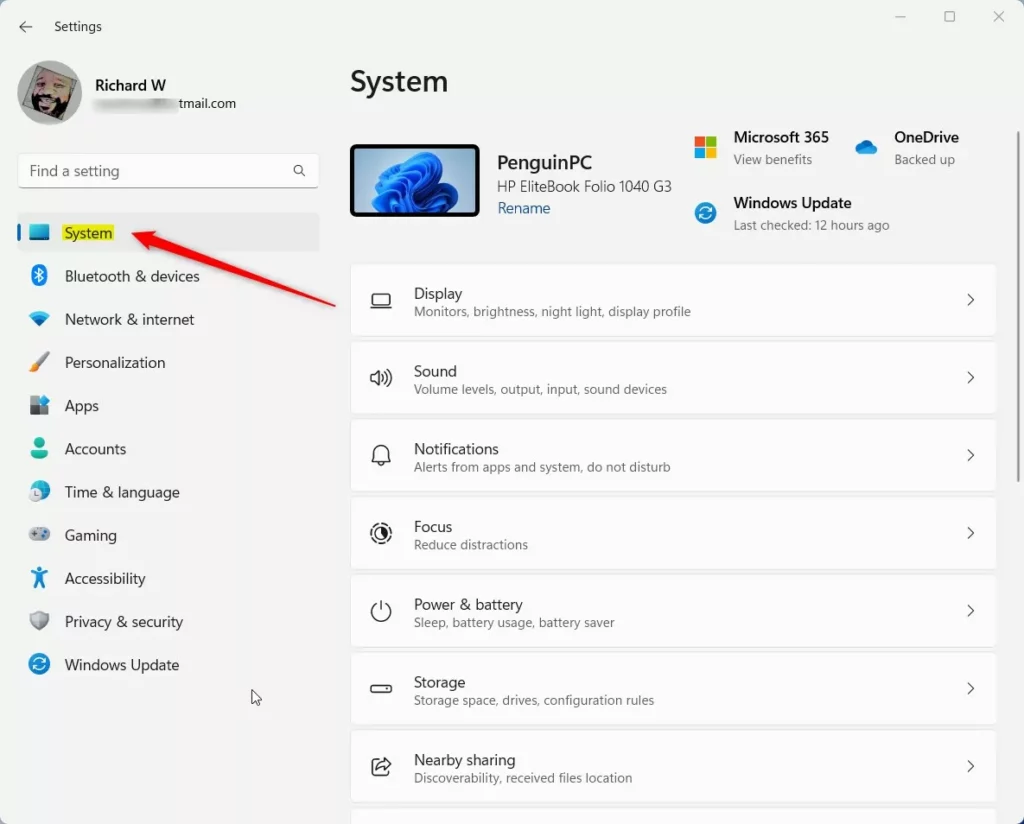
Select the For developer tile on the right to expand it.
On the System -> For developer setting pane under Developer Mode, select the “
Device Portal” tile.
Then, toggle the switch to the On position to enable it.
To disable it, toggle the switch to the Off position.
When you turn it on for the first time, Windows will prompt you to download and install the Windows Developer Mode package.
Click Yes to download the package.
Once the Device Portal is enabled, you can turn on or off ‘Authentication’ so that users must type a username and password to access the Device Portal.
The connection address will also be displayed.
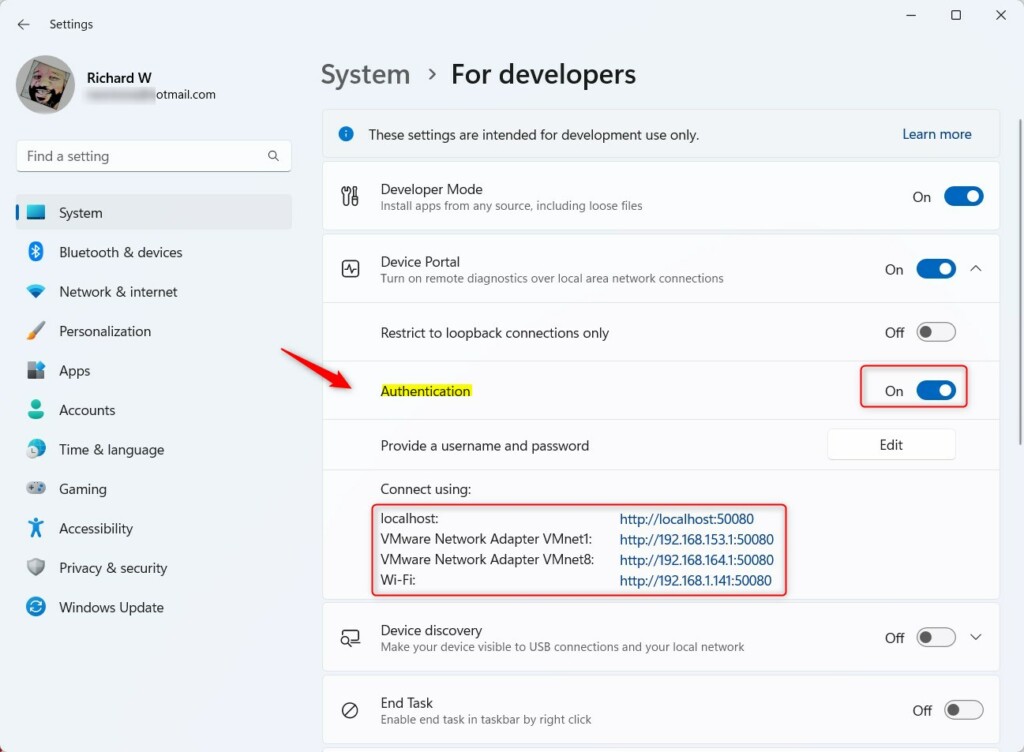
Open your browser and browse to the local host address to log in.
That should do it!
Source:
Microsoft
Conclusion:
- Enabling Windows Device Portal (WDP) allows remote access and advanced diagnostic tools to manage your Windows 11 device seamlessly.
- Following the steps outlined in this article, you can easily turn on or off WDP in Windows 11, adapting it to your specific needs.
- The ability to toggle the ‘Authentication’ feature in WDP ensures additional security by requiring a username and password for access.
- Whether for troubleshooting or device management, WDP offers a comprehensive set of tools for users to leverage effectively.
If you find any errors above or have something to add, please use the comments form below.