
Содержание
- 1 Center application
- 2 Make sure that the scroll bars and status bar are hidden and that the formula bar is displayed:
- 3 Set the window position and size
- 4 To change the values of the WindowState, Width, and Height properties of the Excel application window, you must explicitly reference the Application object
- 5 Zoom a form
- 6 Zooming a Window and Setting Display Options
Center application
Private Sub Workbook_Open()
    Dim maxWidth As Integer
    Dim maxHeight As Integer
    Application.WindowState = xlMaximized
    maxWidth = Application.Width
    maxHeight = Application.Height
    Call CenterApp(maxWidth, maxHeight)
End Sub
Sub CenterApp(maxWidth As Integer, maxHeight As Integer)
    Dim appLeft As Integer
    Dim appTop As Integer
    Dim appWidth As Integer
    Dim appHeight As Integer
    Application.WindowState = xlNormal
    appLeft = maxWidth / 4
    appTop = maxHeight / 4
    appWidth = maxWidth / 2
    appHeight = maxHeight / 2
    Application.Left = appLeft
    Application.Top = appTop
    Application.Width = appWidth
    Application.Height = appHeight
End Sub
Make sure that the scroll bars and status bar are hidden and that the formula bar is displayed:
Sub scroll()
    With Application
        .DisplayScrollBars = False
        .DisplayStatusBar = False
        .DisplayFormulaBar = True
    End With
End Sub
Set the window position and size
Sub win()
    Dim myWindow1 As Window, myWindow2 As Window
    Set myWindow1 = ActiveWindow
    Set myWindow2 = myWindow1.NewWindow
    With myWindow1
        .WindowState = xlNormal
        .Top = 0
        .Left = 0
        .Height = Application.UsableHeight
        .Width = Application.UsableWidth * 0.25
    End With
    With myWindow2
        .WindowState = xlNormal
        .Top = 0
        .Left = (Application.UsableWidth * 0.25) + 1
        .Height = Application.UsableHeight
        .Width = Application.UsableWidth * 0.75
    End With
End Sub
To change the values of the WindowState, Width, and Height properties of the Excel application window, you must explicitly reference the Application object
Sub changeSize()
    Application.WindowState = xlNormal
    Application.Width = 600
    Application.Height = 450
    End Sub
Zoom a form
Private Sub UserForm_Initialize()
    LabelZoom.Caption = ActiveWindow.Zoom
"   Zoom
    With ScrollBarZoom
        .Min = 10
        .Max = 400
        .SmallChange = 1
        .LargeChange = 10
        .Value = ActiveWindow.Zoom
    End With

"   Horizontally scrolling
    With ScrollBarColumns
        .Min = 1
        .Max = 256
        .Value = ActiveWindow.ScrollColumn
        .LargeChange = 25
        .SmallChange = 1
    End With

"   Vertically scrolling
    With ScrollBarRows
        .Min = 1
        .Max = ActiveSheet.Rows.Count
        .Value = ActiveWindow.ScrollRow
        .LargeChange = 25
        .SmallChange = 1
    End With
End Sub
Zooming a Window and Setting Display Options
Sub zoom()
    ActiveWindow.Zoom = 150
End Sub
Provide feedback
Saved searches
Use saved searches to filter your results more quickly
Sign up
Excel VBA Application Object, Properties & Methods
Related Links:
Working with Objects in Excel VBA
Excel VBA Workbook Object, working with Workbooks in Excel
Microsoft Excel VBA – Worksheets
Excel VBA Range Object, Referencing Cells and Ranges
Excel VBA Custom Classes and Objects
———————————————————————————————————–
Contents:
The Application Object
Instances where using the Application qualifier is required to be used for Properties or Methods of the Application object
Application.OnTime Method
Application.GetOpenFilename Method
Properties & Methods of the Application Object – when it is not required to specify the Application qualifier
Calculate Method
———————————————————————————————————–
The Application Object refers to the host application of Excel, and the entire Excel application is represented by it. If the host application is the Microsoft Word application, the Application Object refers to and represents the Word application.
All applications like Excel, Access, Word or PowerPoint, which use VBA, have their own object model. While writing vba code in Microsoft Office Excel, you will be using the objects provided by the Excel object model. The object model is a large hierarchy of all the objects used in VBA. The Object Model of the Application (Excel) refers to and contains its programming objects which are related to each other in a hierarchy. The entire Excel application is represented by the Application Object which is at the top of the Excel object hierarchy and moving down you can access the objects from Application to Workbook to Worksheet to Range (Cells) and further on, by connecting the objects with a period (dot). Excel objects are accessed through ‘parent’ objects – Worksheet is the parent of the Range Object, and the Workbook is the parent of the Worksheet object, and the Application object is the parent of the Workbook object.
Example – the following code line inserts the text “Hello” in the cell A1 of the worksheet named Sheet1 of the workbook named ExcelVBA.xlsm:
Application.Workbooks(“ExcelVBA.xlsm”).
Worksheets(“Sheet1”).Range(“A1”) = “Hello”
The Application object is the Default Object, Excel assumes it even when it is not specified. The Application qualifier is mostly not required to be used in vba code, because the default application is Excel itself, unless you want to refer to other outside applications (like Microsoft Word or Access) in your code or you want to refer to Excel from another application like Miscrosoft Word. In your VBA code, both the expressions Application.ActiveWorkbook.Name and ActiveWorkbook.Name will have the same effect of returning the Active Workbook’s name. However, there are some instances when the Application qualifier is required to be used, viz. generally when using properties & methods which relate to the Excel window’s appearance, or which relate to how the excel application behaves as a whole.
We elaborate on some often used properties & methods below.
Instances where using the Application qualifier is required to be used for Properties or Methods of the Application object:
Height, Width and WindowState Properties. Refer below Example of using these properties:
Sub ApplicationObject_WinSt_Ht_Wd()
‘The WindowState property sets the state of the application window. Setting options are xlNormal, xlMaximized (sets the active window to the maximum available size provided it is not already maximized) & xlMinimized:
Application.WindowState = xlNormal
‘Height & Width Properties, set the height and width of the application window, in points.
‘Note that these properties cannot be set if the window is maximized, and the properties are read-only if the window is minimized.
Application.Height = 350
Application.Width = 450
End Sub
Application.DisplayFullScreen Property. Boolean Value – with the DisplayFullScreen Property set to True, the application window is maximized filling the entire screen and the application title bar gets hid:
Application.DisplayFullScreen = True
Application.DisplayFormulaBar Property. Boolean Value – displays or hides the Formula Bar when set to True or False respectively:
Application.DisplayFormulaBar = False
Application.Calculation Property returns or sets the calculation mode. There are 3 settings: xlCalculationAutomatic – (Default) Automatic recalculation by Excel as data is entered in cells; xlCalculationSemiautomatic – Automatic recalculation by Excel except for Data Tables; xlCalculationManual – Calculation is done only when requested by user on clicking “Calculate Now” or pressing F9.
Application.Calculation = xlCalculationManual
Application.EditDirectlyInCell Property. Boolean Value – allows or disallows editing directly in cells when set to True or False respectively:
Application.EditDirectlyInCell = False
Application.ScreenUpdating Property. Boolean Value. When your vba code (macros) executes, your screen view gets refreshed or updated with its actions. If the ScreenUpdating Property is set to False, screen updating will be turned off, and you will not be able to view what your code does but it executes faster. It is common to turn off screen updating in vba procedures to make codes run faster (and set the property back to True after the code execution ends).
Application.ScreenUpdating = False
Application.DisplayAlerts Property. Boolean Value. While executing a macro code, certain alerts are displayed by Excel to confirm an action viz. excel asks for a confirmation while deleting a worksheet. Setting this property to False will not display any prompts or alerts and in this case a default response will be chosen by Excel. This property is restored to its default value of True after the procedure ends.
Application.DisplayAlerts = False
Application.DefaultFilePath Property. This property sets (or returns) the default folder or path used by Excel while opening files.
Application.DefaultFilePath = “C:\My Documents\Excel”
Application.Quit Method. Use this method to quit the Excel Application. Note that after closing the workbook, the excel window remains open. To exit Excel, use the Quit method as shown below.
‘closes ThisWorkbook after saving it, but does not quit Excel:
ThisWorkbook.Close SaveChanges:=True
‘quits the Excel Application and then closes ThisWorkbook after saving it (the Quit method does not terminate Excel):
Application.Quit
ThisWorkbook.Close SaveChanges:=True
‘using the following closes ThisWorkbook, but does not quit the Excel Application because the macro also gets closed with ThisWorkbook without reading the Application.Quit line:
ThisWorkbook.Close SaveChanges:=True
Application.Quit
Application.OnTime Method. This method is used in VBA to automatically run a procedure at periodic intervals or at a specific time of day. In the following example, RunTime is a Public variable of type Date, which sets the time interval [RunTime = Now + TimeValue(“00:00:03”)] and the macro named MacroAutoRun will run automatically, at the scheduled time interval of 3 seconds, with the OnTime Method.
Application.OnTime RunTime, “MacroAutoRun”
The Application.OnTime Method has been illustrated in detail in the section “Application.OnTime VBA, Schedule Excel to Run Macros at Periodic Intervals or a Specified Time.“.
Example of using the Application.OnTime Method:
Public RunTime As Date
Dim count As Integer
_______________________
Sub MacroAutoRun()
‘This procedure uses the OnTime Method to auto increment cell value at specific time intervals, and Stops the procedure after it runs for a specific number of times.
‘set the time interval at 3 seconds, at which interval the procedure will run:
RunTime = Now + TimeValue(“00:00:03”)
‘procedure named MacroAutoRun will autmatically run, at the sheduled time interval, with the OnTime Method.
Application.OnTime RunTime, “MacroAutoRun”, , True
‘increment the value in cell A1 (in Active Worksheet) by 5, for each time the Macro is repeated:
Cells(1, 1).Value = Cells(1, 1).Value + 5
count = count + 1
‘stop the procedure after it runs for 5 times:
If count = 5 Then
Application.OnTime RunTime, “MacroAutoRun”, , False
count = 0
End If
End Sub
Application.ActivateMicrosoftApp Method. This method activates an already running Microsoft application or else it creates a new instance of the application in case the application is not already running. Below codes start and activate Word, Access & Power Point respectively:
Application.ActivateMicrosoftApp xlMicrosoftWord
Application.ActivateMicrosoftApp xlMicrosoftAccess
Application.ActivateMicrosoftApp xlMicrosoftPowerPoint
Application.GetOpenFilename Method
The GetOpenFilename method gets the file name (to open) from the user by displaying the standard Open dialog box, but the file is not actually opened by the method. The method returns the full path and name of the selected file(s). Syntax: ApplicationObject.GetOpenFilename(FileFilter, FilterIndex, Title, ButtonText, MultiSelect). All arguments are optional to specify, but it is necessary to specify the ApplicationObject. The FileFilter argument is a string value which specifies the filter criteria for the type of files which will be displayed in the directory from which the user gets the file name. See below how to specifies the filter criteria in this argument. If there are 4 filters specified in FileFilter, you can specify any one of them as the default criteria by using the index numbers of 1 to 4 (for 3 filters, use index numbers 1 to 3) in the FilterIndex argument. Use the Title argument to specify the dialog box’s title – default title is “Open” if not specified. ButtonText argument is applicable only for computers running Excel for the Macintosh (Mac). Set the MultiSelect argument to True to allow selecting multiple file names, its default setting being False.
Using FileFilter for .xlsm Excel files (Note how the string specifies in pairs and uses the wildcard character):
“Excel Files (*.xlsm), *.xlsm”
Using FileFilter for .xls, .xlsx & .xlsm Excel files (Note how the string specifies in pairs, uses the semi-colon and the wildcard characters):
“Excel Files(*.xls;*.xlsx;*.xlsm), *.xls;*.xlsx;*.xlsm”
Using FileFilter for .xlsm Excel files & .txt Text files (Excel files & Text files will each be listed separately in the drop-down list of File types):
“Excel Files (*.xlsm), *.xlsm,Text Files (*.txt),*.txt”
If the FileFilter argument is omitted, it will default to All Files:
“All Files (*.*),*.*”
Example 1: Select and Open a single file (and enter text, save and close the workbook), using Application.GetOpenFilename & Workbooks.Open methods.
Sub GetOpenFilename1()
‘select and open a single file, using Application.GetOpenFilename & Workbooks.Open methods.
‘in this example we open an excel .xlsm workbook from a chosen location/directory, select a worksheet and enter text, save and close the workbook.
Dim fileName As Variant
Dim wkbk As Workbook
Dim strSetFolder As String
Dim strCurFolder As String
‘CurDir returns the current directory or path. This is being stored to revert to this initial directory after running the procedure.
strCurFolder = CurDir
‘set a folder or location from where to select files in the Open dialog box:
strSetFolder = “C:\My Documents\Excel”
‘set current drive:
ChDrive strSetFolder
‘set current directory or folder:
ChDir strSetFolder
‘The GetOpenFilename method gets a file name from the user by displaying the standard Open dialog box, but the method does not actually open a file.
‘the GetOpenFilename method returns the full path and name of the selected file(s).
fileName = Application.GetOpenFilename(filefilter:=“Excel Files (*.xlsm), *.xlsm”, title:=“Select a file”)
‘if the user clicks the Cancel button, fileName returns False (ie. file name is returned as False). Note that an alternate first code line could be – If fileName = “False” Then – in that case you can also Dim fileName as String.
If fileName = False Then
MsgBox “Please select a file to continue”
Exit Sub
Else
‘Workbooks.Open method opens a workbook:
Workbooks.Open (fileName)
‘set the workbook variable to the opened workbook:
Set wkbk = ActiveWorkbook
‘select worksheet named Sheet1 in the opened workbook:
Sheets(“Sheet1”).Select
‘enter text in Range A1 in Sheet1 of the workbook:
wkbk.ActiveSheet.Range(“A1”) = “Hello”
‘save workbook:
wkbk.Save
‘close workbook:
wkbk.Close
End If
‘change and revert to initial drive:
ChDrive strCurFolder
‘change and revert to initial directory or folder:
ChDir strCurFolder
End Sub
Example 2: Select and Open Multiple files, using Application.GetOpenFilename & Workbooks.Open methods.
Sub GetOpenFilename2()
‘select and open multiple files, using Application.GetOpenFilename & Workbooks.Open methods
Dim FileNames As Variant
Dim i As Integer
Dim iFiles As Integer
‘The GetOpenFilename method gets a file name from the user by displaying the standard Open dialog box, but the method does not actually open a file.
‘the GetOpenFilename method returns the full path and name of the selected file(s).
‘set MultiSelect to True to allow selecting multiple file names, its default setting being False.
FileNames = Application.GetOpenFilename(filefilter:=“Excel Files(*.xls;*.xlsx;*.xlsm), *.xls;*.xlsx;*.xlsm”, title:=“Select file(s)”, MultiSelect:=True)
‘check if not an array ie. if the user clicks the Cancel button:
If IsArray(FileNames) = False Then
MsgBox “Please select file(s) to continue”
Exit Sub
Else
‘determine number of files to open:
iFiles = UBound(FileNames) – LBound(FileNames) + 1
For i = 1 To iFiles
‘Workbooks.Open method opens a workbook:
Workbooks.Open FileNames(i)
Next i
End If
End Sub
Example 3: Open an existing excel .xlsm workbook from a chosen directory, add a new workbook in the same location and save it as an .xlsm file, then copy a worksheet from the existing workbook to the newly added workbook, and then close both the workbooks.
Sub GetOpenFilename3()
‘using Application.GetOpenFilename, Workbooks.Open, Workbooks.Add, Workbook.SaveAs, Workbook.Save & Workbook.Close methods
‘in this example we open an existing excel .xlsm workbook from a chosen directory, then add a new workbook in the same location and save it as an .xlsm file, and copy a worksheet from the existing workbook to the newly added workbook, and then close both the workbooks.
Dim fileName As Variant
Dim strSetFolder As String
Dim wbTarget As Workbook
Dim wbSource As Workbook
‘set a folder or location from where to select files in the Open dialog box:
strSetFolder = “C:\My Documents\Excel”
‘set current drive:
ChDrive strSetFolder
‘set current directory or folder:
ChDir strSetFolder
‘The GetOpenFilename method gets a file name from the user by displaying the standard Open dialog box, but the method does not actually open a file.
‘the GetOpenFilename method returns the full path and name of the selected file(s).
fileName = Application.GetOpenFilename(filefilter:=“Excel Files (*.xlsm), *.xlsm”, title:=“Select a file”)
‘if the user clicks the Cancel button, fileName returns False (ie. file name is returned as False).
If fileName = False Then
MsgBox “Please select a file to continue”
Exit Sub
Else
‘Workbooks.Open method opens a workbook:
Set wbSource = Workbooks.Open(fileName)
End If
‘add a new workbook, which is the target workbook to which a worksheet will be copied:
Workbooks.Add
‘save the target workbook with a new name and as .xlsm file type.
‘Remember that in Excel 2007-2010 while using SaveAs, it is necessary to specify the FileFormat parameter to save a FileName with a .xlsm extension if the ActiveWorkbook is not a .xlsm file.
‘.xlsm FileFormat representing a macros enabled file: xlOpenXMLWorkbookMacroEnabled = 52. You can use either FileFormat:=xlOpenXMLWorkbookMacroEnabled or FileFormat:=52. For a non .xlsm file, you can use SaveAs without specifying the FileFormat viz. ActiveWorkbook.SaveAs FileName:=“newWorkbook.xlsx”.
ActiveWorkbook.SaveAs fileName:=“newWorkbook.xlsm”, FileFormat:=52
Set wbTarget = ActiveWorkbook
‘copy worksheet named Sheet2 from source workbook to the new target workbook as the last sheet:
wbSource.Worksheets(“Sheet2”).Copy After:=wbTarget.Sheets(Sheets.Count)
‘close both the workbooks, after saving the newly created target workbook:
wbSource.Close
wbTarget.Close SaveChanges:=True
End Sub
Properties & Methods of the Application Object – when it is not required to specify the Application qualifier.
Those properties and methods whose use does not require specifying the Application object qualifier are considered “global”. You can view these global properties & methods in the Object Browser in VBE (View -> Object Browser; or press F2), by choosing Excel from the Project/Libraries drop down list in the top pane, and then clicking <globals> which appears at the top in the Classes box. Instances where using the Application qualifier is not required to be used include:
ActiveCell Property. The ActiveCell Property, applied to an Application object, returns the active cell (Range object) in the worksheet displayed in the active window. You can also apply this property to a Window object by specifying the window to look for the active cell. Note that in the absence of a worksheet being displayed in the window, the property will fail.
Any of the following codes can be used alternatively (note that Value is the default property of a Range object):
MsgBox “Active Cell’s value is: ” & Application.ActiveCell
MsgBox “Active Cell’s value is: ” & ActiveCell
MsgBox “Active Cell’s value is: ” & ActiveWindow.ActiveCell
MsgBox “Active Cell’s value is: ” & ActiveCell.Value
ActiveWindow Property. This property returns the active window. The active window is the currently selected window / the window on top / the window with the current focus.
Code to display ActiveWindow’s name which appears in the title bar:
MsgBox “Active Window is: ” & Application.ActiveWindow.Caption
MsgBox “Active Window is: ” & ActiveWindow.Caption
ActiveWorkbook Property. This property returns the active workbook (ie. the workbook in the active window).
MsgBox “Active Workbook’s name is ” & Application.ActiveWorkbook.Name
MsgBox “Active Workbook’s name is ” & ActiveWorkbook.Name
ThisWorkbook Property. This property is used only from within the Excel Application and returns the workbook in which the code is running currently.
MsgBox “This Workbook’s name is ” & Application.ThisWorkbook.Name
MsgBox “This Workbook’s name is ” & ThisWorkbook.Name
Note that though most times the ActiveWorkbook is the same as ThisWorkbook, but it might not always be so. The active workbook can be different than the workbook in which the code is running, as shown by the following code example. The Active Object has been illustrated in detail in the section “Working with Objects in Excel VBA“.
Sub ActiveWorkbook_ThisWorkbook()
‘Open two Excel workbook files (“Book1.xlsm” and “Book2.xlsm”) in a single instance (this will enable all workbooks to access macros).
‘Enter this code in the workbook “Book1.xlsm”, which is also the active/selected workbook.
‘returns “Book1.xlsm”:
MsgBox “Active Workbook’s name is ” & ActiveWorkbook.Name
‘returns “Book1.xlsm”:
MsgBox “This Workbook’s name is ” & ThisWorkbook.Name
‘activate “Book2.xlsm”:
Workbooks(“Book2.xlsm”).Activate
‘returns “Book2.xlsm”, while ThisWorkbook remains “Book1.xlsm”:
MsgBox “Active Workbook’s name is ” & ActiveWorkbook.Name
‘returns “Book1.xlsm”:
MsgBox “This Workbook’s name is ” & ThisWorkbook.Name
‘activate “Book1.xlsm”:
Workbooks(“Book1.xlsm”).Activate
‘returns “Book1.xlsm”:
MsgBox “Active Workbook’s name is ” & ActiveWorkbook.Name
‘returns “Book1.xlsm”:
MsgBox “This Workbook’s name is ” & ThisWorkbook.Name
End Sub
ActiveSheet Property. The ActiveSheet Property, applied to an Application object, returns the active sheet in the active workbook. You can also apply this property to a Workbook or Window object by specifying the workbook or window to look for the active sheet.
Following codes return the active sheet in the active workbook:
Msgbox “Active Sheet’s name is ” & Application.ActiveSheet.Name
MsgBox “Active Sheet’s name is ” & Application.ActiveWorkbook.ActiveSheet.Name
Msgbox “Active Sheet’s name is ” & ActiveSheet.Name
MsgBox “Active Sheet’s name is ” & ActiveWorkbook.ActiveSheet.Name
Following code returns the active sheet in the specified workbook (named “ExcelVBA.xlsm”):
MsgBox “Active Sheet’s name is ” & Application.Workbooks(“ExcelVBA.xlsm”).
ActiveSheet.Name
ActiveChart Property. The ActiveChart Property, applied to an Application object, returns the active chart in the active workbook. In your workbook you can have separate chart sheets which sets charts as worksheets, or embedded charts which includes the chart as an object within a worksheet. A chart sheet or an embedded chart is active if it has been selected it or if it has been activated with the Activate method. You can also apply the ActiveChart property to a Workbook or Window object by specifying the workbook or window to look for the active chart.
Following codes return the active chart in the active workbook:
MsgBox “Active Chart name is: ” & Application.ActiveChart.Name
MsgBox “Active Chart name is: ” & Application.ActiveWorkbook.ActiveChart.Name
MsgBox “Active Chart name is: ” & ActiveChart.Name
MsgBox “Active Chart name is: ” & ActiveWorkbook.ActiveChart.Name
Following code returns the active chart in the specified workbook (named “ExcelVBA.xlsm”):
MsgBox “Active Chart name is: ” & Application.Workbooks(“ExcelVBA.xlsm”).
ActiveChart.Name
Application.ActivePrinter Property. This property sets (or returns) the active printer’s name.
Set a local HP LaserJet 1022 printer on LPT1 as the active printer:
Application.ActivePrinter = “HP LaserJet 1022 on Ne02:”
ActivePrinter = “HP LaserJet 1022 on Ne02:”
Set a local Adobe PDF printer on Ne04 as the active printer:
Application.ActivePrinter = “Adobe PDF on Ne04:”
ActivePrinter = “Adobe PDF on Ne04:”
Selection Property. The Selection Property when applied to an Application object, returns the object which is selected in the active window. The selected object could be a Range object (single cell or range of cells) in the active worksheet, a ChartArea object in the active worksheet, and so on. You can also apply the Selection property to a Window object wherein the property will return the selected object in the specified window.
Presuming the current selection to be a Range object in the active worksheet, to clear the contents of the cells currently selected in the active worksheet, use any of the 2 code lines (with or without using the Application object qualifier):
Application.Selection.Clear
Selection.Clear
Example: Select a Range of cells, get the object type of the selection, use the Selection to change font color & font size.
Sub SelectionProperty()
‘Select a Range of cells, get the object type of the selection, use the Selection to change font color & font size.
‘select a range of cells in the active worksheet:
Range(“A1:C3”).Select
‘get the object type of the selection – returns “Range”:
MsgBox TypeName(Selection)
‘change the font color of the selected range to Red:
Selection.Font.Color = vbRed
‘change the font size of the selected range to 11:
Selection.Font.Size = 14
End Sub
Sheets Property. A Sheets Collection object refers to all sheets contained in a workbook, which includes chart sheets and worksheets. The Sheets Property, applied to an Application object, returns a Sheets collection in the Active Workbook. You can also apply this property to a Workbook object by specifying the workbook which will return a Sheets collection in the specified Workbook.
Below example shows how to count the number of sheets in the active workbook and return the name of each sheet.
Sub SheetsCollection()
Dim n As Integer
‘count number of sheets in the active workbook:
MsgBox “Number of Sheets in the Active Workbook are: ” & Application.Sheets.Count
MsgBox “Number of Sheets in the Active Workbook are: ” & Sheets.Count
‘Sheet Name based on the index value:
For n = 1 To Sheets.Count
MsgBox Sheets(n).Name
Next n
‘Sheet Name by looping through all sheets in the active workbook:
For Each Sheet In Sheets
MsgBox Sheet.Name
Next
End Sub
Range Property. The Range Property returns a Range object (single cell or range of cells). You can use the syntax: Range(cell1). This can only be an A1-style reference, and you can use a range operator (ie. colon) or the union operator (ie. comma), or it can be a named range. You can also use the syntax: Range(cell1,cell2) – where cell1 and cell2 are Range objects that represent the range of contiguous cells specifying the start and end cells. To apply the Range property to an Application object, you can either omit the object qualifier viz. Range(cell1) or use Application.Range(cell1), both of which will return the Range object in the ActiveSheet. To apply the Range Property to a Workbook object or Range object, specify the respective object qualifier as shown below.
Range Property as applicable to the Application Object
Any of the following codes will insert a value of 10 in the cell A1 of the active sheet (with or without using the Application object qualifier or typing ActiveSheet):
Application.ActiveSheet.Range(“A1”).Value = 10
ActiveSheet.Range(“A1”).Value = 10
Application.Range(“A1”).Value = 10
Range(“A1”).Value = 10
The following will insert a value of 10 in the cells A1, A2, A3 & A4 (wherein the cells refer to the upper-left corner & lower-right corner of the range) of the active sheet. The second expression uses the syntax: Range(cell1,cell2):
Range(“A1:A4”).Value = 10
Range(“A1”, “A4”).Value = 10
The following will insert a value of 10 in the cells A1, B2 & C4 of the active sheet (note that specifying “Value” after Range is not necessary because this assumed being the default property of the Range object):
Range(“A1,B2,C4”) = 10
The following will insert a value of 10 in the Named Range “Score” of the active sheet, viz. you can name the range A1 as “Score” and use the following code:
Range(“Score”) = 10
Range Property as applicable to the Worksheet Object
The following will insert the text “Steve” in the cell A1 of the worksheet named “Sheet1”:
Worksheets(“Sheet1”).Range(“A1”) = “Steve”
Range Property as applicable to the Range Object
When Range Property is applied to a Range object, then the property becomes relative to the Range object (reference starting from upper-left corner of the Range object) as shown below:
Sub RangeProperty()
‘Range Property as applicable to the Range Object
‘select a range in the active sheet:
Range(“C5:E8”).Select
‘inserts a value of 10 in Range C5:
Selection.Range(“A1”) = 10
‘inserts a value of 11 in Range C6:
Selection.Range(“A2”) = 11
‘inserts a value of 20 in Range D5:
Selection.Range(“B1”) = 20
‘inserts a value of 20 in Range D6:
Selection.Range(“B2”) = 21
End Sub
Calculate Method.
The Calculate Method, when applied to an Application object, calculates all workbooks that are open. You can also apply this method to a Worksheet object by specifying the worksheet in a workbook; or you can apply this method to a Range Collection by specifying a cell or a range of cells in a worksheet.
Calculate Method as applicable to the Application Object
Use any of the following code lines to calculate all workbooks that are open:
Application.Calculate
Calculate
Calculate Method as applicable to the Worksheet Object
Use any of the following code lines to calculate a specified worksheet (named “Sheet1”):
Application.Worksheets(“Sheet1”).Calculate
Worksheets(“Sheet1”).Calculate
Calculate Method as applicable to the Range of Cells
Use any of the following code lines to calculate the specified range (cells A5, A6 & A7) in a worksheet:
Application.Worksheets(“Sheet1”).
Range(“A5:A7”).Calculate
Worksheets(“Sheet1”).Range(“A5:A7”).Calculate
The following code line calculates the entire column (column A) in a worksheet:
Worksheets(“Sheet1”).Columns(1).Calculate
The following code line calculates the specific cells A5, A6, B7 & B20 in a worksheet:
Worksheets(“Sheet1”).
Range(“A5,A6,B7,B20”).Calculate
Use the following code line to calculate the specified range (cells A5, A6 & A7) in the active worksheet:
Range(“A5:A7”).Calculate
Speed up your VBA Code by Turning off Screen Updates and Automatic Calculations
In Excel, the default calculation mode is Automatic Mode (Application.Calculation = xlCalculationAutomatic), wherein Excel automatically calculates each cell as you enter it. When Excel is in Manual Mode (Application.Calculation = xlCalculationManual), calculation is done only when requested by the user viz. on clicking “Calculate Now” or pressing F9 or changing the calculation mode to Automatic. While in Automatic Mode, for each new value entered by a macro, Excel will recalculate all cells referred to or impacted by the new value thereby slowing the execution of the vba code. This can slow down the working of the vba code considerably, especially in the case of large macros wherein calculations are significant. To speed up a macro and make the execution faster & efficient, it is typical of developers to turn off automatic calculation right at the start of the macro, recalculate the specific worksheet or range using the Calculate method within the macro, and then turn on the automatic calculation back at the end of the code.
The following Example turns off Screen Updates and Automatic Calculations & use the Calculate Method, while running their vba codes (macros):
Sub CalculateMethod()
‘turn off Screen Updates and Automatic Calculations & use the Calculate Method, while running code.
‘turn off Screen Updates and Automatic Calculations:
Application.ScreenUpdating = False
Application.Calculation = xlCalculationManual
Enter Your Code Here
‘use the Calculate method to calculate all open workbooks:
Application.Calculate
‘turn on Screen Updates and Automatic Calculations:
Application.ScreenUpdating = True
Application.Calculation = xlCalculationAutomatic
End Sub
Excel is a Microsoft application used to work with spreadsheets. VBA is embedded in the Excel application and can be used to work programmatically with Excel. The Excel Object Library contains classes that make working with Excel in VBA possible. The classes in the Excel Object Library are referred to as the Excel Object Model. When using VBA within Excel, a reference is automatically included to the Excel Object Library.
Excel Object Model
The Excel Object Model contains classes that make working with Excel in VBA possible. The Excel Object Model contains many classes but the general overview of the Excel Object Model is Application → Workbook → Worksheet → Range.
-
Application-
Workbooks-
Workbook-
Worksheets-
Worksheet- Range
-
PivotTables- PivotTable
-
ChartObjects- ChartObject
-
ListObjects- ListObject
-
QueryTables- QueryTable
-
-
PivotCaches- PivotCache
-
Charts- Chart
- VBProject*
-
-
-
Windows- Window
-
AddIns- AddIn
-
Dialogs- Dialog
- FileDialog**
-
*The VBProject class is defined in the VBIDE library but is a property of the Workbook object.
**The FileDialog class is defined in the Office library but is a property of the Excel.Application object.
Context
The place where VBA code is written determines the implied context when referring to classes. For example, when using VBA in Excel and referring to the Application object, it is implied that Application and Excel.Application are the same object. However, when using VBA in another application to work with Excel, it is necessary to qualify references to avoid naming collisions with classes in the other application. Using qualified references requires that a reference is set to the library where the classes are defined. If a reference cannot be set, late-binding can be used instead.
Public Sub Example()

    '''In Excel

    Debug.Print Application Is Excel.Application 'Prints: True

End Sub
Public Sub Example()
'''In Outlook
'Reference to Excel Object Library is required
Debug.Print Application Is Excel.Application 'Prints: False
Debug.Print Application Is Outlook.Application 'Prints: True
End SubTo retrieve the Excel Application object from another application, attempt to retrieve the running application and if that fails start a new instance of the application.
Public Function GetExcelApp() As Object

    On Error Resume Next
    Set GetExcelApp = GetObject(, "Excel.Application")
    On Error GoTo 0

    If GetExcelApp Is Nothing Then
        Set GetExcelApp = CreateObject("Excel.Application")
    End If

End Function
Application
The Application object is the top-level object in the Excel Object Model which represents the Excel Application itself. The Application object contains information, settings, and functionality of the Excel application.
Application-Level Settings
Certain properties of the Application object can be changed which alters the way Excel behaves. These properties can sometimes be set manually from the Options menu or programmatically with VBA.
The ScreenUpdating property can be set to False to prevent the screen from updating while a macro is running. Then it can be set back to True to allow the updates to take place. Disabling screen updating while a macro is running can improve performance and speed as well as prevent the screen from flickering while code is executing.
The EnableEvents property can be set to False to prevent events from being triggered when a macro is running. At times it is necessary to disable events to avoid infinite loops. Other times it may be unnecessary for events to be running while code is executing. Set the property back to True at the end of the macro to re-enable normal event behavior.
The DisplayAlerts property can be set to False to prevent Excel alert messages from popping up while a macro is running. The property should be set back to True at the end of the macro to allow Excel pop-up alerts.
The Calculation property can be set to prevent formulas from recalculating while a macro is running. In Excel there are volatile functions that update whenever any change is made on the worksheet. This can be unnecessary and very inefficient. After the macro finishes running the Calculate method can be called on the sheet and the Calculation property can be set to xlCalculationAutomatic.
Public Sub Example()

    Application.ScreenUpdating = False
    Application.EnableEvents = False
    Application.DisplayAlerts = False
    Application.Calculation = xlCalculationManual

    'Code statements

    Application.Calculation = xlCalculationAutomatic
    Application.DisplayAlerts = True
    Application.EnableEvents = True
    Application.ScreenUpdating = True

End Sub
WorksheetFunction
The WorksheetFunction object can be used to call Excel spreadsheet functions in VBA.
Public Sub Example()

    Dim TheSum As Double

    TheSum = Application.WorksheetFunction.Sum(1, 2, 3, 4, 5)

End Sub
Run
The Run method is used to call a procedure based on a string representing the procedure’s name. The Run method can be used to call a procedure in a similar way to a callback function.
Option Explicit

Public Sub Example()

    Dim Arr(0 To 9) As Long
    Arr(0) = 1
    Arr(1) = 2
    Arr(2) = 3
    Arr(3) = 4
    Arr(4) = 5
    Arr(5) = 6
    Arr(6) = 7
    Arr(7) = 8
    Arr(8) = 9
    Arr(9) = 10

    OperateOnValues Arr, "Square"

    PrintArray Arr

End Sub

Public Sub OperateOnValues(Arr As Variant, Callback As String)
    Dim i As Long
    For i = LBound(Arr) To UBound(Arr)
        Arr(i) = Application.Run(Callback, Arr(i))
    Next i
End Sub

Public Function Square(Num As Long) As Long
    Square = Num * Num
End Function

Public Sub PrintArray(Arr As Variant)
    Dim i As Long
    For i = LBound(Arr) To UBound(Arr)
        Debug.Print Arr(i)
    Next i
End Sub
Evaluate
The Evaluate method can be used to evaluate formulas, cell references, chart elements, and form controls. Square bracket syntax, [expression], can be used instead of using Application.Evaluate(expression). Evaluate can evaluate worksheet formulas that return an array and it can evaluate array literals.
Public Sub Example()

    'Evaluate range reference
    Debug.Print Application.Evaluate("A1").Value2
    Debug.Print [A1].Value2


    'Evaluate worksheet formula
    Debug.Print Application.Evaluate("Sum(1, 2, 3, 4, 5)")
    Debug.Print [Sum(1, 2, 3, 4, 5)]


    'Evaluate array literal
    Dim Arr()
    Arr = Application.Evaluate("{1,2,3;4,5,6;7,8,9}")
    Arr = [{1,2,3;4,5,6;7,8,9}]

    Debug.Print Arr(1, 1)
    Debug.Print Arr(1, 2)
    Debug.Print Arr(1, 3)

    Debug.Print Arr(2, 1)
    Debug.Print Arr(2, 2)
    Debug.Print Arr(2, 3)

    Debug.Print Arr(3, 1)
    Debug.Print Arr(3, 2)
    Debug.Print Arr(3, 3)

End Sub
Union
The Union method is used to combine two or more ranges into a single Range object. The ranges do not need to be contiguous.
Public Sub Example()

    Dim Rng As Range

    Set Rng = Union(Range("A1"), Range("A2")) 'Contiguous Range
    Rng.Interior.Color = vbRed

    Set Rng = Union(Range("C1"), Range("C3")) 'Noncontiguous Range
    Rng.Interior.Color = vbGreen

End Sub
Intersect
The Intersect method returns the Range where two or more Ranges intersect. If none of the Ranges intersect the method returns Nothing. If Ranges from more than one Worksheet are passed, an error occurs.
Public Sub IntersectingRanges()

    Dim WS As Worksheet
    Set WS = Activesheet

    Dim R1 As Range
    Set R1 = WS.Range("A1:C5")

    Dim R2 As Range
    Set R2 = WS.Range("C1:E5")

    Dim I As Range
    Set I = Application.Intersect(R1, R2)

    If I Is Nothing Then
        Debug.Print "Ranges do not intersect."
    Else
        Debug.Print I.Address
    End If

End Sub
Volatile
The Volatile method is used to make a User-Defined Function volatile. Volatile functions are recalculated whenever any change occurs on the Worksheet.
Public Function AddTwoNumbers(Num1 As Double, Num2 As Double) As Double

    Application.Volatile

    AddTwoNumbers = Num1 + Num2

End Function
SendKeys
The SendKeys method is used to send keyboard keys to the active application.
Public Sub Example()

    'Add text to the first cell

    Application.SendKeys "^{HOME}"
    Application.SendKeys "Hello, World!"
    Application.SendKeys "{ENTER}"

End Sub
OnKey
The OnKey method is used to assign a macro to a keyboard key.
Public Sub Example()

    'Assign keyboard shortcut
    Application.OnKey "^a", "DisplayMessage"

    'Disable keyboard shortcut
    Application.OnKey "^a", ""

    'Return keyboard shortcut to default
    Application.OnKey "^a"

End Sub

Public Sub DisplayMessage()
    Msgbox "Hello, World"
End Sub
InputBox
The InputBox method is used to display an input box and get user input. Acceptable data types can be specified by the Type parameter.
Public Sub Example()

    Dim UserInput
    UserInput = Application.InputBox("Enter Number", Type:=1 + 2) 'Accepts Number or Text

    Debug.Print UserInput

End Sub
Speech
The Speech object can be used to make Excel talk.
Public Sub Example()

    Application.Speech.Speak "Hello World"

End Sub
FileDialog
The FileDialog property is used to create a FileDialog object which users can use to select files and folders from the file system.
Public Sub Example()

    'Get file path from file picker FileDialog

    Dim FD As FileDialog
    Set FD = Application.FileDialog(msoFileDialogFilePicker)
    With FD
        .AllowMultiSelect = False
        If .Show Then
            Debug.Print .SelectedItems(1)
        Else
            Debug.Print "No file selected."
        End If
    End With

End Sub
Dialogs
The Dialogs property is used to create a Dialog object object which can represent dialog windows.
Public Sub Example()

    'Get color from EditColor Dialog

    Dim ColorIndex  As Long
    Dim EditColor   As Dialog
    Dim Result      As Boolean
    Dim ColorValue  As Long

    ColorIndex = 56
    Set EditColor = Application.Dialogs(xlDialogEditColor)
    Result = D.Show(ColorIndex)
    ColorValue = ThisWorkbook.Colors(ColorIndex)
    Debug.Print ColorValue

End Sub
Properties
There are a number of useful properties that can be used to get information about the Excel application and the user’s platform.
The PathSeparator property returns the path separator character for the user’s system. On Windows this will be a «\» and on Mac this will be a «/».
The OperatingSystem property returns a string describing the user’s operating system.
The UserName property returns the UserName of the Excel user.
Windows
The Window object represents a window. The Windows collection object contains a collection of Window objects and can be accessed through the Application.Windows property. The Window object can be used to control various settings and features of windows in Excel. Some properties that can be controlled are Split, FreezePanes, DisplayGridlines, and DisplayFormulas.
Public Sub Example()

    'Toggle Gridlines

    Dim WS As Worksheet
    Set WS = ActiveSheet
    WS.Activate

    Dim W As Window
    Set W = Application.ActiveWindow

    W.DisplayGridlines = Not W.DisplayGridlines

End Sub
Workbooks
The Workbook object represents an Excel Workbook. The Workbooks collection object contains all open Workbooks under the Excel Application. To access the Workbooks collection use the Application.Workbooks property.
Referring to Workbooks
To refer to a Workbook, use the workbook’s Name or Index in the Workbooks collection. When referring to a Workbook by name, the file extension may be required if file extensions are shown on the user’s system in the File Explorer. Workbook indexes start at 1.
Public Sub Example()

    Dim WB As Workbook

    Set WB = Workbooks("Example.xlsx")

    Set WB = Workbooks(1)

End Sub
Every Workbook has its own VBA Project associated with it. To reference the Workbook containing the VBA Project where the code is running, use the ThisWorkbook property.
Public Sub Example()

    Dim WB As Workbook

    Set WB = ThisWorkbook

End Sub
Iterating Over Workbooks
A For Next or For Each loop can be used to iterate over the Workbooks collection.
Public Sub Example()

    Dim i As Long
    For i = 1 To Workbooks.Count
        Debug.Print Workbooks(i).Name
    Next i

    Dim WB As Workbook
    For Each WB In Workbooks
        Debug.Print WB.Name
    Next WB

End Sub
Open Workbook
To Open a Workbook use the Workbooks.Open method.
Public Sub Example()

    Dim WB As Workbook
    Set WB = Workbooks.Open("C:\Example.xlsx")

End Sub
Add Workbook
To create a Workbook use the Workbooks.Add method.
Public Sub Example()

    Dim WB As Workbook
    Set WB = Workbooks.Add

End Sub
Save Workbook
To save a Workbook use the Workbook.SaveAs and Workbook.Save methods. Use the XlFileFormat enum to determine the file format to use when saving.
Public Sub Example()

    Dim WB As Workbook
    Set WB = Workbooks.Add

    WB.SaveAs "C:\Example.xlsx", xlWorkbookDefault

    WB.Range("A1").Value2 = "Hello, World!"

    WB.Save

End Sub
Close Workbook
To close a Workbook use the Workbook.Close method.
Public Sub Example()

    Dim WB As Workbook
    Set WB = Workbooks.Open("C:\Example.xlsx")

    WB.Close

End Sub
Worksheets
The Worksheet object represents a Worksheet within a Workbook. The Worksheets collection object contains a collection of all Worksheets within a given Workbook. Use the Workbook.Worksheets property to access the Workbooks collection.
Referring To Worksheets
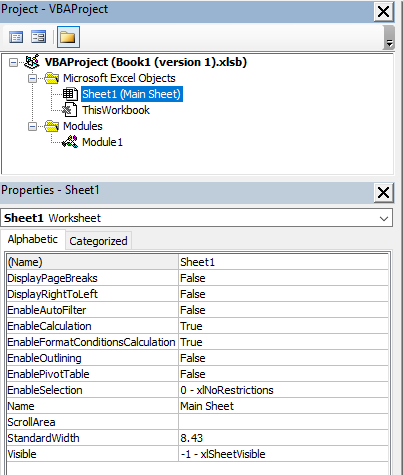
Worksheets can be referenced from the Worksheets collection by the Name property, Index property, or CodeName property. The Name and CodeName appear side by side in the project explorer in the Visual Basic Editor. The Name property is the name that appears on the sheet tab in Excel. The CodeName property can be set in the properties window for the Worksheet object. If a Worksheet is referred to by its Name or Index, the sheet may be moved or renamed which can break code that relies on these properties. It may be better when possible to set the CodeName property of Worksheets in the Visual Basic Editor and refer to sheets by CodeName.
Public Sub Example()

    Dim WS As Worksheet

    Set WS = Worksheets("Main Sheet") 'Name
    Set WS = Worksheets(1) 'Index
    Set WS = Sheet1 'CodeName

    Debug.Print WS.Name
    Debug.Print WS.Index
    Debug.Print WS.CodeName

End Sub
Iterating
A For Next or For Each loop can be used to iterate over the the Worksheets collection.
Public Sub Example()

    Dim i As Long
    For i = 1 To Worksheets.Count
        Debug.Print Worksheets(i).Name
    Next i

    Dim WS As Worksheet
    For Each WS In Worksheets
        Debug.Print WS.Name
    Next WS

End Sub
Add
Worksheets can be added to a Workbook using the Worksheets.Add method.
Public Sub Example()

    'Add Worksheet after last sheet

    Dim WB As Workbook
    Dim WS As Worksheet

    Set WS = WB.Worksheets.Add(After:=WB.Worksheets(WB.Worksheets.Count))

End Sub
Copy
To copy a Worksheet use the Worksheet.Copy method.
Public Sub Example()

    Dim WB As Workbook
    Set WB = ThisWorkbook

    Dim WS As Worksheet
    Set WS = WB.Worksheets(1)

    Dim WSCopy As Worksheet
    Set WSCopy = WS.Copy(After:=WB.Worksheets(WB.Worksheets.Count))

End Sub
Move
To move a Worksheet use the Worksheet.Move method.
Public Sub Example()

    Dim WB As Workbook
    Set WB = ThisWorkbook

    Dim WS As Worksheet
    Set WS = WB.Worksheets(WB.Worksheets.Count)

    WS.Move Before:=WB.Worksheets(1)

End Sub
Delete
To Delete a Worksheet use the Worksheet.Delete method. When a sheet is deleted an alert pops up warning that the sheet will be permanently deleted. To prevent this pop-up, disable alerts by setting the Application.DisplayAlerts property to False. After the sheet is deleted, alerts can be re-enabled by setting the property to True.
Public Sub Example()

    'Suppress alert that sheet will be deleted permanently
    Application.DisplayAlerts = False

    WS.Delete

    'Unsuppress alerts
    Application.DisplayAlerts = True

End Sub
Naming
The Worksheet.Name property represents the worksheet name displayed on the sheet tab in Excel. The Worksheet.CodeName property represents the Worksheet object’s name in code and can be used directly in code as an object variable.
Public Sub Example()

    Dim WB As Workbook
    Set WB = ThisWorkbook

    Dim WS As Worksheet
    Set WS = WB.Worksheets.Add(After:=WB.Worksheets(WB.Worksheets.Count))

    WS.Name = "Main"

    Debug.Print WS.Name
    Debug.Print WS.CodeName

End Sub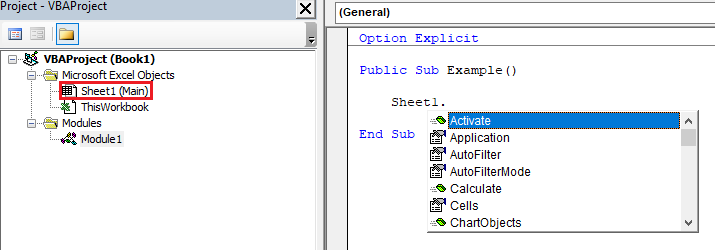
If the Worksheet name is already taken an error will occur. It may be necessary to create a function to name a Worksheet which handles naming collisions.
Option Explicit

Public Sub Example()

    Dim WS As Worksheet

    Set WS = ThisWorkbook.Worksheets.Add
    NameWorksheet WS, "Test"

    Set WS = ThisWorkbook.Worksheets.Add
    NameWorksheet WS, "Test"

End Sub

Public Sub NameWorksheet(WS As Worksheet, WSName As String)

    Dim WSName1 As String
    WSName1 = WSName

    Dim WB As Workbook
    Set WB = WS.Parent

    Dim WSs As Sheets
    Set WSs = WB.Worksheets

    Dim WSCount As Long
    WSCount = WSs.Count

    Dim IsNamed As Boolean
    Dim c As Long
    Do While Not IsNamed

        Dim NameFound As Boolean
        NameFound = False

        Dim i As Long
        For i = 1 To WSCount
            If WSName1 = WSs(i).Name Then
                NameFound = True
                Exit For
            End If
        Next i

        If NameFound Then
            c = c + 1
            WSName1 = WSName & " (" & c & ")"
        Else
            WS.Name = WSName1
            IsNamed = True
        End If

    Loop

End Sub
Ranges
The Range object represents a range of cells on a Worksheet.
Cells Property
The Worksheet.Cells and Range.Cells properties can be used to return a Range object given a row and column index. With the Worksheet.Cells property the row and column indexes are relative to the entire worksheet. With the Range.Cells property the row and column indexes are relative to the Range. The Cells property is useful when iterating over rows and columns.
Public Sub Example()

    Dim WS As Worksheet
    Set WS = ThisWorkbook.Worksheets(1)

    Dim i As Long
    For i = 1 To 10
        WS.Cells(i, 1).Value2 = i
    Next i

End Sub
Public Sub Example()
Dim Rng As Range
Set Rng = ThisWorkbook.Worksheets(1).Range("B11:B20")
Dim i As Long
For i = 1 To 10
Rng.Cells(i, 1).Value2 = i
Next i
End SubCell Values
The Value property of the Range object returns the value stored in a cell.
The Value2 property of the Range object returns the value stored in a cell. Currency and Date types are returned as their underlying numerical values and not the correctly formatted Currency or Date.
The Text property of the Range object returns the text that is currently displayed in the cell.
Public Sub Example()

    'Prints 1000000, Currency
    Debug.Print Range("A1").Value, TypeName(Range("A1").Value)

    'Prints 1000000, Double
    Debug.Print Range("A1").Value2, TypeName(Range("A1").Value2)

    'Prints $1,000,000.00, String
    'Prints #########, String
    Debug.Print Range("A1").Text, TypeName(Range("A1").Text)

End Sub
Formulas
The Formula and FormulaR1C1 properties can be used to add or read the formula in a cell. The Formula property uses A-1 style cell referencing and the FormulaR1C1 property uses R1C1 style cell referencing.
Public Sub Example()

    Range("B1").Formula = "=SUM($A$1:$A$10)"

    Range("B1").FormulaR1C1 = "=SUM(RC[-1]:R[9]C[-1])"

End Sub
Copy and Paste
Ranges can be copied and pasted using the Copy method and the PasteSpecial method.
Public Sub ExampleRange()

    'Copy directly
    Range("A1").Copy Range("B1")

    'Copy and paste
    Range("A1").Copy
    Range("B1").PasteSpecial xlPasteValues

End Sub
Formatting
The Interior object allows properties related to the Range’s interior color to be set. Use the Range.Interior property to get the Interior object for a Range.
The Font object allows properties about a Range’s font to be set. Use the Range.Font property to get the Font object for a Range.
The Borders object allows properties about a Range’s borders to be set. Use the Range.Borders property to get the Borders object for a Range.
Public Sub Example()

    With Range("A1")

        With .Interior
            .Color = vbRed
        End With

        With .Font
            .Bold = True
            .Italic = True
        End With

        With .Borders
            .LineStyle = xlContinuous
            .Color = vbBlue
        End With

    End With

End Sub
Conditional Formatting
The FormatConditions object is used to add Conditional Formatting to a Range. Use the Range.FormatConditions property to get the FormatConditions object for a Range.
Public Sub Example()

    'Highlight Duplicates

    With Range("A:A")
        .FormatConditions.AddUniqueValues
        .FormatConditions(.FormatConditions.Count).SetFirstPriority
        .FormatConditions(1).DupeUnique = xlDuplicate
        With .FormatConditions(1).Font
            .Color = -16383844
            .TintAndShade = 0
        End With
        With .FormatConditions(1).Interior
            .PatternColorIndex = xlAutomatic
            .Color = 13551615
            .TintAndShade = 0
        End With
        .FormatConditions(1).StopIfTrue = False
    End If

End Sub
NumberFormat
The NumberFormat property is used to set the data type of a range. The format codes for the NumberFormat property are the same codes as the codes in the Format Cells dialog in Excel.
| Format | Format Code |
|---|---|
| General | «General» |
| Number | «0.00» |
| Currency | «$#,##0.00» |
| Accounting | «_($* #,##0.00_);_($* (#,##0.00);_($* «»-«»??_);_(@_)» |
| Short Date | «m/d/yyyy» |
| Long Date | «[$-x-sysdate]dddd, mmmm dd, yyyy» |
| Time | «[$-x-systime]h:mm:ss AM/PM» |
| Percentage | «0.00%» |
| Fraction | «# ?/?» |
| Scientific Notation | «0.00E+00» |
| Text | «@» |
| ZIP Code | «00000» |
| ZIP Code + 4 | «00000-0000» |
| Phone Number | «[<=9999999]###-####;(###) ###-####» |
| Social Security Number | «000-00-0000» |
Public Sub Example()
'Format cell as Text
Range("A1").NumberFormat = "@"
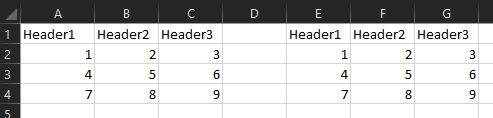
End SubCurrentRegion
The CurrentRegion property can be used to reference a region of rows and columns where there is connected data. The intersection of a blank row and a blank column divides regions.
Public Sub Example()

    Dim Rng As Range
    Set Rng = Range("A1").CurrentRegion

    Debug.Print Rng.Address 'Prints $A$1:$C$4

End Sub
Resize
The Resize property is used to resize a Range object. The Resize property can be used to resize ranges so that arrays can be directly assigned to the range.
Public Sub Example()

    Dim Arr(0 To 2, 0 To 2) As Long

    Arr(0, 0) = 1
    Arr(0, 1) = 2
    Arr(0, 2) = 3

    Arr(1, 0) = 4
    Arr(1, 1) = 5
    Arr(1, 2) = 6

    Arr(2, 0) = 7
    Arr(2, 1) = 8
    Arr(2, 2) = 9

    Dim RowCount As Long
    RowCount = UBound(Arr, 1) - LBound(Arr, 1) + 1

    Dim ColumnCount As Long
    ColumnCount = UBound(Arr, 2) - LBound(Arr, 2) + 1

    Range("A1").Resize(RowCount, ColumnCount).Value = Arr

End Sub
PivotTables And Charts
PivotTables and Charts are a very useful way to view and manipulate data in Excel.
PivotCaches
The PivotCache object contains the data used to create PivotTables. PivotCaches are stored at the Workbook level. The PivotCaches collection object contains all the PivotCache objects for a given Workbook. Use the Workbook.PivotCaches method to return the PivotCaches collection for a Workbook. To create a new PivotCache use the PivotCaches.Create method. Use the XlPivotTableSourceType enum to specify the type of data source for the new PivotCache.
PivotTables
Once a PivotCache is created, it can be used to create a PivotTable. The PivotTable object represents a PivotTable on a Worksheet. The PivotTables collection object contains all the PivotTables for a Worksheet. Use the Worksheet.PivotTables method to get the PivotTables collection for a Worksheet. To create a new PivotTable use the PivotTables.Add or PivotCache.CreatePivotTable method. To add fields to a PivotTable use the PivotTable.AddFields method and the PivotTable.AddDataField method.
Charts
Charts can be created as their own stand-alone sheet or they can be embedded in a Worksheet.
To create a stand-alone chart sheet get a Charts or Sheets collection using the Workbook.Charts property and use the Charts.Add2 or Sheets.Add method respectively. When using the Sheets.Add method specify the type as a chart using the XlSheetType enum. Use the Chart.SetSourceData method and pass the TableRange property of the PivotTable.
To create an embedded chart, create a Shape object using the AddChart2 method of the Worksheet’s Shapes collection object property. Retrieve the Chart object from the Shape using the Shape.Chart property. Finally, set the source data of the Chart using the Chart.SetSourceData method with the TableRange property of the PivotTable.
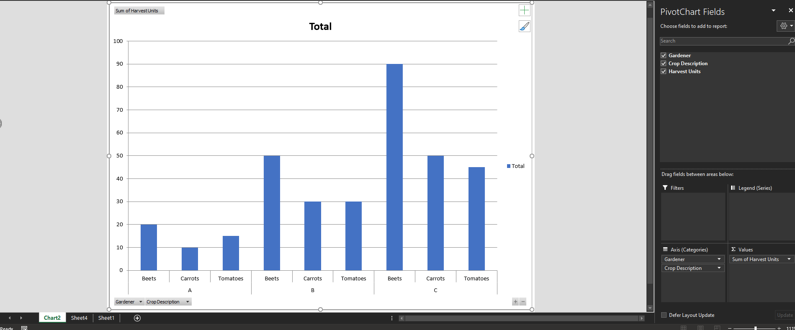
Example
Consider an example using gardeners and their harvest output crops.
Public Sub CreatePivotTableAndCharts()

    Dim PCaches      As PivotCaches
    Dim PCache       As PivotCache
    Dim NewWS        As Worksheet
    Dim PTables      As PivotTables
    Dim PTable       As PivotTable
    Dim PChartShape  As Shape
    Dim PChart       As Chart
    Dim PChartSheet  As Chart

    'Create PivotCache
    Set PCaches = ThisWorkbook.PivotCaches
    Set PCache = _
    PCaches.Create(xlDatabase, ThisWorkbook.Worksheets(1).Range("A1").CurrentRegion)

    'Create PivotTable
    Set NewWS = ThisWorkbook.Worksheets.Add
    Set PTables = NewWS.PivotTables
    Set PTable = PTables.Add(PCache, NewWS.Range("A1"))
    PTable.AddFields RowFields:=Array("Gardener", "Crop Description")
    PTable.AddDataField PTable.PivotFields("Harvest Units"), "Sum of Harvest Units", xlSum

    'Create Embdedded Chart
    Set PChartShape = NewWS.Shapes.AddChart2(XlChartType:=xlColumnStacked)
    Set PChart = PChartShape.Chart
    PChart.SetSourceData PTable.TableRange1

    'Create Sheet Chart
    Set PChartSheet = ThisWorkbook.Charts.Add
    PChartSheet.SetSourceData PTable.TableRange1

End Sub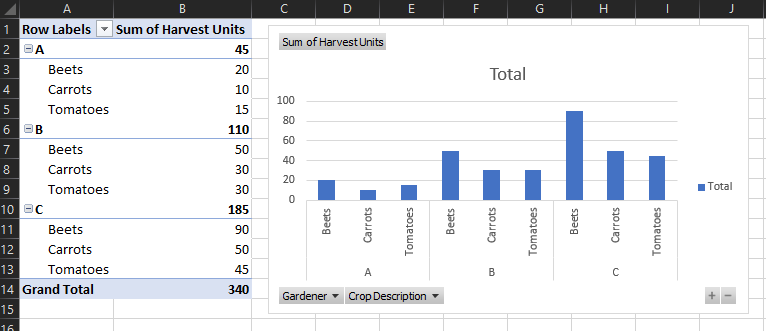
ListObjects
The ListObject class is used to represent a table in Excel. The ListObjects collection object contains all ListObject objects in a Worksheet. Use the Worksheet.ListObjects property to retrieve the ListObjects collection object for a Worksheet. A ListObject can be created using the ListObjects.Add method. Specify the type of data source using the XlListObjectSourceType enum.
Public Sub Example()

    'Create table from Range

    Dim WS As Worksheet
    Set WS = ThisWorkbook.Worksheets(1)

    Dim LO As ListObject
    Set LO = WS.ListObjects.Add(xlSrcRange, WS.Range("A1").CurrentRegion, , xlYes)
    LO.Name = "Table1"

End Sub
QueryTables
The QueryTable object is used to import source data into Excel. The QueryTables collection object contains all QueryTable objects for a Worksheet. Use the Worksheet.QueryTables property to retrieve the QueryTables collection for the Worksheet. A QueryTable object can be created using the QueryTables.Add method. Provide a connection string for the specific data source when creating a QueryTable.
Public Sub Example()

    'Add QueryTable from Excel sheet

    Dim ExcelFilePath As String
    ExcelFilePath = "C:\example.xlsx"

    Dim ConnectionString As String
    ConnectionString = _
        "ODBC;" & _
        "Driver={Microsoft Excel Driver (*.xls, *.xlsx, *.xlsm, *.xlsb)};" & _
        "DBQ=" & ExcelFilePath & ";"

    Dim WS As Worksheet
    Set WS = ThisWorkbook.Worksheets(1)

    Dim QT As QueryTable
    Set QT = WS.QueryTables.Add(ConnectionString, WS.Range("A1"), "SELECT * FROM [Sheet1$]")
    QT.Refresh

End Sub
Public Sub Example()
'Add QueryTable from Text/CSV file
Dim WS As Worksheet
Set WS = ThisWorkbook.Worksheets(1)
Dim TextFilePath As String
TextFilePath = "C:\example.csv"
Dim ConnectionString As String
ConnectionString = "TEXT;" & TextFilePath
Dim QT As QueryTable
Set QT = WS.QueryTables.Add(ConnectionString, WS.Cells(1, 1))
WS.Cells.NumberFormat = "@"
With QT
.TextFileConsecutiveDelimiter = False
.TextFileCommaDelimiter = True
.TextFileParseType = xlDelimited
.TextFileTextQualifier = xlTextQualifierDoubleQuote
'MUST Assign TextFileColumnDataTypes to Avoid Data Type Guessing
.TextFileColumnDataTypes = Array(xlTextFormat, xlTextFormat, xlTextFormat)
.Refresh
.SaveData = False
.Delete
End With
End SubLast Updated :
29 Oct, 2022
The Excel VBA Application object is one of the most commonly utilized objects when using VBA to automate any task. It uses several Excel programs and runs various operations on Excel Workbooks. To work with the Excel Application Object, it has many Properties and Methods. Below is a brief description of each of the most useful Properties and Methods when automating any task.
VBA Application Object Methods in Excel
Calculate Method
In VBA, the Calculate Application Method is used to calculate all open Workbooks, a single Worksheet, or a range on a worksheet.
Syntax
In VBA, the Calculate method of the application object has the following syntax:
Application.Calculate
Example:

The macro above is used to perform calculations in a specified Worksheet.
CalculateFull Method
In VBA, the CalculateFull Application Method is used to force a full calculation in all open Workbooks data.
Syntax:
Application.CalculateFull
Example:

The macro above is used to force full calculations in all open workbooks data.
FindFile Method
In VBA, the FindFile Application Method is used to display the Open dialog box, which allows the user to open a workbook or file. This method returns either True or False as a Boolean result. If the value is true, the user has successfully opened the file. If the user closes the dialog box, the value is false.
Syntax:
Application.FindFile
Example:

The procedure above displays the open dialog box and opens the selected file in Excel.
Goto Method
In VBA, the Goto Application Method is used to pick any range on a worksheet or any visual basic process in any workbook. If the selected worksheet is not currently active, it is activated.
Syntax:
Application.Goto (
Example:

The procedure outlined above Chooses cell ‘C100’ from the Example1 worksheet. And the ‘Scroll:=True’ sentence below scrolls through the worksheet.
Run Method
The Run Application Method in VBA is used to execute a procedure or function defined in Visual Basic.
Syntax:
Application.Run(
Example:

Wait Method
In VBA, the Wait Application Method is used to pause or stop a running macro until a defined or specified time. It returns either true or false as a Boolean value. It returns true if the specified time has arrived; otherwise, it returns False.
Syntax:
Application.Wait(Time)
Where
Time: It is a necessary parameter. It defines the time at which you want the macro to resume.
Example:

The macro below pauses a program until 6 p.m. today.