
Способ 1: «Проводник»
Чтобы самостоятельно перейти к папке «AppData» в системном «Проводнике», потребуется сначала активировать отображение скрытых файлов. Для этого:
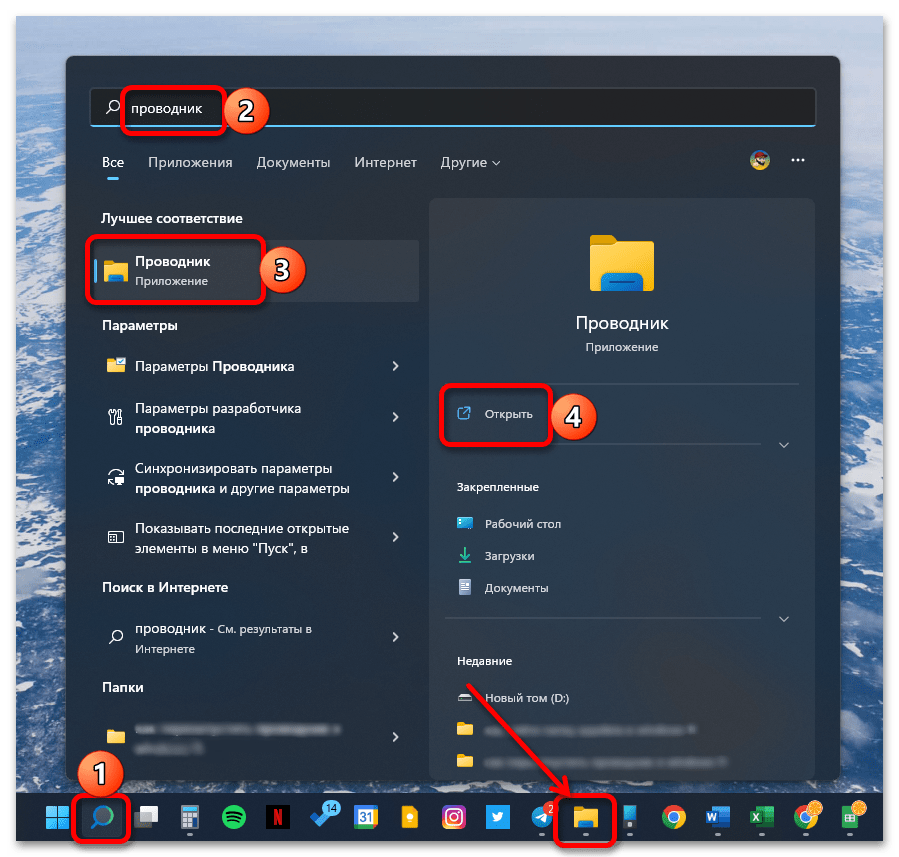
- Любым удобным способом откройте «Проводник» (например, воспользовавшись сочетанием клавиш «Win+E», ярлыком на панели задач или поиском по системе).

Читайте также: Как открыть «Проводник» в Виндовс 11
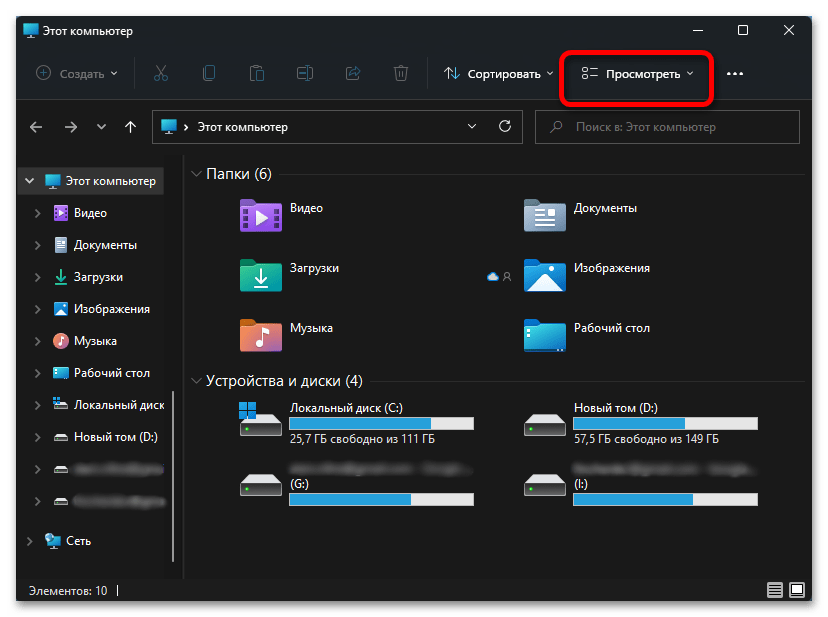
- Разверните расположенное на верхней панели меню «Просмотреть».
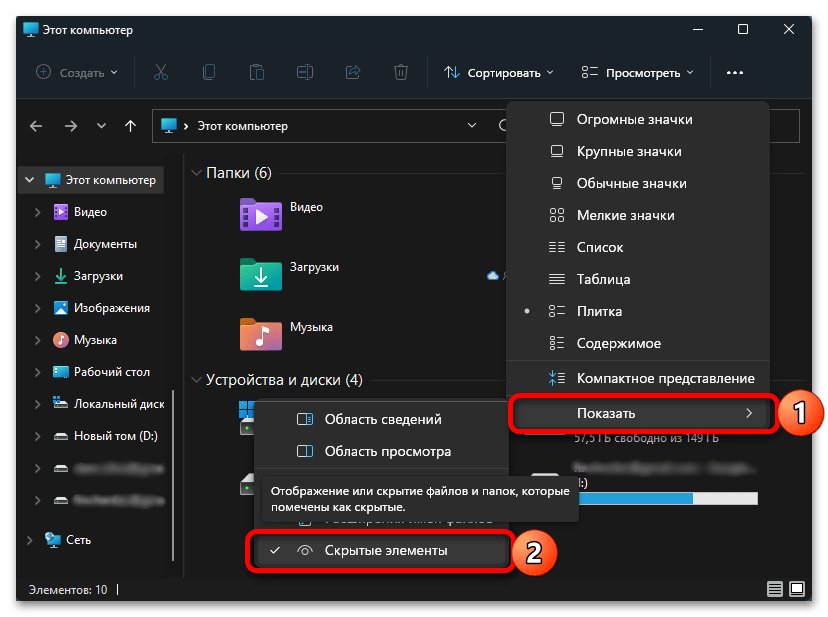
- Наведите указатель курсора на пункт «Показать» и установите галочку напротив «Скрытые элементы».
Читайте также: Как включить отображение скрытых файлов в Windows 11
C:\Users\user_name\AppData
C:\Пользователи\имя_пользователя\AppData
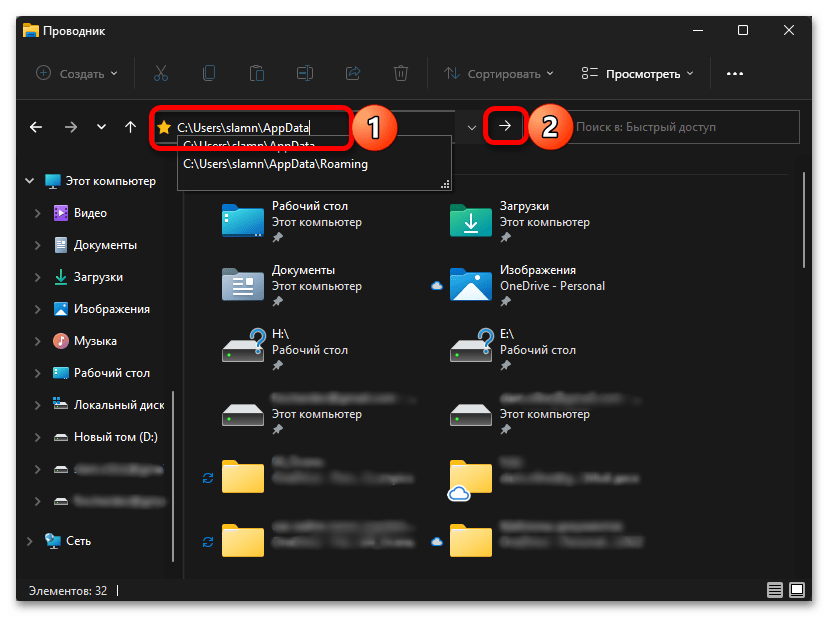
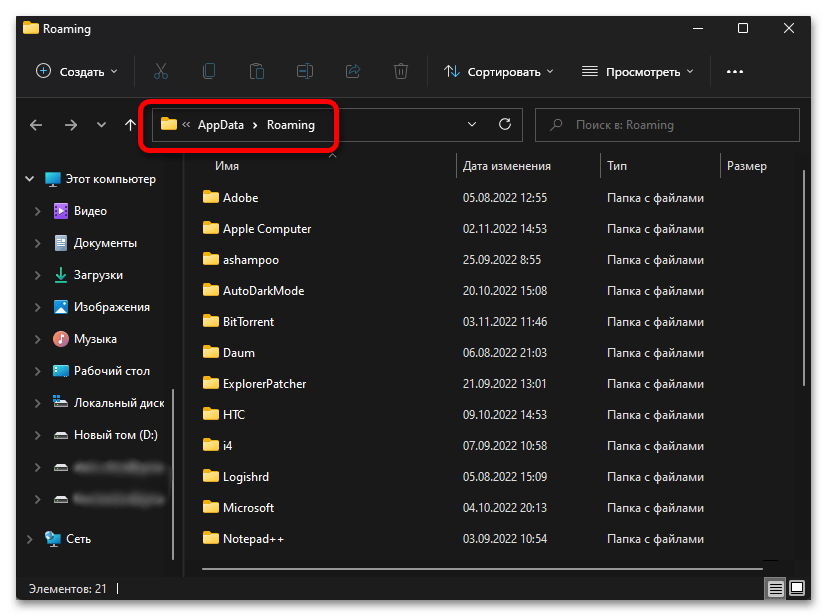
Все что от вас требуется далее для решения нашей задачи – перейти по указанному выше пути, последовательно открывая папки, либо скопировать это значение, вставить его в адресную строку «Проводника» и нажать клавишу «Enter» или указывающую вправо стрелку.
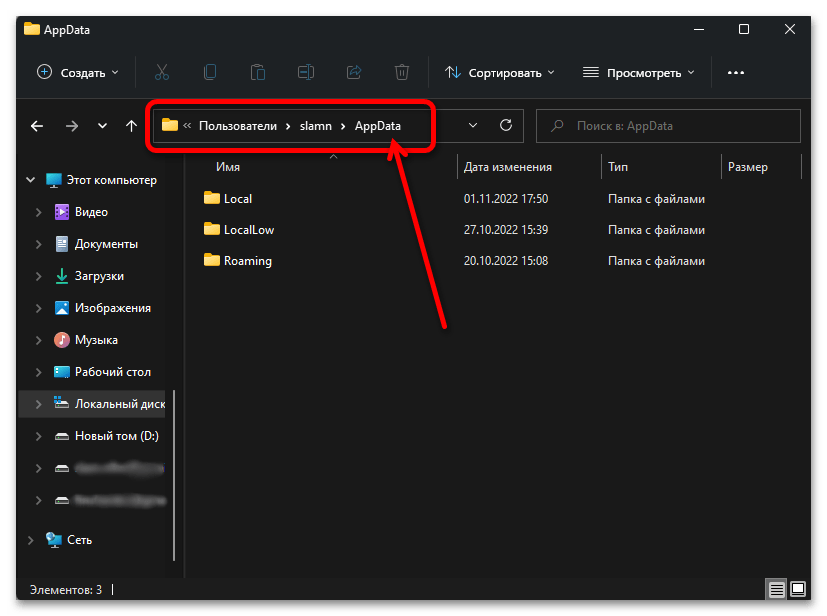
Важно! Для перехода к нужному расположению вы можете использовать любой из двух вышеуказанных адресов, но «user_name» или «имя_пользователя» потребуется заменить на имя вашей учетной записи в Виндовс 11.
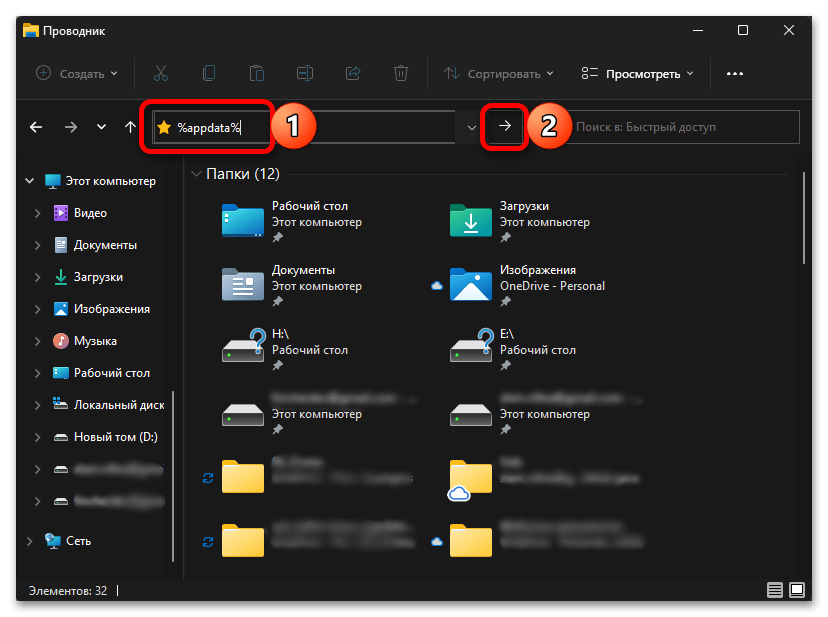
Существует и более простой способ решения нашей задачи, не требующий включения отображения скрытых объектов в системе и подстановки имени пользователя в вышеуказанный путь. Просто скопируйте представленную ниже команду, вставьте ее в адресную строку «Проводника» и нажмите «Enter» либо на стрелку.
%appdata%
Способ 2: «Выполнить»
Оснастка «Выполнить» позволяет быстро запускать различные компоненты Windows 11 и встроенные приложения. Ее же можно задействовать и для перехода к интересующему нас расположению.
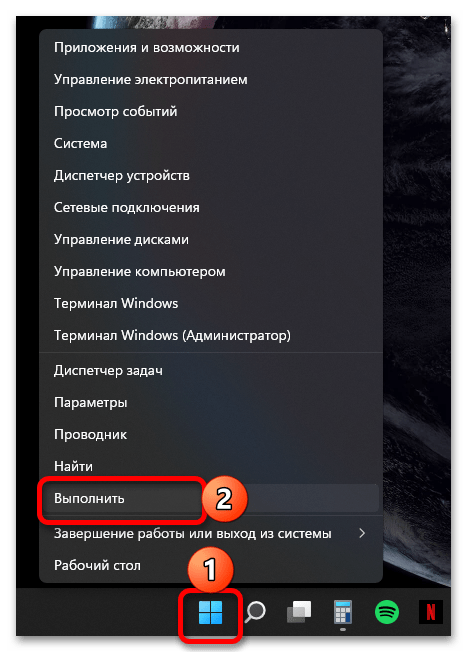
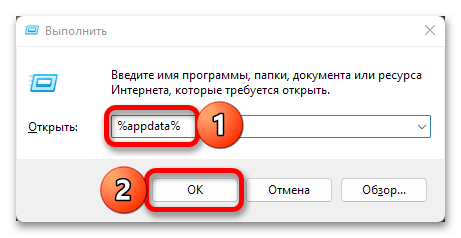
- Используя сочетание клавиш «Win+R» или дополнительное меню «Пуск» (вызывается нажатием правой кнопки мышки по ней), откройте окно «Выполнить».
- Вставьте представленную ниже команду или полный путь к папке (
C:\Users\user_name\AppData), предварительно заменив в нем «user_name» на собственное имя пользователя. Нажмите «ОК» или «Enter» для перехода.%appdata% - Если вами использовалась именно команда, а не полный адрес, будет открыта не «AppData», а вложенная в нее папка «Roaming». Поэтому если потребуется, вернитесь на шаг назад.
Способ 3: Поиск
Используя стандартную для Виндовс 11 функцию поиска, можно также быстро перейти в искомую директорию, а точнее, к ее содержимому, показанному на изображении выше.

Просто нажмите на значок лупы на панели задач или задействуйте клавиши «Win+S» и введите уже знакомую по предыдущим методам команду:
%appdata%
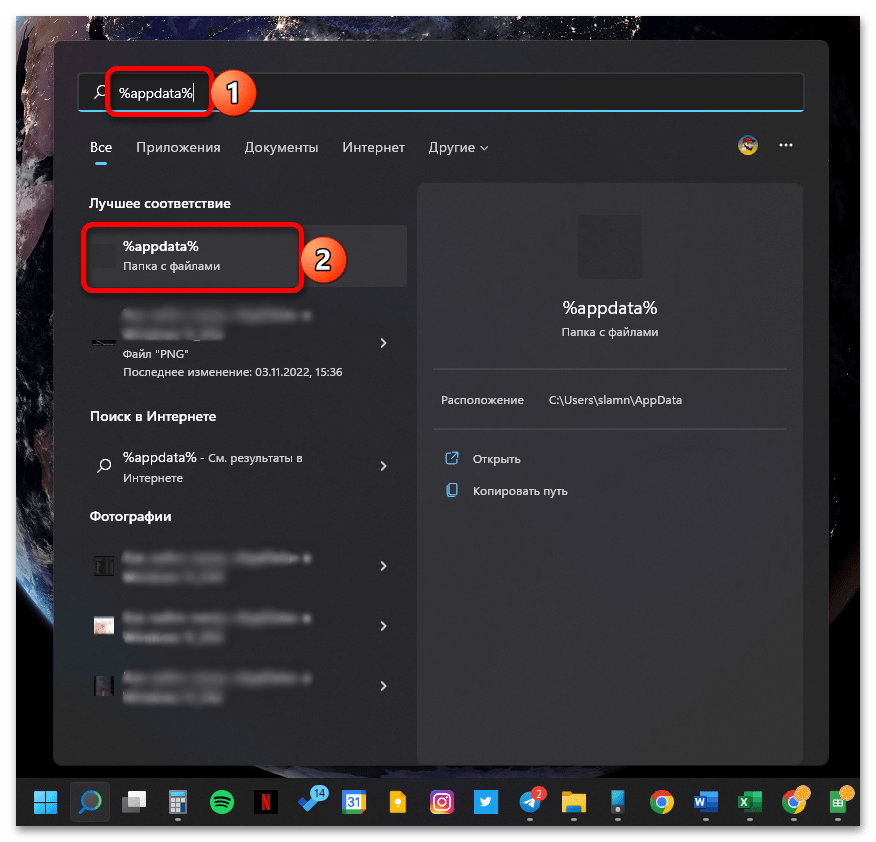
Кликните по первому результату в списке «Лучшее соответствие», подписанному как «Папка с файлами».
Как и в предыдущем случае, будет открыта вложенная в «AppData» директория «Roaming».
Наша группа в TelegramПолезные советы и помощь
Многие инструкции, касающиеся Windows 11 или Windows 10 затрагивают действия в системной папке AppData и вложенных папках — Local, Roaming и других. Не все начинающие пользователи могут найти нужную папку, также у них порой возникают вопросы, связанные с тем, что на диске нет расположения C:\Users при просмотре в проводнике.
В этой простой инструкции о том, как найти папку AppData в Windows разных версий несколькими способами: очень быстрый метод открыть это расположение в проводнике, а также простой переход к нужной папке.
Быстрое открытие папки AppData в проводнике
Папка AppData находится на системном диске C в папке Пользователи (или Users)\Имя_пользователя\ и по умолчанию является скрытой. Однако, не обязательно включать показ скрытых файлов и папок, чтобы перейти к этой папке.
В Windows есть очень быстрый способ открыть папку AppData с помощью проводника и короткого пути:
- Откройте проводник, введите %appdata% в адресной строке проводника и нажмите Enter.

- Вы автоматически окажетесь в папке AppData/Roaming.
- Если вам нужен верхний уровень (сама папка AppData, а не вложенная Roaming), нажмите по AppData в адресной строке проводника или нажмите по кнопке перехода на уровень вверх.


Включение показа скрытых папок и переход к папке AppData
Второй способ — включить отображение скрытых папок и файлов в Windows, а затем перейти к папке AppData в проводнике.
Для первого шага используйте одну из инструкций:
- Как показать скрытые и системные папки и файлы Windows 11
- Как включить показ скрытых и системных папок и файлов Windows 10
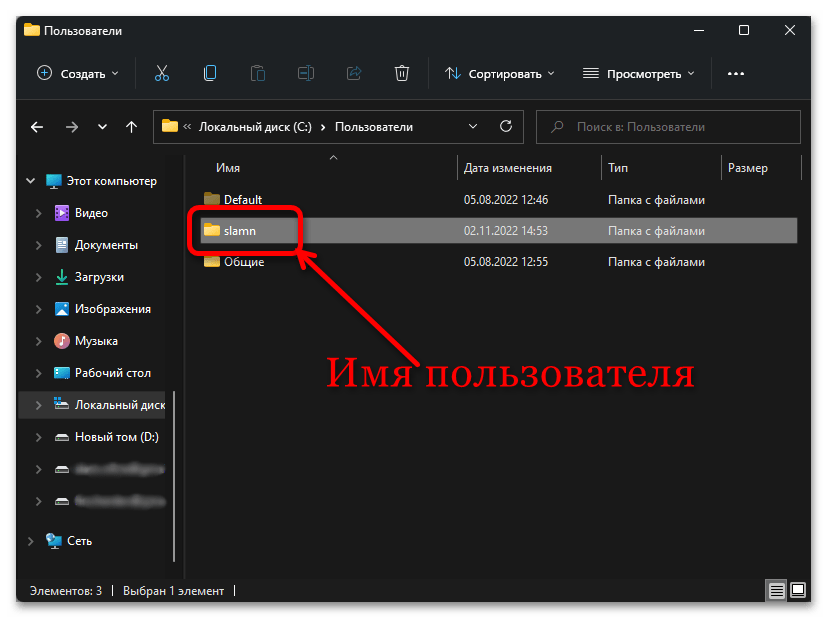
После этого останется открыть проводник и зайти в C:\Пользователи (или C:\Users\), открыть папку с вашим именем пользователя и уже в ней вы увидите нужную папку AppData.

Случается, что в какой-то инструкции пользователи видят, что нужно перейти к папке C:\Users\Имя\AppData\Local или C:\Users\Имя\AppData\Roaming, но не находят папку Users на диске C. Причина в том, что в Проводнике русскоязычных версий Windows она отображается как папка «Пользователи».
Сама папка содержит различные данные установленных программ, некоторые из этих данных создаются при установке и настройке программ, другие (например, временные файлы) могут создаваться при работе программ. Не следует удалять файлы из этой папки, если вы не знаете, что именно вы удаляете и не уверены в том, что это безопасно.
When it comes to finding the AppData folder in Windows 11, many users find themselves puzzled. This folder, which contains important application data files, is not easily visible or accessible. So, where exactly is AppData hiding?
In Windows 11, the AppData folder is located in the user profile directory, which is typically found in the C:\Users\ folder. However, by default, this folder is hidden to prevent accidental modification or deletion of important files. To access the AppData folder, you will need to enable the option to show hidden files and folders in the File Explorer settings. Once enabled, you can navigate to the user profile directory, locate the AppData folder, and access the application data it contains.
In Windows 11, the AppData folder is located in a slightly different path compared to previous versions of Windows. To find the AppData folder, follow these steps:
- Click on the «Start» button in the taskbar.
- Click on your username, which appears at the top of the Start menu.
- In the dropdown menu, select «AppData» from the list. It will be located below your username.
By following these steps, you can easily access the AppData folder in Windows 11.

Understanding the Location of Appdata in Windows 11
«Where Is Appdata in Windows 11?» is a question frequently asked by users who have recently upgraded to Microsoft’s latest operating system. Appdata, also known as Application Data, is a vital folder that stores user-specific application data, settings, and configurations. It plays a crucial role in maintaining personalized settings and preferences for various applications installed on a Windows system. However, with the release of Windows 11, there have been some changes in the location of the Appdata folder. In this article, we will explore the different aspects of the Appdata folder in Windows 11, its new location, and how users can access it.»
The Default Location of Appdata in Windows 11
In previous versions of Windows, including Windows 10 and earlier, the default location of the Appdata folder was «C:\Users\[Username]\AppData\Roaming». However, in Windows 11, Microsoft has introduced a new default location for the Appdata folder. The new default path is «C:\Users\[Username]\AppData\Local». This change was implemented to provide a more streamlined and simplified structure for storing user-specific application data.
It’s important to note that the Appdata folder is a hidden folder by default in Windows 11. This means that it won’t be visible to users unless they have enabled the option to show hidden files and folders in the File Explorer settings. Users can easily access the new location of the Appdata folder by following a few simple steps:
- Open File Explorer by clicking on the folder icon in the taskbar or by pressing the Win + E keyboard shortcut.
- Click on the «View» tab at the top of the File Explorer window.
- In the «Show/hide» section, check the box next to «Hidden items».
- Once hidden items are enabled, navigate to the new location of the Appdata folder by following this path: C:\Users\[Username]\AppData\Local.
By following these steps, users can easily access the Appdata folder in Windows 11 and view the application data stored within it.
Why was the Location of Appdata Changed in Windows 11?
The decision to change the default location of the Appdata folder in Windows 11 was primarily driven by Microsoft’s goal to simplify the file system structure and improve performance. The new location of the Appdata folder, which is now stored under the «Local» directory instead of the «Roaming» directory, aligns with the new architecture of Windows 11.
By moving the Appdata folder to the «Local» directory, Microsoft aims to segregate user-specific application data that doesn’t require synchronization across multiple devices. This change helps improve the performance of Windows 11 by reducing the amount of data that needs to be synchronized and uploaded to cloud services.
Additionally, this change also brings consistency to the file system structure as other user-specific folders such as «Documents,» «Downloads,» and «Pictures» are already located under the «Local» directory in Windows 11.
Accessing Appdata for Specific Applications
While the default location for the Appdata folder has changed in Windows 11, it’s important to note that some applications might still store their data in the previous location («C:\Users\[Username]\AppData\Roaming») or have their own custom folders. Users may need to access the Appdata folders of specific applications for troubleshooting, configuration changes, or transferring data between systems.
To access the Appdata folder for a specific application, users can follow these steps:
- Open File Explorer and navigate to the new default location of the Appdata folder: «C:\Users\[Username]\AppData\Local».
- In the «Address Bar» at the top of the File Explorer window, type «%appdata%» followed by the Enter key.
- A new File Explorer window will open, displaying the «Roaming» directory where the Appdata folder for specific applications might be located.
Users can navigate through the folders within the Appdata\Roaming directory to find the specific application they are looking for. Each application may have its own folder with its name or a unique identifier.
Creating a Shortcut to the Appdata Folder
For easier access to the Appdata folder, users can create a shortcut on their desktop or in their preferred location. Here’s how:
- Right-click on an empty area on your desktop or desired location and select «New» → «Shortcut».
- In the «Create Shortcut» window, enter the following location for the target: «%userprofile%\AppData\Local».
- Click «Next» and provide a name for the shortcut. For example, «Appdata».
- Click «Finish» to create the shortcut.
With the shortcut created, users can simply double-click on it to quickly access the Appdata folder in Windows 11.
Backing Up and Restoring Appdata in Windows 11
As the Appdata folder contains important application data and configurations, it’s crucial to regularly back up this folder to avoid losing personalized settings. Backing up Appdata allows users to restore their application settings and data in case of system failure, hardware changes, or when migrating to a new computer.
To manually back up the Appdata folder:
- Navigate to the new default location of the Appdata folder: «C:\Users\[Username]\AppData\Local».
- Copy the entire Appdata folder to an external storage device or a location of your choice.
For restoring the Appdata folder:
- Copy the backed-up Appdata folder to the new default location: «C:\Users\[Username]\AppData\Local».
It’s worth noting that some applications might require additional steps for restoring their data properly. It’s recommended to consult the documentation or support resources of the specific applications for accurate restoration procedures.
Understanding the Impact and Benefits of the Appdata Location Change
The change in the default location of the Appdata folder in Windows 11 has both immediate impacts and long-term benefits for users and the overall system performance. The new location aligns with the simplified file system structure of Windows 11 and improves the performance by reducing the synchronization overhead for application data that doesn’t require roaming across devices.
Moreover, by segregating user-specific application data in the «Local» directory, Windows 11 achieves consistency in the storage locations of various user folders, providing a more streamlined and organized file system structure.
Although this change may require users to familiarize themselves with the new location and adapt to the modified file paths for specific applications, it ultimately delivers a more efficient and reliable user experience by optimizing system performance and simplifying data storage.

Locating AppData in Windows 11
AppData is a hidden system folder in Windows that stores application-specific data and settings. However, in Windows 11, the AppData folder has been renamed and slightly reorganized. Here’s how you can find it:
- In the File Explorer, open your local disk (usually labeled C:).
- In the toolbar at the top, click on the «View» tab.
- In the «Show/Hide» section, enable the «Hidden items» checkbox. This will display hidden folders and files.
- Navigate to the following directory:
C:\Users\YourUsername\AppData. Replace «YourUsername» with your actual Windows username.
In this AppData folder, you’ll find three sub-folders: «Local», «LocalLow», and «Roaming». These folders store different types of application data:
- Local: Contains data that is specific to your local user account and not shared between accounts.
- LocalLow: Contains low-integrity data and settings for applications that require limited access rights.
- Roaming: Contains data that roams with your user account to other computers on the network, if enabled.
By following these steps, you can easily locate and access the AppData folder and its sub-folders in Windows 11 to manage application-specific data and settings.
Key Takeaways: Where Is Appdata in Windows 11
- The location of Appdata folder has changed in Windows 11.
- In Windows 11, you can find Appdata under the User folder.
- To access the Appdata folder, navigate to «C:\Users\%USERNAME%\AppData».
- If you’re having trouble locating the Appdata folder, you can use the Run dialog by pressing the Windows key + R and typing «%APPDATA%».
- Appdata contains important user-specific application data and settings in Windows 11.
Frequently Asked Questions
Here are some common questions related to the location of AppData in Windows 11.
1. Can you tell me where the AppData folder is located in Windows 11?
In Windows 11, the AppData folder is hidden by default. To access it, follow these steps:
1. Open File Explorer by pressing the Windows key + E.
2. Click on the «View» tab at the top of the window.
3. Check the «Hidden items» box in the toolbar. This will display the hidden folders and files.
4. Navigate to the following path: C:\Users\[your_username]\AppData
2. Why is the AppData folder hidden in Windows 11?
The AppData folder is hidden in Windows 11 to prevent users from accidentally modifying or deleting important system files. It contains sensitive data and settings specific to each user, which should not be altered unless necessary.
Hiding the AppData folder helps to maintain the stability and integrity of the operating system.
3. Can I unhide the AppData folder permanently in Windows 11?
Yes, you can unhide the AppData folder permanently in Windows 11 by following these steps:
1. Open File Explorer by pressing the Windows key + E.
2. Click on the «View» tab at the top of the window.
3. Click on the «Options» button in the toolbar.
4. In the Folder Options window that appears, click on the «View» tab.
5. Under «Hidden files and folders,» select the «Show hidden files, folders, and drives» option.
6. Click «Apply» and then «OK» to save the changes. The AppData folder will now be visible.
4. Can I move the AppData folder to a different location in Windows 11?
Moving the AppData folder to a different location is not recommended in Windows 11. The AppData folder contains critical user-specific data and settings that are essential for the functioning of various programs and applications.
If you move the AppData folder to a different location, it can result in compatibility issues, data loss, and program malfunction.
5. How can I access the AppData folder of another user on Windows 11?
To access the AppData folder of another user on Windows 11, follow these steps:
1. Open File Explorer by pressing the Windows key + E.
2. In the address bar at the top of the window, type «C:\Users\» followed by the username of the desired user.
For example, if the username is «John,» the address would be «C:\Users\John.»
3. Press Enter or click the arrow next to the address bar to navigate to the user’s folder.
4. Within the user’s folder, you will find the «AppData» folder.
In summary, finding the AppData folder in Windows 11 might require a few extra steps compared to previous versions. However, with a little guidance, it is still accessible and can be useful for managing application data.
To locate the AppData folder in Windows 11, you can access it by typing ‘%appdata%’ in the File Explorer’s address bar or by using the Run dialog box. Additionally, you can find the folder in your user directory by enabling the ‘Show hidden files and folders’ option. Remember to be cautious when making changes to files stored in the AppData folder, as they may affect the functionality and settings of your applications.
The AppData folder has been a part of Windows for years, but where is it and what is it even for? Below is an explanation of this folder and directions for how to see the AppData folder.
The AppData folder is a hidden, protected folder in Windows operating systems. The AppData folder stores app-specific data like configuration settings and temporary files that don’t necessarily need to be in plain view or quickly accessible since most people don’t need to be in there.
There are three subfolders within AppData:
- Local contains data that can be used across different versions of the same app by the same user. This includes settings and temporary files.
- LocalLow is similar to the Local subfolder, but intended for data that should be available to all users of the computer.
- Roaming contains data that can roam/move with the user profile from computer to computer. It’s useful in server environments where the user might log into their account on more than one computer. This includes settings that should be synchronized across multiple devices.
Where is the Appdata folder in Windows 11 & Windows 10?
It’s easy to see the AppData folder in Windows 11 and Windows 10, but not as easy as viewing a regular folder. This is because the AppData folder is hidden by design. Fortunately, getting to the AppData folder is still extremely easy. Here’s how to do it:
Method #1: File Explorer
Browsing through your computer’s folders is one way to find the AppData folder, but first you’ll have to make a small change to how your folders are displayed:
1. Open File Explorer by pressing Windows key + E.
2. Show hidden files and folders. One way to do this is via the View menu at the top of any folder.
3. Now, open the root of the C drive.
4. Open the Users folder.
5. Open your personal folder. It’s named after your user account name.
6. Finally, open AppData.
Method #2: Run Dialog Box
This is my preferred way of opening the AppData folder in Windows 11 and Windows 10 because it’s just so darn fast:
1. Open the Run dialog box. A quick way is to press Windows key + r, but you can also find the Run option when you right-click the Start button.
2. Type appdata.
3. Press Enter to launch the AppData folder immediately.
How to Find Appdata folder in Older Versions of Windows
It’s equally as easy to see the AppData folder in Windows 8, Windows 7, Windows Vista, and Windows XP. In fact, the steps are identical to locating AppData in newer versions of Windows. We recommend going the Run command route:
1. Press Windows key + R to open Run.
2. Type appdata.
3. Press Enter on your keyboard to see the AppData folder without making any other changes to your computer.
How to Move AppData Folder
Users cannot move this folder the way they can move an app installation because apps are hardwired to look for it in its default location. If you need to move AppData, you will have to use a junction or a symbolic link.
- Decide where you want to move AppData to, and move the folder to the new location.
- You must now create a junction link to the AppData folder at the following location;
C:\Users\YourUserName - Open Command Prompt with admin rights.
- Run the following command but update the file paths.
- ‘path to junction link’ should be replaced with this path C:\Users\YourUserName\AppData
- ‘Path to target folder’ should be replaced with the path to the AppData folder at its new location.
mklink /J "path to junction link" "path to target folder"
Example
mklink /J "C:\Users\fatiw\AppData" "D:\AppData"
Undo AppData Move
If you later decide you’d like to put the AppData folder back where it originally was, you can do so easily.
- Open Command Prompt with admin rights.
- Run the following command to remove the junction link that you created but update the path in the command before you run it.
rmdir "path to junction link" - Move the AppData folder back to the following location.
mklink /J "C:\Users\YourUserName
Deleting folders in AppData
The three main sub-folders in AppData, i.e., Local, LocalLow, and Roaming should never be deleted. The folders under these folders can be deleted however, make sure you do not plan on using the app that a certain folder is for. If you’ve uninstalled an app, deleting its folder from AppData is safe.
The Secret World of Your App Folder: Revealed
You may not need to use this folder often, but it house your crucial files. If you want to see where your bookmarks, saved sessions, and more are stored, it’s all here. By using the simple steps above you’ll be able to quickly find and access this folder.

Fatima Wahab
Fatima has been writing for AddictiveTips for six years. She began as a junior writer and has been working as the Editor in Chief since 2014.
Fatima gets an adrenaline rush from figuring out how technology works, and how to manipulate it. A well-designed app, something that solves a common everyday problem and looks
Accessing the AppData folder in Windows 11 is pretty simple once you know where to look. This folder holds important files for your applications, and sometimes you need to get in there to modify, delete, or back up certain data. Follow these straightforward steps to find and access the AppData folder on your Windows 11 system.
In the following steps, you’ll learn how to access the hidden AppData folder in Windows 11. This folder is crucial for various software settings and data storage, and knowing how to reach it can be beneficial for troubleshooting and customization.
Step 1: Open File Explorer
Step 1: Open File Explorer by clicking the folder icon on your taskbar or pressing Windows + E on your keyboard.
File Explorer is your gateway to all the files on your computer. You’ll need it to navigate through your directories.
Step 2: Enable Hidden Items
Step 2: Click on the “View” tab at the top of File Explorer, then check the box for “Hidden items.”
The AppData folder is hidden by default, so you need to enable viewing hidden items to see it.
Step 3: Navigate to Your User Folder
Step 3: In the left-hand sidebar, click on “This PC,” then navigate to your primary drive (usually labeled C:), and open the ‘Users’ folder.
Your user folder contains personal files and settings, including the AppData folder.
Step 4: Open Your User Profile
Step 4: Find and open the folder named after your user profile.
Your user profile folder contains all your individual settings and personal data, including the hidden AppData folder.
Step 5: Access the AppData Folder
Step 5: Inside your user profile folder, you should now see the AppData folder. Double-click to open it.
Once you’ve enabled hidden items, the AppData folder will be visible and accessible.
After completing these steps, you will have access to the AppData folder, which contains three subfolders: Local, LocalLow, and Roaming. Each of these has specific files and settings for your apps.
Tips for Accessing the AppData Folder in Windows 11
- Shortcut Method: You can quickly access the AppData folder by typing
%appdata%in the File Explorer address bar. - Backup Regularly: Keep a backup of important files from AppData in case you need to restore settings or data.
- Be Cautious: Modifying files in the AppData folder can affect how your applications run. Make sure you know what you’re changing.
- Use Search: If you can’t find a particular file, use the search function within the AppData folder.
- Check Permissions: Ensure you have the necessary permissions to access or modify files in the AppData folder.
Frequently Asked Questions
What is the AppData folder used for?
The AppData folder stores application settings, files, and data. It’s where programs keep their personal data and settings.
Can I delete files in the AppData folder?
You can delete files, but be careful. Deleting essential files can cause applications to malfunction.
How do I find a specific file in the AppData folder?
Use the search bar within the AppData folder to locate specific files quickly.
Is the AppData folder the same for all users?
No, each user on a Windows system has their own AppData folder with individual application data and settings.
Why can’t I see the AppData folder?
The AppData folder is hidden by default. You need to enable the “Hidden items” view in File Explorer.
Summary
- Open File Explorer.
- Enable Hidden Items.
- Navigate to Your User Folder.
- Open Your User Profile.
- Access the AppData Folder.
Conclusion
Accessing the AppData folder in Windows 11 is a useful skill for anyone looking to manage application settings or troubleshoot software issues. By following the easy steps outlined above, you can unlock this hidden directory and make necessary modifications. Remember always to be cautious when altering files in this folder, as it houses critical data for your apps.
For further reading, consider looking into specific uses of the Local, LocalLow, and Roaming subfolders within AppData. Knowing what each subfolder does can help you better manage your application data. If you found this guide helpful, bookmark this page for quick reference and share it with friends who might need a hand navigating their Windows 11 system!
Matthew Burleigh has been writing tech tutorials since 2008. His writing has appeared on dozens of different websites and been read over 50 million times.
After receiving his Bachelor’s and Master’s degrees in Computer Science he spent several years working in IT management for small businesses. However, he now works full time writing content online and creating websites.
His main writing topics include iPhones, Microsoft Office, Google Apps, Android, and Photoshop, but he has also written about many other tech topics as well.
Read his full bio here.