
Многие пользователи iPhone не имеют в своем распоряжении яблочного компьютера. В этом случае они не только лишаются удобных фишек экосистемы Apple, но и не имеют возможности получить доступ к некоторым данным на других устройствах.
На помощь приходят веб-сервисы и облачная синхронизация. Сейчас расскажем как получить доступ к своим заметкам iCloud на компьютере с операционной системой Windows. Это может пригодиться как для локального резервного копирования, так и для доступа к данным на случай утери смартфона.
Есть целых три способа работать с заметками из iPhone на Windows-ПК.
1. Получите доступ к заметкам через web-интерфейс
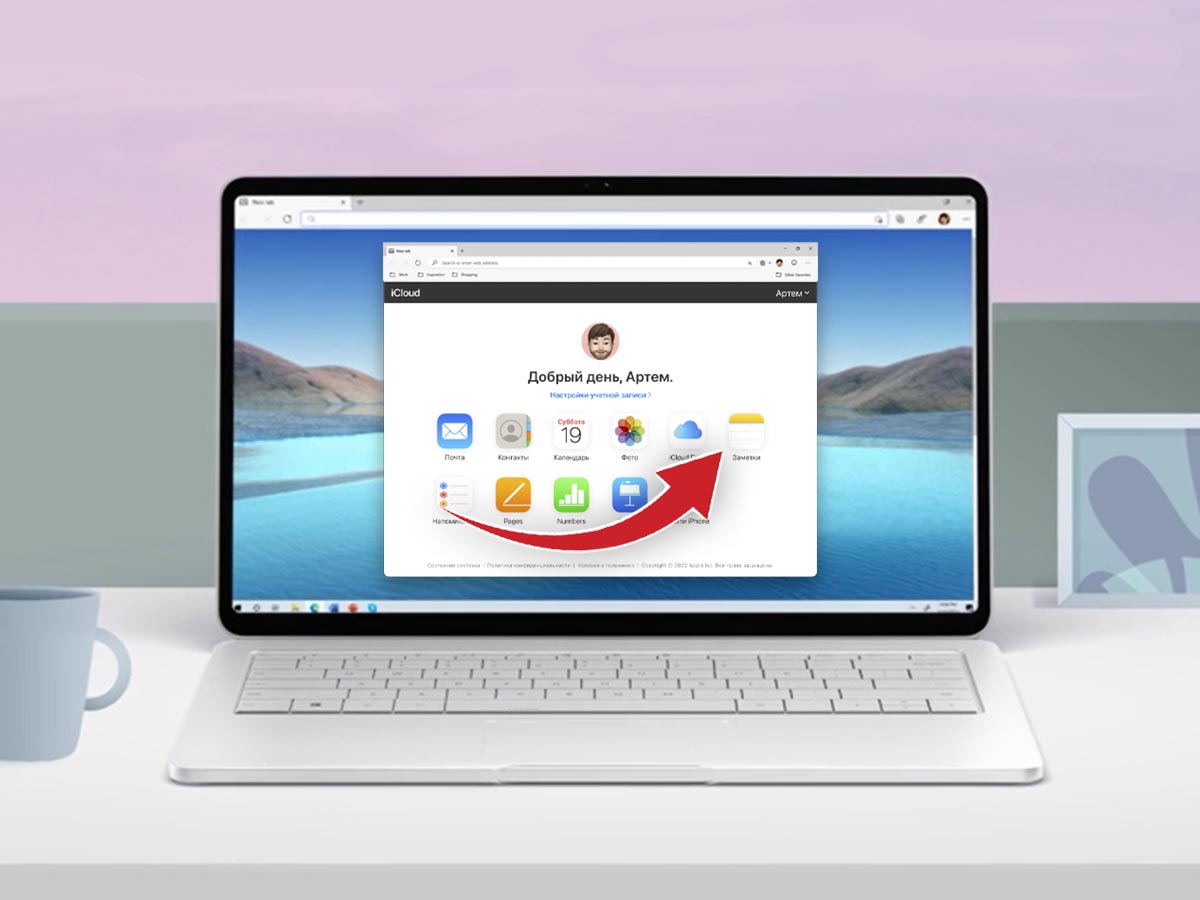
▣ Перейдите в веб-версию сервиса iCloud в любом браузере на Windows и авторизуйтесь при помощи своей учетной записи Apple ID.
▣ При включенной двухфакторной аутентификации придется подтвердить вход с любого вашего гаджета Apple.
▣ Откройте раздел Заметки для получения доступа ко всем своим данным из облака.
Все вносимые изменения будут синхронизироваться с другими вашими гаджетами, на которых включена миграция заметок через iCloud. Если синхронизация данных с облаком на других гаджетах отключена либо заметки синхронизируются через другую учетную запись, например Google, вы не увидите данные в iCloud.
2. Перенесите заметки в другой сервис с синхронизацией
Экосистема гаджетов Apple предполагает использование и синхронизацию заметок через другие почтовые сервисы. Это может быть учётка Google, Outlook или отечественные Mail.ru и Яндекс.
Все заметки при этом переедут из iCloud и не будут доступны при обращении указанным выше способом.
В тему: Как создать резервную копию заметок из iCloud
▶ Добавьте необходимую учетную запись на iPhone по пути Настройки – Заметки – Учетные записи.
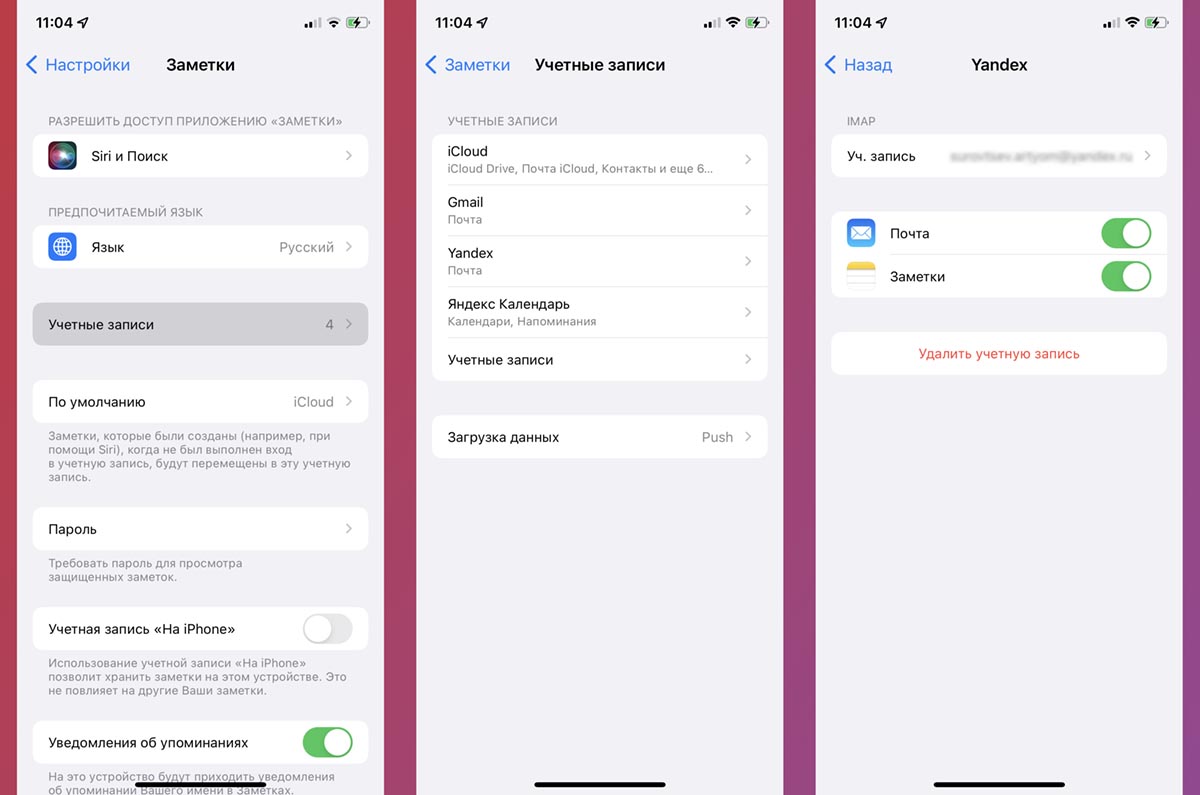
▶ Активируйте синхронизацию заметок для новой учетки.

▶ Перенесите все необходимые заметки на смартфоне из папок На iPhone или iCloud в папку новой учетной записи.
В некоторых случаях заметки могут не переноситься группами. Тогда придется копировать и вставлять записи по одной.
После этого на Windows компьютере сможете получить доступ к перенесенным заметкам в браузере. Для этого будет достаточно перейти в веб-версию используемого для синхронизации данных почтового сервиса.
3. Создайте веб-приложение для работы с заметками на Windows
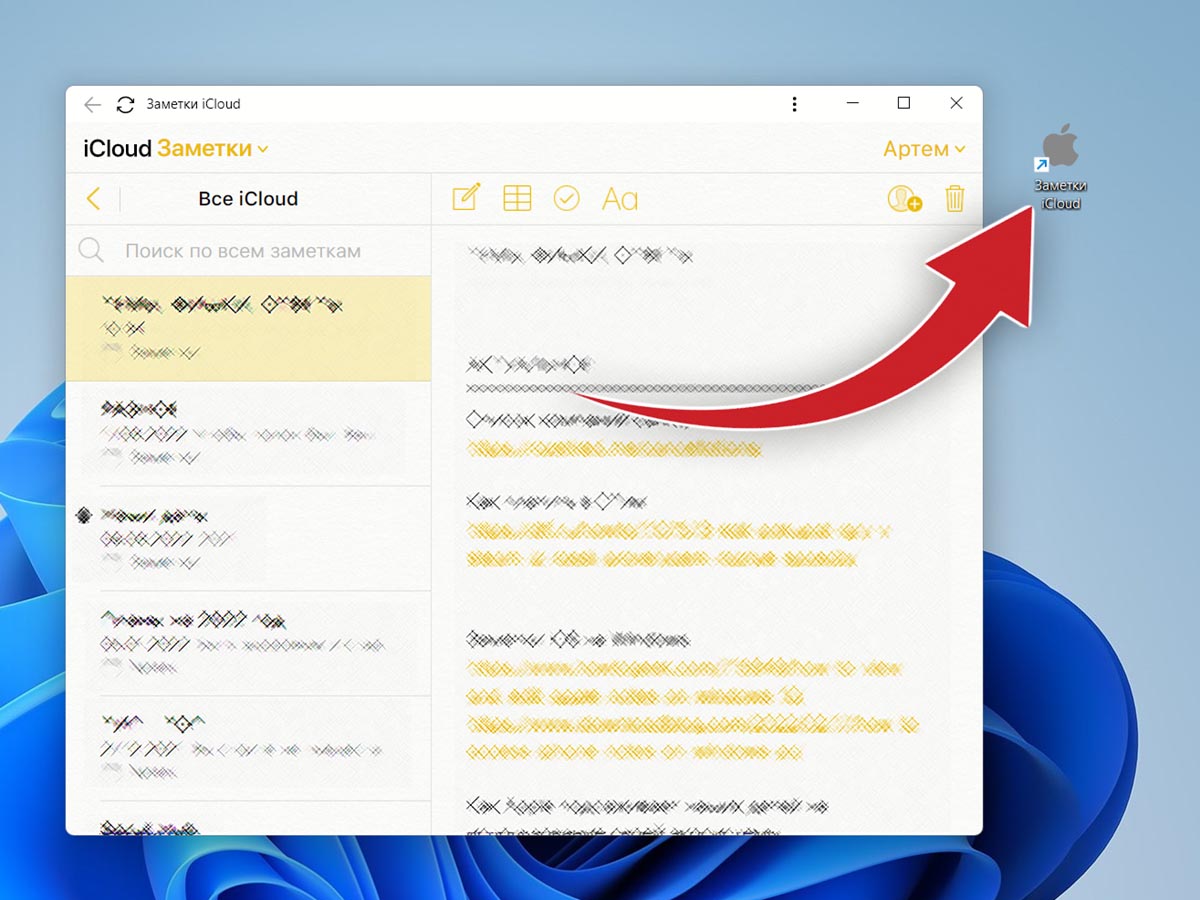
Такой способ удобнее всего, ведь он не требует перегруппировке заметок на смартфоне и не будет запрашивать дополнительное подтверждение со смартфона при повторном запуске утилиты на компьютере.
◉ Перейдите в веб-версию сервиса iCloud в любом браузере на Windows и авторизуйтесь при помощи своей учетной записи Apple ID.
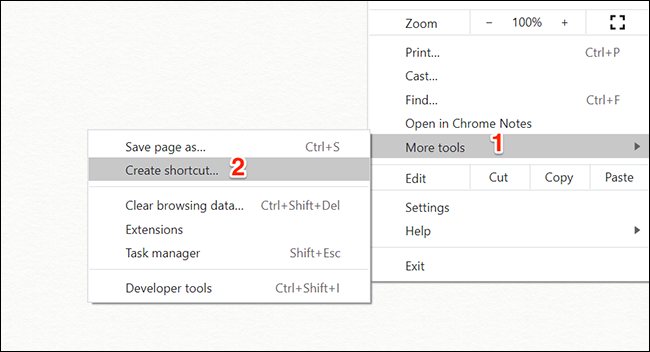
◉ В браузере перейдите в раздел Меню – Дополнительные инструменты – Создать ярлык.

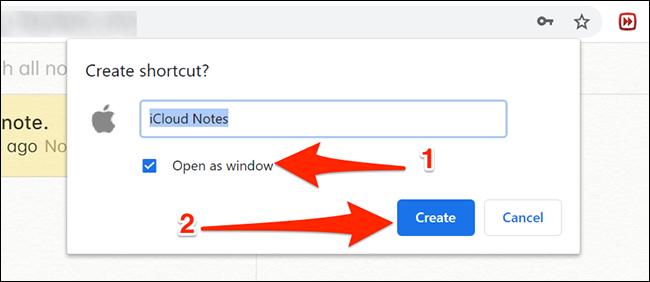
◉ Придумайте имя для веб-приложения и отметьте флаг Открывать в отдельном окне.
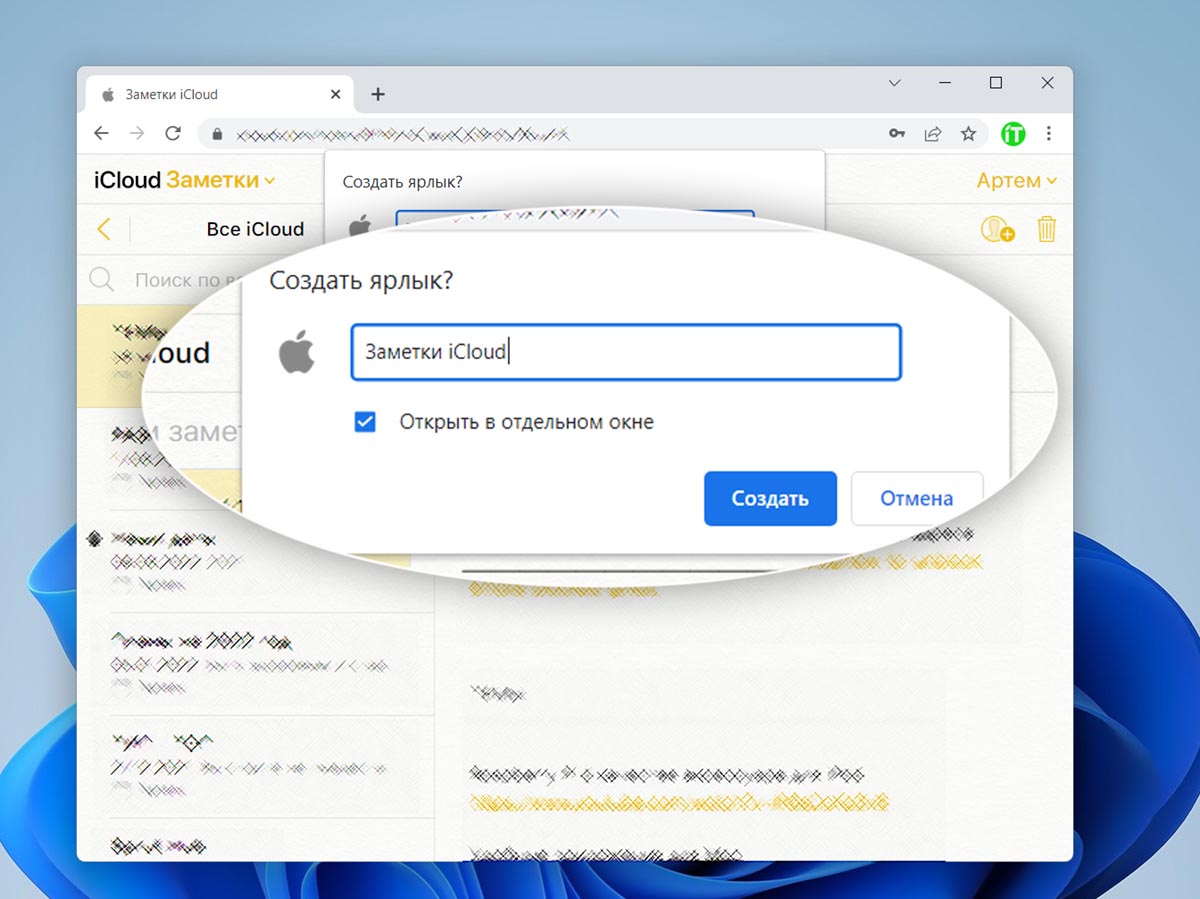
◉ При первом запуске веб-приложения при помощи ярлыка отключите выход из системы при закрытии и нажмите Доверять этому браузеру, чтобы не вводить пароль при каждом входе.
Так вы получите удобное веб-приложение для доступа к заметкам из iCloud на компьютере Windows.
В тему: Все про подготовку к блокировке iCloud в России
(44 голосов, общий рейтинг: 4.32 из 5)
iPhones.ru
Есть несколько способов работать с данными без экосистемы Apple.
Артём Суровцев
@artyomsurovtsev
Люблю технологии и все, что с ними связано. Верю, что величайшие открытия человечества еще впереди!
Quick Links
-
Use the iCloud Website to Access Apple Notes
-
Make a Progressive Web App to View Apple Notes on Windows 10
-
Use Gmail to View Apple Notes on Windows 10
If you use Windows 10, you know that there’s no native app to access Apple Notes on your PC. However, there are some other ways to access your iPhone, iPad, and Mac notes on your Windows 10-based computer. Here’s how.
Use the iCloud Website to Access Apple Notes
The iCloud website lets you access many of Apple’s services on your non-Apple devices, including Apple Notes. You can use this website on your Windows 10 PC and get access to all your iPhone, iPad, and macOS notes.
First, you need to ensure that your Apple devices’ notes are synced to iCloud.
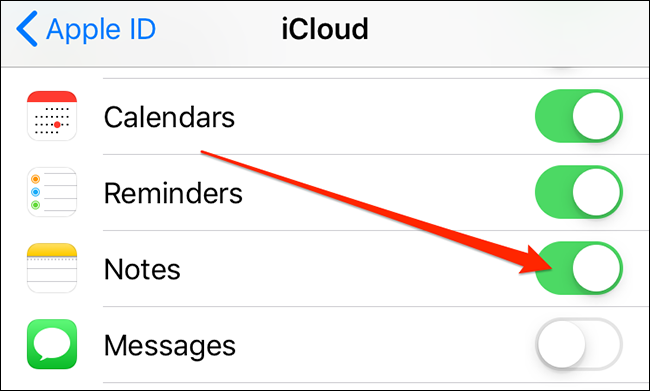
On your iPhone or iPad, head into Settings > [Your Name] > iCloud and turn on the «Notes» toggle.
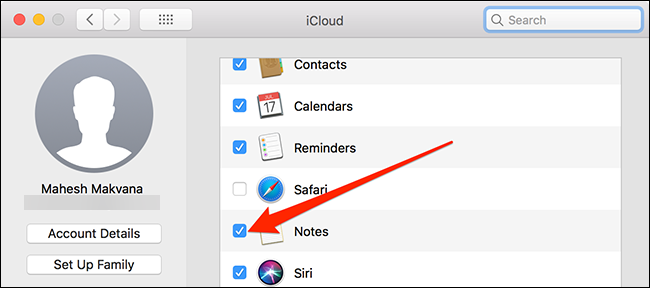
On macOS, click the Apple logo in the top-left corner, select «System Preferences,» choose «iCloud,» and tick the «Notes» box.
Now that your notes are synced to iCloud, you can access them from your PC. Launch a browser on your computer, open the iCloud website, and log in to your account.
Click «Notes» on the iCloud website, and you’ll see all your iOS and macOS notes on your screen.
You can view as well as edit all your notes. You can even create new notes from this screen.
Make a Progressive Web App to View Apple Notes on Windows 10
If you don’t like the browser-like interface for accessing Apple Notes, you can actually make a progressive web app that shows all your notes in an app-like interface.
A progressive web app is basically a wrapper of a website. Instead of having to open the browser and clicking options, you can access all your notes with a single click in a progressive web app.
You can use both Microsoft Edge as well as Google Chrome to make an app for Apple Notes. Here, we show how you can do the task in both these browsers.
Open Edge or Chrome on your PC and access the iCloud website. Log in to your account and click the «Notes» icon to view your notes.
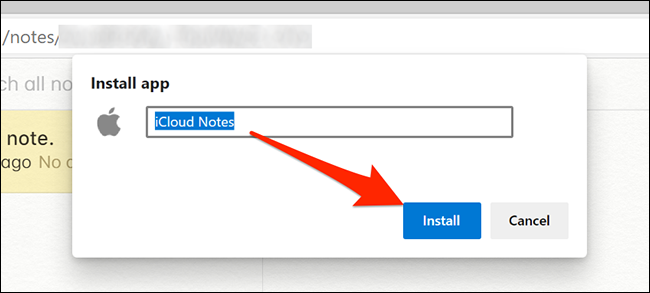
If you’re using Google Chrome, click the three dots in the top-right corner and select More Tools > Create Shortcut.
Tick the «Open as window» box and click «Create.» You can change the app name, though it’s optional.
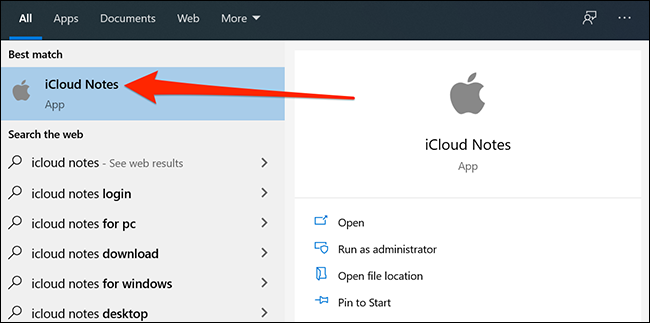
You’ll see the shortcut to your newly created app on your desktop, and you can search for the app using the «Start» menu.
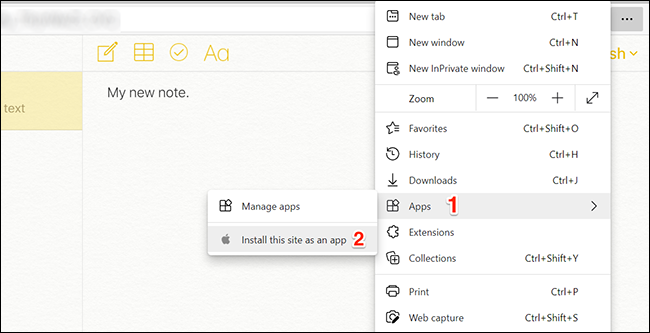
If you’re using Edge, click the three dots in the top-right corner and select Apps > Install this site as an app.
Enter a name for your app and click «Install.» You can then find your app in the «Start» menu.
Clicking on this app opens Apple Notes as if you’ve installed the actual Notes app on your Windows 10 PC. Standard browser elements like the address bar and the bookmarks bar are all stripped off, giving you the pure native app’s feel and look.
Since these are standard Windows apps, you can uninstall them if you no longer need them.
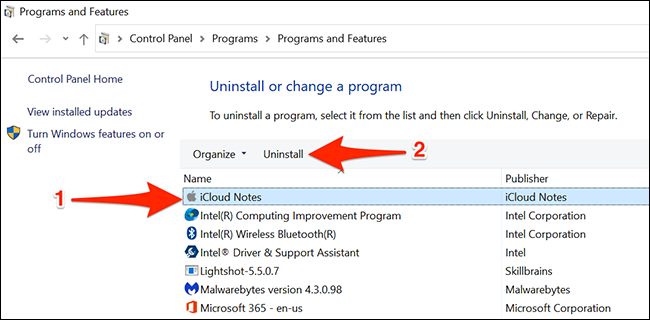
You can do this by heading into Control Panel > Uninstall a program, selecting the app in the list, and clicking the «Uninstall» option.
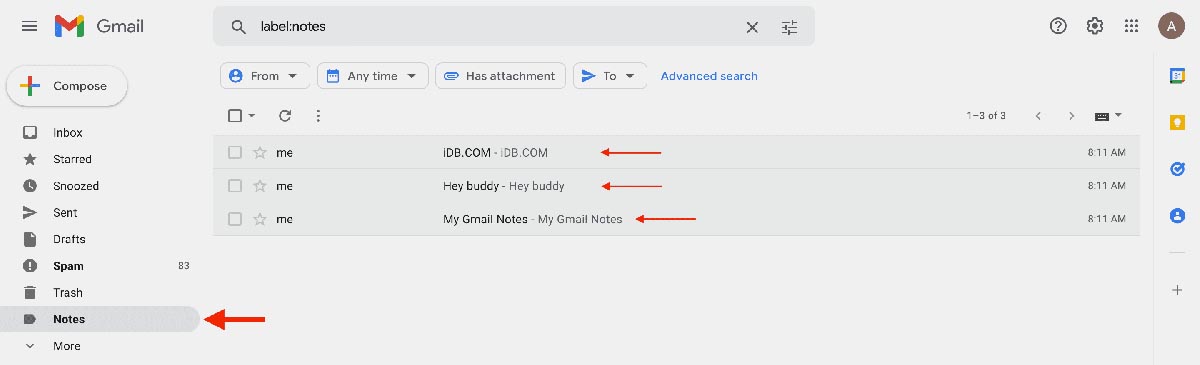
Use Gmail to View Apple Notes on Windows 10
If you use Gmail, you can actually integrate Gmail with Apple Notes and view all your iOS and macOS notes on your Windows 10 PC.
Here are a few things that you should know before you do this:
- You can’t import your existing notes into Gmail. Only the notes you create after performing this procedure will appear in your Gmail account.
- Gmail doesn’t let you edit your notes. You can only view your notes. Your notes are editable only on your Apple devices.
If that’s okay with you, start by heading into Settings > Passwords & Accounts > Gmail and turning on the «Notes» toggle on your iOS device.
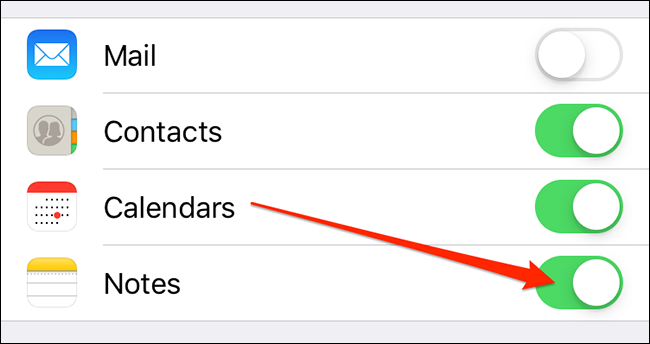
If you’re running iOS 14 or later, you need to head into Settings > Contacts > Accounts > Gmail and enable the «Notes» toggle.
Once you do that, Gmail will create a new folder named «Gmail» in the Notes app on your iOS device. Any notes you create within this «Gmail» section are accessible from your Gmail account.
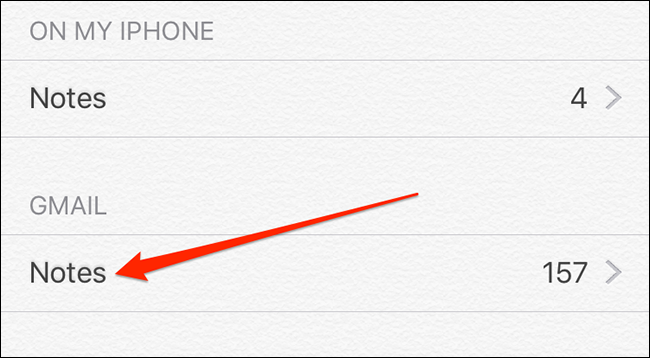
To view your Apple Notes in Gmail, open the Gmail site and click «Notes» on the left. You’ll see all the notes that you’ve created under the «Gmail» section in the Notes app on your devices.

That’s all there is to it.
If you often exchange data like this, it’s a good idea to integrate your iPhone with your Windows PC.
If you’re a Windows PC user but rely on Apple Notes to organize your thoughts, jot down ideas, or manage daily tasks, you may be wondering whether there’s a way to access and use this tool outside the Apple ecosystem. Although Apple Notes is not natively supported on Windows, there are a few clever workarounds that allow you to view, edit, and manage your notes without needing a Mac or iPhone.
In this article, we’ll explore how to use Apple Notes on a Windows PC effectively—through iCloud and other alternatives. Whether you’re transitioning between devices or just need access at work or school, you’ll find these solutions both simple and practical.
Accessing Apple Notes via iCloud
The most direct and official way to access your Apple Notes on a Windows PC is through iCloud.com, Apple’s cloud-based platform. This method doesn’t require installing special apps or programs and allows access from any browser.
Steps to Access Apple Notes Using iCloud
- Open your preferred web browser (Chrome, Edge, Firefox, etc.).
- Go to the official iCloud website: www.icloud.com.
- Log in using your Apple ID credentials.
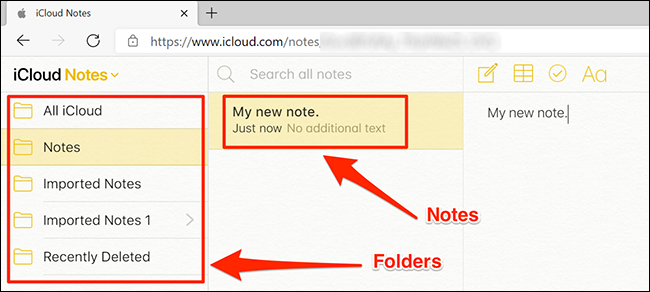
- Look for the Notes icon in the dashboard and click on it.
Once inside, you’ll see all your synced notes. You can create new notes, edit existing ones, move them into folders, and even search through them.

This method keeps your notes synced across all platforms—Mac, iPhone, iPad, and now even your Windows PC. It’s a great solution for occasional note-taking or emergency access when you’re unable to use an Apple device.
Making Sure Notes Are Synced with iCloud
Before relying on iCloud to access your Apple Notes, ensure that iCloud Sync is enabled on your Apple device. If it’s not, iCloud won’t save or sync your notes, making them unavailable through the browser interface.
To enable iCloud Sync for Notes:
- Go to Settings on your iPhone or iPad.
- Tap on your name to open Apple ID settings.
- Select iCloud.
- Scroll down and toggle the switch for Notes to the ON position.
Now, every note you create or edit on your Apple device will automatically be available on iCloud—and, by extension, your Windows PC.
Helpful Tips for Using Apple Notes on Windows
Although the web version of Apple Notes is less polished compared to the app on an iPhone or Mac, it still offers several useful features:
- Rich text formatting: Use bold, italics, lists, and even tables.
- Folder organization: Move and sort notes into folders for better structure.
- Search function: Quickly find notes by keyword or content.
- Real-time sync: Changes made on one platform reflect on all devices.
But keep in mind that certain advanced features, like scanning documents or drawing with Apple Pencil, won’t be accessible on the web version.

Alternatives to Consider
If you find the iCloud method limiting, or simply want a more seamless cross-platform experience, you might consider these options:
1. Use Third-Party Note Apps with iCloud Integration
Apps like Microsoft OneNote or Evernote offer more robust Windows support while syncing with your Apple Notes through iCloud or other import tools. These are ideal if you’re switching away from Apple Notes but want to preserve your old notes.
2. Manually Copy Notes to a Platform-Neutral App
If you only need occasional access, an option could be to copy your most used notes into Google Keep or Notion. It’s not automated, but it lets you work cross-platform easily.
Security and Privacy Considerations
When accessing your Apple ID from a Windows browser, always use a secure connection and log out when you’re done—especially on a shared computer. Also, make sure to enable two-factor authentication on your Apple ID for added protection.
Final Thoughts
While Apple Notes isn’t natively built for Windows users, using iCloud.com is a convenient and secure way to bridge the gap between platforms. Whether you’re jotting down a quick idea or organizing a complex project, accessing your notes from anywhere ensures you’re always productive, no matter which device is in front of you.
With just a few small adjustments, you can effectively integrate Apple Notes into your Windows workflow—without missing a beat.
Acknowledging the gap in Apple’s ecosystem, Apple Notes is now available on Windows through iCloud. This means you can access your iPhone or iPad notes directly from a Windows PC or laptop, and vice versa. The integration allows seamless syncing of notes across devices, ensuring you never miss a crucial note again.
As a self-proclaimed productivity enthusiast, I’ve always been fascinated by the power of note-taking to supercharge my workflow.
For me, there’s something undeniably satisfying about transforming scattered ideas into a cohesive, well-organized system that fuels my creativity and streamlines my tasks.
But, let’s be real – traditional note-taking methods can be a real productivity killer.
Inconsistent formatting, limited searching capabilities, and difficulty accessing notes across devices are just a few of the challenges I’ve faced as a dedicated note-taker.
That is until I discovered Apple Notes for Windows – a game-changing tool that has revolutionized my approach to note-taking and transformed me into a more organized, efficient version of myself.
The Power of Note-Taking
As I sit down to write this section, I’m reminded of a conversation I had with a friend who’s a master note-taker.
She swears by her trusty notebook and pen, claiming that note-taking is the secret to her incredible productivity.
And you know what?
I believe her.
In fact, I’m convinced that note-taking is one of the most underappreciated tools in our productivity arsenal.
But before we dive into the benefits of note-taking, let’s acknowledge the challenges faced by traditional note-takers.
Have you ever found yourself struggling to keep up with inconsistent formatting and organization?
Or maybe you’ve experienced the frustration of trying to search for a specific note amidst a sea of scribbled notes?
Or perhaps you’ve encountered the limitation of not being able to share your notes across devices – forcing you to start from scratch every time you switch between your laptop, tablet, or phone.
Yeah, I thought so.
The truth is, traditional note-taking methods can be cumbersome and ineffective.
That’s why I’m excited to introduce you to a game-changer for note-takers: Apple Notes for Windows!
The Benefits of Note-Taking
So, what exactly are the benefits of note-taking?
Well, my friend, let me tell you:
- Improved Retention: When you take notes by hand or digitally, your brain is more likely to retain the information. In fact, research has shown that students who take notes by hand tend to perform better on exams than those who type their notes.
- Enhanced Creativity: Note-taking can actually help stimulate your creative juices! By processing and organizing information, you’re more likely to make connections between seemingly unrelated ideas – leading to innovative solutions.
- Increased Organization: Notes provide a tangible record of your thoughts and ideas, allowing you to track progress, identify patterns, and prioritize tasks.
Unlocking Your Productivity with Apple Notes for Windows
Now that we’ve covered the benefits of note-taking, let’s talk about how Apple Notes for Windows can help you unlock your productivity potential.
With this powerful tool, you’ll be able to:
- Organize Your Thoughts: Apple Notes for Windows allows you to create and manage notes across multiple devices – keeping everything organized and easily accessible.
- Search and Filter with Ease: Say goodbye to the frustration of searching for a specific note! Apple Notes for Windows provides robust search and filtering capabilities, making it easy to find what you need when you need it.
- Collaborate and Share: Need to share your notes with colleagues or team members? Apple Notes for Windows makes it easy to collaborate and share your notes across devices – no more starting from scratch!
In the next section, we’ll dive deeper into the specifics of how Apple Notes for Windows can revolutionize your note-taking experience.
But for now, I hope you’re as excited as I am about the possibilities this powerful tool offers!
I’m excited to share with you a game-changing tool that’s been making waves in the productivity world – Apple Notes for Windows!
If you’re anything like me, you’re always on the lookout for ways to boost your workflow and stay organized.
And trust me, this note-taking app has got it all.
Easy Note-Taking with a User-Friendly Interface
Let’s face it: taking notes can be a real drag if the tool isn’t user-friendly.
But Apple Notes for Windows is designed to make note-taking a breeze.
The interface is clean and intuitive, making it easy to jot down ideas as they come to you.
Whether you’re in a meeting, brainstorming with colleagues, or simply trying to capture a great idea, Apple Notes makes it simple.
Advanced Organization and Tagging System
One of the biggest challenges with note-taking apps is organizing all those notes!
But Apple Notes for Windows has got that covered too.
The app features an advanced tagging system that allows you to categorize your notes by project, task, or priority.
This means you can easily find what you’re looking for and stay focused on the tasks at hand.
Seamless Syncing Across All Devices
We’ve all been there – trying to access our notes from one device only to realize they’re not synced up with our other devices.
But Apple Notes for Windows takes care of that problem too!
With seamless syncing across all your devices, you can access your notes from anywhere, at any time.
Integration with Other Microsoft Office Apps
Last but certainly not least, Apple Notes for Windows integrates seamlessly with other Microsoft Office apps like Word and PowerPoint.
This means you can easily turn your notes into a polished report or presentation, taking your productivity to the next level.
In conclusion, Apple Notes for Windows is a game-changer for note-takers everywhere.
With its user-friendly interface, advanced organization and tagging system, seamless syncing across all devices, and integration with other Microsoft Office apps, this tool has got everything you need to stay organized and productive.
So why wait?
Give it a try today and unlock your productivity potential!
Unlocking Productivity with Apple Notes
I’m excited to share a game-changer for note-takers – Apple Notes on Windows!
As someone who’s always looking to optimize their productivity, I was thrilled to discover how this powerful tool can revolutionize your workflow.
In this section, I’ll show you how Apple Notes can become your go-to app for note-taking and organization.
Your Centralized Hub for Note-Taking and Organization
One of the most significant benefits of using Apple Notes is its ability to serve as a centralized hub for all your notes and ideas.
Gone are the days of scattered notes, scraps of paper, or multiple apps cluttering up your digital space!
With Apple Notes, you can store all your thoughts, reminders, and tasks in one place.
Imagine being able to quickly access and review all your notes, no matter where you are.
Enhancing Collaboration: Share Your Genius with Others
Collaboration is a crucial aspect of productivity, and Apple Notes makes it incredibly easy to share your ideas and insights with others.
Whether you’re working on a project with colleagues or simply want to bounce ideas off friends and family, sharing notes has never been more seamless.
You can even create shared notebooks for teams or groups, making it simple to work together towards a common goal.
Streamlining Workflow: Automate Your Tasks and Processes
But wait, there’s more!
Apple Notes also allows you to streamline your workflow by automating repetitive tasks and processes.
For instance, you can set reminders for upcoming deadlines, create templates for frequently used notes, or even use the app’s built-in OCR (Optical Character Recognition) feature to digitize physical documents.
The possibilities are endless!
In my next section, I’ll dive deeper into some of the more advanced features and tips for getting the most out of Apple Notes on Windows.
Stay tuned!
Tips and Tricks for Getting the Most Out of Apple Notes
I’m gonna let you in on a little secret: I used to be a serial note-taker.
I’d jot down ideas, reminders, and inspiration wherever I went – from coffee shops to conference calls.
But it wasn’t until I discovered Apple Notes that my note-taking game changed forever.
Now, I know what you’re thinking: “Apple Notes is for Mac users only.” Ah, but no!
With the power of cross-platform compatibility, you can unlock your productivity with Apple Notes on Windows too!
So, without further ado, let’s dive into the tips and tricks that’ll take your note-taking to the next level:
Custom Templates: The Secret to Consistency
When I first started using Apple Notes, I was overwhelmed by the sheer number of templates available.
But then it hit me – why not create my own?
With custom templates, you can standardize your note-taking experience and ensure consistency across all your notes.
For example, you could create a template for meeting notes that includes sections for:
- Date and time
- Attendees
- Agenda topics
- Action items
This way, every time you take notes during a meeting, they’ll be organized and easy to review.
It’s like having a personal note-taking butler ( minus the fancy hat).
Tags and Filters: The Dynamic Duo of Searchability
Tags and filters are the unsung heroes of Apple Notes.
By applying relevant tags to your notes, you can quickly find specific information whenever you need it.
Let’s say you’re working on a project with multiple tasks and deadlines.
You could create separate tags for each task and apply them to individual notes.
Then, when you want to review all the notes related to a particular task, simply search by tag – voilà!
Integrating with Other Apps: The Power of Harmony
The beauty of Apple Notes lies in its seamless integration with other apps and services.
For instance, you can link your Todoist tasks directly to your Apple Notes, ensuring that your tasks and notes are always in sync.
Evernote users can also enjoy this harmonious marriage by linking their accounts to Apple Notes.
This means you can access all your notes from either platform – the ultimate note-taking flexibility!
So, there you have it – my top tips for getting the most out of Apple Notes on Windows.
With custom templates, tags and filters, and integrations with other apps, you’ll be well on your way to becoming a productivity powerhouse.
What’s your favorite tip or trick for using Apple Notes?
Let me know in the comments below!
Final Thoughts
In conclusion, Apple Notes for Windows is a game-changer for anyone looking to unlock their productivity.
As someone who’s tried and tested various note-taking tools, I can attest that this app has revolutionized my workflow.
With its user-friendly interface, advanced organization features, and seamless syncing capabilities, Apple Notes has become an indispensable tool in my digital arsenal.
Personally, what I love most about Apple Notes is how it’s allowed me to streamline my thinking and focus on the tasks at hand.
By creating a centralized hub for note-taking and organization, I’ve been able to eliminate the stress of searching for lost notes or trying to recall important details.
It’s amazing how much more productive you can be when your thoughts are organized and easily accessible!
If you’re looking to take your productivity to the next level, I highly recommend giving Apple Notes a try.
With its user-friendly interface and powerful features, it’s the perfect tool for anyone looking to stay ahead of the curve.
Want to access your Apple Notes on a PC? In this tutorial, we’ll show you how to create, edit, move, delete, and work on your iPhone notes on a Windows computer.
Before we get started, you should know that the built-in Apple Notes app on iPhone, iPad, and Mac lacks a Windows version or browser extension. But thanks to the two methods shown below, accessing Apple Notes on your Windows PC is easy.
Use the web version of iCloud Notes
This is not only the easiest but also the best method to view, create, edit, and delete your Apple Notes on a Windows or Linux computer. All you need is a web browser.
1) Visit iCloud.com in Chrome, Edge, Firefox, or a browser of your choice on your Windows PC.
2) Sign in using the same Apple Account you use on your iPhone. If you don’t know your Apple ID, here’s how to find it.
3) Click Notes.
4) You can now access all your Apple Notes. You can also create a new note, open locked notes, edit existing ones, move or delete notes, recover recently deleted notes, create and remove notes folders, and do almost everything else. All the changes you make on the web version of iCloud Notes will also sync to your Apple devices, such as iPhone, iPad, Mac, and Vision Pro.
Note:
- Using the above steps, you can only access those notes that are stored in iCloud. If you have added your Gmail or other third-party accounts to your iPhone and are creating notes in it, please see the next method.
- And if you were creating notes under the On My iPhone/iPad/Mac folders, these notes are saved locally only to that particular device. To access these on a Windows PC, you’ll have to move them to iCloud first. Once they are available in iCloud, you can access them in a browser on your non-Apple device.
Use Gmail, Outlook, or Yahoo to access your iPhone Notes
In addition to iCloud and local On My iPhone accounts, you can add third-party locations like Google, Outlook, and Yahoo to the Apple Notes app. To do that, go to iPhone Settings > Apps > Notes > Accounts > Add Account.
Once you have added your preferred accounts, open the Notes app and tap Folders to see all the possible locations where you can create notes inside the iOS Notes app.

Use the steps below to to see these non-iCloud notes on a Windows PC.
Gmail
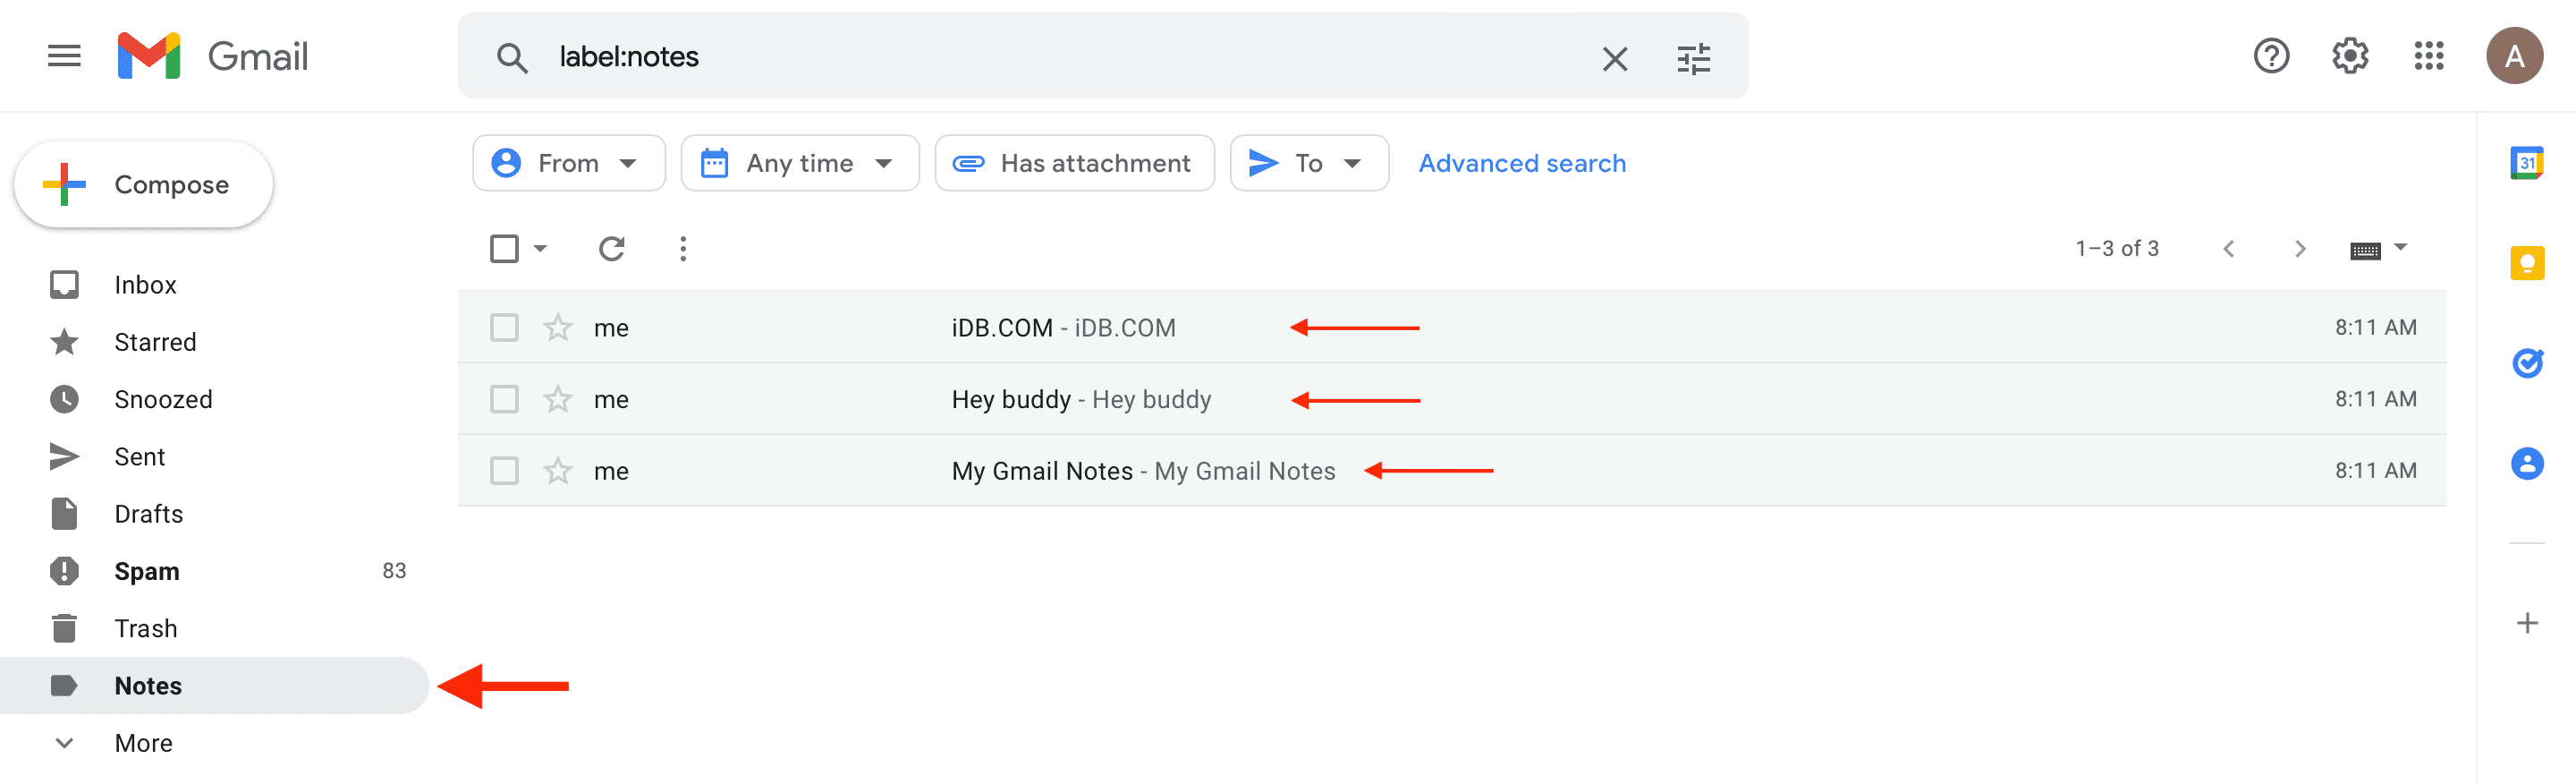
You can access (but not edit) all the notes you have under the Gmail folder of the iPhone Notes app by visiting mail.google.com on your Windows PC and going to the Notes section. Make sure to use the same Google account that’s on your iPhone.
Outlook
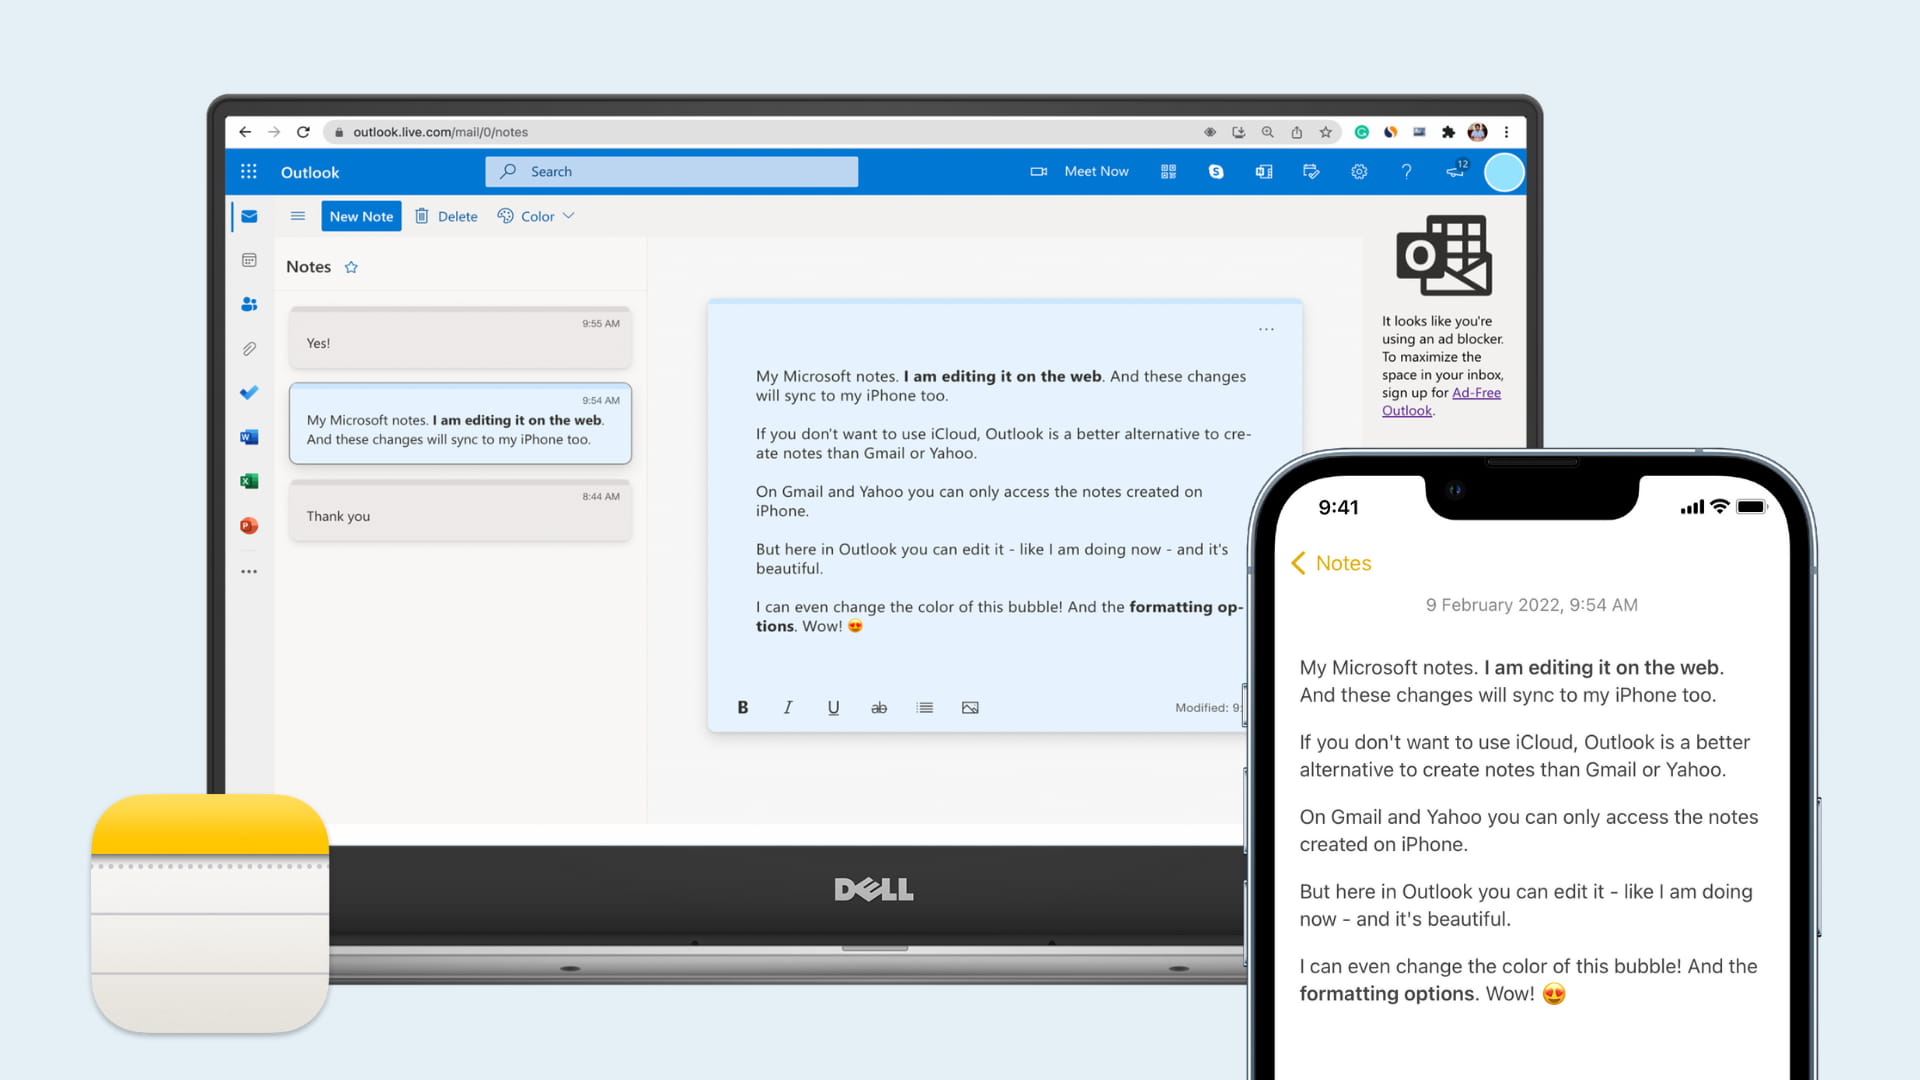
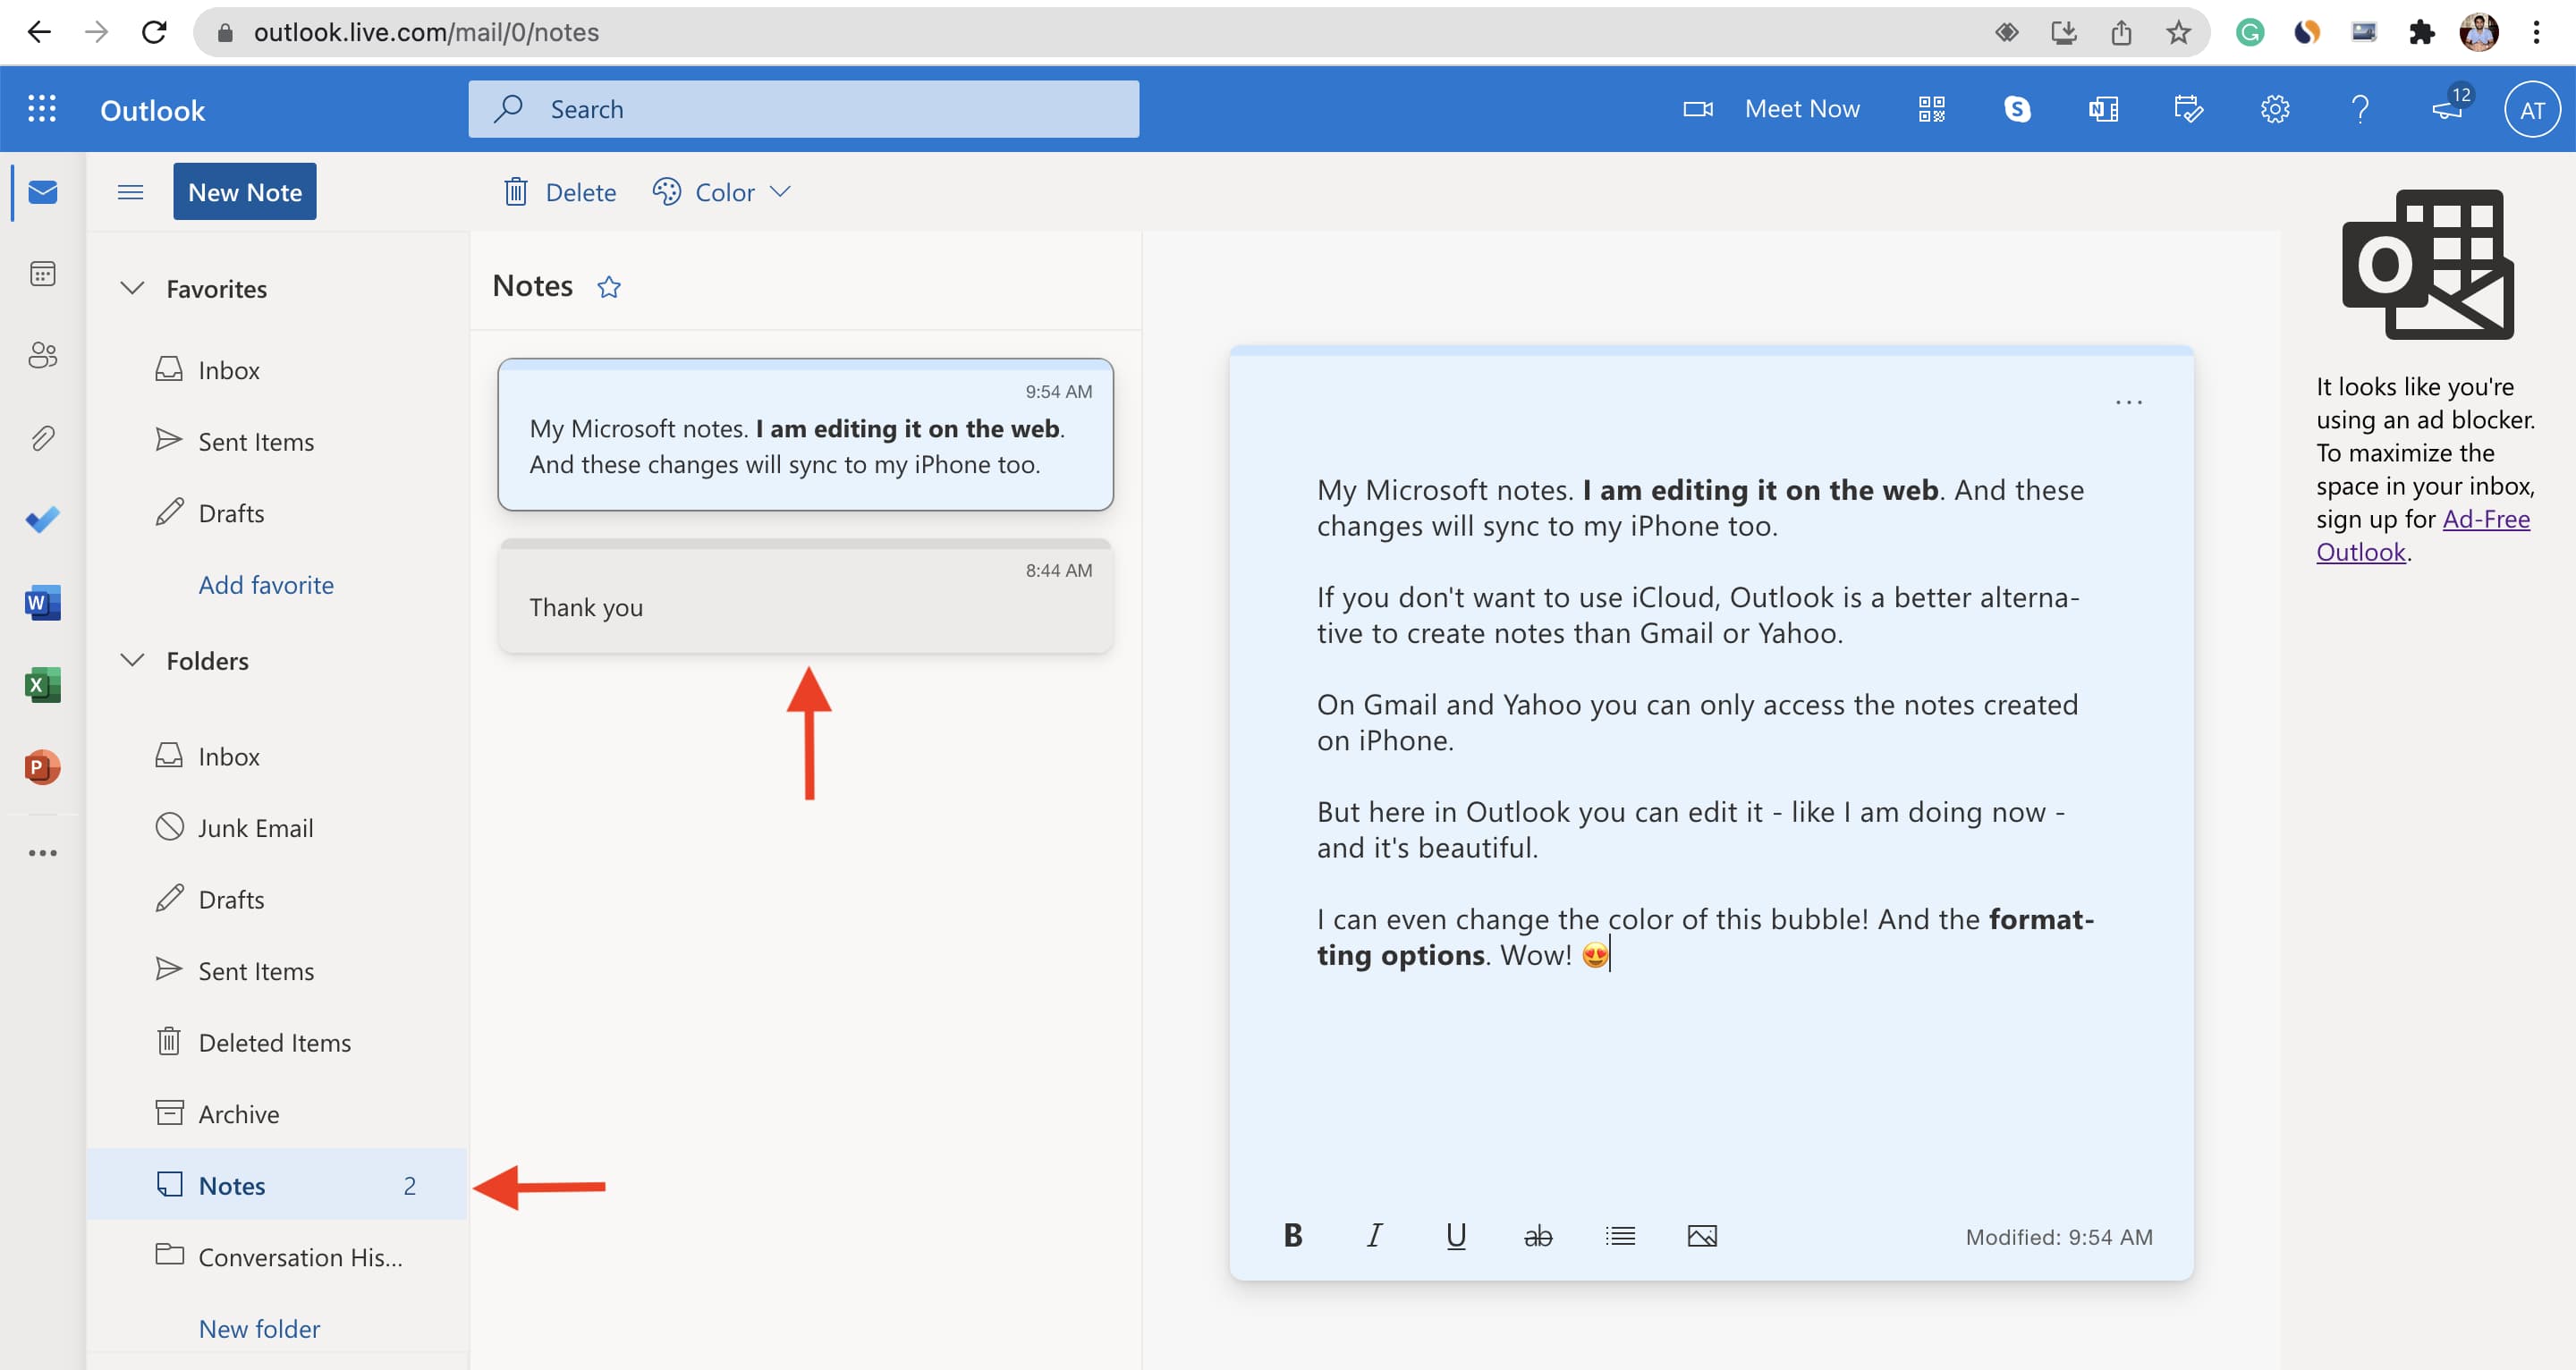
You can access and edit notes saved in the Outlook folder of the iPhone Notes app on the web by logging in at outlook.live.com and selecting the Notes folder. All edits you make on the web will sync to your iPhone. If they don’t, just create a new note in the Outlook section of the iPhone Notes app. This will force everything to sync, and you will see the changes on the web and iPhone.
Compared to Gmail and Yahoo, Outlook’s approach is better as it lets you edit on the web and syncs the changes everywhere.
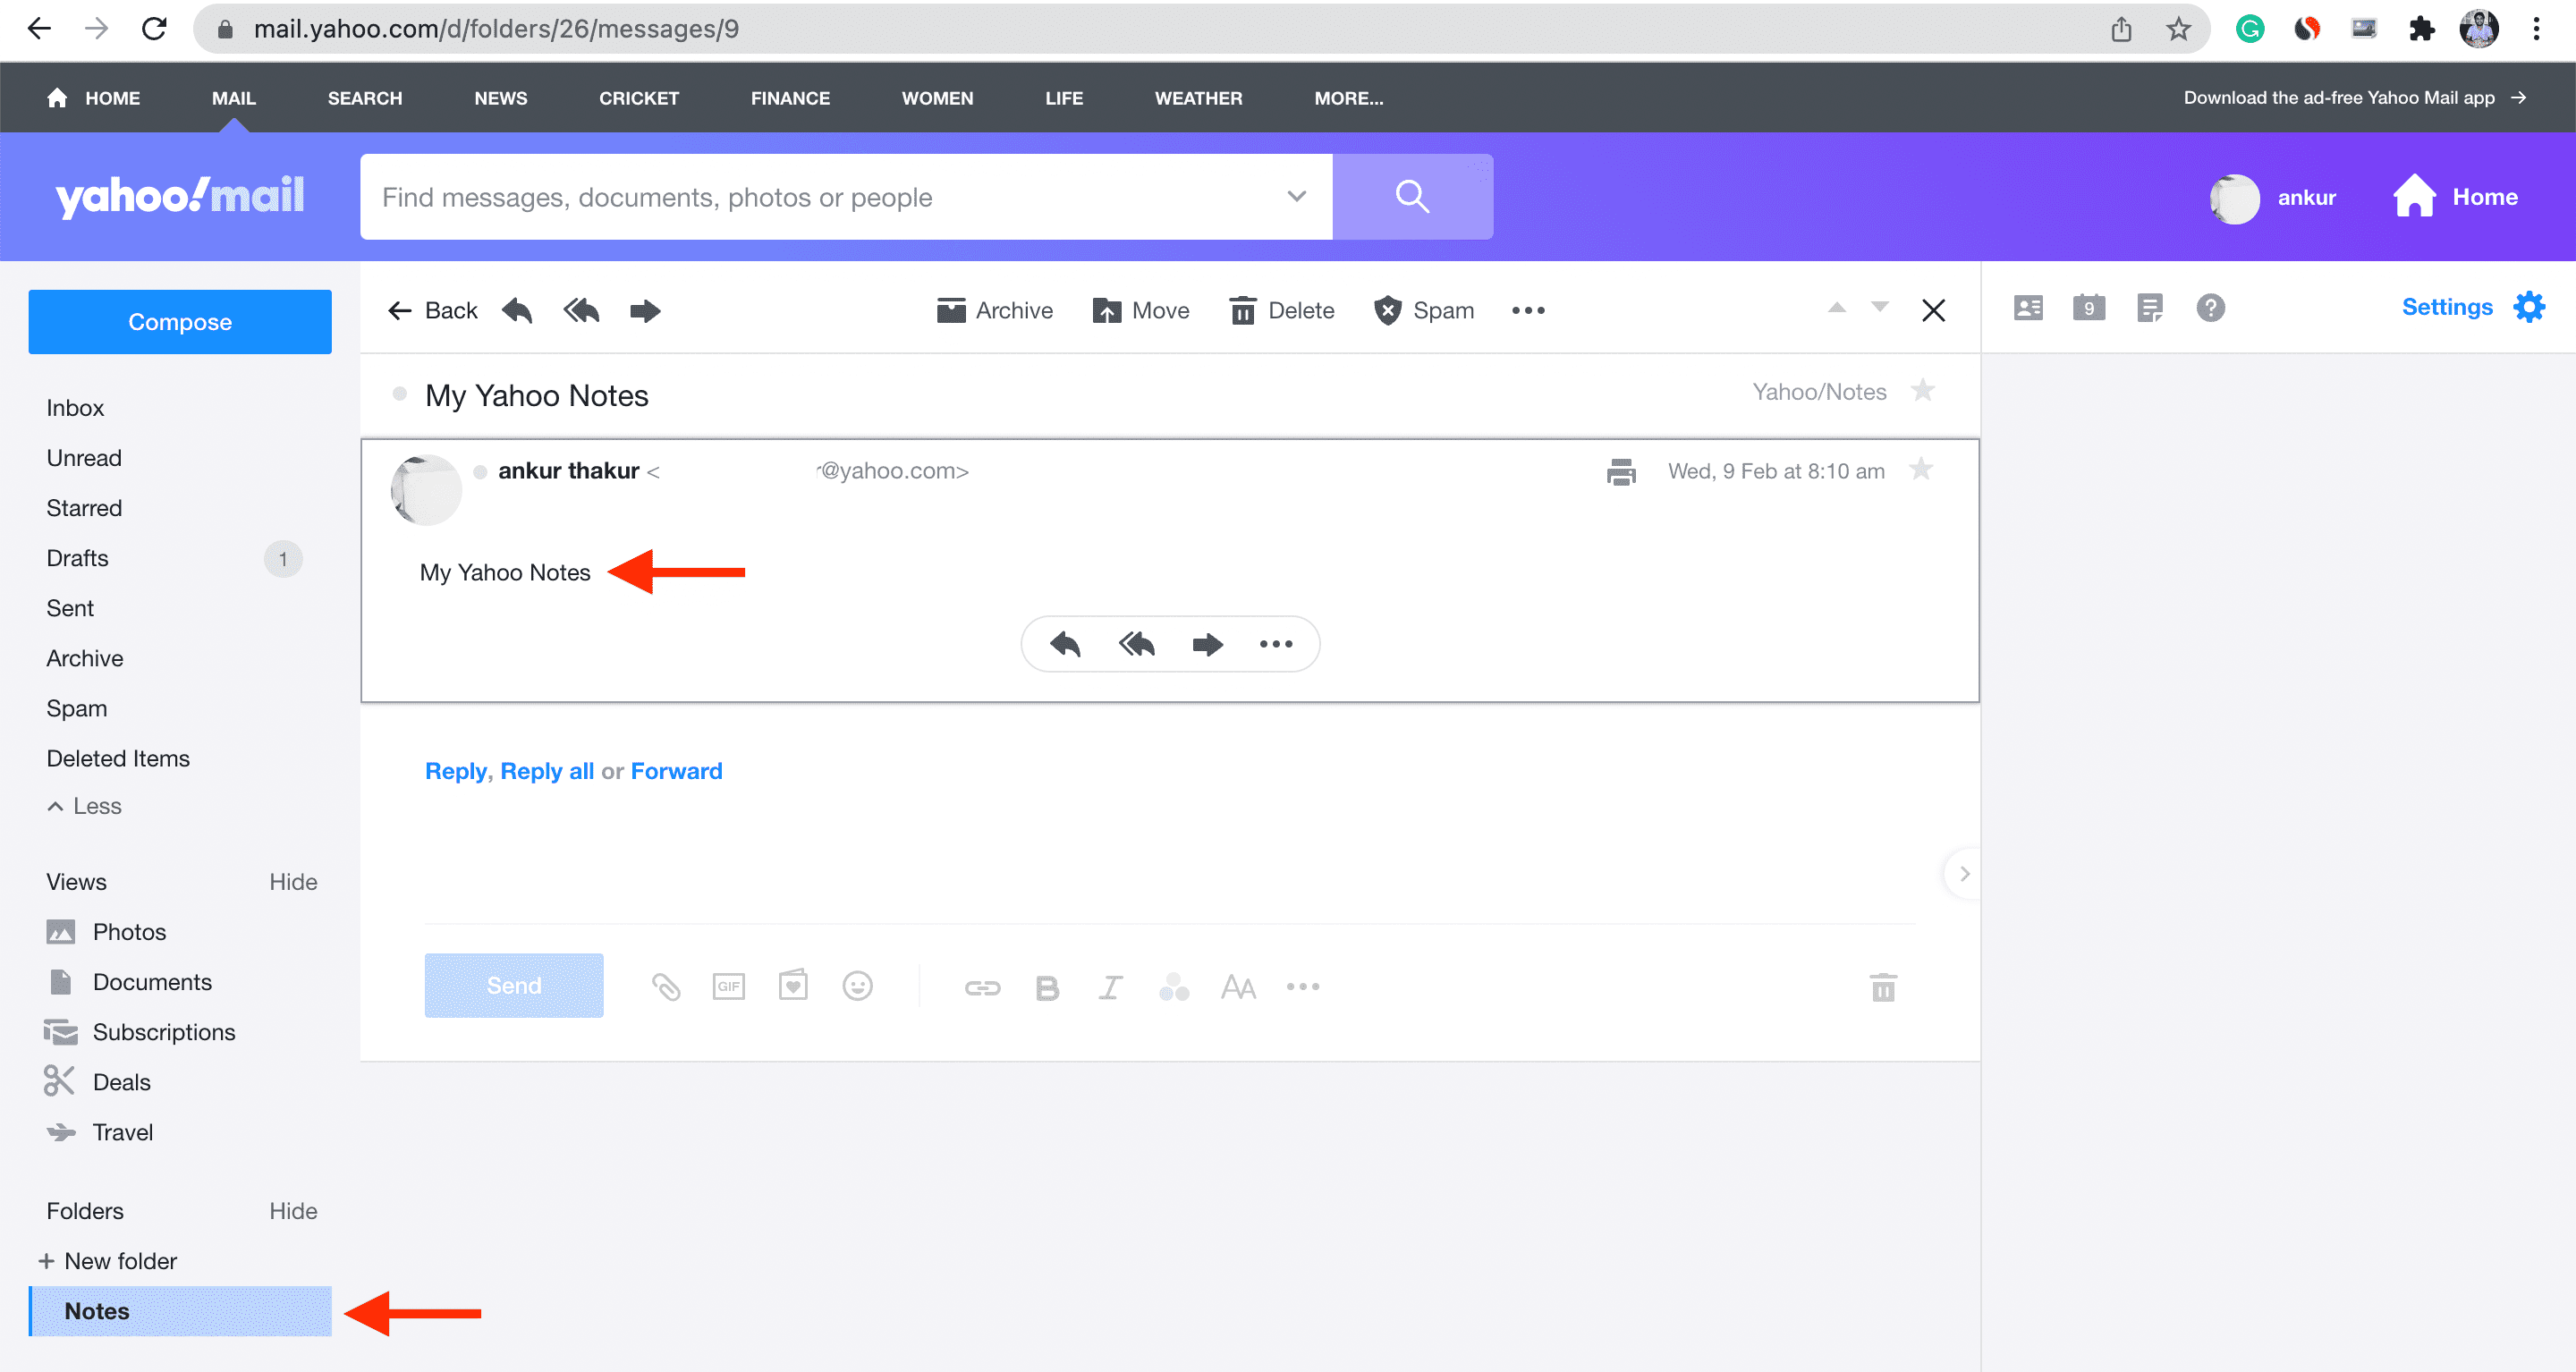
Yahoo
Similarly, notes you create under the Yahoo folder inside your iPhone Notes app can be accessed (not edited) by opening mail.yahoo.com on your PC and going to the Notes section.
One major downside of using Gmail, Yahoo, Outlook, or a non-Apple service is that it won’t upload your existing iCloud notes to them and make them accessible inside Gmail, Yahoo, or Outlook.
Another piece of information you must know is that you can move notes in Gmail, Yahoo, or Outlook to iCloud, but you can’t move iCloud notes to Gmail, Yahoo, or Outlook.
All in all, these are two of the easiest ways to access notes created inside the official Apple Notes app on your Windows PC.
In summary:
- If you save your notes to iCloud, follow the first method to access them on the web.
- And if you save your notes elsewhere, like Gmail, Outlook, or Yahoo, use the second method to access them through their respective services on the web.
Finally, I would leave you with this piece of advice — if you regularly use an iPhone and a Windows PC or Android phone, consider checking out some excellent cross-platform note-taking apps like Microsoft OneNote, Simplenote, Google Keep, and Evernote. These services offer their entire feature suite on all platforms, and either one of them can be an excellent Notes app alternative.
More on notes:
- 32 tips to use Apple Notes like a pro
- How to use a different font in the Apple Notes app
- 12 ways to create a new note quickly on your iPhone or iPad