
In today’s tech-centric world, versatility and compatibility are paramount. For those who are accustomed to the sleek functionality of Apple products but find themselves in a Windows environment, achieving a seamless connection between devices can be a challenge. One of the most sought-after ways to bridge this gap is by connecting an Apple mouse to a Windows system. This article will guide you through the process, offering insights into different types of Apple mice, compatibility issues, and tips for ensuring a smooth experience.
Understanding Apple Mouse Types and Compatibility
Before delving into the specifics of connecting your Apple mouse to a Windows computer, it’s vital to understand the different types of Apple mice that exist. Apple has produced various mouse models over the years, each with unique features and functionalities. The main models include:
The Apple Magic Mouse
The Apple Magic Mouse, known for its sleek design and multi-touch surface, is a favorite among Apple enthusiasts. This mouse connects via Bluetooth, making it ideal for wireless use. However, it can also be paired with Windows PCs, albeit with some limitations.
The Apple Mouse (Wired and Wireless)
The earlier versions of the Apple Mouse, known as the Mighty Mouse, were available in both wired and wireless formats. Though not as popular today, these models still have dedicated users who wish to maintain compatibility with their Windows systems.
Preparing Your Apple Mouse for Windows
Before you can establish a connection between your Apple mouse and your Windows PC, there are a few preparation steps to consider.
Ensure Proper Functionality
To begin, make sure that your Apple mouse is fully functional. If the mouse is not responsive, it may require new batteries (for wireless models) or a cleaning if it’s a wired version.
Check Bluetooth Features
For wireless models like the Magic Mouse, ensure that your Windows computer has Bluetooth capabilities. This feature is generally standard on modern laptops but may require a Bluetooth adapter for desktop computers. Here’s how you can check:
- Open Settings: Click on the Start menu and select the gear icon (Settings).
- Go to Devices: Choose ‘Devices’ from the options provided.
- Look for Bluetooth: In the left-hand menu, click on ‘Bluetooth & other devices.’ If you see options here, your device has Bluetooth.
Now that you have verified that your mouse and your Windows computer are ready, follow these detailed steps to connect them successfully.
For the Apple Magic Mouse
Step 1: Activate Bluetooth on Your Windows Computer
Before proceeding with the mouse setup, ensure that Bluetooth is turned on. Here’s how:
- Open the Bluetooth & other devices settings as instructed above.
- Toggle the Bluetooth switch to the On position.
Step 2: Put Your Apple Magic Mouse in Pairing Mode
To make your Apple Magic Mouse discoverable by your Windows computer, it needs to be in pairing mode. Follow these steps:
- Turn on the mouse by flipping the switch on the bottom.
- If the mouse has been connected to another device, you might need to remove that connection for pairing. Hold the mouse still for a few moments.
Step 3: Add the Mouse to Your Windows Devices
After enabling Bluetooth and putting your mouse in pairing mode, it’s time to add it to your device list:
- Click on Add Bluetooth or other device.
- Select Bluetooth from the options provided.
- When your Magic Mouse appears in the list, click on it to pair.
- Follow any on-screen instructions for installation completion.
Troubleshooting Connection Issues
If your mouse does not connect, try the following troubleshooting tips:
- Ensure the mouse is charged or has fresh batteries.
- Turn off and back on the Bluetooth on your computer.
- Remove any previous connections to the mouse and try to reconnect.
Step 4: Configure Mouse Settings
Once successfully connected, you may want to adjust your mouse settings for better usability. Open Mouse settings in Windows to customize speed, sensitivity, and button configurations.
For Older Apple Mice (Mighty Mouse)
The process for connecting the older Mighty Mouse models may vary slightly based on whether they are wired or wireless.
Step 1: For Wired Mice
Simply plug the wire into the USB port of your Windows computer. The operating system should automatically recognize the device and configure it appropriately.
Step 2: For Wireless Mice
Follow the same general Bluetooth connection steps as listed for the Apple Magic Mouse. For older wireless models with a USB receiver, insert the USB dongle into your computer, and it should detect the mouse automatically.
Utilizing Third-Party Software for Enhanced Use
While Apple devices are generally designed for seamless integration within their ecosystem, you can enhance the functionality of an Apple mouse on Windows using third-party software tools.
Using Boot Camp for Mac Users
If you are using Boot Camp to run Windows on a Mac, connecting your Apple mouse is typically straightforward. Boot Camp streamlines the process, making it easy to utilize Apple peripherals. Simply follow the connection instructions, and the drivers will usually install automatically.
Alternative Software Solutions
There are also various software solutions available that cater to specific functionalities of the Apple mouse:
- SmoothScrolling: This software can enhance the scrolling experience, providing a smoother response that mimics macOS.
- X-Mouse Button Control: It allows for extensive configuration of mouse buttons and provides additional functionality for enhanced productivity.
Common Issues and Solutions When Using an Apple Mouse on Windows
Despite the ease of connecting an Apple mouse to a Windows system, users may encounter several challenges. Below is a compilation of common issues along with their potential solutions:
1. Mouse Lag or Unresponsive Movement
If you experience slow response times:
- Check Bluetooth Interference: Ensure that there are no electronic devices nearby that could interfere with the Bluetooth signal.
- Position the Mouse: Make sure there’s a clear line of sight between your mouse and the computer’s Bluetooth receiver.
2. Driver Issues
Sometimes, the operating system may struggle to recognize drivers:
- Update Drivers: Go to Windows Update and ensure that your drivers, especially Bluetooth drivers, are up to date.
- Reinstall Bluetooth Driver: Uninstall and then reinstall your Bluetooth drivers from the Device Manager if issues persist.
3. Differing Button Functions
Some users may find that the right-click functionality differs from what they expect:
- Adjust Settings: Go to mouse settings in Windows and configure the primary and secondary click according to your preference.
Conclusion: Enjoy the Best of Both Worlds
Connecting an Apple mouse to a Windows system might seem daunting at first, but with the right approach and a few troubleshooting tips, it can be an effortless endeavor. Whether you prefer Apple’s Magic Mouse or an older model, understanding how to bridge the compatibility gap opens up a world of possibilities, allowing you to enjoy the smooth functionality of Apple devices alongside the practicality of Windows.
This guide highlighted the importance of preparing your devices, followed specific steps to connect various Apple mice, and addressed common issues users might face. With these insights, you are well-equipped to harness the best of both operating systems and take control of your computing experience. Now, grab your Apple mouse, follow the steps outlined, and enjoy the seamless use of macOS brilliance while navigating through the versatile Windows platform!
How can I connect my Apple Mouse to a Windows PC?
To connect your Apple Mouse to a Windows PC, start by ensuring that the mouse is in pairing mode. For a Magic Mouse, this typically involves turning it on and making sure the green light is visible. Then, on your Windows PC, go to “Settings,” click on “Devices,” and select “Bluetooth & other devices.” Make sure Bluetooth is enabled, and choose “Add Bluetooth or other device” to begin the pairing process.
Once your Windows PC detects the Apple Mouse, it will appear on the list of available devices. Click on the mouse’s name to pair it with your PC. You will know the connection is successful when you see a confirmation message. If you experience any issues during this process, restarting both your mouse and computer, and ensuring no other Bluetooth devices are connected might help resolve the problem.
Will all the features of my Apple Mouse work on Windows?
While basic functionality such as clicking and scrolling will work seamlessly, some advanced features of the Apple Mouse may not be fully supported on Windows. For example, gestures such as swipe or pinch-to-zoom may not function as intended. This is mainly due to the hardware and software differences between Apple and Windows ecosystems.
To maximize compatibility, you might consider downloading third-party software that provides additional functionalities for your mouse. There are several applications designed for this purpose that can help you customize mouse settings and adjust button configurations to better suit your workflow on Windows.
Do I need any special software to use an Apple Mouse on Windows?
In most cases, you will not need any special software to connect and use an Apple Mouse on Windows, as the system generally recognizes it as a generic Bluetooth mouse. Basic functionalities such as left and right clicks, scrolling, and basic settings should work immediately upon connection without further configuration.
However, if you want to access advanced features and customize settings to your liking, you may want to explore third-party mouse configuration software. Programs like “X-Mouse Button Control” or “Magic Utilities” are popular options that can provide enhanced customization and feature support, allowing you to get more out of your Apple Mouse while using a Windows environment.
Can I use my Apple Mouse with a Windows laptop as well?
Yes, you can use your Apple Mouse with a Windows laptop just as you would with a desktop PC. The connection process remains the same; simply ensure that Bluetooth is enabled on the laptop and follow the steps to pair the mouse. The size, portability, and battery life of the Apple Mouse make it a convenient choice for both desktop and laptop usage.
Once connected, expect similar functionality regardless of the device type. However, keep in mind that the limited advanced features may still apply, as they depend on Windows’ ability to recognize and utilize specific functionalities of the Apple Mouse. If you frequently switch between devices, the ease of connection and familiarity with the mouse can enhance your overall experience.
What should I do if my Apple Mouse isn’t connecting to Windows?
If your Apple Mouse isn’t connecting to Windows, start by ensuring that Bluetooth is enabled on your PC and that the mouse is charged. Sometimes low battery can prevent the device from entering pairing mode. You can also try turning off the mouse and turning it back on to refresh the connection attempt. Additionally, make sure no other devices are interfering with the Bluetooth connection.
If the issue persists, consider removing any previously paired devices that are not in use, as the limit on connections may be causing interference. Restarting both your computer and the mouse may also resolve connectivity issues. In some cases, updating your Windows Bluetooth drivers can make a significant difference, so checking for any available updates could help establish a stable connection.
Is it possible to use an Apple Mouse with Windows through USB?
An Apple Mouse, particularly the Magic Mouse, is primarily designed for Bluetooth connectivity, and it does not have a USB port for direct wired connection. However, if you have a wired Apple Mouse, you can connect it to your Windows PC using a USB port without any additional setup. Simply plug it in, and Windows should automatically recognize it and install the necessary drivers.
For Bluetooth models, you cannot connect them via USB directly, but if you have a Bluetooth adapter for your PC, it can create a wireless connection. This means that for wireless models, you’ll still need to go through the Bluetooth settings in Windows to pair them. Utilizing a USB connection for a wireless Apple Mouse is not feasible, as their design and functionality are tailored specifically for Bluetooth use.
The Apple Magic Mouse isn’t the most ergonomic mouse on the planet, but you just can’t deny how well it works on the Mac. It connects flawlessly and is super convenient to configure. But what if you want to use it on a PC or Mac running Windows 10 via Boot Camp?
This tutorial covers everything you need to set up and use the Magic Mouse on a Windows PC or Mac computer.
Can Magic Mouse Be Used with Windows?
The Magic Mouse uses Bluetooth, so you can connect it to Windows and use it for basic navigation without issues. The mouse will also connect and work on any Bluetooth-enabled device that supports mouse input.
Although Magic Mouse works on Windows devices, not all features function as they do on Mac computers. For instance, you can’t scroll through pages using gestures unless you install the additional drivers. Also, you can only view your Magic Mouse battery status or customize scroll directions in Windows with third-party apps.
The steps in the next section will help set up Magic Mouse in Windows for a Mac-like experience.
You can connect a Magic Mouse over Bluetooth to a Windows or Mac computer like any Bluetooth device. If your computer doesn’t support Bluetooth, pair it with a Bluetooth adapter instead.
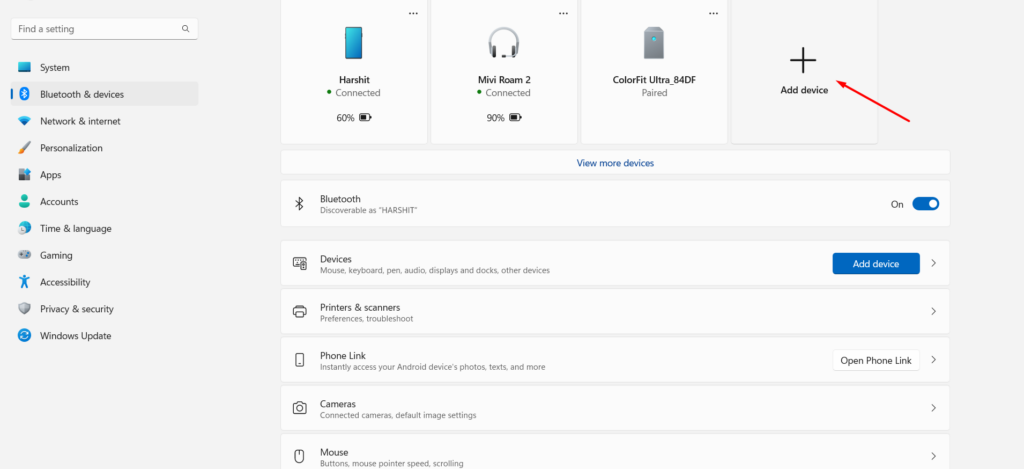
- Open the Start menu and select Settings. You can also open Windows Settings using the Windows key + I shortcut.
- Select Bluetooth & devices in the sidebar, turn on Bluetooth, and select the Add device button.
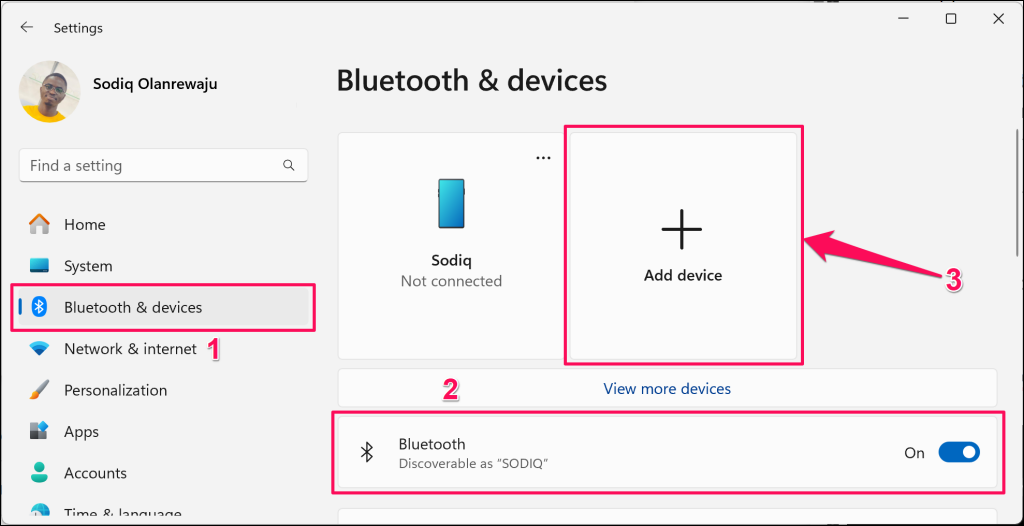
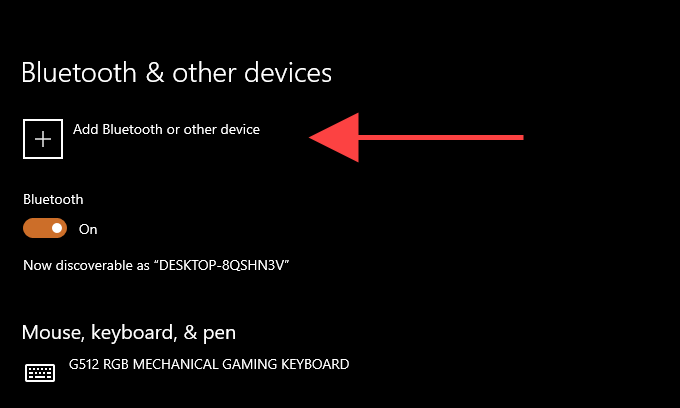
In Windows 10, go to Settings > Devices > Bluetooth & other devices, turn on Bluetooth (if disabled), and select Add Bluetooth or other device.
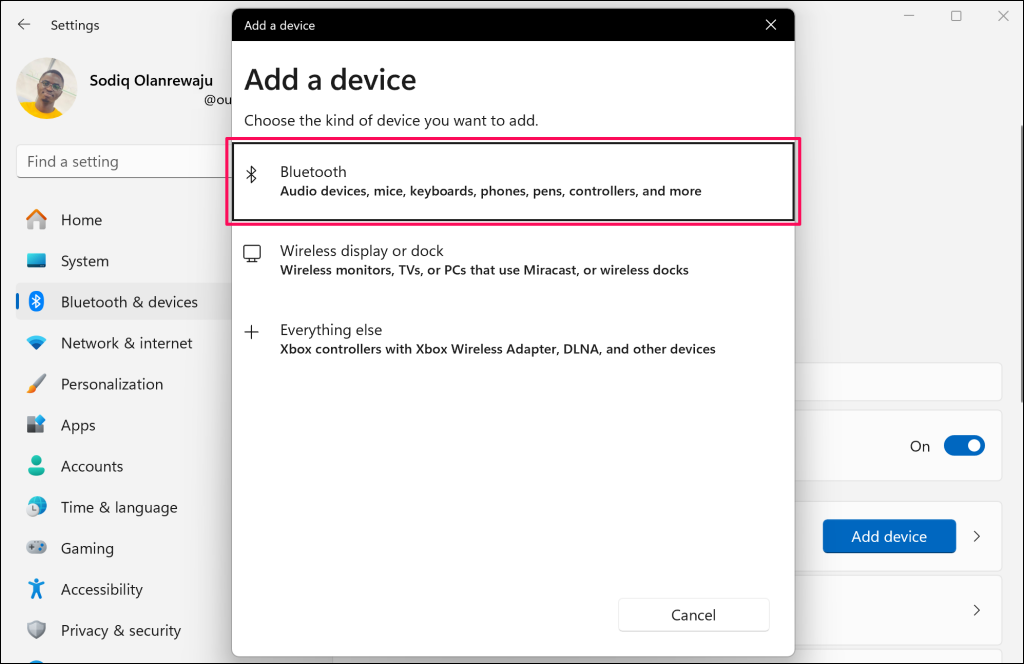
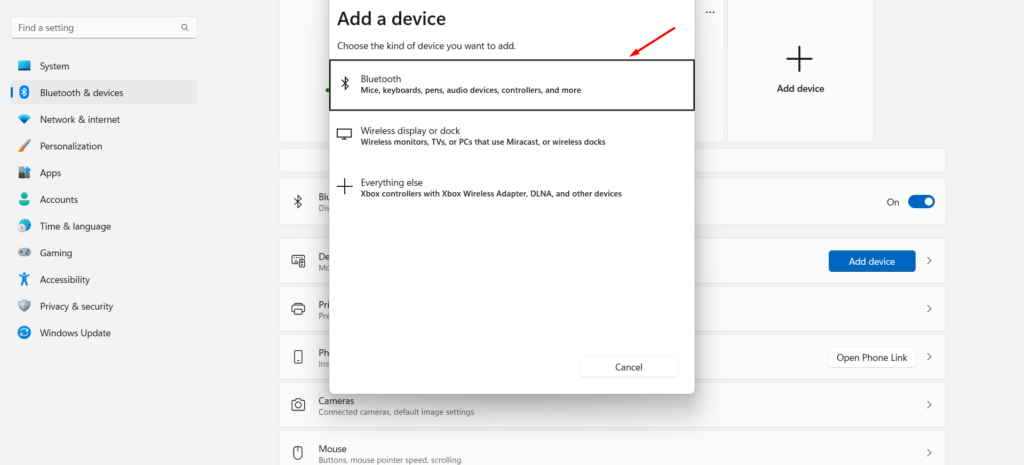
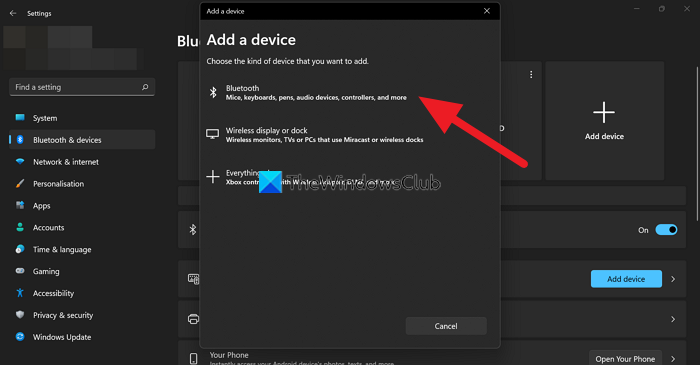
- Select Bluetooth on the “Add a device” pop-up window.
- Select your Magic Mouse from the list of available Bluetooth devices.
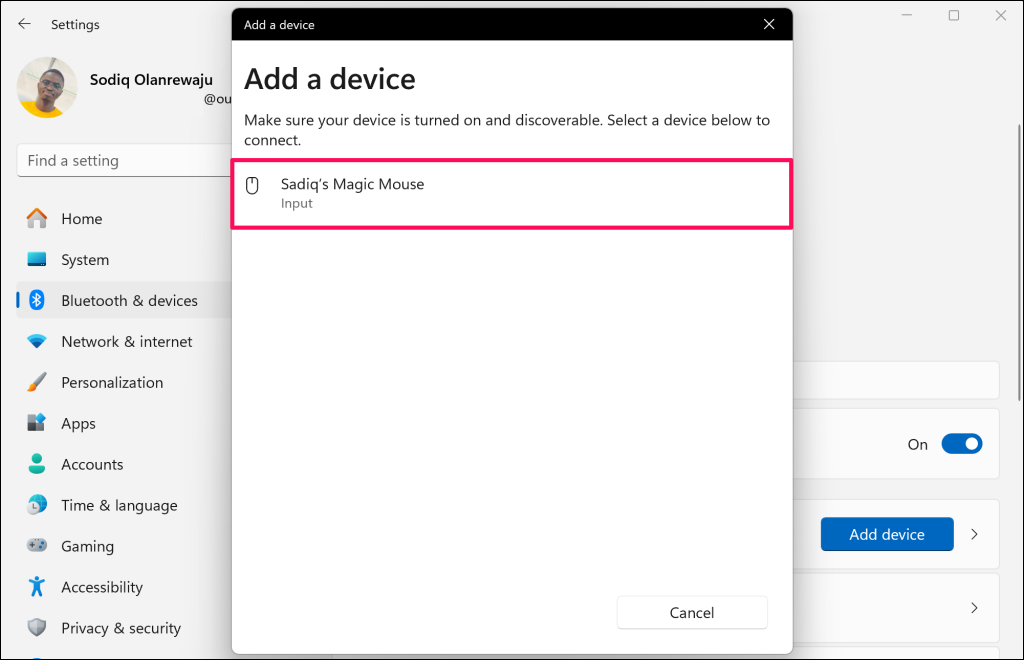
7. Select Done to finish the pairing process.
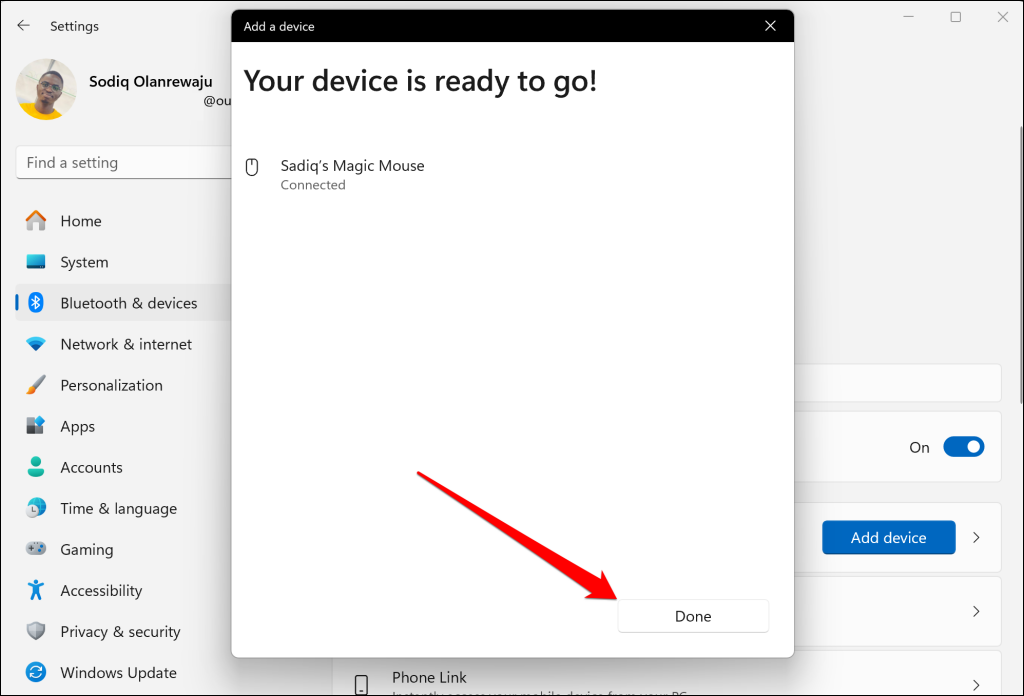
Note: Turn off your Magic Mouse and turn it back on if it doesn’t appear on the list of available Bluetooth devices. Charge or plug your Magic Mouse into a power source if Windows doesn’t detect it over Bluetooth.
You can now start using the Magic Mouse to navigate Windows. Click the left button to perform a regular click and the right button to execute a right click.
Go to Settings > Bluetooth & devices > Mouse to reconfigure your Magic Mouse buttons, adjust the cursor/scrolling speed, pointer size/color, etc.
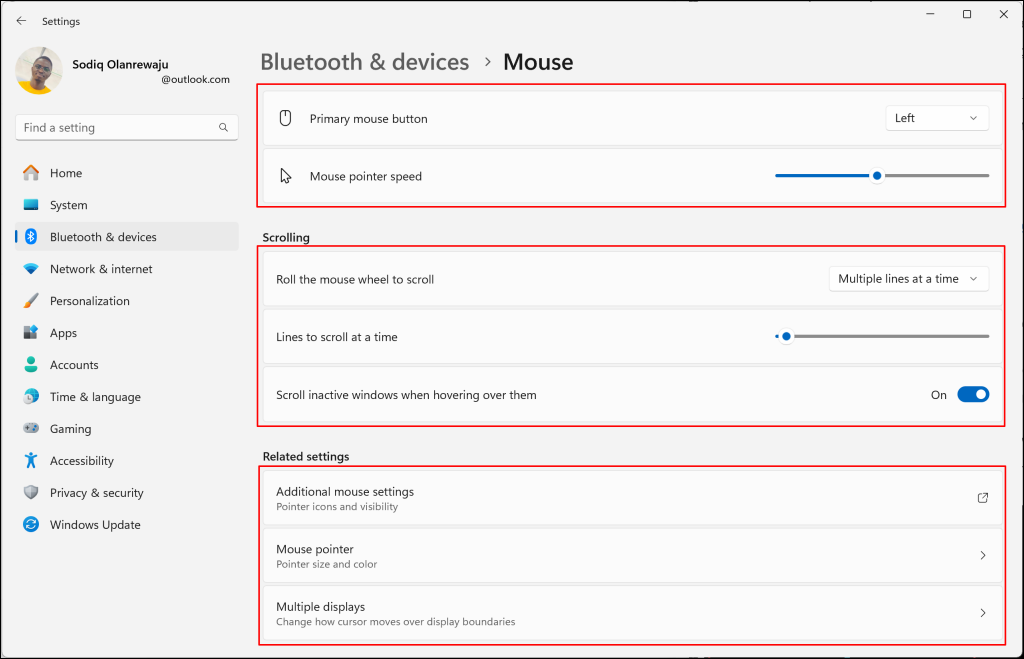
Select Additional mouse options in the “Related settings” section to configure the double-click speed, pointer precision, etc.
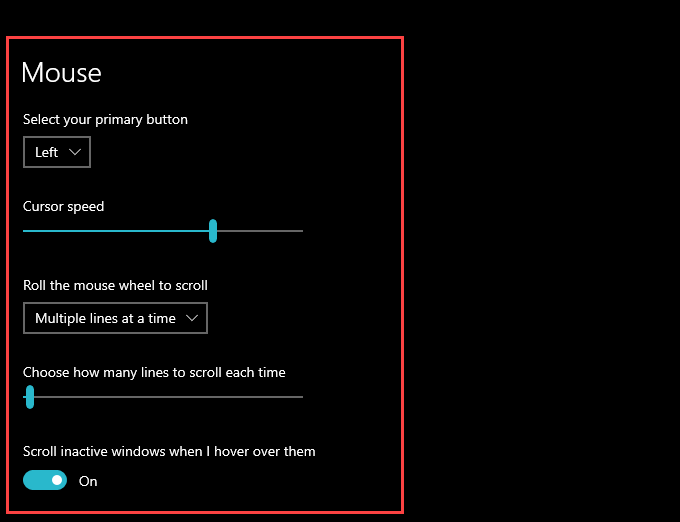
In Windows, head to Start > Settings > Devices > Mouse to configure your Magic Mouse buttons and pointer speed.
Note: You can’t scroll in Windows using your Magic Mouse until you install the Apple Wireless Mouse driver.
How to Install Magic Mouse Driver in Windows
As earlier mentioned, you need the Apple Wireless Mouse driver to scroll with the Magic Mouse in Windows. There are two methods to get the driver on your computer.
You can download it directly from Apple’s website or via third-party tools like Brigadier.
Download Driver Directly From Apple
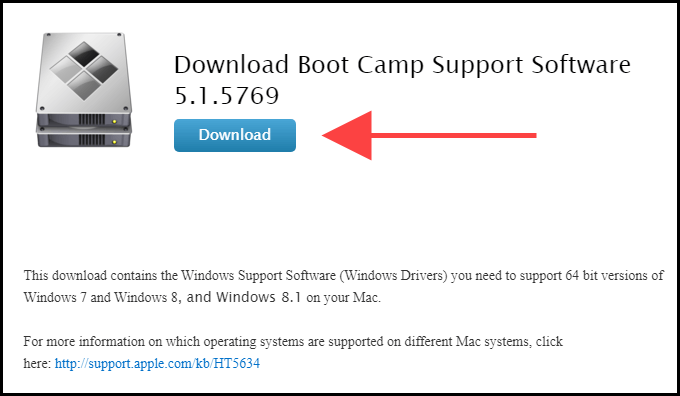
Apple provides a Boot Camp Support Software package that contains the Magic Mouse driver needed to enable scrolling on the PC. However, it’s pretty dated and may not allow scrolling in some Windows 10 and 11 versions.
1. Go to Apple’s Downloads page and search for boot camp support software. Then, download the most recent Boot Camp Support Software version to your PC.
2. Extract the downloaded ZIP file.
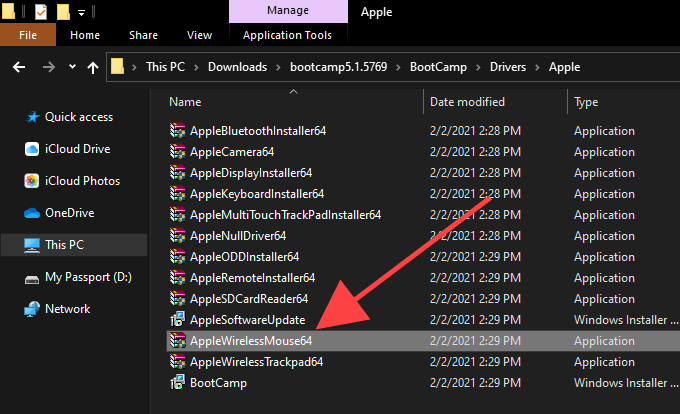
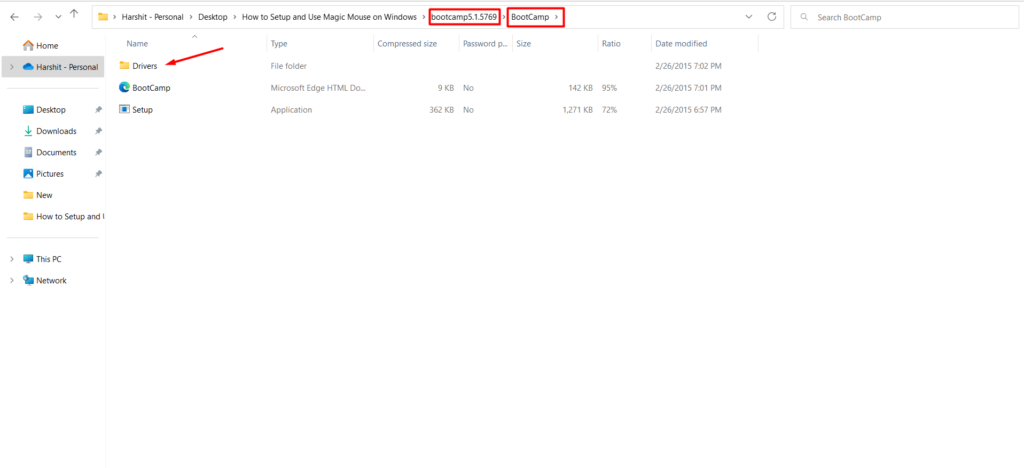
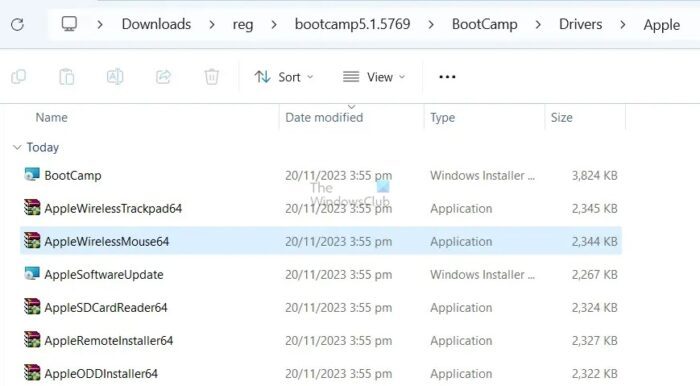
3. Open the extracted folder and go to BootCamp > Drivers > Apple.
4. Double-click the file labeled AppleWirelessMouse64 and follow all on-screen instructions to install the Apple Wireless Mouse Drivers.
5. Restart your PC and check if you can scroll vertically or horizontally in Windows using the Magic Mouse. If not, try out the following method.
Download Driver From Apple Using Brigadier
Brigadier is a Python script that can fetch the latest Boot Camp Support Software from Apple by identifying your PC as a Mac. The Apple Wireless Mouse driver in the package is compatible with almost all computers running Windows 10.
Connect your computer to the internet and follow the steps below.
- Download Brigadier from GitHub and copy the Brigadier.exe file to the desktop.
- Right-click the brigadier.exe setup file and select Properties in the context menu.
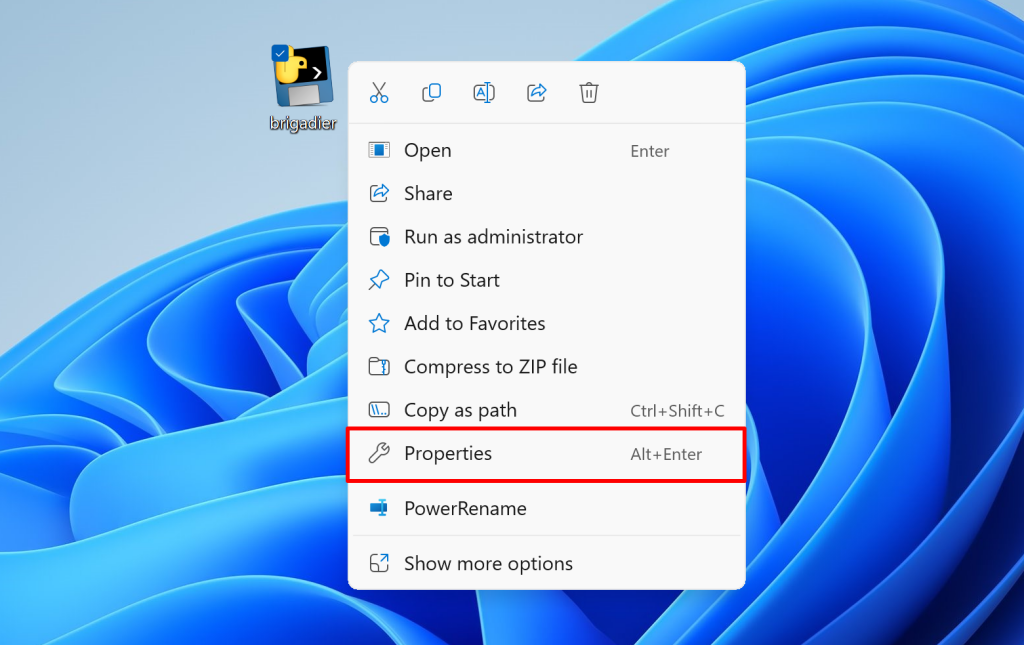
- Copy the file’s location or path to your computer’s clipboard.

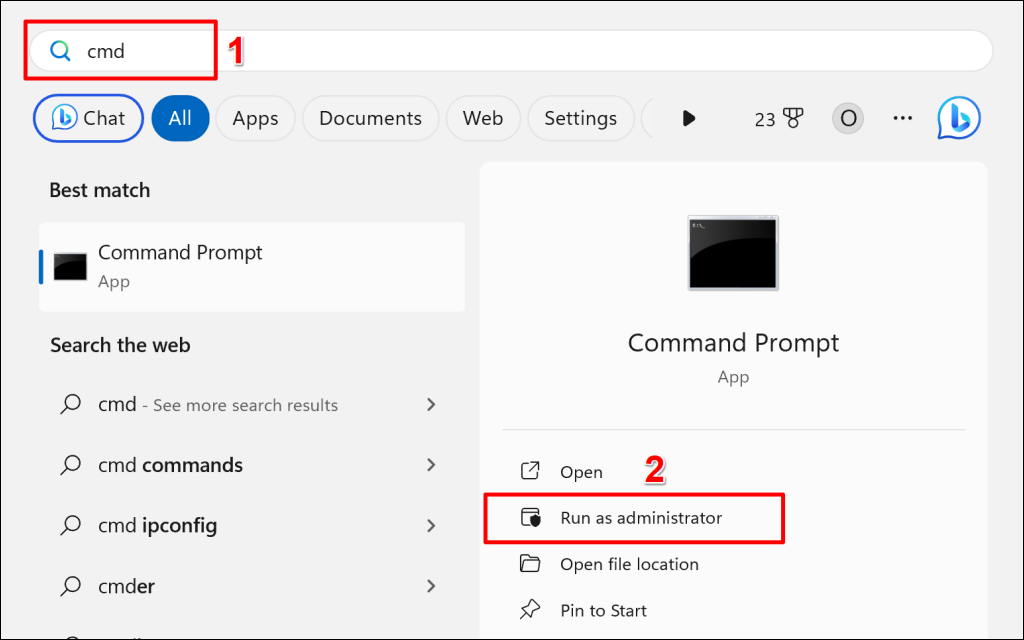
- Open the Start menu, type cmd in the search box, and select Run as administrator.
- Type the command below into the Command Prompt console and press Enter:
cd [brigadier_location]Replace [brigadier_location] with the location of the brigadier.exe file on your computer—see step #3. The command should look like this:
cd C:UsersolanrOneDriveDesktop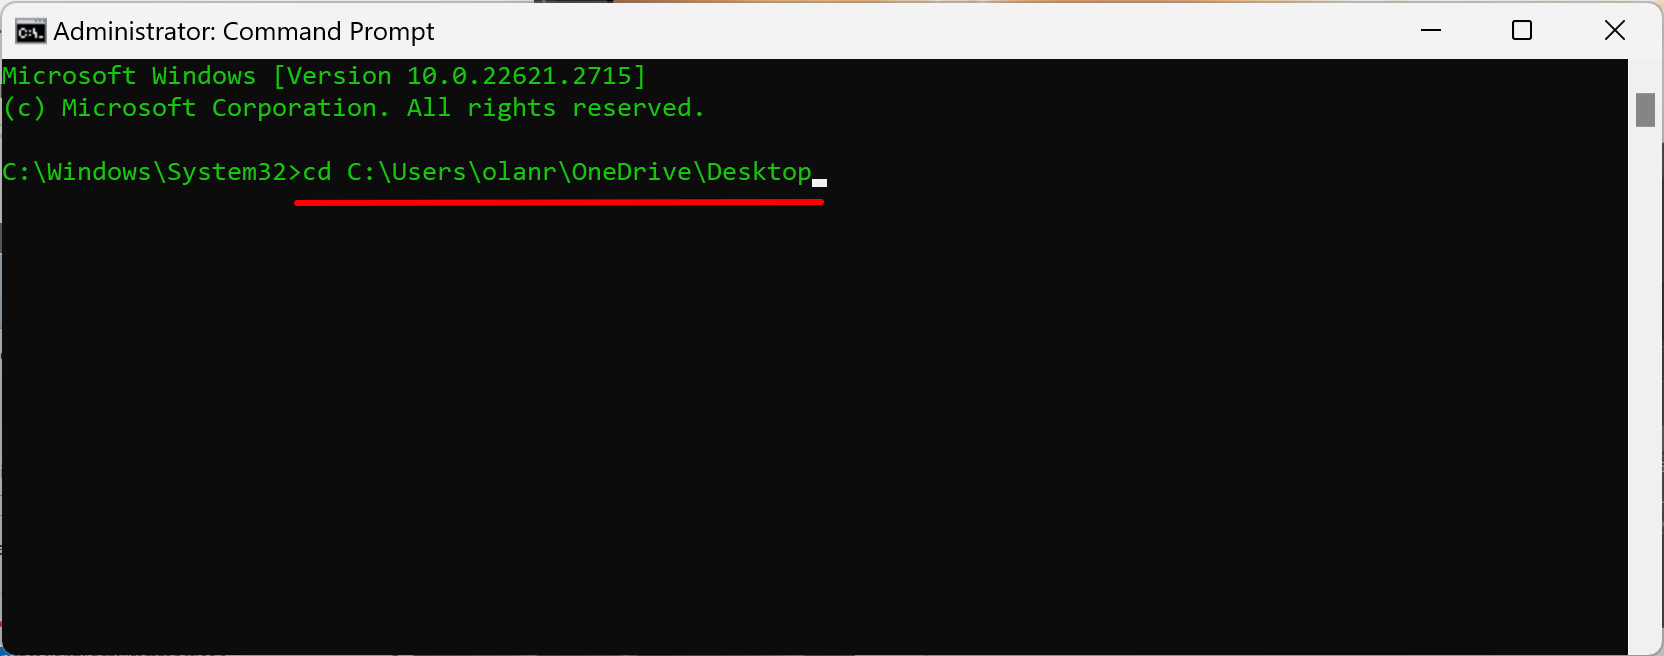
- Next, type the command below and press Enter:
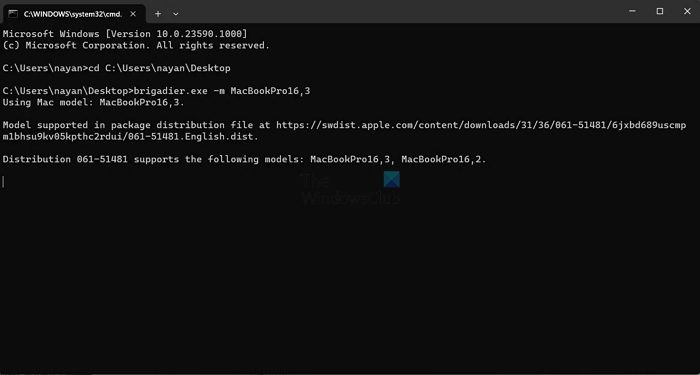
brigadier.exe -m MacBookPro16,3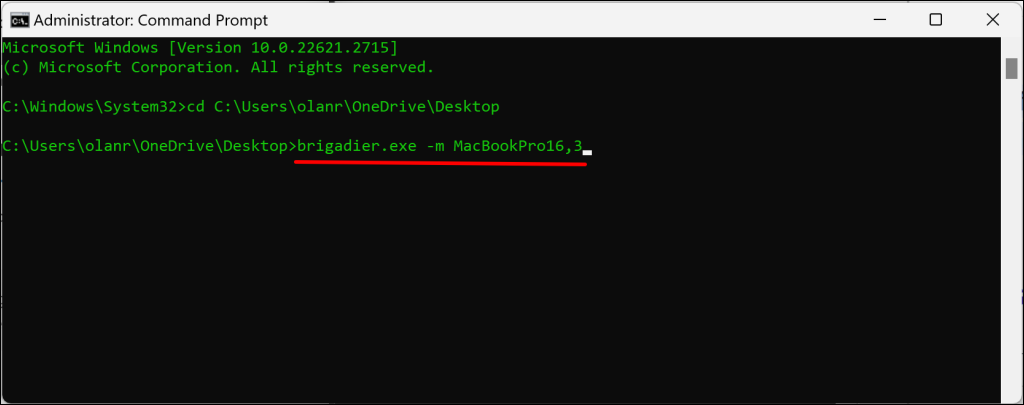
The command above includes a Mac model identifier—MacBookPro16,3—that identifies your PC as a 13-inch 2020 MacBook Pro. You can swap it with another identifier, but using a recent Mac model that supports Windows over Boot Camp is a good idea.
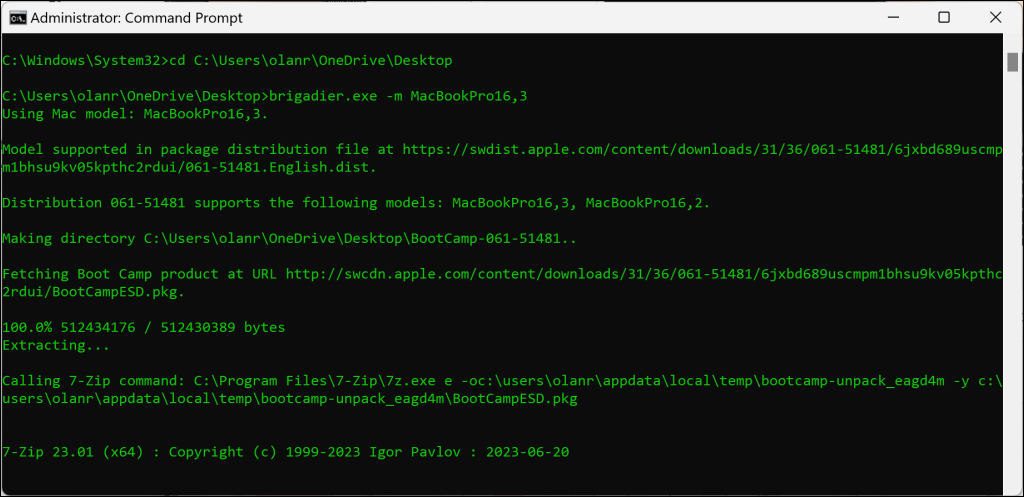
Wait until Brigadier downloads and saves the latest drivers from Apple to the desktop. You’ll find the files in a “BootCamp” folder in the same location as the brigadier.exe setup file.

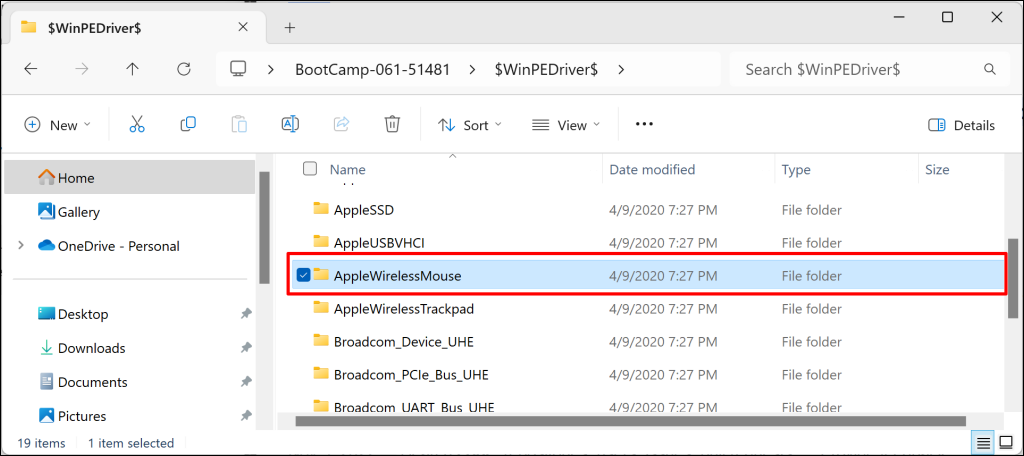
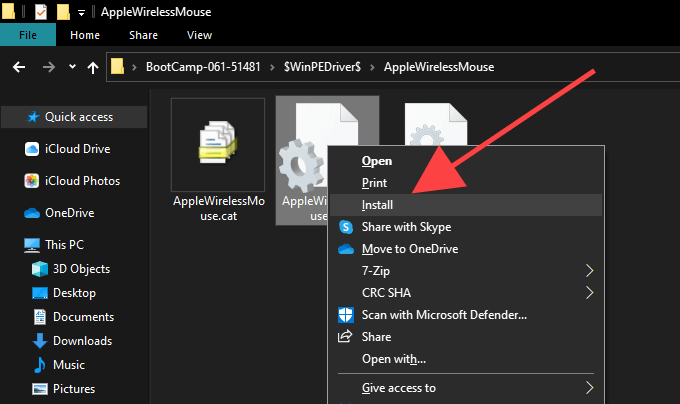
- Open the BootCamp folder on the desktop and go to $WinPEDriver$ > AppleWirelessMouse.
- Right-click the AppleWirelessMouse (or AppleWirelessMouse.inf) setup file, select Install, and wait a few seconds.
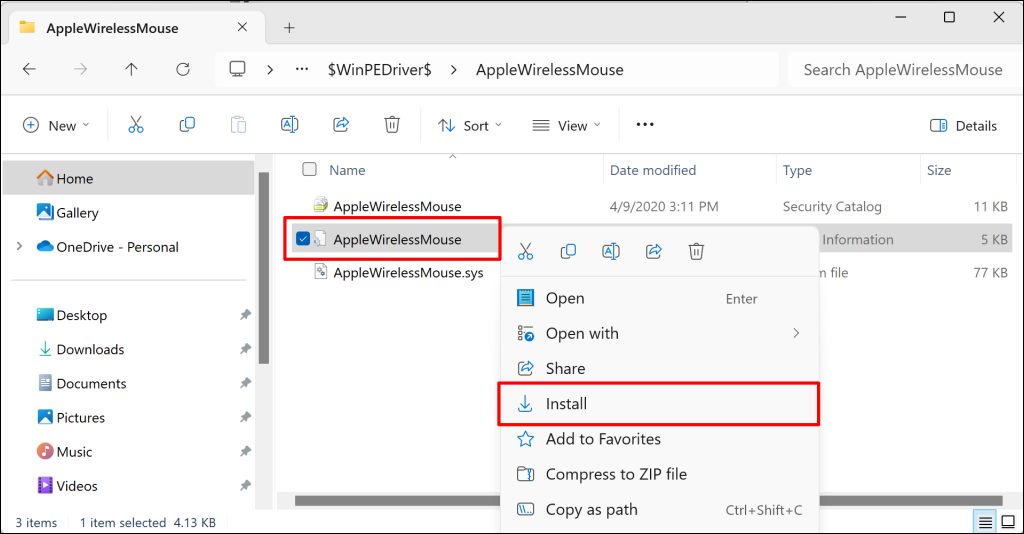
You should now be able to scroll horizontally and vertically with your Magic Mouse.
How to Install Magic Mouse Driver for Windows on Mac
Your Mac automatically installs the Boot Camp Support Software package when you set up Windows 10 using Boot Camp. The package contains drivers that allow Apple devices and accessories to function correctly in Windows. However, in most cases, the Magic Mouse won’t scroll until you install pending driver updates via Apple Software Update.
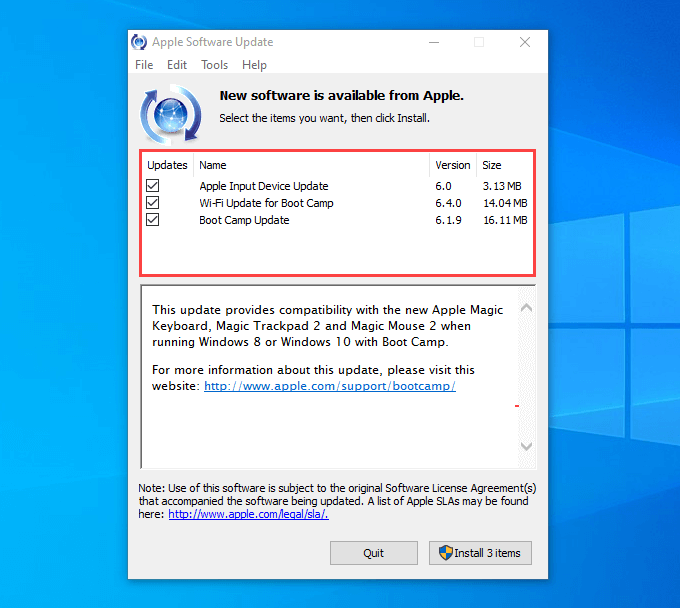
- Open the Start menu, type Apple Software Update, and select Open.
Note: Apple Software Update is pre-installed on Windows running via Boot Camp, so you don’t have to install it separately.
- Wait until Apple Software Update scans for available updates.
- Check the boxes next to Apple Input Device Update and Boot Camp Update. It’s also a good idea to select any other listed updates.
- Select Install N items to download and apply the updates.
5. Restart your Mac computer. The Magic Mouse should work correctly when you run Windows on your Mac.
Configure Magic Mouse in Windows Using Third-Party Software
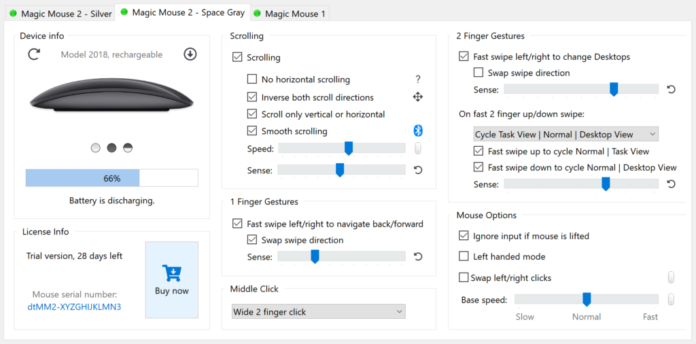
Even after correctly setting up your Magic Mouse in Windows, it doesn’t feel like using the device alongside macOS. That’s where third-party tools like Magic Mouse Utilities come into the picture.
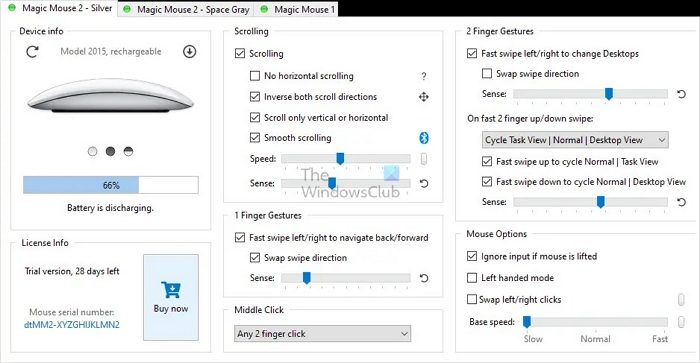
Magic Mouse Utilities is a third-party program that optimizes the usage of Apple accessories on Windows devices. It introduces multiple gestures that allow you to move between pages, switch among desktops, invoke Task View, etc. It also allows you to customize scrolling, middle-click actions, swap buttons, etc.
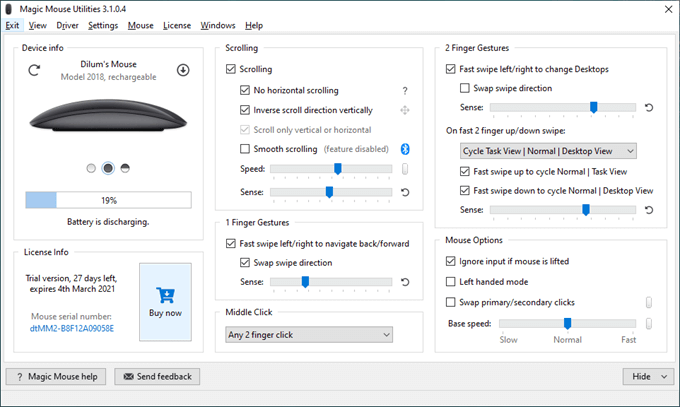
You can even see your Magic Mouse battery status in real time. The program is easy to install and use in Windows. Connect your Magic Mouse to Windows via Bluetooth, install and launch Magic Mouse Utilities, and it’ll automatically detect the mouse.
Magic Mouse Utilities isn’t free, but it’s pretty affordable. The app costs $14.90 for a one-year subscription, but you can get a 28-day free trial to test things out thoroughly. It’s as close as you can get to emulating a Mac-like Magic Mouse experience on Windows.
Related Posts
- How to Middle Click on macOS Using Trackpad or Magic Mouse
- Apple Mouse Not Working? 9 Ways to Fix
- Magic Mouse Won’t Connect or Not Scrolling?
- How to Use Your iPhone as a USB Drive on Mac and PC
- Apple’s Big Week: Design Debates, AI Ambitions, and Regulatory Roadblocks
Magic Mouse is one of Apple’s most innovative products. It comes with an ergonomic design and excellent features. Most importantly, Magic Mouse is known for its lightning-fast connectivity. Magic Mouse is designed for macOS and iPadOS devices. But, interestingly, it also works seamlessly with Windows.
Yes, you can use Magic Mouse on different versions of Windows, including Windows 11 and 10. But, the process of connecting and using a Magic Mouse with a Windows PC is quite different from connecting with a Mac. Though, it is still possible. This guide explains all the ways to setup and use Magic Mouse on Windows 11/10.
How to Connect Magic Mouse to Windows 11/10
Magic Mouse is a Bluetooth mouse. It means You can easily pair it with your Windows PC using Bluetooth. Below are the steps to connect Magic Mouse on a Windows 11 or 10 PC.
How to Connect Magic Mouse to Windows 11
If you are using a Windows 11 PC, here is how you can connect Magic Mouse using Bluetooth on Windows 11:
1. Press Win + I to open your PC Settings.
2. Head to Bluetooth & devices settings from the left-sidebar.
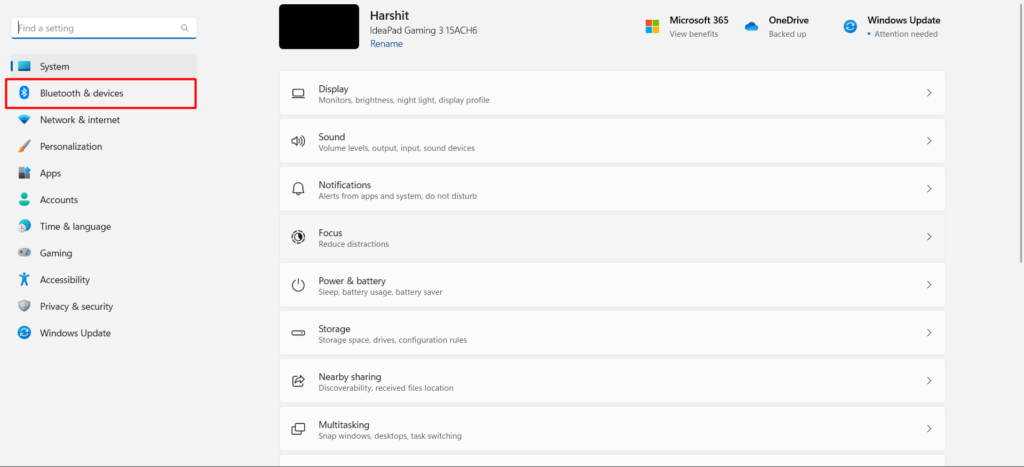
3. You will now see a toggle in the Bluetooth settings. Click on the toggle to turn on Bluetooth. If you see the toggle in blue now, it means the Bluetooth is enabled.
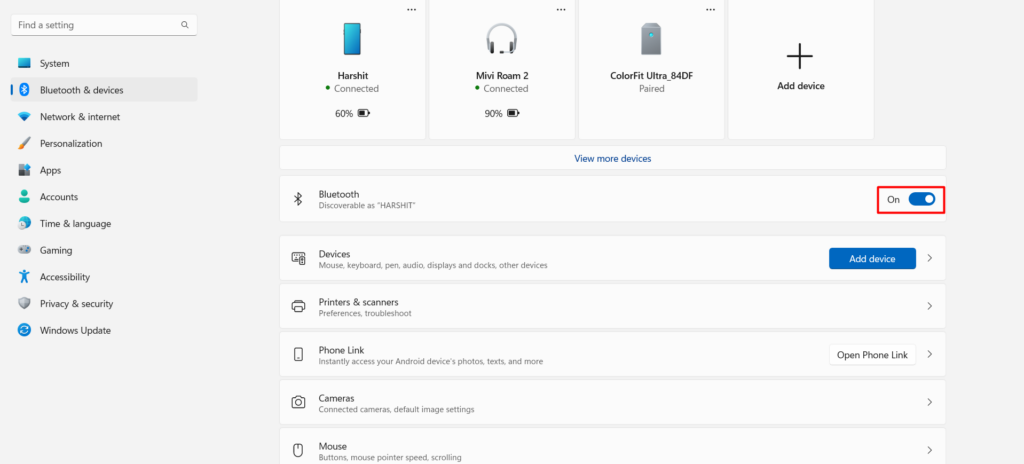
4. Click on the Add button.
5. Now, select Bluetooth.
6. Windows will start searching for the Bluetooth-enabled devices near you.
7. Once the scan completes, select your Magic Mouse or Magic Trackpad from the available devices and select Done.
Voila! You have now connected Magic Mouse to your Windows 11 PC.
How to Connect Magic Mouse to Windows 10
Alternatively, if you are a Windows 10 user, continue reading to know how to connect Magic Mouse with your Windows 10 PC.
1. Open Windows Settings by pressing the keyboard shortcut: Win + I.
2. Head to the Devices section.
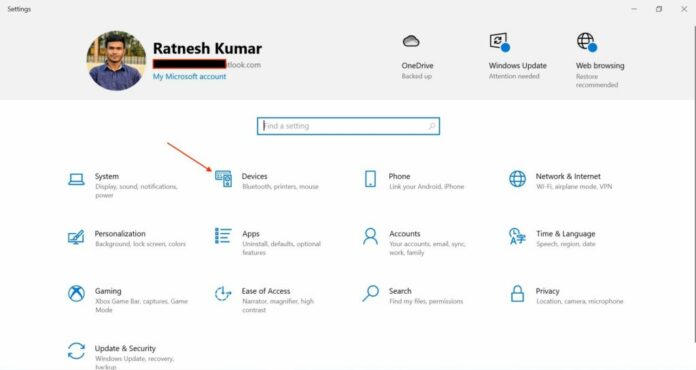
3. Click on Bluetooth & other devices to open Bluetooth settings.
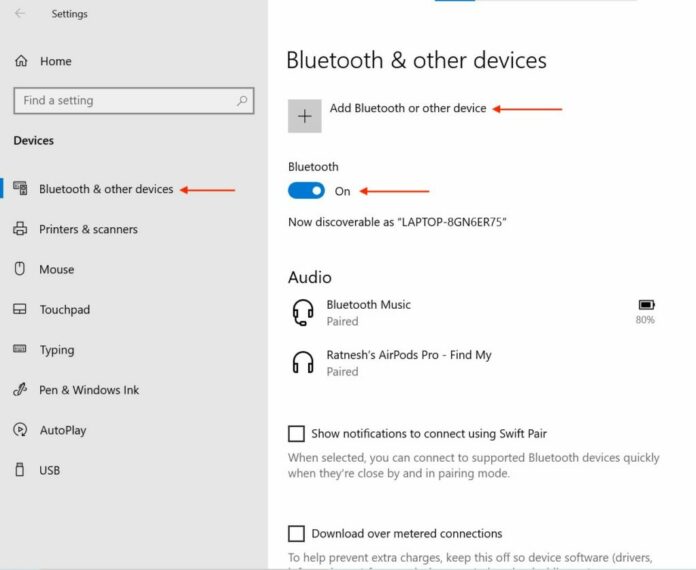
4. You will now see a toggle in the Bluetooth & other devices settings. Click on the toggle to turn on Bluetooth. You will see ‘On’ beside the toggle if it’s on.
5. Click Add Bluetooth or other device.
6. Then, select Bluetooth.
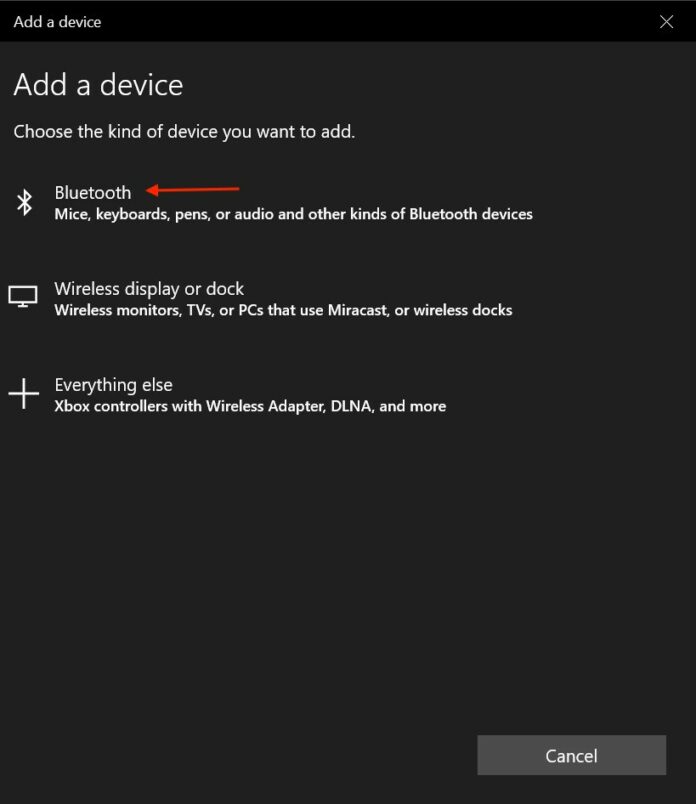
7. Wait a few seconds to let Windows scan nearby Bluetooth devices.
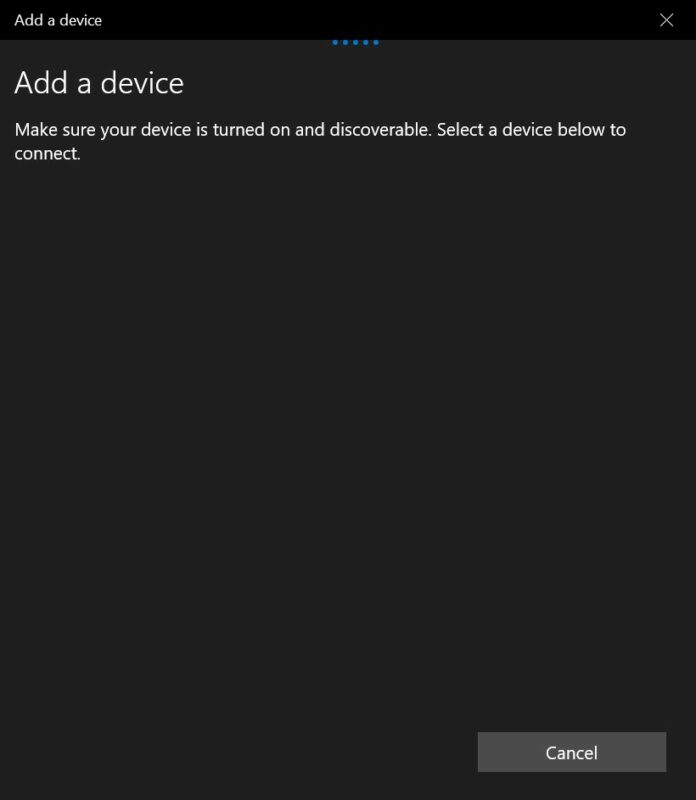
7. Choose your Magic Mouse from the available Bluetooth devices list.
8. Click Done, and now you have connected the Magic Mouse to your Windows PC.
That’s it! You have now finally connected your Magic Mouse with your Windows 10 PC.
How to Scroll with Magic Mouse on Windows 11
When you connect the Magic Mouse for the first time to your Windows PC. You will find the scrolling feature disabled. There is no joy in using the Magic Mouse without scrolling gestures. It feels like using an ordinary wireless mouse.
Scrolling gestures will help work faster and more efficiently. Therefore, you should enable scrolling gestures in Magic Mouse. You will need to install the Magic Mouse driver to enable the scrolling on Magic Mouse. It would be a bit technical, but you don’t need to worry, as we will try to explain it in the simplest manner.
There are two ways to install the Magic Mouse driver on your PC: Boot Camp Support Software, and Brigadier. You can install the driver manually as well as automatically. We have explained both methods. You can follow any of them to install the Magic Mouse driver on your Windows 11 PC.
Boot Camp Support Software
You can easily download the Magic Mouse driver directly from Apple. Follow the steps to download the Magic Mouse driver from the Apple Support Downloads page.
1. Head to Apple Support Downloads page.
2. Type Boot Camp Support Software in the search bar and click the Search button.
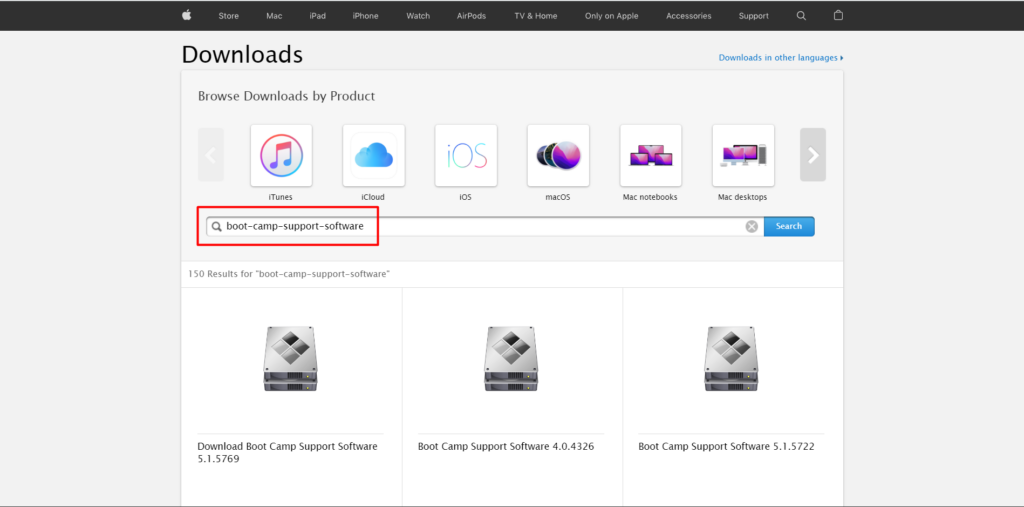
3. Download the latest Boot Camp Support Software 5.1.5769 version.
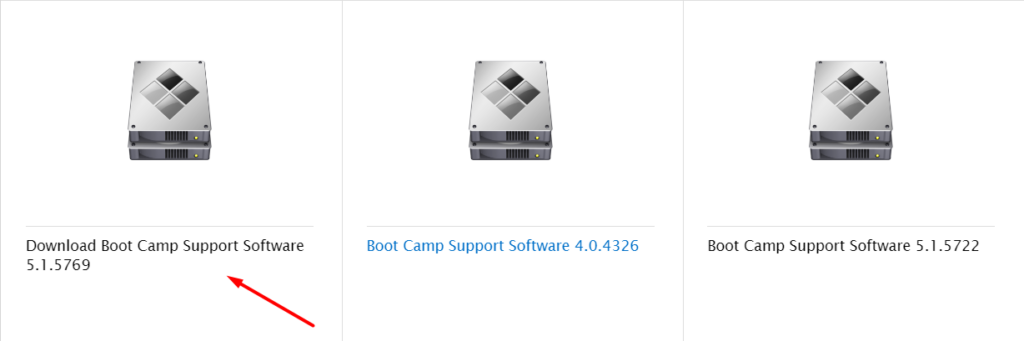
4. Extract the downloaded Boot Camp Support Software zip file on your PC.
5. Open the Bootcamp folder.
6. In the Bootcamp folder, open the Drivers folder and move to the Apple folder.
7. Double-click on the AppleWirelessMouse64 to install the Magic Mouse driver.
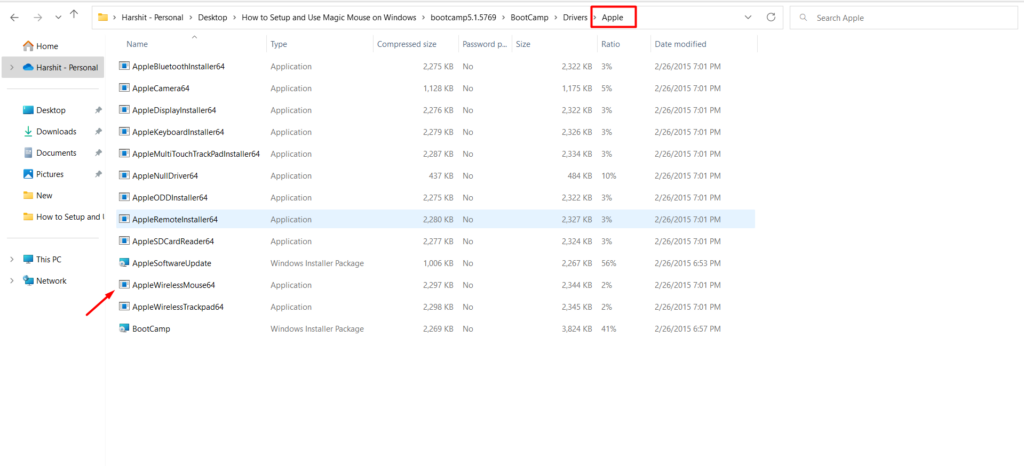
8. Follow the on-screen instructions, and click on Run.

9. In the end, Restart your PC, and connect your Magic Mouse to check whether the scrolling gestures are now working.
Using Brigadier
You can download and install the Magic Mouse driver using Brigadier. Brigadier is a free tool that lets you download Boot Camp drivers. You can also use Brigadier to support software without opening Boot Camp Assistant. Follow the given steps to install the Magic Mouse driver using Brigadier.
1. Copy and Paste the Brigadier.exe on your desktop from GitHub.
2. Open CMD from the Start menu.

3. Type cd Desktop in CMD.
4. Copy and paste the mentioned command in the same CMD window:
brigadier.exe -m MacBookPro16,3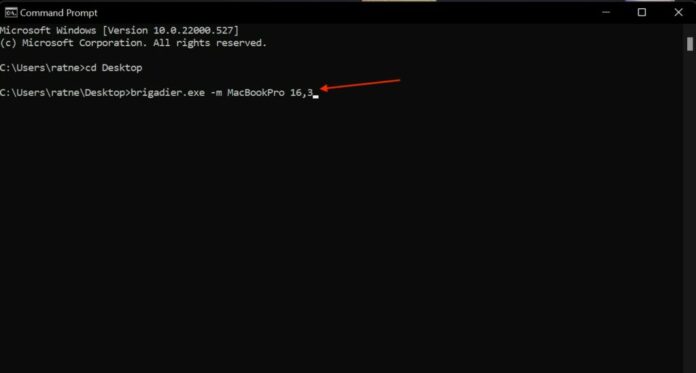
5. Brigadier will now download the latest Magic Mouse driver.
6. You will now see a Bootcamp folder on your Desktop. Open it.
7. Open the $WinPEDriver$ folder, then head to AppleWirelessMouse folder.
8. Right-click on the AppleWirelessMouse64.inf and click on Install.
8. Now, Restart the PC.
9. Disconnect your Magic Mouse and reconnect to check whether your Magic Mouse is working fine or not.
These are the three working methods to install the Magic Mouse driver on your Windows PC. You have now enabled the scrolling functionality of your Magic Mouse.
Bonus: Try Magic Mouse Utilities
Magic Mouse is entirely different from other wireless mice out there. You can’t tweak typical wireless mice. But, you can fine-tune the Magic Mouse in a few steps and per your requirements. You can use Magic Mouse Utilities software to tune your Magic Mouse. Additionally, this software supports both Magic Mouse 1 and Magic Mouse 2.
With Magic Mouse Utilities software, you can enable scrolling and customize your Magic Mouse middle button. Magic Mouse Utilities is a paid software that costs $14.99/per year. You can download the Magic Mouse Utilities software for Windows 11/10.
Fix Magic Mouse Not Working on Windows 11/10
In this tutorial, we mentioned two methods to use Magic Mouse on Windows 11/10, but what if they aren’t working? You can try these quick fixes to fix the Magic Mouse not working issue.
Some users have reported that their Magic Mouse right-click and left-click stopped working on Windows. If this is the same case with you, you can check these below-mentioned fixes.
Update Magic Mouse Driver
If any of the above-mentioned methods don’t work you may need to update the Magic Mouse driver. It is essential to keep the Magic Mouse driver up to date. Otherwise, they can cause issues and may make your mouse malfunction. You can use the Apple Software Update to update your Magic Mouse driver.
1. Press the Windows key and search Apple Software Update.
2. Open the Apple Software Update, and it will now start scanning for the latest updates of the Magic Mouse driver.
3. Check the Apple Input Device Update and Boot Camp Update checkboxes from the list.
4. Click Install to download the updates.
5. Reboot the PC and connect the Magic Mouse.
FAQs
Can you use Apple Magic Mouse with Windows 11?
Yes, you can use Magic Mouse with a Windows PC. You need to pair it with your Windows PC using Bluetooth. And then, you need to install the Magic Mouse driver to use Magic Mouse’s scrolling gestures.
How do I connect my Magic Mouse 1 to Windows 11?
You can connect your Magic Mouse 1 to Windows 11 using Bluetooth. Further to enable scrolling you will have to install the Magic Mouse driver.
How do I get my Apple mouse to scroll on Windows 11?
You can get your Apple mouse to scroll on Windows 11 by installing the Magic Mouse driver. We have provided two ways to install the Magic Mouse driver on Windows 11 PC
Final Words
Magic Mouse isn’t only compatible with Mac. You can also use it with your Windows PC. All you need to do is connect your Magic Mouse with your PC using Bluetooth just like any other Bluetooth accessory. Initially, you will only be able to right or left-click using your Magic Mouse.
To scroll with Magic Mouse on Windows 11, you will need to install the Magic Mouse driver. We have explained two methods for installing the Magic Mouse driver. Once done you should be able to use your Magic Mouse on Windows 11 with its full capabilities.
You do not have to switch to macOS just to enjoy the quality feel, precision and capabilities of the Apple magic mouse, especially the current rechargeable version. I have a dedicated Windows 11 computer for client work and, I like my accessories to all be the same so I set about making the Apple Magic mouse work. In this guide, I will walk you through the process of setting up and using the Magic Mouse fully on your Windows 11 PC. So, buy yourself an Apple Magic mouse 2 in Black or white cheaper than Apple, brand new from Amazon UK, and let’s dive in!
TL:DR – I wasn’t a fan until I got one for my Mac, but I’ve slowly been won over by the feel and the cordless convenience and now I have that for Windows too.
Contents
- Use an Apple Magic Mouse on Windows 11 with working scrolling
- Getting Started
- Checking System Requirements
- Connecting the Magic Mouse
- Installing the Apple Magic Mouse driver for Windows in Windows 11
- Troubleshooting
I’ve preferred cheap corded mice since my first expensive Microsoft Mouse that came with an InPort expansion card for my IBM PC XT in 1985! But even dinosaurs like me need to move on and Apples Magic Mouse is great to use.

Use an Apple Magic Mouse on Windows 11 with working scrolling
Getting Started
You will need a Windows 11 based computer with Bluetooth Capability, and an Apple Magic Mouse. Look for the later model which has a rechargeable battery and lightning connector and more colour options. You can find a genuine Apple Magic Mouse at Amazon. The latest versions include an Apple USB-C to Lightning Cable in the box which you’ll need in order to recharge your mouse.
Checking System Requirements
Before embarking on your magical mouse journey, it’s essential to ensure that your system meets the requirements for using the Magic Mouse on Windows 11. Here are the steps to check your system compatibility:
- To see if your PC is eligible to upgrade, you can download and run the Microsoft PC Health Check app, which will scan your system and inform you if it meets the necessary specifications or you can check if Windows 11 is available for your device by going to Settings > Update & Security > Check for updates.
- Magic Mouse connects to your Windows 11 PC wirelessly via Bluetooth. Therefore, it’s crucial to verify that your computer has built-in Bluetooth capability. If your PC doesn’t have it, you would need to purchase a bluetooth adapter such as the TP-Link Nano USB Bluetooth 5.3 Adapter for Multiple Devices, Long Range Bluetooth Dongle/Receiver for Win 11/10/8.1/7, Plug and Play (UB5A) to make the mouse connect. Make sure you choose one that supports Windows 11, and that has the USB connector you have on your computer.
Connecting the Magic Mouse
Assuming your system is ready, it’s time to connect the Magic Mouse to your Windows 11 PC. Here’s how you can do it:
- Enable Bluetooth on Windows 11: To establish a connection between the Magic Mouse and your PC, you first need to enable Bluetooth on Windows 11. Navigate to the Settings menu, click on «Bluetooth & devices,» and ensure that Bluetooth is toggled on.
- Connect your Magic Magic Mouse, with your PC: In Bluetooth settings on your Windows 11 PC click on the «Add device» button. Windows will search for available devices, and when it detects the Magic Mouse, click on its name to initiate the pairing process. After a few moments, the connection will be established, you can click «Done» and you’ll be ready to experience the magic of the Magic Mouse on Windows 11. If you cant find it in available devices you may need to connect it first to a Mac via a USB to Lightning cable, or a USB-C cable if its the very latest model and then ‘Forget’ the connection and then turn it off and on again.
- Thats it. Sort of. Your mouse works with the basic mouse driver in Windows 11. However, this doesn’t allow you to scroll using the magic mouse. If you need to scroll you need to do more.
Installing the Apple Magic Mouse driver for Windows in Windows 11
Apple software engineers write Windows software. They have pretty much always done so. It must be fun being a Windows developer at Apple. I imagine they are a slightly unloved but passionate group of herberts. Anyway, there is a set of Windows drivers for Apple products and it is provided for BootCamp, which is a mechanism provided by Apple by which you can run Windows on an Intel based Mac computer. The BootCamp drivers provide support for scrolling with the Magic Mouse so it MUST be possible to get to work — but Apple only provide the drivers on installation of BootCamp on a supported Mac computer.
Fortunately, there is a utility called «Brigadier» which can fetch the BootCamp drivers for a given Mac computer and although venerable, it has had a recent (2022) release.
You can use it to get the drivers.
I have a last of the line Intel Mac Mini — the 2018 fourth generation Mac mini, which has Intel Coffee Lake processors, Bluetooth 5, four combination USB-C 3.1 ports that support Thunderbolt 3, two USB 3.0 Type-A ports, and HDMI 2. It supports BootCamp and Magic Mouse so that would seem a good latest BootCamp driver set to download from Apple.
- Download the Brigadier executable from GitHub to your Windows 11 PC. Run it with the model identifier for the Mac you wish to download the BootCamp drivers for. C:\>brigadier -m Macmini8,1 and watch as it does its work and downloads the BootCamp drivers to your PC.
- You’ll find the mouse driver in a directory inside the BootCamp driver set for the ‘Mac’ you chose at BootCamp\Drivers\Apple\AppleWirelessMouse and if you right click on the ‘inf’ file you can choose ‘Install’. You may need to restart Windows after that. Do so, and your Windows 11 PC will come back to life with proper Magic Mouse scrolling!
Troubleshooting
- If your Magic Mouse is not connecting to your Windows 11 PC, there are a few steps you can take to troubleshoot the issue. First, make sure that the mouse is turned on and in discovery mode. If it was paired already you might need to connect it to a Mac with a Lightning cable or a USB-C cable for the very latest model and ‘Forget’ the device before it becomes discoverable to Windows.
- If you’re experiencing an unresponsive cursor with your Magic Mouse, after a few days use you probably need to replace the batteries (first generation) or plug in to a charger via the lightning port to charge up.
- Third-Party Apps exist to give you even more control over the Apple Magic Mouse. I haven’t needed them but I am (as you can probably tell) a bit of a gesture luddite. Left Click, Right Click and scroll are pretty much all I want.
- If you have one Magic Mouse for Mac computers and another for Windows consider a White one for macOS and a Black one for the dark side of Windows 11. It quickly becomes automatic to reach for the right one on the same mousepad.
- Don’t connect your Magic Mouse with a Lightning cable to a Mac or it will forget your pairing and connect to the mac instead. If this happens ‘Forget it’ Turn it off, Restart Windows and go through the pairing process again.
In conclusion, setting up and using the Magic Mouse on Windows 11 is a straightforward experience that brings Apple’s Magic hardware to Windows. By following the steps outlined in this guide, you can connect your Magic Mouse on your Windows 11 PC and enable scrolling. So go ahead, unleash the magic, and enjoy a truly enchanting computing experience!
Apple’s Magic Mouse is a popular tech a PC owner can get. Thanks to its sleek design, gliding with the mouse on your desk becomes super easy. Although Magic Mouse is a popular choice among Apple users, there are a lot of Windows users who also use it. But many users get clueless when setting up the magic mouse on Windows for the first time. Hence, to help you, we have created an in-depth guide to setting up and using Magic Mouse on Windows 11/10.
Connecting Magic Mouse to your PC shouldn’t be an issue. However, desktop users must ensure that they have Bluetooth to establish a wireless connection. In case you don’t have Bluetooth, consider buying a Bluetooth adapter. Once ready, you can follow these steps:
- First, look at the bottom side of the Magic Mouse and turn the little switch on. Also, make sure your mouse is fully charged.
- Next, press Windows Key + I to launch Settings on your PC.
- Go to Bluetooth & devices.
- Click on Add device > Bluetooth.
- Now, let Windows search for Magic Mouse; once you find it, click and follow the on-screen steps to establish a connection.
That was all about connecting your Magic Mouse to your computer. You can customize your Magic Mouse settings, like the pointer speed, primary mouse button, scroll settings, etc, by going to Bluetooth & devices > Mouse.
How do you scroll with Magic Mouse on Windows 11/10?
After connecting your Magic Mouse, you will realize the scroll button isn’t working. However, there is nothing to worry about, as your computer doesn’t have the necessary drivers to support scrolling for Magic Mouse. Download and install the required drivers from the official Bootcamp driver, or use Brigadier to fix this.
Bootcamp Driver
The bootcamp driver will help you with the required drivers to use Magic Mouse on a Windows computer. The main job of Bootcamp drivers is to allow Mac computers to run Windows. But it also comes in handy while using Magic Mouse on Windows seamlessly.
- First, go to the Apple Bootcamp support software download page.
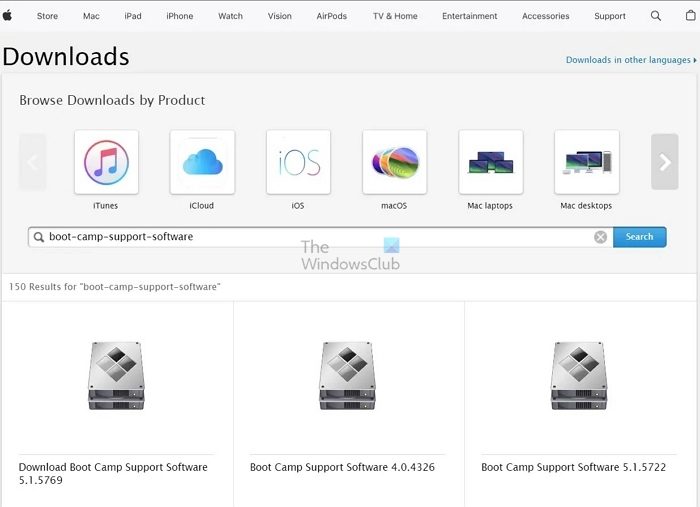
- Over here, download the latest version of the driver.
- Once the Zip file is downloaded, extract it.
- Go to BootCamp> Drivers > Apple.
- Over here, run the AppleWirelessMouse64 file by double-clicking on it.
- Finally, follow all the onscreen steps to install the driver on your PC.
Once installed, you shouldn’t have any issues using scrolling with your Magic Mouse. If you still do, move to the below fix.
Brigadier
If the official driver no longer supports Windows, you can use a third-party utility tool called the Brigadier. It is a tool developed for downloading and installing the necessary Apple hardware drivers on Windows.
- First, download Brigadier from GitHub and copy it to your Desktop.
- Press Windows Key + R to launch Run.
- Type CMD and press Enter.
- Go to the location where you downloaded the driver.
- After that, run the following command: brigadier.exe -m MacBookPro16,3
- This will make Brigadier download the required drivers from Apple and create a folder on your Desktop.
- Once downloaded, open the newly created folder and navigate to $WinPEDriver$ > AppleWirelessMouse.

- Finally, right-click on AppleWirelessMouse.inf file and select Install.
Magic Mouse Utilities
The Bootcamp driver and Brigadier may not work for you in rare cases. In such a case, you can rely on a third-party premium tool called the Magic Mouse Utilities. This will solve any issue you are facing using Magic Mouse on Windows.
Also, it helps you with lots of customization options for your mouse. You can configure the middle mouse button, desktop and task view navigation, smooth scrolling, and more.
However, being a premium tool, it is not free. Instead, it comes with 28 28-day trial period to test the tool, and if it works for you, you can purchase a license for € 16.99/year for a single device.
Read: Magic Mouse not working on Windows 11
Connecting Magic Mouse on Windows can be tricky if you set it up for the first time. But thanks to the Apple Bootcamp driver support, you shouldn’t have any issues. Even if you do, there are two more alternatives to try out.
Does Magic keyboard work with PC?
As with any keyboard labeled for Macs, including the Magic Keyboard and Magic Keyboard with Touch ID, you can use Apple Keyboards with a Windows PC once you have correctly set it up. However, Touch ID will not work on non-Apple devices. Nonetheless, the rest of the keyboard functions perfectly well.
Does Magic Mouse last long?
The lithium-ion battery used by the Magic Mouse 2 generally has a lifespan of 3 to 5 years, after which it may need to be replaced. It’s worth noting that battery lifespan can vary depending on usage and other environmental factors.