
Magic Utilities download
- Details
-
All downloads include an obligation free, fully functional 28-day trial period for Windows.
In case you get a corrupt download, in your Edge browser select Save as instead of Run.
| Download licensed and trial version | Windows support | Platform | CPU | Download alternative | Version | Release date |
|---|---|---|---|---|---|---|
| MagicUtilities-Setup-3.1.5.6-Win10.exe | Windows 10+11 | 64bit | x64+ARM | Download mirror | 3.1.5.6 | 20 Nov 2024 |
Changelog + older versions
Supported devices
- Details
-

If you want to use the Apple Magic Mouse in Windows 10, you should download and install the Magic Mouse driver for Windows. And this post will show you how to download and install the Magic Mouse driver for Windows.
There are two ways you can download and install your Magic Mouse driver:
Option 1 – Manually – You’ll need some computer skills and patience to update your drivers this way because you need to find exactly the right driver online, download it, and install it step by step.
OR
Option 2 – Automatically (Recommended) – This is the quickest and easiest option. It’s all done with just a couple of mouse clicks – easy even if you’re a computer newbie.
Option 1 – Download and install the Magic Mouse driver manually
Since the mouse is offered by Apple, Apple keeps releasing updated Magic Mouse drivers for Windows 10, and you can download your driver from Apple.
Here’s what you need to do:
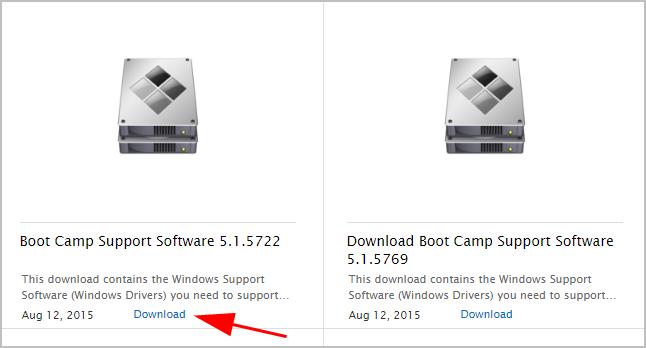
- Visit the Apple Support page.
- Choose the latest version of the driver, then click Download.

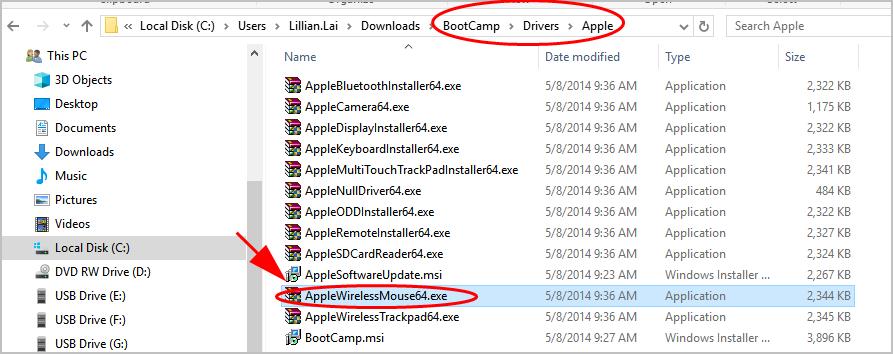
- Unzip the downloaded file, then go to BootCamp > Drivers > Apple > Apple WirelessMouse64.exe.

- Double-click the AppleWirelessMouse64.exe file to run.
- Follow the on-screen instructions to finish the install.
Then you can connect your Magic Mouse and it should be working in Windows 10.
Option 2 – Download and install Magic Mouse driver automatically
If you don’t have the time, patience, or computer skills to update the Magic Mouse driver manually, you can do it automatically with Driver Easy.
Driver Easy will automatically recognize your system and find the correct drivers for it. You don’t need to know exactly what system your computer is running, you don’t need to be troubled by the wrong driver you would be downloading, and you don’t need to worry about making a mistake when installing. Driver Easy handles it all.
You can update your drivers automatically with either the 7 days free trial or the Pro version of Driver Easy. It takes just 2 clicks, and you get full support and a 30-day money-back guarantee with the Pro version:
- Download and install Driver Easy.
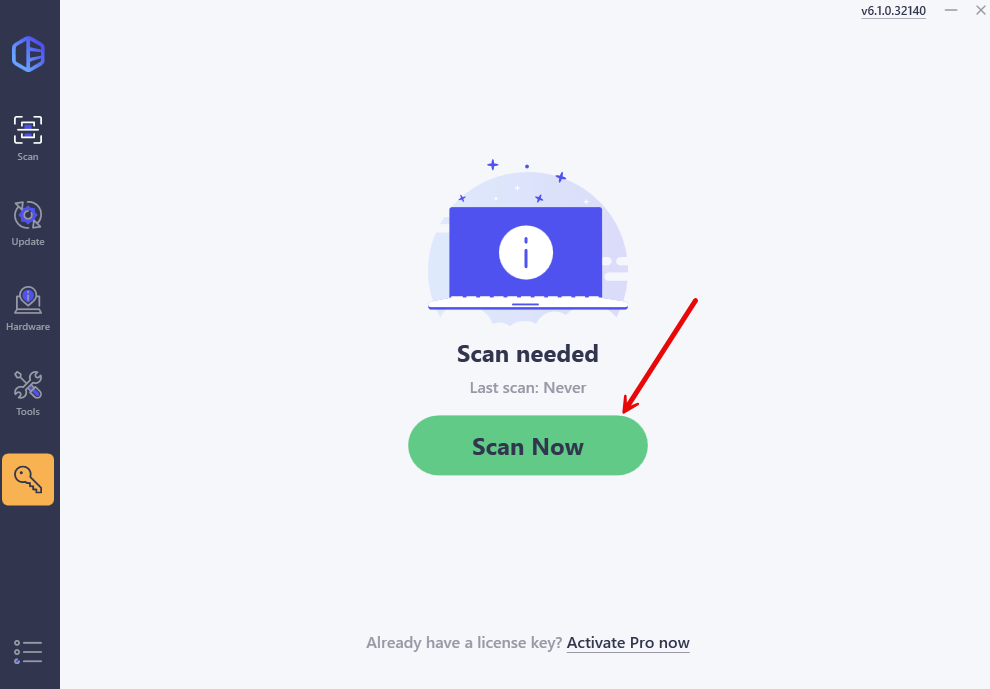
- Run Driver Easy and click the Scan Now button. Driver Easy will then scan your computer and detect any problem drivers.

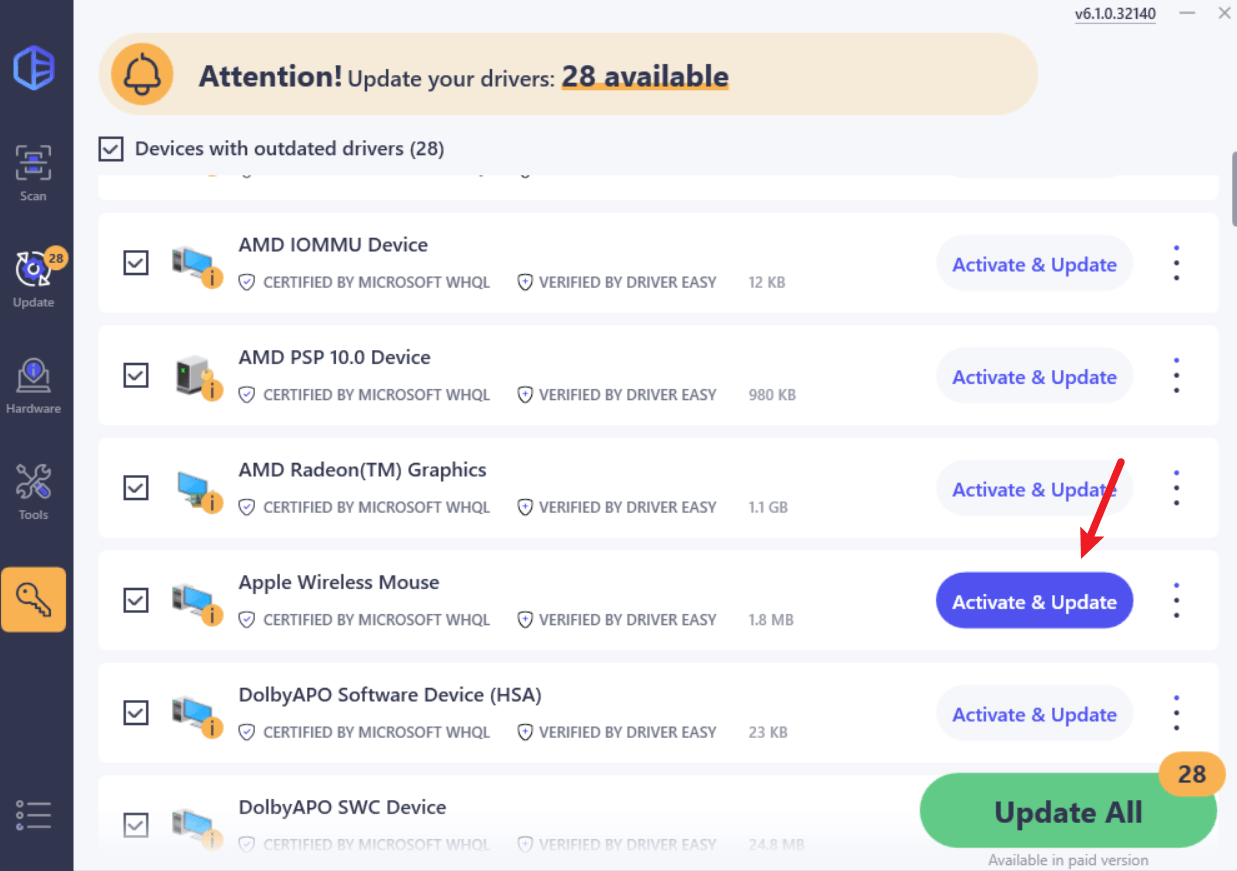
- Click the Activate & Update button next to the flagged device to automatically download and install the correct version of this driver.
Or click Update All to automatically download and install the correct version of all the drivers that are missing or out of date on your system (You’ll need the Pro version for this – when you select Update All, you’ll get a prompt to upgrade. If you’re not prepared to purchase the Pro version yet, Driver Easy provides a 7-day trial at no cost, granting access to all Pro features like fast downloads and easy installation. No charges will occur until after your 7-day trial period ends.)

- Restart your computer for the change to take effect.
If you need assistance, please contact Driver Easy’s support team at support@drivereasy.com.
Hello, is it possible to install driver for magic mouse in Windows 10? I updated Win8.1 to Win10, all works fine except mouse, it is determined as Microsoft mouse and scrolling doesn’t work.
iMac,
OS X Yosemite (10.10.2)
Posted on Jul 29, 2015 1:10 PM
Posted on Aug 5, 2016 9:01 AM
Download the latest boot camp support sw
The latest I can find as follow..
https://support.apple.com/kb/DL1837?viewlocale=en_US&locale=en_US
Unzip the file…bootcamp5.1.5769.zip
locate and run AppleWirelessMouse64.exe under the following folder to run the driver installation…
bootcamp5.1.5769.zip\BootCamp\Drivers\Apple
Done. You should have your scrolling working for the Apple magic mouse.
This driver will get your Apple mouse to work on non Apple computers.
Apple Magic Mouse Windows 10 driver
A detailed downloading guide on how to install and update Apple Magic mouse driver for Windows 10. Read the entire document for complete details!
From the information gathered online, we learned that many users have experienced issues while using Apple Magic Mouse in Windows 10, 8, 7. Are you also struggling with the same trouble?
In order to use Apple Magic Mouse in Windows 10, you need to install the most suitable magic mouse Windows driver. As you may know, a driver is an essential software component that channels the communication between your computer, connected hardware devices, and Windows OS. The same methodology goes regarding the Apple Magic Mouse.
Therefore, to help you we have created this downloading and installation guide. Here we have mentioned the best ways to perform the driver update.
Easy & Quick Methods to Download, Install and Update Apple Magic Mouse Driver for Windows 10
There are mainly two ways to download Apple Magic Mouse driver for Windows 10 i.e, manually or automatically. Let’s read them below:
Method 1: Automatically Download and Install Apple Magic Mouse Driver through Bit Driver Updater
There are numerous driver updater tools available in the marketplace to update outdated drivers automatically within a few clicks. Out of all, Bit Driver Updater is one of the most dedicated driver updater software.
This software boasts some of the premium and advanced features like single-click driver update, PC optimizer, and driver scan scheduler. Bit Driver Updater will automatically scan your PC for outdated, broken, or faulty drivers and replace them with the correct drivers.
This is the most convenient way to perform driver download and update tasks. Now, have a look at the below-mentioned steps to update Apple Magic Mouse drivers for Windows 10 via Bit Driver Updater:
Step 1: First and foremost, download the Bit Driver Updater from the download button below.
Step 2: Double click the downloaded file to run it and then follow the on-screen instructions to get the software installed on your computer.
Step 3: Launch the Bit Driver Updater on your computer and let the software scan your machine for faulty or out-of-date drivers.
A point to remember: Once you install the software and launch it on your computer, then it automatically starts scanning your system for the drivers that need to be installed and updated. But, if you want to run a scan manually, then you can also do so. For this, you are required to click on the Scan button from the left pane.

Step 4: After the scanning, it provides you with a detailed list of outdated drivers, you need to go through the entire list and then find the Apple Magic Mouse Windows 10 driver, and click on the Update Now button presented next to the driver.

Step 5: Alternatively, you have an option to update all outdated drivers within one click and that’s by clicking the Update All button.
The user can update drivers automatically either with the free or paid version of Bit Driver Updater. Although, keep in mind that the pro version takes only one click to update all faulty, missing, broken, or outdated drivers. Plus, you also receive a 60-day money-back guarantee. So, you can get your full value without giving a reason but only within 60-days of the purchase period.
Moreover, the pro version of Bit Driver Updater automatically creates a backup of currently installed drivers and allows its users to restore them when required.
Also Read: How to Download & Update Microsoft Mouse Driver on Windows 10
Method 2: Use Official Apple Support to Download Apple Magic Mouse Driver Manually
If you don’t want to use any third-party software for installing the latest version of the Apple Magic Mouse Windows driver. Then, you have to download the drivers manually from the official source. Since the magic mouse is produced by Apple, and Apple keeps releasing new drivers for themselves. So, to install Apple Magic mouse drivers for Windows 10 you need to visit Apple’s official website. Here is how to do that!
Step 1: Go to the official support page of Apple.
Step 2: Then, select the newest version of the driver and click on the Download option.

Step 3: After downloading finished, unzip the driver downloaded file, then navigate to BootCamp, Drivers, and Apple.
Step 4: Thereafter, find the AppleWirelessMouse64.exe file and double click on it to run the file.

Step 5: Execute the instructions appearing on your screen to complete the driver installation.
Congrats! There you have installed the Apple Magic mouse Windows 10 driver. While using this method, do keep in mind that you must have complete technical knowledge, especially about the drivers and the device for which you wish to install and update the drivers. Along with this, you should have enough time as the manual method takes a lot of time.
Also Read: Bluetooth Mouse Not Working on Windows 10/8/7 [FIXED]
Download and Install Apple Magic Mouse Driver for Windows 10: DONE
Thus, how to make Apple Magic Mouse work on Windows 10. The post discussed the effective methods to download and install Apple Magic Mouse driver for Windows 10. We hope you have liked the information shared in this article.
In our view, you should get the latest drivers installed automatically since the manual approach is error-prone and time-consuming.
Was this downloading guide helpful for you? Do tell us in the comments below. Also, mention your doubts and further suggestions in the comments section below. We will try to serve you best.
And, for reading more installation as well as troubleshooting guides do subscribe to our Newsletter. In addition to this, follow us on Facebook, Twitter, Instagram, and Pinterest for instant technical support.
This archive contains the Windows drivers for the following Apple devices:
- Apple Magic Keyboard (wired and wireless gen 1 & 2)
- Apple Magic Mouse (gen 1 & 2)
- Apple Magic Trackpad (gen 1 & 2)
In order to install the one you need just extract the archive, enter into the folder of the device you need, right click on the INF file and click on the Install entry. After that your device will be fully working, in the case of the mouse you will notice that right click and scrolling will start to work.
As an additional note, you might want to change the scrolling direction after install, in this case you will need to make some changes in the Windows registry. The steps are:
- Go to the device manager (right click on the Windows menu icon and choose it).
- Expand the Mouse section and double click on the newly installed device (might be shown as HID compatible mouse or something like that).
- Go to the details tab and select the device instance path property. Please note the value and keep it available; you can copy it to a notepad for that.
- Open the Windows registry editor (press Win+R, type regedit and press Enter).
- Go to the next route:
HKEY_LOCAL_MACHINE\SYSTEM\CurrentControlSet\Enum
- In there, follow the route defined by the instance path value. In my case was
HID\{00001124-0000-1000-8000-00805F9B34FB}_VID&0001004C_PID&0269\8&3AC3F21&0&0000for the Magic Mouse 2.
- Go to the Device Parameters subkey, change the FlipFlopHScroll and FlipFlopWheel values to 1 (double click on each to open the change value modal window).
- Close the registry editor and restart the computer.
- After Windows starts, the scroll will be as in MacOS natural configuration.
I extracted this files from my bootcamp installation, I hope they work for you.
- Addeddate
- 2020-08-24 16:41:42
- Identifier
- apple-drivers-windows
- Scanner
- Internet Archive HTML5 Uploader 1.6.4
comment
Reviews
There are no reviews yet. Be the first one to
write a review.
1,503
Views
DOWNLOAD OPTIONS
Uploaded by
Hilde_Brando
on