
Apple Input Device Drivers for Windows 10 & 11
Re-packaged official driver support software enabling the native usage of various Apple accessories and peripherals—including keyboards, mice, and trackpads.
Version
Built with Windows Support version 6.1.7071 (latest version).
Information
Apple has released drivers enabling the native usage of their proprietary interface and peripheral devices on Microsoft Windows operating systems.
To protect its users, Apple began requiring their driver downloads to occur through a controlled utility—known as Boot Camp Assistant—available only on macOS to automate the process and prevent the user from accidental misconfiguration of critical system drivers, but this also restricted the accessibility to non-critical and necessary device drivers such as human interface devices. This repository aims to provide access to device drivers in the event that they cannot be acquired via Boot Camp Assistant.
Compatibility
The drivers listed here are compatible with Windows 10 and 11. Though Apple has not made an official comment on Windows 11 compatibility, testing demonstrates they still function as intended.
Compatible devices include all versions of Apple Magic Mouse, Apple Magic Keyboard, Apple Magic Trackpad, and all Apple proprietary wired keyboards and mice.
Usage
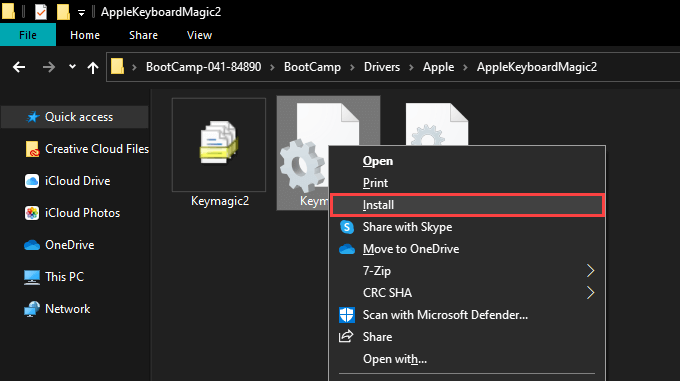
To install the desired device driver, open the folder name corresponding to the device type, right-click the .inf file and choose Install. Upon completion you will need to disconnect and reconnect your device.
The Apple Magic Keyboard will require you to install the .inf files in both the AppleKeyboard and AppleMagicKeyboard2 folders.
Settings
Function Key Reversal
To reverse the function of the Fn key, change the following DWORD (32-bit) Values in the Registry Editor from 0 to 1:
HKEY_LOCAL_MACHINE\SYSTEM\ControlSet001\Services\KeyMagic\OSXFnBehavior
HKEY_LOCAL_MACHINE\SYSTEM\CurrentControlSet\Services\KeyMagic\OSXFnBehavior
Inverted Scrolling
To reverse the direction of the scroll wheel the same way macOS does, change the following DWORD (32-bit) Value in the Registry Editor from 0 to 1 and restart your PC:
HKEY_LOCAL_MACHINE\SYSTEM\CurrentControlSet\Enum\HID\xxxxx\yyyyy\Device Parameters\FlipFlopWheel
Let xxxxx respresent the device instance ID (this can be found through Device Manager) and yyyyy the next (only) available registry key.
Remapping the ⌘ Key
To make the command key ⌘ function as a control CTRL the same way macOS does, you will need to use a utility like Sharpkeys or Microsoft PowerToys.
License
Apple has not provided any software license agreement for the use of its Windows Support Software—only Boot Camp Utility, which provides no specifications on proprietary driver usage. Since no usage license has been explicitly declared, the content here is intended only for those running Windows on a genuine macOS product via Boot Camp but have issues downloading the drivers via Boot Camp Assistant.
Resources
brigadier — Utility for downloading Windows Support Software on Windows natively.
Sharpkeys and Microsoft PowerToys — GitHub utilities that can assist in remapping the ⌘ key to emulate macOS.
Boot Camp Support Software — Versions 5.1.5621 and 4.0.4033 for Windows 7 installs (use this table to find out which version you need).
Boot Camp Utility — Software License Agreement (PDF)
tl;dr:
- Download and extract the Apple Boot Camp drivers I repackaged: BootCamp-061-51481.zip
- Right-click
BootCamp/Drivers/Apple/AppleKeyboardMagic2/Keymagic2.inf(orBootCamp/Drivers/Apple/AppleKeyboard/Keymagic64.infor appropriate driver) and then «Install». - Unplug and re-plugin your keyboard.
- If you want to reverse the fn key behavior, change
HKEY_LOCAL_MACHINE\SYSTEM\ControlSet001\Services\KeyMagic\OSXFnBehaviorandHKEY_LOCAL_MACHINE\SYSTEM\CurrentControlSet\Services\KeyMagic\OSXFnBehaviorfrom01to00. Restart for registry changes to take effect.
If those drivers don’t work, try getting latest from the source:
- Download latest exe from Brigadier release page.
- Find the latest or a current Mac model (ex:
MacBookPro16,3). - Run
brigadier.exe -m MacBookPro16,3to download Apple Boot Camp drivers.
If you can’t or don’t want to use Brigadier, see the bottom of this post.
Note: I have not tested this over Bluetooth. I keep my keyboard connected via the supplied lightning to USB cable.
I recently acquired an Apple Magic Keyboard and wanted to use it on my PC. It worked when I plugged it in but I could not access any of the media keys/fn keys (ex: volume up and down). This is because Windows was using the default keyboard drivers.
When I first started looking for solutions I found hacky, unsigned drivers and key mappers. These were not ideal.
Apple actually does supply Windows drivers for Apple Keyboards, Apple Magic Keyboards, and apparently other Apple Mouse and Trackpad devices. Apple created these for Boot Camp (a program that allows you to run Windows in a virtual machine in OSX). However, there is not an easy way to access them. Normally, Apple wants you to download and install a large suite of software and drivers meant for Boot Camp which will do all kinds of nasty things to your PC. Thankfully, the keyboard and other drivers can be isolated and installed independently.
Download Boot Camp Drivers
If you want to skip this section, you can download the drivers I extracted from the bellow process and see if they work for you: BootCamp-061-51481.zip
Because we are not going through Boot Camp, the first challenge is getting access to the Boot Camp drivers. The easiest way to do so is to use the Brigadier program. This automatically locates the URL for a given Mac model and downloads and extracts the appropriate Boot Camp drivers. If you can’t or don’t want to use this program, see the bottom of this post.
Download the latest exe from the releases page and run it like so:
brigadier.exe -m MacBookPro16,3
MacBookPro16,3 is the model of the latest MacBook Pro (at the time of writing) which I got from this page. I used this model because I wanted to ensure I got the latest drivers.
This will create a folder next to brigadier.exe named something like BootCamp-061-51481. The numbers in the name will be whatever version of Boot Camp drivers were downloaded.
Install Drivers
Navigate to BootCamp\Drivers\Apple\AppleKeyboardMagic2 for Apple Magic Keyboard drivers. I have not tested this, but I assume you would use BootCamp\Drivers\Apple\AppleKeyboard for other Apple Keyboards. Or, $WinPEDriver$\AppleMultiTouchTrackPadPro for Apple Magic Trackpad 2, etc. I don’t think there is any harm in installing more drivers than you need as only the appropriate ones will be used, but that is also untested.
Right-click Keymagic2.inf (or whichever .inf file exists for your driver) and then «Install» to install the driver.
After installation is complete, unplug and re-plugin your keyboard. If everything worked, you should be able to use the Volume Up/F12 (without holding the fn key) and the Volume will change. To debug, check in device manager; «Apple Keyboard» should be listed under «Human Interface Devices».
Change fn Key Behavior
By default, when the fn key is not held, the media keys will be activated. When the fn keys is held the F1-12 keys will be activated.
To reverse the fn key behavior, open RegEdit and navigate to HKEY_LOCAL_MACHINE\SYSTEM\ControlSet001\Services\KeyMagic\ and update OSXFnBehavior key from 01 to 00 (in the binary editor this will update from 00000000 01 . to 00000000 00 .).
Not sure if this is necessary, but also navigate to HKEY_LOCAL_MACHINE\SYSTEM\CurrentControlSet\Services\KeyMagic\ and make sure the OSXFnBehavior key has the same value.
Restart your PC for the registry changes to take effect.
Poking around in the Boot Camp package, I noticed several other drivers of note. BootCamp\Drivers\Apple\AppleKeyboardInternalUSB may be related to the USB ports on Apple keyboards. There are also some drivers that looked to be related to Apple Mice, Trackpads, Cameras, Displays, etc:
- BootCamp\Drivers\Apple\AppleCamera
- BootCamp\Drivers\Apple\AppleKeyboard
- BootCamp\Drivers\Apple\AppleKeyboardInternalUSB
- BootCamp\Drivers\Apple\AppleKeyboardMagic2
- BootCamp\Drivers\Apple\AppleKeyManager
- $WinPEDriver$\AppleMultiTouchTrackPad
- $WinPEDriver$\AppleMultiTouchTrackPadPro
- $WinPEDriver$\AppleWirelessMouse
- $WinPEDriver$\AppleWirelessTrackpad
This is not a full list of drivers. Just the ones I found interesting. I have not tested any of these. Again. I don’t think there is any harm in installing more drivers than you need as only the appropriate ones will be used, but that is also untested.
Brigadier Alternative
If you can’t or don’t want to use Brigadier, you can manually find, download, and extract the Boot Camp drivers. Brigadier uses this XML file (at the time of writing, subject to change) to locate the correct package. You can do this manually by downloading the XML file, opening it with a text editor, and searching for the BootCampESD.pkg URL with the latest PostDate. Downlad the .pkg file and extract the contents using 7-Zip, WinZip, WinRAR, or any other utility capable of unpacking .pkg and .dmg files:
- Extract
Payload~fromBootCampESD.pkg - Extract
.\Library\Application Support\BootCamp\WindowsSupport.dmgfromPayload~(this file is actually an archive). - Extract the contents of
WindowsSupport.dmg
Here are the 7-Zip commands used to accomplish the above:
"C:\Program Files\7-Zip\7z.exe" e -y BootCampESD.pkg
"C:\Program Files\7-Zip\7z.exe" e -y Payload~
"C:\Program Files\7-Zip\7z.exe" x -y WindowsSupport.dmg
How to Use Apple Keyboard and Mouse on Windows 10
In today’s digital age, the ecosystem of devices is more integrated than ever. While Apple products are renowned for their design and functionality, many users find themselves in cross-platform scenarios, needing to use Apple peripherals like a keyboard or mouse on a Windows operating system. Here’s a comprehensive guide to effectively use an Apple keyboard and mouse on Windows 10.
Introduction to Apple Keyboard and Mouse
Apple’s keyboard and mouse products, including the Magic Keyboard and Magic Mouse, are built to work seamlessly with macOS. They offer an ergonomic design, responsive controls, and advanced features like multi-touch support. However, transitioning to a Windows setup can present challenges. With a little effort, you can achieve a fully functional experience, enhancing your productivity while enjoying the quality of Apple hardware.
Connection Methods
The first step in using your Apple keyboard and mouse with Windows 10 is to connect them to your computer. You have two primary options: Bluetooth and USB.
-
Bluetooth Connection
- Both the Magic Keyboard and Magic Mouse support Bluetooth, allowing for a wireless connection without needing any additional software.
- Ensure your Windows 10 PC has Bluetooth capabilities (most laptops and desktops do, but you can easily verify this through Device Manager).
-
To connect:
a. Turn on your Apple keyboard/mouse. Make sure it has power or is charged.
b. Open Bluetooth settings on Windows 10 – Click on the Start menu, then open Settings > Devices > Bluetooth & other devices.
c. Turn on Bluetooth (if it’s not already).
d. Add Bluetooth or other devices – Click on “Add Bluetooth or other device,” then choose “Bluetooth.”
e. Select your device from the list (your keyboard or mouse).
f. Complete the pairing by entering the passcode if prompted (usually, a code will appear on the screen that you need to type using the Apple keyboard).
-
USB Connection
- If you prefer a wired connection or your Bluetooth is not functioning, you can use a USB cable.
- Simply connect the USB cable to your Apple keyboard/mouse and then plug the other end into a USB port on your Windows PC.
- Windows should automatically recognize the device.
Configuring the Keyboard
Once connected, you might notice that the layout and functionality differ from a standard Windows keyboard.
-
Keyboard Layout
- Apple keyboards can have different keys compared to traditional PC keyboards. The most significant differences involve the Command (⌘), Option (⌥), and Control (⌃) keys, which do not directly correlate to standard Windows keyboard keys.
-
You can configure the modifier keys to better suit Windows use:
a. Open Settings and select «Devices.»
b. Click on «Typing» and then «Advanced keyboard settings.»
c. Here, you can change your keyboard layout to match your preferences better.
-
Key Remapping
- To create a more seamless experience, you may want to remap the keys:
- Use third-party software like SharpKeys, AutoHotkey, or PowerToys.
- PowerToys: This Microsoft utility allows you to customize your keyboard. Once installed, open PowerToys and navigate to the Keyboard Manager feature. Here, you can remap keys easily.
- AutoHotkey: A more complex tool but offers immense flexibility. With AutoHotkey, you can script custom key functions and remappings.
- To create a more seamless experience, you may want to remap the keys:
-
Function Keys
- Apple keyboards typically feature function keys that control macOS features like screen brightness and volume. On Windows, you can use these keys with the Fn key for common functions.
- To use function keys as traditional F-keys:
a. Hold the Fn key while pressing the desired function key.
b. Alternatively, you might change this behavior in the Keyboard settings.
Configuring the Mouse
Using the Magic Mouse on Windows can feel different from a standard mouse. Here’s how to customize its functionality for a smoother experience.
-
Basic Functionality
- The Magic Mouse supports basic functionalities like clicking and scrolling right out of the box. However, you may want to customize additional features.
-
Touch Gestures
- The Magic Mouse has a surface that supports multi-touch and gestures. Unfortunately, some of these features (like swipe and scroll) might need additional software to work correctly on Windows.
-
To enable advanced functionalities:
a. Use software like TouchMousePointer – It can help simulate some of the features found in macOS.
-
Mouse Sensitivity and Speed
-
To adjust the sensitivity of the Magic Mouse:
a. Go to Settings > Devices > Mouse.
b. Adjust the MS pointer speed slider according to your preference.
-
-
Right-click Functionality
- By default, the Magic Mouse might not support right-clicking when used with Windows.
-
To enable right-click:
a. Go to Mouse settings in Windows.
b. Enable the «One Finger Tap» or similar options for secondary actions.
Troubleshooting Common Issues
Even with all the correct settings, you may run into a few problems when using an Apple keyboard and mouse on Windows 10. Here are some common issues and their solutions:
-
Connection Problems
- If your keyboard or mouse won’t connect, try the following:
- Restart the Bluetooth service by turning it off and then back on in the Bluetooth settings.
- Remove the device from the Bluetooth settings and try pairing it again.
- Ensure that your devices are charged or have fresh batteries.
- If your keyboard or mouse won’t connect, try the following:
-
Key Mapping Issues
- If certain keys aren’t functioning as expected:
- Double-check your remapping as detailed in the previous sections.
- Use software like SharpKeys to ensure mappings are applied correctly.
- If certain keys aren’t functioning as expected:
-
Lag or Performance Issues
- Sometimes users may experience lag with Bluetooth devices. This can be resolved by:
- Checking for any interference from other Bluetooth devices.
- Ensuring your Windows 10 is fully updated.
- Restarting your PC.
- Sometimes users may experience lag with Bluetooth devices. This can be resolved by:
-
Driver Problems
- If the keyboard/mouse isn’t functioning correctly, updating drivers may help.
- Open Device Manager and find the keyboards or mice section.
- Right-click on your device and select “Update Driver.”
- If the keyboard/mouse isn’t functioning correctly, updating drivers may help.
-
Battery Management
- If your wireless devices are not responding:
- Check battery levels. Low battery can limit functionality.
- Charge your Magic Mouse using a Lightning cable for a few moments before trying to reconnect.
- If your wireless devices are not responding:
Using Apple Keyboard and Mouse with Virtual Machines
If you are using virtualization software like VMware or VirtualBox, using your Apple Keyboard and Mouse within a virtualized environment can also be accomplished:
-
Setting Up Virtual Environment
- You can run Windows on a virtual machine on your Mac, and successfully use the Apple peripherals within it, though the setup may differ depending on your VM software.
-
Keyboard Shortcuts Translation
- Similar to using Boot Camp, ensure you’re familiar with how shortcuts translate from macOS to Windows in your chosen virtualization software.
Conclusion
Using an Apple keyboard and mouse on a Windows 10 system can enhance your productivity and comfort, bridging the best of both worlds. With the proper setup and configuration, you can enjoy the ergonomic perfection and aesthetic design of Apple products without losing the functionality provided by Windows. Whether you prefer Bluetooth or USB connections, key remapping, and custom mouse settings, the adaptability of these devices allows you to tailor your experience to fit your personal and professional needs.
Despite a few challenges, the flexibility and compatibility of Apple peripherals with Windows systems illustrate the ever-evolving landscape of tech integration, ensuring that you can find the best solutions for your digital workspace. So go ahead, connect your Apple keyboard and mouse to your Windows 10 machine, and enjoy a streamlined, efficient working environment!
With this guide, you are now ready to embark on the journey of using Apple peripherals on Windows. Happy typing and scrolling!
-
Main page -
Drivers
-
Input devices
-
Input devices Apple
- Apple Keyboard
-
Apple Keyboard
Driver type:
Human Interface Devices (HID)
Vendor:
Apple Inc
Version:
6.1.7000.0
*.inf file:
keymagic64.inf
Windows 8
64-bit ,
8.1
64-bit ,
10 / 11
64-bit
-
Apple Keyboard
Driver type:
Human Interface Devices (HID)
Vendor:
Apple Inc
Version:
4.0.2.0
*.inf file:
applemtm.inf
Windows 8
32-bit ,
8.1
32-bit ,
10 / 11
32-bit
There are no drivers for Apple Keyboard for Windows.
Download DriverHub to find drivers automatically.
Apple Keyboard drivers were collected from official websites of manufacturers and other trusted sources.
Official driver packages will help you to restore your Apple Keyboard (Input devices).
Download latest drivers for Apple Keyboard on Windows.
Version: 1.3.15.3625 for Windows 8, 10 and 11
Free software
Optional software included
- Yandex Browser
- Opera Browser
- Avast Free Antivirus
- World of Tanks
- World of Warships
Apple’s Magic Keyboard is a remarkably sleek-looking device with scissor-switch keys that allow for an incredible typing experience. The best thing is that you can also use it with other devices.
Since the Magic Keyboard uses Bluetooth for connectivity, you should have no trouble pairing it with a PC or Mac running Windows via Boot Camp. However, slight differences in the Magic Keyboard can pose a challenge.

So below, you’ll figure out what you must do to set up and use the Magic Keyboard correctly on Windows. You’ll also learn how to install the latest drivers for the device should you run into any issues.
You can pair your Apple Magic Keyboard with Windows similar to any other Bluetooth device. However, if you just installed Windows over Boot Camp and had the keyboard connected to macOS, it should be automatically paired with Windows. If not, the steps below should help you connect it with Windows on any PC or Mac.
1. Turn your Magic Keyboard on, and then off. You should find the power switch on the top-right edge of the device.
2. Open the Start menu and select Settings > Devices > Bluetooth & other devices.
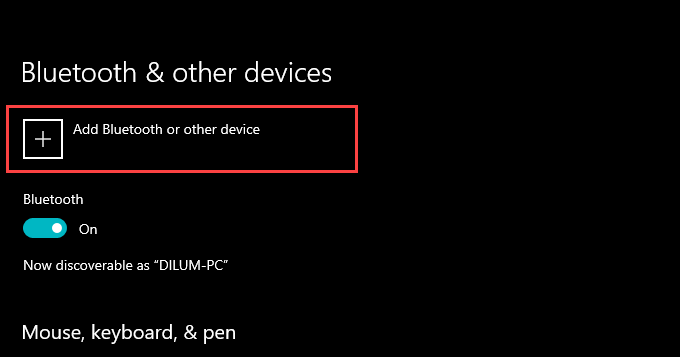
3. Turn on the switch next to Bluetooth and select Add Bluetooth or other device.
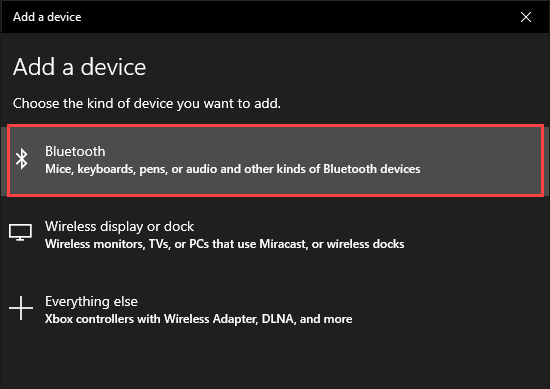
4. Select Bluetooth.
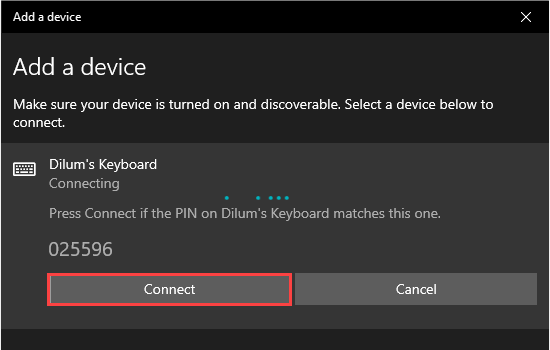
5. Select your Magic Keyboard. If Windows displays a six-digit PIN and asks you to confirm if you see it on the Magic Keyboard (which is impossible since it has no display), simply select Connect.
6. Select Done.
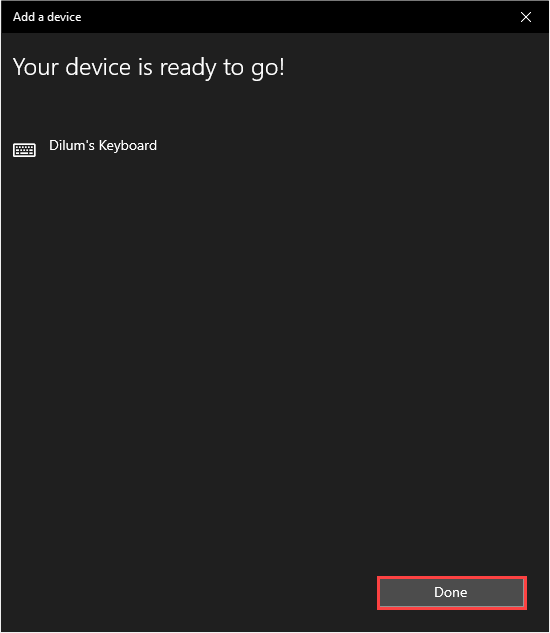
You’ve now finished pairing your Magic Keyboard, so you should be able to start using it with Windows immediately.
Replacement Magic Keyboard Keys on Windows
Apple designs the Magic Keyboard for macOS, so you’ll notice several differences (specifically with the modifier keys) compared to a typical PC keyboard. Thankfully, most keys work as substitutes, so here’s a list of the most important:
Alt —> Option
AltGR —> Option + Control
Windows —> Command
Backspace —> Delete
Enter —> Return
If you use an Apple Magic Keyboard without a numeric keypad, you’ll find various keys (such as Home, Page Up/Down, and End) completely missing. The same applies to all Magic Keyboard models since they don’t include the Print Screen and Applications keys.
In that case, you’ll have to rely on the On-Screen Keyboard that comes built into Windows to perform the relevant actions. You can invoke it whenever you want using the Windows + Ctrl + O keyboard shortcut (or on the Magic Keyboard by pressing Command + Ctrl + O).
Install Magic Keyboard Drivers on Windows
The Magic Keyboard should work without issues as soon as you finish pairing it with
Windows. But if you run into connectivity or other problems while using the Magic Keyboard, you must install the relevant drivers for the device.
Use Brigadier
Apple does not release the latest official Magic Keyboard drivers for use on Windows PCs, so you must use a Python script called Brigadier to download them as part of Boot Camp Support Software.
1. Download the Brigadier.exe file from Github and copy it to your desktop.
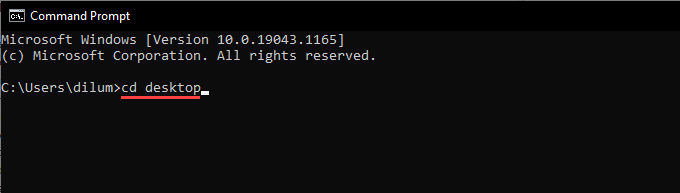
2. Search for and open the Command Prompt. Then, type cd desktop and press Enter.
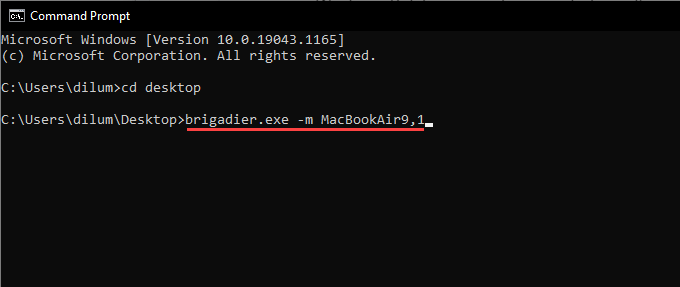
3. Next, type brigadier.exe -m MacBookAir9,1 and press Enter.
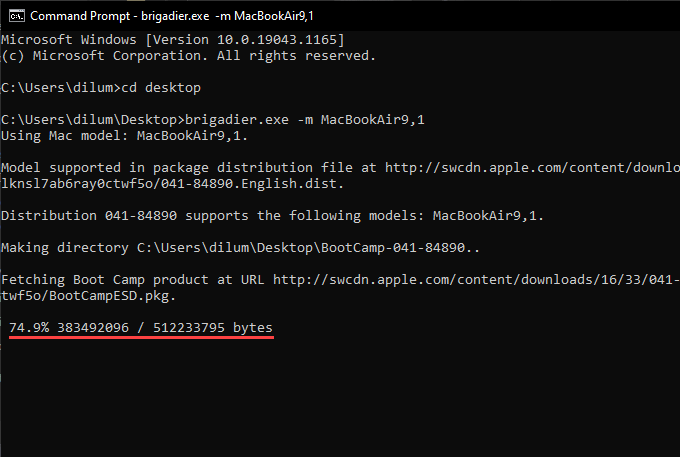
4. Wait until Brigadier finishes downloading the Boot Camp Support Software. Then, exit the Command Prompt console.
5. Open the BootCamp folder on your desktop. Then, navigate through the subfolders labeled BootCamp > Drivers > Apple > AppleKeyboardMagic2.
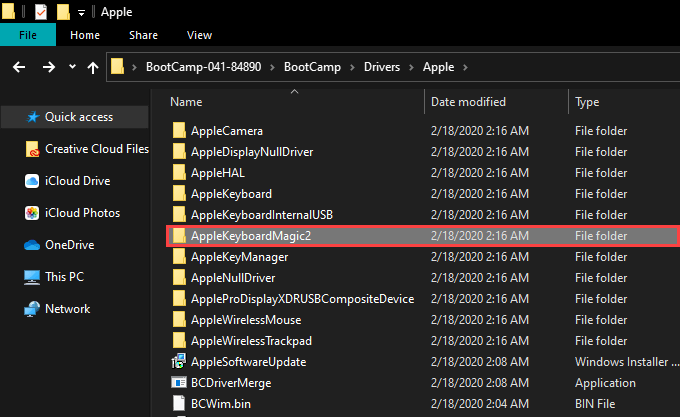
6. Right-click the Keymagic2.inf file and select Install.
Use Apple Software Update
If you use Windows via Boot Camp on a Mac, you can install Magic Keyboard-related updates directly via the Apple Software Update applet.
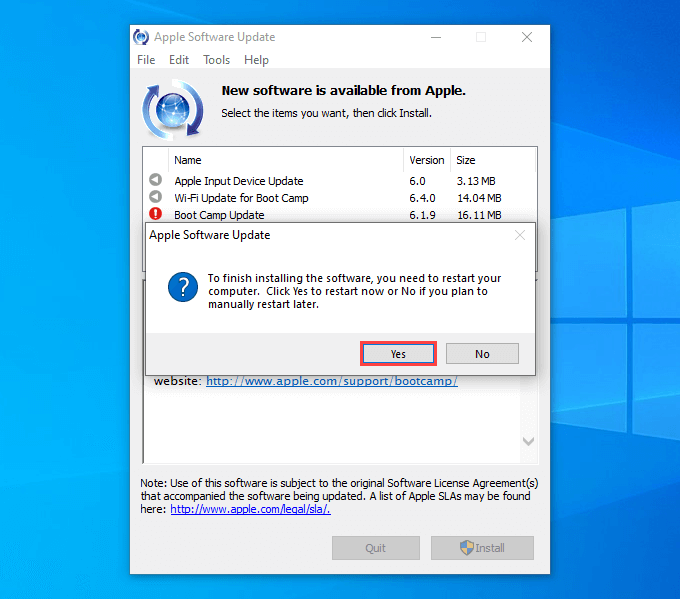
1. Open the Start menu and select Apple Software Update from the list of programs.
2. Check the box next to Apple Input Device Update. For your Boot Camp installation to work optimally, you must also select any other updates. Then, select Install Items.

3. Complete Yes to restart Windows and complete installing the selected items.
Try Magic Keyboard Utilities
If you need superior functionality while using your Magic Keyboard with Windows, it’s worth looking into third-party support software called Magic Keyboard Utilities.
Not only does Magic Keyboard Utilities install the drivers required to get your Apple Magic Keyboard running smoothly on Windows, but it can also change modifier keys, help you switch between different keyboard layouts, map useful actions to the function keys, and so on. It even lets you keep tabs on the keyboard’s battery life.
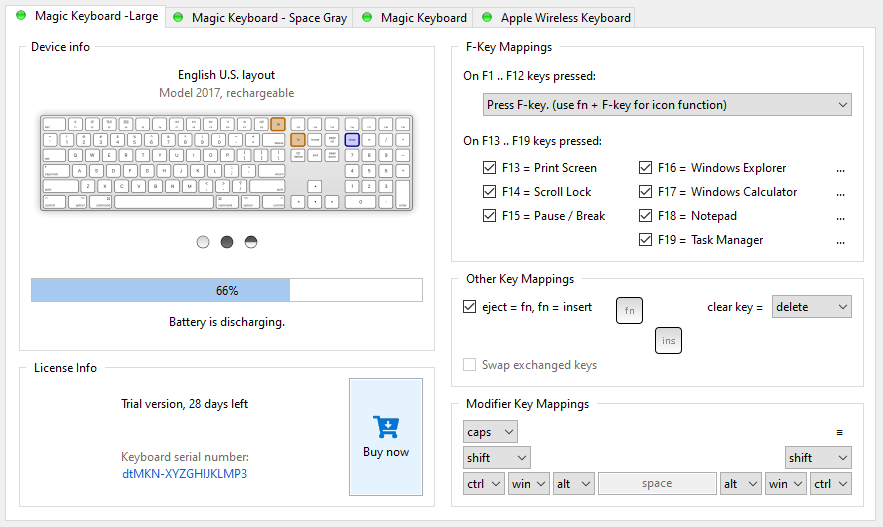
Magic Keyboard Utilities costs $14.90 a year, but you can thoroughly test out the application for 28 days with a free trial. It’s a steep price to pay, but if you plan on using your Magic Keyboard with your PC for the long haul, it should help improve the experience a lot.
Absolute Magic on Windows
The slight differences in the keyboard layout coupled with various missing keys might make the Magic Keyboard a tad challenging to deal with on the PC. However, use it for some time, and you should find it more manageable. Now that you’ve finished setting up your Apple Magic Keyboard, here’s what you must do to set up your Magic Mouse on Windows.
Related Posts
- How To Fix Magic Keyboard Caps Lock Not Working
- How to Fix Function Keys Not Working on Apple Magic Wireless Keyboard
- How to Use Your iPhone as a USB Drive on Mac and PC
- Apple’s Big Week: Design Debates, AI Ambitions, and Regulatory Roadblocks
- How to Connect Xbox Controllers to Your Mac