
SF-Windows
All the San Francisco and other Apple Fonts for Windows
Official site: developer.apple.com/fonts/
Tested on Windows 10 — 11 | macOS 10.14 — 15.1
If you encounter any issues, feel free to open a bug report.

San Francisco
San Francisco is an Apple designed typeface that provides a consistent, legible, and friendly typographic voice. Across all Apple products, the size-specific outlines and dynamic tracking ensure optimal legibility at every point size and screen resolution. Numbers have proportional widths by default, so they feel harmonious and naturally spaced within the time and data-centric interfaces people use every day.
Nine weights, including italics — and features like small caps, fractions, inferior and superior numerals, indices, arrows, and more — offer breadth and depth for precision typesetting. San Francisco also adapts intelligently to different contexts. When indicating time, for example, the colon in San Francisco switches to a vertically centered form. And each operating system works with the typeface to apply size-specific font features automatically.
SF Pro
This neutral, flexible, sans-serif typeface is the system font for iOS, iPadOS, macOS and tvOS. SF Pro features nine weights, variable optical sizes for optimal legibility, four widths, and includes a rounded variant. SF Pro supports over 150 languages across Latin, Greek, and Cyrillic scripts.
SF Compact
Sharing many features with SF Pro, SF Compact features an efficient, compact design that is optimized for small sizes and narrow columns. SF Compact is the system font for watchOS and includes a rounded variant.
SF Mono
This monospaced variant of San Francisco enables alignment between rows and columns of text, and is used in coding environments like Xcode. SF Mono features six weights and supports Latin, Greek, and Cyrillic scripts.
New York
A companion to San Francisco, this serif typeface is based on essential aspects of historical type styles. New York features six weights, supports Latin, Greek, and Cyrillic scripts, and features variable optical sizes allowing it to perform as a traditional reading face at small sizes and a graphic display face at larger sizes.
SF Script Extensions
Like San Francisco, these extensions to the Apple system font feature nine weights, a rounded variant, and variable optical sizes that automatically adjust spacing and proportion based on the point size.
Each script extension has been designed to fit with SF Pro for multilingual typesetting, while respecting the natural proportions for each script by adjusting weight, contrast, and vertical metrics.
SF Arabic
A contemporary interpretation of the Naskh style with a rational and flexible design.
SF Armenian
Designed with proportions that have been adjusted for a better visual balance in multilingual typesetting.
SF Georgian
Supports modern Georgian, Mkhedruli, and Mtavruli uppercase forms.
SF Hebrew
With full support of the Niqqud diacritical marks.
Last Updated: November 26 2023
Excuse the long title, but this drove me absolutely bonkers. Part of creating prototypes that are as realistic as possible is ensuring that you have as close to the actual resources as possible. I was building a Figma prototype the other day on a Windows desktop I have at home and it did take more effort than I liked to setup Apple’s UI fonts. Being an ex-Software Engineer I did find a way, and I hope to help other Designers who may not have the know-how.
Step 1: Download the fonts
Sounds easy enough– after a quick Google I quickly found myself on the official source of Apple’s San Francisco fonts for text and display:
https://developer.apple.com/fonts/
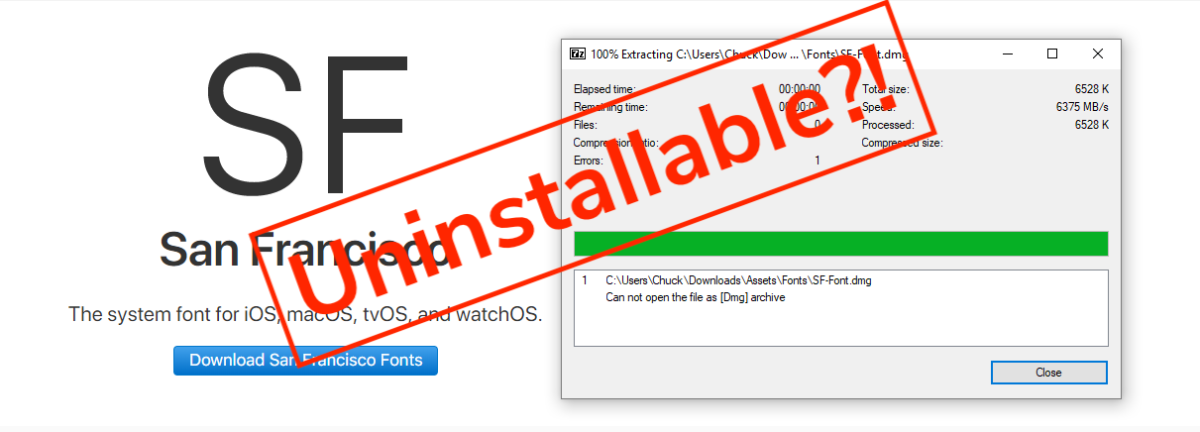
Problem is, the .dmg file is not a native format to Windows. Most Designers and Mac people will recognise this as a standard file format containing applications or plugins for applications. Think of it as a fancy .zip or .rar file.
I followed this guide and similar resources, but to no avail:
https://graphicdesign.stackexchange.com/questions/71470/how-to-use-san-francisco-font-on-windows
I wanted to install as little single-use software as possible, and had no luck extracting using the 7zip utility (refer back to the featured image at the beginning). After some more digging, I actually found and downloaded the fonts from here in a lovely .zip folder:
https://github.com/AppleDesignResources/SanFranciscoFont/issues/1
End of story right? Extract the folder and install the fonts? Nope! Windows 10 throws a fit at some .otf files.
Step 2: Convert your Fonts to Installable Formats
The easy mode is to use an online converter, but I find that online tools like that don’t make it easy to convert multiple files at a time. This is probably to prevent people overloading their systems with huge requests. If you only have one or two fonts, you can probably use one like this:
http://www.freefontconverter.com/
Ain’t as much fun though, is it? Let’s do the techie thing and convert them ourselves!
2a. Install the Windows subsystem for Linux on your machine:
https://www.windowscentral.com/how-install-bash-shell-command-line-windows-10
If you haven’t used it before and are a bit daunted by using terminals, don’t worry I’ll try to make it as clear as possible :wink:. Plus, it’s the Swiss Army Knife of computers. I hooked up my system with Ubuntu as I thought most guides online would be in that format.
2b. Open up a bash terminal once you’re ready. Windows key + “bash.exe” or within the start menu, find the program “bash.exe”.
I found and used this guide to help me:
http://www.stuermer.ch/blog/convert-otf-to-ttf-font-on-ubuntu.html
So, let’s install the fontforge cli (command line interface) tool:
# Just to make sure we have the latest repo info
sudo apt-get update

# Now install fontforge
sudo apt-get install fontforge -y

# Change directory to where you downloaded the fonts.
# Here's where I put mine
cd /mnt/c/Users/Chuck/Downloads/Assets/Fonts/
Since the file systems are quite different on a Windows machine versus a Linux machine, it’ll take a bit of getting used to and wrangling the two worlds to get to where you want to be. If you think of your Local C: drive, that’s just a hard drive device on the computer. Linux typically mounts those devices on the root system under /mnt, so the path above is saying /folder where Linux mounts hard drive and USB drives/the C drive/usual folders....
Back on Windows land, copy paste the script to a new file where you downloaded your fonts and call it otf2ttf.sh. Notepad application is just fine. You could call it anything really, but if you’re charting really unfamiliar territory it’s best to leave the names as is:
#!/usr/local/bin/fontforge
# Quick and dirty hack: converts a font to truetype (.ttf)
Print("Opening "+$1);
Open($1);
Print("Saving "+$1:r+".ttf");
Generate($1:r+".ttf");
Quit(0);
Done? Cool. Make sure it’s executable over in bash land.
# Make that new script file executable
chmod +x otf2ttf.sh

# Lost? Make sure you're in the right directory! Check using pwd command:
charlesr@DESKTOP$ pwd
/mnt/c/Users/Chuck/Downloads/Assets/Fonts
Sweet, now we can do our conversions!
# Test out a single file to make sure it works as expected:
fontforge -script otf2ttf.sh ./SF-Fonts-June19/SF-UI/SF-UI-Display-Black.otf

# Worked? Great! Let's convert them all up
for i in ./SF-Fonts-June19/SF-UI/*.otf; do fontforge -script otf2ttf.sh $i; done
Step 3: Install the Fonts
All that’s left is to install all the fonts! To make this easier, let’s put all the .ttf files in a folder:
# Move to the fonts folder
cd SF-Fonts-June19/SF-UI

# Make a new folder for the ttf
mkdir converted-fonts

# Now move all .ttf files to the new folder
mv *.ttf converted-fonts

# Prove they're there
ls converted-fonts
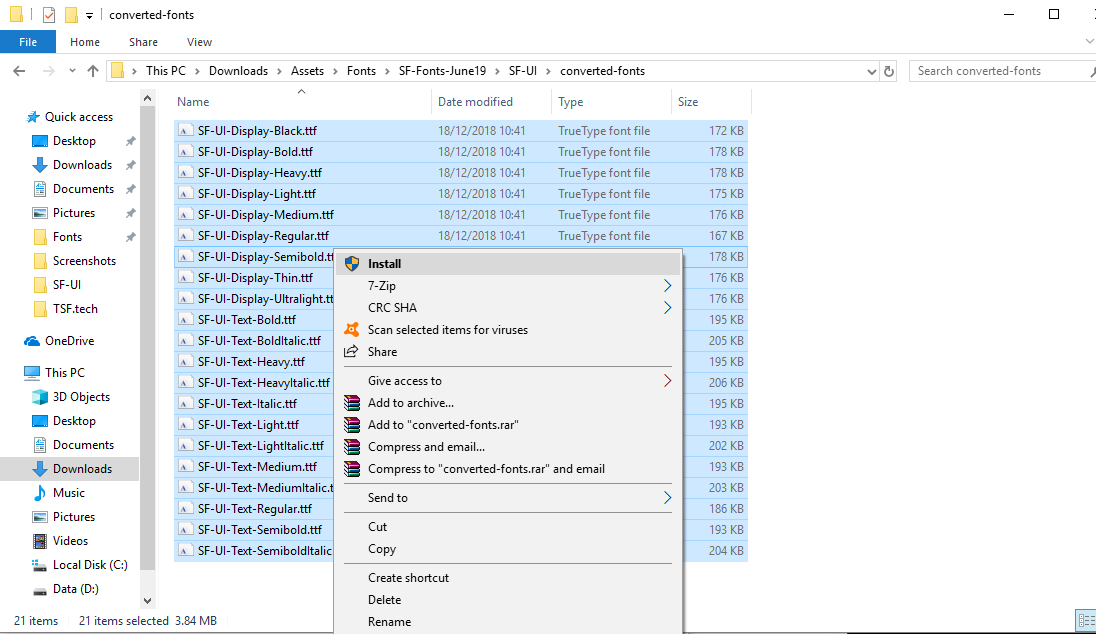
Highlight all the new .ttf fonts in Windows explorer, right click and install:
Well done; go forth and let your prototyping skills shine!
If you get stuck or want to chat, you can find me on Twitter via @chuckwired or email.
Skip to content

If you are a lowly Windows user like myself, and work with iOS, you are probably frustrated with how terrible Apple’s support is for Windows users. I know I am. So I’m going to show you a quick and easy to way to download, install and use the San Francisco typeface on Windows.
Step 1: Download the font package from Apple.
https://developer.apple.com/fonts/
Make sure to download the regular fonts and not the compact fonts for watchOS. The download will have an annoying .pkg file that Windows users will be unable to open immediately. That’s okay.
Step 2: Download and install 7zip.
http://www.7-zip.org/download.html
This will allow you to dig into the .pkg file and navigate to the font files.
Step 3: Open the .pkg file using 7zip.
The fonts will be found by navigating to San Francisco Pro.pkg > Payload > Payload > . > Library > Fonts
Select all of the font files and click the “Extract” button in the top navigation of 7zip. Once extracted you can install the fonts like any other Windows font.

And that’s it! Hope this helps your next iOS project.
If you’ve ever used a Mac or seen a friend using a Mac, you’ve no doubt noticed some of the unique and crystal clear fonts that are found on Mac devices. Mac devices are expensive to get simply for using those sweet fonts, but what if you could just extract a Mac font from macOS, and then get it working on Windows? It’s certainly possibly to do, but it’s not as simple as a cut and paste.
That said, if you follow along with us below, we’ll take you step by step and show you how to get mac fonts working on Windows. So without further ado, let’s get started:
Are macOS fonts and Windows fonts interchangeable?
There’s something that is called a TrueType font, or a .TFF file. This was designed by Apple, and is sort-of cross-platform. Windows supports the TrueType font file format, but not in the way that you think.
You can’t use an Apple TrueType font directly on Windows. You have to convert it to a Windows TrueType font, as the Apple TrueType can only be used on Mac devices. However, once you convert it to a Windows TrueType font, you can move that over to the Mac device and use it just fine. This is because the Windows TrueType works on both Windows and Mac devices.
That said, macOS fonts are interchangeable, but they take a bit of work to make them interchangeable, as you can see.
Other font types
There’s one other “font type” worth talking about, and that’s the OpenType font, or the .OTF file extension. This font type is completely cross-platform, allowing you to use it on Mac and Windows as you wish.
This is because the OpenType font has all of the necessary components for Mac and Windows — the .AFM file for Mac, and then the .PFB and .PFM files for Windows. That said, an OpenType font can essentially be copied over and installed from platform to platform as you please.
Getting Mac fonts on Windows
With today’s tools, it’s actually extremely easy to get a Mac font on Windows. The first step is to download and install a program on Windows called MacType. You can get it for free here. Run the installer, and follow the setup wizard. Once it’s installed, we can get those fonts on Windows.
Next, open up the MacType program. You’ll want to select your language — usually English — and then press Next.
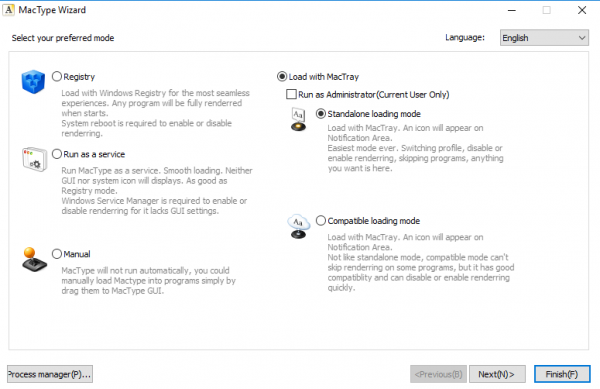
On the next page, you’ll see a list of radio buttons and options. You can ignore most of these, as we’ll be selecting the Load with MacTray option at the top-right corner. In addition to that, you’ll want to click on the Run as Administrator radio button, and also the Standalone loading mode option, as seen in the image above. Click Next.
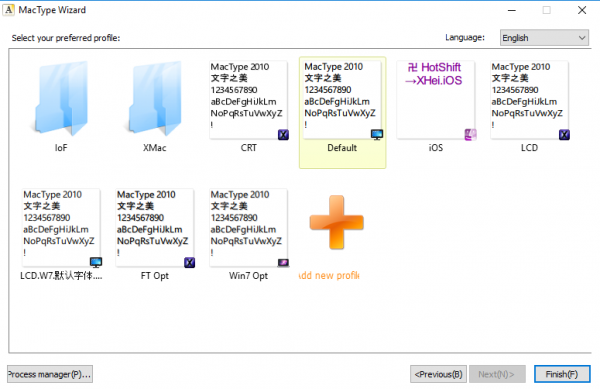
On this page, we’ll want to select the option that says Default, and then Finish.
Now, we need to switch up the Windows font rendering, which will make your Mac fonts all that more clear. To do this, we’ll use a free program called GDIPP. You can go to the Google Code page, and download it for the correct version of your system — 64-bit or 32-bit Windows.
Once the installation is complete, there’s literally nothing you have to do afterwards. It simply replaces the Windows gdi32.dll text rendering program with one that can bring you “beautiful, anti-aliased text” that you would find over on macOS and earlier versions of the operating system.
Undoing MacType and GDIPP
If you decide that you’re ready to get rid of those MacFonts, since they’re all program-based, it’s actually quite easy to get rid of them, especially in Windows 10.
Open up your Start menu, and press the Gear icon. This opens up the Settings panel. From there, simply search for Add or remove programs, and click it.
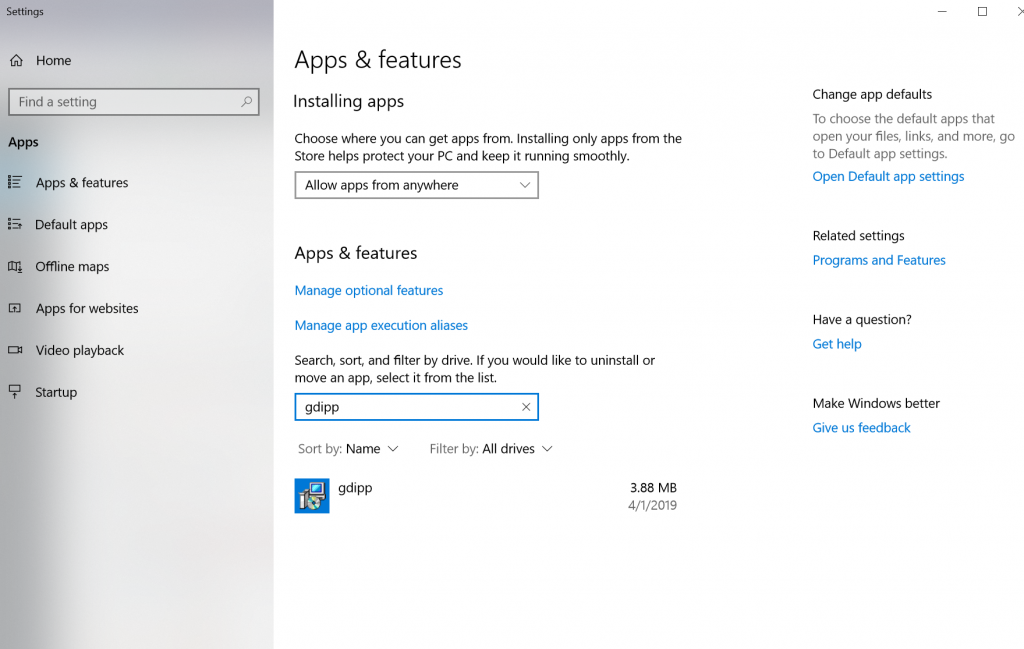
Once you’re in, you can scroll through the list to find MacType and GDIPP. Or, you can enter either name in the search bar. Once you do, click on the program, and then press the Uninstall button. This will get rid of those Mac fonts on Windows; however, if you ever want them back, you can simply follow the steps above again.
Closing
As you can see, it’s quite easy to get Mac fonts on your Windows machine. By following the steps above, you should have those beautiful, crisp and clear Mac fonts on your Windows machines in just a couple of minutes. Of course, MacType isn’t the only way to get Mac fonts on your PC — there are countless other programs that are out there that can help you with the same process. That said, if you’re not seeing that MacType is doing anything, it might be worth poking around and seeing what else is out there, too.
How do the new Mac fonts you installed look on your Windows machine? Let us know in the comments section below, we’d love to hear from our readers!
Download Windows Speedup Tool to fix errors and make PC run faster
If you are using both macOS and Windows, you might have observed that the font in the Mac looks different than the fonts in the Windows system. The text in the Windows system appears smaller and less sharp as compared to the Mac system. Some also prefer the color representation in Mac rather than in Windows. It may, therefore, appear to some that, unlike Mac, the texts in Windows aren’t optimized for reading long-form articles.
Windows Font vs Mac Font
The way the fonts appear on your machine depends on the software called Font renderer. Apple cares about Mac’s aesthetic and puts in a lot of effort to the stuff like modern UI and font rendering that distinguishes Mac from other systems like Windows. Windows uses DirectWrite technology to render fonts and Mac, on the other hand, uses Free-Type font rendering that has better font smoothing capability than Windows.
As of now, Microsoft offers ClearType software technology for the recent Windows version to improve the text readability on laptop screens and flat LCD monitors. A simple tweak on ClearType’s settings,s improves the readability of text and attempts to smooth the fonts on your monitor. However, most of the users, like designers and artists, still prefer using Mac’s Freestyle rather than Clear Type technology. If your work involves constantly switching between Mac OS and Windows systems, you may wish to have a smooth Mac-like font on a Windows machine.
Read: How to make Windows 10 look like Mac.
Get Mac font for Windows 11/10
While some Windows users, such as developers and web designers, simply love the way Windows renders the font, some might prefer Apple fonts as the texts look sharper, nicer, and easier to read. In this article, we explain how to replace your Windows font with a Mac-like smooth font using free programs like MacType and GDIPP.
1] MacType installs Mac font on Windows

As the name suggests, MacType is a powerful program which aims to provide Mac like smooth fonts on Windows 11/10. The latest version of MacType is fully compatible with Windows 11/10 and is easy to use with additional customization options. Follow the below steps to use MacType on Windows 11/10.
Download the latest version of MacType here. Run the installer file and during installation choose complete install.
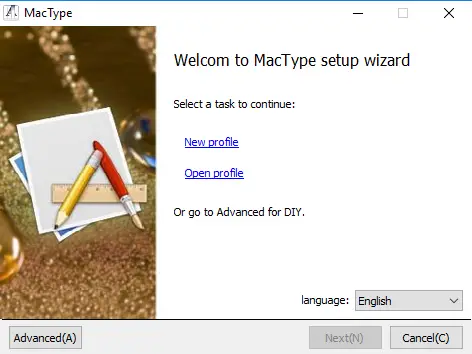
Once the MacType is installed, Launch the program and select the language as English.
In the MacType Wizard window, Click on the radio button with option Load with MacTray.

Check the box with option Run as Administrator and click radio button with option Standalone loading mode.
Click the Next button. Choose the MacType default font smoothing profile labeled in Chinese and click Finish button.

Click OK in the confirmation dialogue box to apply the changes.
The Font profile determines the components involved in the font smoothing process. You can create a new font profile or edit the existing font profile using MacType Control Panel which will be created as your desktop shortcut soon after installation is complete.
Read: How to add Custom Fonts to Command Prompt in Windows.
2] GDIPP for Windows

GDIPP is a simple program that aims to provide you with the effect of Windows text appearing like Mac OS. It is extremely easy to use and can be easily customized on both 32-bit version Windows and 64-bit Windows It allows you to install 32-bit components and 64-bit components separately. However, both these components share the same setting file. Once the program is installed, the 32-bit processes will only render 32-bit applications, and 64-bit components will only render 64-bit applications in 64-bit Windows version.
Download the latest version of GDIPP here. Run the downloaded installer.
Once the installation is complete, you will have the smooth Mac-like fonts on your Windows machine.
Read next: Convert Mac font to Windows-compatible font using DfontSplitter.
Pavithra is a Windows enthusiast, who loves keeping abreast with the latest in the world of technology.