
⊞ Windows 11 Troubleshooting for Apple Devices app

Apple Devices (Preview App)
Pre-requisites:
- Make sure your Apple Device OS (iOS, iPadOS, etc.) is updated above versions 15
Settings >
General >
About >
Locate your OS version (i.e. iOS Version 16.4)
- Turn off Lockdown Mode.
This can be done in:
Settings >
Privacy & Security >
(scroll all the way down) — Lockdown Mode (On / Off) >
(scroll down) and Turn Off Lockdown Mode; Enter your Passcode and wait for your device to restart. You can re-turn it on after disconnecting your device.
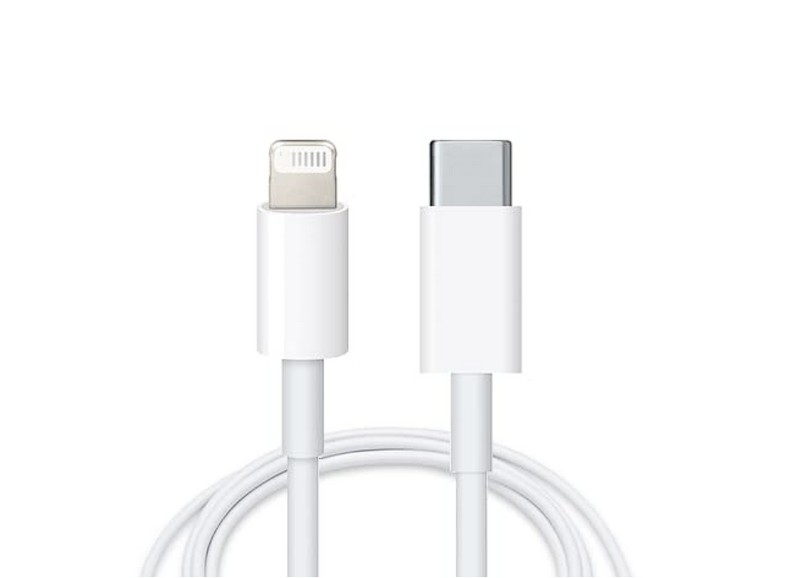
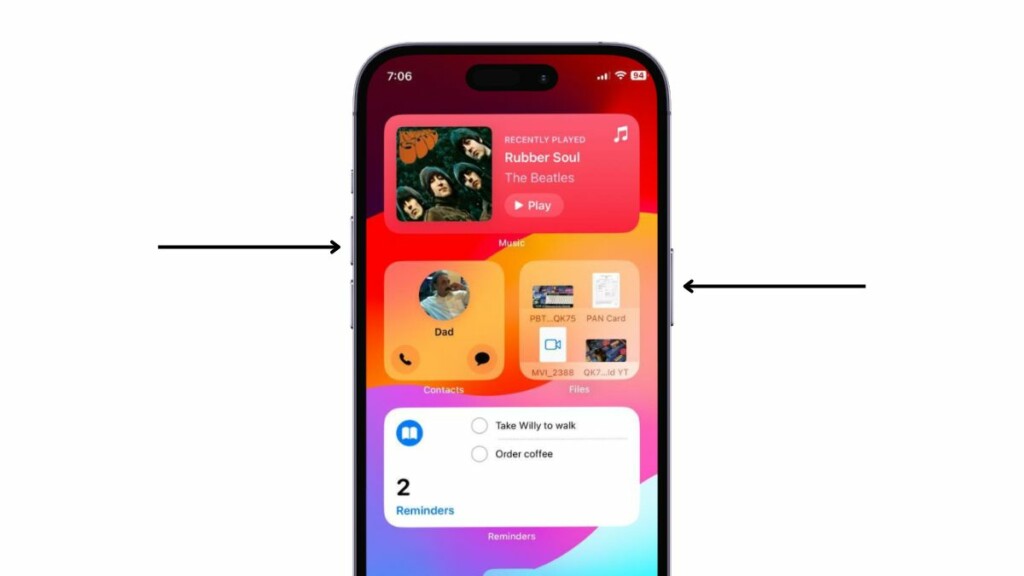
- Do Not use a Multi-port Dongle. Use either a direct cord with a USB-C end (if your computer does not have USB A 1–3 ports), or a conversion add-on to convert your USB A 3 charger plug to a USB-C. If your computer / device has a USB A port, you can connect directly to that if your charger cord has a USB A plug.
Examples of USB-C items mentioned:
> iPhone / iPad USB-C Charger Cord (Amazon)
> USB-A (1–3) -To- USB-C Converter Add-on (Amazon)
On Your PC, turn off your VPN (Virtual Private Network). This may or may not intrude, but this helps.
— — — — — — — — — — — — —
Once Prequisites are checked:
- Plug your Apple Device into your computer / device. Wait for:
- Windows 11 to load up your Apple Device (check your File Explorer)
- You will get the “Photos & Videos” Prompt on your Apple Device, Press “Allow”.
- You will get the “Trust this Device / Computer” Prompt, Press “Trust” (this may happen more than once).
2. Open Apple Devices app (your PC). Wait 10–20 seconds. Apple needs to put a loading icon on this process.
3. Your Apple device will appear below “Devices” (top-left-hand column). If it does not, click on Devices, and your Apple device will appear below in a separate list.
4. Then, wait for your device to load up. You can choose how you want to sync, backup, restore, encrypt your backup, and update your Apple Device directly from Apple Devices (Preview). Your Apple device must be connected for the duration of using Apple Devices.
You can press the Triangle “Eject” icon to left of your device to stop the Apple Devices app from accessing your device (make sure to wait for it to disappear from list)—* NOTE* — you still have to eject your your actual device from your computer to safely remove and unplug your device.
5. From Apple Devices, you can also find your Files from your other apps, as well as how to sync and backup your Photos to your computer. You can use the existing Microsoft Photos App to organize your Photos (your phone will appear in the left-hand column to import new photos to your PC).
6. Similar to the new MacOS versions, iTunes has been replaced with separate apps for each of the different Media types. On Apple Devices, you will need to download these separately:
- For TV / Movies / Video / Apple TV+ Streaming : Apple TV (Preview)
- For Music / Albums / Streaming Music : Apple Music (Preview)
- For accessing your Apple Account / iCloud / iCloud Photos : iCloud app
- - — Additionally, you can access your iCloud data online at iCloud.com
7. To use iCloud.com, make sure that “Access iCloud Data on Web” is turned on.
To do this go to:
Settings >
Your “Name”Apple ID account (just below the word “Settings”) >
iCloud (with the iCloud icon) and your GB number plan >
(scroll all the way down) and see if the button has been switched to “on” for Access iCloud Data on Web (if not turned on, it will give you some confirmation prompts to agree with to do so).
8. In iCloud.com, you will also have access to other Apple specific apps such as:
Find My ( locate your Apple Device (must be turned on, on your device)
Pages (Apple’s “Word” document app)
Numbers (Apple’s “Excel” spreadsheet app)
Keynote (Apple’s “PowerPoint” presentation app)
Notes ( notepad app)
Reminders (reminder app)
Mail (email web client app)
Calendar (web calendar app)
Photos (Apple’s “Microsoft Photos” photos app)
Contacts (contacts app)
iCloud Drive ( your online “File Explorer” / Finder / Files app)
& More (like Data Recovery, HomeKit Secure Video, etc.)
9. If you need to access your Apple ID (your main Apple account), visit:
AppleID.apple.com
- Here you can access your login information, subscriptions, payment, and other details.
10. More Apple Media:
To learn more about what’s going on with Apple, visit Apple Newsroom.
Learn, Watch and Find Support on Apple Support YT Channel.
Apple Content & Event Videos on Apple YT Channel.
International Apple YT Channels (click here).
Apple Music Interviews and Concerts on Apple Music YT Channel.
Find what’s playing on Apple TV + on Apple TV YT Channel.
Browse Microsoft Video Resources ( link )
After discontinuing the iTunes app on Windows platforms, Apple released three new applications for users to access its services and manage their iPhones and other devices. While the Apple Music and Apple TV apps let users access Apple’s music and entertainment services on Windows PCs and laptops, the new Apple Devices app helps manage their devices, such as iPhones, iPads, and iPods. However, after the public release of the Apple Devices app, many users are experiencing unexpected issues with it on their Windows 11 PCs and laptops.
As you are already reading this article, we presume that you are one of the users who is currently facing the Apple Devices app not working issue on Windows 11. Well, fret not! In this in-depth guide, we have curated a list of some of the most effective fixes for the Apple Devices not working issue on Windows 11. Check out the following sections for all the details!
Fix Apple Devices App Not Working on Windows 11
Although the Apple Devices app is a great tool for managing iPhones, iPads, and other Apple devices on a Windows 11 PC or laptop, it is no good when it cannot detect your connected device or simply stops working.
So, what do you do when you experience the Apple Devices app not working issue on Windows 11? Well, try out the following fixes on your Windows 11 device one by one to see which one works and get the Apple Devices app up and running once again. We have also included easy-to-follow steps to help you execute the fixes on your Windows 11 PC or laptop.
1. Check Your USB Cable and USB Port
Now, if you are connecting your iPhone or any other Apple device to your Windows 11 PC or laptop and it is not showing up in the Apple Devices app, you might want to check your data cable and the connection port of your computer. If either of them is damaged or non-functional, your iPhone will not connect to your Windows 11 PC or laptop, and naturally, won’t get detected by the Apple Devices app.
So first, check the USB cable that you are using to connect your iPhone and ensure it is functioning and compatible. You can do this by using the same cable to charge your iPhone using an adapter. If the iPhone charges with it, your cable is fine. However, if it does not charge, you might want to replace that cable and use an MFi-certified cable or the one that came in the box.
In case you find that your USB cable is fine, try checking the USB port of your Windows 11 PC or laptop that you are using for the connection. Try connecting your iPhone to a different port and check if that works. In case your port is damaged, you need to replace it with a new one or continue using other ports of your Windows 11 PC or laptop.
2. Clean Your iPhone/iPad/iPod Port
If the USB cable and the USB port of your Windows 11 device are perfectly fine but your iPhone, iPad, or iPod is not showing up in the Apple Devices app, you can try cleaning the port of your mobile device.
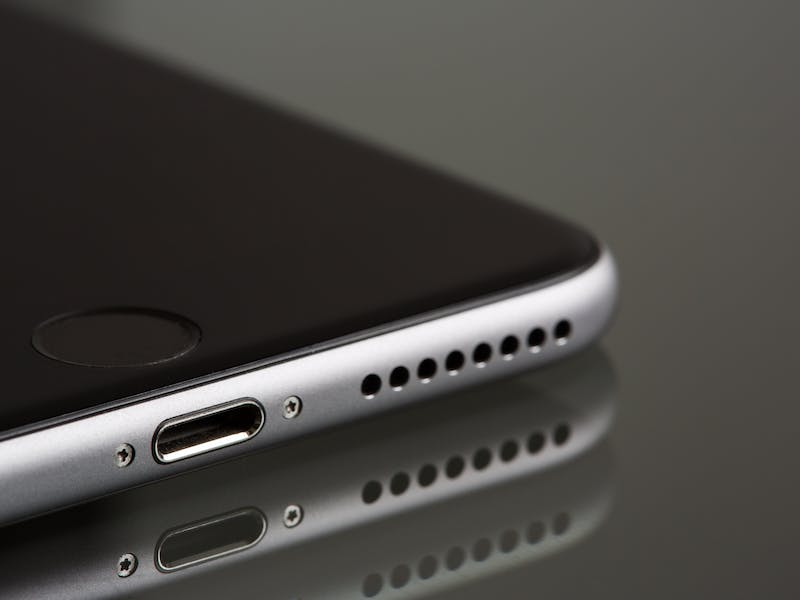
Oftentimes dirt and debris stuck inside the port of your iPhone can prevent a secure connection. If that is indeed the case, disconnect the device, carefully poke out all the dirt from the port, and try reconnecting it to your Windows 11 PC or laptop.
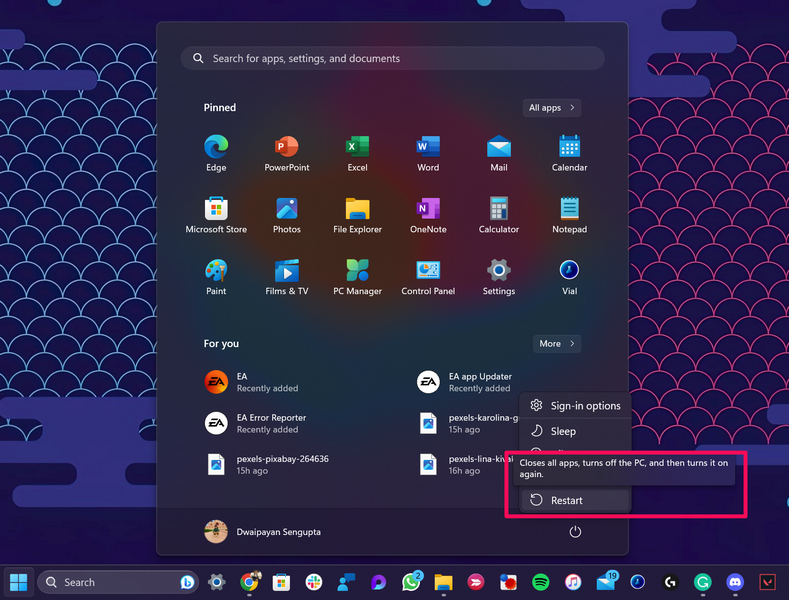
3. Restart Your Windows 11 PC or Laptop and iPhone
Now, this might sound a little bit stupid but hear us out! A restart of your Windows 11 PC or laptop can often work wonders when it comes to issues such as the one you are currently facing.
Restarting your Windows 11 PC or laptop will close all the running apps and background processes. This could get rid of any app or process that might be creating an interference for the Apple Devices app on your Windows 11 device.
So, open the Start menu and use the Power button to restart your Windows 11 PC or laptop.
You can also press Alt + F4 (while on the Desktop screen) and use the Shut Down Windows dialog box to restart your device.
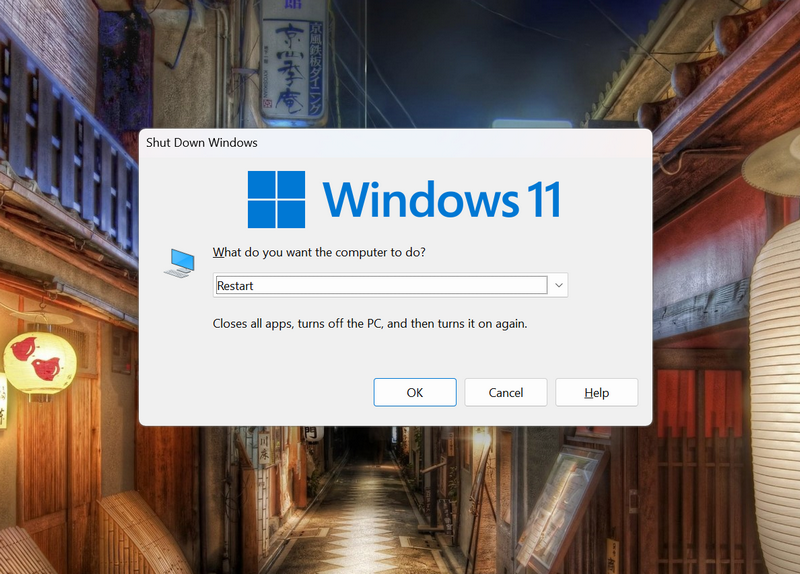
Following the restart, launch the Apple Devices app, connect your iPhone, and check whether or not it is working on your Windows 11 PC or laptop.
4. Restart Your iPhone
Along with restarting your Windows 11 PC or laptop, you can also restart your iPhone or iPad once before connecting it. This will dismiss any temporary glitch in iOS that might be causing the detection issues in the Apple Devices app on Windows 11. So, follow the steps right below to restart your iPhone:
1. Press and hold the Side/Power button and either of the Volume buttons of your device simultaneously.
2. Once the sliders appear, use the Slide to power off slider to turn off your device.
3. After the device completely shuts down, press and hold the Side/Power button until the Apple logo appears.
Following the restart, unlock your iPhone or iPad and connect it to your Windows 11 PC or laptop. Launch the Apple Devices app and check whether or not the connected device is showing up in it.
5. Force Close the Apple Devices App and Relaunch on Windows 11
In case the Apple Devices app somehow gets stuck or is not responding on your Windows 11 PC or laptop, you can try force-closing it and then relaunch it once again. This gets rid of any in-app glitches that might be causing the Apple Devices app to malfunction on your Windows 11 device and get it back to a functional state.
So, follow the steps right below to force-close the Apple Devices app and relaunch it on your Windows computer:
1. With the Apple Devices app opened, press Ctrl + Shift + Esc to open the Task Manager on Windows 11.
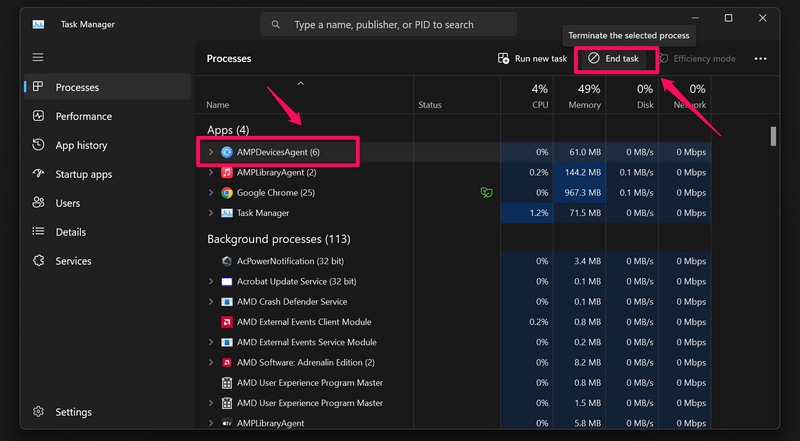
2. Under the Processes tab on the left nav bar, locate the Apple Devices app on the right pane.
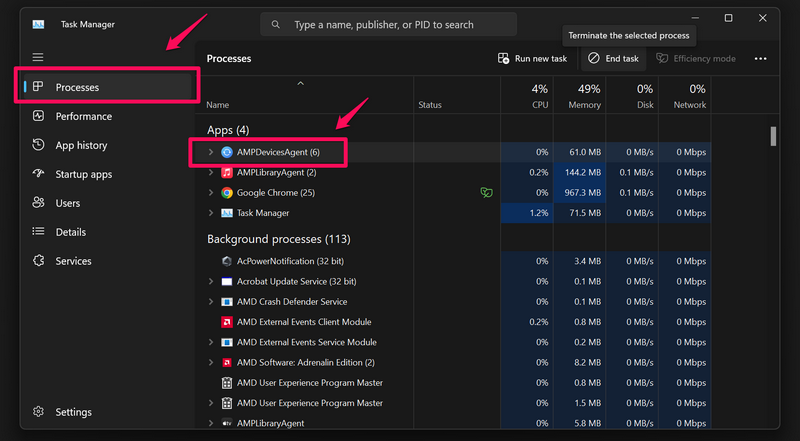
3. Click it once to select and hit the End Task button above.
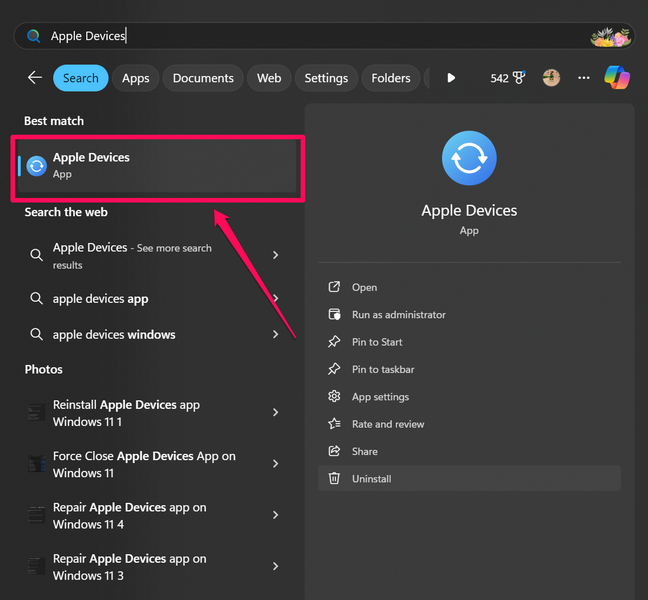
4. Once it closes, use Windows + S to open Windows search.
5. Locate the Apple Devices app and click it to relaunch.
6. Repair/Reset the Apple Devices App on Windows 11
Now, if you are experiencing frequent crashes and glitches in the Apple Devices app on your Windows 11 PC or laptop, you can try repairing it. If repairing does not resolve the issue with it, you can reset the Apple Devices app. Check out the sub-sections below to learn how you can repair and reset the Apple Devices app on Windows 11.
Repair the Apple Devices App
Repairing the Apple Devices app on Windows 11 is fairly easy. It also gets rid of in-app glitches and bugs without affecting the app data on your Windows 11 PC or laptop. Follow the steps right below to repair the Apple Devices app:
1. Use Windows + I to launch the Settings app on your Windows 11 device.
2. Go to the Apps tab on the left navigation bar and click the Installed apps option on the right pane.

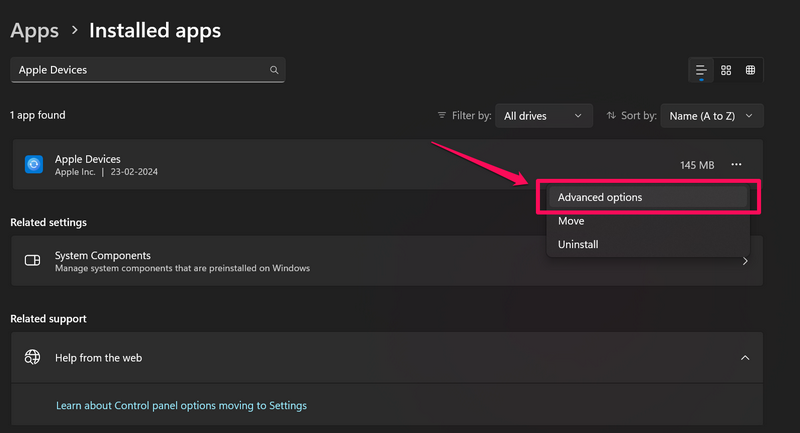
3. Use the above search bar to find the Apple Devices app and click the three-dot button next to it.
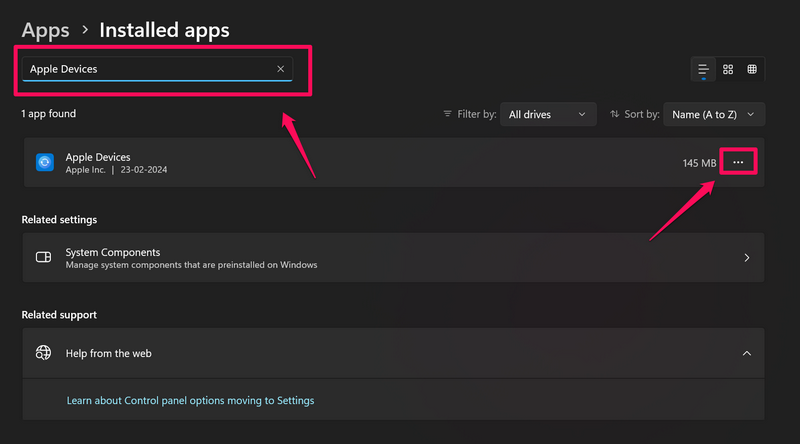
4. Click on Advanced options on the context menu.
5. Scroll down to the Reset section on the following page and click the Repair button.
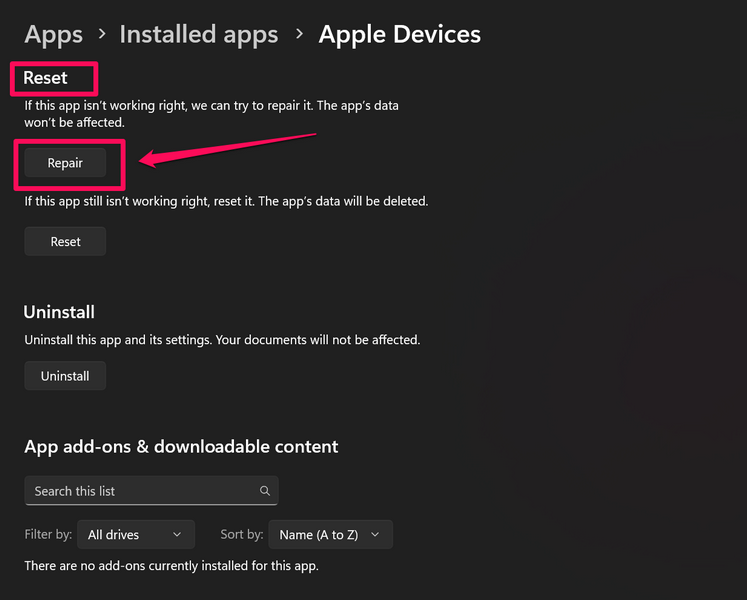
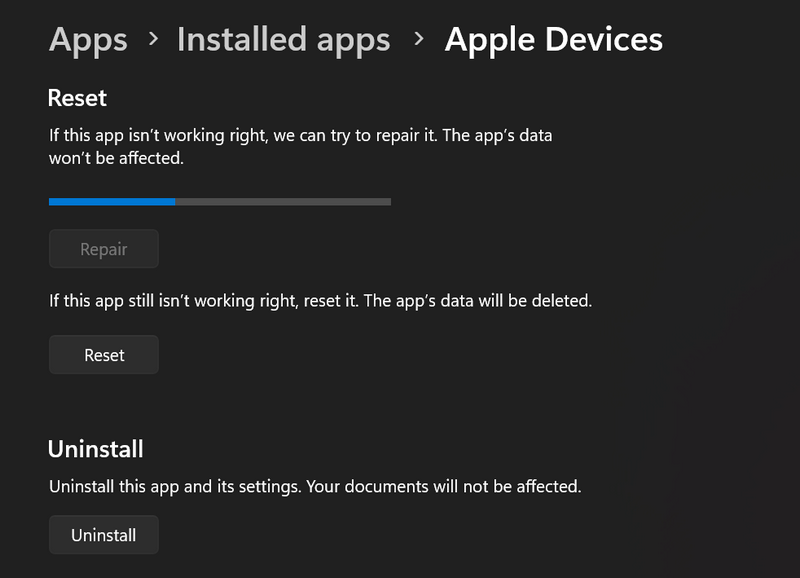
6. Wait for the Repair process to complete.
Now, launch the Apple Devices app on your Windows 11 device and check if it is working properly. If not, proceed to the next section right away.
Reset the Apple Devices
Unlike the repair process, resetting the Apple Devices app will delete all the app data from your Windows 11 PC or laptop. So, it is worth noting that you will have to set up the Apple Devices app from scratch after resetting it on your device. With that said, follow the steps below to reset the Apple Devices app on Windows 11:
1. Follow steps 1-3 from the previous section to open the Advanced options page for the Apple Devices app.
2. Scroll down to the Reset section and this time hit the Reset button.

3. Wait for the Reset process to complete.
After the reset is completed, launch the Apple Devices app on your Windows 11 PC or laptop, and check whether or not it is functioning properly.
7. Update the Apple Devices App on Windows 11
Another reason why you might experience issues with the Apple Devices app on your Windows 11 PC or laptop is an outdated app version. So, if you have not updated the Apple Devices app in a long time, it might be a good time to check for its latest updates on your device.
Follow the steps right below to check for the latest update for the Apple Devices app and install it on your Windows 11 computer:
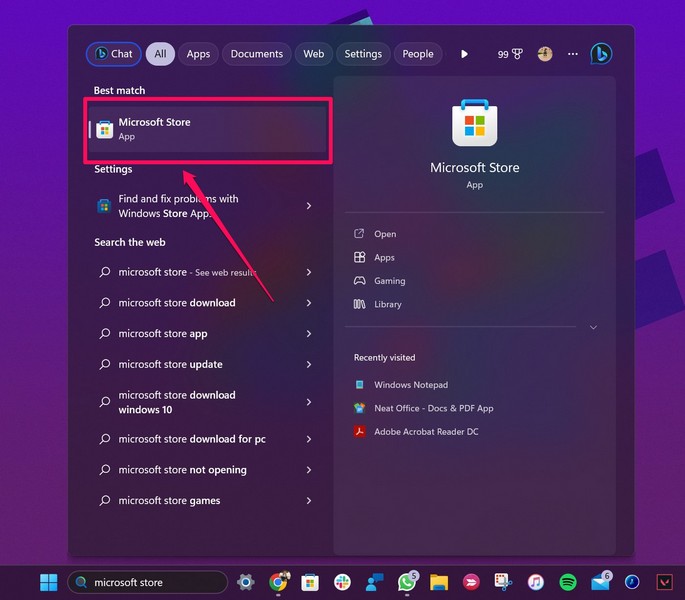
1. Use Windows + S to open Windows search and locate the Microsoft Store app.
2. Click on it to open.
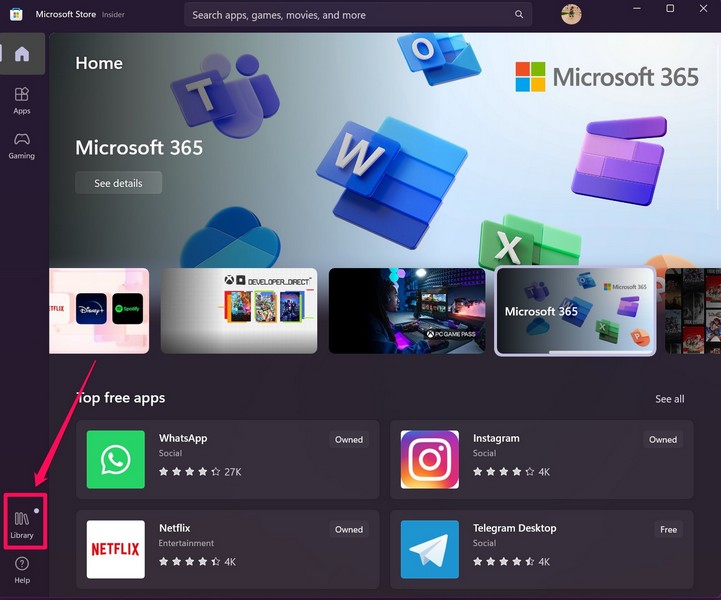
3. On the Home page, click the Library tab on the left navigation bar.
4. Check if there is any update available for the Apple Devices app.
5. If you do not see it right away, click the Get updates button above to manually check for updates.
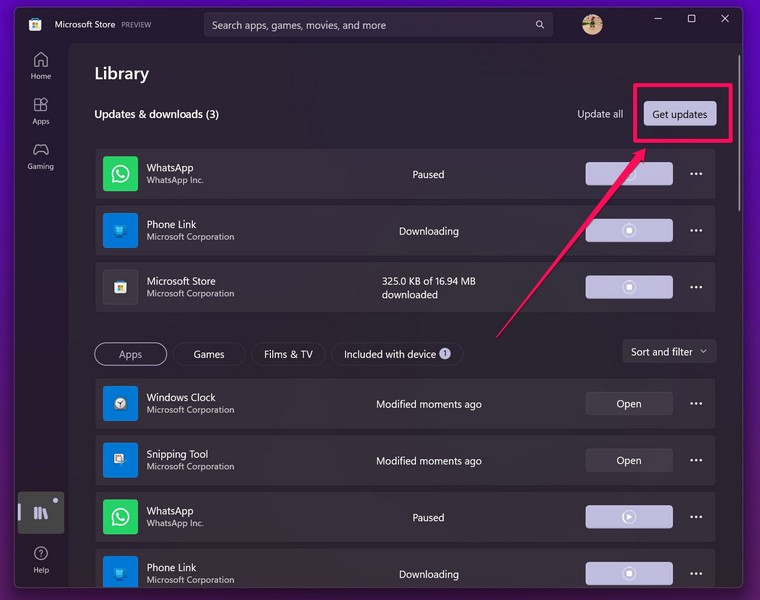
6. Once the update for the Apple Devices app shows up, click the Get button to install it.
Following the update, restart your Windows 11 PC or laptop. After the restart, launch the Apple Devices app and check if the issue has been resolved.
8. Re-install the Apple Devices App on Windows 11
If updating the Apple Devices app did not resolve the issue with it on your Windows 11 PC or laptop, try re-installing it on your device. Much like the Reset process, re-installing the Apple Devices app will delete all the app data from your computer.
However, after the re-installation, you would know that you have the up-to-date version of it and that too, without any of the previous bugs or glitches. So, follow the steps right below to re-install the Apple Devices app on your Windows 11 PC or laptop:
1. Use Windows + S to invoke Windows search and locate the Apple Devices app.
2. Click the Uninstall option for it on the right pane.
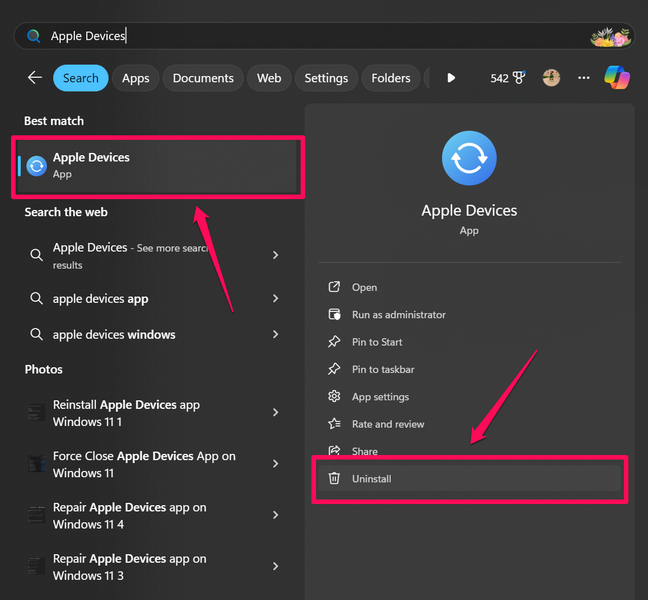
3. Confirm your action on the following prompt.

4. Wait for the app to uninstall from your device.
5. Now, locate and launch the Microsoft Store app.
6. Use the above search bar to find the Apple Devices app and click on the app listing.
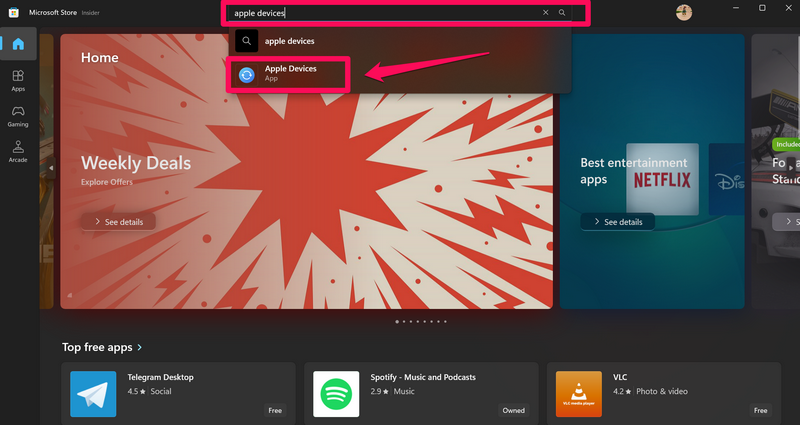
7. Click the Install button to initiate the installation process.
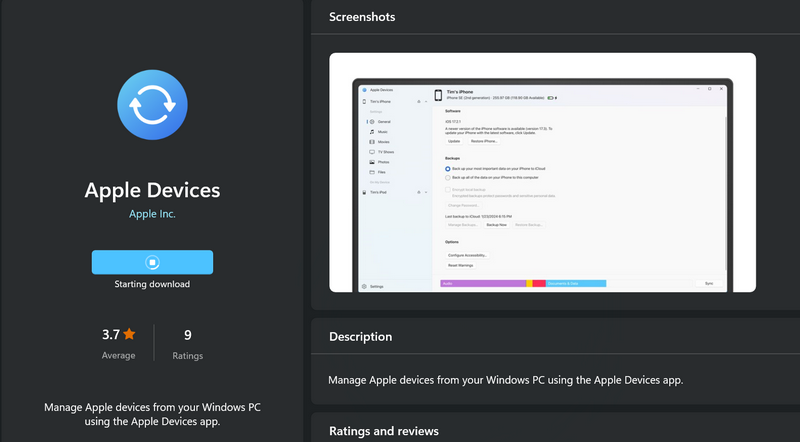
Once it is completed, launch the Apple Devices app on your Windows 11 PC or laptop, set it up, connect your iPhone, and check whether or not it is working properly.
9. Check for Windows 11 Update
Much like how an outdated version of the Apple Devices app might cause it to malfunction, an outdated Windows 11 version can do the same. Outdated Windows versions can contain various bugs and security loopholes that might cause Windows apps (both system and third-party) to run into issues.
So, if you have not updated the Windows 11 version on your PC or laptop in a while, you might want to do that now. You can follow the steps right below to check for Windows 11 update and install it on your device:
1. Open the Windows Settings app using the Windows + I shortcut.
2. Go to the Windows Update tab on the left navigation bar.
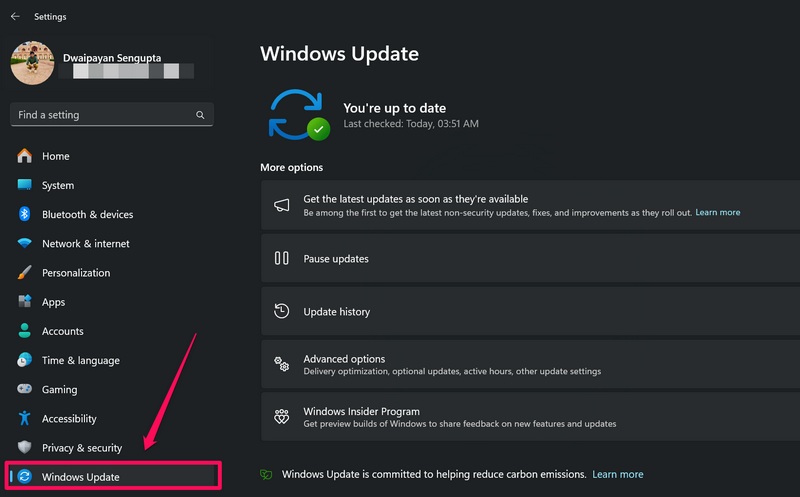
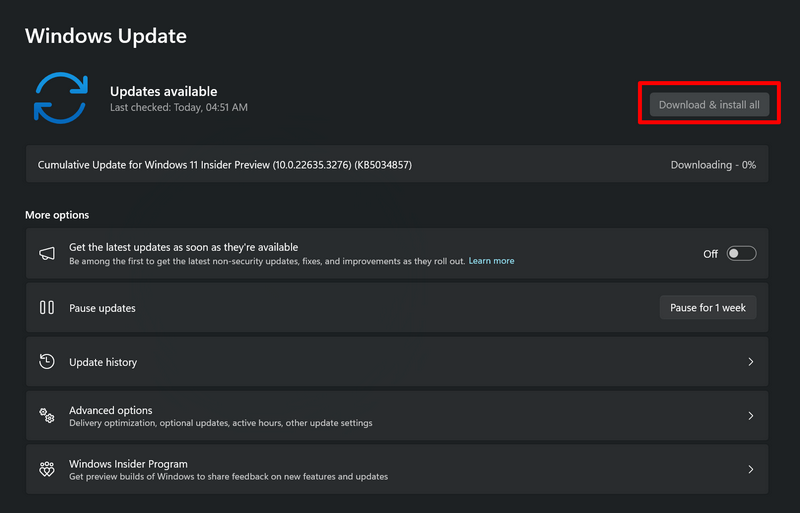
3. Click the Check for updates button on the right pane.
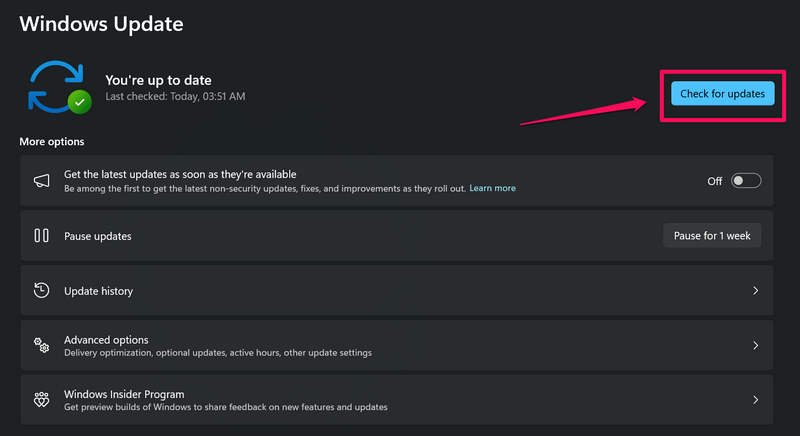
4. Once the latest Windows 11 update is available, click the Download and install button to initiate the update process.
5. Wait for the update to download and then click the Restart Now button to install it on your PC or laptop.
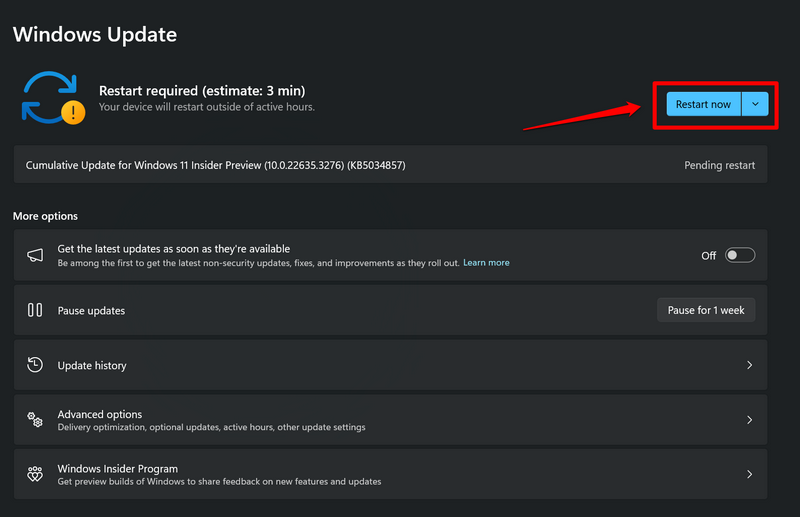
Following the restart, locate and launch the Apple Devices, connect any Apple device, and check whether or not it is detecting it on your Windows 11 device. Check the other functions of the app to ensure everything is working properly.
FAQs
Why can’t I connect my iPhone to Windows 11 using iTunes?
The iTunes app for Windows has been discontinued by Apple. So, if you want to connect and manage your iPhone on Windows 11, download and install the Apple Devices app which is available for free on the Microsoft Store.
Why is the Apple Devices app not detecting my iPhone on Windows 11?
There could be various reasons why the Apple Devices app might not detect your iPhone. These include a faulty or incompatible USB cable, a damaged USB port on your computer, or dirt and debris stuck inside the iPhone port.
How to get the Apple Devices app on Windows 11?
The Apple Devices app is available for free on the Microsoft Store. So, you can simply open the Microsoft Store app on your Windows 11 device, search for the Apple Devices app, and install it from there.
Wrapping Up
There you have it, guys! That wraps up our comprehensive guide on how to fix the Apple Devices app not working issue on Windows 11 PCs and laptops. The Apple Devices app is an essential tool for Windows users who own Apple devices. It not only lets users sync content from Windows devices but also helps download and install iOS updates and restore Apple devices.
So, if you were experiencing issues with it on your Windows 11 PC or laptop, we hope this article helped you resolve them right away. If it did, don’t forget to let us know in the comments below. You can also check out our guides on how to fix the Apple Music app and Apple TV app, in case you are facing any issues with them. Lastly, thank you for reading this article till the very end. We will see you again in the next one!
Многие пользователи Windows 11 и 10 сталкиваются с ситуацией, когда при завершении работы, перезагрузке или включении компьютера появляется экран «Подготовка Windows. Не выключайте компьютер». Появляется и не исчезает.
В этом материале о том, что это за экран, что делать, если компьютер или ноутбука «завис» на нём и дополнительная информация, которая может быть полезной.
Почему появляется экран «Подготовка Windows» и причины его зависания

Экран с надписью «Подготовка Windows. Не выключайте компьютер» обычно говорит о том, что выполняется установка обновлений Windows 11/10, при этом возможны следующие сценарии:
- Обновления были загружены в фоновом режиме и уже начали устанавливаться (что отображается в их статусе в Центре обновления Windows) когда вы решили выключить компьютер или перезагрузить его. Установку необходимо завершить и пока этого не произойдёт, вы видите соответствующее сообщение.

- Обновления были скачаны, подготовлены к установке, но для установки требуется перезагрузка — в этом случае после нажатия «Обновить и завершить работу» или «Обновить и перезагрузить» в меню завершения работы вы увидите экран «Подготовка Windows».
- Обновление устанавливается в несколько этапов — в этом случае экран с сообщением может появиться уже после перезагрузки или нескольких инициированных автоматически перезагрузок либо после включения компьютера после завершения работы.

Само по себе сообщение «Подготовка Windows. Не выключайте компьютер» — нормальное явление для Windows и является частью процесса установки обновлений, однако иногда пользователям кажется, что компьютер завис и какие-либо операции не выполняются. Действительно ли это так? Не обязательно.
Установка различных обновлений Windows 11/10 может занимать разное время, а период, в течение которого выполняется «Подготовка Windows» может зависеть от ряда факторов:
- Размер, тип обновления. Например, объемные обновления компонентов выполняются значительно дольше, чем обновления драйверов или определений Microsoft Defender.
- Количество обновлений в очереди. Только что установленная Windows, автоматически может загрузить объемный набор обновлений, выпущенных с момента выхода дистрибутива, а их установка потребовать нескольких часов.
- Производительность компьютера или ноутбука. На компьютере с быстрым SSD, процессором и достаточным объемом RAM обновление может устанавливаться в разы быстрее, чем на ноутбуке с медленным HDD и «офисными» характеристиками, особенно если на нём включены опции экономии заряда батареи или включен профиль электропитания для бесшумной работы.
- Свободное место на системном разделе диска. Неочевидный фактор, но очень сильно влияющий на скорость процесса обновления: пользователи, у которых единицы свободных гигабайт на диске C: могут обнаружить, что многие задачи, выполняемые на системном разделе диска (а в случае обновлений — это загрузка и распаковка необходимых файлов, замена обновлённых системных файлов, создание точки восстановления системы и другие) происходят очень медленно.
- На процессорах Intel 12, 13, 14 и более новых поколений, оснащённых E-ядрами, иногда процессы обновления могут выполняться именно на них, что приводит к снижению скорости обновления даже по сравнению с менее производительными системами.
Подводя итог этому разделу, система, замершая на экране «Подготовка Windows. Не выключайте компьютер» не обязательно зависла. С большой вероятностью выполняется штатный процесс обновления, на продолжительность которого могут влиять различные факторы.
Как долго может длиться процесс и что делать, если он не завершается
Чётких временных рамок для экрана «Подготовка Windows» нет — всё будет зависеть от конкретных условий. Чаще всего процесс длится от нескольких минут до получаса — это нормальные значения. В очень редких случаях он может занять до 2–3 часов. И почти всегда он завершается штатно, без каких-либо дополнительных действий пользователя.
Что делать, если вам кажется, что компьютер завис на этом экране?
- Наберитесь терпения и дождитесь завершения процесса, если этот вариант применим. В случае ноутбука настоятельно рекомендую подключить его к источнику питания — это может ускорить процесс и снизить возможные риски. Обратите внимание на дополнительные признаки активности системы — индикаторы дисков, шум вентиляторов системы охлаждения
- При появлении экрана «Подготовка Windows» на этапе завершения работы или перезагрузки может сработать следующий метод: нажмите клавиши Ctrl+Alt+Delete на клавиатуре, а затем по кнопке «Отмена» в появившемся меню.
- Выключить компьютер долгим удержанием кнопки питания. Использование этого метода несёт риски — обычно проблем не возникает и следующее включение происходит штатно, либо с очередным запуском процесса подготовки Windows. Однако в редких случаях принудительное выключение в процессе обновления может вызвать сбои Windows, особенно в случае, если вы наблюдаете не просто сообщение «Подготовка Windows. Не выключайте компьютер» и «кружочки», а процент завершения процесса. Использование метода допустимо в случаях, когда иные варианты не приемлемы, вы осознаёте риски и берёте ответственность за возможные последствия на себя.
Если вам пришлось прибегнуть к последнему из вариантов, после чего вы столкнулись с ошибками запуска Windows 11/10, могут помочь точки восстановления системы — их использование возможно не только из запущенной ОС, но и с загрузочной флешки или среды восстановления.
Уровень сложностиПростой
Время на прочтение4 мин
Количество просмотров7.5K
Сегодня я расскажу о стороннем приложении Apple Devices, но лишь потому, что оно проверяет версию ОС Windows и категорически не устанавливается в Windows 10 LTSC или IoT LTSC. Ну и, конечно, расскажу, как его победить.
Данная статься не пропагандирует ни техники или продуктов Apple, ни замену устаревшего комбайна iTunes отдельными приложениями Apple, ни (упаси бог мне такое вам предлагать) использование продуктов Apple на Windows вместо Mac. Однако…
Еще полгода назад на Windows, наконец, появились приложения Apple Devices (Устройства Apple), Apple Music и Apple TV. На Mac они давно заменили мультимедиа комбайн iTunes, который стал неповоротлив, а для Windows несколько припозднились. Без комментариев. Причем, Apple выпуская новые приложения установила крайне непонятное требование, сборка ОС не ниже чем 19045 (в терминологии Microsoft, это Windows 10 22H2, смотри мою статью Все о версиях Windows 10 и как максимально продлить поддержку своей ОС / Хабр (habr.com)). Что крайне печально, так, то, что версия долгосрочной ветви обслуживания Windows 10 Enterprise LTSC и Windows 10 IoT Enterprise LTSC максимально имеют версию 19044 (21H2) и, соответственно, установка на них приложения Apple Devices заблокирована. Рассмотрим же, как это починить. Кстати, этот же метод позволяет ставить современный Adobe Photoshop на LTSC издания, – он также проверяет именно версию ОС.
Я уже рассказывал в упомянутой выше статье, что те, кто хотят оставаться на Windows 10, наверняка должны задуматься именно об издании IoT Enterprise LTSC, так как оно одно будет поддерживаться и получать обновления аж до 13.01.2032. Обычные Профессиональные и Корпоративные издания «стухнут» уже через год – до 12.01.2025, а Enterprise LTSC будет получать свои обновления до 12.01.2027. Стало быть, разумный пользователь Windows 10 перешел на издание IoT Enterprise LTSC: кстати, и для Windows 11 это наилучшее издание, всем рекомендую почитать статью Windows 11 24H2 IoT Enterprise LTSC – что за зверь, и чем он хорош? / Хабр (habr.com). Впрочем, сегодня я анонсировал немного другую тему.

В силу сложившихся привычек я люблю яблоки. Помню, еще с 2009 года, работая в Microsoft, я странно смотрелся со своим огрызком среди царства Люмии, но речь опять же не о том. Я до сих пор предпочитаю продукты Apple и ОС Microsoft – моё право. И я крайне не люблю неповоротливый iTunes. Когда-то это был крутой музыкальный проигрыватель, но с годами в него напихали много разного (прямо как Microsoft в Windows 11). Услышав отклики пользователей Apple сначала на MacOS, затем и на Windows разделила комбайн на несколько приложений: Apple Music, Apple TV и Apple Devices. Я о том сам узнал с запозданием, – ведь параллельно Apple продолжает выпускать для Windows старый iTunes, тот отлично обновляется, и я знать не знаю что он уже не обязателен, что мне для прослушивания музыки и листания сериалов по подписке на ноут можно установить Apple Music и Apple TV, а на стационарный компьютер есть Apple Devices, где я могу иногда сделать локальную резервную копию данных с телефона (привет всем, кому санкции отрубили данные в облаках) или перепрошить неработоспособное устройство. Так как же его установить?
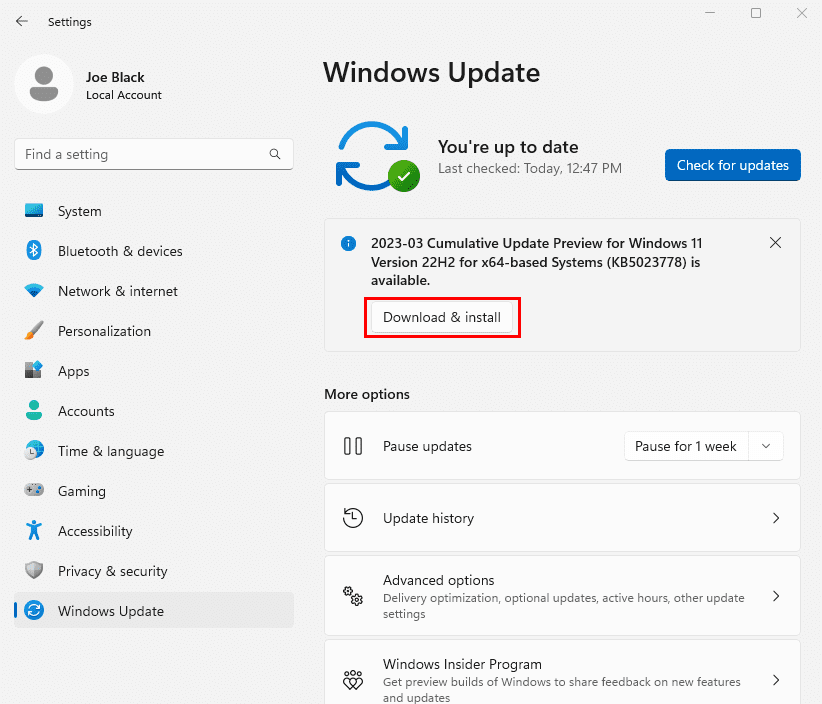
Apple говорит прямо – устанавливайте новые приложения из магазина Windows Store. Бесплатно. Но я почему-то не могу там найти этих приложений.

Решил поискать в интернет, и в браузере сразу же попадаю на страницу приложения в магазине:

При попытке открыть страницу приложения в магазине или скачать его из браузера получаю отказ:

Версия Windows на моём компьютере не удовлетворяет минимальным требованиям продукта. Обновите Windows 😊 Спасибо тебе, Apple!
Те кто читали мою статью Все о версиях Windows 10 и как максимально продлить поддержку своей ОС / Хабр (habr.com) знают, что Windows 10 22H2 (19045) отличается от Windows 10 21H2 (19044) наличием одного небольшого обновления, которое по каким-то причинам не устанавливается на Windows 10 LTSC. Там же в статье я рассказывал, что за обновление KB5015684. Позволю себе процитировать кусок оттуда: «Для получения возможностей Windows 10 22H2 в LTSC издании, следует загрузить с каталога обновлений Microsoft KB5015684 (прямые ссылки на x64, x86 и arm64 пакеты), распаковать CAB файл – тем же WinRar, и установить обновление, использовав команду Dism /online /add-package /packagepath:microsoft-windows-22h2enablement-package~31bf3856ad364e35~amd64~~10.0.19041.1799.mum (из командной строки, в режиме администратора, предварительно перейдя в ту папку, куда вы распаковали обновление). Все, у вас после перезагрузки готово LTSC (или IoT LTSC) издание Windows 10 22H2».

Я загрузил и распаковал обновление и установил его:

После перезагрузки моя ОС стала Windows 10 22H2 (19045), теперь требованиям Apple (и Adobe) я удовлетворяю:

Мне сразу же доступны приложения Apple Music и Apple Devices из магазина:

Забавно, но Apple Devices для установки требует Microsoft Edge WebView2.

Ржу в голос. Спасибо, Apple, что ты помогаешь мне установить Edge, который я сам же и удалял! ☹

Что ж, мыши плакали, плевались и кололись, но продолжали жрать кактус. Установив Edge WebView2, я могу работать с новыми приложениями Apple на Windows 10 LTSC, с чем вас и себя поздравляю!
Насколько я понимаю, ровно та же проблема возникает у желающих установить свеже украденный Adobe Photoshop, который не ставится на LTSC издания Windows 10, ибо они не 22H2. Решение аналогично!
На этом по данной теме всё. Если остались вопросы, спрашивайте – отвечу. Ставьте лайк, подписывайтесь. Предлагайте идеи для новых статей.
Новости, обзоры продуктов и конкурсы от команды Timeweb.Cloud — в нашем Telegram-канале ↩

📚 Читайте также:
-
➤ Как устроены серийники для Windows, и как восстановить стёршийся COA;
-
➤ Устраняем уязвимости в Active Directory Windows;
-
➤ Ленточные накопители в домашнем ПК;
-
➤ Апгрейд мобильного компьютера паяльником;
-
➤ Как создавалась антология Риддика.
I recently upgraded to Microsoft Windows 11 and found that iTunes no longer detected my Apple iPad or iPhone. Here’s how I fixed it.
Syncing your iPhone or iPad with a Windows 11 PC is fairly simple. Just install the iTunes app, and connect the device to the PC using a supported cable after opening the iTunes app. The iPad or iPhone asks you to authorize the Windows 11 PC, and you’re in. However, issues start to surface when the iTunes back-end drivers are faulty or iPad/iPhone is unable to communicate with the Windows PC and vice versa.
Irrespective of the reasons that stop the Windows 11 iTunes app from detecting your iPhone, iPad, or iPod, try the troubleshooting methods mentioned here. You should be able to connect the Apple smartphone or tablet to your PC to sync audio and video files or download photos from the device.
Contents
- 1 What’s The iTunes Not Detecting iPhone/iPad Error?
- 2 How to Fix iPhone or iPad Not Detected
- 2.1 1. Perform Some Basic Checks of the Accessories
- 2.2 2. Restart Windows 11 PC and iPhone or iPad
- 2.3 3. Connect the USB Cable Directly Between the Devices
- 2.4 4. Update the Operating Systems on All Devices
- 2.4.1 Update Windows 11
- 2.4.2 Update iPhone/iPad
- 2.5 5. Don’t Forget to Authorize the PC From iPhone or iPad
- 2.6 6. Fix iTunes Not Detecting iPhone or iPad Using the Services Tool
- 2.7 7. Update USB Drivers From the Device Manager
- 2.8 8. Manually Install Apple Mobile Device Drivers
- 3 FAQ
- 3.1 Why don’t I have the Drivers folder?
- 4 Conclusion
What’s The iTunes Not Detecting iPhone/iPad Error?
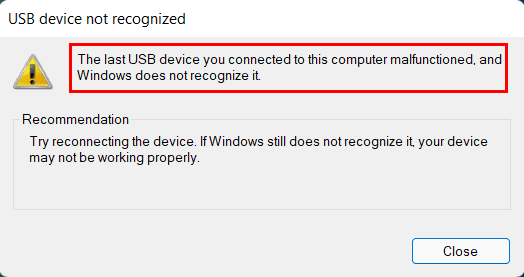
When you connect your iPhone or iPad to a Windows 11 PC when the iTunes app on the PC is open, the device should show up in the appropriate section of the iTunes app. If the device doesn’t show up, it means you’re facing the “iTunes not detecting iPhone or iPad” error. In most cases, there are no error messages on your Windows 11 PC. In some instances, you could get any or all of the following error messages:
The last USB device you connected to this computer malfunctioned, and Windows does not recognize it
Unknown USB Device (Device Descriptor Request Failed)
Whatever the reason is, the issue is serious. It stops you from syncing your iPad or iPhone with a Windows 11 PC so that you can download data to the PC for long-term storage. iTunes music and video syncing also don’t work. Want to fix this situation real quick? Try the troubleshooting tips mentioned below.
Also read: iTunes Store Icon is Missing From iPhone or iPad
1. Perform Some Basic Checks of the Accessories
According to Apple, you must use Apple MFi Program-certified USB Lightning to USB A and USB-C to USB A cables to connect your iPhone and iPad with a Windows 11 PC. Hence, check if the cable you’re using is of the right quality and specifications or not. If possible, use a new USB cable or borrow one from a friend. If the issue doesn’t appear again after replacing the USB cable, you must get a new one.
Sometimes, debris and lint on the USB ports of the PC and Apple device could prevent a successful electronic connection between the port and USB cable. Inspect the USB ports closely for any obstacles. If there is any debris, clean that using a dry cotton swab. Also, you could try an alternative USB port at the back of the PC case.
2. Restart Windows 11 PC and iPhone or iPad
If you don’t see any activity on your Windows 11 PC after connecting the iPhone/iPad, try restarting both devices. Here’s how it’s done:
- On the Windows PC, go to the Start menu and click the Power icon.
- Then, choose the Restart option to reboot the PC.
- To restart an iPhone or iPad, go to the Settings app.
- Tap General on the left-side navigation pane.
- Scroll down the right-side menu until you locate the Shut Down button.
- Tap the button and then slide the Slide to power off button on top of the screen to the right to shut down.
- Now, press the top button once to start the iPhone or iPad.

After a reboot, open the iTunes app on your Windows 11 PC. Connect the iPhone/iPad to the PC using a supported USB cable. If everything goes well, you should see the Apple iPhone or Apple iPad detected notification on the bottom right corner of the PC. The iTunes app will also show the device in the appropriate section.
Also read: How to Reset iPhone & iPad Settings
3. Connect the USB Cable Directly Between the Devices
Often, you might use a USB hub to connect all USB-compatible devices conveniently. A hub is easy to access than the USB ports at the back of the PC case near the motherboard’s I/O interface. However, your Apple product may not support these hubs. Hubs may not be able to provide the exact amount of cable voltage an iPhone or iPad needs to establish a successful connection with the Windows 11 PC.
Also, some PC displays come with a few USB A ports, which you might regularly use for other USB devices. If you try to connect the USB-C to USB A or Lighting to USB-A cable to these ports, an iPhone or iPad may not respond when you open the iTunes app. Therefore, connect the USB A port from the Lighting or USB-C cable directly to the back of the PC case for optimum connectivity via cables.
4. Update the Operating Systems on All Devices
You must ensure that you’re running the latest operating systems on the Windows 11 PC and iPhone/iPad. Here’s how you can check for updates on these devices:
Update Windows 11
- Hit the Windows + I keys on your PC.
- Select the Windows Update option from the left-side navigation panel.
- Windows 11 will start checking for the updates automatically.
- Even if it tells you You’re up to date, look for Windows 11 feature updates below the Check for Updates button.
Update iPhone/iPad
- Open the Settings app and tap General.
- Tap the Software Update button on the right side of the General settings screen.
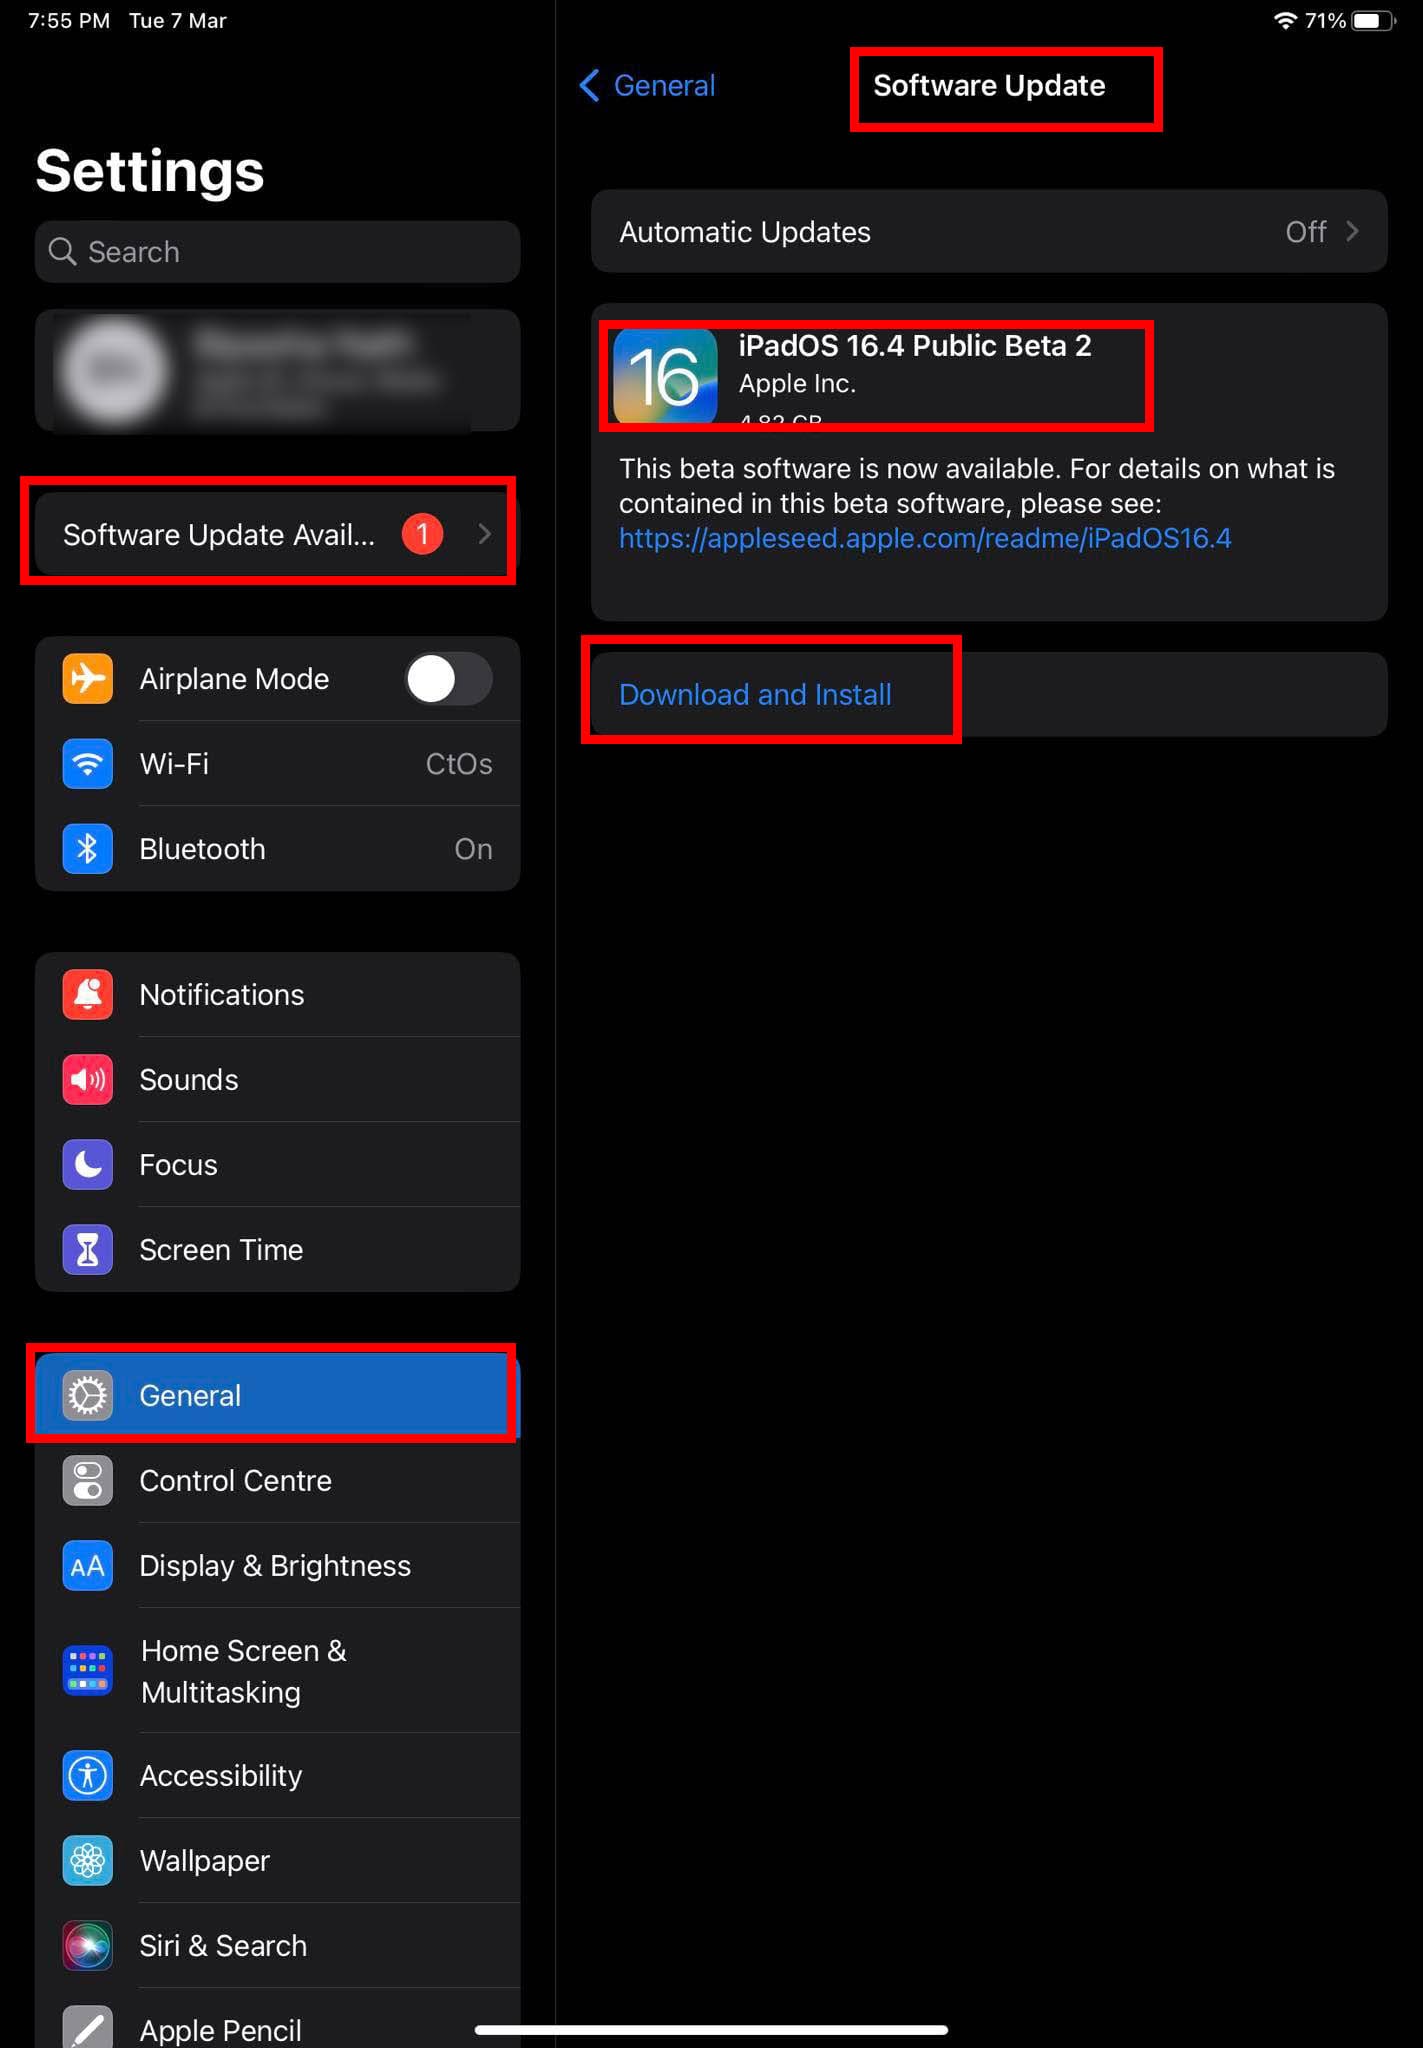
- If there are any pending updates, touch the Download and Install button.
After updating all the devices, attempt connecting iPhone with the PC, and this time you shouldn’t face the “iTunes not detecting iPhone” issue.
When you connect the iPhone or iPad with a Windows 11 PC that has the latest iTunes, the iPhone/iPad will ask you to authenticate the action. The mobile or tablet device screen shows the following pop-up:
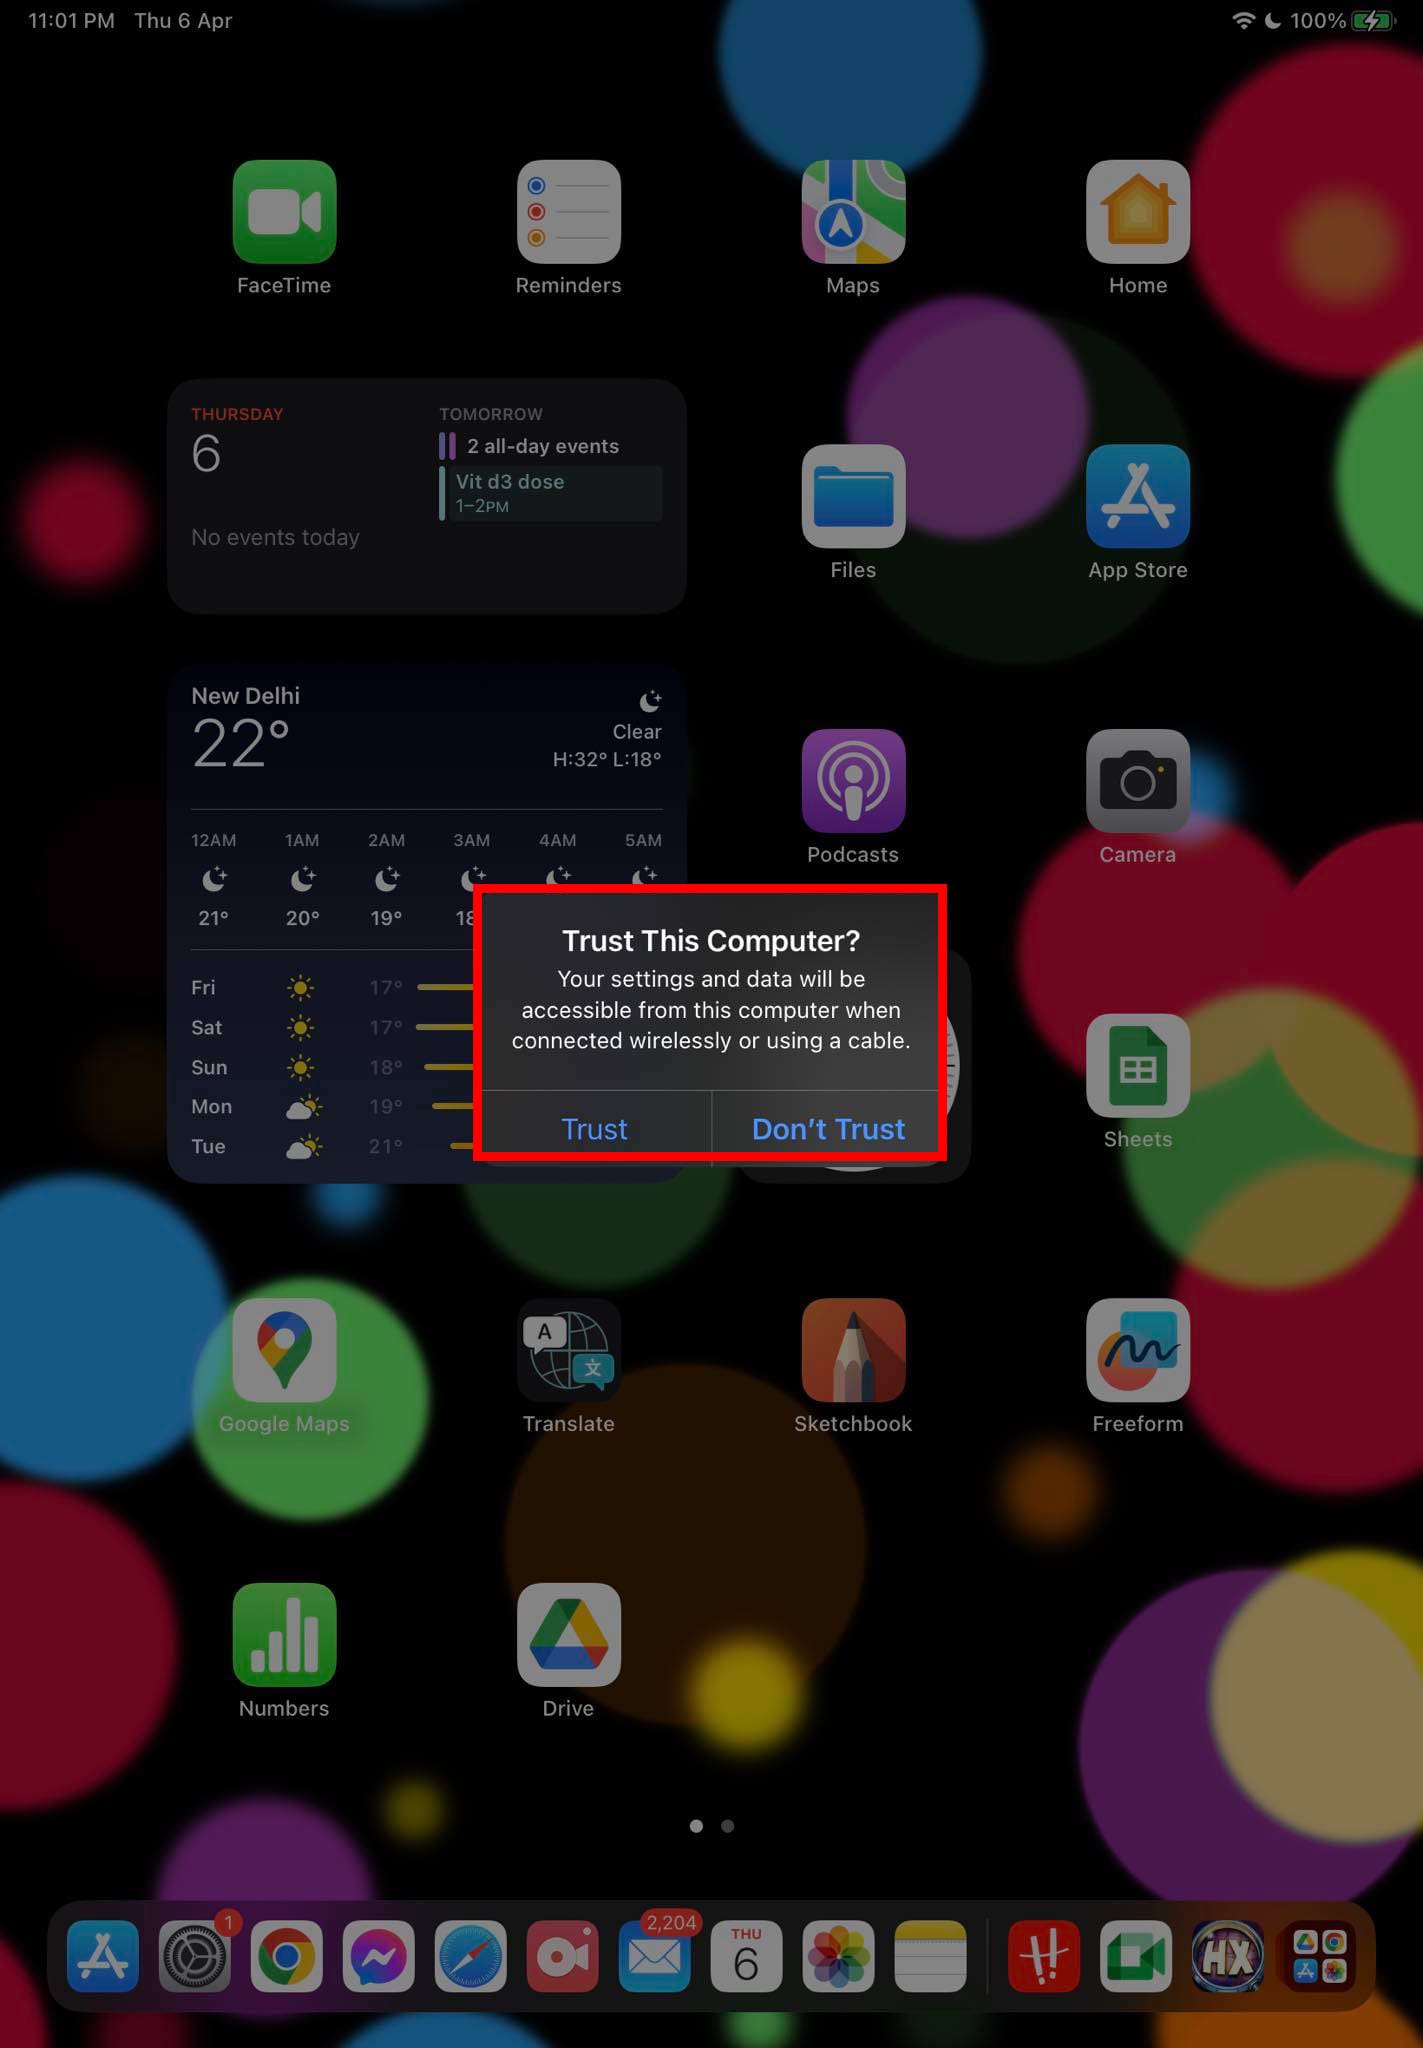
Trust the Computer? Trust or Don't Trust
Once you tap the Trust button, your iPhone/iPad will ask you to enter the device passcode. Enter the password and you should be able to see the device on iTunes. If you ignore these steps, you won’t see the iPhone or iPad on iTunes.
6. Fix iTunes Not Detecting iPhone or iPad Using the Services Tool
When you install the iTunes app on your PC, the installer package itself installs two critical Windows Services required to connect an iPhone/iPad/iPod efficiently with iTunes. These services are as outlined below:
- Apple Mobile Device Service
- Bonjour Service
If someone or something stops these Windows Services on your PC and set these services to start manually or don’t start at all, then you’ll for sure face the “iTunes Not Detecting iPhone” error. Hence, it’s worth checking these services on your PC to ensure that they are working properly. Here’s how you can accomplish this:
- Hit the Windows + R buttons together to open the Run command.
- Type in the following code in the Run command box and hit Enter:
services.msc
- The Services utility will open.
- In the list of all Windows Services, look for the services mentioned earlier.
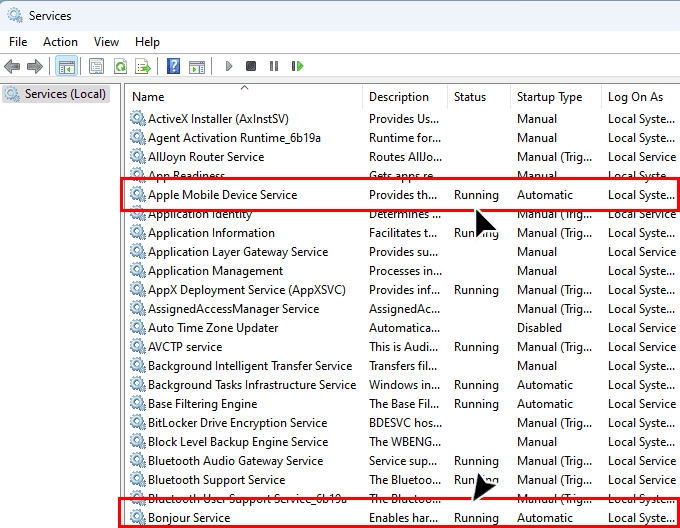
- The Status of these services should show Running.
- If that’s not the case, double-click the Apple Mobile Device Service.
- Select Automatic in the Startup type drop-down list.
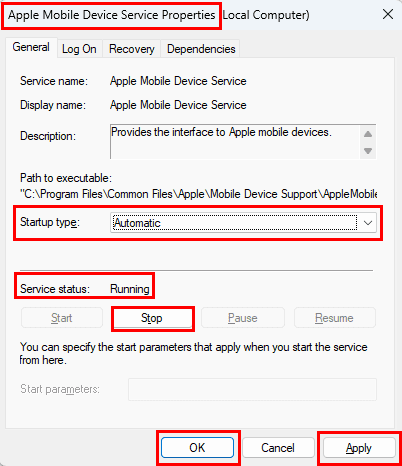
- Also, click Start under the Service status section.
- Do the same thing for the Bonjour Service.
- Restart your PC.
7. Update USB Drivers From the Device Manager
An outdated USB driver may also stop your device from communicating through iTunes. To resolve these, try these steps:
- Click Start on Windows 11 and type Device.
- Select Device Manager to open the tool.
- Expand the Universal Serial Bus devices entry.
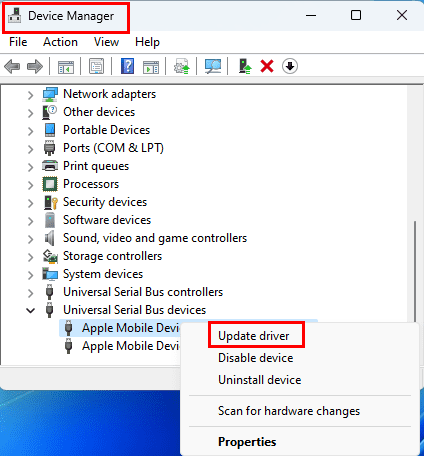
- Click the Apple Mobile Device Composite Device and right-click and select Update driver.
- Do the same for Apple Mobile Device USB Device driver.
8. Manually Install Apple Mobile Device Drivers
- Ensure you have installed the latest version of iTunes.
- Plug your Apple iPhone or iPad into a USB port on your computer using a supported Lightning or USB-C cable.
- Ensure your iPhone/iPad is on the Home Screen. If there’s any prompt to Trust, select the prompt to trust Windows 11 PC.
- Hit the Windows + I keys together and click Bluetooth & devices.
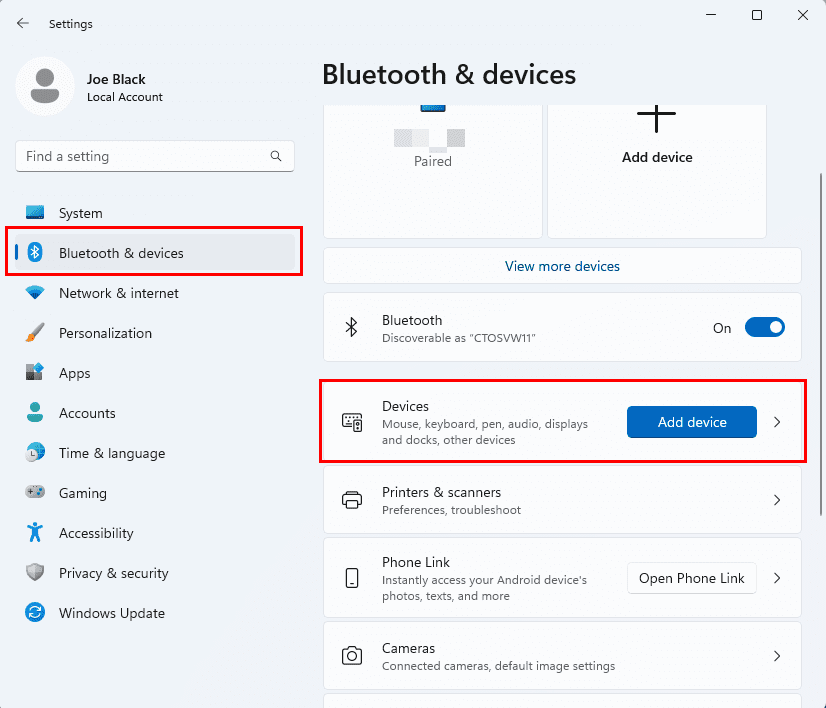
- Now, select the Devices menu on the right-side panel.
- When inside the Devices screen, scroll to the bottom to find the More devices and printer settings menu.
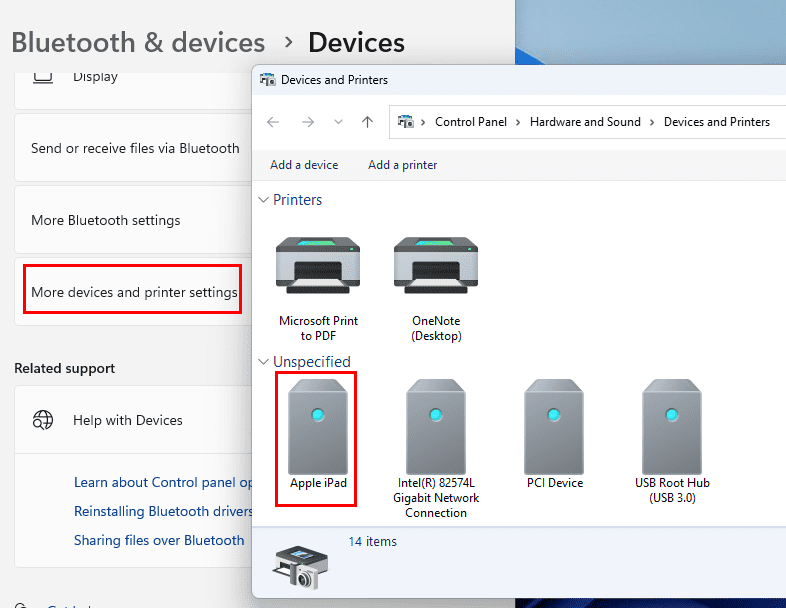
- Click it and scroll down on the new window to find iPad/iPhone under the Unspecified device list.
- Right-click the device and choose Properties on the context menu.
Note: If you don’t see your device listed here, ensure you have selected to trust the PC on the device and you are using a supported cable.
- Select the Hardware tab, then click the Properties button.
- From the General tab, select the Change settings button.
- Select the Driver tab, then select Update Driver.
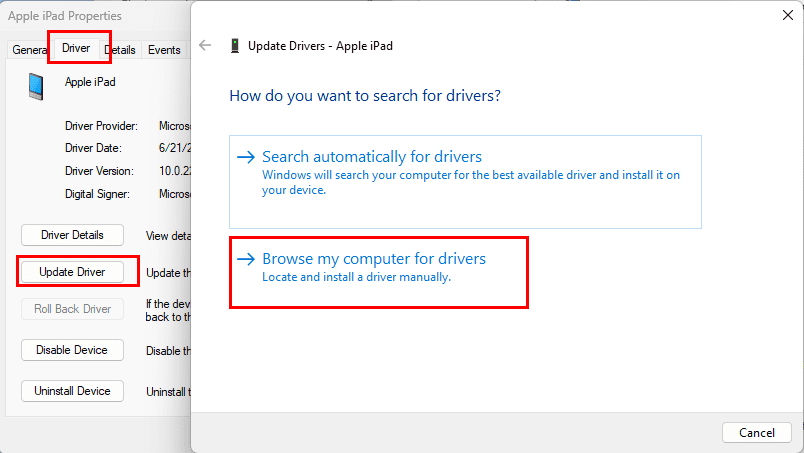
- Choose the Browse my computer for driver software option.
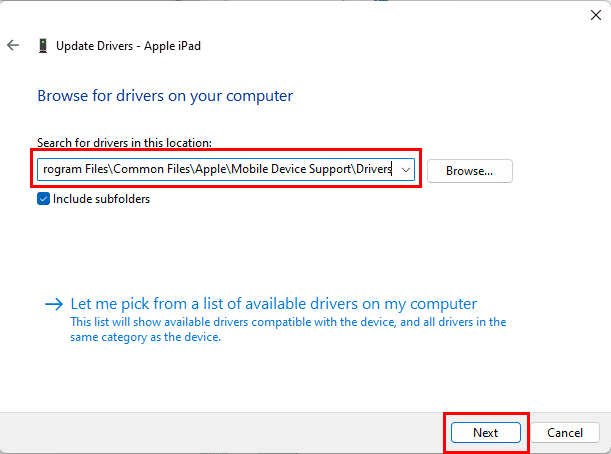
- Select the Browse button and navigate to the following directory:
C:\Program Files\Common Files\Apple\Mobile Device Support\Drivers
- If you don’t have the above folder, check the following directory:
C:\Program Files (x86)\Common Files\Apple\Mobile Device Support\Drivers
- If you still don’t see it, try uninstalling and reinstalling iTunes.
- This time, install iTunes by downloading the Windows installation package from Apple. Don’t re-install the Microsoft Store iTunes app.
Note: Since a few of you have messaged me that you still don’t see this folder, I have zipped up the files and made them available for download here. Unzip the folder somewhere, then point Windows to the files.
- Click Next and then hit the Close button.
- iTunes should now detect and sync with your iPhone or iPad successfully.
FAQ
Why don’t I have the Drivers folder?
It’s possible your installation of iTunes didn’t include it as you downloaded the app from Microsoft Store. Uninstall this app from your Windows 11 PC. Then, go to the iTunes Apple portal and click the Windows hyperlink beside Looking for other versions? narration on the website. App download will begin automatically. Install the app to get the Drivers folder.
Conclusion
I hope you can now fix the iTunes Not Detecting iPhone yourself. Try the above methods and share your comments about the outcomes below. If the issue is persisting, you can contact Apple Support or Microsoft Support.