
Let us make it clearer with an example. You all are aware of the Offline Maps that Windows provides and if you have not changed its location, then its default place will be the C: drive (assuming that to be your Windows location) but it is quite difficult to dig it out as it is deeply placed somewhere. So, focusing on these instances, we thought to write down the Path and Default File Folders Location Windows 10.
Now we would like to share how you can search the folders location on your own.
You must be familiar with the fact that Windows is not suited or is incompatible for relative paths in shortcuts. So, users equally who work on numerous machines and carry lightweight programs on flash drives and it becomes difficult for you to locate each program by deeply going into their respective folder.
Hence, we thought to present you the simplest steps to create portable shortcut with relative paths in Windows 10 and so, let us begin –
Related searches: folder location windows 10, folder location of windows 10 themes, folder location windows media player, folder location taskbar windows 10, folder location for start menu windows 10, folder location for windows live mail,
folder location for firefox bookmarks, folder location drivers, folder location bookmarks chrome, folder location of recycle bin, folder location for windows updates, folder location outlook
Некоторые пользователи могут столкнуться с тем, что иконки (значки) файлов, папок и ярлыков в Проводнике и на рабочем столе Windows отображаются неправильно или с иными проблемами: например, показ одинаковых значков по умолчанию для различных типов файлов. В этом случае может помочь очистка их кэша.
В этой инструкции подробно о том, как очистить кэш иконок в Windows 11 или 10 и дополнительная информация на тему, которая может оказаться полезной.
Ручное удаление файла IconCache.db
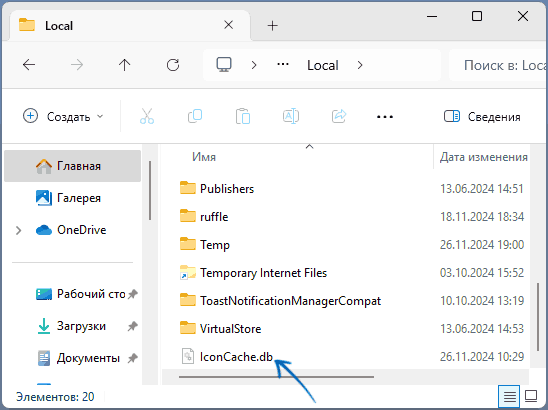
Кэш значков Windows 11/10 и предыдущих версий ОС для текущего пользователя хранится в файле базы данных IconCache.db. Соответственно, для его очистки достаточно удалить этот файл, после чего он будет автоматически создан вновь.
Сделать это можно вручную в Проводнике, используя следующие шаги:
- В Параметрах Проводника на вкладке «Вид» (перейти в параметры можно в меню Проводника или с помощью команды Win+R — control folders) отключите опцию «Скрывать защищенные системные файлы» и включите опцию «Показывать скрытые файлы, папки и диски», примените настройки (подробно про включение показа скрытых и системных файлов).
- Введите
%userprofile%\AppData\Local
в адресную строку Проводника и нажмите Enter.
- В открывшейся папке вы найдёте файл IconCache.db, удалите его.

- Перейдите в папку
%userprofile%\AppData\Local\Microsoft\Windows\Explorer
и удалите все файлы, имена которых начинаются с iconcache в этой папке. Если при этом вы увидите сообщения об ошибках, используйте метод с командной строкой, описанный далее.
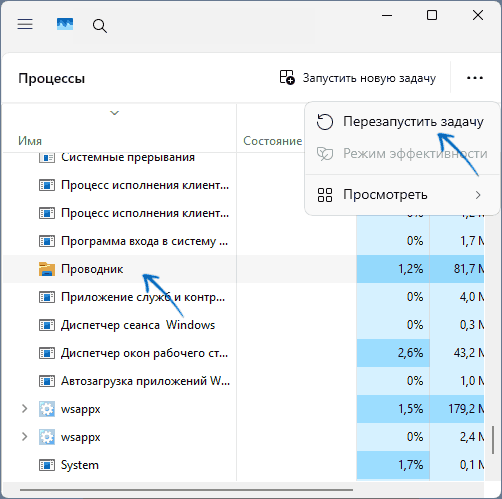
- Перезапустите Проводник (explorer.exe) — сделать это можно в диспетчере задач (или перезагрузите компьютер).

Готово, кэш значков будет очищен и создан заново.
Командная строка
Возможно, более простым способом будет использование командной строки или же создание bat-файла для очистки кэша иконок. В случае с командной строкой достаточно запустить её от имени администратора, после чего по порядку ввести команды (после второй команды пропадёт рабочий стол, но последняя его вернёт):
cd /d %userprofile%\AppData\Local
taskkill /f /im explorer.exe
attrib -h iconcache.db
del iconcache.db
cd /d %userprofile%\AppData\Local\Microsoft\Windows\Explorer
attrib -h iconcache_*.db
del iconcache_*.db
start %windir%\explorer.exe
Если эти же команды прописать в командный файл .bat, то очистку кэша значков и перезапуск Проводника будет выполнять простой запуск этого файла, лучше от имени администратора.
Некоторые дополнительные нюансы в контексте темы очистки кэша иконок:
- Если проблемы возникли с отображением миниатюр (эскизов), очистить их можно в утилите «Очистка диска» (Win+R — cleanmgr)
- Очистка эскизов также возможна в командной строке:
cd /d %userprofile%\AppData\Local\Microsoft\Windows\Explorer
taskkill /f /im explorer.exe
attrib -h thumbcache_*.db
del thumbcache_*.db
start %windir%\explorer.exe
- Существуют сторонние программы для очистки кэша иконок, например, IconsRefresh (разработка более не ведётся, но утилита исправно работает и в Windows 11).
В случае, если у вас остаются вопросы, касающиеся кэша значков Windows, вы можете задать их в комментариях ниже, я постараюсь помочь.
Довольно частая проблема, с которой сталкиваются администраторы терминальных (RDS) ферм Windows Server – нехватка места на системном диске, вызванная большим размером пользовательских данных. В этой статье мы покажем, как настроить автоматическую очистку корзины, папки Загрузки (Downloads), временных папок Temp и папок кэша пользователей в Windows с помощью PowerShell скриптов и групповых политик.
Содержание:
- Автоматическая очистка папок Temp и Downloads с помощью Windows Storage Space
- Очистка корзины пользователей Windows
- PowerShell скрипт для очистки папок Temp, Downloads, кэша в профиле пользователя
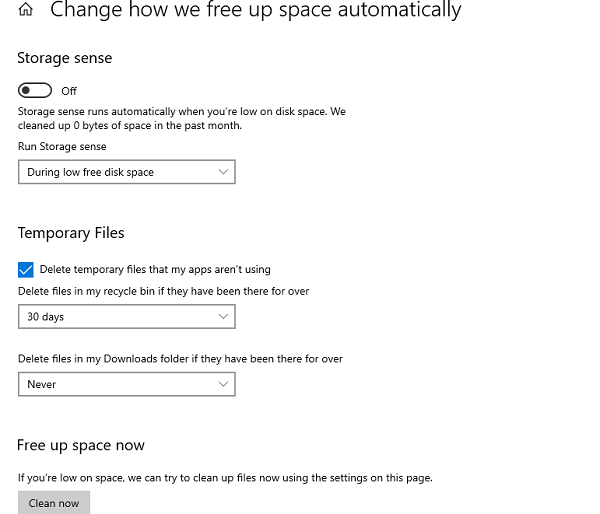
Автоматическая очистка папок Temp и Downloads с помощью Windows Storage Space
В Windows Server 2019/2022 и Windows 10/11 вы можете использовать встроенную функцию Storage Sense (Контроль памяти) для автоматически удаления старых и временных файлов. Для нее есть отдельные параметры GPO, которые позволяют включить очистку папок Temp и Downloads.
Очистка корзины пользователей Windows
На хосте Windows по умолчанию включена корзина для удаленных файлов (
$Recycle.Bin
). На RDS хосте в этом каталоге будет находится индивидуальная папка корзины для каждого пользователя (с SID пользователя в качестве имени). Со временем вы заметите, что суммарный размер файлов в корзине всех пользователей станет занимать значительную часть места диска RDS сервера.
По умолчанию размер корзины в Windows составляет около 5% от размера диска. Вы можете изменить максимальный размер корзины на каждом диске в ее свойствах. Здесь же можно полностью отключить корзину с помощью опции Don’t move files to the Recycle Bin.
Однако это изменит настройки корзины только для текущего пользователя.
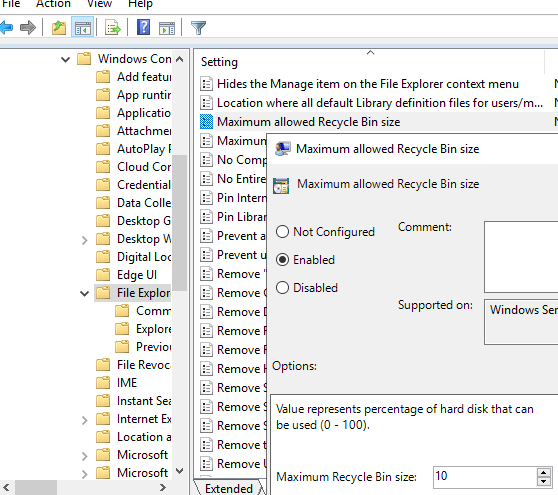
Вы можете задать максимальный размер корзины для пользователей через параметр групповой политики Maximum recycle bin size allowed в разделе User Configuration -> Administrative Templates -> Windows Components -> File Explorer. Максимальный размер корзины задается в процентах от размер диска. Если задать здесь 0, корзина будет отключена для всех дисков.
Для очистки корзины в Windows можно использовать командлет Clear-RecycleBin (доступен начиная с версии PowerShell 5.1 в Win 10). Для очистки корзины без запроса, выполните команду:
Clear-RecycleBin -Force
При запуске этой команды на RDS сервере от имени простого пользователя, будет очищена только корзина текущего пользователя. Можно добавить эту команду в логоф скрипт GPO, чтобы корзина очищалась при выходе пользователя:
%windir%\System32\WindowsPowerShell\v1.0\powershell.exe -NoProfile -Command Clear-RecycleBin -Confirm:$false
Для предыдущих версий Windows (со старыми версиями PowerShell) можно использовать такой скрипт:
$Shell = New-Object -ComObject Shell.Application
$RecycleBin = $Shell.Namespace(0xA)
$RecycleBin.Items() | %{Remove-Item $_.Path -Recurse -Confirm:$false}
PowerShell скрипт для очистки папок Temp, Downloads, кэша в профиле пользователя
Рассмотрим небольшой PowerShell скрипт для очистки содержимого папок Temp, Downloads и некоторых других временных папок в профиле пользователя на RDS или обычном компьютере Windows.
Комментарии к скрипту:
- В этом примере мы будем удалять файлы старше 14 дней в папке Downloads (вы можете изменить эту настройку). Остальные папки с кэшем и временными файлами очищаются полностью;
- Скрипт предназначен для запуска от имени текущего пользователя (скрипт удаляет старые файлы при выходе пользователя из Windows и запускается как GPO логофф скрипт);
- Всю информацию об удаленных файлах будет сохраняться в текстовый лог файл (можно отключить после отладки скрипта на тестовых пользователях);
- Дополнительно очищаем кэш RDP;
- Выполняется очистка каталога с ошибками Windows Error Reporting (WER) в профиле пользователя;
- В скрипте закомментированы строки очистки кэша Google Chrome. Если пользователи используют его и кэш Chrome занимает много места, раскоментируйте строки с путями;
- Вы можете добавить в скрипт дополнителен операцию проверки текущего размера папки с профилем пользователя до очистки и после (позволяет получить более точную информацию, но выполняется медленно). Либо можно просто проверить свободное место на диске до и после (выполняется мгновенно).
# Скрипт можно использовать для очистки папок в профиле пользователя (кэш, temp, downloads,кэш google chrome)
# PowerShell скрипт запускается из-под пользователя (права администратора) не требуются. Очищаются только временные файлы и кэш текущего пользователя.
# Оптимально для запуска через логофф скрипт GPO или через планировщик Task Scheduler
# Можно использовать на RDS хостах, VDI или рабочих станциях для очистки профилей пользователей
# Рекомендуем сначала протестировать работу скрипта в вашем окружении, и после этого удалить опцию WhatIf для физического удаления файлов
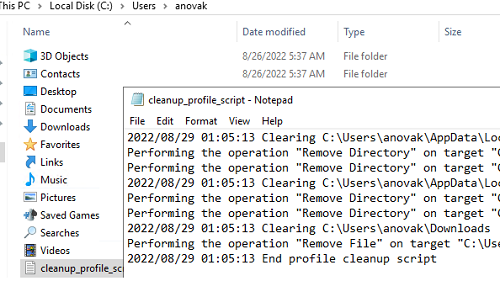
$Logfile = "$env:USERPROFILE\cleanup_profile_script.log"
$OldFilesData = (get-date).adddays(-14)
# Полная очистка каталогов с кэшем
[array] $clear_paths = (
'AppData\Local\Temp',
'AppData\Local\Microsoft\Terminal Server Client\Cache',
'AppData\Local\Microsoft\Windows\WER',
'AppData\Local\Microsoft\Windows\AppCache',
'AppData\Local\CrashDumps'
#'AppData\Local\Google\Chrome\User Data\Default\Cache',
#'AppData\Local\Google\Chrome\User Data\Default\Cache2\entries',
#'AppData\Local\Google\Chrome\User Data\Default\Cookies',
#'AppData\Local\Google\Chrome\User Data\Default\Media Cache',
#'AppData\Local\Google\Chrome\User Data\Default\Cookies-Journal'
)
# Каталоги, в которых удаляются только старые файлы
[array] $clear_old_paths = (
 'Downloads'
)
function WriteLog
{
Param ([string]$LogString)
$Stamp = (Get-Date).toString("yyyy/MM/dd HH:mm:ss")
$LogMessage = "$Stamp $LogString"
Add-content $LogFile -value $LogMessage
}
WriteLog "Starting profile cleanup script"
# если вы хотите очистить каталог с кэшем Google Chrome, нужно  остановить процесс chrome.exe
$currentuser=$env:UserDomain + "\"+ $env:UserName
WriteLog  "Stopping Chrome.exe Process for $currentuser"
Get-Process -name chrome -ErrorAction SilentlyContinue| ? {$_.SI -eq (Get-Process -PID $PID).SessionId} | Stop-Process
Start-Sleep -Seconds 5
# очистка каталогов с кэшем
ForEach ($path In $clear_paths)
{
If ((Test-Path -Path "$env:USERPROFILE\$path") -eq $true)
{
WriteLog "Clearing $env:USERPROFILE\$path"
Remove-Item -Path "$env:USERPROFILE\$path" -Recurse -Force -ErrorAction SilentlyContinue -whatif  -Verbose 4>&1 | Add-Content $Logfile
}
}
# удаление старых файлов
ForEach ($path_old In $clear_old_paths)
{
If ((Test-Path -Path "$env:USERPROFILE\$path_old") -eq $true)
{
WriteLog "Clearing $env:USERPROFILE\$path_old"
Get-ChildItem -Path "$env:USERPROFILE\$path_old" -Recurse -Force -ErrorAction SilentlyContinue | Where-Object {($_.LastWriteTime -lt $OldFilesData )} | Remove-Item  -Recurse -Force -ErrorAction SilentlyContinue -whatif  -Verbose 4>&1 | Add-Content $Logfile
}
}
WriteLog "End profile cleanup script"
По аналогии вы можете добавить в массив
$clear_paths
другие папки, которые вам нужно очищать в профиле пользователя.
Данный PowerShell скрипт можно выполнять при завершении сессии пользователя на RDS сервере. Проще всего назначить скрипт через logoff политику GPO.
- Создайте новую GPO и назначьте ее на OU, в котором находятся ваши RDS хосты;
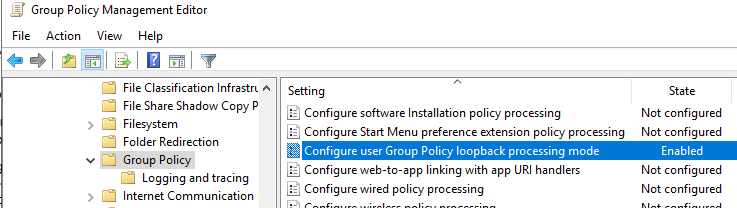
- В настройках политики включите Режим замыкания групповой политики (Loopback Processing mode). То нужно чтобы к применить настройки из секции пользователей к компьютеру;

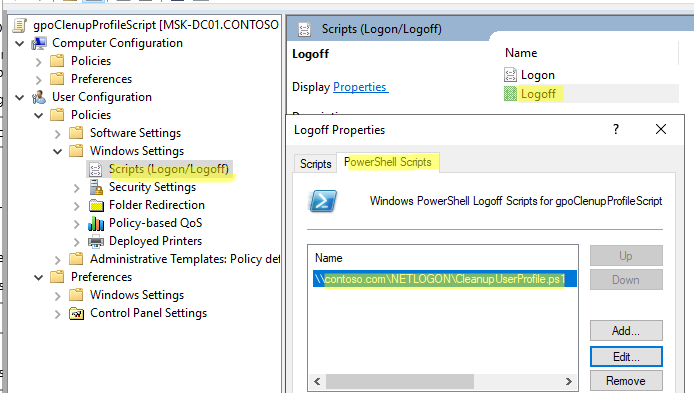
- Скопируйте файл PowerShell скрипта на контроллер домена в каталог Netlogon (
\\winitpro.ru\netlogon\CleanupUserProfile.ps1
) ; - Перейдите в раздел GPO User Configuration -> Policies -> Windows Settings -> Scripts -> Logoff. Перейдите на вкладку PowerShell Scripts и добавьте путь к PS1 файлу в Netlogon;
- Чтобы применить новые настройки GPO, выполните выход пользователя из Windows;
- Теперь при завершении сеанса пользователя на RDS сервере указанные каталоги будут автоматически очищаться. Вы можете проверить список удаленных файлов и каталогов в текстовом лог файле в профиле пользователя.
Рассмотренные здесь методы очистки пользовательских папок можно использовать как для локально хранящихся профилей пользователей, так и контейнеров User Profile Disks или FSlogix профилей на Windows Server RDSH. Также эффективно будет просто исключить временные папки из перемещаемых профилей.
Microsoft Windows 7
C:\Users\{user}\AppData\Local\Microsoft\Internet Explorer\IECompatData\
C:\Users\{user}\AppData\Local\Microsoft\Feeds Cache\
C:\Users\{user}\AppData\Local\Microsoft\Windows\WebCache\
C:\Users\{user}\AppData\Local\Microsoft\Windows\History\
C:\Users\{user}\AppData\Local\Microsoft\Windows\Temporary Internet Files\
C:\Users\{user}\AppData\Local\Temp\
C:\Users\{user}\AppData\LocalLow\Microsoft\Internet Explorer\DOMStore\
C:\Users\{user}\AppData\Roaming\Microsoft\Internet Explorer\UserData\
C:\Users\{user}\AppData\Roaming\Microsoft\Internet Explorer\UserData\Low\
C:\Users\{user}\AppData\Roaming\Microsoft\Windows\Cookies\
C:\Users\{user}\AppData\Roaming\Microsoft\Windows\Cookies\Low\
C:\Users\{user}\AppData\Roaming\Microsoft\Windows\DNTException\
C:\Users\{user}\AppData\Roaming\Microsoft\Windows\DNTException\Low\
C:\Users\{user}\AppData\Roaming\Microsoft\Windows\IECompatCache\
C:\Users\{user}\AppData\Roaming\Microsoft\Windows\IECompatCache\Low\
C:\Users\{user}\AppData\Roaming\Microsoft\Windows\IECompatUACache\
C:\Users\{user}\AppData\Roaming\Microsoft\Windows\IECompatUACache\Low\
C:\Users\{user}\AppData\Roaming\Microsoft\Windows\IEDownloadHistory\
C:\Users\{user}\AppData\Roaming\Microsoft\Windows\IETldCache\
C:\Users\{user}\AppData\Roaming\Microsoft\Windows\IETldCache\Low\
C:\Users\{user}\AppData\Roaming\Microsoft\Windows\PrivacIE\
C:\Users\{user}\AppData\Roaming\Microsoft\Windows\PrivacIE\Low\
Microsoft Windows 8
C:\Users\{user}\AppData\Local\Microsoft\Internet Explorer\IECompatData\
C:\Users\{user}\AppData\Local\Microsoft\Windows\History\
C:\Users\{user}\AppData\Local\Microsoft\Windows\WebCache\
C:\Users\{user}\AppData\LocalLow\Microsoft\Internet Explorer\DOMStore
The Windows operating system creates thumbnail cache files for images and other file types to speed up the loading of folders on the system. Under Windows XP, thumbs.db files were being used and they were put into the folders the images were stored in.
Starting with Windows Vista, Microsoft moved the cache to a central location (%userprofile%\AppData\Local\Microsoft\Windows\Explorer) where thumbcache_xxx.db files are stored in. Here you also find an index file that contains information where each cached version of an image is found in.
The only exception to the rule is when you browse network shares using Windows Vista or newer versions of Windows. Instead of using the local thumbnail cache, thumbs.db files are created in the folders that you are browsing. This behavior can be changed in the Group Policy.
You can think of them as caches that are designed to speed up the display of folders when you use Windows Explorer.
Without the thumbnail cache, Windows would have to process the images in the folder on load every time the folder is opened, which can slow down the display depending on the overall performance of the system and the number of image files in the folder.
Windows does not only store image formats in the database files though. While one of the main purposes is to process jpeg, png, bmp, tiff and gif image files, the cache is also used for document formats such as docx, pptx, pdf and html, and video formats such as avi.
The effect that a thumbs.db cache file and thumbcache file has on the loading time of a folder can be witnessed best if you open a large folder full of image files. You will notice that the loading is faster when the thumbnail cache is enabled. This becomes especially apparent on slow storage devices such as image DVDs or slow hard drives.
Why you may want to turn off the caching
There are a couple of reasons why you may want to turn off the caching. First, there have been issues in the past where thumbs.db files have prevented the renaming or deletion of files or folders on the system.
Depending on how the computer is used, it may also have privacy implications. A cached thumbnail of an image that you have deleted may still be stored in the cache. If you are the sole user of the PC, it may not be an issue. If there are other users, or even third-parties who may gain access to the computer, you may want to delete those caches regularly to avoid this from happening.
It is furthermore possible to link thumbnails with their original files using various methods.
Turning off the caching may however affect the folder loading speed. As mentioned earlier, this can be especially noticeable when you open folders with lots of file types that are usually cached to speed up the loading time.
How to turn of thumbnail caching
From Windows XP onward, Microsoft implemented an option to disable the creation of thumbs.db files on the operating system.
If you are using Windows XP
- Click on My Computer.
- Select Tools > Folder Options.
- Switch to the View tab.
- Check «Do not cache thumbnails».
If you are using Windows Vista or newer
- Click on Start > Control Panel > Folder Options.
- If you are using Windows 8, go to the desktop part, press Windows-C to open the Charms menu, and select Settings > Control Panel.
- If you are using Windows 10, open Explorer and select File > Change folder and search options.
- Select the View tab.
- Find the Files and Folders section there, and check «Always show icons, never thumbnails» to disable the generation of the database files.
Alternative Group Policy Editor

If your operating system supports the Group Policy Editor, you can use it to disable thumbnail caching. To load the editor, do the following:
- Tap on Windows-R to open the run box.
- Type gpedit.msc and hit enter.
- Navigate to the following folder: User Configuration > Administrative Templates > Windows Components > Windows Explorer.
- If you are using Windows 8 or newer: User Configuration > Administrative Templates > Windows Components > File Explorer
Here you find the following preferences:
- Turn off the display of thumbnails and only display icons (Vista or higher) — disables the display of thumbnails in Windows Explorer when enabled.
- Turn off the display of thumbnails and only display icons on network folders (Vista or higher) — disables the display of thumbnails on network folders in Explorer when enabled.
- Turn off the caching of thumbnails in hidden thumbs.db files (Vista or higher) — when enabled, prevents Windows Explorer from reading, creating or writing to thumbs.db files.
- Turn off the caching of thumbnail pictures (XP or higher) — prevents that Windows caches thumbnail pictures.
Using the Windows Registry
If you do not have access to the Group Policy Editor on your system, you can disable the generation of thumbnail caches on Windows using the Registry instead.
- Tap on the Windows-key, type regedit, and hit enter.
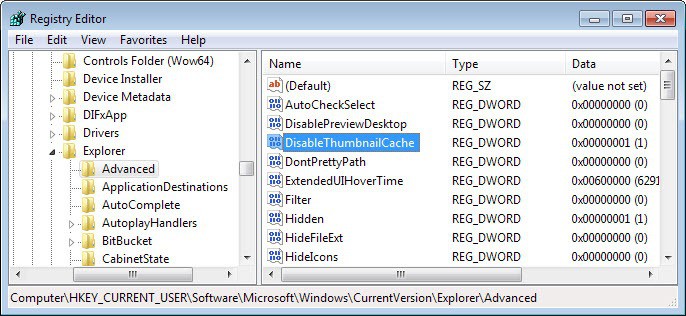
- Navigate to the following key using the folder structure on the left: HKEY_CURRENT_USER\Software\Microsoft\Windows\CurrentVersion\Explorer\Advanced
- Locate the preference DisableThumbnailCache on the right.
- Change its value from 0 to 1 to disable the feature.
- If you want to restore it at a later point in time, change it back to 0.
How to view and delete existing thumbs.db files
Existing files are not removed automatically when you disable the creation of thumbnail cache files in Windows. For that, you can either use specialized viewer and cleaner applications, or general purpose programs instead.
One of the easier ways is to use Windows Search to find all thumbs.db files. Once you have found them all, use Ctrl-A to select them and hit the delete button to remove them all from your system.
Specialized applications
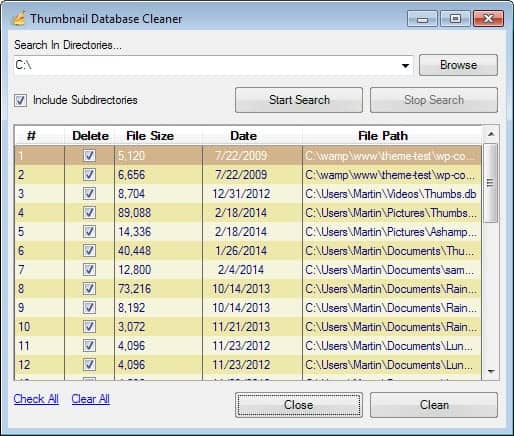
Thumbnail Database Cleaner has been designed specifically to find and remove thumbs.db files on the system. Please note that the program requires the Microsoft .Net Framework 2.0.
Just run it, select a drive you want to scan, and click the start search button afterwards. It displays all thumbnail caches it finds, and you can select some or all for removal.
You can furthermore sort the display by file size, date or file path. The only thing missing is a viewer module that lets you view individual files.
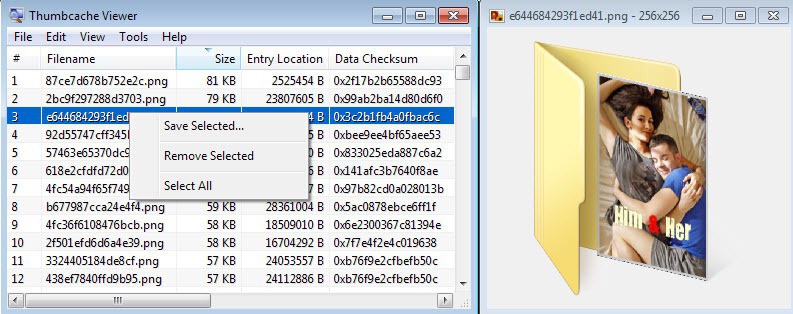
Thumbs Viewer is another program that you can use for that purpose. Its primary purpose is to view the contents of a thumbs.db file, but it can also be used to remove cached thumbnails from it.
The program displays all cached files automatically when you load a database file. You can sort the entries by name, size or location, and view each thumbnail with a click on it.
Entries can be deleted or saved with a right-click. If you want to remove all, use Ctrl-A to mark them all, right-click and select remove selected from the context menu.
Thumbs.db Explorer provides you with another option. It works similar to Thumbs Viewer in that you need to point it to a thumbnail file that you want to load in the software.
Note that it can only load thumbs.db files and not thumbcache files. It displays the total number of thumbnails in the file, their name and size.
You can use it to save some or all images to your local system, but not delete the selection.
Thumbs Remover is the final program of this list. It can be used to search the system for thumbs.db files to remove them all or select ones in one go.
It comes as a standalone version and installer which both work identical. Point the program to a drive letter and click on start to run the scan. It may take a while as the program goes through all folders on the drive to find any thumbs.db file.
All files are displayed in the interface afterwards, and you can delete some or all of them from here easily using buttons the program makes available.
General purpose programs
The popular temporary file cleaner CCleaner can remove all thumbnail cache files from the operating system. The option is selected by default, and you find it under Windows > Windows Explorer in the program interface.

The Windows operating system ships with its own cleanup tool. You can run it with a click on Start, typing Disk Cleanup, and the selection of the entry. If you are using Windows 8 or 10, you simply type Disk Cleanup on the Start Screen part of the operating system and select the result.
Select the drive that you want to scan, and a thumbnails entry should be listed here then.
Tip: Configure Windows 10 to prevent the automatic deletion of thumbnails.
Summary
Article Name
All you need to know about thumbnail cache files in Windows
Description
The Windows operating system creates thumbnail cache files for images and other file types to speed up the loading of folders on the system.
Author
Martin Brinkmann
Publisher
Ghacks Technology News
Logo
Advertisement