
As a developer, you don’t write routines to install or uninstall your Windows Store app. Instead, you package your app and submit it to the Windows Store. Users acquire your app from the Windows Store as an app package. Windows uses info in an app package to install the app on a per-user basis, and ensure that all traces of the app are gone from the device after all users who installed the app uninstall it.
An app package is a container based on the Open Packing Conventions (OPC) standard. OPC defines a structured way to store data and resources for the app by using a standard ZIP file. For info about how to use Microsoft Visual Studio to deploy app packages, see Deploying Windows Store apps from Visual Studio.
Starting with Windows 8.1, new app bundles help to optimize the packaging and distribution of an app. And resource packs let you offer extras, like localization or assets for high-resolution displays, to customers who want them, without affecting disk space, bandwidth, or the app-purchase experience for customers who don’t.
Windows Store app deployment
The Windows Store app model is a declarative state-driven process that provides all installation and update data and instructions for an app in a single package. In this declarative model, deployment operations are reliable. The files shipped in the package are immutable, which means that they haven’t been modified since they were delivered to the computer. Because the package owner doesn’t need to write custom actions and code, the number of failure points are reduced.
During the update process, a new version of the app is downloaded and installed to the user’s profile; immediately afterwards the old version is removed from the computer. In contrast to Windows Installer, there is no concept of patch files or any other files that are used to deploy a Windows Store app.
Because Windows Store apps are installed into a user’s profile, each user has complete control over their Windows Store apps. Apps can be installed, updated, and removed without affecting any other user’s apps on the computer.
For more info about deployment, see Deployment for Windows Store apps.
Windows Store app packages – .appx
All the components that define a Windows Store app are stored in a Windows Store app package. This Windows Store app package has a .appx file extension and is the unit of installation for a Windows Store app. Windows Store app packages are ZIP-based container files that are defined as a subset of the ISO and ECMA Open Packaging Conventions (OPC) standards. Each Windows Store app package contains the app’s payload files plus info needed to validate, deploy, manage, and update the app. From a high-level view, each Windows Store app package contains these items:
- App payload
-
App code files and assets
Payload files are the code files and assets that you author when you create your Windows Store app.
- App manifest
-
App manifest file (AppxManifest.xml)
The app manifest declares the identity of the app, the app’s capabilities, and info for deploying and updating. For more info about the app manifest file, see App package manifest.
- App block map
-
App package’s block map file (AppxBlockMap.xml)
The block map file lists all the app files contained in the package along with associated cryptographic hash values that the operating system uses to validate file integrity and to optimize an update for the app. For more info about the block map file, see App package block map.
- App signature
-
App package’s digital signature file (AppxSignature.p7x)
The app package signature ensures that the package and contents haven’t been modified after they were signed. If the signing certificate validates to a Trusted Root Certification Authorities Certificate, the signature also identifies who signed the package. The signer of the package is typically the publisher or author of the app.
These preceding items comprise a fully self-contained Windows Store app that can be deployed to Windows 8 and later. You create the app payload and manifest files for your app. When Visual Studio packages your app, it automatically adds the app block map and signature files to the package. But you can also use the standalone MakeAppx and SignTool utilities if you want to manually package your app. These sections describe how to package and deploy Windows Store apps.
- How to create an app package
- How to create an app package signing certificate
- How to sign an app package using SignTool
- How to troubleshoot app package signature errors
- How to programmatically sign an app package
- How to develop an OEM app that uses a custom file
Package identity
One of the most fundamental pieces of the app package is the 5-part tuple that defines the package. This tuple is known as the package identity and consists of this data:
- Name
-
A general name that is used for the app package. For example, «myCompany.mySuite.myApp».
Note This name isn’t necessarily what is displayed on the app tile.
- Publisher
-
The publisher refers to the publisher of the Windows Store app. In most cases, the publisher is the same as the account that was used to register for a Windows 8 developer account.
- Version
-
A four part version descriptor (major.minor.build.revision) that is used to service future releases of the app. For example, «1.0.0.0».
Note You must use all four parts of the version descriptor.
- ProcessorArchitecture
-
The target architecture of the app package. This value can be «x86», «x64», «arm», or «neutral». In many cases, this field can be «neutral» to represent all architectures.
- ResourceID
-
Optional.
A publisher-specified string that specifies the resources of the app package. This part of the tuple is used primarily if the app package has assets that are specific to a region, such as, languages.
If you are creating the package manually, see the Identity element.
Package format
Here we describe details about app packages, that is, the .appx file format.
App packages are read-only
Although app packages are based on a subset of OPC, we recommend not to use existing APIs for manipulating OPC or ZIP files to edit app packages. After you create an app package, treat the package as read-only. The Visual Studio and MakeAppx processes that create app packages automatically generate and add the AppxBlockMap.xml file to the package. If you change any of the package contents, you need to update the package’s block map file to match. To create a new package and block map file, you must rebuild the package with Visual Studio, the MakeAppx pack command, or the Windows 8 native-code IAppxPackageWriter APIs.
App package payload file names
To comply with OPC, the file path names for all files that are stored in an app package must be Uniform Resource Identifier (URI) compliant. File paths that are not URI compliant need to be percent-encoded when stored in an app package, and decoded back into the original file path when extracted from the package. For example, consider this payload file with a path and name that contains embedded spaces and URI reserved characters ‘[‘ and ‘]’:
\my pictures\kids party[3].jpg
When you store this payload file in the app package, the path for the file becomes:
/my%20pictures/kids%20party%5B3%5D.jpg
Visual Studio, the app packager (MakeAppx), and the Packaging APIs handle the percent-encoding and decoding of file paths automatically. If you attempt to extract files directly from an app package by using general ZIP utilities or APIs, the file paths might remain percent-encoded. So we recommend that you extract files from an app package by using either the MakeAppx unpack command or the IAppxPackageReader APIs.
App package capacities
App packages support apps up to these capacity limits:
| Package capacity | Maximum |
|---|---|
| File count | 100,000 files |
| Package size | 100 GB |
App package reserved path and file names
These path and file names are reserved, so don’t use them for app payload files:
| Reserved path and file names | Use |
|---|---|
| /AppxManifest.xml | Reserved file name for the developer-authored app package manifest |
| /AppxBlockMap.xml | Reserved file name for app package block map |
| /AppxSignature.p7x | Reserved file name for app package Microsoft Authenticode digital signature |
| /[Content_Types].xml | Reserved file name for content types metadata required by OPC for the app package |
| /AppxMetadata/ | Reserved folder path for app package metadata files |
| /Microsoft.System.Package.Metadata/ | Reserved folder path for Microsoft metadata files about deployed app packages |
App package digital signatures
You must sign every app package before users can install them. While app package signing is partly automated through Authenticode, you must control the following features when you sign app packages:
- The subject name of the code signing certificate must match the Publisher attribute that is specified in the Identity element of the AppxManifest.xml file in the app package.
- The hash algorithm that is used to sign the app package must match the hash algorithm that is used to generate the AppxBlockMap.xml file in the app package. This hash algorithm is specified in the HashMethod attribute of the BlockMap element.
- An app package can’t be time stamped independently of signing. It must be time stamped during signing if time stamping is desired.
- App packages don’t support multiple enveloped signatures.
The signature of a package determines how the Windows Store app is licensed. How an app is licensed affects how it can be installed and run, so even two app packages with the same package identity might not be treated as equivalent during installation. For example, you can’t install an app package with the same package identity as another already installed app, if it doesn’t also have the same signature.
Declarative install
Windows Store app deployment is an entirely declarative process that relies on the app package manifest. You use the app package manifest to capture your desired integration with the operating system. For example, you use the app package manifest to declare the need to use a file type association, such as .jpg, on the operating system.
By doing this, Windows can completely manage the Windows Store app deployment process so that it’s a consistent, dependable experience for each user on a multitude of devices. Moreover, by having a declarative installation Windows Store app, uninstallation of the app becomes deterministic and repeatable.
Within the app package manifest, you can declare a wide range of technologies as part of Windows Store app installation.
App pre-requisites
To successfully deploy an app, the operating system must satisfy all of that app’s pre-requisites that are referenced in the app package manifest. For example, if a version of Windows exposes a new API that a Windows Store app calls, the app declares a pre-requisite on that specific minimum version operating system. In this case, the proper operating system must be present on the target computer before the app can be installed. In Windows 8 and later, you can declare these key types of pre-requisites in the app package manifest:
- OSMinVersion
-
Specifies the minimum version of the Windows operating system and app model platform where this app is permitted to run.
- OSMaxVersionTested
-
Specifies the maximum version of the Windows operating system where this app was tested by the developer and known to be in a working state. This pre-requisite field is used by the operating system to determine if there is any app compatibility issue that might arise during the app’s usage. For example, if the app calls an API from the Windows 8 SDK and the API was later changed in a subsequent version of Windows, the app might behave incorrectly. This pre-requisite field helps ensure that the operating system can identify and correct this behavior so the app continues to function on all subsequent versions of the operating system.
Capabilities
Windows Store apps that need programmatic access to user resources such as Pictures or connected devices such as a webcam, must declare the appropriate capability. An app requests access by declaring capabilities in its app package manifest. You can declare capabilities by using the Manifest Designer in Visual Studio, or you can add them manually to the package manifest as described in How to specify capabilities in a package manifest. For more info about capabilities, see App capability declarations.
Dependencies
The Windows Store hosts a unique set of app packages that contain Windows components that service independently of Windows. Windows Store apps can use these app packages by declaring a dependency in their app package manifest. These Windows components contained in app packages hosted by the Windows Store are called Windows component libraries. The Windows Store manages the process of ensuring that the correct version of the Windows component library is present when the app is installed on a Windows 8 computer. These libraries, which include Windows Library for JavaScript, C++ Runtime Libraries (CRT), and PlayReady DRM, are essential to the creation of Windows Store apps. When an app deploys from the Windows Store, Windows satisfies the dependency declaration by downloading and installing the appropriate Windows component library with the app that is being downloaded from the Windows Store. For side loading Windows Store apps for testing or enterprise deployment, the Windows component library app package must be supplied and specified during deployment of the app package.
App bundles
Starting with Windows 8.1, you can use the app bundle (or .appxbundle package) to help optimize the packaging and distribution of a Windows Store app and resource packages to users all around the world.
Note Create one app bundle for all your architectures rather than separate bundles for each architecture.
You create the app bundle payload for your app. Visual Studio creates and adds the bundle manifest. When Visual Studio bundles your app, it automatically splits the resources into separate packages and adds the app block map and signature files to the bundle. These items make up a fully self-contained Windows Store app that can be deployed to systems beginning with Windows 8.1.
- App packages (.appx)
-
The app bundle can contain more than one app package only if they each target a different specific architecture. For example, it can contain both an x86.appx and an amd64.appx package, but not two amd64.appx packages.
- Resource packages (.appx)
-
The app bundle contains resource packages (.appx files) for language, scale, and Microsoft DirectX feature level. Each app bundle can contain many different resource packages to support different device configurations. When directly referencing a resource package in your Windows Store app you should make full use of the resource management system.
Note Resource packages must never contain code.
- App bundle manifest (AppxBundleManifest.xml)
-
The app bundle manifest (.appxbundlemanifest file) contains all of the applicability info about the contained packages. For any particular package, it specifies the type of package («Application» or «Resource») plus version and resource-targeting info. Specifically for app packages, the app bundle manifest includes info about the architecture.
In general, the app bundle manifest allows the Windows 8.1 app model to understand the contents of the app bundle and determine at installation time which app package and resource packages to install on the user’s device.
Here’s an example of an app bundle manifest file.
<?xml version="1.0" encoding="UTF-8" standalone="no"?> <Bundle xmlns="http://schemas.microsoft.com/appx/2013/bundle" SchemaVersion="1.0"> <Identity Name="Example" Publisher="CN=ExamplePublisher" Version="2013.101.312.1053"/> <Packages> <Package Type="application" Version="1.0.0.5" Architecture="x86" FileName="AppPackage_X86.appx" Offset="49" Size="3207"> <Resources> <Resource Language="en-us"/> <Resource Scale="100" /> </Resources> </Package> <Package Type="application" Version="1.0.0.4" Architecture="x64" FileName="AppPackage_X64.appx" Offset="3329" Size="3204"> <Resources> <Resource Language="en-us"/> <Resource Scale="100" /> </Resources> </Package> <Package Type="resource" Version="1.0.0.0" ResourceId="French" FileName="ResourcePackage_French.appx" Offset="6606" Size="1423"> <Resources> <Resource Language="fr"/> <Resource Language="fr-fr"/> <Resource Language="fr-ca"/> </Resources> </Package> <Package Type="resource" Version="1.0.0.3" ResourceId="HiRes" FileName="ResourcePackage_HiRes.appx" Offset="8111" Size="1584"> <Resources> <Resource Scale="140"/> </Resources> </Package> </Packages> </Bundle> - App block map (AppxBlockMap.xml)
-
The block map file lists all the files contained in the bundle (except app and resource packages), along with associated cryptographic hash values that the operating system uses to validate file integrity and to optimize an update for the app. For more info about the block map file, see App package block map.
- App signature (AppxSignature.p7x)
-
The app bundle signature ensures that the package and contents haven’t been modified since they were signed. If the signing certificate validates to a Trusted Root Certification Authorities Certificate, the signature also identifies who signed the package. The signer of the package is typically the publisher or author of the app.
Resource packages
Starting with Windows 8.1, you can use the resource package to contain additional resources for the core app (for example, French-specific assets like strings or images). By using the resource package, you can separate the core app package from those additional resources. The resource package thus serves to tailor the app’s overall experience without requiring download and installation of all resource packages to the PC.
The resource package is optional and can’t be depended on by the app package. This means the app package must contain at least one set of default resources that can always be used in case no resource packages were installed on the PC. This helps keep a couple of key promises:
-
The app package can always be installed and launched properly on any PC without resource packages.
-
If the installed resource package is not complete, the app package has resources to fall back on.
The resource package serves these purposes in the app model:
-
Provides resource candidates that the resource-management system can use when the app runs, to tailor the app’s experience.
-
Provides metadata that allows the resource package to target a specific resource qualifier (for example, user scale, system scale, and DirectX features).
Resource packages can target only one resource qualifier per package. But, your app can have many resource packages.
Resource packages must never contain code.
Per user deployments
Windows Store app deployments are per user, which means they only impact the account of the user who installed them. Furthermore, in multi-user scenarios, users don’t have any knowledge of what was installed for any other user. For example, suppose UserA installed the Notepad app while UserB installed the Calculator app. In this scenario, UserA and UserB have no knowledge into other apps installed to the same computer (app isolation).
App isolation
App isolation on the operating system is only limited to the user portion of the Windows Store app. All other data from the app is stored in a location that the operating system can access. For example, suppose UserA installed the Calculator app and UserB also installed the Calculator app; in this scenario, only one copy of the Calculator app binaries are stored on the drive (%ProgramFiles%\WindowsApps), and both users have access. UserA doesn’t see UserB’s app data and vice versa. While the runtime binaries are shared, the app data is still isolated.
Note The %ProgramFiles%\WindowsApps directory can’t be changed. This also includes the underlying %ProgramFiles% directory as well as the %ProgramData% and %UserProfile% directories.
Multi version existence
In addition to containing all the Windows Store app binaries for all users on the system, the WindowsApps directory can also contain multiple versions of the same Windows Store app. For example, suppose both UserA and UserB installed the Notepad app, and UserA updated to version 2 of the Notepad app while UserB didn’t. In this scenario, two versions of the Notepad app exist on the operating system. Because only one version is installed for each user, the multiple versions don’t conflict with each other.
Note This behavior is also applicable to dependency packages.
Deployment for Windows Store apps
These sections describe the flow of installing, updating, and removing Windows Store apps.
Installing Windows Store apps
This figure shows the flow of installing Windows Store apps:

The Windows Store app deployment process occurs in multiple phases. Initially, Windows acquires and validates the app manifest, app block map, and app signature. Next, Windows checks the app package’s deployment criteria to ensure that the app deployment will be successful. Next, Windows stages the package binaries to the WindowsApps directory. Finally, Windows registers the package into the user’s account.
Deployment checks (validation)
This figure shows the phase where Windows performs deployment checks:

After the user starts to install a Windows Store app, Windows must complete these checks before the deployment process can begin:
- OSMinVersion must be satisfied
-
You specify app pre-requisites within the app package manifest. They express the requirement for a specific minimum operating system version to be satisfied. For more info about app pre-requisites, see App pre-requisites.
- App dependencies must be satisfied
-
Windows Store apps can express a dependency on another app package for added functionality that the app needs. For more info about app dependencies, see Dependencies.
- Disk space must be sufficient
-
Each Windows Store app requires a certain amount of disk space to be present so the app can deploy. If there isn’t enough disk space present on the computer to deploy the package, deployment fails.
- App isn’t already deployed
-
Within the context of the specific user that installed the Windows Store app, the app can’t be installed again so a check whether the app is not installed already must be performed.
- App assets must pass signature check
-
Using the already validated BlockMap, each file in the app package must have its integrity checked.
Package staging
This figure shows the phase where Windows stages the package:

After the app model determines that the package can deploy on the computer, Windows stores the package’s contents on the disk in the %ProgramFiles%\WindowsApps directory in a new directory named after the package identity:
<Package Name>_<Version>_<Architecture>_<ResourceID>_<Publisher Hash>
The staging process occurs via a set of requests made by the deployment engine to the source of the package’s location. These requests are then satisfied by the source and returned to the deployment engine where they are decompressed, validated against the BlockMap, and copied into the appropriate file.
Package registration
This figure shows the phase where Windows registers the package:

Package registration is the final phase in the deployment process. During this phase, the extensions that are declared in the manifest are registered with the operating system. This enables the app to deeply integrate with the operating system. For example, if you want your app to be able to open .txt files, declare a FileTypeAssociation extension as XML in your app package manifest and specify .txt as the file type. At deployment time, this XML is translated into the set of system changes that need to occur to properly register the app to handle .txt files. These changes are then made on behalf of the app, by the app model. The app model supports many different extensions. For more info about these extensions, see App contracts and extensions.
Updating Windows Store apps
This figure shows the flow of updating Windows Store apps:

The updating workflow is similar to that of Installing Windows Store apps, but here are a few key differences that make updating unique.
Deployment checks for updating
This figure shows the phase where Windows performs deployment checks in updating:

If the currently installed app package’s version is greater than or equal to what the user is trying to install, deployment won’t succeed.
Package staging (delta downloads)
This figure shows the phase where Windows stages the updated package:

The staging process during update is similar to the typical staging process during installation. But the key difference is that a pre-existing version of the package is already installed on the operating system. After the pre-existing package installation completes, a set of payload files are downloaded and copied to the computer. In many cases, many of those payload files won’t change or will only slightly change in the updated version of the app package. You can use those payload files to construct the updated app package content and assets. Because the BlockMap structure of the app package contains a list of hashes for each block of each file, Windows can compute the precise set of changes on a block level via a comparison of the former and new app BlockMap files. Here are the possible outcomes as a result of this comparison:
- A file was unchanged
-
The file is hard linked to the updated package folder location.
- Blocks in a file were unchanged
-
The unchanged blocks are copied over into the updated package folder.
- Blocks in the file were changed
-
The changed blocks are marked to be downloaded from the source.
- An entire file is new
-
The entire file will be downloaded from the source.
- A file no longer exists
-
The file will not be used for the update at all.
After the comparison completes, all the data that can be preserved is hard linked or copied and any new data is downloaded from the source and used to make the updated files.
Package registration for updating
This figure shows the phase where Windows registers the updated package:

When you update a package’s registration, Windows also needs to update registrations of the previous versions. The app model automatically updates any existing extension registrations, removes obsolete registrations, and registers new extensions based on the declarations that are present in the manifests of the former and new versions of the app.
Apps in use
The process of de-registering an app package from the operating system involves removing the internals that allow Windows to launch the Windows Store app. In some certain cases, the app can be running while the update occurs. In this scenario, the deployment engine requests to suspend and subsequently terminate the app. The update process either succeeds or fails depending on the outcome of that request. In the case where the operations succeed, the app is also prevented from launching for the short duration of time while the registration of the new app package and de-registration of the former app package occurs. After this phase completes, the app is re-allowed to launch.
App data
App data is an entity that has a version that is outside of the actual Windows Store app. As such, if the ApplicationData.Version wasn’t updated along with the update for the Windows Store app, the app state isn’t affected by the update for the Windows Store app.
Package de-staging
This figure shows the phase where Windows de-stages the updated package:

After the registration operation successfully completes, if the pre-existing version of the package is not being used by any other user on the operating system, the package is marked for removal from the operating system. Initially, Windows copies the pre-existing version’s app package folder into the %ProgramFiles%\WindowsApps\Deleted directory. When no other deployment operations are ongoing, Windows deletes the pre-existing version’s app package folder.
Note In multi-user scenarios, the app package might still be installed on the operating system for another user. In this case, the package content isn’t de-staged from the operating system until all users have removed it.
Removing Windows Store apps
This figure shows the flow of removing Windows Store apps:

Similarly to the way packages are installed per user on a computer, they are also only removed per user. If the Windows Store app is installed for multiple users, it is only de-registered for the current user. For example, if UserA and UserB have the Calculator app installed and UserA uninstalls the app, it is removed only for UserA and not for UserB. The removal process consists of the same basic phases as the updating process.
Package de-registration
This figure shows the phase where Windows de-registers the removed package:

The de-registration process is where the Windows Store app’s integration into the user’s account is removed. Any associated data that was installed to the user’s account, such as app state, is also removed. Similar to the updating process, the deployment engine must request the app be suspended and terminated via the Process Lifetime Manager (PLM) so the app can be de-registered from the user’s account.
Note After the PLM returns, the removal operation continues to de-register the Windows Store app from the user’s account. The operation continues even if the PLM was not successful.
Package de-staging
This figure shows the phase where Windows de-stages the removed package:

After the de-registration operation successfully completes, the package, if it is not being used by any other user on the operating system, is marked for removal from the operating system. Initially, Windows copies the package’s app package folder into the %ProgramFiles%\WindowsApps\Deleted directory. When no other deployment operations are ongoing, Windows deletes the package’s app package folder.
Note In multi-user scenarios, the app package might still be installed on the operating system for another user. In this case, the package content isn’t de-staged from the operating system until all users have removed it.
App bundle deployment
Starting with Windows 8.1, you can deploy app bundles to optimize the packaging and distribution of your app.
The deployment of app bundles via the Windows Store follows this workflow.

The Windows Store app deployment process occurs in multiple phases. Initially, Windows acquires and validates the app bundle manifest, bundle block map, and bundle signature. Next, Windows checks the bundle manifest to ensure that there is an app that can be deployed on the current architecture. When the right app package has been found, Windows checks the app package’s deployment criteria to make sure that the app deployment will be successful.
Then Windows determines the subset of applicable resource packages for deployment and stages these package binaries to the \WindowsApps\ directory. Finally, Windows registers the app package and resource packages into the user’s account.
Validation
After the user starts to install a Windows Store app, Windows must complete these checks before deployment can begin.
| Test | Conditions |
|---|---|
|
Architecture support |
The bundle can contain up to three architecture-specific app packages, all specified in the app bundle manifest. |
|
Minimum operating-system version |
You specify prerequisites within the app package manifest. They express the requirement for a specific minimum operating-system version. For example, for Windows 8.1 the appropriate version number is 6.3. For more info about app prerequisites, see App packaging pre-requisites. |
|
App dependencies |
A Windows Store app can express a dependency on another component package for added functionality that the app needs. For more info about app dependencies, see App packaging dependencies. |
|
Disk space |
Each Windows Store app requires a certain amount of disk space for deployment. If there isn’t enough disk space to deploy the package, deployment fails. |
|
Signature check |
Each file in the app package must have its integrity checked against the already validated BlockMap. |
Package applicability
After Windows verifies that the app bundle can be deployed on the system, it then determines the resource packages to deploy alongside the app package to enhance the user’s experience. Applicability is checked based on these three specific resource qualifiers.
| Qualifier | Description |
|---|---|
|
User language |
Any language that the user has added into the preferred languages list is counted toward the final set of applicable language resource packages to be deployed. Windows 8.1 and later supports many locales and languages for resource packages. |
|
System scale |
Scale values for all monitors are used to determine the final set of applicable scale resource packages to be deployed. Windows 8.1 and later supports three scale factors for resource packages: scale-100, scale-140 and scale-180. |
|
DirectX feature level |
All DirectX feature levels available on the system are used to determine the final set of applicable DirectX resource packages to be deployed. Windows 8.1 and later supports three DirectX feature levels for resource packages: DXFL-DX9, DXFL-DX10 and DXFL-DX11. |
Package staging
After Windows determines that the app bundle can be deployed on the system and which packages to deploy, the package contents are downloaded to the \WindowsApps\ directory. A new directory is created for each package downloaded and is named by using the package identity name value, like this.
<Package Name>_<Version>_<Architecture>_<ResourceID>_<Publisher Hash>
The staging process occurs via a set of requests made by the deployment engine to the source of the package’s location. These requests are then satisfied by the source and returned to the deployment engine where they are decompressed, validated against the BlockMap, and copied into the appropriate file.
Package registration
Package registration is the final phase in the deployment process. During this phase, two key operations occur:
-
The extensions that are declared in the app package manifest are registered with the operating system. This enables the app to integrate deeply with the operating system. For example, if you want your app to be able to open text (.txt) files, declare a FileTypeAssociation extension as XML in your app package manifest and specify «.txt» as the file type.
At deployment time, this XML is translated into the set of system changes required to properly register the app to handle .txt files. These changes are then made by the app model on behalf of the app. The app model supports many different extensions. For more info about these extensions, see App contracts and extensions.
-
All resource packages are registered with the resource management system. which can then use them to optimize the user’s experience when the app runs.
Inventory of packages
As Windows Store apps are installed, updated, and removed, a given user can at any time view which app packages are installed or pre-staged. A user with Administrator privileges can also determine which app packages are installed for all users on the system. For more info about how to inventory packages on the operating system, see Tools and PowerShell cmdlets.
Frequently asked questions
- How do I install multiple packages simultaneously?
-
You can install multiple packages by calling the Packaging APIs multiple times or once for the entire set of packages to be installed. The underlying implementation of the app model allows for any number of app packages to be awaiting deployment. But only up to 3 concurrent staging operations per user (total of 7 simultaneous stage operations per operating system) and 1 registration operation per operating system is allowed.
- What happens if the package is already installed?
-
If the package is already installed, a package with the same package identity that is registered for the current user’s account already exists. In this scenario, the identical package isn’t installed.
- Can an update be made mandatory?
-
You can’t make an update mandatory via the app model. The update model is strictly optional. In rare cases, the Windows Store can deem an update appropriate to be distributed as a higher priority update (such as a security fix). In this case, the update can be forcefully deployed to clients.
In the Enterprise, you can force an update via group policy.
- How can I roll back an update to a previous version?
-
You can’t roll back a Windows Store app to a previous version of the app. Because the app package data is removed from the operating system shortly after the package is uninstalled, there is no way to restore it.
- Can I move my %ProgramFiles%, %ProgramData% or %UserProfile% directories around?
-
This is not a supported scenario for Windows Store apps and will cause errors in using the app.
Packaging and deployment programming interfaces
Windows Runtime
- Windows.ApplicationModel.Package class
- Windows.Management.Core namespace
- Windows.Management.Deployment namespace
Win32/COM
- App packaging API
- Package management API
InstallShield 2022
Edition:Windows App package creation is available in Basic MSI projects.
Important:The Windows 10 Anniversary Update is required for installing and testing a Windows App package (.appx) with desktop extensions (Desktop Bridge) included. To digitally sign the Windows App package, InstallShield must be installed on a Windows 10 machine or a machine with the Windows 10 SDK installed.
Tip:Sideloading must be enabled for a Windows App package to be successfully sideloaded. For more information about sideloading, refer to the Enable your device for deployment MSDN article.
The following table provides an overview of the ways you can distribute Windows App packages:
Windows App Distribution Methods
|
Distribution Method |
Description |
Distribution Method Setting |
Signing Considerations |
|
Windows Store |
Upload the Windows App package to the Windows Store. Refer to the Packaging Windows Apps (MSDN article) for more information. Any package distributed through the Windows Store is subject to additional policies that limit its contents. |
Windows Store |
This type of app doesn’t need to be signed before it is uploaded to Microsoft because Microsoft signs the package. |
|
Sideloaded and added to a Suite/Advanced UI Project |
Add a sideloading Windows App package to a Suite/Advanced UI project as described in Adding a Sideloading Windows App Package (.appx | .msix) to a Suite/Advanced UI Project. A common example of a sideloading app is one that is distributed to an enterprise environment and is internal to a company only. You can use condition checks such as the Windows App Package Eligible eligibility condition of a Windows App package (.appx) or the UWP Type Present condition in either an exit condition or a package’s eligibility condition as well as other condition checks to employ this type of distribution method. This type of scenario provides flexibility to let end users conditionally install an .msi package versus a Windows App package. For more information, refer to the Types of Condition Checks in Advanced UI and Suite/Advanced UI Projects topic. |
Direct Distribution (Sideload) |
If a package will be sideloaded and added to a Suite, the Windows App package must be signed before it is built into the Suite/Advanced UI project. |
|
Sideloaded and delivered as a Windows App package (.appx) |
Deliver a Windows App package (appx) file to your customer as an executable installer that can be double-clicked to perform the installation. A common example of a sideloading app is one that is distributed to an enterprise environment and is internal to a company only. |
Direct Distribution (Sideload) |
If a package will be sideloaded, you will typically need to sign it, unless your customer wishes to sign it themselves. The package must be signed before the double-click installation will succeed. |
See Also
Creating Windows App Packages
Appx/MSIX Tab for a Release
Shortcut Settings
Types of Condition Checks in Advanced UI and Suite/Advanced UI Projects
Adding a Sideloading Windows App Package (.appx | .msix) to a Suite/Advanced UI Project
Provide feedback
Saved searches
Use saved searches to filter your results more quickly
Sign up
Appearance settings
The “new” Windows Package Manager – or WinGet – will be the replacement of the current Windows Store for Business (WSfB). Since the WSfB is announced end of life for next year (https://learn.microsoft.com/en-us/microsoft-store/microsoft-store-for-business-overview), we need to start looking into WinGet to manage applications.
WinGet is a full open source application manager that is managed by Microsoft. WinGet can install applications from three sources:
- Windows Store
You can deploy and install public store apps. - Public Repository
Microsoft provides a public community repository. https://github.com/microsoft/winget-pkgs
There are already hundreds of preconfigured applications added. - Private Repository
You also have the option to host your own repository and add line of business apps to it that are maintained by the company administrators.
Before you start, you need to deploy WinGet to the devices. After you deployed WinGet you can install the application out of the three sources.
This article will focus on the Public Repository.
Deploy WinGet
You have three possibilities to deploy WinGet:
- Via Windows Store application https://apps.microsoft.com/store/detail/app-installer/9NBLGGH4NNS1
- Use the MSIX bundle installer for Workspace ONE UEM higher as 22.10
- Use a script to install the MSIX package
You get the latest WinGet release here: https://github.com/microsoft/winget-cli/releases
Add the application to Workspace ONE
Upload .msixbundle with UEM 22.10:
You’ll see, that Workspace ONE is checking for missing dependencies. In the MSIX bundle package, there are two missing dependencies that need to be added.

You can download the dependencies here:
https://www.nuget.org/packages/Microsoft.UI.Xaml/
the Microsoft UI XAML package needs to be extracted (the path to the .appx package is tools\AppX\x64\Release)
and
https://aka.ms/Microsoft.VCLibs.x64.14.00.Desktop.appx
After you added the package, you can deploy it to your devices.
Use a script application for deployment
If your environment is not on 22.10, you can use this script to download and install the latest Windows Package Manager.
function Get-GithubLatestRelease {
    param (
        [parameter(Mandatory)][string]$project, # e.g. paintdotnet/release
        [parameter(Mandatory)][string]$pattern, # regex. e.g. install.x64.zip
        [switch]$prerelease
    )

    # Get all releases and then get the first matching release. Necessary because a project's "latest"
    # release according to Github might be of a different product or component than the one you're
    # looking for. Also, Github's 'latest' release doesn't include prereleases.
    $releases = Invoke-RestMethod -Method Get -Uri "https://api.github.com/repos/$project/releases"
    $downloadUrl = $releases |
                   Where-Object { $_.prerelease -eq $prerelease } |
                   ForEach-Object { $_.assets } |
                   Where-Object { $_.name -match $pattern } |
                   Select-Object -First 1 -ExpandProperty "browser_download_url"

    return $downloadUrl
}


$URL = Get-GithubLatestRelease -project "microsoft/winget-cli" -pattern "Microsoft.DesktopAppInstaller.+.msixbundle"

Add-AppPackage -path "$PSScriptRoot\Microsoft.UI.Xaml.2.7.appx" -Verbose

Add-AppxPackage 'https://aka.ms/Microsoft.VCLibs.x64.14.00.Desktop.appx' -Verbose

Add-AppxPackage "$URL" -Verbose
As detection you can use the following PowerShell script:
try
{
    winget -v
}
catch
{

    exit 1234
}

exit 0
Install a WinGet application
After you installed WinGet, you now can now go ahead and deploy applications.
The easiest way is to use the Workspace ONE Script function.
Create a new script – if you want to show the app in the app catalog, enable this function and add an icon.
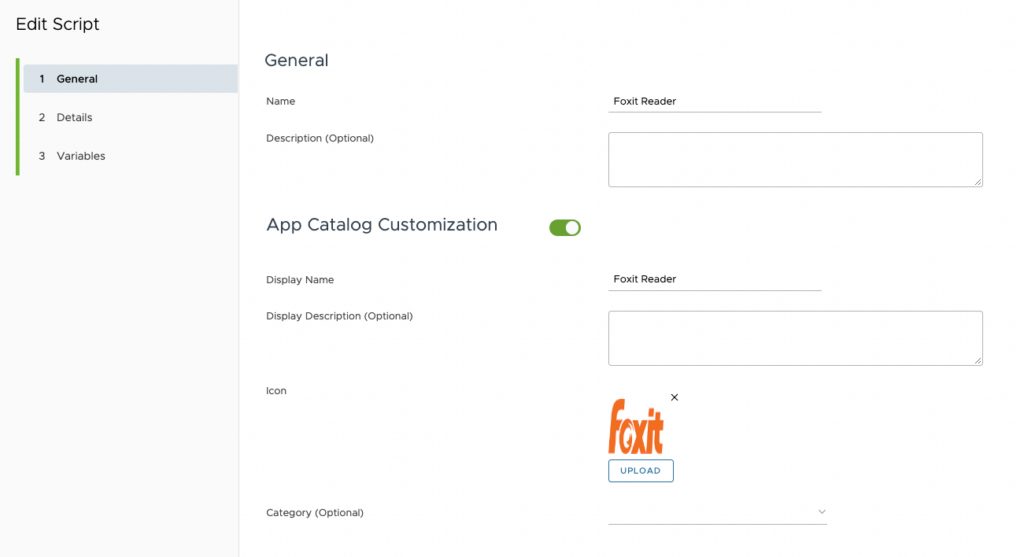
This will help the end user to find the right application – regardless if the app is a real Win32 packaged application or a WinGet packaged application.
Next, select Details and configure the script as you need, e.g., Execution Context.
Make sure you increase the timeout setting, since the application gets downloaded first and then installed.
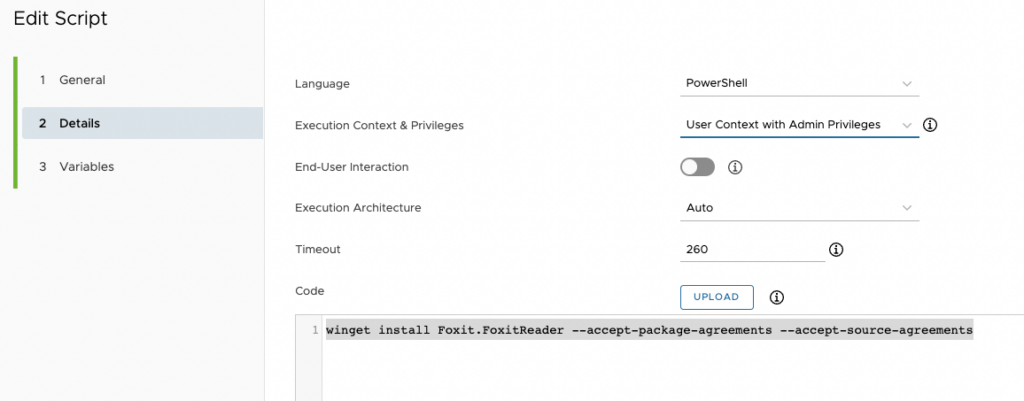
The code itself is quite simple to use:
winget install APPLICATIONNAME --accept-package-agreements --accept-source-agreementsReplace “APPLICATIONNAME” with the WinGet application name. The two parameters are to make sure that all agreements are accepted, and the application will install in silent mode.
After you created the script, you can deploy the script to the device.
In the Intelligent HUB you will see no difference between a normal application and a scripted application.
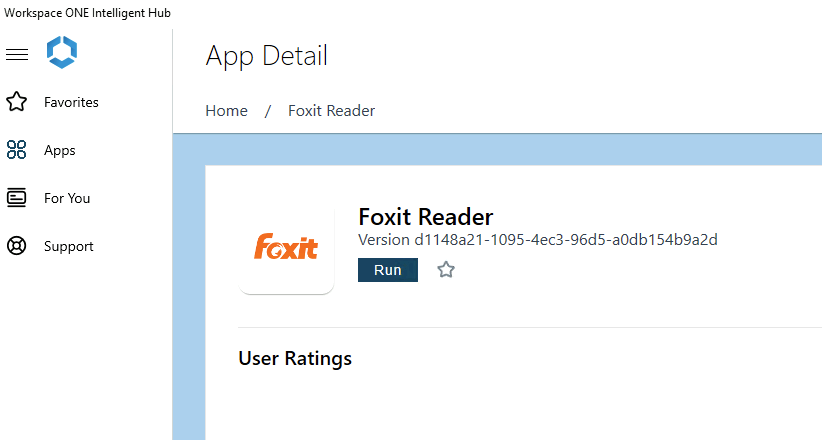
And after some minutes, you’ll see the installed application:
The only difference is, that the end user don’t get any toast notification if a script gets executed.
Empowering customers in client management since 2012.
Empowering customers in modern management since 2018.
Intune App Deployment: Making it Easy
So, you wanna get your Windows apps onto a bunch of computers using Microsoft Intune? It’s actually not as scary as it sounds. I remember when I first started with Intune, I was totally lost. But after a lot of trial and error, I figured out a system that works. And that’s what I’m gonna share with you today. I’ll walk you through the whole process, step by step, so you can deploy your apps without pulling your hair out. By the end of this, you’ll have a solid understanding of how to package and deploy Windows applications using Intune. We’ll cover everything from prepping your apps to monitoring the deployment. And don’t worry, I’ll keep it simple and easy to understand. I promise.
Intune, for those who don’t know, is basically Microsoft’s cloud-based service that helps you manage devices and apps. It’s part of Microsoft Endpoint Manager, and it’s super useful for businesses of all sizes. Think of it as a central control panel for all your company’s devices and apps. It’s pretty cool, actually.
Now, before we get started, it’s important to know that there are different ways to deploy apps with Intune. You can deploy apps from the Microsoft Store, you can deploy web apps, and you can deploy Windows apps. Today, we’re focusing on Windows apps, which are usually packaged as .msi, .exe, or .intunewin files. This guide will focus on the .intunewin format which is the standard format to use to deploy Win32 apps using Intune. It’s kind of the most flexible, you know?
So, let’s get started, shall we?
Preparing Your Windows Application for Intune
Alright, first things first. Before you can deploy your app, you need to get it ready for Intune. This usually involves packaging it into the .intunewin format. Here’s how:
Download the Microsoft Win32 Content Prep Tool
You’ll need a special tool from Microsoft called the Microsoft Win32 Content Prep Tool. This tool helps you convert your regular .exe or .msi installer into the .intunewin format that Intune likes. You can download it from the Microsoft website. Just search for «Microsoft Win32 Content Prep Tool» and you should find it easily. It’s a free download, so don’t worry about paying anything. I think it used to be called the Intune Win32 App Packaging Tool, so if you see that, it’s the same thing. Microsoft loves renaming stuff, doesn’t it?
Using the Win32 Content Prep Tool
Okay, once you’ve downloaded the tool, you’ll need to run it from the command line. Don’t worry, it’s not as scary as it sounds. Just open a command prompt or PowerShell window and navigate to the directory where you saved the tool. Then, run the tool with the following command:
IntuneWinAppUtil.exe
The tool will then ask you a few questions:
- Source folder: This is the folder where your app’s installer files are located (e.g., the folder containing your .exe or .msi file).
- Setup file: This is the name of the actual installer file (e.g., setup.exe or myapp.msi).
- Output folder: This is the folder where you want the .intunewin file to be created.
- Catalog folder: This is optional. You can specify a folder to store catalog files, but you don’t really need to worry about this for basic deployments.
Just answer the questions carefully, and the tool will create the .intunewin file for you. This file basically contains all the installer files and some extra metadata that Intune needs to deploy the app correctly.
A Quick Example
Let’s say you have an app called «MyCoolApp» and its installer file is «MyCoolApp.exe». You’ve saved all the installer files in a folder called «C:\MyCoolApp». You want to create the .intunewin file in a folder called «C:\IntunePackages». Here’s how you would run the tool:
IntuneWinAppUtil.exe -c C:\MyCoolApp -s MyCoolApp.exe -o C:\IntunePackages
That’s it! The tool will create a file called «MyCoolApp.intunewin» in the «C:\IntunePackages» folder. You’re now ready to upload this file to Intune.
Adding the Application to Intune
Now that you have your .intunewin file, it’s time to add the application to Intune. Here’s how you do it:
- Log in to the Microsoft Endpoint Manager admin center. You can access it by going to endpoint.microsoft.com.
- Go to Apps > All apps. This is where you’ll see all the apps that are currently managed by Intune.
- Click Add. This will start the process of adding a new app.
- Select App type. In the «App type» dropdown, select «Windows app (Win32)». This is the option you want for deploying .intunewin files.
- Click Select.
App Information
Next, you’ll need to provide some information about the app:
- App package file: Click «Select app package file» and browse to the .intunewin file you created earlier.
- Name: Enter the name of the app (e.g., MyCoolApp).
- Description: Enter a brief description of the app. This will be displayed to users in the Company Portal.
- Publisher: Enter the name of the app’s publisher (e.g., MyCoolApp Inc.).
- Category: Select a category for the app (e.g., Productivity, Utilities).
- Show this as a featured app in Company Portal: Choose whether you want to feature this app in the Company Portal.
- Information URL: Enter a URL with more information about the app.
- Privacy URL: Enter a URL with the app’s privacy policy.
- Developer: Enter the name of the app’s developer.
- Owner: Enter the name of the person or team responsible for managing the app in Intune.
- Notes: Add any notes about the app.
- Logo: Upload a logo for the app. This will be displayed in the Company Portal.
Fill out all the information carefully. The more information you provide, the easier it will be for users to find and understand the app in the Company Portal. Plus, it just looks more professional, y’know?
Requirements
This is where you specify the minimum requirements for the app to be installed. You can specify things like the operating system version, the processor architecture, and the amount of free disk space. This ensures that the app is only installed on devices that meet the minimum requirements.
- Operating system architecture: Select the processor architecture that the app supports (e.g., 32-bit, 64-bit).
- Minimum operating system: Select the minimum operating system version that the app supports (e.g., Windows 10 1809, Windows 11).
- Disk space required (MB): Enter the amount of free disk space required to install the app.
- Physical memory required (MB): Enter the amount of physical memory required to install the app.
- Minimum number of logical processors required: Enter the minimum number of logical processors required to install the app.
- Minimum CPU speed required (MHz): Enter the minimum CPU speed required to install the app.
- Configure additional requirement rules: You can add custom requirement rules based on registry keys, files, or PowerShell scripts. This is useful for more advanced scenarios where you need to check for specific conditions before installing the app.
Setting the requirements correctly is super important. If you don’t, the app might try to install on devices that aren’t compatible, which can lead to all sorts of problems. So, take your time and make sure you get it right.
Detection Rules
Detection rules tell Intune how to detect whether the app is already installed on a device. This is important because Intune needs to know whether to install the app or not. You can create detection rules based on file existence, registry keys, or MSI product codes.
- Rules format: Select the format of the detection rules. You can choose between «Manually configure detection rules» and «Use custom script to detect app». The manual option is usually fine for most apps.
If you choose «Manually configure detection rules», you’ll need to add one or more detection rules. For each rule, you’ll need to specify:
- Rule type: The type of rule (e.g., File, Registry, MSI).
- Path: The path to the file or registry key.
- Value: The value to check for.
- Detection method: The method to use to detect the app (e.g., File exists, Value equals).
For example, if your app installs a file called «MyCoolApp.exe» in the «C:\Program Files\MyCoolApp» folder, you would create a file detection rule with the following settings:
- Rule type: File
- Path: C:\Program Files\MyCoolApp
- File or folder: MyCoolApp.exe
- Detection method: File exists
If you choose «Use custom script to detect app», you’ll need to provide a PowerShell script that checks for the app’s existence and returns a specific exit code. This is useful for more complex scenarios where you need to perform more advanced checks.
Make sure your detection rules are accurate! If they’re not, Intune might not install the app correctly, or it might try to install it multiple times. I’ve seen it happen, and it’s not pretty.
Installation and Uninstallation Commands
This is where you specify the commands that Intune should use to install and uninstall the app. These commands are usually the same commands that you would use to install or uninstall the app manually.
- Install command: The command to use to install the app (e.g., MyCoolApp.exe /silent).
- Uninstall command: The command to use to uninstall the app (e.g., MyCoolApp.exe /uninstall).
The install and uninstall commands are super important. If you don’t specify them correctly, Intune won’t be able to install or uninstall the app. So, make sure you test them thoroughly before deploying the app to your users. Sometimes you have to play around with the silent install switches to get them right, but once you do, you’re golden.
Return Codes
This is where you specify the return codes that Intune should expect from the installation and uninstallation commands. Return codes are numbers that indicate whether the command was successful or not. For example, a return code of 0 usually means that the command was successful, while a return code of 1 usually means that the command failed.
Intune has some default return codes that it recognizes, but you can also add your own custom return codes. This is useful for apps that use non-standard return codes.
Understanding return codes is crucial for troubleshooting app deployments. If an app fails to install, the return code can tell you why. So, make sure you pay attention to the return codes and understand what they mean.
Assigning the Application to Users or Devices
Okay, you’ve added the app to Intune, and you’ve configured all the settings. Now it’s time to assign the app to users or devices. This tells Intune who should get the app and how it should be deployed.
- Go to Apps > All apps.
- Select the app you want to assign.
- Click Assignments.
- Click Add group.
You can assign the app to users or devices. If you assign it to users, the app will be installed on any device that the user enrolls in Intune. If you assign it to devices, the app will be installed on the specified devices, regardless of who is using them.
You can also choose between different assignment types:
- Required: The app will be automatically installed on the assigned devices or for the assigned users.
- Available for enrolled devices: The app will be available in the Company Portal, and users can choose to install it if they want to.
- Uninstall: The app will be uninstalled from the assigned devices or for the assigned users.
Choose the assignment type that best suits your needs. For example, if you want to make sure that all users have a specific app installed, you would assign it as «Required». If you want to give users the option to install an app, you would assign it as «Available for enrolled devices».
Assigning apps correctly is key to a successful Intune deployment. If you assign an app to the wrong users or devices, it might not be installed correctly, or it might be installed on devices that don’t need it. So, double-check your assignments before you save them.
Monitoring the Deployment
Once you’ve assigned the app, Intune will start deploying it to the assigned devices or users. You can monitor the deployment progress in the Intune console.
- Go to Apps > All apps.
- Select the app you want to monitor.
- Click Device install status or User install status.
This will show you a list of all the devices or users that the app has been assigned to, along with their installation status. You can see whether the app has been installed successfully, whether it’s still pending, or whether it has failed to install.
If an app fails to install, you can click on the device or user to see more details about the failure. This can help you troubleshoot the problem and figure out what went wrong. Sometimes it’s a simple issue, like a missing dependency or a incorrect install command. Other times, it can be more complicated, like a compatibility issue or a problem with the device’s configuration.
Monitoring your deployments is essential for ensuring that your apps are being installed correctly. If you see any failures, you need to investigate them and fix them as soon as possible. Otherwise, your users might not be able to access the apps they need, which can impact their productivity.
Troubleshooting Common Intune App Deployment Issues
Okay, so sometimes things don’t go as planned. Apps fail to install, users complain, and you’re left scratching your head. Don’t worry, it happens to everyone. Here are some common Intune app deployment issues and how to troubleshoot them:
- App fails to install: Check the installation status in the Intune console. Look for any error messages or return codes that can help you identify the problem. Common causes include incorrect install commands, missing dependencies, compatibility issues, and device configuration problems.
- App is not detected after installation: Check your detection rules. Make sure they’re accurate and that they’re correctly detecting the app’s existence. Sometimes the file paths or registry keys change, so you need to update your detection rules accordingly.
- App is installed multiple times: This usually happens when the detection rules are not accurate. Intune thinks the app is not installed, so it tries to install it again. Double-check your detection rules and make sure they’re working correctly.
- App is not available in the Company Portal: Make sure the app is assigned to the user or device. Also, check the assignment type. If the app is assigned as «Available for enrolled devices», users need to manually install it from the Company Portal.
- App installs, but doesn’t work: Compatibility issues are the most common reason. Check the app’s requirements and make sure the device meets them. Also, check for any known compatibility issues with the operating system or other installed apps.
Troubleshooting Intune app deployments can be challenging, but it’s also a great learning experience. The more you troubleshoot, the better you’ll become at identifying and resolving issues. And don’t be afraid to ask for help! There are plenty of online resources and communities where you can get assistance from other Intune users.
A quick note on MSIX
You might have heard of MSIX. It’s Microsoft’s modern app packaging format for Windows. It’s designed to be more secure and reliable than traditional .exe and .msi installers. Intune supports MSIX, so you can package your apps as MSIX files and deploy them using Intune. It’s something to consider for the future, but for now, the .intunewin format is still the most widely used and supported.
Intune and Security
One of the great things about Intune is its focus on security. When you deploy apps through Intune, you can be sure that they’re being installed securely and that they’re being managed according to your organization’s policies. Intune provides features like:
- App protection policies: These policies help protect your company’s data by restricting what users can do with the apps. For example, you can prevent users from copying data from a managed app to an unmanaged app.
- Conditional access: This feature allows you to control access to your company’s resources based on certain conditions, such as the device’s compliance status or the user’s location.
- Device compliance policies: These policies help ensure that devices meet your organization’s security requirements. For example, you can require devices to have a strong password or to be encrypted.
By using these security features, you can create a secure and managed environment for your users and their devices. This is especially important in today’s world, where security threats are becoming more and more common.
More Advanced Scenarios
Alright, so we’ve covered the basics of packaging and deploying Windows applications with Intune. But what about more advanced scenarios? Here are a few things you might want to consider:
- Deploying apps with dependencies: Some apps require other apps or components to be installed before they can be installed. You can use Intune’s dependency feature to ensure that all the required dependencies are installed before the main app is installed.
- Deploying apps with configuration files: Some apps require configuration files to be placed in specific locations on the device. You can use Intune’s Win32 app management feature to deploy configuration files along with the app.
- Deploying apps with PowerShell scripts: You can use PowerShell scripts to perform more advanced installation or configuration tasks. For example, you can use a PowerShell script to create registry keys, modify files, or install additional components.
These are just a few examples of the more advanced things you can do with Intune. The possibilities are endless! With a little bit of creativity and some technical know-how, you can use Intune to deploy and manage almost any Windows application.
What about the Microsoft Store?
Yeah, good point. You can also deploy apps from the Microsoft Store using Intune. It’s actually pretty easy. You just need to connect your Intune tenant to the Microsoft Store for Business, and then you can select apps from the store and deploy them to your users. The advantage of deploying apps from the Microsoft Store is that they’re automatically updated, so you don’t have to worry about managing updates yourself. Plus, they’re usually more secure than traditional .exe and .msi installers.
Final Thoughts
Packaging and deploying Windows applications with Intune might seem daunting at first, but it’s actually a pretty straightforward process once you get the hang of it. By following the steps outlined in this guide, you can easily deploy your apps to your users and manage them effectively. Remember to test your deployments thoroughly and to monitor them closely. And don’t be afraid to experiment and try new things. The more you use Intune, the better you’ll become at it. And that, my friends, is a good thing.
FAQ
- What if the app requires admin rights to install?
- Intune typically installs apps in the user context, which doesn’t grant admin rights. For apps that require admin rights, you’ll need to package them in a way that they can install silently without requiring user interaction or elevation. Sometimes, you can use a system account to install the app. You can set the installation behavior to System in the Intune app settings. However, be careful when using system context, as it can have security implications.
- Can I deploy older .exe installers with Intune?
- Yes, you can deploy older .exe installers with Intune. The key is to use the Microsoft Win32 Content Prep Tool to convert the .exe into the .intunewin format. You’ll also need to figure out the silent install switches for the .exe so that it can be installed without user interaction. This might involve some trial and error, but it’s usually possible to find the right switches with a little research.
- How do I update apps that are already deployed with Intune?
- Updating apps with Intune depends on how the app was originally deployed. If the app was deployed from the Microsoft Store, it will be updated automatically. If the app was deployed as a Win32 app, you’ll need to create a new version of the app in Intune and assign it to the same users or devices. Intune will then automatically update the app on the devices. Make sure to test the update thoroughly before deploying it to all users.
- What are some alternatives to Intune for app deployment?
- While Intune is a great tool for app deployment, there are other options available. Some popular alternatives include: Microsoft Configuration Manager (formerly SCCM), which is a more comprehensive on-premises solution; VMware Workspace ONE, which is a cloud-based solution that offers a wide range of features; and Citrix Endpoint Management, which is another cloud-based solution that focuses on virtual apps and desktops. The best option for you will depend on your organization’s specific needs and requirements. Intune is a great choice if you’re already using Microsoft 365 and you want a cloud-based solution that’s easy to use. But if you need more advanced features or you prefer an on-premises solution, you might want to consider one of the alternatives.