
Product Help
Install and run Android APK files on Windows 10 and 11, eliminating the need for a simulator. The app provides a comprehensive solution designed to enable Windows 10 and 11 users to seamlessly install and run Android APK files directly on their PCs. Leveraging the Windows Subsystem for Android (WSA) and Android Debug Bridge (ADB), which are included with the app installation, it creates a virtualized Android environment within Windows.
Important: If you experience issues connecting WSA to ADB, Click the button below to review helpful tips and guides for troubleshooting any issues.
Quick Start
One of the primary reasons to use the WSA Manager & APK Installer app (let’s call it the WSA+APK App from now and on), is to install and run APK installers on a Windows OS, just like you would on an Android device. This app provides you exactly just that.
1. Before installing APK files
Before installing any APK files, use the app to install and run WSA by connecting WSA to ADB. The app is designed to fully automate this process, with the option of manually configure each step.
Once WSA is fully ready, you can install and run APK files.
2. How to set up WSA
The WSA Status Manager is designed solely for the purpose of guiding you though all steps required to install and run WSA.
Click here to review the steps in detail
Click here for troubleshooting any issues that may come up
3. Install APK files
When WSA is ready, the app displays its readiness in both the Home screen as well as the WSA Status screen. Proceed with installing APK files using the following two methods:
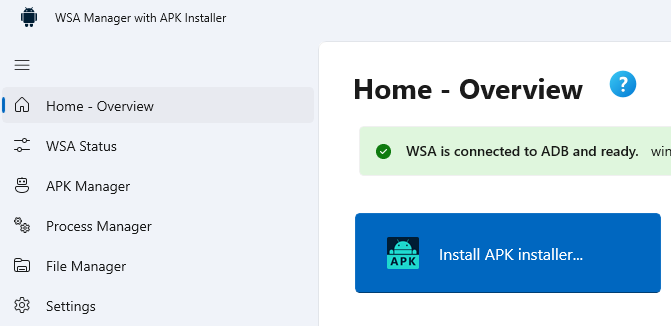
- Go to ‘Home – Overview’ and click the ‘Install APK installer…’
- Go to ‘APK Manager’ and click the ‘Install’ button [+] from toolbar at the top
Follow the prompt provided by the app to complete the installation process.
Click here for more information about Installing APK files
Key Features
- Home – Overview: Presents an overview of WSA status and provides quick access to all key features.
- WSA Status Manager: Installs, connects, and monitors WSA and ADB to ensure WSA is always ready for use.
- APK Manager: Installs APK files and manages currently installed APKs.
- Process Manager: Manages active processes running in the WSA environment.
- File Manager: A full-fledged File Manager for the WSA, allowing users to manage files and folders within the WSA file system.
WSA Status Manager
The WSA Status Manager is an important component of the overall WSA installation and configuration process, necessary for installing and running APK installers.
To install and run APK files on a Windows OS, you need to have the Windows Subsystem for Android (WSA) installed and configured. WSA creates a virtualized Android environment within Windows, enabling the installation and execution of APK files directly on the Windows system. Additionally, the presence of the Android Debug Bridge (ADB) facilitates communication between the Windows OS and the Android environment, ensuring seamless operation of APK files on Windows.
Important: If you experience issues connecting WSA to ADB, Click here to review helpful tips and guides for troubleshooting any issues >>.
The WSA Status Manager is an important component of the overall WSA installation and configuration process, necessary for installing and running APK installers.
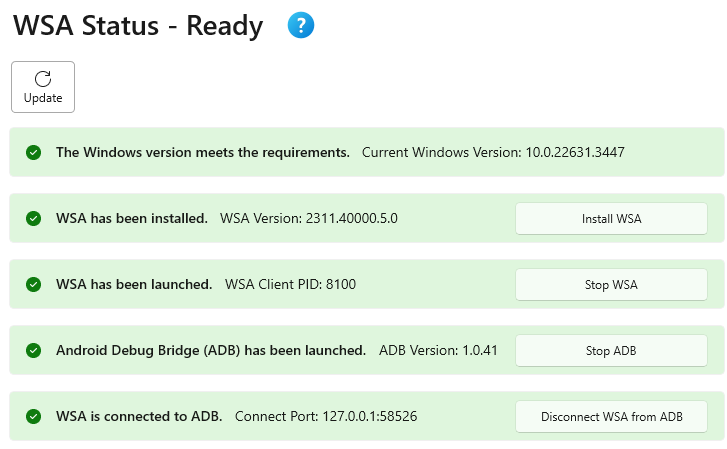
The WSA Status Manager window intuitively guides users through the following five essential steps to ensure WSA is fully installed and ready for use:
- Check the Windows version requirements.
- Install WSA for your Windows system.
- Launch WSA.
- Start ADB (Android Debug Bridge).
- Connect WSA to ADB.
Each step must be completed successfully to ensure that all dependencies and prerequisites are met before proceeding to the next step.
1. Windows Version Requirements

The minimum system requirement for Windows Versions are:
- Windows 10: 10.0.19045.2311
- Windows 11: supports all versions
2. Install WSA
WSA (Windows Subsystem for Android) is a feature in Windows 10 and 11 that enables users to run Android apps directly on their Windows devices without the need for an emulator. WSA creates a virtualized Android environment within Windows, allowing users to install and run Android apps seamlessly.

The app detects if a valid version of WSA has been installed and notifies you if a copy of WSA need to be installed. Click the “Install WSA” button and following the instructions to install WSA.
Note: Prior to installing WSA, it is essential to verify that all system settings prerequisites are correctly configured. These settings include:
- Ensuring “Hyper-V” is checked in the “Turn Windows features on or off” menu.
- Ensuring “Virtual Machine Platform” is checked.
Once WSA is installed, the app displays the current WSA version number.
3. Start WSA

Once WSA is installed, click the “Start WSA” button to launch the WSA. This process is usually pretty fast. Once WSA has started, the app displays the Client PID number just to assure you that WSA is actually running.

The Client PID (Process ID) number for Windows Subsystem for Android (WSA) can vary depending on the specific instance of the WSA process running on the system. Each instance of WSA will have its own unique PID assigned by the operating system. Therefore, there isn’t a specific or fixed client PID number for WSA.
4. Start ADB
ADB (Android Debug Bridge) is a versatile command-line tool that facilitates communication between the Windows OS and an Android device or environment, including WSA. WSA relies on ADB for communication between the Windows operating system and the Android environment it creates. ADB enables users to interact with the Android subsystem, install and run Android apps, and transfer files. The communication bridge provided by ADB is essential for managing and controlling the Android environment within Windows facilitated by WSA.

To initiate ADB, click the “Start ADB” button. ADB is included as part of the app installer and should have been installed during the installation process.
Once started, ADB displays its version number.

APK Installer & Manager
1. Install APK files
When WSA is ready, install APK files from either the Home screen or the APK Installer & Manager.
2. Run APK files
All installed APK files appear in the app list of the APK Manager, to run an APK file:
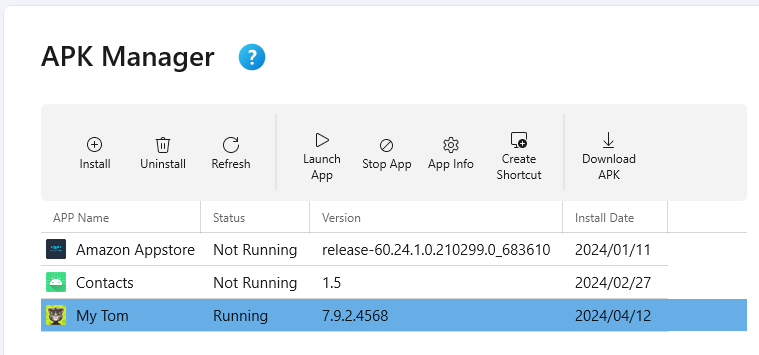
- Select the APK file entry
- Click the ‘Launch App‘ toolbar button
For ease of access, use the ‘Create Shortcut‘ toolbar button to add a shortcut to the installed APK instance on your desktop.
3. APK Management
The APK Manager offers additional functions for managing installed APK files:
- Uninstall: Remove an APK file from your Windows system.
- Refresh: Query and relist all installed APK files.
- Stop App: Terminate the running instance of an APK file.
- App Info: Review detailed information about the APK file.
- Create Shortcut: Add a desktop shortcut to the APK file.
- Download APK: Download an APK installer from a valid URL source.
Process Manager
Similar to the Windows Task Manager, the Process Manager provides a quick overview of the running processes within the WSA environment, including system processes and any currently running APK files.
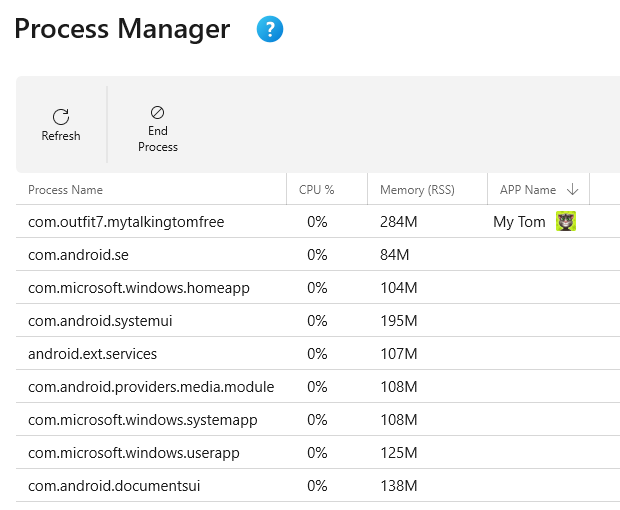
Functions available in the Process Manager include:
- Refresh: Query and relist all running processes.
- End Process: Force termination of a running process.
Note: Exercise caution when terminating processes, as ending system processes may unintentionally shut down the WSA environment.
File Manager
The File Manager displays the content of the WSA file system and offers functions to manage files and folders.
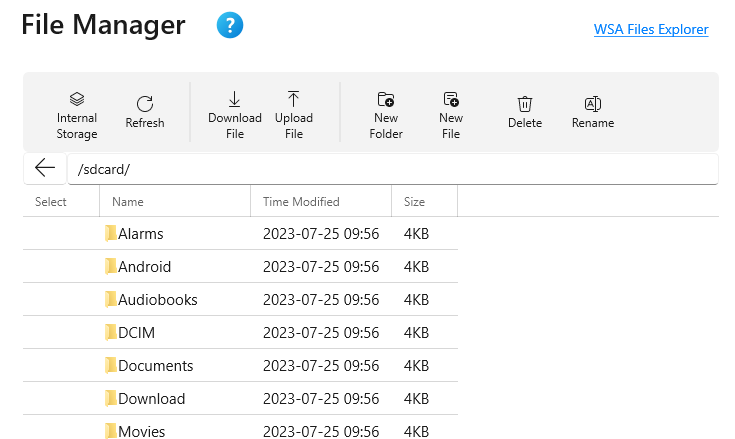
Functions available in the File Manager include:
- Internal Storage: Opens the default SD Card folder where documents and files are typically installed on an Android system.
- Refresh: Queries and relists the content of the current file folder location.
- Download File: Downloads selected files. Note: Only file-level download is supported; folder-level download is not supported.
- Upload File: Selects and uploads a file to the current file location.
- New Folder: Creates a new folder.
- New File: Creates a blank file.
- Delete: Deletes the currently selected file.
- Rename: Renames the currently selected file.
Table of Contents
Latest Tech Blog
Provide feedback
Saved searches
Use saved searches to filter your results more quickly
Sign up
Appearance settings
Last Updated :
11 Mar, 2022
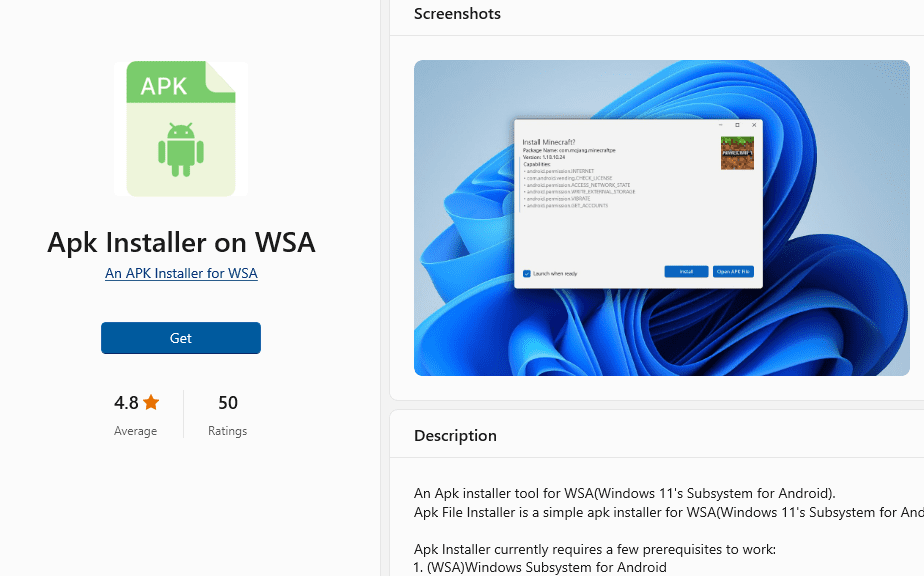
As we all know that the new Windows 11 has arrived. It is a very special version of Windows because it allows us to sideload our applications and games from other devices like Android phones. We can now run these APK files on our Windows devices easily. For that purpose, we require a special type of application known as the APK Installer on WSA.
WSA stands for Windows Subsystem for Android (WSA). It allows the users to sideload various Android apps on their Windows devices. It allows this by creating a virtual machine engine on their Windows device that installs these APK files first. The APK Installer takes the APKs of the popular applications and games through the Amazon Webstore which also contains the Android format-based APK applications. Then it converts these APK files through virtualization into the virtual machine engine so that can run on the Windows device. It is only supported on the latest version of Windows 11 and Microsoft Store.
Installing APK Installer on Windows
Follow the below steps to install APK Installer on Windows:
Step 1: Visit the official website of APK Installer using any web browser like Google Chrome, Microsoft Edge, etc.
Step 2: Press the «GET» button on the website to start the download of the APK Installer Application.
Step 3: It will then automatically re-direct you to the Windows Store App by Microsoft for the Windows device and the download will start in the background.
Step 4: After the download gets finished, the APK Installer app will get installed within 2-3 minutes. It will then show up on the all programs list of the Start menu.
Step 5: Then open the APK Installer application. This app works with the latest version of the Microsoft Windows Store to install Android-based APK Files to be installed on a Windows device.
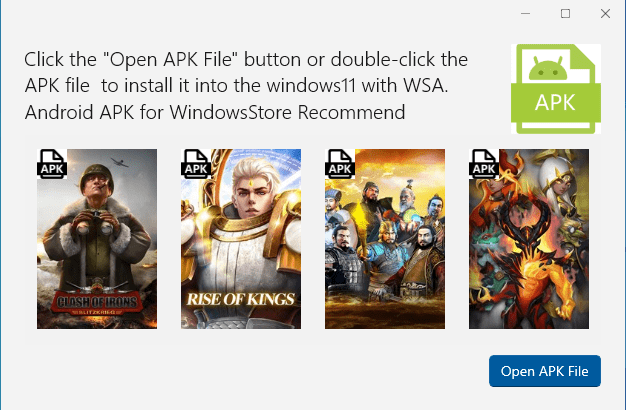
Step 6: Then click on the Open APK file option by choosing the appropriate games or applications that you want to install the Android-based applications on. It shows you the list of the supported recommendations of these APK files which are available on the Play Store on Android only.
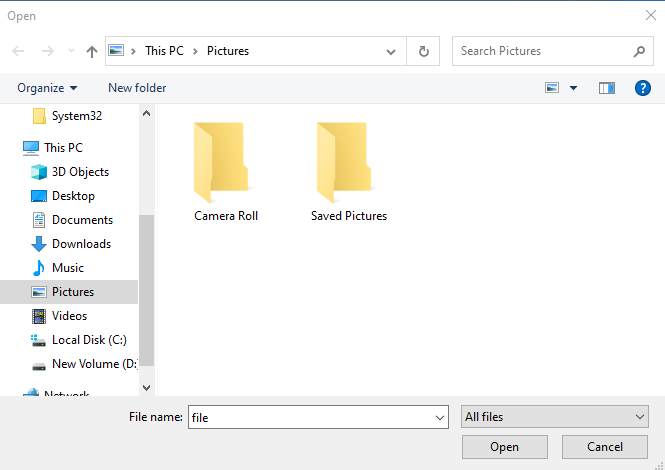
Step 7: Then it will show you a dialog box to enter the file name and the location where you want to install that APK file on your device. Enter the file name and click on the Open button. Then it will download that APK file via Amazon Store which supports Android and then show it you to install it on your Windows device. Click on «GET» of that selected application from the Installer to install the APK files on your Windows device.
Congratulations!! At this point, you have successfully installed the APK application on your Windows device.
Install APK Files on Windows 10
APK File Installer currently support Windows 11. If you are running Windows 10 then follow the instructions below to manually set up WSA to install APK files.
1. Prerequisites and System Requirements
- Ensure your system meets the following requirements:
- 64-bit Windows 10 (preferably version 22H2)
- Minimum 8GB RAM (16GB recommended)
- Enable virtualization in BIOS/UEFI settings.
2. Enable Virtualization and Required Windows Features
- BIOS/UEFI Settings: Enable virtualization (VT-x or AMD-V).
- Windows Features: Turn on “Windows Hypervisor Platform” and “Virtual Machine Platform” from Optional Features in Windows.
3. Enable Developer Mode
- Go to Settings > Update & Security > For Developers, and enable Developer Mode to allow third-party and debugging tools.
4. Install Windows Subsystem for Linux (WSL)
- Install WSL from the Optional Features window to enable the environment needed for WSA installation.
5. Download and Install WSA
- Use a community-sourced backport of WSA (since it’s not officially available for Windows 10) via a script that installs WSA. This process manipulates WSL to create a similar setup as Windows 11’s WSA.
6. Configure WSA and ADB
- After installing WSA, enable Developer Mode in WSA and connect ADB (Android Debug Bridge) to interact with Android apps on Windows.
7. Install APK Files
- Use ADB to sideload APK files onto the system. This step ensures that the APK is properly installed and executable on Windows 10.
8. Troubleshooting
- If any issues arise during installation, resetting WSA or ensuring proper virtualization settings are enabled may resolve them.
More Guides and Tips
Infinity Office Suite
– Word, Excel, PowerPoint, eBook
Best Alternative to Microsoft Office
Открыть на Lolzteam
Привет! Возможно, есть те, кто знают про Windows Subsystem for Android, который позволяет запускать Android приложения на Windows 11. Мало того, что его нельзя так просто установить на Windows 10, так ещё и там отсутствуют Google Play сервисы! Конечно же, пользователи обошли эти ограничения. И давайте всё это дело сейчас установим.
Но перед установкой нужно проверить системные требования:
Требования
- Сборка Windows 11 как минимум 22000.526 или сборка Windows 10 как минимум 20H1 10.0.19041.264 (чтобы узнать, нажмите Win + R -> winver)
- Минимум 8 ГБ ОЗУ
А ещё нужно обязательно включить некоторые компоненты Windows. Для этого нажимаем Win + R -> OptionalFeatures.exe.
Включаем Платформа виртуальной машины, Платформа низкоуровневой оболочки Windows, Подсистема Windows для Linux
Нажимаем ОК, перезагружаем ПК после установки.
Теперь можно скачивать и устанавливать Подисистему Windows для Android!
(в сборки встроены Google сервисы, удалён Amazon Store)
Для Windows 10https://github.com/MustardChef/WSABuilds/releases/download/Windows_10_2307.40000.6.0/WSA_2307.40000.6.0_x64_Release-Nightly-MindTheGapps-13.0-RemovedAmazon_Windows_10.7zДля Windows 11https://github.com/MustardChef/WSABuilds/releases/download/Windows_11_2307.40000.6.0/WSA_2307.40000.6.0_x64_Release-Nightly-MindTheGapps-13.0-RemovedAmazon.7z
Нужно распаковать архив, рекомендую поместить файлы куда-нибудь в Program Files, чтобы они не мешались.
Получится C:\Program Files\WSA
Откройте PowerShell, введите команду Set-ExecutionPolicy -Scope CurrentUser -ExecutionPolicy Bypass -Force;
Это нужно, чтобы разрешить запуск ps1 файлов. Затем нажмите правой кнопкой на Install.ps1 ->Выполнить с помощью PowerShell
Просто ждём, когда все установится.
Когда появится такое окно, и в командной строке будет написано All Done, значит установка завершена!
Здесь просто нажимаем продолжить, затем ожидаем первый запуск подсистемы.
В Пуске появятся Параметры подсистемы…, Google Play и Google. Запускаем их и радуемся! 
При первом входе в Google аккаунт приложение может вылетать, просто перезапускаем. Остальные приложения работают отлично! Я протестировал: Total Commander, Photomath, VK X, Google, Мой Tele2, Google Authenticator
Как теперь устанавливать приложения?
Из Play Маркета и так понятно, а вот насчёт APK… Есть программа, которая ассоциирует APK файлы с командами adb для быстрой установки их в Подсистему.
https://github.com/TCNOco/TcNo-WSA-SimpleSideload/releases/download/2021-12-07/SimpleSideload.exe
1) Запускаем
2) Нажимаем Y, затем Enter
3) Открываем Параметры Подсистемы, переходим во вкладку Разработчик, включаем Режим разработчика
4) Открываем командную строку, пишем команду %appdata%\platform-tools\adb.exe connect 127.0.0.1:58526
Где 127.0.0.1:58526 — адрес, который указан в параметрах, он у вас может отличаться
5) Всё готово, просто открываем APK файл из проводника и он будет установлен, появится в Пуске для запуска!
Программы в Пуске
4 и 5 пункты нужно будет повторять каждый раз после перезапуска ПК, остальные нужно выполнить только один раз.
На этом все! Удачи!
Статья написана 21 мая 2023