
windows:server:2022:apcupsd
Содержание
Случилось страшное! – старенький IPPON Smart Winner 3000 потерял связь с реальностью сервером по USB…
Не знаю пока, насколько страшная это беда, в ремонт его пока не отвозили, а просто, учитывая его солидный возраст и грядущую массовую замену АКБ1), заказали новый ИБП Ippon Innova RT II 3000, но последний соизволил задержаться в доставке на несколько месяцев… Т.е. все это время стойка находится под постоянной угрозой – сам ИБП вроде, и работает, и нагрузку какое-то более-менее приличное время держит, но серверам ничего не рассказывает и, в случае чего, они рискуют просто вырубиться в момент!
В связи с недопустимостью такого развития событий, придумалась простая, но рабочая схема – к одному из серверов был подключен по USB простенький APC Back-UPS CS практически без нагрузки2)…
Далее планировалось на этот сервер воткнуть PowerChute Personal Edition3) или, если что-то пойдет не так, какой-то альтернативный софт… и естественно, что-то пошло нет так – Personal Edition не устанавливается на сервера, и этим «альтернативным софтом», после долгих мытарств и тестов, был выбран Apcupsd.
Конфигурация
И правильно, что он – настройка там простая и незатейливая при всем необходимом функционале.
Ведущий
После загрузки4) и установки приложения на «главном» сервере, куда подключен ИБП, нужно заменить драйвер «American Power Conversion USB ИБП» в разделе «Устройства HID (Human Interface Devices)» на «American Power Conversion USB UPS (Apcupsd)»5), после чего он переместится в раздел «Батареи» вместо присутствующего там по умолчанию устройства «Батарея ИБП HID».
Конфигурация примерно такая:
- apcupsd.conf
-
# General
#UPSNAME
UPSCABLE usb
UPSTYPE usb
DEVICE
#POLLTIME 60
SCRIPTDIR c:\apcupsd\etc\apcupsd
PWRFAILDIR c:\apcupsd\etc\apcupsd
NOLOGINDIR c:\apcupsd\etc\apcupsd

# Failures
ONBATTERYDELAY 6
BATTERYLEVEL 70
MINUTES 5
TIMEOUT 0
ANNOY 300
ANNOYDELAY 60
NOLOGON disable
KILLDELAY 0

# NIS
NETSERVER on
NISIP 0.0.0.0
NISPORT 3551
EVENTSFILE c:\apcupsd\etc\apcupsd\apcupsd.events
EVENTSFILEMAX 10

# Sharing
UPSCLASS standalone
UPSMODE disable

# Logging
STATTIME 0
STATFILE c:\apcupsd\etc\apcupsd\apcupsd.status
LOGSTATS off
DATATIME 0
#FACILITY DAEMON

# UPS EPROM
#UPSNAME UPS_IDEN
#BATTDATE mm/dd/yy
#SENSITIVITY H
#WAKEUP 60
#SLEEP 180
#LOTRANSFER  208
#HITRANSFER 253
#RETURNCHARGE 15
#BEEPSTATE T
#LOWBATT 2
#OUTPUTVOLTS 230
#SELFTEST 336
Значимые переменные, которые необходимо проверить и при необходимости изменить:
-
UPSCABLE
-
UPSTYPE
-
DEVICE
-
POLLTIME
-
BATTERYLEVEL
-
MINUTES
-
NETSERVER
-
NISIP
-
NISPORT
В общем, файл конфигурации хорошо прокомментирован, добавить нечего, но вот, если нужно, онлайн описание директив.
Ведомые
На ведомых серверах конфигурация должна быть изменена так6):
UPSCABLE ether
UPSTYPE net
DEVICE master-dvs.local:3551
POLLTIME 10
BATTERYLEVEL 80
MINUTES 6
Директива «NETSERVER» должна тоже быть в положении «on»!
Расписания
Для минимизации казусов, я выбрал такие значения директив «BATTERYLEVEL» и «MINUTES»:
| Role | BATTERYLEVEL | MINUTES |
|---|---|---|
| Primary7) | 90 | 7 |
Slaves  |
80 | 6 |
| Master9) | 70 | 5 |
Т.к. в этой модели ведомые опрашивают ведущего, а не ведущий уведомляет ведомых, для корректной последовательности выключения важно, чтобы ведущий выключался последним, иначе, при потере связи с ведущим, ведомые сразу выключатся не взирая на «расписание»!
Уведомления
Для отправки уведомлений на почту, в комплекте присутствуют несколько простых скриптов, внутри, по сути, практически идентичных:
-
commfailure.vbs.example
-
offbattery.vbs.example
-
onbattery.vbs.example
Для активации, их нужно отредактировать, добавив правильные настройки почты, и переименовать, убрав «.example» из имени файла.
При необходимости можно повесить уведомления на другие события, скопировав скрипт «commfailure.vbs», отредактировав и переименовав его в одно из этих значений:
-
commfailure
-
commok
-
powerout
-
onbattery
-
offbattery
-
mainsback
-
failing
-
timeout
-
loadlimit
-
runlimit
-
doshutdown
-
annoyme
-
emergency
-
changeme
-
remotedown
-
startselftest
-
endselftest
-
battdetach
-
battattach
Дисклеймер
-
Использование материалов данной базы знаний разрешено на условиях лицензии, указанной внизу каждой страницы! При использовании материалов активная гиперссылка на соответствующую страницу данной базы знаний обязательна!
-
Автор не несет и не может нести какую либо ответственность за последствия использования материалов, размещенных в данной базе знаний. Все материалы предоставляются по принципу «как есть». Используйте их исключительно на свой страх и риск.
-
Все высказывания, мысли или идеи автора, размещенные в материалах данной базе знаний, являются исключительно его личным субъективным мнением и могут не совпадать с мнением читателей!
-
При размещении ссылок в данной базе знаний на интернет-страницы третьих лиц автор не несет ответственности за их техническую функциональность (особенно отсутствие вирусов) и содержание! При обнаружении таких ссылок, можно и желательно сообщить о них в комментариях к соответствующей статье.
Последнее изменение: 2023/09/21 01:28 —
Николай Солошин
Apcupsd in Windows
Last modified: Jun. 11, 2010 Contents 1 - Summary 2 - Dependencies 3 - Apcupsd installation 4 - Service configuration 5 - Apcaccess example 6 - Apctray example 7 - Service check 1 - Summary This guide will show how to install apcupsd in Windows. Apcupsd is used for power management and controlling of APC UPS's. This has been tested in Windows 2000, XP, 2003 and 2008. 2 - Dependencies You will need to have Windows configured to send emails using Blat. You will will also need some information about the UPS and the UPS cable. Model number UPS cable type The serial port or USB ports will need to be enabled in the BIOS of the computer. If you enabled the serial port in the BIOS and plan to use it, you can find out what the serial COM port is by doing the following. Type the following in at the Run button on the Start Menu. This will open the device management console. devmgmt.msc Expand Port (COM & LPT) to find the serial COM port number in the computer. For this guide we will use the serial port. 3 - Apcupsd installation Download the apcupsd Windows package at http://www.apcupsd.org/. Run the installer and keep all components selected to be installed.I set the destination folder to be C:\Program Files\apcupsd. Uncheck the box to edit the client configuration file (apcupsd.conf). On the next screen, keep the box checked next to Install Apcupsd as a Service and uncheck the box next to Start Apcupsd now. Next, you will get a message that says the apcupsd service has been successfully installed. Keep the box checked to Install the icon in the System Tray. Next, you will get a message that says the apctray has been successfully installed. The apcupsd service and the apctray application have been successfully installed. 4 - Service configuration We need to make a change in the registry to the apcupsd service so that it will kill the power to the UPS after the computer has been shut down. Open the registry editor by typing the following at the Run button on the Start Menu. regedit Navigate to the following area and change the ImagePath entry to end in -p. HKEY_LOCAL_MACHINE\SYSTEM\CurrentControlSet\Services\Apcupsd Set it so that the apcupsd service will start when the system starts up. Open the services management console by typing the following at the Run button on the Start Menu. services.msc Set the Apcupsd UPS Monitor service to have it's startup type to be Automatic. You can modify the apccontrol script to send email notifications for different UPS events. The apccontrol script is the following file. C:\Program Files\apcupsd\etc\apcupsd\apccontrol.bat Navigate to C:\Program Files\apcupsd\etc\apcupsd and make a backup of the apccontrol.bat file. Afterwards, edit the apccontrol.bat file. The configuration file that the apcupsd service will use is the following file. C:\Program Files\apcupsd\etc\apcupsd\apcupsd.conf You can create your own configuration file. Here is a simple example. This uses an APC UPS 940-0095A serial cable. ## apcupsd.conf v1.1 ## UPSCABLE 940-0095A UPSTYPE apcsmart DEVICE COM1 UPSCLASS standalone UPSMODE disable Navigate to C:\Program Files\apcupsd\etc\apcupsd and make a backup of the apcupsd.conf file. Afterwards, edit the apcupsd.conf file. Open a command prompt and start the apcupsd service.
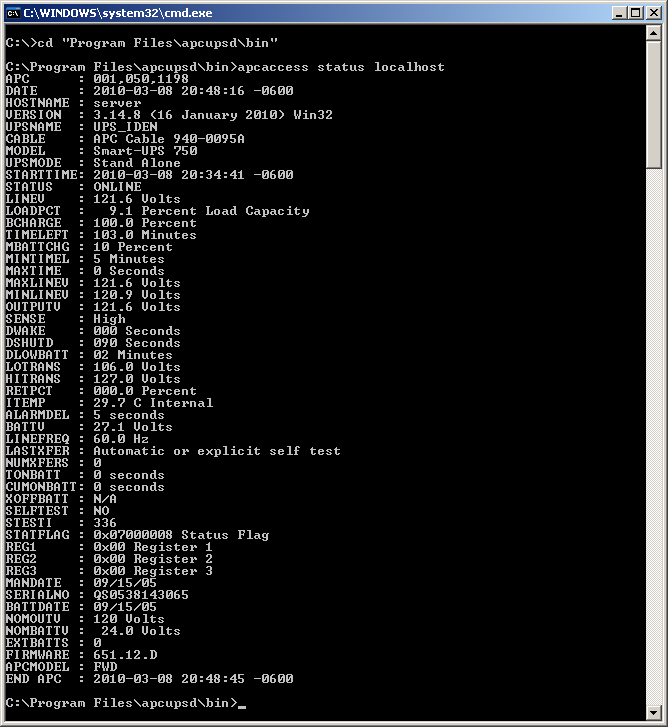
 The service has successfully started. Also, you will now see the apctray icon in the lower right-hand corner of the screen near where the time is displayed. 5 - Apcaccess example This command prints the UPS model number, software version, status, load percentage, battery charge and other information.
 6 - Apctray example You can view the apcaccess information graphically by right-clicking on the apctray icon and selecting Status.
 7 - Service check Reboot your computer. Log in like normal and check to see that the apcupsd service is running. Open the services management console by typing the following at the Run button on the Start Menu. services.msc Check to make sure that the apcupsd service has started.
 That's it, now you have apcupsd running in Windows.


What’s big and slow and rarely ever useful? For one thing, the software that comes with every desktop-grade Uninterruptible Power Supply (UPS) made by APC. This isn’t news. I know APC would like nothing more than to have me buy a more expensive piece of hardware that I don’t need, just to get the useful software that I do need.
Enter APCUPSD with USB support for Windows. It’s free. It’s open source. It’s probably not supported by APC, but if you’ve ever tried to get tech support for a desktop-grade APC unit that was connected to a server, you already know APC isn’t going to help you with computer problems. This free piece of software makes my UPS more useful than just a battery with a power switch. Now I can have my server send a text message to my mobile phone whenever a blackout strikes my area. I can see live power management statistics from any web browser in the world, including the one on my phone. I have fewer things to monitor with regard to uptime, and I love it.
Step 1: Get Rid of PowerChute
Making all of this magical automation work by itself starts out with simple steps. Go to the Add or Remove Programs Control Panel, uninstall PowerChute from the computer, and then install APCUPSD. Sounds easy so far, right?
Step 2: Run the APCUPSD Setup Wizard
The setup file I used was named winapcupsd-3.14.8.exe. This is where you might begin to sense that this isn’t going to be as easy as you had hoped. The installation wizard for Windows asks a bunch of questions for which you will not find answers in the documentation. Here’s my understanding of them.
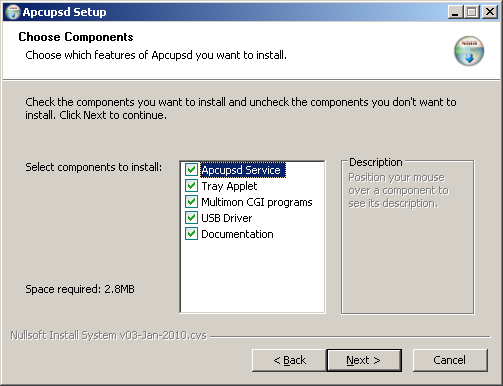
Choose Components
- Apcupsd Service – This should be installed if the USB cable from a UPS is connected directly to this computer. It does all of the monitoring for you.
- Tray Applet – This is similar to the graphical interface of PowerChute. It sits in the system tray and takes up space doing nothing useful. This can be installed on any computer.
- Multimon CGI programs – This should be installed on web server computers so that the UPS status can be seen through the Internet.
- USB Driver – This is part of the Apcupsd Service and should be installed at the same time as the first component.
- Documentation – You will want at least one copy of this to be installed.
Step 3: Edit apcupsd.conf
The setup wizard actually does a nice job of providing a default configuration that is compatible with USB-connected APC units. In my opinion, there is only one part of the configuration that needs close attention.
APCUPSD turns your computer into a public server by default, using “NETSERVER on” and “NISIP 0.0.0.0”. This is really inappropriate unless you intend to involve multiple computers and a firewall in your UPS monitoring plan. My screenshot shows how to limit access by using “NISIP 127.0.0.1”. Changing the configuration in that way will prevent any other computer from directly viewing your UPS information. Do not jump to the conclusion that it might be easier to use “NETSERVER off”. The Tray Applet and CGI components both rely on the server capabilities of the monitoring service to interact with the UPS.
Another area that may be of interest is system logging. Unfortunately, I am only able to describe all of the ways in which this doesn’t work on Windows. Setting STATTIME to a non-zero value causes the apcupsd.status file to be continuously overwritten. Setting “LOGSTATS on” causes a flood of useless messages to appear in the Application Event Log. And finally, setting DATATIME to a non-zero value logs a set of comma-separated values, but only in the Application Event Log. All of these options seem potentially very useful, but I couldn’t find any explanation of how to make them work in a Windows environment.
Step 4: Hack the Registry
Here’s where things really start getting sloppy. The developers had neither the confidence in their shutdown code, nor the foresight about a missing installation step needed to make this easy. If you want your UPS to turn off after your computer shuts down during a blackout, and then turn back on when the power is restored, you have to change this registry value. It’s located at HKLM\System\CurrentControlSet\Services\Apcupsd\ImagePath and all you have to do is add “-p” on to the end of it. This also makes you familiar with what to erase if your UPS starts turning off at the wrong time.
As you might have guessed, editing the registry does nothing until you reboot the computer or restart the monitoring service. I prefer the latter method because this will have to be done after any changes to the apcupsd.conf file.
Step 5: Mobile Alerts From Your UPS
This is my favorite step. For all of its bragging about being designed to send notification e-mails, APCUPSD hardly does that at all. It’s designed to call a batch file for each event triggered by the monitoring service, and those batch files are not provided. The good news is that as soon as you can figure out how to send an e-mail from a batch file, you’re all set. I decided that because my server already has the PHP engine installed and configured for outgoing e-mail, and because I wanted to keep this simple, all I had to do was call the PHP mail command from my batch file. My example file is named <apcupsd location>\etc\apcupsd\onbattery.bat and it only has one line of code in it:
php -r "mail('my.mobile.address@domain.com','UPS Alert','Power failure. Running on UPS battery.');"Now, in theory, I should see that appear as a text message on my mobile phone as soon as the next blackout happens. This depends on my ISP not being blacked out at the same time, among other things.
Windows Native Solution
There is a way to do this without installing software such as PHP. As suggested by the presence of an onbattery.vbs.example file, you might be able to use the built-in scripting engine to generate e-mails for you. But I must offer several warnings:
- Do not attempt to implement the onbattery.vbs.example file. It is full of bugs and excessively complicated.
- You will need to have the IIS v6.0 SMTP service fully operational already to make this easy.
- If you are unable to run .vbs files for any reason, then this will not work at all.
What you will need to do is drop several lines of code into a new file.
Put the file at: <apcupsd location>\etc\apcupsd\onbattery.vbs
Customize the middle four lines of this stuff and put it in the file:
Set Msg = CreateObject("CDO.Message")
Msg.To = "my.mobile.address@domain.com"
Msg.From = "upsd@domain.com"
Msg.Subject = "UPS Alert"
Msg.TextBody = "Power failure. Running on UPS battery."
Msg.Send
If all goes well, you can double click that new file and see a message arrive at your e-mail address. APCUPSD will trigger the same file for you whenever the onbattery event occurs.
If this doesn’t go well, or if you need help customizing this script, I suggest visiting Stack Overflow for some beginner-level mail scripting advice.
Preventing Nuisance Alerts
If your UPS lives in a noisy electrical environment, then you will want to tweak the apcupsd.conf file again. The conf file contains a parameter named ONBATTERYDELAY that suppresses alerts for rapid switching between battery and line power. It defaults to 6 seconds, which means you could get 20 on/off alerts every minute when the UPS is simply doing its job. A new value of 30 seconds or more will provide you with only the more critical alerts.
Step 6: Install the CGI program on IIS v6.0
If you thought those last few steps were tricky, then prepare yourself. In fact, since this IIS web server is entirely optional, I am providing these instructions more for my own reference than as a tutorial. It is assumed you already have an IIS website up and running, so the full details of making a website from scratch are beyond the purpose of this article.
To get the APCUPSD information to display on an IIS v6.0 website, you must first create a “cgi-bin” area where it is allowed to run. It doesn’t have to be named “cgi-bin”, but it has to accomplish the same thing, and should not be located anywhere someone could upload a virus. So, pick out a website, or a subdirectory, or a virtual directory anywhere you like in the Internet Information Services (IIS) Manager. Into that directory, you will need to copy the files from <apcupsd location>\cgi\ and make sure they all end in .cgi. I ended up with four .cgi files and an extra file named mingwm10.dll that doesn’t seem to do anything, so I left that one out.
Next, go back to the IIS Manager and click on Web Service Extensions.
Click on “Add a new web service extension…”
Now you can enable the .cgi files that you’ve placed on your website. Give this “Extension” a new name as you like, and add each of the four files to the “Required files” list. Make sure that you do not use any UNC paths here. They must be local drive letter paths for this to work. After the files are added, make sure the new extension is set to Allowed.
To make your web directory a true “cgi-bin,” go to the Properties of that directory in IIS Manager, find the “Execute permissions” drop down box, and set it to “Scripts and Executables.” If all else fails, you can try reading KB 315122 which pretty much says the same thing, but in true Microsoft style makes you feel clueless and empty inside.
Finally, click on “Application Pools” in IIS Manager, right-click on the one you’re using (probably DefaultAppPool) and then click Recycle. Much like the monitoring service itself, your CGI application pool has to be restarted every time the settings change in IIS Manager.
Well, maybe not finally. All that work was just to get IIS configured. To configure the CGI application itself, you must ensure that the two files named apcupsd.css and hosts.conf are located in a directory that is named exactly C:\apcupsd\etc\apcupsd\ If you installed APCUPSD into any path other than C:\apcupsd\ then you must create that path now and copy the two files. If your web server is not the same computer that the UPS is connected to, then you must also edit the hosts.conf file so that it points to the address of the other computer.
Now you should be able to aim your web browser at /multimon.cgi and see the UPS information from anywhere you can see the website.
Содержание
Установка
apt-get install apcupsd
Дополнительно можно установить документацию и APC UPS Power Management (web interface):
apt-get install apcupsd-doc apcupsd-cgi
Настройка
User Manual
Файл: /etc/apcupsd/apcupsd.conf
Здесь приведены переменные для настройки управления ИБП при аварии питания, ни одна из этих переменных не является обязательной. Но если вы используете ИБП с упрощенной системой команд (dumb) он не определяет низкий заряд батареи и поэтому нужно задать значение для переменной TIMEOUT которая используется для выключения системы.
BATTERYLEVEL
Уровень заряда батарей в процентах (%).
Если указано значение BATTERYLEVEL, то во время отключения электроэнергии, apcupsd выдаст команду на завершение выключение системы, когда уровень заряда батареи упадет ниже заданного значения.
Значение по умолчанию: 5
Значение для отключения этого параметра: -1
Этот параметр игнорируется для простых ИБП (не имеющих расширенной сигнализации).
MINUTES
Время работы от батарей, в минутах.
Если указано значение MINUTES, то во время отключения электроэнергии, apcupsd выдаст команду на завершение выключение системы, когда оставшиеся время работы от батарей (рассчитанное ИБП) будет меньше заданного времени.
Значение по умолчанию: 3
Расчетное время работы от батарей TIMELEFT может быть получено в результате выполнения команды apcaccess
Если значение равно нулю или неправдоподобное, то ИБП, вероятно, сломан.
Значение для отключения этого параметра: -1
Этот параметр игнорируется для простых ИБП (не имеющих расширенной сигнализации).
Следует отметить, что некоторые могут выдавать неверное значение, когда аккумулятор полностью заряжен.
TIMEOUT
Время в секундах.
После отключения электропитания, apcupsd будет остановить систему, когда заданное в этом параметре время в секундах, уже истекло.
Чтобы отключить этот параметр установите его значение -1
Обычно для всех моделей Smart UPS и простых ИБП с кабелями, которые поддерживают индикация разряда батарей, это должно быть нулю, так что время завершения работы будет зависеть от уровня заряда аккумулятора (BATTERYLEVEL) и/или времени работы от батарей (MINUTES), либо в случае напряжения сигнализации ИБП, когда батарея исчерпан.
Эта команда необходима для простых (не имеющих расширенной сигнализации ИБП), которые не обеспечивают выдачу сигнала полного разряда аккумулятора (для них только тестирование может определить этот момент).
Для получения дополнительной информации см. apctest.
Этот таймер может быть также полезно, если вы хотите, чтобы некоторые рабом машины остановки до другой машины для экономии энергии батареи. Это также полезно для тестирования apcupsd потому что вы можете заставить быстрого выключения, установив небольшой стоимости (например 60) и потянув за вилку к ИБП.
TIMEOUT, BATTERYLEVEL, and MINUTES can be set together without problems. apcupsd will react to the first case or test that is valid. Normally SmartUPS users will set TIMEOUT to zero so that the system is shutdown depending on the percentage battery charge remaining (BATTERYLEVEL) or the remaining battery runtime (MINUTES).
ANNOY
Время в секундах.
Время в секундах между сообщениями запрашивающей зарегистрированным пользователям выйти системы при отключении питания.
Этот счётчик запускается только тогда, когда ИБП работает от батареи.
Значение по умолчанию это 300 секунд (5 минут).
По умолчанию, отправить сообщение на системную консоль в системах Unix и всплывающее сообщение в MS Windows.
Значение ANNOYDELAY должно быть больше ANNOY, с тем чтобы получить слишком частые сообщения.
ANNOYDELAY
Время в секундах.
Время задержки в секундах перед тем, как apcupsd начнёт рассылать подключённым пользователям предложение выйти из системы. Этот таймер запускается только после того, ИБП работает от батареи. Этот таймер сбрасывается, когда внешнее питание возобновляется. Значение по умолчанию составляет 60 секунд. Таким образом, первое предупреждение, чтобы выйти из системы происходит после 60 секунд работы от батарей, при условии, что NOLOGON не установлен, чтобы отключить.
DEVICE
Имя устройства.
Например для Com 1 значение: /dev/ttyS0
UPSCABLE
Тип интерфейса.
| Тип | Назначение |
|---|---|
| apcsmart | стандартный RS-232 кабель APC |
| usb | специализированный??? кабель USB от APC |
| net | (виртуальная заглушка. Означает, что на самом деле информацию об ИБП можно считать по сети. Очень удобно, когда к одному ИБП подключено несколько серверов) |
sharemaster
- /etc/apcupsd/apcupsd.conf
-
#
# Master
#

UPSNAME UPS_Name
UPSCABLE 940-0024C
UPSTYPE apcsmart
DEVICE /dev/ttyS0
POLLTIME 60
LOCKFILE /var/lock
SCRIPTDIR /etc/apcupsd
PWRFAILDIR /etc/apcupsd
NOLOGINDIR /etc
ONBATTERYDELAY 6
BATTERYLEVEL 15
MINUTES 10
TIMEOUT 0
ANNOY 300
ANNOYDELAY 60
NOLOGON disable
KILLDELAY 0
NETSERVER on
NISIP 0.0.0.0
NISPORT 3551

EVENTSFILE /var/log/apcupsd.events
EVENTSFILEMAX 10

UPSCLASS sharemaster
UPSMODE disable

STATTIME 600
STATFILE /tmp/apcupsd.status
LOGSTATS off
DATATIME 0
shareslave
- /etc/apcupsd/apcupsd.conf
-
#
# Slave
#

UPSTYPE apcsmart
UPSTYPE net
DEVICE IP-Address:Port
POLLTIME 60
LOCKFILE /var/lock
SCRIPTDIR /etc/apcupsd
PWRFAILDIR /etc/apcupsd
NOLOGINDIR /etc
ONBATTERYDELAY 6
BATTERYLEVEL 5
MINUTES 15
TIMEOUT 0
ANNOY 300
ANNOYDELAY 60
NOLOGON disable
KILLDELAY 0
NETSERVER on
NISIP 0.0.0.0
NISPORT 3551

EVENTSFILE /var/log/apcupsd.events
EVENTSFILEMAX 10

UPSCLASS shareslave
UPSMODE disable

STATTIME 3600
STATFILE /var/log/apcupsd.status
LOGSTATS off
DATATIME 0
После настройки:
1. Вносим изменения в файл
- /etc/default/apcupsd
-
ISCONFIGURED=yes
2. Запускаем
service apcupsd start
Подключение по USB
Использование
apcaccess
Zabbix
Отслеживание состояния ИБП через apcupsd Zabbix сервером.
Template APCUPSd
Ссылка на Share.Zabbix.com
Переменные:
-
Имя
-
Текущий статус
-
Уровень заряда батареи
-
Внутренняя температура
-
Напряжение на входе
-
Уровень нагрузки
-
Уровень чувствительности
-
Количество переходов на питание от батареи с момента запуска
apcupsd
Работает через Zabbix агент, ниже приведены настройки для различных ОС:
Linux
- /etc/zabbix/zabbix_agentd.conf.d/userparameter_apcupsd.conf
-
UserParameter=UPSNAME,cat /var/log/apcupsd.status|awk '/^(UPSNAME).*:/ {print $3}'
UserParameter=STATUS,cat /var/log/apcupsd.status|awk '/^(STATUS).*:/ {print $3,$4,$5}'
UserParameter=ITEMP,cat /var/log/apcupsd.status|awk '/^(ITEMP).*:/ {print $3}'
UserParameter=LOADPCT,cat /var/log/apcupsd.status|awk '/^(LOADPCT).*:/ {print $3}'
UserParameter=NUMXFERS,cat /var/log/apcupsd.status|awk '/^(NUMXFERS).*:/ {print $3}'
UserParameter=BCHARGE,cat /var/log/apcupsd.status|awk '/^(BCHARGE).*:/ {print $3}'
UserParameter=SENSE,cat /var/log/apcupsd.status|awk '/^(SENSE).*:/ {print $3}'
UserParameter=LINEV,cat /var/log/apcupsd.status|awk '/^(LINEV).*:/ {print $3}'
MS Windows
В этом примере использован Gawk 3.1.6.
- c:\zabbix\conf\userparameter_apcupsd.win.conf
-
UserParameter=UPSNAME,type c:\apcupsd\etc\apcupsd\apcupsd.status|c:\programs\bin\awk "/^(UPSNAME).*:/ {print $3}"
UserParameter=STATUS,type c:\apcupsd\etc\apcupsd\apcupsd.status|c:\programs\bin\awk "/^(STATUS).*:/ {print $3,$4,$5}"
UserParameter=ITEMP,type c:\apcupsd\etc\apcupsd\apcupsd.status|c:\programs\bin\awk "/^(ITEMP).*:/ {print $3}"
UserParameter=LOADPCT,type c:\apcupsd\etc\apcupsd\apcupsd.status|c:\programs\bin\awk "/^(LOADPCT).*:/ {print $3}"
UserParameter=NUMXFERS,type c:\apcupsd\etc\apcupsd\apcupsd.status|c:\programs\bin\awk "/^(NUMXFERS).*:/ {print $3}"
UserParameter=BCHARGE,type c:\apcupsd\etc\apcupsd\apcupsd.status|c:\programs\bin\awk "/^(BCHARGE).*:/ {print $3}"
UserParameter=SENSE,type c:\apcupsd\etc\apcupsd\apcupsd.status|c:\programs\bin\awk "/^(SENSE).*:/ {print $3}"
UserParameter=LINEV,type c:\apcupsd\etc\apcupsd\apcupsd.status|c:\programs\bin\awk "/^(LINEV).*:/ {print $3}"
Ссылки
Provide feedback
Saved searches
Use saved searches to filter your results more quickly
Sign up