
Apache Tomcat is an open-source web server and servlet container for Java code. Tomcat executes programs written in the Java programming language, and it implements many Java EE specifications, including Jakarta Servlet, Jakarta Server Pages, and others.
In this tutorial, you will learn to install the Apache Tomcat server on Windows.
Prerequisites:
- Java JRE installed and configured
- Administrator privileges
How to Install Tomcat on Windows
In this section, we will cover two ways of installing the Tomcat web server:
- Via Windows Service Installer.
- From a zip archive.
Follow the steps below to download and install Tomcat.
Step 1: Download Tomcat for Windows
To download the Tomcat installation file, follow the steps below:
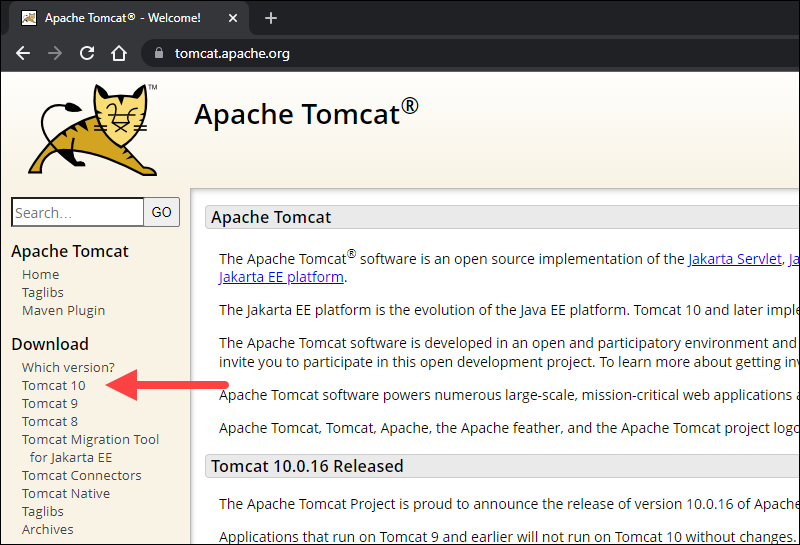
1. Browse to the official Apache Tomcat website. Locate the Download section and click the latest Tomcat version available. At the time of writing this article, the latest Tomcat version was version 10.
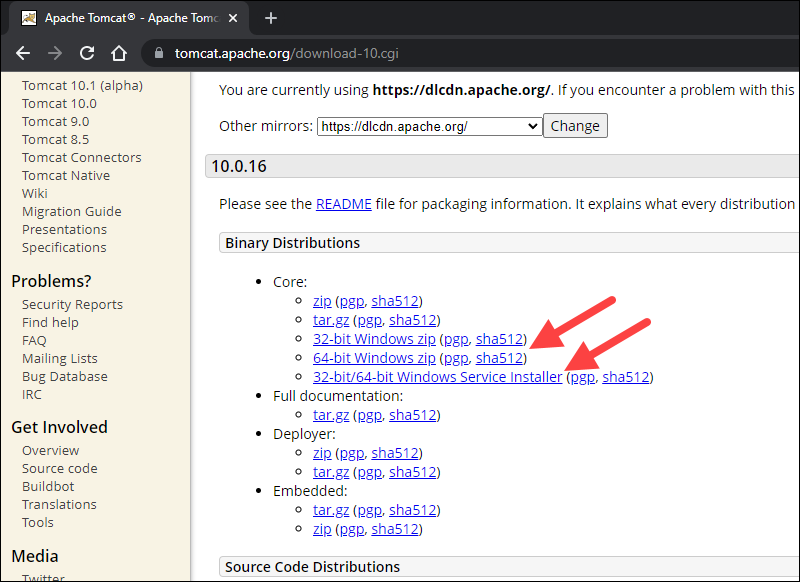
2. On the Download page, scroll down and locate the Binary Distributions area.
In the Core list, depending on the installation type you prefer, click the download link for the Windows Service Installer or the 32bit/64bit Windows zip file.
Step 2: Install Tomcat
Install Tomcat via the Windows Service Installer for an automated and wizard-guided experience. The service installer installs the Tomcat service and runs it automatically when the system boots.
For a portable experience, install Tomcat using the zip file and avoid installing the service. Easily uninstall Tomcat when it is no longer needed by deleting the Tomcat directory, or move it around when necessary.
Note: Take a look at our list of 13 best Java IDEs, which help write, debug, and test Java code.
Method 1: Install Tomcat Using the Windows Service Installer
Follow the steps below to install Tomcat using the Windows Service Installer.
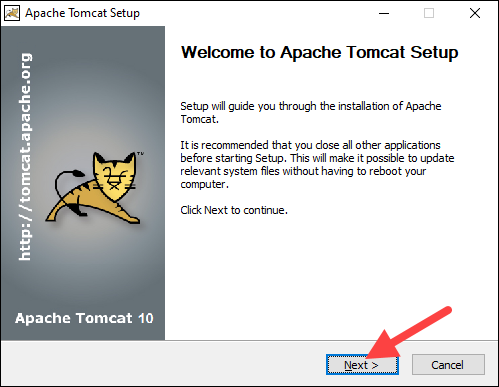
1. Open the downloaded Windows Service Installer file to start the installation process.
2. In the Tomcat Setup welcome screen, click Next to proceed.
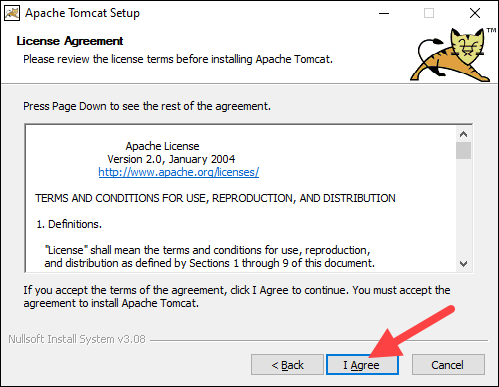
3. Read the License Agreement and if you agree to the terms, click I Agree to proceed to the next step.
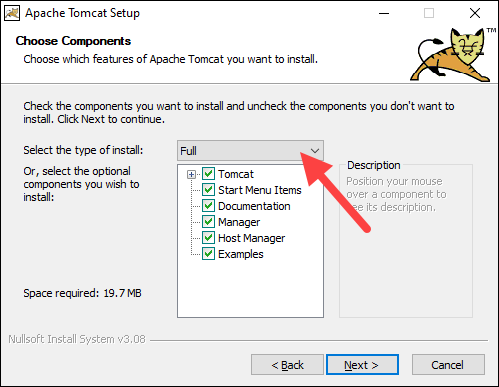
4. In the Tomcat component selection screen, choose Full in the dropdown menu to ensure the wizard installs the Tomcat Host Manager and Servlet and JSP examples web applications. Alternatively, keep the default Normal installation type and click Next.
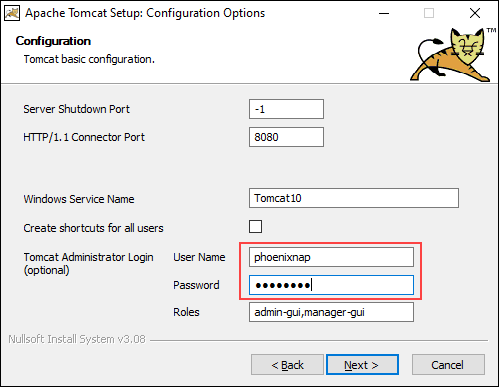
5. The next step configures the Tomcat server. For instance, enter the Administrator login credentials or choose a different connection port. When finished, click Next to proceed to the next step.
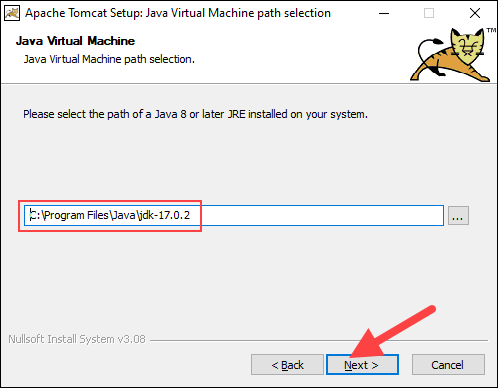
6. The next step requires you to enter the full path to the JRE directory on your system. The wizard auto-completes this if you have previously set up the Java environment variables. Click Next to proceed to the next step.
7. Choose the Tomcat server install location or keep the default one and click Install.

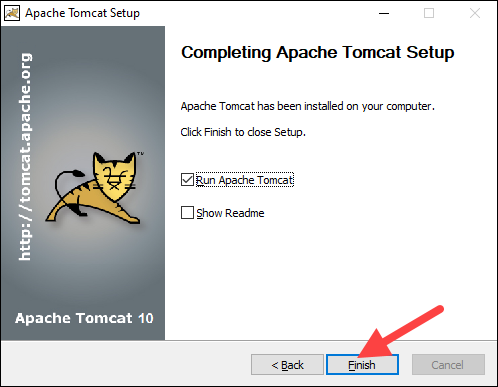
8. Check the Run Apache Tomcat box to start the service after the installation finishes. Optionally, check the Show Readme box to see the Readme file. To complete the installation, click Finish.
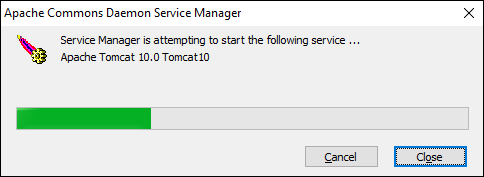
9. A popup window appears that starts the Tomcat service. After the process completes, the window closes automatically. The Apache Tomcat web server is now successfully installed .
Method 2: Install Tomcat Using the zip Archive
Follow the steps below to set up the Tomcat server using the zip archive.
1. After downloading the 32bit/64bit Windows zip file, depending on your Windows version, unzip the downloaded file. Right-click the file and select Extract all…
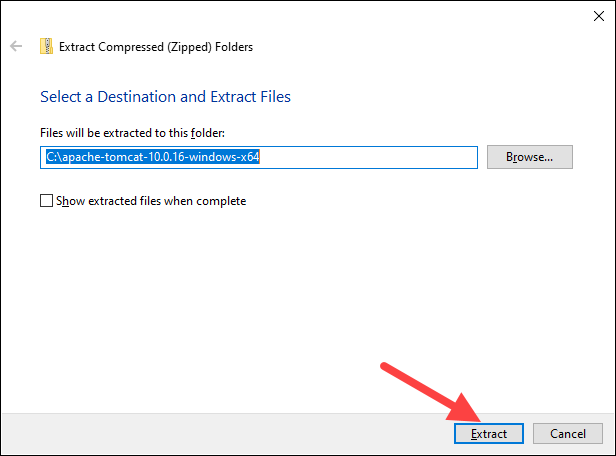
2. Choose where to extract the archive contents. For easier navigation, we recommend extracting it to the hard drive’s root. Optionally, give the directory a shorter name to facilitate server configuration later. Click Extract to start the process.
3. Navigate to the conf sub-directory within the extracted directory and locate the server.xml file.
Important: Back up the .xml files before making any changes.
4. The default connection port is 8080. To choose a different port, edit the server.xml file with a text editor, such as Notepad++, and locate the following lines:
<Connector port="8080" protocol="HTTP/1.1"
           connectionTimeout="20000"
           redirectPort="8443" />
Change the connector port number to any number between 1024 and 65535.
5. To enable directory browsing, locate the web.xml file in the conf directory and edit the file with a text editor. Directory browsing helps when testing the system, and sometimes it may be the solution for a 403 forbidden error.
Locate the following lines and change the listings value from false to true:
<servlet>
  <servlet-name>default</servlet-name>
  <servlet-class>org.apache.catalina.servlets.DefaultServlet</servlet-class>
  <init-param>
    <param-name>debug</param-name>
    <param-value>0</param-value>
  </init-param>
  <init-param>
    <param-name>listings</param-name>
    <param-value>false</param-value>
  </init-param>
  <load-on-startup>1</load-on-startup>
</servlet>
6. Implement an auto-reload feature by editing the context.xml file. Above all, auto-reload is useful in development to prevent restarting the server manually each time a change is made.
Using a text editor, open the context.xml file. Locate the following line and change the value from false to true in each instance:
<Context reloadable="false" crossContext="false" parallelAnnotationScanning="false">
   ......
   ......
</Context>
7. After making the changes, start the server. Press the Windows key and type cmd. Press Enter to open a Command Prompt window.
8. Move to the bin directory of your Tomcat server and run:
startup
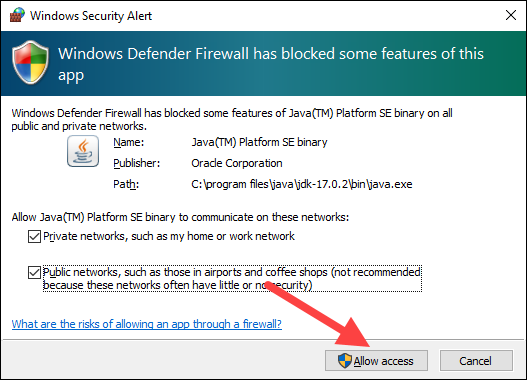
8. Add an exception for Tomcat in the firewall:
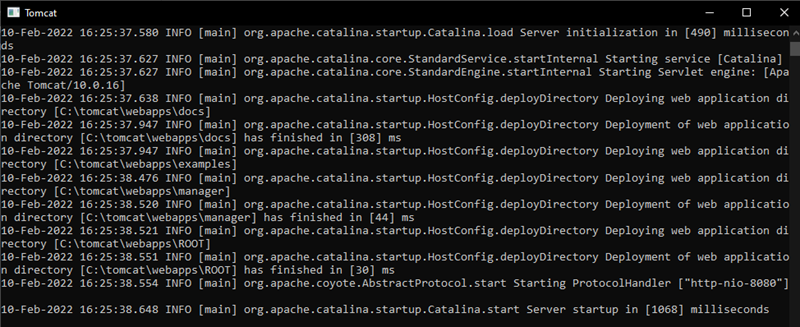
9. A new Tomcat console window appears. This console receives error messages and system.out.println() messages issued by the Java servlets.
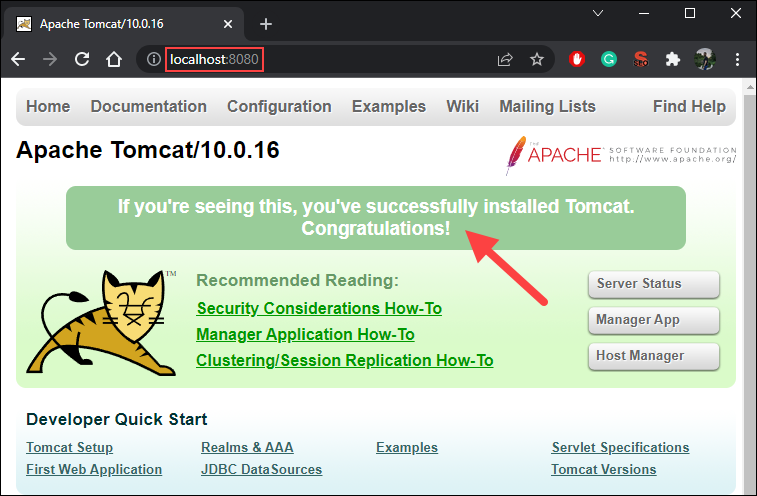
10. Access the server using a browser as an HTTP client. Browse to http://localhost:8080 and access the Tomcat welcome page to ensure the server works.
In addition, use the Developer Quick Start links to see more information about the server and start using and configuring the server.
11. Shut down the Tomcat server by pressing Ctrl+C on the Tomcat console.
Step 3: Check if Apache Tomcat Service Is Running
Installing Tomcat using the Windows Service Installer installs Tomcat as a Windows service that automatically runs on boot. Follow the steps below to ensure that Tomcat is started as a Windows service.
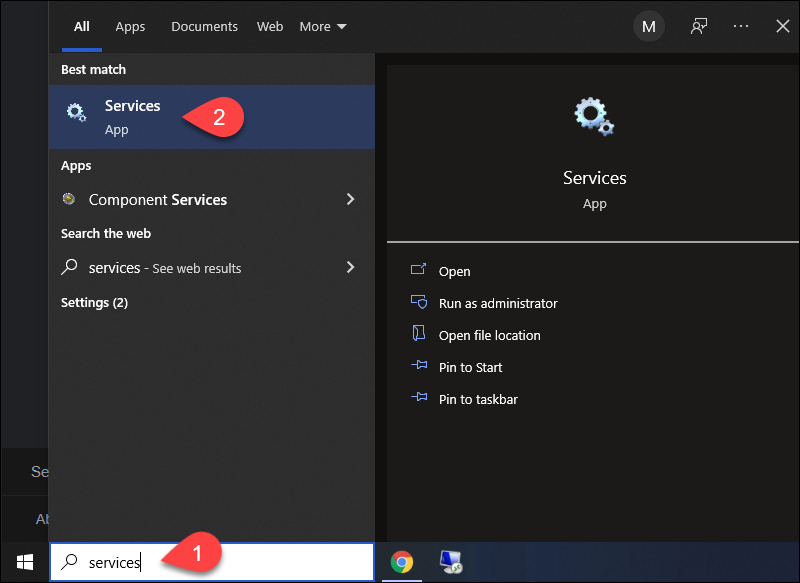
1. Open the Start menu and search for Services.
2. Select the Services result.
3. In the Services window, locate the Apache Tomcat service. The Status column indicates whether the service is running or not. Start or Stop the service using the buttons in the toolbar or by pressing Stop or Restart on the left side of the service list.
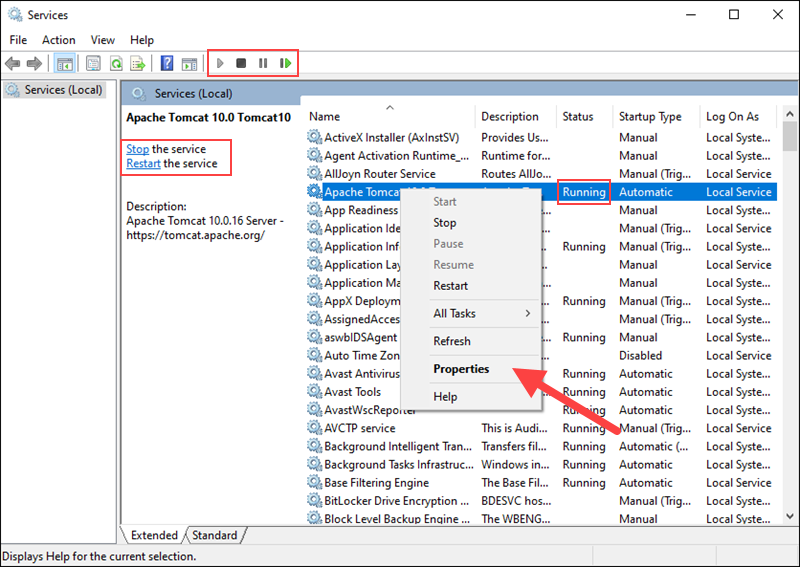
Configure the service startup by right-clicking the Tomcat service and selecting Properties.
4. In the Properties window, under the Startup type dropdown menu, select how to run the Tomcat service:
- Automatic (Delayed Start). Starts the service shortly after boot. A delayed start improves server boot performance and has security benefits.
- Automatic. Automatically starts the service on boot.
- Manual. The service starts only when Windows or another service needs it or if invoked.
- Disabled. Disables the service startup, even if you try to start it.
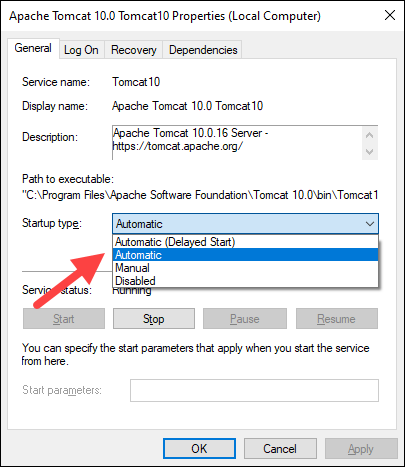
Click OK to confirm the changes.
Note: If you are looking for a different operating system, our Knowledge Base also has a tutorial on how to install Tomcat on Ubuntu.
Conclusion
This guide showed how to install the Apache Tomcat web server on Windows. While Tomcat doesn’t provide all the features of Java EE, many applications require only the features that Tomcat provides. Therefore, heavier tools aren’t always necessary.
Learn more about servers in our tutorial on big data servers, or learn what a database server is.
Was this article helpful?
YesNo
Last Updated :
19 Jan, 2023
Apache Tomcat which is short for “Tomcat” is a free, open-source Java Servlet, Java Expression Language, JavaServer Pages, and WebSocket implementation. Tomcat is an HTTP web server that basically runs Java code in a “pure Java” environment. Here, we will see how to install Tomcat 10 on Windows 10 from Zip Archive. Requirements are Java 8 or above must be already installed. Make sure Windows Firewall allows Tomcat application.
Installing Apache Tomcat on Windows
Step 1: We need to first install the Tomcat 10 zip file from this website. On the website, select the 64-bit Windows zip (PGP, sha512) in the Core section to start the download process for the Tomcat zip file.
.jpg)
Step 2: Check If JDK Is Installed. Open Command Prompt and enter the following commands
java -version
javac -version

If JDK is not installed on your computer, install JDK. In the above picture, we can see JDK is already installed on our computer.
Step 3: Unzip Tomcat 10 Zip File. Go to the location where you have downloaded the Tomcat 10 zip file. Right-click on the apache tomcat file place the cursor on 7-Zip and click on Extract Here to extract the folder.
.jpg)
Step 4: Creating JAVA_HOME Variable. Click Start then in the search bar, search for “Edit the system environment variables” and click on it. The following System Properties box will open. Select Environment Variables in the box.
.jpg)
On clicking Environment Variables the following box will open.
.png)
Step 5: We have to create a JAVA_HOME variable and insert the path of the JDK file stored in our computer, which will be shown below. So select New from the System variables in the above picture. A New System Variable box will be opened where we will have to fill in the Variable name and Variable value.
.png)
Step 6: Go to the location where you have stored the contents of the JDK file in My Computer or PC. Copy the root path of the location of the JDK file as shown below.
.jpg)
Step 7: Paste the JDK path from the above picture into the Variable value field and in the Variable name field, give the name JAVA_HOME as shown below.
.png)
Step 8: Check the Working of Tomcat. Open the extracted apache tomcat file. We will see all the following files in them. Among them open the batch file named “startup”.
.jpg)
Step 9: Check if the Startup Windows Batch File is running properly.
.jpg)
By default, the server port number is 8080.
Step 10: Successful Installation of Tomcat. Our next step is to open an internet browser like Google and type in the address
http://localhost:8080
Then click enter and the following browser will appear suggesting the successful installation of Apache Tomcat.

Download Article
A complete guide for beginners to get Tomcat up and running fast
Download Article
- Installing & Configuring Java
- Installing Tomcat
- Tips
|
|
Tomcat is a popular open-source web server that runs Java applications. Whether you’re a Java developer, a system administrator, or just a beginner, installing Tomcat on Windows is simple. Once you’ve installed the latest version of Java, you can download and run the latest Tomcat Windows Service Installer, which walks you through the rest of the setup. This wikiHow guide teaches you how to install the Apache Tomcat web server environment on your Windows PC.
Things You Should Know
- You’ll need Java 11 or later to run Tomcat. If you’re using an earlier version, download and install the latest JDK.
- When running the Tomcat installer, select the «Full» installation to install the management interfaces and make Tomcat launch automatically.
- You won’t see a Tomcat icon in the system tray when Tomcat is running, but you’ll see its process in Task Manager.
-

To run the latest version of Apache Tomcat on Windows, you’ll to install Java 11 or later.[1]
To get the latest version of Java, you’ll want to download the latest JDK (Java Development Toolkit) installer:- Go to https://www.oracle.com/java/technologies/downloads/ and click the Windows tab.
- Click the download link next to «x64 Installer» to save the installer to your PC.
- If you’ve already installed Java, skip to Installing Tomcat.
-
Double-click the file you downloaded, then follow the on-screen instructions on the installer. Once Java is installed, click Close on the wizard.
- Java will install to C:\Program Files\Java\jdk(version number) by default.
Advertisement
-
Once installed, press Windows key + E to open File Explorer, click This PC in the left panel, and navigate to Program Files > Java.
- If you installed Java in a different location, go to that location now.
-
For example, you’ll see a folder called jdk-21 (if you installed Java 21) in the Java folder. Double-click the JDK folder to open it.
-
At the top of File Explorer, click the path to the folder, select the full path to the current folder, right-click it, and select Copy on the menu.
-
Now that the path is copied, you’ll need to update your environment variables. To open System Properties:
- Type advanced system into the Windows search bar.
- Click View advanced system settings.
-
This button is near the bottom-right corner of the dialogue box.
-
This section is the second box at the bottom of the Environment Variables window.
-
This will be the name of your new system variable.
-
Right-click the bottom field and select Paste to paste the copied folder directory.
-
This will add your new system variable.
-
Scroll down the variable list in the bottom box, and click Path to select it.
-
This will allow you to edit the contents of the Path variable in a new dialogue box.
-
It’s in the upper-right corner of the window. This will add a new entry at the bottom of the list.
-
This will be added to the Path variable in your system.
- Click OK 2 more times until all System Properties windows are closed. You are now ready to download and install the Tomcat files on your computer.


Advertisement
-
As of October 2023, you can download Apache Tomcat 10.1.14. The Apache Software Foundation recommends using the Windows Service Installer, which makes it easy to install Tomcat on both 64-bit and 32-bit Windows systems.[2]
- Go to https://tomcat.apache.org.
- Click the Tomcat 10 link in the left panel.
- Under «Binary Distributions,» click 32-bit/64-bit Windows Service Installer.
- If prompted, select a saving location for the installer file.
-
This will open the License Agreement on a new page.
-
It’s on the bottom-right corner of the installer window.
-
This option ensures that you’ll be installing the core aspects of Tomcat, a script that launches the server automatically at boot time, the admin management panel, the Tomcat Host app, and the Servlet and JSP Examples web app.
- Optionally, you can click and uncheck the components you don’t want to install on the list here.
-
By default, Tomcat will run on port 8080. If you want it to run on a different port, replace the port. You can also give the Tomcat service a name other than «Tomcat10,» and create an administrator username and password for the HTML interfaces here.
- You will need to open TCP port 8080 (or the custom port you entered) to allow inbound connections.
-
When you’re prompted to specify the location of your JRE (Java Runtime Environment), click this button to select your file location.
-
The default path is C:\Program Files\Java\jdk(version number).
-
By default, Tomcat will install to C:\Program Files\Apache Software Foundation\Tomcat 10.1. You can change the installation location if you’d like. Once you click Install, Tomcat will install on Windows.
-
When your Tomcat setup is finished, click this button to close the installer. If you leave the «Run Apache Tomcat» option selected, Tomcat will launch instantly.
- Because you chose the Full installation, the Windows Tomcat service will launch automatically each time you restart your PC.
- Even though Tomcat is running, you won’t see an icon for it in your system tray. However, when you open Task Manager, you’ll see it on the Processes tab and an entry for it on the Startup apps tab.
-
Instead of editing configuration files directly, you can use this GUI tool in your Start menu to adjust the following:
- Control whether the Tomcat service launches automatically.
- Choose whether to log on as a local service account, network service account, local system account, or a specific account.
- Choose what appears in your server logs and where the server logs are stored.
- Specify which version of Java to use (helpful if you install more than one version), and specify Java options, memory preferences, and classpath.
- Add startup flags to Tomcat (check the Readme file for options).
- Choose shutdown options.


Advertisement
Ask a Question
200 characters left
Include your email address to get a message when this question is answered.
Submit
Advertisement
-
Tomcat has an HTML management interface that makes creating and managing virtual hosts on your server easy. You can open Host Manager by clicking Host Manager in the «Apache Tomcat» group in your Start menu.[3]
-
You can control who has access to Host Manager and Tomcat Manager by editing the tomcat-users.xml file in C:\Program Files\Tomcat 10.1\conf.[4]
-
To deploy web applications, use Tomcat Manager in your browser. You can get there by navigating to https//127.0.0.1/manager/html.
Thanks for submitting a tip for review!
Advertisement
References
About This Article
Article SummaryX
1. Install and configure Java JDK.
2. Download the Tomcat 9 installer from https://tomcat.apache.org/download-90.cgi.
3. Launch the installer.
4. Click Next, and then I Agree.
5. Select the Full install, and click Next twice.
6. Click the three-dot button to specify JRE location.
7. Select your jre folder, and click OK.
8. Click Next, and then Install.
9. Click Finish.
Did this summary help you?
Thanks to all authors for creating a page that has been read 49,723 times.
Is this article up to date?
Since this article was first written, Lucee has a Windows Installer which installs Tomcat with Lucee.
Before we start with the installation, we need to dive into some basics:
What we don’t like
- A mix of binaries (exe, dll-files) and configuration data (eg. XML files) in the application directory
- The software needs change permissions to write data into his application directory
- A windows service needs System Authority permissions
What we really like
- The application can live perfectly with read permissions in its application directory
- The data of the application can be stored in a data directory on a different drive as C-drive
- A windows service can run with a low privileged user permissions
This guide will fully cover a setup of Apache Tomcat to fulfill these goals from What we really like above.
In terms of Apache Tomcat, we split the files by setting Tomcat’s main variables to the Application path and Data path later on:
catalina.home=C:\Program Files\Tomcat
catalina.base=D:\Tomcat
Before we start, let’s download Apache Tomcat from this page: Tomcat 8 Downloads. Scroll down a bit and choose the link 64-bit Windows zip. Download the product and unzip the content to a temporary folder on your server.
Installation
- Create the folders C:\Program Files\Tomcat, C:\Program Files\Tomcat\bin and C:\Program Files\Tomcat\lib
- Browse the expanded content in your temporary folder and change into the folder apache-tomcat-8.0.18.
- Copy the five files from the root in to the folder C:\Program Files\Tomcat
- Goto the folder named bin.
- Copy all files, except *.bat, *.gz and *.sh to the folder C:\Program Files\Tomcat\bin. We don’t need the batch files: The Tomcat service will get his configuration from the Windows registry instead.
- Go back one level and goto to the folder named lib
- Copy all files to the folder C:\Program Files\Tomcat\lib
That’s it, at least for the application folder. Tomcat requires approximately 10MB of diskspace.
Command line:
md "C:\Program Files\Tomcat"
copy D:\temp\apache-tomcat-8.0.18\*.* "C:\Program Files\Tomcat" /Y

md "C:\Program Files\Tomcat\bin"
copy D:\temp\apache-tomcat-8.0.18\bin\*.exe "C:\Program Files\Tomcat\bin" /Y
copy D:\temp\apache-tomcat-8.0.18\bin\*.dll "C:\Program Files\Tomcat\bin" /Y
copy D:\temp\apache-tomcat-8.0.18\bin\*.jar "C:\Program Files\Tomcat\bin" /Y
copy D:\temp\apache-tomcat-8.0.18\bin\*.xml "C:\Program Files\Tomcat\bin" /Y

md "C:\Program Files\Tomcat\lib"
copy D:\temp\apache-tomcat-8.0.18\lib\*.jar "C:\Program Files\Tomcat\lib" /Y
Note: You can paste the content of the container above directly into the command line of the server.
Now lets do the same for the configuration and data folder:
- Create the folders: D:\Tomcat, D:\Tomcat\conf and D:\Tomcat\webapps.
- Goto the folder named conf.
- Copy all files to the folder D:\Tomcat\conf
- Create the folders D:\Tomcat\webapps\host-manager, D:\Tomcat\webapps\manager and D:\Tomcat\webapps\ROOT.
- Goto the folder named webapps.
- Copy the folders host-manager, manager and ROOT to the matching folder on the target. All these folders have subfolders.
- Create the folders D:\Tomcat\logs, D:\Tomcat\endorsed, D:\Tomcat\temp and D:\Tomcat\work. Some of these directories remain empty until the very first start of Tomcat.
Command line:
md D:\Tomcat
md D:\Tomcat\conf
copy D:\temp\apache-tomcat-8.0.18\conf\*.* D:\Tomcat\conf /Y

md D:\Tomcat\webapps
md D:\Tomcat\webapps\host-manager
xcopy D:\temp\apache-tomcat-8.0.18\webapps\host-manager\*.* D:\Tomcat\webapps\host-manager /s /Y
md D:\Tomcat\webapps\manager
xcopy D:\temp\apache-tomcat-8.0.18\webapps\manager\*.* D:\Tomcat\webapps\manager /s /Y
md D:\Tomcat\webapps\ROOT
xcopy D:\temp\apache-tomcat-8.0.18\webapps\ROOT\*.* D:\Tomcat\webapps\ROOT /s /Y

md D:\Tomcat\endorsed
md D:\Tomcat\logs
md D:\Tomcat\temp
md D:\Tomcat\work
We finished the basic installation. Now we have to edit some of the configuration files.
Let’s go to the folder D:\Tomcat\conf.
server.xml
Catalina’s default host needs some tweaking. Find the line:
<Host name="localhost" appBase="webapps"
            unpackWARs="true" autoDeploy="true">
Change this line to:
<Host name="localhost" appBase="D:\Tomcat\webapps" workDir="D:\Tomcat\work\Catalina\localhost" unpackWARs="true" autoDeploy="true">
A few lines below, you will find the line:
<Valve className="org.apache.catalina.valves.AccessLogValve" directory="logs"
We need to specify the full path to the log directory:
<Valve className="org.apache.catalina.valves.AccessLogValve" directory="D:\Tomcat\logs"
The next step is optional. Tomcat and Lucee are listening on port 8080 to access the administrator interface. Other web servers might use this port already or if you suffer from a security paranoia like i do, we want to have this port on a really weard number.
Note: The Lucee’ians are used to have port 8888 to access the administrator interface.
Find the setting:
<Connector port="8080" protocol="HTTP/1.1"
               connectionTimeout="20000"
               redirectPort="8443" />
Change the port 8080 to the new port.
If you like to access the Tomcat Administration from outside of the server, the Windows firewall needs to be opened with a rule:
netsh advfirewall firewall add rule name="Apache Tomcat" dir=in action=allow protocol=TCP localport=8888 program="C:\Program Files\Tomcat\bin\tomcat8.exe" profile=ANY
You don’t like the command prompt? Add the rule with the firewall applet in the control panel.
Be sure, that the port is limited to the main exe file C:\Program Files\Tomcat\bin\tomcat8.exe.
Todo: maxHttpHeaderSize=»8192″ (Default: 4096)
minSpareThreads=»25″ (Default: 4)
disableUploadTimeout=»true» (Default: false)
tomcat-users.xml
This file holds rules, usernames and passwords to access the administrator interface of Tomcat. The access to the administrator interface is disabled by default:
<!--
  <role rolename="tomcat"/>
  <role rolename="role1"/>
  <user username="tomcat" password="tomcat" roles="tomcat"/>
  <user username="both" password="tomcat" roles="tomcat,role1"/>
  <user username="role1" password="tomcat" roles="role1"/>
-->
Replace the content with this:
<role rolename="admin-gui"/>
<role rolename="manager-gui"/>
<user name="AccountName" password="VeryStrongPassword" roles="admin-gui,manager-gui" />
Choose a clever name for the administrator account. For security reasons, do not choose admin or administrator!
The password should contain a mix between upper- and lower-case letters, numbers and special characters like _-!.
catalina.properties
This is an optional task, which cuts the time Tomcat takes to start:
Find the line:
tomcat.util.scan.StandardJarScanFilter.jarsToSkip=\
Remove the lines below until the next comment and change the line to:
tomcat.util.scan.StandardJarScanFilter.jarsToSkip=\*.jar
Instead of skipping the list of JAR’s at startup, Tomcat will skip all JAR’s.
Find the line:
tomcat.util.scan.StandardJarScanFilter.jarsToScan=log4j-core*.jar,log4j-taglib*.jar
Add a remark in front of the line:
#tomcat.util.scan.StandardJarScanFilter.jarsToScan=log4j-core*.jar,log4j-taglib*.jar
Update
An minor update requires mostly only the replacement of the files in the folders C:\Program Files\Tomcat\bin and C:\Program Files\Tomcat\lib. Stop the Tomcat service, replace the files and start the service. That’s it.
Reference: Tomcat Configuration Reference

Table of Contents
- Introduction
- 1. Prerequisites
- 2. Installation Steps
- 2.1 Install Tomcat as a windows service
- 2.2 Install Tomcat as a standalone application:
- 3. Change the default port of Tomcat
- 4. Check if Tomcat is up
- 4. Tomcat Logging
- Summary
- Next Steps
Introduction
Tomcat is an open-source Java application server provided by Apache, it is the most popular application server for the java environment. In this article, we provide a step-by-step guide on how to install and set up an apache tomcat in a windows environment.
1. Prerequisites
Tomcat doesn’t work without Java, so before installing tomcat on the machine, you should install a compatible Java runtime version and set up the JAVA_HOME environment variable. Both java and tomcat versions should be compatible so I recommend always install the same version for java and tomcat, in this tutorial we use java 8 and tomcat 8.
2. Installation Steps
There are two ways for installing tomcat in a windows machine, you can either install it as a windows service or as a standalone application.
2.1 Install Tomcat as a windows service
The main benefit of installing Tomcat as a windows service is to allow starting it automatically at the startup of the windows.
Following are the steps for installing and setting up tomcat as a windows service:
- Download the windows service installer from here.
- Install the downloaded file, pass all the setup until reaching Configuration Options.
here you can set the service name, the shutdown port, and the running port of tomcat, by default tomcat runs on port 8080, so I recommend keeping the default configuration as it is, you can always change this configuration after the installation.
- After completing the installation, the tomcat folder can be found under “C:\Program Files\Apache Software Foundation\Tomcat 8.5”.
- If you open the windows services, you find a new service called Apache Tomcat 8.5 Tomcat8, change its startup type to Automatic.
And here you go, tomcat is installed as a windows service, and will start at the windows startup.
2.2 Install Tomcat as a standalone application:
If you want to manage the startup of tomcat manually, you can install it as a standalone application through the following steps:
- Download the tomcat zip file from here.
- Extract the downloaded zip under the “D:” drive.
- To start tomcat, run “startup.bat” file under “D:\apache-tomcat-7.0.35\bin”.
- To stop tomcat, run “shutdown.bat” file under “D:\apache-tomcat-7.0.35\bin”.
3. Change the default port of Tomcat
To change the default running port of tomcat, open “server.xml” under the “D:\apache-tomcat-7.0.35\conf” folder and change the port attribute of the Connector tag.
<Connector port="9095" protocol="HTTP/1.1"
               connectionTimeout="20000"
               redirectPort="8443" />
Here, we set tomcat to run on port 9095, a restart is required for the change to take effect.
4. Check if Tomcat is up
In order to make sure that tomcat is started up correctly on the configured port, just run localhost:9095 URL on any browser and if you get the following screen then tomcat is up and ready to serve requests.
4. Tomcat Logging
Tomcat log files can be found under “D:\apache-tomcat-7.0.35\logs”, there are 2 important log files to be checked when investigating applications issues:
- tomcat8-stderr..log: This file logs all the runtime exceptions which are thrown by the running application.
- tomcat8-stdout..log: This file displays all the trace and info logs generated by the application.
If these files are not found, you can check the catalina..log file which holds all the exceptions and info logs generated by the application.
Summary
Tomcat is an open-source Java application server provided by Apache, it is the most popular application server for the java environment. In this article, we provide a step-by-step guide on how to install and set up an apache tomcat in a windows environment.
Next Steps
If you’re interested in learning more about the basics of Java, coding, and software development, check out our Coding Essentials Guidebook for Developers, where we cover the essential languages, concepts, and tools that you’ll need to become a professional developer.
Thanks and happy coding! We hope you enjoyed this article. If you have any questions or comments, feel free to reach out to jacob@initialcommit.io.