
Файлы .htaccess размещаются в папках сайтов веб-сервера Apache. Они позволяют изменять настройки веб-сервера на уровне конкретных папок.
По ряду причин, которые рассмотрены ниже в данной статье, если у вас есть доступ к главному конфигурационного файлу веб-сервера httpd, то следует полностью избегать использование файла .htaccess и даже отключить его поддержку. Тем не менее очень часто файл .htaccess является единственным вариантом для пользователя изменить настройки (например, на совместном хостинге), поэтому .htaccess применяется очень часто даже несмотря на то, что всё, что можно сделать с помощью .htaccess, точно также можно настроить и в главном конфигурационном файле Apache. Вместо установки директив в файле .htaccess, лучше устанавливать их в блоке Directory, поскольку эффект будет такой, но производительность улучшиться.
Файлы .htaccess ещё называют «распределёнными конфигурационными файлами», поскольку настройки, применимые к директориям и которые можно указать в конфигурации, также можно разместить по одной или сразу несколько в файлах .htaccess. Эти настройки будут применены к текущей папке, где расположен .htaccess, а также ко всем её вложенным подпапкам.
Если имеются неправильные настройки в главном конфигурационном файле Apache, то веб-сервер не запустится. Но «с помощью» .htaccess можно сделать так, что неправильные настройки будут подгружены при обращении к файлам папки — в этом случае веб-сервер продолжит работу, но для этого запроса будет выдана ошибка 500 — Сервер пока не может обработать этот запрос.
Включение поддержки файла .htaccess сказывается на производительность сервера даже в том случае, если фактически этот файл не используется (объяснение ниже). Поэтому по умолчанию файл .htaccess отключён в Apache.
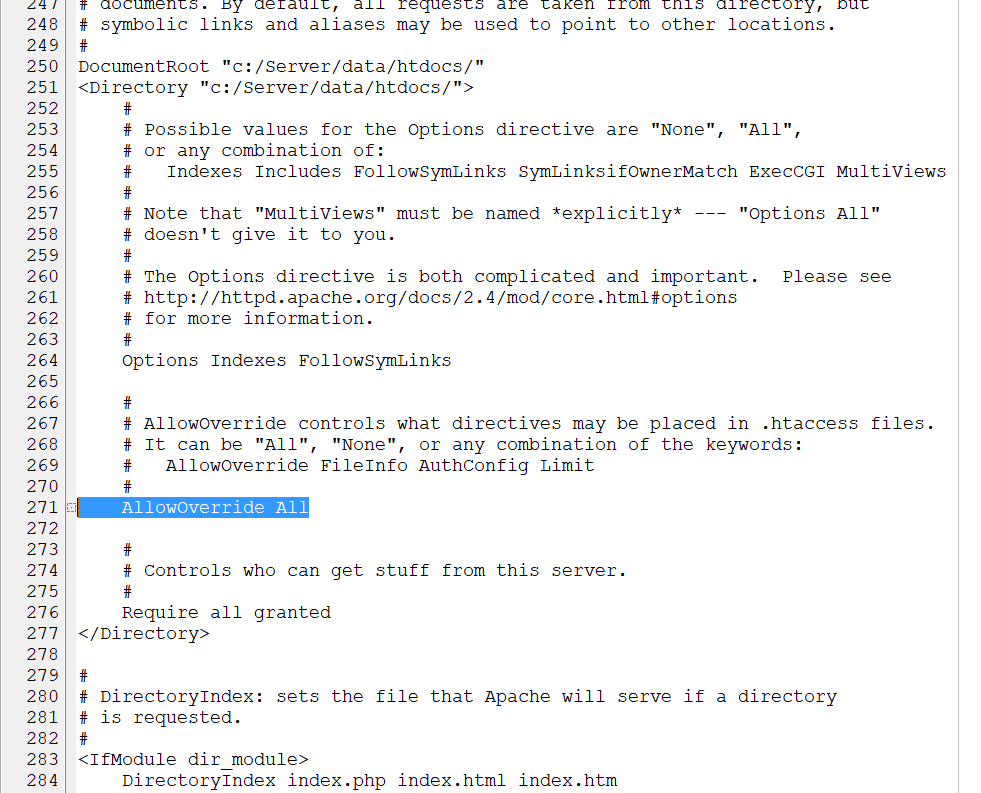
Включить .htaccess можно индивидуально для каждой директивы Directory. Для этого внутри неё нужно указать нужную настройку с помощью директивы AllowOverride. По умолчанию в главном конфигурационном файле следующее:
<Directory "${SRVROOT}/htdocs">
    Options Indexes FollowSymLinks

    AllowOverride None

    Require all granted
</Directory>
Как видно, AllowOverride установлен на None. Вместо None можно указать All или любые комбинации ключевых слов, например:
AllowOverride FileInfo AuthConfig Limit
Для включения всех возможностей .htaccess установите так:
<Directory "${SRVROOT}/htdocs">
    Options Indexes FollowSymLinks

    AllowOverride All

    Require all granted
</Directory>
Чтобы настройки вступили в силу, перезапустите веб-сервер.
Файл .htaccess находится не в папках Apache, а в папках сайтов, то есть к нему может быть сделан запрос и, при неправильной настройке, посторонние его могут скачать. Файл .htaccess содержать информацию интересную для атакующего (хакеров), поэтому нужно запретить посторонним доступ к этому файлу. Запрет доступа к файлам .htaccess и .htpasswd для посетителей сайтов делается следующим образом:
<Files ".ht*">
    Require all denied
</Files>
По умолчанию эта настройка уже имеется в главном конфигурационном файле Apache.
Как поменять имя файла .htaccess
Для дополнительной безопасности, либо для своего удобства, можно поменять имя файла .htaccess. Точнее говоря, точно также как и файлы .htaccess будут обрабатываться файлы с указанным произвольным именем.
Для этого используется директива AccessFileName, которая позволяет поменять имя файла .htaccess на другое. Допустим мы решили назвать файл именем .config, тогда в конфигурационный файл сервера нужно добавить следующее:
AccessFileName ".config"
Какие настройки можно использовать в .htaccess
В файле .htaccess можно использовать многие (но не все) настройки, которые можно прописать в конфигурационном файле сервера. Чтобы точно узнать про конкретную директиву, можно её использовать в .htaccess или нет, нужно открыть документацию https://httpd.apache.org/docs/current/, найти интересующую директиву и посмотрите, указан ли в строке Context файл .htaccess. Если указан, значит можно использовать.
Пример:
Context:	server config, virtual host, directory, .htaccess
Override:	FileInfo
Очень часто файл .htaccess используется для настройки доступа или для установки правил RewriteRule (mod_rewrite), но в этом файле можно использовать и другие настройки.
Точно также, из-за того, что обычно для контроля доступа и RewriteRule используется .htaccess, многие упускают из виду, что эти же самые настройки можно прописать и в главном конфигурационном файле Apache. То есть при желании вы можете отказаться от использования .htaccess и перенести настройки mod_rewrite в конфигурацию веб-сервера.
Синтаксис .htaccess
У .htaccess нет особенных настроек синтаксиса — директивы записываются также, как и в конфигурационных файлах.
Если вы получили ошибку 5xx — Ошибка сервера, это означает, что имеется ошибка в синтаксисе .htaccess.
Как применяются директивы файла .htaccess
Конфигурационные директивы, найденные в файле .htaccess, применяются к директории, в которой найден файл .htaccess, и всем её поддиректориям. Тем не менее, важно также помнить, что могут быть файлы .htaccess в родительских директориях. Директивы применяются в том порядке, как они были найдены. Поэтому файл .htaccess конкретной директории может перезаписывать директивы, найденные в файлах .htaccess выше в дереве директорий. А те, в свою очередь, могли уже перезаписать директивы, найденные ещё выше или директивы самого главного конфигурационного файла сервера.
Пример:
В директории /www/htdocs/example1 у нас есть файл .htaccess содержащий следующее:
Options +ExecCGI
Примечание: у вас должна быть включена опция «AllowOverride Options» чтобы разрешить использовать директиву «Options» в .htaccess файлах. Либо значение AllowOverride должно быть установлено на All.
В директории /www/htdocs/example1/example2 у нас есть файл .htaccess содержащий:
Options Includes
Поскольку второй файл .htaccess в директории /www/htdocs/example1/example2, то выполнение CGI не разрешено, поскольку эффект будет иметь опция Options Includes, которая полностью перезаписывает значения настроек Options, имеющих место ранее.
Объединение файла .htaccess с главными конфигурационными файлами
Файлы .htaccess могут перезаписать раздел <Directory> для соответствующей директории, но будут перезаписаны другими типами конфигурационных разделов из главных конфигурационных файлов. Это можно использовать для закрепления конкретных конфигурацией, даже при наличии либеральных настроек AllowOverride. Например, для предотвращения выполнения скрипта, но позволив все другие настройки в .htaccess, вы можете использовать:
<Directory "/www/htdocs">
    AllowOverride All
</Directory>

<Location "/">
    Options +IncludesNoExec -ExecCGI
</Location>
Этот пример подразумевает, что вашим DocumentRoot является /www/htdocs.
Когда (не) использовать файлы .htaccess
Если коротко, вы должны использовать файлы .htaccess только когда у вас нет доступа к главному конфигурационному файлу сервера. Как уже было отмечено, распространены неправильные мнения, что аутентификацию пользователей и директивы mod_rewrite можно указывать только в .htaccess. Это просто неверно. Конфигурации аутентификации можно поместить в главную конфигурацию сервера и, на самом деле, это более предпочтительный вариант. Аналогично директивы mod_rewrite в главной конфигурации сервера работают лучше по многим причинам.
Файлы .htaccess должны использоваться в случае, когда веб-мастеру нужно применить изменённые настройки к серверу на уровне директорий, но у него нет root доступа к системе сервера. Это обычный случай для виртуальных хостингов, то есть на практике очень часто файлы .htaccess являются единственной возможной альтернативой.
Тем не менее, в целом использование файлов .htaccess следует избегать когда это возможно. Любые настройки, которые вы собираетесь разместить в файле .htaccess, могут быть эффективно сделаны в разделе <Directory> в главном конфигурационном файле сервера.
Имеется две главные причины избежания использования файлов .htaccess.
Первая причина — это производительность. Когда AllowOverride установлена на разрешение использования файлов .htaccess, httpd будет искать файлы .htaccess в каждой папке. То есть разрешение файлов .htaccess ударяет по производительности не зависимо от того, используете вы на самом деле .htaccess или нет, создали вы хоть один файл .htaccess или нет. Файл .htaccess загружается каждый раз, когда запрашивается документ.
Более того, помните, что httpd должен искать файлы .htaccess в директориях более высокого уровня чтобы собрать полный набор директив, которые должны быть применены. Таким образом, если файл запрошен из директории /www/htdocs/example, то httpd должен искать эти файлы в:
- /.htaccess
- /www/.htaccess
- /www/htdocs/.htaccess
- /www/htdocs/example/.htaccess
И таким образом при каждом запросе к файлу из текущей директории, в системе выполняется 4 дополнительных доступа к файлу, даже если ни оидн из них не существует. (Примечание: описан случай, когда файл .htaccess был включён для /, что встречается не очень часто).
В случае директив RewriteRule в контексте .htaccess эти регулярные выражения должны перекомпилироваться с каждым запросом к этой директории, в то время как в контексте главной конфигурации сервера, они компилируются только один раз и кэшируются. Дополнительно, сами правила более сложные, поскольку они должны работать с ограничениями, приносимыми контекстом директории и mod_rewrite.
Второе о чём нужно помнить, это безопасность. Вы разрешаете пользователям модифицировать конфигурацию сервера, что может привести к изменениям за пределами вашего контроля.
Помещение файла .htaccess с управляющими директивами в папку /www/htdocs/example эквивалентно помещению этих же директив в раздел Directory: <Directory «/www/htdocs/example»> в главных настройках конфигурации сервера:
Содержимое файла .htaccess в /www/htdocs/example
AddType text/example ".exm"
Секция из файла httpd.conf:
<Directory "/www/htdocs/example">
    AddType text/example ".exm"
</Directory>
При этом размещение этой конфигурации в файле настроек сервера приведёт в результате к меньшему влиянию на производительность, поскольку конфигурация загружается только один раз при запуске httpd, а не при каждом запросе к файлу.
Можно полностью отключить использование файлов .htaccess установив директиву AllowOverride на none:
AllowOverride None
Решение проблем
Когда вы помещаете директивы в файл .htaccess и не получаете желаемого эффекта, может быть несколько причин из-за которых что-то пошло не так.
Чаще всего проблема в том, что AllowOverride не установлена так, чтобы учитывались ваши конфигурационные директивы. Убедитесь, что у вас не включено
AllowOverride None
Следующий тест позволит однозначно ответить на вопрос, включена ли поддержка файлов .htaccess или нет: поместите какой-нибудь мусор в файл .htaccess и перезагрузите страницу. Если не появиться ошибка сервера, то практически наверняка включено AllowOverride None.
С другой стороны, если вы получаете ошибки сервера при попытке доступа к документам, проверьте лог error (ошибок) httpd. Весьма вероятно, что он скажет вам, что эта используемая в файле .htaccess директива не разрешена:
[Fri Sep 17 18:43:16 2010] [alert] [client 192.168.200.51] /var/www/html/.htaccess: DirectoryIndex not allowed here
Это говорит о том, что либо вы используете директиву, которая не разрешена в файлах .htaccess, или что у вас просто нет установленной AllowOverride на уровень, достаточном для используемой директивы.
Ещё один вариант, в журнале может быть сказано, что у вас ошибка синтаксиса в самой используемой директиве:
[Sat Aug 09 16:22:34 2008] [alert] [client 192.168.200.51] /var/www/html/.htaccess: RewriteCond: bad flag delimiters
В этом случае сообщение об ошибке должно быть конкретным о том, что у вас не так с файлом .htaccess и используемыми директивами.
Связанные статьи:
- Как в Windows поменять сообщения ошибок Apache (100%)
- Как защитить папку Apache паролем в Windows (100%)
- Apache для Windows (53.4%)
- Как запустить Apache на Windows (53.4%)
- Документация по Apache на русском языке (53.4%)
- Как в phpMyAdmin поменять настройки экспорта по умолчанию (RANDOM — 50%)
The .htaccess file in Apache allows configurations at the directory and subdirectory level. Using .htaccess enables you to configure website permissions without altering server configuration files.
This tutorial will show how to set up and enable .htaccess on Apache, restrict access to specific localizations on the server, manage IP addresses, and more.
Prerequisites
- A working Apache web server installation (this guide uses an Ubuntu Apache installation).
- Access to a terminal window/command line.
- Access to a user account with root privileges.
- A text editor, such as nano.
How to Enable .htaccess in Apache
By default, the .htaccess file is not enabled primarily for security and performance reasons. Allowing .htaccess files can introduce security vulnerabilities if users misconfigure the settings to expose sensitive information or weaken server security. Additionally, improperly configuring the server can significantly degrade performance.
The sections below show how to enable .htaccess in Apache and configure it properly.
Step 1: Enable .htaccess
Follow the steps below to enable .htaccess in Apache:
1. Open the default host configuration file by running the following command:
sudo nano /etc/apache2/sites-available/default2. Locate the section labeled <Directory /var/www>. In that section, change the AllowOverride None entry to:
AllowOverride All
3. Save the file and exit.
4. Restart the Apache service for the changes to take effect:
sudo systemctl apache2 restartStep 2: Create .htaccess File
Like most Linux software packages, Apache functions on configuration files, one of which is the .htaccess file. It works by specifying a setting along with a value. If your server does not have an .htaccess file, it might be configured globally or might not require one.
However, if you need specific directory-level configurations or URL rewrites, you can create and manage .htaccess files as needed. Follow the steps below:
1. Create and open the .htaccess file for editing with the following command:
sudo nano /var/www/my_website.com/.htaccessReplace my_website.com with the name of your actual website.
2. Save the file and exit.
3. Restart the Apache service to apply the changes:
sudo systemctl apache2 restartStep 3: Restrict Directory Listings
There may be locations on your server that you want to restrict access to. You can do this by creating a list of usernames and passwords that are authorized to have access.
1. Start by creating a new file — .htpasswd, in a separate directory:
sudo nano /user/safe_location/.htpasswd2. In the file, enter a username and password for each user that you want to create. Make sure to use strong passwords and enter only one username/password pair per line.
3. Save the file and exit.
4. Next, edit .htaccess and paste the following lines to enable authentication:
AuthUserFile /user/safe_location/.htpasswd
AuthGroupFile /dev/null
AuthName "Please Enter Password"
AuthType Basic
Require valid-user
- Replace
/user/safe_location/.htpasswdwith the location of your choice. Don’t store it in the same directory as your web content, for security reasons. AuthUserFile. Sets the location for your .htpasswd file.AuthGroupFile. If you are not using a group, keep this as a placeholder.AuthName. The text displayed to the user. You can phrase it as you like.AuthType. Type of authentication used — keep the default value.Require valid-user. Allows any of the several authorized people to log on. You can change this toRequire user new_userto restrict access only to someone with the usernamenew_user.
Why Configure an Apache .htaccess File and How?
Configuring an Apache .htaccess file allows you to manage server settings such as redirects, access control, and URL rewriting on a per-directory basis without modifying the main server configuration. It is also important to configure the file properly to prevent unauthorized access.
This section shows the most common configuration settings and how to set them properly.
Custom Error Pages
You can use the .htaccess file to point basic functions to a new location, such as custom error pages. One example is the 404 page. Follow the steps below:
1. Open the .htaccess file and paste the following line:
ErrorDocument 404 /404.htmlThis line tells the system to look at the website’s content directory for a /404.html file as the error page.
2. Create the 404 page using the command below:
sudo nano cd /var/www/My_Website.com/public.html/404.htmlReplace My_Website.com with your website address.
The command will open the 404.html file in your text editor.
3. Paste the following code in the file:
<!doctype html>
<html>
<body>
404 Error: Page not found
</body>
</html>
You can customize this page to display any kind of error message. You can also customize any other error pages you want. Just specify the ErrorDocument number, for example, Error 500, and then point .htaccess to the new error.html file that you create.
Redirections
Redirections are essential for directing traffic from outdated URLs to new ones, managing moved content, or consolidating multiple URLs into a single destination. You can use the .htaccess file to create both temporary (302) and permanent (301) redirects.
For example:
Open the .htaccess file and paste the following:
Redirect301/Other_Website.com/index.html/My_Website.com/index.htmlThis line instructs Apache to take any traffic searching for Other_Website.com and redirect it to My_Website.com. Replace the values with your own website addresses.
Blocking Traffic
Blocking unwanted traffic, such as malicious bots or users from specific IP addresses, can be efficiently handled with .htaccess. It is possible to:
- Allow only specific IPs.
- Block specific IP addresses.
- Block visitors by the referrer.
The sections below explain each scenario.
Allow Specific IP Addresses
To allow access to specific IP addresses only, specify them in the .htaccess file. Open the .htaccess file and paste the following lines:
order deny, allow
allow from 192.168.0.54
allow from 192.168.0 
The lines above allow access only to the specified IP addresses and block the rest.
Block IP Addresses
Depending on whether you want to block a single or a range of IP addresses, use one of the following:
- To block a single IP address, use the following syntax:
deny from 192.168.1.1- Block multiple IP addresses:
deny from 192.168.1.1 192.168.1.2 192.168.1.3- Block a range of IP addresses:
deny from 192.168.1.0/24If you leave off the final digit, it will block all IP addresses in the 0 — 255 range. For example:
deny from 192.168.0Note: You can save your .htaccess file after each operation listed above. When you finish making changes, just reload your Apache service before testing. It is also helpful to add comments to the file. Use the # sign to mark a line as a comment, which will let you make notes that the system won’t read as commands.
Cross-Origin Resource Control
Cross-Origin Resource Sharing (CORS) restricts web pages or scripts from accessing resources from another domain. To manage cross-origin requests and improve security, .htaccess can set CORS headers to control which domains are allowed to access resources on your server.
The following is an example configuration of the .htaccess file that defines who can access resources and which methods are permissible, preventing unauthorized cross-origin requests:
# Allow all domains
Header set Access-Control-Allow-Origin "*"

# Allow a specific domain
Header set Access-Control-Allow-Origin "https://example.com"

# Allow multiple methods
Header set Access-Control-Allow-Methods "GET, POST, PUT"
mod_rewrite
The mod_rewrite module provides a flexible and powerful way to manipulate URLs using rules defined in .htaccess. It is commonly used for creating user-friendly URLs, redirecting traffic, and rewriting request URLs.
The following example configuration enables mod_rewrite, redirects non-www URLs to their www counterparts, and rewrites requests from product/123 to product.php?id=123:
# Enable mod_rewrite
RewriteEngine On

# Redirect non-www to www
RewriteCond %{HTTP_HOST} ^example\.com [NC]
RewriteRule ^(.*)$ http://www.example.com/$1 [L,R=301]

# Rewrite URLs to a single script
RewriteRule ^product/([0-9]+)$ /product.php?id=$1 [L]
You can also use mod_rewrite to prevent people from being redirected from a specific site to your server. This might be helpful if you want to isolate traffic patterns. You can also use it if you are getting excess server traffic from a questionable source.
Open the .htaccess file and add the following block:
RewriteEngine on
# Options +FollowSymlinks
RewriteCond %{HTTP_REFERER} blockeddomain\.com [NC]
RewriteRule .* - [F]
The NC option instructs to ignore the upper or lower case so that the rule cannot be bypassed by entering BlockedDomain.com.
If you want to add more domains, note the following:
RewriteEngine on
# Options +FollowSymlinks
RewriteCond %{HTTP_REFERER} blockeddomain\.com [NC,OR]
RewriteCond %{HTTP_REFERER} blockeddomain2\.com
RewriteRule .* - [F]
The OR flag tells the system that you are not done adding blocked referrers yet. Omit this option on the last entry.
CGI Execution
The Common Gateway Interface (CGI) allows a web server to interact with external content-generating programs, such as CGI programs or CGI scripts. CGI allows you to place dynamic content on your website in any programming language you are most familiar with. The .htaccess file can be used to enable or configure CGI script execution in a directory.
Open the .htaccess file and add the following lines to enable CGI execution and specify the script handler:
<Directory "/home/*/public_html">
    Options +ExecCGI
    AddHandler cgi-script .cgi .pl
</Directory>
The configuration above allows CGI program execution for any file ending in .cgi and .pl in users’ directories.
Server-Side Includes (SSIs)
Server Side Includes (SSIs) allow HTML pages to include other files or script outputs, facilitating a modular and maintainable web page design. You can enable SSIs via .htaccess.
Open the .htaccess file and paste the following code to enable SSIs:
AddType text/html .shtml
AddHandler server-parsed .shtml
Options Indexes FollowSymLinks Includes
AddHandler server-parsed .html .htm
This configuration tells Apache to treat .shtml, .html, and .htm files as HTML and allows them to be parsed for Server-Side Includes (SSI). It also enables directory listings, symbolic link following, and server-side includes.
Conclusion
Enabling .htaccess can be an incredibly valuable tool for managing your Apache web server. It provides granular control over web server configurations on a per-directory basis, making it ideal for implementing specific rules and settings without modifying the global server configuration.
This guide provided the basic commands and configurations for .htaccess, with some of the most likely scenarios you might encounter.
Next, learn how to fix the Apache 403 Forbidden error or see how to set up Apache Virtual Hosts on Ubuntu.
Was this article helpful?
YesNo
The .htaccess file is a powerful configuration tool that allows you to control and customize various aspects of your website’s behavior on an Apache web server. This guide will cover how to enable .htaccess in Apache, discuss best practices, and provide examples of common use cases to help you make the most of this feature.
1. Understanding .htaccess and its benefits
The .htaccess (hypertext access) file is a hidden configuration file used by Apache web servers. It allows you to manage settings for individual directories within your website without having to modify the global Apache configuration. Benefits of using .htaccess include:
- Increased flexibility: Apply custom configurations to specific directories or subdirectories.
- Centralized control: Manage multiple settings in one file.
- Dynamic changes: Changes to the .htaccess file take effect immediately without restarting Apache.
To enable .htaccess in Apache, follow these steps:
- Editing the main Apache configuration file:
Locate the main Apache configuration file, typically named httpd.conf or apache2.conf, and open it in a text editor. - Allowing .htaccess overrides:
Find thedirective for your website’s document root. Inside this block, change the AllowOverride directive from None to All. This allows .htaccess files to override the default Apache settings.Example:
<Directory «/var/www/html»>
AllowOverride All
</Directory>
Save and close the configuration file.
- Restarting Apache:
Restart the Apache web server to apply the changes. Depending on your operating system, use one of the following commands:- Ubuntu/Debian: `sudo systemctl restart apache2`
- CentOS/Fedora: `sudo systemctl restart httpd`
3. Best practices for using .htaccess
- Keep .htaccess files organized: Limit the number of .htaccess files, and only use them when necessary.
- Ensure proper permissions: Set appropriate file permissions (e.g., 644) to prevent unauthorized access.
- Test changes in a development environment: Always test changes in a development or staging environment before making changes to a production server.
- Keep backups: Maintain backups of your .htaccess files to quickly revert changes if needed.
4. Common use cases and examples
4.1. Custom error pages
Create custom error pages for various HTTP error codes:
|
ErrorDocument 404 /custom_404.html ErrorDocument 500 /custom_500.html |
4.2. Password protection
Protect a directory with a password:
|
AuthType Basic AuthName «Restricted Area» AuthUserFile /path/to/.htpasswd Require valid-user |
4.3. URL rewriting and redirection
Redirect all HTTP requests to HTTPS:
|
RewriteEngine On RewriteCond %{HTTPS} off RewriteRule ^(.*)$ https://%{HTTP_HOST}%{REQUEST_URI} [L,R=301] |
4.4. Blocking IP addresses
Block specific IP addresses from accessing your website:
|
order allow,deny deny from 192.168.1.1 deny from 192.168.1.2 allow from all |
4.5. Implementing caching rules
Set caching rules for specific file types:
|
<FilesMatch «.(jpg|jpeg|png|gif|js|css)$»> ExpiresActive On ExpiresDefault «access plus 1 month» </FilesMatch> |
5. Troubleshooting .htaccess issues
- Check for syntax errors: Ensure that your .htaccess file is free of syntax errors. You can use online .htaccess validators to help identify issues.
- Verify file permissions: Confirm that your .htaccess file has the correct file permissions, such as 644, to ensure it can be read by the web server.
- Examine Apache error logs: Review the Apache error logs for any messages related to .htaccess issues. These logs can provide valuable information for diagnosing problems.
- Test with a minimal .htaccess file: If you’re unsure whether .htaccess is enabled, create a minimal .htaccess file with a single directive (e.g., `Redirect /test.html /test2.html`) and see if it takes effect.
Conclusion
In this comprehensive guide, we’ve covered how to enable .htaccess in Apache, discussed best practices for using .htaccess, and provided examples of common use cases. By understanding how to enable and configure .htaccess files, you can take advantage of their powerful features to enhance and customize your website’s behavior on an Apache web server.
Enabling htaccess Files on Apache in Windows. Learn how to easily enable .htaccess on Apache2 in Windows. By default, XAMPP and similar Apache Web Servers running on Windows do not have mod_rewrite enabled, which causes Apache to ignore .htaccess files.
This step-by-step guide will help you activate mod_rewrite, allowing you to use .htaccess files effectively. Whether you’re optimizing WordPress permalinks, improving site security, or setting up redirects, it has you covered.
How to Enable htaccess Files
What is an .htaccess File?
An .htaccess file (Hypertext Access File) is a configuration file used on Apache web servers to customize server behavior for specific directories. These settings override the server’s global configuration and apply to the directory where the file is located and its subdirectories.
Common Uses of .htaccess Files
- URL Rewriting: Create user-friendly, SEO-optimized URLs.
- Authentication and Authorization: Protect certain areas of your website with a username and password.
- Custom Error Pages: Design unique pages for error codes like 404 or 500.
- Redirects: Manage redirects for seamless navigation and improved SEO.
- Security: Block IP addresses and restrict directory access to enhance website security.
Note: The .htaccess file is specific to Apache servers. Other web servers, like Nginx, use completely different configuration methods.
How to Create htaccess Files in Windows
By default, Windows does not allow you to name a file .htaccess. Attempting to do so results in the error: «You must type a filename.» Fortunately, there’s a simple workaround to force Windows to accept .htaccess as a file name. Here’s how:
- From your Desktop, right-click and select New > Text Document.
- Open the New Text Document.
- Navigate to and select File > Save As.
- (1) For «File name:» enter .htaccess.
(2) Next to «Save as type:» select All Files (*.*) from the dropdown.
(3) Click Save.
That’s all there is to it! You should now have an .htaccess file on your Windows Desktop.
How to Enable htaccess on Apache2 in Windows
Follow these steps to enable htaccess files on an Apache server in Windows, such as those using XAMPP:
-
-
- Locate and open the httpd.conf file: Navigate to the
apache/confdirectory in your XAMPP installation and open the file in a text editor. - Enable mod_rewrite: Find the line:
#LoadModule rewrite_module modules/mod_rewrite.soRemove the
#to enable the module:LoadModule rewrite_module modules/mod_rewrite.so - Update directory settings: Look for the section starting with:
<Directory "path_to_your_directory">Ensure it contains the following directive:
AllowOverride AllThis enables the .htaccess file to override default settings.
- Restart Apache: Use the XAMPP control panel to restart the Apache server for the changes to take effect.
- Create an .htaccess file: Place this file in your website’s root directory and add your rewrite rules or other configurations.
- Locate and open the httpd.conf file: Navigate to the
Once complete, your server will recognize and use .htaccess files to manage configurations such as URL redirection, access control, and more.
How to Enable htaccess for WordPress
Using htaccess files is crucial for WordPress sites, especially for enabling pretty permalinks. Here’s how to enable and configure WordPress htaccess:
- Check for an Existing htaccess File: Look for the .htaccess file in your WordPress root directory. If it doesn’t exist, create one.
- Set File Permissions: Ensure the file permissions are set to
644for security. Use an FTP client or hosting control panel for this step. - Update Permalink Settings:
- Go to Settings → Permalinks in your WordPress admin dashboard.
- Select your desired permalink structure and save changes.
- WordPress will automatically update the .htaccess file with the appropriate rewrite rules.
After these steps, your WordPress site will use pretty permalinks, enhancing both user experience and SEO.
.htaccess FAQs
Here are some commonly asked questions regarding the use of .htaccess files:
What happens if the htaccess file is not working?
Ensure that mod_rewrite is enabled in Apache, and check for syntax errors in your .htaccess file.
Can I use .htaccess on Nginx?
No, .htaccess is specific to Apache servers. Nginx uses a different configuration system (nginx.conf).
What are the security risks of .htaccess files?
Incorrectly configured .htaccess files can expose sensitive data or create vulnerabilities. Always review and test configurations carefully.
Advanced Tips for Optimization
- Leverage Browser Caching: Add rules to cache static resources for faster page loads.
- Implement HTTPS Redirection: Force all traffic to use HTTPS for better security and SEO.
- Protect Sensitive Files: Deny access to sensitive files like wp-config.php or .env.
Important Notes
Note: These instructions apply to Apache-based servers only. If you are using Nginx or other server types, the configuration process will differ. By following this guide, you can fully leverage the power of htaccess XAMPP and WordPress htaccess. You can make htaccess files in Windows for enhanced functionality, security, and SEO on Apache servers.
-