
AMD OverDrive is a software utility from the CPU manufacturer that helps you with overclocking and fan control. However, some people encounter AODDriver2.sys error when using this software. This post from MiniTool provides you with multiple solutions to fix the error.
AODDriver2.sys
AODDriver2.sys is a useful utility for people who use ADM CPU because it enables them to extract maximum performance from the hardware. However, any conflict with AMD OverDrive software can cause Aoddriver2.sys error in Windows PC.
Many people have reported that aoddriver2.sys error is resulting in BOSD(Blue Screen of Death) from Windows 7 to Windows 10. AODDriver2.sys is a Windows driver that allows the computer to communicate with hardware or connected devices.
In this case, AODDriver2.sys can directly access the inside of the Windows operating system, then your computer will be shut down by the conflict between the driver and the hardware, and the AODDriver2.sys BSOD error message will appear.
In addition, AODDriver2.sys error makes your computer extremely difficult to restart and diagnose because of the frequent shutdowns.
What causes the AODDriver2.sys blue screen error? It can be caused by several reasons and the installed AMD OverDrive software with incompatible CPU is one of the reasons. Here are the most common AODDriver2.sys error messages as follows.
SYSTEM_SERVICE_EXCEPTION AODDriver2.SYS
SYSTEM_THREAD_EXCEPTION_NOT_HANDLED AODDriver2.SYS
In this next part, I will introduce how to fix the AODDriver2.sys error on Windows.
How to Fix the AODDriver2.sys BSOD Error
- Uninstall AMD OverDrive
- Run System File Checker
- Perform System Restore
- Uninstall the AMD OverDrive program in Safe Mode
- Perform System Image Recovery in WinRE
- Perform a Clean Install
How to Fix the AODDriver2.sys BSOD Error
There are multiple solutions to this error. You should try them to fix AODDriver2.sys blue screen depends on your case since this error may cause your PC can’t boot normally. Thus, if your PC can boot, go to case 1. If cannot, go to case 2.
Case 1: Your PC Can Boot Normally
Fix 1: Uninstall AMD OverDrive
First, if you haven’t uninstalled the AMD OverDrive software yet, now you should do that. Follow the instructions below:
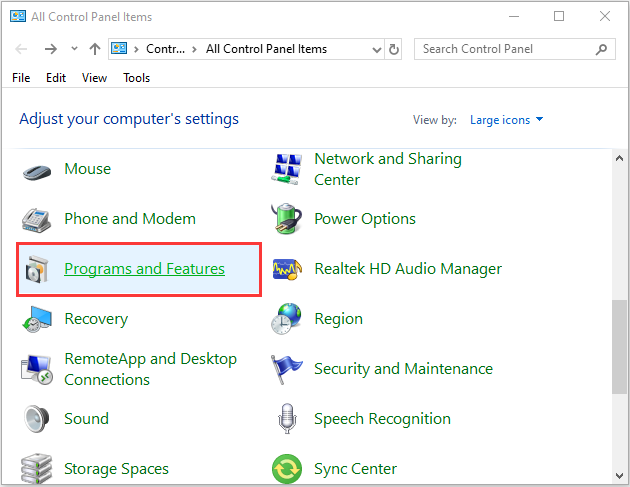
Step 1: Search for Control Panel in the Search box to open it.
Step 2: Navigate to the Programs and Features section and click it.

Step 3: Find AMD OverDrive in the list and right-click it to choose Uninstall/Change.
Step 4: Follow the on-screen instructions to uninstall it.
After the uninstallation is complete, restart the PC and check if the issue has been fixed.
Fix 2: Run System File Checker
If the problem persists, continue to the next method: use System File Checker. Sometimes, AODDriver2.sys BSOD is caused by the corrupted Windows system files. Here are the steps to fix it:
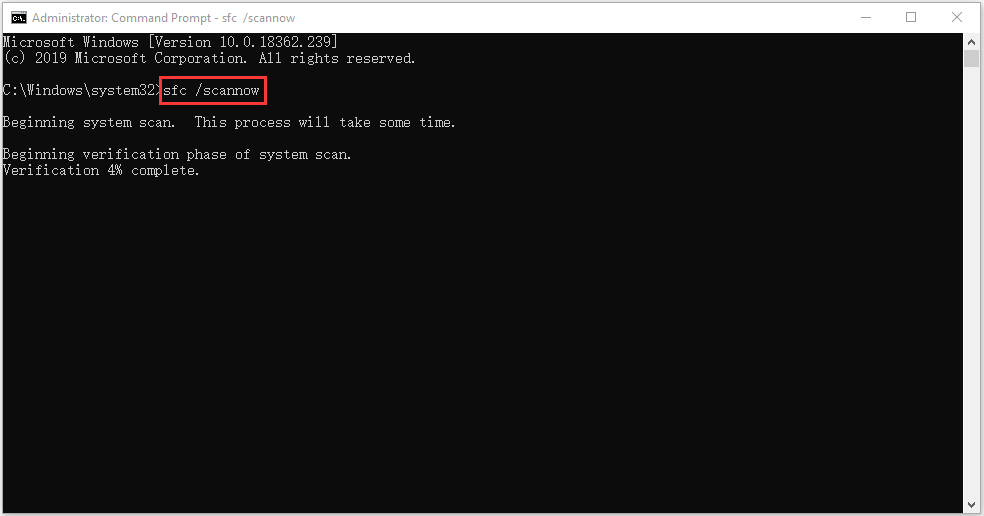
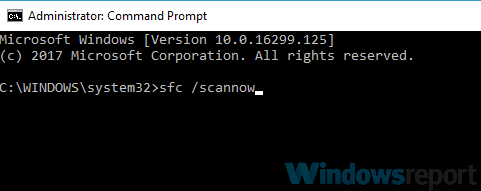
Step 1: Input command prompt in the Search box. Then right-click Command Prompt and select Run as administrator to open the command window.
Step 2: Type the command sfc /scannow and then press Enter.

Wait patiently until the verification process 100% completes. Then reboot the computer to see whether the AODDriver2.sys error still exists.
Tip: Please make sure there is a space between “sfc” and “/scannow”.
If the sfc /scannow command is unable to fix AODDriver2.sys on Windows 10, you can run DISM to fix the Windows system image. So, type the correct command.
Dism /Online /Cleanup-Image /CheckHealth
Dism /Online /Cleanup-Image /ScanHealth
Dism /Online /Cleanup-Image /RestoreHealth
After that, you can check whether you still encounter the issue.
Fix 3: Perform System Restore
If you have created a system restore point or system image backup with Windows snap-in tools, you can try using the restore point to restore your computer. This may help you fix the AODDriver2.sys error.
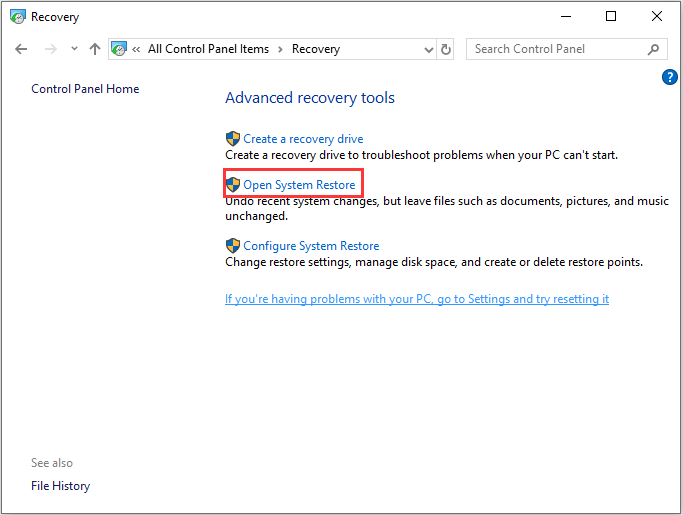
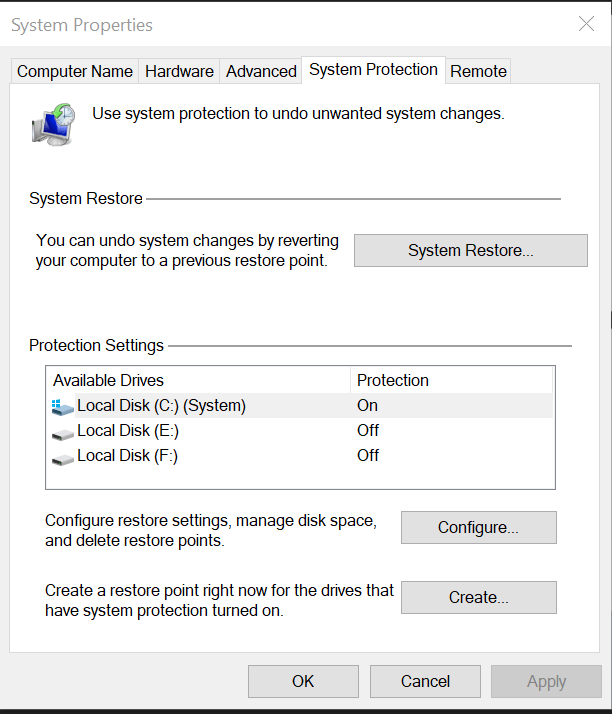
Step 1: Search for control panel in the Search box, then open it.
Step 2: Click Recovery to continue. Choose Open System Restore in the pop-up interface to continue.
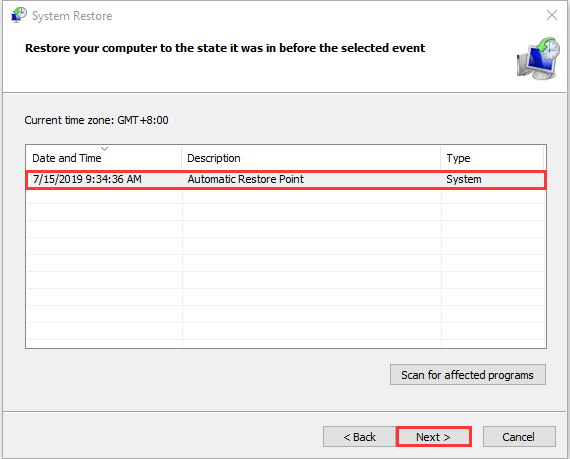
Step 3: In the Restore system files and settings interface, you can click Next to continue.
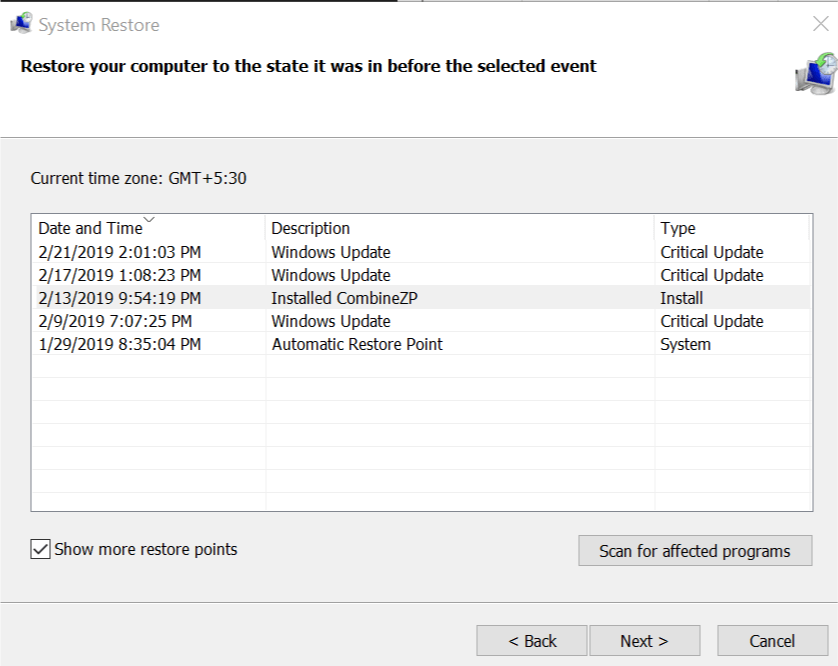
Step 4: Choose a time point to restore your computer to the state it was in before the selected event and click Next to continue.
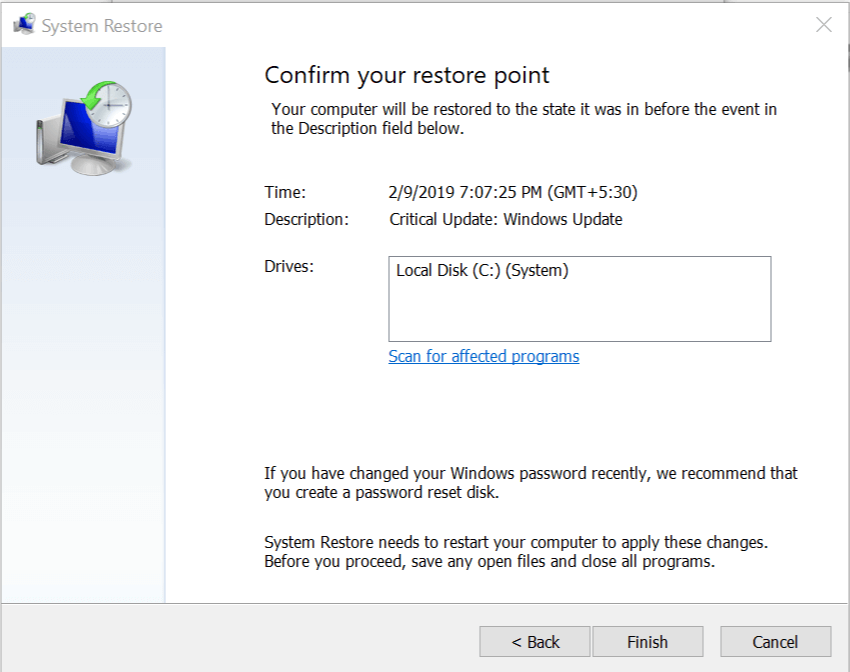
Step 5: You need to confirm the restore point and click Finish.

When the system restore process is finished, you can reverse your computer to a previous state. Then you can check if the error has gone.
Case 2: Your PC Cannot Boot Normally
If your PC cannot boot normally because of the AODDriver2.sys error, booting your PC into Safe Mode is the first thing you should do. Then you can start to fix the error.
Safe Mode is a built-in diagnostic mode of Windows 10 (7, 8, etc.) computer operating system. If you start Windows 10 PC in Safe Mode, it will only allow starting up basic system programs and services in the booting process.
When your computer can’t boot, you should restart your PC several times to boot to WinRE(Windows Recovery Environment) to enter into Safe Mode. You can also use Windows 10 recovery bootable media like a DVD/USB bootable drive to enter WinRE. Here are the steps:
Step 1: Insert your Windows installation CD/DVD or USB bootable drive to your computer, and start the computer.
Step 2: Enter the BIOS. If you don’t know how to do that, read this post – How to Enter BIOS Windows 10/8/7 (HP/Asus/Dell/Lenovo, any PC).
Step 3: Choose the DVD or USB flash drive as the first boot device and boot the Windows 10 PC from the device.
Step 4: Click Repair your computer to enter into WinRE successfully.
Now, you can continue to enter Safe Mode.
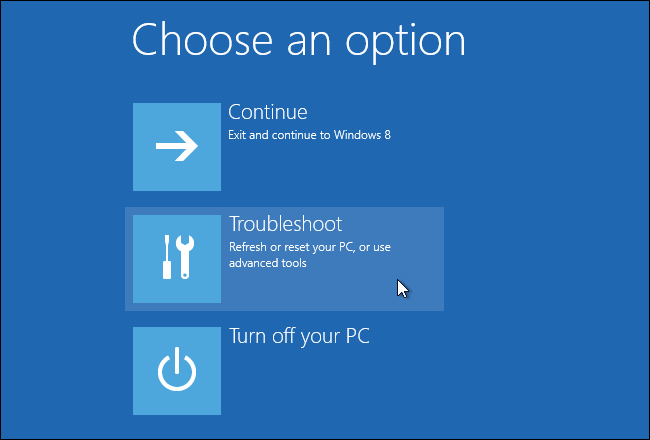
Step 1: From the Choose an option screen, click the Troubleshoot option. Next, click Advanced Options.
Step 2: Click the Startup Settings option.
Step 3: Click the Restart button.
Step 4: Then you will see multiple options for startup. Press the F4 key to enable Safe Mode.
Now your PC will restart in Safe Mode.
Fix 1: Uninstall the AMD OverDrive program in Safe Mode
If the AMD OverDrive program is making the system crash, you can uninstall it in Safe Mode.
Step 1: Go to Control Panel > Programs and Features.
Step 2: Find and uninstall the AMD OverDrive software.
Step 3: Get out of the Safe Mode and restart your PC.
Fix 2: Perform System Image Recovery in WinRE
If the previous method doesn’t work, you should perform system image recovery via Safe Mode. Here is how to do that:
Step 1: Enter WinRE.
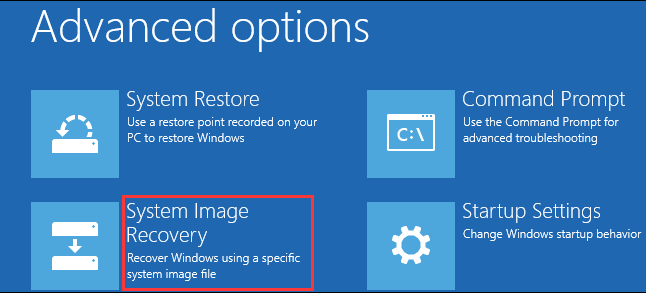
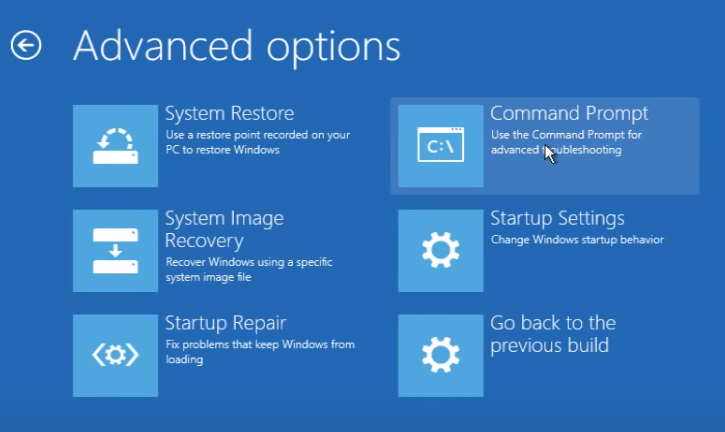
Step 2: You should choose Troubleshoot in Choose an option, and then choose Advanced options.
Step 3: Choose System Image Recovery in Advanced options to get a new window.
Step 4: Choose the latest system image and then click Next.
Step 5: Follow the guidance to restore your PC. When a warning window for formatting pops up during the process, you need to click Yes.
Fix 3: Perform a Clean Install
Finally, if none of the above solutions can fix the AODDriver2.sys error, there is only one solution left – reset your Windows 10. This is more like a refresh of the system than reinstalling.
Step 1: Enter the WinRE. Then go to Choose an option > Troubleshoot > Reset this PC.
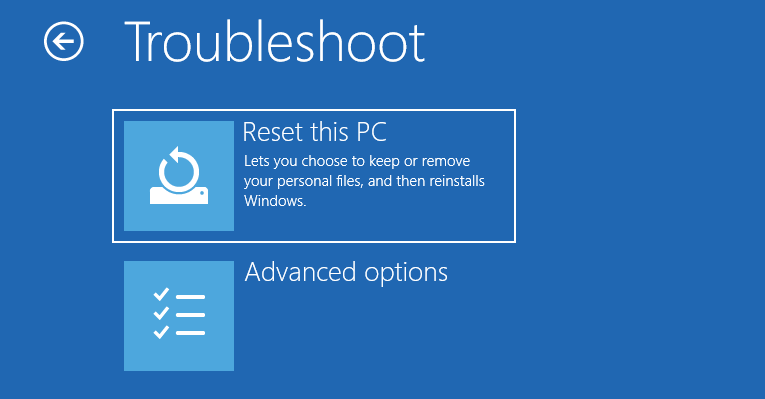
Step 2: Choose Keep my files and continue with the resetting process.
Tip: If you choose to remove everything, you had better back up your important files in advance, read this post – How to Back up Data without Booting Windows? Easy Ways Are Here!.
Here are some effective solutions to AODDriver2.sys blue screen. Try them out if you have this issue, and share it on Twitter to let more people know.Click to Tweet
Useful Suggestion: Back up Your System
After you fix the AODDriver2.sys error, I have a suggestion for you. In case of something wrong with your system, it is recommended to back up your system in advance. Now, I will introduce a piece of free backup software for you – MiniTool ShadowMaker.
MiniTool ShadowMaker provides a one-click system backup solution. It supports backing up your system drive completely, including system partition, system reserved partition and EFI system partition. And you can image all of your data including computer settings, applications, drivers, system files and boot files.
The system backup is bootable. When the system crashes, you can restore your computer to a normal state. This post – How to Restore Computer to Earlier Date in Windows 10/8/7 (2 Ways) may be the one you need.
MiniTool ShadowMaker provides a Trial edition that gives you a 30-day free trial for all backup features. You can purchase its Pro Edition to use it permanently.
Now you can download MiniTool ShadowMaker Trial Edition to back up your system.
MiniTool ShadowMaker TrialClick to Download100%Clean & Safe
Now, let’s see how to back up your Windows system.
Step 1: Decide a Backup Mode
- Launch MiniTool ShadowMaker and keep using the trial edition.
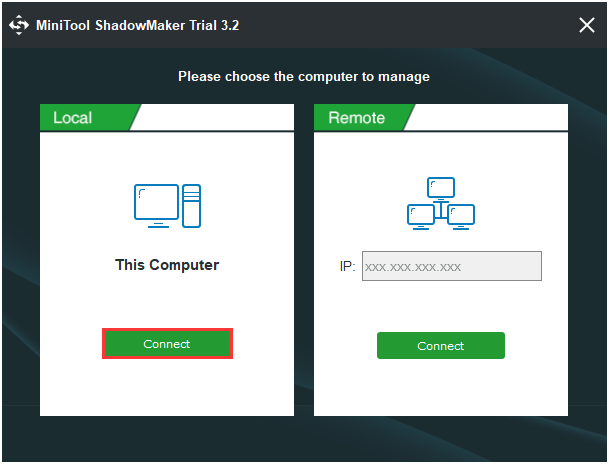
- Please choose the computer to manage and click Connect in the Local section to enter the main interface.
Step 2: Choose Backup Source
- Go to the Backup page.
- This software selects the system partition and system reserved partition by default.
Step 3: Choose a Destination Path to Store Your System.
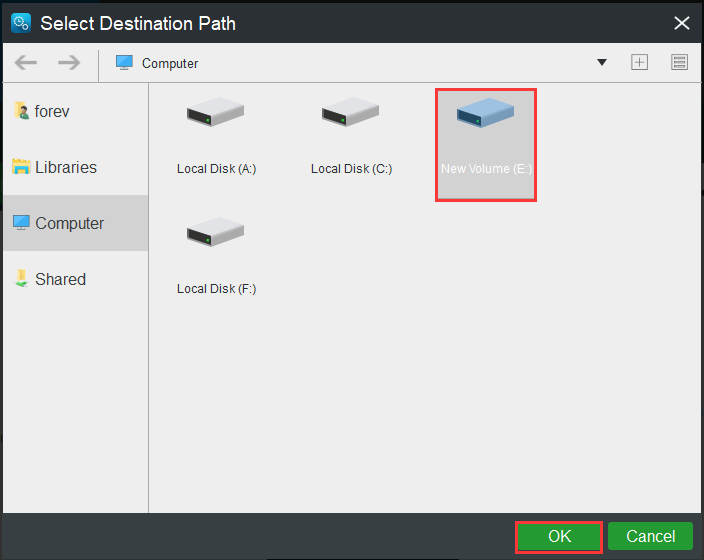
- You can back up your system to an external hard drive, USB flash drive, NAS and more.
- Then choose a destination path to store your system and click OK. Here I take the New Volume (E) as an example.
Tip:
1. Please do not save a volume image file to the volume being backed up.
2. The destination that used to store the system must have enough storage space.
Step 4: Start to Back up
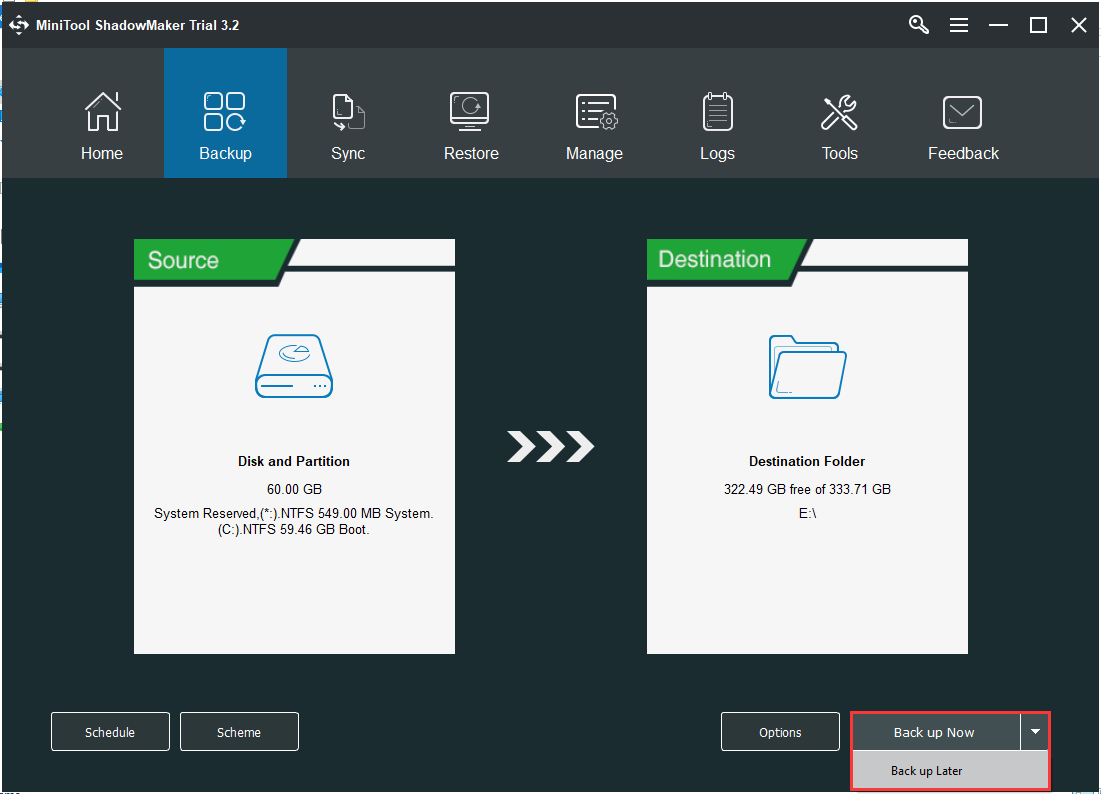
- Go back to the following interface.
- You have two options: click Back up Now to start the backup process immediately or click Back up Later to delay the backup process.
Here are all the steps of using MiniTool ShadowMaker to back up your system.
Tip: In addition to the method mentioned above, here is another method to back up the system disk. That is using the feature of MiniTool ShadowMaker – Clone Disk, read this post – The Best Alternative to Acronis Clone Software: MiniTool ShadowMaker to learn more information.
MiniTool ShadowMaker can help you back up system to protect your data. Share it on Twitter to let more people know.Click to Tweet
Bottom Lines
To sum up, this post tells you how to fix the AODDriver2.sys error. If your PC is affected by the error, this post will help you diagnose and fix the issue by yourself.
In addition, it is recommended to create a system image with the professional backup software to better safeguard your computer. Thus, if you have any problem with MiniTool ShadowMaker, please feel free to contact us via the email [email protected] and we will reply to you as soon as possible.
AODDriver2.sys FAQ
☘️ What is AMD OverDrive?
AMD OverDrive is a Windows program with which you can control overclocking settings. Bad overclock settings can cause system instability and prevent the operating system from loading.
? Is overclocking safe?
If done correctly, overclocking is generally a pretty safe endeavor. However, if you’re not willing to risk damaging your processor, you may want to skip it.
? Do I need to overclock?
If your machine is new enough to run the latest titles, its CPU/GPU are likely sufficient already. Overlocking may cost you more money to overclock in the long run, and it will void any warranties your CPU may have.
? How to check if your PC has been overclocked?
- Enter the BIOS.
- Once in the BIOS, navigate to your CPU frequency. If the CPU Frequency is different to the turbo speed of your CPU, then the CPU has been overclocked.
How to fix «error code aoddriver2.sys»
Sometimes «error code aoddriver2.sys» may happen when your computer’s system becomes overloaded or important system files go missing, get accidentally deleted or corrupted. These types of issues occur on computers that do not undergo proper regular maintenance, which may lead to critical issues and system malfunctions. .sys issues may be fixed with special software that repairs system elements and tunes up system settings to restore stability.
The article provides details on the issue meaning, causes and ways to repair the malfunction.
-
1
Ways to repair «error code aoddriver2.sys» -
2
Meaning of «error code aoddriver2.sys» -
3
Causes of «error code aoddriver2.sys»
Ways to repair «error code aoddriver2.sys»
Fixing «error code aoddriver2.sys» manually is a task that should only be undertaken by advanced users as it involves working with system files and may interfere with Windows operation. For non-advanced users, special software is recommended to repair Windows malfunctions, which does not require any special skills from the user.
The following steps may fix the issue:
-
Download Outbyte PC Repair application
Special offer. See more information about Outbyte; uninstall instructions; EULA; Privacy Policy.
- Install and launch the application
- Click the ‘Scan Now’ button to detect issues and malfunctions
- Click the ‘Repair All’ button to fix them
The same application can be used to run preventative measures to reduce the chance of this or other system issues appearing in the future.
Meaning of «error code aoddriver2.sys»
.sys issues are malfunctions with cabinet files that are used to maintain archive integrity in Microsoft Windows. When a .sys issue occurs on your computer, you are generally notified via a pop-up style warning message what kind of .sys issue you’re having. Normally, such issues are attributed to specific types of archives or system area, which may be mentioned in the warning message.
No matter what .sys issue you are experiencing, the result can be a slow PC that may freeze or crash, and an overall decline in user experience.
Common causes of «error code aoddriver2.sys»
.sys issues may occur for a variety of reasons. One of the most common causes is the .sys file being overridden or shared with an older version of a program across other applications, or archives being corrupted.
Another possibility would be the installation or un-installation of a program conducted incorrectly, or the compression process going wrong.
Ignoring aoddriver2.sys malfunction may eventually lead to PC slowdown or a full system crash, so fixing the issue is important to maintaining optimal computer performance.
Special Offer
Outbyte PC Repair
Windows 11, 10, 8, 7
Trusted and Monitored
The following steps should fix the aoddriver2.sys issue:
-
Step 1.
Download Outbyte PC Repair application
See more information about Outbyte; uninstall instructions; EULA; Privacy Policy.
-
Step 2.
Install and launch the application -
Step 3.
Click the Scan Now button to detect issues and abnormalities -
Step 4.
Click the Repair All button to fix the issues
| Compatibility | Win 11, 10, 8, 7 |
| Download Size | 21.2 MB |
| Requirements | 300 MHz Processor, 256 MB RAM, 50 MB HDD space |
Limitations: trial version offers an unlimited number of scans, backups and restores of your Windows system elements for free. Registration for the full version starts from USD 29.95.
[Решено] Как исправить ошибку Aoddriver2.sys «BSOD (синий экран)»
Большинство ошибок aoddriver2.sys типа «синий экран смерти» (BSOD) возникают в результате неисправного оборудования, отсутствия / повреждения драйверов для AMD OverDrive Service Driver или повреждения драйверов режима ядра. Как правило, любую проблему, связанную с файлом SYS, можно решить посредством замены файла на новую копию. Кроме того, если ошибка aoddriver2.sys вызвана устаревшим или неправильным драйвером устройства, мы рекомендуем запустить сканирование драйверов, чтобы выявить и выполнить замену всех устаревших драйверов, связанных с aoddriver2.sys.
Системные файлы, которые относятся к формату Windows System File обычно содержат суффикс файла SYS. В таблице ниже представлен список доступных для загрузки файлов aoddriver2.sys, подходящих для большинства версий Windows (включая %%os%%). Если в настоящий момент отсутствует необходимая вам версия aoddriver2.sys, запросите ей, нажав на кнопку Request (Запрос) рядом с необходимой версией файла. В крайнем случае, если ниже отсутствует необходимый вам файл ниже, для получения необходимой версии вы также можете связаться с Advanced Mirco Devices, Inc..
Размещение вновь загруженного файла aoddriver2.sys в правильном каталоге (в месте расположения исходного файла), скорее всего, решит проблему, однако, чтобы однозначно в этом убедиться, следует выполнить проверку. Убедитесь в том, что вам удалось устранить ошибку, открыв AMD OverDrive Service Driver и (или) выполнив операцию, при выполнении которой возникала проблема.
Источник
How to Fix the AODDriver2.sys BSOD Error on Windows 10 [MiniTool Tips]
AMD OverDrive is a software utility from the CPU manufacturer that helps you with overclocking and fan control. However, some people encounter AODDriver2.sys error when using this software. This post from MiniTool provides you with multiple solutions to fix the error.
AODDriver2.sys
AODDriver2.sys is a useful utility for people who use ADM CPU because it enables them to extract maximum performance from the hardware. However, any conflict with AMD OverDrive software can cause Aoddriver2.sys error in Windows PC.
Many people have reported that aoddriver2.sys error is resulting in BOSD(Blue Screen of Death) from Windows 7 to Windows 10. AODDriver2.sys is a Windows driver that allows the computer to communicate with hardware or connected devices.
In this case, AODDriver2.sys can directly access the inside of the Windows operating system, then your computer will be shut down by the conflict between the driver and the hardware, and the AODDriver2.sys BSOD error message will appear.
In addition, AODDriver2.sys error makes your computer extremely difficult to restart and diagnose because of the frequent shutdowns.
What causes the AODDriver2.sys blue screen error? It can be caused by several reasons and the installed AMD OverDrive software with incompatible CPU is one of the reasons. Here are the most common AODDriver2.sys error messages as follows.

Have you received a stop code: system_service_exception in Windows 11/10/8/7 with a blue screen? Here are full fixes for the system exception error!
In this next part, I will introduce how to fix the AODDriver2.sys error on Windows.
How to Fix the AODDriver2.sys BSOD Error
- Uninstall AMD OverDrive
- Run System File Checker
- Perform System Restore
- Uninstall the AMD OverDrive program in Safe Mode
- Perform System Image Recovery in WinRE
- Perform a Clean Install
How to Fix the AODDriver2.sys BSOD Error
There are multiple solutions to this error. You should try them to fix AODDriver2.sys blue screen depends on your case since this error may cause your PC can’t boot normally. Thus, if your PC can boot, go to case 1. If cannot, go to case 2.
Case 1: Your PC Can Boot Normally
Fix 1: Uninstall AMD OverDrive
First, if you haven’t uninstalled the AMD OverDrive software yet, now you should do that. Follow the instructions below:
Step 1: Search for Control Panel in the Search box to open it.
Step 2: Navigate to the Programs and Features section and click it.
Step 3: Find AMD OverDrive in the list and right-click it to choose Uninstall/Change.
Step 4: Follow the on-screen instructions to uninstall it.
After the uninstallation is complete, restart the PC and check if the issue has been fixed.
Fix 2: Run System File Checker
If the problem persists, continue to the next method: use System File Checker. Sometimes, AODDriver2.sys BSOD is caused by the corrupted Windows system files. Here are the steps to fix it:
Step 1: Input command prompt in the Search box. Then right-click Command Prompt and select Run as administrator to open the command window.
Step 2: Type the command sfc /scannow and then press Enter.
Wait patiently until the verification process 100% completes. Then reboot the computer to see whether the AODDriver2.sys error still exists.
If the sfc /scannow command is unable to fix AODDriver2.sys on Windows 10, you can run DISM to fix the Windows system image. So, type the correct command.
Dism /Online /Cleanup-Image /CheckHealth
Dism /Online /Cleanup-Image /ScanHealth
Dism /Online /Cleanup-Image /RestoreHealth
After that, you can check whether you still encounter the issue.
Fix 3: Perform System Restore
If you have created a system restore point or system image backup with Windows snap-in tools, you can try using the restore point to restore your computer. This may help you fix the AODDriver2.sys error.
Step 1: Search for control panel in the Search box, then open it.
Step 2: Click Recovery to continue. Choose Open System Restore in the pop-up interface to continue.

Step 3: In the Restore system files and settings interface, you can click Next to continue.
Step 4: Choose a time point to restore your computer to the state it was in before the selected event and click Next to continue.

Step 5: You need to confirm the restore point and click Finish.

When the system restore process is finished, you can reverse your computer to a previous state. Then you can check if the error has gone.
What is a system restore point and how to create restore point Windows 10? This post will show you the answers.
Case 2: Your PC Cannot Boot Normally
If your PC cannot boot normally because of the AODDriver2.sys error, booting your PC into Safe Mode is the first thing you should do. Then you can start to fix the error.
Safe Mode is a built-in diagnostic mode of Windows 10 (7, 8, etc.) computer operating system. If you start Windows 10 PC in Safe Mode, it will only allow starting up basic system programs and services in the booting process.
When your computer can’t boot, you should restart your PC several times to boot to WinRE(Windows Recovery Environment) to enter into Safe Mode. You can also use Windows 10 recovery bootable media like a DVD/USB bootable drive to enter WinRE. Here are the steps:
Step 1: Insert your Windows installation CD/DVD or USB bootable drive to your computer, and start the computer.
Step 2: Enter the BIOS. If you don’t know how to do that, read this post — How to Enter BIOS Windows 10/8/7 (HP/Asus/Dell/Lenovo, any PC).
Step 3: Choose the DVD or USB flash drive as the first boot device and boot the Windows 10 PC from the device.
Step 4: Click Repair your computer to enter into WinRE successfully.
Now, you can continue to enter Safe Mode.
Step 1: From the Choose an option screen, click the Troubleshoot option. Next, click Advanced Options.
Step 2: Click the Startup Settings option.
Step 3: Click the Restart button.
Step 4: Then you will see multiple options for startup. Press the F4 key to enable Safe Mode.
Now your PC will restart in Safe Mode.
Fix 1: Uninstall the AMD OverDrive program in Safe Mode
If the AMD OverDrive program is making the system crash, you can uninstall it in Safe Mode.
Step 1: Go to Control Panel > Programs and Features.
Step 2: Find and uninstall the AMD OverDrive software.
Step 3: Get out of the Safe Mode and restart your PC.
Fix 2: Perform System Image Recovery in WinRE
If the previous method doesn’t work, you should perform system image recovery via Safe Mode. Here is how to do that:
Step 1: Enter WinRE.
Step 2: You should choose Troubleshoot in Choose an option, and then choose Advanced options.
Step 3: Choose System Image Recovery in Advanced options to get a new window.

Step 4: Choose the latest system image and then click Next.
Step 5: Follow the guidance to restore your PC. When a warning window for formatting pops up during the process, you need to click Yes.

Receive the system image restore failed error message in Windows 10? This post shows you full solutions to fix it on 3 common cases.
Fix 3: Perform a Clean Install
Finally, if none of the above solutions can fix the AODDriver2.sys error, there is only one solution left – reset your Windows 10. This is more like a refresh of the system than reinstalling.
Step 1: Enter the WinRE. Then go to Choose an option > Troubleshoot > Reset this PC.

Step 2: Choose Keep my files and continue with the resetting process.
Useful Suggestion: Back up Your System
After you fix the AODDriver2.sys error, I have a suggestion for you. In case of something wrong with your system, it is recommended to back up your system in advance. Now, I will introduce a piece of free backup software for you — MiniTool ShadowMaker.
MiniTool ShadowMaker provides a one-click system backup solution. It supports backing up your system drive completely, including system partition, system reserved partition and EFI system partition. And you can image all of your data including computer settings, applications, drivers, system files and boot files.
The system backup is bootable. When the system crashes, you can restore your computer to a normal state. This post — How to Restore Computer to Earlier Date in Windows 10/8/7 (2 Ways) may be the one you need.
MiniTool ShadowMaker provides a Trial edition that gives you a 30-day free trial for all backup features. You can purchase its Pro Edition to use it permanently.
Now you can download MiniTool ShadowMaker Trial Edition to back up your system.
Now, let’s see how to back up your Windows system.
Step 1: Decide a Backup Mode
- Launch MiniTool ShadowMaker and keep using the trial edition.
- Please choose the computer to manage and click Connect in the Local section to enter the main interface.

Step 2: Choose Backup Source
- Go to the Backup page.
- This software selects the system partition and system reserved partition by default.
Step 3: Choose a Destination Path to Store Your System.
- You can back up your system to an external hard drive, USB flash drive, NAS and more.
- Then choose a destination path to store your system and click OK. Here I take the New Volume (E) as an example.

Step 4: Start to Back up
- Go back to the following interface.
- You have two options: click Back up Now to start the backup process immediately or click Back up Later to delay the backup process.

Here are all the steps of using MiniTool ShadowMaker to back up your system.
Bottom Lines
To sum up, this post tells you how to fix the AODDriver2.sys error. If your PC is affected by the error, this post will help you diagnose and fix the issue by yourself.
In addition, it is recommended to create a system image with the professional backup software to better safeguard your computer. Thus, if you have any problem with MiniTool ShadowMaker, please feel free to contact us via the email [email protected] and we will reply to you as soon as possible.
Источник
The blue screen of death or BSOD (as it is also called) is a shutdown screen or exception error that appears when a fatal system error occurs on your Windows computer.
The color screen associated with this problem (blue, red, black, pink) has become synonymous with problems in Windows, which amounts to a system crash or a state in which your operating system can no longer operate safely.
BSoD errors can have several causes, including faulty hardware, corrupt drivers, problematic DLLs, power problems, or even overheating of certain parts of your PC.
Of course, hardware problems that cause BSoD can be fixed by replacing or repairing defective parts, but fixing this problem when the software is defective can be very complex and potentially dangerous to your system.
To avoid unwanted problems by trying to fix them yourself, we recommend using specialized recovery software for Windows, and the best option for this task is definitely Restoro.
Error: The file name is not specified.
This powerful yet compact software allows you to correct BSoD errors in a few clicks without worrying about other side effects.
Next, we present you with a step-by-step guide that will allow you to successfully implement Restoro and start solving various problems, including the dreaded BSoD :
- Download and install Restoro
- Start Restoro
- Restoro is now collecting data about your PC.
Error: The file name is not specified.
- Wait until it finds problems with system stability and possible malware infections.
- Once the scan is complete, Restoro will show you an overview of the current status of your PC.
Error: The file name is not specified.
- Click on “Start Recovery.”
- Restoro will now start downloading and replacing the corrupted registries, DLLs and other damaged files found during the scan.
- This is made possible by online libraries that are used for comparison and replace damaged data with their functional equivalent.
- Restart your PC for all changes to take effect.
Now your computer should be working properly and you won’t have to worry about slow response times, BSoD errors or anything like that.
Warning: This program must be updated from the free version to perform some specific actions.
Remove AMD OverDrive in protected mode.
2.1 Restart the computer.
- From the login screen, press the power button.
- Hold down the Shift key and click Restart.
- You can also do this from the Start menu if you are already logged in.
2.2 Restoring the computer
If your PC does not reboot normally, Windows displays a recovery screen after two failed reboot attempts. At this screen, click Show more recovery options.
2.3 Removing the AMD overdrive in protected mode
- First, turn off the computer.
- Press the Start key and start pressing the F8 key during the boot process until you see the recovery screen.
- In the “Choose Option” screen, select the “Troubleshooting” option.
Error: The file name is not specified. - Then click the “Advanced Options” button.
Error: The file name is not specified. - Under “Advanced Options”, select “Startup Options”.
Error: The file name is not specified. - Click the Restart button and allow the computer to restart.
- After rebooting, you will see several boot options. Press key #4 to enter secure mode.
- Your computer will now restart in safe mode. Go to the control panel.
- Then go to “Programs,” then “Programs and Features.”
- Find AMD OverDrive and remove it.
- To exit safe mode, simply restart the computer.
The aoddriver2.sys error can make your PC unusable. This error usually results in a system crash indefinitely. This problem can be solved by booting your PC in safe mode.
Windows Safe Mode is a diagnostic mode that allows you to troubleshoot your computer software. In safe mode, the operating system loads only important system programs at startup.
This way, if a third-party program crashes the system, you can remove it in safe mode. There are several ways to start in safe mode. I have listed the two ways to get into safe mode in Windows.
3. use IObit Uninstaller
Error: The file name is not specified.
AMD OverDrive may not appear in the Programs and Features screen, making it difficult to uninstall. To solve this problem, you can use IObit Uninstaller.
IObit Uinstaller is an excellent software that automatically removes other programs from your computer. The control panel is not always reliable. Your PC may contain programs that it does not recognize.
So IObit Uninstaller will definitely scan and find all the software installed on your system. From there, you can choose the program you want to uninstall with just a few clicks.
Get IObit Uninstaller.
4. use the system recovery function
4.1 Normal system recovery access point
- In the search bar, type Cortana/Restore.
- In the search result, choose Create Restore Point.
Error: The file name is not specified. - In the System Properties window, click System Restore.
- A new dialog box will open. Click on the “Next” button.
Error: The file name is not specified. - By default, Windows displays the most recently created restore point.
- Select the Show more restore points check box to display all available restore points.
- Check the date the restore point was created and select the restore point accordingly.
- Click the Check Affected Programs button to check which programs installed on your computer will be removed by the recovery process.
Error: The file name is not specified. - Click “Next” to continue.
- Read the confirmation message and press Done if you want to continue.
Windows restores the system to the point where it was working properly. After rebooting, check for improvement.
Windows 10 and earlier versions of the operating system have a system restore feature that allows you to manually or automatically create a system restore point on your PC’s local drive.
The recovery points created can be used to restore normal operation of the computer in the event of an aoddriver2.sys failure or error.
If you can start Windows in normal mode, accessing System Restore is easy. However, if the error prevents you from logging in, you must open System Restore in Safe Mode. I have listed the two methods below.
Note: Programs installed after the selected restore point was created will be deleted during the restore process.
4.2 Restoring access to the system in protected mode
If you cannot access the login screen, you can use the “Restore System to Safe Mode” feature. Scroll up and read Solution 2 of this article to learn how to boot into Safe Mode from the command line. In safe mode, do the following
Note: It is important that you start in safe mode from the command line.
- When the computer switches to safe mode, from the command line, type the following command and press Enter: Rstrui.exe
- Now follow the instructions in Solution 4 – Method 4.1 to learn how to restore the system.
5. Start the Windows File Check.
- Type cmd at the Cortana/search prompt, right-click on the prompt and select Run as Administrator.
- When the command line opens, type the following command and press Enter: sfc/scannowError
- The System File Checker scans protected system files for missing or damaged files and replaces them with files cached on the local hard disk.
- Depending on the PC, the process may take a few minutes to an hour.
If you have installed AMD OverDrive in the correct version of the AMD processor and still get an error message, the problem may be caused by corrupt or missing system files.
Windows has a built-in system file checker to repair missing and damaged system files. To use the System File Checker, run the command line as an administrator.
6. perform a clean installation
Error: The file name is not specified.
That’s the last thing you want to do. A clean install of Windows is a time-consuming process and you also have to reinstall all the programs from scratch.
A clean installation of Windows requires an installation disk or floppy disk. You can easily create an ISO bootable USB flash drive/disk.
You also need to download the media creation utility to install the new Windows on your computer. After installing the new operating system, you should have no problems with it.
Although AMD OverDrive is a useful utility that allows you to overclock your CPU and monitor its temperature and speed, it is recommended that you stop using it if it causes the BSOD AODDriver2.SYS error.
Did any of the solutions solve the AMD OverDrive bug for you? Tell us about your favorite overclocking software in the comments below.
FAQ: More information about AMD OverDrive and its bugs.
- What is the cause of the AODDriver2 system failure?
AMD OverDrive can fail for many reasons. Read this detailed article on BSoD errors for more information.
- What does AMD OverDrive do?
The software controls the fan speed. Check out this excellent article on other overclocking software on the market if you are interested.
- How do I remove AMD OverDrive in safe mode?
Read our article on troubleshooting AMD OverDrive to find out how.
Editor’s note: This article was originally published in March 2019 and revised and updated in February 2021 for the sake of timeliness, accuracy and completeness.
Frequently asked questions
What is the AODDriver2 Sys?
AODDriver2.sys – Drivers for Windows. A driver is a small program that allows the computer to communicate with connected hardware or peripherals. This means that the driver has direct access to the internal parts of the operating system, hardware, etc.
How to fix the BSOD error?
Blue screen of death “BSOD” – What can you do to prevent it?
How do I remove AMD OverDrive in safe mode?
AMD OverDrive step by step removal and undoing
aoddriver2.sys remove manually, how to uninstall amd overdrive in safe mode, how to start windows 10 in safe mode, amd overdrive causing bsod, aod driver 2 blue screen, aoddriver2 sys reddit, aoddriver2.sys intel, system service exception
На чтение 7 мин. Просмотров 12.5k. Опубликовано
AMD OverDrive – это программная утилита от производителя процессоров, которая помогает пользователям с разгоном и управлением вентиляторами.
Это удобная утилита для пользователей процессора ADM, так как она позволяет извлечь максимальную производительность из вашего оборудования.
Однако любой конфликт с программным обеспечением AMD OverDrive может привести к ошибке aoddriver2.sys на ПК с Windows. Ошибка не ограничивается какой-либо одной версией ОС.
От Windows 7 до 10 большое количество пользователей сообщило об ошибке aoddriver2.sys, приводящей к появлению Blue Screen of Death.
Ошибка aoddriver2.sys – это драйвер Windows, который позволяет компьютеру взаимодействовать с оборудованием или подключенными устройствами.
В этом случае процессор. Тот факт, что драйвер имеет прямой доступ к внутренним компонентам ОС Windows, любой конфликт между драйвером и оборудованием может привести к отключению системы.
Таким образом, если на вашем компьютере также присутствует ошибка BSOD aoddriver2.sys, это руководство поможет вам самостоятельно диагностировать и устранить проблему.
В этой статье мы расскажем о распространенных проблемах и способах их устранения для исправления ошибки aoddriver2.sys на устройствах Windows.
Содержание
- Что вызывает ошибки aoddriver2.sys?
- Как исправить ошибки aoddriver2.sys?
- Решение 1. Удалите AMD OverDrive.
- Решение 2. Удалите программу AMD OverDrive в безопасном режиме.
- Решение 3. Используйте Revo Uninstaller
- Решение 4. Используйте восстановление системы
- Решение 5. Запустите средство проверки файлов Windows
- Решение 6. Выполните чистую установку
- Заключение
Ошибка aoddriver2.sys может быть вызвана несколькими причинами, одной из которых является установка программного обеспечения AMD OverDrive с несовместимым процессором.
Например, программное обеспечение AMD OverDrive не поддерживается процессорами серии Ryzen; вместо этого AMD предлагает альтернативу Ryzen Master Utility.
Теперь, если вам случится установить AMD OverDrive на компьютер серии Ryzen, вполне возможно, что вы можете быть затронуты ошибкой aoddriver2.sys.
Ошибка aoddriver2.sys крайне затрудняет перезагрузку и диагностику ПК из-за частых отключений.
Типы ошибок aoddriver2.sys?
Ниже приведены наиболее распространенные сообщения об ошибках aoddriver2.sys.
- SYSTEM_SERVICE_EXCEPTION AODDriver2.SYS
- SYSTEM_THREAD_EXCEPTION_NOT_HANDLED AODDriver2.SYS
Как исправить ошибки aoddriver2.sys?
Есть несколько решений этой проблемы. В зависимости от случая пользователя попробуйте любое из решений, перечисленных в этой статье, чтобы устранить проблему на вашем компьютере.
Решение 1. Удалите AMD OverDrive.
Теперь это очевидное решение. Однако, если вы еще не удалили программное обеспечение AMD OverDrive, самое время это сделать.
- Перейдите в Панель управления> Программы> Программы и компоненты.
- Перезагрузите компьютер после завершения удаления, и это должно решить проблему.
- Также читайте: 10 лучших программ удаления для пользователей ПК
Решение 2. Удалите программу AMD OverDrive в безопасном режиме.
Ошибка aoddriver2.sys может сделать ваш компьютер непригодным для использования. Ошибка обычно ставит систему в бесконечный цикл, не позволяя пользователю получить доступ к каким-либо настройкам на компьютере.
Эту проблему можно решить, загрузив компьютер в безопасном режиме.
Безопасный режим в Windows – это диагностический режим, который позволяет исправить любые проблемы, связанные с программным обеспечением на вашем компьютере. В безопасном режиме ОС загружает только основные системные программы при запуске.
Таким образом, если сторонняя программа вызывает сбой системы, вы можете удалить ее в безопасном режиме.
Вот как загрузить ПК с Windows в безопасном режиме. Есть несколько способов загрузки в безопасном режиме. Я перечислил оба способа доступа к безопасному режиму в Windows.
Метод 1:
Перезагрузите компьютер. На экране входа нажмите кнопку питания. Удерживая клавишу Shift , нажмите Перезагрузить . Это также можно сделать из меню «Пуск», если вы уже вошли в систему.
Метод 2:
Если ваш компьютер не работает нормально, то Windows представит вам экран восстановления после двух неудачных попыток перезагрузки. На экране нажмите Просмотреть дополнительные параметры восстановления , чтобы продолжить.
Метод 3:
Сначала выключите ваш компьютер. Нажмите кнопку запуска и начните нажимать клавишу F8 во время загрузки, пока не появится экран восстановления.
Загрузитесь в безопасном режиме .
-
На экране Выберите вариант выберите вариант Устранение неполадок .

-
Затем нажмите Дополнительные параметры.
-
В разделе Дополнительные параметры выберите параметр Параметры запуска .
- Нажмите кнопку Перезагрузить и перезагрузите компьютер.
- После перезагрузки вы увидите несколько вариантов запуска. Нажмите клавишу # 4, чтобы включить безопасный режим.
- Теперь ваш компьютер перезагрузится в безопасном режиме. Перейдите в Панель управления> Программы> Программы и компоненты .
- Найдите и удалите программное обеспечение AMD OverDrive .
- Чтобы выйти из безопасного режима, просто перезагрузите компьютер.


Решение 3. Используйте Revo Uninstaller
Возможно, что программное обеспечение AMD OverDrive может не отображаться на экране Программы и функций, что затрудняет процесс удаления. Чтобы решить проблему, загрузите пробную версию Revo Uninstaller Pro.
- Получить версию Revo Uninstaller Pro
Запустите программное обеспечение для сканирования и отображения всех установленных драйверов и программного обеспечения. При обнаружении выберите AMD OverDrive и нажмите Удалить.
- Также читайте: Как удалить программы и приложения в Windows 10
Решение 4. Используйте восстановление системы
Windows 10 и более ранние версии ОС поставляются с функциями восстановления системы, которые позволяют вам создать точку восстановления системы вручную или автоматически на локальном диске вашего ПК.
Созданные точки восстановления можно использовать для восстановления вашего компьютера до нормального состояния в случае сбоя или ошибки aoddriver2.sys.
Если вы можете нормально загружаться в Windows, получить доступ к восстановлению системы легко. Однако, если ошибка не позволяет войти в систему, вам необходимо получить доступ к восстановлению системы через безопасный режим. Я перечислил оба метода ниже.
Примечание. . Любая программа, установленная после создания выбранной точки восстановления, будет удалена в процессе восстановления.
Способ 1. Доступ к точке восстановления системы в обычном режиме
-
В панели Cortana/Search введите Восстановить. Выберите Создать a Восстановить точку в результатах поиска.
/>
- В окне Свойства системы нажмите кнопку Восстановление системы .
-
Откроется новое диалоговое окно. Нажмите Далее.
- По умолчанию Windows покажет самую последнюю точку восстановления. Установите флажок «Показать больше точек восстановления» , чтобы просмотреть все доступные точки восстановления.
- Проверьте дату создания точки восстановления и выберите точку восстановления соответственно.
-
Нажмите кнопку Сканировать на наличие уязвимых программ , чтобы проверить, какие программы, установленные на вашем компьютере, будут удалены из-за процесса восстановления.
- Нажмите Далее , чтобы продолжить. Прочитайте подтверждающее сообщение и, если вы хотите продолжить, нажмите кнопку Готово .


Windows вернет систему обратно, когда она работала отлично. После перезагрузки проверьте наличие каких-либо улучшений.
Способ 2. Доступ к восстановлению системы через безопасный режим
Если вы не можете получить доступ к экрану входа в систему, вы можете использовать восстановление системы через безопасный режим.
Пролистайте и прочитайте « Решение 2 » этой статьи, чтобы узнать, как загрузиться в безопасном режиме с помощью командной строки. Перейдя в безопасный режим, сделайте следующее.
Примечание. Важно, чтобы вы загрузились в безопасный режим с помощью командной строки.
Когда компьютер перезагрузится в безопасном режиме с помощью командной строки, введите следующую команду и нажмите Enter.
rstrui.exe
Теперь следуйте инструкциям, приведенным в # Решение 4 – Метод 1 , чтобы узнать, как продолжить процесс восстановления системы.
- Также читайте: Как включить зарезервированное хранилище в Windows 10
Решение 5. Запустите средство проверки файлов Windows
Если вы установили AMD OverDrive на нужную версию процессора AMD и по-прежнему получаете сообщение об ошибке, проблема может быть связана с поврежденными или отсутствующими системными файлами. Windows поставляется со встроенным средством проверки системных файлов для восстановления отсутствующих и поврежденных системных файлов.
Чтобы использовать средство проверки системных файлов, запустите командную строку от имени администратора. Вот как это сделать:
- Введите cmd на панели Cortana/Search, щелкните правой кнопкой мыши Командная строка и выберите Запуск от имени администратора.
-
Когда откроется командная строка, введите следующую команду и нажмите ввод. sfc/scannow
- Проверка системных файлов просканирует защищенные системные файлы на наличие отсутствующих или поврежденных файлов и заменит их кэшированными файлами с локального жесткого диска.
- Процесс может занять от нескольких минут до часа, в зависимости от вашего компьютера.

Решение 6. Выполните чистую установку
Теперь это последнее, что кто-то хочет сделать.Выполнение чистой установки ОС Windows – это трудоемкий процесс, и вам также нужно будет снова установить все программы с нуля.
Чтобы выполнить чистую установку ОС Windows, вам понадобится установочный диск или диск.
Вы можете легко создать загрузочную флешку/диск с помощью ISO. Мы уже подробно рассмотрели эту тему.
Заключение
Хотя AMD OverDrive – это небольшая удобная утилита, которая позволяет разогнать ваш процессор, а также контролировать температуру и скорость, рекомендуется прекратить использование, если это вызывает ошибку BSOD AODDriver2.SYS.
Вы можете найти множество альтернатив для AMD OverDrive, включая AIDA 64, HWINFO, CoreTemp и другие. Эти утилиты можно бесплатно скачать и использовать, и они дают точные результаты для разгона и определения температуры.
Какое-нибудь решение исправило ошибку AMD OverDrive для вас? Дайте нам знать ваше любимое программное обеспечение для разгона в комментариях ниже.
by Tashreef Shareef
Tashreef Shareef is a software developer turned tech writer. He discovered his interest in technology after reading a tech magazine accidentally. Now he writes about everything tech from… read more
Updated on
- If you’re getting the aoddriver2.sys error message, your AMD OverDrive software is malfunctioning.
- You can solve any BSoDrelated problem by installing a third-party program.
- Uninstalling your AMD OverDrive by following our method will also fix your aoddriver2.sys blue screen.
- Follow our guide and use the built-in system restore tool to quickly solve the error message.

XINSTALL BY CLICKING THE DOWNLOAD
FILE
AMD OverDrive is a software utility from the CPU manufacturer that helps users with overclocking and fan control. It is a handy utility for ADM CPU users as it enables you to push the hardware’s limit.
However, any conflict with the AMD OverDrive software can result in aoddriver2.sys error in Windows PCs.
The error is not limited to any one version of the OS. A good number of users have reported the aoddriver2.sys error resulting in Blue Screen of Death.
The aoddriver2.sys error is a Windows driver that allows the computer to communicate with hardware or connected devices.
In this case, the CPU. The fact that the driver has direct access to the internals of the Windows OS, any conflict between the driver and the hardware can result in a system shutdown.
So, if you are PC also affected by the aoddriver2.sys error, this guide will help you diagnose and fix the issue by yourself, the common problems and solutions to fix the aoddriver2.sys error.
The aoddriver2.sys failed error can be caused by several reasons and one of them being the installation of AMD OverDrive software with an incompatible CPU.
For example, the AMD OverDrive software is not supported by Ryzen series processors; instead, AMD offers an alternative called Ryzen Master Utility.
Now if you happen to install AMD OverDrive on a Ryzen series computer, it is possible that you might be affected by aoddriver2.sys error, which makes running your PC extremely difficult.
Below are the most common aoddriver2.sys error messages displayed:
- SYSTEM_SERVICE_EXCEPTION AODDriver2.SYS
- SYSTEM_THREAD_EXCEPTION_NOT_HANDLED AODDriver2.SYS
How do I fix aoddriver2.sys errors in Windows 10?
1. Use a third-party BsoD fixer
We highly recommend using Fortect if your PC keeps crashing. The software will repair and restore any corrupted files that might be causing crashes.
How we test, review and rate?
We have worked for the past 6 months on building a new review system on how we produce content. Using it, we have subsequently redone most of our articles to provide actual hands-on expertise on the guides we made.
For more details you can read how we test, review, and rate at WindowsReport.
It will also protect your system from future issues. In addition, it will also keep you safe while browsing the internet. Take a look at it now and see for yourself.
2. Uninstall the AMD OverDrive program in Safe Mode
2.1 Restart your PC.
- From the login screen click on the Power button.
- Hold the Shift key and click on Restart.
- This can also be done from the Start menu if you are already logged in.
2.2 Repair your PC
If your PC doesn’t restart normally, then Windows will present you with a Recovery screen after two failed restart attempts. From the screen, click on See Advanced Repair Options to proceed.
2.3 Uninstall AMD OverDrive in Safe mode
- First shutdown your PC.
- Press the start button and start pressing the F8 key during boot till you see the Recovery screen.
- From the Choose an option screen, click Troubleshoot option.

- Next, click on Advanced Options.

- Under Advanced options section, click on the Startup Settings option.

- Click on the Restart button and let the PC restart.
- Upon restart, you will see multiple options to startup. Press the #4 key to enable Safe Mode.
- Now your PC will restart in Safe Mode. Go to Control Panel.
- Then, go to Programs, then Programs and Features.
- Find and uninstall AMD OverDrive software.
- To get out of the Safe Mode, simply restart your PC.

The aoddriver2.sys error can leave your PC unusable. The error usually puts the system into an endless crashing loop. This problem can be solved by booting the computer into Safe Mode.
Safe Mode in Windows is a diagnostic mode that allows you to fix any software-related problems with your computer. When in Safe Mode, the OS only loads essential system programs during startup.
This way, if a third-party program is making the system crash, you can uninstall it in Safe Mode. There are multiple ways to boot into Safe Mode. I have listed both the methods to access Safe Mode on Windows.
3. Use System Restore
3.1. Access System Restore Point normally
- In the Cortana/Search bar type Restore.
- Select Create a Restore Point option from the search result.

- From the System Properties window, click on System Restore button.
- A new dialogue box will open. Click on Next.

- By default, Windows will show the most recently created restore point.
- Check Show more restore points option to view all the available restore points.
- Check the date when the restore point was created and select the restore point accordingly.
- Click on Scan for affected programs button to check which programs installed on your computer will be uninstalled due to the restore process.

- Click on Next to proceed.
- Read the confirmation message and if you want to go ahead click Finish.
Windows will restore the system back to when it was working perfectly fine. After the restart check for any improvements.
Windows 10 and earlier version of the OS come with System Restore features that allows you to create a system restore point manually or automatically on your PCs local drive.
The created restore points can be used to restore your PC back to normal in case of a crash or aoddriver2.sys error.
If you can boot into Windows normally, accessing system restore is easy. However, in case the error doesn’t let you log in, then you have to access system restore via Safe Mode. I have listed both the methods below.
Note: Any program installed after the selected restore point was created will be uninstalled during the restore process.
3.2 Access System Restore via Safe Mode
- When the PC restarts into Safe Mode with Command Prompt, enter the following command and hit Enter:
Rstrui.exe - Now follow the instructions give in Solution 3 – Method 3.1 to known how to proceed with the system restore process.
If you are unable to access the login screen, you can use the System Restore via Safe Mode.
Scroll up and read Solution 2 of this article to know how to boot into Safe Mode with Command Prompt. Once you are in the Safe Mode, do the following.
Note: It is important that you boot into Safe Mode with Command Prompt.
4. Run Windows File Checker
- Type cmd in the Cortana/Search bar, right-click on Command Prompt and select Run as administrator.
- When the Command Prompt opens, type the following command and hit Enter:
sfc/scannow
- System File Checker will scan the protected system files for any missing or corrupted files and replace them with cached files from the local hard drive.
- The process can take a few minutes to an hour depending on your PC.
If you have installed AMD OverDrive on the right-version of the AMD processor and still getting the error, the problem can be with the corrupt or missing system files.
Windows comes with a built-in System File Checker tool to repair missing and corrupted system files. To use System File Checker, run the command prompt as admin.
5. Use a third-party uninstaller tool
It is possible that the AMD OverDrive software may not be visible in the Program and feature screen making the uninstallation process difficult. We recommend using IObit Uninstaller to solve this issue.
IObit Uninstaller is a great software that automatically uninstalls other programs from your computer. Control Panel is not always reliable. There can be programs that aren’t recognized by it on your PC.
Therefore, IObit Uninstaller will make sure to scan and find all the installed software in your system. From there, you can choose which one to uninstall, with just a few clicks.
6. Perform a Clean Install
Now, this is the last thing anyone wants to do. Performing a clean install of Windows OS is a time-consuming process, and you would also need to install all the programs right from scratch again.
To perform a clean install of Windows OS, you need an installation drive or disk. You can easily create a bootable USB flash drive / Disk using the ISO.
You also need to download the Media Creation Tool to install your new Windows on the computer. After installing the new OS, you should not be experiencing any problems with it.
While AMD OverDrive is a handy little utility that allows you to overclock your CPU and also monitor the temperature and speed, it is recommended to stop the use if it causes AODDriver2.SYS BSOD error.
Did any of the solutions fix the AMD OverDrive error for you? Do let us know your favorite overclocking software in the comments below.
AMD OverDrive is a software utility from the CPU manufacturer that helps you with overclocking and fan control. However, some people encounter AODDriver2.sys error when using this software. This post from MiniTool provides you with multiple solutions to fix the error.
AODDriver2.sys
AODDriver2.sys is a useful utility for people who use ADM CPU because it enables them to extract maximum performance from the hardware. However, any conflict with AMD OverDrive software can cause Aoddriver2.sys error in Windows PC.
Many people have reported that aoddriver2.sys error is resulting in BOSD(Blue Screen of Death) from Windows 7 to Windows 10. AODDriver2.sys is a Windows driver that allows the computer to communicate with hardware or connected devices.
In this case, AODDriver2.sys can directly access the inside of the Windows operating system, then your computer will be shut down by the conflict between the driver and the hardware, and the AODDriver2.sys BSOD error message will appear.
In addition, AODDriver2.sys error makes your computer extremely difficult to restart and diagnose because of the frequent shutdowns.
What causes the AODDriver2.sys blue screen error? It can be caused by several reasons and the installed AMD OverDrive software with incompatible CPU is one of the reasons. Here are the most common AODDriver2.sys error messages as follows.
SYSTEM_SERVICE_EXCEPTION AODDriver2.SYS
SYSTEM_THREAD_EXCEPTION_NOT_HANDLED AODDriver2.SYS
In this next part, I will introduce how to fix the AODDriver2.sys error on Windows.
How to Fix the AODDriver2.sys BSOD Error
- Uninstall AMD OverDrive
- Run System File Checker
- Perform System Restore
- Uninstall the AMD OverDrive program in Safe Mode
- Perform System Image Recovery in WinRE
- Perform a Clean Install
How to Fix the AODDriver2.sys BSOD Error
There are multiple solutions to this error. You should try them to fix AODDriver2.sys blue screen depends on your case since this error may cause your PC can’t boot normally. Thus, if your PC can boot, go to case 1. If cannot, go to case 2.
Case 1: Your PC Can Boot Normally
Fix 1: Uninstall AMD OverDrive
First, if you haven’t uninstalled the AMD OverDrive software yet, now you should do that. Follow the instructions below:
Step 1: Search for Control Panel in the Search box to open it.
Step 2: Navigate to the Programs and Features section and click it.
Step 3: Find AMD OverDrive in the list and right-click it to choose Uninstall/Change.
Step 4: Follow the on-screen instructions to uninstall it.
After the uninstallation is complete, restart the PC and check if the issue has been fixed.
Fix 2: Run System File Checker
If the problem persists, continue to the next method: use System File Checker. Sometimes, AODDriver2.sys BSOD is caused by the corrupted Windows system files. Here are the steps to fix it:
Step 1: Input command prompt in the Search box. Then right-click Command Prompt and select Run as administrator to open the command window.
Step 2: Type the command sfc /scannow and then press Enter.
Wait patiently until the verification process 100% completes. Then reboot the computer to see whether the AODDriver2.sys error still exists.
Tip: Please make sure there is a space between “sfc” and “/scannow”.
If the sfc /scannow command is unable to fix AODDriver2.sys on Windows 10, you can run DISM to fix the Windows system image. So, type the correct command.
Dism /Online /Cleanup-Image /CheckHealth
Dism /Online /Cleanup-Image /ScanHealth
Dism /Online /Cleanup-Image /RestoreHealth
After that, you can check whether you still encounter the issue.
Fix 3: Perform System Restore
If you have created a system restore point or system image backup with Windows snap-in tools, you can try using the restore point to restore your computer. This may help you fix the AODDriver2.sys error.
Step 1: Search for control panel in the Search box, then open it.
Step 2: Click Recovery to continue. Choose Open System Restore in the pop-up interface to continue.
Step 3: In the Restore system files and settings interface, you can click Next to continue.
Step 4: Choose a time point to restore your computer to the state it was in before the selected event and click Next to continue.
Step 5: You need to confirm the restore point and click Finish.
When the system restore process is finished, you can reverse your computer to a previous state. Then you can check if the error has gone.
Case 2: Your PC Cannot Boot Normally
If your PC cannot boot normally because of the AODDriver2.sys error, booting your PC into Safe Mode is the first thing you should do. Then you can start to fix the error.
Safe Mode is a built-in diagnostic mode of Windows 10 (7, 8, etc.) computer operating system. If you start Windows 10 PC in Safe Mode, it will only allow starting up basic system programs and services in the booting process.
When your computer can’t boot, you should restart your PC several times to boot to WinRE(Windows Recovery Environment) to enter into Safe Mode. You can also use Windows 10 recovery bootable media like a DVD/USB bootable drive to enter WinRE. Here are the steps:
Step 1: Insert your Windows installation CD/DVD or USB bootable drive to your computer, and start the computer.
Step 2: Enter the BIOS. If you don’t know how to do that, read this post – How to Enter BIOS Windows 10/8/7 (HP/Asus/Dell/Lenovo, any PC).
Step 3: Choose the DVD or USB flash drive as the first boot device and boot the Windows 10 PC from the device.
Step 4: Click Repair your computer to enter into WinRE successfully.
Now, you can continue to enter Safe Mode.
Step 1: From the Choose an option screen, click the Troubleshoot option. Next, click Advanced Options.
Step 2: Click the Startup Settings option.
Step 3: Click the Restart button.
Step 4: Then you will see multiple options for startup. Press the F4 key to enable Safe Mode.
Now your PC will restart in Safe Mode.
Fix 1: Uninstall the AMD OverDrive program in Safe Mode
If the AMD OverDrive program is making the system crash, you can uninstall it in Safe Mode.
Step 1: Go to Control Panel > Programs and Features.
Step 2: Find and uninstall the AMD OverDrive software.
Step 3: Get out of the Safe Mode and restart your PC.
Fix 2: Perform System Image Recovery in WinRE
If the previous method doesn’t work, you should perform system image recovery via Safe Mode. Here is how to do that:
Step 1: Enter WinRE.
Step 2: You should choose Troubleshoot in Choose an option, and then choose Advanced options.
Step 3: Choose System Image Recovery in Advanced options to get a new window.
Step 4: Choose the latest system image and then click Next.
Step 5: Follow the guidance to restore your PC. When a warning window for formatting pops up during the process, you need to click Yes.
Fix 3: Perform a Clean Install
Finally, if none of the above solutions can fix the AODDriver2.sys error, there is only one solution left – reset your Windows 10. This is more like a refresh of the system than reinstalling.
Step 1: Enter the WinRE. Then go to Choose an option > Troubleshoot > Reset this PC.
Step 2: Choose Keep my files and continue with the resetting process.
Tip: If you choose to remove everything, you had better back up your important files in advance, read this post – How to Back up Data without Booting Windows? Easy Ways Are Here!.
Here are some effective solutions to AODDriver2.sys blue screen. Try them out if you have this issue, and share it on Twitter to let more people know.Click to Tweet
Useful Suggestion: Back up Your System
After you fix the AODDriver2.sys error, I have a suggestion for you. In case of something wrong with your system, it is recommended to back up your system in advance. Now, I will introduce a piece of free backup software for you – MiniTool ShadowMaker.
MiniTool ShadowMaker provides a one-click system backup solution. It supports backing up your system drive completely, including system partition, system reserved partition and EFI system partition. And you can image all of your data including computer settings, applications, drivers, system files and boot files.
The system backup is bootable. When the system crashes, you can restore your computer to a normal state. This post – How to Restore Computer to Earlier Date in Windows 10/8/7 (2 Ways) may be the one you need.
MiniTool ShadowMaker provides a Trial edition that gives you a 30-day free trial for all backup features. You can purchase its Pro Edition to use it permanently.
Now you can download MiniTool ShadowMaker Trial Edition to back up your system.
MiniTool ShadowMaker TrialClick to Download100%Clean & Safe
Now, let’s see how to back up your Windows system.
Step 1: Decide a Backup Mode
- Launch MiniTool ShadowMaker and keep using the trial edition.
- Please choose the computer to manage and click Connect in the Local section to enter the main interface.
Step 2: Choose Backup Source
- Go to the Backup page.
- This software selects the system partition and system reserved partition by default.
Step 3: Choose a Destination Path to Store Your System.
- You can back up your system to an external hard drive, USB flash drive, NAS and more.
- Then choose a destination path to store your system and click OK. Here I take the New Volume (E) as an example.
Tip:
1. Please do not save a volume image file to the volume being backed up.
2. The destination that used to store the system must have enough storage space.
Step 4: Start to Back up
- Go back to the following interface.
- You have two options: click Back up Now to start the backup process immediately or click Back up Later to delay the backup process.
Here are all the steps of using MiniTool ShadowMaker to back up your system.
Tip: In addition to the method mentioned above, here is another method to back up the system disk. That is using the feature of MiniTool ShadowMaker – Clone Disk, read this post – The Best Alternative to Acronis Clone Software: MiniTool ShadowMaker to learn more information.
MiniTool ShadowMaker can help you back up system to protect your data. Share it on Twitter to let more people know.Click to Tweet
Bottom Lines
To sum up, this post tells you how to fix the AODDriver2.sys error. If your PC is affected by the error, this post will help you diagnose and fix the issue by yourself.
In addition, it is recommended to create a system image with the professional backup software to better safeguard your computer. Thus, if you have any problem with MiniTool ShadowMaker, please feel free to contact us via the email [email protected] and we will reply to you as soon as possible.
AODDriver2.sys FAQ
☘️ What is AMD OverDrive?
AMD OverDrive is a Windows program with which you can control overclocking settings. Bad overclock settings can cause system instability and prevent the operating system from loading.
? Is overclocking safe?
If done correctly, overclocking is generally a pretty safe endeavor. However, if you’re not willing to risk damaging your processor, you may want to skip it.
? Do I need to overclock?
If your machine is new enough to run the latest titles, its CPU/GPU are likely sufficient already. Overlocking may cost you more money to overclock in the long run, and it will void any warranties your CPU may have.
? How to check if your PC has been overclocked?
- Enter the BIOS.
- Once in the BIOS, navigate to your CPU frequency. If the CPU Frequency is different to the turbo speed of your CPU, then the CPU has been overclocked.
AMD OverDrive is a software utility from the CPU manufacturer that helps you with overclocking and fan control. However, some people encounter AODDriver2.sys error when using this software. This post from MiniTool provides you with multiple solutions to fix the error.
AODDriver2.sys
AMD OverDrive is a processor manufacturer’s software tool that helps users overclock and control fans.
This is a useful tool for ADM processors because it allows you to get the maximum performance from your equipment.
However, any conflict with AMD OverDrive software may cause aoddriver2.sys error on Windows-based computers. The error is not limited to one version of the operating system.
From Windows 7 to 10, a large number of users reported aoddriver2.sys error causing blue screen of death.
Aoddriver2.sys error is a Windows driver that allows the computer to communicate with the hardware or connected devices.
In this case, the CPU. The fact that the driver has direct access to the internal components of the Windows operating system, any conflict between the driver and the hardware can cause the system to shut down.
So, if you are also PC affected by aoddriver2.sys BSOD error, this guide will help you diagnose and solve the problem yourself.
Fix the AODDriver2.sys BSOD Error
There are multiple solutions to this error. You should try them to fix AODDriver2.sys blue screen depends on your case since this error may cause your PC can’t boot normally. Thus, if your PC can boot, go to case 1. If cannot, go to case 2.
Case 1: Your PC Can Boot Normally
Fix 1: Uninstall AMD OverDrive
First, if you haven’t uninstalled the AMD OverDrive software yet, now you should do that. Follow the instructions below:
Step 1: Search for Control Panel in the Search box to open it.
Step 2: Navigate to the Programs and Features section and click it.
Step 3: Find AMD OverDrive in the list and right-click it to choose Uninstall/Change.
Step 4: Follow the on-screen instructions to uninstall it.
After the uninstallation is complete, restart the PC and check if the issue has been fixed.
Fix 2: Run System File Checker
If the problem persists, continue to the next method: use System File Checker. Sometimes, AODDriver2.sys BSOD is caused by the corrupted Windows system files. Here are the steps to fix it:
Step 1: Input command prompt in the Search box. Then right-click Command Prompt and select Run as administrator to open the command window.
Step 2: Type the command sfc /scannow and then press Enter.
Wait patiently until the verification process 100% completes. Then reboot the computer to see whether the AODDriver2.sys error still exists.
If the sfc /scannow command is unable to fix AODDriver2.sys on Windows 10, you can run DISM to fix the Windows system image. So, type the correct command.
Dism /Online /Cleanup-Image /CheckHealth
Dism /Online /Cleanup-Image /ScanHealth
Dism /Online /Cleanup-Image /RestoreHealth
After that, you can check whether you still encounter the issue.
Fix 3: Perform System Restore
If you have created a system restore point or system image backup with Windows snap-in tools, you can try using the restore point to restore your computer. This may help you fix the AODDriver2.sys error.
Step 1: Search for control panel in the Search box, then open it.
Step 2: Click Recovery to continue. Choose Open System Restore in the pop-up interface to continue.
Step 3: In the Restore system files and settings interface, you can click Next to continue.
Step 4: Choose a time point to restore your computer to the state it was in before the selected event and click Next to continue.
Step 5: You need to confirm the restore point and click Finish.
When the system restore process is finished, you can reverse your computer to a previous state. Then you can check if the error has gone.
Case 2: Your PC Cannot Boot Normally
If your PC cannot boot normally because of the AODDriver2.sys error, booting your PC into Safe Mode is the first thing you should do. Then you can start to fix the error.
Safe Mode is a built-in diagnostic mode of Windows 10 (7, 8, etc.) computer operating system. If you start Windows 10 PC in Safe Mode, it will only allow starting up basic system programs and services in the booting process.
When your computer can’t boot, you should restart your PC several times to boot to WinRE(Windows Recovery Environment) to enter into Safe Mode. You can also use Windows 10 recovery bootable media like a DVD/USB bootable drive to enter WinRE. Check out the steps.
Useful Suggestion: Back up Your System
After you fix the AODDriver2.sys error, I have a suggestion for you. In case of something wrong with your system, it is recommended to back up your system in advance. Now, I will introduce a piece of free backup software for you — MiniTool ShadowMaker.
MiniTool ShadowMaker provides a one-click system backup solution. It supports backing up your system drive completely, including system partition, system reserved partition and EFI system partition. And you can image all of your data including computer settings, applications, drivers, system files and boot files.
The system backup is bootable. When the system crashes, you can restore your computer to a normal state. This post — How to Restore Computer to Earlier Date in Windows 10/8/7 (2 Ways) may be the one you need.
MiniTool ShadowMaker provides a Trial edition that gives you a 30-day free trial for all backup features. You can purchase its Pro Edition to use it permanently.
News From
MiniTool Solution
Category: Data Recovery Services Profile: MiniTool Solution Ltd. is a software development company based in Canada. As a dedicated software development company, MiniTool Solution Ltd. provides customers with complete business software solutions in the data recovery and partition management industry.
This email address is being protected from spambots. You need JavaScript enabled to view it.
Большинство ошибок aoddriver2.sys типа «синий экран смерти» (BSOD) возникают в результате неисправного оборудования, отсутствия / повреждения драйверов для AMD OverDrive Service Driver или повреждения драйверов режима ядра. Как правило, любую проблему, связанную с файлом SYS, можно решить посредством замены файла на новую копию. Кроме того, если ошибка aoddriver2.sys вызвана устаревшим или неправильным драйвером устройства, мы рекомендуем запустить сканирование драйверов, чтобы выявить и выполнить замену всех устаревших драйверов, связанных с aoddriver2.sys.
Системные файлы, которые относятся к формату Windows System File обычно содержат суффикс файла SYS. В таблице ниже представлен список доступных для загрузки файлов aoddriver2.sys, подходящих для большинства версий Windows (включая %%os%%). Если в настоящий момент отсутствует необходимая вам версия aoddriver2.sys, запросите ей, нажав на кнопку Request (Запрос) рядом с необходимой версией файла. В крайнем случае, если ниже отсутствует необходимый вам файл ниже, для получения необходимой версии вы также можете связаться с Advanced Mirco Devices, Inc..
Размещение вновь загруженного файла aoddriver2.sys в правильном каталоге (в месте расположения исходного файла), скорее всего, решит проблему, однако, чтобы однозначно в этом убедиться, следует выполнить проверку. Убедитесь в том, что вам удалось устранить ошибку, открыв AMD OverDrive Service Driver и (или) выполнив операцию, при выполнении которой возникала проблема.
| Aoddriver2.sys Описание файла | |
|---|---|
| Ext: | SYS |
| Группа: | AMD OverDrive Service Driver |
| App: | AMD OverDrive Service Driver |
| Версия программного обеспечения: | 4.0.0.0 |
| Создано: | Advanced Mirco Devices, Inc. |
| Имя: | aoddriver2.sys |
| Размер (в байтах): | 55424 |
| SHA-1: | 938ff97c6faf750ed4a8dfd4bdf28b9eba3b529f |
| MD5: | f312fad7dbd49ed21a194ac71b497832 |
| CRC32: |
Продукт Solvusoft
Загрузка
WinThruster 2023 — Сканировать ваш компьютер на наличие ошибок реестра в aoddriver2.sys
Windows
11/10/8/7/Vista/XP
Установить необязательные продукты — WinThruster (Solvusoft) | Лицензия | Политика защиты личных сведений | Условия | Удаление
SYS
aoddriver2.sys
Идентификатор статьи: 1295540
Aoddriver2.sys
| Имя файла | Идентификатор файла (контрольная сумма MD5) | Размер файла | Загрузить | |||||||||||||||||
|---|---|---|---|---|---|---|---|---|---|---|---|---|---|---|---|---|---|---|---|---|
| + aoddriver2.sys | f312fad7dbd49ed21a194ac71b497832 | 54.12 KB | ||||||||||||||||||
|
Типичные ошибки Aoddriver2.sys
«Синий экран смерти», связанный с aoddriver2.sys, как правило, будет одним из следующих:
- «Windows неожиданно завершает работу из-за проблемы с aoddriver2.sys. «
- «: (Aoddriver2.sys вызвал ошибку. Компьютер необходимо перезагрузить. «
- «0x0000000A: IRQL_NOT_LESS_РАВНО — aoddriver2.sys»
- ОСТАНОВКА 0x01E: КМОДЕ_ИСКЛЮЧЕНИЕ_НЕТ_ОБРАБАТЫВАЕТСЯ — aoddriver2.sys
- 0×00000050: СТРАНИЦА_FAULT_IN_NONPAGED_AREA — aoddriver2.sys
В большинстве случаев после установки нового оборудования или программного обеспечения возникнут ошибки синего экрана aoddriver2.sys. Во время установки AMD OverDrive Service Driver могут возникнуть ошибки aoddriver2.sys, во время работы программы, связанной с aoddriver2.sys, во время загрузки драйвера устройства, связанного с Advanced Mirco Devices, Inc., или во время запуска/завершения работы. Запись ошибок Blue Screen aoddriver2.sys, связанных с AMD OverDrive Service Driver, имеет решающее значение для обнаружения неисправностей и ретрансляции обратно в Advanced Mirco Devices, Inc. для вариантов ремонта.
Истоки проблем Aoddriver2.sys
Ошибки Aoddriver2.sys BSOD вызваны различными проблемами прошивки, оборудования, драйверов или программного обеспечения. Они могут быть связаны с оборудованием AMD OverDrive Service Driver или Advanced Mirco Devices, Inc., но не всегда.
В частности, эти проблемы aoddriver2.sys возникают через:
- Устаревшие, поврежденные или неправильно настроенные драйверы устройств Advanced Mirco Devices, Inc./AMD OverDrive Service Driver.
- Повреждение реестра Windows из-за недавнего изменения программного обеспечения (установка или удаление), связанного с aoddriver2.sys.
- Вредоносные программы заразили aoddriver2.sys (или связанный с AMD OverDrive Service Driver), создавая повреждения и ошибки aoddriver2.sys.
- Конфликт оборудования, включающий аппаратное обеспечение Advanced Mirco Devices, Inc., влияющий на aoddriver2.sys.
- Установка AMD OverDrive Service Driver или драйверов устройств (aoddriver2.sys), вызывающих удаление или повреждение.
- Aoddriver2.sys BSOD, вытекающий из повреждения жесткого диска.
- Ошибка STOP/ aoddriver2.sys, вызвавшая повреждение памяти (ОЗУ).