
В Windows Server 2016 и 2019 по умолчанию установлен и включен “родной” бесплатный антивирус Microsoft — Windows Defender (начиная с Windows 10 2004 используется название Microsoft Defender). В этой статье мы рассмотрим особенности настройки и управления антивирусом Windows Defender в Windows Server 2019/2016.
Содержание:
- Графический интерфейс Windows Defender
- Удаление антивируса Microsoft Defender в Windows Server 2019 и 2016
- Управление Windows Defender с помощью PowerShell
- Добавить исключения в антивирусе Windows Defender
- Получаем статус Windows Defender с удаленных компьютеров через PowerShell
- Обновление антивируса Windows Defender
- Управление настройками Microsoft Defender Antivirus с помощью GPO
Графический интерфейс Windows Defender
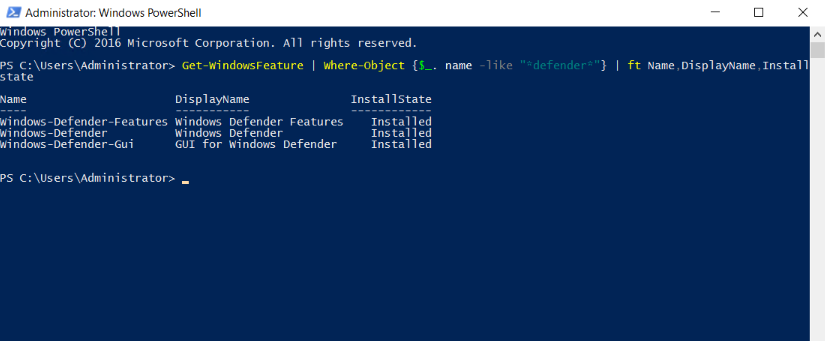
В версиях Windows Server 2016 и 2019 (в том числе в Core редакции) уже встроен движок антивируса Windows Defender (Защитник Windows). Вы можете проверить наличие установленного компонента Windows Defender Antivirus с помощью PowerShell:
Get-WindowsFeature | Where-Object {$_. name -like "*defender*"} | ft Name,DisplayName,Installstate

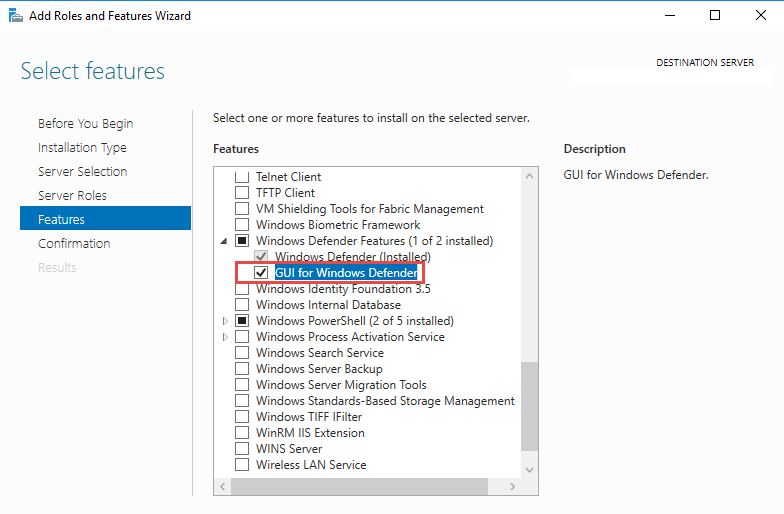
Однако в Windows Server 2016 у Windows Defender по-умолчанию нет графического интерфейса управления. Вы можете установить графическую оболочку Windows Defender в Windows Server 2016 через консоль Server Manager (Add Roles and Features -> Features -> Windows Defender Features -> компонент GUI for Windows Defender).
Установить графический компонент антивируса Windows Defender можно с помощью PowerShell командлета Install-WindowsFeature:
Install-WindowsFeature -Name Windows-Defender-GUI
Для удаления графического консоли Defender используется командлет:
Uninstall-WindowsFeature -Name Windows-Defender-GUI
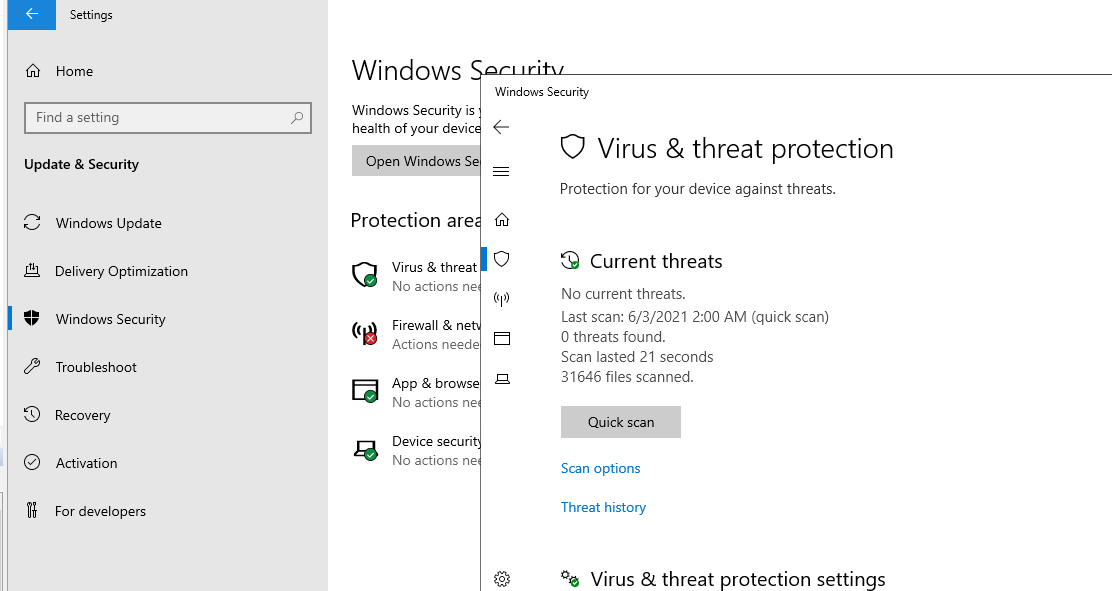
В Windows Server 2019 графический интерфейс Defender основан на APPX приложении и доступен через меню Windows Security (панель Settings -> Update and Security).
Настройка Windows Defender производится через меню “Virus and threat protection”.
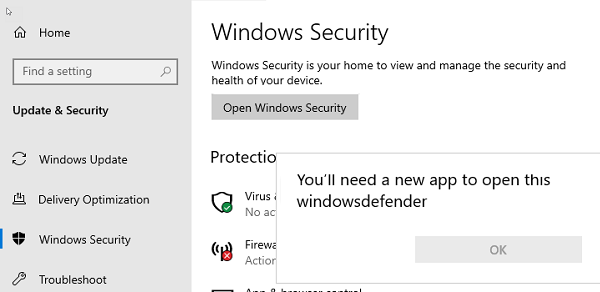
Если вы не можете открыть меню настроек Defender, а при запуске апплета Windows Security у вас появляется ошибка “You’ll need a new app to open this windowsdefender”, нужно перерегистрировать APPX приложение с помощью файла манифеста такой командой PowerShell:
Add-AppxPackage -Register -DisableDevelopmentMode "C:\Windows\SystemApps\Microsoft.Windows.SecHealthUI_cw5n1h2txyewy\AppXManifest.xml"
Если APPX приложение полностью удалено, можно его восстановить вручную по аналогии с восстановлением приложения Micorosft Store.
Удаление антивируса Microsoft Defender в Windows Server 2019 и 2016
В Windows 10 при установке любого стороннего антивируса (Kaspersky, McAfee, Symantec, и т.д.) встроенный антивирус Windows Defender автоматически отключается, однако в Windows Server этого не происходит. Отключать компонент встроенного антивируса нужно вручную (в большинстве случаев не рекомендуется использовать одновременно несколько разных антивирусов на одном компьютере/сервере).
Удалить компонент Windows Defender в Windows Server 2019/2016 можно из графической консоли Server Manager или такой PowerShell командой:
Uninstall-WindowsFeature -Name Windows-Defender
Не удаляйте Windows Defender, если на сервере отсутствует другой антивирус.
Установить службы Windows Defender можно командой:
Add-WindowsFeature Windows-Defender-Features,Windows-Defender-GUI

Управление Windows Defender с помощью PowerShell
Рассмотрим типовые команды PowerShell, которые можно использовать для управления антивирусом Windows Defender.
Проверить, запущена ли служба Windows Defender Antivirus Service можно с помощью команды PowerShell Get-Service:
Get-Service WinDefend
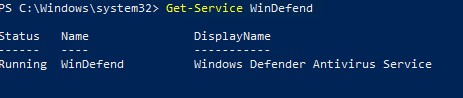
Как вы видите, служба запушена (статус –
Running
).
Текущие настройки и статус Defender можно вывести с помощью командлета:
Get-MpComputerStatus

Вывод комадлета содержит версию и дату обновления антивирусных баз (AntivirusSignatureLastUpdated, AntispywareSignatureLastUpdated), включенные компоненты антвируса, время последнего сканирования (QuickScanStartTime) и т.д.
Отключить защиту в реальном времени Windows Defender (RealTimeProtectionEnabled) можно с помощью команды:
Set-MpPreference -DisableRealtimeMonitoring $true
После выполнения данной команды, антивирус не будет сканировать на лету все обрабатываемые системой файлы.
Включить защиту в реальном времени:
Set-MpPreference -DisableRealtimeMonitoring $false
Более полный список командлетов PowerShell, которые можно использовать для управления антивирусом есть в статье Управление Windows Defender с помощью PowerShell.
Добавить исключения в антивирусе Windows Defender
В антивирусе Microsoft можно задать список исключений – это имена, расширения файлов, каталоги, которые нужно исключить из автоматической проверки антивирусом Windows Defender.
Особенность Защитника в Windows Server – он автоматически генерируемый список исключений антивируса, который применяется в зависимости от установленных ролей сервера. Например, при установке роли Hyper-V в исключения антивируса добавляются файлы виртуальных и дифференциальных дисков, vhds дисков (*.vhd, *.vhdx, *.avhd), снапшоты и другие файлы виртуальных машин, каталоги и процессы Hyper-V (Vmms.exe, Vmwp.exe)
Если нужно отключить автоматические исключения Microsoft Defender, выполните команду:
Set-MpPreference -DisableAutoExclusions $true
Чтобы вручную добавить определенные каталоги в список исключения антивируса, выполните команду:
Set-MpPreference -ExclusionPath "C:\Test", "C:\VM", "C:\Nano"
Чтобы исключить антивирусную проверку определенных процессов, выполните команду:
Set-MpPreference -ExclusionProcess "vmms.exe", "Vmwp.exe"
Получаем статус Windows Defender с удаленных компьютеров через PowerShell
Вы можете удаленно опросить состояние Microsoft Defender на удаленных компьютерах с помощью PowerShell. Следующий простой скрипт при помощи командлета Get-ADComputer выберет все Windows Server хосты в домене и через WinRM (командлетом Invoke-Command) получит состояние антивируса, время последнего обновления баз и т.д.
$Report = @()
$servers= Get-ADComputer -Filter 'operatingsystem -like "*server*" -and enabled -eq "true"'| Select-Object -ExpandProperty Name
foreach ($server in $servers) {
$defenderinfo= Invoke-Command $server -ScriptBlock {Get-MpComputerStatus | Select-Object -Property Antivirusenabled,RealTimeProtectionEnabled,AntivirusSignatureLastUpdated,QuickScanAge,FullScanAge}
If ($defenderinfo) {
$objReport = [PSCustomObject]@{
User = $defenderinfo.PSComputername
Antivirusenabled = $defenderinfo.Antivirusenabled
RealTimeProtectionEnabled = $defenderinfo.RealTimeProtectionEnabled
AntivirusSignatureLastUpdated = $defenderinfo.AntivirusSignatureLastUpdated
QuickScanAge = $defenderinfo.QuickScanAge
FullScanAge = $defenderinfo.FullScanAge
}
$Report += $objReport
}
}
$Report|ft

Для получения информации о срабатываниях антивируса с удаленных компьютеров можно использовать такой PowerShell скрипт:
$Report = @()
$servers= Get-ADComputer -Filter 'operatingsystem -like "*server*" -and enabled -eq "true"'| Select-Object -ExpandProperty Name
foreach ($server in $servers) {
$defenderalerts= Invoke-Command $server -ScriptBlock {Get-MpThreatDetection | Select-Object -Property DomainUser,ProcessName,InitialDetectionTime ,CleaningActionID,Resources }
If ($defenderalerts) {
foreach ($defenderalert in $defenderalerts) {
$objReport = [PSCustomObject]@{
Computer = $defenderalert.PSComputername
DomainUser = $defenderalert.DomainUser
ProcessName = $defenderalert.ProcessName
InitialDetectionTime = $defenderalert.InitialDetectionTime
CleaningActionID = $defenderalert.CleaningActionID
Resources = $defenderalert.Resources
}
$Report += $objReport
}
}
}
$Report|ft
В отчете видно имя зараженного файла, выполненное действие, пользователь и процесс-владелец.

Обновление антивируса Windows Defender
Антивирус Windows Defender может автоматически обновляться из Интернета с серверов Windows Update. Если в вашей внутренней сети установлен сервер WSUS, антивирус может получать обновления с него. Убедитесь, что установка обновлений одобрена на стороне WSUS сервера (в консоли WSUS обновления антивирусных баз Windows Defender, называются Definition Updates), а клиенты нацелены на нужный сервер WSUS с помощью GPO.
В некоторых случаях, после получения кривого обновления, Защитник Windows может работать некорректно. В этом случае рекомендуется сбросить текущие базы и перекачать их заново:
"%PROGRAMFILES%\Windows Defender\MPCMDRUN.exe" -RemoveDefinitions -All
"%PROGRAMFILES%\Windows Defender\MPCMDRUN.exe" –SignatureUpdate
Если на сервере нет прямого доступа в Интернет, вы можете настроить обновление Microsoft Defender из сетевой папки.
Скачайте обновления Windows Defender вручную (https://www.microsoft.com/en-us/wdsi/defenderupdates) и помесите в сетевую папку.
Укажите путь к сетевому каталогу с обновлениями в настройках Defender:
Set-MpPreference -SignatureDefinitionUpdateFileSharesSources \\fs01\Updates\Defender
Запустите обновление базы сигнатур:
Update-MpSignature -UpdateSource FileShares
Управление настройками Microsoft Defender Antivirus с помощью GPO
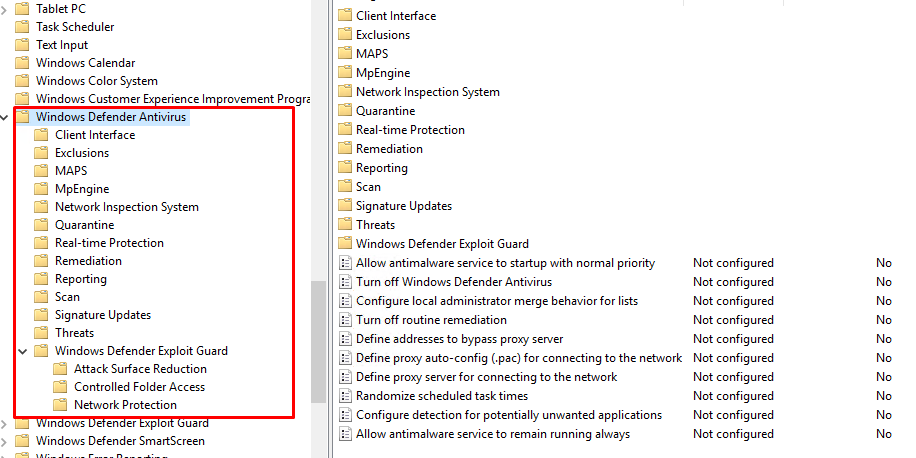
Вы можете управлять основными параметрами Microsoft Defender на компьютерах и серверах домена централизованно с помощью GPO. Для этого используется отдельный раздел групповых политик Computer Configurations -> Administrative Template -> Windows Component -> Windows Defender Antivirus.
В этом разделе доступно более 100 различных параметров для управления настройками Microsoft Defender.
Например, для отключения антивируса Microsoft Defender нужно включить параметр GPO Turn off Windows Defender Antivirus.
Более подробно о доступных параметрах групповых политик Defender можно посмотреть здесь https://docs.microsoft.com/en-us/microsoft-365/security/defender-endpoint/use-group-policy-microsoft-defender-antivirus
Централизованное управление Windows Defender доступно через Advanced Threat Protection доступно через портал “Azure Security Center” (ASC) при наличии подписки (около 15$ за сервер в месяц).
In this article, we want to teach you to Enable Defender Antivirus on Windows Server 2022. If you want to protect your Windows from viruses, malware, etc, Microsoft Defender Antivirus is a good choice for you.
Microsoft Defender Antivirus offers you many features including:
- Track your data and control your privacy settings
- It has a Password generator
- Password monitor
When you have activated it, Microsoft Defender acts as the primary antivirus app on your device. It scans files, remediates threats, and lists detected threats in security reports on the Windows Security app.
This tutorial will show you to activate your Defender Antivirus from the server manager on Windows Server 2022.
To set up Defender Antivirus, log in to your Windows server and follow the steps below.
Access Server Manager on Windows Server 2022
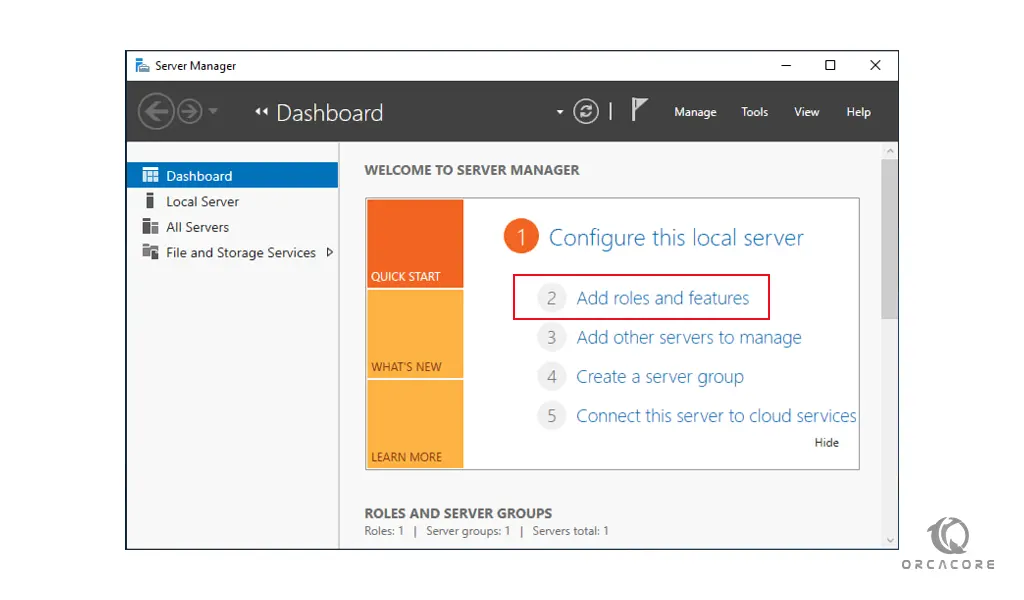
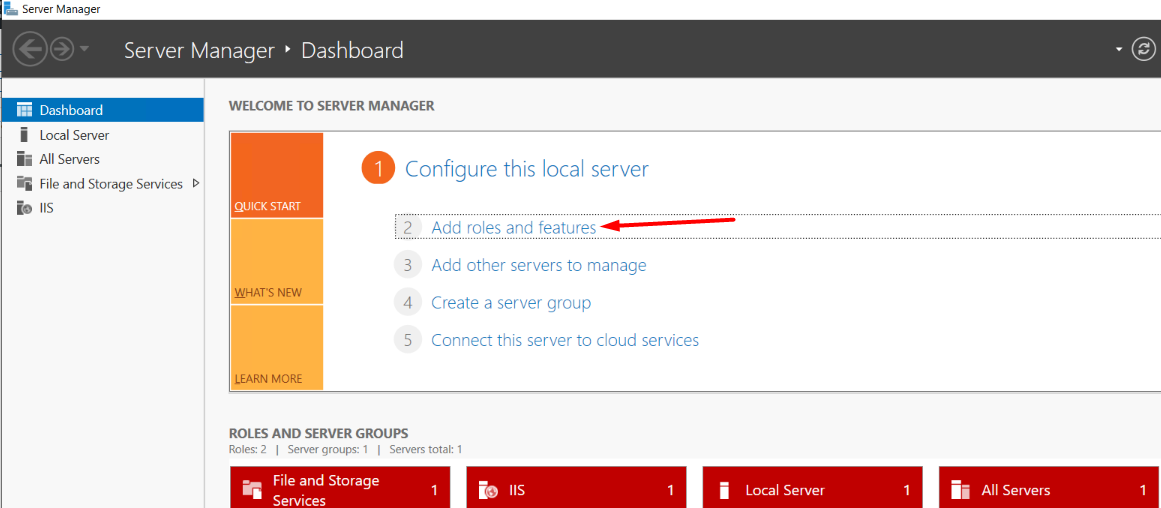
To enable the Defender Antivirus, you need to open your Server Manager. From your search bar, type server manager and open your app.
Add Roles and Features
From your Server Manager, click on Add Roles and Features.
Then, in the Before Begin screen, just click Next to continue.
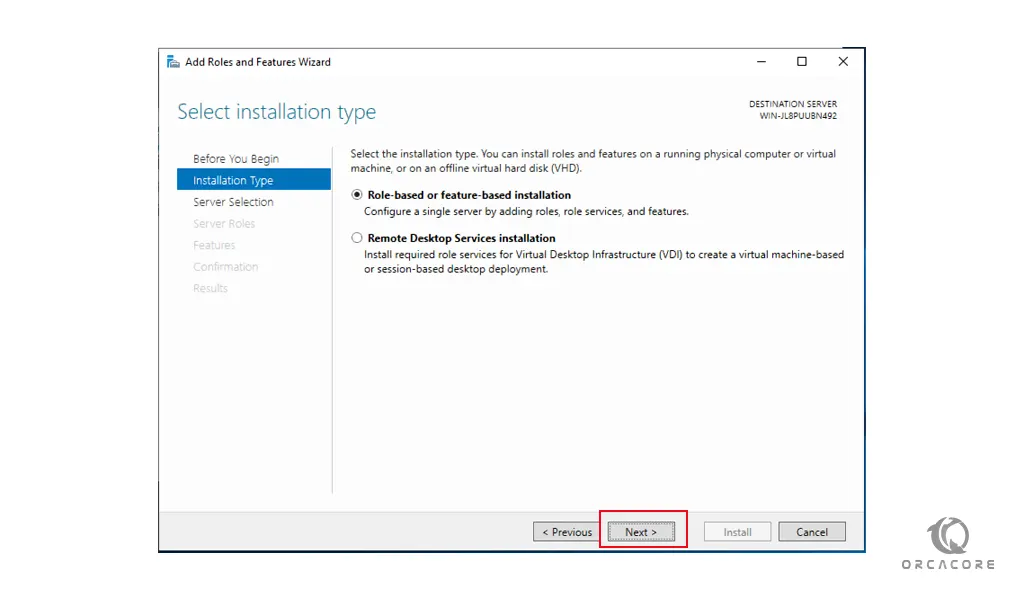
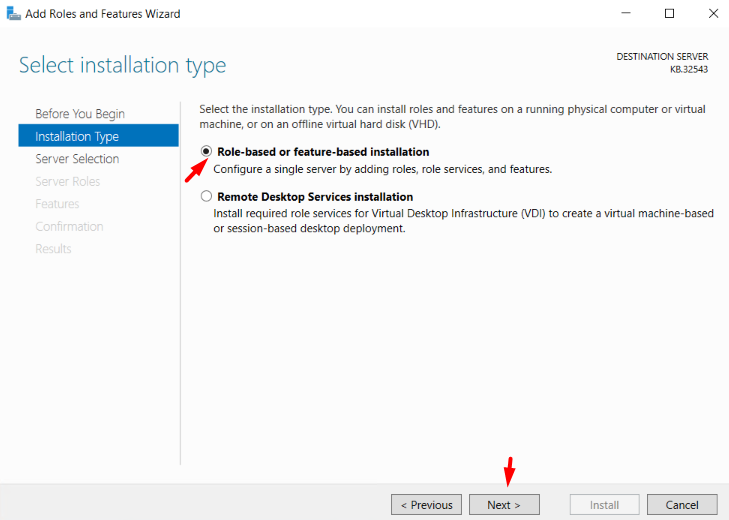
Role-based or feature-based Installation
At this point, select the Role-based or feature-based installation and click Next.
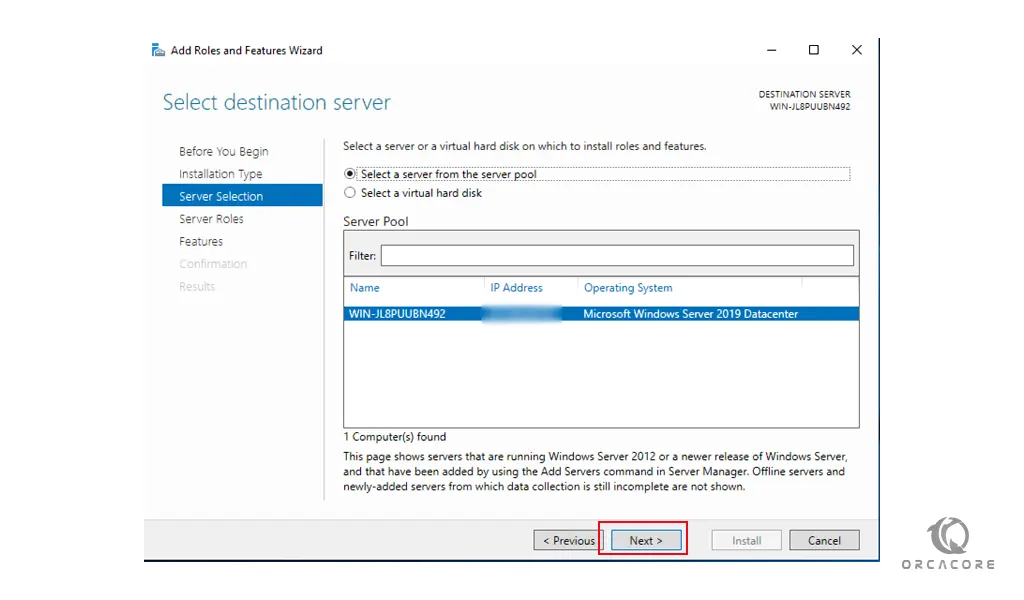
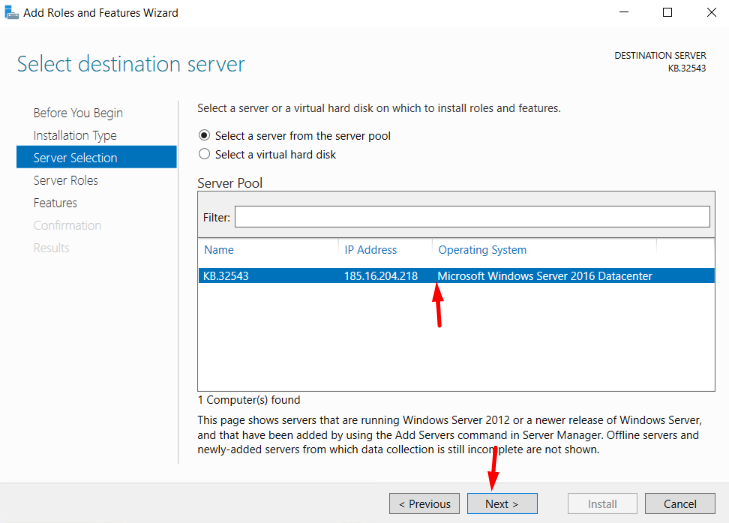
Select Destination Server
At this point, you need to select your destination server and click Next. Here we select a server from the server pool. Proceed to the next steps to enable the Defender Antivirus.
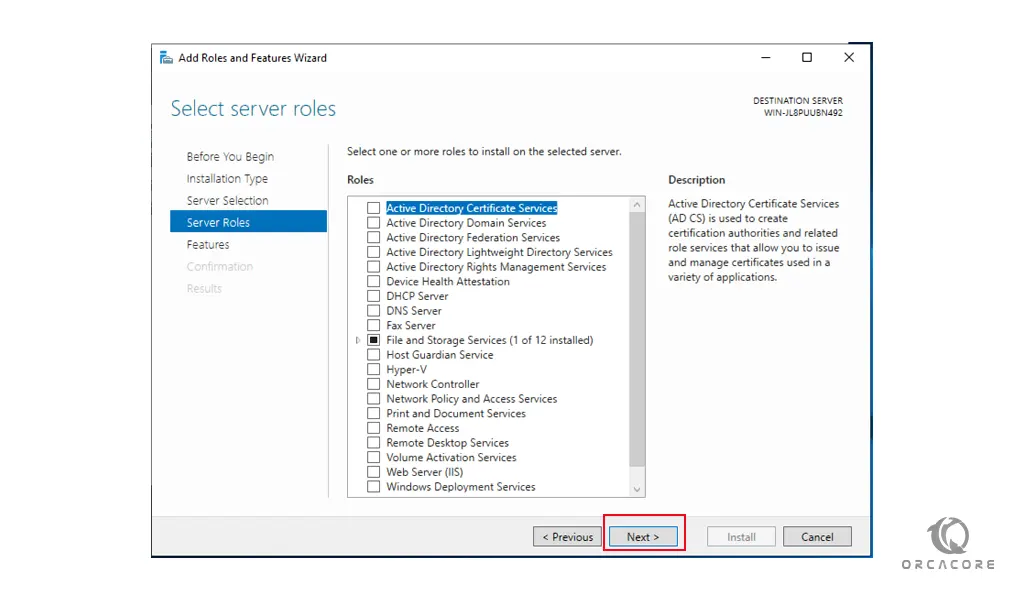
Select Server Roles
Here you can select the server roles and click Next.
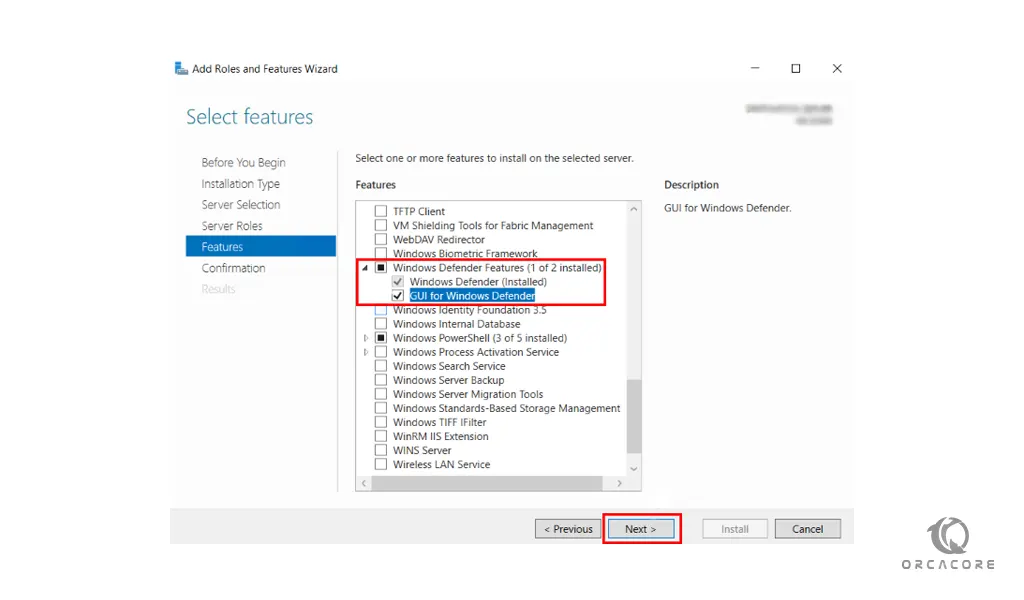
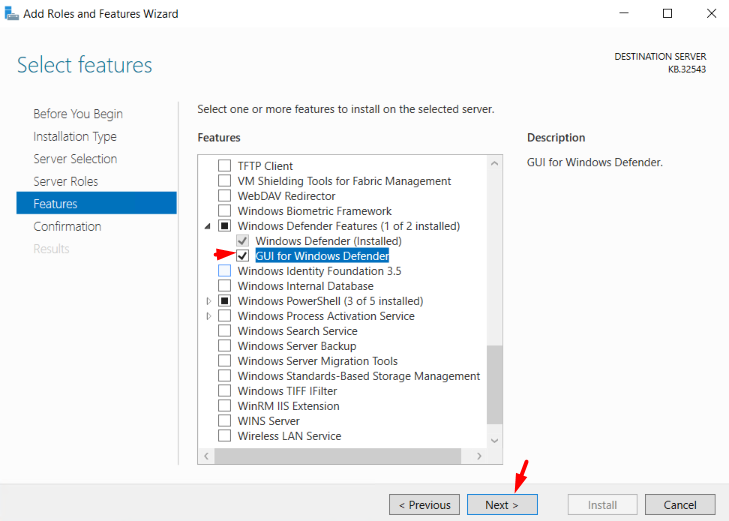
Choose Windows Defender Features
At this point, you need to choose the Windows Defender features and check out Windows Defender and GUI for the Windows Defender box and click Next.
Install Defender Antivirus on Windows Server 2022
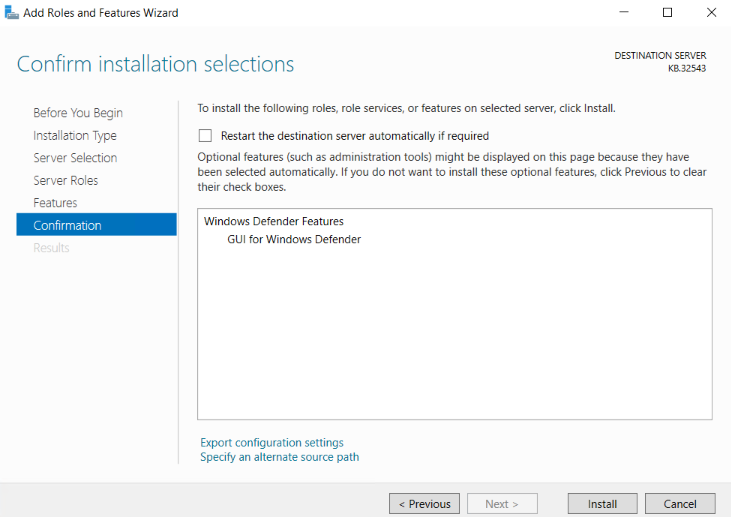
Now you need to click on Install to install the Defender Antivirus on your Windows server.
This will take some time to complete. Finally, click Close.
Conclusion
By using this guide, you can easily Enable your Defender Antivirus on your Windows Server 2022. With this option, you can protect your server from viruses and infections.
Hope you enjoy it. You may be interested in these articles:
Install Nessus Scanner on Windows Server 2022
Install Android Studio on Windows Server 2022
Windows especially have fantastic preinstalled Windows Defender Antivirus on their major operating system. Keeping the server secure from the well-known attacks Windows Defender will surely help you. It has a very simplistic mechanism and configuration which you can do as per requirements.
In this article learn: How to use and configure Windows Defender Antivirus on Windows Server?
Check Windows Defender Antivirus & Addons Status
In some OS settings windows defender antivirus is disabled due make the performance better. But we can go ahead and check the status of Windows Defender using the following steps whether it is installed or available to install,
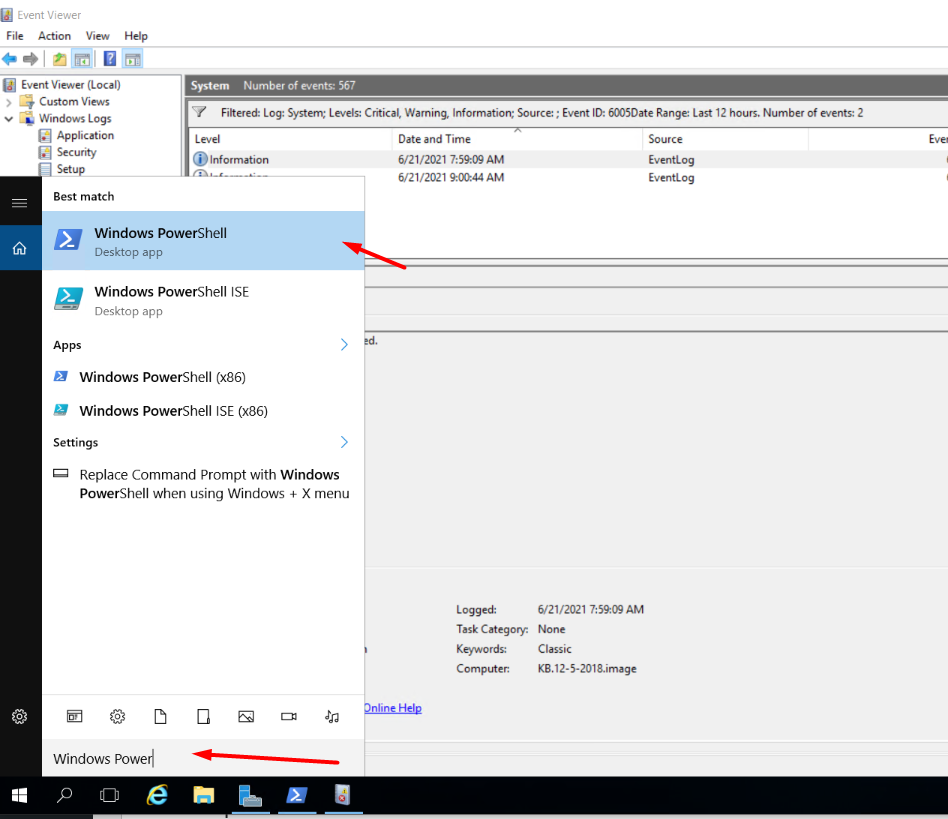
1. Login to Windows Server → Search and Open “Windows Powershell“.
2. Run the following command to enable the Windows Defender Antivirus on the server.
Get-WindowsFeature | Where-Object {$_. name -like "*defender*"} | ft Name,DisplayName,Installstate
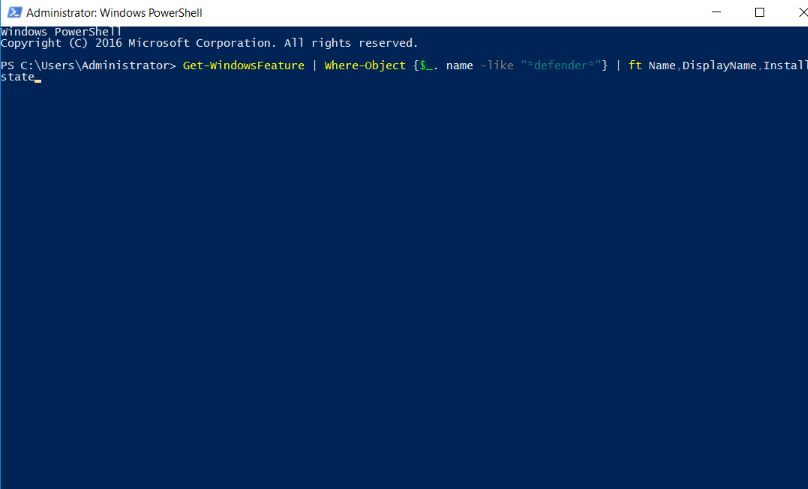
3. Now you can see all the available or installed status of windows defender antivirus and modules/addons of the windows defender antivirus. All the items with Available Status you can install using following methods,
Install Windows Defender Antivirus GUI Manually.
In the windows server operating systems (2012, 2016, etc) there is no GUI is installed/enabled by default for Windows Defender Antivirus. But, windows offer us options to install/enable the GUI using server manager or Powershell. If the above command turned output as Available for Windows Defender and its add-on modules, you can install it from server manager or Powershell.
Using Server Manager.
1. Log in to your Windows Server 2012, 2016, or later → Open Server Manager.
2. Click on “Add Roles and Features“.
3. In the Installation Type section, select Role-based or feature-based installation → Next.
4. In Server Selection, select your Windows Server, if your server is configured in the network, then select the particular server from the list to process the installation → Next.
5. Do not select or Deselect anything in Server Roles Section → Click Next
6. In the Feature Section, click on GUI for Windows Defender as well as Windows Defender (If it is not installed) from under Windows Defender Features.
7. In the Confirmation section, click on Install.
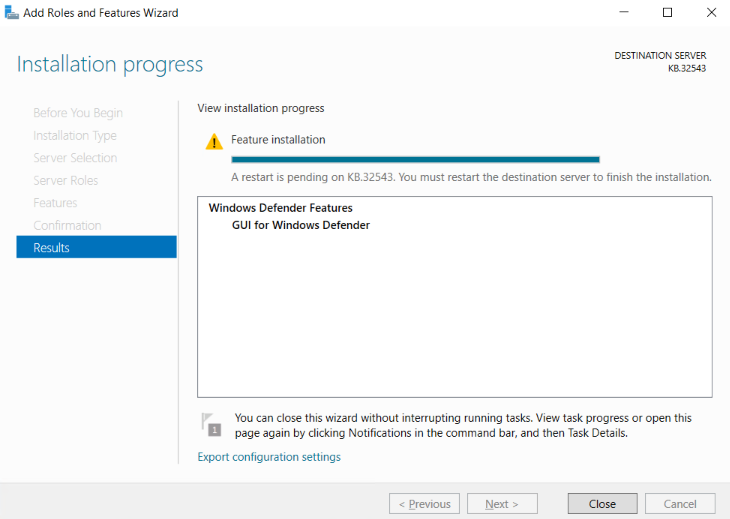
You must restart the destination server to finish the installation.
Using PowerShell.
1. Login to Windows Server → Search and Open “Windows Powershell”.
2. Run the below command to install the Windows Defender Antivirus,
Install-WindowsFeature -Name Windows-Defender
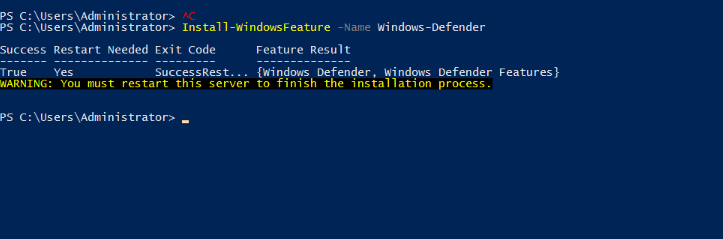
3. Run the following command to install/enable the Windows Defender Antivirus GUI on the server.
Install-WindowsFeature -Name Windows-Defender-GUI
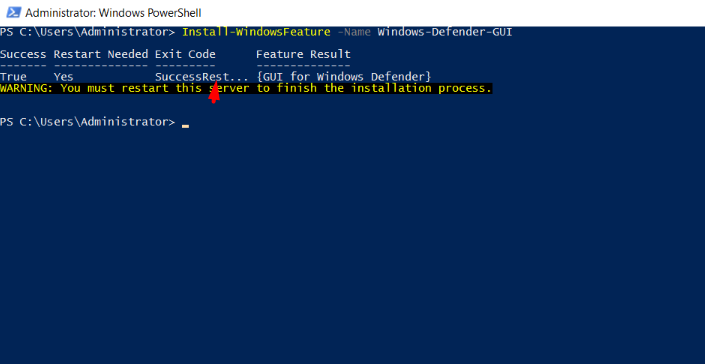
You must restart the destination server to finish the installation.
Configure Windows Defender Antivirus.
This is a crucial part of Windows Defender Antivirus working. The default settings offered by windows are quite decent and should work properly as per security concerns but we can take the configuration to next level and make sure to increase server security with manual configuration.
First, log in to Windows Server → Search and Open “Windows Defender Settings“.
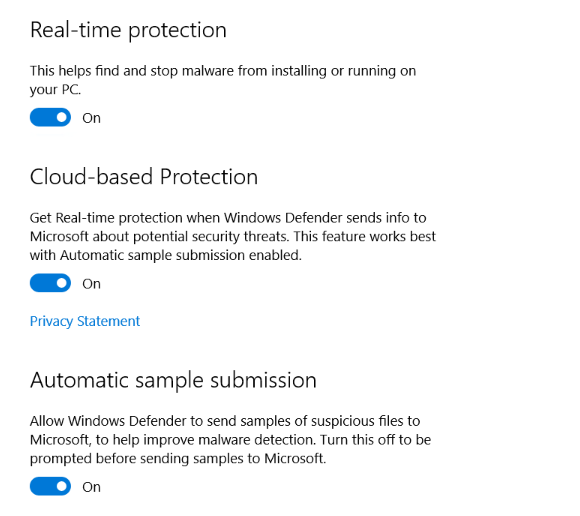
Realtime Protection (Recommended)
This feature provided by windows works in real-time and stops any kind of malware activity running on the server. Enabling this option may cause extra use of hardware resources.
Cloud-based Protection
If any real-time malware activity got detected then its information will be shared with Microsoft, the collectively provided data from other servers as well will help Microsoft to stop or workaround to those potential risks.
Automatic Sample Selection (Optional)
If this option is enabled, windows will share suspicious files with Microsoft and help them investigate them to reduce future attacks.
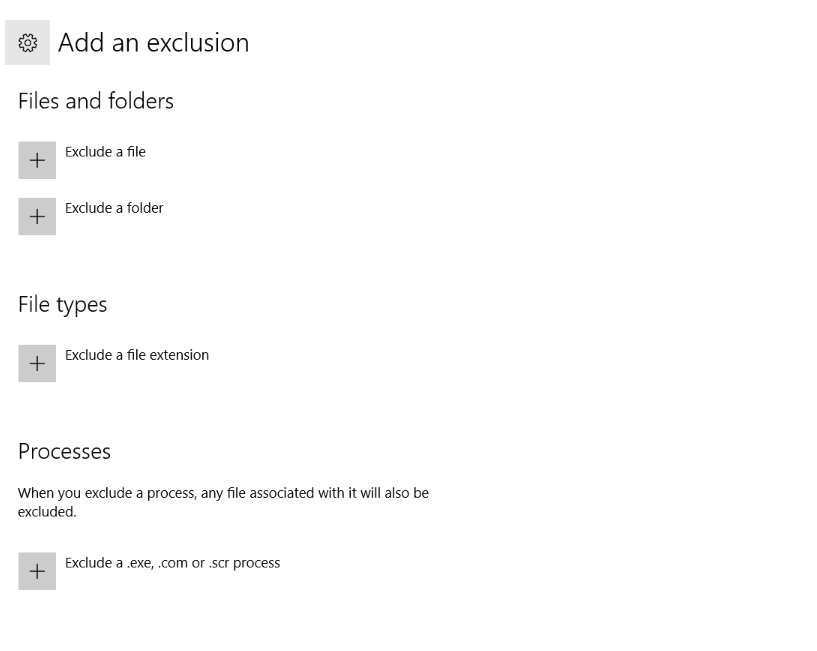
Exclusions
Through this option, you can exclude any program, file, process, and file type from Windows Defender Antivirus Protection.
Operating Windows Defender Antivirus GUI.
First, log in to Windows Server → Search and Open “Windows Defender Settings” → Click on “Windows Defender Settings“.
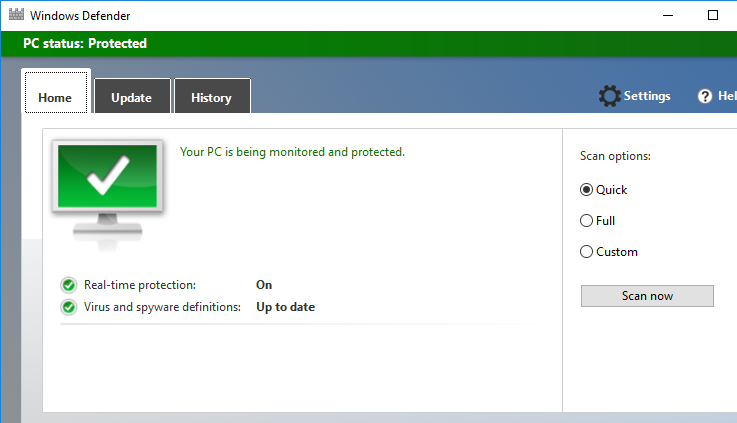
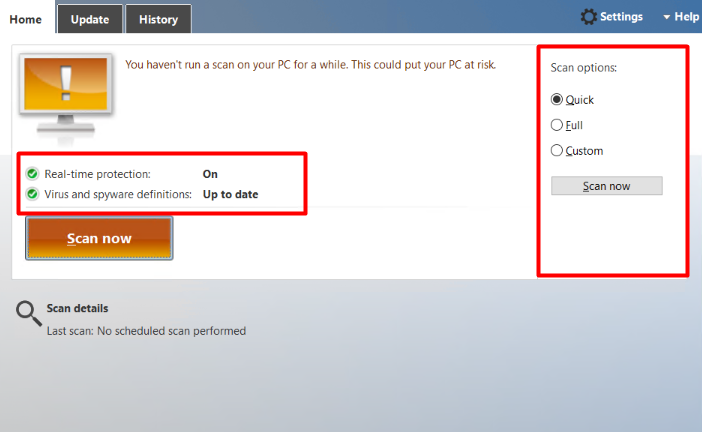
In the “Home” tab you can schedule the scan. Also, can customize scan with the help of scan options.
Quick: This option scans the area which is most likely to be get infected with malware, spyware, viruses.
Full: This option scans all the files available on the hard drive of the system as well as running programs for any kind of threat.
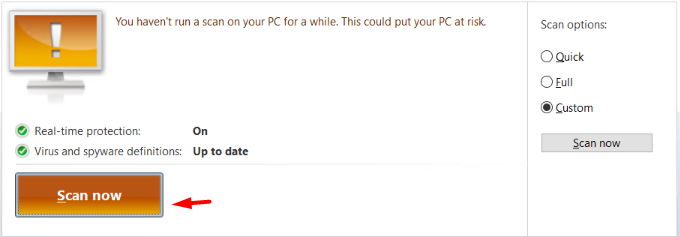
Custom: This option only checks the specified location for the infected files.
Also, if you enabled the Real-time protection as per the above instructions you can check its status on the GUI interface.
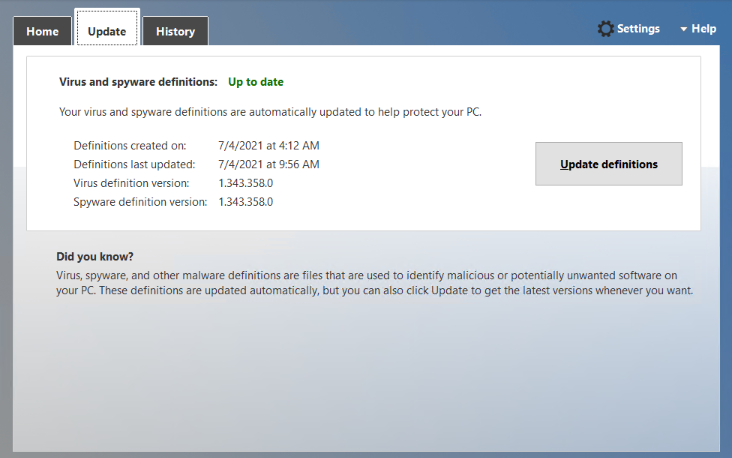
In the “Update” tab, Microsoft provides regular updates over newly developed malware, spyware; you should keep the Windows Defender Antimalware up to the date. All the last update and new update-related information you can find under the “Update” section.
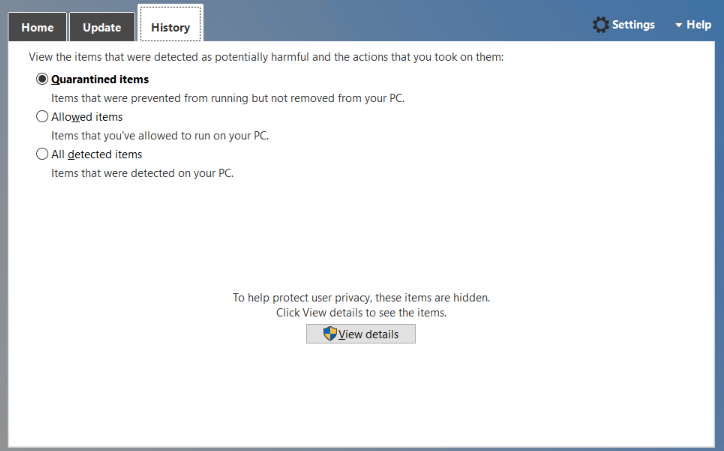
In the “History” tab you can find the following event history,
Quarantine Items: These are items that are prevented from running by the windows but not yet removed.
Allowed Items: These are items that are manually allowed by you.
All detected items: These are items detected on the server.
Once you configure all the above options, you can click on the “Scan Now” button to start the scanning.
Как отключить Microsoft Defender на Windows Server 2019
Microsoft Defender (ранее известный как Windows Defender) — это встроенный антивирус и система защиты, разработанные компанией Microsoft для операционных систем Windows. Windows Server 2019 также включает в себя этот компонент для предотвращения и обнаружения вредоносного ПО. Однако, в некоторых ситуациях, администраторы могут захотеть отключить Защитник из-за конфликта с другим антивирусным программным обеспечением или для оптимизации производительности сервера.
В этой статье мы рассмотрим, как отключить Microsoft Defender на Windows Server 2019.
Метод 1: Отключение Microsoft Defender через групповую политику
Откройте «Проводник» и нажмите правой кнопкой мыши на значок «Этот компьютер». Затем выберите «Управление».
В открывшемся окне «Управление компьютером» перейдите в раздел «Службы и приложения» и выберите «Службы».
Найдите и дважды щелкните по службе «Защитник Windows», чтобы открыть ее свойства.
Во вкладке «Основное» измените тип запуска на «Отключено» и нажмите кнопку «ОК».
Теперь откройте «gpedit.msc» (редактор локальных групповых политик) с помощью поиска Windows или командной строки.
В редакторе локальных групповых политик перейдите по следующему пути: Конфигурация компьютера > Административные шаблоны > Компоненты Windows > Защитник Windows.
Найдите и дважды щелкните по параметру «Отключить защитник Windows».
В открывшемся окне выберите «Включено» и нажмите кнопку «ОК», чтобы сохранить изменения.
Перезагрузите сервер для применения изменений.
Метод 2: Отключение Microsoft Defender через реестр
-
Откройте «regedit» (редактор реестра) с помощью поиска Windows или командной строки.
-
В редакторе реестра перейдите по следующему пути: HKEY_LOCAL_MACHINE\SOFTWARE\Policies\Microsoft\Windows Defender.
-
Если ключ «Windows Defender» отсутствует, создайте его, щелкнув правой кнопкой мыши на «Microsoft» и выбрав «Новый» > «Ключ». Назовите новый ключ «Windows Defender».
-
Далее, щелкните правой кнопкой мыши на ключе «Windows Defender» и выберите «Новый» > «DWORD (32-битное значение)».
-
Назовите новое значение «DisableAntiSpyware» и установите его значение на «1».
-
Если вы хотите отключить также и облачную защиту, создайте еще одно значение DWORD (32-битное значение) с именем «DisableCloudProtection» и установите его значение на «1».
-
Закройте редактор реестра и перезагрузите сервер для применения изменений.
Обратите внимание: Редактирование реестра может привести к нестабильности системы, если выполняется неправильно. Перед внесением изменений рекомендуется создать резервную копию реестра или точку восстановления системы.
Заключение
В этой статье мы рассмотрели три способа отключения Microsoft Defender в Windows Server 2019 для начинающих пользователей. Отключение Защитника может быть полезным для улучшения производительности сервера или устранения конфликтов с другими антивирусными решениями. Однако, прежде чем отключать Microsoft Defender, убедитесь, что у вас установлено и настроено альтернативное антивирусное программное обеспечение для защиты сервера от вредоносного ПО и других угроз.
Также предлагаем рассмотреть другие полезные статьи:
- Как предоставить доступ к Windows Server по IP или диапазону IP
- Зачем нужно отключение UDP для RDP-подключений к Windows Server
- Как добавить правило в Брандмауэр Windows Server 2012, 2016, 2019
Eager to know about ‘windows defender antivirus’ and install it? Then take a peek at this blog.
Here at Bobcares, we have seen several such Windows related queries as part of our Server Management Services for web hosts and online service providers.
Today we’ll see how to install windows defender antivirus.
A few facts about windows defender antivirus
The Microsoft Defender is an anti-malware component that Microsoft Windows provides. It is available on Windows Server 2016 and Windows Server 2019.
Also, it is referred to as the Endpoint Protection.
The functionality, configuration, and management are quite the same for the Microsoft Defender Antivirus on Windows 10 except for a few differences.
How to install Windows Defender Antivirus in Windows servers2016 and 2019
Now let’s take a look at how to install the Defender.
1. Enable the user interface on Windows Server 2016 or 2019
Microsoft Defender Antivirus is installed and functional on Windows Server 2016 and Windows Server 2019 by default. Also, the GUI is installed by default in some of the SKUs. However, in case, if it is not installed then you can add it by using the Add Roles and Features Wizard or PowerShell.
Turn on the GUI using the Add Roles and Features Wizard
- Use the Add Roles and Features Wizard.
- When you come across the Features step of the wizard which is present under Windows Defender Features, select the GUI for Windows Defender option.
Turn on the GUI using PowerShell
Run the below PowerShell cmdlet to enable the interface.
Install-WindowsFeature -Name Windows-Defender-GUI2. Install Microsoft Defender Antivirus on Windows Server 2016 or 2019
For installation, you can use either the Add Roles and Features Wizard or PowerShell to install Microsoft Defender Antivirus.
Use the Add Roles and Features Wizard
In Add Roles and Features Wizard, when you come across the Features step of the wizard, select the Microsoft Defender Antivirus option. Also, select the GUI for the Windows Defender option.
Use PowerShell
Run the below command to install Microsoft Defender Antivirus using the PowerShell.
Install-WindowsFeature -Name Windows-Defender3. Verify Microsoft Defender Antivirus is running
Run the below PowerShell cmdlet to verify that Microsoft Defender Antivirus is running on the server
Get-Service -Name windefendRun the below PowerShell cmdlet to verify that firewall protection is turned on or not.
Get-Service -Name mpssvcTo verify that Microsoft Defender Antivirus is running or not, you can use Command Prompt as an alternative to PowerShell. For that, run the below command from a command prompt.
sc query Windefend4. Update antimalware Security intelligence
You must have the Windows Update service running so that you will get an updated antimalware Security intelligence. In case, if you are using update management service, like Windows Server Update Services (WSUS), make sure that updates for Microsoft Defender Antivirus Security.
By default, on Windows Server 2016 or 2019, the Windows Update doesn’t download and install updates automatically. However, you can change this configuration by using one of the following methods.
Method 1: Windows Update in Control Panel
- ‘Install updates automatically’ results in all updates being automatically installed, including Windows Defender Security intelligence updates.
- ‘Download updates but let me choose whether to install them’ will allow Windows Defender to download and install Security intelligence updates automatically. But other updates aren’t installed automatically.
Method 2: Group Policy
- You can set up and manage Windows Update by using the settings available in Group Policy, in the following path: ‘Administrative Templates\Windows Components\Windows Update\Configure Automatic Updates’
Method 3: The AUOptions registry key
- The following two values will allow Windows Update to automatically download and install Security intelligence updates.
– 4 Install updates automatically. This value will result in all updates being automatically installed, including Windows Defender Security intelligence updates.
– 3 Download updates but let me choose whether to install them. This value will allow Windows Defender to download and install Security intelligence updates automatically. But other updates aren’t installed automatically.
Ensure that you enable ‘Windows Error Reporting service’ and ‘Windows Update service’ so that protection from malware is maintained.
[Need any further assistance with Windows queries? – We are here to help you.]
Conclusion
In today’s writeup, we saw how to install windows defender antivirus.
PREVENT YOUR SERVER FROM CRASHING!
Never again lose customers to poor server speed! Let us help you.
Our server experts will monitor & maintain your server 24/7 so that it remains lightning fast and secure.
GET STARTED
var google_conversion_label = «owonCMyG5nEQ0aD71QM»;