
Все способы:
- Способ 1: Ручное завершение задачи
- Способ 2: Отключение защиты в реальном времени
- Способ 3: Ручное отключение службы
- Способ 4: Изменение локальной групповой политики
- Способ 5: Установка стороннего антивируса
- Вопросы и ответы: 4
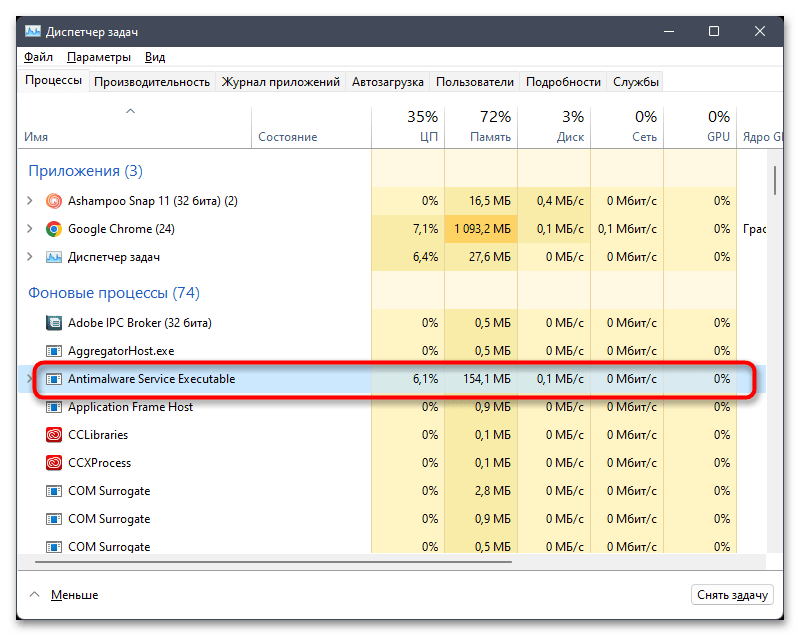
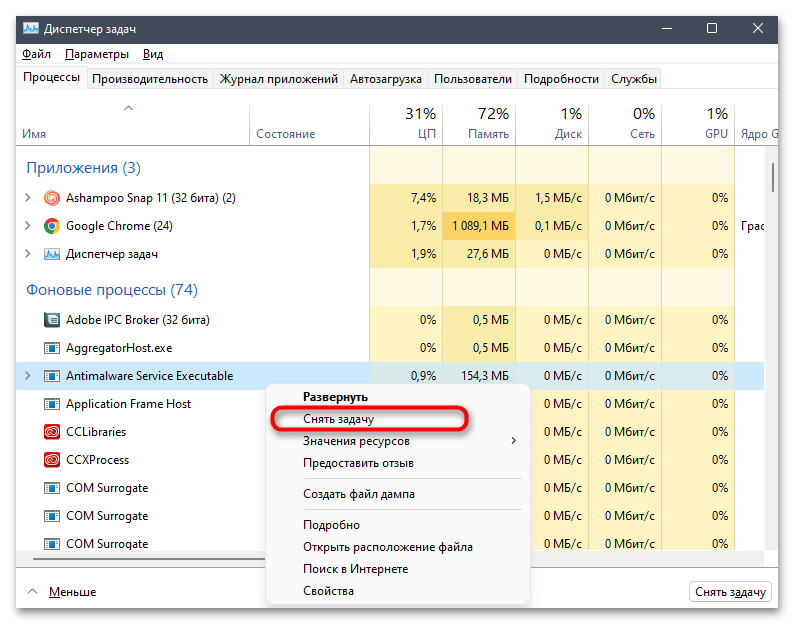
Способ 1: Ручное завершение задачи
«Antimalware Service Executable» — название процесса, который отображается в «Диспетчере задач» и связан с компонентами «Защитника Windows». Обычно его завершение осуществляется путем отключения защиты в реальном времени и других функций. Временно прекратить выполнение задачи можно самостоятельно, завершив ее через тот же «Диспетчер задач».
- Щелкните правой кнопкой мыши по кнопке «Пуск» и из появившегося контекстного меню выберите пункт «Диспетчер задач».
- На вкладке с процессами найдите «Antimalware Service Executable» и кликните правой кнопкой мыши по задаче.
- Из контекстного меню выберите пункт «Снять задачу». Если на экране не появилось никаких ошибок, вы можете быть уверены в том, что на время служба завершила свою работу, но может быть в любой момент запущена Защитником автоматически.
Способ 2: Отключение защиты в реальном времени
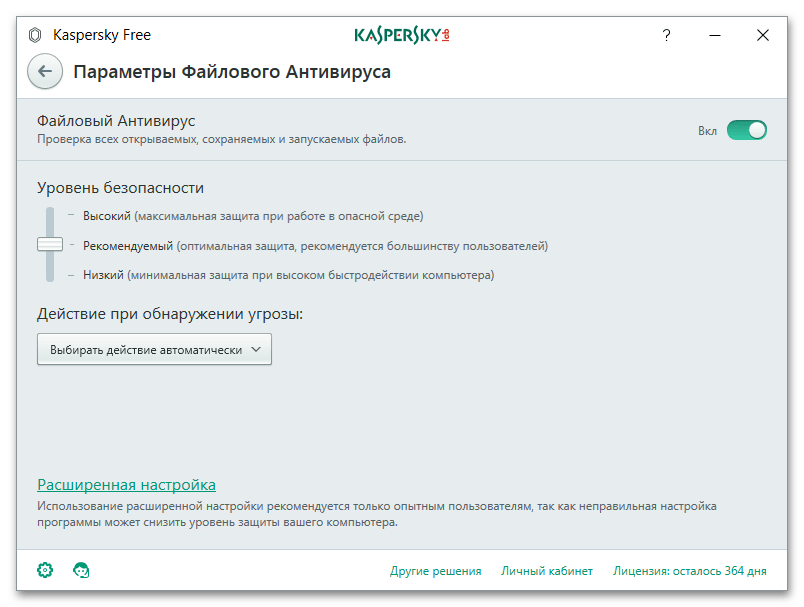
Самый действенный метод прекращения работы «Antimalware Service Executable» — отключение работы встроенного в Windows 11 средства защиты. Обычно достаточно будет прекратить проверку в реальном времени, что сделает систему немного уязвимее к вирусам, поэтому самостоятельно решайте, стоит ли прибегать к подобным действиям.
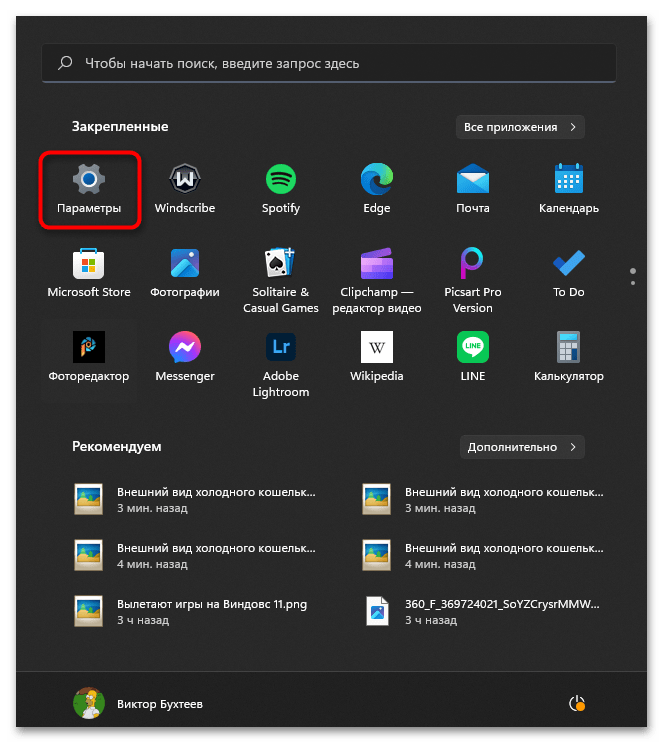
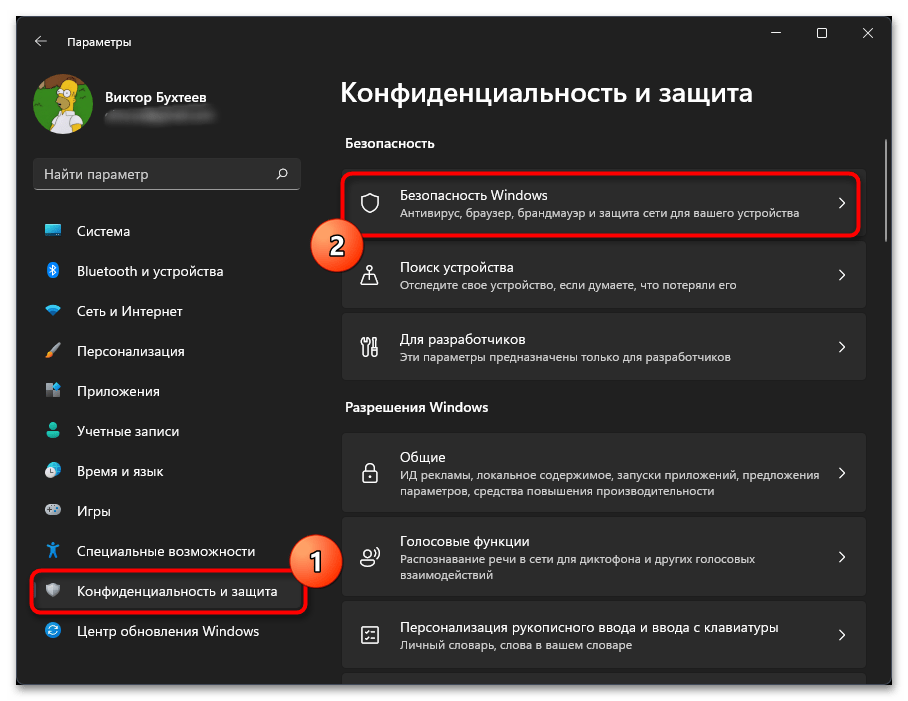
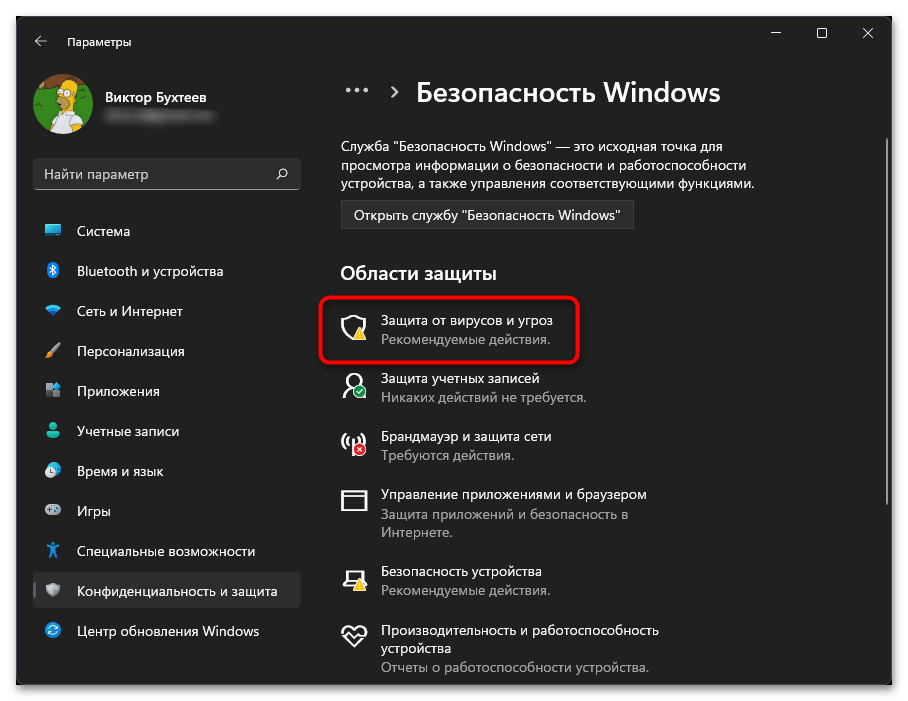
- Если вы решили отключить защиту для прекращения работы службы, в меню «Пуск» нажмите по значку «Параметры».
- На панели слева выберите раздел «Конфиденциальность и защита», затем перейдите в «Безопасность Windows».
- В списке «Области защиты» левой кнопкой мыши нажмите по «Защита от вирусов и угроз».
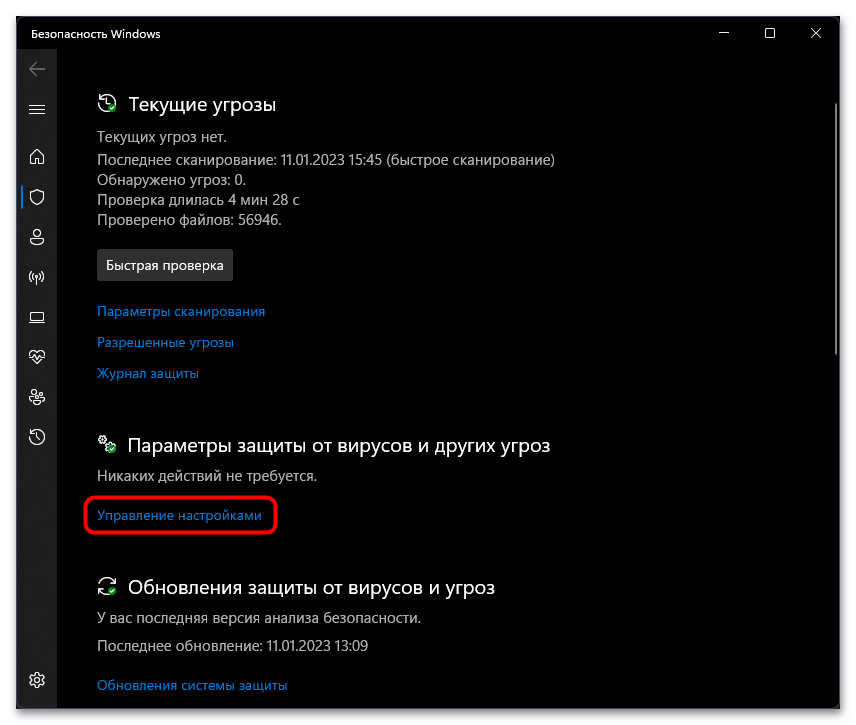
- В новом окне опуститесь к блоку «Параметры защиты от вирусов и угроз», затем щелкните по ссылке «Управление настройками».
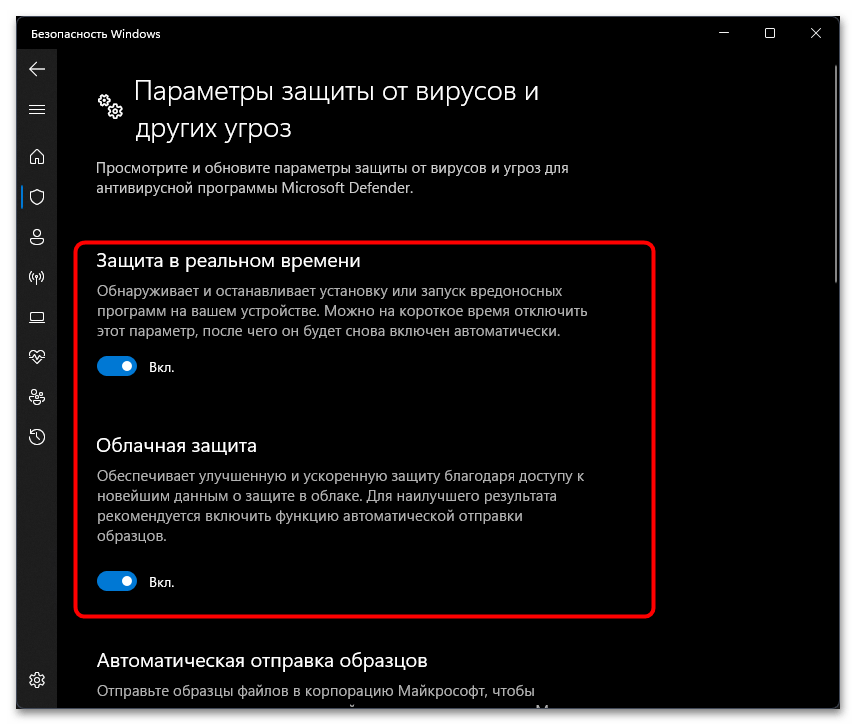
- Перетащите переключатель «Защита в реальном времени» в состояние «Откл.». То же самое можете сделать и с «Облачная защита», чтобы наверняка избавиться от рассматриваемого в статье процесса.
Способ 3: Ручное отключение службы
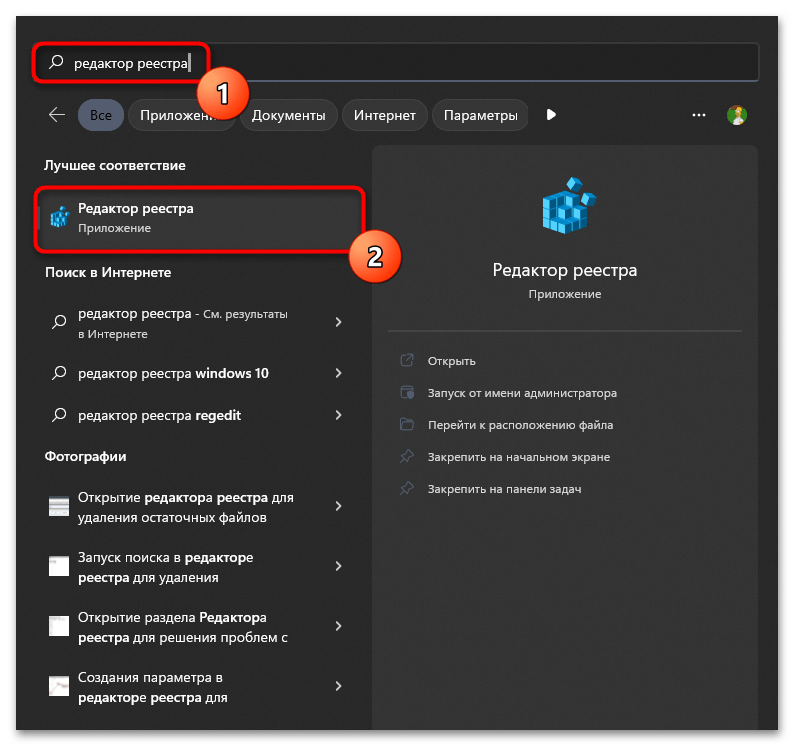
По умолчанию службу, связанную с «Antimalware Service Executable» в Windows 11, отключить не получится. Предварительно понадобится внести изменения в реестр, чтобы настройка стала доступной. Вам достаточно будет следовать инструкции, чтобы без проблем отыскать необходимые параметры и внести в них требуемые изменения.
- Для начала отыщите «Редактор реестра» через «Пуск» и запустите данное приложение.
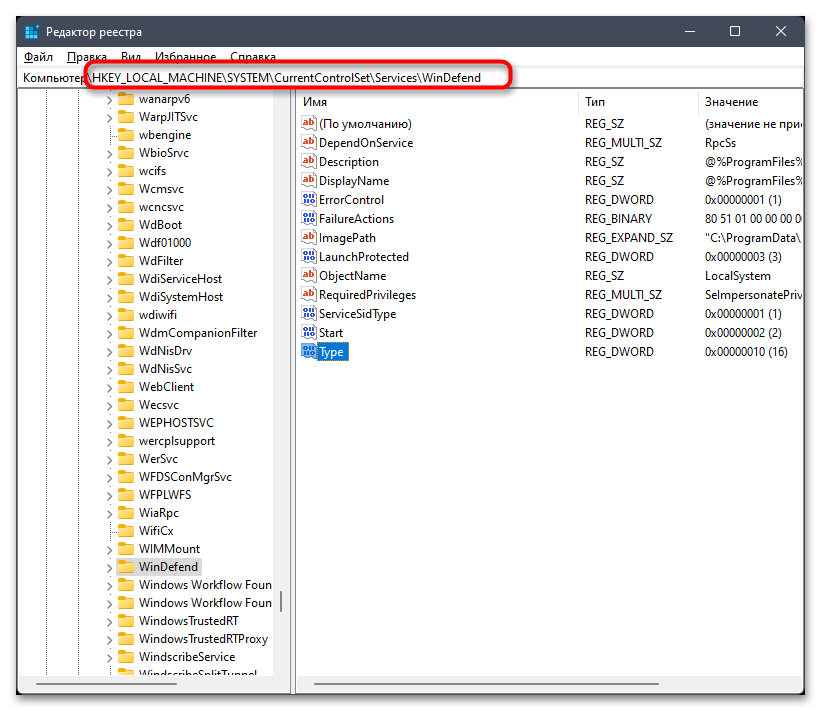
- В нем перейдите по пути
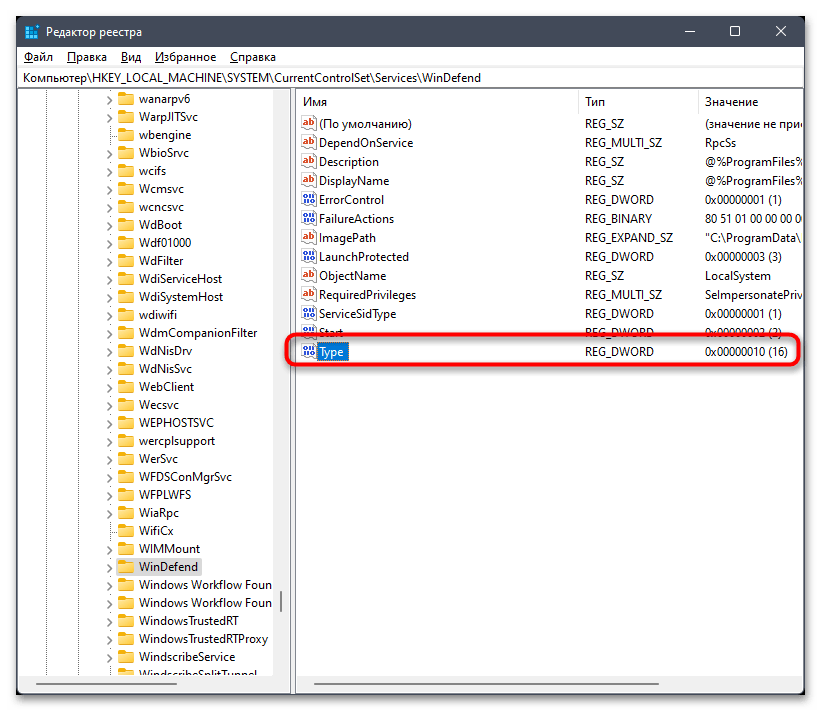
Компьютер\HKEY_LOCAL_MACHINE\SYSTEM\CurrentControlSet\Services\WinDefend. - В корне каталога отыщите параметр с названием «Type» и дважды щелкните по нему левой кнопкой мыши для открытия меню изменения значения.
- Установите его как «3» и примените изменения.
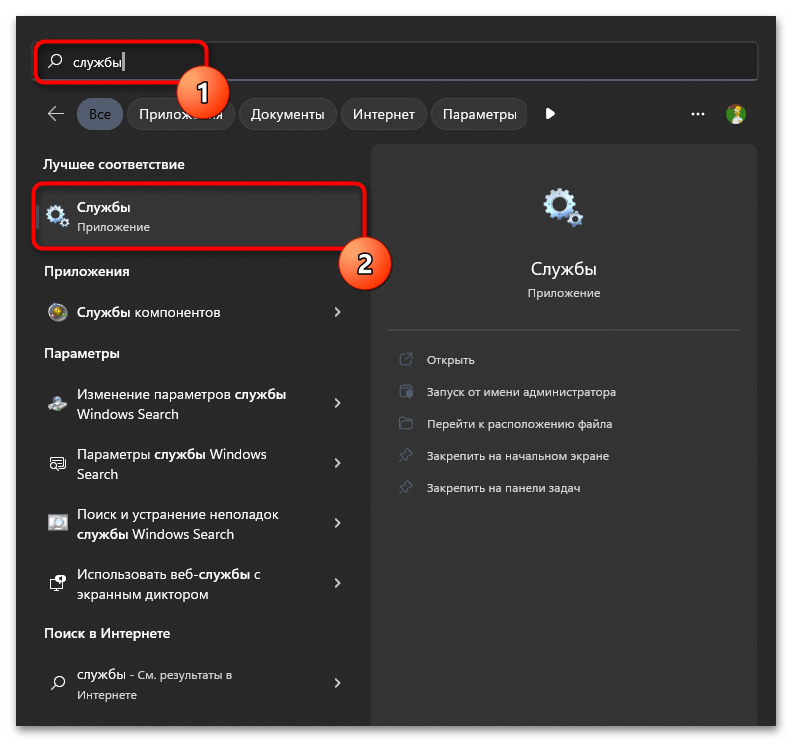
- Далее через тот же поиск в «Пуске» запустите «Службы».
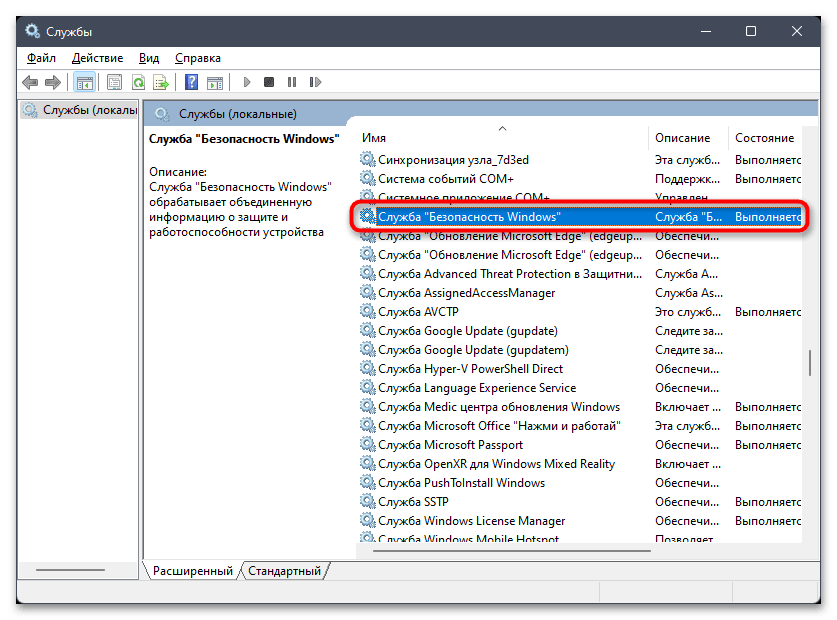
- Отыщите службу с названием «Служба «Безопасность Windows»», щелкните по ней дважды для открытия свойств, затем остановите и установите тип запуска «Вручную».
Способ 4: Изменение локальной групповой политики
Еще один метод отключения защиты в реальном времени, который поможет избавиться от процесса, отображаемого в «Диспетчере задач», — изменение локальной групповой политики. Для доступа к ее редактору у вас обязательно должна быть Windows 11 Pro или Enterprise, поскольку в релизе Home это приложение отсутствует.
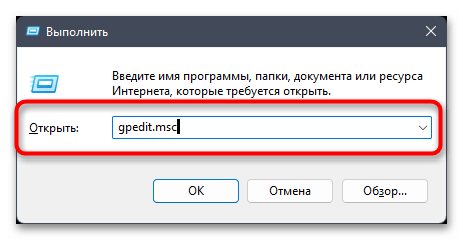
- Откройте «Выполнить», используя для этого сочетание клавиш Win + R. Введите команду
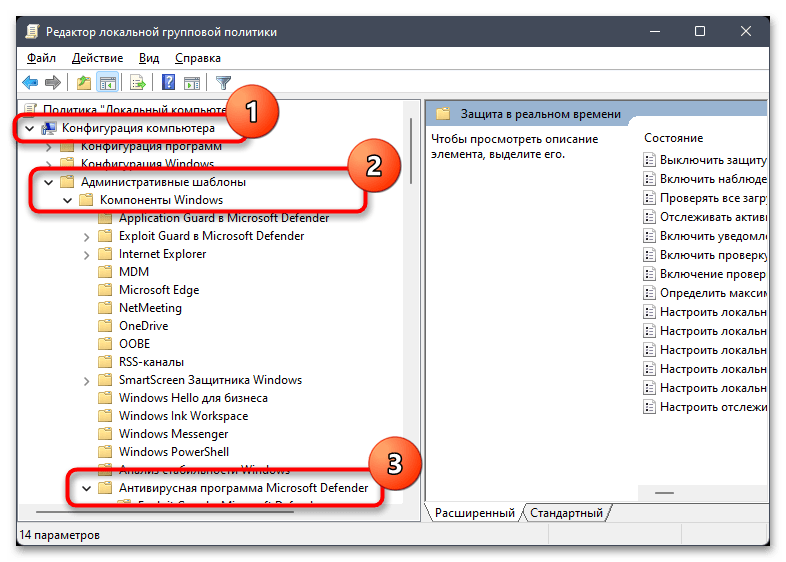
gpedit.mscи нажмите Enter для ее применения. - В окне редактора разверните «Конфигурация компьютера», затем «Административные шаблоны» — «Компоненты Windows» и найдите директорию «Антивирусная программа Microsoft Defender».
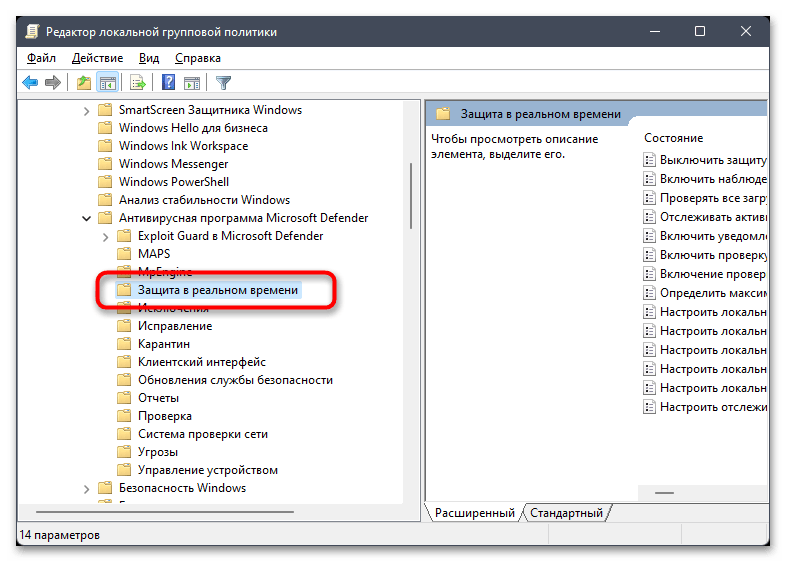
- В этом каталоге левой кнопкой мыши выберите папку «Защита в реальном времени».
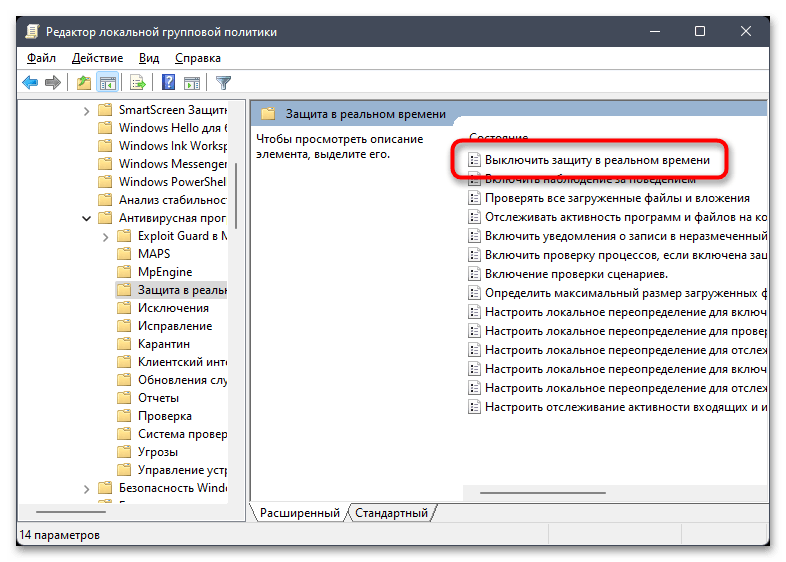
- В блоке справа найдите политику под названием «Выключить защиту в реальном времени» и дважды кликните по файлу левой кнопкой мыши.
- Установите значение «Включено», сохраните изменения и перезагрузите компьютер, чтобы настройка вступила в силу.

Способ 5: Установка стороннего антивируса
Последний метод довольно необычный и подойдет лишь некоторым. Его суть заключается в установке стороннего антивируса, после чего служба «Antimalware Service Executable» автоматически перестанет работать, поскольку операционная система найдет новую программу борьбы с угрозами и отдаст предпочтение ей. В будущем вы можете на время или полностью останавливать защиту нового антивируса, не переживая, что после этого запустится стандартное средство Windows. Оно не будет включаться до тех пор, пока на ПК установлена любая другая защита. Достаточно будет выбрать даже бесплатный антивирус, о чем рассказано в другой статье на нашем сайте по следующей ссылке.
Подробнее: Установка бесплатного антивируса на ПК
Наша группа в TelegramПолезные советы и помощь
How to Fix ‘Antimalware Service Executable’ High Memory, CPU, or Disk Usage in Windows 11
In the vast world of Windows operating systems, many users encounter issues that impact performance and usability. One such problem that has been frequently reported is the high memory, CPU, or disk usage caused by a component known as the ‘Antimalware Service Executable.’ This service is closely related to Windows Defender, the built-in antivirus solution of Windows 11. While robust in protecting your system against malware, it can sometimes become a resource hog, leading to frustration among users trying to maintain smooth operation on their machines. In this article, we will delve into what the Antimalware Service Executable is, why it can cause high resource usage, and how to effectively solve this issue.
Understanding Antimalware Service Executable
What Is Antimalware Service Executable?
Antimalware Service Executable is usually represented as MsMpEng.exe in the Windows Task Manager. It is part of the Windows Defender Antivirus, tasked with real-time protection against malware threats. It continuously scans files and programs for malicious software, providing a first line of defense against various types of cyber threats, such as viruses, worms, and trojans.
Why Does It Consume So Many Resources?
Several factors can contribute to high memory, CPU, or disk usage by the Antimalware Service Executable:
-
Real-time Protection: When real-time protection is enabled, Antimalware Service Executable continuously scans files being executed or opened on your computer. This merciless vigilance can lead to high CPU usage, especially if you run many applications simultaneously.
-
Full System Scans: The service performs full system scans frequently to ensure no threats are present. These scans can use substantial CPU and disk resources, especially on lower-spec machines or with a vast amount of files.
-
Conflicts with Other Antivirus Software: If you’re running another antivirus alongside Windows Defender, conflicts may arise, leading to increased resource consumption.
-
Corrupted Files or Malware: Sometimes the problem could be rooted deeper, where corrupted files within Windows Defender or actual malware attempts to hide from detection might cause the service to work overtime.
-
Scheduling of Scans: Certain system configurations allow Defender to schedule scans at inconvenient times, often when you are using the computer actively.
Understanding the causes of the high resource usage will help you address the problem effectively, allowing your system to operate smoothly.
How to Fix High Resource Usage
Here, we will explore simple yet effective solutions that can help you fix the high memory, CPU, or disk usage associated with Antimalware Service Executable.
1. Configure Windows Defender Settings
Adjusting the settings for Windows Defender can significantly reduce resource usage.
Disable Real-Time Protection Temporarily:
Although not recommended for extended periods due to security risks, you may choose to disable this feature temporarily to check if it reduces resource usage:
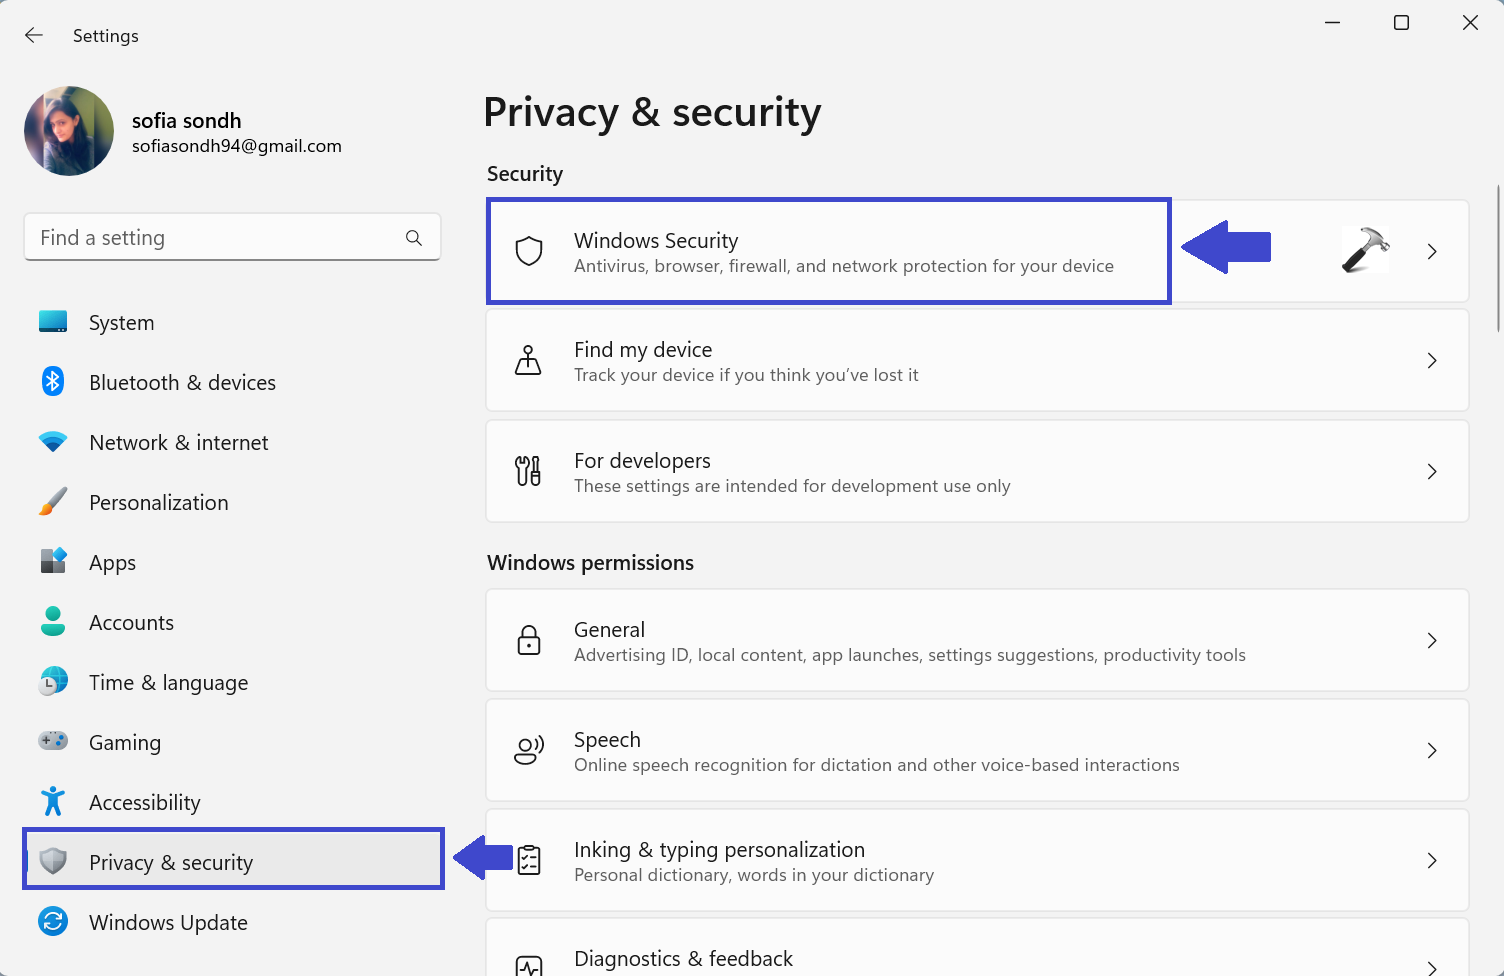
- Go to
Settings(you can use Win + I). - Click on
Privacy & security. - Select
Windows Security. - Click on
Virus & threat protection. - Click on
Manage settingsunder the ‘Virus & threat protection settings’ section. - Toggle off the
Real-time protectionoption.
Note: Don’t forget to turn this back on after troubleshooting.
Disable Cloud-Delivered Protection:
The cloud-delivered protection feature can also contribute to resource consumption. Consider disabling it:
- Go to the same
Virus & threat protectionsettings. - Scroll down to
Cloud-delivered protection. - Toggle it off.
2. Adjust Scheduled Scans
If you’re facing performance issues when your computer is in use, adjusting the schedule for full scans can be important.
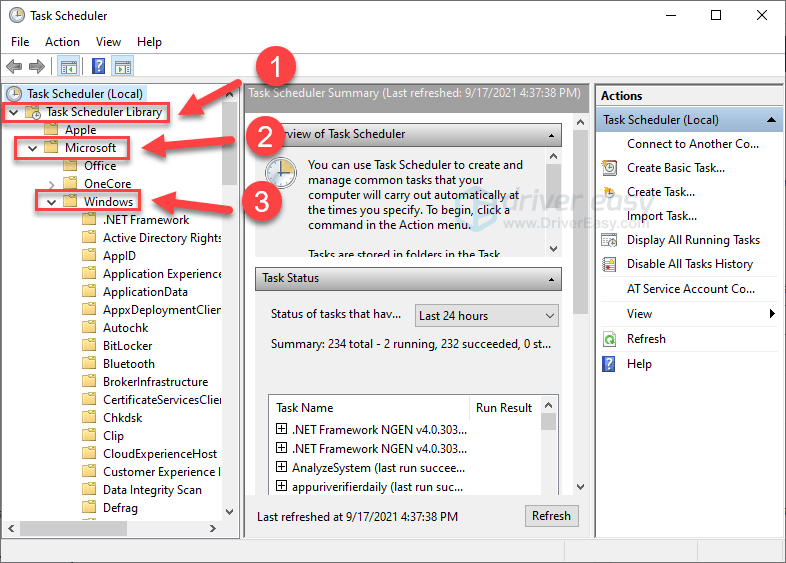
- Search for
Task Schedulerusing the Start menu. - Find the task for Windows Defender (usually under Task Scheduler Library → Microsoft → Windows → Windows Defender).
- Locate
Windows Defender Scheduled Scanand right-click it. - Choose
Propertiesand switch to theTriggerstab. - Modify the timing to a more convenient period when you are less likely to use the system.
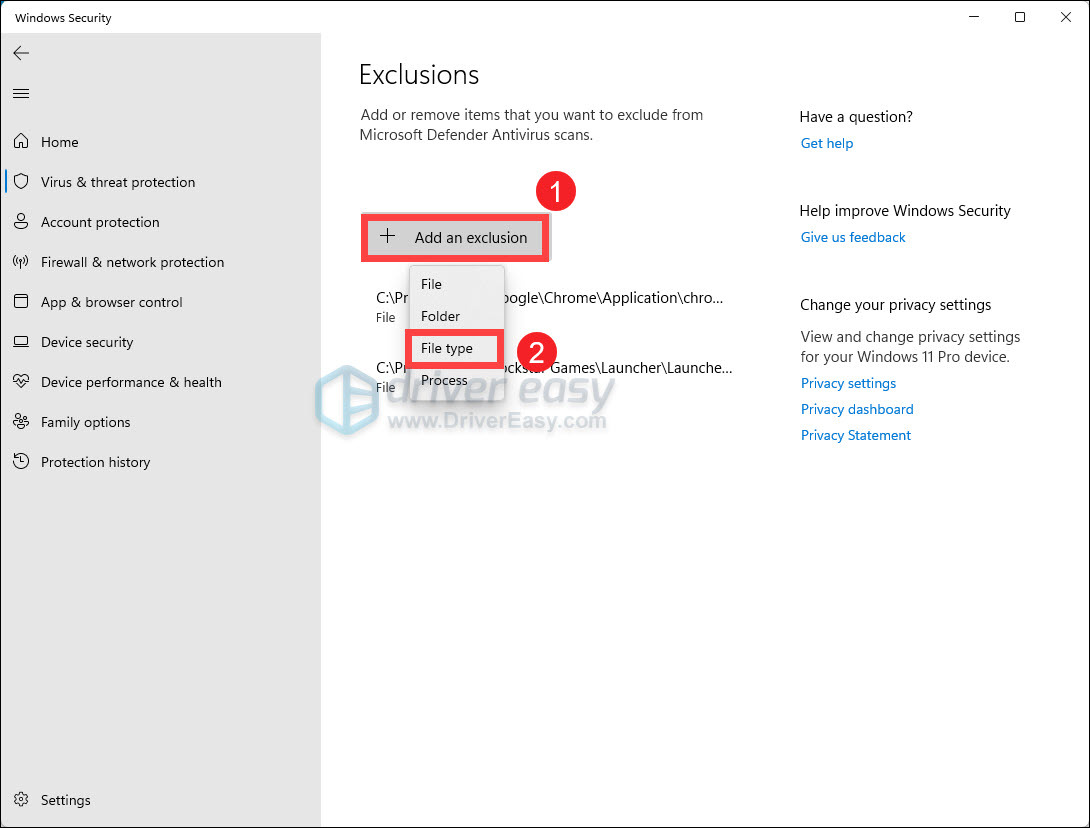
3. Exclude Certain Folders
Exclusions can also minimize resource use. If you have specific folders that you trust and often access, excluding them can lessen the workload for Antimalware Service Executable.
- Go back to
Virus & threat protection settings. - Click on
Add or remove exclusions. - Click the
Add an exclusionbutton. - Choose the type of exclusion you want to add (folders, files, etc.), then navigate to select the desired folder.
4. Utilize Windows Defender Offline
Sometimes, a full system scan using Windows Defender Offline can solve issues that cause high resource usage:
- Open
Windows Security. - Go to
Virus & threat protection. - Scroll down and find
Microsoft Defender Offline scan, then clickScan now. - Your computer will restart and perform a scan before Windows loads.
This method helps detect and remove harder-to-detect threats that can be taxing on resources.
5. Update Windows
Keeping your system and its components up-to-date can help fix bugs and improve performance. Regular updates include performance enhancements for Windows Defender as well:
- Press
Windows + Ito open Settings. - Click on
Windows Update. - If an update is available, click on
Download and install.
6. Perform System Maintenance
Regular system maintenance tasks can alleviate the pressure on Antimalware Service Executable and ensure it runs more efficiently. Here’s what you can do:
-
Disk Cleanup: Use the built-in Disk Cleanup Tool to remove temporary files and improve overall performance.
- Search for
Disk Cleanupin the Start menu. - Select the drive you want to clean (usually C:).
- Check all boxes for files you want to delete and click
OK.
- Search for
-
Defragment Your Hard Drive: If you are using a traditional HDD, defragmenting can enhance performance significantly.
- Search for
Defragment and Optimize Drives. - Select your hard drive and click
Optimize.
- Search for
7. Consider Alternative Antivirus Solutions
While it’s ideal to use Windows Defender for seamless integration, sometimes third-party antivirus solutions may perform better without causing excessive resource consumption:
- Research reliable antivirus options that are known for their light system resources.
- Uninstall Windows Defender if you find a suitable alternative, ensuring any compatibility concerns are addressed.
Remember that having multiple antivirus programs simultaneously can lead to conflicts and increased resource usage.
8. Hardware Upgrades
If your system continues to struggle with high resource usage, consider upgrading your hardware:
- Increase RAM: If you’re frequently near or exceeding your RAM limits, upgrading can facilitate smoother multitasking.
- SSD Installation: Switching from an HDD to an SSD can dramatically improve system responsiveness and reduce disk usage, which in turn might lessen the load from Antimalware Service Executable.
Conclusion
High memory, CPU, or disk usage due to the Antimalware Service Executable is an issue many Windows 11 users face, but it is manageable with the right steps. By understanding the underlying causes and implementing the solutions discussed, you can optimize both Windows Defender’s performance and your system’s overall resource usage. Regular maintenance, prudent adjustments to settings, and consideration for alternative solutions can contribute significantly to a smoother computing experience.
In summary, while ensuring the security of your system is paramount, maintaining a balance between security protection and performance is equally important. With careful monitoring and adjustments, you can enjoy a responsive and secure Windows 11 environment.
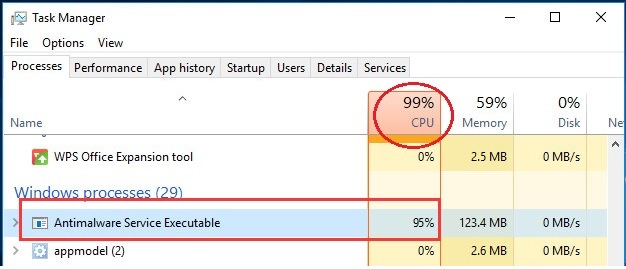
If you noticed that the Antimalware Service Executable process takes up a high CPU on Windows, rest assured – you’re not alone. Many Windows users also report this problem. More importantly, you can fix this problem by yourself without asking a technician for help.
In this article, you’ll learn what Antimalware Service Executable exactly is and how to fix its high CPU usage issue.
What is Antimalware Service Executable?
You may know Windows Defender in your Windows, it’s an antivirus software built in Windows. Antimalware Service Executable is one of the background-running services in Windows Defender. It’s also known as MsMpEng.exe, you can find this on the Details tab in your Task Manager.
Antimalware Service Executable is running to scan the malware and spyware when you access them. It will detect if there’s anything harmful. Besides, it also takes a background scan of your system for any viruses or worms. Its scanning relies heavily on your computer’s CPU, that’s why you find it’s eating the CPU usage on your Windows. Couldn’t we solve this problem for the safety of our Windows? No, you can solve it. Move on to the next part, please.
Fixes for ‘Antimalware Service Executable high CPU‘:
- Change Windows Defender’s schedule
- Add Antimalware Service Executable to Windows Defender exclusion list
- Check Real-time protection settings
Fix 1: Change Windows Defender’s schedule
The error is mainly due to its real-time protection feature. So we can change Windows Defender’s schedule to fix it.
- On your keyboard, press the Windows logo key and R at the same time to invoke the Run box. Type taskschd.msc and press Enter.
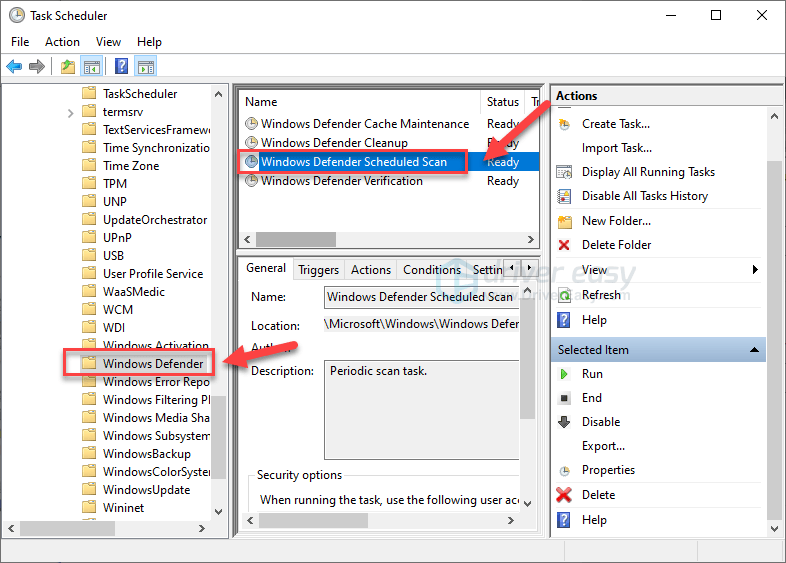
- Double-click on Task Scheduler Library > Microsoft > Windows.

- Double-click Windows Defender in Windows. Then double-click Windows Defender Scheduled Scan.
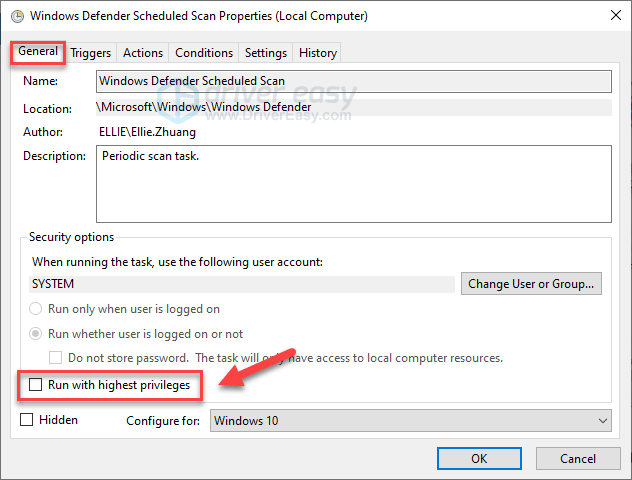
- Uncheck Run with highest privileges.

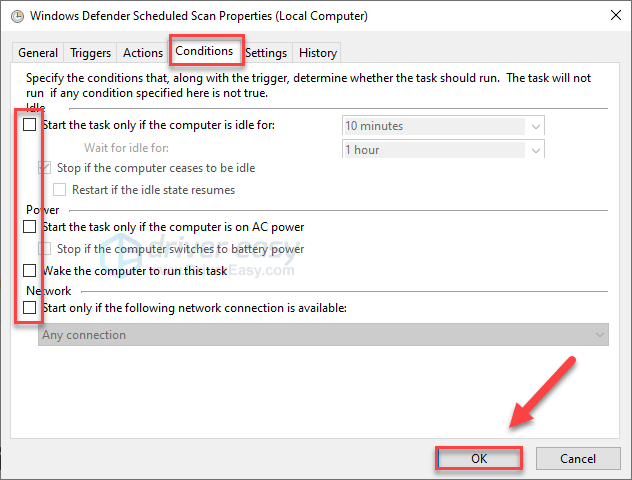
- Uncheck all the items in the Conditions section. Then click OK.
- With the steps above, your error should be fixed now.
If unfortunately, it doesn’t work, please don’t be frustrated, try the following method.
Fix 2: Add Antimalware Service Executable to Windows Defender exclusion list
High CPU usage can signal issues with Windows Defender real-time scanning. A troubleshooting step is to add the Antimalware Service Executable to Defender’s exclusion list. This prevents scanning of the file, potentially stopping unnecessary scans causing high CPU.
Below we’ll show you how to do this.
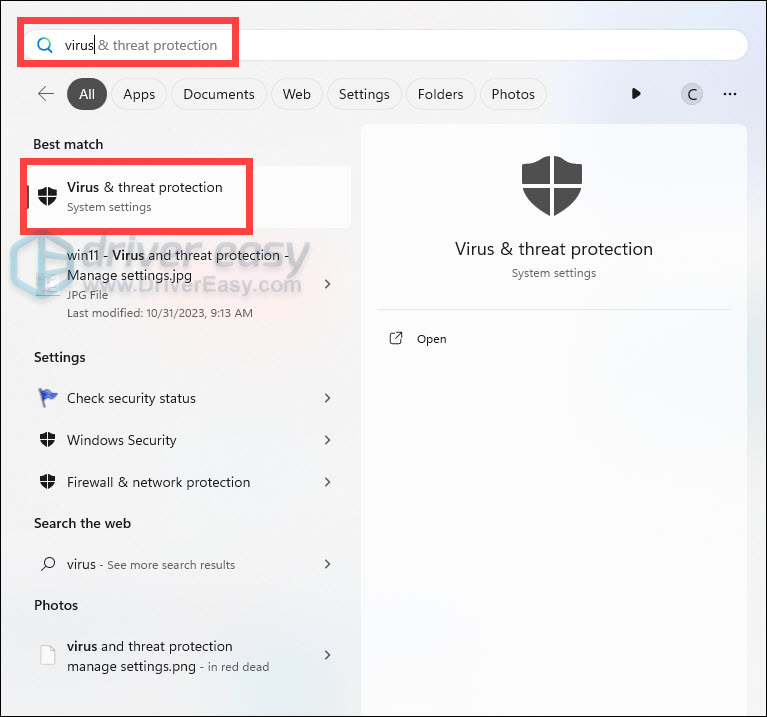
- On your keyboard, press the Windows logo key to open the Start menu. Type virus, and click Virus & threat protection from the list of results.

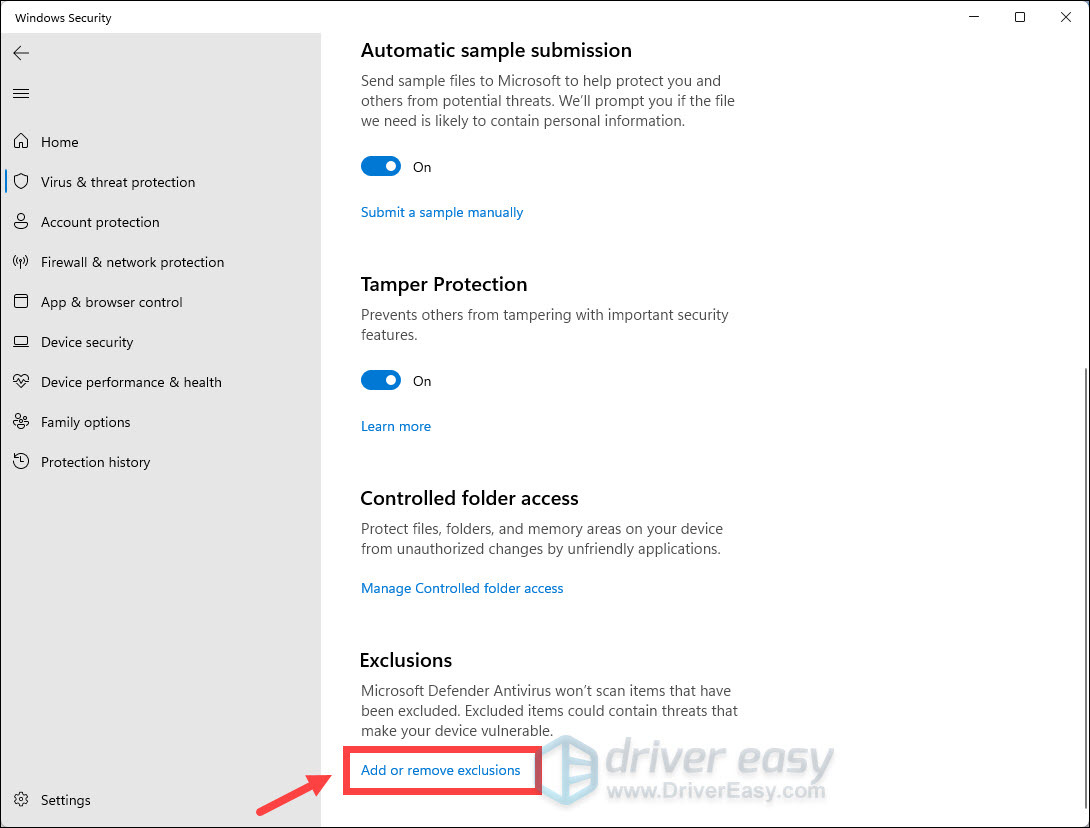
- Find Manage settings under Virus & threat protection settings and click on it.

- Scroll to the bottom and click Add or remove exclusions.

- When you’re asked for permission, click Yes to proceed.
- Click Add an exclusion. From the drop-down menu, select Folder.
- Then select the following path:
C:\Program files\Windows Defender

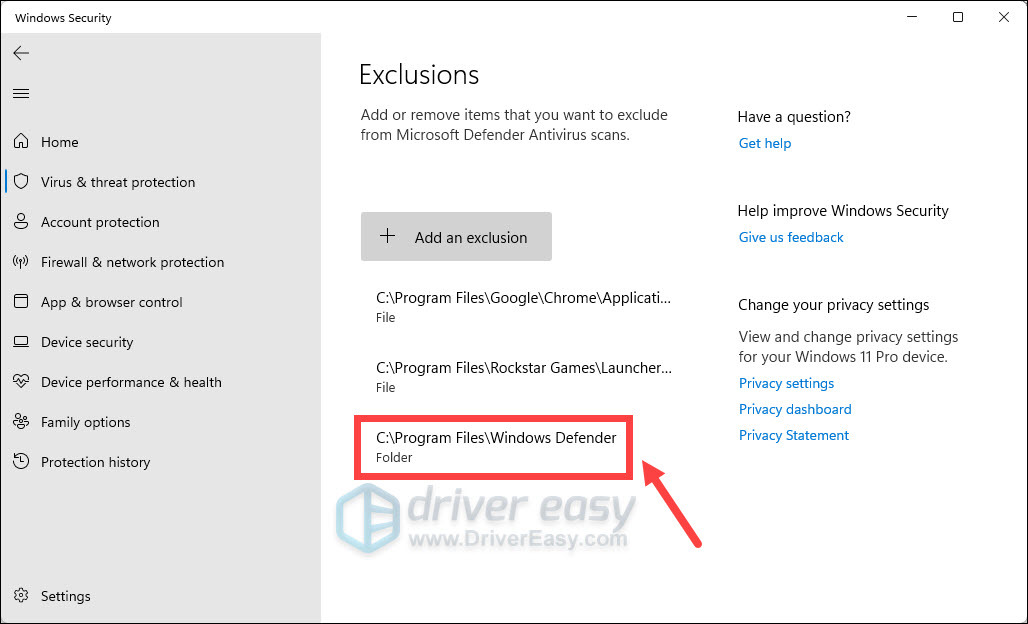
Then restart your computer and check if it still consumes high CPU and RAM resources.
Fix 3: Check real-time protection settings
Another workaround for this issue is turning off the real-time protection.
- On your keyboard, press the Windows logo key to open the Start menu. Type virus, and click Virus & threat protection from the list of results.
- Find Manage settings under Virus & threat protection settings and click on it.
- Scroll a little bit and click on the switch to turn Off Real-time protection.
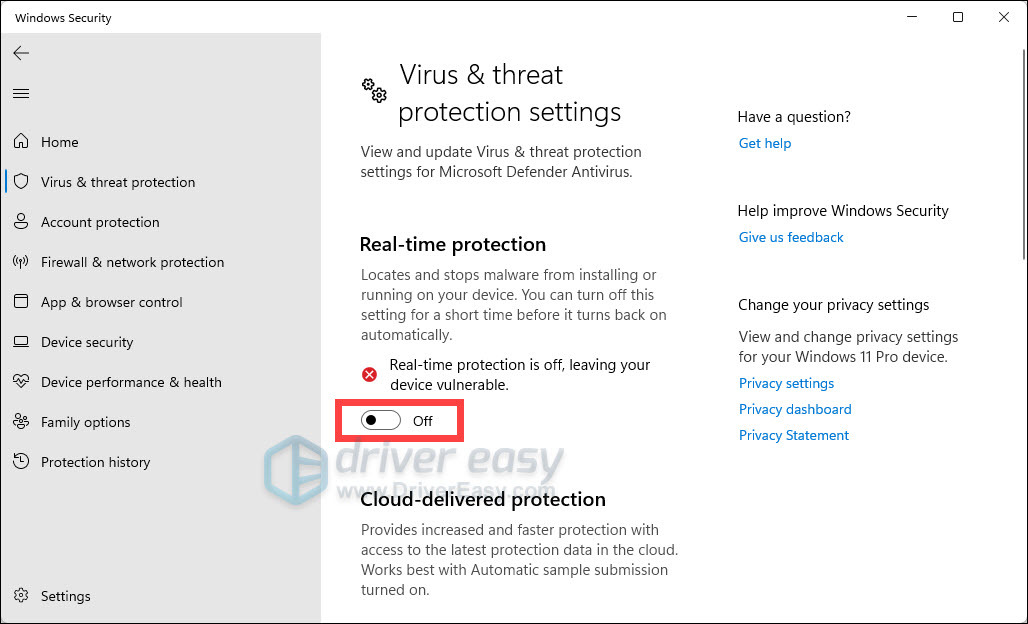
Turning off Real-time protection leaves your device vulnerable, so make sure you re-enable the setting after the troubleshooting.
Still Running Slow?
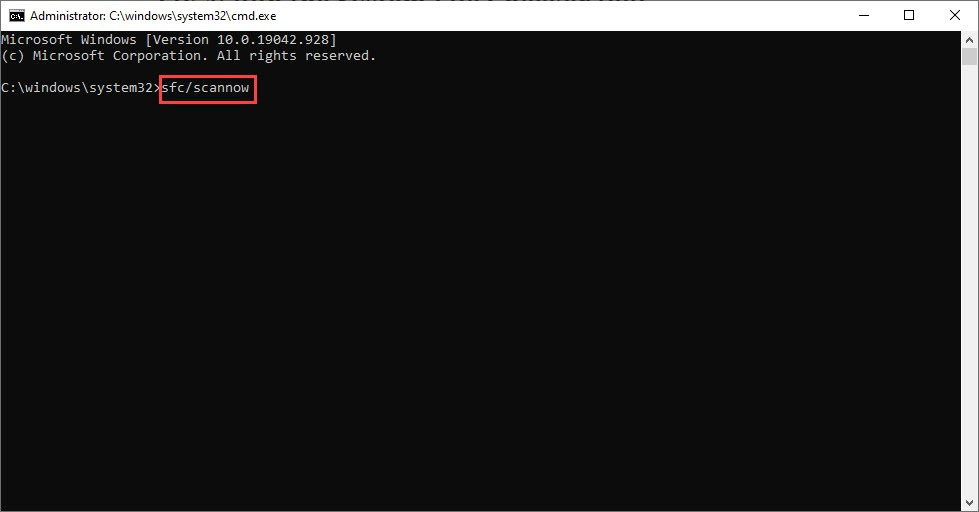
If, after trying the above, your PC is still running slow, we highly recommend you scan your Windows OS for faulty files or missing system components.
System File Checker is a Windows built-in tool that can help you scan for and repair any corruptions of your system files. Follow the instructions to see how to use it:
- Press the Windows logo key and R on your keyboard to invoke the Run box.
- On your keyboard, type cmd and press Ctrl, Shift and Enter at the same time to run Command Prompt as administrator.
- You’ll be prompted for permission. Click Yes to open Command Prompt.
- Type sfc/scannow, then press Enter.

- The System Files Checker tool will automatically scan for corrupt or missing files and fix them, if there’s any.
- Restart your PC to see if the problem persists.

That’s it for this guide. Hopefully, it helped. Feel free to leave a comment below if you have any questions or suggestions.
212
212 people found this helpful
| Workable Solutions | Step-by-step Troubleshooting |
|---|---|
| 1. Turn Off Windows Defender Antivirus | Step 1. Press Windows + R to open the Run windows, type gpedit.msc…Full steps |
| 2. Turn Off Real-Time Protection | Step 1. Press Windows + R to open the Run dialog box and type gpedit.msc…Full steps |
| 3. Turn Off Windows Defender via Registry | Step 1. Press Windows + R to open dialog box, input regedit…Full steps |
| 4. Reschedule Windows Defender Scheduled Scan | Step 1. Press Windows Key + R to open the Run dialog box…Full steps |
Windows has built-in antivirus software, Windows Defender. If you choose Windows Defender as your best choice. When you open Task Manager on Windows 11, you can see a background process named MsMpEng.exe or Antimalware Service Executable. If you open task manager, you can see the antimalware service executable running in a background process.
Why is Antimalware Service Executable Running High in Windows 11
If you find the antivirus program takes up a large amount of CPU, the program may be scanning your computer for malicious software in real-time. If you have updated your computer or installed large files, Windows Defender will take time to do a full scan.
How to Fix Antimalware Service Executable High Memory Usage (5 Ways)
In this part, we will list 5 ways to stop Antimalware Service Executable. Before applying these solutions, we recommend downloading another Antivirus alternative software. Otherwise, your computer is vulnerable to unexpected danger.
Read also:
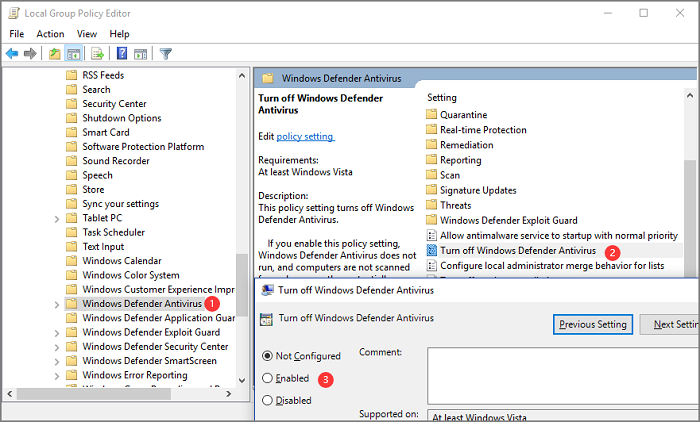
1. Turn Off Windows Defender Antivirus via Group Policy Editor
Step 1. Press Windows + R to open the Run windows, type gpedit.msc and click OK or Enter key to launch Local Group Policy Editor.
Step 2. Go to Computer Configuration > Administrative Templates > Windows Components > Windows Defender or Windows Defender Antivirus
Step 3. Move to the right panel. Press Extended and you can see the option like Turn off Windows Defender Antivirus.
Step 4. Double-click it and choose Enabled as images shown. Click OK.
2. Turn Off Real-Time Protection
Step 1. Press Windows + R to open the Run dialog box and type gpedit.msc.
Step 2. On the Local Group Policy Editor, go to Computer Configuration > Administrative Templates > Windows Components > Windows Defender Antivirus > Real-Time Protection
Step 3. Double-click Turn-off real-time protection and choose Enabled.

3. Turn Off Windows Defender via Registry (If Available)
Except for using Group Policy Editor, another choice is to start with Registry to disable Windows Defender. However, if you are not a practiced hand that understanding how harmful it is for change, we recommend you move to the next solution.
Step 1. Press Windows + R to open dialog box, input regedit and click OK to run Registry Editor.
Step 2. Follow the path: HKEY_LOCAL_MACHINE\SOFTWARE\Policies\Microsoft\Windows Defender
Step 3. Double-click the DisableAntiSpyware, set Value data as 1, and click OK.

If you find your Windows Defender Disableantispyware missing in Registry, you can create a new one as follows.
Step 1. Right-click the blank > Click New > Select DWORD (32-bit) Value from the menu > Set name as DisableAntiSpyware and click Enter
Step 2. Roll back to step 3 on the previous part.
4. Reschedule Windows Defender Scheduled Scan
Step 1. Press Windows Key + R to open the Run dialog box. Type taskschd.msc and press Enter.
Step 2. Navigate to Task Scheduler Library > Microsoft > Windows
Step 3. Expand Windows Defender, click Windows Defender Scheduled Scan, and then click Properties from the right pane.
Step 4. On the Windows Defender Scheduled Scan Properties window, move to the Security options part and uncheck Run with highest privileges.
Step 5. Click Conditions options, uncheck all search boxes under Idle, Power, and Network. Click OK.
Step 6. Open Properties again, choose the Triggers tab, and click New.
Under settings, choose the option base on your preference and click OK.
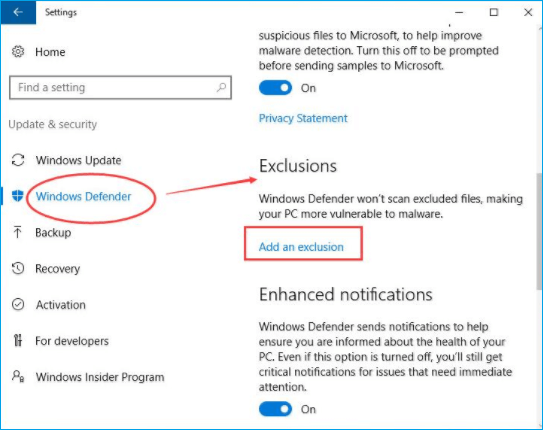
5. Add Program to Exclusion List
Step 1. Click the Windows icon on the centered toolbar.
Step 2. Navigate to Settings > Update & Security > Windows Defender
Step 3. Under the Exclusions tab, click Add an exclusion.
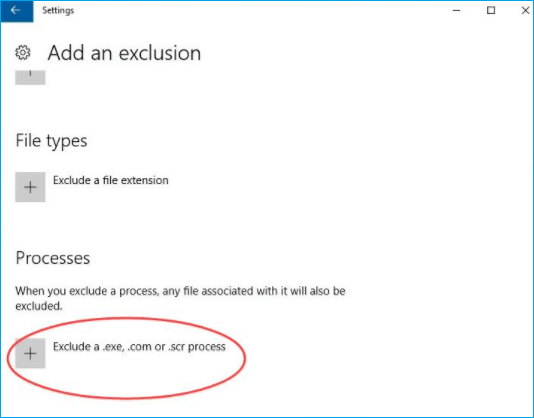
Step 4. Scroll down to choose Exclude a .exe, .com or .scr process.
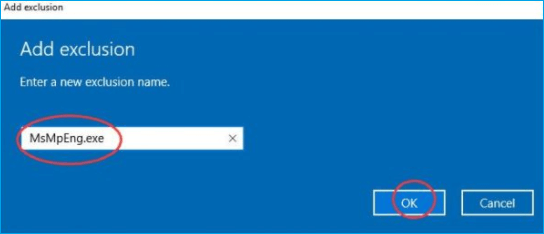
Step 5. Type MsMpEng.exe. and click OK.
If the above five methods fixed antimalware service executable high memory usage, you can click the social button below to share it with more people in need.
Bonus Tip about Better PC Performance
1. How to Partition Hard Disks in Windows 11?
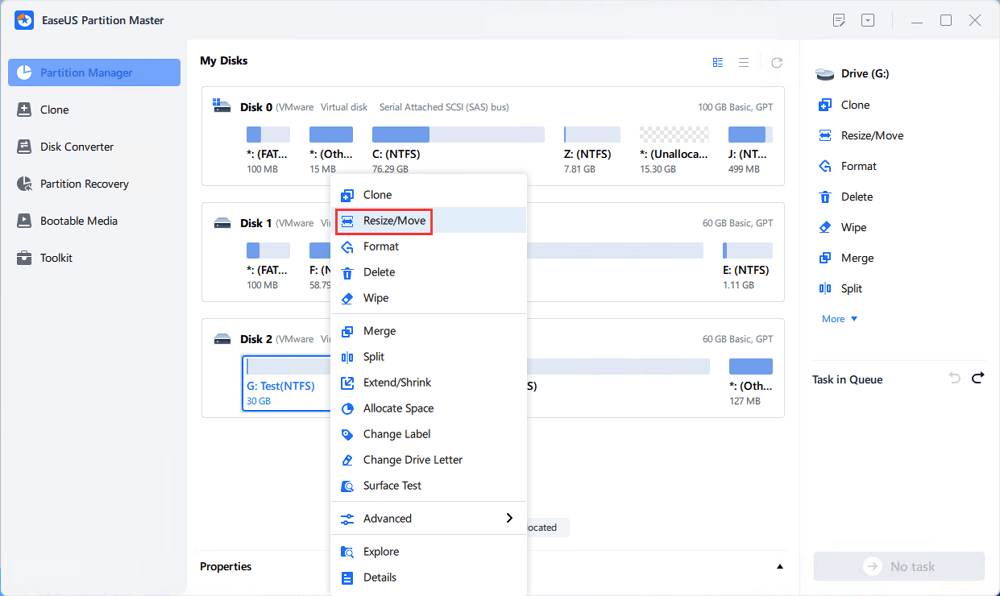
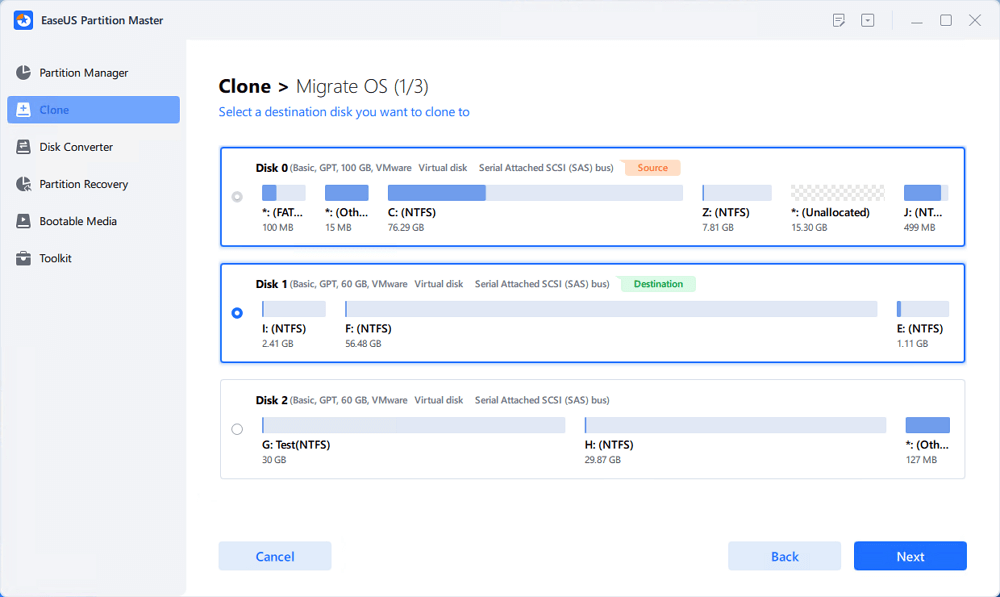
Using the computer, we should not only consider the protection of the computer from the virus attack but also consider whether the hard disk is healthy or not. EaseUS Partition Master is a robust disk partition software to enhance your disk performance. It features in resize/move partitions, convert MBR to GPT in Windows 11, and more.
[1] «Resize/Move» enables you to adjust space of a selected disk partition as wish. Right-lick «Resize/Move», you can shrink a volume, extend the other one, or create unallocated space for special use.
[2] «Clone» aims to make two identical hard disks or partitions with the same layout and content. You can use the «Clone» feature to upgrade a hard disk, replace a failing one, backup the drive data and so on.

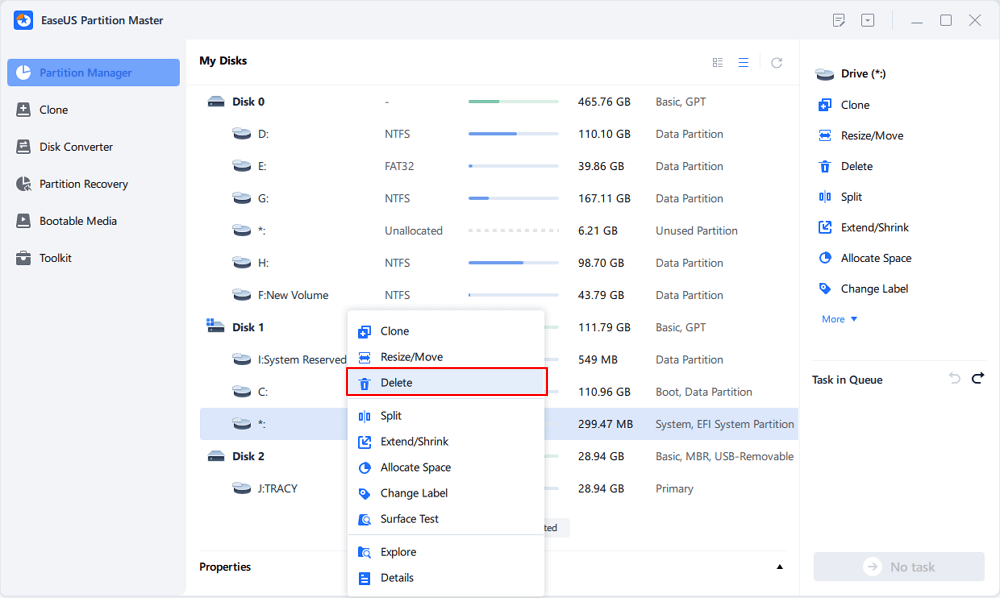
[3] «Delete» is a common method to remove an unwanted disk partition, turning it into unallocated space.
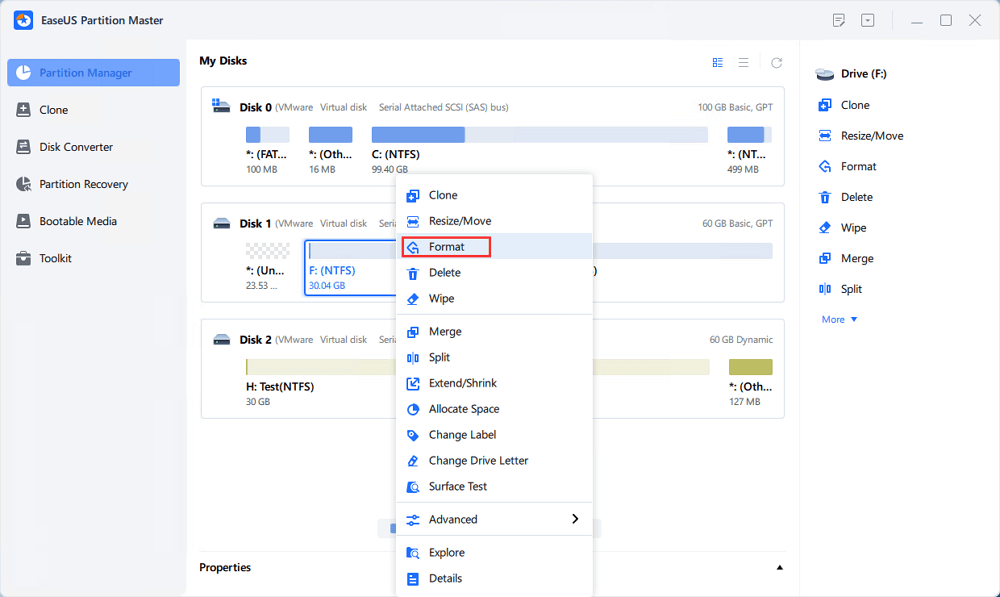
[4] «Format» is frequently used in many situations. By formatting a drive partition, you can alter the file system, fix some corruption issues, and sometimes remove viruses and malware.
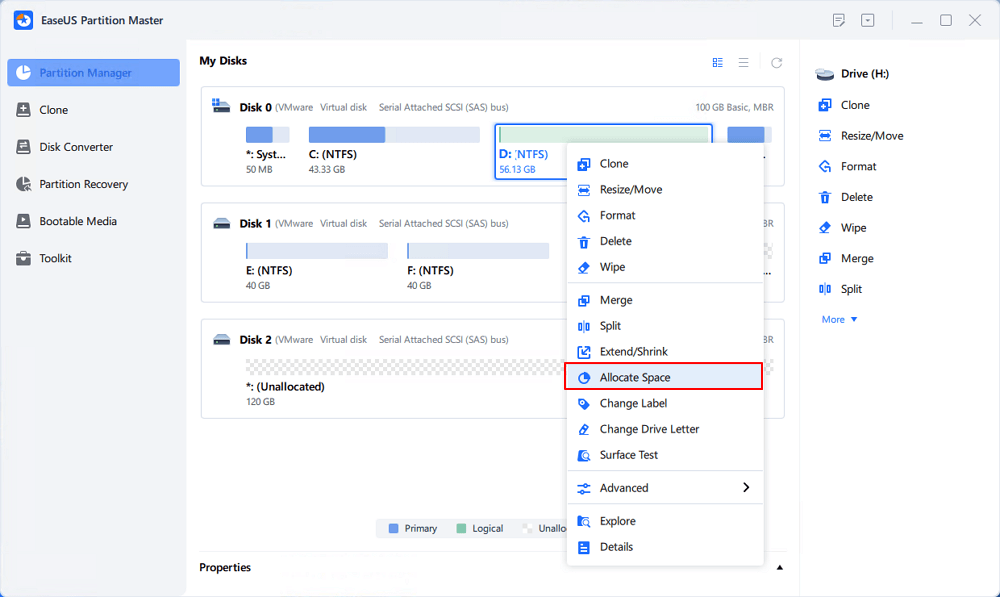
[5] «Allocate space» is very useful when one drive partition space is too much while the other is inadequate.
[6] «Migrate OS» makes it easy to transfer a Windows installation drive to the other without reinstalling.
[7] Conversion between GPT and MBR, NTFS and FAT32, and Basic to Dynamic is getting more and more popular among EaseUS Partition Master customers. Besides all the listed benefits, there are so many functional yet practical features are waiting you to explore.

2. How to Turn On Windows Defender in Windows 11?
If you turn off the Windows Defender and want to set it back for the data protection option, you can follow the steps.
Step 1. Click the Windows icon on the bottom screen to open Start Menu. Click Settings.
Step 2. Type Windows Security Settings in the search box.
Step 3. Go to Windows Security > Click Virus & threat protection > Under Virus & threat protection updates, click Protection updates > Scroll down to click Privacy settings and enable 4 tabs.
Step 4. Go back now and click Virus & threat protection again > Click Manage settings > Turn on Real-time protection > Click Yes
Under the Scan options part, click Full scan.
Antimalware Service Executable is a component of Windows Security that runs in the background and also know as MsMpEng.exe. It is a Windows Security process that executes real-time protection against malware. It uses too much CPU because it always runs in the background. While running in the background, it scans programs and files whenever it detects anything malicious. In this article, we will teach you how to disable Antimalware Service Executable in Windows 11.
Page Contents
Here we have three methods using which you can disable Antimalware Service Executable:
Method 1: Disable Antimalware Service Executable by Disabling Real-time Protection
Here we have two methods by which you can disable Real-time Protection:
1. Using Local Group Policy Editor
1: Press the Windows key + R. Type gpedit.msc and click OK.
2: Navigate the following path:
Computer Configuration\Administrative Templates\Microsoft Defender Antivirus
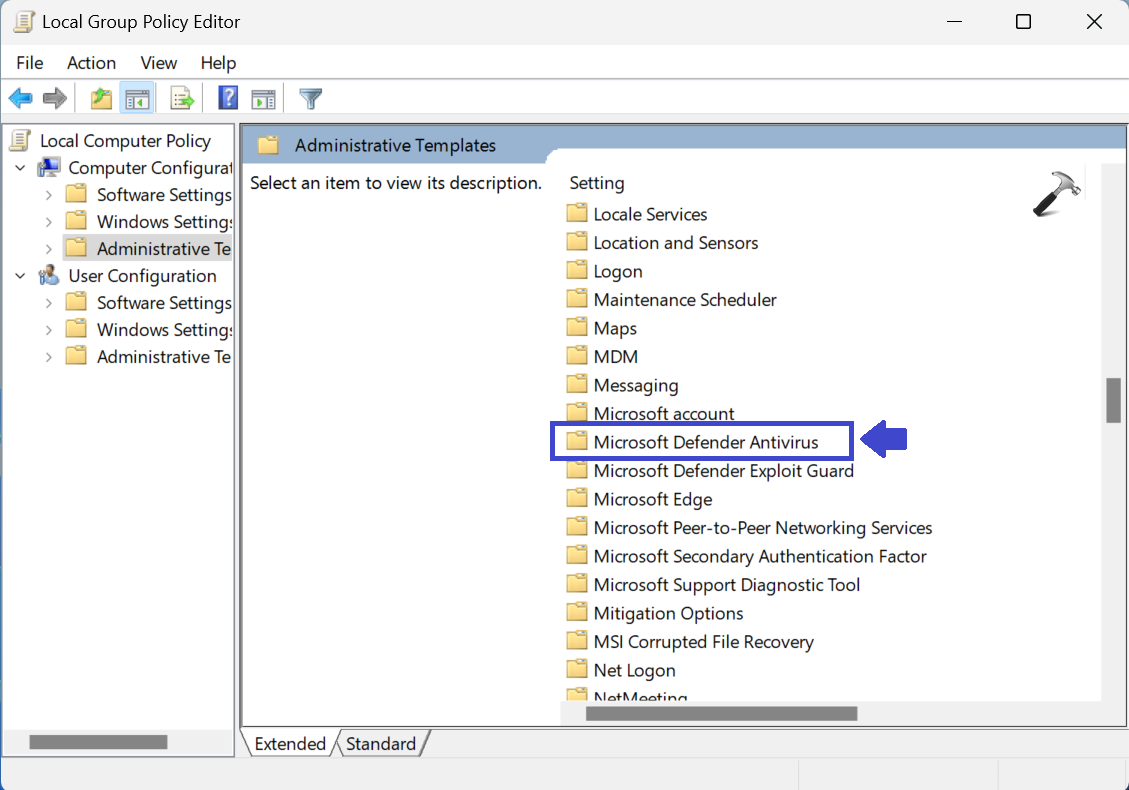
3: Click Real-time Protection. Double-click on “Turn off real-time protection”.
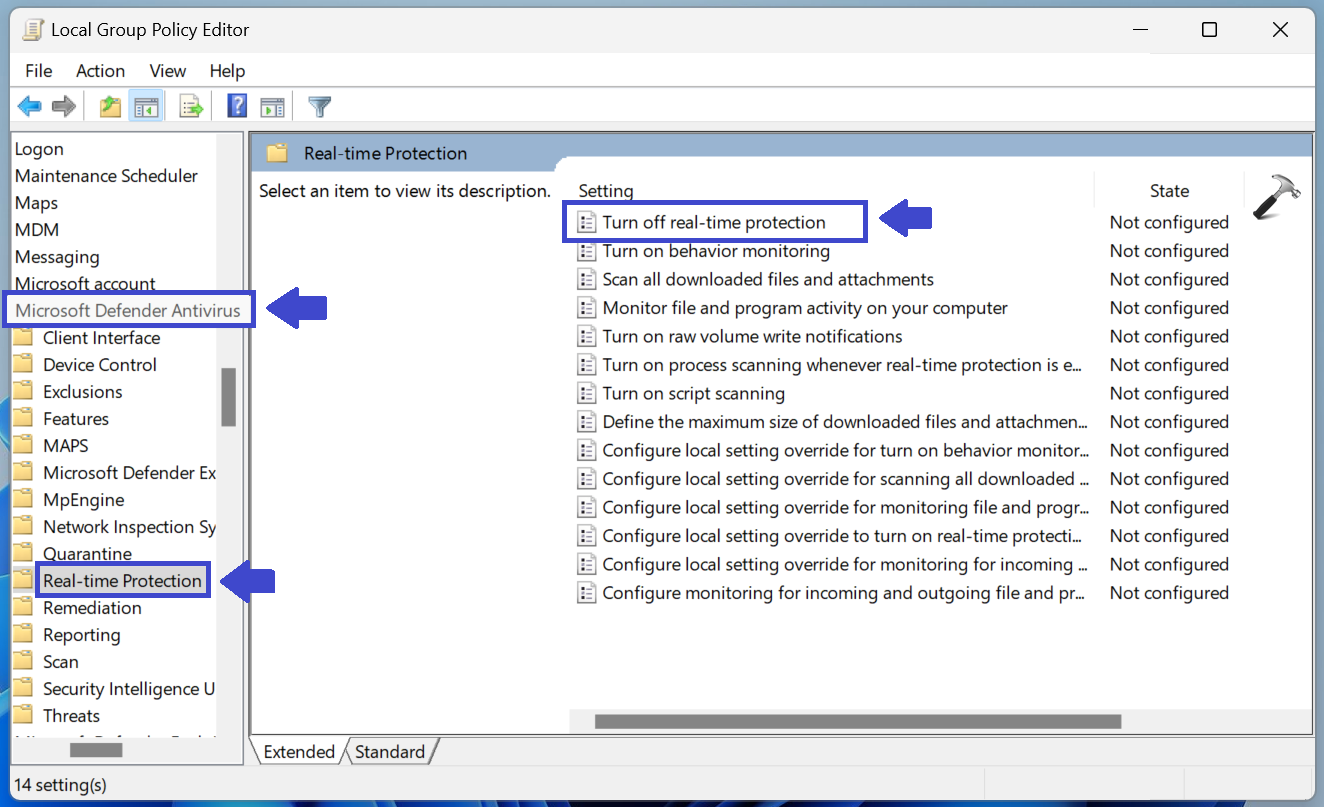
4: Prompt box will appear. Now, select Enabled to disable real-time protection.

5: Click OK followed by Apply.
6: Close the Local Group Policy Editor Window and restart your computer.
2. Using Settings App
1: Open Settings App.
2: In Privacy & security, select Windows Security.
3: Select Virus & threat Protection settings and click Manage settings.
4: Under Real-time protection, turn it off.
5: Close the Window and restart the computer.
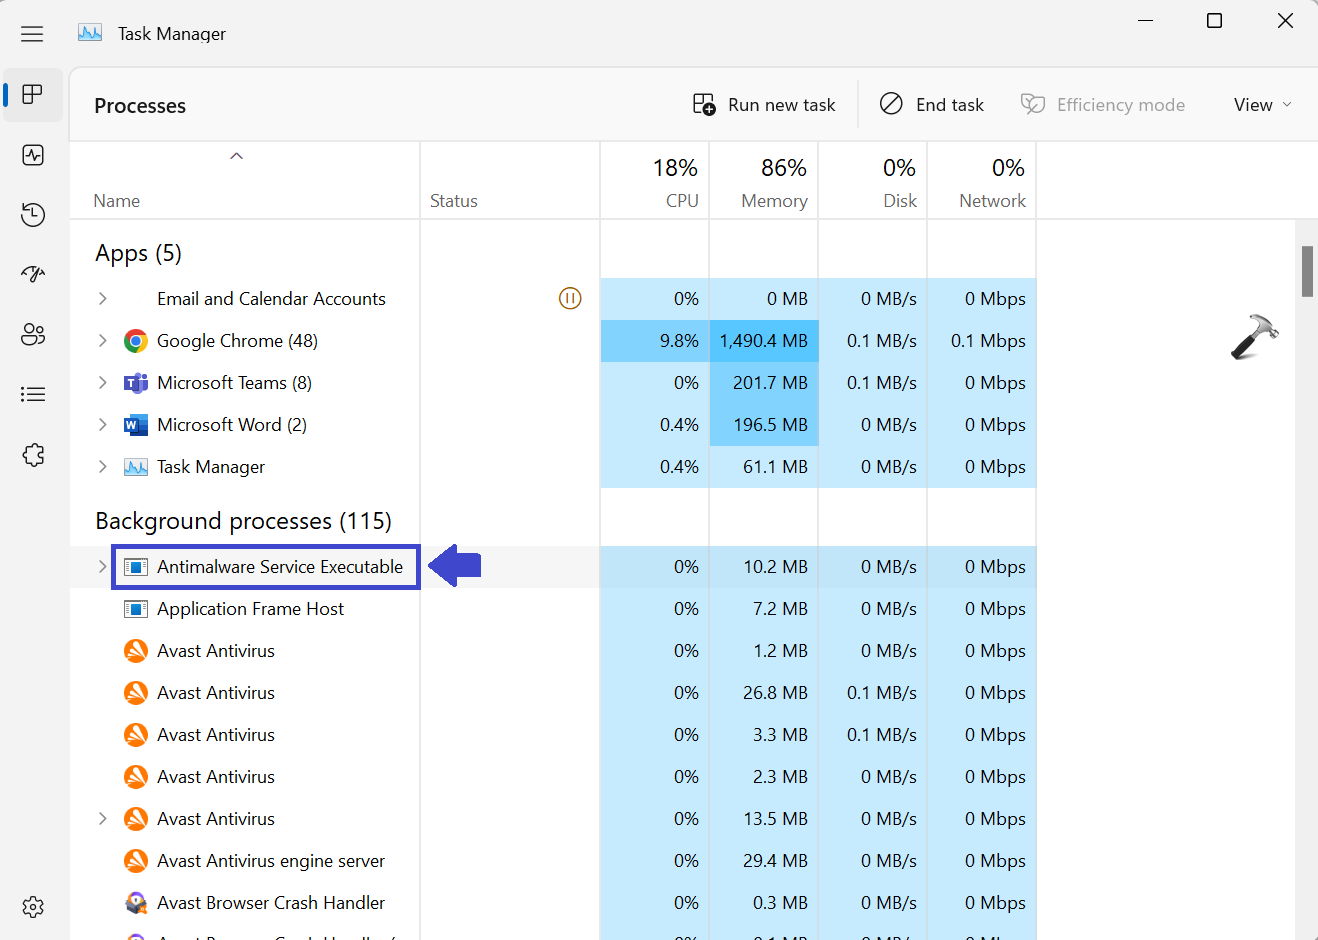
Method 2: Disable Antimalware Service Executable using Task Manager
1. Press the Windows key + X to open the WinX menu.
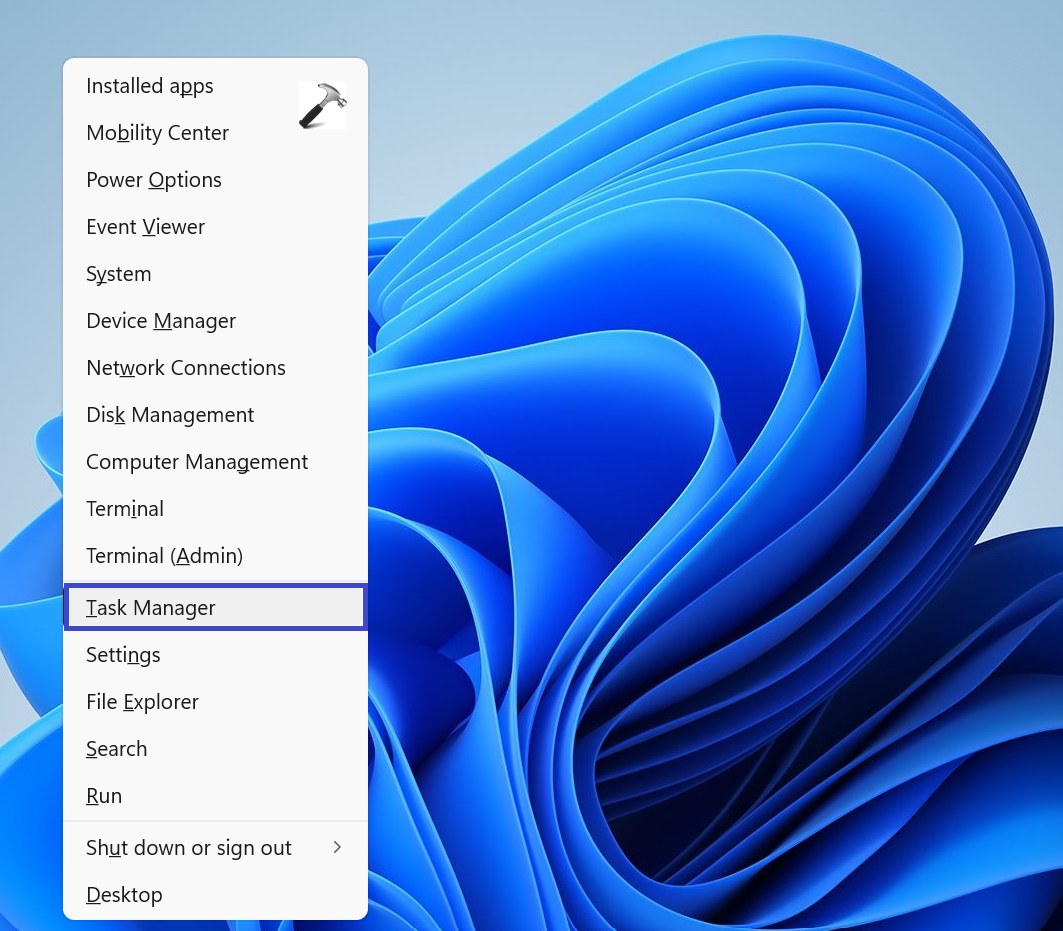
2. Select Task Manager.
3. Select the Antimalware Service Executable process from the list.
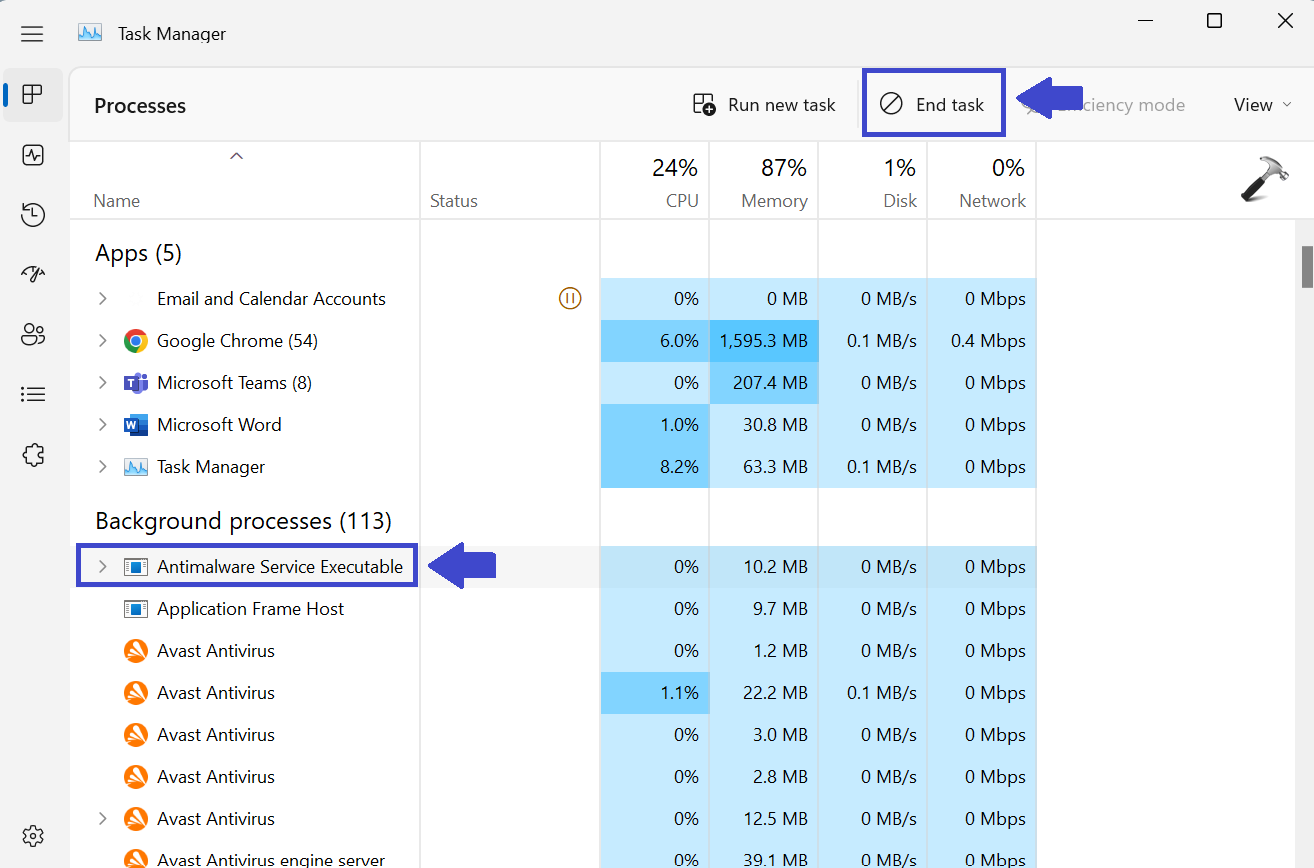
4. Click on the End Task button.
Method 3: Disable Antimalware Service using PowerShell
If the Services panel doesn’t allow you to disable the Antimalware Service Executable, then you can disable it using Windows PowerShell. Follow the below steps to do so:
1. Open Windows PowerShell and select “Run as administration”.
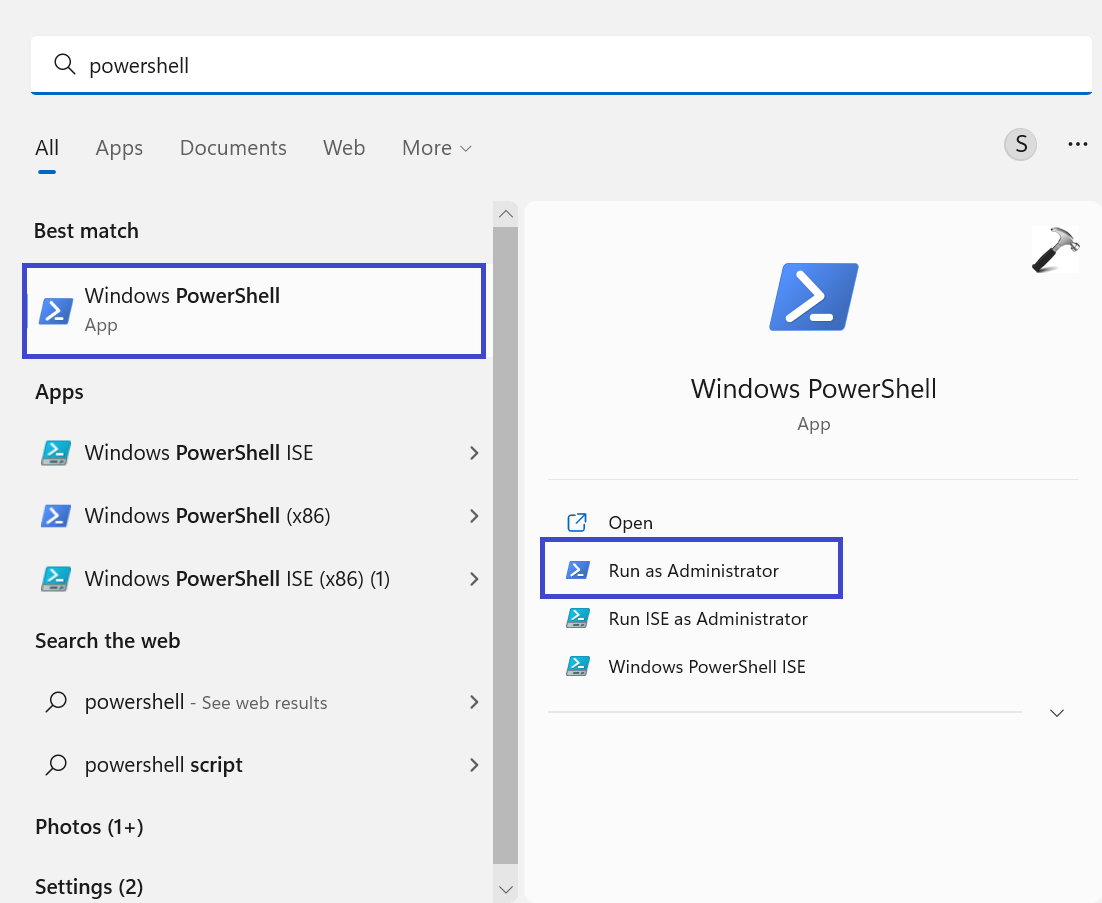
2. Copy and paste the below command:
Stop-Service -Name “WinDefend”
3. Hit Enter.

4. Close the PowerShell Window and restart your computer to apply the settings.
That’s it!