
Updated on Apr 28, 2025
If you found that the Antimalware Service Executable high disk usage occurs on Windows 11/10, take it easy, you’re not alone. Many Windows users are encountering Antimalware Service Executable high memory problems.
In this article, you’ll learn everything about Antimalware Sevice Executable and how to fix Antimalware Service Executable high CPU issue.
Besides, at the end of this article, we recommend a free partition management tool to help you easily create, resize, clone, move, merge, and format partitions to improve computer performance.
| Fixe Antimalware Service Executable High Memory | Step-by-step Troubleshooting |
|---|---|
| Fix 1. Disable Real-Time Protection | Turn off the real-time protection to solve the Antimalware Service Executable high CPU usage…Full steps |
| Fix 2. Change Windows Defender’s Scheduling Options | Change Windows Defender’s schedule is another method to solve the Antimalware Service Executable…Full steps |
| Fix 3. Add Antimalware Service Executable to Exclusion List | Press the Windows logo key + I at the same time to open the Settings window. Click «Update & security»…Full steps |
| Fix 4. Disable Windows Defender | Press Windows Key + R to open the Run Dialog Box. In the Run Dialog Box, type regedit and click «OK»…Full steps |
| Fix 5. Update All Device Drivers | You can also try to fix Antimalware Service Executable high CPU issue by updating all your device drivers…Full steps |
Read Also: 100% Disk Usage in Windows 10
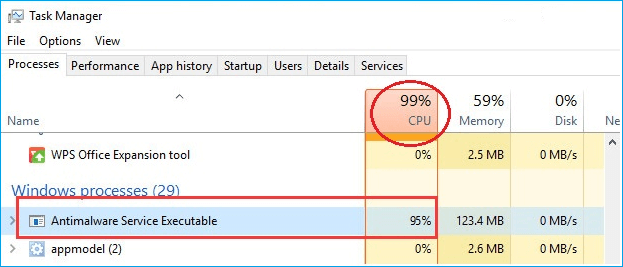
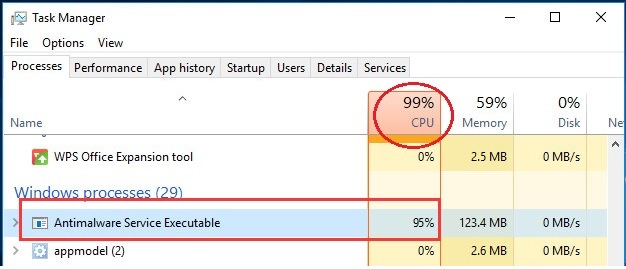
The Antimalware Service Executable (Msmpeng.exe) process is part of Windows Defender, a built-in antivirus feature that comes with Windows 11/10. You can find this on the Details tab in your Task Manager.
Antimalware Service Executable provides real-time scanning and is responsible for checking files for malware whenever you access them. It also performs background system scans to check for dangerous software, install antivirus definition updates, and does anything else a security application like Windows Defender needs to do.
Its scanning relies heavily on your computer’s CPU; that’s why you find Antimalware Service Executable high CPU, huge disk, memory, RAM, and even network bandwidth, draining computer resources, especially after getting a Windows 11/10 update. Go to the next part to solve antimalware service executable high memory Windows 11.
Windows 10 Free Partition Manager
EaseUS Partition Master Free, a well-designed disk management tool for beginners and experts to manage partitions and to extend your capableness.
How to Stop Antimalware Service Executable High Disk Usage [5 Ways]
If the Antimalware Service Executable process takes up a high CPU on your Windows 10, don’t worry. We have easy solutions for you to deal with it. Now, read this article in-depth and try the five easy methods to fix the windows antimalware service executable high memory/CPU usage.
Fix 1. Disable Real-Time Protection
Fix 2. Change Windows Defender’s Scheduling Options
Fix 3. Add Antimalware Service Executable to Windows Defender’s Exclusion List
Fix 4. Disable Windows Defender in Registry
Fix 5. Update all Available Device Drivers
Showing fix 1 and fix 3, this video guide released by A2MTech is help to disable antimalware service executable high memory/CPU/Disk on Windows 10.
If you think this video is helpful, don’t hesitate to share it with your friends. Click the buttons below can quickly share this article.
Fix 1. Disable Real-Time Protection
Antimalware Service Executable high disk usage issue is large because of the real-time feature, which will constantly scan your Windows computer no matter what you do. It acts quickly and consumes much CPU storage, which leads to high CPU and memory usage.
The most probable fix to the Antimalware Service Executable high CPU issue is turning off the real-time protection. After this, the Windows Defender won’t work, and your computer will be vulnerable. So, use this method only as a temporary solution.
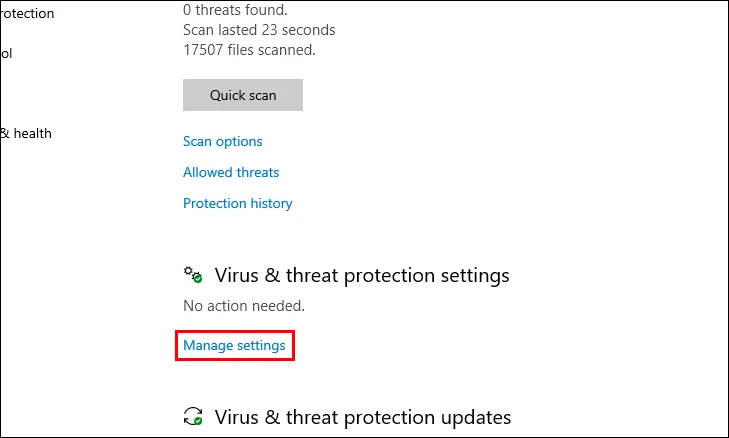
Step 1. Click the «Start menu > Settings > Update & security».
Step 2. Select «Windows security > Virus & threat protection > Manage settings».
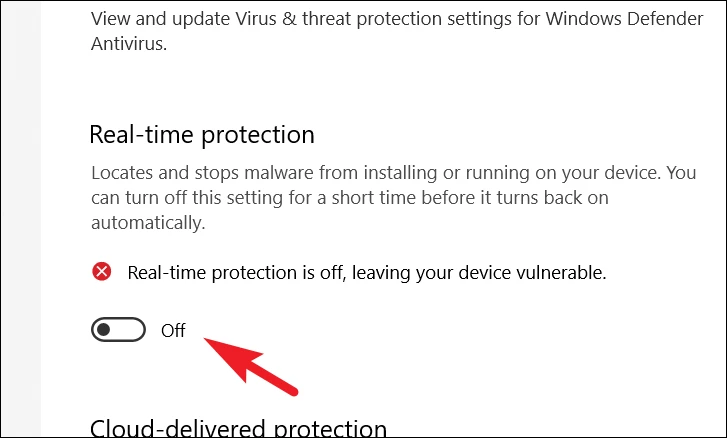
Step 3. Switch the «Real-time protection» setting to Off.

Fix 2. Change Windows Defender’s Scheduling Options
Change Windows Defender’s schedule is an effective way because the real-time protection feature mainly causes the error. Follow the details below and fix the Antimalware Service Executable high disk usage issue.
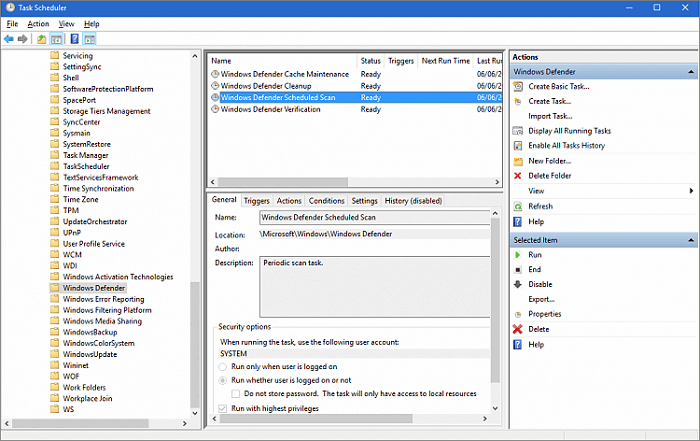
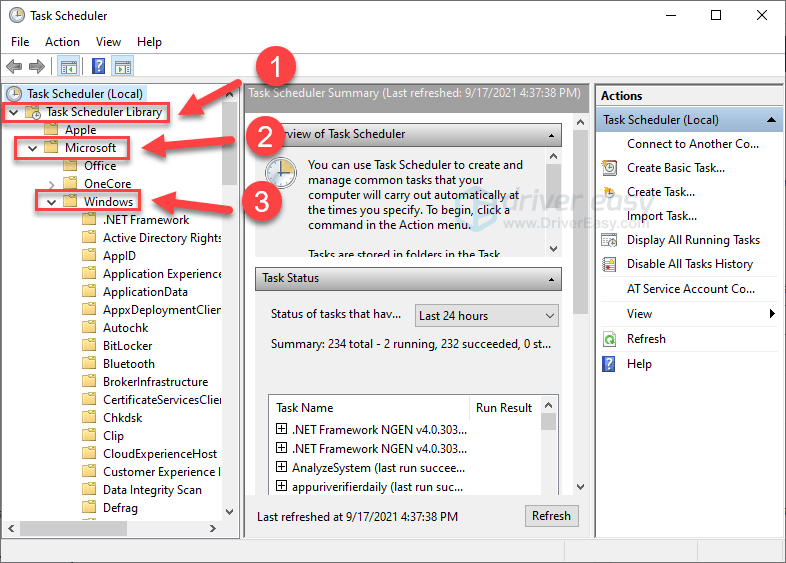
Step 1. Press Windows key + R at the same time to invoke the Run box. Type taskschd.msc and press Enter.
Step 2. Double-click on «Task Scheduler Library» > «Microsoft» > «Windows».
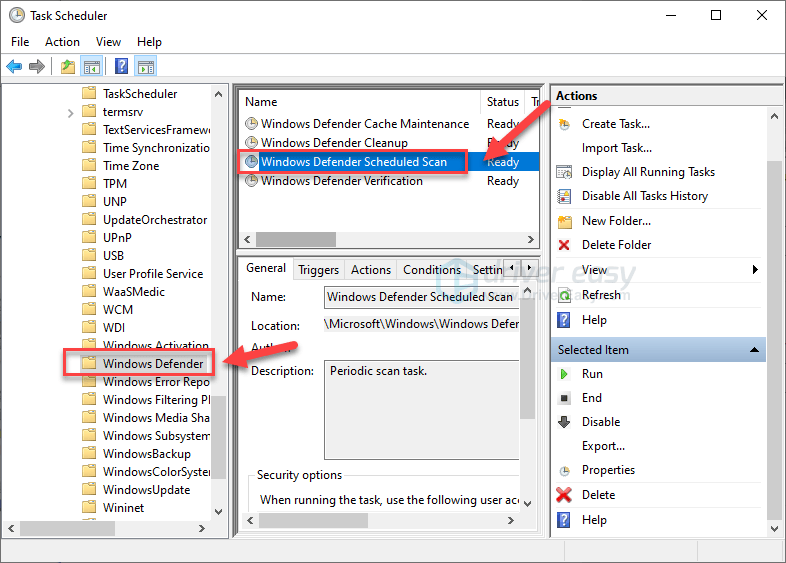
Step 3. Find and expand «Windows Defender». Then double-click «Windows Defender Scheduled Scan».
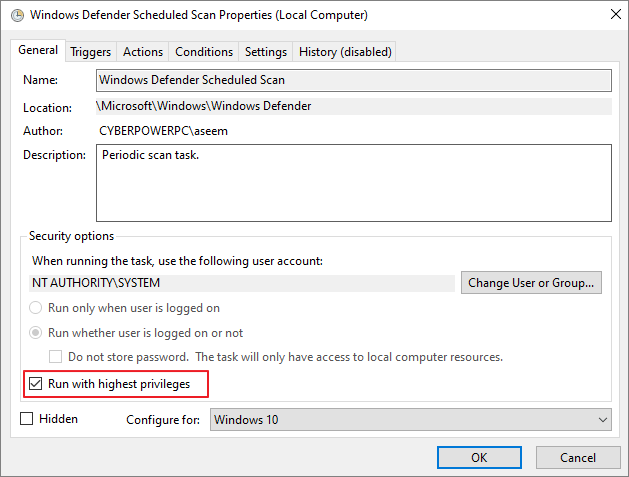
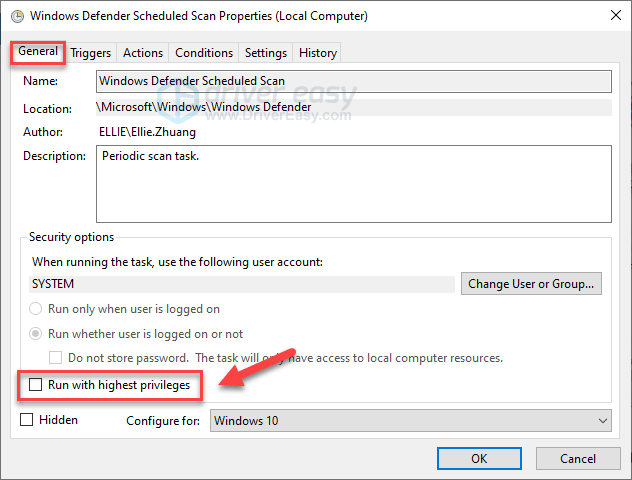
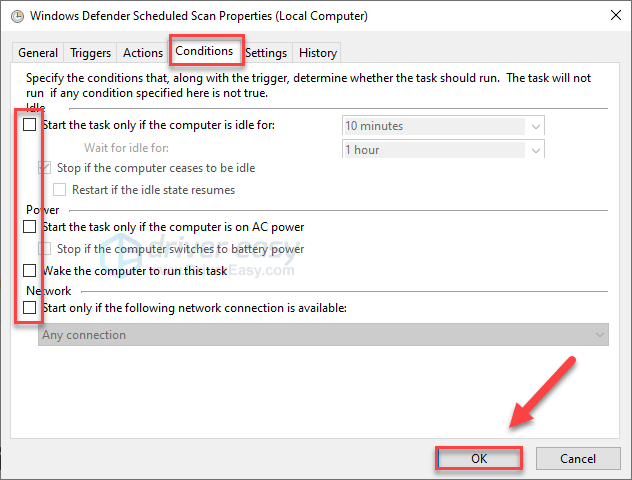
Step 4. Uncheck «Run with highest privileges» on the property window.
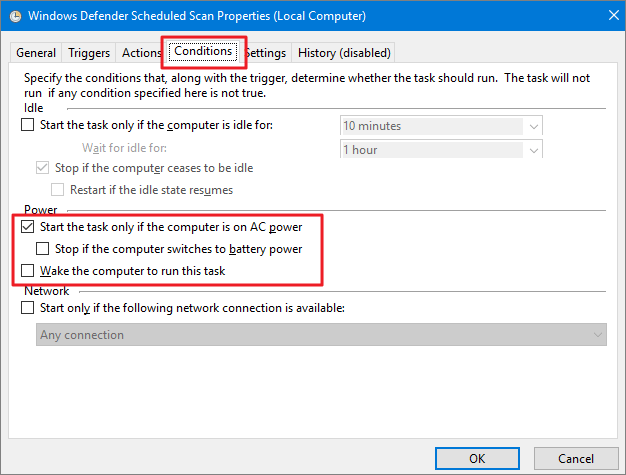
Step 5. Uncheck all the items in the «Conditions» section. Then click «OK».
With the steps above, your error should be fixed now. If, unfortunately, it doesn’t help you, make sure to try the second solution below.
Fix 3. Add Antimalware Service Executable to Windows Defender’s Exclusion List
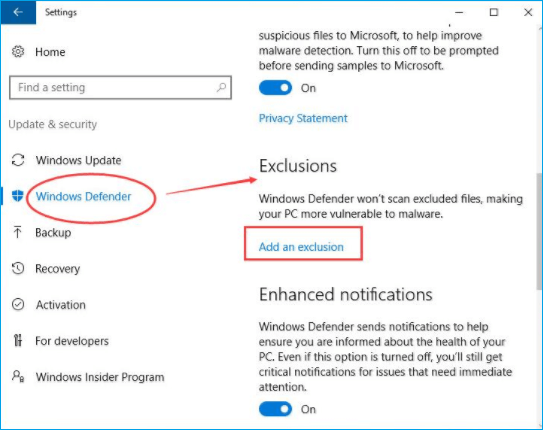
Step 1. Press the Windows logo key + I at the same time to open the Settings window. Click «Update & security».
Step 2. Click «Windows Defender». Then click «Add an exclusion» in Exclusions.
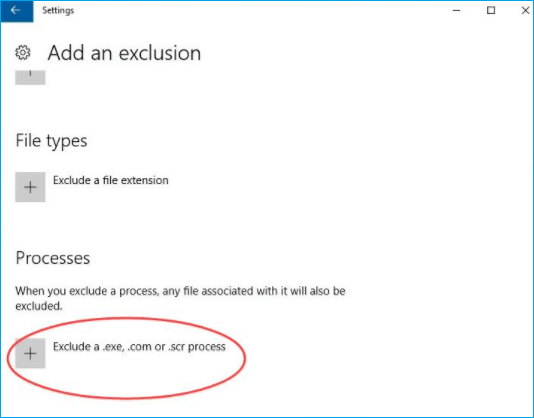
Step 3. Click «Exclude a .exe, .com or .scr process».
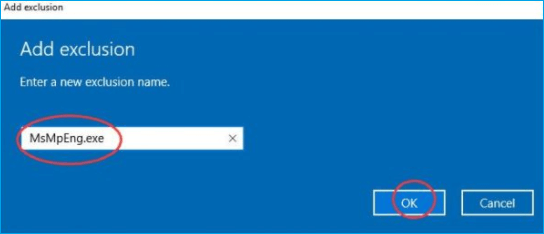
Step 4. Type MsMpEng.exe. Then click «OK».
Alongside enabling Windows’ built-in virus-defending utility, you can also turn to thrid-party virus-cleaning software for help. TotalAV is one of the famed and reliable anti-virus software that you can rely on to scan and clean up all malware, virus, and even online threats from your PC:
TOTALAV
TotalAV is an Award Winning Antivirus and Security Software. It Provides Real-Time Protection from Viruses, Malware & Online Threats.
Fix 4. Disable Windows Defender in Registry
When your Windows defender got corrupted by being overworked due to continuous file scanning, the Antimalware Service Executable high CPU issue may be settled by disabling Windows defender.
Step 1. Press Windows Key + R to open the Run Dialog Box.
Step 2. In the Run Dialog Box, type regedit and click «OK» to open the Registry Editor.
Step 3. In the navigation pane on the left, double-click the folders to navigate to HKEY_LOCAL_MACHINE\SOFTWARE\Policies\Microsoft\Windows Defender.
Step 4. If you find a registry entry named DisableAntiSpyware, double-click it and set its value data to 1.

Note: If you do not see a registry entry named DisableAntiSpyware, right-click in the main Registry Editor pane and select «New» > «DWORD (32 bit) Value». Name this new registry entry DisableAntiSpyware. Double click it and set its value data to 1.
Fix 5. Update all Available Device Drivers
Is your Windows 10 still running slow after trying the above? You can also try to update all your available device drivers. The latest drivers can keep your computer running stable and quickly.
You can manually update your device drivers manually by going to the manufacturer’s website and searching for the exact device’s most recent correct driver. Make sure to choose drivers that are compatible with your variant of Windows system versions.
Run Computer Without Antimalware Service Executable High CPU/RAM/Disk Usage Issue
Windows Defender is a free and valuable tool to protect your computer from a virus attack, but it can certainly eat up your CPU. By following the methods in this article, you’ll be able to fix the Antimalware Service Executable high disk usage issue and keep your computer running at full speed.
Bonus Tip: How to Partition Hard Drives on Windows 11/10/8/7 for Free
When we use a computer, we all want it to perform at its best. Disk management is an important way to enhance system performance. EaseUS Partition Master Free makes it effortless to partition hard drives and take full advantage of your disk space. It provides other one-stop partition and disk management solutions for Windows 11/10/8/7, for instance:
- Resize/move partitions (the Pro version allows to move space from D drive to C drive directly), create, format, delete, and merge partitions
- Completely wipe out all the data on the hard disk to prevent information from being leaked or recovered
The following steps show how to resize and move partitions effortlessly and securely with this renowned partition management software.
Step 1. Launch EaseUS Partition Master to check for free space at the Partition Manager section.
- If your hard drive has unallocated space, jump to Step 3 to create partition.
- If the hard drive has no unallocated space, continue with Step 2.
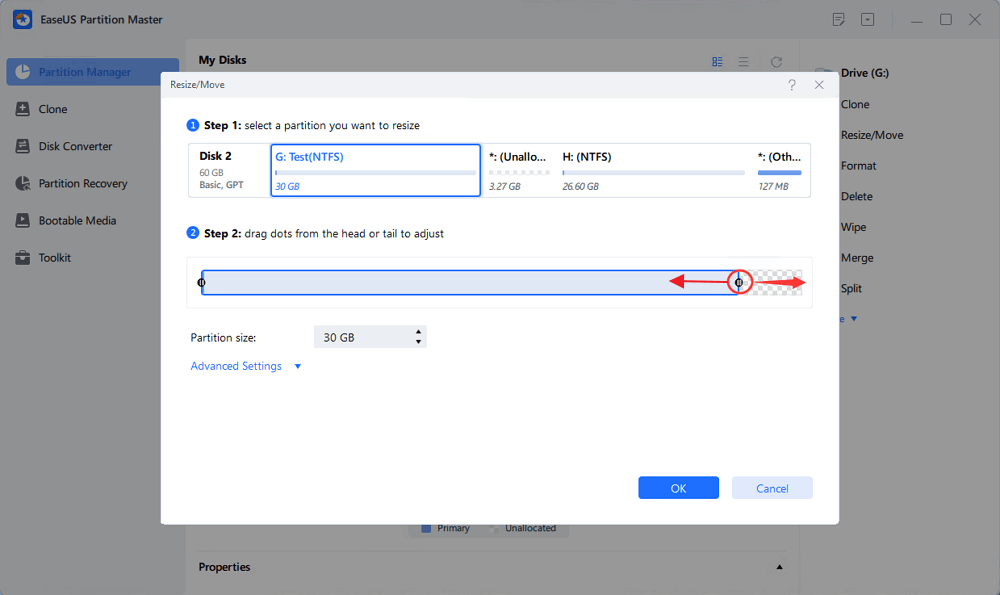
Step 2. Shrink a disk partition to create unallocated space.
Right-click on the target drive partition with a lot free space and select «Resize/Move».
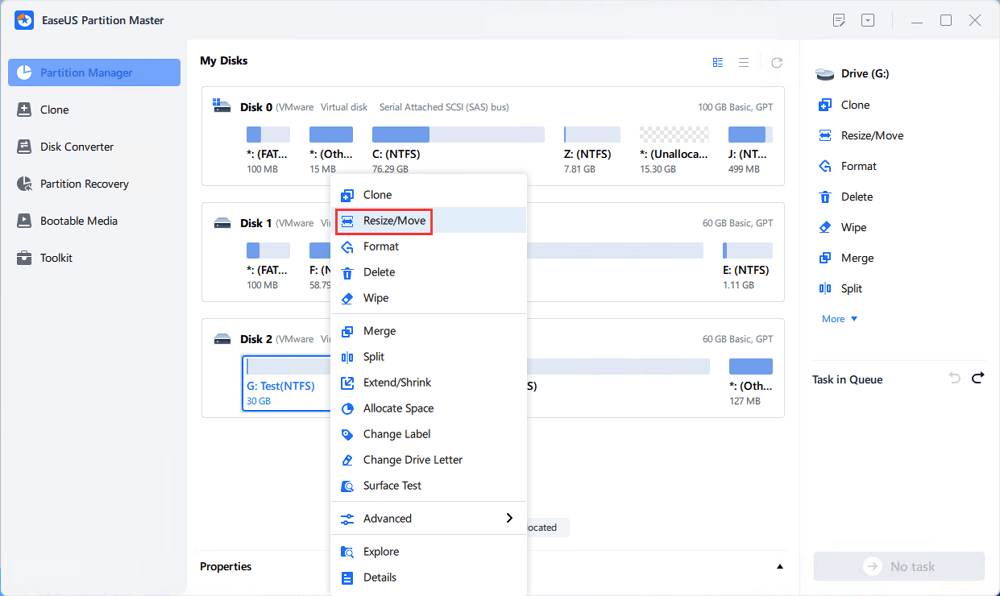
Drag either end of the partition rightwards or leftwards to shrink the partition size so as to get ample unallocated space. You can visually know how much space you’ve decreased in the «Size of partition» area. Click «OK».
Click «Execute xx Task» and then «Apply» to save all the changes.

Go back to Partition Manager, there should be unallocated space appearing on the same disk and you can continue with the next step to create new partition on your hard drive.
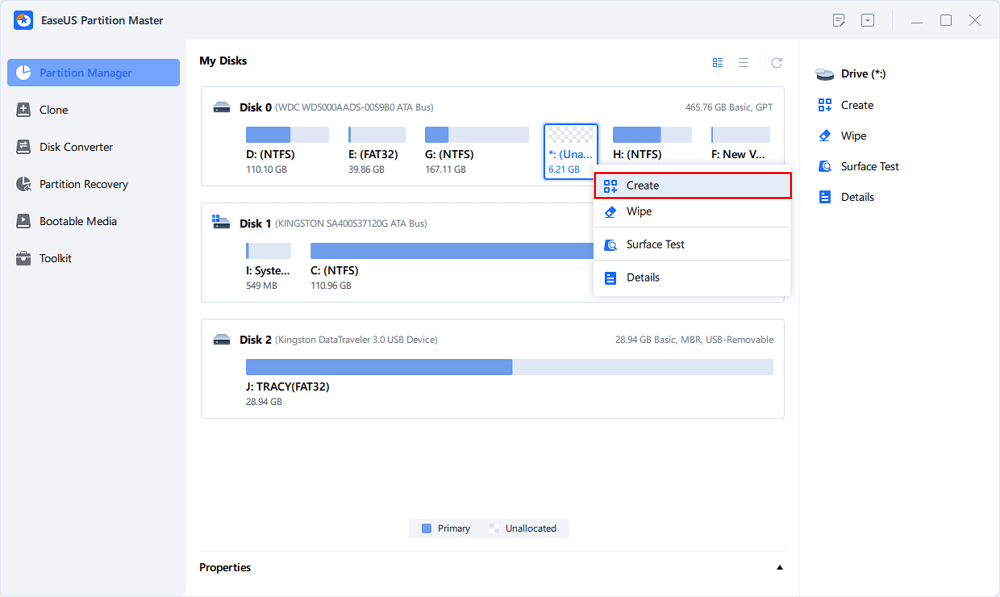
Step 3. Create a new partition with unallocated space on the target hard drive.
Right-click on the unallocated space and choose «Create».
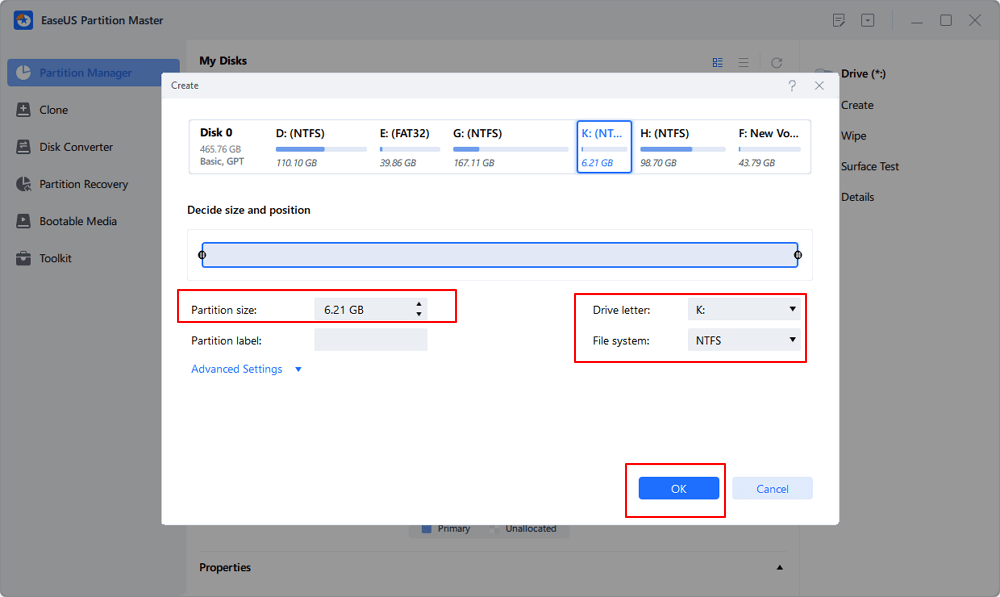
Customize the partition size, partition drive letter, partition label, file system (NTFS, FAT32, EXT2/3/4, exFAT) and more in the Advanced Settings. Click «OK».
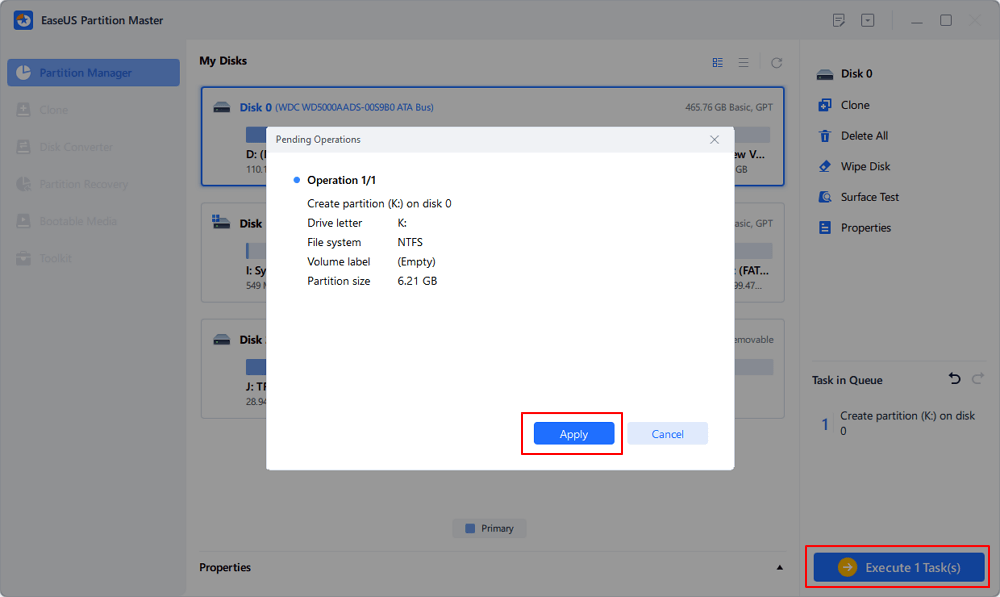
Finally, click «Execute * Task» and «Apply» to complete creating partition with the unallocated space on your disk. Repeat the steps to partition a hard drive and get many more partitions.
Read More About Antimalware Service Executable High Memory/CPU/RAM
Here are the five top frequently asked questions related to the antimalware service executable high disk usage issue. If you also have any of these problems, you can find the methods here.
Why is Antimalware Service Executable Using So Much?
Antimalware service executable high disk CPU is mostly caused by the real-time feature that can constantly scan files, connections, and other related applications in real-time. Whenever you download new files or any software or access any files, antimalware keeps scanning everything to check whether it is malicious or not. It acts quickly, which leads to the problem of high memory and high CPU usage.
Is It OK to Disable Antimalware Service Executable?
If you are suffering from antimalware service executable high CPU usage, disk, or memory usage problem on your Windows, you can turn off the real-time protection.
After doing that, Windows Defender will be disabled as well as Antimalware Service Executable. If your computer is unprotected, viruses can easily get into it. We do not recommend that at all.
How to Stop/Disable Antimalware Service Executable from Disk?
- Type Task Scheduler in the Search button. Click to expand «Task Scheduler Library > Microsoft > Windows».
- Click «Windows Defender» in Windows. Then double-click «Windows Defender Scheduled Scan».
- Uncheck «Run with highest privileges».
- Uncheck all the items in the Conditions section. Then click «OK».
Why Is My Disk Usage at 100?
If you see a very high disk usage, that means something else is not quite right. First, you can check your disk usage by opening the Task Manager in Windows 10. You’ll see a quick overview of CPU, memory, disk, and network utilization on the main process tab.
To fix Windows 10 100% disk usage issue, you can:
- Restart your system
- Check anti-virus software
- Update windows 10
- Check disk error
- Stop the superfetch service
- Clean up junk files and running memory
- Reset virtual memory and increase the ram
- Perform a clean boot on windows 10
- Upgrade the hard drive to a larger one
Are you noticing your Windows 11 computer running slower than usual, with high CPU, memory, or disk usage? Upon checking the Task Manager, you might find a process named Antimalware Service Executable consuming significant system resources. In this guide, we’ll explore effective methods to reduce the resource consumption caused by this process without compromising your system’s security.
What is ‘Antimalware Service Executable’?
The Antimalware Service Executable is a core component of Windows Defender, the built-in antivirus program in Windows 11. This process runs in the background, providing real-time protection by scanning for malware and viruses. If you don’t have a third-party antivirus installed, Windows Defender is essential to safeguard your system.
While Windows Defender is crucial for security, sometimes the Antimalware Service Executable can consume excessive system resources, leading to performance issues. If you’re facing this problem, here are some methods to mitigate the high resource usage.
Method 1: Change the Windows Defender Task Schedule
Adjusting the scan schedule of Windows Defender can help reduce its impact on system performance during active hours. By scheduling scans at times when you’re less likely to use your computer, you can minimize high resource usage.
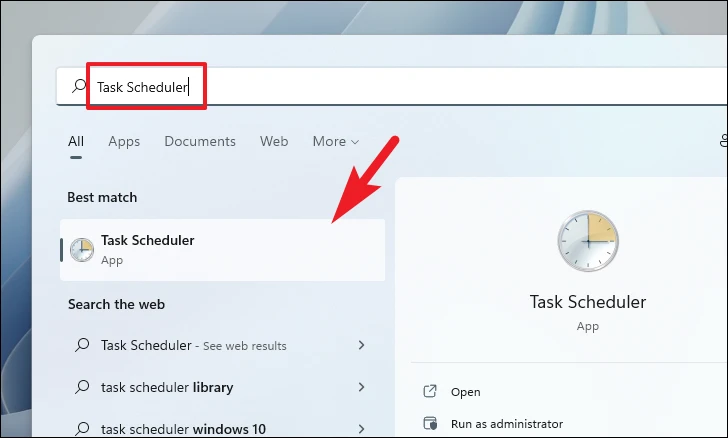
Step 1: Open the Start Menu and type Task Scheduler in the search bar. Then, click on the Task Scheduler app from the search results.
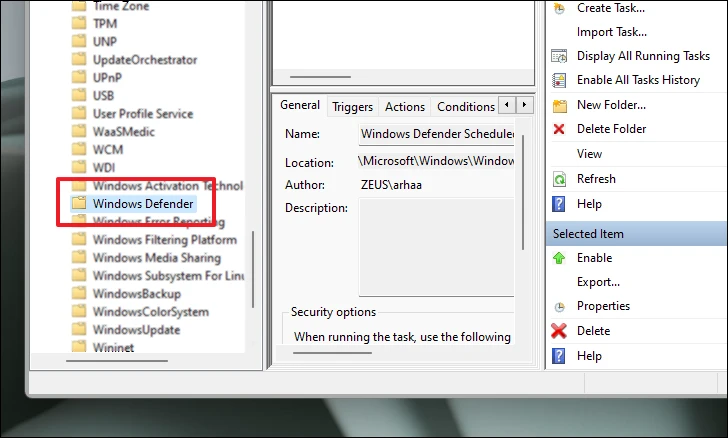
Step 2: In the Task Scheduler window, navigate to the left pane and expand Task Scheduler Library. Then, double-click on Microsoft and select Windows.
Step 3: Scroll through the list and locate the Windows Defender folder. Click on it to view its tasks in the center pane.
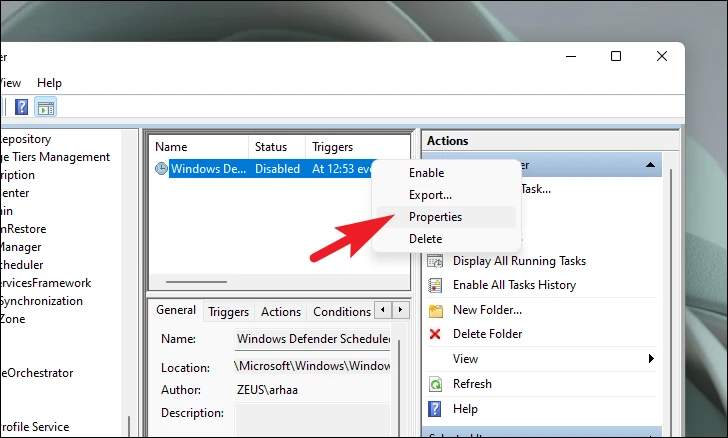
Step 4: In the center pane, right-click on the task named Windows Defender Scheduled Scan and select Properties from the context menu.
Step 5: In the Properties window, switch to the Triggers tab and click on New to create a new trigger.
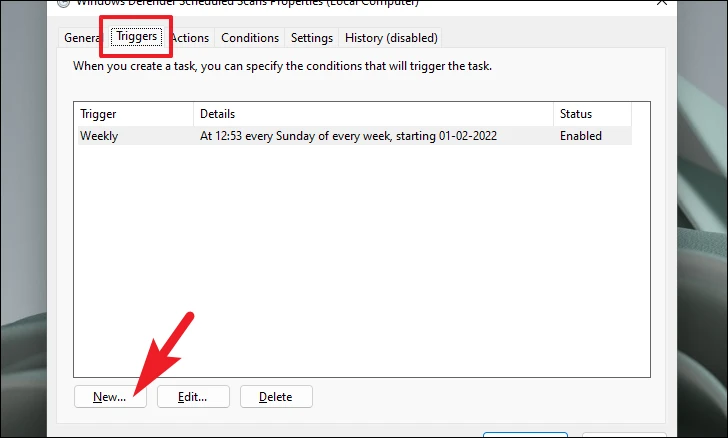
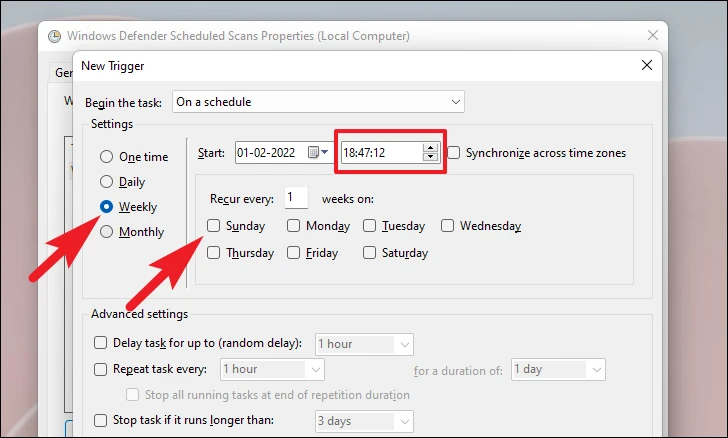
Step 6: In the New Trigger window, set the task to begin On a schedule. Choose the Weekly option, select a day and time when your computer is typically idle, and click OK to save the new trigger.
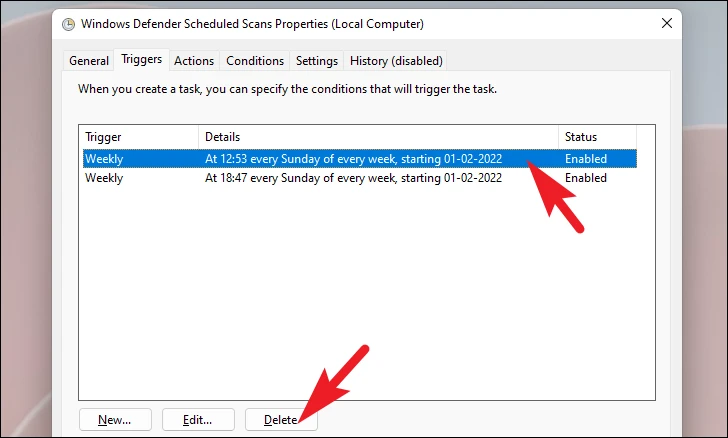
Step 7: Back in the Triggers tab, select any existing triggers that you did not create and click Delete to remove them. This ensures that scans only occur at the scheduled times you’ve set.
By adjusting the scan schedule, Windows Defender will perform scans during off-peak hours, reducing high resource consumption while you’re using your computer.
Method 2: Turn Off Real-Time Protection in Windows Defender
Disabling Real-Time Protection can significantly reduce resource usage, but it also decreases your system’s security. Use this method cautiously, especially if you don’t have another antivirus solution installed.
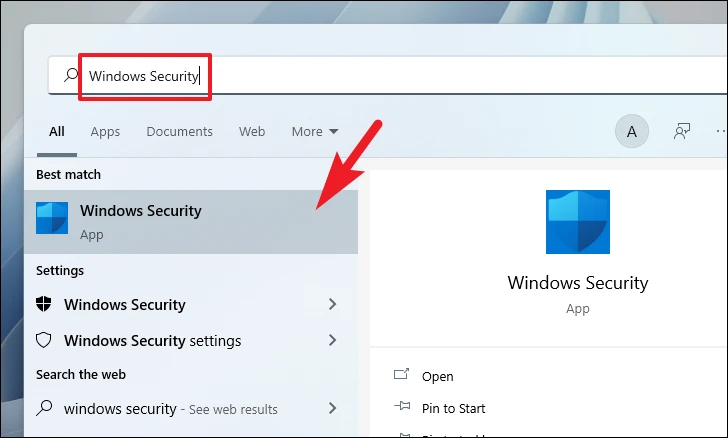
Step 1: Open the Start Menu, type Windows Security, and select the Windows Security app from the search results.
Step 2: In the Windows Security window, click on Virus & threat protection from the left pane.
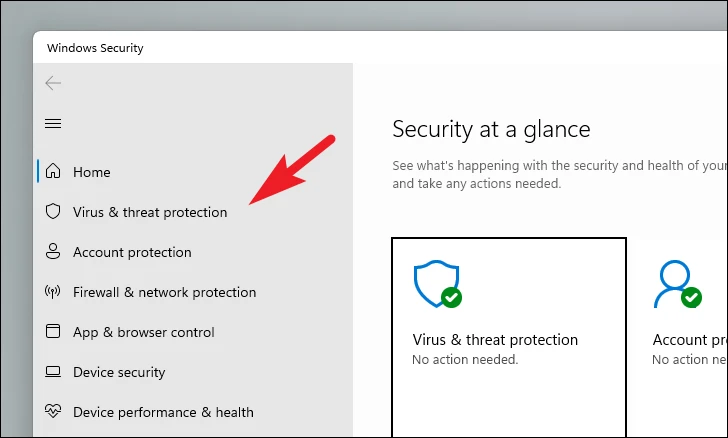
Step 3: Under the Virus & threat protection settings, click on Manage settings.
Step 4: Find the Real-time protection toggle and switch it to Off. If prompted, confirm the action to turn off real-time scanning.
With Real-Time Protection disabled, Windows Defender will no longer continuously monitor your system, which can reduce high CPU and memory usage. However, make sure you have another antivirus solution in place to keep your system protected.
Method 3: Stop the Windows Defender Service
Stopping the Windows Defender service can free up system resources. This method should only be used if you have another antivirus program installed, as it turns off essential security features.
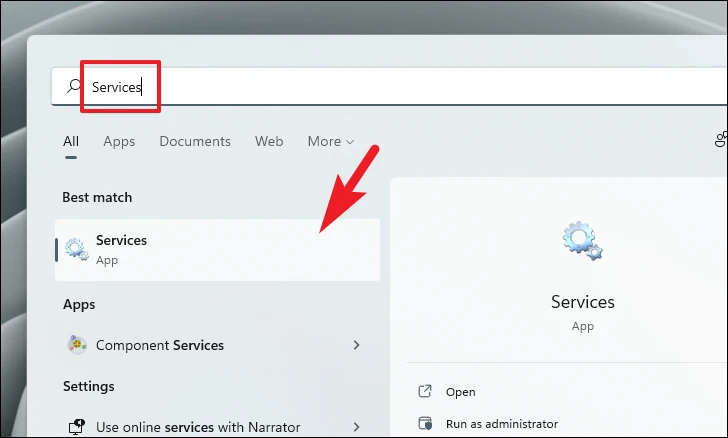
Step 1: Open the Start Menu, type Services, and select the Services app from the search results.
Step 2: In the Services window, scroll down to find Windows Defender Antivirus Service. Right-click on it and choose Stop from the context menu.
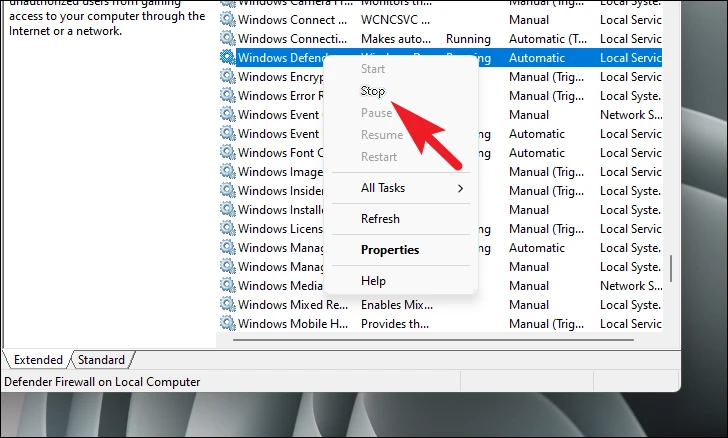
This will temporarily stop the Windows Defender service. Keep in mind that Windows may restart this service automatically after a while or upon reboot. To prevent it from restarting, you would need to disable it permanently, which is not recommended unless you have a reliable alternative in place.
Method 4: Disable Windows Defender Using the Registry Editor
For a more permanent solution, you can disable Windows Defender through the Registry Editor. This method should be used with caution, as modifying the registry can have unintended consequences. Make sure to back up your registry before proceeding.
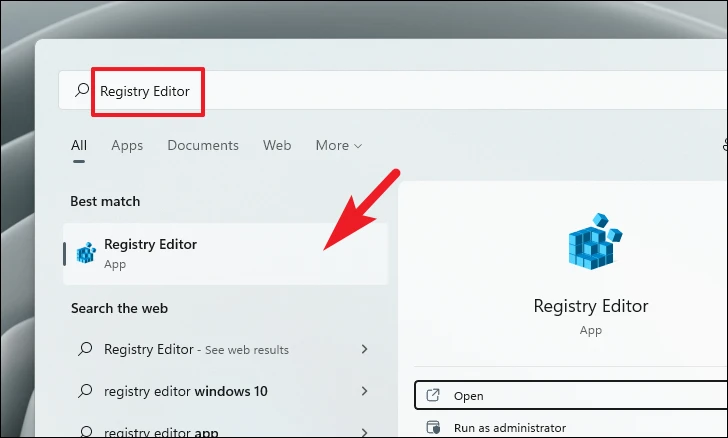
Step 1: Open the Start Menu, type Registry Editor, and click on the Registry Editor app from the search results.
Step 2: In the Registry Editor, navigate to the following path by copying and pasting it into the address bar and pressing Enter:
HKEY_LOCAL_MACHINE\SOFTWARE\Microsoft\Windows Defender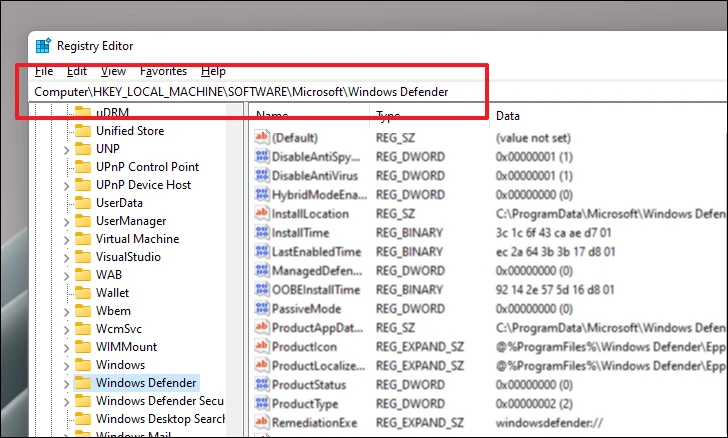
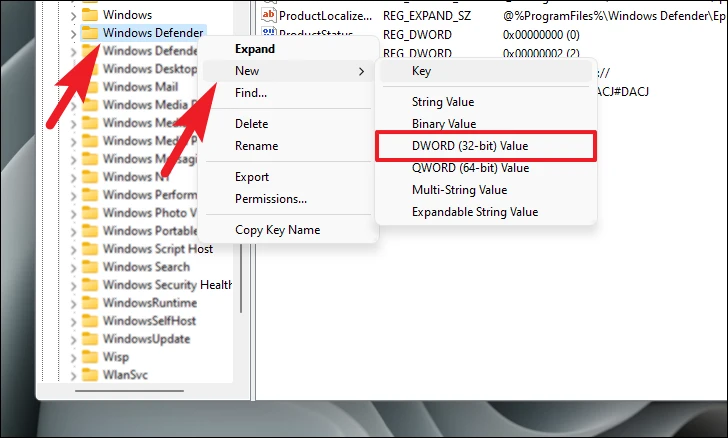
Step 3: In the left pane, right-click on the Windows Defender key, hover over New, and select DWORD (32-bit) Value.
Step 4: Rename the new value to DisableAntiSpyware and press Enter to save the name.
Step 5: Double-click on DisableAntiSpyware, set the Value data to 1, and click OK.
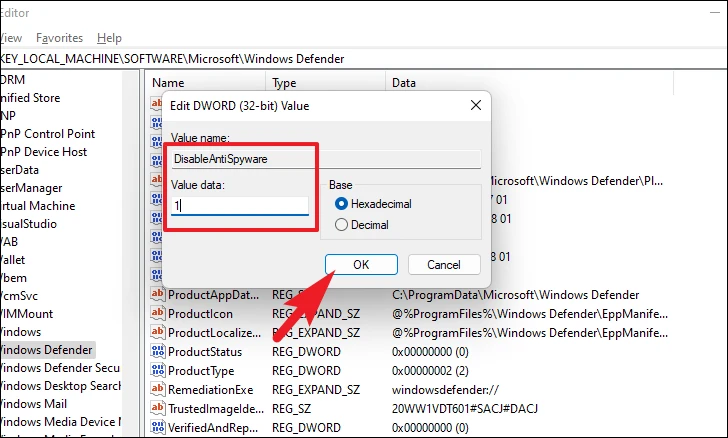
Step 6: Close the Registry Editor and restart your computer to apply the changes.
After restarting, Windows Defender should be disabled, and the Antimalware Service Executable process should no longer consume system resources. Remember, disabling Windows Defender leaves your system vulnerable unless you have another antivirus installed.
By following these methods, you can effectively reduce the high CPU, memory, or disk usage caused by the Antimalware Service Executable process on your Windows 11 computer. Always ensure your system remains protected by using a reliable antivirus solution if you choose to disable Windows Defender.
Antimalware Service Executable, a part of Defender integrated into Windows Security suite, is a legitimate process and not a malware or a security threat. It was designed to protect your PC from malware, however, while doing so, it may begin to consume too many system resources like RAM and CPU. This affects PC’s performance.
Pro Tip: Top 8 Ways to Maximize CPU Performance on Windows 11
Should You Disable It
No. Antimalware Service Executable, as the name suggests, protects your PC from malware threats. It runs a periodic scan. When Defender runs, you will see a temporary CPU and RAM usage spike. However, usage levels should return to normal once Scan is complete.
Also, even if you disable the Antimalware Service Executable process, Defender will restart it automatically. You can only stop it from running by completely disabling Windows Security which is also not recommended as it leaves your PC at risk.
The information about this process on forums and social media sites is misleading. One is that installing another antivirus app will stop this process. I have Malwarebytes Premium installed, and Antimalware Service Executable still runs in the background on my PC.
When Should You Troubleshoot?

You need to troubleshoot the Antimalware Service Executable for high RAM and CPU usage only when it constantly uses an unusually high amount of resources. On my PC, the CPU shows 0% while the memory is just 108MB. Once the Scan is complete and any detected threat has been dealt with, Antimalware Service Executable should return to its previous state.

Press Ctrl+Shift+Esc keyboard shortcut to open Task Manager and search for MsMpEng.exe or Antimalware Service Executable to find it. You will see a screen like the above screenshot where you can view system resources being used.
1. Run a Manual Scan and Get Malwarebytes
Run a manual scan using Defender:
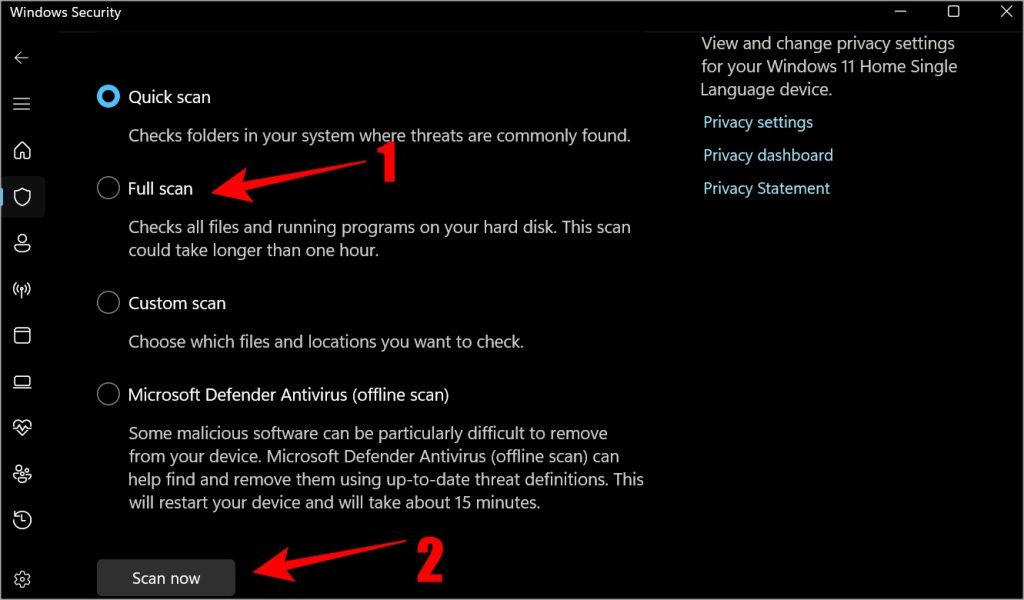
- Open Windows Security using Windows Search.
- Select Virus & threat protection.
- Select Scan options under Quick Scan.
- Select Full scan and click on Scan now.
Malwarebytes is a trusted name and you can use it to do two things:
- Remove all malware threats Defender failed to detect or remove.
- Replace Defender reducing over usage of resources by Antimalware Service Executable though the service will still run in the background.
Download: Malwarebytes
We don’t recommend that you use two antivirus programs on the same machine at the same time. Installing Malwarebytes will disable Defender automatically.
Microsoft has a standalone tool called Microsoft Safety Scanner to find and remove malware form your computer. You will have to download a fresh copy every time you want to run it as it is not updated automatically and doesn’t have to be installed.
2. Turn Off and On the Real-Time Protection
Several Windows users found this simple tip to resolve Antimalware Service Executable process consuming too much RAM and processing power.
- Go to Windows Security > Virus & threat protection > Manage settings.
- Turn off the toggle below Real-time protection. Wait a few moments, and turn it on again. If turning it off resolves the problem but turning it back on brings it back, continue reading.

3. Change Windows Defender’s Schedule
Windows Security runs periodic scans in the background. It could be running these scans when you work. Rescheduling the scan may fix Antimalware Service Executable process taking too much CPU and RAM. Instead of daily, you can schedule it to run weekly.
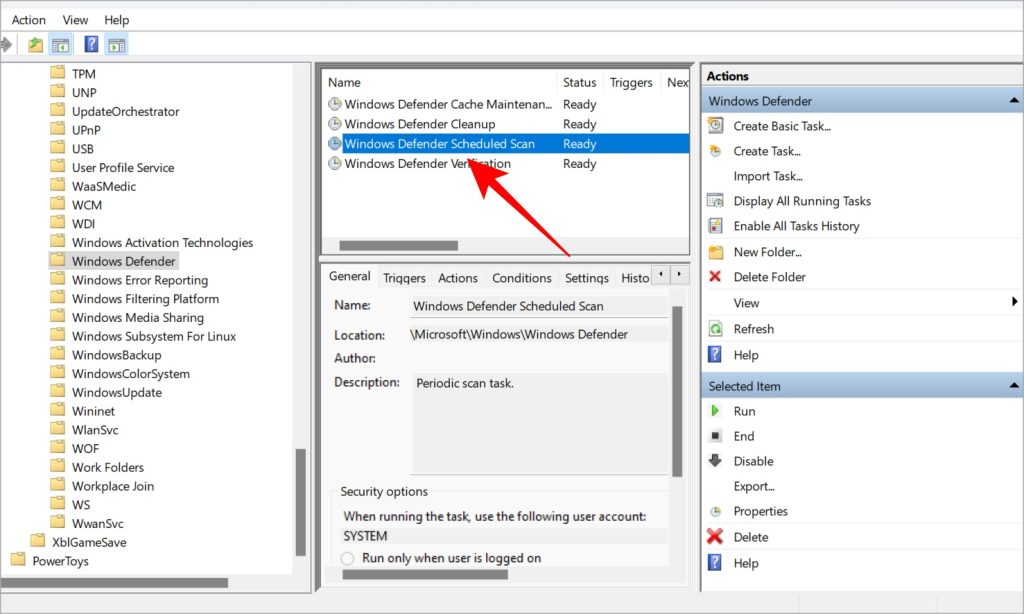
- Open Task Scheduler from Windows Search.
- In the left window pane, navigate to Task Scheduler Library > Microsoft > Windows > Windows Defender.
- Double-click on Windows Defender Scheduled Scan option in the middle window pane under the Name column.
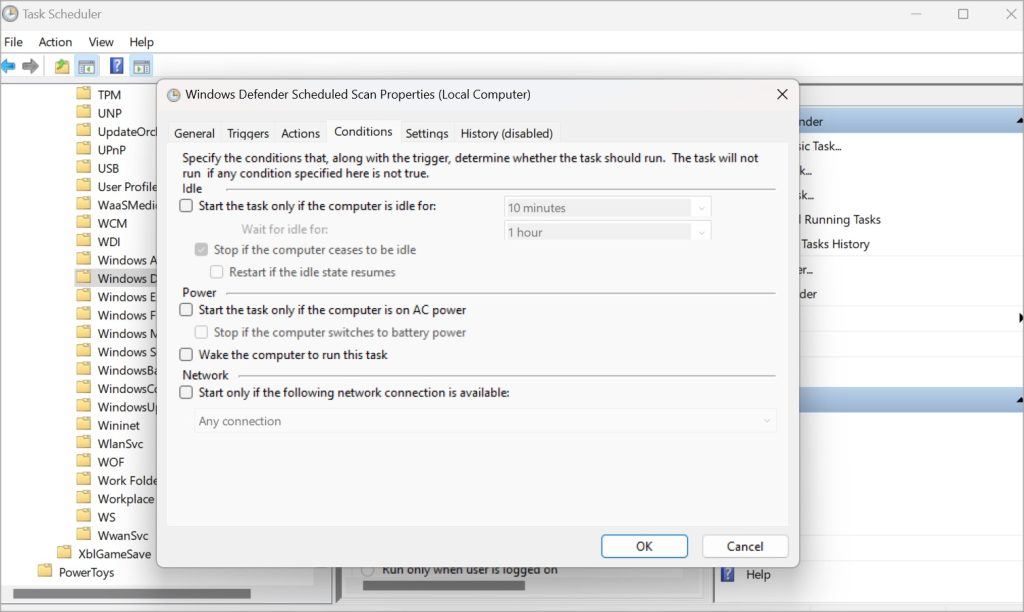
- In the pop-up that follows, uncheck Run with highest privileges option under General tab.
- Uncheck everything under the Conditions tab.
- Click on OK to save all settings in all open windows and check again if Antimalware Service Executable is consuming too many resources in the Task Manager (press Ctrl+Shift+Esc keyboard shortcut to open directly).
- To set a new schedule, go to the Triggers tab, and click on New. On the pop-up, select Weekly and check Enabled.
- Repeat the same steps for Windows Defender Cache Maintenance, Windows Defender Cleanup, Windows Defender Verification in the middle window-pane. Go back to step 3 above.


4. Disable AntiSpyware
This issue, discovered by members of Windows Insiders users, traces back to a Registry Editor key. Here’s how to fix it:
- Open Registry Editor with admin rights using Windows Search.
- Navigate to HKEY_LOCAL_MACHINE\SOFTWARE\Policies\Microsoft\Windows Defender folder structure from the left window-pane.
- You will find DisableAntiSpyware file in the right window pane. If not, right-click anywhere and select New > DWORD (32-bit) Value.
- Rename the file as DisableAntiSpyware.
- Double-click to open the newly created file and enter the Value data as 1.
- Save all changes. Reboot your computer.


5. Disable Exploit Protection Service
At times, Defender is unable to close a stubborn service. This leads to a continuous loop where Antimalware Service Executable is continuously running in the background trying, failing, and then retrying to finish the task resulting in high CPU and RAM usage.
- Open PowerShell with admin rights from Windows Search.
- Copy and past the command below and hit Enter:
powershell “ForEach($v in (Get-Command -Name \”Set-ProcessMitigation\”).Parameters[\”Disable\”].Attributes.ValidValues){Set-ProcessMitigation -System -Disable $v.ToString().Replace(\” \”, \”\”).Replace(\”`n\”, \”\”) -ErrorAction SilentlyContinue}”6. Clean Boot and Reset Option
A clean boot will load your Windows OS with the bare minimum of drivers and apps that are essential to run the OS. Microsoft has an excellent guide on how to perform a clean boot. Once done, read the Reset the computer to start normally after clean boot troubleshooting to reboot the computer in regular mode with all apps and features including startup programs.
7. Add MsMpEng.exe to Exclusion List
What happens is that when scanning for malware, Antimalware Service Executable also scans its folder where it is saved. This may again create a loop of sorts leading to high CPU and RAM usage. Adding the associated process to the exclusion list will prevent that.
- Launch Microsoft Defender from Windows Search.
- Go to Virus & threat protection > Manage settings under Virus & threat protection settings.
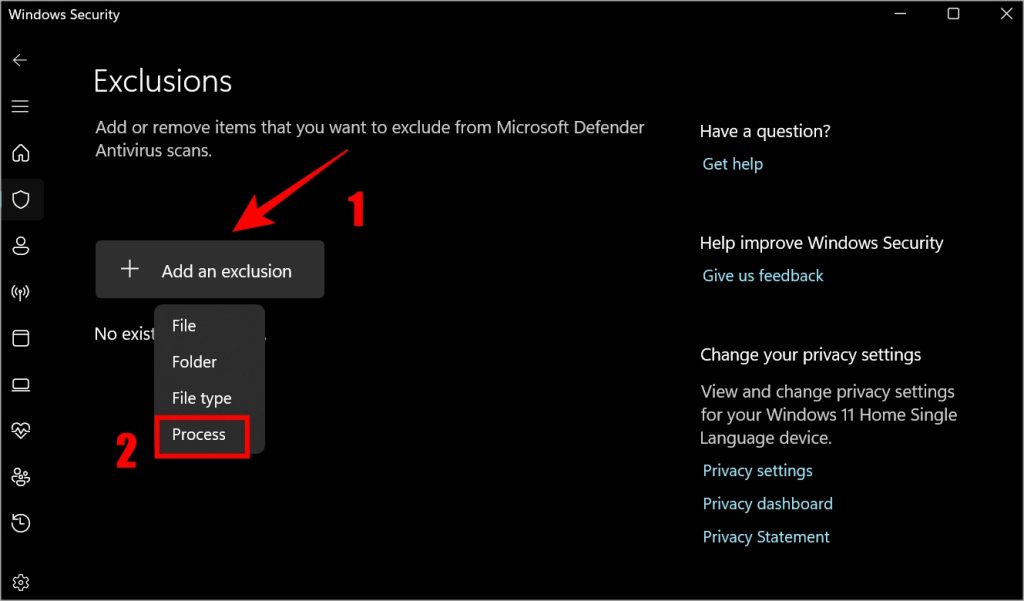
- At the bottom, click on Add or remove exclusions under Exclusions.
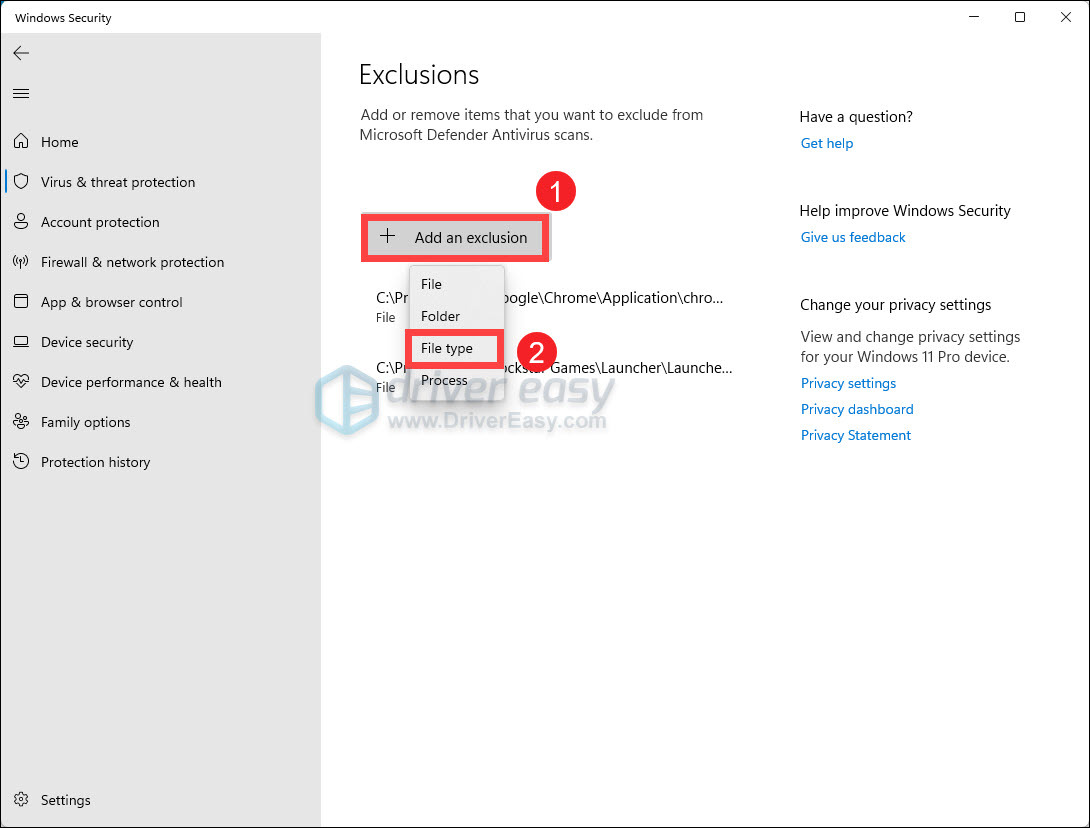
- Click on Add an exclusion and select Process from the drop-down menu.
- Type MsMpEng.exe and click Add.

Antimalware Service Executable Process
The process itself is legit. The only problem is when it begins to consume more resources than it should. That’s when you experience a slow PC. We don’t recommend disabling Defender without enabling another antivirus app. We also don’t recommend disabling critical services using Group Policy Editor. Instead, there are some workarounds that you can use to fix Antimalware Service Executable process running in loops.
Gaurav Bidasaria
Gaurav is an editor here at TechWiser but also contributes as a writer. He has more than 10 years of experience as a writer and has written how-to guides, comparisons, listicles, and in-depth explainers on Windows, Android, web, and cloud apps, and the Apple ecosystem.
He loves tinkering with new gadgets and learning about new happenings in the tech world.
He has previously worked on Guiding Tech, Make Tech Easier, and other prominent tech blogs and has over 1000+ articles that have been read over 50 million times.
If you noticed that the Antimalware Service Executable process takes up a high CPU on Windows, rest assured – you’re not alone. Many Windows users also report this problem. More importantly, you can fix this problem by yourself without asking a technician for help.
In this article, you’ll learn what Antimalware Service Executable exactly is and how to fix its high CPU usage issue.
What is Antimalware Service Executable?
You may know Windows Defender in your Windows, it’s an antivirus software built in Windows. Antimalware Service Executable is one of the background-running services in Windows Defender. It’s also known as MsMpEng.exe, you can find this on the Details tab in your Task Manager.
Antimalware Service Executable is running to scan the malware and spyware when you access them. It will detect if there’s anything harmful. Besides, it also takes a background scan of your system for any viruses or worms. Its scanning relies heavily on your computer’s CPU, that’s why you find it’s eating the CPU usage on your Windows. Couldn’t we solve this problem for the safety of our Windows? No, you can solve it. Move on to the next part, please.
Fixes for ‘Antimalware Service Executable high CPU‘:
- Change Windows Defender’s schedule
- Add Antimalware Service Executable to Windows Defender exclusion list
- Check Real-time protection settings
Fix 1: Change Windows Defender’s schedule
The error is mainly due to its real-time protection feature. So we can change Windows Defender’s schedule to fix it.
- On your keyboard, press the Windows logo key and R at the same time to invoke the Run box. Type taskschd.msc and press Enter.
- Double-click on Task Scheduler Library > Microsoft > Windows.

- Double-click Windows Defender in Windows. Then double-click Windows Defender Scheduled Scan.
- Uncheck Run with highest privileges.

- Uncheck all the items in the Conditions section. Then click OK.
- With the steps above, your error should be fixed now.
If unfortunately, it doesn’t work, please don’t be frustrated, try the following method.
Fix 2: Add Antimalware Service Executable to Windows Defender exclusion list
High CPU usage can signal issues with Windows Defender real-time scanning. A troubleshooting step is to add the Antimalware Service Executable to Defender’s exclusion list. This prevents scanning of the file, potentially stopping unnecessary scans causing high CPU.
Below we’ll show you how to do this.
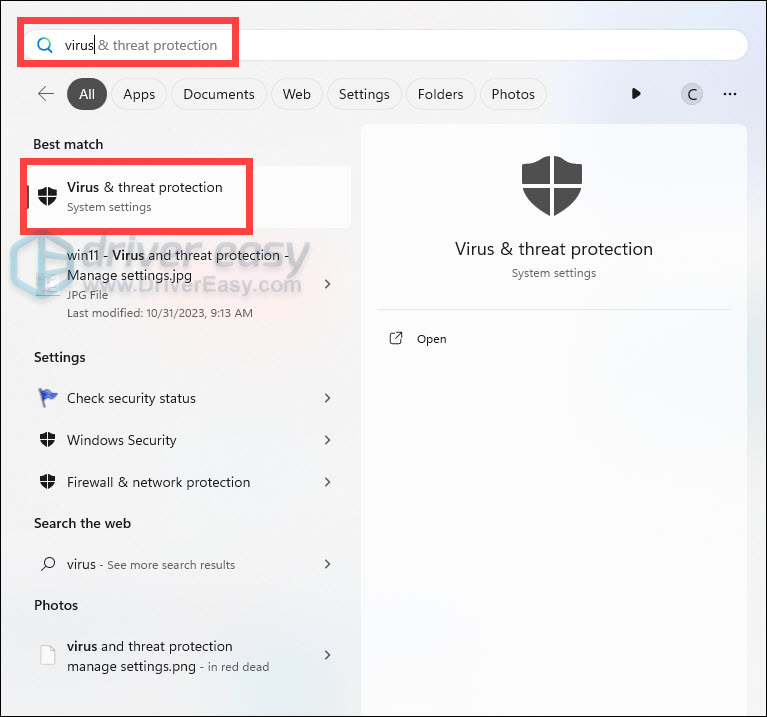
- On your keyboard, press the Windows logo key to open the Start menu. Type virus, and click Virus & threat protection from the list of results.

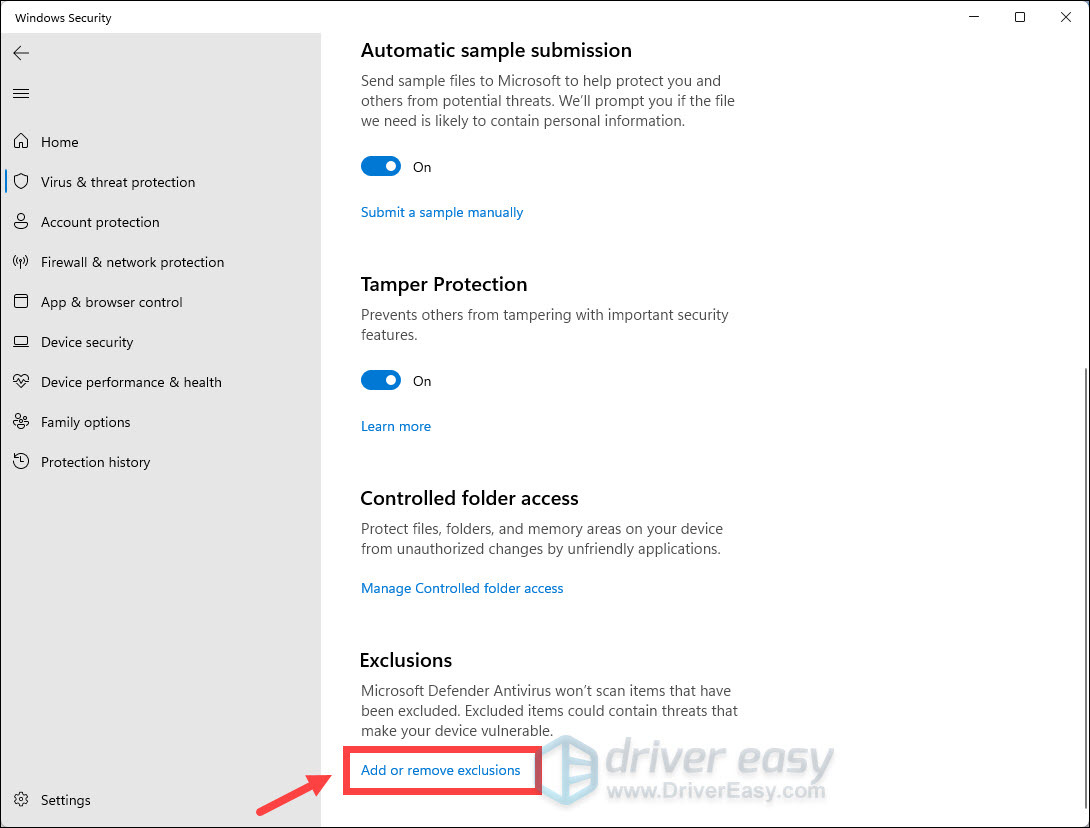
- Find Manage settings under Virus & threat protection settings and click on it.

- Scroll to the bottom and click Add or remove exclusions.

- When you’re asked for permission, click Yes to proceed.
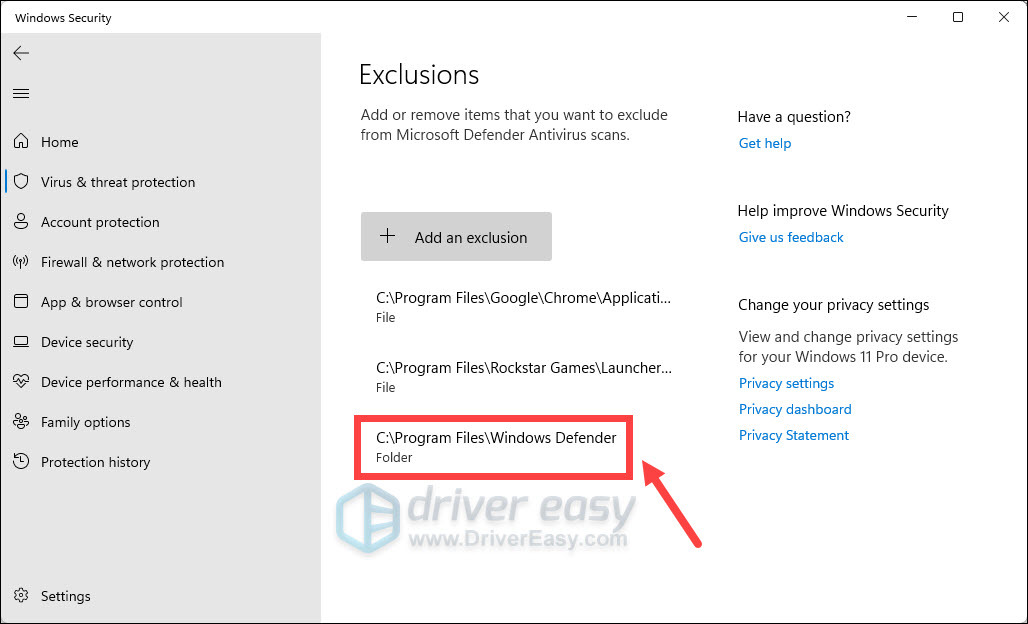
- Click Add an exclusion. From the drop-down menu, select Folder.
- Then select the following path:
C:\Program files\Windows Defender

Then restart your computer and check if it still consumes high CPU and RAM resources.
Fix 3: Check real-time protection settings
Another workaround for this issue is turning off the real-time protection.
- On your keyboard, press the Windows logo key to open the Start menu. Type virus, and click Virus & threat protection from the list of results.
- Find Manage settings under Virus & threat protection settings and click on it.
- Scroll a little bit and click on the switch to turn Off Real-time protection.
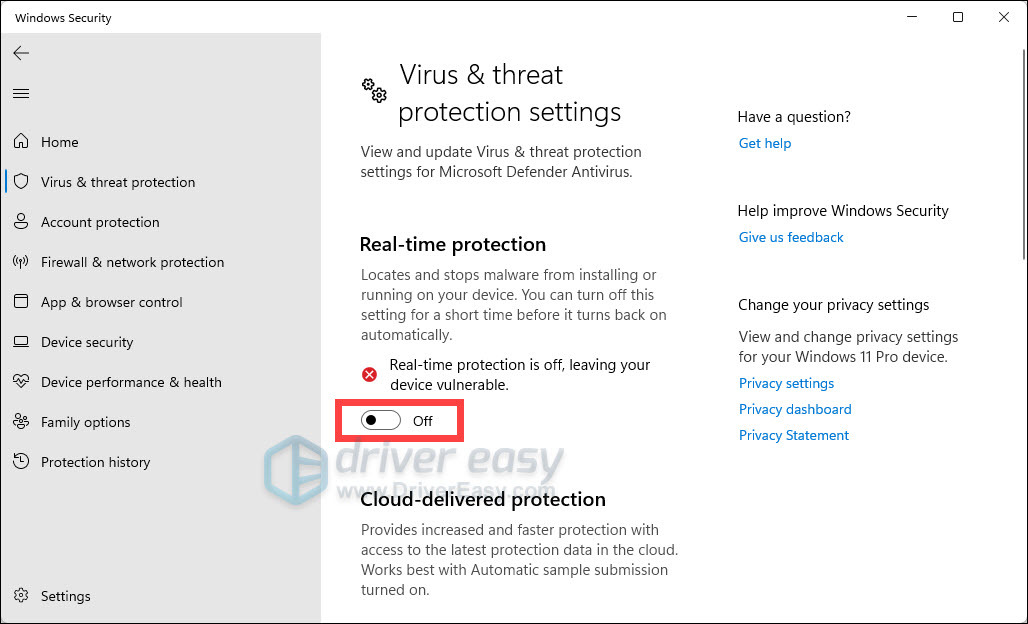
Turning off Real-time protection leaves your device vulnerable, so make sure you re-enable the setting after the troubleshooting.
Still Running Slow?
If, after trying the above, your PC is still running slow, we highly recommend you scan your Windows OS for faulty files or missing system components.
System File Checker is a Windows built-in tool that can help you scan for and repair any corruptions of your system files. Follow the instructions to see how to use it:
- Press the Windows logo key and R on your keyboard to invoke the Run box.
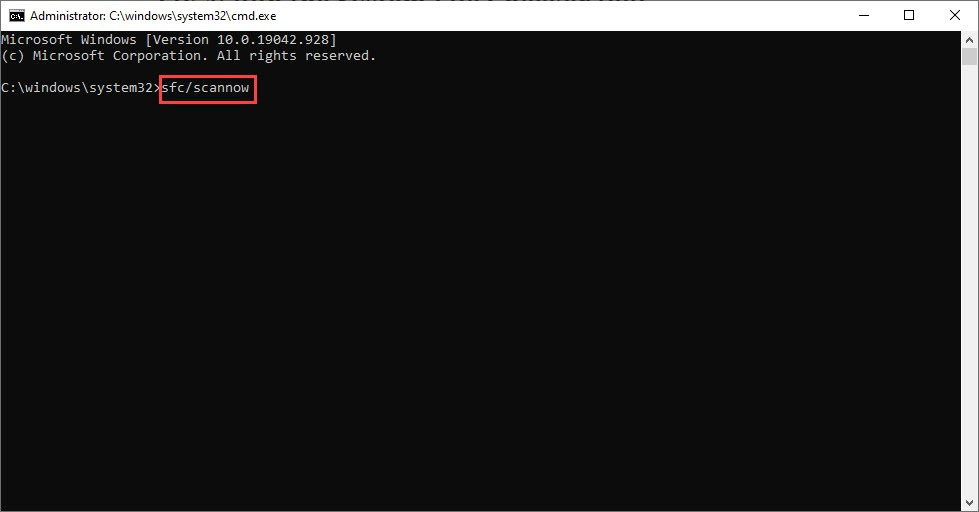
- On your keyboard, type cmd and press Ctrl, Shift and Enter at the same time to run Command Prompt as administrator.
- You’ll be prompted for permission. Click Yes to open Command Prompt.
- Type sfc/scannow, then press Enter.

- The System Files Checker tool will automatically scan for corrupt or missing files and fix them, if there’s any.
- Restart your PC to see if the problem persists.

That’s it for this guide. Hopefully, it helped. Feel free to leave a comment below if you have any questions or suggestions.
212
212 people found this helpful
If you are facing Antimalware Service Executable issue with high memory in your Windows 10 or in your windows 11, you are not alone. Lots of Windows users have complained that they are seeing Antimalware service executable with high memory usage in their task manager. And no this is not a virus, in fact, it is an important part of windows security i.e, windows defender which might be causing high cpu usage in your windows computer.
Let’s see what it is and how to fix it.
What is the MsMpEng.exe or Antimalware Service Executable?
The MsMpEng.exe file is an important component of Windows Security (Windows Defender) that checks your computer for threats, stops them, and installs antivirus updates. And it can be seen in your task manager under the name “Antimalware service executable”.
MsMpEng.exe/Antimalware Service Executable allows Windows Defender to continuously monitor your computer for potential threats and provide real-time protection against malware and cyberattacks.
How do I open antimalware service executable?
If you want to take a look at this program, follow these steps:
- Open task manager by pressing ctrl + shift + Esc all together
- In there, in the process tab look for “Antimalware Service Executable”
- Right-click on it and click on “Open file location”
- And there you will see a file named “MsMpEng.exe” under your windows deferred folder
Is antimalware service executable a virus?
Lots of windows users when they see this program for the first time running in task manager (especially with high CPU/memory usage) think that it’s a virus, but it’s not a virus in fact it is important for your windows OS. A virus can impact your windows, for example a virus can can cause file transfer speed dropping to zero in your windows, but fortunately antimalware service executable is not a virus and you don’t have to worry about such issue.
And to be sure you can expand the Antimalware Service Executable tab from task manager you’ll see that it comes under Microsoft Defender Antivirus Service and thus it is not a virus
You can also Right-click on “Antimalware Service Executable” and click on “Open file location” and there you will see a file named “MsMpEng.exe” under your windows defender folder

So now you know that this is a quite important component of windows security, you might be wondering then …
Why is antimalware service executable using so much high memory usage?
Since MsMpEng.exe/Antimalware service executable is a crucial part of windows security, it sometimes takes a full scan of the whole computer, which performs a comprehensive check of all files on your computer. The Full scan uses a lot of CPU resources and is not afraid to use whatever your system has available; as a result, you may experience lag, delays, hangings, and other problems while it is running.
Now that you know what antimalware service executable is and why it uses so much high memory usage sometimes, let’s jump on the part on how to fix Antimalware Service Executable high memory in windows 10
Table of Contents
Fix #1: Change Windows Defender’s scheduling options
Since mostly you experienced high memory usage by Antimalware Service Executable because it takes a full scan of your computer and takes too much CPU resources, the smartest move you can do is to schedule this full scan at a time when you won’t be using too much of your CPU resources.
So to learn how to Change Windows Defender’s scheduling options follow these steps carefully:
Press Windows key + R to open the dialog box and Type taskschd.msc and press Enter. It will take you to Task Scheduler

In task scheduler, Double click on Task Scheduler Library then under that click on Microsoft then under that click on windows

Now Find and expand Windows Defender. Then double-click Windows Defender Scheduled Scan

Uncheck Run with the highest privileges on the property window.

In the conditions tab uncheck everything

This should fix your problem.
You can also Schedule a new scan as your PC has become vulnerable now.
- To schedule a new scan go into the Triggers tab and click on new.
-

- Here either select weekly or monthly and then select the day according to your preference
-

- Now click OK and restart your computer. This will do a scan as per the time you have chosen.


This should fix your problem but if it doesn’t, try the next fix.
Fix #2: Add Antimalware Service Executable to Windows Defender’s Exclusion List
Windows Defender scans all programs, files, folders, and processes, etc in your computer, so there are chances that this is the reason why you are getting a high memory usage problem.
So If the above method didn’t work much for you, You can add Antimalware Service Executable to Windows Defender’s Exclusion List, which you can do by first finding the exact file location of Antimalware Service Executable and submitting it into the Windows Defender’s Exclusion List.
To get the folder location of Antimalware Service Executable, follow the steps below:
Open task manager and Look for Antimalware Service Executable, and then right-click on it and click on Open file location

Now it will redirect you to windows file explorer, where the antimalware service executable folder is, from here you can copy the file location

Here it should be something like this:
C:\ProgramData\Microsoft\Windows Defender\Platform\4.18.2109.6-0\MsMpEng.exe
Now we have to submit this file location in Windows Defender’s Exclusion List, to do that follow the steps below:
Click the button below to open windows security or press windows key + R and in that dialog box enter windowsdefender://threat/ and click OK
OPEN WINDOWS SECURITY

From here, click on manage settings

Scroll down and click on Add or remove exclusions

Click on Add an exclusion and then click on Process

Now inside that, enter the full path of the Antimalware Service Executable location (C:\ProgramData\Microsoft\Windows Defender\Platform\4.18.2109.6-0\MsMpEng.exe) and click on Add.

After that restart your computer and check if you see any changes.
Fix #3: Disable Real-Time Protection
Due to the real-time feature of Antimalware Service Executable, which will continuously scan your Windows computer no matter what you do, the problem with high disk usage is significant. As a result, its execution rate is fast and the CPU storage is large, which leads to high memory and CPU usage.
Turning off real-time protection is likely to fix the Antimalware Service Executable high CPU issue. But then the Windows Defender will no longer work after this, and your computer will be vulnerable So use this method only temporarily.
To disable real-time protection follow the steps below:
Click the button below to open windows security or press windows key + R and in that dialog box enter windowsdefender://threat/ and click OK
OPEN WINDOWS SECURITY
From here, click on manage settings
Now disable real-time protection from here

Hopefully, this should fix your problem.
Fix #4: Disable windows defender from Registry Editor
It may be possible to fix an Antimalware Service Executable high CPU issue when your Windows Defender has become corrupted by being overworked by continuous file scanning.
- Press Windows Key + R to open the Run Dialog Box type regedit and click OK to open the Registry Editor.

- In the navigation panel on the left, double-click the folders to navigate to HKEY_LOCAL_MACHINE\SOFTWARE\Policies\Microsoft\Windows Defender

- If you find a registry entry named DisableAntiSpyware, double-click it and set its value data to 1.


If you do not see a registry entry named DisableAntiSpyware,
- right-click in the main Registry Editor panel and select New > DWORD (32 bit) Value
- Name this new registry entry DisableAntiSpyware. Double click it and set its value data to 1.
Hopefully, this should fix your problem
Fix #5: Disable windows defender with Defender-Control
If microsoft defender using too much memory and you have disaled the windows defender from the settings, There is still chances that your windows defender might become active again and start eating ram, so to stop antimalware service executable from using memory you can use a third party tool Defender-control to disable windows defender which works like wonder.
To download the tool you can visit here

Just download it as zip and extract it some where in your computer and then run the exe file.
you can also watch the video below for detailed instructions
Also read: ( FIXED ) file explorer preview pane not working for pdf in windows
Fix #6: Update all bad drivers
If none of the solutions mentioned above worked for you then try updating and installing the appropriate driver for your device.
You can manually update all of the drivers from the device manager on your computer.
It can be done by going to the manufacturer’s website and searching for the exact device’s most recent correct driver. Make sure to choose drivers that are compatible with your variant of Windows system versions.
Pro tip: Use drivereasy To update all your missing drivers in one click (Get from here and you’ll get 10 % discount)
Fix #7: Scan with Malwarebytes
Lots of windows users claim that scanning their computer with Malwarebytes did the job, so try to do a full scan with first windows defender and then Malwarebytes for any potential virus.
![[ SOLVED ] Antimalware Service Executable high memory in windows | WINDOWS GROUND.](https://www.malwarebytes.com/images/website-refresh/premium/take-a-look.webp "[ SOLVED ] Antimalware Service Executable high memory in windows 25")
To scan with Malwarebytes, download this software from here
More About Antimalware Service Executable High CPU
How do I stop antimalware service executable from using so much RAM?
If you are looking for ways to stop antimalware service executable from using so much RAM in your windows PC, you can try the Following fix:
- Change Windows Defender’s scheduling options
- Add Antimalware Service Executable to Windows Defender’s Exclusion List
- Disable Real-Time Protection
- Disable windows defender from Registry Editor
- Disable windows defender with Defender-Control
- Update all bad drivers
- Scan with Malwarebytesv
Can I end the antimalware service executable?
Yes, you can end the antimalware service by turning off the windows defender from the security in your PC, as the antimalware service executable is just a part of windows defender which will automatically be disabled when you disable the windows defender.
Why is antimalware service executable running so high?
There can be lots of reasons why the antimalware service executable is running so high, but mostly it’s running high because it takes a full scan of the whole computer, checking all files. That too in real-time. Due to the fact that the Full scan uses a lot of CPU resources you see the antimalware service executable running so high.
Same steps can be used to fix Antimalware Service Executable high memory in windows 11 or windows 10
Edit: As for april 2023 this solution is still working to fix antimalware service executable high memory
Team windowsground