
Note
This module is part of the ansible.windows collection (version 2.8.0).
You might already have this collection installed if you are using the ansible package.
It is not included in ansible-core.
To check whether it is installed, run ansible-galaxy collection list.
To install it, use: ansible-galaxy collection install ansible.windows.
To use it in a playbook, specify: ansible.windows.win_command.
Synopsis
-
The
win_commandmodule takes the command name followed by a list of space-delimited arguments. -
The given command will be executed on all selected nodes. It will not be processed through the shell, so variables like
$env:HOMEand operations like"<",">","|", and";"will not work (use the ansible.windows.win_shell module if you need these features). -
For non-Windows targets, use the ansible.builtin.command module instead.
Parameters
|
Parameter |
Comments |
|---|---|
|
_raw_params string |
The This is mutually exclusive with the There is no parameter actually named ‘_raw_params’. See the examples! |
|
argv list / elements=string added in ansible.windows 1.11.0 |
A list that contains the executable and arguments to run. The module will attempt to quote the arguments specified based on the Win32 C command-line argument rules. Not all applications use the same quoting rules so the escaping may not work, for those scenarios use |
|
chdir path |
Set the specified path as the current working directory before executing a command. |
|
cmd string added in ansible.windows 1.11.0 |
The command and arguments to run. This is mutually exclusive with the |
|
creates path |
A path or path filter pattern; when the referenced path exists on the target host, the task will be skipped. |
|
output_encoding_override string |
This option overrides the encoding of stdout/stderr output. You can use this option when you need to run a command which ignore the console’s codepage. You should only need to use this option in very rare circumstances. This value can be any valid encoding |
|
removes path |
A path or path filter pattern; when the referenced path does not exist on the target host, the task will be skipped. |
|
stdin string |
Set the stdin of the command directly to the specified value. |
Notes
Note
-
If you want to run a command through a shell (say you are using
<,>,|, etc), you actually want the ansible.windows.win_shell module instead. The ansible.windows.win_command module is much more secure as it’s not affected by the user’s environment. -
creates,removes, andchdircan be specified after the command. For instance, if you only want to run a command if a certain file does not exist, use this. -
Do not try to use the older style free form format and the newer style cmd/argv format. See the examples for how both of these formats are defined.
See Also
Examples
# Older style using the free-form and args format. The command is on the same
# line as the module and 'args' is used to define the options for win_command.
- name: Save the result of 'whoami' in 'whoami_out'
  ansible.windows.win_command: whoami
  register: whoami_out

- name: Run command that only runs if folder exists and runs from a specific folder
  ansible.windows.win_command: wbadmin -backupTarget:C:\backup\
  args:
    chdir: C:\somedir\
    creates: C:\backup\

- name: Run an executable and send data to the stdin for the executable
  ansible.windows.win_command: powershell.exe -
  args:
    stdin: Write-Host test

# Newer style using module options. The command and other arguments are
# defined as module options and are indended like another other module.
- name: Run the 'whoami' executable with the '/all' argument
  ansible.windows.win_command:
    cmd: whoami.exe /all

- name: Run executable in 'C:\Program Files' with a custom chdir
  ansible.windows.win_command:
    # When using cmd, the arguments need to be quoted manually
    cmd: '"C:\Program Files\My Application\run.exe" "argument 1" -force'
    chdir: C:\Windows\TEMP

- name: Run executable using argv and have win_command escape the spaces as needed
  ansible.windows.win_command:
    # When using argv, each entry is quoted in the module
    argv:
      - C:\Program Files\My Application\run.exe
      - argument 1
      - -force

- name: Run an executable that outputs text with big5 encoding
  ansible.windows.win_command: C:\someprog.exe
  args:
    output_encoding_override: big5
Return Values
Common return values are documented here, the following are the fields unique to this module:
|
Key |
Description |
|---|---|
|
cmd string |
The command executed by the task Returned: always Sample: |
|
delta string |
The command execution delta time Returned: always Sample: |
|
end string |
The command execution end time Returned: always Sample: |
|
msg boolean |
changed Returned: always Sample: |
|
rc integer |
The command return code (0 means success) Returned: always Sample: |
|
start string |
The command execution start time Returned: always Sample: |
|
stderr string |
The command standard error Returned: always Sample: |
|
stderr_lines list / elements=string |
The command standard error split in lines Returned: always Sample: |
|
stdout string |
The command standard output Returned: always Sample: |
|
stdout_lines list / elements=string |
The command standard output split in lines Returned: always Sample: |
Collection links
- Issue Tracker
- Repository (Sources)
I will show you several operations which an administrator can perform on a remote windows system using ansible-playbook.
Ansible is one of the most used DevOps tools in the market today. It provides a bunch of windows modules that are used to configure and manage the Windows server. I assume you already have Ansible installed on Windows from where you want to manage the Windows servers.
The following are some of the commonly used tasks performed by Windows administrators on a daily basis. You will be amazed to see how easy it is administered Windows using Ansible.
My Ansible Windows controller machine’s IP address is 192.168.0.106, and my remote Windows system’s IP address is 192.168.0.102. Before you get started, make sure you run a win_ping module to check whether you are able to connect to windows remote server or not.
Geekflare@MSEDGEWIN10 ~
$ ansible win -m win_ping
192.168.0.102 | SUCCESS => {
    "changed": false,
    "ping": "pong"
}
My connection to a remote host is successful.
So, let’s get started with Ansible Playbooks…
Copying Files
win_copy is an ansible module that copies a file from the local server to a remote Windows host. I will use this module to copy a single PDF.
Use the below YAML code, give the source and destination paths.
Geekflare@MSEDGEWIN10 ~
$ vi copy.yml
---

- hosts: win

  tasks:

  - name: Copy File

    win_copy:

      src: C:\output.pdf

      dest: C:\ansible_examples\

      remote_src: yes
Run the ansible-playbook for win_copy.
Geekflare@MSEDGEWIN10 ~
$ ansible-playbook copy.yml

PLAY [win] ***********************************************************************************************************************************

TASK [Gathering Facts] ***********************************************************************************************************************
ok: [192.168.0.102]

TASK [Copy File] *****************************************************************************************************************************
changed: [192.168.0.102]

PLAY RECAP ***********************************************************************************************************************************
192.168.0.102
: ok=2 changed=1 unreachable=0 failed=0
skipped=0 rescued=0 ignored=0
The file has been copied successfully at the destination location on a remote windows system.

Install/UnInstall MSI
To install an application using the MSI file, you need to use win_get_url to mention the path of the MSI file to download and then use the win_package module to install it. The state present means the MSI will be installed on the machine, and the application is in the present state.
Here, I am installing Apache.
YAML code to be used:
Geekflare@MSEDGEWIN10 ~
$ vi msi.yml
---
- name: Installing Apache MSI
  hosts: win

  tasks:
    - name: Download the Apache installer
      win_get_url:
        url: https://archive.apache.org/dist/httpd/binaries/win32/httpd-2.2.25-win32-x86-no_ssl.msi
        dest: C:\ansible_examples\httpd-2.2.25-win32-x86-no_ssl.msi

    - name: Install MSI
      win_package:
        path: C:\ansible_examples\httpd-2.2.25-win32-x86-no_ssl.msi
        state: present
Run the ansible-playbook to install using MSI.
Geekflare@MSEDGEWIN10 ~
$ ansible-playbook msi.yml

PLAY [Installing Apache MSI] *****************************************************************************************************************

TASK [Gathering Facts] ***********************************************************************************************************************
ok: [192.168.0.102]

TASK [Download the Apache installer] *********************************************************************************************************
changed: [192.168.0.102]

TASK [Install MSI] ***************************************************************************************************************************
changed: [192.168.0.102]

PLAY RECAP ***********************************************************************************************************************************
192.168.0.102
: ok=3 changed=2 unreachable=0 failed=0
skipped=0 rescued=0 ignored=0
Now, go to the windows system and check if the apache application got installed successfully.
C:\Users\geekflare>cd C:\Program Files (x86)\Apache Software Foundation\Apache2.2\bin
C:\Program Files (x86)\Apache Software Foundation\Apache2.2\bin>httpd -v
Server version: Apache/2.2.25 (Win32)
Server built: Jul 10 2013 01:52:12
You can also install applications using MSI with arguments. Below is the same example as above, but instead of a state, we are using an install argument to install apache.
YAML code to be used:
---

- name: Installing Apache MSI

  hosts: win

  tasks:

    - name: Download the Apache installer

      win_get_url:

        url: https://archive.apache.org/dist/httpd/binaries/win32/httpd-2.2.25-win32-x86-no_ssl.msi

        dest: C:\ansible_examples\httpd-2.2.25-win32-x86-no_ssl.msi


    - name: Install MSI

      win_package:

        path: C:\ansible_examples\httpd-2.2.25-win32-x86-no_ssl.msi

        arguments:

          - /install

          - /passive

          - /norestart
To uninstall an application using the MSI file, you need to use the win_package module. The state absent means the application will be uninstalled using the MSI file.
Here, I am uninstalling Apache.
Geekflare@MSEDGEWIN10 ~
$ vi uninstall_msi.yml

---

- name: UnInstalling Apache MSI

  hosts: win

  tasks:

    - name: UnInstall MSI

      win_package:

        path: C:\ansible_examples\httpd-2.2.25-win32-x86-no_ssl.msi

        state: absent
Run the ansible-playbook to uninstall using MSI.
Geekflare@MSEDGEWIN10 ~
$ ansible-playbook uninstall_msi.yml

PLAY [UnInstalling Apache MSI] *****************************************************************************************************************

TASK [Gathering Facts] ***********************************************************************************************************************
ok: [192.168.0.102]

TASK [UnInstall MSI] *************************************************************************************************************************
changed: [192.168.0.102]

PLAY RECAP ***********************************************************************************************************************************
192.168.0.102
: ok=2 changed=1 unreachable=0 failed=0
skipped=0 rescued=0 ignored=0
Now, if I check the apache version, I will get the below output as the application got uninstalled.
C:\Program Files (x86)\Apache Software Foundation\Apache2.2\bin>httpd -v 'httpd' is not recognized as an internal or external command,
operable program or batch file.
Uninstall Software (.EXE)
You can also uninstall software with .exe file using the product id of that software.
Geekflare@MSEDGEWIN10 ~
$ vi uninstall.yml
---

- hosts: win

  tasks:

   - name: Uninstall 7-Zip from the exe

     win_package:

       path: C:\Program Files\7-Zip\Uninstall.exe

       product_id: 7-Zip

       arguments: /S

       state: absent
Run the ansible-playbook to uninstall 7-Zip.
Geekflare@MSEDGEWIN10 ~
$ ansible-playbook uninstall.yml

PLAY [win] *************************************************************************************************************************************************************************************

TASK [Gathering Facts] *************************************************************************************************************************************************************************
ok: [192.168.0.102]

TASK [Uninstall 7-Zip from the exe] ***********************************************************************************************************************************************************
changed: [192.168.0.102]

PLAY RECAP *************************************************************************************************************************************************************************************
192.168.0.102              : ok=2    changed=1    unreachable=0    failed=0    skipped=0    rescued=0    ignored=0
Stop/Start/Restart Windows Services
win_service ansible module is used to start, stop, or restart a service. Here, I will show you how to stop the tomcat service.

You need to mention the service name in the YAML file and set the state to stop.
Geekflare@MSEDGEWIN10 ~
$ vi service.yml
---
- hosts: win

  tasks:

   - name: Stop service Tomcat

     win_service:

       name: Tomcat8

       state: stopped
Run the ansible-playbook to stop the tomcat service.
Geekflare@MSEDGEWIN10 ~
$ ansible-playbook service.yml

PLAY [win] ***********************************************************************************************************************************

TASK [Gathering Facts] ***********************************************************************************************************************
ok: [192.168.0.102]

TASK [Stop service Tomcat] ****************************************************************************************************************
changed: [192.168.0.102]

PLAY RECAP ***********************************************************************************************************************************
192.168.0.102
: ok=2 changed=1 unreachable=0 failed=0
skipped=0 rescued=0 ignored=0
If you check the tomcat service on the windows system, it is now in stopped status.

You can define state to started or restarted or paused to change the status of the service.
Gathering Facts
Using win_disk_facts ansible module, you can retrieve all the disk information of the target host.
Geekflare@MSEDGEWIN10 ~
$ vi disk.yml
---
- hosts: win
  tasks:
  - name: Get disk facts
    win_disk_facts:

  - name: Output first disk size
    debug:
      var: ansible_facts.disks[0].size

  - name: Convert first system disk into various formats
    debug:
      msg: '{{ disksize_gib }} vs {{ disksize_gib_human }}'
    vars:
      # Get first system disk
      disk: '{{ ansible_facts.disks|selectattr("system_disk")|first }}'

      # Show disk size in Gibibytes
      disksize_gib_human: '{{ disk.size|filesizeformat(true) }}'
      disksize_gib: '{{ (disk.size/1024|pow(3))|round|int }} GiB'
Run the ansible-playbook to get the disk information.
Geekflare@MSEDGEWIN10 ~
$ ansible-playbook disk.yml

PLAY [win] ***********************************************************************************************************************************

TASK [Gathering Facts] ***********************************************************************************************************************
ok: [192.168.0.102]

TASK [Get disk facts] ************************************************************************************************************************
ok: [192.168.0.102]

TASK [Output first disk size] ****************************************************************************************************************
ok: [192.168.0.102] => {

"ansible_facts.disks[0].size": "1000204886016"
}

TASK [Convert first system disk into various formats] ****************************************************************************************
ok: [192.168.0.102] => {
"msg": "932 GiB vs 931.5 GiB"
}

PLAY RECAP ***********************************************************************************************************************************
192.168.0.102
: ok=4 changed=0 unreachable=0 failed=0
skipped=0 rescued=0 ignored=0
Using win_command ansible module, you can execute commands on the remote host and get CPU information, device details, and much more.
Geekflare@MSEDGEWIN10 ~
$ vi check.yml
---
- hosts: win
  tasks:
   - name: Get disk facts
     win_command: wmic cpu get caption, deviceid, name, numberofcores, maxclockspeed, status
     register: usage

   - debug: msg="{{ usage.stdout }}"
Run the ansible-playbook to get remote system information.
Geekflare@MSEDGEWIN10 ~
$ ansible-playbook check.yml

PLAY [win] ***********************************************************************************************************************************

TASK [Gathering Facts] ***********************************************************************************************************************
ok: [192.168.0.102]

TASK [Get facts] ************************************************************************************************************************
changed: [192.168.0.102]

TASK [debug] *********************************************************************************************************************************
ok: [192.168.0.102] => {
"msg": "Caption DeviceID MaxClockSpeed
Name
NumberOfCores Status \r\r\nIntel64 Family 6 Model 142 Stepping 9 CPU0 2712 Intel(R) Core(TM) i5-7200U CPU @ 2.50GHz 2 OK \r\r\n\r\r\n"
}

PLAY RECAP ***********************************************************************************************************************************
192.168.0.102
: ok=3 changed=1 unreachable=0 failed=0
skipped=0 rescued=0
ignored=0
Running Commands
Whatever commands you run on a window, they can be run through the ansible win_command module. You just need to specify the command in your YAML file. Here, I am just creating a directory.
Geekflare@MSEDGEWIN10 ~
$ vi commands.yml
---

- hosts: win

  tasks:

   - name: run an executable using win_command

     win_command: whoami.exe


   - name: run a cmd command

      win_command: cmd.exe /c mkdir C:\test
Run the ansible-playbook to perform win_command operation.
Geekflare@MSEDGEWIN10 ~
$ ansible-playbook commands.yml

PLAY [win] ***********************************************************************************************************************************

TASK [Gathering Facts] ***********************************************************************************************************************
ok: [192.168.0.102]

TASK [run an executable using win_command] ***************************************************************************************************
changed: [192.168.0.102]

TASK [run a cmd command] *********************************************************************************************************************
changed: [192.168.0.102]

PLAY RECAP ***********************************************************************************************************************************
192.168.0.102
: ok=3 changed=2 unreachable=0 failed=0
skipped=0 rescued=0 ignored=0
Environment Variables
A windows system has multiple environment variables, for example, JAVA_HOME. Using the win_environment ansible module, you can add or modify environment variables on a windows system. In this example, I am adding a new variable to the windows environment variables list.
Geekflare@MSEDGEWIN10 ~
$ vi env.yml
---
- hosts: win
  tasks:
   - name: Set an environment variable for all users
     win_environment:
       state: present
       name: NewVariable
       value: New Value
       level: machine
Run the ansible-playbook to add the environment variable on a remote windows machine.
Geekflare@MSEDGEWIN10 ~
$ ansible-playbook env.yml

PLAY [win] ***********************************************************************************************************************************

TASK [Gathering Facts] ***********************************************************************************************************************
ok: [192.168.0.102]

TASK [Set an environment variable for all users] *********************************************************************************************
changed: [192.168.0.102]

PLAY RECAP ***********************************************************************************************************************************
192.168.0.102
: ok=2 changed=1 unreachable=0 failed=0
skipped=0 rescued=0 ignored=0
Go to the environment variables window; you will see the new variable you just added is present here.

Add/Edit Registry
win_regedit ansible module is used to add or edit registry details on a remote windows machine. You need to give the path of the registry and content to be added/updated. Here I am creating a new registry entry GeekFlare inside HKLM:\SOFTWARE path and then adding name and data to this registry.
Geekflare@MSEDGEWIN10 ~
$ vi registry.yml
---

- hosts: win

  tasks:

   - name: Creating a registry

     win_regedit:

      path: HKLM:\SOFTWARE\GeekFlare

   - name: Modifying a registry, adding name and data

     win_regedit:

      path: HKLM:\SOFTWARE\GeekFlare

      name: Geek

      data: Flare
Run the ansible-playbook to add the registry.
Geekflare@MSEDGEWIN10 ~
$ ansible-playbook registry.yml

PLAY [win] ***********************************************************************************************************************************

TASK [Gathering Facts] ***********************************************************************************************************************
ok: [192.168.0.102]

TASK [Creating a registry] *******************************************************************************************************************
changed: [192.168.0.102]

TASK [Modifying a registry, adding name and data] ********************************************************************************************
changed: [192.168.0.102]

PLAY RECAP ***********************************************************************************************************************************
192.168.0.102
: ok=3 changed=2 unreachable=0 failed=0
skipped=0 rescued=0 ignored=0
If you go to Registry Editor on the remote system, you can see this registry has been added successfully with Name and Data parameters.

Delete Log
win_eventlog ansible module is used to add, clear, or remove windows event logs from the windows system.
Go to Windows Powershell, and list the EventLogs present on the remote windows machine.
PS C:\Users\Geekflare> Get-EventLog -List
  Max(K) Retain OverflowAction        Entries Log
  ------ ------ --------------        ------- ---
  20,480      0 OverwriteAsNeeded      33,549 Application
  20,480      0 OverwriteAsNeeded           0 HardwareEvents
     512      7 OverwriteOlder             20 Internet Explorer
  20,480      0 OverwriteAsNeeded           0 Key Management Service
     128      0 OverwriteAsNeeded         190 OAlerts
                                              Security
  20,480      0 OverwriteAsNeeded      44,828 System
  15,360      0 OverwriteAsNeeded       3,662 Windows PowerShell
Now, I will show how to remove logs from all sources for Internet Explorer.
Geekflare@MSEDGEWIN10 ~
$ vi log.yml
---
- hosts: win
  tasks:
   - name: Remove Internet Explorer Logs
     win_eventlog:
      name: Internet Explorer
      state: absent
Run the ansible-playbook to remove the Internet Explorer form the remote windows machine.
Geekflare@MSEDGEWIN10 ~
$ ansible-playbook log.yml

PLAY [win] *************************************************************************************************************************************************************************************

TASK [Gathering Facts] *************************************************************************************************************************************************************************
ok: [192.168.0.102]

TASK [Remove Internet Explorer Logs] **********************************************************************************************************************************************
changed: [192.168.0.102]

PLAY RECAP *************************************************************************************************************************************************************************************
192.168.0.102              : ok=2    changed=1    unreachable=0    failed=0    skipped=0    rescued=0    ignored=0
Now, if you list the EventLogs again, you will see Internet Explorer logs have been removed.
PS C:\Users\Geekflare> Get-EventLog -List

  Max(K) Retain OverflowAction        Entries Log
  ------ ------ --------------        ------- ---
  20,480      0 OverwriteAsNeeded      33,549 Application
  20,480      0 OverwriteAsNeeded           0 HardwareEvents
  20,480      0 OverwriteAsNeeded           0 Key Management Service
     128      0 OverwriteAsNeeded         190 OAlerts
                                              Security
  20,480      0 OverwriteAsNeeded      44,835 System
  15,360      0 OverwriteAsNeeded          56 Windows PowerShell
So, that was all about Ansible playbooks, which can be used for remote windows administration. Go ahead and try out these playbooks. You can also try other Ansible Windows modules available.
Ansible modules — win_command vs win_shell
How to automate the execution of PowerShell or cmd.exe code on windows target hosts using Ansible Playbook with win_command and win_shell modules.
What is the difference between win_command vs win_shell Ansible modules?
These two Ansible modules are confused one for another but they’re fundamentally different.
Both modules allow you to execute win_command on a target host but in a slightly different way.
I’m Luca Berton and welcome to today’s episode of Ansible Pilot.
win_command vs win_shell
-
win_command -
Executes a command on a remote Windows node
-
it bypasses the Windows shell
-
always set changed to True
-
win_shell -
Execute shell commands on Windows target hosts
-
redirections and win_shell’s inbuilt functionality
-
always set changed to True
The win_command and win_shell Ansible modules execute win_commands on the Windows target node.
Generally speaking, is always better to use a specialized Ansible module to execute a task.
However, sometimes the only way is to execute a Windows PowerShell or cmd.exe via the win_command or win_shell module.
Let me reinforce again, you should avoid as much as possible the usage of win_command/win_shell instead of a better module.
Both modules execute PowerShell or cmd.exe commands on Windows target nodes but in a sensible different way.
The win_command modules execute win_commands on the target machine without using the target win_shell, it simply executes the win_command. The target win_shell is for example sending any PowerShell or cmd.exe. t will not be processed through the shell, so variables like $env:HOME and operations like "<", ">", "|", and ";" are not available. On the other side, every command executed using the win_shell module has all PowerShell or cmd.exe features so it could be expanded in runtime. From the security point of viewwin_command module is more robust and has a more predictable outcome because it bypasses the shell.
Both modules returned always changed status because Ansible is not able to predict if the execution has or has not altered the target system.
For non-Windows targets, use the ansible.builtin.command and ansible.builtin.shell modules instead.
win_command
- Executes a command on a remote Windows node
The win_command module won’t be impacted by local win_shell variables because it bypasses the win_shell. At the same time, it may not be able to run win_shell built-in features and redirections.
win_shell
- Execute shell commands on target hosts
The win_shell Ansible module is potentially more dangerous than the win_command module and should only be used when you actually really need the PowerShell or cmd.exe functionalities. So if you’re not stringing two commands together o variables like $env:HOME and operations like "<", ">", "|", and ";" you don’t really need the win_shell module. Similarly, expanding shell variables requires the win_shell module. If you’re not using these features, don’t use the win_shell module. Sometimes it’s the only way, I know.
Links
- ansible.windows.win_command
- ansible.windows.win_shell

Playbook
Let me show you the difference between win_command vs win_shell Ansible modules in three Ansible Playbooks.
win_command code
---
- name: win_command module Playbook
  hosts: all
  tasks:
    - name: check netstat
      ansible.windows.win_command: "netstat -e"
      register: command_output
    - name: command output
      ansible.builtin.debug:
        var: command_output.stdout_lines
win_command execution
ansible-pilot $ ansible-playbook -i virtualmachines/win/inventory commmand_shell/win_date.yml
PLAY [win_shell module Playbook] **********************************************************************
TASK [Gathering Facts] ****************************************************************************
ok: [WindowsServer]
TASK [check getdate] ******************************************************************************
changed: [WindowsServer]
TASK [command output] *****************************************************************************
ok: [WindowsServer] => {
    "command_output.stdout_lines": [
        "Playbook",
        "",
        "Friday, April 8, 2022 11:19:21 AM",
        "",
        ""
    ]
}
PLAY RECAP ****************************************************************************************
WindowsServer              : ok=3    changed=1    unreachable=0    failed=0    skipped=0    rescued=0    ignored=0
ansible-pilot $
win_shell code
---
- name: win_shell module Playbook
  hosts: all
  tasks:
    - name: check getdate
      ansible.windows.win_shell: |
        hostname
        Get-Date
      register: command_output
    - name: command output
      ansible.builtin.debug:
        var: command_output.stdout_lines
win_shell execution
ansible-pilot $ ansible-playbook -i virtualmachines/win/inventory commmand_shell/win_date.yml
PLAY [win_shell module Playbook] **********************************************************************
TASK [Gathering Facts] ****************************************************************************
ok: [WindowsServer]
TASK [check getdate] ******************************************************************************
changed: [WindowsServer]
TASK [command output] *****************************************************************************
ok: [WindowsServer] => {
    "command_output.stdout_lines": [
        "Playbook",
        "",
        "Friday, April 8, 2022 18:19:36 AM",
        "",
        ""
    ]
}
PLAY RECAP ****************************************************************************************
WindowsServer              : ok=3    changed=1    unreachable=0    failed=0    skipped=0    rescued=0    ignored=0
ansible-pilot $
wrong module code
The win_command doesn’t execute multiple PowerShell lines.
---
- name: win_command module Playbook
  hosts: all
  tasks:
    - name: check getdate
      ansible.windows.win_command: |
        hostname
        Get-Date
      register: command_output
    - name: command output
      ansible.builtin.debug:
        var: command_output.stdout_lines
wrong module execution
ansible-pilot $ ansible-playbook -i virtualmachines/win/inventory commmand_shell/win_date_command.yml
PLAY [win_command module Playbook] ********************************************************************
TASK [Gathering Facts] ****************************************************************************
ok: [WindowsServer]
TASK [check getdate] ******************************************************************************
changed: [WindowsServer]
TASK [command output] *****************************************************************************
ok: [WindowsServer] => {
    "command_output.stdout_lines": [
        "Playbook"
    ]
}
PLAY RECAP ****************************************************************************************
WindowsServer              : ok=3    changed=1    unreachable=0    failed=0    skipped=0    rescued=0    ignored=0
ansible-pilot $
Conclusion
Now you know the difference between win_command vs win_shell Ansible modules and their use case.
You know how to use it based on your use case.
Subscribe to the YouTube channel, Medium, and Website, X (formerly Twitter) to not miss the next episode of the Ansible Pilot.
Academy
Learn the Ansible automation technology with some real-life examples in my
Udemy 300+ Lessons Video Course.

My book Ansible By Examples: 200+ Automation Examples For Linux and Windows System Administrator and DevOps

Donate
Want to keep this project going? Please donate
Patreon
Buy me a Pizza
Even though Ansible is known for managing Linux nodes using SSH, did you know that Ansible on Windows works just as well? Using Windows Remote Management (WinRM), Ansible on Windows can effectively manage all of your Windows nodes too!
Not a reader? Watch this related video tutorial!
Not seeing the video? Make sure your ad blocker is disabled.
With Ansible on Windows, you can perform tasks like deploying patches, managing Windows servers, execute PowerShell scripts, and more.
In this tutorial, you’re going to learn how to set up your first Windows node to be managed with Ansible and see how to run commands and playbooks against it.
Prerequisites
If you’d like to follow along with the tutorial, please be sure you have the following before starting:
- An Ansible controller host – This tutorial will be using Ansible v2.9.18 on an Ubuntu 18.04.5 LTS machine with an IP address of 10.111.4.53. Note that Windows is not supported as a control node, only a managed node.
- Python installed on your Ansible controller host – This tutorial will be using Python v2, but v3 should work just as well.
- The pip package installed on the Ansible controller.
- A Windows 2012 R2 or greater computer for Ansible to manage – This tutorial will use two Windows Server 2012 R2 Standard machines as remote nodes with IP addresses of 52.242.251.213 and 10.111.4.106.
- A Windows workstation – This tutorial will perform some basic pre-configuration to the node that Windows will manage with Ansible and will require you to sitting at a Windows workstation.
- The Windows server to manage has PowerShell Remoting enabled
- A user account in the local Administrators group on the Windows computer. This tutorial will use an account called adminuser.
Setting up the WinRM listener on Windows
Before Ansible can communicate with a remote Windows node, it must be able to make a connection to it. It does this through the Microsoft protocol WinRM. WinRM is the same protocol that PowerShell Remoting uses to run remote commands from within PowerShell.
As of this writing, Ansible does support SSH as a management protocol, but it’s an experimental feature at this time.
For Ansible to use WinRM to communicate with the Windows node, you must configure WinRM. To do this, Ansible provides a PowerShell script that sets various WinRm options.
Although the PowerShell script that Red Hat provides to configure WinRM has been tested and is safe, you should read through it and understand, at a high level, what it’s doing.
Your first task will be to download the configuration script and run Ansible on the Windows node. To do that, assuming you already have PowerShell Remoting enabled on your target Windows computer and you’re at a Windows workstation:
Download the ConfigureRemotingForAnsible.ps1 PowerShell script to your local Windows computer. This tutorial will assume it’s saved in ~\Downloads.
Run the configuration script on the Windows node Ansible will manage using the Invoke-Command command. The command below will run the command on the tutorial’s two demo machines and prompt you for the password for the local adminuser account on the Windows nodes.
Invoke-Command -ComputerName 52.242.251.213, 10.111.4.106 -FilePath '~\Downloads\ConfigureRemotingForAnsible.ps1' -Credential (Get-Credential -UserName adminuser)By default, the configuration script will configure WinRM for basic HTTP authentication. If you’d like Ansible to use a more secure connection, learn How to Configure WinRM over HTTPS for Ansible.
Configuring the Controller of Ansible on Windows
Now that the Windows node is ready for Ansible, let’s now configure the Ansible controller to show Ansible how to communicate with it.
1. Connect to your Ansible controller host via SSH using your favorite SSH client.
2. Install the pywinrm Python module. The pywinrm Python module is required for Ansible on Windows to communicate to hosts via the WinRM protocol.
3. Define the remote Windows nodes in an Ansible inventory file. An Ansible inventory is a collection of remote hosts defined in a file either by their hostname or IP address. Once defined, you can then target Ansible inventories with commands and playbooks, as you’ll soon see.
The default Ansible inventory file is located in the /etc/ansible/hosts directory.
The sample inventory file below is created a windows host group that contains each Windows node. The tutorial is using a host group here to make it easier to target all Windows nodes (if you have more than one) at once later.
[windows]
 54.242.251.213
 10.111.4.106
4. Next, define a few required variables Ansible will use when connecting to the Windows hosts in the inventory file as a windows:vars group.
[windows:vars]
 ansible_user=localadmin ## the windows username for ansible to communicate
 ansible_password=s3crect ## the windows password for ansible to communicate
 ansible_connection=winrm ## The kind of connection which ansible will make with remote windows node
 ansible_winrm_server_cert_validation=ignore ## ignore certificate validation because we'll just be using a self-signed certificate that comes with Ansible
5. Now, use the Ansible win_ping module to execute a simple connection test to the hosts inside of the windows host group defined in step #3.
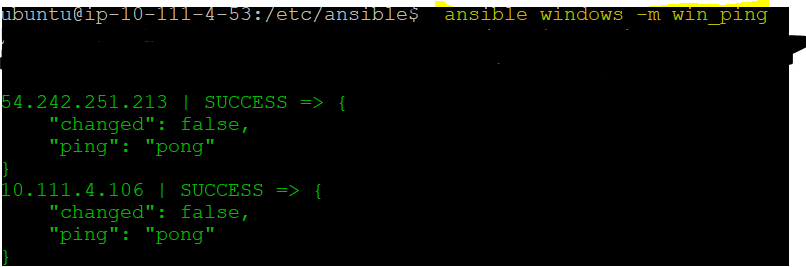
# windows is the host group
# -m tells Ansible to use the win_ping module
 ansible windows -m win_ping
Once executed, you can see below that Ansible returns green text with a SUCCESS message indicating the successful ping attempt.

The output confirms that the Ansible controller host can communicate with the Windows remote host successfully over WinRM.
At this point, you’re all set for Ansible to begin controlling your Windows nodes. Let’s now test this out by running an ad-hoc command on the Windows nodes to change them. Ad-hoc commands are great when you need to run a simple command on nodes without first creating a playbook.
Let’s demonstrate ad-hoc commands by installing a Windows feature on the Windows nodes defined in the windows host group in the inventory file. To do that, assuming you’re still SSHed into your Ansible controller node:
1. Instead of the win_ping module this time, call the win_feature module (-m), passing it two arguments (-a) of name and state indicating the name of the Windows feature and the state you desire it to be in.
# windows here is a group of hosts
# win_feature is the name of the module
# state=present means to install the package or service
 ansible windows -m win_feature -a "name=Telnet-Client state=present"
When you run the above command, if all goes well, Ansible should connect to all of the nodes in the windows host group and run the win_feature command on each checking for, and if not present, installing the Telnet-Client Windows feature.
2. Ansible shows success, but to be sure, connect to the Windows nodes manually with PowerShell and verify the Telnet Client Windows feature is now installed. On your local Windows workstation, run Invoke-Command to run the Get-WindowsFeature PowerShell command on each Windows computer.
Invoke-Command -ComputerName 52.242.251.213, 10.111.4.106 -ScriptBlock { Get-WindowsFeature -Name 'Telnet-Service' } -Credential (Get-Credential -UserName adminuser)At this point, you can run any Windows module you like as ad-hoc commands!
Creating and Running Ansible on Windows Playbooks
Once you’ve mastered the art of running ad-hoc commands on Windows managed nodes, your next task is to create and run playbooks.. An Ansible playbook combines commands into a single place and allows you to write complex logic to perform complex automation scenarios.
Running Remote Windows Commands with the win_command Module
Assuming you’re still connected to your Ansible controller host:
1. Create a folder under your home directory called ansible-windows-demo and change to it. This folder will hold your playbook.
mkdir ~/ansible-windows-demo
cd ~/ansible-windows-demo
2. Open your favorite text editor and create and save a file called ansible-windows.yml in the ~/ansible-windows-demo directory.
Ansible playbooks are written in YAML
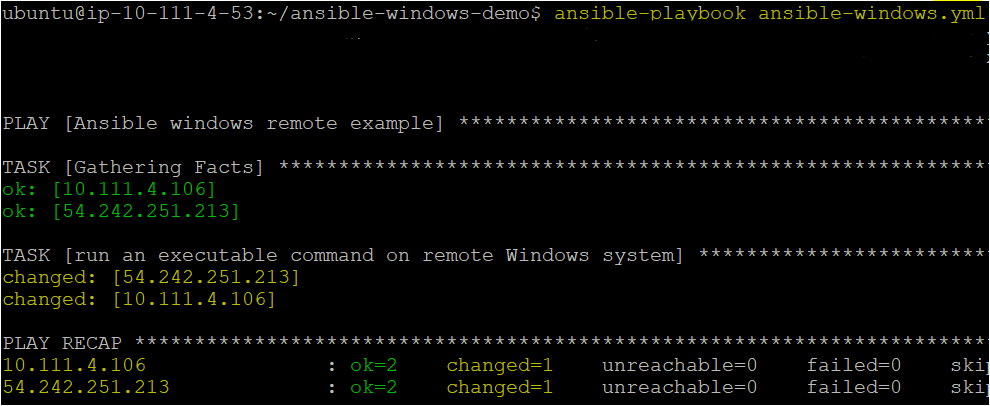
3. Now, copy the below playbook into the ansible-windows.yml file to create a single task. This playbook will execute the netstat Windows command using the win_command Windows Ansible module on all hosts inside the windows host group.
The win_command module executes commands on windows remote host. It doesn’t allow commands which include variables such as special characters, line breaker, greater than symbol, etc.
---
 - name: Ansible win_command module example
   hosts: windows # host group to run the module on
   tasks:
   -  name: run an executable command on a remote Windows system
      win_command: netstat -e # win_command is a Windows module.
4. Invoke the ansible-windows.yml playbook, which executes the task on the remote host by running the following command.
ansible-playbook ansible-windows.ymlIf all went well, you should see output like below.
Running Remote PowerShell Commands with the win_shell Module
You created a playbook to run a remote cmd.exe command (netstat) on Windows managed nodes in the previous example. Let’s now up the ante a bit and run PowerShell commands using the win_shell module.
By default win_shell module runs on PowerShell on windows host
On your local Windows workstation:
1. First, open your favorite text editor on your local Windows workstation and create a sample PowerShell script and copy the following code into it, saving it as one.ps1. This tutorial will save the script to ~\one.ps1.
The below code creates a blank text file called test2.txt in the C:\temp directory.
Set-Content -Path C:\temp\test2.txt -Value ''2. Copy the one.ps1 PowerShell script to your Windows managed nodes using your preferred method. This tutorial will assume you’ve copied the one.ps1 script to the C:\Temp folder on each Windows node.
3. Once the sample PowerShell script is one the Windows node(s), connect to your Ansible controller host and open your favorite text editor again. This time, create and save another playbook called ansible-windows-shell.yml in the same ~/ansible-windows-demo directory.
4. Copy and paste the following playbook into the ansible-windows-shell.yml file. This playbook will run two tasks to demonstrate the win_shell module. It invokes the PowerShell script just copied from step #2 and inserts the PowerShell code directly into the playbook to demonstrate the script isn’t needed at all.
To pass multiple lines of PowerShell code to the win_shell module, use the
|pipe character.
---
 - name: Ansible win_shell module example
   remote_user: localadmin # local Windows user to connect with
   hosts: windows # remote host group
   tasks:
    - name: Single line PowerShell # Running single command using win_shell module
      win_shell: C:\temp\one.ps1
    - name: Run multi-lined shell commands
      win_shell: |
        $text = ' Iam Author of ATA'
       Set-Content -Path C:\temp\test3.txt -Value $text
5. Now, invoke the second playbook ansible-windows-shell.yml, which executes on the remote host but with PowerShell.
ansible-playbook ansible-windows-shell.yml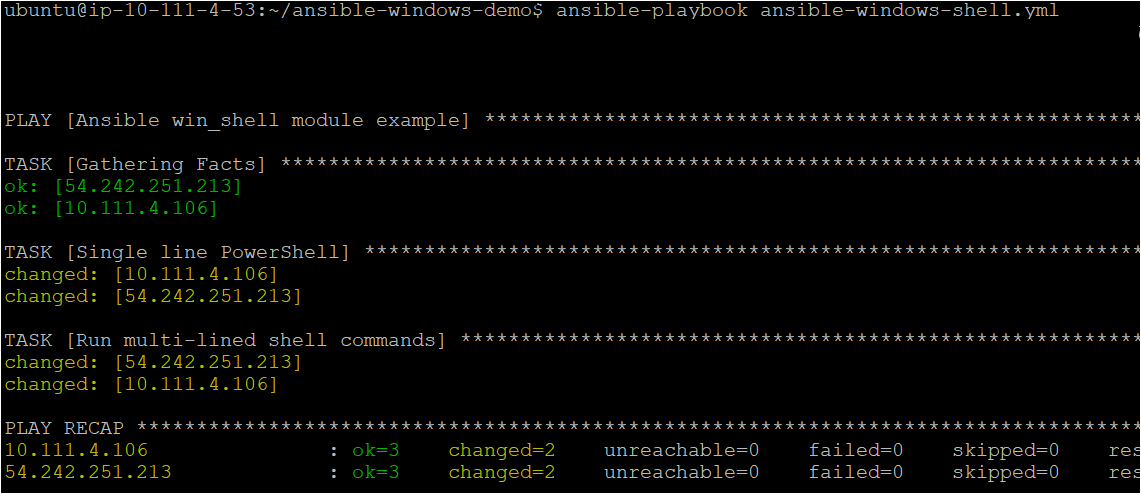
6. If necessary, on your local Windows workstation, verify the playbook executed the existing script and the PowerShell code in the playbook.
Invoke-Command -ComputerName 52.242.251.213, 10.111.4.106 -ScriptBlock { Test-Path -Path 'C:\Temp\test3.txt','C:\Temp\test2.txt' } -Credential (Get-Credential -UserName adminuser)If the Ansible playbook ran successfully, PowerShell should return two True statements indicating that the files now exist.
Conclusion
In this tutorial, you’ve learned how to set up your first Windows managed node in Ansible. Even though Ansible has traditionally been known as a Linux tool, it can easily be used for Windows also!
What playbooks and Windows modules will you start using to manage Windows with Ansible?
Время на прочтение4 мин
Количество просмотров13K

В этой статье мы настроим playbook Ansible таким образом, чтобы c его помощью мы могли удаленно автоматизировать Windows Server 2019 платформа x64, с Linux Ubuntu.
Для этого нужно подготовить Ubuntu и Ansible, а также Windows Server 2019 платформа x64.
Предварительная настройка
-
Установим pip;
-
Установим pywinrm;
-
Установим ansible;
Package Installer for Python (pip) — система управления пакетами в Unix\Linux системами. Установим данный пакет следующей командой:
sudo apt-get install python-pip python-dev build-essential Модуль pywinrm нужен для того, чтобы взаимодействовать с WinRM. Используем команду:
sudo pip install pywinrmAnsible установим командой:
sudo pip install ansibleНастройка playbook
Для начала нам нужно настроить конфигурационный файл ansible.cfg
mkdir ~/ansible
cd ~/ansible
Создаем папку для хранения логов:
mkdir ~/ansible/modules
mkdir ~/ansible/logs
Редактируем файл следующим образом:
hostfile = ~/ansible/inventory
sudo_user = root
log_path = ~/ansible/logs/ansible.log
В host указываем ip адреса подключаемых удаленных компьютеров на базе Windows.
Для экспериментов ранее мы создали пару серверов, которые и будем настраивать:
ip_первой_машины
ip_второй_машины
Пакет для использования модуля winrm
Устанавливаем пакет для использования модуля winrm следующими командами:
zorchik@srv-bionic:~$ sudo pi install
http://github.com/diyan/pywinrm/archive/master.zip#egg=pywinrm
ekzorchik@srv-bionic:~$ sudo find / -name "winrm"
/usr/local/lib/python3.6/dist-packages/winrm
/usr/local/lib/python2.7/dist-packages/winrm
Чтобы подключить Windows делаем команду:
PS C:\Windows\system32> set-executionpolicy remotesigned
Execution Policy Change
The execution policy helps protect you from scripts that you do not trust. Changing the execution policy might expose
you to the security risks described in the about_Execution_Policies help topic at
http://go.microsoft.com/fwlink/?LinkID=135170. Do you want to change the execution policy?
[Y] Yes [N] No [S] Suspend [?] Help (default is "Y"): Y
После этого нужно запустить скрипт для создания правила в Firewall: Allow 5986/TCP.
Скачиваем и распаковываем скрипт PowerShell ConfigureRemotingForAnsible.
PS C:\Windows\system32> cd c:\1
PS C:\1> .\ConfigureRemotingForAnsible.ps1
После чего подключаем Ubuntu к Windows
ekzorchik@srv-bionic:~$ sudo mkdir -p /etc/ansible/windows/group_vars

ekzorchik@srv-bionic:~$ sudo nano /etc/ansible/windows/hosts

[windows]

10.90.90.2

ekzorchik@srv-bionic:~$ sudo nano /etc/ansible/windows/group_vars/windows.yml

file: group_vars/windows.yml

ansible_user: ekzorchik@POLYGON.LOCAL

ansible_password: 712mbddr@

ansible_winrm_transport: basic

#Если получила эта системе kerberos билет

#ansible_winrm_transport: kerberos

ansible_connection: winrm

ansible_winrm_server_cert_validation: ignore

validate_certs: false

ekzorchik@srv-bionic:~$ sudo ansible windows -i /etc/ansible/windows/hosts -m win_ping

10.90.90.2 | SUCCESS => {

"changed": false,

"ping": "pong"

}
Автоматизированное управление Windows через Ansible
В качестве управляющего сервером Ansible используем сервер Ubuntu 16.04. Управляющий сервер – это место, с которого с помощью Ansible мы будем запускать наши модули, сценарии, задачи и т.п. В нашем стенде это сервер с Ansible Tower. Для использования Ansible и работы с этой системой из командной строки нам просто потребуется установить несколько небольших утилит. Поскольку в нашем случае используется сервер с Tower, то нам не требуется устанавливать Ansible, так как он входит в состав установки Tower. Однако пройдем по всем простым шагам, нужным для установки Ansible
Для этого настроим PIP в Ubuntu. Выполним следующие команды:
sudo pip install ansible После этого мы готовы взаимодействовать с сервером Windows.
Настройка WinRM для Ansible
Для конфигурации используем конфигурационный скрипт, который лежит на Githab по ссылке: https://github.com/ansible/ansible/blob/devel/examples/scripts/ConfigureRemotingForAnsible.ps1
Для проверки соединения из Ansible, вы можете использовать команду win_ping, которая использует соединение с WinRM для подключения к серверу. Она проверяет, все ли в соединении с WinRM работает так, как ожидается.
Создайте файл inventory.yml, в котором перечислены хосты, которые вы хотите проверить. Файл inventory.yml имеет только один хост для проверки.
Для проверки соединения с хостами, указанными в инвентаризационном файле, используйте приведенную ниже команду, которая выполняет проверку WinRM соединения.
Ansible test -i inventory.yml -m win_pingЕсли вы все верно настроили, то увидите сообщение SUCCESS. Теперь мы можем использовать автоматизацию Ansible для управления Windows Server.
Запуск команд из Ansible на Windows Server
Для начала работы мы можем использовать несколько основных команд. Мы можем взаимодействовать с нашим сервером, как если мы работали бы с ним с консоли. Ниже приводится команда для получения IP конфигурации на нашем Windows Server.
Ansible test -i inventory.yml -m raw -a "ipconfig"Мы также можем остановить, запустить и перезапустить любые службы:
ansible test -m win_service -a "name=Spooler state=stopped"Как научиться писать playbook
Если вы хотите повысить экспертизу и начать писать собственные плейбуки, приходите курс «Ansible: Infrastructure as Code», который пройдет с 23 января по 19 февраля.
Когда у вас один сервер, им можно управлять вручную: набирать команды, что-то править, настраивать. Если их десять — это всё ещё реально. Но, представим, что у вас сотни серверов, которые разбросаны по разным городам. Тут уже ручным управлением не обойтись. Ansible – один из самых популярных инструментов управления конфигурациями.
Курс полезен для администраторов, инженеров и желающих подняться вверх по карьерной лестнице в качестве девопса. Учиться будет интересно не только тем, кто недавно начал свое знакомство с инструментом, но и тем, кто хочет освежить имеющиеся знания и закрепить их на практике и выстроить структуру.
На курсе вы:
✅ Узнаете как работать с переменными, как писать плейбуки и роли;
✅ Развернете LEMP стек, PostgreSQL и Mongo кластеры,
✅ Задеплоите Flask приложение;
✅ Напишите свой модуль для Ansible;
✅ Настроите IaC в Gitlab;
✅ Разберетесь с работой с облаками и enterprise решениями.
После обучения вы сможете конфигурировать рутинные задачи с помощью удобного инструмента без страха правок конфигураций. Вы будете понимать, когда и как писать свои модули, а также смело залазить под капот Ansible.
Купите курс до 28 декабря и участвуйте в розыгрыше сертификата на 500 000Р на курсы Слёрма.
Посмотреть программу курса и записаться.