
В этой статье мы рассмотрим, как удаленно управлять хостами с Windows через популярную систему управления конфигурациями Ansible. Мы предполагаем, что Ansible уже установлен на вашем хосте Linux.
Содержание:
- Подготовка Windows к удаленному управления через Ansible
- Настройка Ansible для управления компьютерами Windows
- Примеры управления конфигурацией Windows из Ansible
Подготовка Windows к удаленному управления через Ansible
Ansible позволяет удаленно управлять хостами Windows со всеми поддерживаемым версиями ОС, начиная с Windows 7/Windows Server 2008 и до современных Windows 11/Windows Server 2022. В Windows должен быть установлен PowerShell 3.0 (или выше) и NET 4.0+.
Ansible использует WinRM для подключения к Windows. Поэтому вам нужно включить и настроить WinRM listener на всех управляемых хостах.
В Ansible 2.8 и выше доступна экспериментальная опция удаленного управления клиентами Windows 10 и Windows Serve 2019 через встроенный OpenSSH сервер.
- В домене AD можно централизованно настроить WinRM с помощью групповых политик;
- На отдельно стоящем хосте Windows для включения WinRM выполните команду PowerShell:
Enable-PSRemoting –Force
Если WinRM включен и настроен на хостах Windows, проверьте что с сервера Ansible на ваших серверах доступен порт TCP/5985 или TCP/5986 (если используется HTTPS).
$ nc -zv 192.168.13.122 5985

В зависимости от того. в какой среде вы будете использовать Ansible, вам нужно выбрать способ аутентификации.
- Для отдельно-стоящего компьютера или рабочей группы можно использовать HTTPS для WinRM с самоподписанными сертификатами с аутентификацией под локальной учетной записью Windows с правами администратора. Для быстрой настройки хоста Windows можно использовать готовый скрипт ConfigureRemotingForAnsible.ps1 (https://github.com/ansible/ansible/blob/devel/examples/scripts/ConfigureRemotingForAnsible.ps1);
- В моем случае все хосты Windows находятся в домене Active Directory, поэтому я буду использовать учетную запись AD для аутентификации через Ansible. В этом случае нужно настроить Kerberos аутентификацию на сервере Ansible (рассмотрено далее).
Установите необходимые пакеты для Kerberos аутентификации:
- В RHEL/Rocky Linux/CentOS через менеджер пакетов yum/dnf:
$ sudo yum -y install python-devel krb5-devel krb5-libs krb5-workstation - В Ubuntu/Debian:
$ sudo apt-get -y install python-dev libkrb5-dev krb5-user
Теперь установите пакет для python через pip:
$ sudo pip3 install requests-kerberos
Укажите настройки подключения к вашему домену в файле:
$ sudo mcedit /etc/krb5.conf
[logging]
  default = FILE:/var/log/krb5libs.log
 kdc = FILE:/var/log/krb5kdc.log
 admin_server = FILE:/var/log/kadmind.log
[libdefaults]
 dns_lookup_realm = false
 ticket_lifetime = 24h
 renew_lifetime = 7d
 forwardable = true
 rdns = false
default_realm = WINITPRO.LOC
[realms]
  WINITPRO.LOC = {
    admin_server = dc02.winitpro.loc
    kdc = dc02.winitpro.loc
  }
[domain_realm]
 winitpro.loc = WINITPRO.LOC
 .WINITPRO.LOC = WINITPRO.LOC
Проверьте, что вы можете выполнить аутентификацию в вашем домене AD и получите тикет Kerberos:
kinit -C [email protected]
Введите пароль пользователя AD, проверьте что получен тикет.
klist

Настройка Ansible для управления компьютерами Windows
Теперь добавьте все ваши хосты Windows в инвентаризационный файл ansible:
$ sudo mcedit /etc/ansible/hosts
msk-rds2.winitpro.loc
msk-rds3.winitpro.loc
wks-t1122h2.winitpro.loc
[windows_all:vars]
ansible_port=5985
[email protected]
ansible_connection=winrm
ansible_winrm_transport=kerberos
ansible_winrm_scheme=http
ansible_winrm_server_cert_validation=ignore
Проверьте, что все ваши Windows хосты (в моем списке два Windows Server 2019 и один компьютер Windows 11) доступны из Ansible:
$ ansible windows_all -m win_ping
В моем случае все хосты вернули ошибку:
"msg": "kerberos: Bad HTTP response returned from server. Code 500",
"unreachable": true

Причина в том, что в этом примере для WinRM подключения используется протокол HTTP вместо HTTPS. Чтобы игнорировать ошибку, нужно разрешить незашифрованный трафик на хостах Windows:
Set-Item -Path WSMan:\localhost\Service\AllowUnencrypted -Value true
Теперь через Ansible вы можете выполнить произвольную команду на всех хостах. Например, я хочу сбросить DNS кеш на всех хостах Windows:
$ ansible windows_all -m win_shell -a "ipconfig /flushdns"
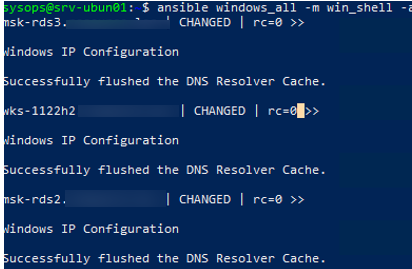
Команда успешно отработала везде.
Примеры управления конфигурацией Windows из Ansible
Теперь вы можете запускать плейбуки Ansible на ваших хостах Windows.
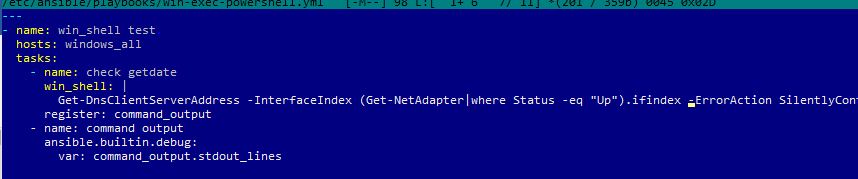
Например, вам нужно через Ansible выполнить PowerShell скрипт на всех хостах (в этом примере мы с помощью PowerShell получим текущие настройки DNS на хостах). Создайте файл плейбука:
$ sudo mcedit /etc/ansible/playbooks/win-exec-powershell.yml
---
- name: win_powershell_exec
  hosts: windows_all
  tasks:
    - name: check DNS
      win_shell: |
        Get-DnsClientServerAddress -InterfaceIndex (Get-NetAdapter|where Status -eq "Up").ifindex -ErrorAction SilentlyContinue
      register: command_output
    - name: command output
      ansible.builtin.debug:
Выполните плейбук:
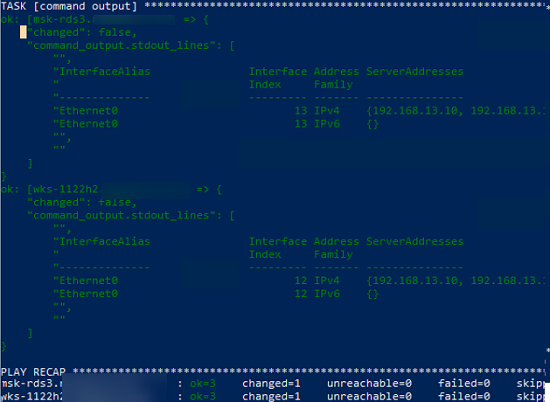
$ ansible-playbook /etc/ansible/playbooks/win-exec-powershell.yml
В данном примере плейбук отработал на всех Windows хостах и вернул текущие настройки DNS.
Далее рассмотрим несколько типовых плейбуков Absible, для стандартных задач управления хостами Windows.
Скопировать файл:
  - name: Copy a single file
    win_copy:
      src: /home/sysops/files/test.ps1"
      dest: C:\Temp\test.ps1
Создать файл:
- name: Create file
  win_file:
    path: C:\Temp\file.txt
    state: touch
Удалить файл:
- name: Delete file
  win_file:
    path: C:\Temp\file.txt
    state: absent
Создать параметр реестра:
- name: Create reg dword
  win_regedit:
    path: HKLM:\SOFTWARE\Microsoft\Windows\CurrentVersion\Policies\DataCollection
    name: AllowTelemetry
    data: 0
    type: dword
Установить программу из MSI:
Установить программу из MSI:
- name: Install MSI package
  win_package:
    path: C:\Distr\adobereader.msi
    arguments:
      - /install
      - /passive
      - /norestart
Запустить службу Windows:
- name: Run Windows Service
  win_service:
    name: wuauserv
    state: started
Установить роль Windows Server:
  - name: Install Windows Feature
    win_feature:
      name: SNMP-Service
      state: present
Открыть порт в файерволе:
- name: Open SMTP Port п
  win_firewall_rule:
    name: port 25
    localport: 25
    action: allow
    direction: in
    protocol: tcp
    state: present
    enabled: yes
Выполнить PowerShell скрипт:
- name: Run PowerShell Script
  win_command: powershell.exe -ExecutionPolicy ByPass -File C:/temp/powershellscript.ps1
В этой статье мы рассмотрели, как управлять конфигурацией компьютеров Windows через Ansible. Если ваши хосты Windows не добавлены в домен Active Directory (находятся в рабочей группе), то удаленное управление конфигурацией хостов Windows через Ansible может быть неплохой альтернативной настройке с помощью доменных групповых политик.
Можно установить Ansible в подсистеме WSL на Windows. Это позволит запускать плейбуки без развертывания отдельного Linux хоста под ansible.
Windows Ansible Playbook
This playbook installs and configures most of the software I use on my Windows 11 machine for software development.
Contents
- Playbook capabilities
- Installation
- Windows host prerequisites installation
- Ansible control node prerequisites installation
- Running a specific set of tagged tasks
- Overriding Defaults
- Included Applications / Configuration (Default)
- Available Parameters
Playbook capabilities
NOTE: The Playbook is fully configurable. You can skip or reconfigure any task by Overriding Defaults.
- Software
- Remove Bloatware (see default config for a complete list of Bloatware).
- Install software and packages selected by the user via Chocolatey.
- Install software and packages selected by the user via WinGet.
- Windows apps & features
- Install and Enable Optional Windows Features chosen by the user.
- Install and Enable the WSL2 distro selected by the user.
- Run defragmentation on volumes selected by the user (in parallel).
- Windows Settings
- Explorer
- Enable Explorer file extensions in file names.
- Open Explorer in the Computer view by default.
- Disable the Ribbon menu in Windows Explorer.
- Enable Right-click Context Menu (Windows 11).
- Start Menu
- Disable Automatic Install of Suggested Apps.
- Disable the «App Suggestions» in the Start menu.
- Disable the «tips» popup.
- Disable ‘Windows Welcome Experience’.
- Taskbar
- Unpin ‘Search’ from Taskbar.
- Unpin Task View, Chat, and Cortana from Taskbar.
- Unpin ‘News and Interests’ from Taskbar.
- Unpin ‘People’ from Taskbar.
- Unpin ‘Edge’, ‘Store’ and other built-in shortcuts from the Taskbar.
- Desktop
- Remove Desktop icons (Ink).
- General
- Set the hostname selected by the user is assigned.
- Configure remote desktop services.
- Set the sound scheme to ‘No sounds’.
- Set the power plan selected by the user.
- Install Windows updates categories selected by the user.
- Disable mouse acceleration.
- Explorer
- Terminal Settings
- Install oh-my-posh with the theme chosen by the user and it set as a default PowerShell theme engine.
Installation
Prepare your Windows host ⏲
This playbook was tested on Windows 10 2004 and Windows 11 21H2 (Pro, Ent). Other versions may work but have not tried.
Copy and paste the code below into your PowerShell terminal to get your Windows machine ready to work with Ansible.
[Net.ServicePointManager]::SecurityProtocol = [Net.SecurityProtocolType]::Tls12
$url = "https://raw.githubusercontent.com/AlexNabokikh/windows-playbook/master/setup.ps1"
$file = "$env:temp\setup.ps1"

(New-Object -TypeName System.Net.WebClient).DownloadFile($url, $file)
powershell.exe -ExecutionPolicy ByPass -File $file -Verbose
Ansible Control node 🕹
-
Install Ansible:
- Upgrade Pip:
pip3 install --upgrade pip - Install Ansible:
pip3 install ansible
- Upgrade Pip:
-
Clone or download this repository to your local drive.
-
Run
ansible-galaxy install -r requirements.ymlinside this directory to install required Ansible collections. -
Add the IP address and credentials of your Windows machine into the
inventoryfile -
Run
ansible-playbook main.ymlinside this directory.
Running a specific set of tagged tasks
You can filter which part of the provisioning process to run by specifying a set of tags using ansible-playbook --tags flag. The tags available are choco , debloat , desktop , explorer , fonts , hostname , mouse , power , sounds , start_menu , taskbar , updates , windows_features , wsl, winget.
ansible-playbook main.yml --tags "choco,wsl"
Overriding Defaults
NOTE: You can override any of the defaults configured in default.config.yml by creating a config.yml file and setting the overrides in that file. For example, you can customize the installed packages and enable/disable specific tasks with something like:
configure_hostname: true
custom_hostname: myhostname

install_windows_updates: true
update_categories:
  - Critical Updates
  - Security Updates
  - * # Installs all updates

choco_installed_packages:
  # installs latest version of the Google Chrome while ignoring the package checksum
  - name: googlechrome
    state: latest
    choco_args: --ignorechecksum
  # installs 2.37.1 version of the git
  - name: git
    version: "2.37.1"
  # installs GO, but won't update it
  - golang

install_fonts: true
installed_nerdfonts:
  - Meslo

install_ohmyposh: true
ohmyposh_theme: agnoster

install_windows_features: true
windows_features:
  Microsoft-Hyper-V: true

install_wsl2: true
wsl2_distribution: wsl-archlinux

remove_bloatware: true
bloatware:
  - Microsoft.Messaging
Included Applications / Configuration (Default)
Packages (installed with Chocolatey):
- adobereader
- auto-dark-mode
- awscli
- Firefox
- git
- golang
- jre8
- kubernetes-cli
- microsoft-windows-terminal
- peazip
- powertoys
- python3
- sharex
- telegram
- terraform
- vlc
- vscode
- zoom
Available Parameters
| Name | Description | Type | Default |
|---|---|---|---|
| configure_hostname | (Optional) Whether or not to set a custom hostname. | bool |
false |
| custom_hostname | (Optional) The hostname to set for the computer. | string |
windows-ansible |
| install_windows_updates | (Optional) Whether or not to install Windows updates. | bool |
true |
| update_categories | (Optional) A list of categories to install updates from. The value * will match all categories. | list |
["CriticalUpdates", "SecurityUpdates", "UpdateRollups"] |
| windows_updates_reboot | (Optional) Whether or not to reboot the host if it is required and continue to install updates after the reboot. | bool |
true |
| remove_bloatware | (Optional) Whether or not to uninstall Windows bloatware. | bool |
true |
| bloatware | (Optional) A list of applications (bloatware) to be uninstalled | list |
full_list |
| choco_installed_packages | (Optional) A list of Chocolatey packages to be installed. | dict |
full_list |
| choco_installed_packages.state | (Optional) State of the package on the system. (present, latest) | string |
present |
| choco_installed_packages.version | (Optional) Specific version of the package to be installed. | string |
omit |
| choco_installed_packages.choco_args | (Optional) Additional parameters to pass to choco.exe. | string |
omit |
| install_windows_features | (Optional) Whether or not to install Windows features. | bool |
false |
| windows_features | (Optional) A list of dicts with Windows features to be installed. | list(dict) |
Microsoft-Hyper-V: true |
| install_wsl2 | (Optional) Whether or not to install Windows Subsystem for Linux. | bool |
true |
| wsl2_distribution | (Optional) The valid name of Linux distribution that will be installed. | string |
wsl-ubuntu-2004 |
| install_fonts | (Optional) Whether or not to install Nerd Fonts. | bool |
true |
| installed_nerdfonts | (Optional) A list of Nerd Fonts to be installed. | list |
["FiraCode", "FantasqueSansMono"] |
| install_ohmyposh | (Optional) Whether or not to Oh My Posh. | bool |
true |
| configure_explorer | (Optional) Whether or not to configure Windows Explorer with sane defaults. | bool |
true |
| configure_taskbar | (Optional) Whether or not to configure Windows TaskBar with sane defaults. | bool |
true |
| configure_start_menu | (Optional) Whether or not to configure Windows Start menu with sane defaults. | bool |
true |
| set_sound_scheme | (Optional) Whether or not to set default Windows Sound Scheme to «No Sounds». | bool |
true |
| disable_mouse_acceleration | (Optional) Whether or not to disable mouse acceleration. | bool |
true |
| remote_desktop_enabled | (Optional) Whether or not enable Remote Desktop. | bool |
true |
| remove_desktop_icons | (Optional) Whether or not remove desktop icons (*.lnk files only). | bool |
false |
| defrag_volumes | (Optional) Whether or not to perform disk defragmentation. | bool |
true |
| include_volumes | (Optional) A list of volumes to be defragmented. | list |
["C"] |
| change_power_plan | (Optional) Whether or not change Power Plan. | bool |
true |
| power_plan | (Optional) Choose a power plan (high_performance, balanced, power_saver). | string |
high_performance |
| install_winget_packages | (Optional) Whether or not to install WinGet packages. | bool |
true |
| winget_packages | (Required) A list of WinGet packages to be installed. | dict |
|
| winget_packages.name | (Optional) A name of the WinGet package to be installed. | string |
|
| winget_packages.source | (Optional) The source of the WinGet package (msstore or winget). |
string |
|
| configure_storage_sense | (Optional) Whether or not configure Windows Storage Sense. | string |
|
| storage_sense | (Optional) A map of storage_sense options. | dict |
|
| storage_sense.enabled | (Optional) Enable or Disable Windows Storage Sense. | bool |
true |
| storage_sense.run_frequency | (Optional) How often Windows Storage Sense has to run (once in 1, 7 or 30 days). | int |
1 |
| storage_sense.delete_unused_files | (Optional) Delete temporary files that my apps aren’t using. | bool |
true |
| storage_sense.delete_recycle_bin_files | (Optional) Delete files in my recycle bin. | bool |
true |
| storage_sense.recycle_bin_age | (Optional) How often recycle bin has to be cleaned up (once in 1, 14, 30 or 60 days). | int |
14 |
| storage_sense.delete_downloads_files | (Optional) Delete files in my Downloads folder. | bool |
true |
| storage_sense.downloads_age | (Optional) How often downloaded files has to be cleaned up (once in 1, 14, 30 or 60 days). | int |
14 |
Author
This project was created by Alexander Nabokikh (initially inspired by geerlingguy/mac-dev-playbook).
License
This software is available under the following licenses:
- MIT
Время на прочтение4 мин
Количество просмотров13K

В этой статье мы настроим playbook Ansible таким образом, чтобы c его помощью мы могли удаленно автоматизировать Windows Server 2019 платформа x64, с Linux Ubuntu.
Для этого нужно подготовить Ubuntu и Ansible, а также Windows Server 2019 платформа x64.
Предварительная настройка
-
Установим pip;
-
Установим pywinrm;
-
Установим ansible;
Package Installer for Python (pip) — система управления пакетами в Unix\Linux системами. Установим данный пакет следующей командой:
sudo apt-get install python-pip python-dev build-essential Модуль pywinrm нужен для того, чтобы взаимодействовать с WinRM. Используем команду:
sudo pip install pywinrmAnsible установим командой:
sudo pip install ansibleНастройка playbook
Для начала нам нужно настроить конфигурационный файл ansible.cfg
mkdir ~/ansible
cd ~/ansible
Создаем папку для хранения логов:
mkdir ~/ansible/modules
mkdir ~/ansible/logs
Редактируем файл следующим образом:
hostfile = ~/ansible/inventory
sudo_user = root
log_path = ~/ansible/logs/ansible.log
В host указываем ip адреса подключаемых удаленных компьютеров на базе Windows.
Для экспериментов ранее мы создали пару серверов, которые и будем настраивать:
ip_первой_машины
ip_второй_машины
Пакет для использования модуля winrm
Устанавливаем пакет для использования модуля winrm следующими командами:
zorchik@srv-bionic:~$ sudo pi install
http://github.com/diyan/pywinrm/archive/master.zip#egg=pywinrm
ekzorchik@srv-bionic:~$ sudo find / -name "winrm"
/usr/local/lib/python3.6/dist-packages/winrm
/usr/local/lib/python2.7/dist-packages/winrm
Чтобы подключить Windows делаем команду:
PS C:\Windows\system32> set-executionpolicy remotesigned
Execution Policy Change
The execution policy helps protect you from scripts that you do not trust. Changing the execution policy might expose
you to the security risks described in the about_Execution_Policies help topic at
http://go.microsoft.com/fwlink/?LinkID=135170. Do you want to change the execution policy?
[Y] Yes [N] No [S] Suspend [?] Help (default is "Y"): Y
После этого нужно запустить скрипт для создания правила в Firewall: Allow 5986/TCP.
Скачиваем и распаковываем скрипт PowerShell ConfigureRemotingForAnsible.
PS C:\Windows\system32> cd c:\1
PS C:\1> .\ConfigureRemotingForAnsible.ps1
После чего подключаем Ubuntu к Windows
ekzorchik@srv-bionic:~$ sudo mkdir -p /etc/ansible/windows/group_vars

ekzorchik@srv-bionic:~$ sudo nano /etc/ansible/windows/hosts

[windows]

10.90.90.2

ekzorchik@srv-bionic:~$ sudo nano /etc/ansible/windows/group_vars/windows.yml

file: group_vars/windows.yml

ansible_user: ekzorchik@POLYGON.LOCAL

ansible_password: 712mbddr@

ansible_winrm_transport: basic

#Если получила эта системе kerberos билет

#ansible_winrm_transport: kerberos

ansible_connection: winrm

ansible_winrm_server_cert_validation: ignore

validate_certs: false

ekzorchik@srv-bionic:~$ sudo ansible windows -i /etc/ansible/windows/hosts -m win_ping

10.90.90.2 | SUCCESS => {

"changed": false,

"ping": "pong"

}
Автоматизированное управление Windows через Ansible
В качестве управляющего сервером Ansible используем сервер Ubuntu 16.04. Управляющий сервер – это место, с которого с помощью Ansible мы будем запускать наши модули, сценарии, задачи и т.п. В нашем стенде это сервер с Ansible Tower. Для использования Ansible и работы с этой системой из командной строки нам просто потребуется установить несколько небольших утилит. Поскольку в нашем случае используется сервер с Tower, то нам не требуется устанавливать Ansible, так как он входит в состав установки Tower. Однако пройдем по всем простым шагам, нужным для установки Ansible
Для этого настроим PIP в Ubuntu. Выполним следующие команды:
sudo pip install ansible После этого мы готовы взаимодействовать с сервером Windows.
Настройка WinRM для Ansible
Для конфигурации используем конфигурационный скрипт, который лежит на Githab по ссылке: https://github.com/ansible/ansible/blob/devel/examples/scripts/ConfigureRemotingForAnsible.ps1
Для проверки соединения из Ansible, вы можете использовать команду win_ping, которая использует соединение с WinRM для подключения к серверу. Она проверяет, все ли в соединении с WinRM работает так, как ожидается.
Создайте файл inventory.yml, в котором перечислены хосты, которые вы хотите проверить. Файл inventory.yml имеет только один хост для проверки.
Для проверки соединения с хостами, указанными в инвентаризационном файле, используйте приведенную ниже команду, которая выполняет проверку WinRM соединения.
Ansible test -i inventory.yml -m win_pingЕсли вы все верно настроили, то увидите сообщение SUCCESS. Теперь мы можем использовать автоматизацию Ansible для управления Windows Server.
Запуск команд из Ansible на Windows Server
Для начала работы мы можем использовать несколько основных команд. Мы можем взаимодействовать с нашим сервером, как если мы работали бы с ним с консоли. Ниже приводится команда для получения IP конфигурации на нашем Windows Server.
Ansible test -i inventory.yml -m raw -a "ipconfig"Мы также можем остановить, запустить и перезапустить любые службы:
ansible test -m win_service -a "name=Spooler state=stopped"Как научиться писать playbook
Если вы хотите повысить экспертизу и начать писать собственные плейбуки, приходите курс «Ansible: Infrastructure as Code», который пройдет с 23 января по 19 февраля.
Когда у вас один сервер, им можно управлять вручную: набирать команды, что-то править, настраивать. Если их десять — это всё ещё реально. Но, представим, что у вас сотни серверов, которые разбросаны по разным городам. Тут уже ручным управлением не обойтись. Ansible – один из самых популярных инструментов управления конфигурациями.
Курс полезен для администраторов, инженеров и желающих подняться вверх по карьерной лестнице в качестве девопса. Учиться будет интересно не только тем, кто недавно начал свое знакомство с инструментом, но и тем, кто хочет освежить имеющиеся знания и закрепить их на практике и выстроить структуру.
На курсе вы:
✅ Узнаете как работать с переменными, как писать плейбуки и роли;
✅ Развернете LEMP стек, PostgreSQL и Mongo кластеры,
✅ Задеплоите Flask приложение;
✅ Напишите свой модуль для Ansible;
✅ Настроите IaC в Gitlab;
✅ Разберетесь с работой с облаками и enterprise решениями.
После обучения вы сможете конфигурировать рутинные задачи с помощью удобного инструмента без страха правок конфигураций. Вы будете понимать, когда и как писать свои модули, а также смело залазить под капот Ansible.
Купите курс до 28 декабря и участвуйте в розыгрыше сертификата на 500 000Р на курсы Слёрма.
Посмотреть программу курса и записаться.
I will show you several operations which an administrator can perform on a remote windows system using ansible-playbook.
Ansible is one of the most used DevOps tools in the market today. It provides a bunch of windows modules that are used to configure and manage the Windows server. I assume you already have Ansible installed on Windows from where you want to manage the Windows servers.
The following are some of the commonly used tasks performed by Windows administrators on a daily basis. You will be amazed to see how easy it is administered Windows using Ansible.
My Ansible Windows controller machine’s IP address is 192.168.0.106, and my remote Windows system’s IP address is 192.168.0.102. Before you get started, make sure you run a win_ping module to check whether you are able to connect to windows remote server or not.
Geekflare@MSEDGEWIN10 ~
$ ansible win -m win_ping
192.168.0.102 | SUCCESS => {
    "changed": false,
    "ping": "pong"
}
My connection to a remote host is successful.
So, let’s get started with Ansible Playbooks…
Copying Files
win_copy is an ansible module that copies a file from the local server to a remote Windows host. I will use this module to copy a single PDF.
Use the below YAML code, give the source and destination paths.
Geekflare@MSEDGEWIN10 ~
$ vi copy.yml
---

- hosts: win

  tasks:

  - name: Copy File

    win_copy:

      src: C:\output.pdf

      dest: C:\ansible_examples\

      remote_src: yes
Run the ansible-playbook for win_copy.
Geekflare@MSEDGEWIN10 ~
$ ansible-playbook copy.yml

PLAY [win] ***********************************************************************************************************************************

TASK [Gathering Facts] ***********************************************************************************************************************
ok: [192.168.0.102]

TASK [Copy File] *****************************************************************************************************************************
changed: [192.168.0.102]

PLAY RECAP ***********************************************************************************************************************************
192.168.0.102
: ok=2 changed=1 unreachable=0 failed=0
skipped=0 rescued=0 ignored=0
The file has been copied successfully at the destination location on a remote windows system.

Install/UnInstall MSI
To install an application using the MSI file, you need to use win_get_url to mention the path of the MSI file to download and then use the win_package module to install it. The state present means the MSI will be installed on the machine, and the application is in the present state.
Here, I am installing Apache.
YAML code to be used:
Geekflare@MSEDGEWIN10 ~
$ vi msi.yml
---
- name: Installing Apache MSI
  hosts: win

  tasks:
    - name: Download the Apache installer
      win_get_url:
        url: https://archive.apache.org/dist/httpd/binaries/win32/httpd-2.2.25-win32-x86-no_ssl.msi
        dest: C:\ansible_examples\httpd-2.2.25-win32-x86-no_ssl.msi

    - name: Install MSI
      win_package:
        path: C:\ansible_examples\httpd-2.2.25-win32-x86-no_ssl.msi
        state: present
Run the ansible-playbook to install using MSI.
Geekflare@MSEDGEWIN10 ~
$ ansible-playbook msi.yml

PLAY [Installing Apache MSI] *****************************************************************************************************************

TASK [Gathering Facts] ***********************************************************************************************************************
ok: [192.168.0.102]

TASK [Download the Apache installer] *********************************************************************************************************
changed: [192.168.0.102]

TASK [Install MSI] ***************************************************************************************************************************
changed: [192.168.0.102]

PLAY RECAP ***********************************************************************************************************************************
192.168.0.102
: ok=3 changed=2 unreachable=0 failed=0
skipped=0 rescued=0 ignored=0
Now, go to the windows system and check if the apache application got installed successfully.
C:\Users\geekflare>cd C:\Program Files (x86)\Apache Software Foundation\Apache2.2\bin
C:\Program Files (x86)\Apache Software Foundation\Apache2.2\bin>httpd -v
Server version: Apache/2.2.25 (Win32)
Server built: Jul 10 2013 01:52:12
You can also install applications using MSI with arguments. Below is the same example as above, but instead of a state, we are using an install argument to install apache.
YAML code to be used:
---

- name: Installing Apache MSI

  hosts: win

  tasks:

    - name: Download the Apache installer

      win_get_url:

        url: https://archive.apache.org/dist/httpd/binaries/win32/httpd-2.2.25-win32-x86-no_ssl.msi

        dest: C:\ansible_examples\httpd-2.2.25-win32-x86-no_ssl.msi


    - name: Install MSI

      win_package:

        path: C:\ansible_examples\httpd-2.2.25-win32-x86-no_ssl.msi

        arguments:

          - /install

          - /passive

          - /norestart
To uninstall an application using the MSI file, you need to use the win_package module. The state absent means the application will be uninstalled using the MSI file.
Here, I am uninstalling Apache.
Geekflare@MSEDGEWIN10 ~
$ vi uninstall_msi.yml

---

- name: UnInstalling Apache MSI

  hosts: win

  tasks:

    - name: UnInstall MSI

      win_package:

        path: C:\ansible_examples\httpd-2.2.25-win32-x86-no_ssl.msi

        state: absent
Run the ansible-playbook to uninstall using MSI.
Geekflare@MSEDGEWIN10 ~
$ ansible-playbook uninstall_msi.yml

PLAY [UnInstalling Apache MSI] *****************************************************************************************************************

TASK [Gathering Facts] ***********************************************************************************************************************
ok: [192.168.0.102]

TASK [UnInstall MSI] *************************************************************************************************************************
changed: [192.168.0.102]

PLAY RECAP ***********************************************************************************************************************************
192.168.0.102
: ok=2 changed=1 unreachable=0 failed=0
skipped=0 rescued=0 ignored=0
Now, if I check the apache version, I will get the below output as the application got uninstalled.
C:\Program Files (x86)\Apache Software Foundation\Apache2.2\bin>httpd -v 'httpd' is not recognized as an internal or external command,
operable program or batch file.
Uninstall Software (.EXE)
You can also uninstall software with .exe file using the product id of that software.
Geekflare@MSEDGEWIN10 ~
$ vi uninstall.yml
---

- hosts: win

  tasks:

   - name: Uninstall 7-Zip from the exe

     win_package:

       path: C:\Program Files\7-Zip\Uninstall.exe

       product_id: 7-Zip

       arguments: /S

       state: absent
Run the ansible-playbook to uninstall 7-Zip.
Geekflare@MSEDGEWIN10 ~
$ ansible-playbook uninstall.yml

PLAY [win] *************************************************************************************************************************************************************************************

TASK [Gathering Facts] *************************************************************************************************************************************************************************
ok: [192.168.0.102]

TASK [Uninstall 7-Zip from the exe] ***********************************************************************************************************************************************************
changed: [192.168.0.102]

PLAY RECAP *************************************************************************************************************************************************************************************
192.168.0.102              : ok=2    changed=1    unreachable=0    failed=0    skipped=0    rescued=0    ignored=0
Stop/Start/Restart Windows Services
win_service ansible module is used to start, stop, or restart a service. Here, I will show you how to stop the tomcat service.

You need to mention the service name in the YAML file and set the state to stop.
Geekflare@MSEDGEWIN10 ~
$ vi service.yml
---
- hosts: win

  tasks:

   - name: Stop service Tomcat

     win_service:

       name: Tomcat8

       state: stopped
Run the ansible-playbook to stop the tomcat service.
Geekflare@MSEDGEWIN10 ~
$ ansible-playbook service.yml

PLAY [win] ***********************************************************************************************************************************

TASK [Gathering Facts] ***********************************************************************************************************************
ok: [192.168.0.102]

TASK [Stop service Tomcat] ****************************************************************************************************************
changed: [192.168.0.102]

PLAY RECAP ***********************************************************************************************************************************
192.168.0.102
: ok=2 changed=1 unreachable=0 failed=0
skipped=0 rescued=0 ignored=0
If you check the tomcat service on the windows system, it is now in stopped status.

You can define state to started or restarted or paused to change the status of the service.
Gathering Facts
Using win_disk_facts ansible module, you can retrieve all the disk information of the target host.
Geekflare@MSEDGEWIN10 ~
$ vi disk.yml
---
- hosts: win
  tasks:
  - name: Get disk facts
    win_disk_facts:

  - name: Output first disk size
    debug:
      var: ansible_facts.disks[0].size

  - name: Convert first system disk into various formats
    debug:
      msg: '{{ disksize_gib }} vs {{ disksize_gib_human }}'
    vars:
      # Get first system disk
      disk: '{{ ansible_facts.disks|selectattr("system_disk")|first }}'

      # Show disk size in Gibibytes
      disksize_gib_human: '{{ disk.size|filesizeformat(true) }}'
      disksize_gib: '{{ (disk.size/1024|pow(3))|round|int }} GiB'
Run the ansible-playbook to get the disk information.
Geekflare@MSEDGEWIN10 ~
$ ansible-playbook disk.yml

PLAY [win] ***********************************************************************************************************************************

TASK [Gathering Facts] ***********************************************************************************************************************
ok: [192.168.0.102]

TASK [Get disk facts] ************************************************************************************************************************
ok: [192.168.0.102]

TASK [Output first disk size] ****************************************************************************************************************
ok: [192.168.0.102] => {

"ansible_facts.disks[0].size": "1000204886016"
}

TASK [Convert first system disk into various formats] ****************************************************************************************
ok: [192.168.0.102] => {
"msg": "932 GiB vs 931.5 GiB"
}

PLAY RECAP ***********************************************************************************************************************************
192.168.0.102
: ok=4 changed=0 unreachable=0 failed=0
skipped=0 rescued=0 ignored=0
Using win_command ansible module, you can execute commands on the remote host and get CPU information, device details, and much more.
Geekflare@MSEDGEWIN10 ~
$ vi check.yml
---
- hosts: win
  tasks:
   - name: Get disk facts
     win_command: wmic cpu get caption, deviceid, name, numberofcores, maxclockspeed, status
     register: usage

   - debug: msg="{{ usage.stdout }}"
Run the ansible-playbook to get remote system information.
Geekflare@MSEDGEWIN10 ~
$ ansible-playbook check.yml

PLAY [win] ***********************************************************************************************************************************

TASK [Gathering Facts] ***********************************************************************************************************************
ok: [192.168.0.102]

TASK [Get facts] ************************************************************************************************************************
changed: [192.168.0.102]

TASK [debug] *********************************************************************************************************************************
ok: [192.168.0.102] => {
"msg": "Caption DeviceID MaxClockSpeed
Name
NumberOfCores Status \r\r\nIntel64 Family 6 Model 142 Stepping 9 CPU0 2712 Intel(R) Core(TM) i5-7200U CPU @ 2.50GHz 2 OK \r\r\n\r\r\n"
}

PLAY RECAP ***********************************************************************************************************************************
192.168.0.102
: ok=3 changed=1 unreachable=0 failed=0
skipped=0 rescued=0
ignored=0
Running Commands
Whatever commands you run on a window, they can be run through the ansible win_command module. You just need to specify the command in your YAML file. Here, I am just creating a directory.
Geekflare@MSEDGEWIN10 ~
$ vi commands.yml
---

- hosts: win

  tasks:

   - name: run an executable using win_command

     win_command: whoami.exe


   - name: run a cmd command

      win_command: cmd.exe /c mkdir C:\test
Run the ansible-playbook to perform win_command operation.
Geekflare@MSEDGEWIN10 ~
$ ansible-playbook commands.yml

PLAY [win] ***********************************************************************************************************************************

TASK [Gathering Facts] ***********************************************************************************************************************
ok: [192.168.0.102]

TASK [run an executable using win_command] ***************************************************************************************************
changed: [192.168.0.102]

TASK [run a cmd command] *********************************************************************************************************************
changed: [192.168.0.102]

PLAY RECAP ***********************************************************************************************************************************
192.168.0.102
: ok=3 changed=2 unreachable=0 failed=0
skipped=0 rescued=0 ignored=0
Environment Variables
A windows system has multiple environment variables, for example, JAVA_HOME. Using the win_environment ansible module, you can add or modify environment variables on a windows system. In this example, I am adding a new variable to the windows environment variables list.
Geekflare@MSEDGEWIN10 ~
$ vi env.yml
---
- hosts: win
  tasks:
   - name: Set an environment variable for all users
     win_environment:
       state: present
       name: NewVariable
       value: New Value
       level: machine
Run the ansible-playbook to add the environment variable on a remote windows machine.
Geekflare@MSEDGEWIN10 ~
$ ansible-playbook env.yml

PLAY [win] ***********************************************************************************************************************************

TASK [Gathering Facts] ***********************************************************************************************************************
ok: [192.168.0.102]

TASK [Set an environment variable for all users] *********************************************************************************************
changed: [192.168.0.102]

PLAY RECAP ***********************************************************************************************************************************
192.168.0.102
: ok=2 changed=1 unreachable=0 failed=0
skipped=0 rescued=0 ignored=0
Go to the environment variables window; you will see the new variable you just added is present here.

Add/Edit Registry
win_regedit ansible module is used to add or edit registry details on a remote windows machine. You need to give the path of the registry and content to be added/updated. Here I am creating a new registry entry GeekFlare inside HKLM:\SOFTWARE path and then adding name and data to this registry.
Geekflare@MSEDGEWIN10 ~
$ vi registry.yml
---

- hosts: win

  tasks:

   - name: Creating a registry

     win_regedit:

      path: HKLM:\SOFTWARE\GeekFlare

   - name: Modifying a registry, adding name and data

     win_regedit:

      path: HKLM:\SOFTWARE\GeekFlare

      name: Geek

      data: Flare
Run the ansible-playbook to add the registry.
Geekflare@MSEDGEWIN10 ~
$ ansible-playbook registry.yml

PLAY [win] ***********************************************************************************************************************************

TASK [Gathering Facts] ***********************************************************************************************************************
ok: [192.168.0.102]

TASK [Creating a registry] *******************************************************************************************************************
changed: [192.168.0.102]

TASK [Modifying a registry, adding name and data] ********************************************************************************************
changed: [192.168.0.102]

PLAY RECAP ***********************************************************************************************************************************
192.168.0.102
: ok=3 changed=2 unreachable=0 failed=0
skipped=0 rescued=0 ignored=0
If you go to Registry Editor on the remote system, you can see this registry has been added successfully with Name and Data parameters.

Delete Log
win_eventlog ansible module is used to add, clear, or remove windows event logs from the windows system.
Go to Windows Powershell, and list the EventLogs present on the remote windows machine.
PS C:\Users\Geekflare> Get-EventLog -List
  Max(K) Retain OverflowAction        Entries Log
  ------ ------ --------------        ------- ---
  20,480      0 OverwriteAsNeeded      33,549 Application
  20,480      0 OverwriteAsNeeded           0 HardwareEvents
     512      7 OverwriteOlder             20 Internet Explorer
  20,480      0 OverwriteAsNeeded           0 Key Management Service
     128      0 OverwriteAsNeeded         190 OAlerts
                                              Security
  20,480      0 OverwriteAsNeeded      44,828 System
  15,360      0 OverwriteAsNeeded       3,662 Windows PowerShell
Now, I will show how to remove logs from all sources for Internet Explorer.
Geekflare@MSEDGEWIN10 ~
$ vi log.yml
---
- hosts: win
  tasks:
   - name: Remove Internet Explorer Logs
     win_eventlog:
      name: Internet Explorer
      state: absent
Run the ansible-playbook to remove the Internet Explorer form the remote windows machine.
Geekflare@MSEDGEWIN10 ~
$ ansible-playbook log.yml

PLAY [win] *************************************************************************************************************************************************************************************

TASK [Gathering Facts] *************************************************************************************************************************************************************************
ok: [192.168.0.102]

TASK [Remove Internet Explorer Logs] **********************************************************************************************************************************************
changed: [192.168.0.102]

PLAY RECAP *************************************************************************************************************************************************************************************
192.168.0.102              : ok=2    changed=1    unreachable=0    failed=0    skipped=0    rescued=0    ignored=0
Now, if you list the EventLogs again, you will see Internet Explorer logs have been removed.
PS C:\Users\Geekflare> Get-EventLog -List

  Max(K) Retain OverflowAction        Entries Log
  ------ ------ --------------        ------- ---
  20,480      0 OverwriteAsNeeded      33,549 Application
  20,480      0 OverwriteAsNeeded           0 HardwareEvents
  20,480      0 OverwriteAsNeeded           0 Key Management Service
     128      0 OverwriteAsNeeded         190 OAlerts
                                              Security
  20,480      0 OverwriteAsNeeded      44,835 System
  15,360      0 OverwriteAsNeeded          56 Windows PowerShell
So, that was all about Ansible playbooks, which can be used for remote windows administration. Go ahead and try out these playbooks. You can also try other Ansible Windows modules available.
Even though Ansible is known for managing Linux nodes using SSH, did you know that Ansible on Windows works just as well? Using Windows Remote Management (WinRM), Ansible on Windows can effectively manage all of your Windows nodes too!
Not a reader? Watch this related video tutorial!
Not seeing the video? Make sure your ad blocker is disabled.
With Ansible on Windows, you can perform tasks like deploying patches, managing Windows servers, execute PowerShell scripts, and more.
In this tutorial, you’re going to learn how to set up your first Windows node to be managed with Ansible and see how to run commands and playbooks against it.
Prerequisites
If you’d like to follow along with the tutorial, please be sure you have the following before starting:
- An Ansible controller host – This tutorial will be using Ansible v2.9.18 on an Ubuntu 18.04.5 LTS machine with an IP address of 10.111.4.53. Note that Windows is not supported as a control node, only a managed node.
- Python installed on your Ansible controller host – This tutorial will be using Python v2, but v3 should work just as well.
- The pip package installed on the Ansible controller.
- A Windows 2012 R2 or greater computer for Ansible to manage – This tutorial will use two Windows Server 2012 R2 Standard machines as remote nodes with IP addresses of 52.242.251.213 and 10.111.4.106.
- A Windows workstation – This tutorial will perform some basic pre-configuration to the node that Windows will manage with Ansible and will require you to sitting at a Windows workstation.
- The Windows server to manage has PowerShell Remoting enabled
- A user account in the local Administrators group on the Windows computer. This tutorial will use an account called adminuser.
Setting up the WinRM listener on Windows
Before Ansible can communicate with a remote Windows node, it must be able to make a connection to it. It does this through the Microsoft protocol WinRM. WinRM is the same protocol that PowerShell Remoting uses to run remote commands from within PowerShell.
As of this writing, Ansible does support SSH as a management protocol, but it’s an experimental feature at this time.
For Ansible to use WinRM to communicate with the Windows node, you must configure WinRM. To do this, Ansible provides a PowerShell script that sets various WinRm options.
Although the PowerShell script that Red Hat provides to configure WinRM has been tested and is safe, you should read through it and understand, at a high level, what it’s doing.
Your first task will be to download the configuration script and run Ansible on the Windows node. To do that, assuming you already have PowerShell Remoting enabled on your target Windows computer and you’re at a Windows workstation:
Download the ConfigureRemotingForAnsible.ps1 PowerShell script to your local Windows computer. This tutorial will assume it’s saved in ~\Downloads.
Run the configuration script on the Windows node Ansible will manage using the Invoke-Command command. The command below will run the command on the tutorial’s two demo machines and prompt you for the password for the local adminuser account on the Windows nodes.
Invoke-Command -ComputerName 52.242.251.213, 10.111.4.106 -FilePath '~\Downloads\ConfigureRemotingForAnsible.ps1' -Credential (Get-Credential -UserName adminuser)By default, the configuration script will configure WinRM for basic HTTP authentication. If you’d like Ansible to use a more secure connection, learn How to Configure WinRM over HTTPS for Ansible.
Configuring the Controller of Ansible on Windows
Now that the Windows node is ready for Ansible, let’s now configure the Ansible controller to show Ansible how to communicate with it.
1. Connect to your Ansible controller host via SSH using your favorite SSH client.
2. Install the pywinrm Python module. The pywinrm Python module is required for Ansible on Windows to communicate to hosts via the WinRM protocol.
3. Define the remote Windows nodes in an Ansible inventory file. An Ansible inventory is a collection of remote hosts defined in a file either by their hostname or IP address. Once defined, you can then target Ansible inventories with commands and playbooks, as you’ll soon see.
The default Ansible inventory file is located in the /etc/ansible/hosts directory.
The sample inventory file below is created a windows host group that contains each Windows node. The tutorial is using a host group here to make it easier to target all Windows nodes (if you have more than one) at once later.
[windows]
 54.242.251.213
 10.111.4.106
4. Next, define a few required variables Ansible will use when connecting to the Windows hosts in the inventory file as a windows:vars group.
[windows:vars]
ansible_user=localadmin ## the windows username for ansible to communicate
ansible_password=s3crect ## the windows password for ansible to communicate
ansible_connection=winrm ## The kind of connection which ansible will make with remote windows node
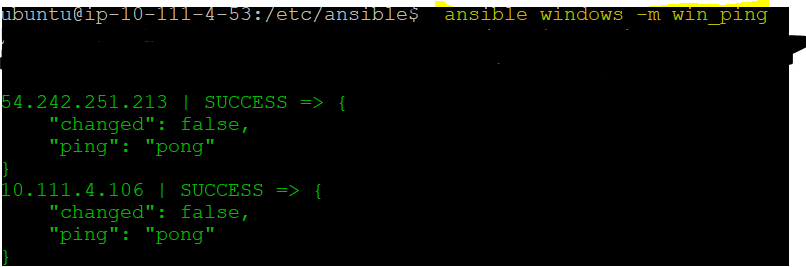
ansible_winrm_server_cert_validation=ignore ## ignore certificate validation because we'll just be using a self-signed certificate that comes with Ansible5. Now, use the Ansible win_ping module to execute a simple connection test to the hosts inside of the windows host group defined in step #3.
# windows is the host group
# -m tells Ansible to use the win_ping module
 ansible windows -m win_ping
Once executed, you can see below that Ansible returns green text with a SUCCESS message indicating the successful ping attempt.

The output confirms that the Ansible controller host can communicate with the Windows remote host successfully over WinRM.
At this point, you’re all set for Ansible to begin controlling your Windows nodes. Let’s now test this out by running an ad-hoc command on the Windows nodes to change them. Ad-hoc commands are great when you need to run a simple command on nodes without first creating a playbook.
Let’s demonstrate ad-hoc commands by installing a Windows feature on the Windows nodes defined in the windows host group in the inventory file. To do that, assuming you’re still SSHed into your Ansible controller node:
1. Instead of the win_ping module this time, call the win_feature module (-m), passing it two arguments (-a) of name and state indicating the name of the Windows feature and the state you desire it to be in.
# windows here is a group of hosts
# win_feature is the name of the module
# state=present means to install the package or service
 ansible windows -m win_feature -a "name=Telnet-Client state=present"
When you run the above command, if all goes well, Ansible should connect to all of the nodes in the windows host group and run the win_feature command on each checking for, and if not present, installing the Telnet-Client Windows feature.
2. Ansible shows success, but to be sure, connect to the Windows nodes manually with PowerShell and verify the Telnet Client Windows feature is now installed. On your local Windows workstation, run Invoke-Command to run the Get-WindowsFeature PowerShell command on each Windows computer.
Invoke-Command -ComputerName 52.242.251.213, 10.111.4.106 -ScriptBlock { Get-WindowsFeature -Name 'Telnet-Service' } -Credential (Get-Credential -UserName adminuser)At this point, you can run any Windows module you like as ad-hoc commands!
Creating and Running Ansible on Windows Playbooks
Once you’ve mastered the art of running ad-hoc commands on Windows managed nodes, your next task is to create and run playbooks.. An Ansible playbook combines commands into a single place and allows you to write complex logic to perform complex automation scenarios.
Running Remote Windows Commands with the win_command Module
Assuming you’re still connected to your Ansible controller host:
1. Create a folder under your home directory called ansible-windows-demo and change to it. This folder will hold your playbook.
mkdir ~/ansible-windows-demo
cd ~/ansible-windows-demo
2. Open your favorite text editor and create and save a file called ansible-windows.yml in the ~/ansible-windows-demo directory.
Ansible playbooks are written in YAML
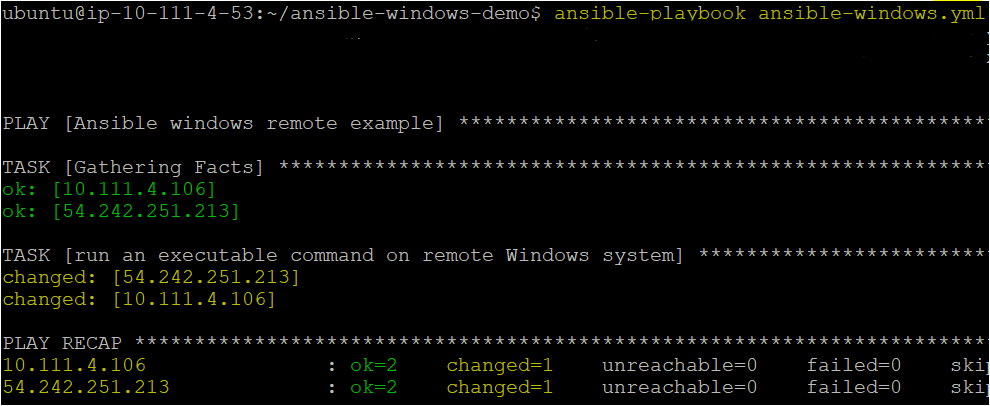
3. Now, copy the below playbook into the ansible-windows.yml file to create a single task. This playbook will execute the netstat Windows command using the win_command Windows Ansible module on all hosts inside the windows host group.
The win_command module executes commands on windows remote host. It doesn’t allow commands which include variables such as special characters, line breaker, greater than symbol, etc.
---
 - name: Ansible win_command module example
   hosts: windows # host group to run the module on
   tasks:
   -  name: run an executable command on a remote Windows system
      win_command: netstat -e # win_command is a Windows module.
4. Invoke the ansible-windows.yml playbook, which executes the task on the remote host by running the following command.
ansible-playbook ansible-windows.ymlIf all went well, you should see output like below.
Running Remote PowerShell Commands with the win_shell Module
You created a playbook to run a remote cmd.exe command (netstat) on Windows managed nodes in the previous example. Let’s now up the ante a bit and run PowerShell commands using the win_shell module.
By default win_shell module runs on PowerShell on windows host
On your local Windows workstation:
1. First, open your favorite text editor on your local Windows workstation and create a sample PowerShell script and copy the following code into it, saving it as one.ps1. This tutorial will save the script to ~\one.ps1.
The below code creates a blank text file called test2.txt in the C:\temp directory.
Set-Content -Path C:\temp\test2.txt -Value ''2. Copy the one.ps1 PowerShell script to your Windows managed nodes using your preferred method. This tutorial will assume you’ve copied the one.ps1 script to the C:\Temp folder on each Windows node.
3. Once the sample PowerShell script is one the Windows node(s), connect to your Ansible controller host and open your favorite text editor again. This time, create and save another playbook called ansible-windows-shell.yml in the same ~/ansible-windows-demo directory.
4. Copy and paste the following playbook into the ansible-windows-shell.yml file. This playbook will run two tasks to demonstrate the win_shell module. It invokes the PowerShell script just copied from step #2 and inserts the PowerShell code directly into the playbook to demonstrate the script isn’t needed at all.
To pass multiple lines of PowerShell code to the win_shell module, use the
|pipe character.
---
 - name: Ansible win_shell module example
   remote_user: localadmin # local Windows user to connect with
   hosts: windows # remote host group
   tasks:
    - name: Single line PowerShell # Running single command using win_shell module
      win_shell: C:\temp\one.ps1
    - name: Run multi-lined shell commands
      win_shell: |
        $text = ' Iam Author of ATA'
       Set-Content -Path C:\temp\test3.txt -Value $text
5. Now, invoke the second playbook ansible-windows-shell.yml, which executes on the remote host but with PowerShell.
ansible-playbook ansible-windows-shell.yml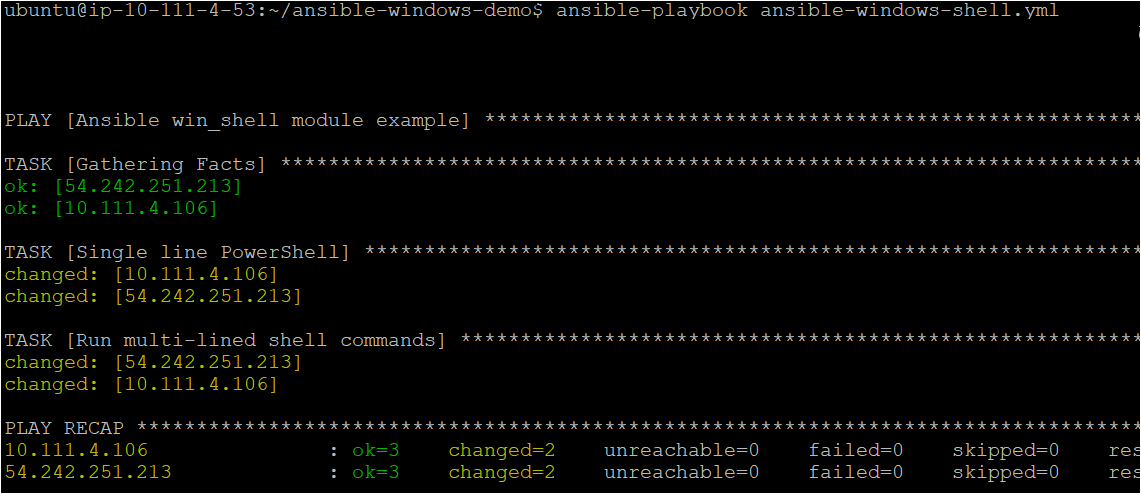
6. If necessary, on your local Windows workstation, verify the playbook executed the existing script and the PowerShell code in the playbook.
Invoke-Command -ComputerName 52.242.251.213, 10.111.4.106 -ScriptBlock { Test-Path -Path 'C:\Temp\test3.txt','C:\Temp\test2.txt' } -Credential (Get-Credential -UserName adminuser)If the Ansible playbook ran successfully, PowerShell should return two True statements indicating that the files now exist.
Conclusion
In this tutorial, you’ve learned how to set up your first Windows managed node in Ansible. Even though Ansible has traditionally been known as a Linux tool, it can easily be used for Windows also!
What playbooks and Windows modules will you start using to manage Windows with Ansible?