
When using Ansible to manage Windows, many of the syntax and rules that apply
for Unix/Linux hosts also apply to Windows, but there are still some differences
when it comes to components like path separators and OS-specific tasks.
This document covers details specific to using Ansible for Windows.
Use Cases
Ansible can be used to orchestrate a multitude of tasks on Windows servers.
Below are some examples and info about common tasks.
Installing Software
There are three main ways that Ansible can be used to install software:
-
Using the
win_chocolateymodule. This sources the program data from the default
public Chocolatey repository. Internal repositories can
be used instead by setting thesourceoption. -
Using the
win_packagemodule. This installs software using an MSI or .exe installer
from a local/network path or URL. -
Using the
win_commandorwin_shellmodule to run an installer manually.
The win_chocolatey module is recommended since it has the most complete logic for checking to see if a package has already been installed and is up-to-date.
Below are some examples of using all three options to install 7-Zip:
# Install/uninstall with chocolatey
- name: Ensure 7-Zip is installed through Chocolatey
  win_chocolatey:
    name: 7zip
    state: present

- name: Ensure 7-Zip is not installed through Chocolatey
  win_chocolatey:
    name: 7zip
    state: absent

# Install/uninstall with win_package
- name: Download the 7-Zip package
  win_get_url:
    url: https://www.7-zip.org/a/7z1701-x64.msi
    dest: C:\temp\7z.msi

- name: Ensure 7-Zip is installed through win_package
  win_package:
    path: C:\temp\7z.msi
    state: present

- name: Ensure 7-Zip is not installed through win_package
  win_package:
    path: C:\temp\7z.msi
    state: absent

# Install/uninstall with win_command
- name: Download the 7-Zip package
  win_get_url:
    url: https://www.7-zip.org/a/7z1701-x64.msi
    dest: C:\temp\7z.msi

- name: Check if 7-Zip is already installed
  win_reg_stat:
    name: HKLM:\SOFTWARE\Microsoft\Windows\CurrentVersion\Uninstall\{23170F69-40C1-2702-1701-000001000000}
  register: 7zip_installed

- name: Ensure 7-Zip is installed through win_command
  win_command: C:\Windows\System32\msiexec.exe /i C:\temp\7z.msi /qn /norestart
  when: 7zip_installed.exists == false

- name: Ensure 7-Zip is uninstalled through win_command
  win_command: C:\Windows\System32\msiexec.exe /x {23170F69-40C1-2702-1701-000001000000} /qn /norestart
  when: 7zip_installed.exists == true
Some installers like Microsoft Office or SQL Server require credential delegation or
access to components restricted by WinRM. The best method to bypass these
issues is to use become with the task. With become, Ansible will run
the installer as if it were run interactively on the host.
Note
Many installers do not properly pass back error information over WinRM. In these cases, if the install has been verified to work locally the recommended method is to use become.
Note
Some installers restart the WinRM or HTTP services, or cause them to become temporarily unavailable, making Ansible assume the system is unreachable.
Installing Updates
The win_updates and win_hotfix modules can be used to install updates
or hotfixes on a host. The module win_updates is used to install multiple
updates by category, while win_hotfix can be used to install a single
update or hotfix file that has been downloaded locally.
Note
The win_hotfix module has a requirement that the DISM PowerShell cmdlets are
present. These cmdlets were only added by default on Windows Server 2012
and newer and must be installed on older Windows hosts.
The following example shows how win_updates can be used:
- name: Install all critical and security updates
  win_updates:
    category_names:
    - CriticalUpdates
    - SecurityUpdates
    state: installed
  register: update_result

- name: Reboot host if required
  win_reboot:
  when: update_result.reboot_required
The following example show how win_hotfix can be used to install a single
update or hotfix:
- name: Download KB3172729 for Server 2012 R2
  win_get_url:
    url: http://download.windowsupdate.com/d/msdownload/update/software/secu/2016/07/windows8.1-kb3172729-x64_e8003822a7ef4705cbb65623b72fd3cec73fe222.msu
    dest: C:\temp\KB3172729.msu

- name: Install hotfix
  win_hotfix:
    hotfix_kb: KB3172729
    source: C:\temp\KB3172729.msu
    state: present
  register: hotfix_result

- name: Reboot host if required
  win_reboot:
  when: hotfix_result.reboot_required
Set Up Users and Groups
Ansible can be used to create Windows users and groups both locally and on a domain.
Local
The modules win_user, win_group and win_group_membership manage
Windows users, groups and group memberships locally.
The following is an example of creating local accounts and groups that can
access a folder on the same host:
- name: Create local group to contain new users
  win_group:
    name: LocalGroup
    description: Allow access to C:\Development folder

- name: Create local user
  win_user:
    name: '{{ item.name }}'
    password: '{{ item.password }}'
    groups: LocalGroup
    update_password: false
    password_never_expires: true
  loop:
  - name: User1
    password: Password1
  - name: User2
    password: Password2

- name: Create Development folder
  win_file:
    path: C:\Development
    state: directory

- name: Set ACL of Development folder
  win_acl:
    path: C:\Development
    rights: FullControl
    state: present
    type: allow
    user: LocalGroup

- name: Remove parent inheritance of Development folder
  win_acl_inheritance:
    path: C:\Development
    reorganize: true
    state: absent
Domain
The modules win_domain_user and win_domain_group manages users and
groups in a domain. The below is an example of ensuring a batch of domain users
are created:
- name: Ensure each account is created
  win_domain_user:
    name: '{{ item.name }}'
    upn: '{{ item.name }}@MY.DOMAIN.COM'
    password: '{{ item.password }}'
    password_never_expires: false
    groups:
    - Test User
    - Application
    company: Ansible
    update_password: on_create
  loop:
  - name: Test User
    password: Password
  - name: Admin User
    password: SuperSecretPass01
  - name: Dev User
    password: '@fvr3IbFBujSRh!3hBg%wgFucD8^x8W5'
Running Commands
In cases where there is no appropriate module available for a task,
a command or script can be run using the win_shell, win_command, raw, and script modules.
The raw module simply executes a Powershell command remotely. Since raw
has none of the wrappers that Ansible typically uses, become, async
and environment variables do not work.
The script module executes a script from the Ansible control node on
one or more Windows hosts. Like raw, script currently does not support
become, async, or environment variables.
The win_command module is used to execute a command which is either an
executable or batch file, while the win_shell module is used to execute commands within a shell.
Choosing Command or Shell
The win_shell and win_command modules can both be used to execute a command or commands.
The win_shell module is run within a shell-like process like PowerShell or cmd, so it has access to shell
operators like <, >, |, ;, &&, and ||. Multi-lined commands can also be run in win_shell.
The win_command module simply runs a process outside of a shell. It can still
run a shell command like mkdir or New-Item by passing the shell commands
to a shell executable like cmd.exe or PowerShell.exe.
Here are some examples of using win_command and win_shell:
- name: Run a command under PowerShell
  win_shell: Get-Service -Name service | Stop-Service

- name: Run a command under cmd
  win_shell: mkdir C:\temp
  args:
    executable: cmd.exe

- name: Run a multiple shell commands
  win_shell: |
    New-Item -Path C:\temp -ItemType Directory
    Remove-Item -Path C:\temp -Force -Recurse
    $path_info = Get-Item -Path C:\temp
    $path_info.FullName

- name: Run an executable using win_command
  win_command: whoami.exe

- name: Run a cmd command
  win_command: cmd.exe /c mkdir C:\temp

- name: Run a vbs script
  win_command: cscript.exe script.vbs
Note
Some commands like mkdir, del, and copy only exist in
the CMD shell. To run them with win_command they must be
prefixed with cmd.exe /c.
Argument Rules
When running a command through win_command, the standard Windows argument
rules apply:
-
Each argument is delimited by a white space, which can either be a space or a
tab. -
An argument can be surrounded by double quotes
". Anything inside these
quotes is interpreted as a single argument even if it contains whitespace. -
A double quote preceded by a backslash
\is interpreted as just a double
quote"and not as an argument delimiter. -
Backslashes are interpreted literally unless it immediately precedes double
quotes; for example\==\and\"==" -
If an even number of backslashes is followed by a double quote, one
backslash is used in the argument for every pair, and the double quote is
used as a string delimiter for the argument. -
If an odd number of backslashes is followed by a double quote, one backslash
is used in the argument for every pair, and the double quote is escaped and
made a literal double quote in the argument.
With those rules in mind, here are some examples of quoting:
- win_command: C:\temp\executable.exe argument1 "argument 2" "C:\path\with space" "double \"quoted\""

argv[0] = C:\temp\executable.exe
argv[1] = argument1
argv[2] = argument 2
argv[3] = C:\path\with space
argv[4] = double "quoted"

- win_command: '"C:\Program Files\Program\program.exe" "escaped \\\" backslash" unquoted-end-backslash\'

argv[0] = C:\Program Files\Program\program.exe
argv[1] = escaped \" backslash
argv[2] = unquoted-end-backslash\

# Due to YAML and Ansible parsing '\"' must be written as '{% raw %}\\{% endraw %}"'
- win_command: C:\temp\executable.exe C:\no\space\path "arg with end \ before end quote{% raw %}\\{% endraw %}"

argv[0] = C:\temp\executable.exe
argv[1] = C:\no\space\path
argv[2] = arg with end \ before end quote\"
For more information, see escaping arguments.
Creating and Running a Scheduled Task
WinRM has some restrictions in place that cause errors when running certain
commands. One way to bypass these restrictions is to run a command through a
scheduled task. A scheduled task is a Windows component that provides the
ability to run an executable on a schedule and under a different account.
Ansible version 2.5 added modules that make it easier to work with scheduled tasks in Windows.
The following is an example of running a script as a scheduled task that deletes itself after
running:
- name: Create scheduled task to run a process
  win_scheduled_task:
    name: adhoc-task
    username: SYSTEM
    actions:
    - path: PowerShell.exe
      arguments: |
        Start-Sleep -Seconds 30  # This isn't required, just here as a demonstration
        New-Item -Path C:\temp\test -ItemType Directory
    # Remove this action if the task shouldn't be deleted on completion
    - path: cmd.exe
      arguments: /c schtasks.exe /Delete /TN "adhoc-task" /F
    triggers:
    - type: registration

- name: Wait for the scheduled task to complete
  win_scheduled_task_stat:
    name: adhoc-task
  register: task_stat
  until: (task_stat.state is defined and task_stat.state.status != "TASK_STATE_RUNNING") or (task_stat.task_exists == False)
  retries: 12
  delay: 10
Note
The modules used in the above example were updated/added in Ansible
version 2.5.
Path Formatting for Windows
Windows differs from a traditional POSIX operating system in many ways. One of
the major changes is the shift from / as the path separator to \. This
can cause major issues with how playbooks are written, since \ is often used
as an escape character on POSIX systems.
Ansible allows two different styles of syntax; each deals with path separators for Windows differently:
YAML Style
When using the YAML syntax for tasks, the rules are well-defined by the YAML
standard:
-
When using a normal string (without quotes), YAML will not consider the
backslash an escape character. -
When using single quotes
', YAML will not consider the backslash an
escape character. -
When using double quotes
", the backslash is considered an escape
character and needs to escaped with another backslash.
Note
You should only quote strings when it is absolutely
necessary or required by YAML, and then use single quotes.
The YAML specification considers the following escape sequences:
-
\0,\\,\",\_,\a,\b,\e,\f,\n,\r,\t,
\v,\L,\Nand\P– Single character escape -
<TAB>,<SPACE>,<NBSP>,<LNSP>,<PSP>– Special
characters -
\x..– 2-digit hex escape -
\u....– 4-digit hex escape -
\U........– 8-digit hex escape
Here are some examples on how to write Windows paths:
# GOOD
tempdir: C:\Windows\Temp

# WORKS
tempdir: 'C:\Windows\Temp'
tempdir: "C:\\Windows\\Temp"

# BAD, BUT SOMETIMES WORKS
tempdir: C:\\Windows\\Temp
tempdir: 'C:\\Windows\\Temp'
tempdir: C:/Windows/Temp
This is an example which will fail:
# FAILS
tempdir: "C:\Windows\Temp"
This example shows the use of single quotes when they are required:
---
- name: Copy tomcat config
  win_copy:
    src: log4j.xml
    dest: '{{tc_home}}\lib\log4j.xml'
Legacy key=value Style
The legacy key=value syntax is used on the command line for ad hoc commands,
or inside playbooks. The use of this style is discouraged within playbooks
because backslash characters need to be escaped, making playbooks harder to read.
The legacy syntax depends on the specific implementation in Ansible, and quoting
(both single and double) does not have any effect on how it is parsed by
Ansible.
The Ansible key=value parser parse_kv() considers the following escape
sequences:
-
\,',",\a,\b,\f,\n,\r,\tand
\v– Single character escape -
\x..– 2-digit hex escape -
\u....– 4-digit hex escape -
\U........– 8-digit hex escape -
\N{...}– Unicode character by name
This means that the backslash is an escape character for some sequences, and it
is usually safer to escape a backslash when in this form.
Here are some examples of using Windows paths with the key=value style:
# GOOD
tempdir=C:\\Windows\\Temp

# WORKS
tempdir='C:\\Windows\\Temp'
tempdir="C:\\Windows\\Temp"

# BAD, BUT SOMETIMES WORKS
tempdir=C:\Windows\Temp
tempdir='C:\Windows\Temp'
tempdir="C:\Windows\Temp"
tempdir=C:/Windows/Temp

# FAILS
tempdir=C:\Windows\temp
tempdir='C:\Windows\temp'
tempdir="C:\Windows\temp"
The failing examples don’t fail outright but will substitute \t with the
<TAB> character resulting in tempdir being C:\Windows<TAB>emp.
Limitations
Some things you cannot do with Ansible and Windows are:
-
Upgrade PowerShell
-
Interact with the WinRM listeners
Because WinRM is reliant on the services being online and running during normal operations, you cannot upgrade PowerShell or interact with WinRM listeners with Ansible. Both of these actions will cause the connection to fail. This can technically be avoided by using async or a scheduled task, but those methods are fragile if the process it runs breaks the underlying connection Ansible uses, and are best left to the bootstrapping process or before an image is
created.
Developing Windows Modules
Because Ansible modules for Windows are written in PowerShell, the development
guides for Windows modules differ substantially from those for standard standard modules. Please see
Windows module development walkthrough for more information.
Topics
- Windows Support
- Windows: How Does It Work
- Installing on the Control Machine
- Active Directory Support
- Installing python-kerberos dependencies
- Installing python-kerberos
- Configuring Kerberos
- Testing a kerberos connection
- Troubleshooting kerberos connections
- Active Directory Support
- Inventory
- Windows System Prep
- Getting to PowerShell 3.0 or higher
- What modules are available
- Developers: Supported modules and how it works
- Reminder: You Must Have a Linux Control Machine
- Windows Facts
- Windows Playbook Examples
- Windows Contributions
Windows: How Does It Work
As you may have already read, Ansible manages Linux/Unix machines using SSH by default.
Starting in version 1.7, Ansible also contains support for managing Windows machines. This uses
native PowerShell remoting, rather than SSH.
Ansible will still be run from a Linux control machine, and uses the “winrm” Python module to talk to remote hosts.
No additional software needs to be installed on the remote machines for Ansible to manage them, it still maintains the agentless properties that make it popular on Linux/Unix.
Note that it is expected you have a basic understanding of Ansible prior to jumping into this section, so if you haven’t written a Linux playbook first, it might be worthwhile to dig in there first.
Installing on the Control Machine
On a Linux control machine:
pip install "pywinrm>=0.1.1"
Note:: on distributions with multiple python versions, use pip2 or pip2.x, where x matches the python minor version Ansible is running under.
Active Directory Support
If you wish to connect to domain accounts published through Active Directory (as opposed to local accounts created on the remote host), you will need to install the “python-kerberos” module on the Ansible control host (and the MIT krb5 libraries it depends on). The Ansible control host also requires a properly configured computer account in Active Directory.
Installing python-kerberos dependencies
# Via Yum
yum -y install python-devel krb5-devel krb5-libs krb5-workstation

# Via Apt (Ubuntu)
sudo apt-get install python-dev libkrb5-dev

# Via Portage (Gentoo)
emerge -av app-crypt/mit-krb5
emerge -av dev-python/setuptools

# Via pkg (FreeBSD)
sudo pkg install security/krb5

# Via OpenCSW (Solaris)
pkgadd -d http://get.opencsw.org/now
/opt/csw/bin/pkgutil -U
/opt/csw/bin/pkgutil -y -i libkrb5_3

# Via Pacman (Arch Linux)
pacman -S krb5
Installing python-kerberos
Once you’ve installed the necessary dependencies, the python-kerberos wrapper can be installed via pip:
Kerberos is installed and configured by default on OS X and many Linux distributions. If your control machine has not already done this for you, you will need to.
Configuring Kerberos
Edit your /etc/krb5.conf (which should be installed as a result of installing packages above) and add the following information for each domain you need to connect to:
In the section that starts with
add the full domain name and the fully qualified domain names of your primary and secondary Active Directory domain controllers. It should look something like this:
[realms]

 MY.DOMAIN.COM = {
  kdc = domain-controller1.my.domain.com
  kdc = domain-controller2.my.domain.com
 }
and in the [domain_realm] section add a line like the following for each domain you want to access:
[domain_realm]
    .my.domain.com = MY.DOMAIN.COM
You may wish to configure other settings here, such as the default domain.
Testing a kerberos connection
If you have installed krb5-workstation (yum) or krb5-user (apt-get) you can use the following command to test that you can be authorised by your domain controller.
Note that the domain part has to be fully qualified and must be in upper case.
To see what tickets if any you have acquired, use the command klist
Troubleshooting kerberos connections
If you unable to connect using kerberos, check the following:
Ensure that forward and reverse DNS lookups are working properly on your domain.
To test this, ping the windows host you want to control by name then use the ip address returned with nslookup. You should get the same name back from DNS when you use nslookup on the ip address.
If you get different hostnames back than the name you originally pinged, speak to your active directory administrator and get them to check that DNS Scavenging is enabled and that DNS and DHCP are updating each other.
Ensure that the Ansible controller has a properly configured computer account in the domain.
Check your Ansible controller’s clock is synchronised with your domain controller. Kerberos is time sensitive and a little clock drift can cause tickets not be granted.
Check you are using the real fully qualified domain name for the domain. Sometimes domains are commonly known to users by aliases. To check this run:
kinit -C user@MY.DOMAIN.COM
klist
If the domain name returned by klist is different from the domain name you requested, you are requesting using an alias, and you need to update your krb5.conf so you are using the fully qualified domain name, not its alias.
Inventory
Ansible’s windows support relies on a few standard variables to indicate the username, password, and connection type (windows) of the remote hosts. These variables are most easily set up in inventory. This is used instead of SSH-keys or passwords as normally fed into Ansible:
[windows]
winserver1.example.com
winserver2.example.com
Note
Ansible 2.0 has deprecated the “ssh” from ansible_ssh_user, ansible_ssh_host, and ansible_ssh_port to become ansible_user, ansible_host, and ansible_port. If you are using a version of Ansible prior to 2.0, you should continue using the older style variables (ansible_ssh_*). These shorter variables are ignored, without warning, in older versions of Ansible.
In group_vars/windows.yml, define the following inventory variables:
# it is suggested that these be encrypted with ansible-vault:
# ansible-vault edit group_vars/windows.yml

ansible_user: Administrator
ansible_password: SecretPasswordGoesHere
ansible_port: 5986
ansible_connection: winrm
# The following is necessary for Python 2.7.9+ when using default WinRM self-signed certificates:
ansible_winrm_server_cert_validation: ignore
Attention for the older style variables (ansible_ssh_*): ansible_ssh_password doesn’t exist, should be ansible_ssh_pass.
Although Ansible is mostly an SSH-oriented system, Windows management will not happen over SSH (yet <http://blogs.msdn.com/b/powershell/archive/2015/06/03/looking-forward-microsoft-support-for-secure-shell-ssh.aspx>).
If you have installed the kerberos module and ansible_user contains @ (e.g. username@realm), Ansible will first attempt Kerberos authentication. This method uses the principal you are authenticated to Kerberos with on the control machine and not «ansible_user«. If that fails, either because you are not signed into Kerberos on the control machine or because the corresponding domain account on the remote host is not available, then Ansible will fall back to “plain” username/password authentication.
When using your playbook, don’t forget to specify –ask-vault-pass to provide the password to unlock the file.
Test your configuration like so, by trying to contact your Windows nodes. Note this is not an ICMP ping, but tests the Ansible
communication channel that leverages Windows remoting:
ansible windows [-i inventory] -m win_ping --ask-vault-pass
If you haven’t done anything to prep your systems yet, this won’t work yet. This is covered in a later
section about how to enable PowerShell remoting — and if necessary — how to upgrade PowerShell to
a version that is 3 or higher.
You’ll run this command again later though, to make sure everything is working.
Since 2.0, the following custom inventory variables are also supported for additional configuration of WinRM connections:
* ``ansible_winrm_scheme``: Specify the connection scheme (``http`` or ``https``) to use for the WinRM connection.  Ansible uses ``https`` by default unless the port is 5985.
* ``ansible_winrm_path``: Specify an alternate path to the WinRM endpoint.  Ansible uses ``/wsman`` by default.
* ``ansible_winrm_realm``: Specify the realm to use for Kerberos authentication.  If the username contains ``@``, Ansible will use the part of the username after ``@`` by default.
* ``ansible_winrm_transport``: Specify one or more transports as a comma-separated list.  By default, Ansible will use ``kerberos,plaintext`` if the ``kerberos`` module is installed and a realm is defined, otherwise ``plaintext``.
* ``ansible_winrm_server_cert_validation``: Specify the server certificate validation mode (``ignore`` or ``validate``). Ansible defaults to ``validate`` on Python 2.7.9 and higher, which will result in certificate validation errors against the Windows self-signed certificates. Unless verifiable certificates have been configured on the WinRM listeners, this should be set to ``ignore``
* ``ansible_winrm_*``: Any additional keyword arguments supported by ``winrm.Protocol`` may be provided.
Windows System Prep
In order for Ansible to manage your windows machines, you will have to enable PowerShell remoting configured.
To automate setup of WinRM, you can run this PowerShell script on the remote machine.
The example script accepts a few arguments which Admins may choose to use to modify the default setup slightly, which might be appropriate in some cases.
- Pass the -CertValidityDays option to customize the expiration date of the generated certificate.
- powershell.exe -File ConfigureRemotingForAnsible.ps1 -CertValidityDays 100
- Pass the -SkipNetworkProfileCheck switch to configure winrm to listen on PUBLIC zone interfaces. (Without this option, the script will fail if any network interface on device is in PUBLIC zone)
- powershell.exe -File ConfigureRemotingForAnsible.ps1 -SkipNetworkProfileCheck
Note
On Windows 7 and Server 2008 R2 machines, due to a bug in Windows
Management Framework 3.0, it may be necessary to install this
hotfix http://support.microsoft.com/kb/2842230 to avoid receiving
out of memory and stack overflow exceptions. Newly-installed Server 2008
R2 systems which are not fully up to date with windows updates are known
to have this issue.
Windows 8.1 and Server 2012 R2 are not affected by this issue as they
come with Windows Management Framework 4.0.
Getting to PowerShell 3.0 or higher
PowerShell 3.0 or higher is needed for most provided Ansible modules for Windows, and is also required to run the above setup script. Note that PowerShell 3.0 is only supported on Windows 7 SP1, Windows Server 2008 SP1, and later releases of Windows.
Looking at an Ansible checkout, copy the examples/scripts/upgrade_to_ps3.ps1 script onto the remote host and run a PowerShell console as an administrator. You will now be running PowerShell 3 and can try connectivity again using the win_ping technique referenced above.
What modules are available
Most of the Ansible modules in core Ansible are written for a combination of Linux/Unix machines and arbitrary web services, though there are various
Windows modules as listed in the “windows” subcategory of the Ansible module index.
Browse this index to see what is available.
In many cases, it may not be necessary to even write or use an Ansible module.
In particular, the “script” module can be used to run arbitrary PowerShell scripts, allowing Windows administrators familiar with PowerShell a very native way to do things, as in the following playbook:
- hosts: windows
  tasks:
    - script: foo.ps1 --argument --other-argument
Note there are a few other Ansible modules that don’t start with “win” that also function, including “slurp”, “raw”, and “setup” (which is how fact gathering works).
Developers: Supported modules and how it works
Developing Ansible modules are covered in a later section of the documentation, with a focus on Linux/Unix.
What if you want to write Windows modules for Ansible though?
For Windows, Ansible modules are implemented in PowerShell. Skim those Linux/Unix module development chapters before proceeding. Windows modules in the core and extras repo live in a “windows/” subdir. Custom modules can go directly into the Ansible “library/” directories or those added in ansible.cfg. Documentation lives in a .py file with the same name. For example, if a module is named “win_ping”, there will be embedded documentation in the “win_ping.py” file, and the actual PowerShell code will live in a “win_ping.ps1” file. Take a look at the sources and this will make more sense.
Modules (ps1 files) should start as follows:
#!powershell
# <license>

# WANT_JSON
# POWERSHELL_COMMON

# code goes here, reading in stdin as JSON and outputting JSON
The above magic is necessary to tell Ansible to mix in some common code and also know how to push modules out. The common code contains some nice wrappers around working with hash data structures and emitting JSON results, and possibly a few more useful things. Regular Ansible has this same concept for reusing Python code — this is just the windows equivalent.
What modules you see in windows/ are just a start. Additional modules may be submitted as pull requests to github.
Reminder: You Must Have a Linux Control Machine
Note running Ansible from a Windows control machine is NOT a goal of the project. Refrain from asking for this feature,
as it limits what technologies, features, and code we can use in the main project in the future. A Linux control machine
will be required to manage Windows hosts.
Cygwin is not supported, so please do not ask questions about Ansible running from Cygwin.
Windows Facts
Just as with Linux/Unix, facts can be gathered for windows hosts, which will return things such as the operating system version. To see what variables are available about a windows host, run the following:
ansible winhost.example.com -m setup
Note that this command invocation is exactly the same as the Linux/Unix equivalent.
Windows Playbook Examples
Look to the list of windows modules for most of what is possible, though also some modules like “raw” and “script” also work on Windows, as do “fetch” and “slurp”.
Here is an example of pushing and running a PowerShell script:
- name: test script module
  hosts: windows
  tasks:
    - name: run test script
      script: files/test_script.ps1
Running individual commands uses the ‘raw’ module, as opposed to the shell or command module as is common on Linux/Unix operating systems:
- name: test raw module
  hosts: windows
  tasks:
    - name: run ipconfig
      raw: ipconfig
      register: ipconfig
    - debug: var=ipconfig
Running common DOS commands like ‘del”, ‘move’, or ‘copy” is unlikely to work on a remote Windows Server using Powershell, but they can work by prefacing the commands with “CMD /C” and enclosing the command in double quotes as in this example:
- name: another raw module example
  hosts: windows
  tasks:
     - name: Move file on remote Windows Server from one location to another
       raw: CMD /C "MOVE /Y C:\teststuff\myfile.conf C:\builds\smtp.conf"
And for a final example, here’s how to use the win_stat module to test for file existence. Note that the data returned by the win_stat module is slightly different than what is provided by the Linux equivalent:
- name: test stat module
  hosts: windows
  tasks:
    - name: test stat module on file
      win_stat: path="C:/Windows/win.ini"
      register: stat_file

    - debug: var=stat_file

    - name: check stat_file result
      assert:
          that:
             - "stat_file.stat.exists"
             - "not stat_file.stat.isdir"
             - "stat_file.stat.size > 0"
             - "stat_file.stat.md5"
Again, recall that the Windows modules are all listed in the Windows category of modules, with the exception that the “raw”, “script”, and “fetch” modules are also available. These modules do not start with a “win” prefix.
Windows Contributions
Windows support in Ansible is still very new, and contributions are quite welcome, whether this is in the
form of new modules, tweaks to existing modules, documentation, or something else. Please stop by the ansible-devel mailing list if you would like to get involved and say hi.
Provide feedback
Saved searches
Use saved searches to filter your results more quickly
Sign up
В этой статье мы рассмотрим, как удаленно управлять хостами с Windows через популярную систему управления конфигурациями Ansible. Мы предполагаем, что Ansible уже установлен на вашем хосте Linux.
Содержание:
- Подготовка Windows к удаленному управления через Ansible
- Настройка Ansible для управления компьютерами Windows
- Примеры управления конфигурацией Windows из Ansible
Подготовка Windows к удаленному управления через Ansible
Ansible позволяет удаленно управлять хостами Windows со всеми поддерживаемым версиями ОС, начиная с Windows 7/Windows Server 2008 и до современных Windows 11/Windows Server 2022. В Windows должен быть установлен PowerShell 3.0 (или выше) и NET 4.0+.
Ansible использует WinRM для подключения к Windows. Поэтому вам нужно включить и настроить WinRM listener на всех управляемых хостах.
В Ansible 2.8 и выше доступна экспериментальная опция удаленного управления клиентами Windows 10 и Windows Serve 2019 через встроенный OpenSSH сервер.
- В домене AD можно централизованно настроить WinRM с помощью групповых политик;
- На отдельно стоящем хосте Windows для включения WinRM выполните команду PowerShell:
Enable-PSRemoting –Force
Если WinRM включен и настроен на хостах Windows, проверьте что с сервера Ansible на ваших серверах доступен порт TCP/5985 или TCP/5986 (если используется HTTPS).
$ nc -zv 192.168.13.122 5985

В зависимости от того. в какой среде вы будете использовать Ansible, вам нужно выбрать способ аутентификации.
- Для отдельно-стоящего компьютера или рабочей группы можно использовать HTTPS для WinRM с самоподписанными сертификатами с аутентификацией под локальной учетной записью Windows с правами администратора. Для быстрой настройки хоста Windows можно использовать готовый скрипт ConfigureRemotingForAnsible.ps1 (https://github.com/ansible/ansible/blob/devel/examples/scripts/ConfigureRemotingForAnsible.ps1);
- В моем случае все хосты Windows находятся в домене Active Directory, поэтому я буду использовать учетную запись AD для аутентификации через Ansible. В этом случае нужно настроить Kerberos аутентификацию на сервере Ansible (рассмотрено далее).
Установите необходимые пакеты для Kerberos аутентификации:
- В RHEL/Rocky Linux/CentOS через менеджер пакетов yum/dnf:
$ sudo yum -y install python-devel krb5-devel krb5-libs krb5-workstation - В Ubuntu/Debian:
$ sudo apt-get -y install python-dev libkrb5-dev krb5-user
Теперь установите пакет для python через pip:
$ sudo pip3 install requests-kerberos
Укажите настройки подключения к вашему домену в файле:
$ sudo mcedit /etc/krb5.conf
[logging]
  default = FILE:/var/log/krb5libs.log
 kdc = FILE:/var/log/krb5kdc.log
 admin_server = FILE:/var/log/kadmind.log
[libdefaults]
 dns_lookup_realm = false
 ticket_lifetime = 24h
 renew_lifetime = 7d
 forwardable = true
 rdns = false
default_realm = WINITPRO.LOC
[realms]
  WINITPRO.LOC = {
    admin_server = dc02.winitpro.loc
    kdc = dc02.winitpro.loc
  }
[domain_realm]
 winitpro.loc = WINITPRO.LOC
 .WINITPRO.LOC = WINITPRO.LOC
Проверьте, что вы можете выполнить аутентификацию в вашем домене AD и получите тикет Kerberos:
kinit -C [email protected]
Введите пароль пользователя AD, проверьте что получен тикет.
klist

Настройка Ansible для управления компьютерами Windows
Теперь добавьте все ваши хосты Windows в инвентаризационный файл ansible:
$ sudo mcedit /etc/ansible/hosts
msk-rds2.winitpro.loc
msk-rds3.winitpro.loc
wks-t1122h2.winitpro.loc
[windows_all:vars]
ansible_port=5985
[email protected]
ansible_connection=winrm
ansible_winrm_transport=kerberos
ansible_winrm_scheme=http
ansible_winrm_server_cert_validation=ignore
Проверьте, что все ваши Windows хосты (в моем списке два Windows Server 2019 и один компьютер Windows 11) доступны из Ansible:
$ ansible windows_all -m win_ping
В моем случае все хосты вернули ошибку:
"msg": "kerberos: Bad HTTP response returned from server. Code 500",
"unreachable": true

Причина в том, что в этом примере для WinRM подключения используется протокол HTTP вместо HTTPS. Чтобы игнорировать ошибку, нужно разрешить незашифрованный трафик на хостах Windows:
Set-Item -Path WSMan:\localhost\Service\AllowUnencrypted -Value true
Теперь через Ansible вы можете выполнить произвольную команду на всех хостах. Например, я хочу сбросить DNS кеш на всех хостах Windows:
$ ansible windows_all -m win_shell -a "ipconfig /flushdns"
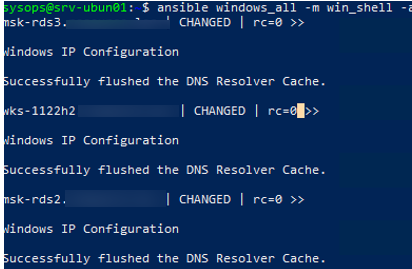
Команда успешно отработала везде.
Примеры управления конфигурацией Windows из Ansible
Теперь вы можете запускать плейбуки Ansible на ваших хостах Windows.
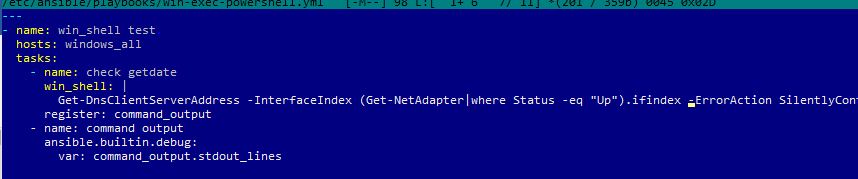
Например, вам нужно через Ansible выполнить PowerShell скрипт на всех хостах (в этом примере мы с помощью PowerShell получим текущие настройки DNS на хостах). Создайте файл плейбука:
$ sudo mcedit /etc/ansible/playbooks/win-exec-powershell.yml
---
- name: win_powershell_exec
  hosts: windows_all
  tasks:
    - name: check DNS
      win_shell: |
        Get-DnsClientServerAddress -InterfaceIndex (Get-NetAdapter|where Status -eq "Up").ifindex -ErrorAction SilentlyContinue
      register: command_output
    - name: command output
      ansible.builtin.debug:
Выполните плейбук:
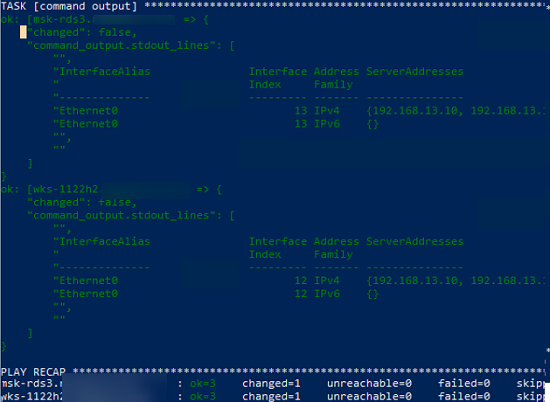
$ ansible-playbook /etc/ansible/playbooks/win-exec-powershell.yml
В данном примере плейбук отработал на всех Windows хостах и вернул текущие настройки DNS.
Далее рассмотрим несколько типовых плейбуков Absible, для стандартных задач управления хостами Windows.
Скопировать файл:
  - name: Copy a single file
    win_copy:
      src: /home/sysops/files/test.ps1"
      dest: C:\Temp\test.ps1
Создать файл:
- name: Create file
  win_file:
    path: C:\Temp\file.txt
    state: touch
Удалить файл:
- name: Delete file
  win_file:
    path: C:\Temp\file.txt
    state: absent
Создать параметр реестра:
- name: Create reg dword
  win_regedit:
    path: HKLM:\SOFTWARE\Microsoft\Windows\CurrentVersion\Policies\DataCollection
    name: AllowTelemetry
    data: 0
    type: dword
Установить программу из MSI:
Установить программу из MSI:
- name: Install MSI package
  win_package:
    path: C:\Distr\adobereader.msi
    arguments:
      - /install
      - /passive
      - /norestart
Запустить службу Windows:
- name: Run Windows Service
  win_service:
    name: wuauserv
    state: started
Установить роль Windows Server:
  - name: Install Windows Feature
    win_feature:
      name: SNMP-Service
      state: present
Открыть порт в файерволе:
- name: Open SMTP Port п
  win_firewall_rule:
    name: port 25
    localport: 25
    action: allow
    direction: in
    protocol: tcp
    state: present
    enabled: yes
Выполнить PowerShell скрипт:
- name: Run PowerShell Script
  win_command: powershell.exe -ExecutionPolicy ByPass -File C:/temp/powershellscript.ps1
В этой статье мы рассмотрели, как управлять конфигурацией компьютеров Windows через Ansible. Если ваши хосты Windows не добавлены в домен Active Directory (находятся в рабочей группе), то удаленное управление конфигурацией хостов Windows через Ansible может быть неплохой альтернативной настройке с помощью доменных групповых политик.
Можно установить Ansible в подсистеме WSL на Windows. Это позволит запускать плейбуки без развертывания отдельного Linux хоста под ansible.
In this article we are going to see how to use Ansible with Windows Host.
How to Setup Windows machine for Ansible to be able to connect or remote login just like SSH in Linux.
While there is a way to use SSH in windows which can be further leveraged by ansible for windows connectivity and automation.
There is a better way and more stable way to do it with Windows Remote Manager (WinRM)
So we are going to see how to use WinRM and connect to remote windows machine from Ansible control machine.
Let’s go.
I have written half a century articles in Ansible mostly for Linux cause I did not really had a requirement or chance to work with Ansible and windows.
And there would be series of articles on this Ansible + Windows combo. Please Stay connected.

How to Setup WinRM in Windows Machine to Prepare for Ansible
The First step for us to be able to connect to the windows machine is to install this WinRM properly on our Windows machine.
Thanks to Ansible team. they have created a PowerShell script that does the required configuration on the windows machine for us.
Do not worry about downloading the Powershell script file. Just run the following powershell command in your PowerShell terminal
This downloads the script automatically and runs it in your terminal.
iex(iwr https://raw.githubusercontent.com/ansible/ansible/devel/examples/scripts/ConfigureRemotingForAnsible.ps1).Content

If the installation is done right. you can see that your WinRM is UP and running and would be listening in port 5986
Like in Linux, Windows has netstat command too you can read more about it here
here is a quick command to for you to check if winrm listens on the port 5986
netstat -anp|findstr 5986
Thats all.
One more thing is pending. If you are on a cloud,
Consider opening this port to ansible control machine. So the Ansible can connect this machine from control machine. ( It is same like Opening up port 22 for linux to allow SSH)
Ansible Configuration Changes on the Control machine.
Hope you have already installed Ansible on your control machine ( Linux/Mac/Windows)
But there are few more extra packages you might need for Ansible to support windows modules
If you are using Ansible with Python 2 use PIP to install this package
pip install pywinrm
If you are using Ansible with Python3 use PIP3 to install pywinrm
pip3 install pywinrm
once the pywinrm package is installed we are all good and we can go and do a quick health check with ping.
But I would recommend you can use telnet or nc command (whichever available) to make sure that the network connectivity is there to the remote machine
nc -w 3 -v <remote windows server ip/hostname> 5986
(or)
telnet <remote windows server ip/hostname>:5986
This would give you an additional confidence that your connection is OK.
Create or Update ansible hosts inventory file
Before you can connect to the remote machine with Ansible.
you need to let Ansible know about this machine, as usual you need to add this machine to any hostgroup. In my case the host group name is win
[win]
192.9.12.122
You can keep the IP or the hostname which ever is reachable from your ansible control machine
Additionally, since this is windows, we need to provide some more variables at the hostgroup level.
[win:vars]
ansible_connection=winrm
ansible_user=administrator
ansible_password=r$eBQNgc5U&A2at8kDwpWo.KzLT5NvHd
ansible_winrm_server_cert_validation=ignore
ansible_connection=winrmto define the connection is not SSH should use winrmansible_userwhat ever the username you have created in the windows machineansible_passwordpassword for that user ( the same one you use for RDP)ansible_winrm_server_cert_validationthis is fine in DEV/TEST environment to tell ansible to ignore hostkey/server cert validation.
The complete inventory file is given below for your reference
[win]
192.9.12.122

[win:vars]
ansible_connection=winrm
ansible_user=administrator
ansible_password=r$eBQNgc5U&A2at8kDwpWo.KzLT5NvHd
ansible_winrm_server_cert_validation=ignore
I have saved this file in my custom directory where I would create my playbooks and named this as ansible_hosts
this is to keep things isolated and neat. You can directly add in the ansible global inventory if you want
Now its a time to test.
Win_ping – Ping the remote windows machine using Ansible.
Even if you are a beginner in Ansible, I presume you might have come across ansible ping module.
Ansible ping is to check the connection from control machine to remote linux machine.
Likewise, Ansible win_ping is to check the connectivity from Control machine to Windows.
It is like a Hello world of programming language we can say.
So we are going execute the following command
ansible win -m win_ping -i ansible_hosts
here the win is our host group name and with -m we are telling ansible to use win_ping module
We have an ansible ad hoc command cheat sheet with various ad hoc command examples.
Quick Note for Mac users – Python Crashing issue
While you are executing this command, you might get a pop up and can see the Python is crashing.
You might see either of these or both error messages which can be solved by setting this environment variable
export OBJC_DISABLE_INITIALIZE_FORK_SAFETY=YES
Error messages are given below for your reference.


Once you have got the successful ping message. You are All good to test your Playbooks and other commands.

Validate Other Ansible AD Hoc commands and Playbooks
Once the win_ping is green. you can execute some other modules and commands either as ad_hoc or as playbook to test it
here is a quick playbook you can use which executes a command on the remote server
---
- name: Windows Test Playbook
  hosts: win
  tasks:
    - name: Remote Execute the mqsc files
      win_shell: |
        hostname
        Get-Date
      register: scriptoutput

    - name: Script output
      debug: var=scriptoutput.stdout
The same playbook can be executed as two ansible ad hoc commands
ansible win -m win_shell -a "hostname" -i ansible_hosts
ansible win -m win_shell -a "Get-Date" -i ansible_hosts
Voila. You did it.
So from here onwards, your windows automation is going to take another form I can imagine.
Good luck.
If you are having any DevOps/Cloud/Automation related projects and looking for support. Try our professional team at Gritfy

Cheers
Sarav
Follow us onFacebook orTwitter
For more practical videos and tutorials. Subscribe to our channel
Find me on Linkedin My Profile
For any Consultation or to hire us [email protected]
If you like this article. Show your Support! Buy me a Coffee.
Signup for Exclusive «Subscriber-only» Content