
Такая популярная операционная система как Android не может обойтись без мощных и простых средств разработки. И именно здесь Android SDK (Software Development Kit или Набор средств для разработки ПО) показывает себя с лучшей стороны. Сегодня мы установим SDK и посмотрим, что он умеет. Это будет цикл статей о разработке приложений и игр для Android
Подготовка к установке
Android SDK поддерживает большинство современных операционных систем под архитектурой x86 и x86_64, в том числе Windows, многие дистрибутивы Linux и Mac OS X. Также на ПК должен быть установлен Java Development Kit (Java 7 или Java  , который обязательно потребуется для многих возможностей SDK, ведь Android неразрывно связан с Java.
Стоит заметить, что для встроенного эмулятора Android необходимо хорошее «железо» на PC, как, в принципе, и для других современных средств разработки.
Установка с помощью Android Studio
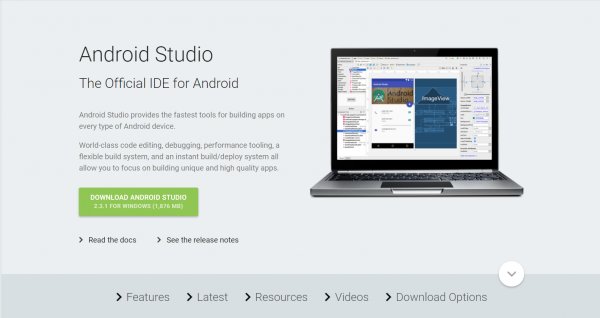
Уже долгое время существует Android Studio — официальная IDE (Integrated Development Enviroment) для разработки под Android. Туда уже включено всё необходимое и устанавливается в один клик. Достаточно лишь установить IDE, и вы также сможете использовать все возможности SDK, интегрированные внутри среды разработки.
Скачать Android Studio можно с официального сайта. Там же можно найти много полезных гайдов по работе с Android SDK, но, к сожалению, доступны они исключительно на английском языке.
Установка отдельного пакета
Если вы не рассчитываете использовать такой мощный инструмент как Android Studio или у вас уже есть установленная Intellij IDEA, на основе которой и работает эта среда разработки, то вы можете установить Android SDK отдельно. Однако никаких других преимуществ этот метод установки не даст и рекомендуется воспользоваться предыдущим способом.
Для загрузки отдельного пакета инструментов для разработки без IDE необходимо воспользоваться сайтом Android Developer. Игнорируя все возможные упоминания об Android Studio, спускаемся в самый низ страницы и находим раздел «Get just command line tools» — можно также воспользоваться поиском по странице. После скачивания подходящего пакета для вашей операционной системы, достаточно распаковать в любое удобное для вас хранилище — рекомендуется также указать местоположение SDK в Intellij IDEA (Project Structure > SDK).
Запуск и возможности
Для получения доступа ко всему функционалу Android SDK достаточно запустить пакетный файл android, если вы работаете под Windows, или же в терминале выполнить команду «android» в папке «tools/» вашего SDK для запуска на Linux и MacOS X. Вам будет предложено установить инструменты для разных версий API, чем больше инструментов установлено — тем лучше. Загрузка пакетов может занять много времени в зависимости от вашей системы и скорости интернет-соединения.
Перейдём к описанию основных инструментов:
- Platform-tools включает в себя основные инструменты взаимодействия с Android, такие как ADB, fastboot и systrace. Android Debugging Bridge поможет отследить ошибки в работе приложений на смартфоне, а также выполнять некоторые действия по работе с APK; fastboot, знакомый всем любителям прошивки своих Android-девайсов, работает в паре с ADB и помогает наладить работу устройства ещё до загрузки ОС, а systrace способен анализировать скорость работы процессов в операционной системе;
- Build-tools работают вместе с Platform-tools, но могут быть обновлены отдельно. Сюда входят такие утилиты как ProGuard для защиты ваших APK-файлов, JOBB для работы с расширениями в формате *.obb, и Zipalign, необходимый для оптимизации ваших готовых приложений;
- Кроме того, в SDK предусмотрен продвинутый эмулятор ОС Android, в котором вы сможете протестировать любые приложения и опробовать функции свежих версий Android. Однако для качественной эмуляции необходимо хорошее железо на ПК, также рекомендуется использовать эмуляцию работы x86.
Зачем же нужен Android SDK?
Android SDK — универсальный набор инструментов, который пригодится каждому пользователю смартфона или планшета, работающего под операционной системой Android. Обычный юзер может получить доступ к необходимым логам, восстановить устройство из нерабочего состояния и получить доступ к полноценному эмулятору, тогда как для разработчика это тот самый необходимый минимум, чтобы начать создавать игры и программы для Android.
Для работы проектов iXBT.com нужны файлы cookie и сервисы аналитики.
Продолжая посещать сайты проектов вы соглашаетесь с нашей
Политикой в отношении файлов cookie
Для создания новых мобильных приложений требуется специализированный инструментарий — набор компонентов, который предоставляет возможность писать код, тестировать его и оценивать результаты работы. Для разработки на платформе Android существует Android SDK, который позволяет создавать полноценные приложения. Часто возникает вопрос у пользователей, желающих заниматься разработкой: что такое Android SDK?

Android SDK (Software Development Kit) представляет собой набор инструментов, которые служат для разработки, отладки, тестирования и написания программного кода с целью создания программного обеспечения для операционной системы Android. Этот пакет предназначен как для профессиональных разработчиков, так и для энтузиастов.
Для обычных пользователей Android SDK может быть полезен для получения подробной информации об операционной системе, выявления и анализа ошибок, а также просмотра логов. Кроме того, с его помощью можно запустить средства восстановления программной оболочки устройства.
Для успешного запуска и использования Android SDK на персональном компьютере необходимо соответствие следующим минимальным требованиям:
1. Операционная система Windows 7 (SP2), Windows 8.1, Windows 10. Все операционные системы должны быть с последним пакетом обновлений.
2. Минимально: любой двухъядерный процессор с частотой 1 ГГц. Рекомендуется: четырехъядерный процессор с тактовой частотой 2,5 ГГц.
3. Оперативная память (ОЗУ) минимально должна быть 3 ГБ. Для оптимальной производительности 8 ГБ. Дополнительно для отладки и тестирования приложений или игр не менее 2 ГБ.
4. Для файла подкачки требуется не менее 4 ГБ свободного пространства на жёстком диске.
5. Разрешение монитора минимально должно быть 1280×800 с частотой обновления 60 Гц. Эти параметры обеспечат стабильную работу Android SDK и комфортные условия для разработки и тестирования приложений.
Чтобы установить Android SDK на операционные системы Windows 7 или 10, выполните следующие шаги:
1. Откройте главную страницу сайта разработчиков программного обеспечения Android.
2. На главной странице сайта в верхнем меню нажмите на кнопку «Download».
3. Вы будете перенаправлены на страницу загрузок. Там появится всплывающее окно, в котором нужно поставить галочку, подтверждая согласие с политикой конфиденциальности.
4. После подтверждения соглашения нажмите на кнопку «Скачать Android SDK для OS Windows». Загрузка начнется автоматически.
Важно помнить:
- Безопасность загрузки: Скачивайте программное обеспечение только с официального сайта разработчиков. Сторонние ресурсы могут распространять вирусы и шпионское ПО.
- Совместимость: Убедитесь, что ваша операционная система соответствует требованиям Android SDK. Программные инструменты Android SDK поддерживаются на 32-битных и 64-битных версиях Windows.
Следуя этим инструкциям, вы сможете безопасно скачать, а также установить Android SDK на вашу систему Windows, что позволит вам начать разработку приложений для андроид.

Приступая к установке Android Studio на компьютер с ОС Windows, необходимо выполнить следующие шаги для корректной настройки ПО:
1. Скачайте пакет для разработки с официального сайта Android Studio.
2. Запустите установочный файл как администратор, чтобы избежать возможных проблем с установкой.
3. После запуска установочного файла может появиться предупреждение системы безопасности. Нажмите «Запустить», чтобы продолжить процесс установки.
4. Далее начнется инициализация, а также распаковка установочных файлов. Дождитесь завершения этого процесса.
5. При появлении всплывающего окна «Разрешить внести новые сведения для этого компьютера», нажмите «Ок».
6. Продолжите процесс установки, нажав на «Next» в окне мастера установки.
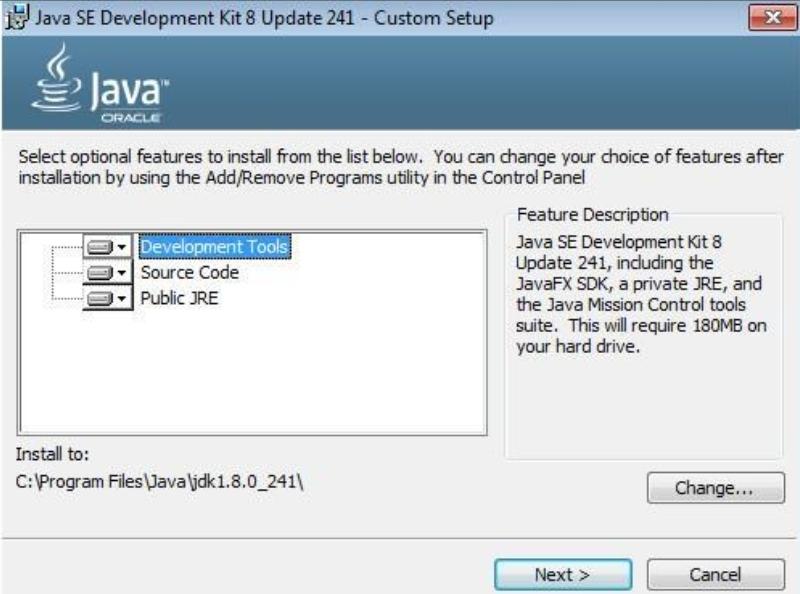
7. Выберите компоненты, которые вы хотите установить на ваш компьютер. Отмените установку тех компонентов, которые не нужны вам.
8. Выберите директорию, куда будут скопированы файлы программного обеспечения.
9. Дождитесь завершения процесса извлечения компонентов Android Platform Tools.
10. Когда на экране появится сообщение «Completed», это означает, что процесс установки завершен.
11. Нажмите «Next» и затем «Finish», чтобы завершить инсталляцию Android Studio.
После успешной установки андроид Studio вы сможете использовать интегрированное средство разработки для создания приложений под устройства на платформе андроид.
Автор: NataVd
Установка андроид SDK является важным шагом после установки основного приложения «Android Studio». Процесс инсталляции включает несколько этапов:
1. Загрузка необходимого файла с официального сайта, соответствующего версии ОС Windows.
2. Запуск установочного файла после загрузки и разрешение на внесение изменений на компьютер.
3. После запуска установочного мастера необходимо нажать кнопку «Next».
4. Автоматическое сканирование и определение компонентов «Android Studio» произойдет после этого.
5. Определение директории, в которую будут распакованы установочные файлы программного обеспечения.
6. Начнется процесс извлечения и распаковки компонентов программы.
7. После установки будет отображено соответствующее сообщение на мониторе.
Java Development Kit (JDK) 4X MSAA — ключевой инструмент, который нужен для создания приложений на платформе Android. Научимся, как его установить.
Для начала, чтобы скачать Android System Development Kit, перейдите на официальный сайт Oracle и найдите раздел «Java» в разделе «Technologies». Затем выберите соответствующую разрядность вашей системы (x64 или x86) и примите лицензионное соглашение, нажав на кнопку «Скачать». Если у вас нет учетной записи Oracle, создайте ее.
После завершения загрузки запустите мастер установки, а затем следуйте его инструкциям. Выберите директорию «Development Tools», куда требуется распаковать файлы JDK.
Автор: NataVd
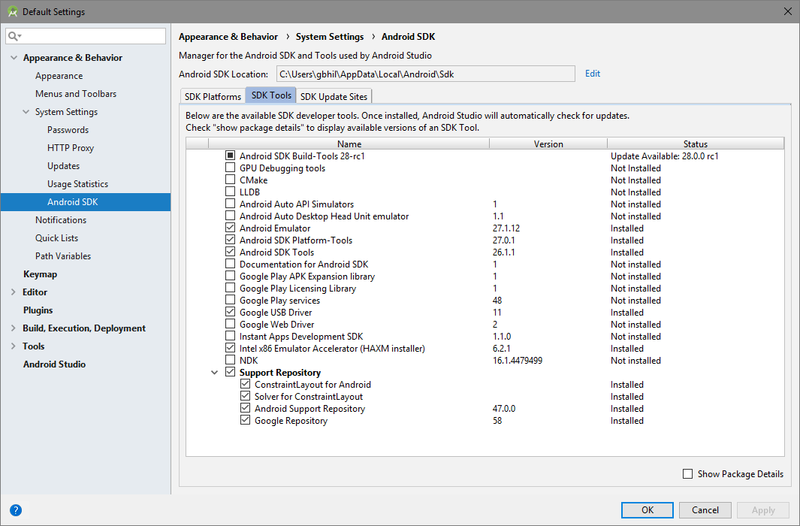
После установки основных компонентов необходимо выполнить первоначальную настройку, а также ознакомиться с пользовательским интерфейсом программного обеспечения. Для начала запустите Android Studio с правами администратора. Затем перейдите на вкладку «Конфигурация», расположенную в нижней части экрана.
Выберите инструмент «Android SDK», чтобы открыть окно «Настройки по умолчанию». Здесь выберите подраздел «Android SDK» и отметьте чекбоксы с версиями ОС, которые планируете использовать в процессе разработки приложений или игр.
Перейдите к разделу «Инструменты», где можно найти информацию о доступных установочных пакетах. Убедитесь, что выбраны чекбоксы для «Support Repository», «Support Library», «Google Play Services» и «USB Driver Platform». После завершения этих шагов настройка основных параметров будет завершена, и вы сможете приступить к работе с Android Studio. Важно помнить о необходимости регулярного обновления программного обеспечения, чтобы быть в курсе последних версий ОП и программного кода.

Android Studio — платформа, которая сегодня находится на пике популярности. Ее успех объясняется множеством полезных функций, делающих процесс разработки приложений более эффективным и удобным. Мы рассмотрим ключевые особенности Android Studio и то, как они помогают разработчикам достичь успеха:
1. Улучшенный редактор макетов. Одно из главных преимуществ Android Studio — это возможность удобного взаимодействия с компонентами пользовательского интерфейса благодаря улучшенному редактору макетов. Этот инструмент значительно упрощает процесс создания и настройки интерфейса приложения, позволяя разработчикам визуализировать результаты своей работы на лету.
2. Автоматизированная сборка с помощью Gradle. Android Studio предоставляет возможность автоматической сборки компонентов приложений при помощи инструмента Gradle. Это позволяет ускорить процесс разработки и упростить поддержку проектов, особенно при работе в команде.
При установке и запуске Android SDK пользователи часто сталкиваются с распространенными ошибками, такими как «Skipping SDK Tools 11» и «non-ASCII». Для успешного преодоления этих препятствий необходимо выполнить несколько простых шагов:
1. Ошибка «Skipping SDK Tools 11»:Чтобы устранить эту проблему, следует провести полное удаление утилиты с компьютера. Затем можно воспользоваться программой «CCleaner», чтобы удалить все остаточные файлы, связанные с Android SDK. После этого необходимо повторно установить компоненты JAVA и Platform Tools.
2. Ошибка «non-ASCII»:Если вы столкнулись с этой ошибкой из-за использования кириллических символов в имени пользователя, рекомендуется зайти в панель управления операционной системы и изменить имя учетной записи на латиницу. Это позволит избежать возникновения данной проблемы при работе с Android SDK.
Следуя этим простым рекомендациям, вы сможете успешно установить и запустить Android SDK без лишних затруднений.
Android SDK setup — Windows guide
If you are a React Native, NativeScript, Flutter or Ionic developer maybe you don’t want to install the entire Android Studio just to have your environment ready. If this is your case, this guide will help you to setup your minimal Android SDK environment in Windows.

Downloads
First of all, we need to download the following stuff.
- Android command-line tools
- Android platform tools
Once downloaded, extract the compressed.
Install Java SDK
Download and install JDK 17. You can pick the binary from AdoptOpenJDK or install it using chocolatey.
To install JDK using chocolatey, just write the following in the terminal:
choco install microsoft-openjdk17
Install Android SDK
Create a directory under C:\ named Development and another called android inside. Place both, cmdline-tools and platform-tools into C:\Development\android.
Once folders are copied, enter to cmdline-tools and open the source.properties file. You will see something like this:
Pkg.Revision=4.0
Pkg.Path=cmdline-tools;4.0
Pkg.Desc=Android SDK Command-line Tools
Check the version number and create a folder named with it. Once created, copy all the content of the cmdline-tools to this new folder.
At the end, you will have the following folder structure.
C:\Development\android\cmdline-tools\[cmdline-tools version]
C:\Development\android\platform-tools
Configure env variables
Android requires some environment variables in order to find the installation
directory in internal processes. So, let’s create them (I will not cover how to do this).
Note: set the environment variables in the System Variables section.
JAVA_HOME
The first environment variable we need to set is JAVA_HOME. Here you need to copy
the installation directory of JDK. In my case it is:
C:\Program Files\AdoptOpenJDK\jdk-8.0.292.10-hotspot
ANDROID_HOME
This must contain the address of the folder containing the cmdline-tools. So it must be:
C:\Development\android
ANDROID_SDK_ROOT
The value for this variable is the same we used for ANDROID_HOME.
Now, edit the path variable and add the following values:
%JAVA_HOME%\bin
%ANDROID_HOME%\cmdline-tools\4.0\bin
%ANDROID_HOME%\platform-tools
Accept changes and restart the OS.
Install Android APIs
We have the tools installed and configured. But this isn’t enough because we need
to install Android APIs (OS versions) and create emulators for our purposes.
Before install them, we have to install the build-tools. So, to know which is
the last version, run the following command:
You’ll see some build-tools versions. Pick the last stable (not RC). The last
one currently is the 30.0.3. So, install it:
sdkmanager "build-tools;30.0.3"
Now we can install the Android APIs we want. So, let’s install the Android 34 API level (Android 14).
We can get the name from the sdkmanager --list previously executed.
sdkmanager "platforms;android-34"
Install Android Images
We have installed Android 34 API, commercially named Android 14. Now we can install
some Android images. An Android image is just a operating system built
under an Android API. So, to see what images we have available, execute sdkmanager --list again.
I gonna install system-images;android-34;google_apis_playstore;x86_64 image:
# if you want android with play store
sdkmanager "system-images;android-34;google_apis_playstore;x86_64"
# otherwise, install the classic one
sdkmanager "system-images;android-34;google_apis;x86_64"
and we’re done.
Create emulators with AVD
We have almost anything to start working: Java, Android SDK, Android APIs and Android images.
The final step to complete our environment is create emulators.
Install emulator
Before all, we need to install the emulator component through this command:
sdkmanager --channel=0 emulator
Note: channel 0 means stable release.
After that, go to environment variables on Windows and add, to the path variable
the following:
%ANDROID_HOME%\emulator
Save changes.
Install Hardware Acceleration Execution Manager (opcional)
There is a very important step to do if you have an intel processor.
We need to install HAXM (Hardware acceleration for Intel). So,
place into the terminal and run this command:
sdkmanager "extras;intel;Hardware_Accelerated_Execution_Manager"
After installed, go to C:\Development\android\extra\intel\Hardware Accelerated Execution Manager
and execute the installer. Go through the wizard and you are done.
Create virtual devices
Run avdmanager list to get all available system images. You will get a list like this:
id: 0 or "tv_1080p"
    Name: Android TV (1080p)
    OEM : Google
    Tag : android-tv
---------
id: 1 or "tv_720p"
    Name: Android TV (720p)
    OEM : Google
    Tag : android-tv
---------
id: 2 or "automotive_1024p_landscape"
    Name: Automotive (1024p landscape)
    OEM : Google
    Tag : android-automotive-playstore
---------
...more images
Note that each item has a name. This is useful to tell avdmanager which device you want.
For example, I want to create an emulator in a Pixel device with google apis and Android 34.
This is the command that will do it:
avdmanager create avd --name "Pixel" --device "pixel" --package "system-images;android-34;google_apis;x86_64" --tag "google_apis" --abi "x86_64"
Note that --device is the name of the device we pick from list. The --package argument
tells what system image we want to use. The --tag argument tells we want to use «google-apis»
or «generic», and --abi is the architecture we want.
This process is almost instantly. So, after run the command you will able to run the emulator
you have created:
emulator -avd "Pixel" # here "Pixel" is the name I set to my emulator
Congratulations, you’re ready to install your favorite hybrid framework and start making great apps!
Download Windows Speedup Tool to fix errors and make PC run faster
The Android SDK, short for Android Software Developer Kit, is arguably the most powerful software utility widely used by programmers who indulge in Android app development. The Windows version of this toolkit serves as a helping hand to developers, and ships several other features like launching apps on the side using the Windows CMD. If you think that this could be of help to you, you can follow this guide to download and use Android SDK and Android Studio on Windows.
How to download and use Android SDK on Windows
The Android SDK by Google allows developers to create Android apps in a very simplistic manner, without them having to be full-blown experts at developing apps. It packages inside the Android Studio, which is Google’s own IDE, and several other necessary libraries. Although there is an option for users to download the SDK without Android Studio, most developers prefer to create with it. We will be looking at how you can use Android SDK both, with Android Studio and without it.
Use Android SDK command line version on Windows (Install Java)
If you’re just interested in the Android SDK to execute command lines, you’re required to download and install the latest version of Java first.
- Visit the official Java downloads page at Oracle.com and click on the Windows tab
- Here, download the ‘x64 MSI Installer’ file and install it
- Once you’re done installing Java, its time for you to install the SDK Command Line
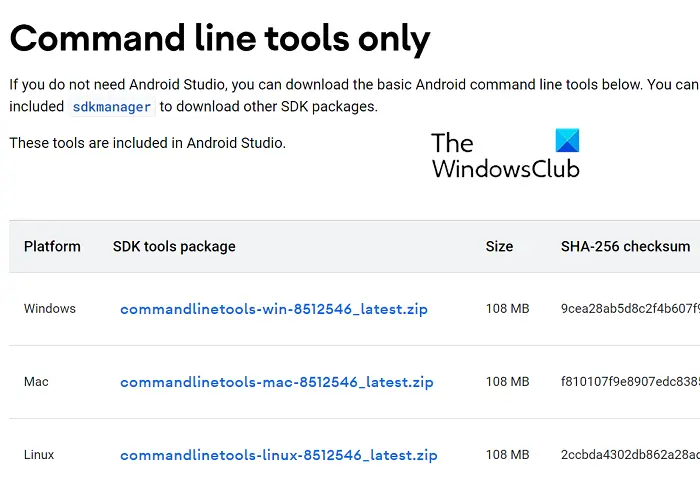
- Visit the Downloads page on developer.android.com and click on Download options
- Scroll down to find the ‘Command Lines Only’ head and download the ‘.zip’ file for Windows
It will take a few minutes for the ‘.zip’ file to download, after which you can extract it and find the “cmdline-tools” program available inside it. Now, go to your C: Drive and create a folder named ‘Android’. Inside it, create a folder named “cmdline-tools” and inside that folder, another new subfolder by the name of “tools”. In this final subfolder, paste all the contents that you’ve just extracted from the SDK Command Line folder.
Let us now see how you can initiate the process of using SDK’s Command-Line version. To do that, follow the steps below:
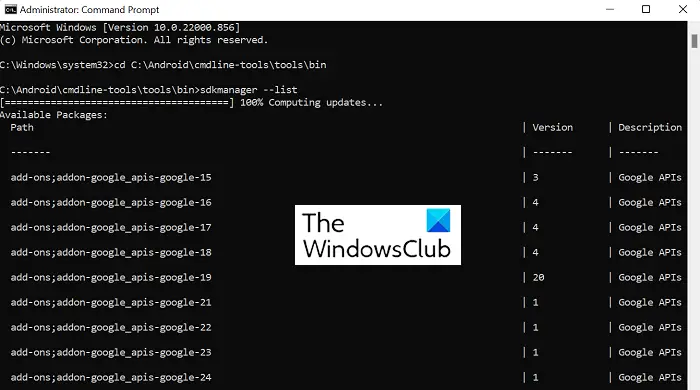
- Run Command Prompt as administrator
- Now paste the following command line:
cd C:\Android\cmdline-tools\tools\bin
- This will open the bin folder in the tools directory we just created. Now, given that you have downloaded and installed Java, paste the following line of code and press enter:
SDK manager –list
- This command will show you the list of installed and valid commands that came with the SDK Command Line
- If you are interested in installing platform tools as well, execute the following command
sdkmanager "platform-tools" "platforms;android-33"
Once you do that, you’ll find a “platform-tools” folder automatically created in your Android folder.
How to install Android Studio on Windows
Let’s look at the flip side now, where you would want to use Google’s Android Studio for your app development processes. The reason we suggested why you may wish to omit to install Android Studio is that it takes up a lot of space, but the convenience and easy-to-use UI it brings along makes it worth it.
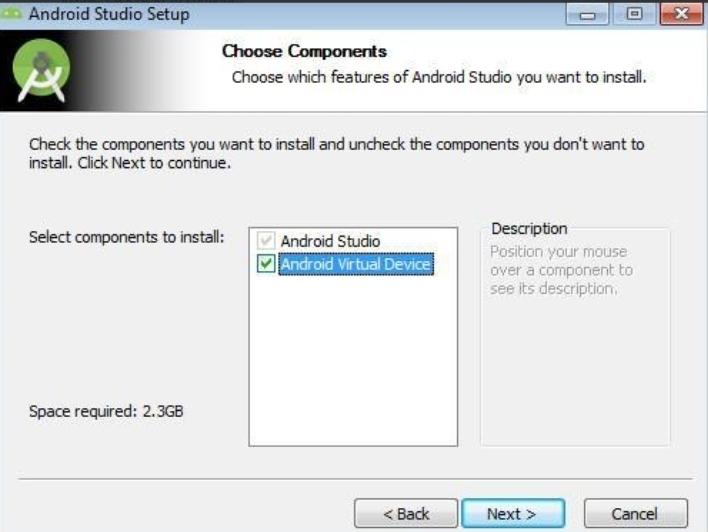
- Visit the Android Studio download page as we’d done above, click on “Download Android Studio” and follow the steps as will be shown subsequently
- This version accompanies a feature called Android Virtual Device. Developers use this to test their prototypes and products, but you don’t need to download this along with the main file
- Select the directory in which you want to save this app, or select the option that you don’t want to import any previous settings, and follow the setup wizard by continuing to click on ‘Next’
- Select the theme you want to run with your Android SDK and if there are any extra components that you’re interested in
- Finish the process once all the components are done downloading by clicking on Finish
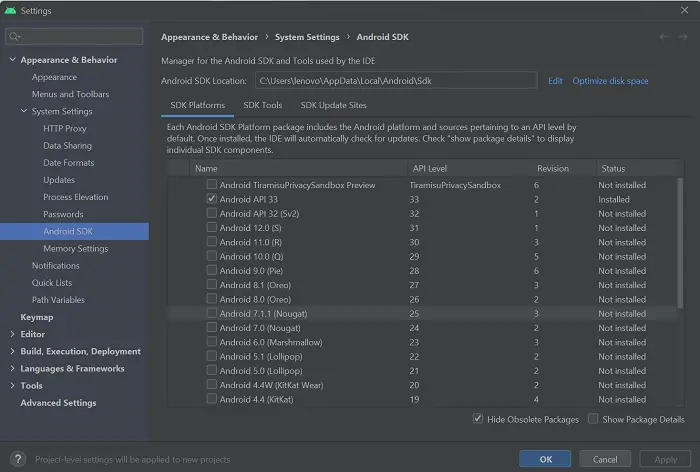
Once this process is finished, you are pretty much good to get the ground running and start with your first project on Android Studio. You can do so by clicking on ‘Create New Project’ and selecting the template of your choice. You also get an option to play around with the SDK Manager. Click on “More Options” and select SDK Manager from this drop-down. In this SDK Manager window is a list of all the installed and non-installed packages that came with this file. You can further filter them out based on obsolete packages.
Where is Android SDK installed in Windows 11/10?
There can be confusion on your mind as to where the Android SDK application file is stored upon being downloaded since the network of files can often get very elaborate and complicated. A way to ensure you remember where it is stored is to manually select the directory in which you want to install it. Alternatively, you can resort to its default saving location:
c:\Users\username\AppData\Local\Android\Sdk.
How do I install platform tools on Windows?
The Android “platform-tools” is a command line functionality used almost exclusively by app developers. Usually accompanied by the Android SDK Manager, they come in handy for complicated tasks like developing and debugging apps. If you find yourself in a situation where you have to download and install platform tools separately on your Windows PC, you can get a ‘.zip’ file for the same from an online repository. Alternatively, the platform-tools utility can also be installed while running the SDK Command-line version.
How do I fix the “SDK tools directory is missing” Error?
You may face the “SDK tools directory is missing” error while starting Android Studio on Windows. To fix that, you have to open the SDK Manager, deselect the ‘Hide obsolete packages’ option on the bottom-right corner, and further, install the Android SDK Tools(obsolete) folder. A new folder by that name will be placed in the same directory as the main Android Studio files.
We hope that you find this post helpful.
An undergraduate student of Business Economics at Delhi University, Divyansh loves Cricket, Formula 1, Television and dabbles his interest in Tech on the side. Writing about the Windows ecosystem is what excites him.
Reader Interactions
(Image credit: Android Central)
Most of us will never need to install the Android SDK. The reason why is right in the name — Software Development Kit. It’s built for people writing Android apps who need tools to work with Android from a computer.
But those tools can also be handy for folks wanting to do some more advanced stuff. Stuff like manually updating software or rooting their phone. Fastboot and ADB are vital if you’re into «hacking» at the Android software. And Google provides it free for everyone.
What to choose?
There are two ways to get a working set of Android tools on your computer. The easy way is just to install Android Studio. Everything needed to run and use the Android command line tools is part of Android Studio, as well as a way to keep the tools updated. While it’s designed for folks who want a complete development environment and includes a code editor, Android emulator, and compiler, you can use just the command line tools and never open the rest.
If you’re not afraid to get your feet wet, you can install just the SDK components outside of Android Studio. Installing them is easy (they’re inside a zip file), but setting up your computer to use them isn’t a straightforward process.
Manually installing the Android SDK
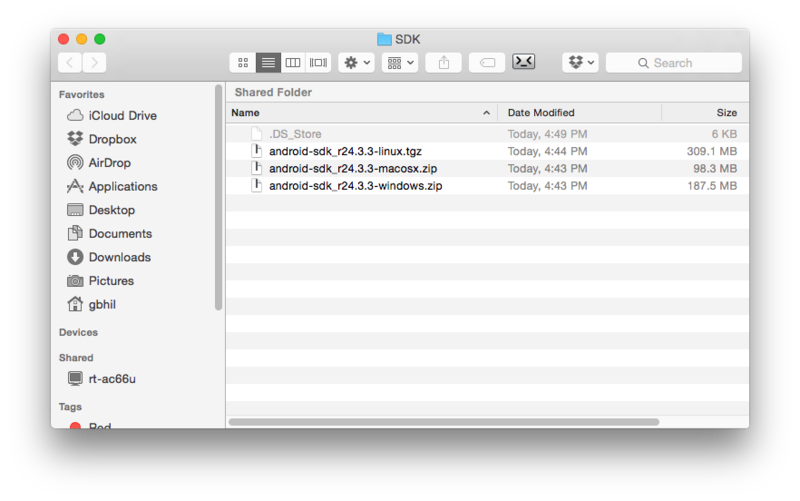
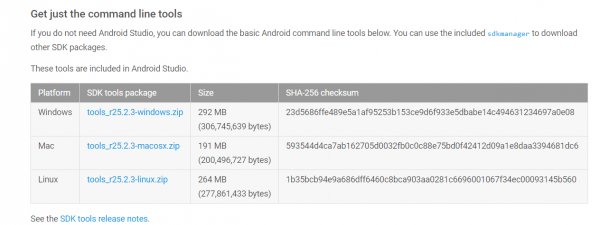
Download the SDK direct from Google by clicking here. Scroll down a bit and find the section marked «Get just the command line tools» and save it somewhere easy to get to, like your desktop. We’ll be extracting it to a better location in the next step.
The file you downloaded is compressed. You’ll need to be familiar with compressed files — and how to extract them — to go any further. If you’re not, stop here and spend the time to learn about them.
Extract your compressed file into the following location:
Get the latest news from Android Central, your trusted companion in the world of Android
- Windows: The root of your C: drive
- OS X: Your home folder
- Linux: Your home folder
Rename the extracted folder to «Android». This will make the rest of this guide, and your time with the SDK, much easier.
Prerequisites
You’ll need a working version of Java to run the SDK components. For most things, you’ll be doing with the SDK, both Open Java and Sun Java from Oracle (yes, that Oracle) will work.
- On a Mac, it’s pretty easy because you’ll already have it installed unless you uninstalled it. If you did, install it again — you should know how to do that if you knew how to uninstall it.
- On Windows, head to the Oracle website and download the correct version (32- or 64-bit) for your computer. Again, if this gives you any trouble, stop what you’re doing and learn a bit more about your computer. If you can’t install Java, maybe you’re not yet ready to use the Android SDK.
- On a Linux computer, you’ll also need to install Java. You can find x86 and x64 binaries for Sun Java from Oracle at their website. OpenJDK also works for most things you’ll need to do with the SDK. (OpenJDK is now bundled with Android Studio which includes the SDK as well as a development environment) and you’ll find complete instructions to get it installed at the OpenJDK website. If you need more assistance or want to use a package manager to install Sun Java, you’ll need to refer to the documentation for your particular distro.
Linux users will also have to make sure they have some 32-bit libraries installed if they are running a 64-bit version of the operating system. If you’re using Ubuntu or another Debian variant, install ncurses5 and stdc++6 through your terminal:
sudo apt-get install lib32ncurses5 lib32stdc++6If you’re using a different flavor of Linux, find the correct packages for ncurses5 and stdc++6 and install them.
Extract the file you downloaded above into a folder named Android on the root of your C drive (Windows) or into your Home folder (Mac, Linux). You might notice a few things are missing if you’ve ever downloaded the command line tools before as the tools and platform-tools folders are missing. That’s OK; we’re about to get them using the included SDK manager.
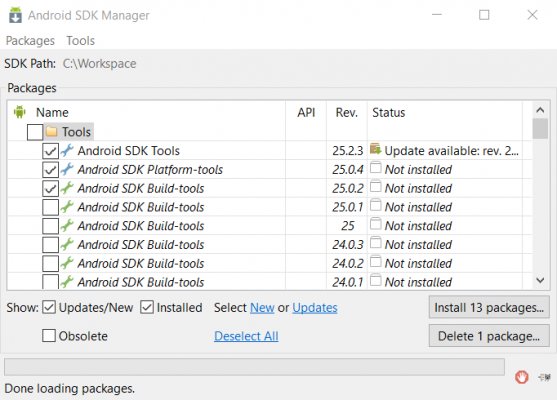
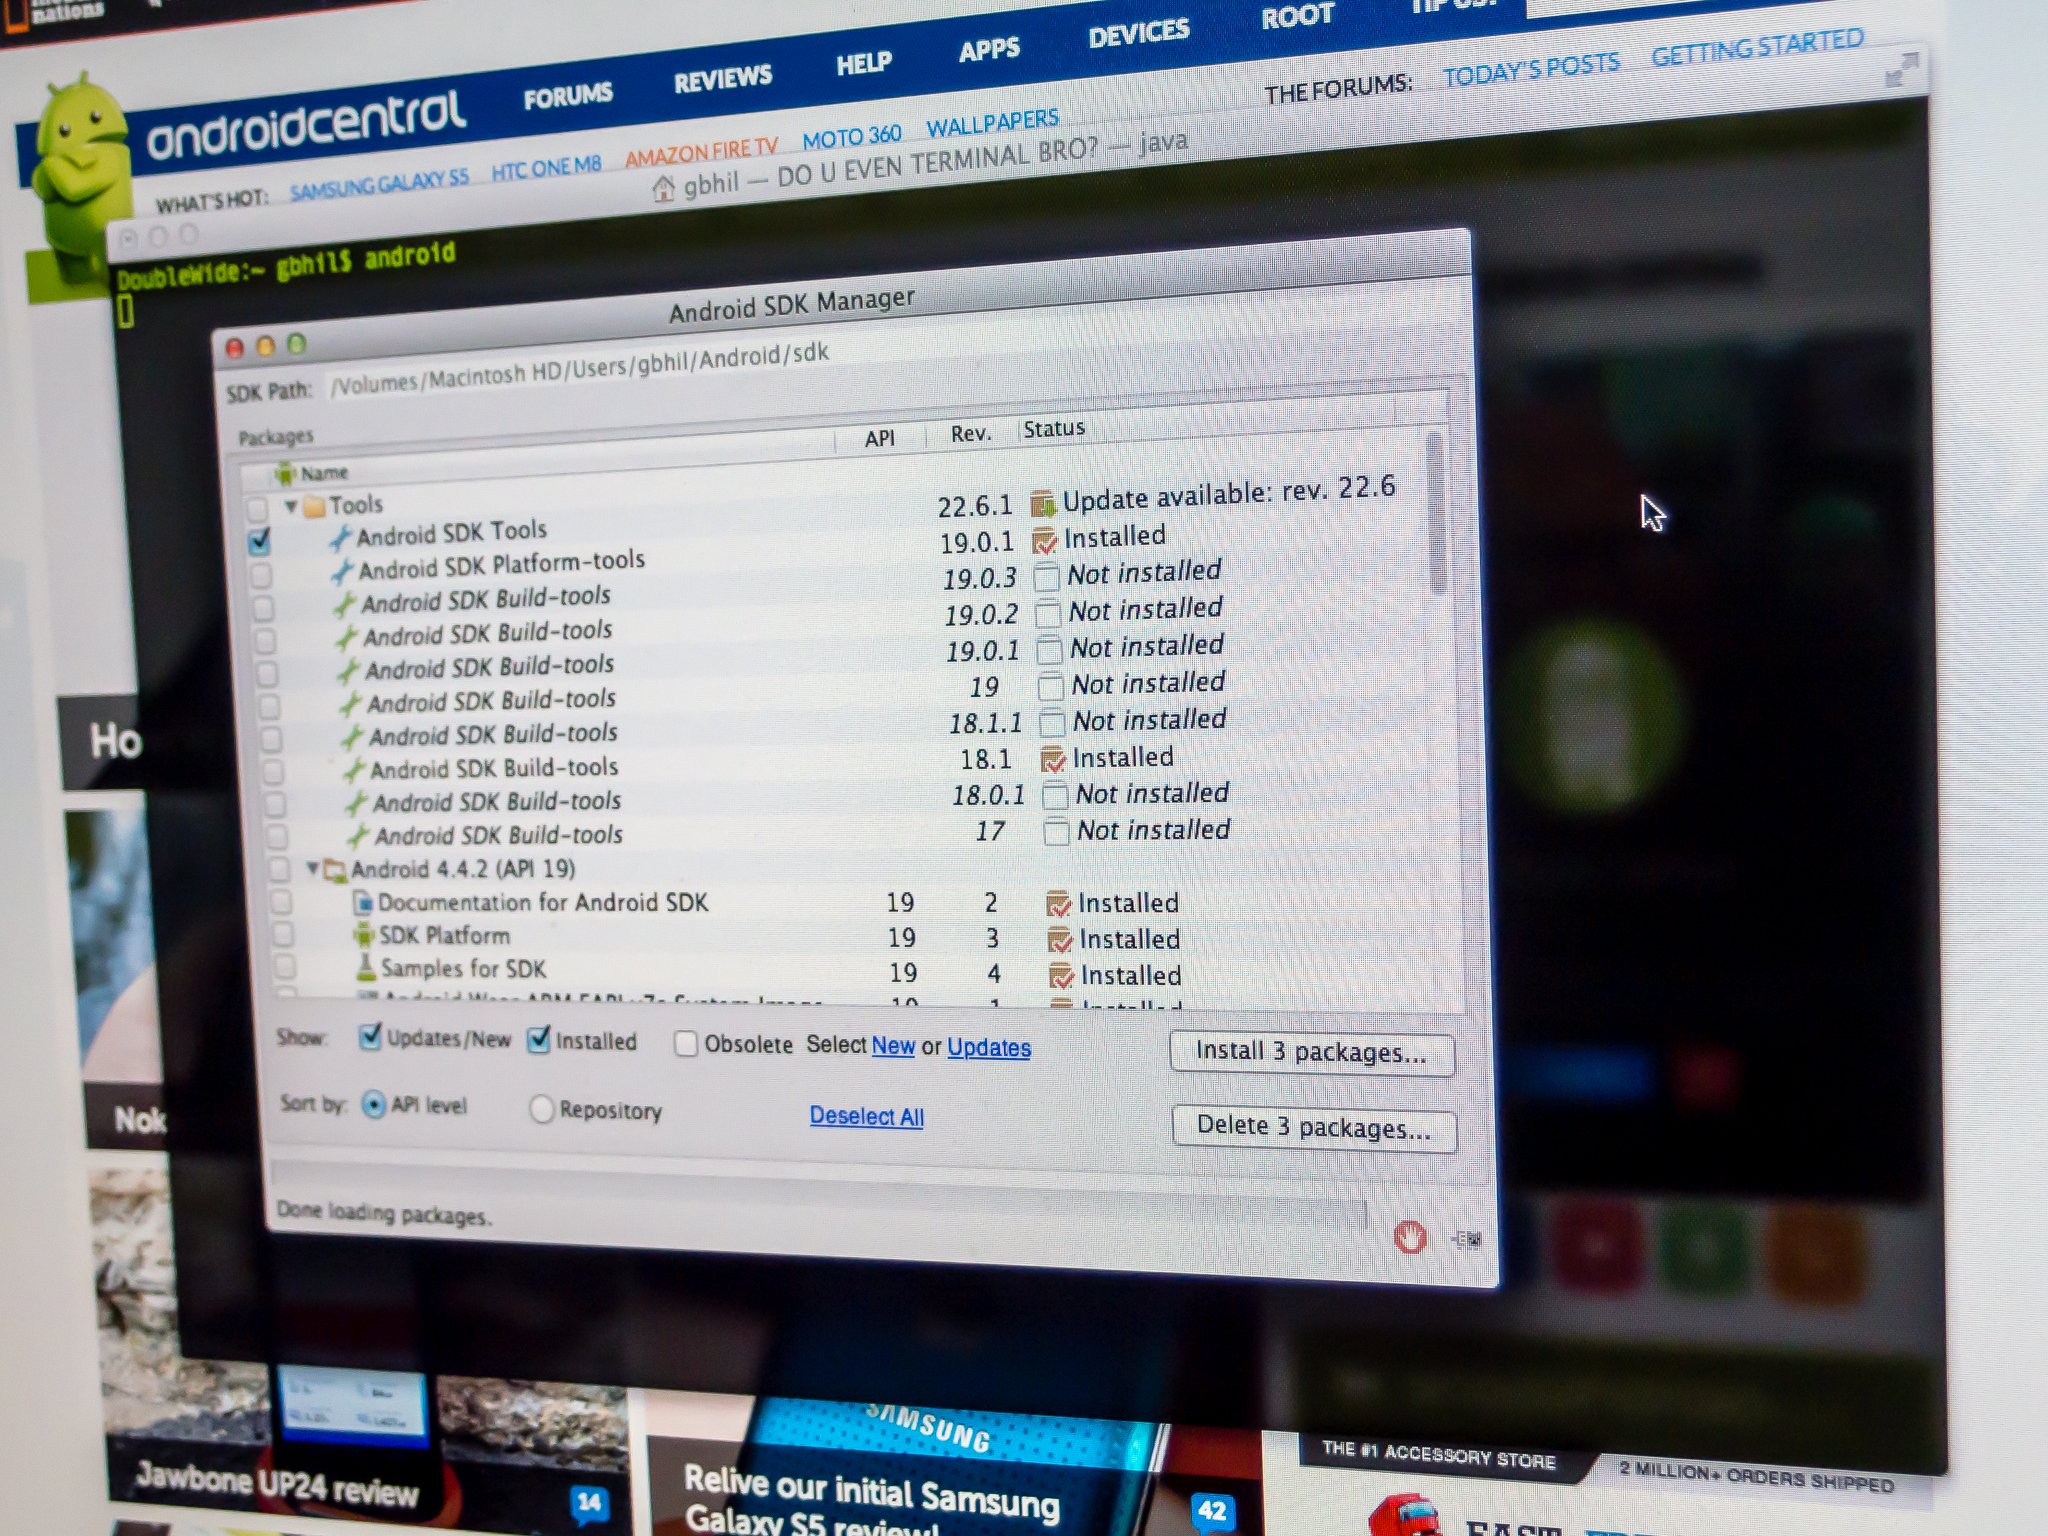
Open the bin folder in the extracted download and find the SDK manager executable file. It may look like a terminal or shell command, but it will open a GUI as long as you have Java installed correctly.
In the SDK manager, you’ll choose to install Android SDK Tools and Android SDK Platform-Tools. If you’re using Windows, you’ll also want to install the Google USB Driver, and if you plan on building AOSP from the source, you may want to install the Android SDK Build-Tools.
Choose the correct files and proceed through the process (it will show you a license agreement you should read), and both tools folders will be installed. But you’re not quite finished!
The tools will be installed into the application data folder. On Windows, it’s in Windows\users\YourUserName\AppData\Local\Android, and on a Mac or Linux, it’s in .Android (notice the dot!) in your home folder. Create a symbolic link (information for Windows users here) for both tools folders in the Android folder you created earlier. This will help get them into your PATH and make life a lot easier.
Setting your PATH
The PATH variable in your computer’s operating system tells it where to look when you want to run a command from a terminal or the command line. For example, to run the ADB command, you either need to type and provide the complete path — ie, the folder ADB is actually in, inside the SDK folder — or have the location set in the PATH variable itself. It’s a bit confusing, but the good news is that doing it is easier than explaining it.
For these directions to work as written, you will have to have extracted and renamed the SDK download folder as mentioned above, and to the correct location for this tutorial.
On Windows
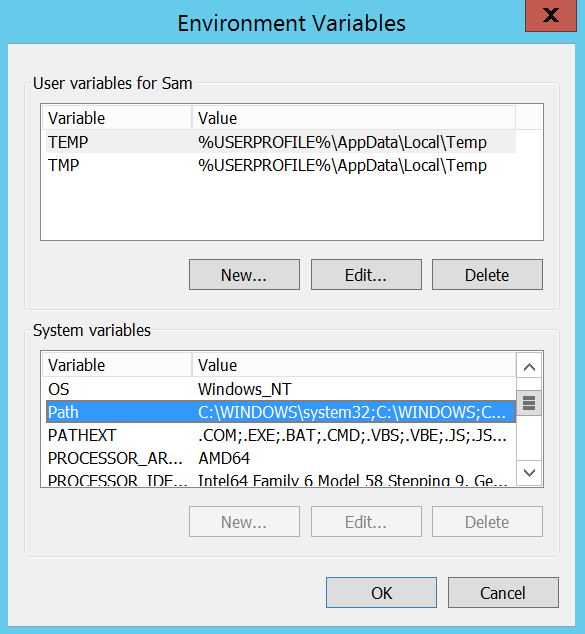
Unless you’re still using an older version of Windows, you no longer can set the PATH in the autoexec.bat file or autoexec.nt file. You’ll need to update the system Environment Variable settings instead. Here’s how it’s done on a Windows 10 machine:
- Hit the Start key on your Keyboard.
- Start typing the words Environment Variables.
- As you type, you’ll see the choice to Edit the system environment variables. Choose it.
- In the Environment Variables window, select the PATH line item in the User variables for (your user name) section, then click the Edit button.
Add the full path to the Android SDK tools and Android SDK platform-tools folders in the edit box, separated by a semi-colon. It should look something like this:
C:\Android\tools;C:\Android\platform-toolsFor older versions of Windows, refer to the documentation that came with your computer for assistance on setting the PATH. And, again: If you’ve installed your SDK somewhere other than \Android, you’ll need to adjust accordingly.
On a Mac

You can set your PATH variable on a machine running OS X in your bash profile. Doing so is easy, and is all done in one file.
In your Home folder is a file named .bash_profile. Open it with any text editor. Never touch the .bashrc or .bash_profile files you might find in the /etc. directory!
You may see a blank file, or it may be full of other information. All we need to do is add a couple of lines to the top of the file:
export PATH="$HOME/Android/tools:$PATH"export PATH="$HOME/Android/platform-tools:$PATH"(Did we mention that if your SDK is in another location, you’ll need to adjust things accordingly? Good.)
Save the file and reboot your computer so that the new PATH is sourced properly.
On Linux
Setting the PATH on a Linux computer is almost the same as on a Mac, you just edit a different file.
Using your favorite text editor, open the ~/.bashrc file. It will probably exist and have multiple entries. If you get an error that the file does not exist, simply create a new file and save it as ~/.bashrc when finished.
You’ll want to add the following two lines to the END of the .bashrc file:
export PATH="$HOME/Android/tools:$PATH"export PATH="$HOME/Android/platform-tools:$PATH"Save the file and close the terminal window. Open a new instance of the terminal and type this command:
source ~/.bashrcYour session will reference the changes you made, and the SDK will be in your PATH.
Wrapping it up

You should now have a working set of Android command-line tools and be able to do things like flash the latest factory images or manually update your phone with a zip file. And because you did it yourself, you have what you need to fix it when things go wrong.
Good luck, and have fun!
Have you listened to this week’s Android Central Podcast?

Every week, the Android Central Podcast brings you the latest tech news, analysis and hot takes, with familiar co-hosts and special guests.
- Subscribe in Pocket Casts: Audio
- Subscribe in Spotify: Audio
- Subscribe in iTunes: Audio
Jerry is an amateur woodworker and struggling shade tree mechanic. There’s nothing he can’t take apart, but many things he can’t reassemble. You’ll find him writing and speaking his loud opinion on Android Central and occasionally on Threads.