
This document describes how to set up your local work environment, how to use Repo to get the Android files, and how to build the files on your machine.
Related reading:
- For an overview of the entire code-review and code-update process, see
Life of a Patch. - For reference details about Repo, see Using Repo and Git.
What’s in the source?
To see snapshots and histories of the files available in the public Android repositories, visit the GitWeb web interface.
The source is approximately 2.6GB in size. You will need 6GB free to complete the build.
Setting up your machine
To build the Android source files, you will need to use Linux or Mac OS. Building under Windows is not currently supported.
Linux
The Android build is routinely tested in house on recent versions of Ubuntu (10.04 and later), but most distributions should have the required build tools available. Reports of successes or failures on other distributions are welcome.
In general you will need:
- Python 2.4, which you can download from python.org.
- JDK 6 if you wish to build Gingerbread or newer; JDK 5 for Froyo or older. You can download either from java.sun.com.
- Git 1.5.4 or newer. You can find it at http://git.or.cz/.
Ubuntu Linux (64-bit)
The Sun JDK is no longer in Ubuntu’s main package repository. In order to download it, you need to add the appropriate repository and indicate to the system which JDK should be used.
Java 6: for Gingerbread and newer
sudo add-apt-repository «deb http://archive.canonical.com/ lucid partner»
sudo add-apt-repository «deb-src http://archive.canonical.com/ubuntu lucid partner»
sudo apt-get update
sudo apt-get install sun-java6-jdk
sudo update-java-alternatives -s java-6-sun
Java 5: for Froyo and older
sudo add-apt-repository «deb http://archive.ubuntu.com/ubuntu dapper main multiverse»
sudo add-apt-repository «deb http://archive.ubuntu.com/ubuntu dapper-updates main multiverse»
sudo apt-get update
sudo apt-get install sun-java5-jdk
sudo update-java-alternatives -s java-1.5.0-sun
To set up your development environment, install the following required packages:
$ sudo apt-get install git-core gnupg flex bison gperf build-essential zip curl zlib1g-dev gcc-multilib g++-multilib libc6-dev-i386 lib32ncurses5-dev ia32-libs x11proto-core-dev libx11-dev lib32readline5-dev lib32z-dev
You might also want Valgrind, a tool that will help you find memory leaks, stack corruption, array bounds overflows, etc.
Running Linux in a virtual machine
If you are running Linux in a virtual machine, you will need at least 1.5GB of RAM and 10GB or more of disk space in order to build the Android tree.
Mac OS X
To build the Android files in a Mac OS environment, you need an Intel/x86 machine running MacOS 10.4 (Tiger), 10.5 (Leopard), or 10.6 (Snow Leopard). The Android build system and tools do not support the obsolete PowerPC architecture.
Android must be built on a case-sensitive file system because the sources contain files that differ only in case. We recommend that you build Android on a partition that has been formatted with the journaled file system HFS+. HFS+ is required to successfully build Mac OS applications such as the Android Emulator for OS X.
Creating a case sensitive disk image
If you want to avoid partitioning/formatting your hard drive, you can use a case-sensitive disk image instead. To create the image, launch Disk Utility and select «New Image». A size of 8 GB is sufficient, or more if you prefer. Be sure to select «case sensitive, journaled» as the volume format.
This will create a .dmg file which, once mounted, acts as a drive with the required formatting for Android development. For a disk image named «android.dmg» stored in your home directory, you can add the following to your ~/.bash_profile to mount the image when you execute «mountAndroid»:
# mount the android file image
function mountAndroid{ hdiutil attach ~/android.dmg-mountpoint /Volumes/android; }
Once mounted, you’ll do all your work in the «android» volume. You can eject it (unmount it) just like you would with an external drive.
To set up your Mac OS development environment, follow these steps:
- Install XCode from http://developer.apple.com. We recommend version 3.0 or newer. If you are not already registered as an Apple developer, you will have to create an Apple ID in order to download.
- Install MacPorts from http://www.macports.org/.
- Make sure that /opt/local/bin appears in your path BEFORE /usr/bin. If not, add
export PATH=/opt/local/bin:$PATH
to your ~/.bash_profile.
- Get make, git, and GPG packages from port:
$ POSIXLY_CORRECT=1 sudo port install gmake libsdl git-core gnupg
If using Mac OS 10.4, also install bison:
$ POSIXLY_CORRECT=1 sudo port install bison
- Temporary step: There is a bug in gmake 3.82 that prevents android from building. You can install version 3.81 using MacPorts by taking the following steps:
Edit /opt/local/etc/macports/sources.conf and a line that says
file:///Users/Shared/dports
above the rsync line. Then create this directory:
$ mkdir /Users/Shared/dports
In the new dports directory, run
$ svn co —revision 50980 http://svn.macports.org/repository/macports/trunk/dports/devel/gmake/ devel/gmake/
Create a port index for your new local repository:
$ portindex /Users/Shared/dports
Finally, install the old version of gmake with
$ sudo port install gmake @3.81
- Set an appropriate per-process file descriptor limit. To do this, add the following lines to your ~/.bash_profile:
# set the number of open files to be 1024
ulimit -S -n 1024
Installing Repo
Repo is a tool that makes it easier to work with Git in the context of Android. For more information about Repo, see Using Repo and Git.
To install, initialize, and configure Repo, follow these steps:
- Make sure you have a bin/ directory in your home directory, and that it is included in your path:
$ mkdir ~/bin
$ PATH=~/bin:$PATH - Download the Repo script and ensure it is executable:
$ curl http://android.git.kernel.org/repo > ~/bin/repo
$ chmod a+x ~/bin/repo
Initializing a Repo client
After installing Repo, set up your client to access the android source repository:
- Create an empty directory to hold your working files:
$ mkdir directory
$ cd directory - Run repo init to bring down the latest version of Repo with all its most recent bug fixes. You must specify a URL for the manifest, which specifies where the various repositories included in the Android source will be placed within your working directory.
$ repo init -u git://android.git.kernel.org/platform/manifest.git
To check out a branch other than «master», specify it with -b:
$ repo init -u git://android.git.kernel.org/platform/manifest.git -b cupcake
- When prompted, please configure Repo with your real name and email address. To use the Gerrit code-review tool, you will need an email address that is connected with a registered Google account. Make sure this is a live address at which you can receive messages. The name that you provide here will show up in attributions for your code submissions.
A successful initialization will end with a message stating that Repo is initialized in your working directory. Your client directory should now contain a
.repo
directory where files such as the manifest will be kept.
Getting the files
To pull down files to your working directory from the repositories as specified in the default manifest, run
$ repo sync
For more about
repo sync
and other Repo commands, see Using Repo and Git.
The Android source files will be located in your working directory under their project names.
Verifying Git Tags
Load the following public key into your GnuPG key database. The key is used to sign annotated tags that represent releases.
$ gpg —import
Copy and paste the key(s) below, then enter EOF (Ctrl-D) to end the input and process the keys.
——BEGIN PGP PUBLIC KEY BLOCK——
Version: GnuPG v1.4.2.2 (GNU/Linux)
mQGiBEnnWD4RBACt9/h4v9xnnGDou13y3dvOx6/t43LPPIxeJ8eX9WB+8LLuROSV
lFhpHawsVAcFlmi7f7jdSRF+OvtZL9ShPKdLfwBJMNkU66/TZmPewS4m782ndtw7
8tR1cXb197Ob8kOfQB3A9yk2XZ4ei4ZC3i6wVdqHLRxABdncwu5hOF9KXwCgkxMD
u4PVgChaAJzTYJ1EG+UYBIUEAJmfearb0qRAN7dEoff0FeXsEaUA6U90sEoVks0Z
wNj96SA8BL+a1OoEUUfpMhiHyLuQSftxisJxTh+2QclzDviDyaTrkANjdYY7p2cq
/HMdOY7LJlHaqtXmZxXjjtw5Uc2QG8UY8aziU3IE9nTjSwCXeJnuyvoizl9/I1S5
jU5SA/9WwIps4SC84ielIXiGWEqq6i6/sk4I9q1YemZF2XVVKnmI1F4iCMtNKsR4
MGSa1gA8s4iQbsKNWPgp7M3a51JCVCu6l/8zTpA+uUGapw4tWCp4o0dpIvDPBEa9
b/aF/ygcR8mh5hgUfpF9IpXdknOsbKCvM9lSSfRciETykZc4wrRCVGhlIEFuZHJv
aWQgT3BlbiBTb3VyY2UgUHJvamVjdCA8aW5pdGlhbC1jb250cmlidXRpb25AYW5k
cm9pZC5jb20+iGAEExECACAFAknnWD4CGwMGCwkIBwMCBBUCCAMEFgIDAQIeAQIX
gAAKCRDorT+BmrEOeNr+AJ42Xy6tEW7r3KzrJxnRX8mij9z8tgCdFfQYiHpYngkI
2t09Ed+9Bm4gmEO5Ag0ESedYRBAIAKVW1JcMBWvV/0Bo9WiByJ9WJ5swMN36/vAl
QN4mWRhfzDOk/Rosdb0csAO/l8Kz0gKQPOfObtyYjvI8JMC3rmi+LIvSUT9806Up
hisyEmmHv6U8gUb/xHLIanXGxwhYzjgeuAXVCsv+EvoPIHbY4L/KvP5x+oCJIDbk
C2b1TvVk9PryzmE4BPIQL/NtgR1oLWm/uWR9zRUFtBnE411aMAN3qnAHBBMZzKMX
LWBGWE0znfRrnczI5p49i2YZJAjyX1P2WzmScK49CV82dzLo71MnrF6fj+Udtb5+
OgTg7Cow+8PRaTkJEW5Y2JIZpnRUq0CYxAmHYX79EMKHDSThf/8AAwUIAJPWsB/M
pK+KMs/s3r6nJrnYLTfdZhtmQXimpoDMJg1zxmL8UfNUKiQZ6esoAWtDgpqt7Y7s
KZ8laHRARonte394hidZzM5nb6hQvpPjt2OlPRsyqVxw4c/KsjADtAuKW9/d8phb
N8bTyOJo856qg4oOEzKG9eeF7oaZTYBy33BTL0408sEBxiMior6b8LrZrAhkqDjA
vUXRwm/fFKgpsOysxC6xi553CxBUCH2omNV6Ka1LNMwzSp9ILz8jEGqmUtkBszwo
G1S8fXgE0Lq3cdDM/GJ4QXP/p6LiwNF99faDMTV3+2SAOGvytOX6KjKVzKOSsfJQ
hN0DlsIw8hqJc0WISQQYEQIACQUCSedYRAIbDAAKCRDorT+BmrEOeCUOAJ9qmR0l
EXzeoxcdoafxqf6gZlJZlACgkWF7wi2YLW3Oa+jv2QSTlrx4KLM=
=Wi5D
——END PGP PUBLIC KEY BLOCK——
After importing the keys, you can verify any tag with
$ git tag -v tagname
Building the code
To build the files, run envsetup, lunch, and make from within your working directory:
$ cd ~/directory
$ source build/envsetup.sh
$ lunch
$ make
If your build fails because of a missing
run-java-tool
, try setting the
ANDROID_JAVA_HOME
environment variable before making.
$ export ANDROID_JAVA_HOME=$JAVA_HOME
What’s next?
See Using Eclipse for instructions on how to use an IDE for Android platform development. To learn about reporting an issue and searching previously reported issues, see Report bugs. For information about editing the files and uploading changes to the code-review server, see Contribute.
Download Android Repositories for GitHub-700 + repositories PC for free at AppsPlayground. adarshgumashta published Android Repositories for GitHub-700 + repositories for Android operating system mobile devices, but it is possible to download and install Android Repositories for GitHub-700 + repositories for PC or Computer with operating systems such as Windows 7, 8, 8.1, 10 and Mac.
Let’s find out the prerequisites to install Android Repositories for GitHub-700 + repositories on Windows PC or MAC computer without much delay.
Select an Android emulator: There are many free and paid Android emulators available for PC and MAC, few of the popular ones are Bluestacks, Andy OS, Nox, MeMu and there are more you can find from Google.
Compatibility: Before downloading them take a look at the minimum system requirements to install the emulator on your PC.
For example, BlueStacks requires OS: Windows 10, Windows 8.1, Windows 8, Windows 7, Windows Vista SP2, Windows XP SP3 (32-bit only), Mac OS Sierra(10.12), High Sierra (10.13) and Mojave(10.14), 2-4GB of RAM, 4GB of disk space for storing Android apps/games, updated graphics drivers.
Finally, download and install the emulator which will work well with your PC’s hardware/software.
How to Download and Install Android Repositories for GitHub-700 + repositories for PC or MAC:
- Open the emulator software from the start menu or desktop shortcut in your PC.
- Associate or set up your Google account with the emulator.
- You can either install the app from Google PlayStore inside the emulator or download Android Repositories for GitHub-700 + repositories APK file and open the APK file with the emulator or drag the file into the emulator window to install Android Repositories for GitHub-700 + repositories for PC.
You can follow above instructions to install Android Repositories for GitHub-700 + repositories for PC with any of the Android emulators available.
Download Android Repositories for GitHub-700 + repositories
Android Repositories for GitHub-700 + repositories for PC
✦ Find your favorite android github repositories ✦
Last Updated :
20 Jul, 2022
Git is created by Linus Torvald. Git is the most popular Version Control System in the world, used by millions of developers. It helps us to keep track of all the files in a project. Git tracks every change that are made. If we make a mistake, it can reset a file to match a previous version or we can also reset the version of all the project files at the same time. The collection of all versions of the project files is known as a Git Repository. It’s basically a folder in which we can edit our files and then run Git commands to store the changes made and pull in changes from other contributors. We can have multiple Git repositories on our computer one for each project we are working on.
Why Git?
- Free
- Open Source
- Super Fast
- Scalable
- Cheap Branching/Merging
Android Studio
Android Studio is the official IDE (Integrated Development Environment) for Android app development. It is based on JetBrains’ IntelliJ IDEA.
Installing Git in Android Studio
To get started we have to install Git which can be downloaded from the official website git-scm.com/downloads.
Step 1: On the download, section select the operating system that we are working on. (As I am working on Windows so, I am going to select Windows)
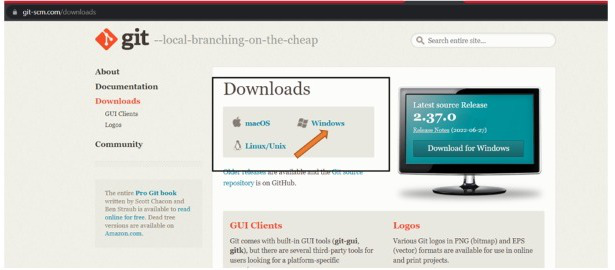
And the download should begin automatically.
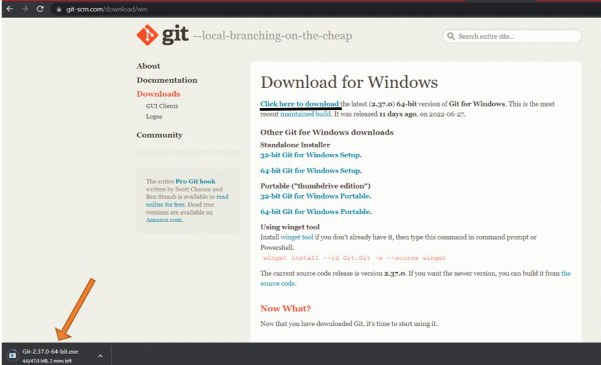
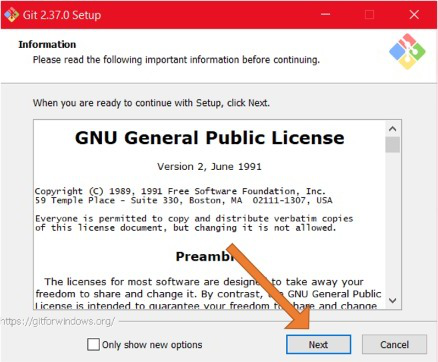
Step 2: Once the download is done we are going to run the executable and then hit «Yes» and then click «Next».
Now, setting up the path is a very important process. It is highly recommended to keep it as the default path because Android Studio can auto-detect Git.
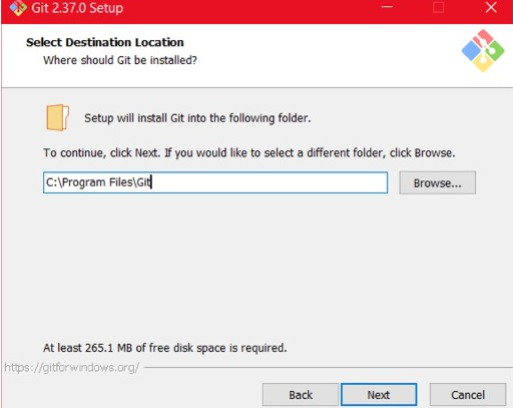
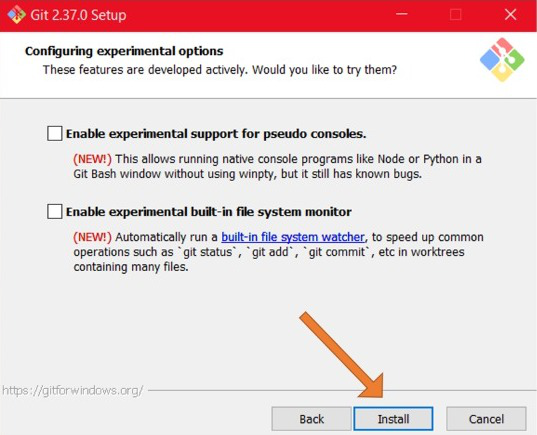
Then keep on hitting next by keeping everything as default. And then finally we have to click install.
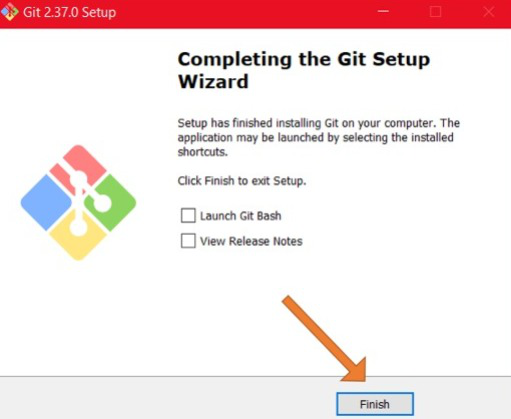
And then click on finish, and Git should be installed on the computer.
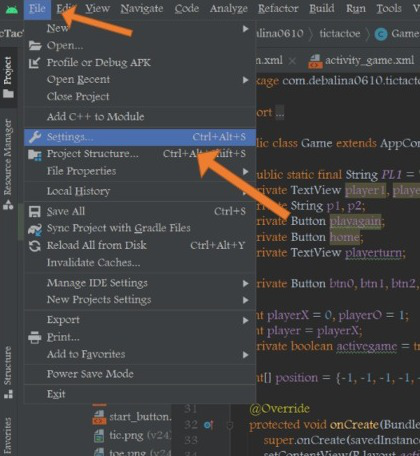
Step 3: Now let’s check on Android Studio whether it auto detects where Git was downloaded. So, to do this we are going to click on «File» and then on «Settings».
Now, in Settings, we are going to click on «Version Control» and then «Git», and in the top portion, it is said that «Auto Detected» is the path where the Git executable file is, and on clicking on «Test» the Git Version which is installed is shown.

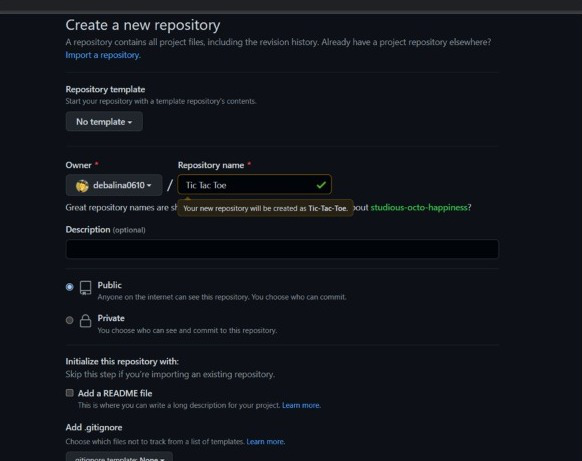
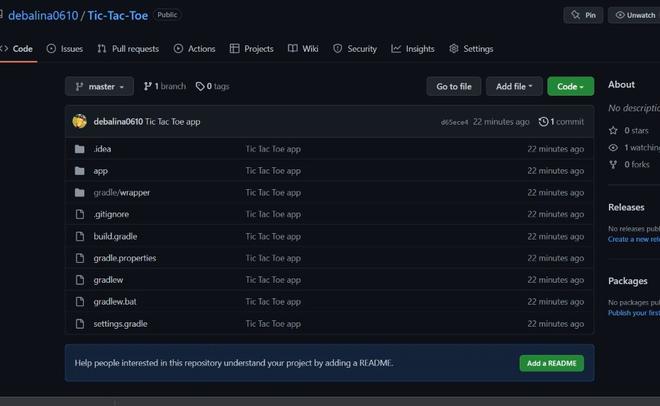
Step 4: To install Git in Android Studio, we have to build a repository on GitHub first.
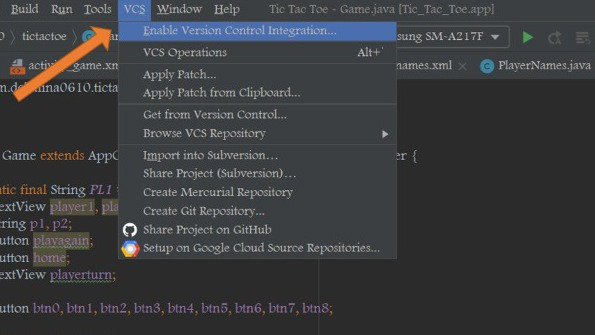
Step 5: Now coming back to Android Studio, click on «VCS» (Version Control Systems) and then click on «Enable Version Control Integration».
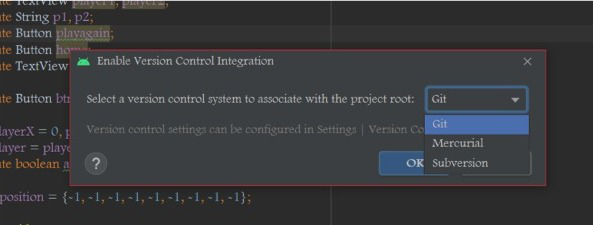
Step 6: Then on selecting a version control, click «Git» and then «Ok».
Step 7: Now, it is shown that a Git repository is created.
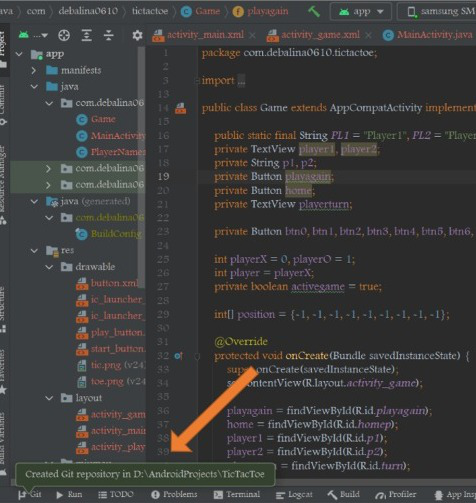
Don’t worry if all the files turn red. It is because we haven’t uploaded those files to GitHub yet.
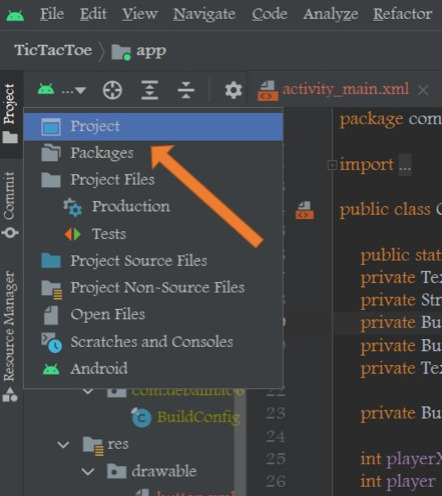
Step 8: In the next step, now coming over to the far left instead of having «Android» we are going to choose «Project».
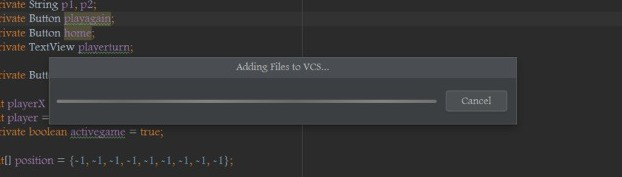
And then we are going to right-click on the first folder coming down to Git and then we are going to add those files.
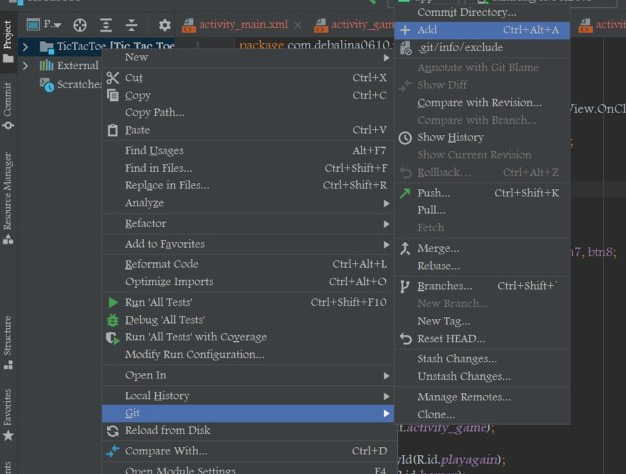
So, it’s going to add them all to our Version Control System.
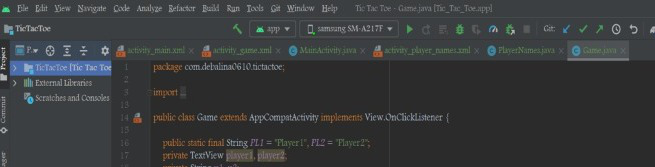
And then, all of the files should turn green.
Step 9: Coming over to Git and then clicking on «Commit».
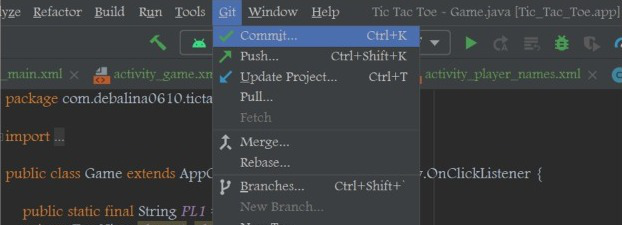
It will ask us to add a comment to it and then click on «Commit».
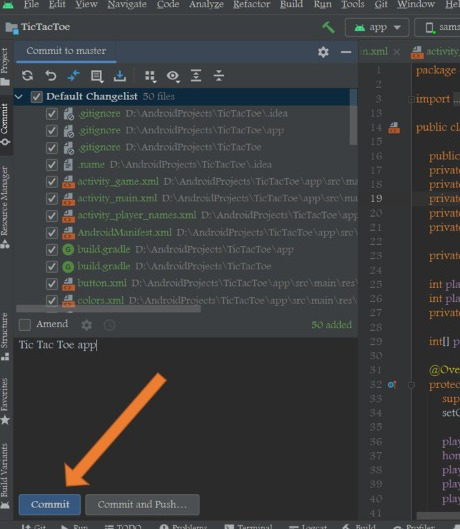
Do not worry about the warnings that are shown. Only the code should not contain any errors, and thus, Git is installed in Android Studio, and also we learned how to commit the files using Git from Android Studio. Now, if we want, then, we can «Push» the files to the GitHub
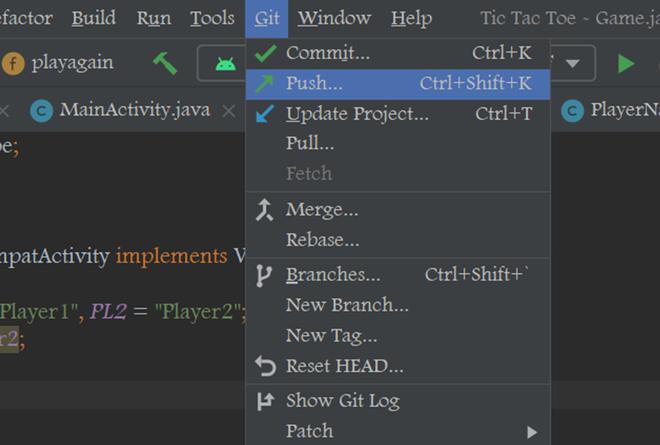
Step 10: Come over to Git and then click on «Push».
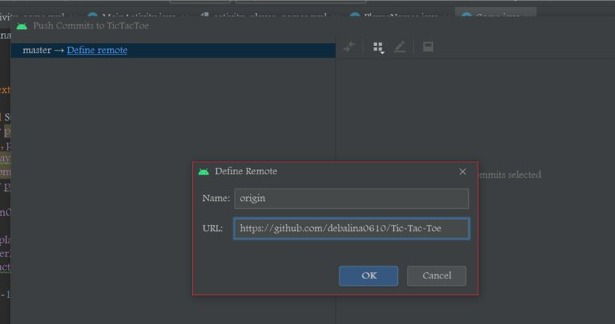
Now, we need to «Define remote» which is actually the repository to which we are uploading to, and then we need to copy and paste the URL of the repository and then click «Ok».
We are shown a list of files that were added to the repository. Now, all we have to do is click «Push».
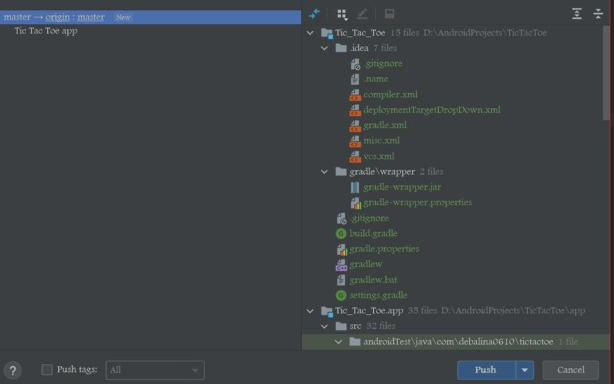
Thus, we have uploaded a project to GitHub.
Overview
The source code for Android is available at https://android.googlesource.com.
It’s important to note that the open source project for Android consists of multiple Git repositories. While each Git repo can be cloned separately, Google provides a special repo script to help retrieve all of them. This script also helps automate the process of submitting pull request changes to the repository, so you
will need to use this tool for any code changes.
While downloading and building the entire tree requires at least 100GB and usually relies on building on
certain machines according to the official docs, you
can also build portions of the repo without needing this much disk space. One downside however is that
initially downloading the Git data from all the repos still takes at least 1-3 hours.
Building Android Tools
This walkthrough shows an example of how you can build the Android Tools repository. It is intended to show how you can contribute back to any part of the Android open source code, such as the components that work with Android Studio, the native emulator, the 9-patch viewer, etc. It also will show you how to setup with a Java IDE to be able to set breakpoints and understand the code better.
Preliminary Setup
See the instructions to make sure you have installed all the necessary libraries. You will need at least JDK 7 installed. There isn’t much setup work needed for OS X, but follow the apt-get install commands if running Ubuntu-based machines. If you are using Ubuntu 15.04 machines, you may need to run these commands at the minimum to get the Tools repository to compile:
sudo apt-get install libc6-dev-i386 lib32z1
sudo ln -s /usr/lib32/libstdc++.so.6 /usr/lib32/libstdc++.so
Download the IntelliJ IDEA Community Edition IDE. You will be able to use this IDE to compile and troubleshoot any of the Java-based tools.
Install the Repo client
The first step necessary is to download the repo client, which helps manage all the various Android repos.
Create a ~/bin directory
You will need to download and store the repo script somewhere. The official docs recommend storing the program
in a ~/bin directory accessible through the PATH environment variable.
$ mkdir ~/bin
$ PATH=~/bin:$PATH
Downloading the repo client
$ curl https://storage.googleapis.com/git-repo-downloads/repo > ~/bin/repo
$ chmod a+x ~/bin/repo
Downloading the source code
Use the repo client to download the latest branch:
$ mkdir studio-1.4-dev
$ cd studio-1.4-dev
$ repo init -u https://android.googlesource.com/platform/manifest -b studio-1.4-dev
$ repo sync
When the repo init command is run, it will first download code from its own repository. It uses the manifest repository to determine what Android repositories are available. You can type repo help or check out the sub commands to see what functions are supported.
The overview page lists all the available branches to use. Most likely you should pick the current development branch. Android Studio and Gradle versions are often released at different times, so there are also separate Git tags created. For instance, if you wish to check out tagged releases for Gradle releases, you can also look through the list of tagged branches and use repo to switch to this branch by typing:
repo init -b gradle_1.3.1
repo sync
The repo sync script will refetch any changes. If you have made any changes in this repo, you may need to do the equivalent of resetting your changes across all Android repositories before attempting to run the sync command.
repo forall -vc "git reset --hard"After running repo, you should have a tools/ directory created. There should be many subdirectories under this directory such as base, emulator, and gradle too. Many of these directories are also separate Git repositories.
Editing the build.gradle
The current tools project requires Java 1.6 and prevents you from building unless Java v1.6 is used. Assuming you have downloaded the latest branch, you can edit the tools/build.gradle in this directory and change the requiredVersion check to match the version you are running. You can obviously set an environment variable to do the same as well.
task('checkJavaVersion') << {
    def jvmVersion = System.getProperty('java.version')
    def requiredVersion = System.getenv('JAVA_FOR_TESTS') ?: '1.6'
    if (!jvmVersion.startsWith(requiredVersion)) {
        throw new RuntimeException("Tools need to be compiled with Java $requiredVersion, you are using Java $jvmVersion.")
    }
}
This pull request is intended to modify the behavior to allow any version of Java v1.6 to run.
Updating gradle.properties
You should have a tools/gradle/wrapper/gradle.properties already created as well. Currently this file assumes that
you have Gradle stored in a external/gradle directory. You can change the distributionUrl reference to point to a remote URL, which will be fetched if it doesn’t currently exist:
distributionBase=GRADLE_USER_HOME
distributionPath=wrapper/dists
zipStoreBase=GRADLE_USER_HOME
zipStorePath=wrapper/dists
distributionUrl=https\://services.gradle.org/distributions/gradle-2.2.1-all.zip
If you forget this step, IntellIJ will likely complain about not having a Gradle Home setup.
Changing the output directory
Normally the Tools project will try to store all the intermediate builds inside a common build/ directory in the main repo. There is a current issue with IntelliJ v13.1 and up that prevents you from doing so.
If you see «Can’t register given path of type ‘SOURCE’ because it’s out of content root», you will need to change
the project.buildDir as shown:
subprojects { Project project ->
    // Change buildDir first so that all plugins pick up the new value.
    //  project.buildDir = project.file("$project.parent.buildDir/../$project.name/build")
    project.buildDir = project.file("build")
}
Opening with a Java IDE
You should now be able to open the tools/build.gradle file. Import the project and make sure that the Gradle wrapper option is selected. You should be able to build the project successfully.
You can find any of the tests, right click on the file, and click on the Debug option..
Experimenting with changes
Click on the Gradle icon on the right side of the screen and find the publishLocal option by going to tools->Tasks->other->publishLocal. Click on it to save it to an /out/repo directory that will be used in the next step.
You can also type the same command at the command-line:
./gradlew publishLocalIf you wish to experiment with the changes made with this new package, you can simply modify your app/build.gradle. You would add an extra maven reference to the out/repo directory created. Assuming you were experimenting on the gradle:1.4.0-beta branch, your configuration would look like the following:
buildscript {
    repositories {
        jcenter()
        maven { url '/home/johndoe/projects/android/out/repo/' }
    }
    dependencies {
        classpath 'com.android.tools.build:gradle:1.4.0-beta'
Submitting changes
You must first start a branch using the repo command:
repo start <branch_name> <project_name>The project name can be determined by looking through the manifest file. For instance, the Tools project has multiple project names: platform/tools/base, platform/tools/build, platform/tools/emulator, etc.
The branch name can refer to any name you wish. It is a name that you will create locally and should refer to the set of changes for a particular improvement or feature change.
Once you’ve started a branch, you can go into the individual repositories and use Git as you normally would to add, revise, and commit changes. To create a pull request, you can type repo upload. If you revise any changes, you would use the same command too.
See the Google guide for submitting patches.
References
- https://source.android.com/source/using-repo.html
- https://source.android.com/source/developing.html
- http://tools.android.com/overview
Решил поделиться своей инструкцией как собрать AOSP (Android Open Source Project). Эта инструкция будет полезна тем кто хочет посмотреть что-же внутри Android и возможно заняться системной разработкой. В любом случаи эти знания полезны для понимания самого Android, как раз для этого и решил собрать AOSP.
Проект собираю на elementary 5.1 OS Ubuntu 18.04 LTS (bionic), пытался на MacOS собрать, но так и не удалось. Для исходников и сборки нужно 200 Гб на жестком диске (лучше SSD, на обычном производительность сильно проседает). Так же много времени, я потратил чтобы скачать и собрать около 20 часов, частично виновата «слабая» конфигурация моего компьютера. У меня установлено всего 8 Гб оперативной памяти, но увеличил размер swap-а до 16 Гб.
Загружаем AOSP
Установить требуемые пакеты для загрузки и сборки :
sudo apt-get install git-core gnupg flex bison build-essential zip curl zlib1g-dev gcc-multilib g++-multilib libc6-dev-i386 lib32ncurses5-dev x11proto-core-dev libx11-dev lib32z1-dev libgl1-mesa-dev libxml2-utils xsltproc unzip fontconfigСоздаем папку и качаем repo утилиту для загрузки исходного кода
mkdir aosp # имя папки можно выбрать любое
cd aosp

curl https://storage.googleapis.com/git-repo-downloads/repo > repo
chmod a+x repo
Исходники AOSP состоят из отдельных проектов с собственными git-репозиториями, repo позволяет упросить всю загрузку всех проектов и разложить по нужным папкам.
Инициализируем repo
./repo init -b android-10.0.0_r45 --depth 1 -u https://android.googlesource.com/platform/manifestПараметры:
- -u — урл git-репозитория с манифестом
- -b — ветка (самая последняя на текущий момент)
- —depth — скачивать только одну ветку (если не использовать, то для каждого репозитория скачается весь индекс, что увеличит время загрузки и место на диске)
Выбрал самую последнюю версию Android 10. Не использую develop или master, так как там устаревший манифест и проект скорее не соберется.
Теперь можно запустить загрузку исходников AOSP
./repo sync -c -j $(nproc) --no-tags --no-clone-bundleПараметры:
- -c — скачивать только текущую ветку манифеста (как указал выше — android-10.0.0_r45)
- -j — количество потоков, обычно указывается столько доступно процессоров
- —no-tags — не скачивать тэги с репозитариев
- —no-clone-bundle — не пытаться качать clone.bundle (упакованная репа, которая уменьшить время на загрузку, но не у всех сервер формирует этот bundle),
—no-clone-bundle можно попробовать убрать, что в теории ускорит скачивание, но у меня заваливается с 404 ошибкой
Скачивание может занять минуты и часы, теперь с repo закончили, если нужно почитать больше то ищите в официальной документации: https://source.android.com/setup/develop/repo
Сборка
Настраиваем среду разработчика:
source build/envsetup.shконфигурируем сборку
lunch aosp_x86_64-engx86_64 — указывается под какой девайс собирать, в данном случае Generic x86_64 подходит для эмуляторов, если будете запускать на Nexus девайсах, то ищите детали в документации https://source.android.com/setup/build/building#choose-a-target
eng — тип сборки (сокращение от engineering), с максимальными логами и дополнительными утилитами для отладки. Другие тип сборки думаю не особо интересны
Для сборки java файлов увеличиваем Heap size, если этого не сделать, то сборка всего завалится с StackOverflow ошибкой:
export _JAVA_OPTIONS="-Xmx4g"Так же можно добавить в .bashrc чтобы постоянно не повторять команду
Все, теперь готовы к сборке:
USE_CCACHE=1 CCACHE_DIR=ccache make -j $(nproc)Можно не использовать CCACHE, что уменьшит количество занимаемого места на диске, но увеличит время повторной сборки. На моем «слабом» компьютере сборка заняла где-то 16 часов.
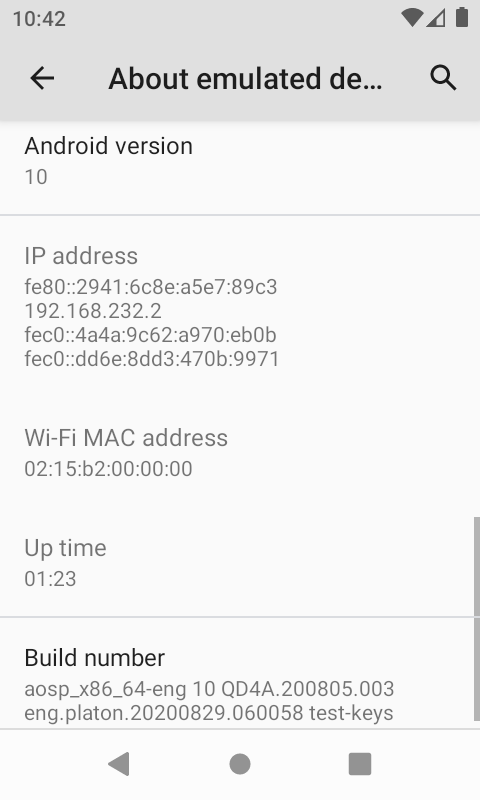
После окончания сборки, запускаем эмулятор:
emulator -show-kernel-show-kernel — выводить уведомления в консоль
Если нажать Enter, то попадем в консоль эмулятора
Если эмулятор не запустился, нужно будет проверить что включена виртуализация
Готовим IDE для отладки
Для начала необходимо сгенериовать проект для IDE, проект генерируется для IDEA. Собираем модули для генератора:
mmm development/tools/idegenЧтобы весь AOSP затолкать в проект, то просто запускаем генератор
development/tools/idegen/idegen.shНо сгенерированный IDEA проект будет очень «тяжелым». Одно открытие и индексация занимает достаточно много времени. Лучше генерировать IDEA проект для каждого отдельного проекта, например для Android фреймворка
development/tools/idegen/intellij-gen.sh frameworks/baseВесь список доступных проектов можно посмотреть в
cat .repo/project.listОткрываем сгенерированный base.iml (находится в папке frameworks/base) в IDEA. Дальше нужно настроить Java, только нужно подключать java без библиотек, так как у AOSP-а свои реализации.

Запускаем отладку
Для начала необходимо запустить monitor
~/Android/Sdk/tools/lib/monitor-x86_64/monitorвозможно потребуется дополнительно поставить jre
sudo apt install openjdk-8-jre-headless
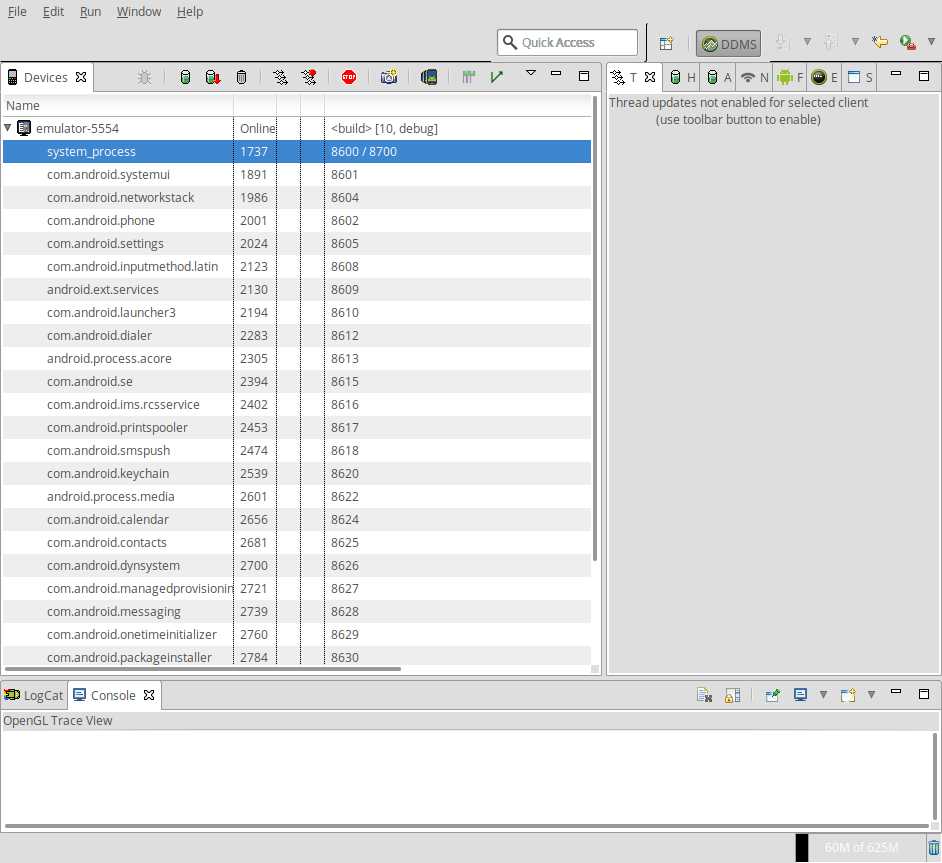
Выбираем процесс, который будем отлаживать. В monitor-е выбираем процесс и справа от порта процесса появится /8700, это как раз порт отладчика, к нему можно подключаться через IDEA.
Все системные штуки находятся в system_process. Его мы и будем отлаживать.
monitor один самых полезных инструментов при отладке и исследования работы AOSP
В проекте добавляем новую Remote конфигурацию, только указываем 8700 порт. Именно к этому порту и будем подключаться
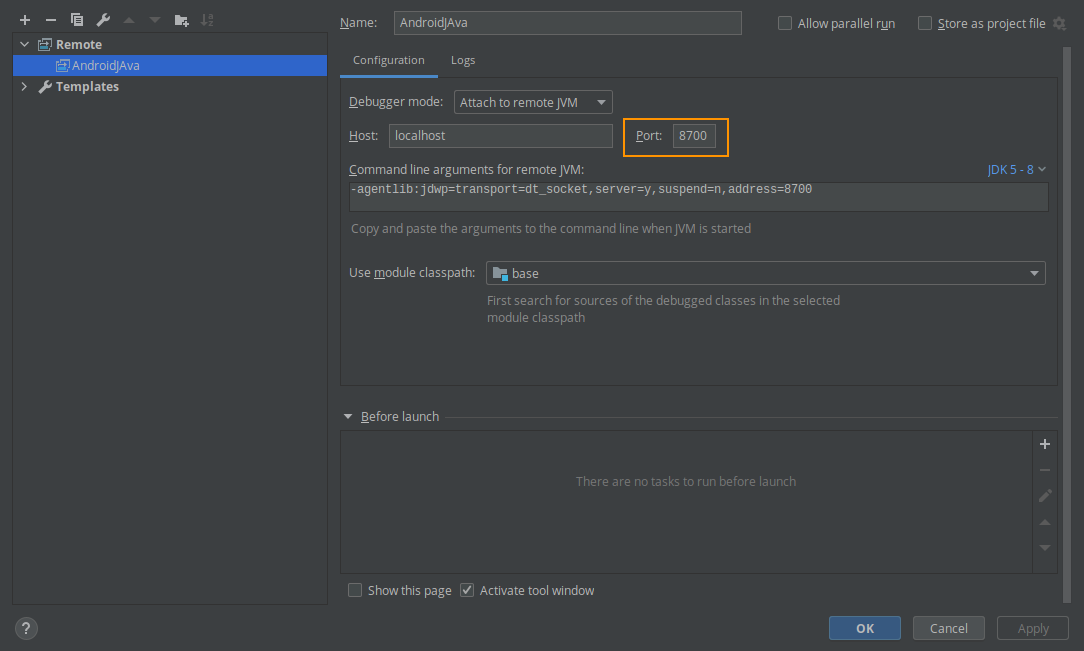
Запускаем Debug (Run → Debug)
Чтобы удостоверится, что все подключилось поставьте брейкпоинт в frameworks/base/services/core/java/com/android/server/wm/ActivityTaskManagerService.java файле на метод:
// line 1040
int startActivityAsUser(IApplicationThread caller, String callingPackage,
            Intent intent, String resolvedType, IBinder resultTo, String resultWho, int requestCode,
            int startFlags, ProfilerInfo profilerInfo, Bundle bOptions, int userId,
            boolean validateIncomingUser) {
//...
}
и запустить любое приложение на эмуляторе (например, Settings).
Теперь все готово для экспериментов.