
You should upgrade or use an alternative browser.
osm0sis
Senior Recognized Developer / Contributor
-
#1
Windows ports of the necessary Linux utils for Android image (kernel/recovery) mod work:
mkbootimg, unpackbootimg: https://github.com/osm0sis/mkbootimg
pxa-mkbootimg, pxa-unpackbootimg: https://github.com/osm0sis/pxa-mkbootimg
elftool: https://github.com/osm0sis/elftool
unpackelf: https://github.com/osm0sis/unpackelf
mboot: https://github.com/osm0sis/mboot
dumpimage, mkimage: https://www.denx.de/wiki/U-Boot/WebHome
mkmtkhdr: https://github.com/osm0sis/mkmtkhdr
loki_tool: https://github.com/djrbliss/loki
futility: https://github.com/osm0sis/futility
boot_signer.jar (requires JRE 8+): https://xdaforums.com/android/software-hacking/signing-boot-images-android-verified-t3600606
blobpack, blobunpack: https://github.com/AndroidRoot/BlobTools
dhtbsign: https://github.com/osm0sis/dhtbsign
rkcrc: https://github.com/linux-rockchip/rkflashtool
sony_dump: https://xdaforums.com/crossdevice-dev/sony/tool-unpack-format-sony-kernel-image-t3530077
bzip2, cat, chmod, cpio, cut, dd, file, find, gzip, hexdump, lzop, printf, tail, truncate, xz;
cygbz2-1, cygcrypto-1.1, cyggcc_s-1, cygiconv-2, cygintl-8, cyglzma-5, cyglzo2-2, cygmagic-1, cygncursesw-10.dll, cygstdc++-6.dll, cygssl-1.1, cygwin1, cygz: https://cygwin.com/
lz4: https://lz4.github.io/lz4/
sudo: https://github.com/mattn/sudo
magic: https://www.darwinsys.com/file/
See the Mobile Edition (AIK-mobile) initial release notes for the specifics on the native Android version.
Likewise for the Linux/macOS Edition (AIK-Linux) initial release notes.
My original intent was to have this package dependency-free, but as you can see, I did have to include Cygwin. Initially just for mkbootimg since the huaixzk standalone version wouldn’t work (it wasn’t loading the kernel as binary, thanks trevd); then I discovered that using the GNUWin32 cpio to unpack somehow didn’t play nice with repacking the ramdisk in a usable state, so at that point I decided I might as well go Cygwin across the board. As it is, I’ve included the latest Cygwin-dependent executables and required libraries from their repos and built my own custom Cygwin image and ramdisk utilities built from the latest sources.
Originally only for Google Pixel/Nexus/AOSP standard boot.img files, built-in support has now expanded to Google Pixel/AOSP vendor_boot.img files, Android Verified Boot (AVBv1)/ChromeOS/SignBlob signed boot.img files, Barnes & Noble Nook «Green Loader» signed boot.img files, Samsung/Spreadtrum DHTB header signed boot.img files, the Samsung/Marvell PXA1088/1908 board boot.img variant (AOSP-PXA), Loki patched boot.img files, amonet patched boot.img files, Sony SIN signed/packaged kernel.elf extraction, Sony ELF kernel.elf files, Intel OSIP Android image files, DENX U-Boot uImage files, Rockchip KRNL signed ramdisk image files, MTK headers for kernel/ramdisk, and LG Bump/Samsung SEAndroid footers for boot.img.
The main advantage here is you don’t need Cygwin shell or PERL scripts. Other guides exist but none of them are universal for target device, compression and/or developed for Windows, Android ARM/x86/MIPS + ARM64/x86_64/MIPS64, and now macOS. With this universality in mind I’ve automated the whole process with batch/shell scripts.
My development work on my many projects comes out of my free time, so if you enjoy this project or anything else I’ve done on xda, please consider sponsoring my ongoing work using my GitHub Sponsors profile. For a one-time donation you can hit the donate link from my profile. Thank you for your support!Instructions
1)
Unzip.
2) Either use the command-line «unpackimg <image-filename.img>», or simply drag-and-drop the image. This will split the image and unpack the ramdisk to a subdirectory.
3) Alter the ramdisk as you like.
4) The repackimg script requires no input and simply recombines the previously split kernel with the newly packed modified ramdisk using all the original image information (which was also split and saved).
5) The cleanup script resets the folder to its initial state, removing the split_img+ramdisk directories and any new packed ramdisk or image files.
There are a few optional, advanced command-line arguments for repackimg: «—original», which will cause it to repack using the original split ramdisk instead of repacking, this is useful for testing or trimming dumps; «—origsize», which will cause it to repack then pad it to the size of the original image, this is useful for repacking dumps to then be fastboot flashed; «—level» with 1-9 and possibly 0 allows changing the compression level used to repack to more closely match the original; «—avbkey» with (optionally path and) a keyname allows changing from the default AOSP verity key; «—forceelf» to attempt to make an older unpacked Sony ELF file repack as an ELF.
All scripts also allow unpacking/repacking with the current directory instead of the AIK directory if «—local» is the first command-line argument.
Supported ramdisk compression formats in the *-ramdiskcomp file are gzip, lzop, lzma, xz, bzip2, lz4, lz4-l (for lz4 legacy), cpio (for uncompressed), and empty (for no ramdisk).
Usage is similar for the Android and Linux versions, again, just review the release notes for them.
Hopefully this is some help to someone. It’s been extremely useful for me in my messing around with kernel ramdisks, which is why I created it in the first place.
Enjoy!
Questions, comments and feedback welcome.
If you are reporting a problem with your device, please clearly state your device name and model/variant, attach a log, as well as provide a link to the image file.
Downloads
Android.Image.Kitchen.v3.8-Win32.zip
UPDATE-AIK.Mobile.Installer.v3.8-ALL-signed.zip
AIK-Linux-v3.8-ALL.tar.gz
Source Code
https://github.com/osm0sis/Android-Image-Kitchen
Credits & Thanks: All authors of the included binaries and libraries for their amazing work, as linked (or linked via GitHub) above. Peteragent5, alansj & iridaki for the general methods used in their PERL scripts and Linux guides. SuperR. & tobias.waldvogel for the general methods used in their kernel.elf unpacking scripts. _that and rayman for the general methods used to repack a working boot.blob. Chainfire for the ChromeOS and SEAndroid general methods. cybojenix for the Bump general method. xyz` & k4y0z for the amonet general method.
Thanks to Goatshocker for testing out things for the HTC image issues, leading to the workaround and subsequent fix, avinashrocks1990 & tajimura for testing out compression support and the large pagesize fix, civato for testing out dtb support, talich for testing out the Linux version, shoey63 for testing out Linux + ELF support, moonbutt74 for testing out Android-x86 support, nathanchance for testing out the new AIK-mobile cpio method on his Pixel 2, leading to important fixes for its support, shakalaca for the great help with completing and testing Intel OSIP support, and Postman1year & CXZa for their help testing to find out the workaround for the Cygwin cut + symlink regression issues. Huge thank you to trevd and Modding.MyMind/SHM for all the contributing work they’ve each done and support they’ve provided.
Disclaimer: Naturally, you take all the responsibility for what happens to your device when you start messing around with things.
Download counts:
AIK — v1.0: 1540; +HTCFix: 430. v1.5: 4718. v1.6: 3556. v1.8: 8678; +Lok2Img: 1629. v1.9: 2580. v2.0: 22886. v2.2: 20522. v2.3: 14524. v2.4: 84432; +LokiAddon: 20071. v2.5: 5004. v2.6: 9354. v2.7: 5442. v2.8: 6639. v2.9: 7672. v3.0: 2810. v3.1: 6502. v3.2: 27104. v3.3: 17736. v3.4: 25988. v3.5: 19051. v3.6: 32472. v3.7: 21457.
Mobile — v1.0: 311. v1.1: 265. v1.2: 302. v1.3: 100. v1.4: 486. v1.5: 224. v1.6: 3303. v1.7: 7798. v1.8: 16286. v1.9: 3800. v2.0: 5444. v2.1: 2526. v2.2: 926. v2.3: 1346. v2.4: 18426. v2.5: 2586. v2.6: 6068. v2.7: 2936. v2.8: 3932. v2.9: 4181. v3.0: 1301. v3.1: 3300. v3.2: 3254. v3.3: 6824. v3.4: 10786. v3.5: 8624. v3.6: 14020. v3.7: 8951.
Linux — v1.0: 75. v1.1: 208. v1.2: 233. v1.3: 112. v1.4: 421. v1.5: 173. v1.6: 1838. v1.7: 2596. v1.8: 4818. v1.9: 604; +v1.9.1: 1068. v2.0: 1836. v2.1: 1240. v2.2: 466. v2.3: 522. v2.4: 8126. v2.5: 1052. v2.6: 2018. v2.7: 1248. v2.8: 2486. v2.9: 5057. v3.0: 1455. v3.1: 2957. v3.2: 14508. v3.3: 10046. v3.4: 16294. v3.5: 12651. v3.6: 16478. v3.7: 12927.
Attachments
-
Android.Image.Kitchen.v3.8-Win32.zip -
UPDATE-AIK.Mobile.Installer.v3.8-ALL-signed.zip -
AIK-Linux-v3.8-ALL.tar.gz
Last edited:
osm0sis
Senior Recognized Developer / Contributor
-
#2
Known Working Devices
Amazon Fire HD 10
Asus Nexus 7 (2012, 2013)
Asus Transformer Pad
Asus Zenfone (2, 5)
Auchan QiLive (Q5, Q7)
Barnes & Noble Nook ( , HD+, 7)
BQ Aquaris M8
Coolpad Catalyst
Essential PH-1
Google Pixel (C, , XL, 2, 2 XL, 3, 3 XL, 3a, 3a XL, 4, 4 XL, 4a, 4a 5G, 5, 5a)
Huawei Ascend Y300
Huawei Mate 8
Huawei Nexus 6P
Huawei U8800 Ideos X5
HTC Nexus 9
HTC One (M7, M8, S, X)
HTC Vivid/Raider 4G
HP Slate 21
LeEco Le Pro3
Lenovo A706
Lenovo K900
Lenovo Vibe K5
LG G(2, 2 Mini, 3, 3 Stylus, 5)
LG GPad (7.0, 8.3, X 8.0)
LG Nexus (4, 5, 5X)
LG Optimus (3D, 4X HD)
LG Stylo 3 Plus
LG V(10, 20)
Micromax Ninja/Bolt A27
Motorola Moto G (2013, 2014)
Motorola Moto X 2014
Motorola Nexus 6
Nextbit Robin
OnePlus (One, 2, X, 3, 3T, 5, 5T, 6, 6T, 7, 7 Pro, 7T, 7T Pro, 8, 8 Pro, 8T, 9R, 9, 9 Pro)
OnePlus Nord ( , N10 5G, N100)
Pantech Vega Iron
Pantech Vega Secret Note
Samsung Galaxy A3 2016
Samsung Galaxy Ace II X
Samsung Galaxy Core Mini 4G
Samsung Galaxy Mega
Samsung Galaxy Nexus
Samsung Galaxy Note (2, 3, 4, Pro 12.2)
Samsung Galaxy S(3, 3 Mini, 4, 5, 6, 7, 8, 8+)
Samsung Galaxy Star
Samsung Galaxy Tab (2 7.0, 3 10.1, 4 7.0, 4 8.0, 4 10.1, A 7.0, A 10.1, Pro 8.4)
Samsung Galaxy Victory
Samsung Galaxy Xcover 3
Samsung Nexus 10
Sony Xperia (Arc S, M, Neo, Neo V, SP, Tab Z4, Z, Z1, Z5)
Spice Mi-355 Stellar Craze
Vodafone Smart Ultra 6
Xiaomi Mi Pad
Xiaomi Poco X2
Xiaomi Redmi (6A, Note 3 Pro)
Confirmed Not Working Devices
- Blackview BV4000 — some newer MediaTek (MTK) devices use special image signing that adds a «BFBF» pre-header signature. While present on multiple MTK devices, it only appears to be enforced by the bootloader on some. See this post.
- HTC Desire 326G, Huawei Honor Bee, Huawei MediaPad T1 7.0 — some newer Spreadtrum devices use special image signing that adds a «SPRD-SECUREFLAG» pre-header signature, so images will unpack/repack but most likely won’t boot unless run through their internal signing tool. See this post.
- Nibiru V05-A, Pipo Max — some RockChip (RK) devices use a variant of the AOSP image format with extra checksums and hidden sections with extra data. There is not currently an open source tool that can handle repacking these. See this post.
- Samsung Galaxy S (Advance, Captivate, Vibrant), Samsung Galaxy S2, Samsung Galaxy Note & Samsung Galaxy Tab — contain zImage (kernel) + ramdisk (possibly within the zImage) but are the «headerless» Linux kernel blob format and require a full cross-compiler to repack correctly. See this post.
- Samsung [various] — the image and SEANDROIDENFORCE footer are followed by a signature that, while present on many Samsung devices, only appears to be enforced by the bootloader on some. See this post.
- Skyworth 50G2A TV — some newer MediaTek (MTK) devices use special image part signing that adds a 256-byte checksum/signature to both Image.gz-dtb/zImage-dtb (kernel) and ramdisk.cpio.gz, so images will unpack/repack but most likely won’t boot unless run through their internal signing tool. See this post.
- Xiaomi Mi Box 3S, ZTE B860H STB — some newer Amlogic devices use special image signing that adds an «AMLSECU!» signature within the header and appears to encrypt the ramdisk, so the image itself will unpack/repack but cannot be re-signed, and the ramdisk cannot be unpacked or modified.
Note: For devices requiring Loki patched images (e.g. LG G2, AT&T Samsung Galaxy S4), your device’s aboot.img dump must be in the script directory to Re-Loki. (Thank you to jeboo for the original one-way Lok2Img Workaround’s binary source, used prior to the official Loki Tool gaining un-Loki support).
Release Notes
v1.0 — Dec 30, 2012 — Initial release.
v1.5 — May 6, 2013 — Linked.
v1.6 — Sep 16, 2013 — Linked.
v1.8 — Dec 9, 2013 — Linked.
v1.9 — Jun 7, 2014 — Linked.
v2.0 — Aug 3, 2014 — Linked.
v2.2 — Mar 25, 2015 — Linked.
v2.3 — Oct 11, 2015 — Linked.
v2.4 — Feb 8, 2016 — Linked.
v2.5 — Jan 26, 2017 — Linked.
v2.6 — Feb 27, 2017 — Linked.
v2.7 — May 1, 2017 — Linked.
v2.8 — Jun 5, 2017 — Linked.
v2.9 — Sep 14, 2017 — Linked.
v3.0 — Dec 14, 2017 — Linked.
v3.1 — Jan 7, 2018 — Linked.
v3.2 — Mar 19, 2018 — Linked.
v3.3 — Jul 23, 2018 — Linked.
v3.4 — Oct 28, 2018 — Linked.
v3.5 — Apr 17, 2019 — Linked.
v3.6 — Sep 22, 2019 — Linked.
v3.7 — May 22, 2020 — Linked.
v3.8 — May 5, 2021 — Linked.
v1.0 — Mar 23, 2014 — Linked. (ARM only)
v1.1 — Apr 19, 2014 — Linked. (ARM only)
v1.2 — May 15, 2014 — Linked. (ARM only)
v1.3 — Jun 7, 2014 — Linked. (ARM, x86 with emulation)
v1.4 — Jun 17, 2014 — Linked. (ARM, x86 with emulation)
v1.5 — Aug 3, 2014 — Linked. (32bit only)
v1.6 — Aug 19, 2014 — Linked. (32bit only)
v1.7 — Dec 26, 2014 — Linked. (32bit only)
v1.8 — Mar 25, 2015 — Linked. (32bit only)
v1.9 — Oct 11, 2015 — Linked. (32bit only)
v2.0 — Dec 7, 2015 — Linked.
v2.1 — Feb 8, 2016 — Linked.
v2.2 — Mar 16, 2016 — Linked.
v2.3 — Apr 1, 2016 — Linked.
v2.4 — Apr 20, 2016 — Linked.
v2.5 — Jan 26, 2017 — Linked.
v2.6 — Feb 27, 2017 — Linked.
v2.7 — May 1, 2017 — Linked.
v2.8 — Jun 5, 2017 — Linked.
v2.9 — Sep 14, 2017 — Linked.
v3.0 — Dec 14, 2017 — Linked.
v3.1 — Jan 7, 2018 — Linked.
v3.2 — Mar 19, 2018 — Linked.
v3.3 — Jul 23, 2018 — Linked.
v3.4 — Oct 28, 2018 — Linked.
v3.5 — Apr 17, 2019 — Linked.
v3.6 — Sep 22, 2019 — Linked.
v3.7 — May 22, 2020 — Linked.
v3.8 — May 5, 2021 — Linked.
v1.0 — Apr 11, 2014 — Linked. (x86, Linux only)
v1.1 — Apr 19, 2014 — Linked. (x86, Linux only)
v1.2 — May 15, 2014 — Linked. (x86, Linux only)
v1.3 — Jun 7, 2014 — Linked. (x86, Linux only)
v1.4 — Jun 17, 2014 — Linked. (x86, Linux only)
v1.5 — Aug 3, 2014 — Linked. (x86, Linux only)
v1.6 — Aug 19, 2014 — Linked. (x86, Linux only)
v1.7 — Dec 26, 2014 — Linked. (Linux only)
v1.8 — Mar 25, 2015 — Linked. (Linux only)
v1.9 — Oct 11, 2015 — Linked. (Linux only)
v2.0 — Dec 7, 2015 — Linked. (Linux only)
v2.1 — Feb 8, 2016 — Linked. (Linux only)
v2.2 — Mar 16, 2016 — Linked. (Linux only)
v2.3 — Apr 1, 2016 — Linked. (Linux only)
v2.4 — Apr 20, 2016 — Linked. (Linux only)
v2.5 — Jan 26, 2017 — Linked. (Linux only)
v2.6 — Feb 27, 2017 — Linked. (Linux only)
v2.7 — May 1, 2017 — Linked. (Linux only)
v2.8 — Jun 5, 2017 — Linked. (Linux only)
v2.9 — Sep 14, 2017 — Linked. (Linux only)
v3.0 — Dec 14, 2017 — Linked.
v3.1 — Jan 7, 2018 — Linked.
v3.2 — Mar 19, 2018 — Linked.
v3.3 — Jul 23, 2018 — Linked.
v3.4 — Oct 28, 2018 — Linked.
v3.5 — Apr 17, 2019 — Linked.
v3.6 — Sep 22, 2019 — Linked.
v3.7 — May 22, 2020 — Linked.
v3.8 — May 5, 2021 — Linked.
If you are reporting a problem with your device, please clearly state your device name and model/variant, attach a log, as well as provide a link to the image file.
Last edited:
osm0sis
Senior Recognized Developer / Contributor
-
#3
If you are reporting a problem with your device, please clearly state your device name and model/variant, attach a log, as well as provide a link to the image file.
Frequently Asked Questions (FAQ)
- Q: Why don’t my .img.lz4 and .img.tar files unpack, I tried renaming them to .img and everything?!
A: File extensions exist for a reason, they denote the format of a file. AIK supports .img files, but renaming things isn’t the same as changing the file format, e.g. for .img.lz4 you actually need to unlz4 to get .img, and for .img.tar you actually need to untar to get .img. - Q: Why is the repacked .img smaller than the original, how will this even work?!
A: It’s smaller because most of a partition dump is empty space, so AIK’s repack is only the actual data inside. If you tried it you’d see it probably works fine (provided you haven’t changed anything). Modern devices also AVBv2 sign images, which uses a bit of space at the end of the partition as well, but this must be done separately with the avbtool Python script from AOSP, and not all devices enforce this signing. You can also try the —origsize option if you want to ensure writing the new image blanks out the old (a fastboot bug on some old bootloaders). - Q: How come nothing works, there’s nothing in bin / android_win_tools?!
A: That’s because no binaries are hosted on GitHub so you can’t just clone/download it and expect it to work. Only use the complete AIK package download links/attachments from the OP of this thread. - Q: This triggered some generic antivirus alert, what the f*ck, are you hax me?!
A: No. Antivirus heuristics recognize patterns in executables and try to guess what might be a threat because it’s «similar» code. Some compression formats (especially the older UPX-compressed Go built sudo.exe AIK uses for Windows Administrator privilege requests) trigger these. Everything here’s open source, I’ve been doing this for over 10 years and I’m an XDA Senior Recognized Developer, so you can either trust my track record, or build them yourself if you’re that worried. - Q: Why is default.prop 0 bytes, why can’t I edit it or prop.default and/or why my changes don’t stick?!
A: Since project Treble brought system-as-root (SAR) — which is years now — default.prop is now a symlink to prop.default, and you can’t open prop.default because the root / filesystem is in the system partition. In boot-as-recovery devices (no recovery partition) there is still a ramdisk containing another prop.default in the boot partition, but it’s only used when booting to recovery so any changes will have no effect on booted Android. - Q: Why does it warn there’s no ramdisk, it can’t unpack it or something?!
A: It tells you there’s no ramdisk because there’s no ramdisk. Your device uses system-as-root (SAR), but doesn’t have recovery in boot, so there’s no boot.img ramdisk at all (0 bytes). See also the above answer for boot-as-recovery devices (no recovery partition).
-
#4
-
#5
EDIT:
Generates new-image.img, but this recovery is unbootable. I tested it with the same recovery.img, without to change anything, just unpack/repack. The generated image is unbootable. Device just stuck on boot logo.
Last edited by a moderator:
trevd
Inactive Recognized Developer
-
#6
Android Image Kitchen — Unpack/Repack Kernel+Recovery Images, and Edit the ramdisk.My initial intention with this was to gather Windows ports of the necessary Linux utils for Android image (kernel/recovery) mod work with as few dependencies (like Cygwin, etc.) as possible. Here’s what I ended up with:
unpackbootimg — http://github.com/huaixzk/android_win_tool/
mkbootfs, mkbootimg — http://xdaforums.com/showthread.php?t=443994
cpio, gzip, libiconv2, libintl3 — http://gnuwin32.sourceforge.net/
cygwin1 — http://cygwin.com/As you can see, in the end I did have to include Cygwin for mkbootimg since the huaixzk standalone version doesn’t appear to work for some reason. I’ve left a note with the author and will update the package to remove Cygwin if he ever fixes the issue. As it is, I’ve included the cygwin1.dll as it’s the only one required, and grabbed the working Cygwin-dependent executable from another thread.
Hi Buddy,
I like what you’re doing here, cygwin dependencies are no good…….. native on whatever platform you’re using is the way to go…. with that in mind here’s a mkbootimg compiled from the aosp source tree.using the MIN_GW toolchain, not a cygwin in sight
not tested it but should be alright for you…….I think I’ll finish the job and smash it althought into one tool, saving f***king about., it’ll will come in useful on linux too
Attachments
Last edited:
osm0sis
Senior Recognized Developer / Contributor
-
#7
Thanks, seems that works fine now.
EDIT:
Generates new-image.img, but this recovery is unbootable. I tested it with the same recovery.img, without to change anything, just unpack/repack. The generated image is unbootable. Device just stuck on boot logo.
Crap. I’ll take it down for now and do some testing. Might be a few days. Things were working over here with the few images I’d tried before. Maybe I messed something up once the scripts got more robust. Batch is an ugly way to do things.
Thanks for the help testing.
Hi Buddy,I like what you’re doing here, cygwin dependencies are no good…….. native on whatever platform you’re using is the way to go…. with that in mind here’s a mkbootimg compiled from the aosp source tree.using the MIN_GW toolchain, not a cygwin in sight
not tested it but should be alright for you…….I think I’ll finish the job and smash it althought into one tool, saving f***king about., it’ll will come in useful on linux too
Thanks bro! I’ll throw that in with the new (hopefully working) version. :good:
And hey go ahead and finish the job if you like. Coding is better than scripting so I’d be happy to get a mod to remove this thread once something better comes along.
Last edited:
osm0sis
Senior Recognized Developer / Contributor
-
#8
It’s all Cygwin for now but trevd has been great and offered to port some things over properly while weeding out the issues, so expect a new release, completely dependency free and automated as always in the coming months, all thanks to him.
Last edited:
-
#9
-
#10
The boot.img before unpack/repack boots fine.
-
#12
Sent from my HTC Vivid 4G
trevd
Inactive Recognized Developer
-
#13
Interesting. Worked for both dancer_69 and myself. Device info and image in PM please.
Hi Folks….
The boot loop maybe because ueventd /watchdogd in the sbin directory haven’t been created, they are (normally) symlinked back to ../init, obviously windows doesn’t support symlinks. a work around when using windows would be to copy-rename the /init to sbin/ueventd and sbin/watchdogd.
This is just «finger in the air» guessing but just something I’ve noticed :laugh:
osm0sis
Senior Recognized Developer / Contributor
-
#14
Hi Folks….The boot loop maybe because ueventd /watchdogd in the sbin directory haven’t been created, they are (normally) symlinked back to ../init, obviously windows doesn’t support symlinks. a work around when using windows would be to copy-rename the /init to sbin/ueventd and sbin/watchdogd.
This is just «finger in the air» guessing but just something I’ve noticed :laugh:
No that doesn’t seem to be the issue here, though I think that’s what the issue was when I was using the gnuwin32 cpio. I was also worried about permissions being set correctly but I haven’t seen any issues with that yet either. I just made sure of both by unpacking and repacking the maguro CWM recovery image then flashing it to my device, and both symlinks and permissions are restored correctly in the filesystem. What’s going on with Goatshocker’s One S is a bit more bizarre.
Oddly enough, even just recombining the original zImage and ramdisk from split_img doesn’t work for him, meaning it’s either unpackbootimg, or more likely mkbootimg at fault. All the commandline variables match for the original and built images (cmdline, pagesize, base), and I’ve tried the Cygwin executable and the native one you posted, so it’s leading me to believe there is something different about how images must be packaged for the HTC One S. Another One S user that can confirm would be good though.
Edit: One S testing was done with Fusion v4 and CM stock from the latest Dark Jelly —
http://xdaforums.com/showthread.php?t=1837630
http://xdaforums.com/showthread.php?t=1848100
trevd
Inactive Recognized Developer
-
#15
dd if=htcsen.img of=htcstrip.img bs=256 skip=1I’ve just done this with an HTC Sensation stock boot image and it unpacked alright after that….. not sure about repacking though
You can check if an additional header is present by opening the boot image in an hex editor, A standard boot image starts with the android magic, which is the byte sequence
This spells ANDROID! in ascii text. If it doesn’t you can normally strip the additional header without any problems.
Looking at the various boot images in my htc sensation backups it seems my CM boot images don’t have the special header..
HTC do have some specialness going on with the S-ON/OFF business etc but I’d just be speculating If I said anymore as my knowledge of the htc boot sequence is limited.
osm0sis
Senior Recognized Developer / Contributor
-
#16
osm0sis
Senior Recognized Developer / Contributor
-
#18
The mkbootimg command does have an extra parameter:
mkbootimg —kernel zImage —ramdisk ramdisk.cpio.gz —base 80400000 —ramdiskaddr 81800000 —cmdline console=ttyHSL0,115200,n8 -o boot.img
Not yet sure if that ramdiskaddr is the magic difference or not. That ramdiskaddr parameter doesn’t even exist in any win32 compile I’ve seen of mkbootimg. I just downloaded a few images (the Dark Jelly ones we tested before) to hexedit and compare. I’ll post again shortly on that.
Last edited:
osm0sis
Senior Recognized Developer / Contributor
-
#19
Since repacking the original ramdisk still wouldn’t boot for the HTC One S in my tests with Goatshocker (which is crazy because it should all be exactly the same), I did just that with Fusion v3.2 and then ran a diff on the original and repack. Doing the same for a GN kernel produces zero differences, ie. the files are identical, but interestingly enough for the One S images there is a single difference, and it’s in the header.
fv32-boot.xxd versus repack-boot.xxd:
0000000: 414e 4452 4f49 4421 0879 5100 0080 4080  ANDROID!.yQ...@.
0000010: b4a2 0200 0000 [color=blue]80[/color]81 0000 0000 0000 3081  ......[color=blue].[/color].......0.
0000020: 0001 4080 0008 0000 0000 0000 0000 0000  ..@.............
0000030: 0000 0000 0000 0000 0000 0000 0000 0000  ................
0000040: 636f 6e73 6f6c 653d 7474 7948 534c 302c  console=ttyHSL0,
0000050: 3131 3532 3030 2c6e 3800 0000 0000 0000  115200,n8.......
----
0000000: 414e 4452 4f49 4421 0879 5100 0080 4080  ANDROID!.yQ...@.
0000010: b4a2 0200 0000 [color=red]40[/color]81 0000 0000 0000 3081  ......[color=red]@[/color].......0.
0000020: 0001 4080 0008 0000 0000 0000 0000 0000  ..@.............
0000030: 0000 0000 0000 0000 0000 0000 0000 0000  ................
0000040: 636f 6e73 6f6c 653d 7474 7948 534c 302c  console=ttyHSL0,
0000050: 3131 3532 3030 2c6e 3800 0000 0000 0000  115200,n8.......
Same change with the TWRP recovery images for the One S (ville) and One X (evita). So somehow I believe that’s our problem with certain HTC devices… No idea why such a thing would occur. I looked into S-ON a bit and it seems that’s controlled from the radio, and would prevent the image from being written, so it shouldn’t have to do with that either. Perhaps it has to do with that extra ramdiskaddr parameter somehow affecting the header.
I could write an extra batch file that flips that byte as a workaround, but I’d prefer to actually figure out why it happens and fix that..
Last edited:
osm0sis
Senior Recognized Developer / Contributor
-
#20
Any ideas or leads on why this single byte difference would occur are welcome, but in the meantime the workaround should make this «universal» again.
Last edited:
Similar threads
Provide feedback
Saved searches
Use saved searches to filter your results more quickly
Sign up
Appearance settings
Updated on
Multi Image Kitchen, or MIK, is a tool that allows you to repack Android partitions. It is an open-source project that was created by XDA Recognized Developer CryptoNick. MIK is used to develop flashable ZIPs for custom ROMs and kernels. You can also use it to modify existing ZIPs.
Features of Multi Image Kitchen
Multi Image Kitchen is a powerful utility that can help you repack Android partitions from Windows. It has several features that make it an ideal tool for repacking Android partitions.
Partition Layout
It can automatically detect the partition layout of your device. This makes it easy to select the partitions that you want to repack.
File Structure
It can automatically generate the file structure for the new partition layout. This makes it easy to keep track of your changes and ensure that all of your files are in the correct location.
Repack Partitions
It can repack partitions without losing any data. This is important if you want to keep your data safe while making changes to your device’s partitions.
Backup & Restore
It can back up and restore your partitions. This is useful if you want to revert to a previous partition layout or if you want to move your partitions to a different device.
Download Multi Image Kitchen
Following are the Multi-Image Kitchen links from which you can download the Tool for Windows.
| Version | Download |
|---|---|
| v4.0 | Link |
Notes
- Avoid putting images in Multi-Image Kitchen Folder to avoid failures. Instead, save the images on the desktop and manually unpack the partition image from the tool.
- If the unpacked partition image contains space in folder or file names, make_ex4fs will not build such an image. Therefore you cannot add folders and files with spaces to the unpacked image either.
- If you did not enter attributes for files and folders manually in fs_config, then the program will collect the section and enter those used by default.
- Credits: Multi Image Kitchen is created and distributed by CryptoNickSoft (Developer). So, full credit goes to him for sharing the Tool for free.
Android Image Kitchen is a program that lets you edit, unpack, and repack boot and recovery images. It allows you to edit the files using your favorite text editor and other tools. It also replaces the original files with the appropriate file permissions. The program is ideal for testing boot and recovery images.
This app is compatible with Android mobile devices, as well as PCs, Macs, and Windows computers. It also runs on various Android emulators. In addition to the mobile platform, Image Kitchen for PC is available for Windows, Mac, and Linux computers. To install Image Kitchen for PC, you can use any Android emulator.
What is IMG Kitchen?
Android Image Kitchen is a free tool for Windows, Mac, Linux, and Android that allows you to Android Image Kitchen [IMG Kitchen] Unpack/Repack Kernel+Recovery Images, and Edit the ramdisk.
Android Image Kitchen Instructions
- Unzip.
- Either use the command line “unpacking “, or simply drag and drop the image. This will split the image and unpack the ramdisk to a subdirectory.
- After the ramdisk as you like.
- The repacking script requires no input and simply recombines the previously split kernel with the newly packed modified ramdisk using all the original image information (which was also split and saved).
- The cleanup script resets the folder to its initial state, removing the split_img+ramdisk directories and any newly packed ramdisk or image files.
There are a few optional, advanced command-line arguments for repacking: “–original”, which will cause it to repack using the original split ramdisk instead of repacking, this is useful for testing or trimming dumps; “–organize”, which will cause it to repack then pad it to the size of the original image, this is useful for repacking dumps to then be fastboot flashed; “–level” with 1-9 and possibly 0 allows changing the compression level used to repack to more closely match the original; “–avbkey” with (optionally path and) a keyname allows changing from the default AOSP verity key; “–forceelf” to attempt to make an older unpacked Sony ELF file repack as an ELF.
All scripts also allow unpacking/repacking with the current directory instead of the AIK directory if “–local” is the first command-line argument.
Supported ramdisk compression formats in the *-ramdiskcomp file are gzip, lzop, lzma, xz, bzip2, lz4, lz4-l (for lz4 legacy), cpio (for uncompressed), and empty (for no ramdisk).
Usage is similar for the Android and Linux versions, again, just review the release notes for them.
Hopefully, this is some help to someone. It’s been extremely useful for me in my messing around with kernel ramdisks, which is why I created it in the first place.
Enjoy!
Also Check: Aroma File Manager Tool
Download IMG Kitchen [All Versions]
| Name | OS | Link |
|---|---|---|
| IMG_Kitchen_win v3.8 | Windows | Download AIK Win32 |
| IMG_Kitchen_Mobile v3.8 | Linux | Download AIK Linux |
| IMG_Kitchen_linux v3.8 | Android | Download AIK Android |
In this comprehensive guide, we will show you the steps to create and port TWRP Recovery to any Android device. When it comes to custom development, the involvement of a custom recovery becomes among the most important prerequisites. This is because your stock recovery isn’t designed to carry out advanced functionalities. Hence right after a user unlock the device’s bootloader, flashing the TWRP Recovery is probably the first step that they usually do.
The benefits of this recovery stand aplenty. For example, you could easily flash ZIP and IMG files, create and restore Nandroid backups, mount external devices, and carry out other advanced functionalities. While some of these functionalities could be carried out without TWRP Recovery as well, but that requires way too much effort. Hence getting hold of the TWRP Recovery for your device is the top-most requirement,
However, this recovery isn’t yet available for every Android device. All the official TWRP builds are hosted on their servers whereas the unofficial ones could be found from XDA. Even then, there are quite a few devices that don’t belong to any of these two lists. And for them, this guide shall come in handy. Given here are the detailed steps to create and port TWRP Recovery to any Android device.
As of now, it is limited to Android devices running the Qualcomm chipset. With MediaTek devices, there are quite a few issues, majorly with the recovery’s recovery.fstab file. As and when I am able to rectify that issue, will create a separate guide for MTK devices as well. With that said, here are the detailed instructions to create and port TWRP Recovery to Android devices with Qualcomm as the underlying chip. Follow along.
- How to Fix Soft brick/Bootloop after installing TWRP Recovery
- Copy Move Rename Delete Files and Folders via TWRP Recovery
- How to Fix TWRP 0MB Internal Memory Issue
- Update TWRP Recovery on any Android Device
Table of Contents

The below instructions have been segregated into separate sections for ease of understanding. Follow along in the exact same sequence as mentioned. Warning! The below process is quite risky and could brick your device and make it unusable. Droidwin and its members wouldn’t be held responsible in case of a thermonuclear war, your alarm doesn’t wake you up, or if anything happens to your device or your data by performing the below steps.
STEP 1: Enable Linux Shell on Windows 10
To carry out all such Android related tweaks, Linux is the go-to choice. However, I didn’t wish to leave my Windows OS at the same time. So I enabled the Linux Bash Shell Command inside Windows 10 only. It is a Developer Mode feature present inside Windows 10 for a few years, but not many seem to have an idea of this. The biggest advantage of this feature is the fact that you don’t have to use any Virtual Machine or a third-party app like Cygwin.
Everything is taken care of by the Windows OS itself. And I have tried out the entire instructions to create and port TWRP Recovery on Android using this Shell Command on Windows 10, so there is no reason why it shouldn’t work for you. With that said, refer to this guide to use Linux on your Windows 10 PC: How to Run Linux Commands in Windows 10 [without Virtual Machine].
STEP 2: Install Android Image Kitchen
Once you have enabled Linux Shell Command on your Windows 10, the next step is to install the Android Image Kitchen. This is where we would be cooking the TWRP Recovery for your device. So download the AIK-Linux-v3.7-ALL.tar.gz. Credits: goes to XDA Senior Recognized Developer / Recognized Contributor osm0sis. Do keep in mind that this is a Linux build as we would be working inside the Linux ecosystem (on a Windows 10 OS!).
Moving on, once you have downloaded it, use an extracting software such as WinRAR to open it. Then extract its contents to any convenient location on your PC. While downloading or extracting it, Windows Defender will identify it as a Trojan. So you might have to temporarily disable it while downloading and extracting Android Kitchen. Once the download/extraction is complete, then make sure to re-enable the Defender again. Then move to the next step to create and port TWRP Recovery to any Android device.
- How to Root Android Devices via TWRP Recovery
- TWRP: fastboot flash vs fastboot boot: Which command to use
- How to use USB OTG or Pen Drive to Flash File via TWRP Recovery
- How to Fix Soft brick/Bootloop after installing TWRP Recovery
STEP 3: Download TWRP for Screen Resolution
You will now have to download the required TWRP recovery in accordance with the desired screen resolution. Thanks to XDA Senior Member Augustoandro for the below piece of valuable information.
- If your screen resolution is 480 x 850 or 480 x 854; then download LG Nexus 4 TWRP.
- Likewise, if your screen resolution is 720 x 1280, or 800 x 1280 or 720 x ‘something’; then download Asus Nexus 7 TWRP
- On the other hand, if your screen resolution is 1080×1920, then download the Motorola Nexus 6 TWRP. As for this guide, I have downloaded this one only.
Once you have downloaded the required recovery file, move to the next step to create and port TWRP Recovery to any Android device.
STEP 4: Get the Stock Recovery.img File
Now you will have to get a hold of the stock recovery.img file. This would be present inside the stock firmware itself. So download the firmware for your device and region (corresponding to your current build number). Once downloaded, extract it. Now if you have a Pixel device, then its partition files are present in ZIP format. So just extract it and get the stock recovery.img file.
On the other hand, OnePlus and a bunch of other OEMs have all its partition files under the payload.bin file. Realme on the other hand has its firmware files under OZIP format. So to extract these files, please refer to our detailed reference guides:
- How to Extract payload.bin and get stock boot image file
- Extract Stock Boot.img from OnePlus OxygenOS Stock ROM
- How to Extract OZIP Realme Stock ROM (Firmware)
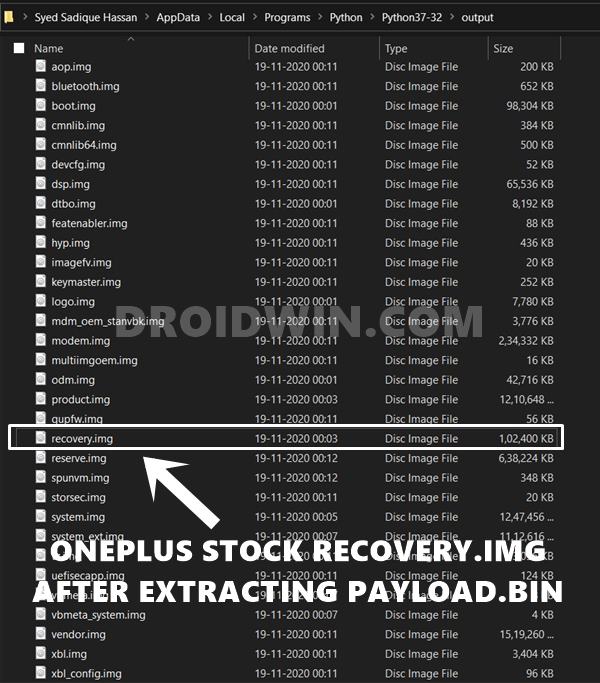
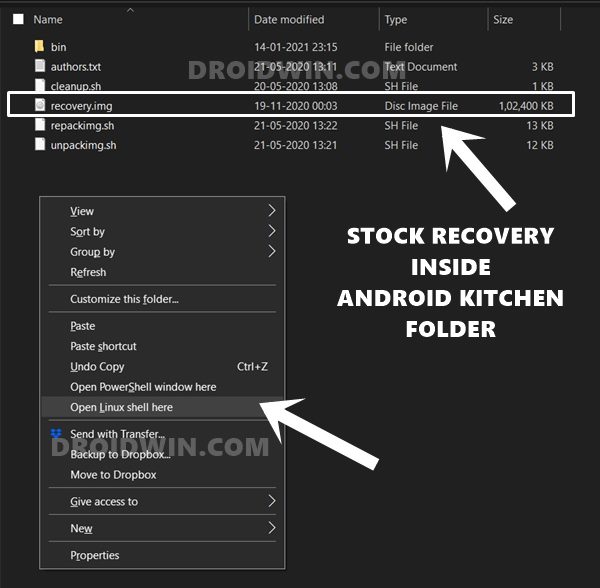
While these guides focus on stock boot.img file, the process is exactly similar for recovery.img file. Just follow the guide as it is and you will get the desired file. Once you get this stock recovery.img file, move it inside the Android Image kitchen folder on your PC (see the below image in STEP 5). Then proceed to the next step to create and port TWRP Recovery to any Android device.
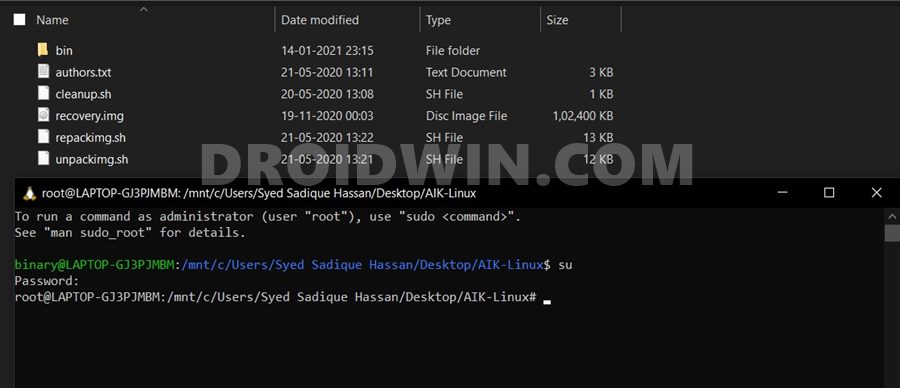
STEP 5: Get Root Privileges in Linux Shell on Windows 10
It’s now time to go to SuperUser Mode and get root access on Linux! For that, you will have to open Ubuntu inside the same directory where you have extracted the Android Image Kitchen (AIK).
- So go to the AIK folder, and while pressing the Shift key, right-click in an empty location and select Open Linux Shell here.

- By doing so, Ubuntu will automatically pick up the directory of AIK.
- Now type in the below code and hit Enter:
su
- It will now ask you to enter the password. Enter the same password that you had input in STEP 1 while setting up Linux for the first time.

- That’s it. You have now got the Root Privileges. Move over to the next step to create and port TWRP Recovery to any Android device.
STEP 6: Creating TWRP Recovery
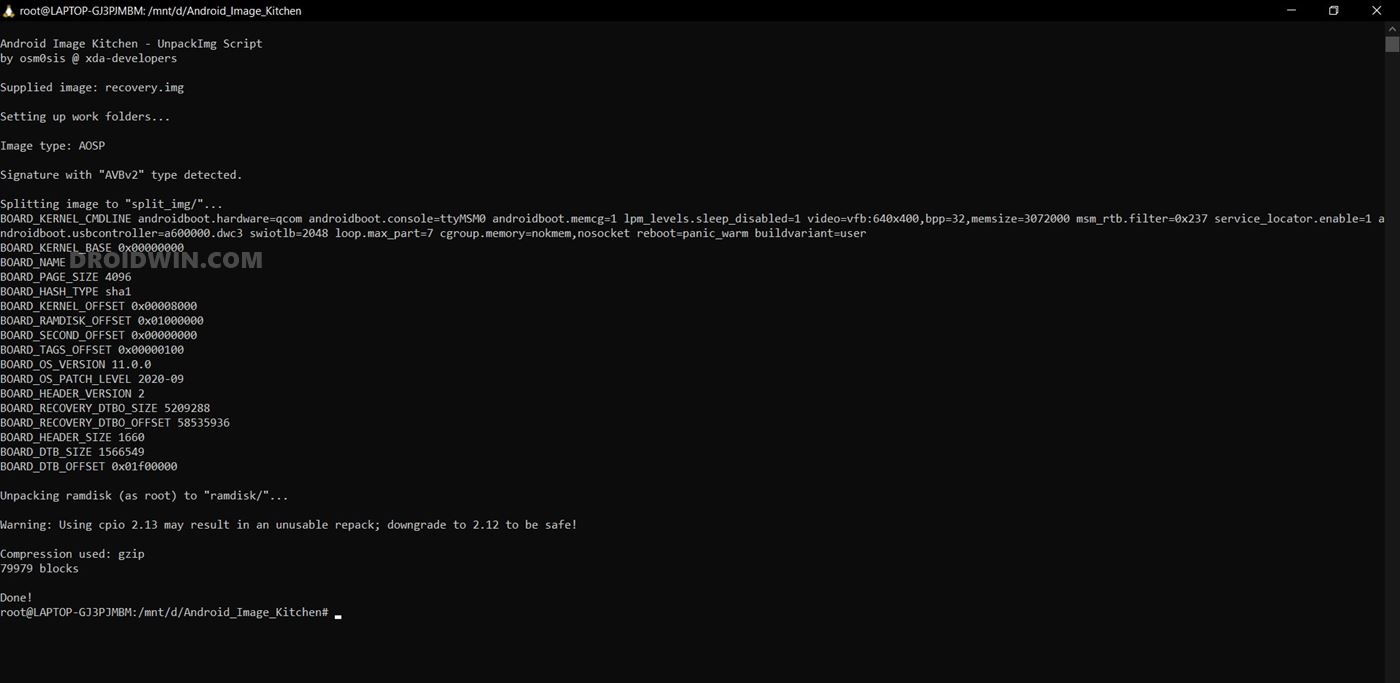
- First off, start by unpacking the stock recovery.img file via the following command:
./unpackimg.sh

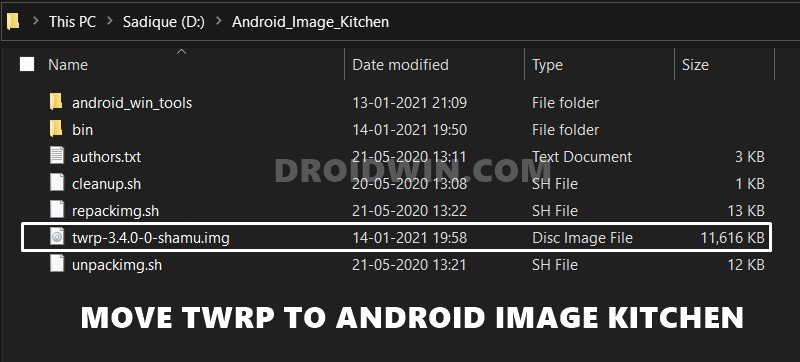
- You will now get two 2 folders: ramdisk and split_img. Move them outside the Android Image Kitchen (AIK) folder. Likewise, also move the stock recovery.img file outside the AIK folder.

- Now move the downloaded TWRP Recovery (from STEP 3) to this AIK folder.

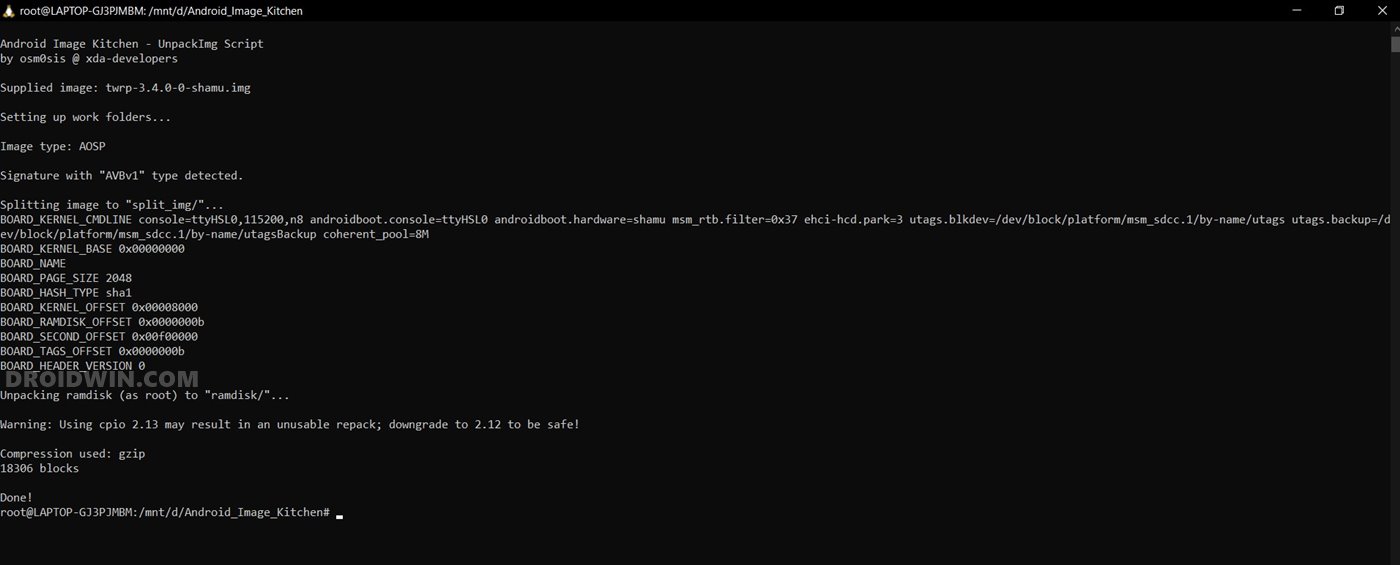
- Use the below command to unpack this TWRP Recovery (earlier we had unpacked stock recovery, this time we are unpacking TWRP):
./unpackimg.sh

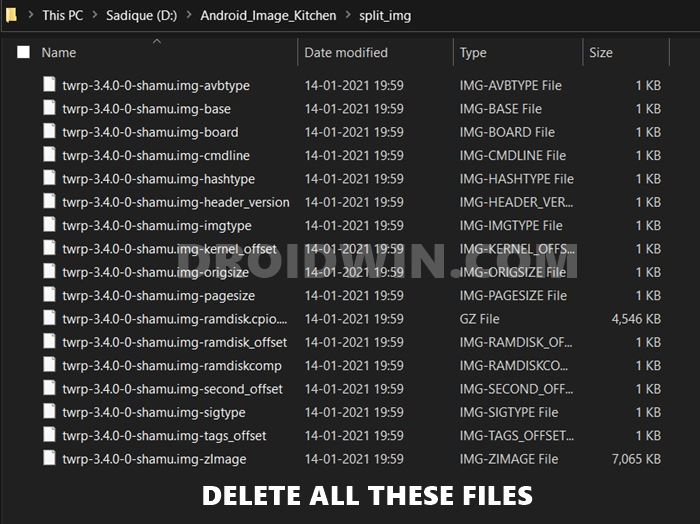
- As soon as the unpacking is completed, go to the split_img folder. You will see a few TWRP files, delete all those files.

- Now copy all the files from the stock recovery split_img folder (that you have moved outside the AIK folder) to the new empty split_img folder (from where you have just deleted the twrp files).
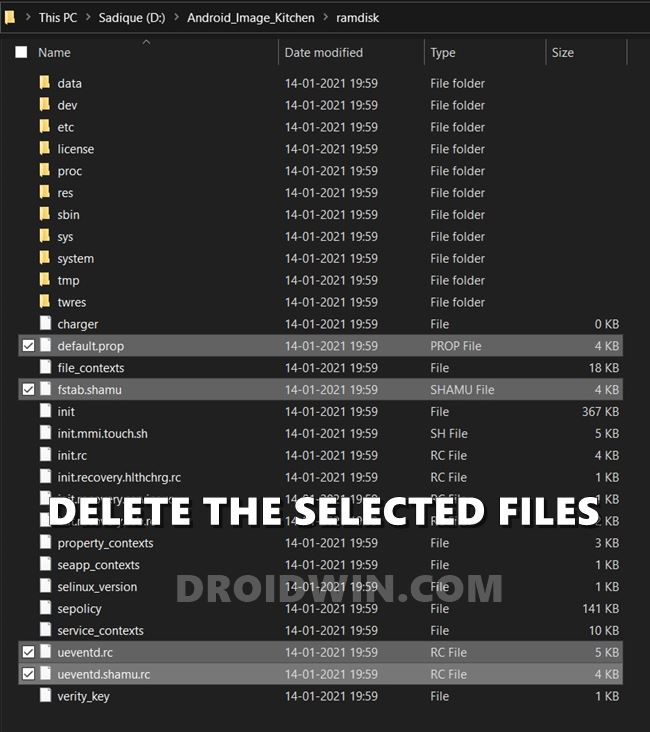
- When that is done, delete the following files from the new ramdisk folder (that is created by TWRP Recovery):
- default.prop
- fstab.devicename_or_chipsetname
- ueventd.rc
- Any other file like ueventd.devicename.rc

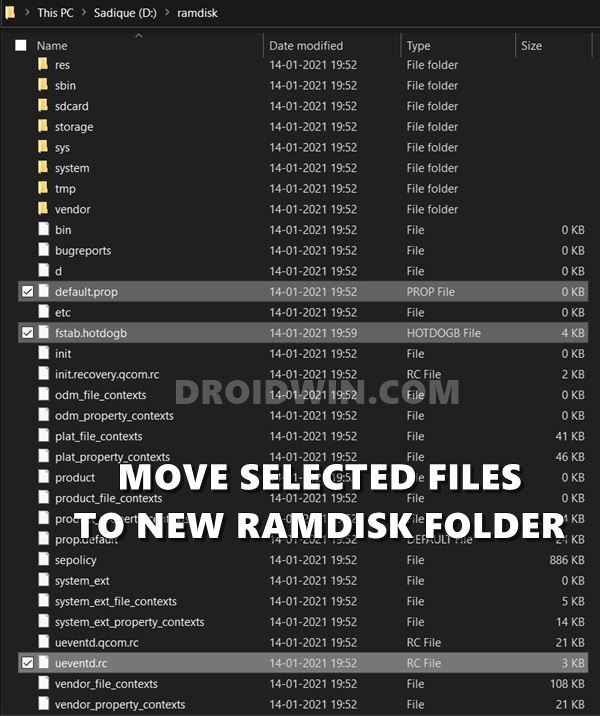
- Now copy and paste these files from the stock ramdisk folder (that we got from stock recovery) to the new ramdisk folder (that we got from TWRP):
- default.prop
- fstab.devicename [if you can’t find this file, don’t forget to check out the /vendor/etc folder as well].
- ueventd.rc [you may check the ramdisk > system > etc folder for this file].

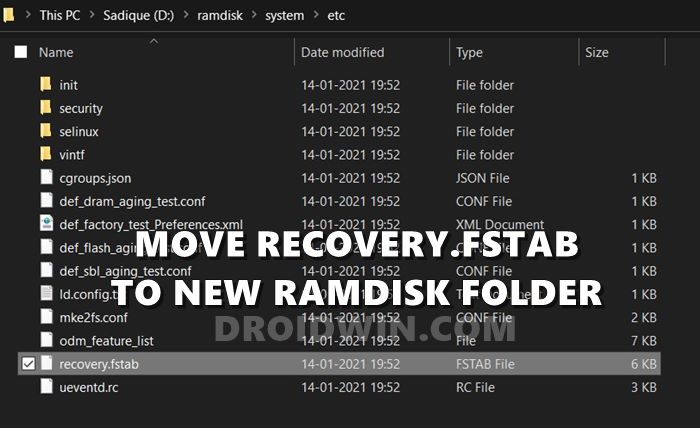
- Now copy the recovery.fstab file from stock ramdisk > system > etc folder and move it to new ramdisk > etc folder. Again, stock ramdisk is the folder that you got via stock recovery whereas the new ramdisk is linked to the TWRP recovery.

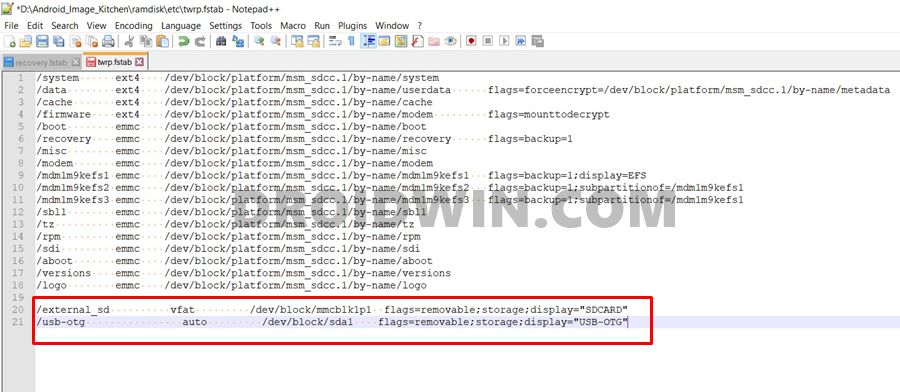
- Open both the recovery.fstab and twrp.fstab via Notepad++. Then edit the twrp.fstab file according to the newly pasted recovery.fstab.
- Make sure to replace”/sdcard” with “/external_sd” and “/usb” with “/usb-otg”. However, if you don’t find these partitions inside the fstab files, then manually add these lines:

-
/external_sd          vfat         /dev/block/mmcblk1p1  flags=removable;storage;display="SDCARD"
/usb-otg                auto         /dev/block/sda1    flags=removable;storage;display="USB-OTG"
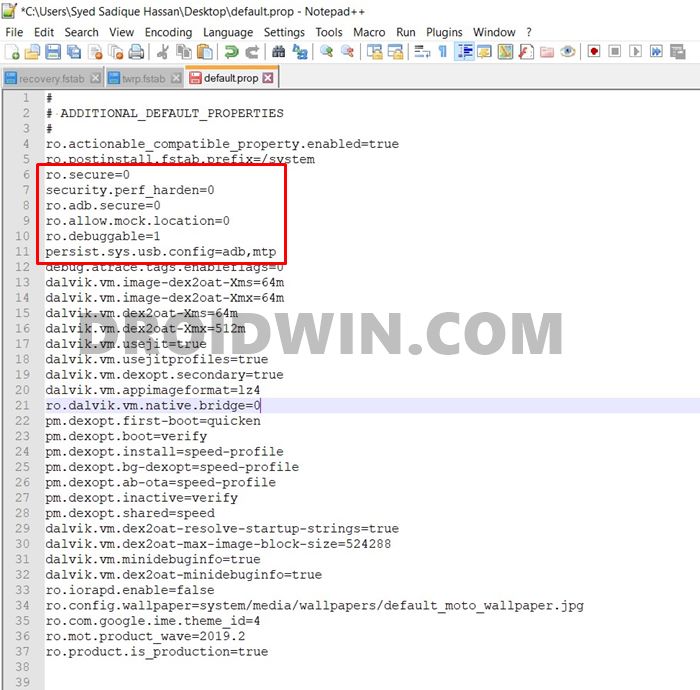
- Finally, open the default.prop file via Notepad++ and make the following changes:
ro.secure=0
ro.adb.secure=0
security.perf_harden=0
ro.debuggable=1
persist.sys.usb.config=adb,mtp

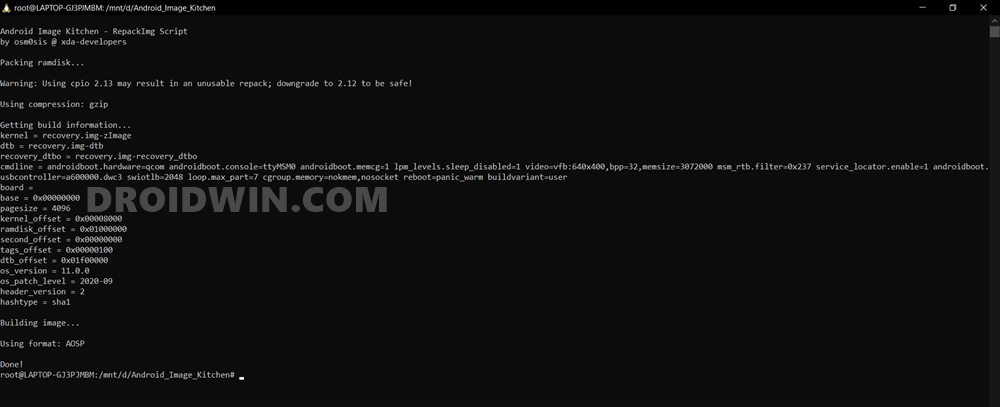
- Finally, it’s time to repack all these pieces of stuff. So come out of the ramdisk folder and inside the main Android Image Kitchen folder, open the Linux shell window (if you already have the previously opened one, continue in that only). Now type in the below command to repack all the files:
./repackimg.sh

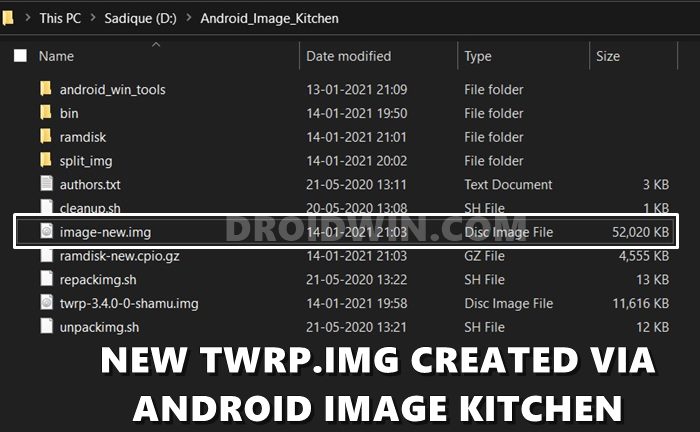
- The new TWRP will now be created inside the Android Image Kitchen folder and will be named as image-new.img.


That’s it. These were the steps to create and port TWRP Recovery for any Android device. You may flash it onto your device and reap the rewards. With that said, if you have any queries, do let us know in the comments section below. I will try my best to address all your queries in as much detail as possible.
- How to Replace LineageOS Recovery with TWRP
- Root Android 11 via Magisk Patched boot.img (without TWRP)
- How to Root Android Devices via TWRP Recovery
- How to Pass Magisk SafetyNet on Rooted Android 11
Other Useful TWRP Resources
- Now that you have created the TWRP Recovery for yourself, it’s time to flash it onto your device. For that, you may refer to our comprehensive guide: TWRP: fastboot flash vs fastboot boot: Which command to use.
- Then upon flashing the TWRP, if you end up in a bootloop, then refer to our guide: How to Fix Soft brick/Bootloop after installing TWRP Recovery
- Likewise, if you get unable to mount data partition error, or internal storage shows 0MB, then this guide will help you out: How to Fix TWRP 0MB Internal Memory Issue.