
The versatility of tablets has evolved dramatically over the years, allowing users to switch between different operating systems seamlessly. For Windows tablet users seeking to explore the Android operating system, there are a variety of methods available that can facilitate the installation of Android on your device. This comprehensive guide will cover the essential steps, tools, and considerations involved in installing Android on your Windows tablet.
Understanding the Basics
Before diving into the installation process, it’s important to understand what Android and Windows are. Android is a mobile operating system developed by Google, predominantly used in smartphones and tablets. Windows, created by Microsoft, is a more versatile operating system designed for laptops, desktops, and tablets.
Installing Android on a Windows tablet can expand its functionality, offering access to a plethora of applications that might not be available on Windows. However, it’s essential to understand that the installation process can vary based on the hardware specifications of the tablet and may involve risks such as voiding warranties or bricking the device if not done properly.
Prerequisites for Android Installation
-
Backup Your Data: Before proceeding, it’s crucial to back up all your important data. This includes photos, documents, and any other files you don’t want to lose. You can use cloud services, an external hard drive, or a USB flash drive for storage.
-
Understanding the Hardware: Make sure you know about your tablet’s hardware specifications, including RAM, storage, and processor type. Some older devices may not support Android installations effectively.
-
Charging Your Tablet: Ensure that your tablet is fully charged or plugged in during the installation process. Power interruptions during installation can lead to serious issues.
-
Researching Android Versions: Different Android versions may work better with certain devices. Researching compatibility can save you time and effort.
Step-by-Step Process to Install Android
There are multiple methods to install Android on a Windows tablet, including using third-party applications, custom firmware, and emulators. Below are some common approaches:
Method 1: Using Android-x86
One of the most reliable methods for installing Android on a Windows tablet is through the Android-x86 project. This project ports Android to the x86 architecture, making it suitable for tablets and laptops.
Step 1: Download Android-x86
- Visit the Android-x86 project’s website and download the latest stable version of the Android-x86 ISO file.
- Choose a version that is compatible with your tablet’s hardware.
Step 2: Create a Bootable USB Drive
You need to create a bootable USB drive containing the Android-x86 ISO file. You can use tools like Rufus or Etcher for this purpose.
- Plug in your USB drive to your Windows tablet.
- Open Rufus. Select your USB drive under «Device.»
- Under «Boot selection,» click “Select” and choose the downloaded Android-x86 ISO file.
- Set «Partition scheme» to MBR and «File system» to FAT32.
- Click on «Start» to create the bootable drive.
Step 3: Boot from the USB Drive
- Restart your Windows tablet and enter the BIOS setup. This is typically done by pressing a specific key (like F2, ESC, or DEL) during startup.
- Change the boot order to set the USB drive as the primary boot device.
- Save your settings and restart the tablet.
Step 4: Install Android-x86
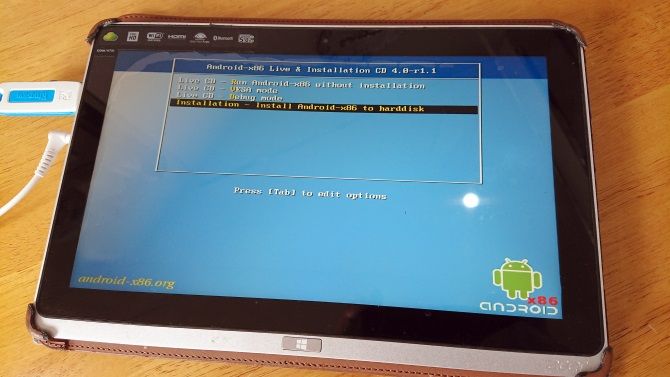
- Once booted into the USB drive, you’ll see the Android-x86 installation screen.
- Choose the «Installation» option to start the installation process.
- Follow the prompts to select your installation type. You can opt for a fresh installation or create a dual-boot environment alongside Windows.
- Choose a partition for installation. Ideally, select «Create/Modify partitions» if you’re customizing.
- Choose to format the partition as ext4.
- Complete the installation and reboot the device.
Step 5: Configure Android
After installation, configure Android settings as prompted. You may need to adjust display settings, Wi-Fi settings, and Google account details.
Method 2: Using Pheonix OS
Pheonix OS is another option for installing Android on a Windows tablet. It provides a desktop-like experience with support for traditional applications along with the Android ecosystem.
Step 1: Download Pheonix OS
- Go to the official Pheonix OS website and download the latest version suitable for your device.
Step 2: Create a Bootable USB Drive
Use Rufus (again, as mentioned earlier) to create a bootable USB with the Pheonix OS installer.
Step 3: Boot from USB and Install Pheonix OS
- Reboot your tablet and enter BIOS to set the USB as the primary boot device.
- Select the «Install» option from the Pheonix OS boot menu.
- Follow the on-screen prompts to install Pheonix OS on your tablet.
Method 3: Using an Emulator
If you’re not ready to commit to fully installing Android on your tablet, using an Android emulator might be the way to go.
Emulators like BlueStacks, Nox Player, or LDPlayer can simulate the Android environment on your Windows tablet.
Step 1: Download and Install Emulator Software
- Download the emulator of your choice from its official website.
- Follow the on-screen instructions to install the software on your tablet.
Step 2: Configure Emulator Settings
- Launch the emulator and sign in with your Google account.
- Explore the Google Play Store to download and install apps.
Potential Issues You May Encounter
- Compatibility Problems: Not all Windows tablets are compatible with Android installation. You may encounter driver issues, especially with peripherals like cameras and touchscreens.
- Boot Loop: If your tablet enters a boot loop after installation, it may be necessary to return to the BIOS and adjust boot settings or reinstall Android.
- Loss of Windows: If you decide to overwrite Windows, ensure you have a Windows installation disk or recovery partition available beforehand.
Conclusion
Installing Android on your Windows tablet can open a door to a variety of apps and experiences that Windows may not offer. However, this process requires careful consideration and understanding of the technology involved. Whether you choose to install Android-x86, Pheonix OS, or utilize an emulator, each method comes with its unique benefits and challenges.
While experimentation with your device can lead to exciting new capabilities, remember to proceed with caution. Always maintain backups of your important data, be aware of the possibility of software issues, and enjoy discovering the capabilities of Android on your Windows tablet.
The digital landscape continues to evolve, and by expanding the systems you can work within, you’ll find opportunities for productivity and creativity that would have previously been unimaginable.
Source: Mikronis.hr
Understanding the benefits of installing Android on a Windows tablet can help you decide if this process is right for you. Here are a few reasons:
- App Compatibility: Many popular apps are available exclusively for Android, allowing you to run these apps directly on your tablet.
- Dual-Boot Option: Switching between Windows and Android can be useful for multitasking or running specific apps not available on Windows.
- Customization: Android offers more customization options compared to Windows, appealing to users who want more control over their device.
Prerequisites
Before starting the installation process, ensure your Windows tablet meets the following prerequisites:
- Hardware Compatibility: The tablet should have a compatible processor (x86 or x64) and at least 4GB of RAM.
- Storage Space: Sufficient storage space is necessary to install both Windows and Android. A minimum of 128GB is recommended.
- Power Supply: Ensure a reliable power supply to avoid interruptions during the installation process.
Tools and Software Needed
To install Android on your Windows tablet, gather the following tools and software:
- Android-x86 Project: This project provides a version of Android that can run on x86-based devices like your Windows tablet.
- VirtualBox or VMware: These virtualization software tools are necessary for running the Android-x86 image.
- Bluestacks (Optional): If you prefer not to install a full-fledged Android environment, Bluestacks can be used as an emulator to run Android apps on your Windows tablet.
Step-by-Step Installation Guide
Step 1: Download Android-x86
Begin by downloading the Android-x86 image from the official website:
- Visit the Android-x86 website and navigate to the downloads section.
- Select the appropriate version for your device (e.g., Android 11 or later).
- Download the ISO file for your chosen version.
Step 2: Install VirtualBox or VMware
Next, install either VirtualBox or VMware on your Windows tablet:
- Download VirtualBox from the official Oracle website.
- Download VMware from the official VMware website.
- Install either tool following the provided instructions.
Step 3: Create a New Virtual Machine
Once VirtualBox or VMware is installed, create a new virtual machine:
- Open VirtualBox and click on «New.»
- Enter a name for your virtual machine (e.g., «Android-x86»).
- Select «Linux» as the operating system and choose «Other Linux» from the drop-down menu.
- Set the memory size to at least 4GB.
- Create a new virtual hard disk with a size of at least 128GB.
- Finish the wizard to create the virtual machine.
Repeat these steps in VMware if you prefer using that software.
Step 4: Mount the ISO File
Mount the downloaded ISO file to your newly created virtual machine:
- Open VirtualBox and select your newly created virtual machine.
- Click on «Settings» and then navigate to «Storage.»
- Add a new storage controller if necessary.
- Select the ISO file you downloaded earlier as the CD/DVD drive.
- Click «OK» to save changes.
Repeat these steps in VMware if you are using it.
Step 5: Boot into Android-x86
Start up your virtual machine:
- Click on «Start» in VirtualBox or VMware.
- The virtual machine will boot from the ISO file and present you with an option to install or try out Android-x86.
- Select «Try Android-x86» to test out the environment without installing it.
If everything is set up correctly, you should see an Android interface on your screen.
Step 6: Install Android-x86
If you decide to install Android-x86, follow these steps:
- Select «Install» from the boot menu.
- Follow the on-screen instructions to complete the installation process.
- Choose your language and keyboard layout.
- Select your installation location (e.g., the virtual hard disk you created).
- Format any existing partitions if necessary.
- Start the installation process by clicking on «Install.»
The installation process may take some time depending on your hardware specifications.
Step 7: Configure Your Virtual Machine
After installation is complete, configure your virtual machine settings:
- Open VirtualBox or VMware and select your newly installed virtual machine.
- Adjust memory settings if needed.
- Set up network settings according to your preference (e.g., NAT, Bridged Adapter).
- Save changes to ensure that your settings are applied.
Troubleshooting Common Issues
During or after installation, you might encounter some common issues:
- Insufficient RAM: Ensure at least 4GB of RAM is allocated to your virtual machine.
- Storage Space: Make sure enough storage space is available for both Windows and Android installations.
- Boot Issues: If booting fails, try adjusting BIOS settings or checking for any hardware conflicts.
Using Bluestacks as an Alternative
If you prefer not to install a full-fledged Android environment but still want to run Android apps on your Windows tablet, consider using Bluestacks:
- Download Bluestacks from its official website.
- Install Bluestacks following the provided instructions.
- Launch Bluestacks and sign in with your Google account.
- Access the Google Play Store within Bluestacks to download and install your desired apps.
Final Thoughts
Installing Android on a Windows tablet requires careful planning and execution but offers significant benefits in terms of app compatibility and customization options. By following this guide, you should be able to successfully install Android-x86 or use Bluestacks as an alternative solution for running Android apps on your device.
While installing Android can enhance your tablet’s functionality, it may also introduce potential stability issues due to compatibility differences between operating systems. Always ensure important data is backed up before proceeding with any installation process. By understanding these steps and being prepared for potential challenges, you can enjoy the best of both worlds—running Windows and Android seamlessly on one device.

Windows tablets are becoming more popular. But if you’re looking for a bigger selection of apps, Android is the answer.
While installing Android on a desktop PC is reasonably straightforward, you might find installation tricky on a Windows tablet. One problem is that tablets don’t have a CD/DVD drive.
So how can you install Android on a Windows tablet? We’ll show you.
What Tablet Are You Using?
Before proceeding, be aware that Android can only be installed on standard 32-bit or 64-bit Windows tablets. Those that use ARM processors (such as the old Microsoft Surface RT) are incompatible.
Meanwhile, the process of installing Android on your Windows tablet differs from device to device. However, the general approach is the same.
Windows 8 tablets are desperate for an upgrade to a usable operating system. In many cases, Windows 10 is the solution. However, the lack of apps or the increasing complexity of Windows 10 may prevent you from upgrading.
For many, Android is the only way to keep using old but perfectly adequate tablet hardware.
What You Need to Install Android on a Windows Tablet
Get started by gathering everything you need to install Android:
- Your Windows tablet, plugged into a power source
- A blank USB flash drive of 16GB or more
- Second USB flash drive with the Windows installer loaded on it (in case of problems)
- USB flash disk writing software (we recommend Etcher)
- USB keyboard (a mouse is optional)
- A USB hub so you can connect multiple devices to your tablet at once
- The right version of Android for your system
When it comes to installing Android, the first option you should try is Phoenix OS. Be sure to check our guide to installing Phoenix OS for full instructions.
Intel also maintains some Android images for Windows machines. You’ll find these as part of the open source Celadon project, available to download on GitHub.
Before proceeding, check the web for steps specifically pertaining to your tablet. It’s important to have a direct, step-by-step reference to ensure you don’t make any mistakes that could wipe your drive. You certainly want to avoid any errors that could leave your computer unbootable.
Windows has a usable UI in touchscreen and tablet mode, but the Microsoft Store’s app selection is comparatively modest.
If you already have experience with Android tablets and don’t particularly like the Windows touch environment, switching is sensible (where possible, that is). Thanks to enhanced OTG support on Android (so you can connect USB drives and input devices) you might not even notice a difference!
Note, however, that you’ll be restricted to apps that support x86-compatible systems. These are growing in number, but don’t expect to run every app in the Play store.
Configuring Your Windows Tablet for Android Installation
You can’t just install a second operating system on a device designed for Windows without making a few adjustments to the system setup.
First, you’ll need to ensure Secure Boot is disabled. Open Settings > Update and Recovery > Recovery and select Restart Now under Advanced Start-up. From here, use your arrow keys to select Troubleshoot, then Advanced Options > UEFI Firmware Settings.
Here, find Security in the left-hand menu and set a Supervisor password. Once you’ve added that, open Boot, find the Secure Boot option, and set it to Disabled.
With that done, hold down Power to restart, then hold the Windows button as well until the screen comes back on. This enables a quick shortcut back into the BIOS screen, where you should ensure UEFI Mode is selected.
Next, switch the tablet off, and connect the USB hub directly to the USB port. Do not use a docking station.
With the keyboard and USB stick connected to the hub, boot up your tablet PC, pressing F12. In the boot menu, use the arrow keys to select the USB drive. When you need to make selections (such as enabling dual boot), use your device’s volume keys.
Different versions of the Android installer have slightly different steps. In most cases, the dual boot option should be selected. It’s often not worth removing Windows entirely as the bootloader is required for Android to boot.
If all goes according to plan, when you next boot up the tablet you should see a boot menu, where you can select between Android and Windows.
Alternative Ways to Run Android Apps on Windows
If your main motivation for installing Android on your Windows tablet is to use apps, emulation is a simpler solution. You can choose from several tools to run Android apps in this way, including:
- NoxPlayer: Probably the best Android emulator for Windows.
- BlueStacks: Ideal for fans of Android gaming.
- Andy: Includes features for game and app development.
Note that these will only run as well as the hardware on your Windows machine allows. Check our guide to the best Android emulators for Windows for more.
Turn Your Windows Tablet Into Android With a Virtual Machine
Installing Android on a Windows tablet can be tough. It might take a while to find a suitable image, for example. In the worst cases, there may not even be a compatible version of Android for you to use.
Don’t give up. If Android emulation doesn’t suit you, consider a virtual machine instead.
Tools such as VMWare Player or VirtualBox run a virtual environment, upon which you install an Android operating system. This might be the operating system you downloaded earlier to run on your specific tablet model, or it could simply be Phoenix OS.
Either way, this is a cleaner option than dual booting or removing Windows entirely. Simply boot Windows, launch the virtual machine, and run Android. Our guide to using VirtualBox will get you started with virtual machines.
Running Android on a Windows Tablet
It can be a hard slog, but eventually you should be able to install Android on your Windows tablet. Perhaps you’ll end up with a dual-boot setup, or maybe you’ll rely on a virtual machine instead. Either way, with Android running, you can start enjoying your favorite apps and games.
With everything is installed, and Android booted up, it should work perfectly. However, whichever method you use to install Android on your Windows tablet, you’ll likely find some features missing or disabled.
As such you’ll need to install Google Apps to get staples like YouTube, Google Play, Gmail, and all the other popular Google-provided Android apps.
Image Credit: peshkova/Depositphotos
Read the full article: How to Install Android on Your Windows Tablet
MakeUseOf
If you are bored of using your existing tablet and do not want to invest in a new one right now, then you can change the operating system of your tablet and make it more interesting. However, before you embark the voyage to transform the operating system of your tablets, keep in mind the following:
- This process might void the warranty of your tablet. Read your OEM policies before you begin.
- This process is entirely done using Third-Party tools, and you will not receive any support from Microsoft or Google.
- While Android OS is free and can be installed on a Windows tablet without legal issues, the Windows installation on an Android tablet is a matter still in grey as no license was purchased and I am still not sure where were the Windows files obtained from.
- The process of installing an alternative operating system on a tablet is mainly for knowledge purpose and proceed only if you accept the above-mentioned points.This article is divided into two sections: How to Install Windows on Android Tablet & How to Install Android on Windows Tablet? You can jump directly to the second one by clicking on the link.
How To Install Windows On Android Tablet?
While you can buy any of the few costlier Windows 10 tablets in the market, you can choose from the huge variety of miscellaneous tablets and run Windows on the Android system. This is a very easy process to perform and can be done by anyone. You can always visit the official website of Change My Software and download your preferred version of Windows with choices over XP, 7,8, 8.1 and 10 or you can download all versions in a single compressed file.

Prerequisites to Install Windows on Android tablets.
- The Android device must be connected to your Windows PC.
- Your Windows PC must be connected to a high-speed internet connection.
- The Android device must have at least 8GB of free space.
- Download the version of Change My Software, you wish to install.
Steps To Install Windows On Android Tablet
Step 1. Connect your Android device to your computer and enable the debugging mode so that a connection is established between your devices.
Step 2. Extract the compressed folder you have downloaded and open the folder of the Windows version you wish to install.
Step 3. Double Click on executable application file labeled as Change My Software X Edition, to open it.
Step 4. Once the GUI is open, select your task and click on it. The App will prompt you to select your language and start downloading the required drivers.

Step 5. Once all the necessary files and folders are downloaded, click on the Install Button which will now be highlighted.
Note: During the final stage of installation, do not check the Remove Android box as this will remove the original Android operating system.
Step 6. After the installation process is complete, you will get an option to choose the operating system. Choose Windows and then let the Windows first setup process continue.

How To Install Android On Windows Tablet?
If you possess an old Windows 8 Tablet that you feel like trashing out, then you can try to install the Android operating system and thus converting your tablet into an Android tablet. Android consumes fewer resources as compared to Windows 10 and is also free of cost. A new operating system would inspire you to use your device more often and find new uses for it.
Installing Android on a Windows tablet is quite tricky as tablets do not have CD/DVD drive. Another important fact to know is Android operating system can only be installed on standard 32- or 64-bit Windows tablets only. It will not be compatible with devices possessing ARM processors.

Why Should I Install Android on a Windows Tablet?
Before you change the operating system of your tablet it is important to know what benefits have Android over Windows operating system:
- Android’s Google Play Store is an ocean of apps as compared to Windows’s Microsoft Store which has a limited collection.
- If you have a Windows 8/8.1 tablet, then switching to Android would be better as it is a lightweight operating system as compared to upgrading to Windows 10, which might not support the hardware configuration.
- Installing Android on a Windows tablet would bring a change over repeatedly using Windows and make things easier as you probably have used Android on your smartphone.
Prerequisites To Install Android On A Windows Tablet
Now that you are convinced to install Android on a Windows Tablet, you need to make a few things ready before the final step. The list of prerequisites includes:
- Your Windows tablet (preferably 100% battery) connected to a power source.
- A USB Flash Disk of at least 16GB.
- A Second USB Flash Disk with your tablet’s Windows installer loaded.
- USB Keyboard
- USB HUB to connect multiple devices to your tablet.

Note: Connect the first USB Flash Disk along with the Keyboard to the USB hub. Before you begin the installation process, connect a USB cable from the hub to the tablet so that it can use the Keyboard and the first at the same time.
- Load the Android OS in the first USB flash disk. To get free Android operating system that is secure and error-free, you can try any of the two sources mentioned below:
- Phoenix OS. This can run on devices having CPU’s consisting of Intel x86 series and does not affect the pre-installed
- Celadon project GitHub – maintained by Intel for Windows machines
- To install Android on your Windows Tablet, you need to first configure your device and make it Android ready. The most important step is to disable the secure boot by following these steps:
Step 1. Open Settings and navigate to Update and Recovery>Recovery>Advanced Start-up> Restart. You will have to use arrow keys here to select Troubleshoot and then locate UEFI Firmware Settings under Advanced Options.
Step 2. In the UEFI Firmware Settings window, you will find the Security options on the left side. You can set a Supervisor Password here.
Step 3. Once you have set a supervisor password, locate the secure boot option and disable it.
Step 4. Hold the Windows button and the power button together. This will restart the tablet into BIOS mode, where you need to select UEFI Mode to boot your tablet.
Step 5. Power off your Tablet.
Steps To Install Android On Your Windows Tablet
Now that everything is set, it is time to install Android on your Windows Tablet by following the below- mentioned steps:
Step 1. Turn Off the tablet.
Step 2. Connect the USB Hub directly to the USB port of the tablet. The keyboard and USB stick with Android OS must be connected to the hub prior to this setting.
Step 3. Now turn on the Tablet and press F12 immediately on the keyboard. This will load the boot menu screen. Choose the USB Drive by using your device’s volume keys.
Step 4. Follow the onscreen instructions. The further steps would differ depending upon the Tablet model and Android version selected.
Note: You will get an option to keep both operating systems, and it is recommended to do so.
Step 5. Once the installation process completes, your tablet will boot up to a boot menu, where you would have to select an operating system first to complete the boot process.
Alternative Ways to Run Android Apps on Windows 10.
If you feel that the process of installing an Android operating system is a difficult task, then you can opt for other simpler ways to run Android apps on Windows 10. If it is the apps, you are after then installing an Android Emulator will do the trick. Emulation is the process of creating a required environment within another environment. Download and install one of the following emulators, and then you can install any Android application and use it on your Windows 10 computer.

BlueStacks: One of the Best Android emulators for playing games.
Android Studio: The fastest emulator.
Android -X86: It creates the complete Android Operating System Environment instead of a space to run Android Apps on Windows 10
Note: An emulator’s performance depends on the hardware configuration of the system.
Another method to run Android apps on Windows 10 is to use tools to create a virtual environment on your system. This method was initially designed to test multiple operating systems on a single OS. The best among the list are:
- VMWare Player.
- Virtual Box.

Running Android On A Windows Tablet Or Windows On Android Tablet.
If Android can be installed on a Windows tablet and vice versa, then it is perhaps time for a hybrid tablet to enter the market. The Android operating system is lightweight and has tons of apps as compared to Windows 10. On the other hand, Windows 10 is more stable and can handle programs than cannot be run in Android. Personally, I think installing Android on a Windows 10 tablet is giving life to a dying piece of hardware as you can use it to play games and watch YouTube. Do share your comments and experience with us in the comments section below and subscribe to our YouTube Channel and Facebook for more tech-related updates.
What You Need to Install Android on a Windows Tablet
- Your Windows tablet, plugged into a power source.
- A blank USB flash drive of 16GB or more.
- Second USB flash drive with the Windows installer loaded on it (in case of problems)
- USB flash disk writing software (we recommend Etcher)
- USB keyboard (a mouse is optional)
How can I change my Windows to Android?
5 tips to help Windows Mobile users switch to Android
- Sign up for a Google account first. The only absolute Google necessity you need on an Android phone is a Google Account.
- Microsoft it all up.
- Move your contacts to Google.
- Use Cortana.
- Install the Windows Central Android app!
Can you install Android on Microsoft Surface?
There are plenty of apps for Windows 8 in the Windows Store, but there are thousands more for Android. With the free BlueStacks application you can now run your favorite Android apps on your Surface Pro.
Can you install a different OS on a tablet?
An Android tablet (or phone) can be flashed with another Android OS irregardless of whether the device is rooted. There are exceptions to this rule, albeit very rare. However, as a general rule, if your device’s bootloader is locked, it will be necessary to unlock it before you can flash a custom Android OS.
Can Android be installed on a PC?
There are many ways to get Android running on a PC, including virtual device emulators, bootable USB versions, and even full standalone applications like BlueStacks.
How do I install an Android operating system?
Updating your Android.
- Make sure your device is connected to Wi-Fi.
- Open Settings.
- Select About Phone.
- Tap Check for Updates. If an update is available, an Update button will appear. Tap it.
- Install. Depending on the OS, you’ll see Install Now, Reboot and install, or Install System Software. Tap it.
Can we install Windows 10 on tablet?
Windows 10 is designed to work on desktops, laptops, and tablets. By default, if you’re using a touchscreen device without a keyboard and mouse, your computer will switch to tablet mode. You can also switch between desktop and tablet mode at any time.
How do I turn my Android tablet into Windows 10?
Connect the Android x86 tablet to the Windows PC using a USB cable.
- Extract the ZIP file containing ‘Change My Software.
- Open the ‘Change My Software’ tool you would like to use.
- Choose Windows 10 then double click on the executable file to open it.
- Choose your desired language and Android option.
Can you update Android OS on tablets?
You can manually check for updates: In the Settings app, choose About Tablet or About Device. (On Samsung tablets, look on the General tab in the Settings app.) Choose System Updates or Software Update.When an update is available, the tablet lets you know.
Can I install Chrome OS on Android tablet?
Chrome OS is closed-source and not available for download, so there is no way of installing it onto another device. You can consider installing what it is based off of, Chromium OS.
How do I install an operating system on my tablet?
Solution 1: Flash the ROM to Reinstall Android OS
- Reboot the Android device and enter Recovery Mode.
- Click on Install ROM from SD card and select the path you downloaded the ZIP file in.
- Flash Rom will now start, and you can even wipe the data if necessary.
How can I run Android apps on Windows without emulator?
How to run Android apps on PC or laptop without an emulator
- Step 1: First, you need to install Microsoft’s You Phone app on your smartphone and PC.
- Step 2: Open the app on your PC and click on Android (or iPhone) and click again on the Continue button.
Which Android OS is best for PC?
10 Best Android OS for PC
- Bluestacks. Yes, the first name that strikes our mind.
- PrimeOS. PrimeOS is one of the best Android OS for PC apps as it provides a similar Android experience on your desktop.
- Chrome OS.
- Phoenix OS.
- Android x86 Project.
- Bliss OS x86.
- Remix OS.
- Openthos.
How can I download Android apps on PC without emulator?
How to Install Android Phoenix OS on PC
- Download the Phoenix OS installer for your OS.
- Open the installer and select Install.
- Select the hard drive where you want to install the OS, then select Next.
- Select the amount of space you want to reserve on your hard drive for Phoenix OS, then select Install.
Can Samsung tablet run Windows?
So the samsung Galaxy Tab S7 is an android device, like an apple phone, not windows. Samsung does, however, make other devices that run Windows i.e. laptops.
Is there any Windows emulator for Android?
Wine (also known as Wine Is Not an Emulator) is a popular piece of software that allows people to run Windows programs on other operating systems, particularly Linux and macOS, and it is now available for Android as well.
Once Windows has been installed on your Android device, it should either boot directly to the Windows OS, or to the “Choose an operating system” screen if you decided to make the tablet into a dual boot device. After that, your version of Windows should then begin its own normal setup process.
How do I install the latest version of Android on my tablet?
How to Manually Update Android Tablets By Version
- Select the Settings application. Its icon is a cog (You may have to select the. Applications icon first).
- Select Software Update.
- Select Download and install.
Will there be a Windows 11?
Starting today, October 5th, Microsoft is rolling out the new Windows 11 to eligible devices. Earlier this year, Microsoft announced the new flagship update to its operating system: Windows 11.
How do I get Google Play on Microsoft?
You’d have to download an Android emulator like Bluestacks to run Google play store & . apks on Windows. Everything is done within Bluestacks, once you’ve logged into your Google account it’ll show any games or apps you’ve downloaded onto your Android phone & they are useable/playable.
How do you download apps on a Windows tablet?
Download New Apps to Your Windows 8 Tablet from the Windows Store
- 2Browse for apps, tapping interesting apps to read their description, details, and reviews left by others.
- 3Search for an app.
- 4Tap an app’s name to read more about it.
- 6Wait for the app to download.
- 7Load the app.