
Whether you are having issues connecting your Google Android phone to your PC to access files, or you can’t seem to get the Android Debug Bridge (ADB) working, smartphone USB connections are not always painless. In many cases your problem is the USB device driver which is installed, or not.
The problem, explained here, started when I noticed that my Nexus 6p was identified as a LeMobile Android Device in the Windows Device Manager. I had no idea what a LeMobile device was or why it was listed. This article explains how to remove an outdated or incorrect Google smartphone USB driver and then install the newest Android driver. Since they use the same driver, this technique also works for Google’s Nexus tablets.
If you are trying to connect a phone other than a Google phone, look here to find your correct drivers, or go to your manufacturer’s (OEM) website. Most of the OEMs (such as Samsung, HTC and Motorola) supply Windows setup programs, which automate the process or install their own connectivity application such as HTC Sync Manager, so you won’t be able to perform the install as shown below.
This is not a discussion of general USB connection troubleshooting. It is assumed that you have a smartphone device listed in the Windows Windows Device Manager. It is not important whether it works or not. We will simply explain how to install the correct USB driver for that phone.
First, a word of caution…
My suggestion is to NEVER use, the many driver “fix-it” websites or programs pandered on the Internet. These applications often supply the wrong drivers, offer better service if you purchase something and are used for other deceptive purposes, such as installing Potentially Unwanted Programs (PUPs.) To be safe let Windows do it, or do it yourself.
Now to let’s begin by getting the current Android USB driver…
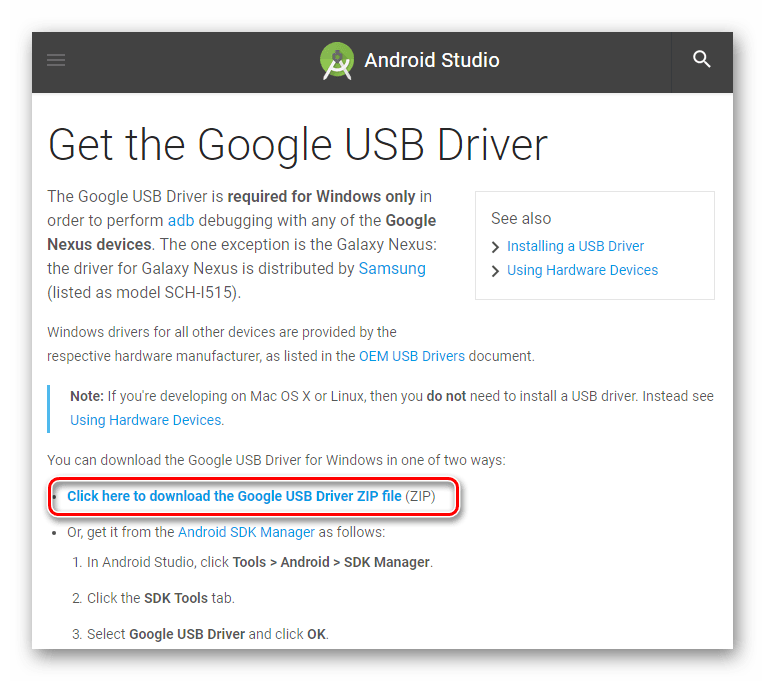
The Google USB driver download page also has a link to their installing drivers’ page should you be interested. The official Google USB drivers for Android devices come as a zipped file. There is no install program in the archive, just the drivers, other files and an INF file. The INF file is the key to the installation.
The Google installation help does not tell you to remove the old driver(s), but leaving these old drivers may come back to haunt you. This would happen if Windows ever thinks they are a better match for your device than the ones which are correct. Such was the case on my PC…
Fixing an incorrect USB driver installation by removing the old software…
The connection problem on my PC was an incorrect and unknown driver which was installed for my Nexus 6p. The installed USB driver was, as shown in the Windows Device Manager screenshot at the left, LeMobile Android Device. If you have this device listed or some other incorrect one, you need to remove and replace the device using the correct driver. I read somewhere that the LeMobile driver is installed by Windows when it thinks that driver is a “better match” for the phone. In my case, my Nexus 6p actually needs the Google Android USB driver.
To remove the LeMobile device driver (or any driver) and use Google’s open the Windows Device Manager:
- Right click on the LeMobile Android Device/Android Composite ADB (see the previous image) to open the context menu shown at the left. Select Uninstall device.
- Then from the Uninstall Device dialog box check Delete the driver software for this device.
- Finally, click the Uninstall button.
Now that the incorrect or outdated driver is gone you could use the Device Manager to install the new one, except without the driver Windows does not “see” the device. To add the phone to the list of installed hardware in the Device Manager, select Action > Scan for hardware changes from main menu. Windows will then install your phone and driver, or you could do it this way…
Installing the USB drivers using the INF file
This is an easy and reliable way to install a device driver. Although it may sound difficult, it really is simple. First, look at the files which are in the Google USB driver archive file (latest_usb_driver_windows.zip). The contents of the zip file looks like this:
This particular install is easy because there is only one INF file. There are some driver archives with several INF files in different folders. Selecting the correct one for the installation would require you to read them all to choose the correct file. In such cases, when you need to pick an INF file from several, it would be easier and safer to use the Windows Add a device tool.
The following shows the contents of the android_winusb.inf file, in case you are curious. There is nothing but plain text inside which are instructions for Windows to decipher…
;
; Android WinUsb driver installation.
;
[Version]
Signature = "$Windows NT$"
Class = AndroidUsbDeviceClass
ClassGuid = {3F966BD9-FA04-4ec5-991C-D326973B5128}
Provider = %ProviderName%
DriverVer = 08/28/2014,11.0.0000.00000
CatalogFile.NTx86 = androidwinusb86.cat
CatalogFile.NTamd64 = androidwinusba64.cat[ClassInstall32]
Addreg = AndroidWinUsbClassReg[AndroidWinUsbClassReg]
HKR,,,0,%ClassName%
HKR,,Icon,,-1[Manufacturer]
%ProviderName% = Google, NTx86, NTamd64[Google.NTx86];Google Nexus One
%SingleAdbInterface% = USB_Install, USB\VID_18D1&PID_0D02
%CompositeAdbInterface% = USB_Install, USB\VID_18D1&PID_0D02&MI_01
%SingleAdbInterface% = USB_Install, USB\VID_18D1&PID_4E11
%CompositeAdbInterface% = USB_Install, USB\VID_18D1&PID_4E12&MI_01

;Google Nexus S
%SingleAdbInterface% = USB_Install, USB\VID_18D1&PID_4E21
%CompositeAdbInterface% = USB_Install, USB\VID_18D1&PID_4E22&MI_01
%SingleAdbInterface% = USB_Install, USB\VID_18D1&PID_4E23
%CompositeAdbInterface% = USB_Install, USB\VID_18D1&PID_4E24&MI_01

;Google Nexus 7
%SingleBootLoaderInterface% = USB_Install, USB\VID_18D1&PID_4E40
%CompositeAdbInterface% = USB_Install, USB\VID_18D1&PID_4E42&MI_01
%CompositeAdbInterface% = USB_Install, USB\VID_18D1&PID_4E44&MI_01

;Google Nexus Q
%SingleBootLoaderInterface% = USB_Install, USB\VID_18D1&PID_2C10
%SingleAdbInterface% = USB_Install, USB\VID_18D1&PID_2C11

;Google Nexus (generic)
%SingleBootLoaderInterface% = USB_Install, USB\VID_18D1&PID_4EE0
%CompositeAdbInterface% = USB_Install, USB\VID_18D1&PID_4EE2&MI_01
%CompositeAdbInterface% = USB_Install, USB\VID_18D1&PID_4EE4&MI_02
%CompositeAdbInterface% = USB_Install, USB\VID_18D1&PID_4EE6&MI_01
%CompositeAdbInterface% = USB_Install, USB\VID_18D1&PID_4EE7

;Google Glass
%SingleAdbInterface% = USB_Install, USB\VID_18D1&PID_9001
%CompositeAdbInterface% = USB_Install, USB\VID_18D1&PID_9001&MI_01

;Project Tango (generic)
%SingleBootLoaderInterface% = USB_Install, USB\VID_18D1&PID_4D00
%CompositeAdbInterface% = USB_Install, USB\VID_18D1&PID_4D02&MI_01
%CompositeAdbInterface% = USB_Install, USB\VID_18D1&PID_4D04&MI_02
%CompositeAdbInterface% = USB_Install, USB\VID_18D1&PID_4D06&MI_01
%CompositeAdbInterface% = USB_Install, USB\VID_18D1&PID_4D07

[Google.NTamd64]

;Google Nexus One
%SingleAdbInterface% = USB_Install, USB\VID_18D1&PID_0D02
%CompositeAdbInterface% = USB_Install, USB\VID_18D1&PID_0D02&MI_01
%SingleAdbInterface% = USB_Install, USB\VID_18D1&PID_4E11
%CompositeAdbInterface% = USB_Install, USB\VID_18D1&PID_4E12&MI_01

;Google Nexus S
%SingleAdbInterface% = USB_Install, USB\VID_18D1&PID_4E21
%CompositeAdbInterface% = USB_Install, USB\VID_18D1&PID_4E22&MI_01
%SingleAdbInterface% = USB_Install, USB\VID_18D1&PID_4E23
%CompositeAdbInterface% = USB_Install, USB\VID_18D1&PID_4E24&MI_01

;Google Nexus 7
%SingleBootLoaderInterface% = USB_Install, USB\VID_18D1&PID_4E40
%CompositeAdbInterface% = USB_Install, USB\VID_18D1&PID_4E42&MI_01
%CompositeAdbInterface% = USB_Install, USB\VID_18D1&PID_4E44&MI_01

;Google Nexus Q
%SingleBootLoaderInterface% = USB_Install, USB\VID_18D1&PID_2C10
%SingleAdbInterface% = USB_Install, USB\VID_18D1&PID_2C11

;Google Nexus (generic)
%SingleBootLoaderInterface% = USB_Install, USB\VID_18D1&PID_4EE0
%CompositeAdbInterface% = USB_Install, USB\VID_18D1&PID_4EE2&MI_01
%CompositeAdbInterface% = USB_Install, USB\VID_18D1&PID_4EE4&MI_02
%CompositeAdbInterface% = USB_Install, USB\VID_18D1&PID_4EE6&MI_01
%CompositeAdbInterface% = USB_Install, USB\VID_18D1&PID_4EE7

;Google Glass
%SingleAdbInterface% = USB_Install, USB\VID_18D1&PID_9001
%CompositeAdbInterface% = USB_Install, USB\VID_18D1&PID_9001&MI_01

;Project Tango (generic)
%SingleBootLoaderInterface% = USB_Install, USB\VID_18D1&PID_4D00
%CompositeAdbInterface% = USB_Install, USB\VID_18D1&PID_4D02&MI_01
%CompositeAdbInterface% = USB_Install, USB\VID_18D1&PID_4D04&MI_02
%CompositeAdbInterface% = USB_Install, USB\VID_18D1&PID_4D06&MI_01
%CompositeAdbInterface% = USB_Install, USB\VID_18D1&PID_4D07

[USB_Install]
Include = winusb.inf
Needs = WINUSB.NT

[USB_Install.Services]
Include = winusb.inf
AddService = WinUSB,0x00000002,WinUSB_ServiceInstall

[WinUSB_ServiceInstall]
DisplayName = %WinUSB_SvcDesc%
ServiceType = 1
StartType = 3
ErrorControl = 1
ServiceBinary = %12%\WinUSB.sys

[USB_Install.Wdf]
KmdfService = WINUSB, WinUSB_Install

[WinUSB_Install]
KmdfLibraryVersion = 1.9

[USB_Install.HW]
AddReg = Dev_AddReg

[Dev_AddReg]
HKR,,DeviceInterfaceGUIDs,0x10000,"{F72FE0D4-CBCB-407d-8814-9ED673D0DD6B}"

[USB_Install.CoInstallers]
AddReg = CoInstallers_AddReg
CopyFiles = CoInstallers_CopyFiles

[CoInstallers_AddReg]
HKR,,CoInstallers32,0x00010000,"WdfCoInstaller01009.dll,WdfCoInstaller","WinUSBCoInstaller2.dll"

[CoInstallers_CopyFiles]
WinUSBCoInstaller2.dll
WdfCoInstaller01009.dll

[DestinationDirs]
CoInstallers_CopyFiles=11

[SourceDisksNames]
1 = %DISK_NAME%,,,\i386
2 = %DISK_NAME%,,,\amd64

[SourceDisksFiles.x86]
WinUSBCoInstaller2.dll = 1
WdfCoInstaller01009.dll = 1

[SourceDisksFiles.amd64]
WinUSBCoInstaller2.dll = 2
WdfCoInstaller01009.dll = 2

[Strings]
ProviderName = "Google, Inc."
SingleAdbInterface = "Android ADB Interface"
CompositeAdbInterface = "Android Composite ADB Interface"
SingleBootLoaderInterface = "Android Bootloader Interface"
WinUSB_SvcDesc = "Android USB Driver"
DISK_NAME = "Android WinUsb installation disk"
ClassName = "Android Device"
Now installing the correct driver…
Make sure that your phone is not connected to the PC by a usb cable prior to step 1.
- Unzip the driver zip file (anywhere you wish)
- Open the folder containing the driver files (see below)
- Right click on the inf file (android_winusb.inf, in this case)
- From the context menu which now appears select Install (see below)
- Plug in the phone and in the Device Manager you should see:
Android Device > Android Composite ADB Interface

That’s it. The Device Manager listing should look like the last image below. If so, you are now connected with the correct driver.
It’s important to remember to always delete all old or erroneous device drivers when updating your drivers. If you ever delete a driver which is required later you can always reinstall it…be assured that Windows will find it.
From this page you can download the latest setup of Android bootloader driver. The bootloader is a program that runs when an Android device is turned on, and it is responsible for initializing the device’s hardware and starting up the operating system. The bootloader is stored in a special area of the device’s memory called the Boot ROM (read-only memory), which cannot be modified.
When the bootloader starts up, it performs a series of checks to make sure that the device’s hardware is functioning properly. It then loads the Android kernel into memory and starts it up. The kernel is the core of the operating system, and it manages the device’s hardware and software resources.
How it works
The bootloader also provides a way to install custom firmware on the device. By entering the bootloader mode, users can install a custom recovery image that allows them to install custom ROMs, kernels, and other modifications. This process is often called «flashing,» and it can be used to unlock the device’s bootloader, which allows the installation of custom firmware.
It is important to note that modifying the bootloader or installing custom firmware can potentially damage the device or void its warranty. It is recommended that users only modify their devices if they have experience with the process or are following trusted instructions.
Android Bootloader Interface Driver
ADB (Android Debug Bridge) is a Windows-based tool that helps you connect your Android device with a PC. It lets you do things like flash factory images, unlock the bootloader, and more.
However, sometimes your computer may not recognize your Android device properly. This could happen if the drivers for your device are outdated or there is an issue with their installation.
Compaitible With Most Android Phones
Google USB drivers are compatible with most Android devices and help your PC communicate with them. This includes transferring data, syncing files and media content to your device, and running ADB and Fastboot commands.
If you’re a developer, these drivers are also a must-have because they allow you to connect your Android device with your development PC over USB. They also act as Android ADB and Fastboot drivers, so you can use them for rooting, debugging apps and ROMs, and unlocking your device’s bootloader.
These drivers are available for both Windows and Mac, and don’t require any extra work to install them. They can be downloaded from the SDK Manager in Android Studio.
Unlocking the bootloader of your Android device allows you to flash custom recovery images, install ROMs, and root your phone. This process will wipe all of your device’s data, so be sure to backup everything before you begin.
There are many different USB drivers available for your device, each used to carry out specific tasks. There are general Android USB Drivers, Android SDK Platform Tools, and Qualcomm USB Drivers, among others.
==>> Download Driver
However, the regular Android USB Drivers don’t work when your device is in Bootloader or Fastboot Mode. This is where Android Bootloader Interface comes in handy.
Once you have these drivers installed, you will be able to use adb and fastboot commands with your device. The first step is to ensure that your device’s USB debugging feature is enabled in the system settings, under Developer options.
After that, you will need to connect your device to your computer using a USB cable. Once you’ve connected your device, run the command “fastboot oem unlock phone-model>” from the terminal window in platform-tools within your Android SDK folder.
Free available for download
The Android Bootloader Interface Driver For Windows is an optional SDK component that you use to connect an Android Developer Phone (ADP), Nexus One, or Nexus S to a Windows development environment. It’s free to download and install from the AVD and SDK Manager.
The drivers allow you to perform adb debugging and flash custom kernels, recovery files, and more on your Android device. They also support sideloading.
Note: The Google USB driver is only for Android Developer Phones and Nexus devices, but all other Android-powered devices require Windows drivers provided by their hardware manufacturer as outlined in the OEM USB Drivers document.
To install the driver, open the Android SDK and click Tools > SDK Manager. From there, select the Google USB driver and click OK. The driver is then downloaded to the Android SDKextrasgoogleusb_driver folder. This allows you to keep the driver up to date and notifies you when a new version is available.
They are easy to install
The Android Bootloader Interface Driver For Windows is an important file that lets your computer communicate with the device through Fastboot, which is required for unlocking the bootloader and flashing factory images. It’s easy to install and maintain, and it’s also compatible with most Google devices.
To start, connect your Android device to your PC with a USB cable. Next, use the hardware update wizard to install the correct driver.
If you’re unable to find the correct driver, you can try searching for it on the device manufacturer’s website. However, this may not solve the problem.
If that doesn’t work, you can download the latest version of the driver from Google’s website and manually install it on your PC. This method is a bit more difficult than the one described below, but it can often resolve your issue.
It also requires you to have the USB debugging feature enabled on your device. This option is available in the Developer Options menu of your Android phone.
Все способы:
- Подготовка Android
- Подготовка Windows
- Установка драйверов для Android-устройств известных брендов
- Установка драйверов ADB, Fastboot, Bootloader
- Установка драйверов VCOM для устройств Mediatek
- Установка драйверов для прошивки Qualcomm-аппаратов
- Советы по устранению проблем
- Вопросы и ответы: 4
Приступая к прошивке Android-девайса, изначально нужно позаботиться о подготовительных процедурах. Это позволит провести процесс записи нужных программных компонентов в устройство максимально быстро и эффективно, а также даст возможность избежать ошибок, которые превратят процедуру в мучение. Одним из самых важных шагов при работе с ПО Android-аппаратов через специализированные Windows-приложения является установка «прошивочных» драйверов.
Подготовка Android
Перед тем, как приступить к установке программных компонентов в Windows, Андроид-девайс нужно подготовить. Во многих случаях для прошивки используются, хотя бы частично либо на определенном этапе, возможности Android Debug Bridge (ADB). Этот инструмент может работать с Android-аппаратом только в том случае, если на последнем активирован режим «Отладки по USB». Практически все производители девайсов и разработчики различных вариаций ОС Android изначально блокируют данную возможность для пользователей. Т.е., после первого запуска аппарата «Отладка по USB» по умолчанию отключена. Включаем режим, идя следующим путем.
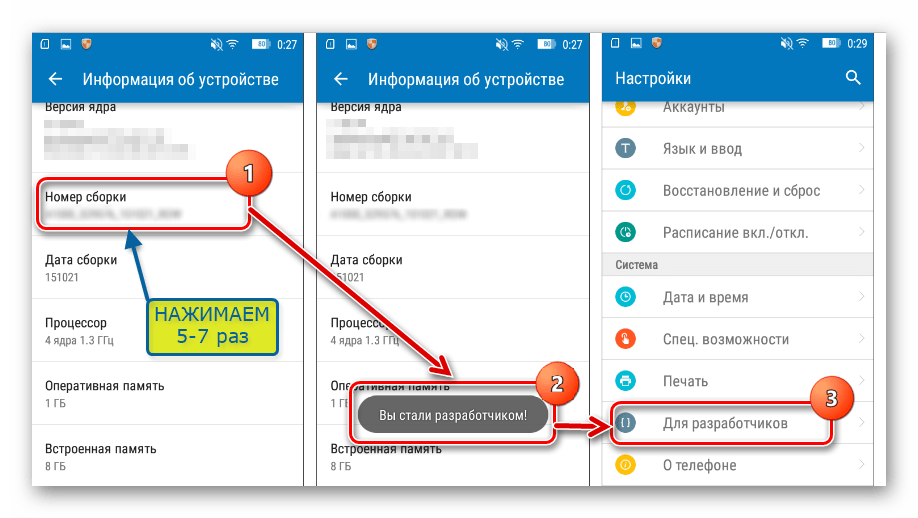
- Сначала нужно активировать пункт «Для разработчиков» в меню «Настройки». Для этого открываем «Настройки» в Android, листаем в самый низ и нажимаем пункт «Об устройстве» (может называться «О планшете», «О телефоне», «Справка» и т.п.).
- Открыв пункт «Об устройстве» меню «Настройки», информирующий о составляющих программно-аппаратной части аппарата, находим надпись: «Номер сборки». Для активации пункта «Для разработчиков» необходимо нажимать на эту надпись 5-7 раз. Каждое нажатие через короткий промежуток времени. Продолжаем до появления сообщения «Вы стали разработчиком!».
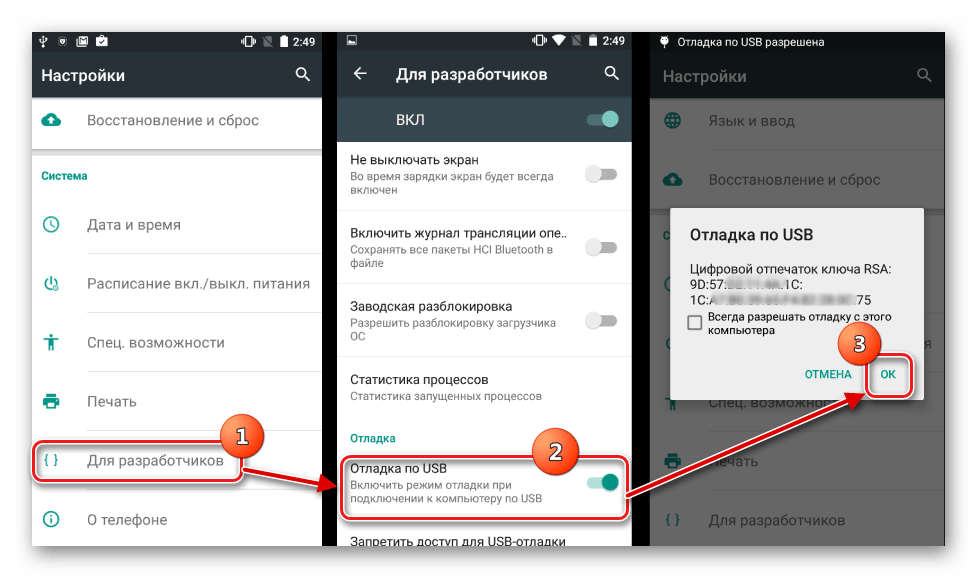
- После вышеописанной манипуляции в меню «Настройки» появляется ранее отсутствующий пункт «Для разработчиков». Заходим в это меню, находим пункт «Отладка по USB» (может называться «Разрешить отладку по USB» и т.п.). Возле этого пункта обязательно присутствует поле для установки галочки, либо переключатель, активируем его или устанавливаем отметку. При подключении к ПК аппарата с включенной «Отладкой по USB» на экране Андроид может быть отображен запрос о предоставлении разрешения конкретному компьютеру работать c девайсом через ADB (3). Даем разрешение нажатием кнопки «ОК» или «Разрешить».

Подготовка Windows
Что касается ОС Windows, ее подготовка перед началом процесса прошивки заключается в отключении проверки цифровой подписи драйверов. Во избежание возможных проблем, необходимо проведение операций, описанных в статье:
Урок: Решаем проблему с проверкой цифровой подписи
Установка драйверов для Android-устройств известных брендов
Первое, что нужно сделать при поиске драйвера для прошивки Android, это обратиться на официальный сайт производителя устройства. Знаменитые производители в большинстве случаев предоставляют возможность загрузки драйверов либо отдельным пакетом, либо в составе фирменного программного обеспечения, предназначенного для обслуживания девайсов бренда.

Для инсталляции, в случае наличия на официальном сайте производителя необходимых файлов, достаточно скачать автоустановщик либо инсталлятор программы для обслуживания Андроид-аппаратов марки, запустить его и следовать подсказкам в окнах приложения.
Разработчики Android решили несколько облегчить пользователям задачу поиска веб-страниц, предназначенных для загрузки необходимых при прошивке аппаратов файлов. На официальном сайте инструментария разработчиков Android Studio есть страница, содержащая таблицу, с помощью которой легко осуществить переход на официальный сайт загрузки ПО многих широко известных брендов.
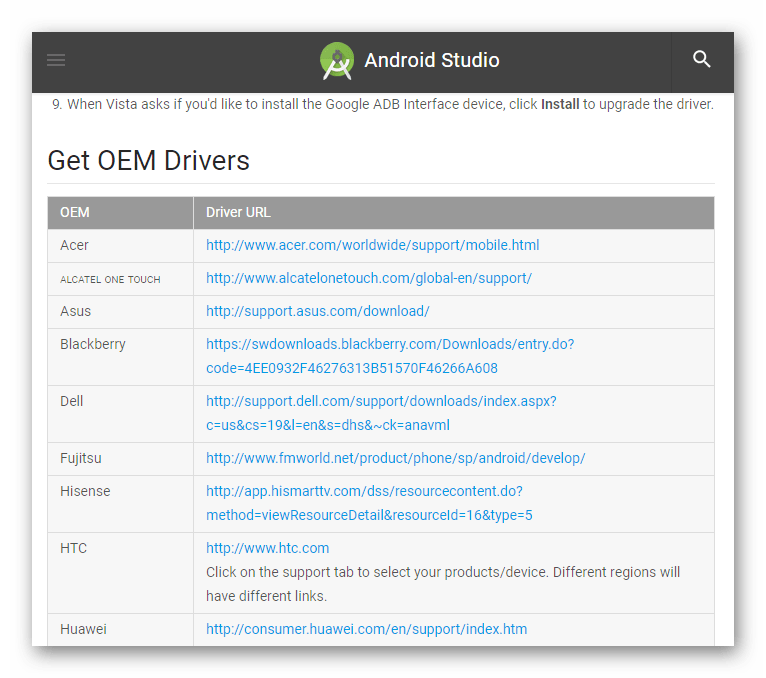
Загрузить драйвера для прошивки Android c официального сайта
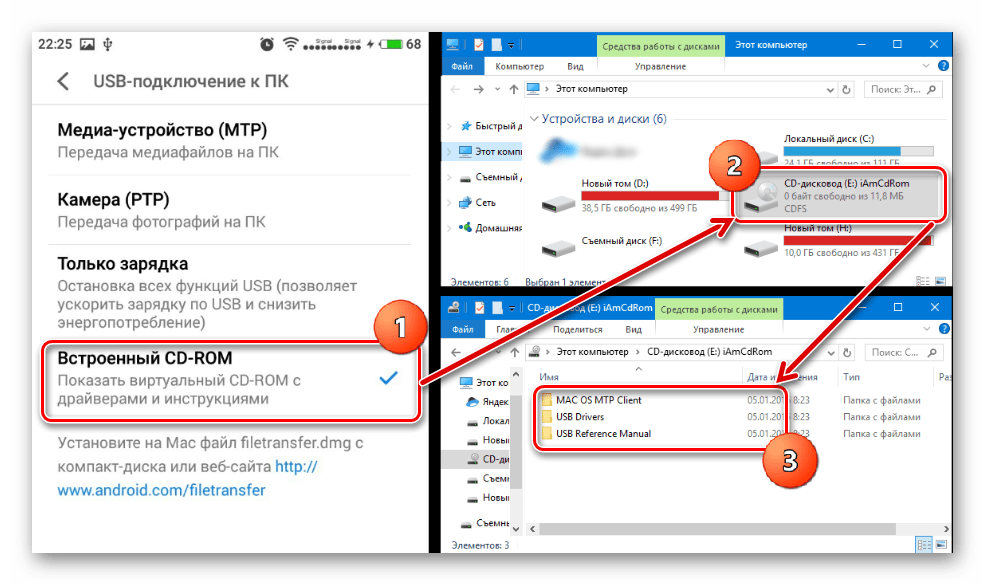
У владельцев устройств, выпущенных широко известными брендами, часто существует еще одна возможность установить нужные компоненты системы, о которой многие забывают. Это интегрированный в систему Android виртуальный CD-диск, содержащий все необходимое.
Для использования этого решения, нужно подключить девайс к USB-порту компьютера и в настройках USB-подключения Android выбрать пункт «Встроенный CD-ROM». После подключения Андроид-девайса в таком режиме в Windows появляется виртуальный дисковод, в котором содержатся в том числе и драйвера необходимые при прошивке.
Установка драйверов ADB, Fastboot, Bootloader
Во многих случаях для установки программных компонентов, обеспечивающих сопряжение и взаимодействие с Windows аппарата в режимах ADB, Fastboot, Bootloader достаточно прибегнуть к пакету, предоставляемому разработчиками Android на официальной странице инструментария Android Studio.
Загрузить драйвера ADB, Fastboot, Bootloader c официального сайта
В том случае, если вышеописанное не срабатывает, обращаемся на сайт производителя девайса и загружаем пакет файлов оттуда.
-
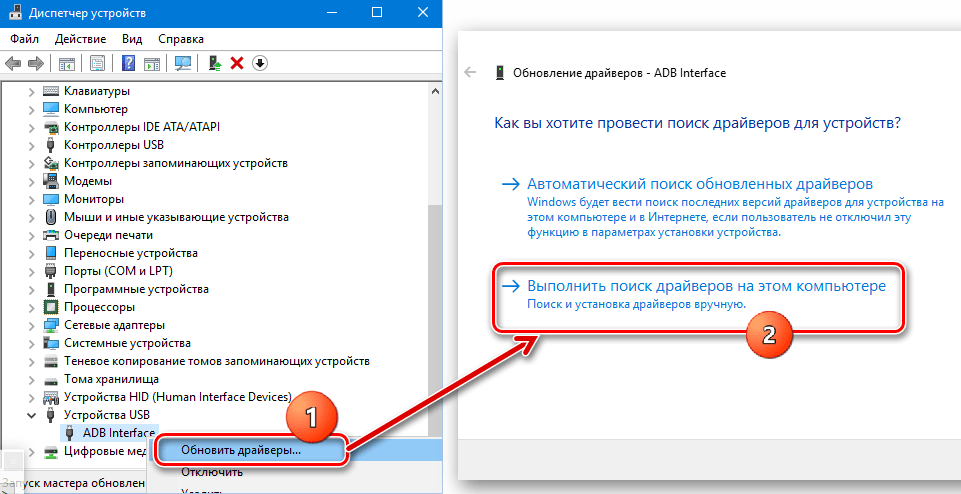
Установка драйверов ADB и Fastboot вручную. Перезагружаем устройство в режим, для которого необходима инсталляция дополнительных компонентов ПО и подключаем его к компьютеру. Находим в «Диспетчере устройств» наименование устройства, для которого не были установлены драйвера, кликаем по его наименованию правой кнопкой мыши и выбираем в раскрывшемся меню пункт «Обновить драйверы…». В открывшемся окне выбираем пункт «Выполнить поиск на этом компьютере».

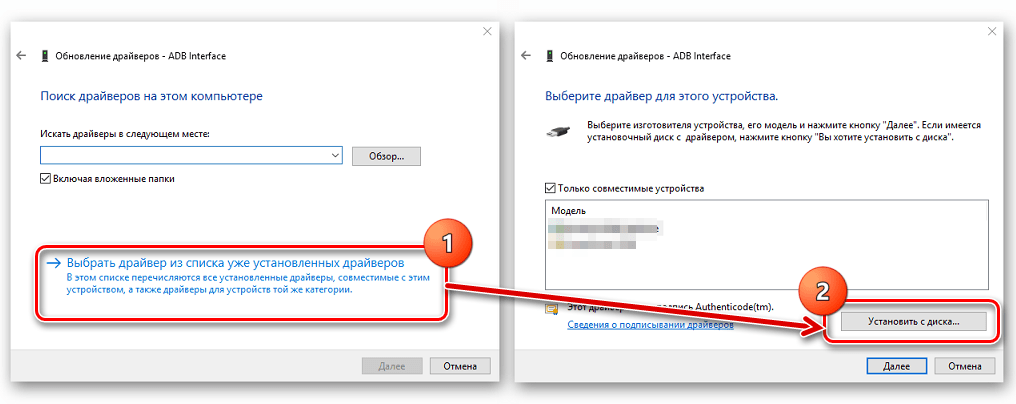
Затем «Выбрать из списка уже установленных…» — «Установить с диска».

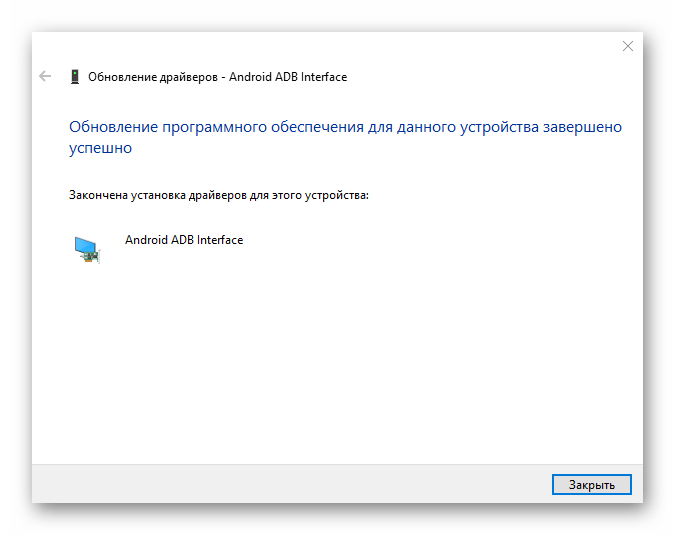
Указываем путь к месту расположения скачанного и распакованного пакета с файлами и выбираем android_winusb.inf. Осталось только дождаться завершения копирования файлов
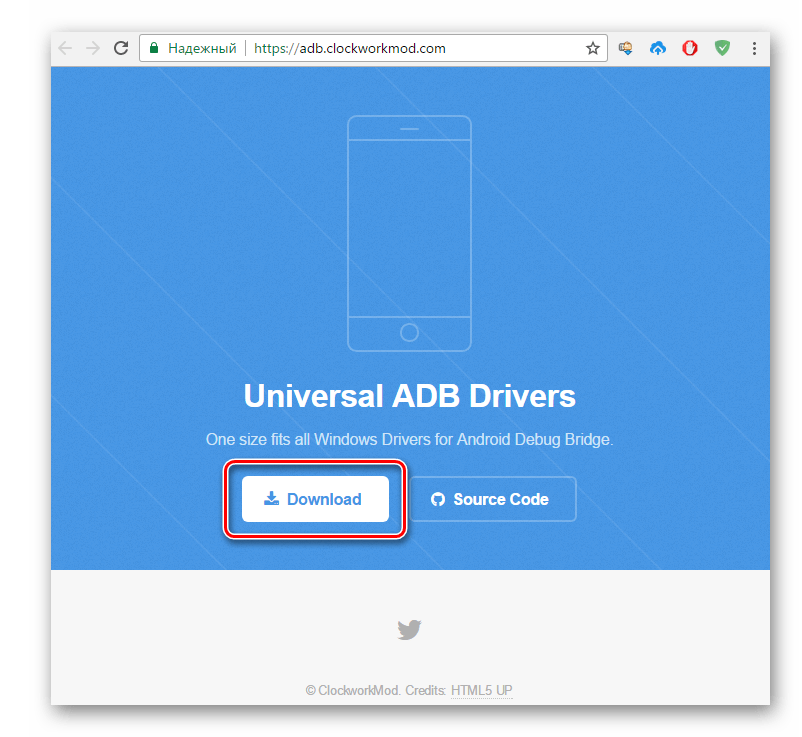
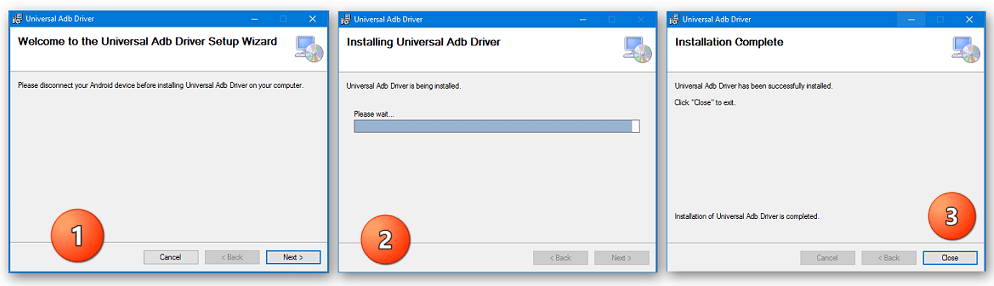
- Существует иное, довольно часто действенное решение установки ПО для особых режимов работы Андроид-устройств. Это пакет универсальных ADB-драйверов c инсталляцией в автоматическом режиме через приложение от создателей всем известного CWM Recovery – команды Сlockworkmod.

Загрузить Universal ADB Drivers с официального сайта
После загрузки инсталлятора, достаточно запустить его и следовать подсказкам в окнах приложения-установщика.
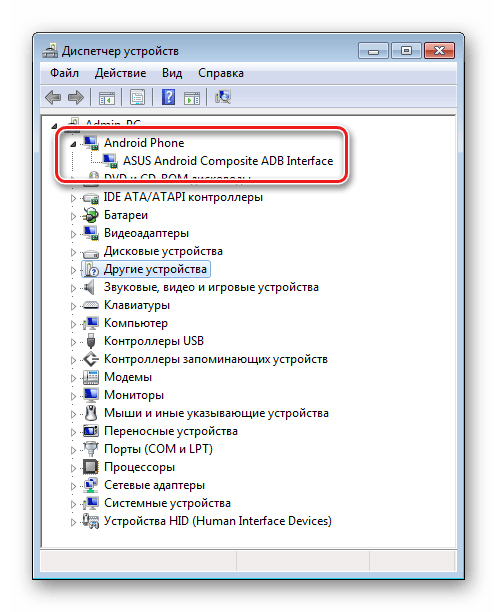
-
Для проверки правильности установки нужно убедиться в корректном отображении подключенного девайса в «Диспетчере устройств».

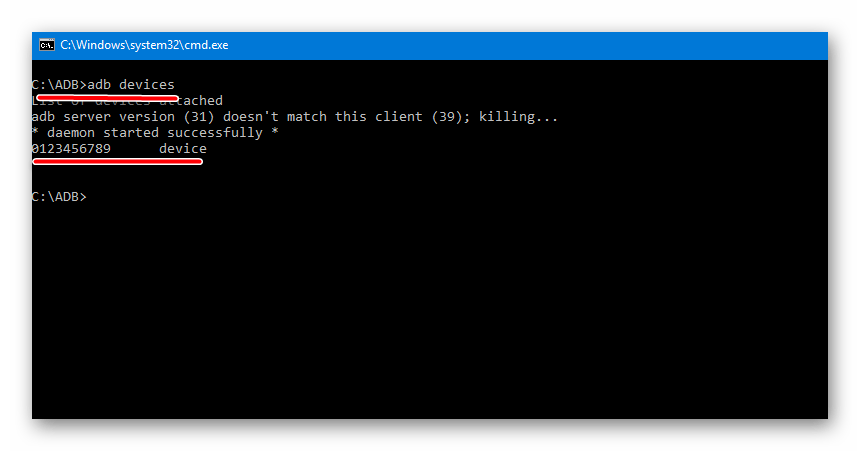
Кроме того, можно послать в консоли ADB команду
adb devices. Ответом системы при правильно настроенном сопряжении девайса и ПК должен быть серийный номер аппарата.
Установка драйверов VCOM для устройств Mediatek
Построенные на базе платформы MTK аппараты примечательны тем, что их прошивка в большинстве случаев осуществляется с помощью приложения SP Flash Tool, а это в свою очередь подразумевает предварительную установку Preloader USB VCOM Driver.
Существует автоустановщик MTK-драйверов. Изначально пробуем решить проблему сопряжения с помощью него.
Скачать MediaTek PreLoader USB VCOM Port с автоустановкой
Необходимо просто загрузить файл-установщик и запустить его. Приложение по своей сути является консольным скриптом и все действия по добавлению в систему необходимых компонентов осуществляются автоматически.

Если способ c автоустановщиком не срабатывает, придется инсталлировать MediaTek PreLoader USB VCOM Port вручную. Для этого выполняем следующие шаги.
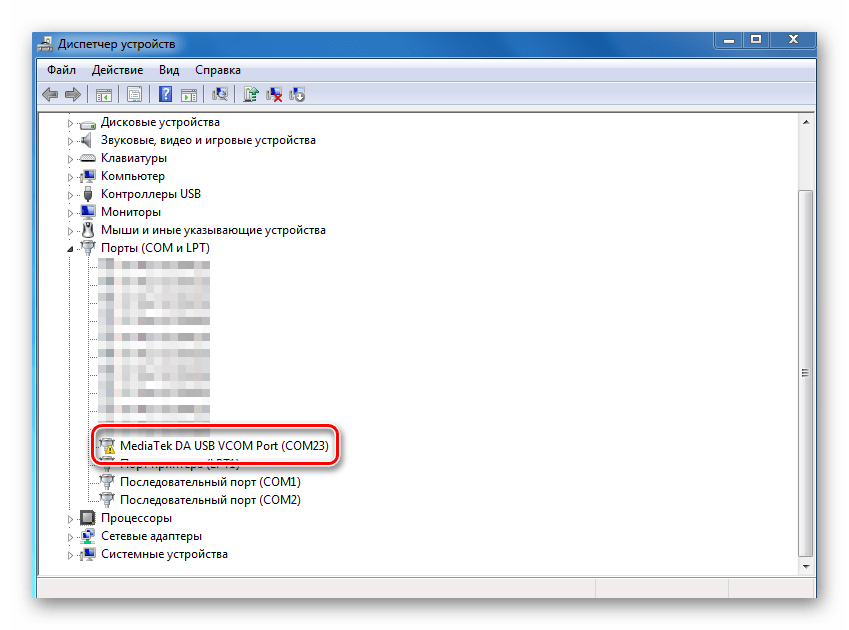
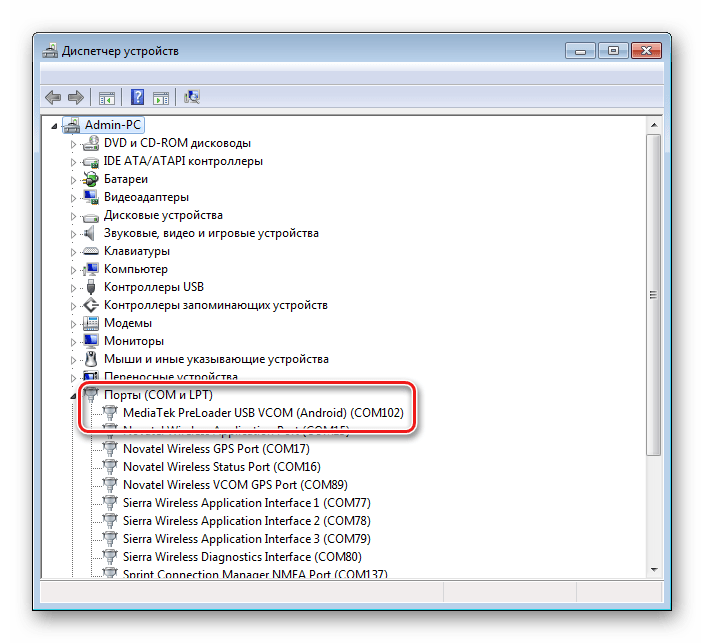
- Выключаем полностью девайс, вытаскиваем и вставляем обратно батарею, если она съемная. Открываем «Диспетчер устройств» и подключаем выключенный Андроид-аппарат к порту ЮСБ компьютера. В некоторых случаях понадобиться подключать аппарат без аккумулятора. Наблюдаем за перечнем устройств в «Диспетчере». На короткое время в перечне аппаратных составляющих должно появиться «Неизвестное устройство», но это редкий случай. Чаще всего MediaTek PreLoader, для которого необходимо установить драйвера отображается на несколько секунд в списке «Порты COM и LPT», помеченный восклицательным знаком.
- При появлении в перечне нового пункта нужно уличить момент и успеть кликнуть по наименованию порта, обозначенного восклицательным знаком, правой кнопкой мыши. В раскрывшемся меню выбираем пункт «Свойства».
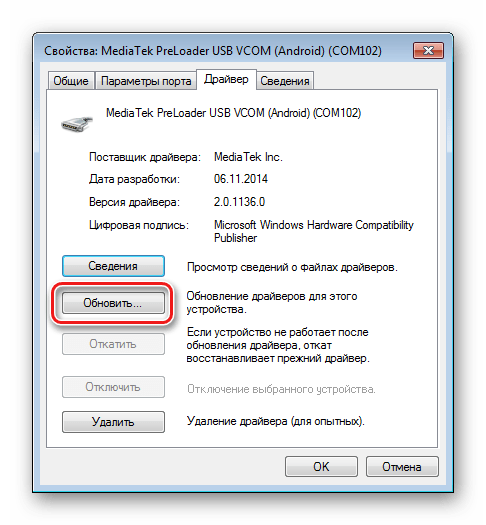
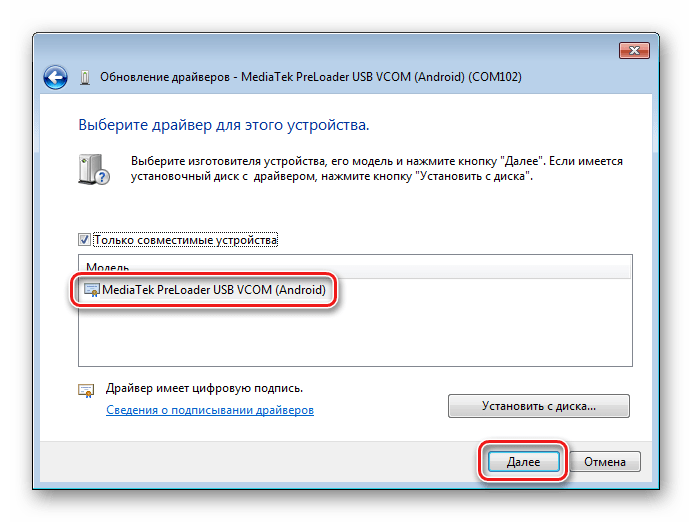
- В открывшемся окне переходим на вкладку «Драйвер» и кликаем кнопку «Обновить…».
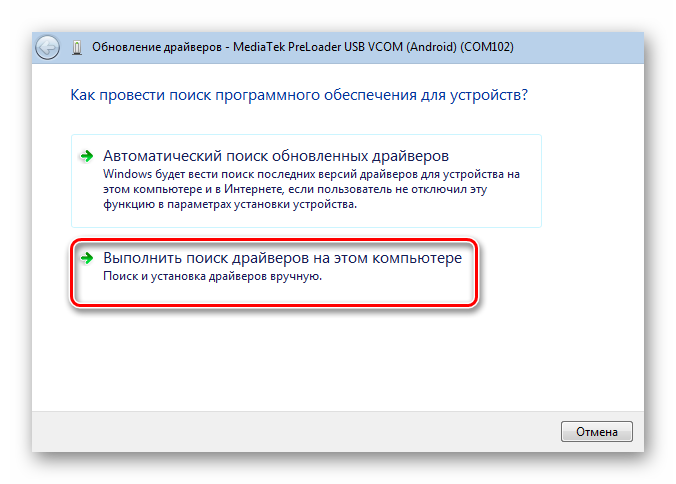
- Выбираем режим «Выполнить поиск драйверов на этом компьютере».
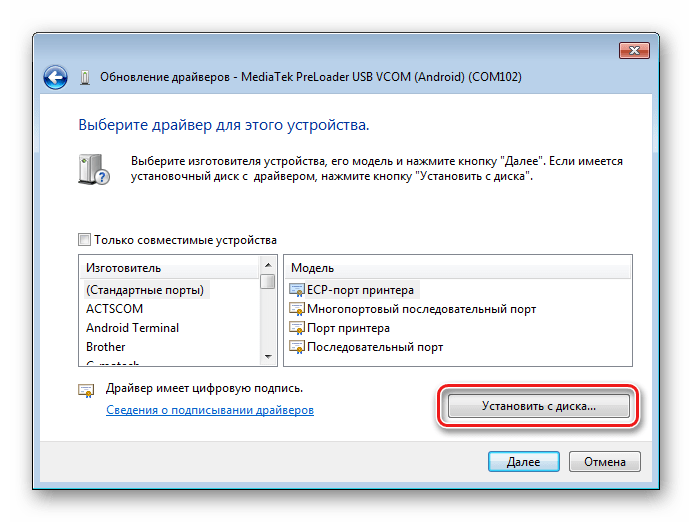
- Доходим до окна с кнопкой «Установить с диска…», нажимаем эту кнопку и указываем путь к папке, содержащей скачанное для девайса ПО. Открываем соответствующий inf-файл.
-
После добавления файла, нажимаем кнопку «Далее»

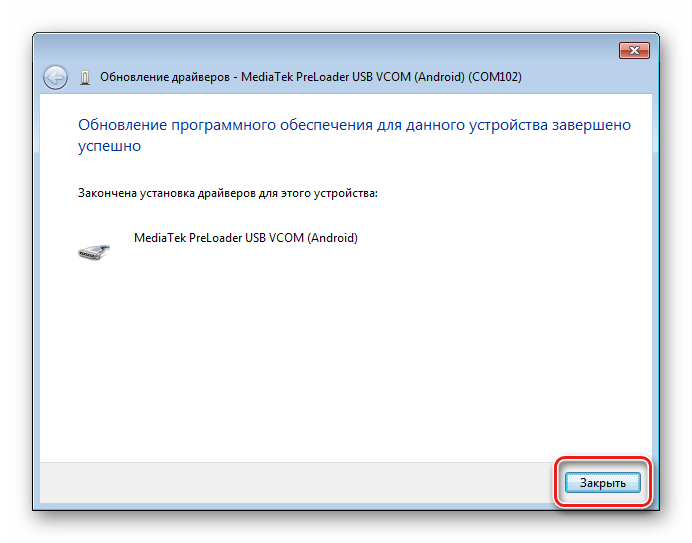
и ждем окончания процесса установки.
- Следует отметить, что даже если все вышеперечисленное сделано верно и установлены необходимые компоненты Windows, проверить наличие девайса в системе можно лишь переподключив его к USB-порту. Постоянно MediaTek PreLoader USB VCOM Port не отображается в «Диспетчере устройств», показывается только на короткий промежуток времени при подключении выключенного аппарата, а затем исчезает из перечня COM-портов.

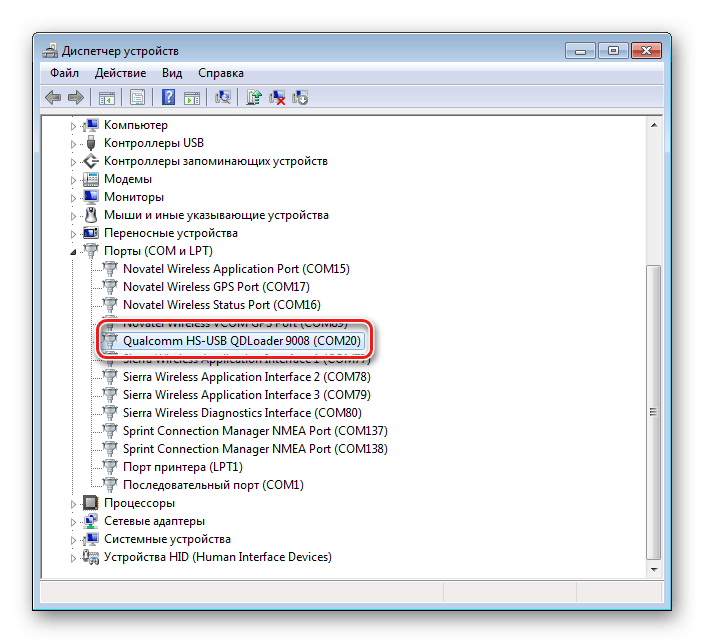
Установка драйверов для прошивки Qualcomm-аппаратов
В общем случае при сопряжении Андроид-девайса, в основе которого лежит аппаратная платформа Qualcomm, с ПК не возникает особых сложностей. К сожалению, Qualcomm не предоставляет возможности загрузки программного обеспечения с собственного официального сайта, а рекомендует обратиться к ресурсам на сайтах OEM-производителей.

Практически для всех устройств, так и следует поступить. Для удобства и ускорения поиска ссылок на страницы загрузки производителей устройств, можно использовать таблицу , составленную разработчиками Andrоid.
Или воспользоваться ссылкой ниже и загрузить последнюю версию пакета Qualcomm Drivers с автоустановкой.
Загрузить драйвера для прошивки Qualcomm
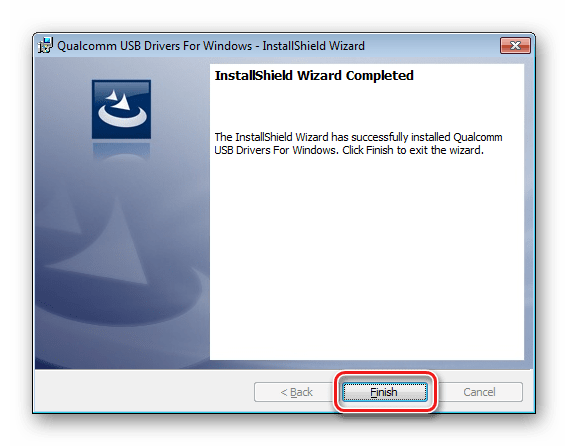
- Загрузив приложение QDLoader HS-USB Driver Setup, запускаем его, нажимаем в главном окне кнопку «Next».
- Затем следуем инструкциям-подсказкам в программе.
- Дожидаемся появления окна с сообщением об успешном окончании работы инсталлятора и закрываем его, нажав кнопку «Finish».
- Можно проверить корректность установки, подключив аппарат в режиме «Download» к USB-порту компьютера и открыв «Диспетчер устройств».


Советы по устранению проблем
Как видим, инсталляция драйверов для прошивки Андроид, не так сложна, как может показаться. Наибольшие трудности пользователь, в действительности, испытывает при поиске необходимого пакета файлов. Три простых совета, как избежать проблем или устранить возникшие ошибки при выполнении сопряжения Android и Windows.
- Если никак не получается подобрать работающий драйвер, можно воспользоваться методом описанным в статье:
- Довольно часто при установке компонентов необходимых для прошивки девайса, выпущенного под малоизвестной торговой маркой, ситуацию «спасает» специальная программа — DriverPack. Инструкция по работе с данным приложением, позволяющим во многих случаях успешно добавить необходимые файлы в систему, представлена по ссылке:
- Еще одной распространенной проблемой является установка драйверов неправильной версии, а также конфликтующие между собой компоненты системы. Для того, чтобы избежать подобной ситуации, необходимо удалить «лишние» в системе аппаратные компоненты. Для облегчения процесса обнаружения и удаления USB-устройств используем программу USBDeview.
Урок: Поиск драйверов по ID оборудования
Подробнее: Как установить драйвера с помощью DriverPack Solution
Скачать программу USBDeview с официального сайта
Наша группа в TelegramПолезные советы и помощь
Install Google’s Android Bootloader Interface Drivers:In this tutorial, we will show you how to install Google’s Android Bootloader Interface drivers on your Windows 10 computer. By doing this, you will be able to connect your Android device to your computer and use it with the Android SDK tools. Before we begin, there are a few things you need to know. First, this process only works for Windows 10 computers. If you are using a different operating system, you will need to find a different guide. Second, you will need to have the Android SDK tools installed on your computer. If you do not have the Android SDK tools installed, please follow our guide on how to do that before proceeding. Assuming you have everything you need, let’s get started!
Table of Contents
Google’s Android Bootloader Interface (abbreviated as ABI) drivers are essentially the files that allow your computer to communicate with your Android device. In order for your computer to be able to send commands to your phone or tablet, it needs to have these drivers installed.
There are a few different ways that you can install these drivers. The easiest way is to use a program like PdaNet+ which will automatically install the drivers for you. However, if you want to manually install the drivers, you can follow the instructions below.
1) Download the Android SDK from Google’s developer website.
2) Extract the contents of the ZIP file somewhere on your computer.
3) Open the “extras” folder and then double-click on the “google-usb_driver” folder.
4) Inside of this folder, there will be a file named “android_winusb.inf”. Right-click on this file and select “Install”.
5) Connect your Android device to your computer via USB cable. If prompted, allow your computer to install any required drivers for your device.
6) Once the drivers have been installed, open up the Command Prompt (search for it in Windows Start menu). Then type in the following command: adb devices
This will list all of the devices that are connected to your computer via USB. If everything is working properly, you should see your device’s serial number listed.
Related : Download Samsung USB Drivers
Why do You Need Them?
If you’re developing Android apps or looking to root your device, you’ll need to install the Android Bootloader Interface drivers. These drivers communicate with your PC over a USB connection and allow you to flash new firmware, or transfer data to and from your device.
Installing the drivers is a fairly simple process, but there are a few things you need to know before you get started. In this article, we’ll walk you through everything you need to know about installing the Android Bootloader Interface drivers.
How to Install the Drivers
If you’re developing for Android, then you need to install the Android Bootloader Interface (ABI) drivers. These drivers are used by the Android SDK to communicate with devices that have bootloaders.
There are two ways to install the ABI drivers: using a GUI tool or using the command line.
If you’re using a GUI tool like Android Studio, then the process is pretty simple. Just open up the SDK Manager, select “Extras”, and then check the box next to “Android Bootloader Interface”. Once it’s installed, you’re all set!
If you’re using the command line, then you’ll need to run the following commands:
First, navigate to your SDK directory. Then, open up the “platform-tools” folder and launch a command prompt (or Terminal on Mac). From there, enter the following commands:
cd /platform-tools
./adb devices // Lists all connected devices
./fastboot devices // Lists all connected devices in fastboot mode
How to Install Android Bootloader Interface Drivers
If you’re developing for Android, you need the Android SDK—which includes the Android platform tools—to perform many tasks. One such task is installing Google’s Android Bootloader Interface (abbreviated as ABI) drivers.
ABI drivers allow you to communicate with the bootloader, which is essential for tasks such as flashing new images and unlocking the bootloader. In this guide, we’ll show you how to install ABI drivers on your Windows PC.
Before we get started, there are a few things to keep in mind:
• You’ll need to use a USB cable to connect your device to your PC.
• If you’re using a Windows 8 or 10 PC, you’ll need to disable Driver Signature Enforcement before proceeding. (We’ll show you how to do this later in the guide.)
• The steps below are meant for advanced users. If you’re not comfortable working with command lines and drivers, we recommend that you seek help from a knowledgeable friend or colleague before proceeding.
Now let’s get started!
Bootloader Commands
There are a few bootloader commands that are useful when installing Google’s Android Bootloader Interface drivers. These commands can help you troubleshoot driver installation issues, or simply make sure that the drivers are installed correctly.
To check if the drivers are installed correctly, you can use the “lsusb” command. This will list all of the USB devices that are connected to your computer. If you see an entry for “Android Bootloader Interface”, then the drivers are installed and working properly.
If you’re having trouble installing the drivers, you can use the “zadig” command to install them manually. This is a bit more complicated, but it can be helpful if the automatic installation isn’t working properly.
Once the drivers are installed, you should be able to use fastboot and adb to communicate with your Android device. Fastboot is used for flashing firmware and recovery images, while adb is used for debugging applications and managing files on your device.
Unable to Install Android Bootloader Interface Drivers
If you’re having difficulty installing the Android Bootloader Interface drivers on your Windows PC, it’s likely due to one of two issues. The first issue could be that you have an outdated version of the Android SDK installed on your computer. The second issue could be that you have multiple versions of the Android SDK installed on your computer, and the drivers are being installed to the wrong SDK folder.
If you think you might have an outdated version of the Android SDK, head over to the Android Developers website and download the latest version. Once you’ve downloaded and installed the latest version of the Android SDK, try installing the bootloader interface drivers again.
If you think you might have multiple versions of the Android SDK installed on your computer, the best thing to do is uninstall all of them and then install just one fresh copy of the Android SDK. After you’ve done that, try installing the bootloader interface drivers again.
How to Install Missing ADB Drivers
If you’re developing Android apps, you need the Android SDK’s Java libraries and tools. The SDK is a big download, so we recommend using a tool like Android Studio to manage it. When you install Android Studio, it automatically installs the correct version of the Android SDK for you.
However, if you want to develop for Android on Windows without installing Android Studio, you can do so by installing the Google USB Driver for Windows. This will give you access to the necessary Java libraries and tools.
To install the Google USB Driver on Windows:
1. Download the driver from this page: https://developer.android.com/studio/run/win-usb#install-driver
2. Unzip the downloaded file and find the google-usb_drivers folder inside.
3. Connect your device to your computer using a USB cable. If necessary, consult your device manufacturer’s documentation for instructions on how to enable USB debugging on your device.
4. Open Device Manager: Right-click My Computer > Manage > Device Manager.<5 If you see a warning message from User Account Control, click Yes to continue.<6 Under Devices by type, expand Portable Devices.<7 Right-click the name of your device, then click Update Driver Software….<8 In the Hardware Update Wizard window that appears, select Browse my computer for driver software and click Next.<9 Click Browse… and locate the google-usb_
How to Install Android Bootloader Interface Drivers on Mac
To install the Android Bootloader Interface drivers on Mac, you will need to download the Android SDK from the Android website. Once you have downloaded the SDK, open it up and then double-click on the SDK Manager icon. In the SDK Manager window, click on the checkbox next to “Android SDK Platform-tools” and then click on the “Install packages” button.
Once the installation has been completed, you will need to open up a Terminal window and navigate to the platform-tools directory within your SDK folder. To do this, type in “cd /Users/[your username]/android-sdk/platform-tools” and then hit Enter.
In the platform-tools directory, type in “./adb devices” and hit Enter. If you see a list of devices, that means your installation was successful!
FAQ
If you’re developing on Windows, you need to install a USB driver for your Android device. In this article, we’ll show you how to install Google’s Android bootloader interface drivers.
Before you begin, make sure you have the following:
– A Windows computer with a USB 2.0 or higher port
– A compatible Android device
– A USB cable
– The latest version of the Android SDK Platform-Tools package
To install the driver:
1. Connect your Android device to your computer’s USB port.
2. If necessary, select your device from the list of devices that appear. On some systems, this step might not be necessary.
3. In the Platform-Tools folder, open a Command Prompt (Windows) or Terminal (Mac and Linux). To do this, press Shift+right-click (or Shift+Ctrl+click on Mac) in the empty space inside the folder, and then select Open Command Prompt Here or Open Terminal Here from the menu that appears. If you see a security warning, click Yes or Allow.
4. At the command prompt/terminal, type adb devices and press Enter. You should see a message that says “List of devices attached” and below that should be your device listed with “device” next to it . If instead, you see “unauthorized”, then allow USB debugging on your device first by going to Settings > About phone/tablet >
Conclusion
Thank you for reading this article on how to install Google’s Android Bootloader Interface drivers. By following the simple steps laid out in this article, you should be able to get your drivers installed quickly and easily. If you have any questions or comments, please feel free to leave them below.
Привет, друзья. Сегодня, можно сказать, спонтанный пост случился, о чем он будет, вы уже могли догадаться из заголовка. Все дело в том, что как раз сегодня пришла посылка из США, и я стал обладателем новенького Google LG Nexus 4. И теперь у меня есть сразу два Нексуса – Samsung Galaxy Nexus и LG Nexus 4 – может быть, я даже напишу обзор сравнение, если вам интересно, но сегодня не об этом.
Да, кому интересно, а я уверен, что многим – цена вопроса 12к рублей с доставкой! Но я опять не об этом…
Да, Pure Android 4 прекрасен сам по себе – удобен, быстр и почти идеален. Обратите внимание, что я говорю именно о том андроиде, который установлен в гуглофонах Nexus, а не всех других телефонах (htc, Samsung, sony и т.д.), т.к. они серьезно переработаны и изменены, увы, не в лучшую сторону. Так что может быть лучше, чем и так почти идеальная прошивка? Улучшенная кастомная прошивка, конечно же!
Поэтому сегодня я первый раз включил телефон только для того, чтобы убедиться, что он вообще работает. Когда я убедился в этом, я его выключил и занялся «плясками с бубном». По горячим следам расскажу о том, как на Nexus 4 разблокировать Bootloader, установить recovery и прошить любую прошивку.
На самом деле все эти пляски с бубном не такие уж и пляски и даже почти не с бубном =) Я, как опытный уже юзер, чувствовал себя уверенно, не переживал и даже не делал никаких бекапов. Как оказалось, все нижеописанные процедуры полностью идентичны тем процедурам, что я проделывал год назад над Galaxy Nexus. Все будет просто, я обещаю!
Для начала надо немного подготовиться и скачать необходимые драйвера:
Качаем драйвера usb_driver.rar – пригодятся для подключения устройства в режиме bootloader к нашему PC. А так же скачиваем архив adb.rar – содержит файлы Fastboot и ADB.
Распаковываем архив Fastboot and ADB в корень диска C, должно получиться C:\adb.
Драйвера тоже распаковываем в корень диска C, получится C:\usb_driver.
Теперь в бой!
Установка драйверов и разблокировка Bootloader в LG Nexus 4
Сперва надо разблокировать Bootloader, без этого ничего не получится сделать.
Существуют различные решения и даже программы, которые позволяют сделать разблокировку, получить root и установить рекавери в один клик, но я как-то не доверяют такому подходу, ибо процедура-то тонкая. Хотя я все же попробовал сегодня воспользоваться программой NEXUS 4 TOOLKIT 1.3, но, как оказалось, скачать можно только базовую версию, а обновление доступно только после оплаты, а без обновления не доступен выбор поддержки android 4.2.2. Короче – не наш вариант!
Три простых шага и никаких понтов:
- Выключаем телефон и переводим его в Fastboot mode (зажимаем кнопки Volume Down + Power), подключаем USB-кабель.
Windows покажет сообщение в трее, типа «Установка программного обеспечений для устройства». По понятным причинам, драйвера сами не установятся. Поэтому: правый клик на Мой компьютер => Диспетчер устройств => Увидим неизвестное устройство Android. Жмем на него два раза, а в открывшемся окне: жмем Обновить драйвер… => Выполнить поиск драйверов на том компьютере => Выбираем папку C:\usb_driver и жмем далее. Начнется установка, появится какой то-вопрос про безопасность, все равно установить. В результат увидим сообщение: «Закончена установка драйверов для данного устройства Android Bootloader Interface». В диспетчере устройств будет написано, что устройство работает нормально — то что надо Закрываем диспетчер.
- Открываем командную строку (Пуск – в окошке поиска пишем cmd – жмем Enter):
- В командной строке пишем cd C:\adb и жмем Enter
- Далее пишем fastboot oem unlock и жмем Enter
- На экране телефона появится предупреждение: «Unlock bootloader?» и бла бла бла. Клавишей громкости выбираем Yes, кнопкой питания подтверждаем выбор. Внимание! Это удалит все данные на вашем телефоне. Сразу после этого появится экран fastboot, где будет красоваться LOCK STATE – unlocked.
 Закрываем диспетчер.
Все просто, правда?
Установка кастомного recovery на LG Nexus 4
Теперь нам необходимо установить recovery, без которого мы просто не сможем прошивать прошивки, ядра и любые твики и моды.
В качестве recovery я рекомендую TWRP Team Win Recovery Project. Посмотреть описание и особенности можно на XDA в оф.теме для NEXUS 4, там же всегда есть актуальная версия. На момент написания данного поста, самая новая версия это 2.4.4.0. Вот удобная прямая ссылка на скачивание. Скачали? Отлично, поехали дальше.
У нас есть файл openrecovery-twrp-2.4.4.0-mako.img. Если вы его закинете в папку c:\adb и переименуете в twrp.img так будет проще на следующем шаге.
- Предполагается, что телефон у нас до сих пор подключен по USB и находится в fastboot mode, на том месте, где мы остановились в предыдущем пункте при разблокировке бутлоадера. Если нет, то просто снова выключаем телефон и, зажав клавиши Volume Down + Power, дожидаемся нужного экрана.
- Открываем командную строку cmd, как это сделать написано в предыдущем пункте в шаге № 2. Далее:
- В командной строке пишем cd C:\adb и жмем Enter
- Далее пишем fastboot flash recovery twrp.img и жмем Enter
- В командной строке мы должны увидеть OKAY
- Закрываем командную строку. А на телефоне кнопкой громкости выбираем пункт Start и жмем кнопку включения – телефон должен включиться, как ни в чем не бывало. Только теперь при запуске под логотипом Google будет показываться открытый замочек. Да, телефон включится как будто в первый раз, придется все настраивать заново, но на самом деле сейчас этого делать не надо, просто пропустите все шаги настройки.
Ну вот, bootloader разблокирован, recovery установлен. Осталось самое простое – установить новую прошивку. Кстати, root нам не нужно получать, если собираемся ставить кастомную прошивку, root там уже будет по умолчанию.
Установка кастомной прошивки на LG Nexus 4
За почти год использования моего предыдущего Samsung Galaxy Nexus я перепробовал целую кучу разных прошивок, частенько перепрошивался, проводил всякие эксперименты. И знаете, однажды я нашел идеальную прошивку, прошивку мечты – это ParanoidAndroid. Я просто не могу ничего другого кроме этой прошивки рекомендовать. Но, так или иначе – выбор за вами, процедура установки разных прошивок идентична.
Примерно вот так может выглядеть ваш Nexus 4 после установки ParanoidAndroid:
Вот видео-обзор этой же прошивки, но тем, кто сам лично ParanoidAndroid не юзал, мало что будет понятно:
https://www.youtube.com/watch?v=aN9an9rqwOY
Итак, с прошивкой мы определились, надо ее скачать. Оф.тема разработчиков прошивки ParanoidAndroid здесь, там же описание, ссылки и новые версии. Скачать саму прошивку можно в разделе mako на goo.im, а так же необходимо будет скачать Google Apps в соответствующем разделе на goo.im.
Прошивку и gapps скачали, теперь их надо как-то залить на телефон. Если телефон нормально виден в проводнике, то пропускаем блок текста ниже, если не получается попасть в память телефона через проводник, то читайте.
Тут небольшая загвоздочка может возникнуть, но только если вы не читаете этот пост – потому что у меня все загвоздки решаются, и я об этом обязательно пишу!
Я сижу и подключаю телефон по USB с помощью кабеля, но зарядка идет, а вот в проводнике я не могу его видеть как папку, чтобы закинуть туда наши архивы для прошивки. Если у вас та же история, тогда вот решение!
Не знаю почему, но Windows решила установить при подключении включенного телефона ADB драйвера (имеется в виду не fastboot, а именно запущенная система android). Может это я как-то что-то не то сделал, но факт есть факт — папки телефона в проводнике не видно. Я думал, что каких-то драйверов не хватает, долго гуглил, ничего не нашел. Решил воспользоваться суровым способом: Заходим в диспетчер устройств, видим «Android device что-то там ADB» – просто нажимаем на него правой кнопкой и выбираем Удалить. Отключаем телефон и сразу подключаем обратно – Windows должна заново определить устройство и установить на него правильные драйвера. Мне это помогло, и в проводнике появилась необходимая папка Nexus 4!
Выбираем папку Nexus 4 / Внутренняя память / Download и туда закидываем архивы, в моем случае это pa_mako-3.10-11MAR2013-131748.zip и pa_gapps-full-4.2-20130308.zip. В вашем случае это будут уже более новые версии, в маркировках разобраться совсем не трудно.
Когда все архивы закачаны, отключаем телефон от компьютера и выключаем. Нам необходимо снова попасть в recovery mode, для этого зажимаем Volume Down + Power пока не включится fastboot, где кнопками громкости выбираем Recovery mode и жмем Power.
Если вдруг случилось так, что вы увидели не главный экран TWRP (его опознать очень просто, сомнений в этом не будет точно), а увидели лежащего на спине андроида с красным треугольником, то есть выход, а как без него!
Для этого держим зажатой кнопку Power пока телефон не выключится. Опять загружаемся в fastboot, подключаем телефон по USB и проделываем заново сценарий по установке recovery. Когда рекавери установлен, не перезагружаемся, а кнопками громкости находим пункт Recovery mode и выбираем его кнопкой питания. Теперь-то точно запустится TWRP, а значит следуем инструкции ниже.
Увидим главный экран TWRP, жмем на верхнюю правую кнопку Wipe, а потом Factory Reset – это удалит все данные на телефоне!
После полного сброса, необходимо вернуться на предыдущий экран и нажать на верхнюю левую кнопку Install. На открывшемся экране из списка папок выбираем Download, а затем нажимаем сначала на файл прошивки pa_mako, потом Add More Zips и сразу выбираем файл pa_gapps и наконец делаем Swipe to Confirm Flash. Сейчас прошьются сразу и прошивка и приложения Google Apps, около минуты ожидания и мы должны увидеть надпись Successful. Очень важно подчистить все кеши, для этого выбираем кнопку Wipe cache/dalvik. Все готово – нажимаем Reboot System.
Сейчас будет загружаться система, но уже с прошивкой ParanoidAndroid. После длительной загрузки попадаем в меню первичной настройки телефона, где надо выбрать язык, указать аккаунт и т.д.
Собственно это и все! Успехов вам друзья. Если у вас появились какие-то вопросы или предложения по поводу процесса прошивки или по поводу ParanoidAndroid – пожалуйста, пишите в комментариях.
На заметку: О том, как получить доступ в меню разработчика на любой прошивке.
Открываем настройки, выбираем пункт «О телефоне» в самом низу, прокручиваем экран до пункта «Номер Сборки», там будет написано JDQ39, что соответствует версии android 4.2.2, у вас может быть написано и что-то другое, это не важно. Жамкаем на эту строку 7 раз подряд. Как итог – должно появиться сообщение «Вы стали разработчиком!» Вот оказывается как легко можно стать разработчиком под androind =))) Возвращаемся обратно в меню настроек, видим новый пункт «Для разработчиков».
UPD: Если вдруг телефон превратился в «кирпич» — что делать?
Мало ли что бывает… Вот как сегодня, например, коллега купил себе такой же Nexus 4 и отдал его мне, чтобы я установил кастомную прошивку. Да нет проблем – сказал я и пошел следовать своей же инструкции, написанной выше. Случилось странное – все данные (zip файл образа прошивки, например), которые я залил на внутренний накопитель для последующей прошивки после сброса, они удалились, самоуничтожились по какой-то неизвестной причине.
Короче, телефон превратился в кирпич, т.е. не включается, а делать что-то ведь надо. Посему проще всего накатить на телефон Factory Image, т.е. заводской образ, чтобы телефон был похож на то, что вы видели, впервые открывая упаковку. И вот инструкция:
- Предполагается, что драйвера у вас уже установлены и телефон подключается к компьютеру, когда он в режиме fastboot. А так же загрузчик разблокирован. Короче, полностью проделаны все шаги под заголовком «Установка драйверов и разблокировка».
- Теперь скачиваем официальный образ телефона отсюда https://developers.google.com/android/nexus/images#occam На данный момент актуальная версия это 4.3 (JWR66V), жмем Link напротив и скачиваем.
- У нас скачался архив occam-jwr66v-factory-08d2b697.tgz, внутри него еще один архив occam-jwr66v-factory-08d2b697.tar, а внутри несколько файлов и еще один архив image-occam-jwr66v.zip – он-то нам и нужен, берем и переносим image-occam-jwr66v.zip в папку C:\adb
- Открываем командную строку и пишем:
cd c:\adb жмем Enter;
 fastboot erase boot жмем Enter;
 fastboot erase cache жмем Enter;
 fastboot erase system жмем Enter;
 fastboot erase userdata жмем Enter;
 fastboot reboot-bootloader жмем Enter;
 fastboot -w update image-occam-jwr66v.zip жмем Enter и ждем.
После последней операции телефон должен сам перезагрузиться и включиться. - Теперь ваш телефон как новый А вы можете повторить то, что не получилось. А именно залить zip-архивы в память телефона и попробовать их прошить заново. Кстати, мы recovery не трогали в процессе восстановления, так что TWRP у вас остался, а значит выключаем телефон, жмем Volume Down + Power, выбираем recovery и вперед!
Ну вот, теперь уж точно все!
До связи друзья. И извините, что перестал часто писать про SEO, обещаю исправиться в ближайшее же время.