
Время на прочтение2 мин
Количество просмотров179K
grep
Многим любителям шела нравится чудная команда grep.
К сожалению, windows нативно не имеет такой команды, по этому некоторые ставят себе наборы различных консольных утилит в *nix стиле, включая grep.
Мне, как любителю посидеть в консоли Windows очень мешало отсутствие грепа, по этому мои скрипты под Win всегда были не так хороши, как могли бы быть. Но мои скрипты должны работать на любой (ну, или почти на любой) Windows, так как же быть?
К счастью, в Windows XP (и выше) появились две команды, которые призваны исправить положение — это find и более мощный вариант — findstr.
первая простая, и имеет явный недостаток — искомый текст надо заключать в кавычки. Не знаю, как вам — но мне очень не удобно печатать кавычки каждый раз 
findstr же этого не требует, и к тому же позволяет искать используя мощь регулярных выражений.
Таким образом, теперь надо помнить, что мы не в bash\zsh\etc, а в Win, и набирать findstr вместо grep.
Ну а на своей машине я сделал следующее:
echo findstr %1 %2 %3 %4 %5 > %systemroot%\grep.cmd
теперь можно не задумываясь грепать вывод:
C:\WINDOWS>netstat -an | grep LISTEN
C:\WINDOWS>findstr LISTEN
TCP 0.0.0.0:135 0.0.0.0:0 LISTENING
TCP 0.0.0.0:445 0.0.0.0:0 LISTENING
TCP 0.0.0.0:1963 0.0.0.0:0 LISTENING
TCP 10.198.17.58:139 0.0.0.0:0 LISTENING
TCP 127.0.0.1:1025 0.0.0.0:0 LISTENING
TCP 127.0.0.1:9050 0.0.0.0:0 LISTENING
TCP 127.0.0.1:9051 0.0.0.0:0 LISTENING
TCP 192.168.56.1:139 0.0.0.0:0 LISTENING
Ну и на закуску:
ifconfig:
echo IF "%1"=="-a" (ipconfig /all) ELSE (ipconfig %1) > %systemroot%\ifconfig.cmd
man:
echo %1 /?> %systemroot%\man.cmd
ls:
echo IF "%1"=="-a" (dir) ELSE (IF "%1"=="-al" (dir) ELSE (dir %1 %2 %3 %4 %5)) > %systemroot%\ls.cmd
Я часто на автомате даю ключ(и) -a(l) команде ls, по этому добавил их «обработку»
UPD перенёс в «Системное администрирование»
The grep command in Linux is widely used for parsing files and searching for useful data in the outputs of different commands.
The findstr command is a Windows grep equivalent in a Windows command-line prompt (CMD).
In a Windows PowerShell the alternative for grep is the Select-String command.
Below you will find some examples of how to “grep” in Windows using these alternatives.
Cool Tip: Windows touch command equivalent in CMD and PowerShell! Read more →
Grep Command in Windows
Grep the output of a netstat command for a specific port:
# Windows CMD
C:\> netstat -na | findstr /c:"PORT"

# Windows PowerShell
PS C:\> netstat -na | Select-String "PORT"
If a command in PowerShell returns some objects, before parsing, they should be converted to strings using the Out-String -Stream command:
# Windows CMD
PS C:\> Get-Alias | Out-String -Stream | Select-String "curl"
Grep a file for a pattern that matches a regular expression (case insensitive):
# Windows CMD
C:\> findstr /i /r /c:"^SEARCH.*STRING$" file.txt

# Windows PowerShell
PS C:\> Select-String "^SEARCH.*STRING$" file.txt
Options used by the findstr command in the example above:
| Option | Description |
|---|---|
/i |
Case-insensitive search. |
/c:"string" |
Use string as a literal search string. Without this option if the search string contains multiple words, separated with spaces, then findstr will return lines that contain either word (OR). |
/r |
Evaluate as a regular expression. |
Display help for the Windows grep command equivalents:
# Windows CMD
C:\> findstr /?

# Windows PowerShell
PS C:\> get-help Select-String
Cool Tip: Windows cat command equivalent in CMD and PowerShell! Read more →
Was it useful? Share this post with the world!
- Home
- OS
- Windows
- Команда findstr аналог grep для Windows
Команда findstr — используется для поиска строк в файлах, является аналогом команды grep в Linux.
Для тех, кто привык набирать команду grep, есть возможность задать алиас для команды findstr
Пример:
echo findstr %1 %2 %3 %4 %5 > %systemroot%\grep.cmd
FINDSTR [/B] [/E] [/L] [/R] [/S] [/I] [/X] [/V] [/N] [/M] [/O] [/P] [/F:файл] [/C:строка] [/G:файл] [/D:список_папок] [/A:цвета] [/OFF[LINE]] строки [[диск:][путь]имя_файла[ ...]]
/B - Искать образец только в началах строк.
/E - Искать образец только в конце строк.
/L - Поиск строк дословно.
/R - Поиск строк как регулярных выражений.
/S - Поиск файлов в текущей папке и всех ее подпапках.
/I - Определяет, что поиск будет вестись без учета регистра.
/X - Печатает строки, которые совпадают точно.
/V - Печатает строки, не содержащие совпадений с искомыми.
/N - Печатает номер строки, в которой найдено совпадение.
/M - Печатает только имя файла, в котором найдено совпадение.
/O - Печатает найденные строки через пустую строку.
/P - Пропускает строки, содержащие непечатаемые символы.
/OFF[LINE] - Не пропускает файлы с установленным атрибутом "Автономный".
/A:цвета - Две шестнадцатеричные цифры - атрибуты цвета. См. "COLOR /?"
/F:файл - Читает список файлов из заданного файла (/ для консоли).
/C:строка - Использует заданную строку как искомую фразу поиска.
/G:файл - Получение строк из заданного файла (/ для консоли).
/D:список_папок - Поиск в списке папок (разделяются точкой с запятой).
строки - Искомый текст.
[диск:][путь]имя_файла - Задает имя файла или файлов.
Использовать пробелы для разделения нескольких искомых строк, если аргумент не имеет префикса /C.
Например, ‘FINDSTR «Привет мир» a.b’ ищет «Привет» или «мир» в файле a.b, а команда ‘FINDSTR /C:»Привет мир» a.b’ ищет строку «Привет мир» в файле a.b.
Краткая сводка по синтаксису регулярных выражений:
. - Любой символ.
* - Повтор: ноль или более вхождений предыдущего символа или класса.
^ - Позиция в строке: начало строки.
$ - Позиция в строке: конец строки.
[класс] - Класс символов: любой единичный символ из множества.
[^класс] - Обратный класс символов: любой единичный символ из дополнения.
[x-y] - Диапазон: любые символы из указанного диапазона.
\x - Служебный символ: символьное обозначение служебного символа x.
\<xyz - Позиция в слове: в начале слова.
xyz\> - Позиция в слове: в конце слова.
На этом все. Командочка нужная, надеюсь пригодиться.
Most of you are familiar with pipe grep command in Linux. Here I am explaining the equivalent command in Windows command line.
Windows has two different command prompts. One is called the CMD and the other one is PowerShell.
PowerShell is more powerful and user friendly compared to the raw shell in windows. Most of the commands in CMD works in PowerShell, but the commands in PowerShell might not work in CMD.
What is grep command in Linux ?
grep is a command for performing filter and search operation in a file or a folder or in the output of another command.
The syntax of grep command is given below.
grep [options] pattern [files]
Options Description
-c : This prints only a count of the lines that match a pattern
-h : Display the matched lines, but do not display the filenames.
-i : Ignores, case for matching
-l : Displays list of a filenames only.
-n : Display the matched lines and their line numbers.
-v : This prints out all the lines that do not matches the pattern
-e exp : Specifies expression with this option. Can use multiple times.
-f file : Takes patterns from file, one per line.
-E : Treats pattern as an extended regular expression (ERE)
-w : Match whole word
-o : Print only the matched parts of a matching line,
with each such part on a separate output line.
-A n : Prints searched line and n lines after the result.
-B n : Prints searched line and n line before the result.
-C n : Prints searched line and n lines after before the result.
Sample usages are given below.
In the below example, the grep command filters and searches for the string “Flask” in the output of the command pip freeze
pip freeze | grep "Flask"In the below example, the grep command searches for the string Amal in the file userlist.txt. The option -i performs case insensitive search inside the file.
grep -i "Amal" userlist.txtgrep command equivalent in Windows CMD
findstr is the command equivalent to grep.
Example is given below. In the below examples, the findstr will do an exact match
pip freeze | findstr "Flask"
netstat -an | findstr "80"
To search a string within a file, use findstr in the following way
findstr <search-string> <filename>
Example
findstr Amal userlist.txt
More details of findstr command can be found in this official documentation.
grep command equivalent in Windows PowerShell
findstr command works in powershell. We have another command in powershell which is Select-String
An example usage is given below.
netstat -an | Select-String 80For searching a string in the contents of a file, use the below syntax
Select-String <string-to-search> <file-name>
Example
Select-String Amal userlist.txt
I hope this explanation is clear. Feel free to comment if you have any questions or suggestions.
Tired of using the same old search tools on your machine, like grep? Why settle? Many grep equivalents in Windows can help search precisely what you are looking for.
In this tutorial, you will learn how these grep equivalents make it possible to search through files faster and find the information you need in a heartbeat.
Stay tuned and befriend powerful search tools!
Prerequisites
This tutorial comprises hands-on demonstrations. To follow along, ensure you have the following in place:
- A Window machine – This tutorial uses Windows 10 PC, but any version of Windows will suffice.
- PowerShell – This tutorial uses PowerShell 7.2.8.
- scoop – This tutorial uses scoop v0.3.1.
Finding Specific Text Strings (findstr) Within Files
Being able to instantly spot specific strings (with particular patterns) you are looking for in a file greatly helps with your workflow. But how? Turn to the findstr command-line utility in Windows, which allows you to search for specific text strings within files.
findstr is often used as a grep equivalent in Windows, as it has similar functionality to the Unix grep command. What are the benefits of using findstr? One example is that it is built into any Windows operating system (OS) — no additional software is required.
To find specific strings in a file, follow these steps:
Create a text file with your preferred text editor, name it notes.txt, and populate the below content to the file.
Hello, world. This is an example of a text file.
I am writing some notes in this file.
Here are some keywords to search for: apple banana cherry.
Now, open PowerShell as admin and run the below command to find strings (findstr) against the search pattern (”apple") in the notes.txt file.
💡 findstr has many parameters that can be used to customize the search. But in this tutorial, you will explore some of the most valuable parameters when searching for strings in files.
findstr "apple" "C:\\myfiles\\notes.txt
💡 Perhaps you are searching for strings in multiple files. If so, specify the file paths separated by spaces, like the one below:
findstr parameters "pattern" "C:\\path\\to\\file1.txt" "C:\\path\\to\\file2.txt"
Finding Strings that Match a Specific Pattern or Literal
When working with configuration files, finding strings in a specific pattern or literal is crucial, especially in debugging. Luckily, the /c parameter tells the findstr command to search for literal strings that match a specified pattern, including any spaces or special characters.
Appending the /c parameter to the findstr command comes in handy in the following but are not limited to:
- Searching for a specific phrase or set of words that appear in a particular order.
- Searching for a string that contains spaces or special characters.
To see how the /c parameter works in action, follow these steps:
1. Run the findstr command below to search for the literal string (/c) banana cherry in the *notes.txt* file.
findstr /c:"banana cherry" "C:\myfiles\notes.txt"In the output below, the findstr command only returns lines containing the exact string banana cherry with a space between the two words.
Remember that the /c parameter is case-sensitive, so the findstr command only returns the string with the exact letter case you specified. If any of the strings in the notes.txt file does not match the specified pattern, the findstr command returns a blank output.

2. Next, add the following line to the notes.txt file, and save the changes.
At this point, there should be two lines in your notes.txt file with the “hello” string. One in all lowercase (hello, world.), and another with an uppercase ‘H’ (Hello, world.).
3. Now, run each command below to search for the hello, world, or Hello, world string literal in the notes.txt file.
# All lowercase pattern
findstr /c:"hello, world" "C:\myfiles\notes.txt"
# With uppercase letter 'H'
findstr /c:"Hello, world" "C:\myfiles\notes.txt"
Notice below that regardless of having two lines that contain the ‘hello, world’ string in the notes.txt file, you only get one line of string.
The /c parameter tells the findstr command to print lines that contain the ‘hello, world’ string with either lowercase or uppercase ‘H’.

4. Lastly, run the findstr command below to search for strings that contain the hello pattern in the notes.txt file while ignoring (/i) the letter case.
Case-sensitive searches work fine if you already know the actual letter case of the string you are looking for. But if you wish to see all lines of strings that match a pattern regardless of the letter case, the /i parameter will do the trick.
findstr /i "hello" "C:\myfiles\notes.txt"
Finding Specified Strings Within Files and Directories
Besides searching for specific strings in files, the findstr command lets you search for matching strings within files, directories, and subdirectories.
Suppose you wish to find all files in a directory that have a specific word in their contents. If so, let the /s parameter do the dirty work.
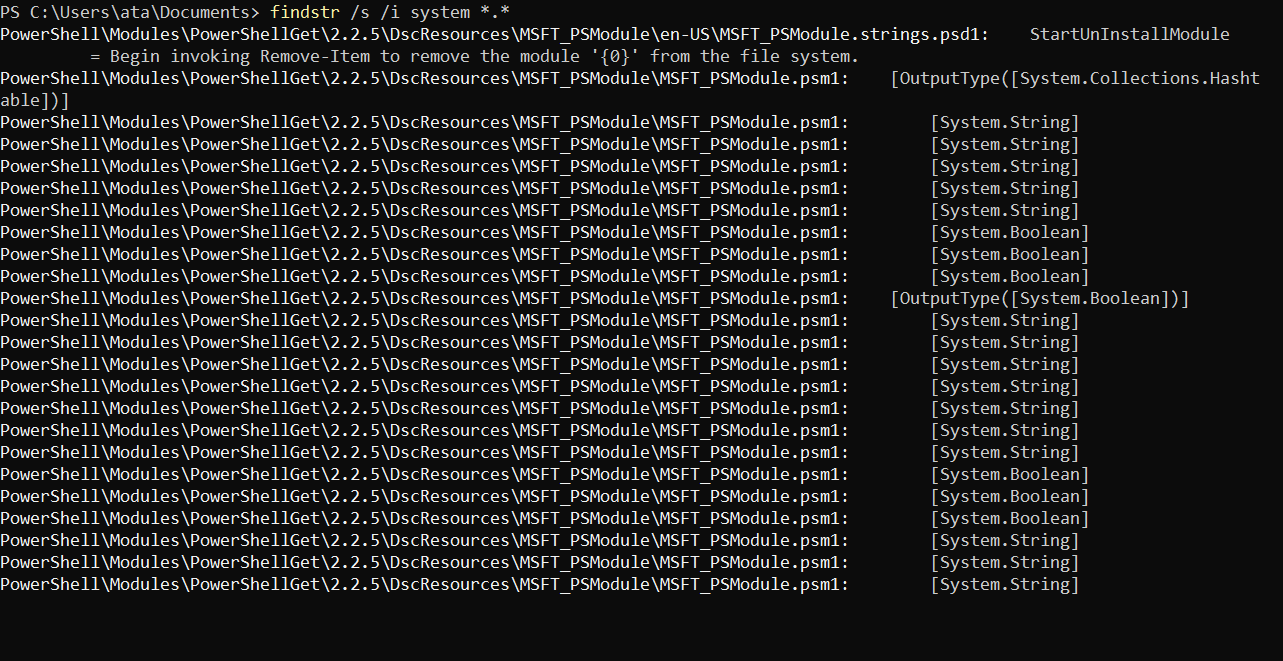
Run the below command to search (/s) in the current directory and its subdirectories (/s) for all files (*.*) that contain the system string, ignoring the letter case (-i)
Keep in mind that this command only searches for files that contain the system string as a whole word and not those that are part of larger words, such as systematic or systemize.
The output below shows a list of filenames, one per line, with the name of each file that contains the ‘system’ string.
Searching Strings Using the Select-String cmdlet
So far, you have seen that the findstr command works excellently in finding strings, but the Select-String cmdlet is not to be left out. This cmdlet is a grep equivalent in Windows that lets you search for specific text patterns in files and strings.
The Select-String cmdlet is designed for efficiency, lets you quickly search through large amounts of text, and supports regular expressions (regexes). In turn, this cmdlet allows you to search for even more complex patterns than findstr.
To see how the Select-String cmdlet works, follow these steps:
1. Open the notes.txt file first, add the following lines, and save the changes.
Adding these lines is a preparation for demonstrating how the Select-String cmdlet handles letter cases in the following steps.
2. Next, run the following command to search for the string apple in the notes.txt file.
Select-String -Pattern "apple" -Path "C:\myfiles\notes.txt"Below, multiple lines contain the ‘apple’ string but in different letter cases since the Select-String cmdlet is case-insensitive. But the good thing is that you can easily spot and verify the matched strings since they are highlighted.

💡 Perhaps you use wish to use simple string matching instead of regex matching. If so, append the
-SimpleMatchparameter, as shown below, and never worry about regex syntax and special characters.Select-String 'APPLE' "C:\\myfiles\\notes.txt" -SimpleMatch
3. Now, run the below command to search for APPLE in the notes.txt file with case sensitivity enabled (-CaseSensitive). The -CaseSensitive parameter comes in handy for search accuracy.
Select-String -Pattern 'APPLE' -Path "C:\myfiles\notes.txt" -CaseSensitiveAs you can see below, the only match found has the exact letter case you specified (APPLE).

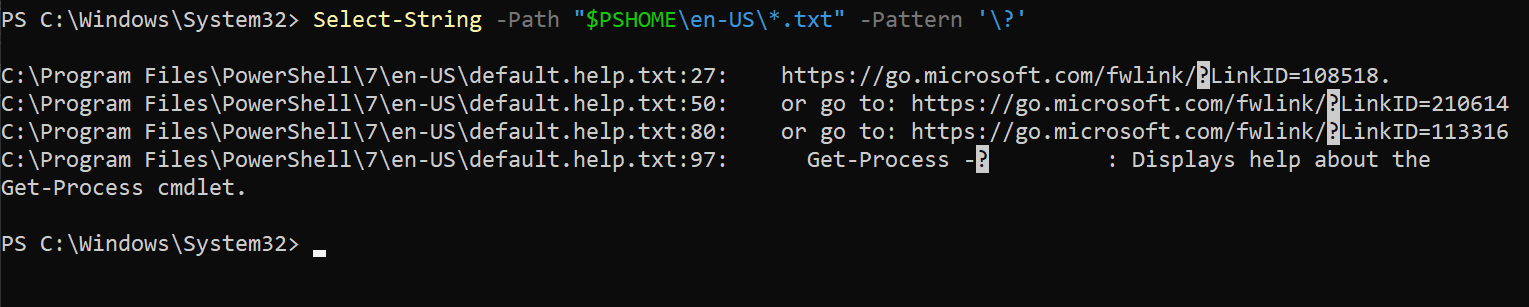
4. Lastly, run the command below using regex to search for the pattern '\?' (a question mark) in all text files (*.txt) in the $PSHOME\en-US directory. A regex allows you to search for more complex patterns.
Select-String -Path "$PSHOME\en-US\*.txt" -Pattern '\?’If a file’s content has a question mark, the command returns the full path of the file to the console, as shown below.
Using ripgrep (rg) as a grep Equivalent in Windows
rg is an open-source command-line utility designed to search through files using regex patterns quickly. Like other command-line utilities, rg has many options and features for customizing your searches.
But unlike findstr and Select-String cmdlet, rg is not installed in your Windows OS by default.
To use rg as your grep equivalent in Windows:
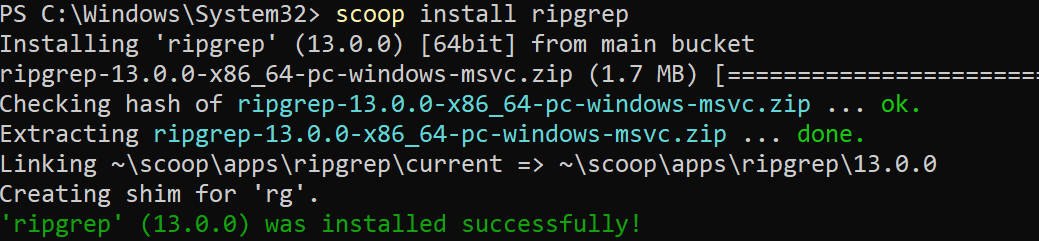
1. Run the below scoop command to install ripgrep on your system. scoop install ripgrep
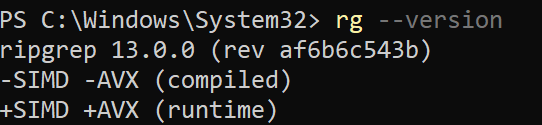
2. Next, run the following rg command to verify rg’s installed version.
As shown below, you will see the version number of rg installed. At this point, you can now run rg commands to search for strings.
3. Run the below rg command to search for the string apple in the notes.txt file.
rg apple C:\myfiles\notes.txtThe output displays any lines in the notes.txt file that contain the string apple, as shown below.
Notice that the output is similar to the Select-String cmdlet’s output. But rather than highlighting, rg changes the matched string’s and line number’s color for quick distinction.

4. Now, run the following command using regex to search for strings in the notes.txt file.
The regex below uses word boundaries (\b) and tells rg to search for lines of strings that contain a word that starts with ‘s’ and ends with ‘e’ (s\w+e).
rg "\bs\w+e\b" "C:\myfiles\notes.txt"
Filtering Searches by Specific File Type
Perhaps you are particular about which directory the file you are looking for is in but not the file’s name. In such cases, searching for the file’s content while filtering the search by file type can be your best option.
Filtering the search to specific file types can be useful when you are only interested in searching particular types of files. Or when you want to exclude certain types of files from the search.
To filter the search to specific file types, the --type option will do the trick as follows:
1. Run the following rg command to search for the string apple in all text files (--type txt) in the C:\\myfiles directory.
The --type option takes a file type as an argument, which tells the rg command to only search files that match the specified file type.
rg "apple" "C:\myfiles" --type txtThe output below shows the line containing the string ‘apple’ and the associated file name (notes.txt).

2. Next, create an XML called notes.xml and populate the code below. This XML file is just a preparation to demonstrate how wildcard searches work.
<?xml version="1.0" encoding="UTF-8"?>
<fruitBasket>
  <fruit id="1">
    <fruitName>Apple</fruitName>
  </fruit>
</fruitBasket>
3. Now, run the below command to search for the string apple in all (*.). This command only searches for txt and xml files as specified (-g).
rg "apple" "C:\myfiles" -g '*.{txt,xml}’By default, rg is case-sensitive. As a result, the output only shows the line that contains the exact string ‘apple’, and the associated file.

4. Finally, run the following command, as you did in step three, to search for the string apple in all files (*.) that have a txt or xml extension. But this time, append the -i option, which tells rg to ignore the letter cases.
rg "apple" "C:\myfiles" -g '*.{txt,xml}’ -i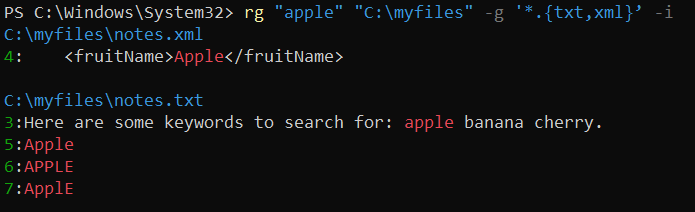
Conclusion
Throughout this tutorial, you have learned many grep equivalents in Windows to search strings as literal and by using regexes. You have unlocked the power of these grep equivalents with a range of options and parameters to customize the search and filter for specific file types.
At this point, you should be confident in debugging problems, identifying issues, and searching through large sets of text files.
Now, why not put your new skills to the test by practicing with regexes and customizing your searches?