
In this article we will troubleshoot Hyper-V live migration issues. This issues do have different kind of error messages in SCVMM, Hyper-V Manager and both event logs on the source and destination host.
Error messages like:
- The Virtual Machine Management Service failed to authenticate a connection for a Virtual Machine migration with host.
- Virtual machine migration for failed because configuration data root cannot be changed for a clustered virtual machine.
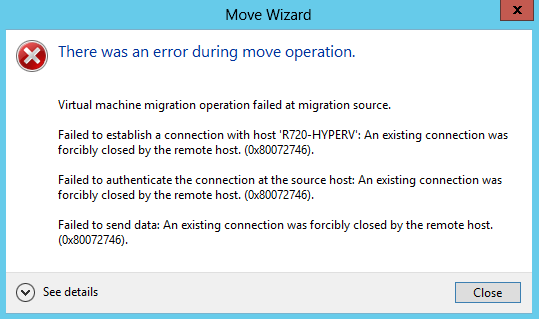
- Virtual machine migration operation for failed at migration source.
- Failed to send data for a Virtual Machine migration: An existing connection was forcibly closed by the remote host. (0x80072746).
- The Virtual Machine Management Service failed to authenticate the connection for a Virtual Machine migration at the source host: An existing connection was forcibly closed by the remote host. (0x80072746).
The root case is mostly because the credential delegation is not set right. Migrating within the same cluster keeps working the most of the time. The issue is focused on migrating between stand-alone Hyper-V hosts and migrating VMs to other Hyper-V Clusters.
- FIRST! Check if both nodes are on the same patchlevel.
- Check if you specify your live migration network and check if both nodes are accessible in this subnet.
- Check your migration settings. Disable credSSP and enable Kerberos.
- Purge the Kerberos tickets on your source / destination, with CMD:
- klist -li 0x3e7 purge
- Try live migrating again.
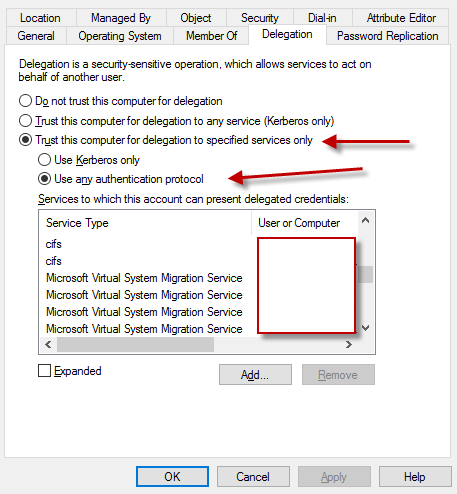
- Still not working? Then we need to edit the credential delegation settings in Active Directory (AD) .
- Credential delegation must be enabled for each Hyper-V Host in both ways. So if you have 3 hosts we need to change it for 3 hosts. The protocols we are talking about are: cifs and Microsoft Virtual System Migration Service. Go to your active directory users and computers, right click on your Hyper-V host and find the delegation tab. Add the hosts like below example.
- Luckily we can automate this annoying process with a PowerShell script like below (All credits to Eric Siron!! for this handy script).
Get it here
You can use Configuration Manager remote control to remotely administer, provide assistance, or view any client computer in the hierarchy. You can use the remote control to troubleshoot hardware and software configuration problems on client computers and to provide support. Configuration Manager supports the remote control of all workgroup computers and domain-joined computers that run supported operating systems for the Configuration Manager client.
Before you begin to use the remote control, ensure that you review the information in the following articles:
Prerequisites for remote control
Configuring remote control
Recently, a colleague of mine troubleshooting an office 365 issue on the end-user device and trying to do remote sessions using Microsoft Teams. Although Teams application has a desktop sharing feature, sometimes it behaves very weirdly.He had issues with desktop sharing sessions using teams so the alternative approach is SCCM remote control tool.
I did a blog post on how to deploy SCCM remote control tools on user device without installing SCCM console, please refer this blog post for more information http://eskonr.com/2018/08/how-to-deploy-sccm-remote-control-bits-standalone-to-clients-without-configmgr-console-being-installed/
You can create a package and deploy the SCCM remote tools to users who are need of it.
When he tried remote control to the user device, it failed with access denied error.
To capture the error details etc., I reproduce the issue and the following is the output of remote control (error snippet is below).

The remote control log (CmRcService.log) on the client located at C:\windows\ccm\logs shows the following error details:

Session denied: The remote user is not authorized to perform remote control on this system.
Disconnecting the connection. An existing connection was forcibly closed by the remote host. (Error: 80072746; Source: Windows)
Failed to do Handshake in Server. An existing connection was forcibly closed by the remote host. (Error: 80072746; Source: Windows)
Failed to validate Security requirement. An existing connection was forcibly closed by the remote host. (Error: 80072746; Source: Windows)
The following are the basic checklist for remote control troubleshooting:
1. Check the firewall port 2701 from the device that you run configuration manager console/sccm remote control tools (source) for remote control to the destination device.
2. Check if the remote control client settings with relevant user groups (permitted viewers) deployed to the client device.
How do you check what remote control settings with user groups added to the device?
When you deploy multiple client settings to the same device, user, or user group, the prioritization and combination of settings are complex. To view the client settings, you can use Resultant Client Settings.
From the SCCM Console, right-click on the device and choose client settings—>Resultant Client Settings

From the resultant client settings , remote tools, remote control is enabled with permitted viewers who can use the remote tools feature.

Both the above checklist are working. now we move on to the client troubleshooting.
When the remote control feature is enabled on the client-side, there will be policy downloaded on the client and remote tools will be enabled. This can be seen from the configuration manager applet.

There is also a registry key and local security group called ‘ConfigMgr Remote Control Users’ that will get created when you enable remote control tools using device client settings.
Registry location for SCCM remote control: Computer\HKEY_LOCAL_MACHINE\SOFTWARE\Microsoft\SMS\Client\Client Components\Remote Control

Local security group: ConfigMgr Remote Control Users
Permitted viewers of the remote control and remote assistance that you added in client settings will be added to both registry and local security group.
In my case, only the registry key was updated with permissions (PermittedViewers) however the local security group was empty.

To fix this issue, we can either add the permitted viewers using GPO or compliance baseline using SCCM.
After adding the user group to the configmgr remote control users group, issue was resolved.
To find the root cause, we can simply create new client settings and increase the priority of the client setting, deploy to client device and monitor the log (CmRcService.log).
How do we find the device that have this issue and fix it with automation?
Following is the simple powershell script to find the devices that have no members added to ‘ConfigMgr Remote Control Users’ . This can be used to create configuration item and deploy to all devices.
if ((Get-LocalGroupMember «ConfigMgr Remote Control Users»).count -ge 1)
{
write-host «Compliant»
}
else
{
write-host «Non-complaint»
}
If compliant then atleast 1 group is member of remote control users, if non-compliant then the group is empty.
you can alter this script to query registry as well.
In order for me to fix the issue, i have created the following powershell script and deploy using compliance baseline method.
This script will check if the permitted group (configured in client setting) is not member then add the group else exit the script and report to sccm with status.
Discover script:
#Discover
If(Get-LocalGroupMember «ConfigMgr Remote Control Users»| where {$_.name -like «eskonr\SCCM-remote-control-users«})
{write-host «Compliant»}
else{write-host «Non-Compliant»}
Remediation script:
#Remediate
Add-LocalGroupMember -Group «ConfigMgr Remote Control Users» -Member «eskonr\SCCM-remote-control-users«
Create configuration baseline and deploy to collection to receive these changes.
When you deploy the configuration baseline, the detection script will run and detect if the group is sec group is member of remote control group or not, if non-complaint then run the remediation script and run the detection script once again to make sure the remediation meet compliant status or not.
You can monitor the compliance baseline information using DcmWmiProvider.log

Reference:
Remotely administer a windows client computer https://docs.microsoft.com/en-us/configmgr/core/clients/manage/remote-control/remotely-administer-a-windows-client-computer
configuration baselines https://docs.microsoft.com/en-us/configmgr/compliance/deploy-use/create-configuration-baselines
Readers help support Windows Report. We may get a commission if you buy through our links.
Read our disclosure page to find out how can you help Windows Report sustain the editorial team. Read more
Error 0x80072746 is an error Windows users encounter when trying to sync Windows Mail clients or loading new emails. It indicates an existing connection was closed abruptly by the remote host. However, this article will discuss why you encounter the error and how to fix it.
Also, our readers may be interested in our guide on 0x800CCC79 Windows Live Mail Error ID on the PC.
What causes the 0x80072746 error?
You can encounter We’re having a problem downloading messages. Make sure you have a connection and your account info is correct, and then try again, Error code 0x80072746 error for many reasons. Some notable ones are:
- Using a VPN connection with Outlook or Mail app – The error can occur when the connection is bordered by a VPN or network-related devices, causing the Mail client not to download emails. Also, incompatible server machine certificates binding to HTTPS can cause it.
- Firewall interference – Firewall services running on your computer can block the connection between the mail app and its server. For instance, BitDefender, AVG, and Windows Firewall can block the svchost.exe file, leading to Mail error code 0x80072746.
- Machine certificate issues – If the relevant machine certificate is not installed on the VPN server, it can cause problems with its connection. Also, HTTPS binding may be faulty or improperly configured.
The above-listed factors are liable to vary on different computers. Regardless, you can fix the issue by following the solutions to be discussed as we go further into the guide.
How can I fix the 0x80072746 error code?
Before trying any advanced steps, go through the following:
- Temporarily disable third-party antivirus software on your computer.
- Fix network congestion or other network-related issues.
- Perform a clean boot to disable startup apps interfering with the Email client.
Proceed with the solutions below if you can’t fix the issue with the checks above:
1. Set up your account manually
- Left-click the Start button, type Windows Mail in the text box, then click on it from the search bar.
- Click the Settings icon and tap the Manage Accounts button from the drop-down.

- Select the mail account generating the error, then click the Remove this account from your device link.

- Go to the Delete account section and click the Delete button to confirm the process.

- Visit the email provider’s website and copy the manual settings for IMAP. If the IMAP setting is not listed here, select POP3.
- Go to the Windows Mail client, click the Settings icon, and tap on the Manage Accounts button from the drop-down.
- Click on the Add Account button. Scroll down and select Advanced Setup.
- Select Internet email to add the credentials and manual settings you got from your email provider for IMAP, and Apply settings.

- Click the Sign In button and check if the error message persists.


The above steps will reset account settings and resolve account-related issues causing the error.
2. Allowing Svchost.exe through Windows Firewall
- Left-click the Start button, type firewall, and open Windows Defender Firewall.
- Go to Allow an app or feature through Windows Defender Firewall on the left pane.

- Click the Change Settings button, then the Allow another app button.

- Tap on the Browse button.
- Navigate to the Windows directory and then system32, select svchost.exe from the list, then click the Add button.
- Click OK to save the changes and restart your PC.
- Go to the Mail client and check if you can access your email without errors.


Allowing Svchost.exe as an exception in Windows Firewall prevents the firewall from checking or blocking its processes.
- D3dx11_42.dll Not Found: How to Fix it
- Windows 11 Shutdown After Inactivity: 4 Ways to Stop it
- Windows Shuts Down Instead of Restarting: 4 Ways to Fix it
- Error no Ace Condition 804 (0x324): Fix it With 4 Steps
- Windows 11 Shutdown But User Stays Logged in: How to Fix it
3. Change VPN settings
- Press Windows + I key to launch the Settings app.
- Select Network & Internet and click on VPN.

- Ensure to toggle On the Allow VPN over metered network option.

- Click the Change adapter options link and select your current internet connectivity network.
- Right-click on your LAN (Wi-Fi) connectivity, then select Properties from the drop-down menu.
- Select Internet Protocol Version 6 (TCP/PV6) and tap OK to confirm the changes.


Tweaking the VPN settings will resolve the error 0x80072746 on Windows PC.
Conclusively, our readers can check our list of the best email apps for Windows 11. Also, you can read about Microsoft Account’s unusual sign-in activity spam.
If you have further questions or suggestions regarding this guide, kindly drop them in the comments section.
Henderson Jayden Harper
Windows Software Expert
Passionate about technology, Crypto, software, Windows, and everything computer-related, he spends most of his time developing new skills and learning more about the tech world.
He also enjoys gaming, writing, walking his dog, and reading and learning about new cultures. He also enjoys spending private time connecting with nature.
Microsoft Hyper-V offers live migration of the Virtual Machines from one hardware to another hardware. It will move the running virtual machine from one server to another. Above error occurred while I was moving my virtual machine from an older server to a new Dell R720 server which came with new processor type. A complete error with error code is given in the snap below:
0x80072746 error code means the remote host closed the connection. The reason why the remote host closed the connection is because of the security and type of processor being used in the configuration of the virtual machines.
please follow the under given instructions to change the Virtual Machine Settings:
- Select the virtual machine which you want to migrate to new server
- Go to settings
- Expand the processor and go to compatibility
- check the check box “Migrate to a physical computer with different processor version”
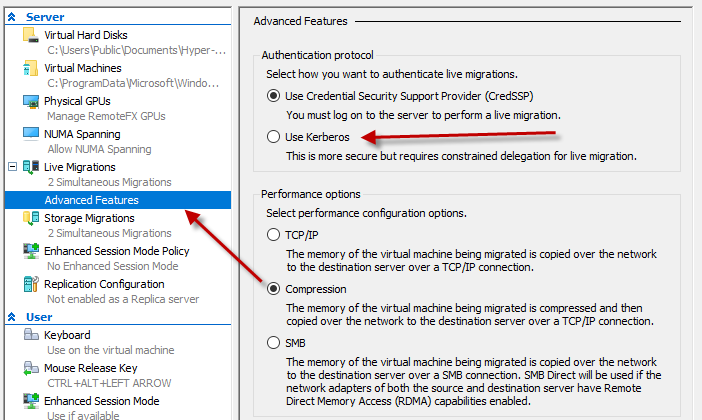
Follow the under given instructions to change the configuration on Hyper-V settings:
These settings will be configured on the server where you are moving the virtual machine machine.
- Open the Hyper-V Manager
- Go to the Hyper-V server
- Right click on it and go to Hyper-V Settings
- Expand Live Migration and go to Advanced Features
- Choose Kerberos under authentication protocol
If you found this post helpful please share it with your friends!!!

Some Windows 11 users have reported that when they try to install a program in the Sandbox that needs to reboot the operating system, they are greeted with an error message that states “The connection to the sandbox was lost, Error 0x80072746. An existing connection was forcibly closed by the remote host.” While other times the sandbox starts working and then stops after 1-2 minutes. So, how do you resolve this error with Sandbox? In this guide, we will tell you how to fix Sandbox error 0x80072746 on Windows 11 in detail below.
Fix: Sandbox Error 0x80072746 on Windows 11
You can easily fix the Sandbox error 0x80072746 on Windows 11 by turning on all the Services required by Sandbox or turning on/off the Windows Sandbox Tool again. Below you will find all methods to fix the Sandbox-related issues on your Windows 11 PC.
1. Turn ON all the Services required by Sandbox
- First, type Services in the Search bar in Windows 11 and press the Enter key.
- After that change the Startup Type to manual for all the services listed below, and if required you can even Start or Restart the same services mentioned below in the following steps:
- Container Manager Services (Startup type: Automatic)
- Hyper–V Virtual Machine (Startup type: Manual)
- Hyper–V Host Computer Service (Startup type: Manual)
- Virtual Disk (Startup type: Manual)
- Network Virtualization Service (Startup type: Manual)
2. Turn ON or OFF Windows Sandbox Tool
- In the Search bar, type Run and press Enter command.
- It will open a Run dialog box.
- In the Run box, type “optionalfeatures” without quotes and press the OK button.
- This will open the Windows Features.
- Go to the bottom and untick the option of Windows Sandbox, then press the OK button.
- Now you need to choose “Restart now”, which will restart Windows 11.
- After the reboot, launch Windows Features again.
- Finally, check the box for the Windows Sandbox option and then choose Restart, which will solve the error.
That is all you need to know about how to fix Sandbox error on Windows 11. In the meanwhile, check out similar types of guides here: How to fix Unspecified Error When Copying File or Folder in Windows 11, and How to fix Windows 11 Cannot Boot at 4k (3840×2160) Resolution.