
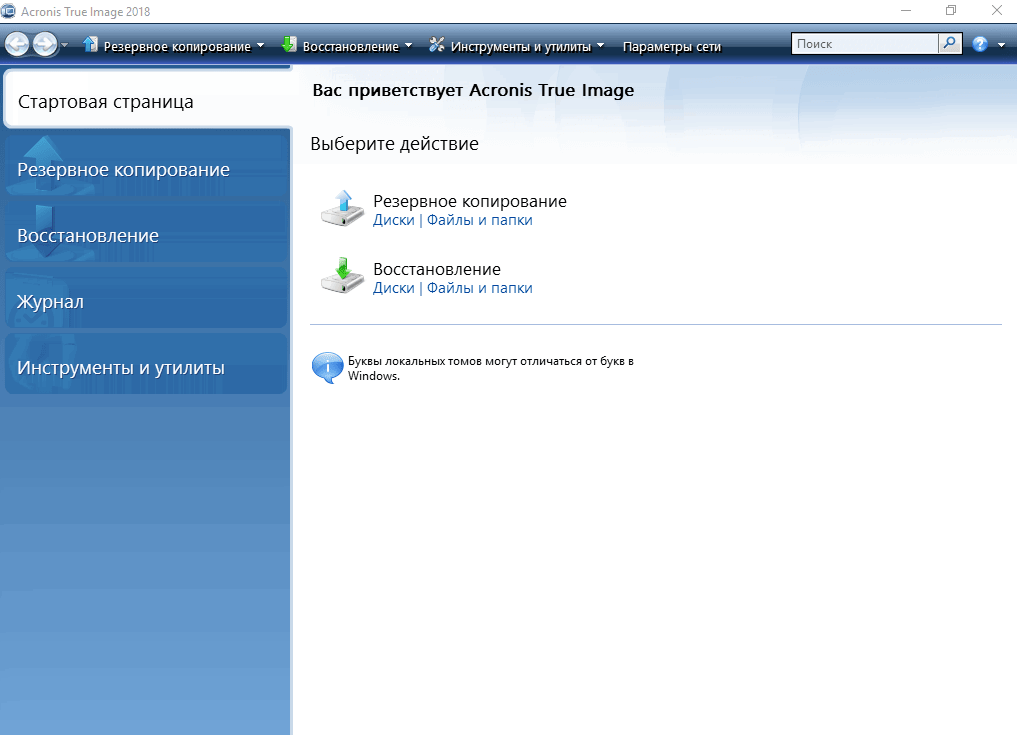
#Bootcamp Drivers and MDT
Once we’re booted into Windows proper, the computer enters what’s known as the State Restore Phase of the Task Sequence. It’s during this we can do important customizations of the live OS, and pretty much automate anything that you want, install additional drivers, packages, scripts etc.
Anyway, we’re going to be installing BootCamp drivers. There are a couple ways to do this. One of the best is using Brigadier, a great tool made by Tim Sutton that automates the download and installation of Apple BootCamp Drivers from Apple’s own software repositories.
Brigadier polls the local machine for its model info, and grabs the appropriate BootCamp software package, just like BootCamp Assistant on OSX, but in an automate-able fashion that resides entirely in Windows, so there’s no need to monkey around with copying drivers to USB keys and then back again. It’s even possible to point Brigadier at an internally hosted mirror of Apple’s Software Update repositories, hosted with something like Reposado, to reduce the amount of outbound network traffic and increase the speed of driver downloads.
For Windows 7 it may be more efficient to actually download specific bootcamp driver packages and poll model info to install the BC drivers directly with MDT, as that is the fastest way of getting our files onto client machines.
For newer versions of Windows, Apple has shifted from making the BootCamp driver packages directly available from a webpage, and although you can download them with BootCamp Assistant or Brigadier, it’s difficult to know which drivers will work for which model.
Brigadier automates this for us anyway, so generally going forward, the best solution is to use it in tandem with an internally hosted repository(although it works quite well without, just not quite as speedy).
Implementation of Brigadier
I’ve found that Brigadier works best with MDT when it is copied to the local machine—I’ve had cases of it not executing properly/failing the Task Sequence when run as an Application or from the network share.
Download Brigadier and place it in a folder in the root of your deployment share. I use a BootCamp folder to hold various packages within their own subfolders, like so:
%deployroot%\BootCamp\Brigadier
Create a new Group/Folder called BootCamp in the State Restore phase of your Task Sequence. Create a «Run Command Line» item inside and name it «Copy Brigadier». Fill out the Command line field in the Properties pane with anxcopycommand, referencing your folder where Brigadier is stored.
Mine looks like this:
xcopy.exe "%deployroot%\BootCamp\Brigadier\*.*" "c:\BootCamp" /Q /H /E /I /Y
This will copy all files within the specified folder and create a destination folder called «BootCamp» on the target machine’s root drive.
Next we want to add another Run Command Line step, immediately after, called «Run Brigadier». Fill it out like this:
C:\BootCamp\brigadier.exe --install --keep-files --output-dir=C:\BootCamp
This will store the drivers in our C:\BootCamp directory so that if the end-user has any hardware issues(or some drivers fail to install, which can happen), the drivers can be manually repaired by re-running the setup exe.
Immediately after this, add another «Restart Computer» step, as the BC drivers will want that—I have had cases of actually using the built-in ‘Restart Now’ button on the BootCamp driver installer borking the Windows install—so generally it’s better to automate these things.
At this point you’re done with Apple-specific hurdles, you’re executing your driver installers automatically, and all that remains are any additional customizations you want to make to your deployment. Woo!
#Bonus Section(for the masochistic)
If you’re installing Windows 10 on 2012 or newer Mac hardware, the above section will work fine—Brigadier does a great job of differentiating hardware and grabbing the appropriate package.
If you’re crazy like me, you might want to do things like attempt to support Windows 10 outside of Apple’s «supported models» matrix by installing legacy BootCamp drivers, and hodgepodging them together to make sure system devices work properly.
Or maybe you’re still installing Windows 7 for some reason and need a way of installing those packages quickly from a local repo that resides on your MDT server, for maximum deployment speed. I’m going to detail both of these methods.
Windows 10 on Pre-2012 Hardware
This is by no means completely airtight, however I’ve had success so far in seeing most models from 2009 onwards be well-supported using this method. We’ll be using a Bootcamp 5 driver package and a Bluetooth driver from this BootCamp 4 driver package. Remove AppleBluetoothBroadcomInstaller64.exe from the BC4 package(found in Drivers\Apple\x64), change its name to AppleBluetoothInstaller64.exe and overwrite the exe in the BC5 driver package. This is one component I’ve found does not install properly with the older version.
Put this special BootCamp distribution in a folder called W10Legacy under your %deployroot%\BootCamp folder.
Then add the following Powershell script to your %deployroot%\Scripts\Custom folder. It evaluates the model number to determine whether to use Brigadier or the older drivers.
Win10 Bootcamp Driver Sorting Script
Now, add a «Run Powershell Script» item to «Custom Tasks» in the State Restore Phase. Call it «Sort for Win10». Fill out the field in the Properties Tab like this:
%scriptroot%\Custom\win10_bc_sorter.ps1
Next, create a new Run Command Line step after this and call it «Copy W10Legacy», fill it out similar to your Copy Brigadier command line, like this:
xcopy.exe "%deployroot%\BootCamp\W10Legacy\*.*" "c:\BootCamp" /Q /H /E /I /Y
Then create a new Run Command Line step below «Run Brigadier» but before the extra «Restart Computer» step. Call it «Run BC5 installer(x64)» and fill out its Properties Tab like this:
msiexec /i C:\BootCamp\Drivers\Apple\bootcamp.msi /qr /norestart
Now comes the conditional stuff—go to the Options Tab of «Copy Brigadier». Add a new Task Sequence Variable Condition. Fill it out like:
Variable: BCType
Condition: equals
Value: Brigadier
Apply the same condition to the «Run Brigadier» step as well.
Then, create a new Condition for the «Copy W10Legacy» and fill it out like:
Variable: BCType
Condition: equals
Value: W10Legacy
And lastly, go to your «Run BC5 installer(x64)» step, and add a TS Variable Condition filled out like:
Variable: BCType
Condition: not equals
Value: Brigadier
That took a while, but it should help you support machines from 2009-2011 better with Windows 10. If that doesn’t work out to your satisfaction, there’s always…
Windows 7 Bootcamp Installation
This works pretty similarly to how we differentiate models with a script for Windows 10, but isntead of using Brigadier, we just use all the Windows 7-relevant driver packages. The reason for this being—as Apple releases newer drivers, Brigadier grabs the latest ones, and if you’ve got something from 2012 or later on your hands, the newer drivers(for newer OSs) don’t work that well on the older OS(or may refuse to install entirely).
First, create the following subfolders in your %deployroot%\BootCamp folder:
- DL1630
- DL1720
- DL1721
- DL1836
- DL1837
Now download the matching driver packages from these links and extract them into their respective folders:
DL1630
DL1720
DL1721
DL1836
DL1837
Put the following script in your %deployroot%\Scripts\Custom folder.
Win7 Bootcamp Driver Sorting Script
Make the Run Powershell Script step in Custom Tasks that executes the script, fill it out like this:
%scriptroot%\Custom\win7_bc_sorter.ps1
Make «Run Command Line» steps for each BootCamp subfolder, with Properties like so:
xcopy.exe "%deployroot%\BootCamp\DL1630\*.*" "c:\BootCamp" /Q /H /E /I /Y
Just replace «DL1630» with the other folder names for each incremental step. Give each step its own name, like «Copy DL1630». Next, add Task Sequence Variable Conditions to the Options Tab of each separate Copy step, fill them out like this:
Variable: BCType
Condition: equals
Value: DL1630
Do this for each Copy step, changing the Value to match the name fo the folder being copied.
Now group all of these steps into a folder called «Copy BC Folder».
Next, after this group make another folder called «Run BC Installer». Inside, make the following Run Command Line steps:
Run BC5 Installer(64bit)
msiexec /i C:\BootCamp\Drivers\Apple\bootcamp.msi /qr /norestart
Run BC4 Installer(64bit)
msiexec /i C:\BootCamp\Drivers\Apple\bootcamp64.msi /qr /norestart
Add the following TS Variable Conditions to the BC5 step:
Variable: BCType
Condition: not equals
Value: DL1630
And the reverse for the BC4 step:
Variable: BCType
Condition: not equals
Value: DL1630
And don’t forget to add the final Restart Computer step after the BootCamp driver execution. That’s it!
Здравствуйте, господа! Это инструкция по установке Windows 10 на iMac 2011 года. Ввиду окончания поддержки, актуальность этих моноблоков сходит на нет. А это значит, что свежие программы не поставить, а скоро так вообще — никакие 🤨
Статья основана на опыте наших инженеров с iMac 21.5″ 2011, а инструкция рассчитана на уверенного пользователя. Скорее всего точная модель iMac роли не играет, главное 2011 год выпуска.
Главные проблемы
- Продать его выгодно уже не выйдет. Ок! Сделаем Upgrade и он снова будет в строю. Хорошо, но какой смысл в быстрой работе без программ?
- Свежую macOS официально не поставишь. Ок! Пропатчим установщик macOS и установим систему насильно, но драйверов на видеокарты (у нас 6700M) AMD Radeon этих лет нет и, видимо, не предвидится. Вывод: через костыли ставить macOS смысла нет;
- Windows 10 официально не поддерживается (только iMac с 2012 года). Ок! Установить таки винду можно, но BootCamp (драйвера Apple) не существует для десятки, но через командную строку можно поставить «родной» BootCamp;
- Нет звука в Windows 10. Никакие драйвера ситуацию не выправляют, так как звуковое устройство неправильно определяется в системе, либо вообще отсутствует в списках. Эта печаль вытекает из проблемы совместимости в режиме EFI (UEFI на обычных ПК). Беда оказалась одна из самых сложных и с ней борются владельцы iMac 2011 года по всему миру, а на GitHub даже есть отдельная ветка! Адекватного лекарства не было, пока наши мастера не разгадали загадку! 😎
P.S. Скорее всего мы не первые, но внятной инструкции не нашли.
Как мы побороли гадость со звуком
Собака оказалась зарыта в инициализации устройств прошивкой EFI (BIOS iMac). iMac умеет грузиться в обычный и режим совместимости. Кстати, для Windows 10 «родной» режим тоже EFI\UEFI и загрузка с диска с таблицей GPT. Но так как в обычном режиме устройства определяются неправильно, надо заставить iMac установить Windows в режиме совместимости на диск с MBR. А iMac упорно грузится через EFI.
Мы прошли первый этап установки десятки на виртуальной машине c простым BIOS и MBR-диском. Не дав начаться после перезагрузки второму этапу (установка основных устройств), сняли образ с виртуалки и вуаля — осталось лишь продолжить установку на реальном iMac 🤓
Upgrade
Чтобы iMac не тупил на Windows 10, как последняя скотина, мы заменили старый и медленный HDD диск на новый SanDisk SSD Plus на 480 Гб. Также расширили оперативную память до 16 гигов. Мини-апгрейд 😊
А как же Windows 7?
Возможность официально установить Windows 7 есть, но её поддержка закончилась в начале 2020 года, а это значит тихо-мирно кончатся и программы, как это было с Windows XP. Ставить хорошую, но заведомо устаревшую систему 2009 года рождения, не хотелось бы.
Установка Windows 10
Стандартно Windows 10 ставится с флешки, но это не наш случай.
Простой метод
Установка Windows 10 с DVD-диска. Загрузка с болванки заставит iMac использовать Legacy BIOS Boot Mode. К сожалению, по каким-то причинам работает 50 на 50. Если у вас таки получился этот трюк, то переходите сразу к установке BootCamp 😏
Второй метод. Как делали мы
Мы подготовили готовый образ с Windows 10 Home для iMac 2011. Система чистая неломаная с сайта Microsoft с обновлениями по 2020 год.
Качаем с нашего яндекс-google диска:
- Образ Windows 10 для iMac 2011
- BootCamp для iMac 2011
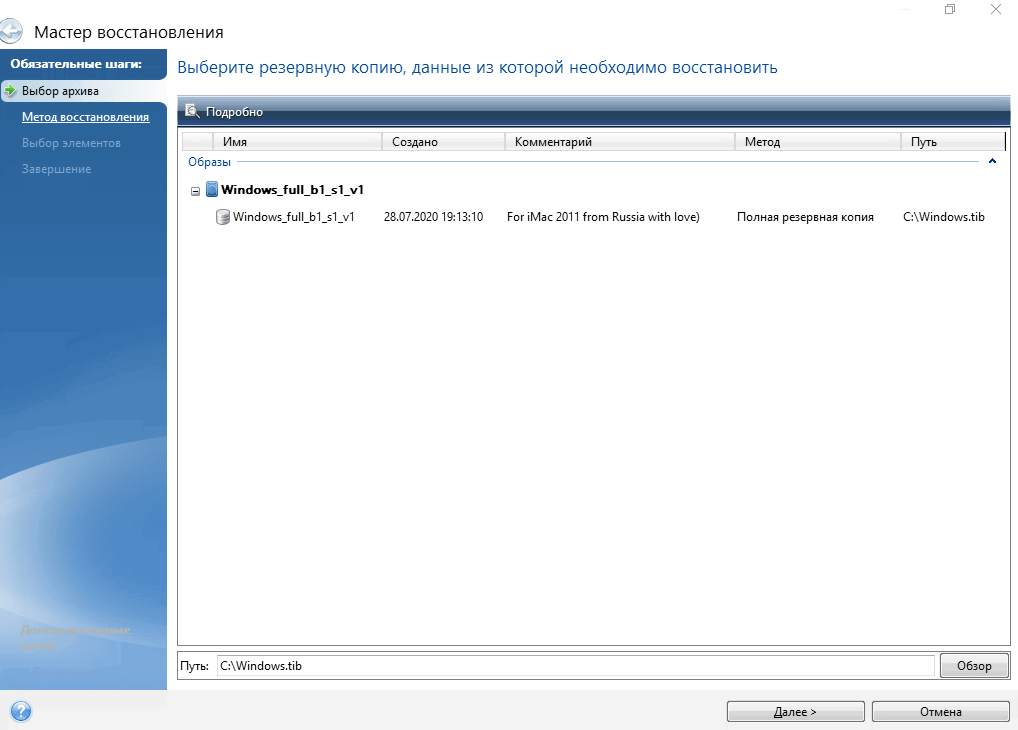
Образ необходимо распаковать на диск iMac через прогу Acronis True Image (образ создан в версии 2018 года). Проще всего это сделать, загрузившись в какой-нибудь LiveCD\LiveUSB. К примеру, WinPE 10-8 Sergei Strelec содержит всё необходимое и грузится с флешки.
Если вы тоже делаете апгрейд и ставите SSD, то образ можно залить заранее (при наличии ПК) и пропустить часть с LiveCD 😉
Важно!
После запуска LiveCD на iMac, в диспетчере дисков убедитесь, что диск со схемой разделов MBR, а не GPT. Заходим в свойства диска -> Тома -> Стиль раздела. Если тут GPT, то жмём правой кнопкой на диск и конвертируем его в MBR. Можно использовать любую другую прогу для работы с дисками.
Инструкция по развёртыванию образа
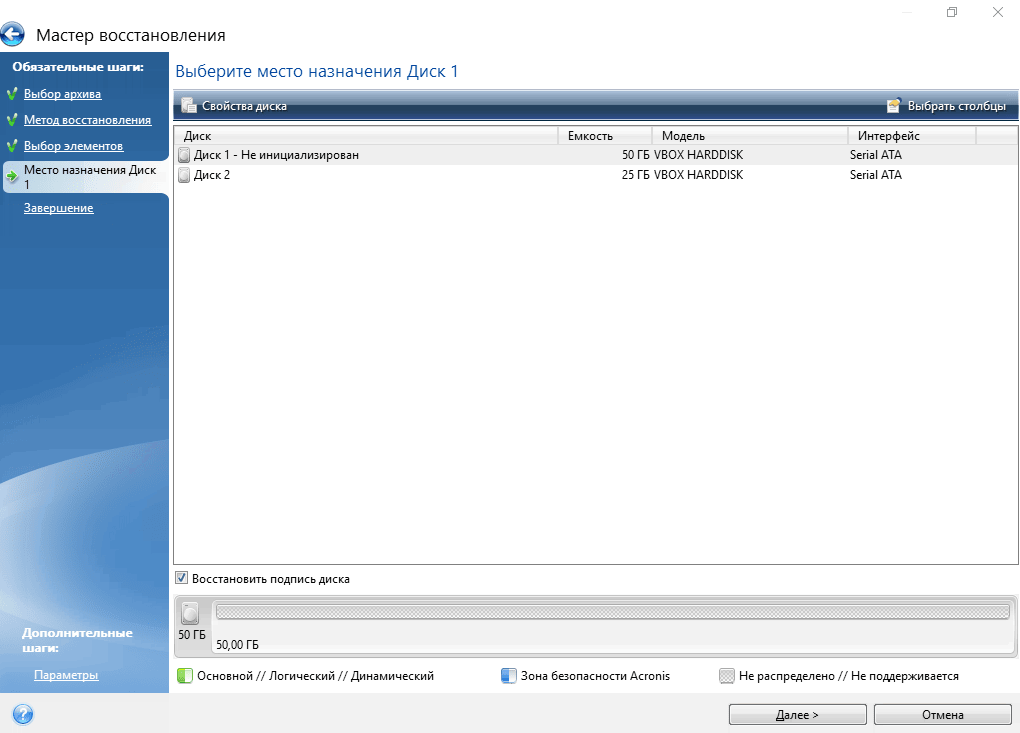
- В Acronis True Image выбираем действие «Восстановление -> Диски»

- Выбираем наш образ-архив
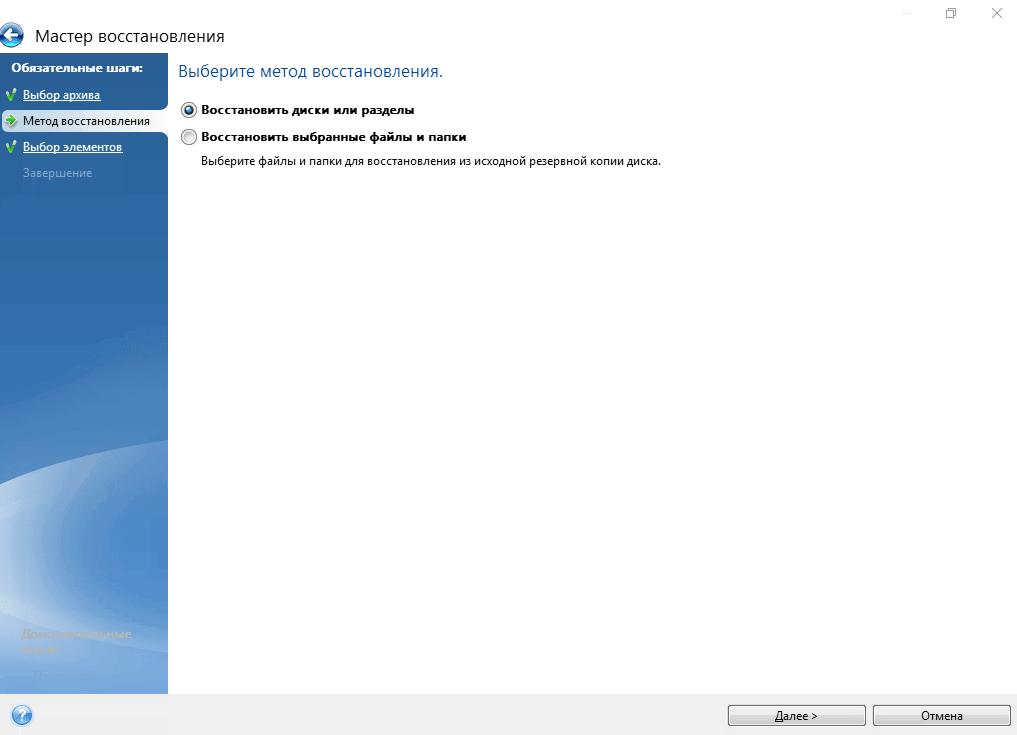
- Метод восстановления «Восстановить диски и разделы»
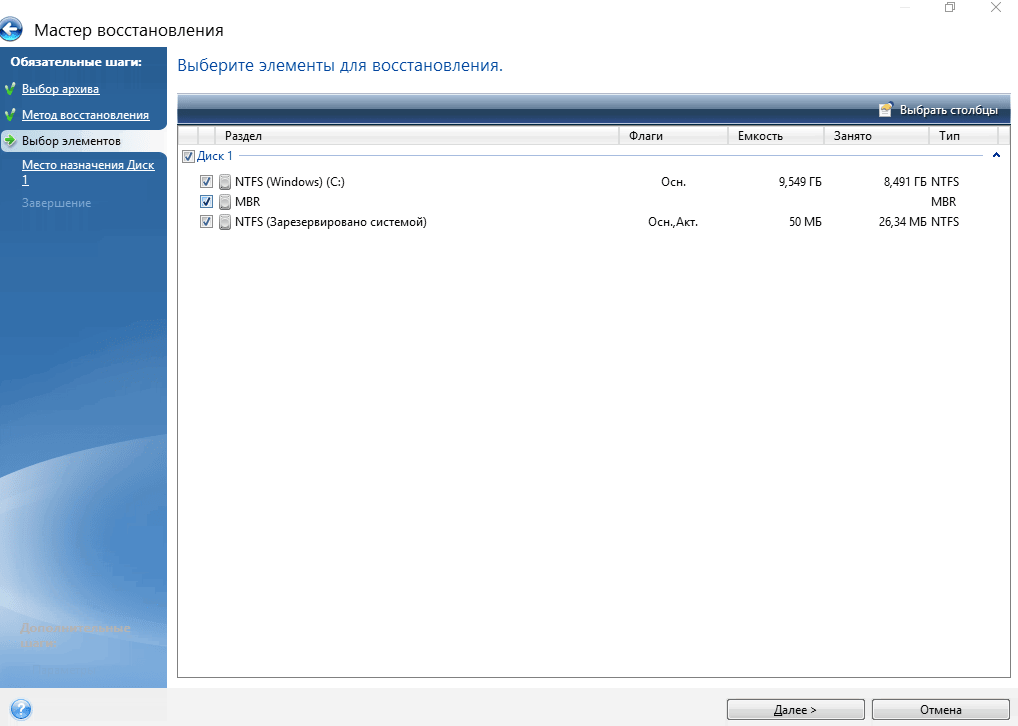
- Ставим галочку на «Диск 1», чтобы выбрались все галочки
- Выбираем целевой диск iMac. В нашем случае это SSD. Скриншот для примера
- Проверяем, всё ли правильно выбрали и жмём «Приступить»
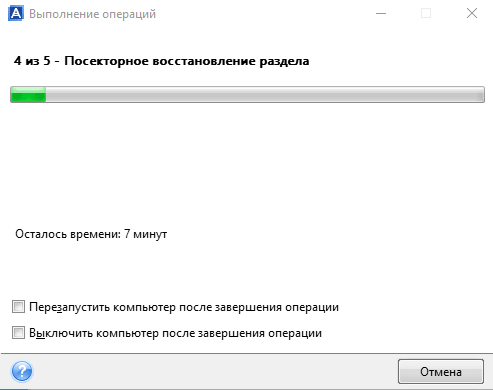
- Ждём окончания операции. Обычно 5-10 минут 🤓

Далее убеждаемся в диспетчере дисков, что диск не изменился на GPT, должен быть MBR! Объединяем диск С и свободное пространство через пункт меню «Расширить том…»

В правой колонке выбираем всё свободное пространство и жмём далее
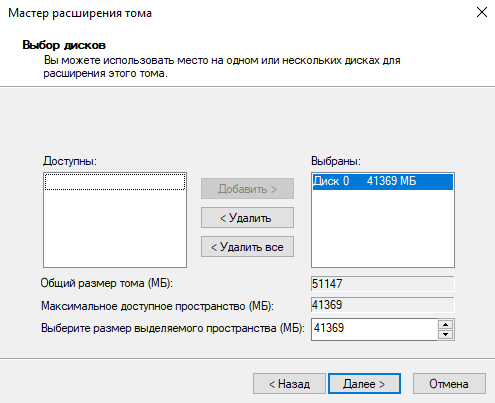
На диске должно остаться два раздела, как на картинке:

Выключаем iMac и отключаем его от электросети на 30 секунд. Отключаем все носители. Включаем iMac. Должна начаться (продолжиться) установка Windows 10.
Дожидаемся окончания установки Windows, всё как обычно.
Важное дополнение о разделе GPT
Многие столкнулись с проблемой, когда после перезагрузки диск превращается формат GPT и установка проходит неправильно. Один из посетителей блога поборол эту гадость и скинул нам видео в группу ВК, за что ему огромная благодарность 😘
Установка BootCamp
BootCamp устанавливается через командную строку. Распаковываем архив в удобное место, к примеру на диск С. Запускаем командную строку от имени администратора и стартуем файл по пути:
C:\BootCamp\Drivers\Apple\BootCamp.msi
Далее последует обычная установка драйверов и предложение перезагрузить iMac. Первый запуск может быть долгим! Если в течение 5 минут красуется чёрный экран, то выключите-включите iMac. Такое может быть.
Подробная инструкция по установке BootCamp
При успешном исходе, звук, регулировка яркости и горячие клавиши на клавиатуре должны работать.
В видео присутствует мат, а ещё оно вертикальное, простите 😳
Wi-Fi и звук! BlueTooth мышь и клавиатура, горячие клавиши и регулировка яркости
Косяки
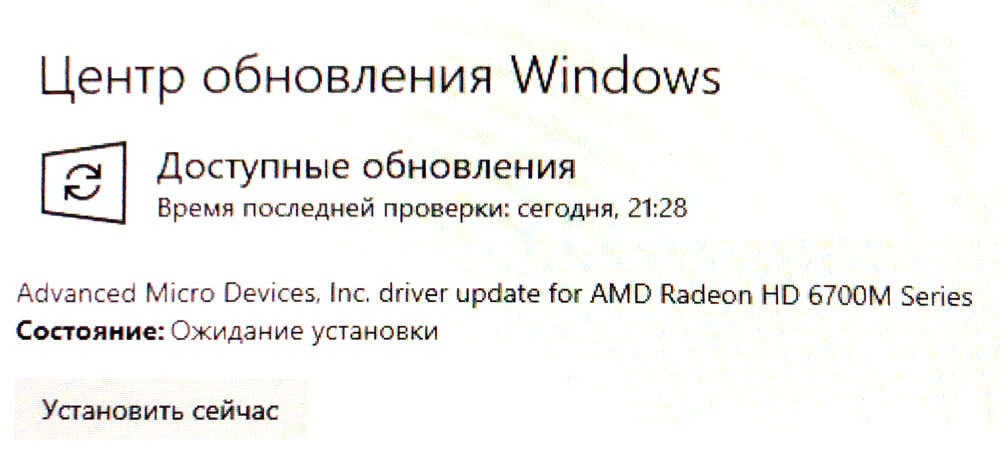
- При первом обновлении Windows скорее всего обновит драйвера на видеоадаптер, в итоге экран может потемнеть и не вернуться обратно.
Подождите 10 минут. Если iMac не отдуплится, то жёcтко выключите-включите его. В дальнейшем таких траблов замечено не было 😋
- Если у вас беспроводные мышь и клавиатура от Apple, то Bluetooth выключать нельзя! Отвалятся и придётся искать проводную мышь, чтобы включить Bluetooth). Изредка мышь и клава глючат. Как вылечить мы не нашли, с чем связано непонятно, происходит редко и жить не мешает
Нюансы
- Не только Apple, но и Microsoft нормально не поддерживают устройства, выпущенные в 2011 году. Это касается не только iMac, но и обычных компов и ноутбуков. На них можно встретить отвал тачпада или USB портов, отсутствие звука, глюки видеокарты и т.п. неприятности. Это связано с переходом на новый тип прошивки в 2012 году — UEFI;
- Microsoft может в любой момент выпустить обновление и всё обгадить весь мёд;
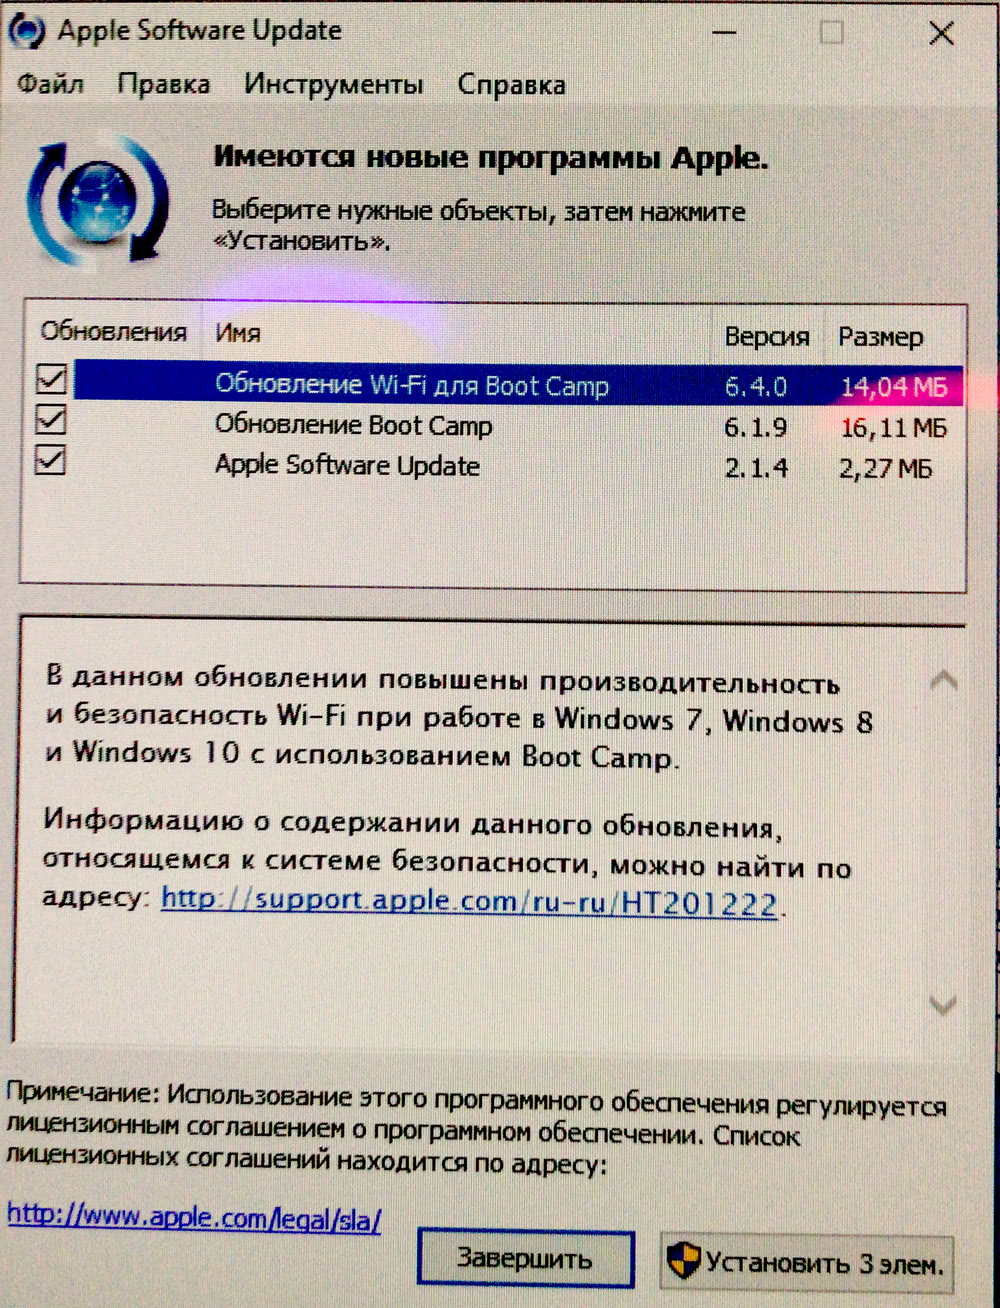
- В состав BootCamp входит утилита Apple Software Update. Через неё обновляются ПО и драйвера от Apple. Прога нашла обновления, но мы не рискнули 🙄
Итого
Считаем, что Upgrade и установка свежей Windows 10 — единственно верное решение, если хотите продлить жизнь iMac ещё на 3-5 лет. Да, это не новый iMac, но работает шустро и не тупит, а цена затеи несоизмеримо меньше 😊
Можем всё сделать за вас! 😎 Выезд на дом или в сервисе -> Установка Windows на Mac
Using Boot Camp Assistant, one can run Windows 10 without third-party virtualization software and can make Windows 10 the primary OS without using third-party software. In order to make sure that your Mac PC keyboard, touchpad, display, keyboard, USB port, and other components work well with Windows, you only need to install the Boot Camp support application and drivers.
Every time a manufacturer releases an update to their hardware, Microsoft automatically pushes driver updates with every Windows update. If you have audio, video, keyboard, mouse, camera, or microphone issues with Windows 10 on your Mac, you should repair the Boot Camp drivers. If your Boot Camp Control Panel does not work, updating or repairing it should fix it.
In this gearupwindows post, we will guide you on repairing and updating Boot Camp Drivers in Windows 10.
In Windows 10, how do I update and repair Boot Camp drivers?
In order to fix and update Boot Camp Drivers in Windows 10, you must update the Boot Camp Assistant software. Here are the steps:-
Step 1. Download the Boot Camp software from Apple’s official webpage.
Step 2. Unzip the download file using WinRAR or any other achieve opener.
Step 3. Open up the BootCamp folder and double-click on Setup.exe to run it.

Step 4. On the following screen, click the Repair button to repair Boot Camp drivers.
You will be prompted to restart your computer once the Boot Camp repair is complete. Click Yes on the prompt to restart your computer once the repair has been completed.
Note: If you don’t find the latest version of Boot Camp on the official website of Apple, you would like to use a third-party free tool, Brigadier, that downloads Boot Camp Drivers without Boot Camp Assistant.
Conclusion
In conclusion, Boot Camp Assistant is a useful tool for running Windows 10 on a Mac without the need for third-party virtualization software. However, in order to ensure that all components of your Mac work well with Windows, it’s important to install the Boot Camp support application and drivers. If you encounter any issues with the drivers, you can easily update and repair them by downloading the latest version of Boot Camp from Apple’s official website or by using a third-party tool like Brigadier. With these simple steps, you can enjoy a seamless experience of running Windows 10 on your Mac.
Readers help support Windows Report. We may get a commission if you buy through our links.
Read our disclosure page to find out how can you help Windows Report sustain the editorial team. Read more
If you want to install Windows and Windows applications on your Mac, there’s a simple tool called Boot Camp that lets you run Mac and Windows side by side.
This tool is quite useful, but sometimes there could be some problems with Windows 10 and Boot Camp.
As far as we know, Boot Camp has been updated to officially support Windows 10, and features such as USB 3 drivers on recent MacBooks and USB Type-C ports on 12-inch MacBook are working.
In addition, Windows 10 support for 64-bit Mac is available as well. To keep your Boot Camp working with Windows 10, follow the steps listed below.
How can I solve Boot Camp issues in Windows 10?
1. Update Boot Camp/computer drivers

- Make sure that your Mac is connected to the Internet.
- Open Boot Camp Assistant from the Utilities folder.
- When the assistant window opens deselect all options, but make sure that Download the Latest Windows support software from Apple is checked.
- Click Continue.
- Make sure that your USB flash drive is connected as the destination disk and click on Continue.
- You might need to enter your administrator username and password; after that, the Boot Camp assistant should download drivers to your USB flash drive.
- After the drivers have been downloaded quit the Boot Camp Assistant window.
- Make sure that your USB is connected to your Mac and go to System Preferences.
- Click the Startup Disk and select the Windows volume icon in the list of drivers.
- Click Restart.
Install the drivers:
- Open the Boot Camp folder in the flash drive and install the drivers you’ve downloaded.
- If Boot Camp asks you to make changes click Yes.
- Click Repair to reinstall or update previously installed Windows Support Software.
- If you get a message saying that software didn’t pass Windows Logo testing just click Continue Anyway.
- After the installation is finished, click Yes to restart your computer.
One amazing tool that allows you to run Windows on MAC is Parallels and we strongly recommend you give it a try.

It’s extremely easy to set up as the tool will automatically detect all you need in order to get started and download the programs. You’ll be set to start using your device in no time.
Another great thing about Parallels is that you can share and folders or copy-paste images, between your MAC and Windows applications.
Parallels is fast, reliable, works with most programs, and offers you 24/7 Support on phone and email.
⇒ Get Parallels
2. Reset PRAM
- Turn off your MacBook by pressing the Power button.
- Turn on the computer.
- Press and hold the Command, Option, P, and R keys at the same time before the grey screen appears. If you’re not fast enough, restart your device again.
- Now, keep holding the keys until your Macbook restarts.
- When you hear the startup sound, simply release the keys.
- Keep in mind that some of your settings have been reset.
Many MacBook owners confirmed that resetting PRAM helped them fix this problem. Keep in mind that the whole process may take a few minutes, so be patient.
Reset PRAM at least three consecutive times. Use the above steps in that regard.
That would be all, I hope this helped you to solve the Boot Camp problems. If you have any questions or suggestions, please reach for our comments section below.
Also, keep in mind that bypassing similar issues is possible when knowing the handiest tricks to apply:
- Boot Camp Windows 10 not booting – If the Boot Camp Windows partition no longer boots, try to perform the NVRAM reset to clear all corrupted settings.
- Boot Camp won’t install Windows 10/Bootcamp installation failed – There are times when Boot Camp refuses to install on Windows 10. In this case, waste no more time and download the latest edition of Windows 10.
- Boot Camp assistant not working – If Boot Camp Assistant doesn’t respond, there is a chance to solve it by using Option-Command-Escape to force the app to quit.
- Repair Boot Camp Windows 10 – The tips above will help if you experience Boot Camp issues.
- Boot Camp Windows 10 keeps restarting – Windows 10 continuously rebooting on MacBook Boot Camp issues are nothing out of the ordinary. When bothered by this problem, run a RAM diagnostics command in Windows 10.
The above solutions should help you fix the Boot Camp problems with Windows 10. If you have additional comments or suggestions, please let us know in the comments section below.
Ivan Jenic
Windows Hardware Expert
Passionate about all elements related to Windows and combined with his innate curiosity, Ivan has delved deep into understanding this operating system, with a specialization in drivers and driver troubleshooting.
When he’s not tackling diverse driver-related problems, Ivan enjoys watching good movies and spending time hiking with his family and friends.
You are here:
Home » Windows 10 » How To Repair & Update Boot Camp Drivers In Windows 10
Boot Camp Assistant makes it possible to install and run the Windows operating system on Mac computers without using any virtualization software.
One needs to install the required Boot Camp support software or drivers to make sure that the keyboard, touchpad, displays, and other components of the Mac computer work great with the Windows operating system.
If you are experiencing display, keyboard, mouse, audio, built-in camera, or microphone issues while running Windows 10 on your Mac, you can repair the Boot Camp drivers to fix issues. You can repair the Boot Camp if the Boot Camp Control Panel is not working properly as well.
In addition to repairing the Boot Camp, this method can also be used to update Boot Camp drivers to the latest version.
Complete the given below directions to repair the Boot Camp in Windows 10/11.
Step 1: The first step is to download the Boot Camp software from Apple. If you have access to the macOS on your Mac machine, refer to our how to download Boot Camp drivers for Windows 10 guide for step-by-step directions.
Alternatively, if you don’t have access to the macOS or removed macOS from your Mac computer, follow the instructions in our how to download Boot Camp drivers on Windows 10 without the Boot Camp Assistant guide to download Boot Camp support software.
Step 2: After downloading the Boot Camp drivers, open up the BootCamp folder and then run the Setup.exe located in that folder.
")
NOTE: If you have downloaded Boot Camp drivers to a USB drive, then the path to the setup file would be:
F:\BootCamp\Setup.exe
Where “F” is the drive letter of the USB drive.
Step 3: Click the Repair button to install missing files and repair damaged Boot Camp drivers and data. Note that old drivers will be updated to the newest version during the process.
")
")
Step 4: Once done, click the Finish button. Reboot your computer when you are asked to do so. Restart and boot into Windows 10 again to check if Boot Camp and its drivers are working well now.
")
")
Our how to install Windows 10 on Mac without the Boot Camp guide might also interest you.