
You probably have noticed that you can’t run programs as administrator by default in Windows 10. This may be a minor inconvenience, but is a way for the OS to keep the system secure.
The idea being not allowing viruses and malware take admin access without you knowing.
To fix various Windows 10/11 problems, we recommend Outbyte PC Repair:
This software will repair common computer errors, protect you from file loss, malware damage, hardware failure, and optimise your computer for peak performance. In three simple steps, you can resolve PC issues and remove virus damage:
- Download Outbyte PC Repair Software
- Click Start Scan to detect Windows 10/11 issues that may be causing PC issues.
- Click Repair All to fix issues with your computer’s security and performance.
This month, Outbyte has been downloaded by 23,167 readers.
This is the case even if you are using the administrator account set up on your PC. This can get pretty annoying if you are in the middle of tweaking your system, modifying the registry, or simply have programs that require administrator access.
Luckily, there are a few ways you can set up Windows 10 to always run as administrator.
We’ll be taking a look at a few solutions below.
- Run a specific application as administrator
- Keyboard shortcut to run an app in administrative mode
- Always run a specific program in elevated mode
- Registry hack to run chosen programs as an administrator
About Accounts
Before we get down to the nitty gritty, it’s a good idea to clear the air about how accounts are set up in Windows 10. You are asked to set up an account if you install the OS anew on your computer or run it for the first time if it came preinstalled on your device.

This is the main account on the system, and can be configured to be an administrator account by default. Despite this, the User Account Control (UAC) window can still pop up right in the middle of adjusting your system. Or you may get other security warnings when you hit enter after typing a command in the console.
That’s because programs don’t run with the highest privileges by default in these newer versions of Windows. Microsoft has set things up that you have to give your approval for running a particular application with elevated privileges.
Running the program as an administrator is not a complicated process. But doing it each time by right-clicking can get tiresome if you run applications that require elevation on a daily basis.

While you can disable UAC completely, this is not recommended. It can open up the floodgates if you are using an administrator account. Any program, including viruses and malware, will have automatic access to make changes to your system — and that’s the last thing you want.
This is where running programs in administrative mode comes in.
Administrator Access
Windows 10 may seem like an overprotective operating system, but all these protections are necessary. They have been put in place to prevent malware and suspicious programs from running amok.
Many old programs need to be run as administrator to properly function. Not to mention you yourself may need to tweak or modify a setting. Working with Command Prompt and PowerShell, most commands need to be run with elevated privileges.
There are a few easy ways to run programs in administrative mode, with each one having its advantages and disadvantages depending on your situation.
You may want a quick workaround or use a keyboard shortcut for occasional use. Or you can opt for a permanent method of turning on administrator mode by default where you specify admin credentials once and use your applications without Windows asking for a password again and again.
Let’s see what we have.
Run a Specific Application as Administrator
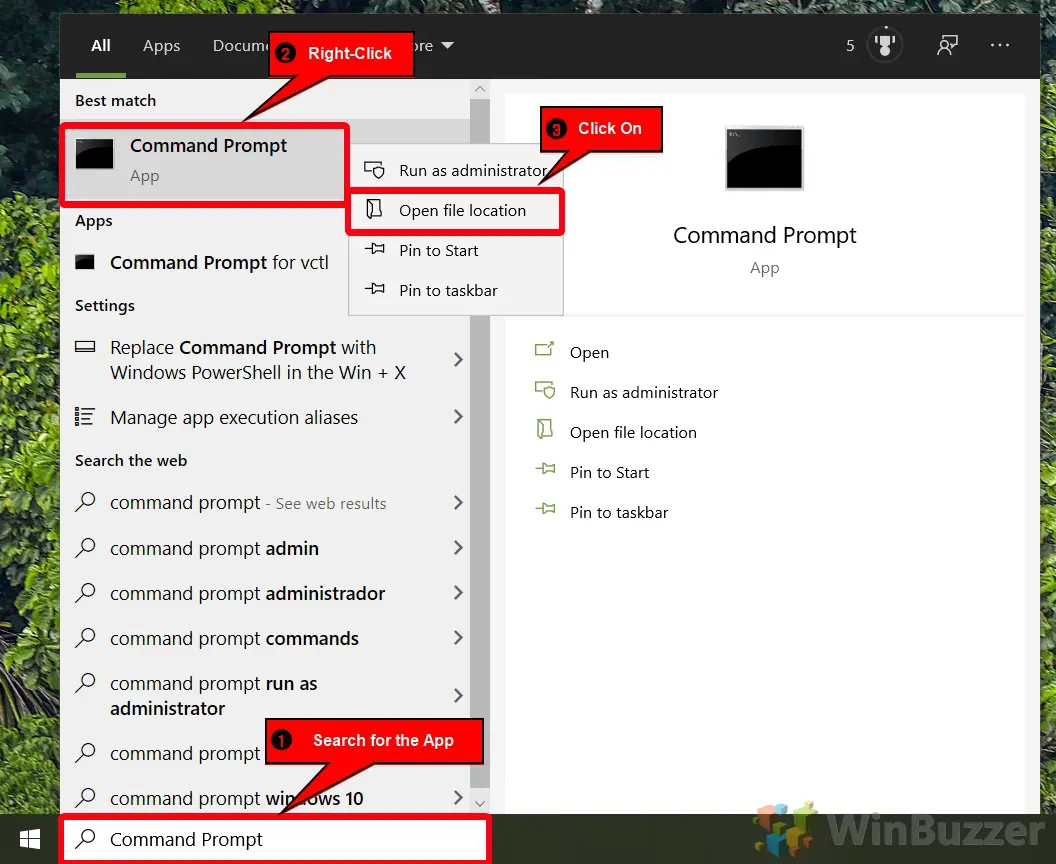
If you’re tinkering around your system and want to quickly run an application as administrator, then the easiest way is to use the option that Microsoft already provides. You can access this from the right-click menu in both File Explorer and the Start Menu.
- Open Start.
- Find the app you want to open from the All apps section in the Start Menu, or search for it.
- Right-click the program and look for the Run as administrator

- Click or tap it to start the program with elevated privileges.

Now, while your chosen app will run, doing this will only run it as administrator once.
Keyboard Shortcuts to run an App in Administrative Mode
Another quick workaround for running a program with elevated privileges is by using keyboard shortcuts to run it in administrative mode. This can be done directly from both the Start Menu or the Run dialog, by holding down a key combination before launching the app.
This is what you need to do to quickly run an app in admin mode from Start.
- Find the program icon in Start.

- Press and hold the Ctrl + Shift keys and click on the program tile or icon.

You can also accomplish this via the Run window.
- Press Win + R to bring up the Run dialog box.
- Type the name of the program that you want to open in elevated mode.
- Hold down the Ctrl + Shift keys and hit the Enter key to open the program.
This is a great way to run some of the system programs like Command Prompt and PowerShell with admin privileges. Microsoft added this ability in Windows 10 Version 1803.
Again, these two keyboard shortcuts only work in the Start Menu and the Run dialog, not other areas like File Explorer. You, obviously, have to repeat these steps every time you want to launch that specific program.
This is okay on occasion. But if you regularly use programs that demand administrator access, then you, again, have a couple of permanent solutions.
Always run a Specific Program in Elevated Mode
Have a bunch of applications that you want to always run in administrator mode so that you don’t have to deal with warnings and error messages? There are a couple of ways to get this done.
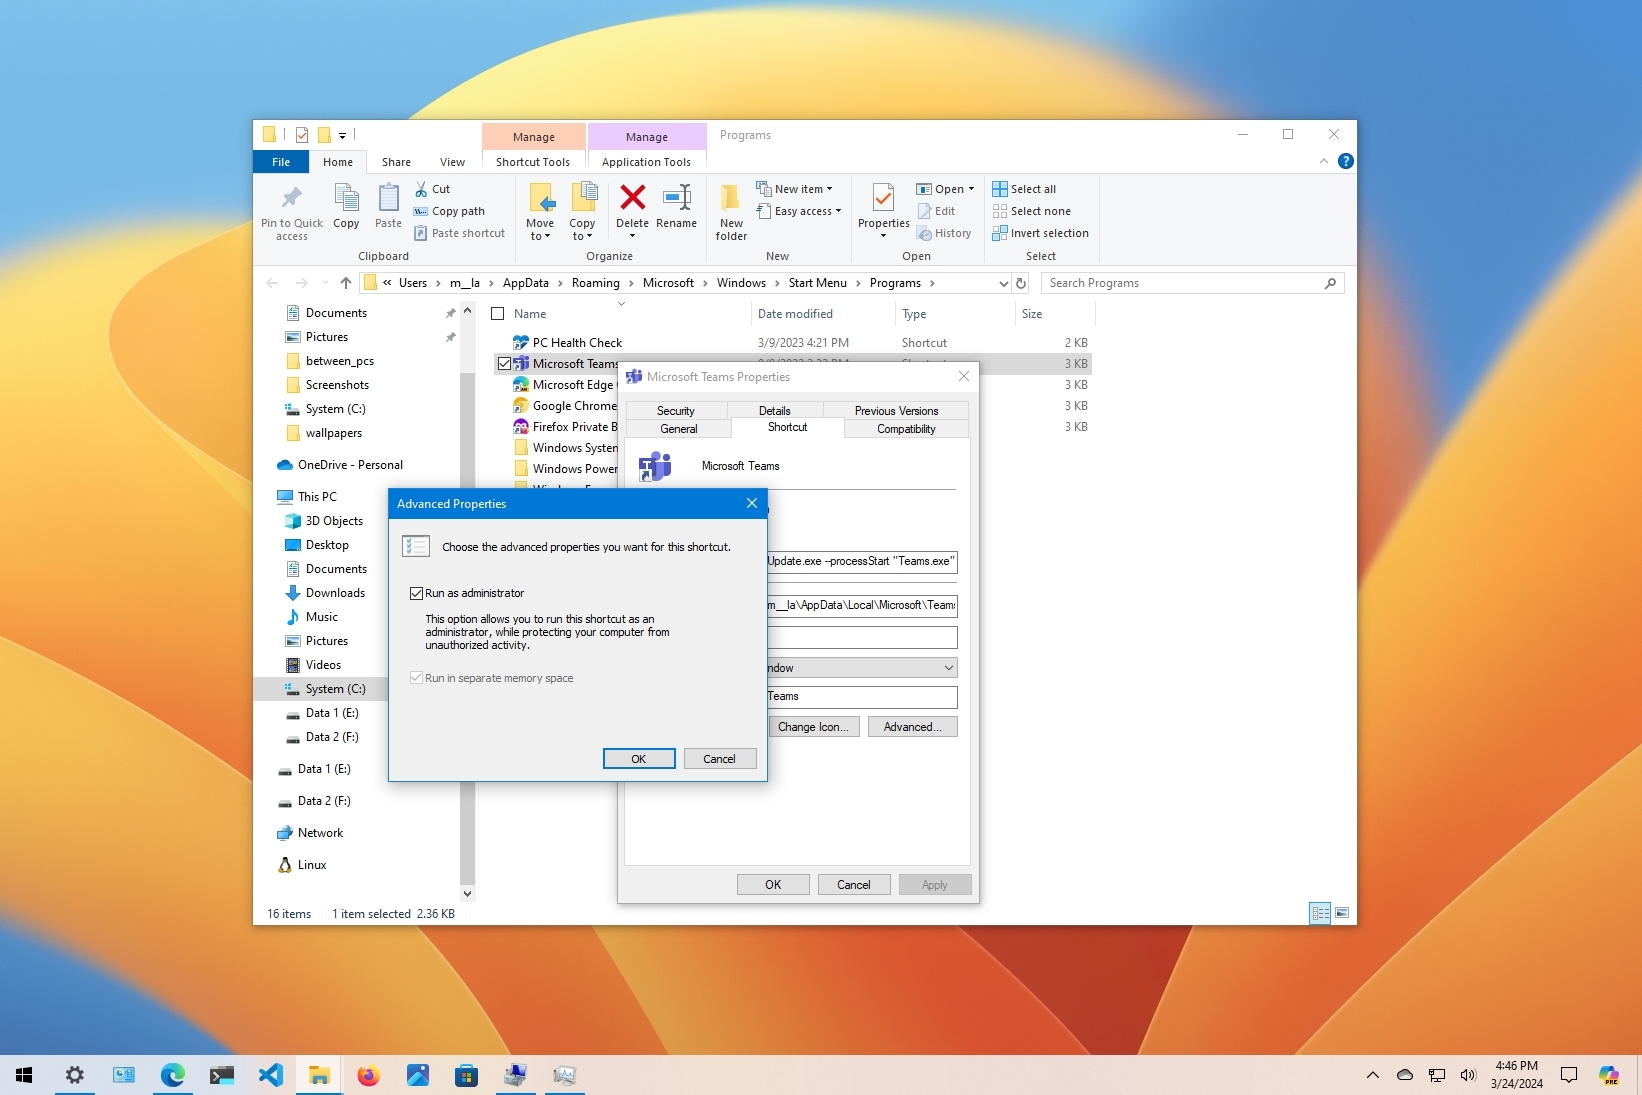
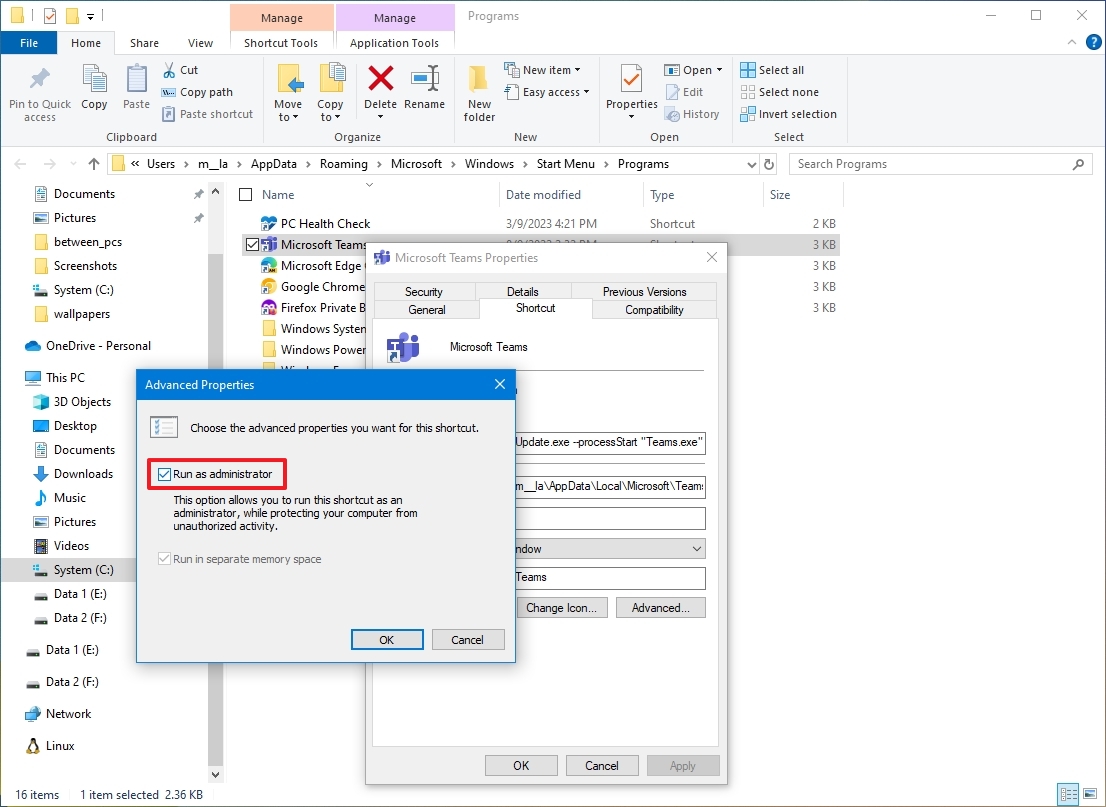
First is, from the Advanced Properties panel.
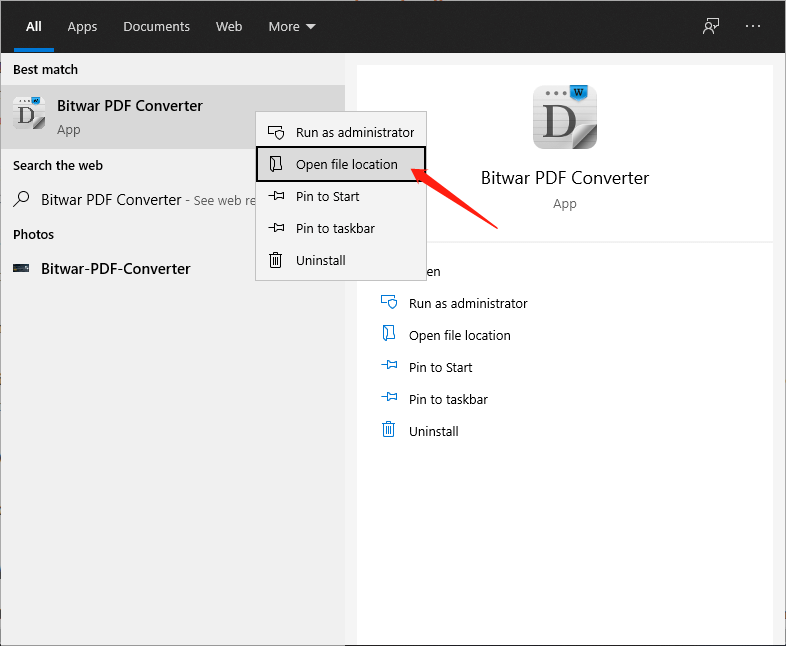
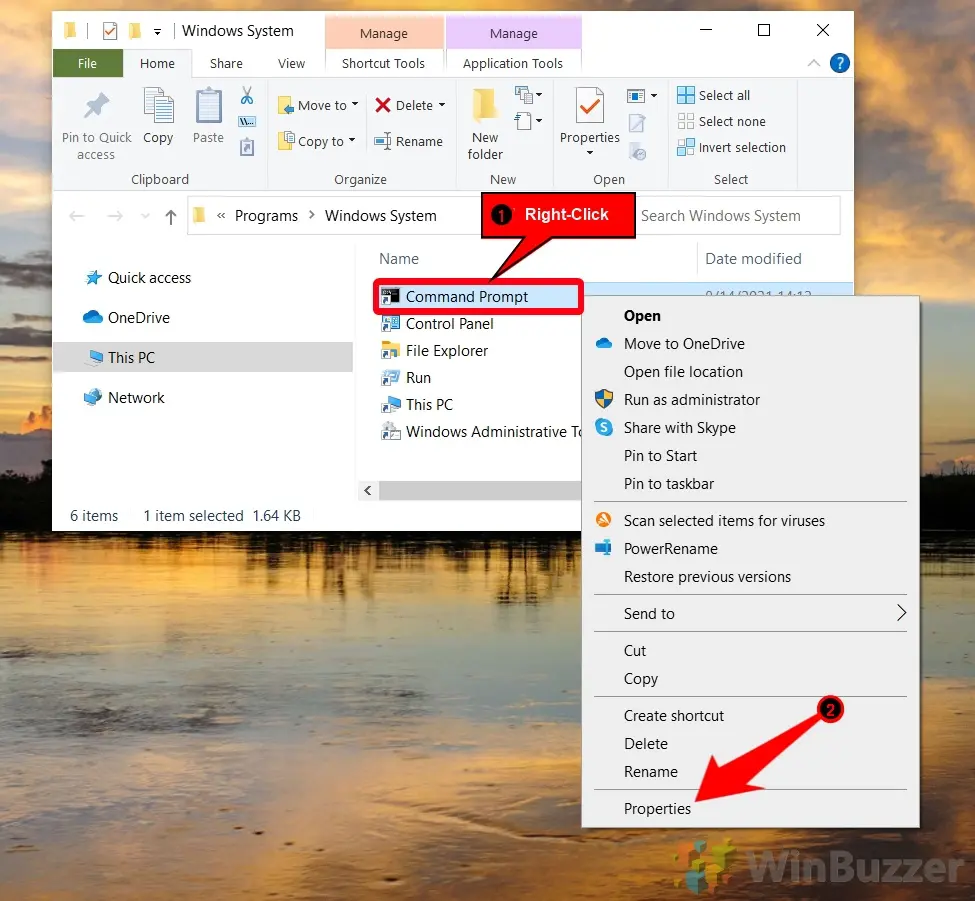
- Open Start, and search for the app that you want to run elevated.
- Right-click the result and select the Open file location
- Locate the program shortcut in the window that opens up, right-click and select Properties.
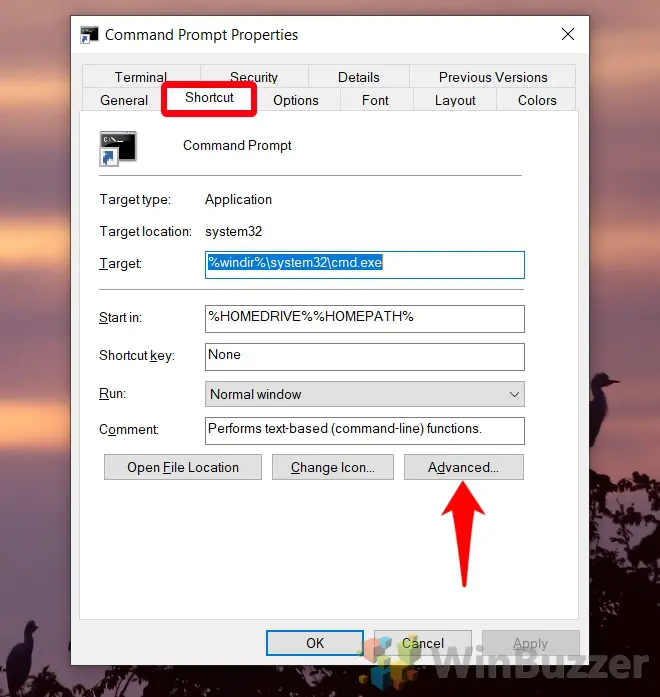
- Click on the Shortcut
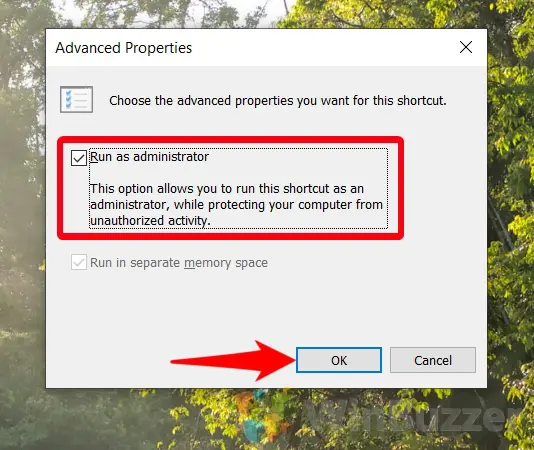
- Now, click on the Advanced button to open the Advanced Properties
- Here, select the Run as administrator
- Click OK and Apply, then the OK button again.
Now, every time you start the app, it will run with elevated privileges.
Obviously, if you are using the default User Account Control settings, which is actually recommended, you will still need to approve the UAC dialog to continue with the application. You can also revert the changes using the same instructions. Simply clear the Run as administrator option to do that.
Another way to do this is in Compatibility Mode.
- Located your application or its shortcut, and right-click on its icon.
- Select Properties in the context menu.
- Go to the Compatibility
- Check the Run this program as an administrator.
- Click OK.
From now on, double-clicking or tapping on your application or shortcut will automatically run it as administrator.
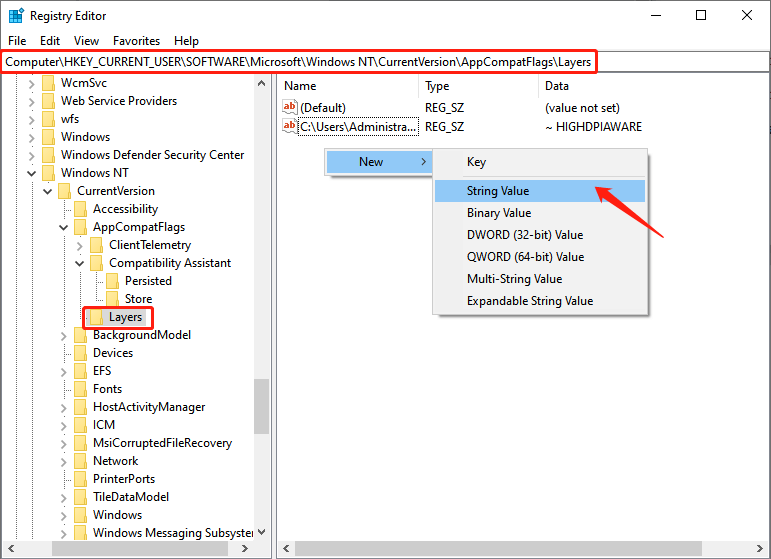
Registry Hack to Run Chosen Programs as an Administrator
Finally, if you are comfortable with a little tinkering of the registry, then this neat little hack lets you add a whole list of programs that will automatically run in elevated mode. This is an excellent way to go about this for power users and system administrators.
And it involves a few simple steps.
- Open the Registry Editor.
- Navigate to the following key HKEY_CURRENT_USER\Software\Microsoft\Windows NT\CurrentVersion\AppCompatFlags\Layers.

- Right-click the blank area in the right pane, and add a new String Value.
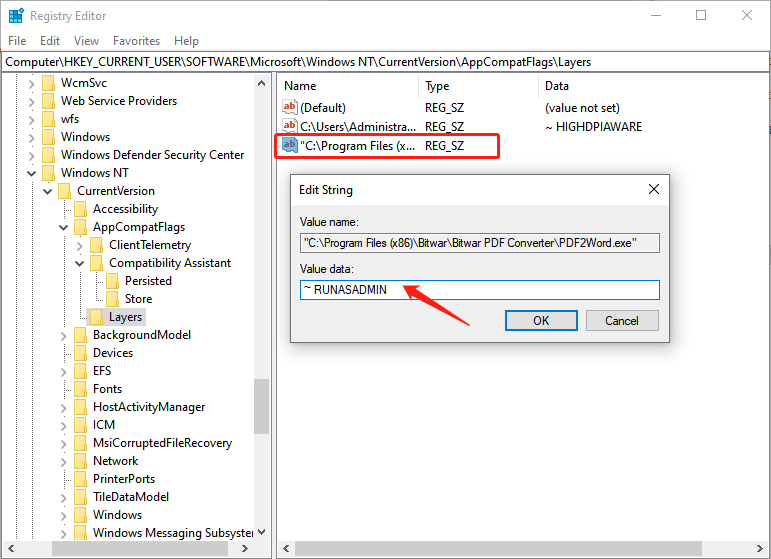
- Rename the string to the full path of the program that you want to always run in administrator mode, and then double-click it to modify it.
- Type ~ RUNASADMIN in the Value data field in the window that pops up.
- Hit OK.

Add in additional programs here, if you want to, using the same process.
Close the Registry Editor when you are done, and your applications will now automatically start with elevated privileges from now on.
Conclusion
Running apps and programs as administrator in Windows 10 may be simple, but the important thing is to only elevate the permission for applications that you trust and know how to use.
All the methods listed above can be used depending on your needs and requirements. For quick application, use the context menu or keyboard shortcut. But if you always want administrative access to specific programs, then the next two methods should be up your alley.
Shawn is a WindowsChimp Staff writer, who is a fan of making lists and does the same on this site. He has a Contemporary Writing degree and been in technology niche since last 3 years.
(Image credit: Mauro Huculak)
On Windows 10, sometimes you have to run programs as an administrator to access advanced functionalities and change system settings. For instance, if you work with Command Prompt or PowerShell, you may need to run them with elevated privileges to execute most commands.
If you use applications that require elevation frequently, you’ve probably noticed that they don’t run with the highest privileges by default. Instead, you must access the right-click context menu or use other methods to run the program as an administrator. It’s not a complicated process, but if it’s an app that you use regularly, the extra steps can get in the way pretty quickly.
Luckily, it’s possible to configure an app to always run as an administrator to save some unnecessary steps.
In this how-to guide, I’ll explain the easy steps to configuring program shortcuts to run with elevated privileges.
How to always run an app elevated on Windows 10
To set an application to always run as an administrator on Windows 10, use these steps:
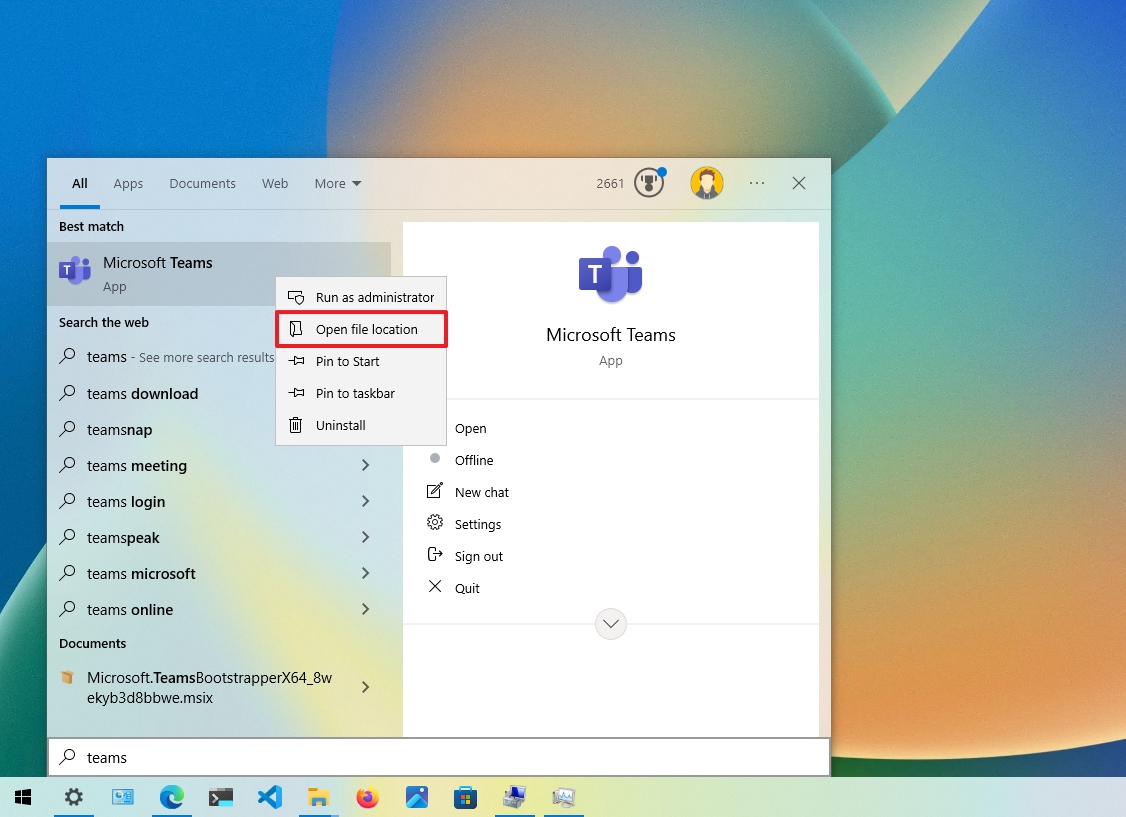
- Open Start.
- Search for the app to run elevated.
- Right-click the top result and select the «Open file location» option.
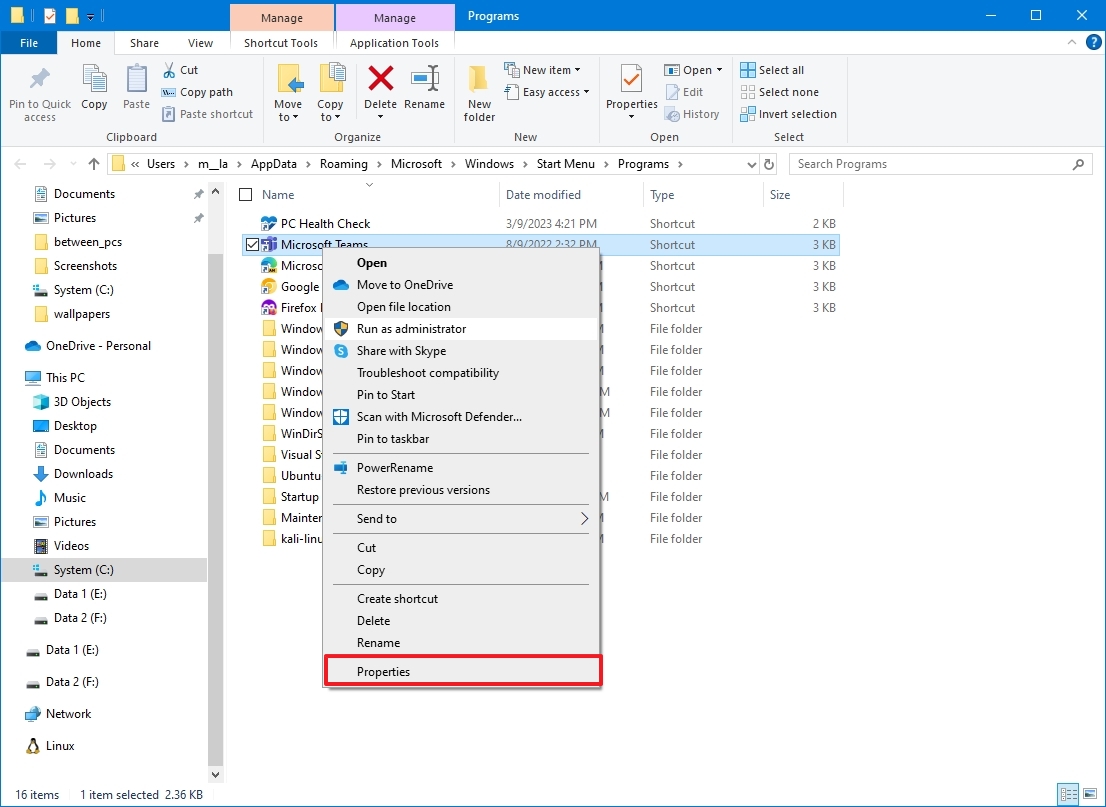
- Right-click the app shortcut and select the Properties option.
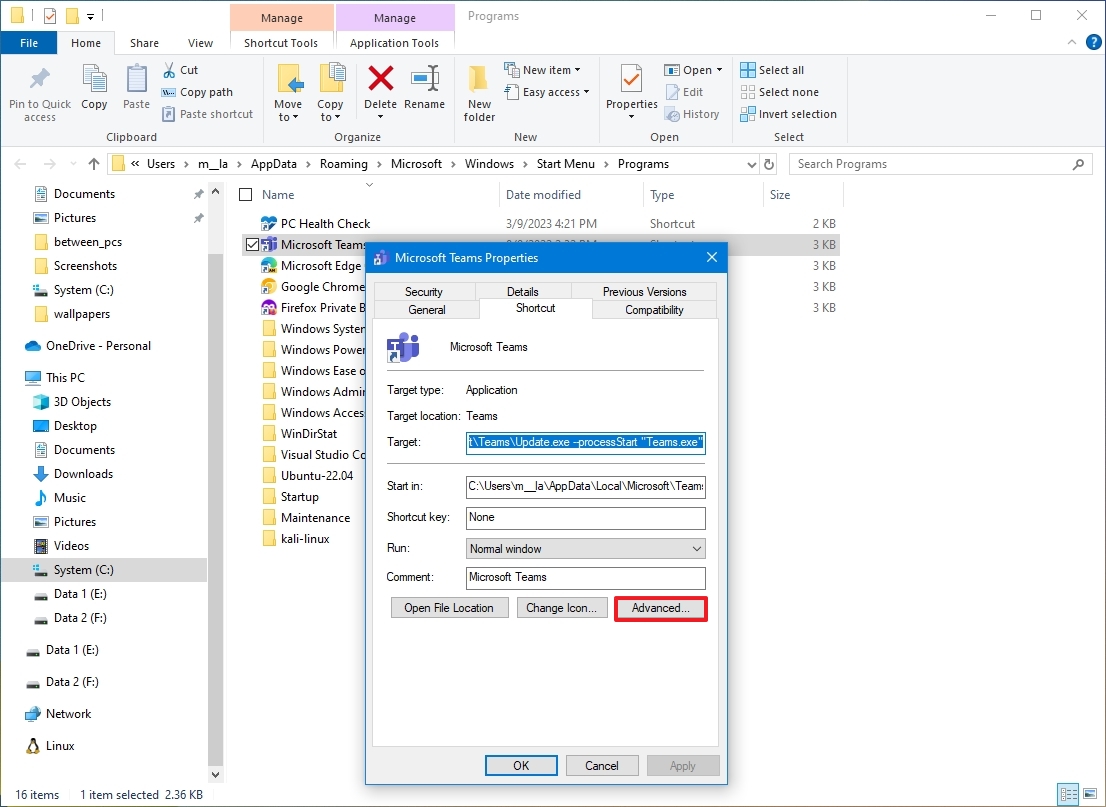
- Click on the Shortcut tab.
- Click the Advanced button.
- Check the «Run as administrator» option.
- Click the OK button.
- Click the Apply button.
- Click the OK button.
Once you complete the steps, the app will run with elevated privileges every time you start it. Of course, if you’re using the default User Account Control Settings (recommended), you’ll still need to approve the UAC dialog to continue with the application.
You can revert the changes at any time with the same instructions, but in step 7, ensure you clear the «Run as administrator» option.
All the latest news, reviews, and guides for Windows and Xbox diehards.
Although we’re focusing this guide on Windows 10, you can always use the same instructions to run apps as an administrator on Windows 8.1, Windows 10, and older versions.
More resources
For more helpful articles, coverage, and answers to common questions about Windows 10, visit the following resources:
- Windows 11 on Windows Central — All you need to know
- Windows 10 on Windows Central — All you need to know
Mauro Huculak has been a Windows How-To Expert contributor for WindowsCentral.com for nearly a decade and has over 15 years of experience writing comprehensive guides. He also has an IT background and has achieved different professional certifications from Microsoft, Cisco, VMware, and CompTIA. He has been recognized as a Microsoft MVP for many years.
Summary: By default, Windows 10 runs programs in user mode. Most classic desktop programs do not require administrator privileges to run. However, programs designed for advanced operations require administrative rights to run. If users want to run a program in administrative mode, they need to specify it in Windows 10 explicitly. In today’s tutorial, we’ll offer you several methods to always run programs as an administrator.
For most programs installed on Windows 10, you’ll be prompted to receive a message asking if you “want to allow it to make changes to your device”. Typically, it would be best if you were an administrator to grant permissions.
This typically provides access to all the software’s potential features, including some that require access to files stored on a PC.
In Windows 10, it is simple to run an application or program as an administrator. But sometimes you may not want to do this all the time. There is a way to run as an administrator at the same time, while running when you need it, and to set this option as the default option when you open the program.
Always Run as Administrator Via Registry
Step 1: Type Registry in the search field to open Registry Editor.
Step 2: Then move to the following path:
HKEY_CURRENT_USER\Software\Microsoft\Windows NT\CurrentVersion\AppCompatFlags\Layers
Step 3: Right-click the right blank area. Then click New and select String Value.
Step 4: Name the new String Value as the full path of the application you need to always run as administrator.
Step 5: Double-click the new String Value and type “~ RUNASADMIN” in the Value data. Then click OK.
Step 6: Close the Registry Editor, and the app will run in administrative mode when you double-click it.
Always Run Programs as Administrator Via Compatibility
Step 1: Right-click the app or its shortcut and select Properties.
Step 2: Select the Compatibility tab. Then check the box showing “Run this program as an administrator” and click OK.
Step 3: After that, this application will automatically run this program as an administrator when you double-click it or its shortcut.
Always Run Programs as Administrator Via Program Shortcut
Step 1: Type the program’s name that you want to run as an administrator in the search field. In the search result, right-click the program name and click Open file location, which will lead you to the shortcut icon in the File Explorer.
Step 2: Right-click the shortcut icon of the program and click Properties.
Step 3: Select the Shortcut tab and click the Advanced button.
Step 4: Check the box showing “Run as administrator” and click OK in the “Advanced Properties” window.
Step 5: After that, it will run this program as an administrator by default every time you double-click its shortcut.
That’s it!
The methods mentioned above have their advantages and disadvantages, depending on the situation. In a word, it is not hard to always run programs as an administrator. I hope this post will be helpful to you.
Running a program as an administrator is necessary to maintain full functionality in some scenarios. However, remembering to do so each you launch an app can be a hassle. Running a command in Command Prompt only be greeted with the “requires administrator privileges” message gets old fast. To remedy this, today we’re going to show you how to set a program to always run as an administrator in Windows 11 or Windows 10.
Before we do so, however, it’s worth issuing a few words of caution. Running an app as an admin every time makes it easier for malware to get a foothold on your PC. The method we show below will set the shortcut for the app to run it as admin rather than directly modifying the permissions of the app itself. This is safer and still requires you to choose “Yes” in a UAC prompt.
For more information about Windows 10 administrator access, as well as different methods to always run apps as an administrator, you can check our long-form how to run a program as an administrator guide.
⚠️ Please note: The process described below is the same in Windows 11 as it is in Windows 10. However, bear in mind that we’ll be using screenshots from Windows 10, so your UI may look a little different. We’ll point out any changes you need to be aware of as they come up.
How to Run Programs Always as Administrator in Windows 11 or Windows 10
- Access the File LocationPress the Start button, type the name of the application (e.g., Command Prompt), right-click on it, and select “Open file location“. This action will navigate you to the location of the shortcut in the File Explorer.

- Open PropertiesRight-click on the application’s shortcut and select “Properties” from the context menu. This will open a window where you can modify the properties of the shortcut. In Windows 11 you will first have to click on “Show More Options”, if you didn´t disable this extra menu.

- Navigate to Advanced SettingsIn the Properties window, switch to the “Shortcut” tab and click on the “Advanced…” button. This will open another window where you can adjust advanced settings for the shortcut.

- Enable “Run as Administrator”Check the box next to “Run as administrator” and click “OK“. This setting ensures that every time the shortcut is used to launch the application, it will request administrative privileges.

- Apply the ChangesClick “OK” in the main Properties window to apply the changes. The next time you launch the application using this shortcut, you will encounter a UAC prompt asking for permission to run the app as an administrator. Select “Yes” to proceed.


FAQ – Frequently Asked Questions About Running Programs as Administrator
Is there a way to run programs as administrator without seeing the UAC prompt every time?
Avoiding the UAC prompt while running programs as administrator involves advanced steps, such as creating scheduled tasks with admin privileges or employing third-party software that bypasses the prompt. These practices, while feasible, carry potential security risks because they circumvent the built-in security mechanism intended to alert users about changes requiring elevated privileges.
Can I set programs to run as administrator for all users on my computer?
Yes, you can set programs to run as administrator for all users by accessing the program’s properties through the executable file or shortcut, navigating to the “Compatibility” tab, and selecting “Change settings for all users” at the bottom. In the new window, check “Run this program as an administrator,” then apply and save the changes. This requires administrative access and will affect all user profiles on the device.
Is it safe to run web browsers as administrator?
Running web browsers as administrator poses significant security risks, including the increased potential for malware to gain system-level access through the browser. It’s strongly advised to use web browsers with standard user privileges to mitigate the risk of attacks that can exploit elevated permissions.
What are the risks of running programs as administrator?
Running programs as administrator can expose your system to increased security risks, such as malware gaining system-level access or unintended changes to critical system settings. Elevated privileges should only be used when absolutely necessary, and users should remain cautious about the source and trustworthiness of any application run with such privileges.
Can running as administrator improve program performance?
While running a program as administrator doesn’t inherently improve its performance in terms of processing speed or efficiency, it does grant the application higher access to system resources. This can be necessary for programs that require elevated privileges to function correctly, potentially resulting in better functionality or enabling features that are otherwise inaccessible under standard user permissions.
Why might some programs require running as administrator to function properly?
Programs may require running as administrator to perform tasks that involve modifying system files, accessing protected areas of the operating system, or interacting with other applications that also run with elevated privileges. This necessity is often seen in system utilities, development tools, and network management software.
How does ‘Run as administrator’ affect software updates?
Running a program as administrator can affect its software updates in that updates requiring changes to system-level components or installation in protected directories may only proceed with administrative permissions. However, not all updates require such privileges, and regularly running a program as administrator when it’s not necessary can pose security risks.
Can I undo the ‘Run as administrator’ setting?
Undoing the ‘Run as administrator’ setting is straightforward. Right-click on the application’s shortcut or executable file, select “Properties,” navigate to the “Compatibility” tab (or “Advanced” settings for shortcuts), and uncheck the “Run this program as an administrator” option. Remember to apply and save your changes.
Do all programs support running as an administrator?
While most programs can be set to run as administrator, certain applications, especially those deeply integrated with the Windows system or designed for a specific security context, may not behave as expected or may outright ignore or disable such settings due to security policies or design decisions.
How can I tell if a program is running as administrator?
A program running as an administrator can often be identified by a shield icon on its application or shortcut icon, signaling elevated privileges. Additionally, checking the details tab in Task Manager for the running application can show whether it’s operating under administrative privileges, typically indicated by the “Elevated” status.
What if ‘Run as administrator’ does not solve my program’s issues?
If running a program as administrator doesn’t resolve your issues, there might be other underlying problems, such as compatibility issues, incorrect settings, or corrupted program files. Consider exploring compatibility mode settings, consulting the program’s support documentation, or reinstalling the application.
Will running programs as administrator use more system resources?
Running programs with administrative privileges doesn’t inherently increase their resource consumption like CPU or memory. However, the actions permitted with elevated rights may involve operations that are resource-intensive, such as accessing or modifying system files, which under normal circumstances are restricted.
Can I configure specific tasks within a program to run as administrator?
Configuring specific tasks within a program to run with elevated privileges typically requires the tasks themselves to be set up with administrative rights, either through scripts, task scheduler configurations, or within the program’s own settings. Direct control over these tasks is highly specific to the program’s design and capabilities.
Can I permanently disable the UAC prompt for all programs?
While it’s possible to adjust UAC settings to never notify, completely turning off UAC is highly discouraged due to the significant security risks it poses. Disabling UAC removes a critical layer of protection, making the system more vulnerable to malware and unauthorized changes.
How do I set a program to always run as administrator directly from the Task Manager?
Setting a program to always run as administrator cannot be directly accomplished through the Task Manager. Instead, changes must be made through the program’s properties by adjusting the compatibility settings or creating a task in the Task Scheduler with administrative privileges to run the program.
Related: How to Change a Normal User to Administrator in Windows
Windows has two general account types, the “Standard” user, who gains access to a selected number of features and functions, and the “Administrator”, who can perform more advanced tasks such as app installation, global settings changes, and command execution. In our other guide, we show you how to make an existing user administrator in Windows 11 or Windows 10 via Settings, netplwiz, Command Prompt, and more.
Related: How to Create a Windows 11 Shutdown Shortcut (or Sleep, Hibernate, Lock)
It typically takes just a few clicks to activate sleep mode in Windows 11, but why wait? In our other tutorial we show you how to create a Windows 11 shutdown shortcut that can do it in a double-click instead, which you can use from the desktop or pinned to the taskbar.
Related: How to Create a Desktop Shortcut to Apps, Websites, or Commands
Though these days many prefer to use Start pins rather than create a shortcut on the desktop, they have their place. Knowing how to create a desktop shortcut can open additional avenues for efficiency, allowing you to pin a website or run a command with a double-click. In our other guide, we show you how to create a desktop shortcut in Windows 11 or Windows 10 using fast, simple, and effective methods.
Last Updated on November 7, 2024 9:22 pm CET
how to make a program run as administrator always windows 10
Running a program as an administrator in Windows 10 can be crucial for accessing advanced features or bypassing certain system restrictions. To make a program run as an administrator all the time, right-click on the program’s shortcut, go to Properties, navigate to the Compatibility tab, and check the box next to «Run this program as an administrator.» Apply the changes, and you’re done. This article will walk you through these steps in detail and provide some additional tips and answers to common questions.
Step-by-Step Guide: How to Make a Program Run as Administrator Always in Windows 10
In this section, we’ll cover the straightforward steps to ensure your program runs with administrative privileges every time you launch it.
Step 1: Locate the Program Shortcut
Right-click on the program’s shortcut.
This step is crucial because you need to access the shortcut’s properties to change its settings. If you don’t have a shortcut, create one by right-clicking on the program’s executable file and selecting «Create shortcut.» Move the shortcut to a convenient location like your desktop.
Step 2: Open Properties
Select «Properties» from the context menu.
Once you right-click the shortcut, a context menu will appear. Scroll down and click on «Properties.» This will open a new window where you can modify various settings for the shortcut.
Step 3: Navigate to the Compatibility Tab
Click on the Compatibility tab in the Properties window.
In the Properties window, you’ll see several tabs at the top. Click on the one labeled «Compatibility.» This tab contains various options related to how the program runs on your system.
Step 4: Enable Administrator Privileges
Check the box that says «Run this program as an administrator.»
Within the Compatibility tab, look for a section labeled «Settings.» Here, you’ll find a checkbox that says «Run this program as an administrator.» Check this box to enable administrative privileges for the program.
Step 5: Apply the Changes
Click «Apply» and then «OK» to save your changes.
Finally, you need to save the changes you’ve made. Click the «Apply» button at the bottom of the window, and then click «OK.» Your program will now always run as an administrator whenever you launch it via this shortcut.
Once you’ve completed these steps, your program will always open with administrative privileges. This ensures that you won’t need to manually enable these privileges each time you run the program.
-
User Account Control (UAC) Prompts: You may receive a UAC prompt each time the program runs. Consider adjusting your UAC settings if this becomes bothersome.
-
Create a Shortcut in Startup Folder: If you want the program to run as an administrator at startup, place the shortcut in the Startup folder.
-
Use Task Scheduler: For more advanced control, use Task Scheduler to create a task that runs the program with administrative privileges.
-
Compatibility Mode: Ensure that «Run this program in compatibility mode» is unchecked unless necessary. It can sometimes interfere with administrative settings.
-
Check Permissions: If you encounter issues, verify that your user account has the necessary permissions to run programs as an administrator.
Frequently Asked Questions
Do I need to be an admin to change these settings?
Yes, you need administrative privileges to modify these settings.
Will this affect the performance of my program?
Running as an administrator usually does not affect performance but can provide necessary permissions for certain tasks.
Can I revert these changes?
Yes, simply uncheck the «Run this program as an administrator» box in the Compatibility tab and apply the changes.
Is it safe to always run programs as an administrator?
Generally, it’s safe for trusted programs but avoid doing this for unknown or less-trusted applications.
What if the option is grayed out?
If the option is grayed out, it might be due to group policies set by your system administrator.
Summary
- Locate Program Shortcut: Right-click on the program’s shortcut.
- Open Properties: Select «Properties.»
- Navigate to Compatibility Tab: Click the Compatibility tab.
- Enable Administrator Privileges: Check «Run this program as an administrator.»
- Apply Changes: Click «Apply» and then «OK.»
Conclusion
Now you know how to make a program run as an administrator always in Windows 10. By following these simple steps, you can ensure that your program has the necessary permissions every time it runs, saving you the hassle of manually enabling administrative privileges each time. This method is straightforward and effective, making it easy even for those who aren’t tech-savvy.
If you’re regularly using programs that need admin rights, taking these steps can be a real time-saver. Plus, it helps in accessing features that might otherwise be restricted. Remember, always be cautious about which programs you grant administrative privileges to, as this can have security implications. For more advanced control, consider looking into using Task Scheduler or modifying UAC settings. Happy computing!
Matt Jacobs has been working as an IT consultant for small businesses since receiving his Master’s degree in 2003. While he still does some consulting work, his primary focus now is on creating technology support content for SupportYourTech.com.
His work can be found on many websites and focuses on topics such as Microsoft Office, Apple devices, Android devices, Photoshop, and more.