
Hot corners is the popular feature in macOS that allows you to trigger an action when you hover the mouse over one of the four screen corners. This is super useful to trigger a quick note, show desktop or lock the screen. Though Windows 11 does not have hot corners, you can use third-party apps to bring that feature to your PC.
Show Desktop with Taskbar Lower Right Corner
By default, Windows come with a feature to show desktop when clicking the extreme right corner on taskbar.
So, you should disable this feature before installing any third-party apps for using the hot corners. Otherwise, the function will overlap and may not work properly when hovering mouse over bottom right corner.
- Right-click on your taskbar and select “Taskbar settings” option.
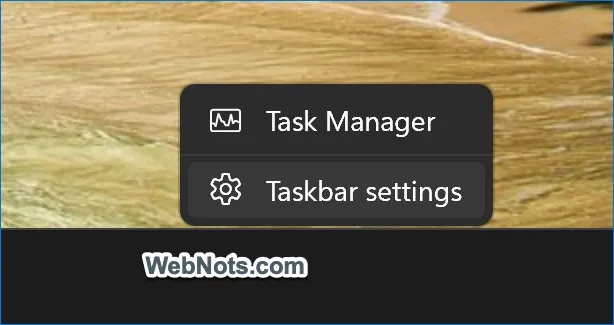
- This will open Settings app and take you to “Personalization > Taskbar” section.

- Expand “Taskbar behaviors” section and scroll down to the bottom. Uncheck “Select the far corner of the taskbar to show the desktop” option to disable the feature.

If you do not want to disable this option, then make sure not to assign any other action to bottom right corner with third-party apps.
Step 1 – Install WinXCorners App
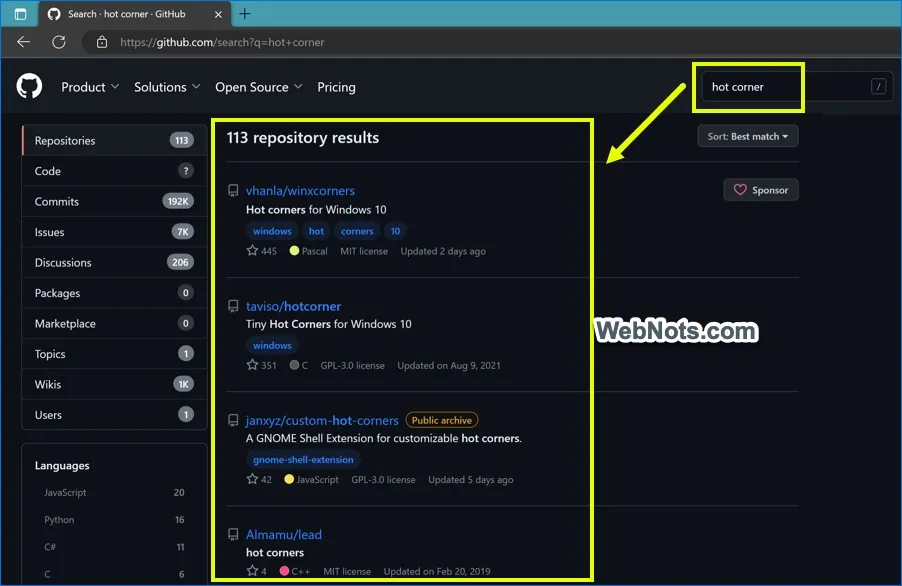
GitHub has lot of free and open-source apps to bring macOS like hot corners to your Windows 10 and 11 computers. Go to GitHub and search for “hot corners” to find the list of available apps. In this article, I will use WinXCorners app for enabling hot corners in Windows 11. Though the app says for Windows 10, it also works on Windows 11 PCs.
Go to WinXCorners app releases page in GitHub, scroll down to the bottom and expand “Assets” section. Click the WinXCorners zip file (currently it is WinXCorners_1.2b.7z) and download the archive file.

Note that, if you are using Microsoft Edge, the browser will block the download by warning you the file is not commonly downloaded. Hover on that warning and click the three dots “More actions” icon and select “Keep” to continue the download.

Now, open “Downloads” folder and extract the downloaded zip file to get WinXCorners executable file. It is better to extract the file to “C:\Program Files” location or move the extracted application file to your preferred location instead of keeping it in Downloads folder.

Step 2 – Assigning Screen Corners with WinXCorners App
Double click on WinXCorners application file to launch the app. The app does not have any icon or settings page, all what you need is to click the hidden icons arrow in taskbar and click on WinXCorners app icon.

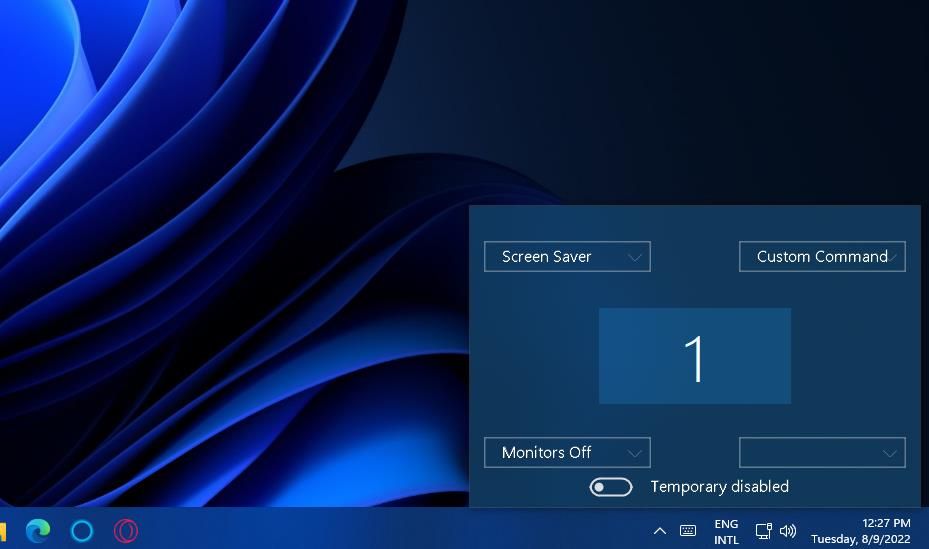
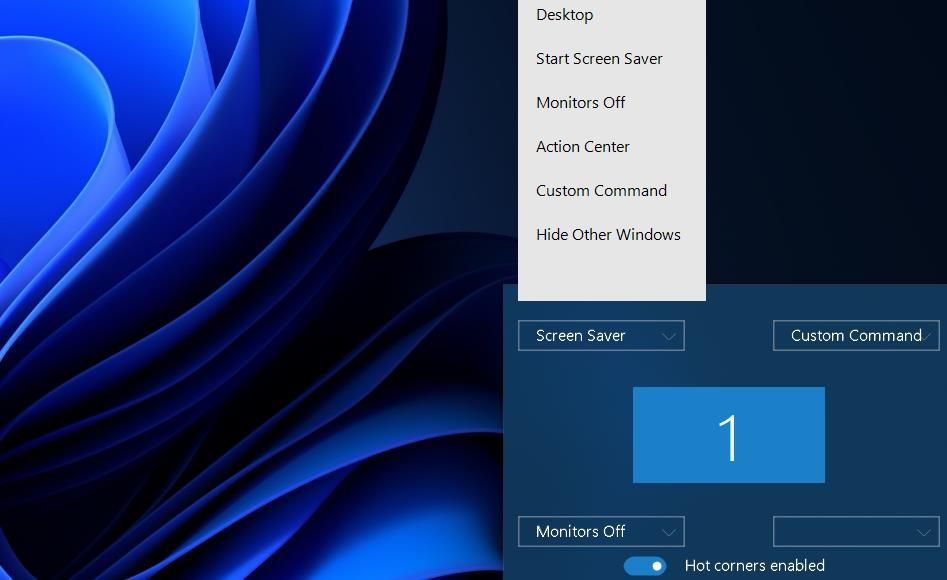
You will see a small pop-up appears showing four dropdown boxes for assigning actions to four screen corners.

Click each dropdown and select one of the desired actions for your screen corners. You have the following actions to select from:
- All Windows – this will show the task view
- Desktop
- Start Screen Saver
- Monitors Off
- Action Center
- Hide Other Windows
- Blank – no action

It should look like below after assigning four different actions for all four screen corners.

Anytime you can turn on or off the “Hot corner” switch to disable the feature completely without changing the actions setup.
Step 3 – Checking Hot Corners
Now, move your mouse over any corner of the screen and you will see the assigned action is automatically triggered. For example, moving the mouse over bottom right corner will open Action Center as per the assignment.
Final Words
Using Mac like hot corners in Windows 11 and 10 computers help to make use of your screen corners to trigger the assigned functions. Windows has a default function to show desktop by clicking right corner of the taskbar. However, you can use apps like WinXCorners to assign different actions to all four corners of your monitor screen. The only limitation of the app is that it will not work on multiple displays. When you use multiple monitors, the app will only work on primary screen and not on the secondary screen.
Apple’s macOS operating system contains some good features that Windows lacks, such as the «hot corners» tool. This feature lets you trigger certain actions by moving the cursor to the corners of your screen.
It’s a pity Windows doesn’t have such a native feature, but we can at least add hot corners to it manually. Both WinXCorners and Hot Corners are third-party software packages that replicate the hot corners from macOS onto your Windows system.
How to Add Hot Corners to Windows With WinXCorners
WinXCorners is a free app compatible with Windows 10 and 11. The software includes six default actions you can apply to the corners of the screen, and the 1.2b version of this software lets you set up custom commands.
WinXCorners 1.2b downloads as a 7z archive. So, you’ll need an extraction utility, such as 7-Zip, to open up the program’s archive. If you have no programs that can extract 7z folders, open the 7-Zip website and grab the app before you continue.
Once done, you can add hot corners to Windows 11 by downloading WinXCorners and extracting it with 7-Zip like this:
- Open the WinXCorners website and click the WinXCorners 1.2b download link on that webpage.
- Open the 7-Zip extraction utility.
-
Select the WinXCorners_1.2b archive in 7-Zip.

-
Click Extract to bring up the window shown directly below.

- Press the ellipses button.
- Choose a folder to include an extracted WinXCorners_1.2b directory in, and press OK to select it.
- Click OK in the Extract window.
- Open the extracted WinXCorners_1.2b folder.
- Double-click WinXCorners.exe to run the software.
- If the software is disabled, click the Temporarily disabled toggle switch in WinXCorners to enable the hot corners.


Once it’s running you can choose screen corner actions by clicking the drop-down menus to select options for them. You can assign most of the default actions available to the four corners. These are the default actions you can select from:
- Hide Windows: Minimizes windows behind the active one.
- Desktop: Brings up the desktop.
- Smart Screen Saver: Activates your selected screen saver.
- Action Center: Opens the Action Center in Windows.
- All Windows: Brings up Task View that displays all window thumbnails.
- Monitors off: Turns the display blank (you can reactivate it by clicking).
Once you’ve selected your actions, move your mouse’s pointer to the top, bottom, left, and right screen corners. Moving the cursor to each corner will trigger whatever action you assigned to it, so long as WinXCorners is running in the background.
To configure WinXCorners to automatically start on boot, right-click its system tray icon and select Start with Windows.
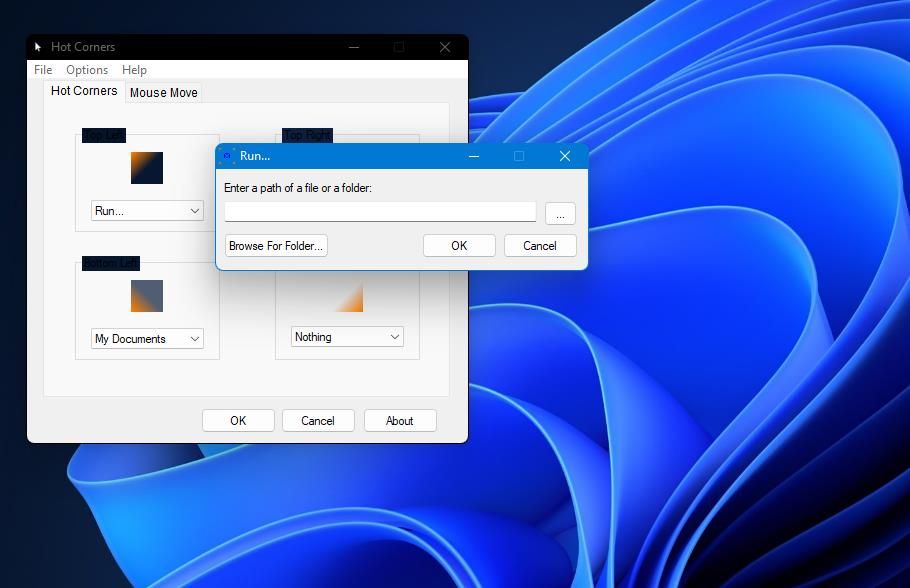
You can also set hot corners to open desktop software, which will let you open a program by moving the cursor to a corner. To do this, you’ll need to set WinXCorners to open a program via its Advanced Options window as follows:
- First, select the Custom Command option for a corner on one of WinXCorners’ drop-down menus.
- Right-click the WinXCorners system tray icon and select Advanced.
-
Select the Enable custom command box in the Advanced Options window.

- Paste in a path to a program’s EXE file in the Custom Command box, and click the OK button.
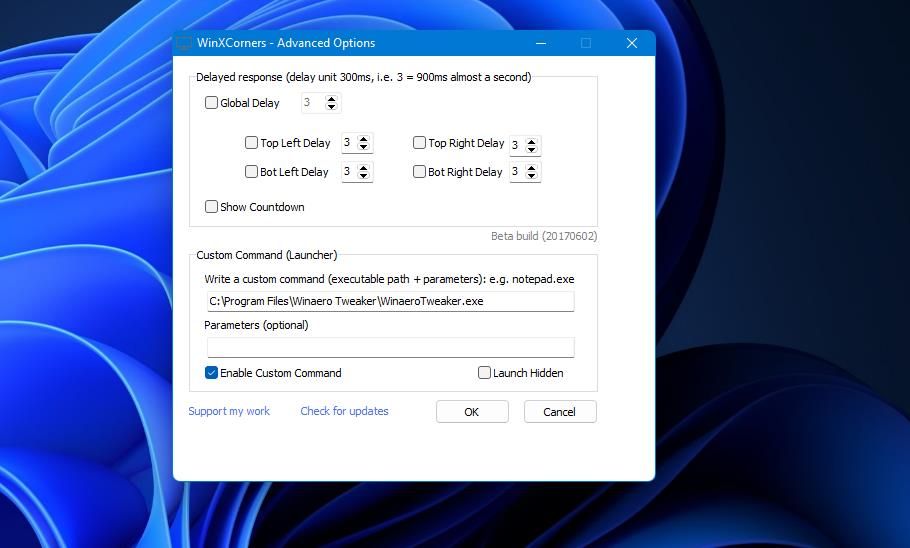
Now the program will open whenever you move the cursor over the chosen corner.
How to Add Hot Corners With the Hot Corners Software
Hot Corners is an alternative to WinXCorners that works much the same. However, this program has some different actions you can set for screen corners.
Hot Corners is a very lightweight app you can utilize on most Windows platforms. Here is how you can add hot corners to Windows 11 with the Hot Corners software:
- Click Download Now on Hot Corners’ Softpedia page.
- Select Download: Softpedia Mirror (US) for the server location.
- Open the file management app by pressing Win + E.
- Navigate to the directory that contains the installer for Hot Corners.
-
Right-click HC-2-2-0.exe and select Run as administrator.

- Click Next and Yes to accept the copyright agreement.
- Select the Run Hot Corners after installation is complete setting and press Next.
- Follow the instructions until the end.
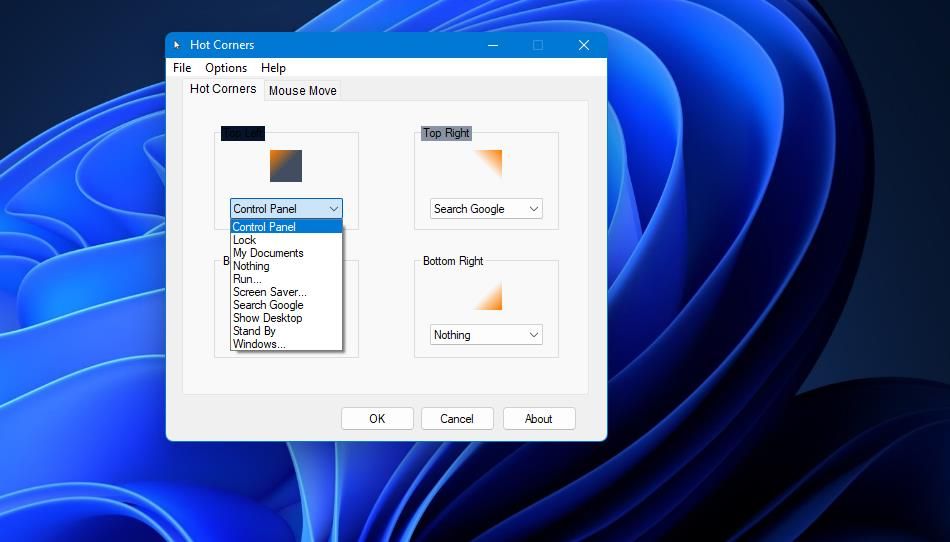
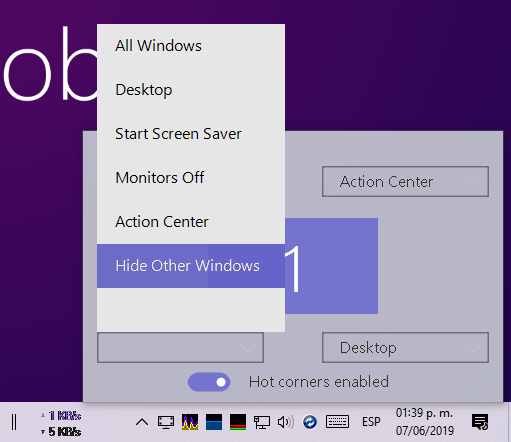
Hot Corners includes nine action options to select from. For example, you can set actions to open system locations like Control Panel and My Documents, or you can set a corner to lock your PC ot put it on standby.
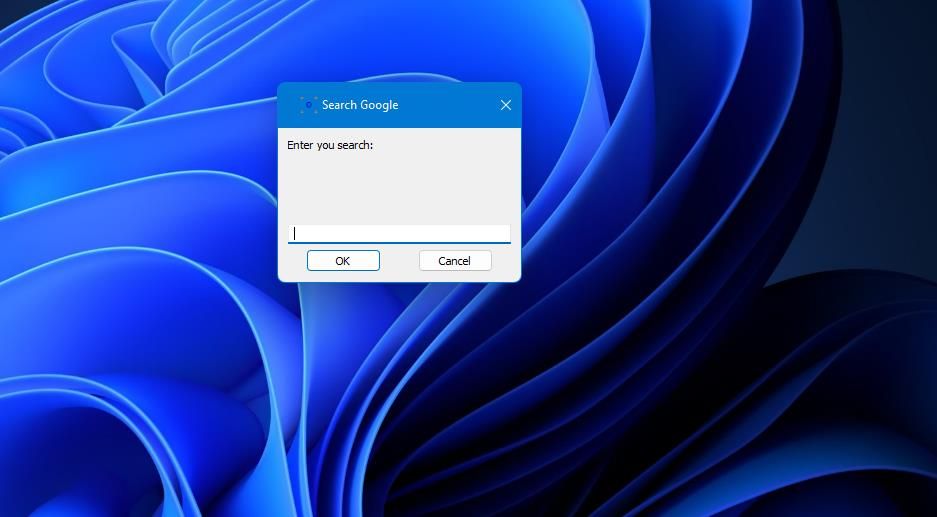
If you select Search Google, moving the cursor over a corner will bring up a small search box. Typing a keyword in that box will bring up Google search results for it in your default browser.
You can also set each corner to open different programs with Hot Corners. To set a program for one corner, click the drop-down menu for it and select Run. Click the ellipses button in the Run window, and select a program. Then select OK on all windows.
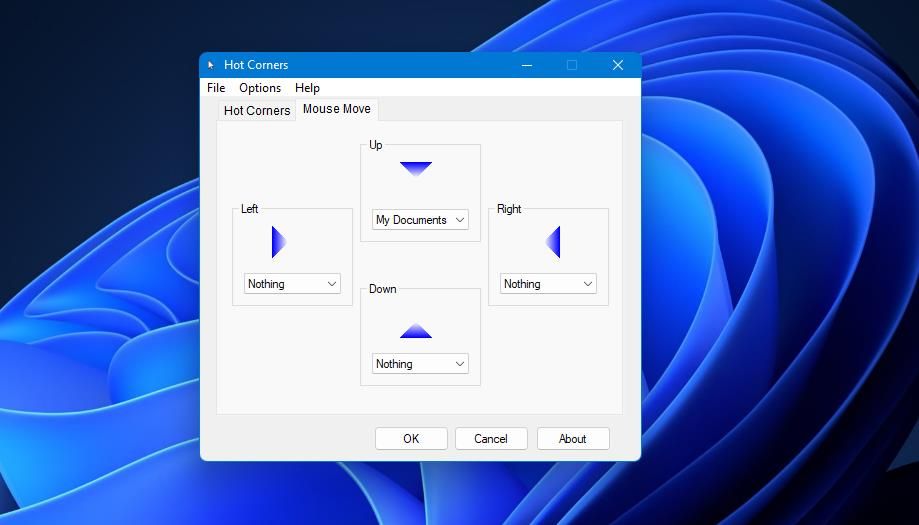
You’ll notice Hot Corners includes a Mouse Move tab. This feature is supposed to enable users to activate actions by moving the mouse up, down, left, and right. However, that feature has a Win + X activation hotkey, which conflicts with Windows 11’s Power User menu. Therefore, that feature only works in Windows platforms that don’t have Power User menus, such as Vista and 7.
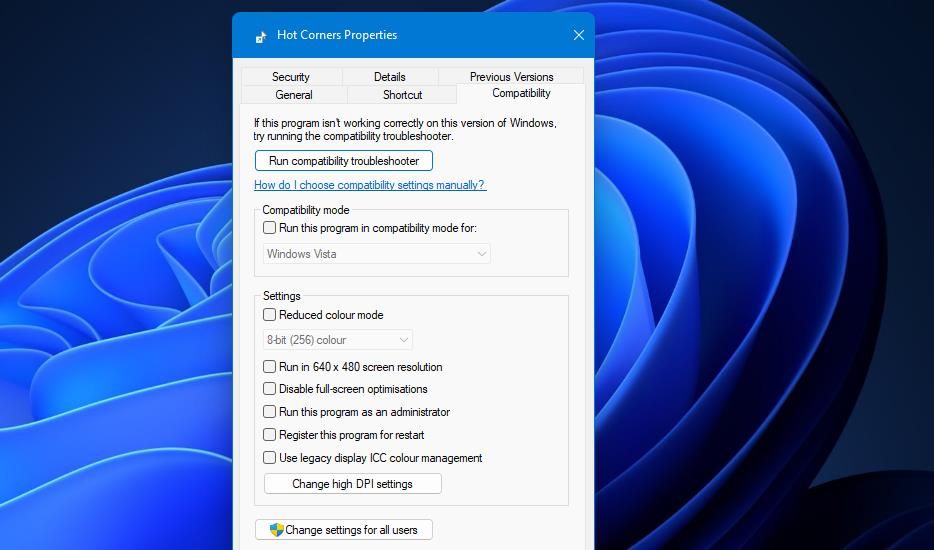
Also, note that Hot Corners doesn’t save settings when you don’t run it as an administrator. So, make sure you always run the software with elevated permissions. The best thing to do is to set the program to always run as an administrator via its Compatibility tab like this:
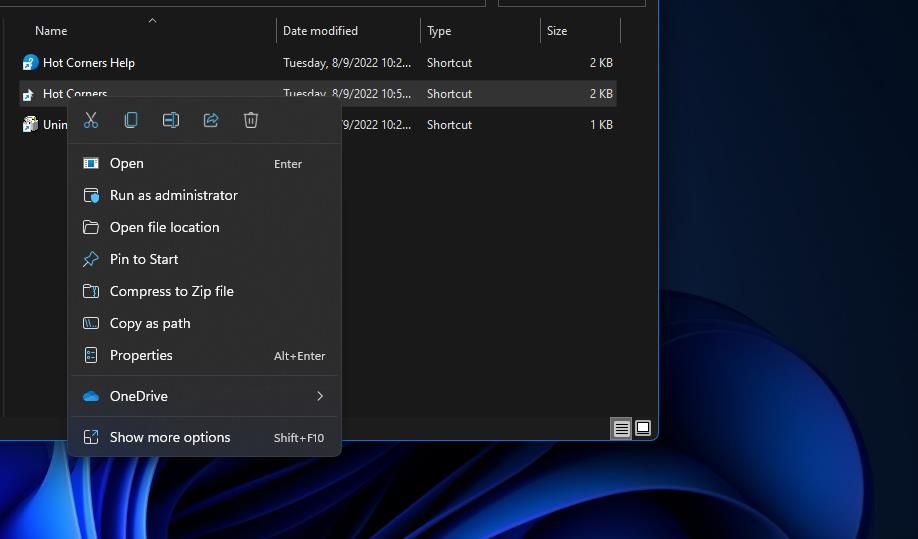
- Open the installation folder for Hot Corners.
- Right-click the Hot Corners.exe file and select Properties.
-
Click Compatibility on the Hot Corners Properties window.

- Select Run this program as administrator and click the Apply (save) button.
Now Hot Corners should always run with elevated permissions. To add the program to your startup items, click Options > Settings in Hot Corners. Select the Run on Start-up checkbox, and click OK on the Settings window.
Hot Corners Adds New Functionality to Windows 11
So, now you can utilize one of the best macOS features in Windows 11 with WinXCorners and Hot Corners. The hot corners feature those software packages enable gives you a new way to trigger common actions and open programs in Windows.
WinXcorners
WinXcorners
WinXcorners is a lightweight utility for Windows 10 and Windows 11 that enhances your desktop experience by allowing you to assign custom actions triggered when you hover your mouse cursor over the corners of your main monitor. Whether you’re a power user, developer, or just someone who appreciates efficiency, WinXcorners provides a seamless way to streamline your workflow.
Key Features ⬆️
-
Corner Actions: Choose from a variety of predefined actions for each corner:
- Show All Windows: Activate Windows’ Task View
Win+Tabto manage your open applications. - Show Desktop: Quickly minimize all windows and reveal the desktop.
- Start Screen Saver: Trigger your screen saver for privacy or energy-saving purposes.
- Turn Off Monitors: Conveniently turn off your display when not in use.
- Start Menu: Invoke the Start Menu on hovering a corner.
- Action Center: Invoke the Action Center without hassle.
- Hide Other Windows: Just like
Win+Home. - Custom: Invoke other executables with command line params
- 🆕 Custom: Execute custom hotkeys (sequence of key hold/release) *v1.3.1 ( How to ⬇️)
- Show All Windows: Activate Windows’ Task View
-
Customization: Tailor WinXcorners to your preferences:
- Assign different actions to different corners.
- Fine-tune hover sensitivity and delay settings.
- Enable or disable automatic startup with Windows.
-
System Tray Integration: WinXcorners runs discreetly in the system tray, ensuring it doesn’t clutter your desktop or Taskbar.
-
Unobstrusive: Its usage won’t interfere with your common tasks, unless you decide to do so.
- It won’t trigger actions while dragging content with your mouse.
- It won’t trigger while using a Full Screen application, like games or media, for instance.
- You can disable it temporarily right from the popup window with the switch toggle.
-
Visible Countdown Counter: Helps you, visually, to know if a corner action is about to be triggered (Advanced feature).
-
Windows 10/11 Theme aware: Partially supports Windows 10 and 11 dark and light theme, so it will look like part of your OS.
🌙themes🔆
| Dark Theme Windows 11 | Light Theme Windows 11 |
|---|---|

|

|
| Dark Theme Windows 10 | Light Theme Windows 10 May 2019 Update onwards |

|
|
Demo Video
🎞
This demonstration would change on following versions.
demo2.mp4
Installation (Portable) ⬆️
- Download the latest release from the GitHub repository.
- Just unzip into a secure folder.
- Run the single small executable, settings will be written/saved there.
- 💡 It will run minimized and hidden in the System Tray
Requirements
— OS: Windows 10 x86/x64  | Windows 11
— HDD: 1.4 MB
— RAM: 9 MB
Download and Installation (?)
| v1.3.2 (2024) | v1.3.0 (2024) | v1.2.1b (2019) |
|---|---|---|
How To Use ⬆️
- Launch WinXcorners popup window from the system tray icon.
- Configure your preferred actions for each corner.
- Hover your mouse cursor over a corner to trigger the assigned action.
Advanced Usage
- Right click the WinXcorners tray icon.
- Select Advanced to open the more advanced options.

|
|
| Advanced options v 1.3.0 | Advanced options v 1.2.1b old snapshot |
- There you can:
- Set a global delay, so the action will trigger after some few seconds.
- Set specific delay for each corner.
- Enable or Disable the triggering of actions while on Full Screen applications, it can also be done via the right click on the system tray icon for WinXcorners.
- Add up to 4 custom actions: Just write the commands and its respective arguments to launch, set hidden launch or visible.
Custom Hotkeys ⬆️
*v1.3.1
The hotkeys will be as follows:
_control or control or control_ where _ means hold or release (prefixed, appended) and without it, a full key press. This will be useful if you have a sequence of hotkeys to do, like _control+k+control_+_control+_b for VSCode for instance, that will do a ctrl+k then ctrl+b to toggle the sidebar.
There is more, it will check for windows on foreground/currently focused, or globally, whether by only its classname or with titlebar text too. The conditional pseudo script will be as follows:
! = follows sequence of hotkeys as mentioned above
# = follows [classname,title] there title is optional to match with current focused window
@ = follows [classname,title] there title is optional to match with any opened window
Rule:
#[classname,title]:(sequence of hotkeys)?(optional sequence of hotkeys in case condition is not met)
For instance the following will check if current window is VSCode’s and will invoke ctrl+k ctrl+b sequence of hotkeys, other wise if not on VSCode, just invoke the Start Menu.
#[Chrome_WidgetWin_1]:(_control+k+control_+_control+_b)?(win)
E.g. #[conditional match]:(hotkey if match)?(hotkey if not)
Another example for Windows 10:
This will check if Alt+Tab’s window is visible, if so, it will hide it, otherwise it will invoke it, as a faster alternative to Task View.
#[MultitaskingViewFrame]:(escape)?(_control+_alt+tab)

Notes
- WinXcorners works seamlessly on your primary monitor but secondary monitors haven’t been tested throughfully, consider it partially supported.
- If you encounter issues with elevated privileges software, try restarting WinXcorners as an administrator specially if you use those kind of elevated privileged software most of the time, otherwise triggering won’t work due to the nature of separate privileges.
- If you encounter other unknown issues, please fill a bug report at the GitHub issues page.
Limitations:
Sometimes the application won't detect the screen edges if you are using (focused) an elevated privileged application. But you can always restart the application as administrator.
Development ⬆️
Build with Delphi 2006 onwards, third party units are in thirdparty and all rights belong to each of them, they’re open source too.
Contribution ⬆️
You’re welcome to PR your improvements.
MIT License
Copyright (c) 2015 Victor Alberto Gil (vhanla)
Permission is hereby granted, free of charge, to any person obtaining a copy
of this software and associated documentation files (the «Software»), to deal
in the Software without restriction, including without limitation the rights
to use, copy, modify, merge, publish, distribute, sublicense, and/or sell
copies of the Software, and to permit persons to whom the Software is
furnished to do so, subject to the following conditions:
The above copyright notice and this permission notice shall be included in all
copies or substantial portions of the Software.
THE SOFTWARE IS PROVIDED «AS IS», WITHOUT WARRANTY OF ANY KIND, EXPRESS OR
IMPLIED, INCLUDING BUT NOT LIMITED TO THE WARRANTIES OF MERCHANTABILITY,
FITNESS FOR A PARTICULAR PURPOSE AND NONINFRINGEMENT. IN NO EVENT SHALL THE
AUTHORS OR COPYRIGHT HOLDERS BE LIABLE FOR ANY CLAIM, DAMAGES OR OTHER
LIABILITY, WHETHER IN AN ACTION OF CONTRACT, TORT OR OTHERWISE, ARISING FROM,
OUT OF OR IN CONNECTION WITH THE SOFTWARE OR THE USE OR OTHER DEALINGS IN THE
SOFTWARE.

Горячие углы (активные углы) — это функция, известная пользователям macOS, которая позволяет запускать определенные действия при наведении мыши на углы экрана. Теперь эта удобная возможность доступна и для Windows 10 и 11 с помощью приложения HotCornersWin.
HotCornersWin интегрирует функцию горячих углов в Windows, позволяя:
- Запускать меню «Пуск».
- Создавать виртуальные рабочие столы.
- Открывать проводник или приложения (например, Snip & Sketch или Action Center).
- Настраивать собственные действия: Например, при наведении на угол экрана можно настроить запуск калькулятора или любого другого приложения.

В приложение есть возможности конфигурации:
- Настройка поведения: Как HotCornersWin будет работать при открытии других приложений.
- Поддержка нескольких мониторов: Удобно для пользователей с несколькими экранами.
- Регулировка задержки действий и циклов опроса.
Почему стоит попробовать HotCornersWin?
- Добавьте современную функцию даже на старые устройства.
- Горячие (активные) углы ускоряют доступ к часто используемым функциям.
- Несмотря на небольшие визуальные несовершенства на Windows 11, разработчики обещают исправления в новых версиях.
По итогу, HotCornersWin — это простой и эффективный способ сделать работу на компьютере более удобной. Независимо от ваших задач, настройка горячих (активных) углов поможет сэкономить время и улучшить производительность.
Скачать бесплатно:
- Версия: 0.9.0;
- Язык: Eng;
- Платформа: Windows 11, 10 (x64);
- Лицензия: Freeware;
- Разработчик: Alexander Korostelin.
85
Перед выходом Windows 11 все внимание общественности было приковано к меню «Пуск» и скругленным углам окон, а остальные функции преподносились маркетологами как «потрясающие» и «дающие невиданное ранее удобство пользования». Редкие критические обзоры новой ОС тонут в потоке восторженных отзывов, но молчать о том, что сотворили с интерфейсом Windows разработчики, нельзя, ведь рано или поздно нам не оставят выбора, как в случае с переходом с Windows 7 на Windows 10, и Windows 11 станет ОС, которая будет необходима для «актуального» железа.
Есть и второй вариант развития событий, в котором Windows 11 повторит судьбу Windows 8, которая вызвала массовое отторжение у пользователей. Но если изменения, которые пришлись не по вкусу пользователям в Windows 8, касались в основном меню «Пуск», заточенному под планшеты и сенсорные экраны, то сомнительных изменений в Windows 11 намного больше.

И если Windows 8, несмотря на всю критику, давала пользователям множество полезных новшеств, большинство из которых стали популярны позднее, с приходом Windows 10, то Windows 11, «из-под капота» которой торчит старая добрая Windows 10, пока не дает практически ничего.

Пристальный взгляд на новую ОС дает понять, что интерфейс Windows 11 это не что иное, как наработки для Windows 10X, ОС, разрабатываемой для двух сенсорных экранов и совсем недавно замороженной. Взгляните на скриншоты интерфейса Windows 10X, доступные из утечек.


Вылитая Windows 11, не правда ли? Похоже, в очередной раз пользователям десктопов, в подавляющем большинстве пользующихся мышью и клавиатурой, предложили упрощенный до примитивизма интерфейс для сенсорных экранов. К счастью, в Windows 11 очень легко вернуть привычный интерфейс из Windows 10, что еще раз показывает, что ничего нового в «новой» ОС нет.
Контекстное меню
Начать стоит с контекстного меню, вызываемого правой кнопкой мыши. Вот так оно выглядит в Windows 11 при щелчке по папке.

Вернуть привычное контекстное меню можно правкой реестра, но я нашел более простой путь. Утилита Windows 11 Classic Context Menu v1.0 от известного разработчика Sordum вернет его за пару кликов.

После нажатия кнопки «Enable Win11 Classic Context Menu Style» классическое меню, к которому мы привыкли за десятилетия, возвращается в Windows 11.
Регулятор громкости

Следующее, что возмутило пользователей в Windows 11 еще больше, чем контекстное меню, это регулятор громкости. Мало того, что в него запихали дополнительные функции, которые там абсолютно не нужны большинству пользователей, так разработчики еще и додумались отключить в нем регулировку колесиком мыши!
Вы только представьте, много лет мы нажимаем на значок громкости и крутим колесиком мыши, но теперь маркетологи решили, что десктоп и интерфейс, заточенный под мышь, устарел и продвинутые пользователи будут регулировать громкость нажатием пальца по сенсорному экрану.

А всем остальным устаревшим ретроградам придется целить курсором в этот маленький кружочек и тащить его по экрану. Сказать что я был в недоумении, когда увидел это — ничего не сказать. Это напоминает знаменитую ОС Bolgenos от Дениса Попова, но выполненную в масштабах огромной корпорации. И это ужасно, ведь это означает, что мы живем в мире, где маркетологи победили дизайнеров, программистов и специалистов по эргономике, и в тысячах хвалебных блогов они убедят пользователей, что это удобнее, чем привычная им мышь с колесиком.

Вернуть привычный и удобный регулятор громкости, в котором изменение уровня производится колесиком мыши, можно с помощью бесплатной утилиты EarTrumpet из Microsoft Store. Утилита сразу открывает доступ и к регулировке уровня громкости разных приложений.


Осталось только скрыть системный значок громкости в настройках и удобство пользования будет полностью восстановлено.
Проблемы с анимацией окон
«Восхитительные» окна Windows 11 имеют серьезную проблему с недостатком кадровой частоты анимаций, о которой писали многие пользователи, в результате чего смотреть на их свертывание и развертывание становится почти физически больно. На скриншоте из видео это особенно заметно.

Еще одна проблема — баги анимации окон, один из которых я тоже записал на видео. Например, в некоторых инсталляторах я вижу вот такое:

Жмем любую кнопку в инсталляторе и получаем интересный эффект в динамике:

Лечение этих проблем простое — отключить анимацию окон.

Меню «Пуск»
Меню «Пуск» в Windows 11 заточено под сенсорные экраны, как и все остальное. Огромное по размеру, оно требует пролистывания панели со значками, уместное только тогда, если вы делаете это пальцем. Его расположение по центру экрана вопрос спорный с точки дизайна, но однозначно неприемлемый с точки зрения эргономики и удобства пользователя Windows, привыкшего к меню «Пуск» за 26(!) лет, со времен Windows 95.
Его расположение в углу экрана позволяет мгновенно открыть его, не прицеливаясь мышью, и хорошо хотя бы то, что нам разрешили вернуть меню «Пуск» в привычное место стандартными настройками Windows 11.

А вот вернуть удобное расположение значков и меню позволит утилита с открытым исходным кодом Open-Shell-Menu, скачать которую можно с GitHub. После ее установки нужно выбрать тип меню и поставить галочку «замена стартовой кнопки».

После этого мы получаем привычное, компактное и удобное меню «Пуск».

Лента проводника
Под нож креативных разработчиков пошла и лента проводника Windows, слишком сложная для сенсорных экранов, а значит — больше ненужная никому. Выглядит в Windows 11 она также «восхитительно» минималистично, как и все остальное.

Как и почти все остальные элементы интерфейса доставшегося Windows 11 от Windows 10, стандартная лента проводника просто скрыта от глаз пользователя и вернуть ее можно правкой реестра. Жмем сочетание клавиш Win+R, вводим regedit, чтобы открыть редактор реестра. Находим ветку HKEY_LOCAL_MACHINE\SOFTWARE\Microsoft\Windows\CurrentVersion\Shell Extensions.

В Shell Extensions жмем «Создать», потом «Раздел». И создаем новый раздел с именем Blocked. В разделе Blocked создаем строковый параметр с именем {e2bf9676-5f8f-435c-97eb-11607a5bedf7}. После этого лента проводника становится такой, какой она была в Windows 10, с элементами, которые нужны пользователям десктопов, особенно тем, кто работает с файлами, а не только жмет пальцем на экраны планшетов, чтобы запустить сериал или открыть Ютуб.

Панель задач
И, наконец, главное. Одна из самых важных частей интерфейса Windows, вырезанная в Windows 11, это панель задач. На панели задач Windows 11 не работает правый клик мышью, возможности перетащить файл или программу на панель задач тоже больше нет. Также стараниями Microsoft пользователи больше не смогут разгруппировать элементы и приложения на панели задач.
Заставить панель задач работать как прежде, стало возможным с помощью утилиты с открытым исходным кодом Explorer Patcher. Скачать ее можно из репозитория разработчика в GitHub. Она представляет собой файл dxgi.dll, который нужно скопировать в C:\Windows и перезапустить проводник. После этого панель задач начинает работать как раньше.

Отображаемые системные значки на панели задач надо включить, для чего жмем Win + R, вставляем в окно следующий путь %windir%\explorer.exe shell:::{05d7b0f4-2121-4eff-bf6b-ed3f69b894d9}\SystemIcons и запускаем. В открывшемся окне выбираем нужные значки.

Теперь панель задач можно переместить и на боковую часть экрана, как она обычно расположена у меня. Вот получившийся результат — Windows 11 стала почти такой же удобной, как и Windows 10.

Итоги

Как видите, вернуть Windows 11 удобство пользования Windows 10 довольно просто. Но общее впечатление о новой ОС удручающее. Разочаровывает не только примитивный интерфейс, заточенный под сенсорные экраны, но и технические проблемы, немыслимые для продукта такого уровня. И только от нас, пользователей, голосующих своим выбором, теперь зависит, будут ли и дальше корпорации кормить нас сырыми и неудобными продуктами, или будут делать их качественно.
Пишите в комментарии, пробовали ли вы Windows 11 и что думаете о новой ОС?
Telegram-канал @overclockers_news — теперь в новом формате. Подписывайся, чтобы быть в курсе всех новостей!