
Updated: 2022-11-18
NOTE: I DON’T GUARANTEE THE KEYS WORK, DON’T CONTACT ME IF ONE IS NOT WORKING, JUST TRY ANOTHER ONE OR QUIT THE PAGE
VMware Workstation 4.x.x
ZHDH1-UR90N-W844G-4PTN6
G1NP0-T88AL-M016F-4P8N2
ZC14J-4U16A-0A04G-4MEZP
J1WF8-58LDE-881DG-4M8Q3
VMware Workstation 5.x.x
LUXRM-WP0DN-A256U-4M9Q3
DJXDR-NDT27-Y2NDU-4YTZK
DA925-HP80U-Z8HDC-4WXXP
3KW2W-AYR2C-88M6F-4MDQ2
VMware Workstation 6.x.x
A0E8R-YUDFV-6AK2F-4GAN2
CRX0D-VWL0V-7CJ6C-46C7A
NA8RX-QPNDU-D2LA9-4WAZL
1H4WM-N21FZ-7GK2A-44U5U
6AJ6N-THY2P-42KEF-4WTFG
FK8R9-LPCDT-88H4Y-4WRN3
KAR8R-T8MAL-K8J6A-4WDXQ
YJEKW-JMFF4-YA1DC-4WTQP
WC5FW-V0CFX-4804A-4WTNL
LR5HT-16602-T814A-4MEN2
THWW8-HRZAH-A24FA-4YTN3
VMware Workstation 7.x.x
FU3D8-28X0N-H8DJQ-4GZZX-MY2T8
ZY7M2-8ZX81-0813Y-AWPG9-PP0G6
CC3W8-DTX9M-4853Y-HPQGX-NU8X6
YU15U-6TWDQ-H88RZ-GGNXC-QFATA
AF1T0-FMZEL-H88FQ-N5NXG-PZUX0
GC3MU-28W06-M80WQ-R4ZXV-YFK98
UA5J0-0HW13-48EMY-VXQNZ-NFUD2
VF7WU-2GF14-488CP-R4Z7Z-NL2YF
VMware Workstation 8.x.x
0A494-8U0EM-UZ2A9-0105M-A303M
MA406-25387-7ZNW8-F197P-1AL2D
4A4GP-6PLD0-QZTP9-WK0NK-C3UQD
4A2XP-D03DN-7Z6H9-Z2ANM-0C9PFD
0F0G8-FK29Q-AZ529-2J1NP-AC02F
VMware Workstation 9.x.x
5U63Y-6QL1K-GZ7K0-ZV17M-3CMQ0
JY4TJ-68L9H-8ZQE1-GA1Q2-03K22
MF471-0R007-RZHD9-TLCNK-3204G
JF09R-AU34Q-7Z6R8-JKAN0-9C7QJ
HY4KG-6KK47-CZCC1-Y8CQ4-13DK1
0U28Q-DP31H-QZL68-8J0QH-AAUK4
0F0PV-AWJ0L-GZLM0-H1874-CA839
0A6H6-4DL4N-KZQX9-Y09QH-9AF3G
0F23V-4D38L-9ZQ38-2K37H-83C50
0F03K-80JEQ-8ZF89-8287H-A2R47
0A22R-400EM-EZ4W8-3K9NK-3AUPL
NA64Z-0V054-UZVC0-2L370-837K4
VMware Workstation 10.x.x
5F211-0MJ82-LZE99-9LCN0-A3A3M
4F4HJ-FDL83-KZVL9-LC17P-22JJG
HV0RV-00K4K-GZ8N1-XUAN2-23Z4A
MY2A4-DMJ8N-HZUA8-2V2Q6-02EKD
NY65G-6238N-PZQ59-1L172-9AT4L
5Y2RY-FK21L-YZZY8-VV1Q4-1A24R
JY65Q-43L9J-TZGP8-80AQH-3AG3H
0Z6PT-F0K50-QZXW8-698Q0-3AR69
NF05Z-08346-TZDE0-213NK-C3Q59
1F0ML-FRH97-0ZZA8-1JA74-8AF6X
5F29M-48312-8ZDF9-A8A5K-2AM0Z
VMware Workstation 11.x.x
VV7XU-F6DDQ-485DZ-X4M7T-PF8ZD
ZG75H-FZF83-M8DLZ-4ZW5E-NP0W0
AV518-09FD0-48D1P-EMQEX-Z72C6
GG7W0-DAY5Q-0858Q-6GWZ9-W7RT8
CV512-FAW91-085NP-DMXQX-QLHAF
AA7DU-APW15-H848Q-P5ZGZ-PCRC2
VU1N2-6DE5N-M8DLQ-AEMEV-XA2Z4
UV3NR-AMZ17-08EZP-9YQQE-MZAY8
GC75U-21E50-M8D5Q-K6YQX-W28V8
1F04Z-6D111-7Z029-AV0Q4-3AEH8
CZ7E2-2FY5P-08DUP-6XNXG-WPKE8
VMware Workstation 12.x.x
AG31K-0GD5P-08ERP-TEQZV-WG09A
UA7T0-2HF5L-080FP-MMPZ9-PKAC6
VA3RR-4HF4Q-M89DY-G7PG9-PVUY2
ZG1TK-DQE8L-H882Q-PFW7G-ZC0EF
YA5N8-DAFD1-085FY-RFZE9-N62U6
GZ1D0-8WZ93-H881Y-WGZGV-ZZ0A2
CY5HR-A0E94-489UZ-TZZX9-NPH9A
FZ11A-F3YDK-084WZ-HYWZT-W30A8
5A02H-AU243-TZJ49-GTC7K-3C61N
VF5XA-FNDDJ-085GZ-4NXZ9-N20E6
UC5MR-8NE16-H81WY-R7QGV-QG2D8
ZG1WH-ATY96-H80QP-X7PEX-Y30V4
AA3E0-0VDE1-0893Z-KGZ59-QGAVF
VMware Workstation 14.x.x
AG352-4YED3-0852Q-LPXXT-MGKG4
FC1R0-2EX4M-H854Y-2NWGE-Q2KXA
ZU3EH-0YXD4-4819Q-CFWQZ-MZHX4
UF3H2-0ME0J-M8EAY-CMNNT-NZ0ZA
GU38K-DJW07-488MY-85YXT-P3HU4
YU1R2-8RZ16-4816Y-WYNET-WQUFD
VV140-2ZFD1-H88YY-N5X5C-PF8Z6
FF7N0-DEX81-H85HP-4ZXZX-YYRU4
CU14H-AEZDM-081MZ-RPXQT-WFKG6
AA1T2-2KE13-088JQ-JEY7C-WUHT0
VMware Workstation 15.x.x
FU512-2DG1H-M85QZ-U7Z5T-PY8ZD
CU3MA-2LG1N-48EGQ-9GNGZ-QG0UD
GV7N2-DQZ00-4897Y-27ZNX-NV0TD
YZ718-4REEQ-08DHQ-JNYQC-ZQRD0
GZ3N0-6CX0L-H80UP-FPM59-NKAD4
YY31H-6EYEJ-480VZ-VXXZC-QF2E0
ZG51K-25FE1-H81ZP-95XGT-WV2C0
VG30H-2AX11-H88FQ-CQXGZ-M6AY4
CU7J2-4KG8J-489TY-X6XGX-MAUX2
FY780-64E90-0845Z-1DWQ9-XPRC0
UF312-07W82-H89XZ-7FPGE-XUH80
AA3DH-0PYD1-0803P-X4Z7V-PGHR4
VMware Workstation 16.x.x
ZF3R0-FHED2-M80TY-8QYGC-NPKYF
YF390-0HF8P-M81RQ-2DXQE-M2UT6
ZF71R-DMX85-08DQY-8YMNC-PPHV8
AZ3E8-DCD8J-0842Z-N6NZE-XPKYF
FC11K-00DE0-0800Z-04Z5E-MC8T6
UY150-ANY57-H80JQ-VDN7E-Q6AGD
AU34A-FFZ57-M81QY-84QE9-WFUW2
VZ75K-2AX01-0806Z-A5W5X-ML8C2
ZC3N2-45Y5N-485XZ-CFPQ9-N70X6
GZ5JR-F8W81-H8D8Y-2ZMNZ-W22R8
YC7NU-28E4N-H89QY-RMNNE-XQAEA
UC1NR-FAE91-081RP-G6Q7T-YZKC4
CZ300-23YEK-H85GZ-UNW5X-WLKD0
GLYYC-VHZUZ-T1X2K-6FZXY-NZ54T
FQUQT-PPNKX-A1Z1M-GGQEU-YQQWZ
ZA9ME-ZAWYZ-T1PMU-JVACT-KKNXZ
RJEP8-V06A9-31WNF-9TYZE-337XX
ZLQPV-VHYPE-V1XWP-DGQXV-UZX9X
LPZN9-62YPG-R1KRT-9EL3E-APGZV
GTUQF-TWGQN-Y1PFM-6DWZM-YP5DV
VKUXV-XMF1K-V1PRQ-DWV9Z-VPZWZ
5LKXT-V4ETY-H1M39-FWQ3R-YF5RX
VMYQA-XFAY7-C1Y8P-D7KEX-VYEDV
WXQWF-C07WD-H1KN9-KFQ9V-YG7TZ
YF390-0HF8P-M81RQ-2DXQE-M2UT6
ZF71R-DMX85-08DQY-8YMNC-PPHV8
AZ3E8-DCD8J-0842Z-N6NZE-XPKYF
FC11K-00DE0-0800Z-04Z5E-MC8T6
ZF3R0-FHED2-M80TY-8QYGC-NPKYF
YF390-0HF8P-M81RQ-2DXQE-M2UT6
ZF71R-DMX85-08DQY-8YMNC-PPHV8
AZ3E8-DCD8J-0842Z-N6NZE-XPKYF
FC11K-00DE0-0800Z-04Z5E-MC8T6
YF390-0HF8P-M81RQ-2DXQE-M2UT6
ZF71R-DMX85-08DQY-8YMNC-PPHV8
ZF3R0-FHED2-M80TY-8QYGC-NPKYF
VMware Workstation 17.x.x
JU090-6039P-08409-8J0QH-2YR7F —> This key 100% worked for me
4A4RR-813DK-M81A9-4U35H-06KND
NZ4RR-FTK5H-H81C1-Q30QH-1V2LA
4Y09U-AJK97-089Z0-A3054-83KLA
4C21U-2KK9Q-M8130-4V2QH-CF810
MC60H-DWHD5-H80U9-6V85M-8280D
| Ⅰ | This article along with all titles and tags are the original content of AppNee. All rights reserved. To repost or reproduce, you must add an explicit footnote along with the URL to this article! |
| Ⅱ | Any manual or automated whole-website collecting/crawling behaviors are strictly prohibited. |
| Ⅲ | Any resources shared on AppNee are limited to personal study and research only, any form of commercial behaviors are strictly prohibited. Otherwise, you may receive a variety of copyright complaints and have to deal with them by yourself. |
| Ⅳ | Before using (especially downloading) any resources shared by AppNee, please first go to read our F.A.Q. page more or less. Otherwise, please bear all the consequences by yourself. |
| This work is licensed under a Creative Commons Attribution-NonCommercial-ShareAlike 4.0 International License. |
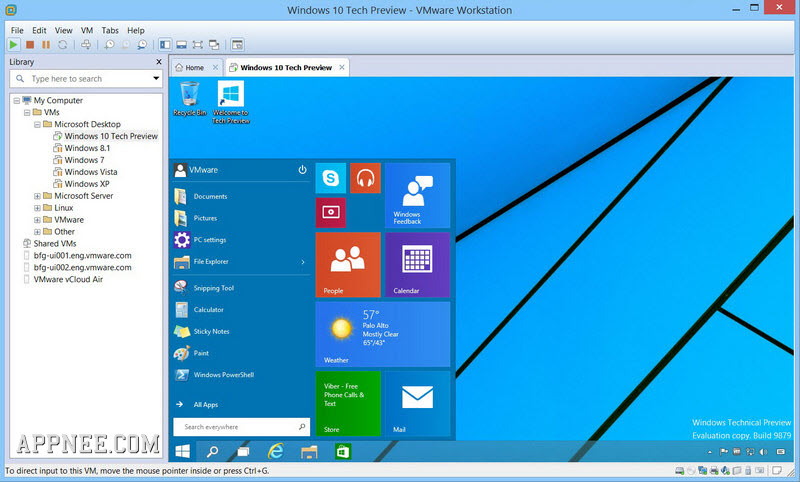
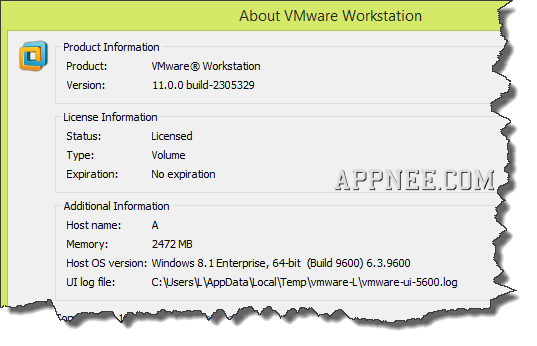
As the world’s most high-profile and most powerful virtualization solution (virtual machine), VMware Workstation 11 has been officially released. The new version brings many improvements and upgrades: adds support for Windows 10; improves the Unity for Windows 8.1; distributes the default RAM of virtual machine for up to 2GB; runs and starts faster, etc.
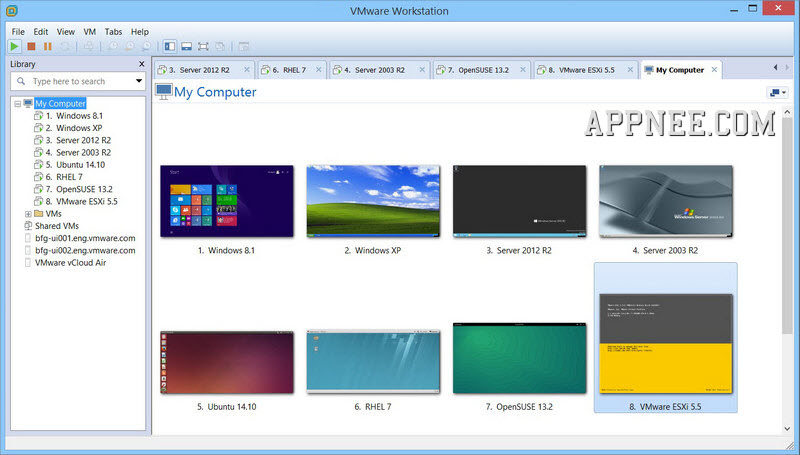
Facing its many important performance improvements, I believe many users want to try the VMware Workstation 11, and may be looking for some working license keys to register for completing the installation. Below AppNee provided 10 permanently valid license keys of VMware Workstation 11 for Windows and Linux, both 32-bit & 64-bit. With which you can use this great virtual machine software VMware Workstation 11 as long as you like.
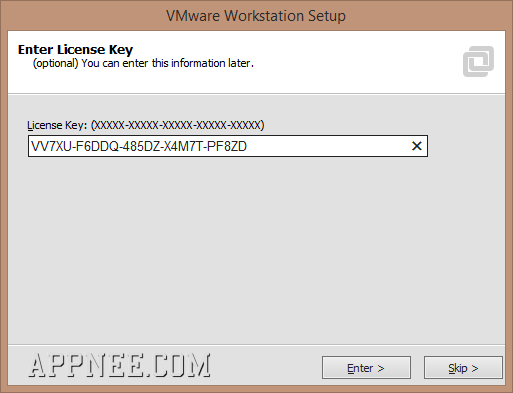
// Universal License Keys //
- VV7XU-F6DDQ-485DZ-X4M7T-PF8ZD
- ZG75H-FZF83-M8DLZ-4ZW5E-NP0W0
- AV518-09FD0-48D1P-EMQEX-Z72C6
- GG7W0-DAY5Q-0858Q-6GWZ9-W7RT8
- CV512-FAW91-085NP-DMXQX-QLHAF
- AA7DU-APW15-H848Q-P5ZGZ-PCRC2
- VU1N2-6DE5N-M8DLQ-AEMEV-XA2Z4
- UV3NR-AMZ17-08EZP-9YQQE-MZAY8
- GC75U-21E50-M8D5Q-K6YQX-W28V8
- 1F04Z-6D111-7Z029-AV0Q4-3AEH8
- CZ7E2-2FY5P-08DUP-6XNXG-WPKE8
// License Information //
- Status: Licensed
- Type: Volume
- Expiration: No expiration
// Installation Notes //
- download and install the trial version from official site
- use any license key above to register
- All done, enjoy!
// Related Links //
- Could not access network location %COMMON_DOCUMENTS%\Shared Virtual Machines
- 10+ VMware Workstation Pro 12.x Universal License Keys for Win & Lin
- VMware Workstation All-Version Universal Keygens AIO
// Download URLs //
(for Windows 32 & 64 bits | Homepage)
(for Linux 64-bit)
| If some download link is missing, and you do need it, just please send an email (along with post link and missing link) to remind us to reupload the missing file for you. And, give us some time to respond. | |
| If there is a password for an archive, it should be «appnee.com». | |
| Most of the reserved downloads (including the 32-bit version) can be requested to reupload via email. |
Recommend high-quality, practical, portable freeware, free game, free eBook, and more
В данной статье покажем как установить Windows 10 (да и в принципе любую версию Windows) на виртуальную машину VMware Workstation Pro. С помощью виртуальной машины у Вас будет возможность изолированно использовать систему, не опасаясь за основную, к примеру тестировать различные приложения.
1) Скачать VMware Workstation Pro можете с официального сайта. Бесплатный триальный период — 30 дней.
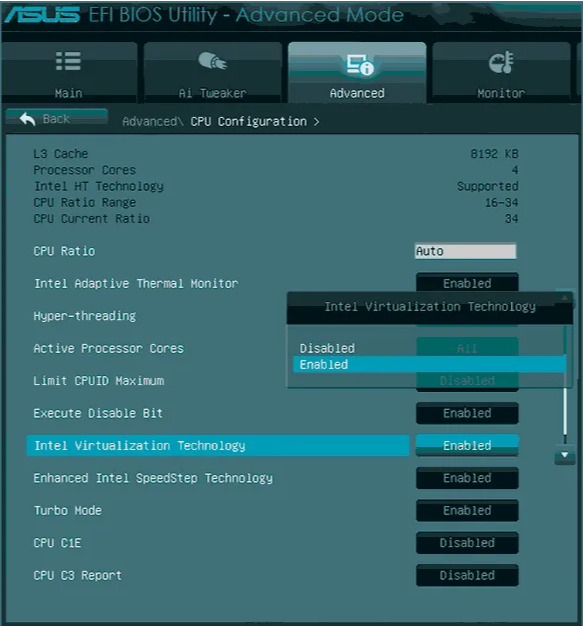
2) Далее, определитесь какую технологию виртуализации Вы будете использовать, аппаратную или программную. Аппаратная работает существенно быстрее по своему отклику, но ее нужно включить. Сделать это можете в Биосе, в зависимости от Вашего процессора Вам нужно будет включить «Intel Virtualization Technology», либо «AMD Virtualization Technology», в каком меню Биоса ее найти уточнайте в инструкции под Вашу материнскую плату. Примерные меню в Intel и AMD.

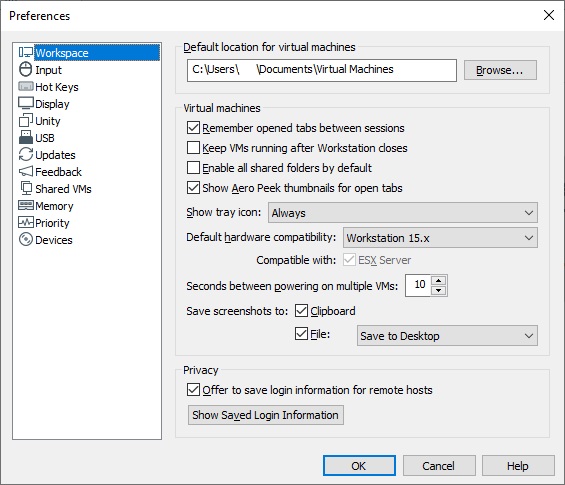
3) После скачивания и установки приложения VMware Workstation Pro запускаем его нажимаем Edit => Preferences.
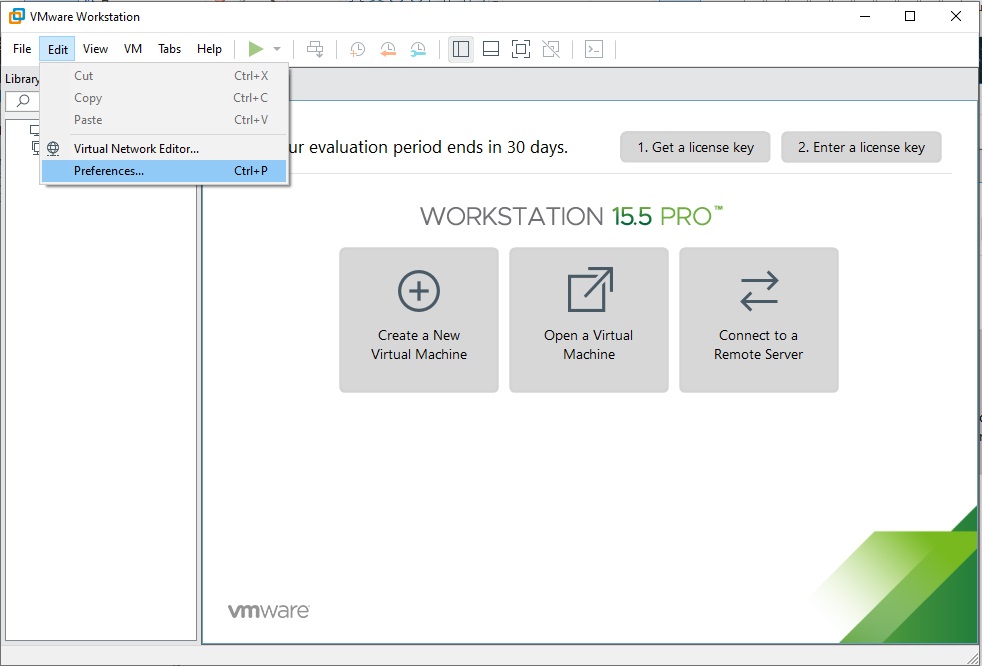
В меню Workspace Вы можете выбрать месторасположение виртуальной машины. Можете оставить как есть, либо поменять на Ваше желаемое (к примеру на другой диск). После выбора места, нажимаем Ок.
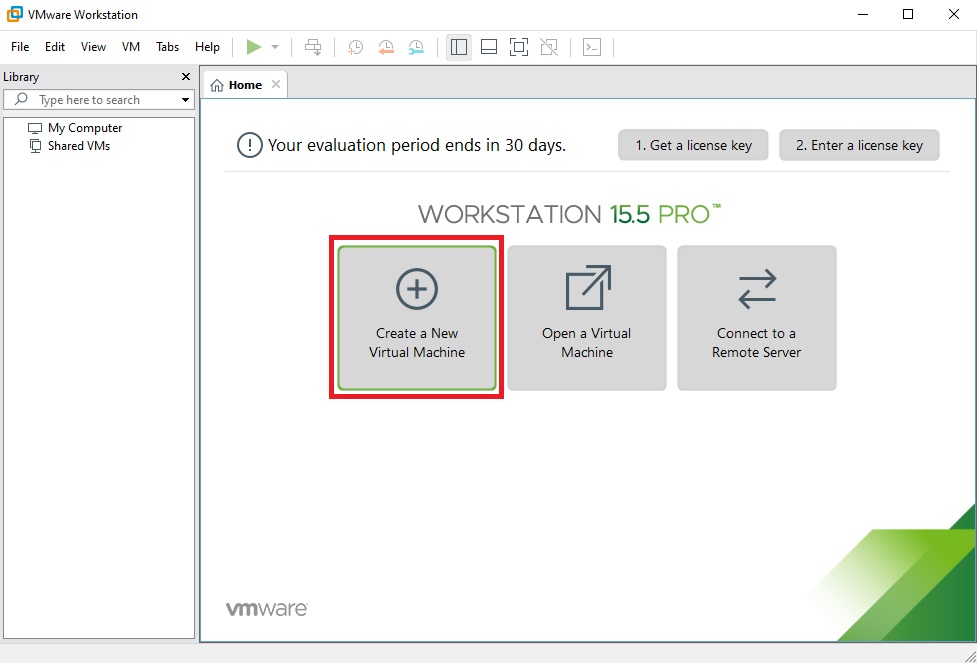
Теперь создадим саму виртуальную машину. Открываем главное окно приложения и нажимаем на Create a New Virtual Machine.
Выбираем первый пункт «Обычная установка».

Далее, пропускаем выбор дистрибутива, его мы выберем позднее.
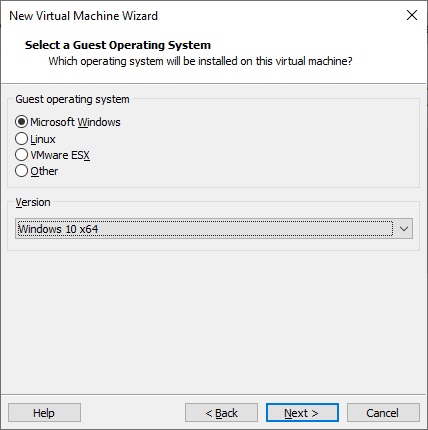
Укажите желаемую ОС, в нашем случае это будет Windows 10 x64.
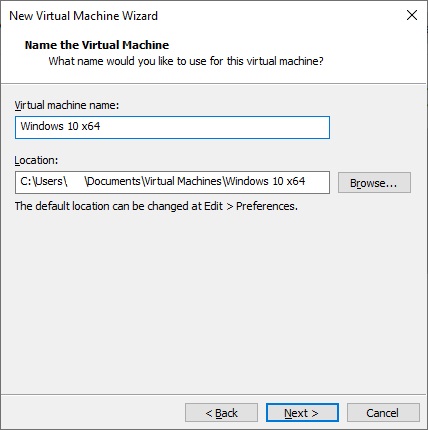
Задайте название и местоположение (можете оставить по умолчанию) виртуальной машины.
Следующий пункт -это выбор между:
1. Сохранение диска в виде одного файла.
2. Разделение диска на несколько файлов.
Если не планируете переносить виртуальную машину на другой ПК, то для увеличения производительности рекомендуем выбрать первый вариант.

В следующем окне нажимаем Customize Hardware.
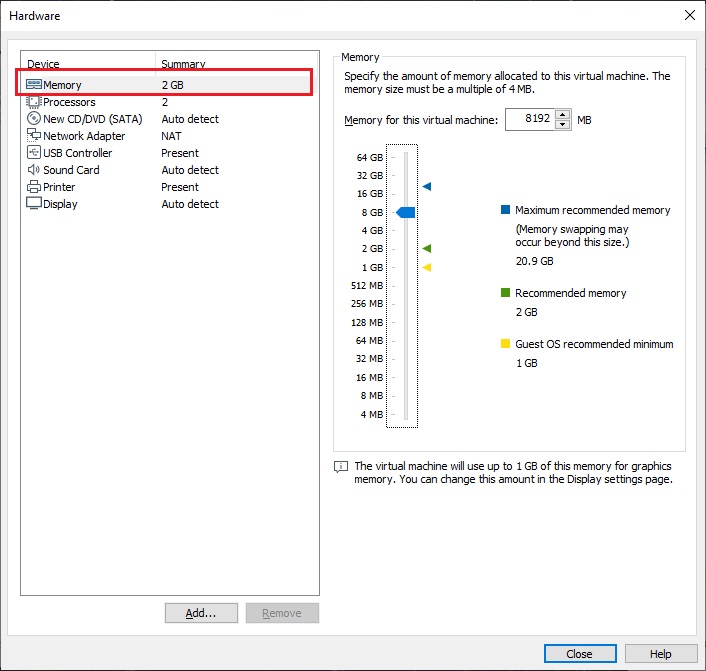
Настроим производительность нашей виртуальной машины. Первым пунктом будет выбор размера оперативной памяти, которая будет выделяться для работы виртуальной машины, само-собой, чем больше, тем лучше. Выбирайте ее исходя из Вашего реального объема ОЗУ на ПК, так, чтобы при работе ВМ Ваш ПК не завис.
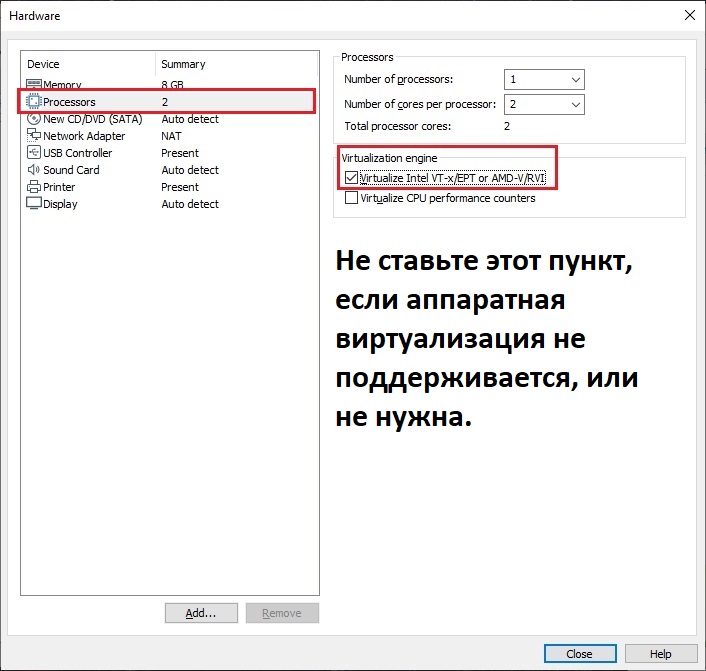
Следующий пункт количество ядер, которое будет выделяться для работы ВМ. А так же актируйте аппаратную виртуализацию, если Вы ее активировали в Биосе. Если нет, то не отмечайте этот пункт.
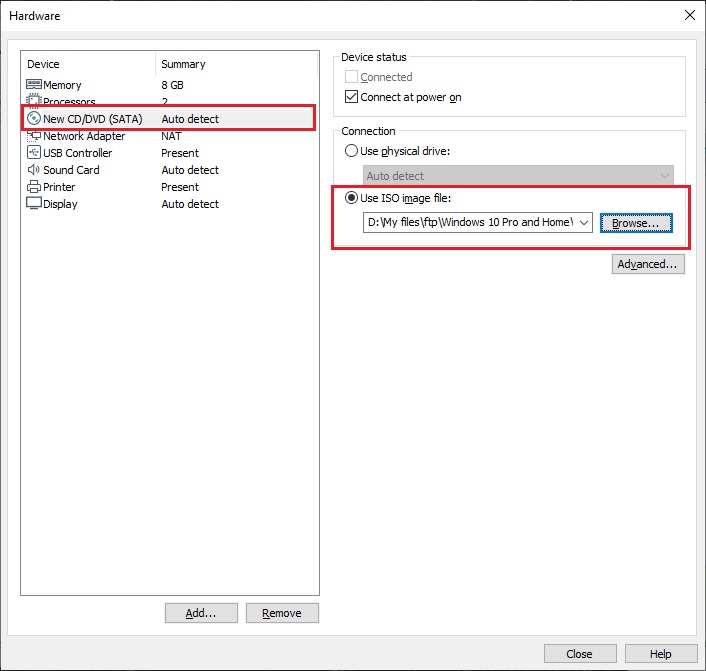
Теперь уже выбираем нужный Вам дистрибутив Windows, который предварительно был скачан и сохранен на Вашем ПК. Если у Вас нет дистрибутива, то скачать оригинальные дистриубтивы Windows можете из нашего каталога. Мы на примере установим Windows 10 Pro.
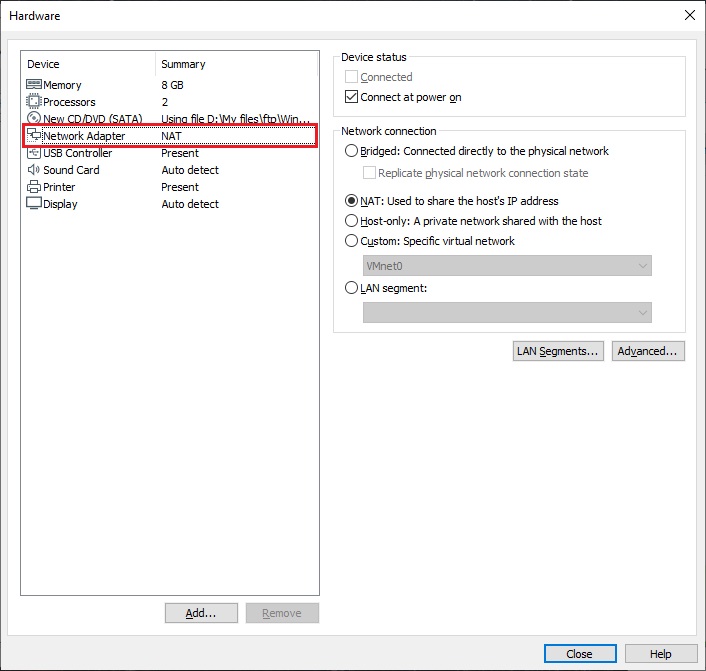
Настройки сети, можете оставить как есть, либо сделать настройку нужную Вам.
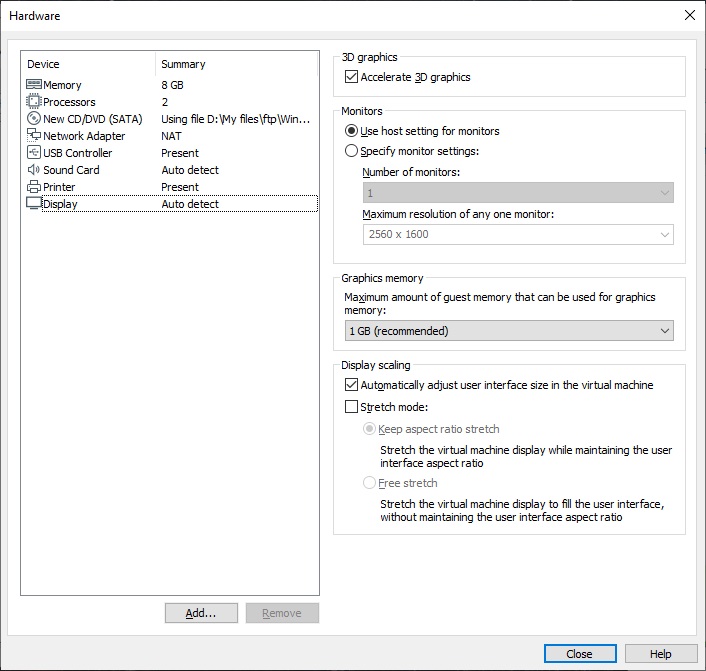
Настройки разрешения. Чем больше, тем лучше. Так же, можете выбрать объем графической памяти выделенной для ВМ. (так же можете оставить все по умолчанию).
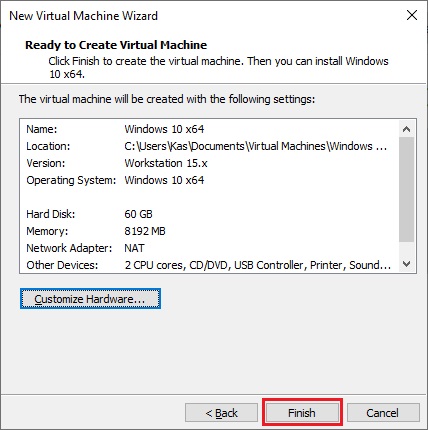
Последним окном нажимаем Finish.
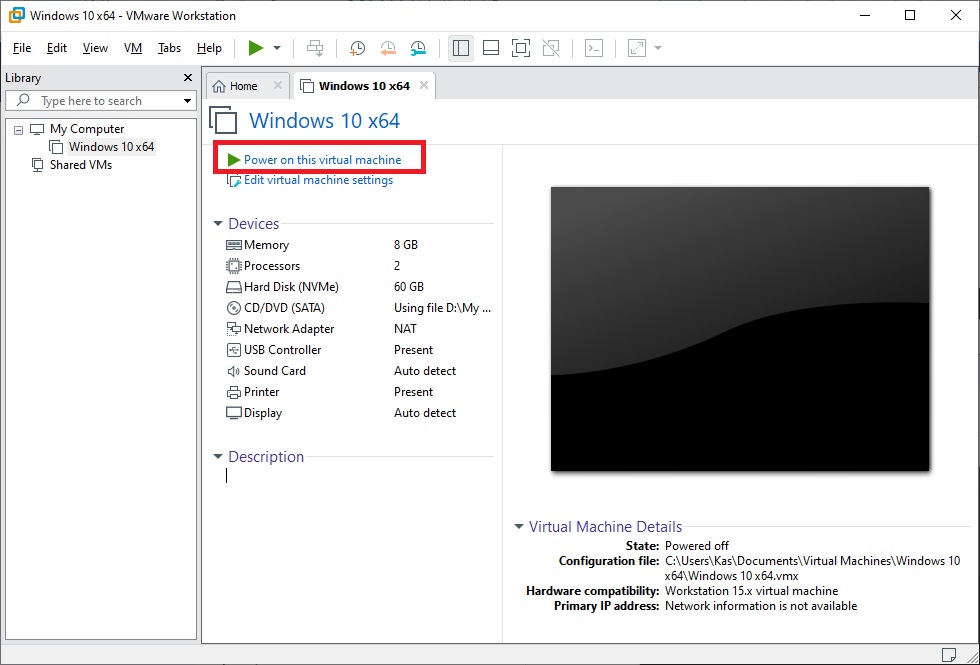
Теперь можем запустить установку системы нажав — Power on this virtual machine.
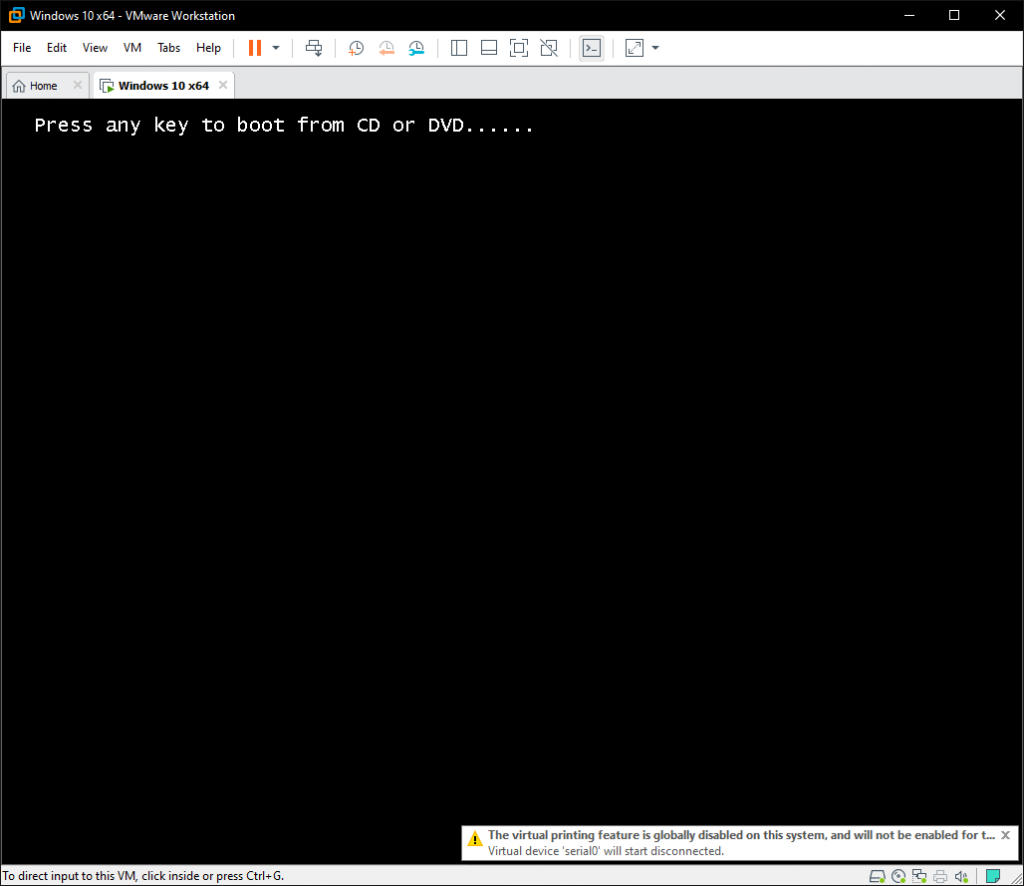
Когда появится надпись Press any key to boot from CD or DVD — нажмите Enter.
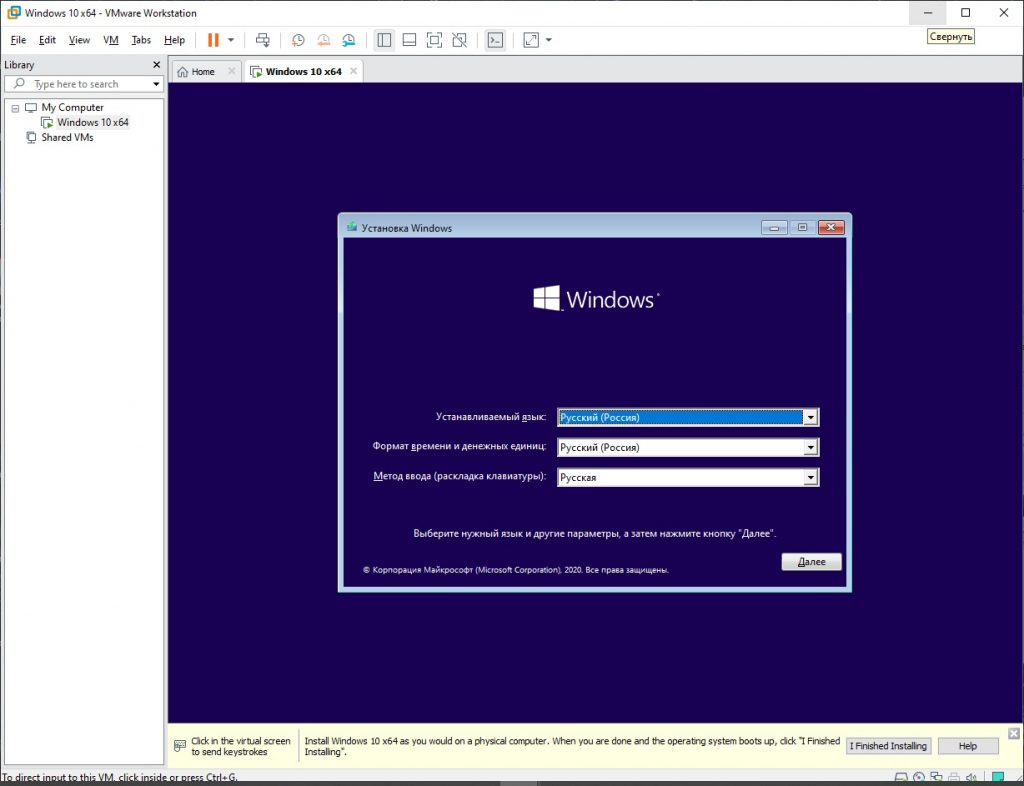
Далее начнется обычная установка Windows 10, она ничем не отличается от обычной. С процессм установки Windows 10 Вы можете ознакомиться в нашей прошлой статье.
После установки системы, когда она покажет рабочий стол — нажмите правой кнопкой мыши на вкладку Вашей действующей ВМ => Settings
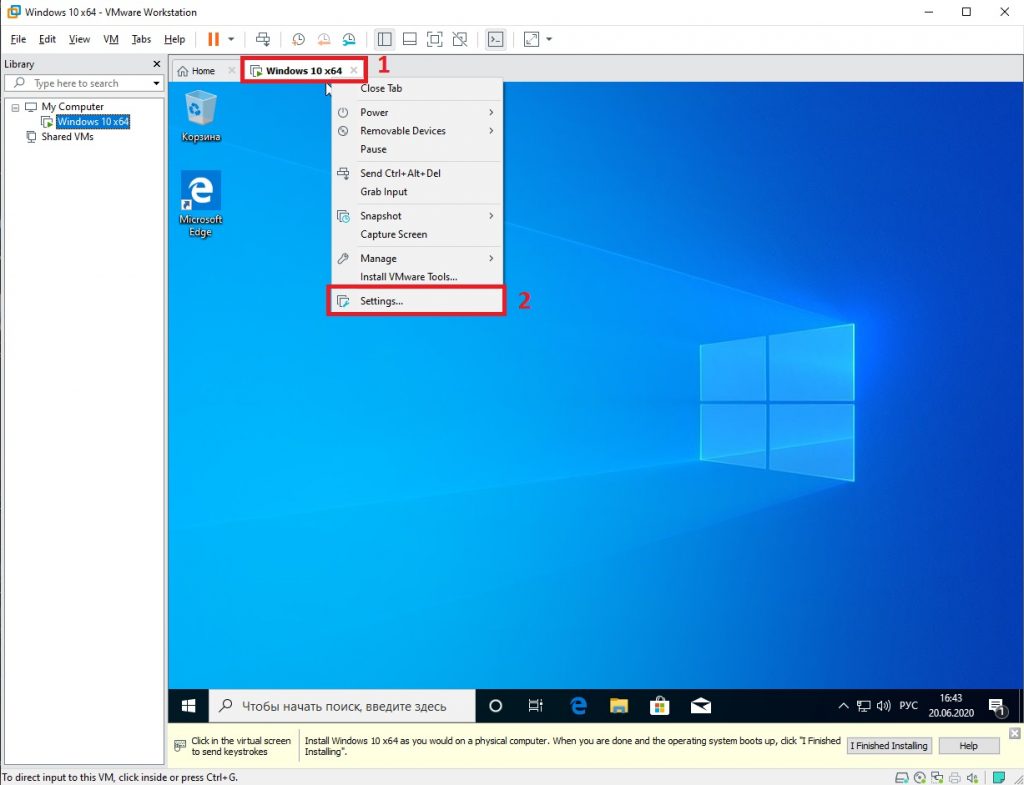
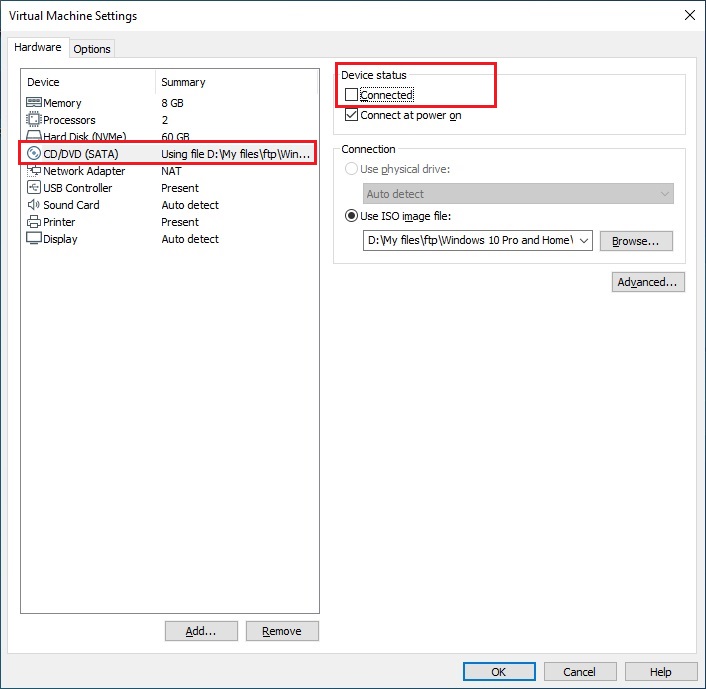
Переходим во вкладку CD/DVD и снимаем галку с Connected, чтобы у нас загружался «жесткий диск», т.е сама система, а не снова ее установка при каждом включении ВМ.
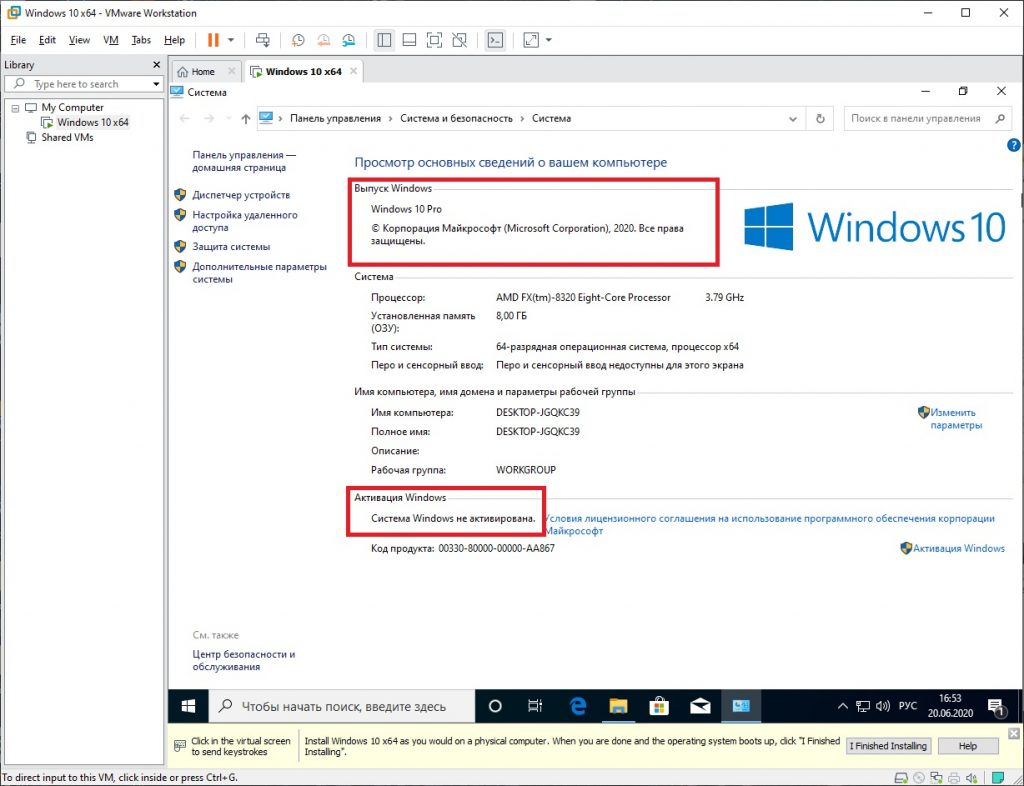
У нас установилась обычная Windows 10 Pro, которая изолирована от основной системе и на ней можно безопасно тестировать приложения, и это не затронит основную систему. Но ее так же необходимо активировать как и обычную Windows. Приобрести оригинальные ключи активации от 1490 ₽ можете в нашем каталоге. Моментальная доставка ключа в автоматическом режиме сразу после оплаты на Ваш Email.
In today’s technological environment, running legacy operating systems on modern hardware is challenging. However, it can be a rewarding experience. Additionally, virtualization software such as VMware Workstation 17 Pro offers solutions. This software helps those who want to rediscover Windows 2000.
In this article, I will explain how to install Windows 2000 Professional SP4 using VMware Workstation 17 Pro. Also, I will show you how to run it on Windows 10 & 11 64-bit. Whether you want to delve into computer history or want to use legacy applications, this VM guide will help you.
How to Set Up Windows 2000 Professional SP4 on Windows 10 using VMware Workstation 17
Microsoft released the Windows 2000 operating system on February 17, 2020, for personal, laptop, and server computers.
Originally, Windows 2000 was called NT 5.0, but this name was changed to 2000 on October 27, 1998. Another common name is Windows 2K. The Windows 2000 system, which was the predecessor of NT 4.0, was fundamentally reliable but received a lot of criticism for having more than 63,000 flaws in this system.
The development of Windows 2000 was more geared towards corporate business computers and offered a more secure Internet connection compared to Windows 95 and 98.
Key features of the Windows 2000 operating system include FAT16, FAT32, NTFS file system, EFS, directory service, DFS, ASR, and RAID. In addition, services such as RAS, VPN, RADIUS, IIS, Active Directory, and RIS have been developed for data communication.
Additionally, Windows 2000 is the first Microsoft system to include the Guest account, which provides for user accounts and restrictions on accessing the system for other users.
Users who want to use the Win200 system, whose support was terminated on July 13, 2010, can now install it on a computer with old hardware. If this is not possible, they can run this old operating system on their physical computers using virtualization software such as VMware Workstation.
How to Create a New Virtual Machine for Windows 2000
If you want to experience using the Windows 2000 system, you don’t need an old PC. After installing the VMware program on your computer with the virtualization feature, you can create a new virtual machine and use this operating system on your host virtually.
In order to install Windows 2000 with VMware, you must have the system’s ISO image file. Or, if you have a physical CD/DVD installation media, you can also install it. However, download the image file from your computer, as installing the ISO file on the virtual computer will provide more performance.
Step 1
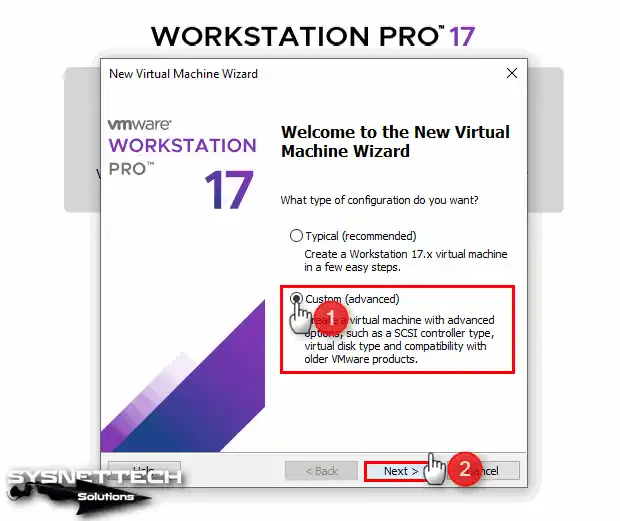
After installing the VMware 17 Pro software on your computer, run it and click Create a New Virtual Machine from the options on the program’s homepage.
Then, when the VM wizard opens, as in the image below, select the Custom (Advanced) option and click the Next button.
Step 2
By default, Workstation 17.x is selected in the VMware hardware compatibility window because the latest version of the virtualization program is installed on your system. If you are using an old VMware version, you will see the hardware version of that version here.
Change the hardware version to Workstation 10.x so that you can run the Windows 200 system entirely correctly, and then click Next.

Step 3
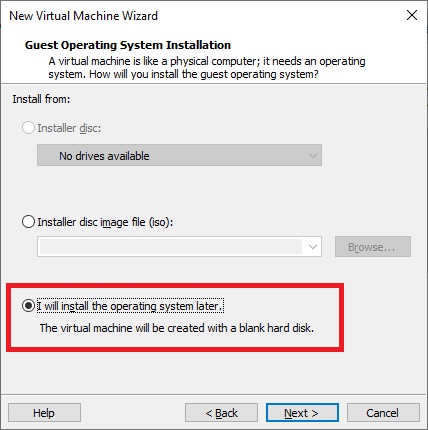
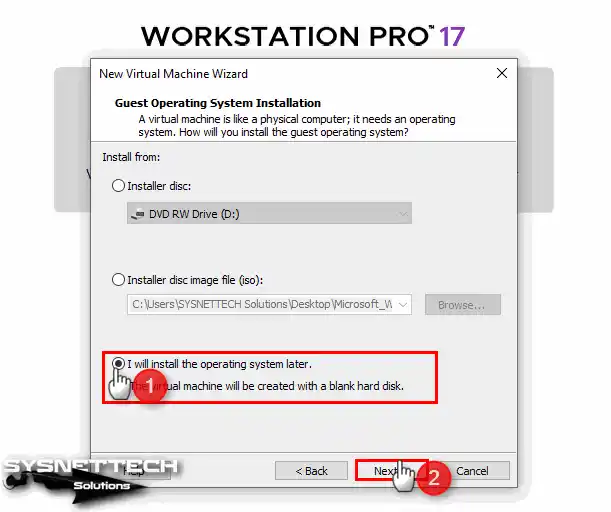
If you have a CD/DVD installation media, as we mentioned above, you should continue with the Installer Disc option in this window. However, since you downloaded the ISO file to your computer, please select I will install the operating system later in this step and click Next.
Step 4
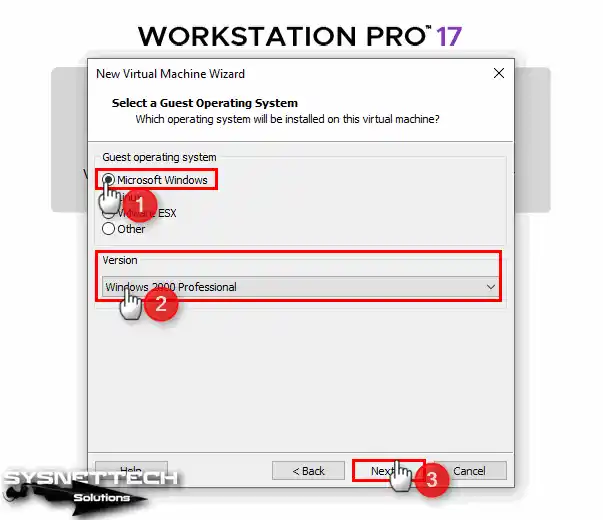
In the Guest operating system selection window, you must first select the manufacturer and then the version of the system you will install. Therefore, tick Microsoft in Guest Operating System and select Windows 2000 Professional version in Version.
Step 5
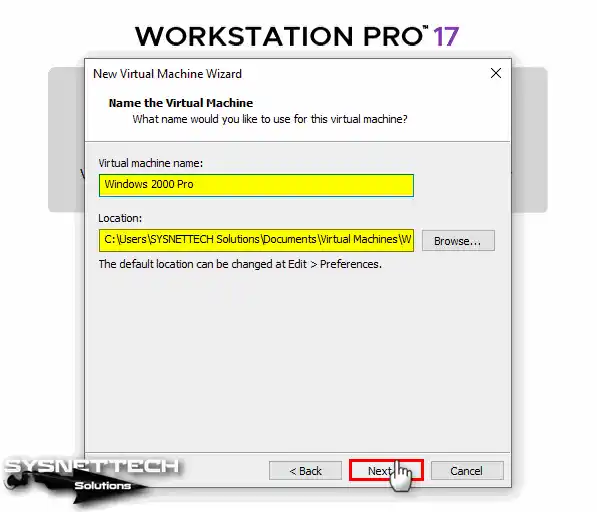
In this window, you can change the name of the virtual machine you will install, and you can also select the location to install it via the Browse button. If you have an old computer, since installing the VM on an external SSD disk will be convenient for both performance and data security, change the location and click Next to continue.
Or, if you have a more recent computer and your disk is SSD or NVMe, you can choose to install your virtual system on the host disk.
Step 6
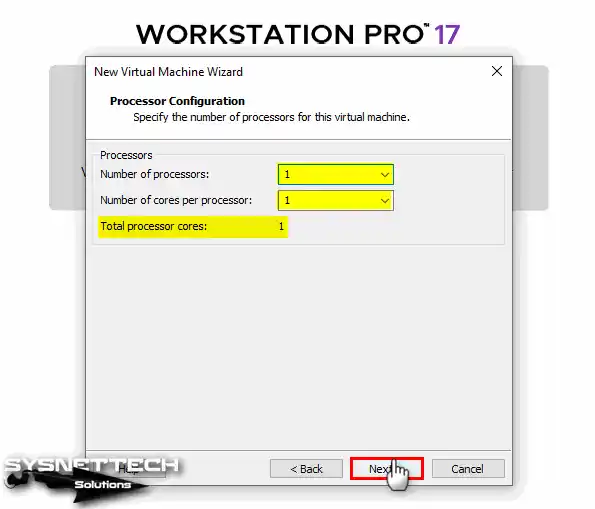
In the processor configuration window, configure 1 processor and 1 core number for the Windows 2000 system. If you configure more CPU/Core values, the VM may not run properly.
Step 7
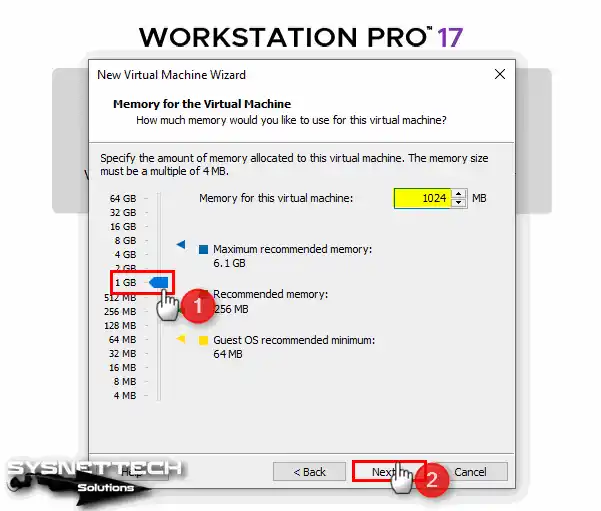
Configure 1 GB RAM size in the memory setting window for the virtual machine and click Next.
Step 8
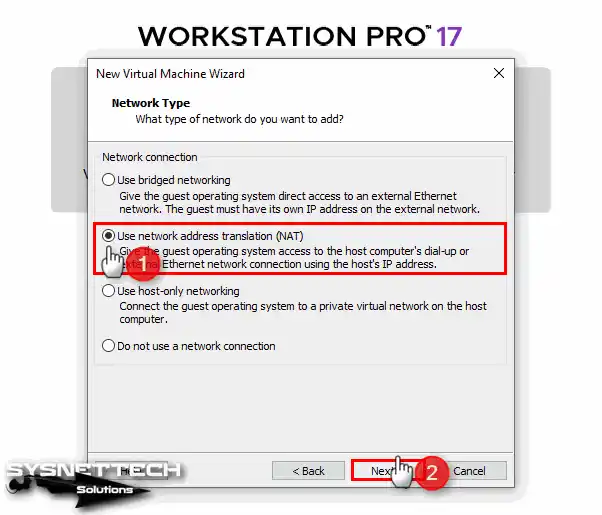
Select NAT for the network adapter of the virtual PC on Workstation Pro and click Next.
Step 9
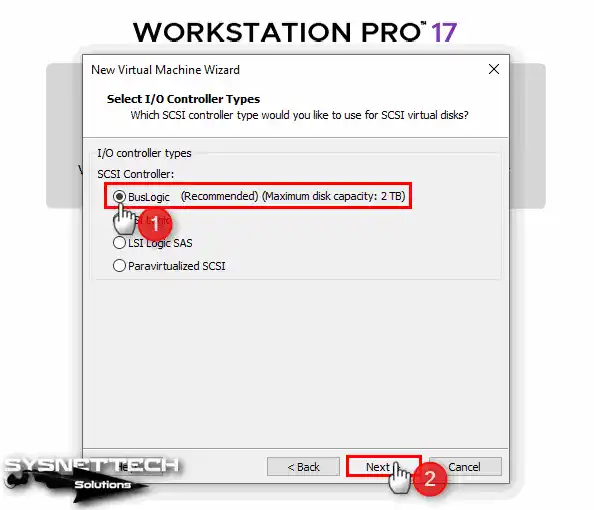
In the I/O Controller types window, select BusLogic to operate the virtual disk more efficiently and click Next.
Step 10
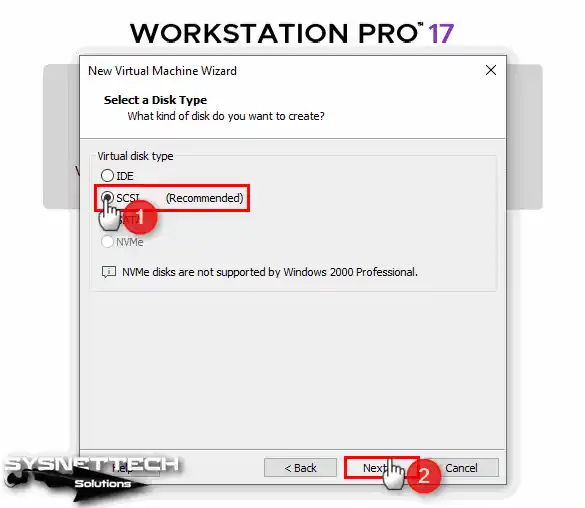
Select the type of virtual disk as SCSI and continue with Next.
Step 11
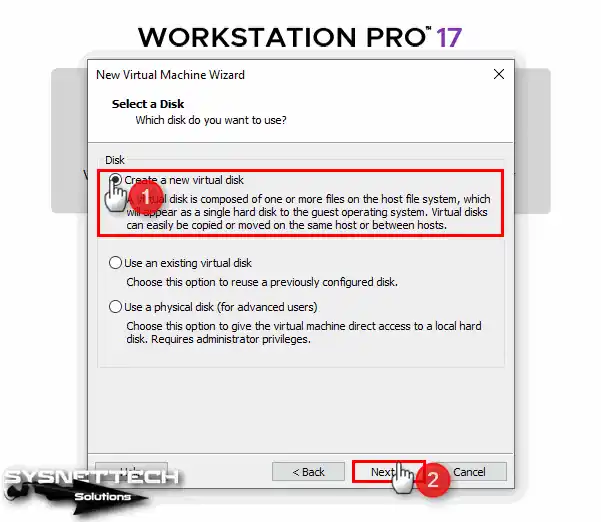
Since you will be installing a clean Windows 2000 system, select the Create a New Virtual Disk option in the Select a Disk window. If you have a disk backup that you have installed before, you can add an existing disk in this window.
Step 12
Adjust the capacity of the virtual disk according to the operations you will perform on the system and the applications you will use. Here, you can choose the recommended disk size for Windows 2000, 8GB, or specify a higher size. Also, store the virtual disk as a single file on your host or external HDD.
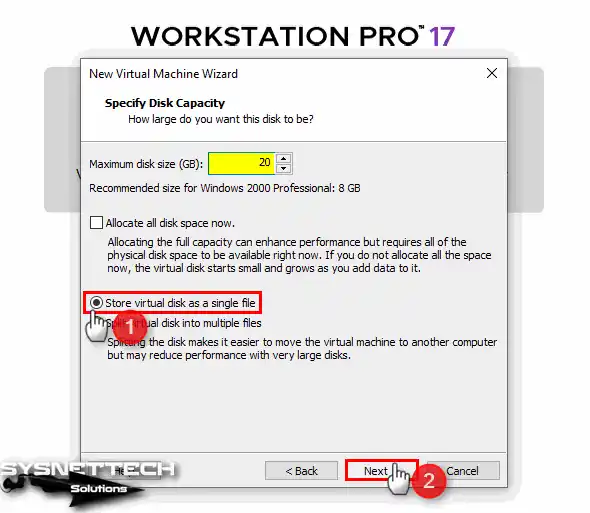
Step 13
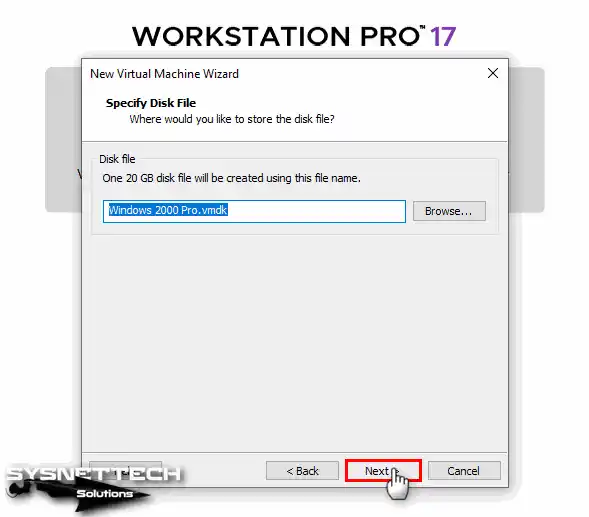
In the “specify disk file” window, you can change the name and location of your virtual disk but continue with the default configuration.
Step 14
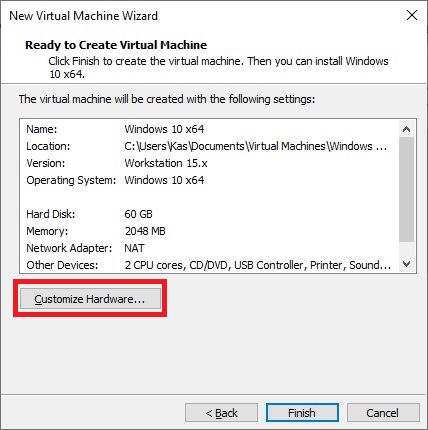
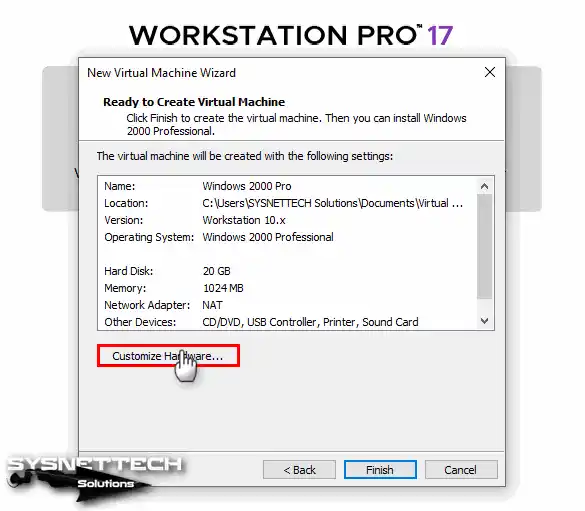
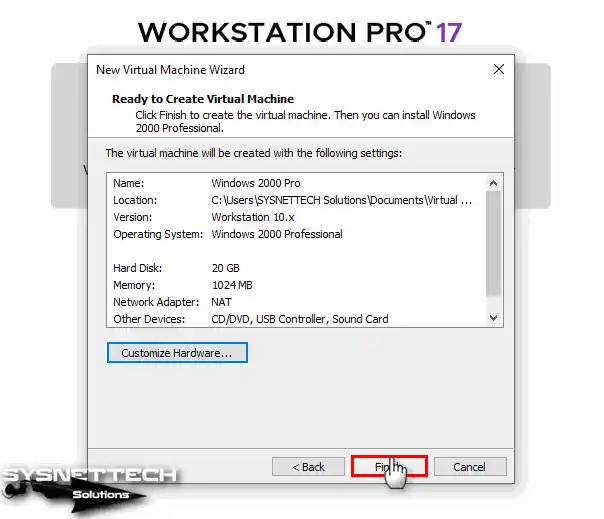
Click the Customize Hardware button in the window containing the summary information of the settings you have configured for the virtual machine.
Step 15
After clicking on the Processor device, enable the virtualization feature by ticking all the options in the Virtualization Engine section.
- Virtualize Intel VT-x/EPT or AMD-V/RVI
- Virtualize CPU Performance Counters

Step 16
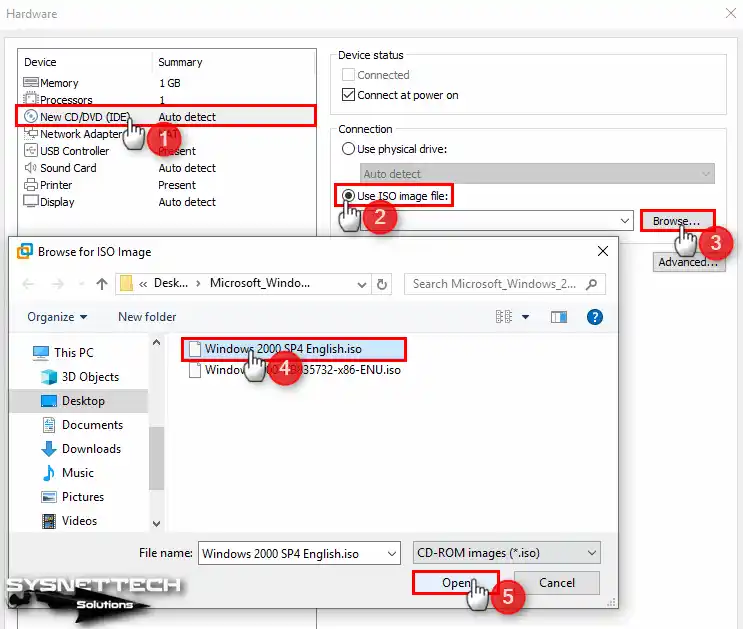
To add the Windows 2000 ISO file to the CD/DVD device, click the Browse button after enabling the Use ISO Image File option. Select the ISO image file you downloaded to your computer and click the Open button.
Step 17
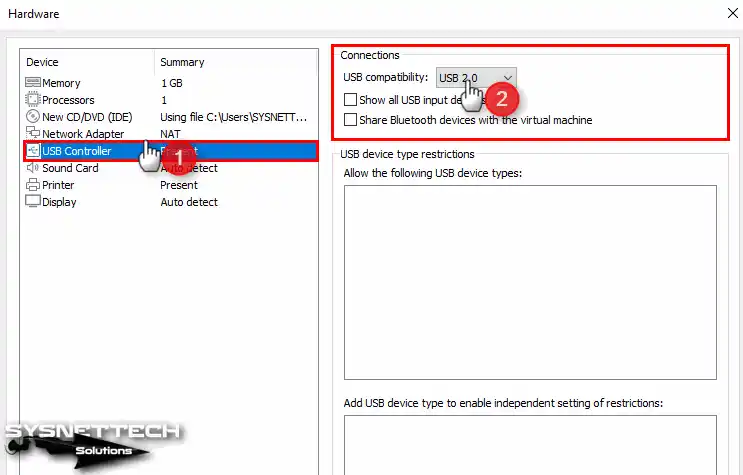
In order to use your USB devices in your virtual system, select the 2.0 compatibility type from the USB Controller device settings.
Step 18
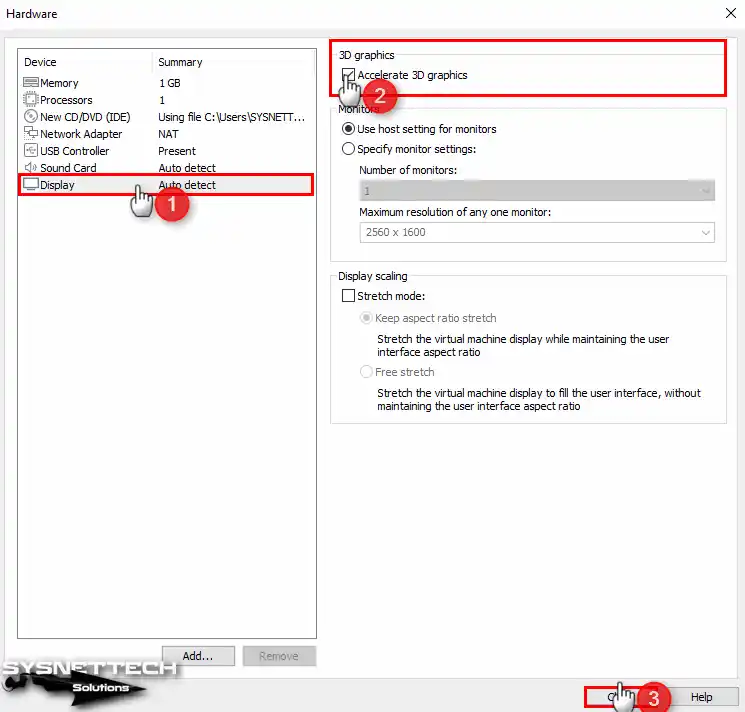
For the Display setting, enable the 3D Graphics feature and do not change the display scaling setting.
Step 19
After preparing the virtual machine, close the summary window and proceed to the installation steps.
Step 20
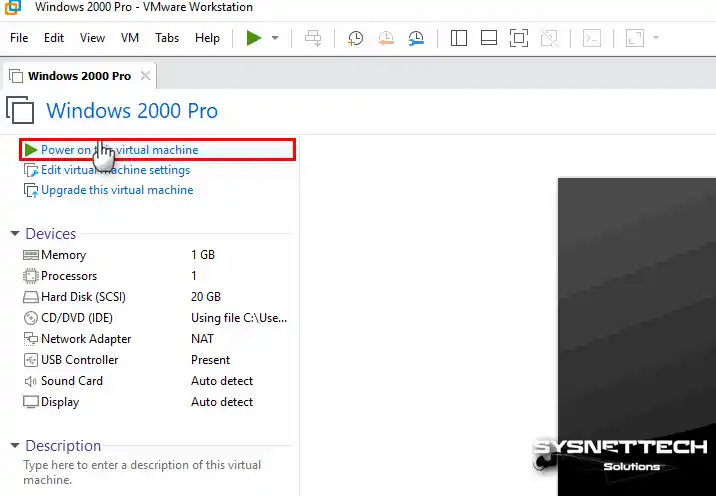
Click Power on this virtual machine to run the Windows 2000 Professional virtual machine.
How to Install Windows 2000
After you prepare the Windows 2000 virtual machine, when you run it, the system will boot from the ISO image file you added to the VM. When you see the installation wizard, you can now start the installation without any problems.
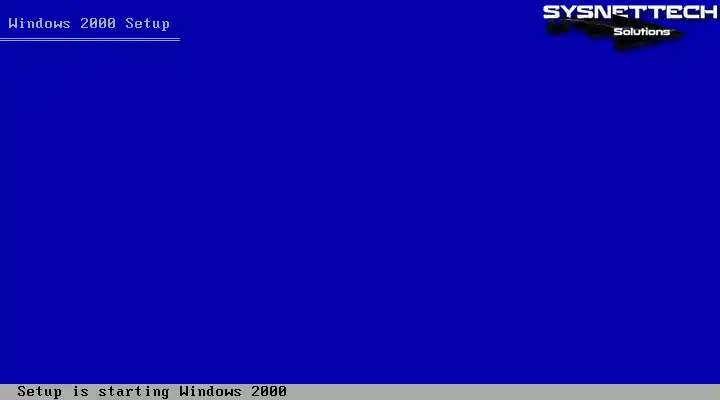
Step 1
Wait for a while when the Windows 2000 Setup screen opens, as in the image below.
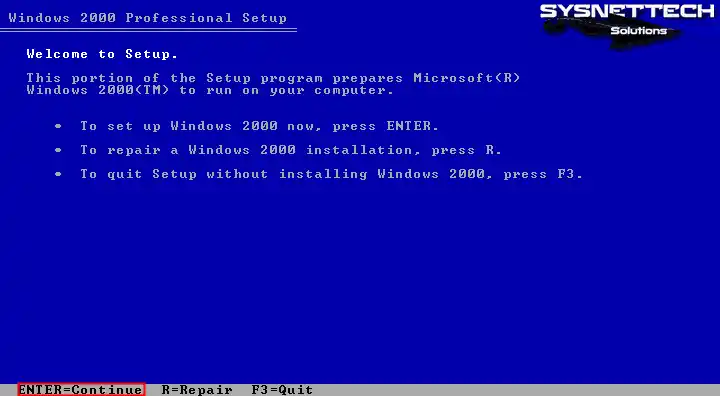
Step 2
On the Welcome screen, you can switch to the relevant screen by pressing the R key to repair your system. In this article, press the Enter key as we will install the Win2000 system from scratch.
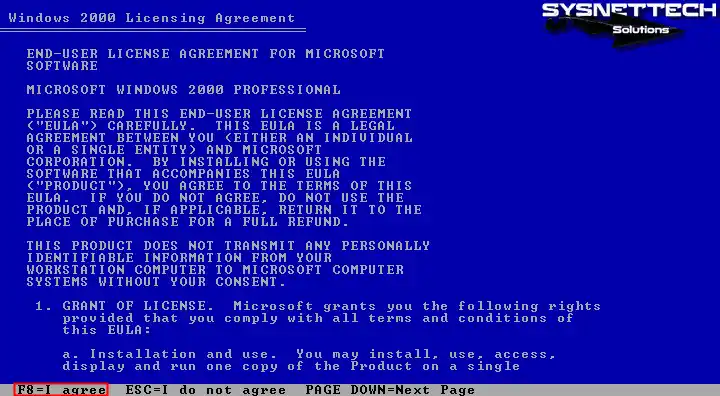
Step 3
Accept the Microsoft Windows 2000 Professional license agreement on your virtual computer.
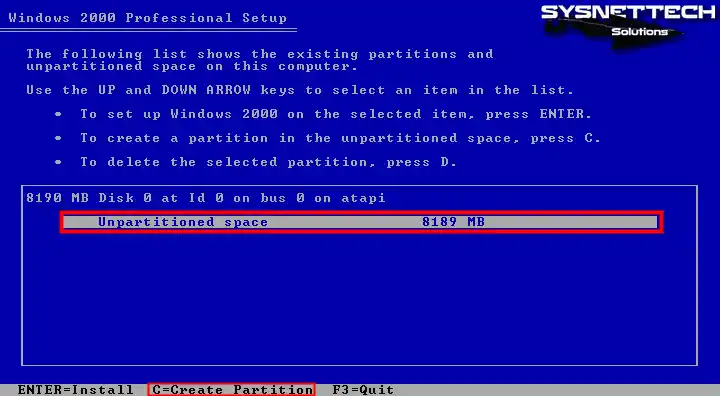
Step 4
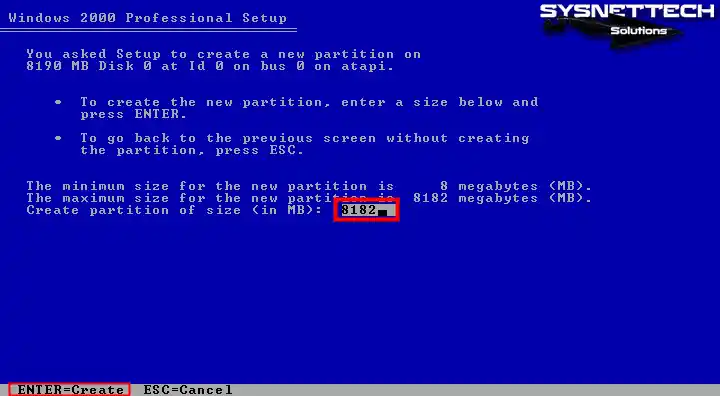
Here, you can see the size you assigned to the virtual disk in the steps to prepare the virtual PC. Press C to create a new Partition on the disk.
Step 5
Press Enter to accept the automatically set value for the virtual disk.
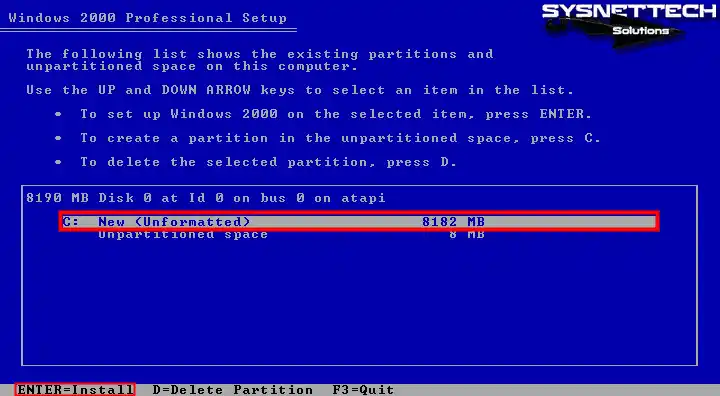
Step 6
After creating the C partition on the disk, press Enter to start the installation.
Step 7
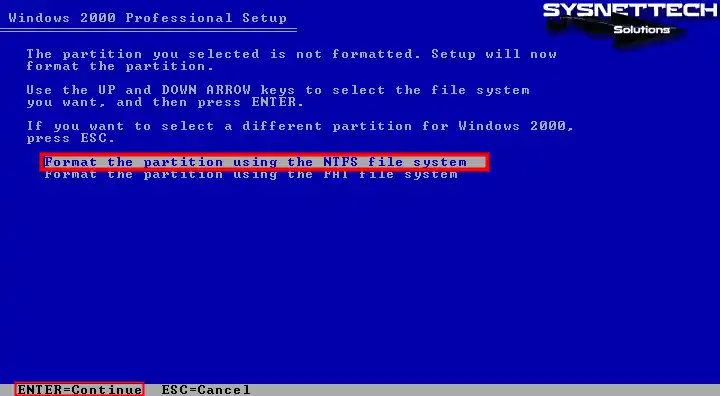
Press Enter on the “Format the partition using NTFS file system” option to configure and format the disk file format as NTFS.
Step 8
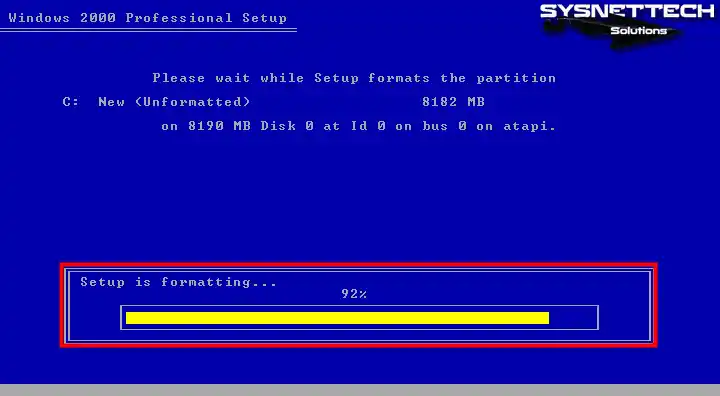
Wait while the setup wizard formats the disk. This will take very little time on the VM, but on a physical computer, it may take some time.
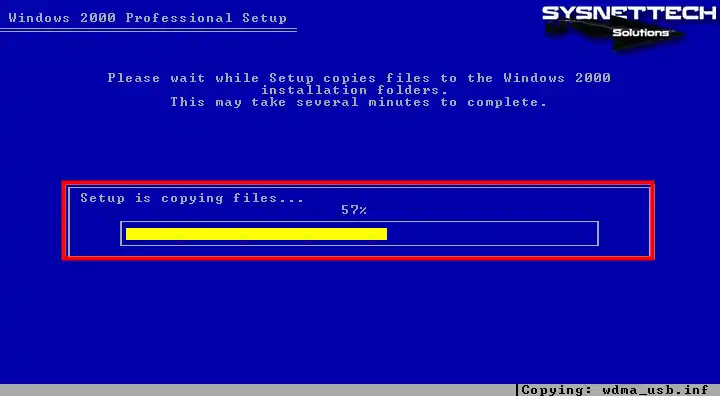
Step 9
Wait while the setup wizard copies the Windows 2K system files to disk.
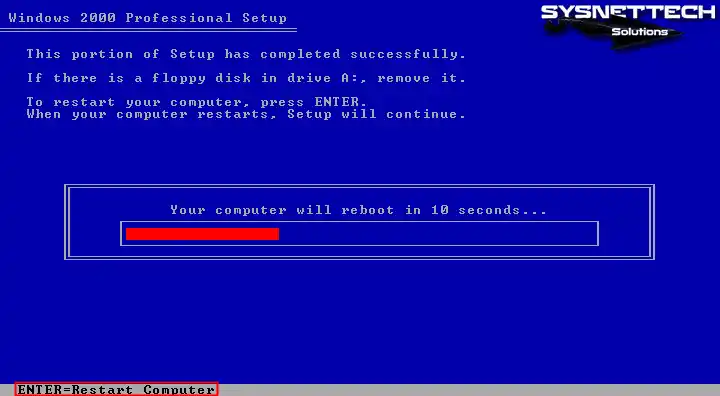
Step 10
Your virtual computer will restart after the time specified by the timer has elapsed, but press Enter to reboot your system manually.
Step 11
Wait while your Windows 2K virtual system boots up.

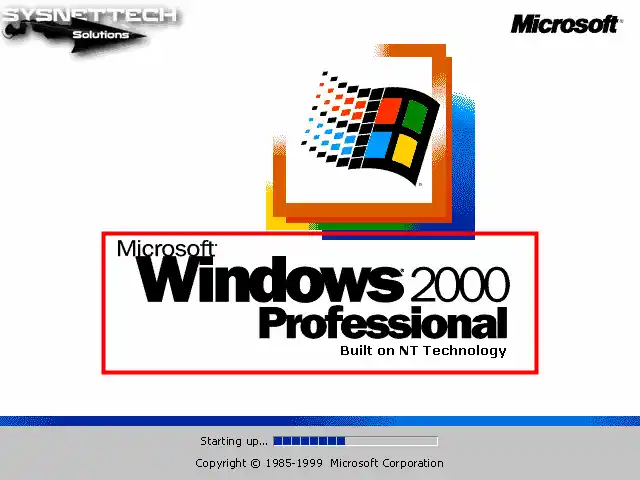
Step 12
Wait while Microsoft Windows 2000 Professional (Built on NT Technology) starts up.
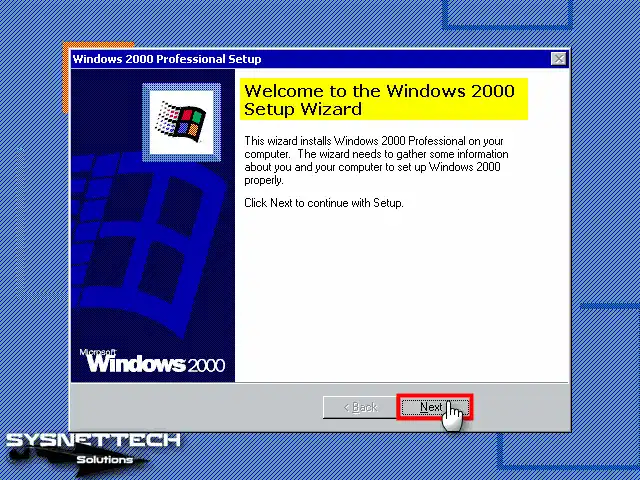
Step 13
It is reported that some information about your virtual computer will be collected for installation when the Win2K setup wizard opens, so click Next to continue.
Step 14
Wait while the setup wizard installs the drivers for your virtual PC devices, such as the keyboard and mouse. At this step, the screen of your virtual PC may flicker, so do not turn off your system.

Step 15
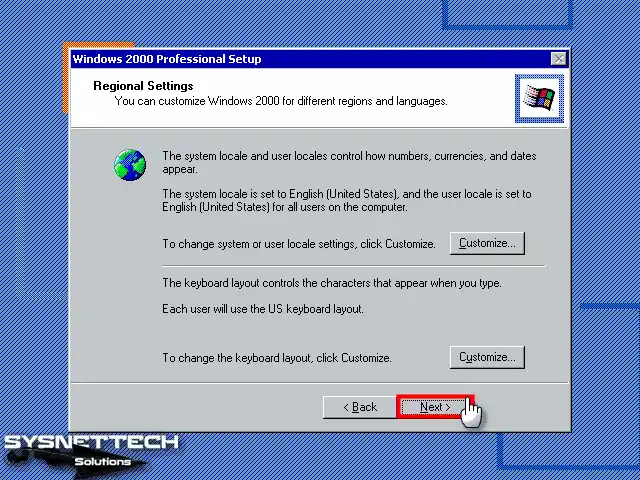
Configure the region and location of your system according to where you live and click Next.
Step 16
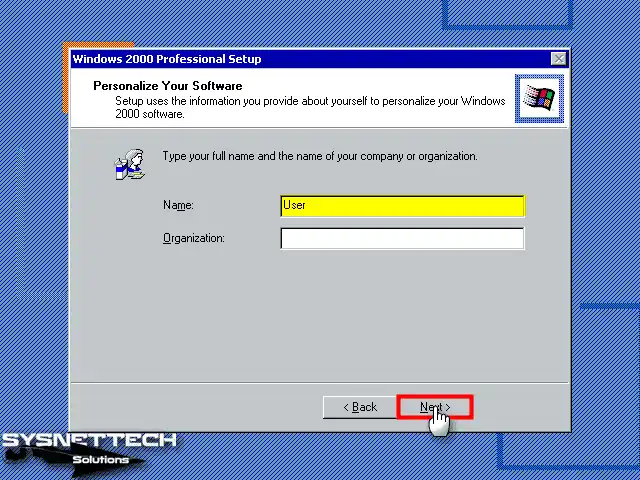
Type a user account name for your virtual system and continue.
Step 17
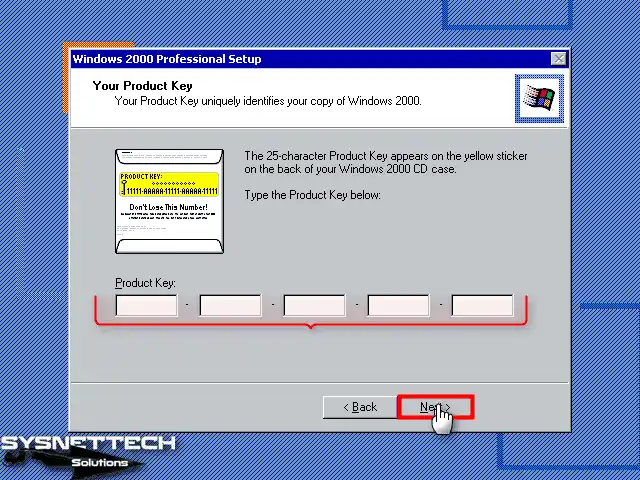
Enter the product key of the Windows 2000 Professional operating system correctly and click Next.
Step 18
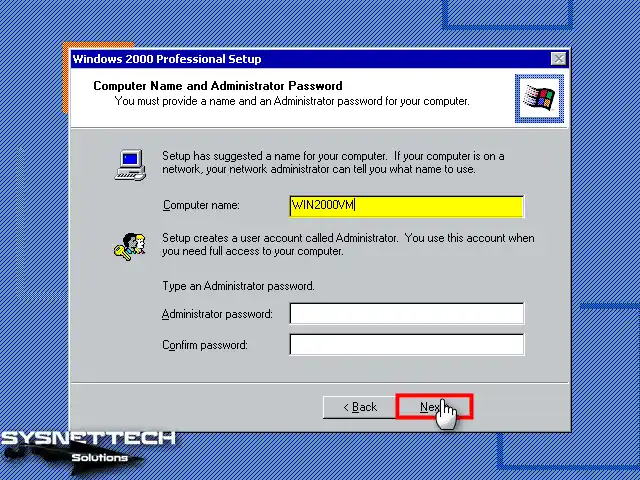
In this window, type a computer name and also set an administrator password for your system.
Step 19
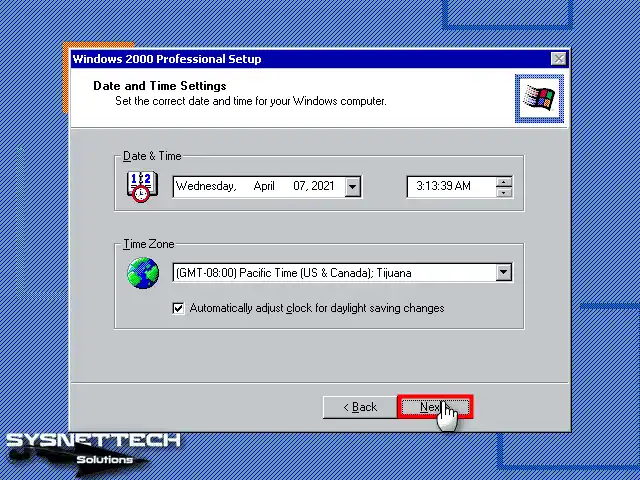
Configure the date and time settings of your virtual system according to the country and location you live in.
Step 20
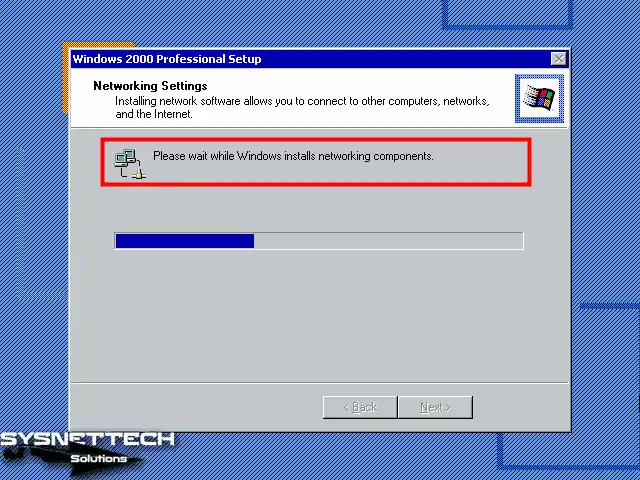
Wait while Windows installs the system and network components.
Step 21
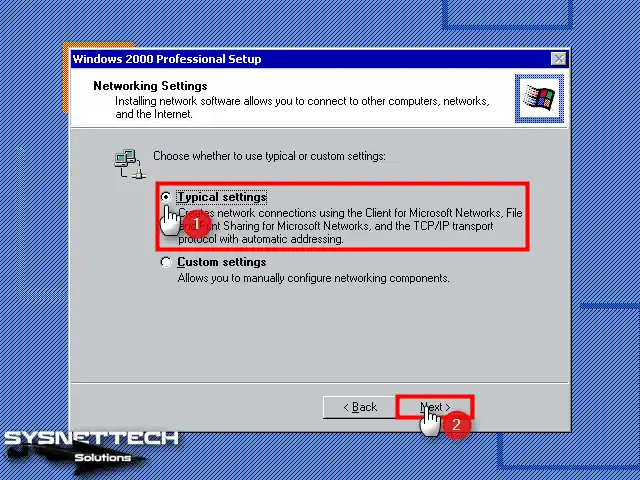
Configure the network settings to Typical for Windows 2000 and continue.
Step 22
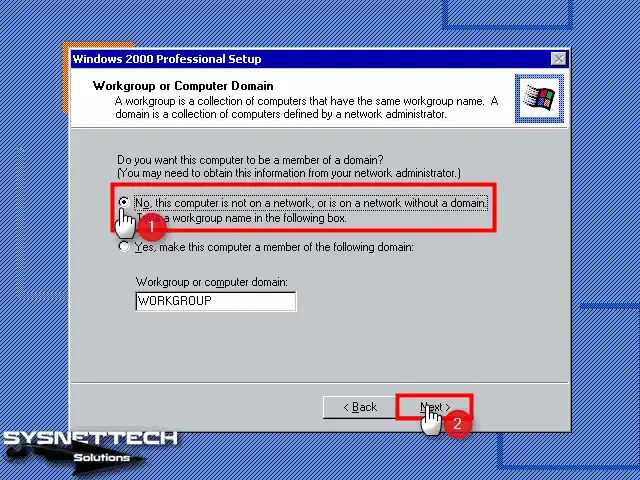
If you are using the Active Directory service on a server in your network structure, you can add your virtual system to the domain environment. Otherwise, configure WORKGROUP for default local network settings.
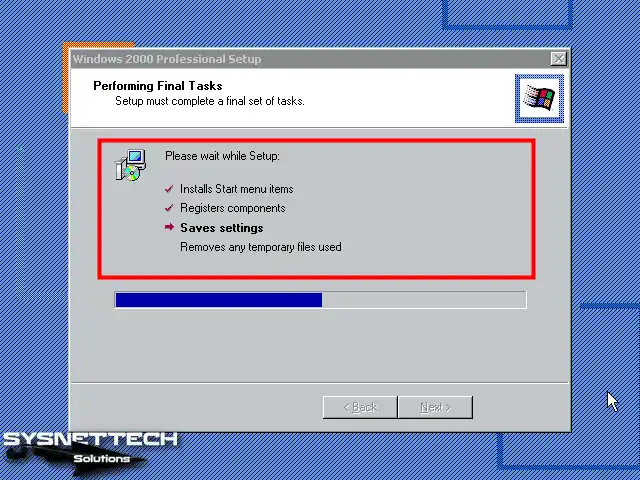
Step 23
Wait while the setup wizard configures your system’s start menu items, registry components, and other settings.
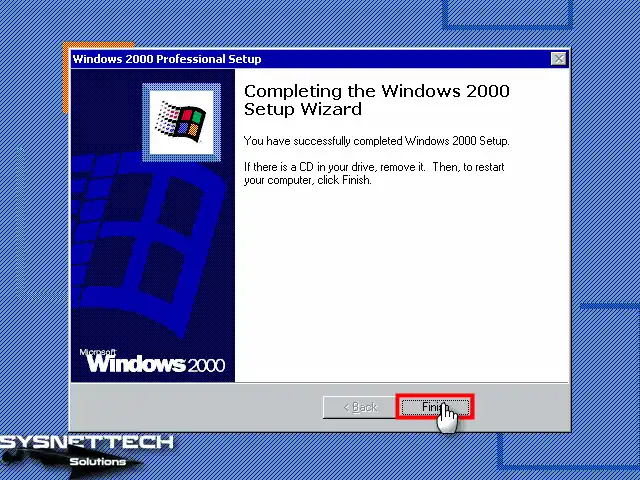
Step 24
After successfully installing the Windows system, click Finish to close the window. In this step, your virtual PC will restart.
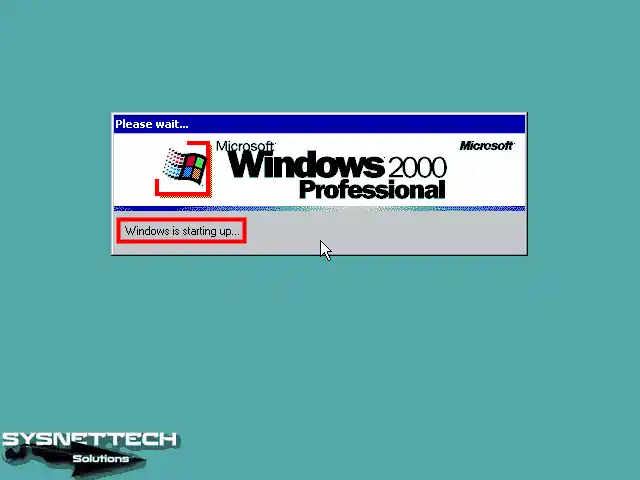
Step 25
Wait while Win2000 Pro starts up.
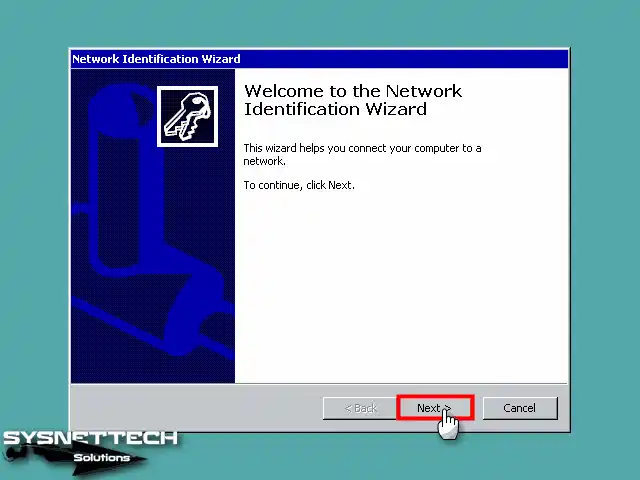
Step 26
Click Next when the Network Identification wizard opens.
Step 27
If you are going to use only one user account on your system by default, you can assign a password to your user account in this window. You can also set password enforcement at user login to restrict use by unauthorized persons.
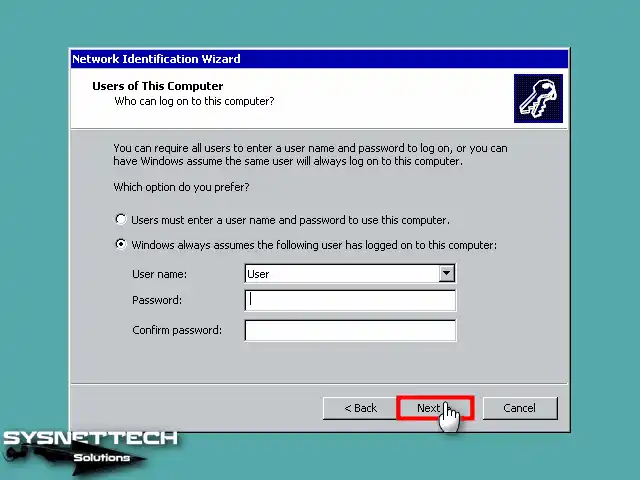
Step 28
After configuring the network and login settings, click Finish.

Step 29
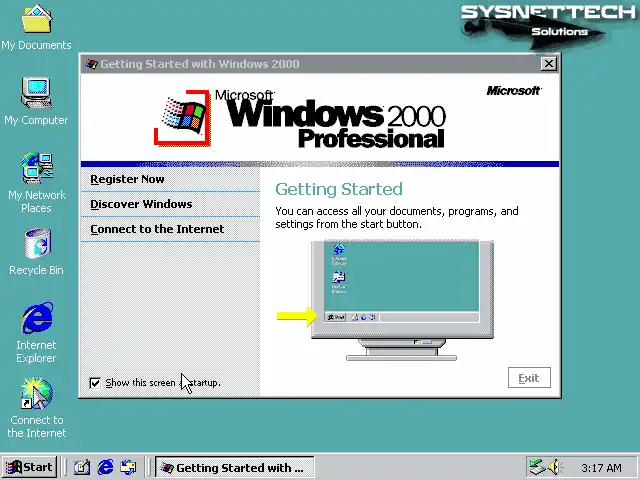
When your Windows 2K operating system starts, you will see the first desktop screen, as in the image below.
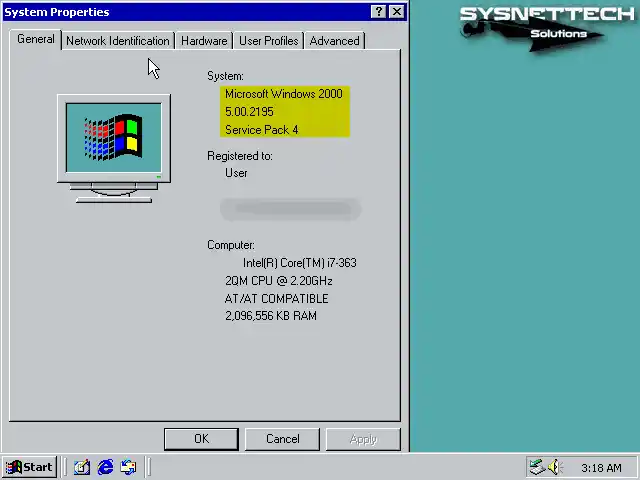
Step 30
After right-clicking on My Computer, click Properties from the listed options and check the system information.
How to Install VMware Tools
After successfully installing the Windows 2K system on a new virtual machine until this step, you need to install VMware Tools to fix problems such as screen resolution.
Thanks to VMware Tools, you can use your virtual system running in your VM more efficiently and efficiently.
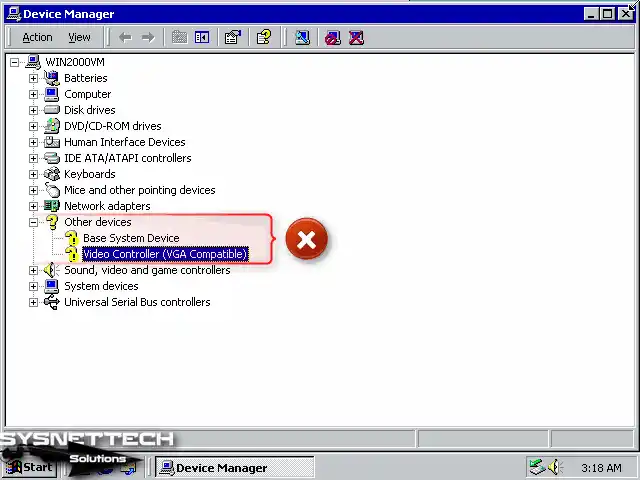
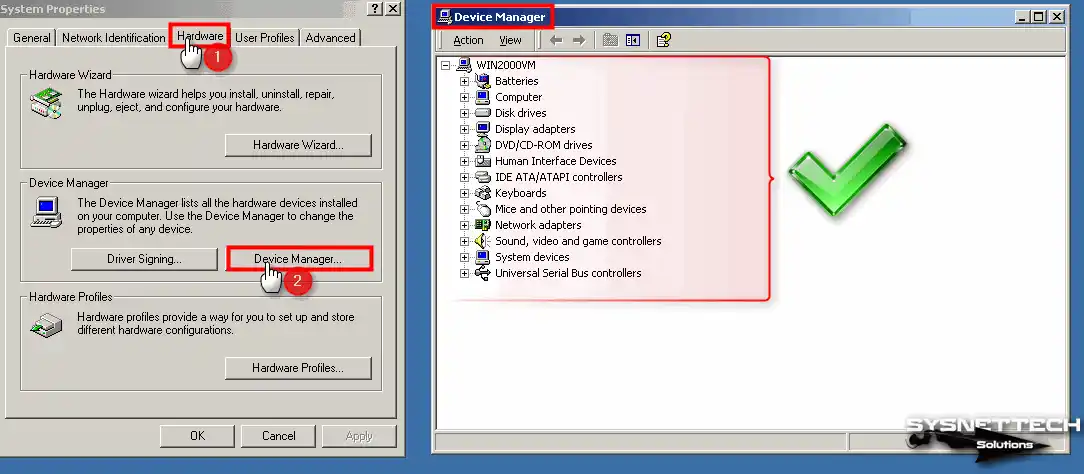
Step 1
First, right-click on My Computer, then open Properties / Hardware / Device Manager and check for drivers not installed on your VM.
Step 2
Click VM / Install VMware Tools in Workstation Pro’s menu.

Step 3
If you get the following error while trying to open the VMware Tools wizard, you need to install the KB835732 update on your system. You can find the KB835732 update in the Win2K ISO file you downloaded to your computer.
Microsoft Runtime DLLs cannot be installed on this operating system.
Please see Microsoft KB835732 for details.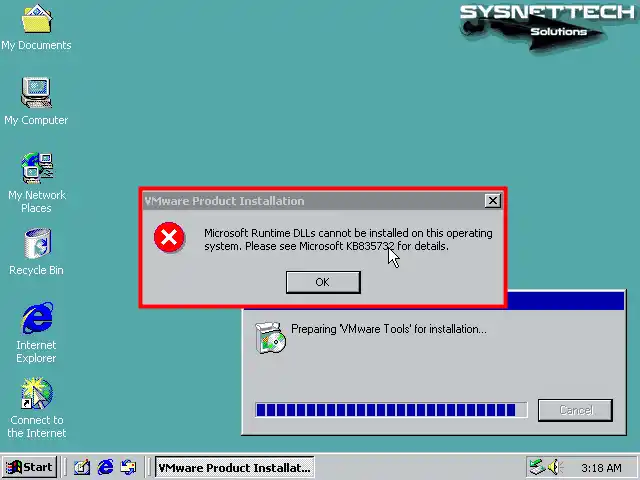
Step 4
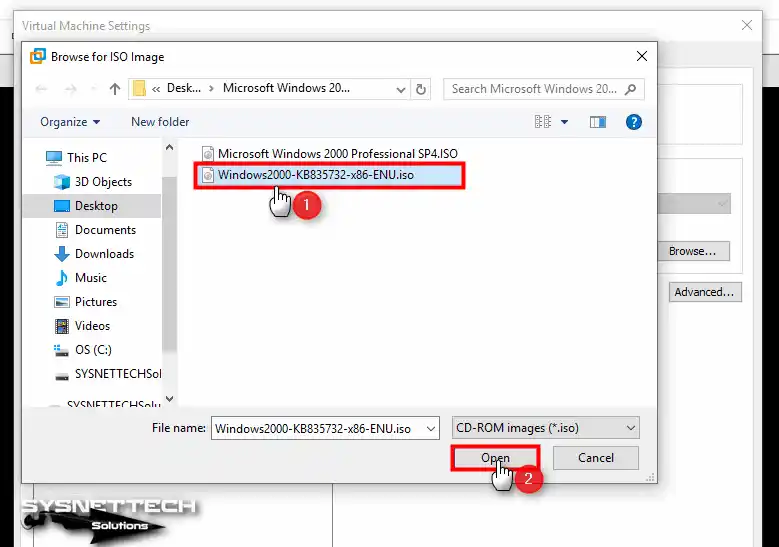
Add the KB835732 ISO file to the virtual machine’s CD/DVD device.
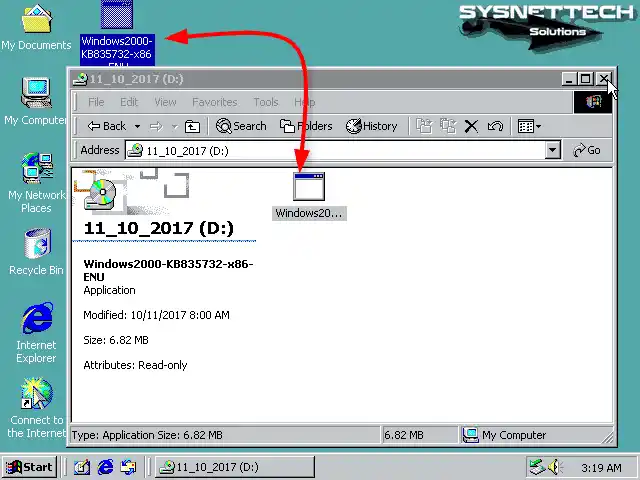
Step 5
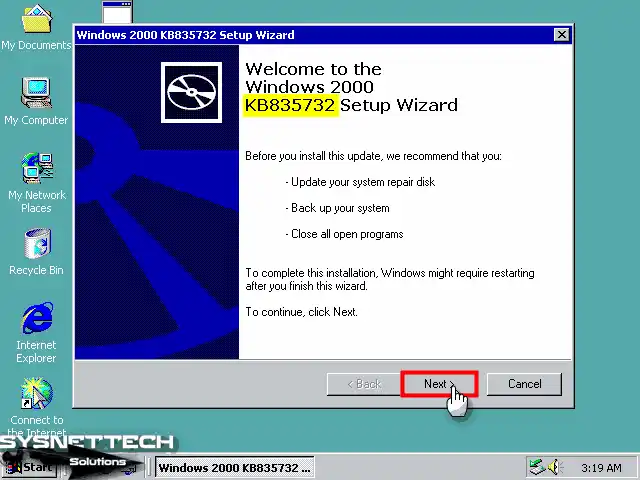
Open My Computer and copy the EXE file in the image file to the desktop location.
Step 6
To install the Win2000 KB835732 update, open the setup file and click Next in the setup wizard.
Step 7
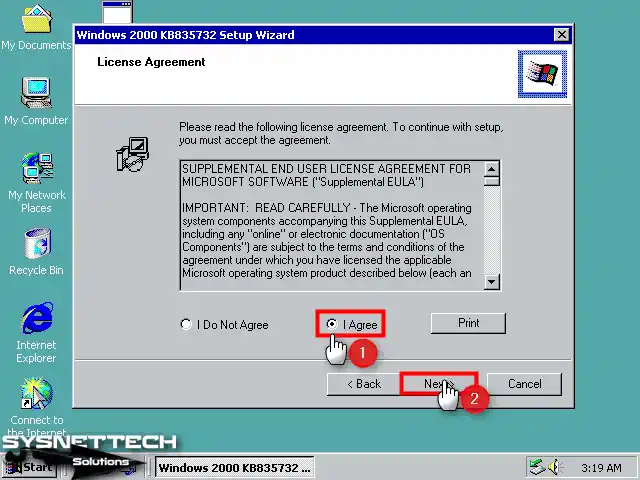
Accept the license agreement of the Windows KB835732 update and click Next.
Step 8
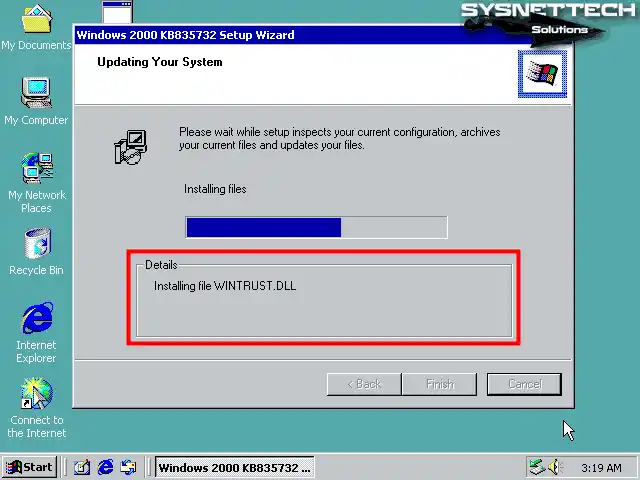
Wait while the setup wizard is updating your system, and do not turn off your system.
Step 9
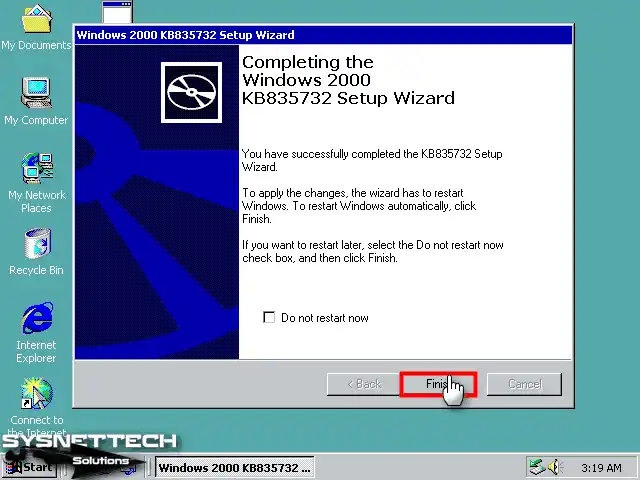
After completing the installation, click Finish and restart your system.
Step 10
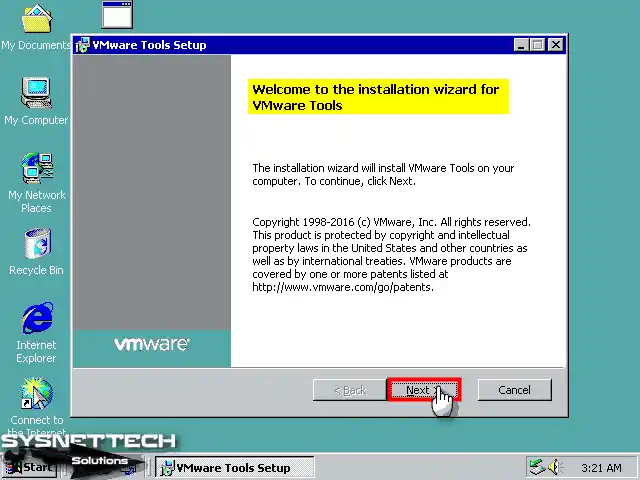
When you start the VMware Tools installation again, continue with Next when the installation wizard opens.
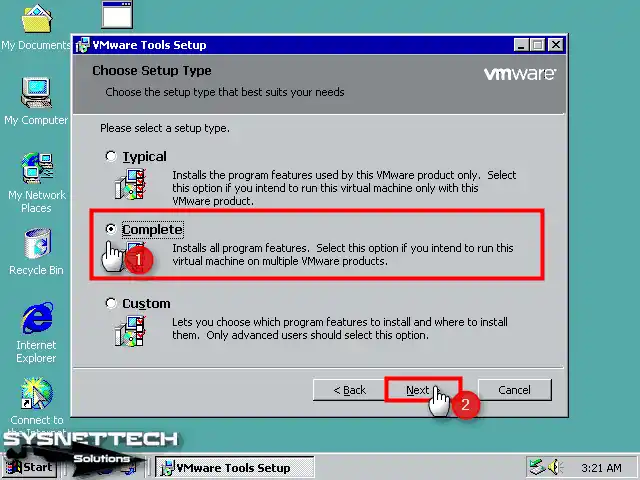
Step 11
Select Complete as the installation type and continue.
Step 12
Finally, click the Install button to start the installation of the virtual machine tools.
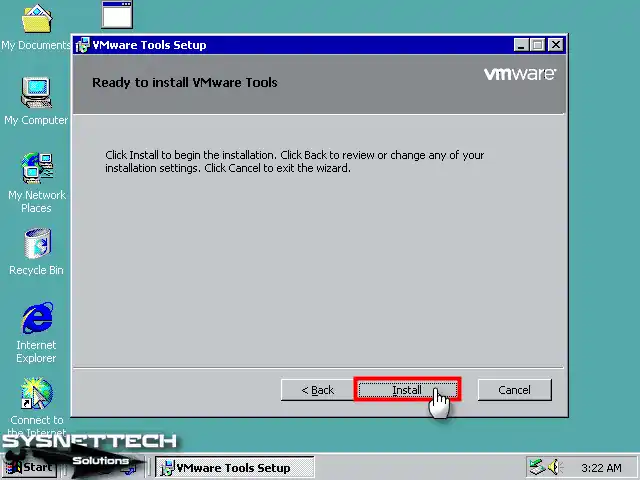
Step 13
Finally, click the Install button to start the installation of the virtual machine tools.
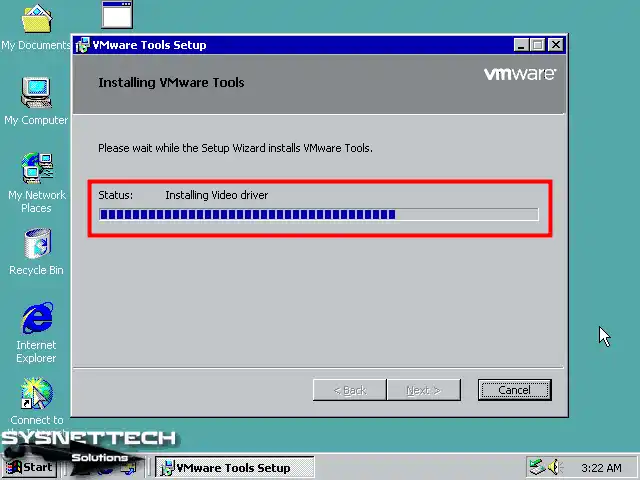
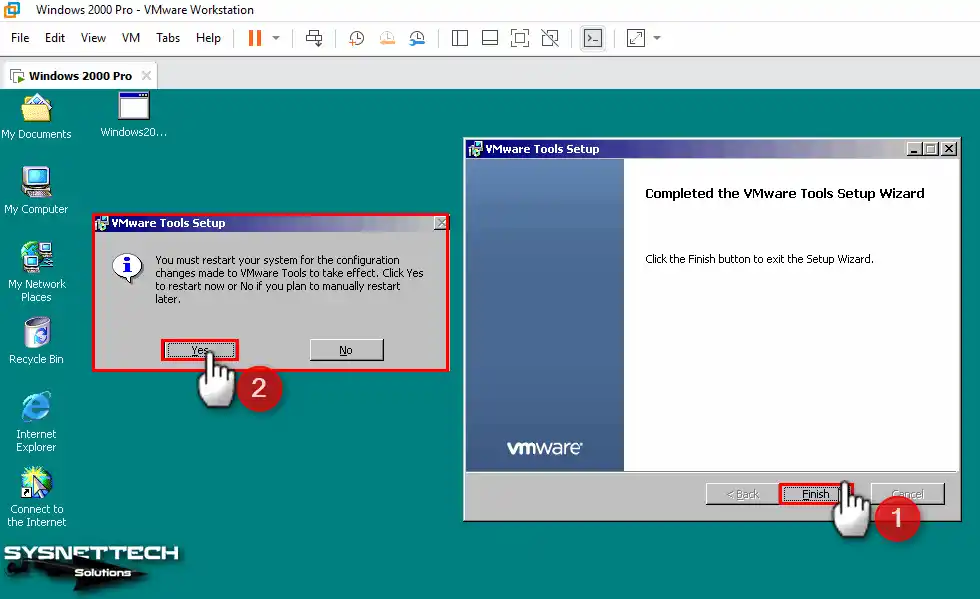
Step 14
After completing the VM Tools installation, click Finish, and after closing the window, restart your virtual system and ensure the settings are active.
Step 15
When you view Device Manager again after your system boots up, you can see that all drivers are installed.
Step 16
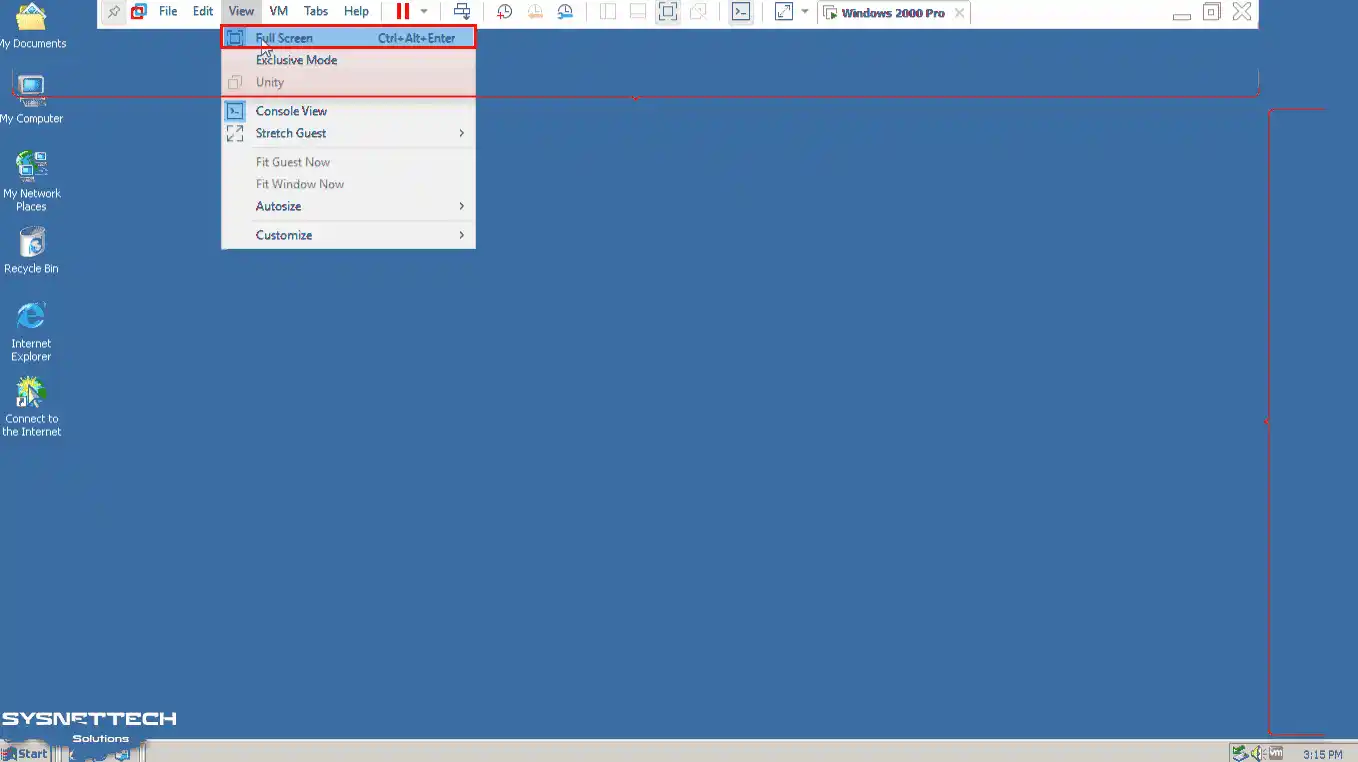
When you want to use your Windows guest machine in full-screen mode, click View / Full Screen from the tool menu and check that the resolution of the VM is adapted to the screen of your host PC.
Step 17
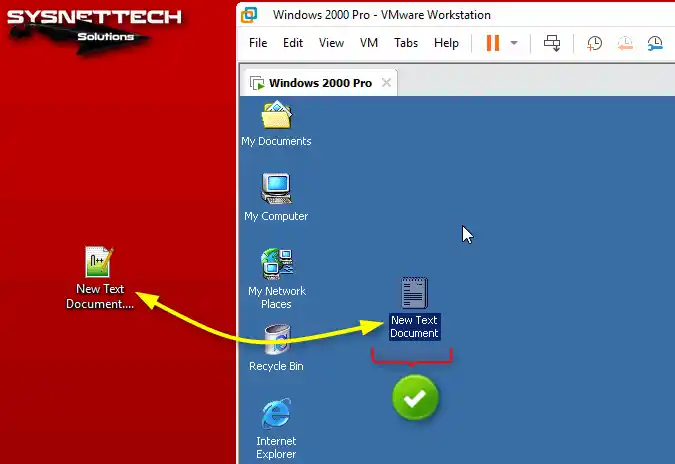
At the same time, drag and drop any of your files to quickly transfer files from your host system to your guest’s virtual system.
How to Configure the Internet Connection
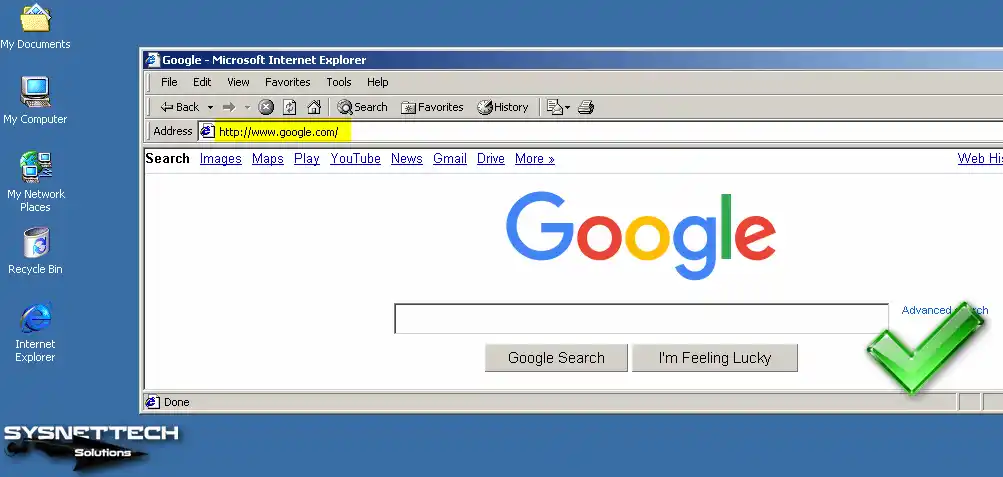
Another thing you will do on your virtual computer is to check the network and Internet connection. After you set the internet connection settings, you can easily access services such as Google.
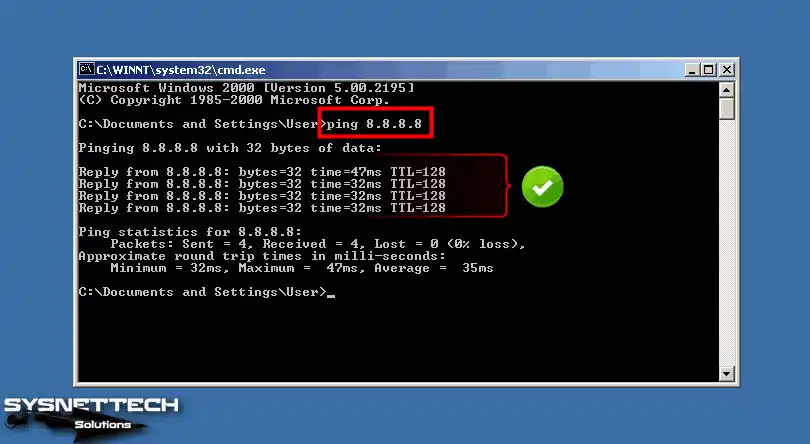
Step 1
First, open the Run agent from the Start Menu, type CMD in the text box, and press Enter. After opening the CMD command prompt, check that you can access Google servers with the ping 8.8.8.8 command.
Step 2
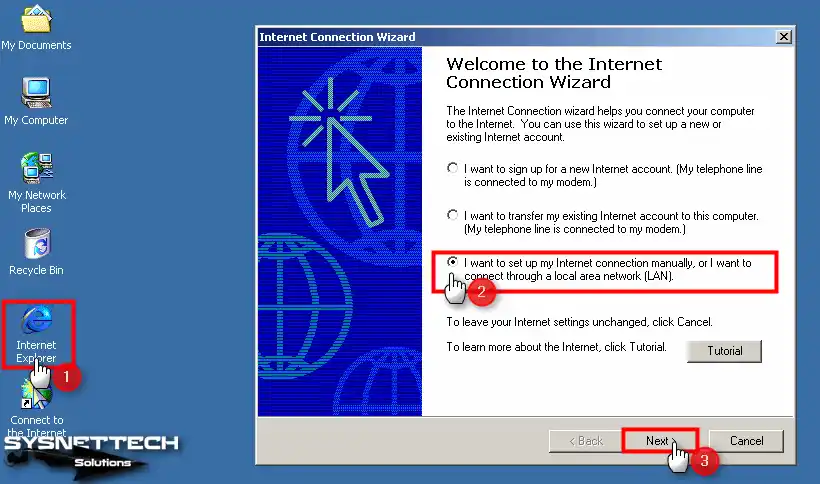
If your internet connection is working, when you click on the Internet Explorer browser, the Internet Connection Wizard will open. In this window, select I connect to the Internet via LAN option and click Next.
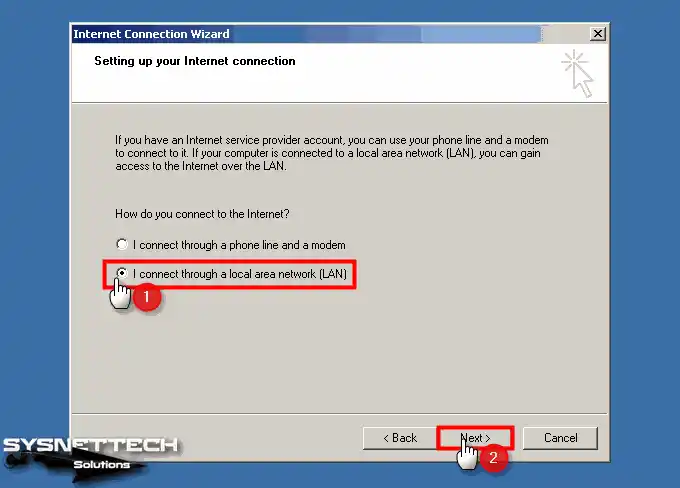
Step 3
Select the LAN connection setting again and click Next.
Step 4
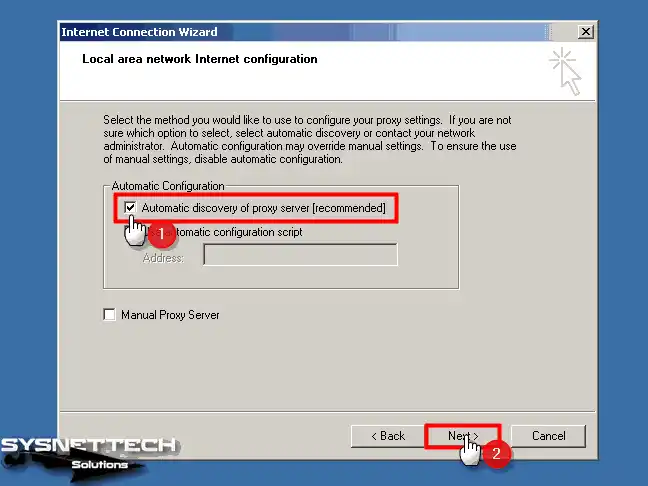
Enable automatic discovery of proxy servers and continue.
Step 5
If you want to set up an Internet Mail account, you can select Yes and make the necessary settings. Here, select No to configure the mail account later and click Next.

Step 6
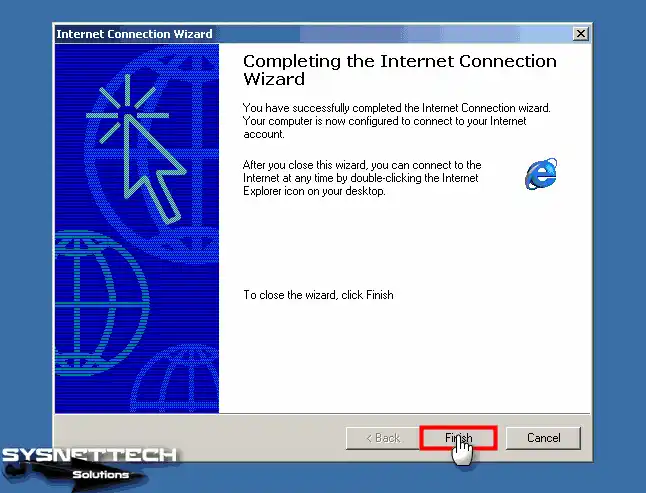
After configuring the Internet connection settings, click Finish to close the window.
Step 7
When the Internet Explorer browser automatically opens, visit the Google website and check your connection.
How to Configure Shared Folder
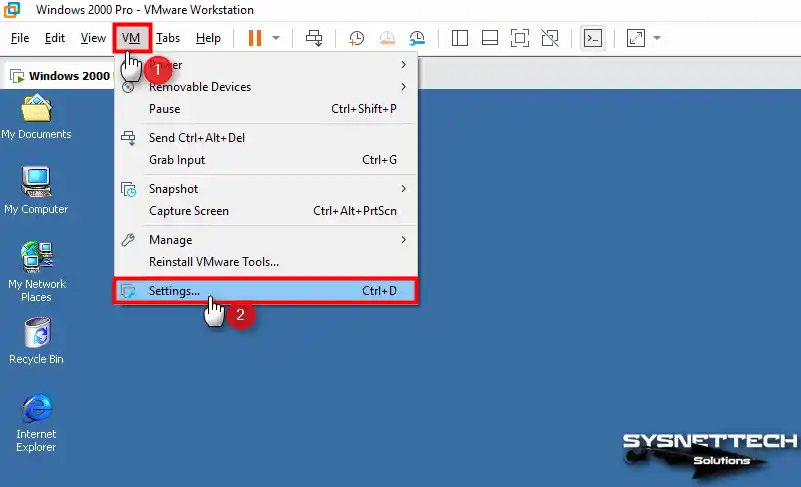
By activating the Shared Folder feature on your virtual computer, you can transfer files between the host and the VM more easily.
Step 1
Click VM / Settings to enable Shared Folder on Win2000 VM.
Step 2
In the Virtual Machine Settings window, click Options and then select the Shared Folders feature.
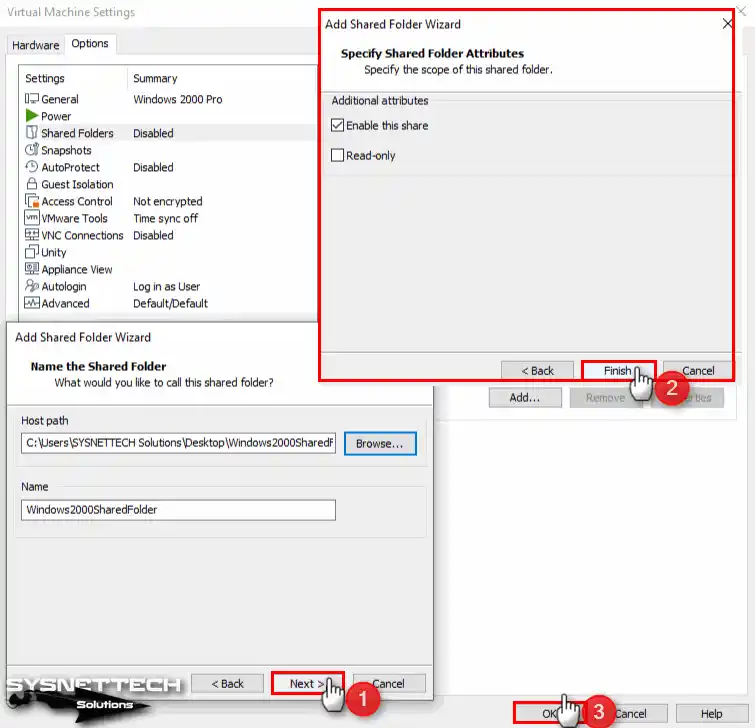
Enable the Folder Sharing setting on the right, check the relevant option to use the shared folder as a network drive, and click the Add button to select a shared folder on the host.
When the Shared Folder wizard opens, click Next to continue.
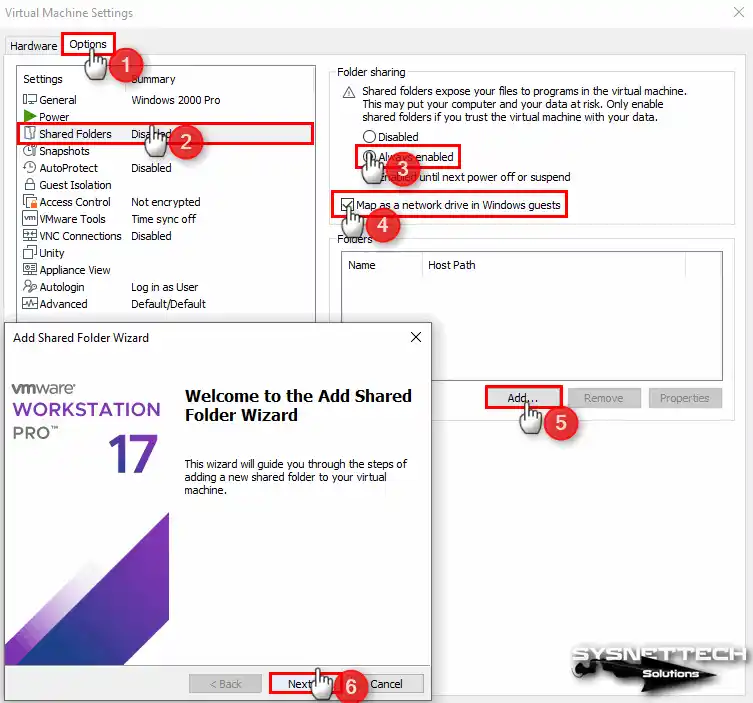
Step 3
Select a folder on your host via the Browse button.
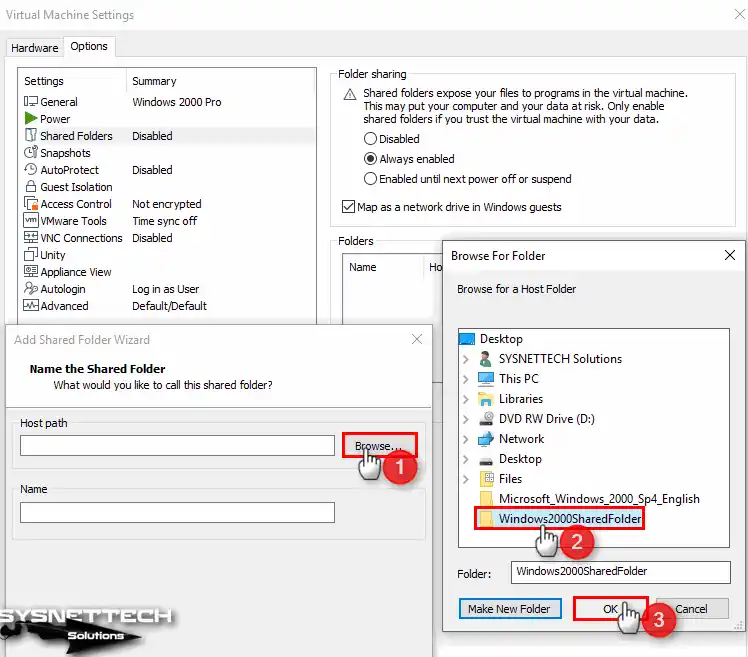
Step 4
Enable public folder sharing in this window and click Finish.
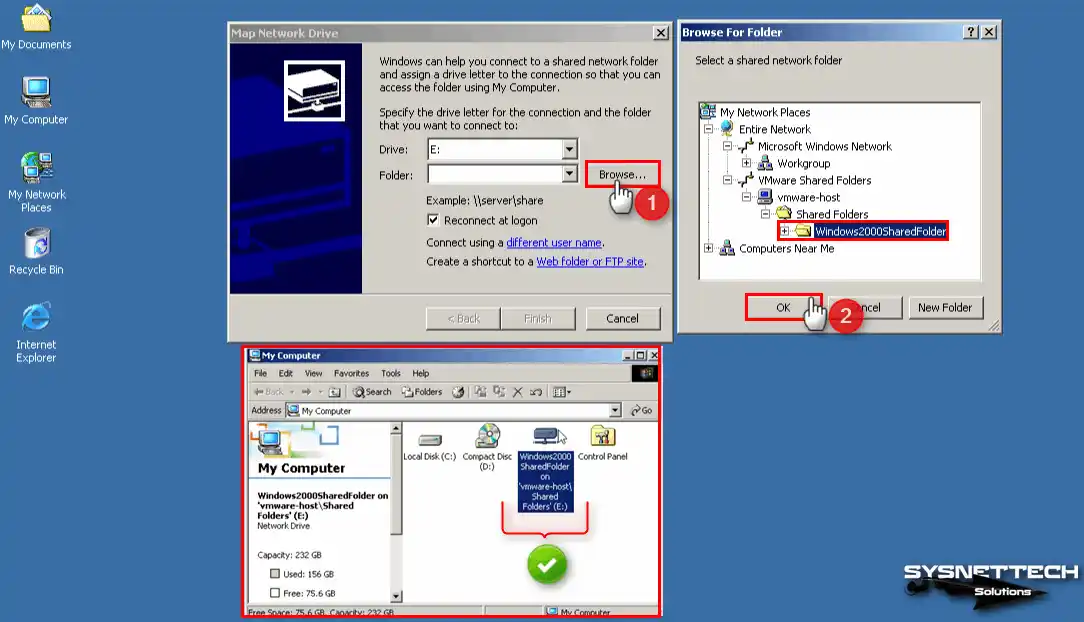
Step 5
Click My Network Places, and you can see that the operation is successful when you try to access the shared folder on the host, as in the image below.

Step 6
Also, to use the public folder as a network drive, click Map Network Drive on My Computer, and then add the Shared Folder location via Browse to the Folder section.
How to Use USB Flash Memory
Using a Flash Memory or Portable Hard Disk using the USB connection port on Windows 2000 is possible without driver installation.
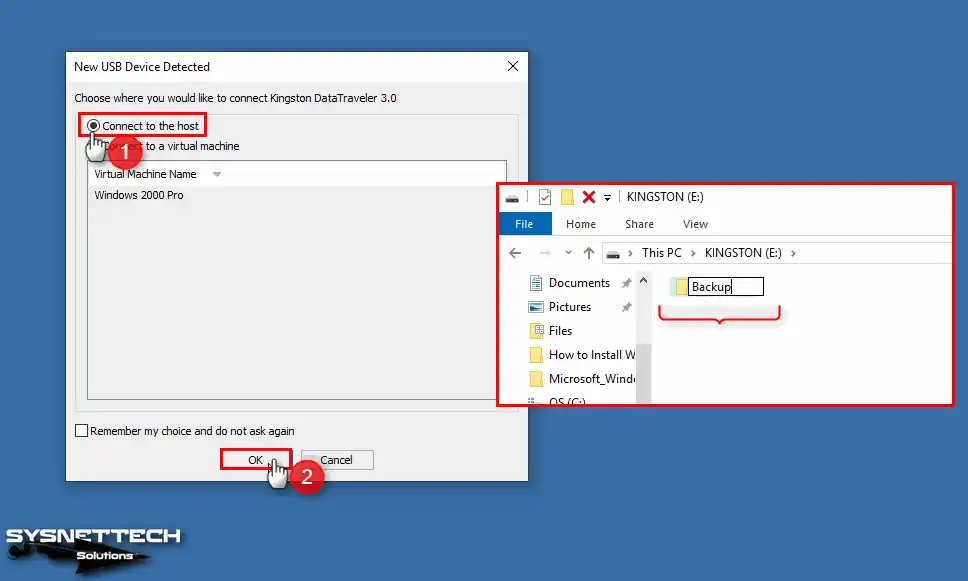
Step 1
After plugging your USB flash drive into the host’s USB port, the New USB Device Detected window will open on VMware. In this window, first, enable the Connect to the Host option and click OK.
Create a folder called Backup in your USB memory on your host system.
Step 2
To connect your USB disk to the VM, click VM / Removable Devices / Name of your USB / Connect from the Workstation tool menu.
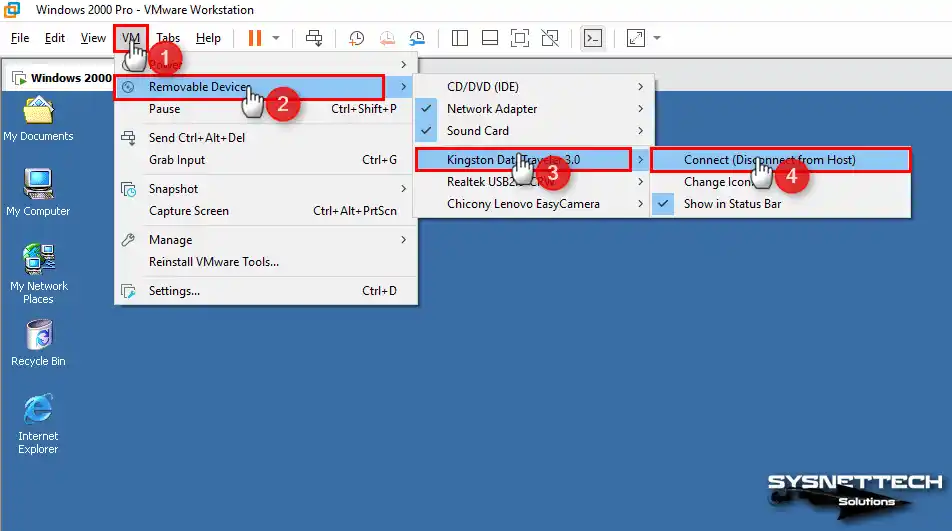
Step 3
The system will automatically install the drivers for your USB flash memory. When you check Device Manager, you can see that KINGSTON DataTraveler 3.0 USB Device is active.

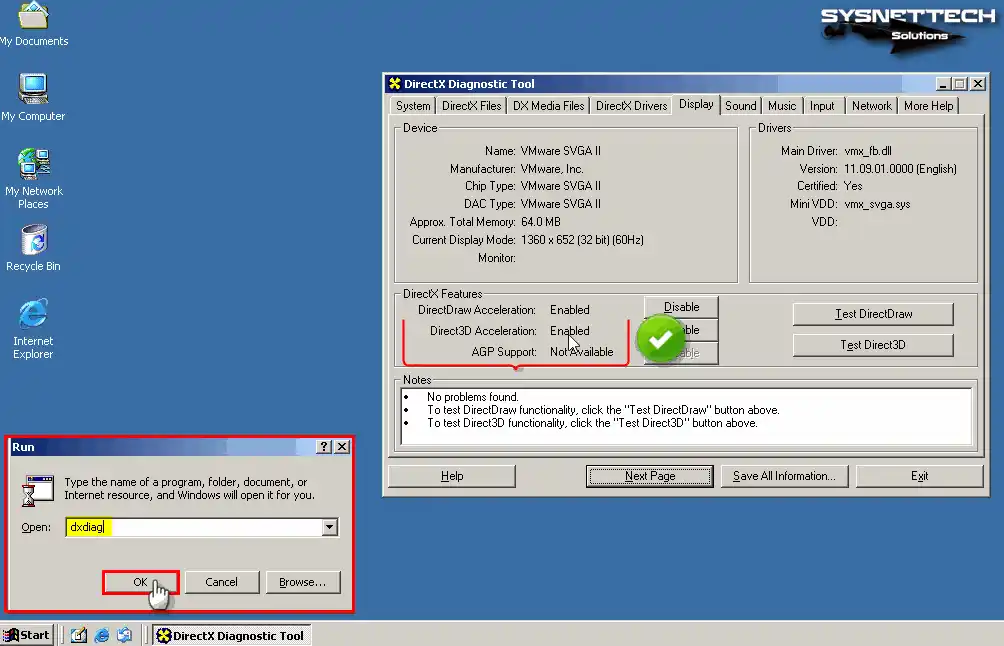
How to Check Direct3D
After installing your Win2K system on the virtual PC, you should be able to play games outside of your work or use applications that require 3D acceleration.
If you had selected a higher virtual hardware compatibility value instead of 10.x when creating the VM, Direct3D Acceleration would not be enabled on your virtual system and would appear Disabled.
To check if the Direct3D feature is enabled on your system, press the Windows + R keys together, and then type and run the “dxdiag” command in the window that opens.
To check if the Direct3D feature is enabled on your system, press the Windows + R keys together, and then type and run the “dxdiag” command in the window that opens.
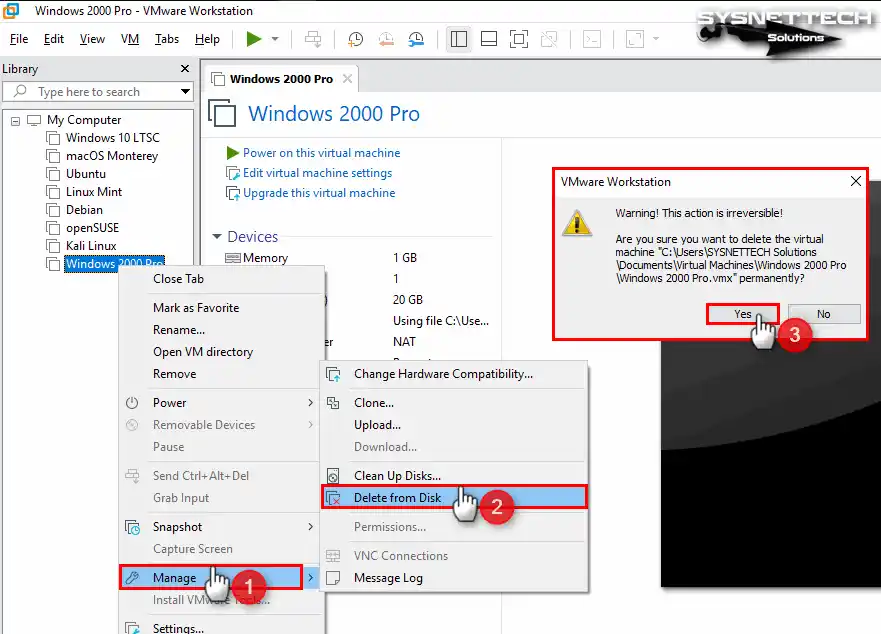
How to Delete the VM
If you no longer want to run your Win2K guest machine on your host PC, we recommend deleting all VM files completely to save disk space.
Right-click on your guest machine from the left panel of Workstation Pro and click Manage / Delete From Disk. In the warning window that opens, click Yes to confirm the deletion of all your virtual system files.
Video
Installing Old Versions
| Workstation Version | Youtube Video | Slide |
|---|---|---|
| 14 Pro | Watch | – |
| 16 Pro | Watch | View |
| 17 Pro (NEW) | Watch | – |
Conclusion
As a result, it is possible to run Windows 2000 on a virtual machine with VMware Workstation 17 Pro. This gives you the way to experience the classic operating system on modern hardware.
With the steps I outline in this article, you can create a new virtual machine. Additionally, you can easily install Windows 2000. Whether for nostalgic purposes or custom software compatibility, this method is functional.
Virtualization of Windows 2000 opens up new possibilities. In today’s computing environment, it is effective for interacting with the legacy system. This helps users interact with the legacy system.
Activate VMware products with multikeygen by BTCR. Below, you can find the supported softs.
Supported Programs
- VMware vCenter 8 Foundation VMware vCenter 8 Standard
- VMware vCenter 8 Essential
- VMware vCenter 8 Standard for Embedded OEMs
- VMware vCloud Suite Standard
- VMware vCloud Suite Advanced
- VMware vCloud Suite Enterprise
- VMware vRealize Automation Advanced
- VMware vRealize Automation Enterprise
- VMware vRealize Suite 2018 Advanced
- VMware vRealize Suite 2018 Enterprise
- VMware vRealize Suite 2019 Advanced
- VMware vRealize Flex Advanced
- VMware vRealize Flex Enterprise
- VMware vRealize Cloud Advanced
- VMware vRealize Cloud Enterprise
- VMware vSAN Enterprise Plus
- VMware vSAN For Tanzu
- VMware vSAN Enterprise For Retail And Branch Offices
- VMware vSAN Enterprise For Desktop
- VMware vSAN Standard For Embedded OEMs
- VMware vSAN Standard
- VMware vSAN Enterprise for Embedded OEMs
- VMware vSAN Enterprise
- VMware vSAN Advanced For Retail And Branch Offices
- VMware vSAN Advanced for Desktop
- VMware vSAN Advanced For Embedded OEMs
- VMware vSAN Advanced
- VMware vSAN Advanced (Stretched Cluster) For Desktop
- VMware vSAN Advanced (Stretched Cluster)
- VMware vSphere 8 ESXi Enterprise Plus Retail
- VMware vSphere 8 ESXi Enterprise Plus Kubernetes
- VMware Workstation Pro Linux v17
- VMware Workstation Player Linux v17
- VMware Workstation Player Windows v17
- VMware Workstation Pro Windows v17
- VMware Fusion v13
Screenshots
VMware Homepage
OS: Windows XP / Vista / 7 / 8 / 8.1 / 10 (x86-x64)
Language: ENG
Size: 0,80 MB.
Login or register to see spoiler’s content
Spoilers are only visible for VIP users.