
Broadcom Driver Downloads
The latest LAN driver downloads for Broadcom NetXtreme and Broadcom Netlink 4401 Fast Ethernet and Gigabit Ethernet NICs (network interface cards/controllers) can be found here.
For other drivers please visit www.broadcom.com.
NetXtreme | Netlink 4401
latest LAN drivers for Broadcom NetXtreme 10/100/1000M Gigabit Ethernet (GbE) and 10/100M Fast Ethernet (FE) NICs, also called NetXtreme Desktop/Mobile and NetXtreme Server
To use BCM5700, BCM5701 and BCM5702 devices under Vista, Windows Server 2008, Windows Server 2008 R2, or Windows 7, please use the Windows XP/2003 (x64) driver — they are not supported by the later drivers.
| system | version | size | date |
|---|---|---|---|
| Windows Vista x64 Windows 7 x64 Windows 8 x64 Windows 8.1 x64 Windows 10 x64 |
v17.2.0.2 | 186 KiB | 2015/10/26 |
| Windows Vista Windows 7 Windows 8 Windows 8.1 Windows 10 |
v17.2.0.2 | 163 KiB | 2015/10/26 |
| Windows XP x64 Windows 2003 x64 |
v15.2.0.4 | 202 KiB | 2014/04/10 |
| Windows XP Windows 2003 |
v15.2.0.4 | 184 KiB | 2014/04/10 |
| Windows XP IA64 Windows 2003 IA64 Windows 2008 IA64 |
v14.2.0.5a | 268 KiB | 2010/08/06 |
| Windows 2000 | v14.2.0.5a | 94 KiB | 2010/08/06 |
| Windows 98SE Windows ME |
v10.24d | 62 KiB | 2007/02/01 |
| Windows NT 4.0 | v10.62.1.2c | 68 KiB | 2008/05/23 |
| DOS | NDIS2 v16.2.0 | 26 KiB | 2014/08/19 |
| ODI16 v16.2.0 | 28 KiB | 2014/08/19 | |
| Linux | tg3 v3.137k | 398 KiB | 2015/10/28 |
Netlink 4401
latest LAN drivers for Broadcom Netlink 4401 10/100M Fast Ethernet (FE) NICs
| system | version | size | date |
|---|---|---|---|
| Windows 7 Windows 8 Windows 8.1 Windows 10 |
included | — | — |
| Windows XP x64 Windows 2003 x64 Windows Vista x64 |
v4.60 | 32 KiB | 2007/02/02 |
| Windows 98SE Windows ME Windows 2000 Windows XP Windows 2003 Windows Vista |
v4.60 | 44 KiB | 2007/02/02 |
| DOS | NDIS2 v3.12 | 15 KiB | 2006/06/26 |
| ODI16 v3.11 | 16 KiB | 2006/06/26 | |
| Netware | ODI32 v2.04 | 14 KiB | 2006/06/26 |
Back to Contents

Windows® .NET Advanced Server Driver Software:
Broadcom NetXtreme™ Gigabit Ethernet Adapter User’s
Guide
This chapter provides the following information:
Installing
the Driver Software
Modifying
Configuration Parameters
Removing
the Driver Software
| NOTE The Gigabit Ethernet Adapter must be physically installed in your system prior to installing the driver software. See Installing the Hardware for details. |
When the Windows .NET system first boots up after installing a new hardware
device, such as a Gigabit Ethernet Adapter, the system automatically detects
&the new hardware and prompts you to install the driver software for that
device.
A network device driver must be installed before the Gigabit Ethernet Adapter
can be used with your Windows .NET system.
Installing the Adapter Software
To install the adapter software for Windows .NET, do
the following
| NOTE Before beginning this procedure, verify that the Windows .NET system has been upgraded to the latest version with the latest service pack applied. |
- Start your Windows .NET system
and log in. You must have Network Administrator privileges to install the
driver software.
When you boot up the Windows .NET system after installing the adapter
card, a series of Found New Hardware windows are displayed.
Updating the Adapter Software
To update the adapter software for Windows .NET, do the
following
- Start your Windows .NET system
and log in. You must have Network Administrator privileges to update the driver
software. - From the Start
menu, right click My Computer and select System Properties to
display the following menu.


- When the System Properties window
opens, click the Hardware tab to display the following menu.

- When the Device Manager window
opens, right-click on the Broadcom NetXtreme™ Gigabit Ethernet adapter
and select Update Driver.
- In the Hardware Update Wizard window, select Install
the software automatically (Recommended), then click Next.

The Hardware Update Wizard searches
for the appropriate driver and automatically updates the software.
If asked to specify the location of the Windows .NET
CD-ROM instead, click Browse (dont use the text entry field) and locate
the path to the Gigabit Ethernet drivers that was specified above.
- Once the software update is complete,
click Finish to close the wizard and complete the software installation.
Once installation of the driver software is complete, you are ready to modify
configuration parameters.
Back
to Top
Modifying Configuration Parameters
Although the default values should be appropriate in most cases, you may change
any of the available options to meet the requirements of your specific system.
Once the adapter driver software has been installed, you can use this procedure
to verify or change the following adapter properties:
- 802.1p
QOS - Checksum Offload
- Ethernet@WireSpeed™
- Flow Control
- Jumbo Mtu
- Large Send Offload
- Speed & Duplex
- Wake Up Capabilities
- WOL Speed
Driver Properties
Advanced Tab
To configure the adapter parameters,
bring up the Driver Properties Advanced tab as follows:
- Click Start then select Control Panel from
the pop-up menu. - Click on the Performance Maintenance category, then click
on the System Control Panel icon to display the System Properties window. - Click the Hardware tab and then click Device
Manager. The Device Manager window displays. - Scroll down the list of hardware devices to Network
Adapters. Click the plus (+) to the left of the icon to display the list
of adapters currently configured. - Double-click the Gigabit Ethernet Adapter you want to
configure. The Gigabit Ethernet Properties window displays, showing the General
tab.
- Click the Advanced tab. A window showing the list
of configurable properties (and default values) for the adapter displays.
- Change the operating parameters as desired. To change
adapter operating parameters listed under the Advanced tab, click on
the options listed under Properties and then use the pull-down window
under Value to change the default or assigned value.

802.1p
QOS Parameter
The 802.1p QOS parameter is
a standard that enables Quality of Service. Disabled by default, select Enable
from the Value drop-down menu to enable this parameter. Once enabled, select
Disable from the Advanced tab «Value» drop-down menu
to disable this parameter.

Checksum Offload Parameter
Normally the Checksum Offload
function is computed by the protocol stack. By selecting one of the Checksum
Offload parameters, the checksum can be computed by the Gigabit Ethernet
Adapter. To enable one of the Checksum Offload parameters, select the
parameter from the Advanced tab «Value» drop-down menu. These
parameters are described and shown below:
- Rx TCP/IP Checksum — Enables
receive TCP, IP, and UDP checksum offloading - Tx TCP/IP Checksum — Enables
transmit TCP, IP, and UDP checksum offloading - Tx/Rx TCP/IP Checksum (default)
— Enables transmit and receive TCP, IP, and UDP checksum offloading
Ethernet@WireSpeed™ Parameter
The
Ethernet@WireSpeed parameter enables a 1000BASE-T Ethernet adapter to
establish a link at a lower speed when only 2 pairs of wires are available in
the cable plant. By default, the adapter is set to Enable. To disable
the Ethernet@WireSpeed™ parameter, select Disable from the «Value»
drop-down menu as shown below:
- Disable — Disables Ethernet@WireSpeed
- Enable (default) — Enables
Ethernet@WireSpeed
Flow Control Parameter
The Flow Control parameter allows
the user to enable or disable the receipt or transmission of PAUSE frames. PAUSE
frames enable the adapter and the switch to control the transmit rate. The side
that is receiving the PAUSE frame will momentarily stop transmitting. The recommended
selection is Disable, which will configure the adapter to ignore PAUSE
frames. Disabled by default, to enable Flow Control to receive, transmit, or
receive and transmit PAUSE frames, select the appropriate parameter from the
Advanced tab «Value» drop-down menu described and shown below.
- Auto — PAUSE frame receipt
and transmission is optimized - Disable — (default) PAUSE frame receipt
and transmission is disabled (recommended) - Rx PAUSE — PAUSE
frame receipt is enabled - Rx/Tx PAUSE —
PAUSE frame receipt and transmission is enabled - Tx PAUSE — PAUSE
frame transmission is enabled
Jumbo Mtu Parameter
The Jumbo Mtu parameter allows
the adapter to transmit and receive oversized Ethernet frames that are greater
than 1514 but less than 9000 bytes in length. Note that this parameter will
require a switch that is able to process large frames.
Set at 1500 bytes by default,
to increase the size of the received frames, increment the byte quantity in
500-byte increments from the Advanced tab «Value» counter,
shown below.
Large Send Offload Parameter
Normally the TCP segmentation is
done by the protocol stack. By enabling the Large Send Offload value,
the TCP segmentation can be done by the Gigabit Ethernet Adapter. To enable
the Large Send Offload, select the parameter from the Advanced
tab «Value» drop-down menu. These values are described and shown below:
| NOTE Large Send Offload features are only supported on the 5701 NetXtreme Adapter. |
- Disable — Disables large
send offloading - Enable (default) — Enables
large send offloading
Speed &
Duplex Parameter
The Speed & Duplex parameter
allows the user to set the connection speed to the network and mode. Note that
Full-Duplex Mode allows the adapter to transmit and receive network data simultaneously.
The adapter is set to Auto (optimum connection) by default. Set the speed
and mode as described and shown below:
- 10 Mb Full — Sets the speed
at 10Mbps and mode to Full Duplex - 10 Mb Half — Sets the speed
at 10Mbps and mode to Half Duplex - 100 Mb Full — Sets the
speed at 100Mbps and mode to Full Duplex - 100 Mb Half — Sets the
speed at 100Mbps and mode to Half Duplex - Auto — (Default) Sets the
speed and mode for optimum network connection (recommended)
|
NOTE 1Gbps speed is enabled by selecting Auto. |
|
NOTES Auto is the recommended selection. |
Wake Up Capabilities
Parameter
The Wake Up Capabilities parameter
allows the user to set the adapter to wake up from a low power mode when it
receives a network wake up frame. Two wake up frames are possible: Magic
Packet and Wake Up Frame. By default, the adapter is set to Both.
To set the adapter to wake up from a frame, select the appropriate Advanced
tab parameter from the «Value» drop-down menu as described and shown
below:
- Both (default) — Selects
both Magic Packet and Wake Up Frame as wake up frames - Magic Packet — Select Magic
Packet as the wake up frame - None — Selects no wake
up frame - Wake Up Frame
— Selects Wake Up Frame as the wake up frame
WOL Speed Parameter
The WOL Speed parameter allows
the user to select the speed at which the adapter connects to the network during
Wake-on-LAN mode. By default, the adapter is set to Auto. Set the speed
as described and shown below:
| NOTE WOL Speed at 100 Mb is only supported on the 5701 NetXtreme Adapter. |
- 10 Mb — Sets the speed
at 10 Mb - 100 Mb — Sets the speed
at 100 Mb - Auto (default) — Sets the
speed for optimum network connection
Save Settings
- When the adapter parameter configuration is complete,
click OK at the Gigabit Ethernet Controller Properties screen to accept
the settings. - If prompted to restart your computer, click Yes.
Note that, while it is not necessary to reboot the system for new adapter
properties to take effect, rebooting is recommended to reinitialize all registers. - Verify that the adapter port LEDs operate as described
in Table 1 in the Introduction.
Back
to Top
Power Management
Power management specifies whether
the operating system turns off the selected device if that device is able to
be turned off. If the device is busy doing something, however, (servicing a
call, for example), the operating system will not shut down the device. The
operating system will try to shut down every possible device only when it is
hibernating. Some devices must stay on at all times. If you need the device
to stay on at all times, do not check this box.

| NOTE To enable the Wake-on LAN in standby mode for the Broadcom NetXtreme™ Gigabit Ethernet adapter you must select the «Allow the device to bring the computer out of standby» checkbox. |
Removing the Driver Software
Before physically removing an adapter from your system,
first remove the adapter driver software.
- Start your Windows .NET system and log in. You must
have Network Administrator privileges to remove the driver software. - Open the Control Panel and double-click the System icon.
- At the System Properties screen, click the Hardware
tab.
-
Click Device Manager.
The Device Manager screen will appear.
- Expand Network adapters
(click the + sign). All network adapters will display.
- Right-click on the adapter to be removed and select Uninstall.
- Click OK to complete the installation.
|
NOTE Not all driver files are removed as part |
Back
to Top
Back
to Contents
Как вы знаете, Windows Server – это специализированная операционная система, предназначенная только для сервера. В сегодняшнем посте я покажу вам, как бесплатно активировать Windows на вашем VPS или выделенном сервере с помощью ключей клиентского продукта KMS. Хотя лицензия KMS действительна только в течение 180 дней, но количество активаций не ограничено. Таким образом, вы можете обновить его, когда захотите. На самом деле, лицензия будет обновляться автоматически каждые 7 дней по умолчанию (почти аналогично Let’s Encrypt certificate). Таким образом, просто сделайте это один раз и полностью забудьте об этом.
Поддерживаемые продукты:
- Windows Server 2022/2019/2016.
- Windows Server, версия 1809, 1803, 1709.
- Windows Server 2008/2012 (R2).
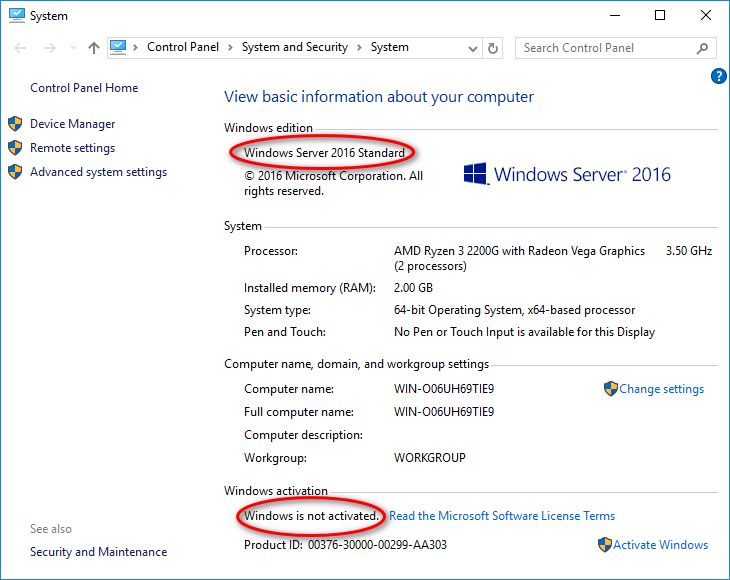
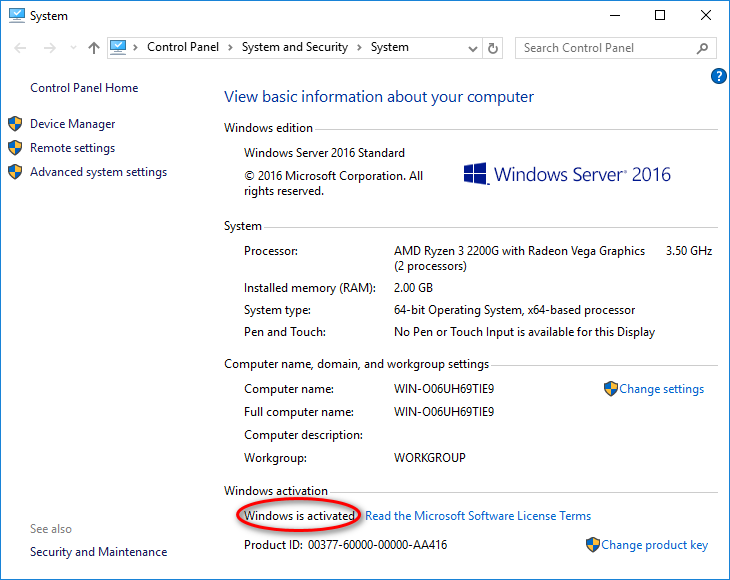
Как вы можете видеть на изображении выше, я использую копию стандарта Windows Server 2016, и она не активирована.
Метод 1: Ручная установка клиентского ключа KMS и его активация.
Метод 2: Использование предварительно написанного пакетного файла.
Метод 1: Ручная установка клиентского ключа KMS и его активация.
Шаг 1.1: Получите правильный ключ продукта от официальная статья Microsoft.
Ключ настройки клиента KMS стандарта Win Server 2016: “ WC2BQ-8NRM3-FDDYY-2BFGV-KHKQY ”. Я буду использовать это на следующем шаге.
Шаг 1.2: Установите ключ на вашем сервере.
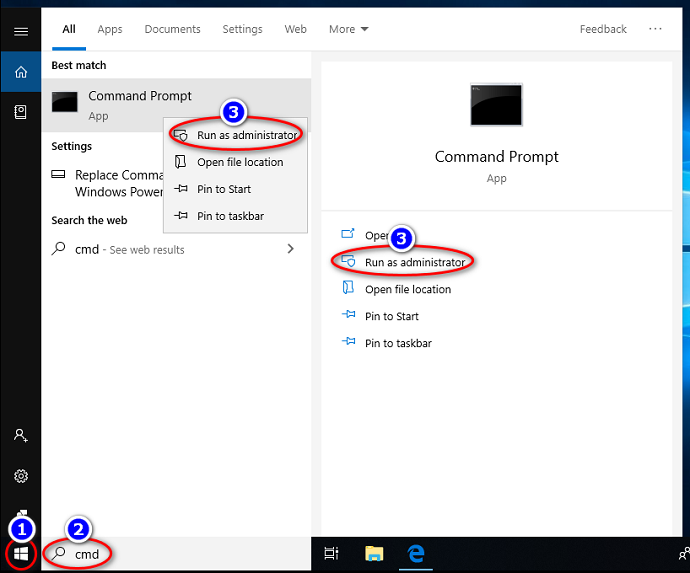
Чтобы открыть командную строку, нажмите кнопку Windows, найдите “ cmd ” и запустите командную строку в качестве администратора. Затем введите “ slmgr /ipk CLIENTKEY ” в командном окне.
Примечание: за каждой командой следует нажатие Enter.

запустить команду slmgr ipk
Шаг 1.3: Установите сервер KMS.
Введите “ slmgr /skms km8.msguides.com ” в окне.

Шаг 1.4: Активируйте клиентский ключ KMS.
Наконец, используйте команду “slmgr /ato ”, чтобы активировать Windows.
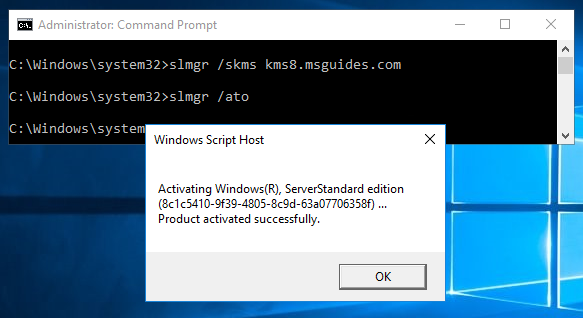
запустить команду slmgr ato
Если вы видите ошибку 0xC004F074, это означает, что ваше интернет-соединение нестабильно или сервер занят. Пожалуйста, убедитесь, что ваше устройство подключено к сети, и повторите команду “ ato ”, пока не добьетесь успеха.
Метод 2: Использование предварительно написанного пакетного файла.
Этот больше не рекомендуется из-за новое обновление Microsoft.
Шаг 2.1: Скопируйте весь текст ниже в текстовый файл.
@echo off
title Activate Windows Server (ALL versions) for FREE - MSGuides.com&cls&echo =====================================================================================&echo #Project: Activating Microsoft software products for FREE without additional software&echo =====================================================================================&echo.&echo #Supported products:&echo http://bit.ly/kmsclientkeys&echo.&echo.&echo ============================================================================&echo Activating your Windows...&set i=1
cscript //nologo slmgr.vbs /ipk 4DWFP-JF3DJ-B7DTH-78FJB-PDRHK >nul||cscript //nologo slmgr.vbs /ipk 22XQ2-VRXRG-P8D42-K34TD-G3QQC >nul||cscript //nologo slmgr.vbs /ipk 7M67G-PC374-GR742-YH8V4-TCBY3 >nul||cscript //nologo slmgr.vbs /ipk RCTX3-KWVHP-BR6TB-RB6DM-6X7HP >nul||cscript //nologo slmgr.vbs /ipk 39BXF-X8Q23-P2WWT-38T2F-G3FPG >nul||cscript //nologo slmgr.vbs /ipk YQGMW-MPWTJ-34KDK-48M3W-X4Q6V >nul||cscript //nologo slmgr.vbs /ipk W7VD6-7JFBR-RX26B-YKQ3Y-6FFFJ >nul||cscript //nologo slmgr.vbs /ipk TM24T-X9RMF-VWXK6-X8JC9-BFGM2 >nul||cscript //nologo slmgr.vbs /ipk WYR28-R7TFJ-3X2YQ-YCY4H-M249D >nul||cscript //nologo slmgr.vbs /ipk GT63C-RJFQ3-4GMB6-BRFB9-CB83V >nul||cscript //nologo slmgr.vbs /ipk 74YFP-3QFB3-KQT8W-PMXWJ-7M648 >nul||cscript //nologo slmgr.vbs /ipk 489J6-VHDMP-X63PK-3K798-CPX3Y >nul||cscript //nologo slmgr.vbs /ipk YC6KT-GKW9T-YTKYR-T4X34-R7VHC >nul||cscript //nologo slmgr.vbs /ipk TT8MH-CG224-D3D7Q-498W2-9QCTX >nul||cscript //nologo slmgr.vbs /ipk 6TPJF-RBVHG-WBW2R-86QPH-6RTM4 >nul||cscript //nologo slmgr.vbs /ipk 48HP8-DN98B-MYWDG-T2DCC-8W83P >nul||cscript //nologo slmgr.vbs /ipk XNH6W-2V9GX-RGJ4K-Y8X6F-QGJ2G >nul||cscript //nologo slmgr.vbs /ipk HM7DN-YVMH3-46JC3-XYTG7-CYQJJ >nul||cscript //nologo slmgr.vbs /ipk XC9B7-NBPP2-83J2H-RHMBY-92BT4 >nul||cscript //nologo slmgr.vbs /ipk 4K36P-JN4VD-GDC6V-KDT89-DYFKP >nul||cscript //nologo slmgr.vbs /ipk 2WN2H-YGCQR-KFX6K-CD6TF-84YXQ >nul||cscript //nologo slmgr.vbs /ipk 8N2M2-HWPGY-7PGT9-HGDD8-GVGGY >nul||cscript //nologo slmgr.vbs /ipk BN3D2-R7TKB-3YPBD-8DRP2-27GG4 >nul||cscript //nologo slmgr.vbs /ipk KNC87-3J2TX-XB4WP-VCPJV-M4FWM >nul||cscript //nologo slmgr.vbs /ipk W3GGN-FT8W3-Y4M27-J84CP-Q3VJ9 >nul||cscript //nologo slmgr.vbs /ipk D2N9P-3P6X9-2R39C-7RTCD-MDVJX >nul||cscript //nologo slmgr.vbs /ipk JCKRF-N37P4-C2D82-9YXRT-4M63B >nul||cscript //nologo slmgr.vbs /ipk WC2BQ-8NRM3-FDDYY-2BFGV-KHKQY >nul||cscript //nologo slmgr.vbs /ipk CB7KF-BWN84-R7R2Y-793K2-8XDDG >nul||cscript //nologo slmgr.vbs /ipk WVDHN-86M7X-466P6-VHXV7-YY726 >nul||cscript //nologo slmgr.vbs /ipk N69G4-B89J2-4G8F4-WWYCC-J464C >nul||cscript //nologo slmgr.vbs /ipk WMDGN-G9PQG-XVVXX-R3X43-63DFG >nul||cscript //nologo slmgr.vbs /ipk DPCNP-XQFKJ-BJF7R-FRC8D-GF6G4 >nul||cscript //nologo slmgr.vbs /ipk 6Y6KB-N82V8-D8CQV-23MJW-BWTG6 >nul||cscript //nologo slmgr.vbs /ipk PTXN8-JFHJM-4WC78-MPCBR-9W4KR >nul||cscript //nologo slmgr.vbs /ipk 2HXDN-KRXHB-GPYC7-YCKFJ-7FVDG >nul||cscript //nologo slmgr.vbs /ipk N2KJX-J94YW-TQVFB-DG9YT-724CC >nul||cscript //nologo slmgr.vbs /ipk 6NMRW-2C8FM-D24W7-TQWMY-CWH2D >nul||cscript //nologo slmgr.vbs /ipk WX4NM-KYWYW-QJJR4-XV3QB-6VM33 >nul||cscript //nologo slmgr.vbs /ipk VDYBN-27WPP-V4HQT-9VMD4-VMK7H >nul||goto notsupported
:skms
if %i% GTR 10 goto busy
if %i% EQU 1 set KMS=kms7.MSGuides.com
if %i% EQU 2 set KMS=kms8.MSGuides.com
if %i% EQU 3 set KMS=kms9.MSGuides.com
if %i% GTR 3 goto ato
cscript //nologo slmgr.vbs /skms %KMS%:1688 >nul
:ato
echo ============================================================================&echo.&echo.&cscript //nologo slmgr.vbs /ato | find /i "successfully" && (echo.&echo ============================================================================&echo.&echo #My official blog: MSGuides.com&echo.&echo #How it works: bit.ly/kms-server&echo.&echo #Please feel free to contact me at msguides.com@gmail.com if you have any questions or concerns.&echo.&echo #Please consider supporting this project: donate.msguides.com&echo #Your support is helping me keep my servers running 24/7!&echo.&echo ============================================================================&choice /n /c YN /m "Would you like to visit my blog [Y,N]?" & if errorlevel 2 exit) || (echo The connection to my KMS server failed! Trying to connect to another one... & echo Please wait... & echo. & echo. & set /a i+=1 & goto skms)
explorer "http://MSGuides.com"&goto halt
:notsupported
echo ============================================================================&echo.&echo Sorry, your version is not supported.&echo.&goto halt
:busy
echo ============================================================================&echo.&echo Sorry, the server is busy and can't respond to your request. Please try again.&echo.
:halt
pause >nul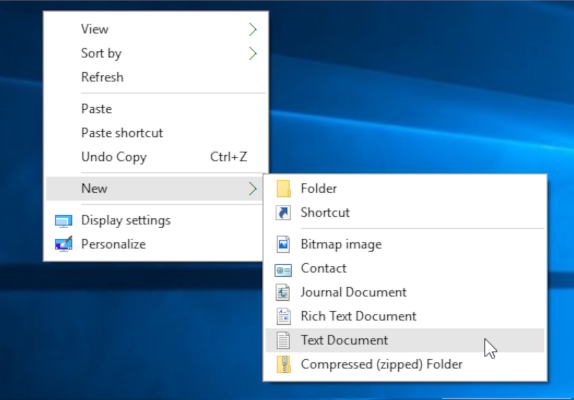
Создать новый текстовый документ
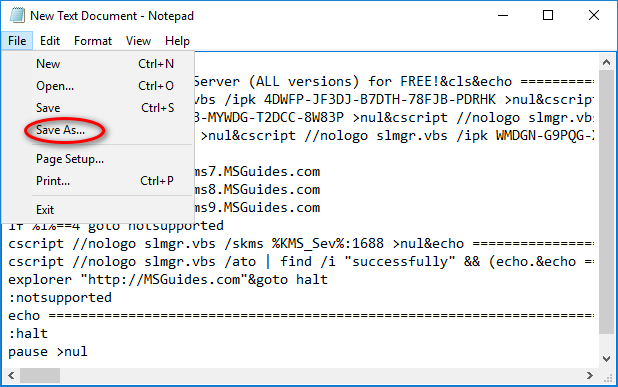
Сохранить пакетный скрипт
Шаг 2.2: Сохраните текстовый файл в виде пакетного файла с расширением .cmd. (Eg run.cmd)
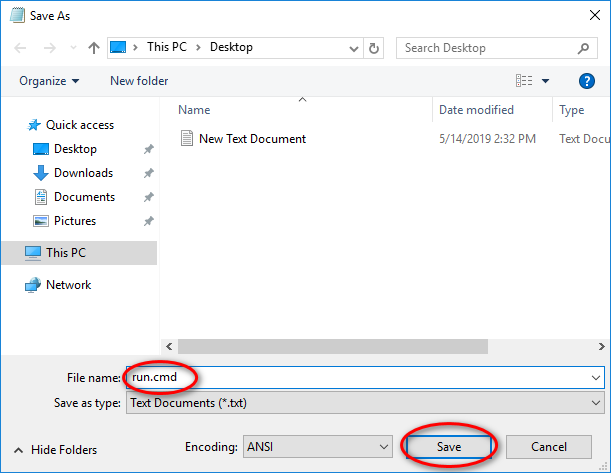
Установить имя пакетного скрипта
Шаг 2.3: Запустите пакетный файл с правами администратора.
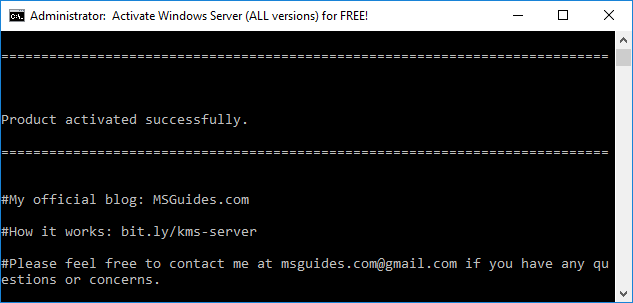
Windows Server успешно активирован
Наконец, проверьте статус активации вашего сервера еще раз.
На этом активация завершена. Спасибо за прочтение.
Несколько раз встречался с тем, что скорость копирования файлов по сети с/на виртуальные машины на Hyper-V в Windows Server 2019 намного ниже, чем в ВМ аналогичной конфигурации на хосте с Windows Server 2016. В некоторых тестах скорость записи/чтения данных по сети на ВМ в Windows Server 2019 почти в три раза ниже, чем в WS2016 (тестировалось копирование по SMB, SSH/SCP). Эта статья не претендует на абсолютную истину, но в ней я попытался собрать различные методики улучшения производительности сети в виртуальных машинах Hyper-V на Windows Server 2019 (и последних билдах Windows 10).
Receive Segment Coalescing в Hyper-V 2019
В первую очередь нужно вспомнить про технологии Receive Segment Coalescing (RSC), которая появилась в Hyper-V на Windows Server 2019/2022 (и в Windows 10 начиная с билда 1809). Receive Segment Coalescing используется на уровне виртуального коммутатора (vSwitch), позволяет снизить нагрузку на CPU и увеличить пропускную способность сети за счет объединения нескольких TCP сегментов в меньшее количество более крупных сегментов. Увеличение производительности сети достигается за счет того, что несколько больших сегментов обрабатывают быстрее множества мелких.
В предыдущих версиях Hyper-V на Windows Server 2016/2012R2 поддерживалась только аппаратная версия Receive Segment Coalescing на уровне сетевой карты.
Наличие включенной поддержки RSC часто бывает источником дополнительной сетевой задержки в некоторых комбинациях железа.
Проблема проявляется как в полноценной Windows Server 2019 с графическим интерфейсом, так и в бесплатной редакции Windows Hyper-V Server.
По умолчанию в Windows Server 2019 RSC включен для всех внешних (External) vSwitches.
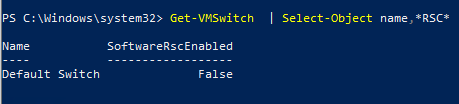
Проверить, включен ли RSC для виртуальных коммутаторов можно командой:
Get-VMSwitch | Select-Object *RSC*
Можно запретить использовать RSC для IPv4 трафика на уровне клиентского сетевого адаптера:
Disable-NetAdapterRsc -Name "Ethernet" -IPv4
Проверьте, увеличится ли скорость копирования в ВМ на Hyper-V при отключении RSC. Если скорость сети увеличилась, можно отключить RSC на виртуальном коммутаторе, к которому подключена ВМ.
Пропускную способность сети можно замерить с помощью утилиты iperf.
Чтобы отключить программный RSC для определенного виртуального коммутатора, выполните команду:
Set-VMSwitch -Name vSwitchName -EnableSoftwareRsc $false
Включить/отключить RSC можно на лету, это не повлияет на активные подключения.
Либо можно полностью отключить RSC на хосте:
netsh int tcp set global rsc=disabled
Режим VMQ в драйвере сетевого адаптера
В некоторых случаях наличие включенной опции VMQ (Virtual Machine Queue) в драйвере сетевого адаптера физического хоста Hyper-V может привести к плохой производительности сети в виртуальных машинах Hyper-V. Связано это с тем, что VMQ это аппаратная функция, и, если она не поддерживается железом, но включена в драйвере это вызывает потерю пакетов и увеличивает сетевую задержку. Эта проблема характерна для сетевых карточек Broadcom Gigabit и встречается во всех версиях Hyper-V на Windows 2012 R2/2016/2019.
VMQ предназначен для повышения производительности сети за счет передачи пакетов от физического сетевого адаптера напрямую виртуальным машинам.
Вы можете отключить VMQ в свойствах драйвера сетевого адаптера.
Либо вы можете вывести список сетевых адаптеров с поддержкой VMQ и их статус с помощью PowerShell:
Get-NetAdapterVmq
Чтобы отключить VMQ для определенного адаптера, выполните команду (сетевой адаптер будет недоступен в течении пары секунд):
Set-NetAdapterVmq -Name “NICName” -Enabled $False

После отключения VMQ лучше перезагрузить хост и проверить сетевую производительность.
Оптимизация параметров протокола TCP для Windows Server 2019 Hyper-V
Сохраните текущие настройки TCP на хосте Hyper-V и примените новые настройки, которые сделают настройки протокола TCP в Windows Server 2019 максимально похожими на Windows Server 2016.
Сохраните текущие настройки:
Get-NetTCPSetting -SettingName Datacenter,DatacenterCustom,InternetCustom,Internet|select SettingName,CongestionProvider,CwndRestart,ForceWS|Export-csv c:\ps\nettcp_backup.csv
В Windows Server 2019 и Windows 10 1709+ по-умолчанию используется реализация протокола TCP — CUBIC. Данный алгоритм оптимизирован для использования в высокоскоростных сетях с большой задержкой (также используется по-умолчанию в ядре Linux начиная с 2.6.19).
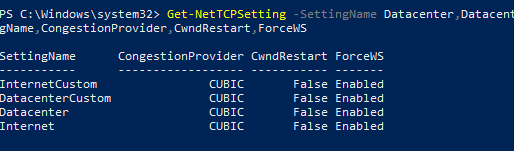
Следующие настройки нужно применять только на Windows Server 2019 или Hyper-V 2019.
Примените новые настройка для LAN сети:
Set-NetTCPSetting -SettingName DatacenterCustom,Datacenter -CongestionProvider DCTCP
Set-NetTCPSetting -SettingName DatacenterCustom,Datacenter -CwndRestart True
Set-NetTCPSetting -SettingName DatacenterCustom,Datacenter -ForceWS Disabled
Для WAN сети:
Set-NetTCPSetting -SettingName InternetCustom,Internet -CongestionProvider CTCP
Set-NetTCPSetting -SettingName InternetCustom,Internet -DelayedAckTimeoutMs 50
Set-NetTCPSetting -SettingName InternetCustom,Internet -ForceWS Disabled
Отключите методики оптимизации сетевого RSS и RSC на уровне стека TCP:
netsh int tcp show global
netsh int tcp set global RSS=Disabled
netsh int tcp set global RSC=Disabled
или на уровне сетевых адаптеров:
Get-NetAdapter | Set-NetAdapterAdvancedProperty -DisplayName "Recv Segment Coalescing (IPv4)" -DisplayValue "Disabled" -NoRestart
Get-NetAdapter | Set-NetAdapterAdvancedProperty -DisplayName "Recv Segment Coalescing (IPv6)" -DisplayValue "Disabled" -NoRestart
Get-NetAdapter | Set-NetAdapterAdvancedProperty -DisplayName "Receive Side Scaling" -DisplayValue "Disabled" –NoRestart
Отключите vRSS для всех ВМ:
Get-VM | Set-VMNetworkAdapter -VrssEnabled $FALSE
Отключите функцию Large Send Offload (LSO) на сетевых картах:
Get-NetAdapter | Set-NetAdapterAdvancedProperty -DisplayName "Large Send Offload Version 2 (IPv4)" -DisplayValue "Disabled" -NoRestart
Get-NetAdapter | Set-NetAdapterAdvancedProperty -DisplayName "Large Send Offload Version 2 (IPv6)" -DisplayValue "Disabled" -NoRestart
Get-NetAdapter | Restart-NetAdapter
Также эти опции можно отключить в свойствах сетевого адаптера на вкладке Advanced:
- Recv Segment Coalescing (IPv4/IPv6) = Disabled
- Large Send Offload V2 (IPv4/IPv6) = Disabled
Данные настройки стека TCP максимально приблизят настройки сетевых протоколов Windows Server 2019 к предыдущим версиям Windows Server.
41 available drivers
NetXtreme Gigabit Ethernet Plus
Windows 11, 10, 8.1, 8, 7
x64
NetXtreme Gigabit Ethernet Plus
Windows 11, 10, 8.1, 8, 7
x64
NetXtreme Gigabit Ethernet Plus
Windows 11, 10, 8.1, 8, 7
x64
NetXtreme Gigabit Ethernet Plus
Windows 11, 10, 8.1, 8, 7
x64
NetXtreme Gigabit Ethernet Plus
INF files:
b57nd60a.inf, b57nd60x.inf
Windows 11, 10, 8.1, 8, 7
x64/x86
NetXtreme Gigabit Ethernet Plus
Windows 11, 10, 8.1, 8, 7
x64
NetXtreme Gigabit Ethernet Plus
Windows 11, 10, 8.1, 8, 7
x64
NetXtreme Gigabit Ethernet Plus
INF files:
b57nd60a.inf, b57nd60x.inf
Windows 11, 10, 8.1, 8, 7
x64/x86
NetXtreme Gigabit Ethernet Plus
Windows 11, 10, 8.1, 8, 7
x64
NetXtreme Gigabit Ethernet Plus
Windows 11, 10, 8.1, 8, 7
x64
NetXtreme Gigabit Ethernet Plus
Windows 11, 10, 8.1, 8, 7
x64
NetXtreme Gigabit Ethernet Plus
Windows 11, 10, 8.1, 8, 7
x64
NetXtreme Gigabit Ethernet Plus
Windows 11, 10, 8.1, 8, 7
x64
NetXtreme Gigabit Ethernet Plus
Windows 11, 10, 8.1, 8, 7
x64
NetXtreme Gigabit Ethernet Plus
INF files:
b57nd60a.inf, b57nd60x.inf
Windows 11, 10, 8.1, 8, 7
x64/x86
NetXtreme Gigabit Ethernet Plus
Windows 11, 10, 8.1, 8, 7
x64
NetXtreme Gigabit Ethernet Plus
INF files:
b57nd60a.inf, b57nd60x.inf
Windows 11, 10, 8.1, 8, 7
x64/x86
NetXtreme Gigabit Ethernet Plus
INF files:
b57nd60a.inf, b57nd60x.inf
Windows 11, 10, 8.1, 8, 7
x64/x86
NetXtreme Gigabit Ethernet Plus
INF files:
b57nd60a.inf, b57nd60x.inf
Windows 11, 10, 8.1, 8, 7
x64/x86
NetXtreme Gigabit Ethernet Plus
Windows 11, 10, 8.1, 8, 7
x64
NetXtreme Gigabit Ethernet Plus
INF files:
b57nd60a.inf, b57nd60x.inf
Windows 11, 10, 8.1, 8, 7
x64/x86
NetXtreme Gigabit Ethernet Plus
INF files:
b57nd60a.inf, b57nd60x.inf
Windows 11, 10, 8.1, 8, 7
x64/x86
NetXtreme Gigabit Ethernet Plus
INF files:
b57nd60a.inf, b57nd60x.inf
Windows 11, 10, 8.1, 8, 7
x64/x86
NetXtreme Gigabit Ethernet Plus
INF files:
b57nd60a.inf, b57nd60x.inf
Windows 11, 10, 8.1, 8, 7
x64/x86
NetXtreme Gigabit Ethernet Plus
INF files:
b57nd60a.inf, b57nd60x.inf
Windows 11, 10, 8.1, 8, 7
x64/x86
NetXtreme Gigabit Ethernet Plus
Windows 11, 10, 8.1, 8, 7
x64
NetXtreme Gigabit Ethernet Plus
INF files:
b57nd60a.inf, b57nd60x.inf
Windows 11, 10, 8.1, 8, 7
x64/x86
NetXtreme Gigabit Ethernet Plus
INF files:
b57nd60a.inf, b57nd60x.inf
Windows 11, 10, 8.1, 8, 7
x64/x86
NetXtreme Gigabit Ethernet Plus
INF files:
b57nd60a.inf, b57nd60x.inf
Windows 11, 10, 8.1, 8, 7
x64/x86
NetXtreme Gigabit Ethernet Plus
INF files:
b57nd60a.inf, b57nd60x.inf
Windows 11, 10, 8.1, 8, 7
x64/x86
NetXtreme Gigabit Ethernet Plus
INF files:
b57nd60a.inf, b57nd60x.inf
Windows 11, 10, 8.1, 8, 7
x64/x86
NetXtreme Gigabit Ethernet Plus
INF files:
b57nd60a.inf, b57nd60x.inf
Windows 11, 10, 8.1, 8, 7
x64/x86
NetXtreme Gigabit Ethernet Plus
INF files:
b57nd60a.inf, b57nd60x.inf
Windows 11, 10, 8.1, 8, 7
x64/x86
NetXtreme Gigabit Ethernet Plus
Windows 11, 10, 8.1, 8, 7
x64
NetXtreme Gigabit Ethernet Plus
INF files:
b57nd60a.inf, b57nd60x.inf
Windows 11, 10, 8.1, 8, 7
x64/x86
NetXtreme Gigabit Ethernet Plus
INF files:
b57nd60a.inf, b57nd60x.inf
Windows 11, 10, 8.1, 8, 7
x64/x86
NetXtreme Gigabit Ethernet Plus
Windows 11, 10, 8.1, 8, 7
x86
NetXtreme Gigabit Ethernet Plus
INF files:
b57nd60a.inf, b57nd60x.inf
Windows 11, 10, 8.1, 8, 7
x64/x86
NetXtreme Gigabit Ethernet Plus
INF files:
b57nd60a.inf, b57nd60x.inf
Windows 11, 10, 8.1, 8, 7
x64/x86
NetXtreme Gigabit Ethernet Plus
INF files:
b57nd60a.inf, b57nd60x.inf
Windows 11, 10, 8.1, 8, 7
x64/x86
NetXtreme Gigabit Ethernet Plus
INF files:
b57nd60a.inf, b57nd60x.inf
Windows 11, 10, 8.1, 8, 7
x64/x86