
Activating Windows 11 in Parallels Desktop works the same way as on a PC. You can use any applicable existing Windows license to activate Windows 11 in Parallels Desktop or purchase a new Windows license.
Note: Parallels® Desktop is an authorized solution for running Arm® versions of Windows 11 Pro and Windows 11 Enterprise in a virtual environment on its platform on Apple M-series computers.
You will need to acquire a separate license for Windows 11 Pro if you do not already have one. A unique license is required for each instance of Windows 11 Pro that you are running, either on a hardware or in a virtual machine. You can buy a license from the Microsoft Store or purchase one through retail. Windows 11 Pro product keys are platform agnostic (x64 vs Arm). To use Windows 11 Enterprise with this solution, you will first need to acquire the Windows 11 Pro license and then can upgrade to Windows 11 Enterprise through a volume licensing agreement (contact your IT admin for more information).
For more information, please visit Microsoft FAQ.
Activate Windows 11
Purchase a new license
- Open Windows Settings > System > Activation.
- Click “Get a new license in the Microsoft Store app».
- Click «Buy» and proceed with the purchase process. Windows will be automatically activated after a successful purchase.


Activate with existing license
1. Open Windows Settings > System > Activation.
2. Click “Troubleshoot”.

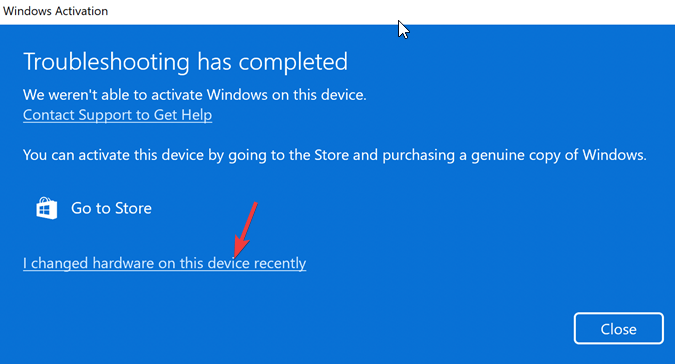
3. Click “I changed hardware on this device recently” on the appeared dialog:

4. Sign in to your Microsoft account. Press Enter when prompted for the existing Windows password.

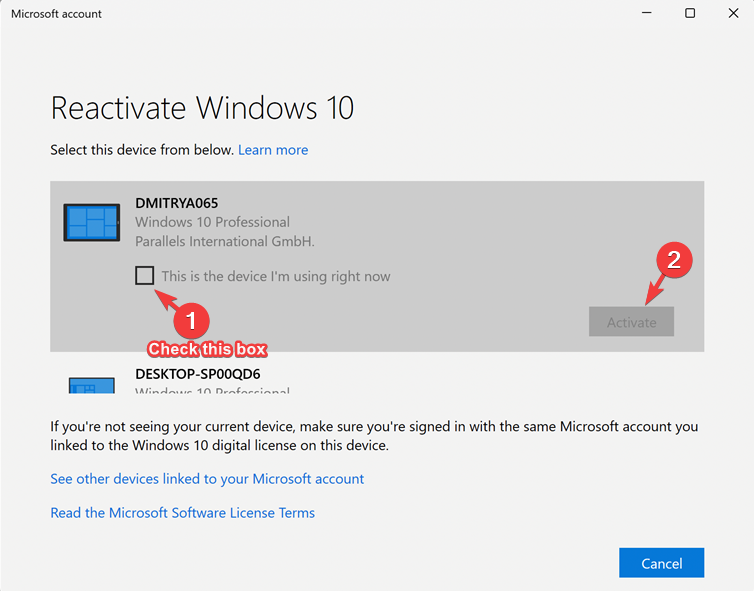
5. Check the option “This is the device I’m using right now” and click “Activate”.
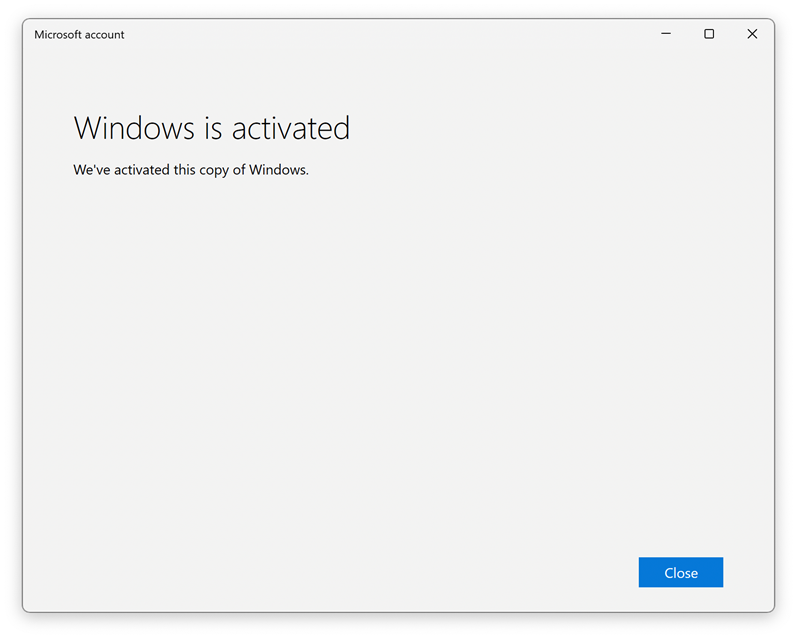
6. Windows is activated now.
For more information, please visit Microsoft FAQ.
Virtual machines are a popular way to run Windows on the latest Apple Silicon Macs but there is one drawback – M-series Macs can only run Windows ARM.
Running Windows ARM in a virtual environment like Parallels Desktop or VMware Fusion is a common workaround for Mac users who require access to Windows-based software.
However, the licensing and legality surrounding Windows 11 ARM on Macs with Apple silicon is somewhat nuanced as we’ll explain.
Table of Contents
- What Is Windows 11 ARM?
- Legality of Running Windows 11 ARM on Macs
- Are All Virtual Machines Allowed To Run Windows 11 ARM?
- How to Legally Run Windows 11 ARM on a Mac
- Conclusion
What Is Windows 11 ARM?
Windows 11 ARM is a version of Windows designed to run on devices powered by ARM-based processors.
Apple’s M-series chips are ARM-based, meaning users must use Windows 11 ARM (as opposed to traditional x86 Windows that runs on most PCs) to run Windows natively or in a virtualized environment.
Windows ARM can run most of the software that the x86 version does but it uses something called “x86 emulation” to do so which is slightly less efficient and stable.
Legality of Running Windows 11 ARM on Macs
The main question is whether it’s legal to activate and run Windows 11 ARM on a Mac in a virtual machine.
As of now, Microsoft has not officially offered Windows 11 ARM for individual purchase or download as it does with the standard x86 version of Windows.
In the case of x86 Windows, users can easily buy a license for personal use from Microsoft and run it in various environments, but this process is unclear for the ARM version.
Microsoft has yet to offer a direct consumer license for Windows 11 ARM.
Even though Microsoft itself authorizes running Windows 11 ARM on a Mac using a tool like Parallels Desktop, the exact license requirements are not as straightforward.
When you install Parallels for the first time, Windows 11 ARM prompts you to buy a license although you can still keep using it even if you don’t.
You can use Windows ARM indefinitely without a license, but you will see “Activate Windows” watermarks and won’t be able to customize Windows 11.
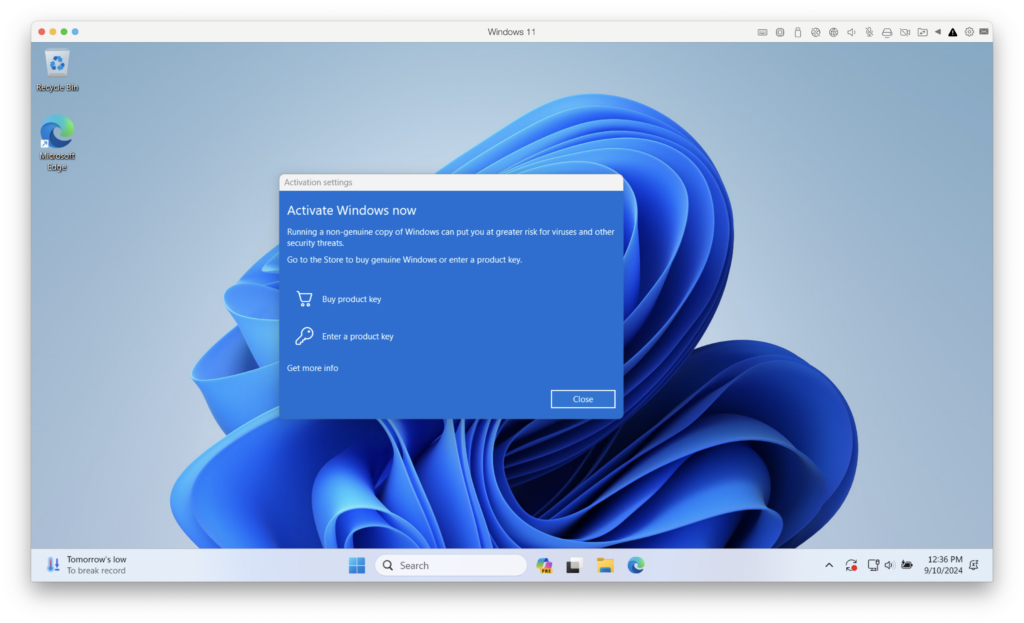
When you click on “Buy product key”, it takes you to the Windows 11 Pro purchase page suggesting that if you buy a Windows 11 Pro license, it’s also valid for Windows ARM.
Parallels confirms this on its support page for activating Windows:
You will need to acquire a separate license for Windows 11 Pro if you do not already have one. A unique license is required for each instance of Windows 11 Pro that you are running, either on a hardware or in a virtual machine. You can buy a license from the Microsoft Store or purchase one through retail. Windows 11 Pro product keys are platform agnostic (x64 vs Arm). To use Windows 11 Enterprise with this solution, you will first need to acquire the Windows 11 Pro license and then can upgrade to Windows 11 Enterprise through a volume licensing agreement (contact your IT admin for more information).
On the Microsoft support page, the company confirms this in a footnote.
However, because Microsoft does not provide a direct consumer channel to purchase a standalone Windows 11 ARM license, the exact licensing terms remain ambiguous.
Microsoft has historically only offered Windows ARM through OEMs and on specific ARM devices, but it is yet to be sold separately.
Are All Virtual Machines Allowed To Run Windows 11 ARM?
Because Microsoft has no specific individual commercial license available for Windows ARM, there’s no specific virtual machines that isn’t “allowed” to download and use Windows ARM.
Parallels is the only one that Microsoft has explicitly authorized on its site but this doesn’t mean that other virtual machines are not allowed to use it.
The tech support team at Microsoft has offered users advice on how to get Windows 11 ARM activated using VMware Fusion for example which the company wouldn’t do if it were unauthorized.
How to Legally Run Windows 11 ARM on a Mac
For users wanting to run Windows 11 ARM on a Mac, here are the main steps:
- Install Parallels Desktop using the free trial (or a similar virtualization software like VMware Fusion). Parallels Desktop is optimized for M-series chips and will automatically download and install Windows 11 ARM during setup.
- Activate Windows 11 ARM: Users can activate their Windows 11 installation via Parallels or Microsoft’s own activation servers with a Windows Pro license. If you already own a Windows 11 Pro license key, it’s worth checking if it works for activation, although if it has already been activated on another machine, it’s unlikely it will work.
- Purchase Parallels: After the Parallels trial has finished, you will have to purchase a subscription to keep using it. However, this doesn’t include a license to use Windows ARM. Parallels is licensed to run Windows 11 ARM but purchasing Parallels does not include a Windows license.
Conclusion
Currently, activation of Windows 11 ARM in virtual machines on Apple Silicon Macs can be done by purchasing a Windows 11 Pro license.
However, since Microsoft hasn’t released Windows 11 ARM for individual sale, it’s uncertain what the licensing terms are for it.
For those using Windows in a professional or corporate setting, purchasing a volume Windows ARM license may provide a clearer legal route.
FAQ
1. Can I legally run Windows 11 ARM on my Mac?
- It is legal to run Windows 11 ARM on a Mac. However, while it’s possible to run Windows 11 ARM on a Mac using virtual machine software like Parallels and VMware Fusion, Microsoft does not sell standalone licenses for Windows 11 ARM, making the exact licensing status unclear for individual users. Since Microsoft has authorized Parallels to run Windows ARM and hasn’t stated anything against other virtual machines using it, it has to be assumed that there is no legal issue running it on a Mac.
2. Do I need a Windows 11 license to use it on my Mac?
- Yes, you generally need a Windows 11 license although it’s not essential to continue using it unless you want to customize Windows ande remove watermarks. However, the exact process for obtaining a specific license for the ARM version of Windows 11 is not straightforward, as Microsoft hasn’t released it for consumer purchase. At the moment, it seems a Windows 11 Pro license is enough to activate Windows ARM for individuals. Companies can buy volume licenses for Windows ARM.
3. How do I install Windows 11 ARM on my Mac?
- Using virtualization tools like Parallels Desktop and VMware Fusion, you can download and install Windows 11 ARM automatically as part of the setup. Both of these VMs facilitate this process for users on Macs with M-series chips.
4. Is Parallels Desktop necessary to run Windows 11 ARM on a Mac?
- Parallels Desktop is authorized to run Windows ARM on a Mac. However, there are other virtual machines that run Windows ARM on a Mac and Microsoft has not stated there is anything wrong with this.
Activating Windows 11 on Parallels is a task that many users may be looking to accomplish, especially those utilizing a Mac system. Parallels Desktop allows Mac users to run Windows alongside their macOS, offering the flexibility of utilizing both operating systems for various tasks. Whether you want to install software exclusive to Windows, play Windows games, or simply need Windows for work, activating Windows 11 is a crucial step to unlock its full potential. This guide will take you through the entire process of activating Windows 11 on Parallels step-by-step.
Understanding Windows Activation
Before diving into activation procedures, it’s essential to understand what Windows activation is. Activation is a process designed to verify that your copy of Windows has been legitimately obtained and is not being used on more devices than permitted by Microsoft’s licensing terms. When Windows is activated, it allows for updates, support, and the use of the complete feature set of the operating system.
Requirements for Activating Windows 11 on Parallels
-
Parallels Desktop Installed: Ensure that you have Parallels Desktop installed and updated to the latest version. The latest version ensures compatibility with Windows 11.
-
Windows 11 ISO Image: You will need a Windows 11 ISO image file that you can download from the official Microsoft website.
-
A Valid Windows 11 License: A legitimate product key is necessary for activation. This key can be purchased through Microsoft or authorized retailers.
-
Sufficient System Resources: Make sure your Mac meets the system requirements to effectively run Parallels and Windows 11. This includes enough memory, CPU, and storage space.
Step-by-Step Process to Activate Windows 11 on Parallels
Step 1: Install Parallels Desktop
- Begin by downloading the Parallels Desktop installer from the official Parallels website.
- Open the downloaded file and follow the on-screen instructions to install the application on your Mac.
- Once installed, launch Parallels and sign in or create a Parallels account.
Step 2: Create a Windows 11 Virtual Machine
- Open Parallels Desktop and select “File” from the menu bar, then click on “New”.
- Choose “Install Windows or another OS from a DVD or image file”.
- Locate the Windows 11 ISO file you previously downloaded and click “Continue”.
- Choose the appropriate installation method, typically “Express Installation”. This allows for easier and quicker setup.
- You will be prompted to enter your Windows 11 product key. If you don’t have it at this stage, you can skip this step and enter it later.
- Assign resources such as RAM and storage to the virtual machine according to your system’s capabilities and specific needs.
Step 3: Configure Windows 11 Virtual Machine Settings
Configuring the virtual machine settings ensures that Windows runs smoothly.
- Select your new Windows 11 virtual machine from the Parallels Desktop Control Center.
- Click on the gear icon (Configuration) to open the settings.
- In the “Hardware” tab, adjust settings like CPU and RAM allocation depending on your workload.
- Under “Options,” configure integration settings to determine how Windows interfaces with macOS (such as using a shared clipboard and file sharing).
- Click “OK” to save your configurations.
Step 4: Installing Windows 11
- Boot up your virtual machine. It will launch the Windows 11 installer.
- Follow the installation prompts, selecting language preferences, region, and keyboard input method.
- Accept the license agreement to proceed with the installation.
- Choose either to upgrade (if you have an existing version of Windows) or perform a custom installation.
- Select the drive where Windows 11 will be installed and follow the prompts until the installation is complete. Your machine may restart several times during this process.
Step 5: Activating Windows 11
Activation can happen during installation or after the OS is running. Here’s how to do it:
- Once Windows has successfully booted, you can check the activation status. Go to Settings > Update & Security > Activation.
- If you skipped entering the product key during installation, you would see an option to activate Windows. Click on “Change product key”.
- Enter your valid Windows 11 product key and click “Next”.
- Follow the prompts to complete the activation process. The system will check the validity of the key against Microsoft’s servers.
- If successful, you will receive an activation confirmation. At this point, Windows 11 is fully activated.
Step 6: Troubleshooting Activation Issues
Occasionally, you may encounter issues during the activation process. Here are a few steps to troubleshoot:
-
Check Your Internet Connection: Ensure your virtual machine has access to the internet for activation.
-
Re-enter the Product Key: Double-check for any mistakes when entering your product key.
-
Windows Activation Troubleshooter: Navigate to Settings > Update & Security > Activation and run the troubleshooter. This tool can help identify and resolve common issues.
-
Contact Microsoft Support: If problems persist, contacting Microsoft support can help resolve any licensing disputes or queries related to your specific activation circumstances.
Benefits of Activating Windows 11
Access to Updates
Activated Windows 11 allows you to download and install updates released by Microsoft. These updates often include security features and enhancements critical for your system’s safety and performance.
Enhanced Features
Many features in Windows 11 remain locked until you activate it. By activating your system, you can utilize all aspects of the operating system, improving your productivity with additional tools and capabilities.
Personalization Options
An activated version of Windows 11 offers more personalization options, allowing you to customize themes, backgrounds, and other aspects to better reflect your preferences.
Conclusion
Activating Windows 11 on Parallels is a straightforward process, especially with the right preparations in place. By following the steps outlined above, Mac users can benefit from the full functionality of Windows 11 within their macOS environment. Remember, having a legitimate license key is crucial for activation, as this not only provides you with legal access to the software but also enables you to receive vital updates and support from Microsoft.
Whether you are a casual user looking to run specific applications or a professional needing access to Windows-only software, activating Windows 11 will enhance your computing experience considerably. If you encounter any hitches during this process, don’t hesitate to refer back to this guide for assistance or reach out to Microsoft for support. Enjoy the seamless blending of both worlds with your newly activated Windows 11 on Parallels!
Readers help support Windows Report. We may get a commission if you buy through our links.
Read our disclosure page to find out how can you help Windows Report sustain the editorial team. Read more
Many users have been long waiting to download & install Windows 11 ARM ISO on M1 Mac. Previously, Windows 10 ARM-based PCs had many limitations, but as the Windows 11 ARM version was released, Microsoft made things a lot easier.
It now offers support for 64-bit apps, but for M1 Mac, there’s still no official support. For now, you can run the Windows apps on Apple laptops using any of these 5 best PC emulation software for Mac.
How can I download and install Windows 11 on my M1 Mac?
1. Download Windows 11 on M1 Mac
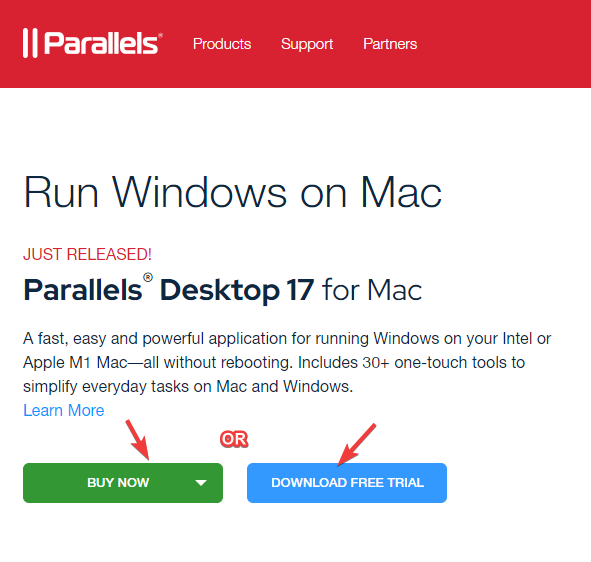
- Visit the Parallels Desktop 17 for Mac web page.
- Click on Download Free Trial or click on Buy Now to purchase a new license.

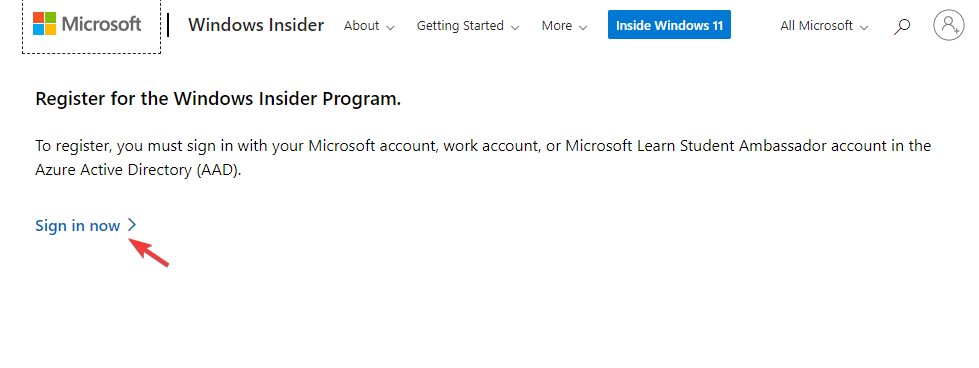
- Now, register for the Windows Insider Program on its official web page.
- Here, click on Sign in now. Log in with your Windows credentials.

- Follow the on-screen instructions to complete the registration.

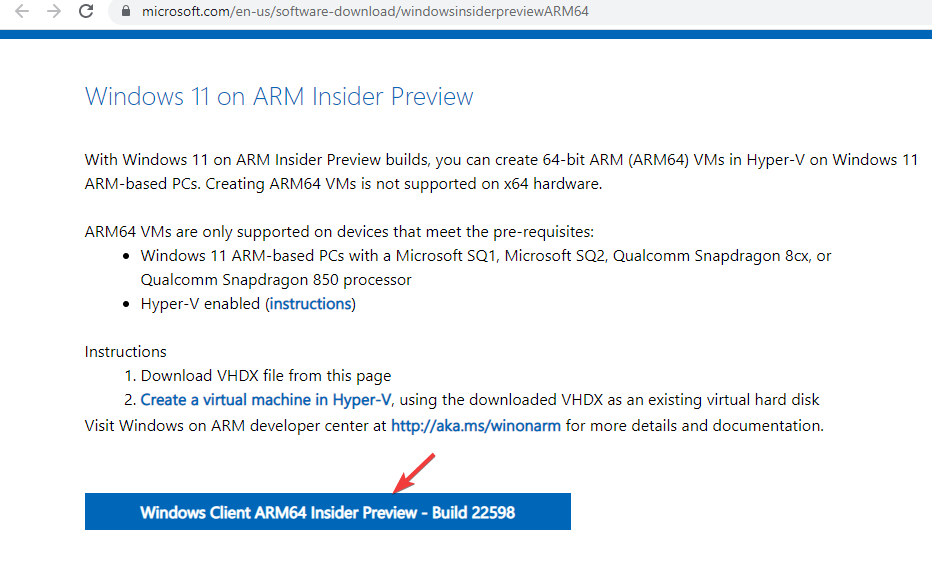
- Now, visit the Windows Insider Preview ARM64 web page.
- Here, click on the blue button to download the Windows Client ARM64 Insider Preview VHDX image.

- After the VHDX image is successfully downloaded, double-click on the file to open on Parallel’s desktop.
- Next, follow the instructions on the screen and wait till the installation is complete.
Parallels Desktop is one of the fastest in testing compared to its competitors and is also known for seamless graphics performance for gaming.
Moreover, it also helps you install macOS from the recovery partition on Intel-powered Macs, thus, making it an expert’s choice for virtualization software.
- Microsoft releases Windows 11 (KB5058411, KB5058405) May 2025 Patch Tuesday
- You can now share an app/browser window with Copilot Vision to help you with different tasks
- Windows 11 24H2’s Settings now bundles FAQs section to tell you more about your system
2. Activate Windows 11 on Mac with Apple M1 chip
2.1. Activate with the current license
- Press the Win + I keys simultaneously to open Windows Settings.
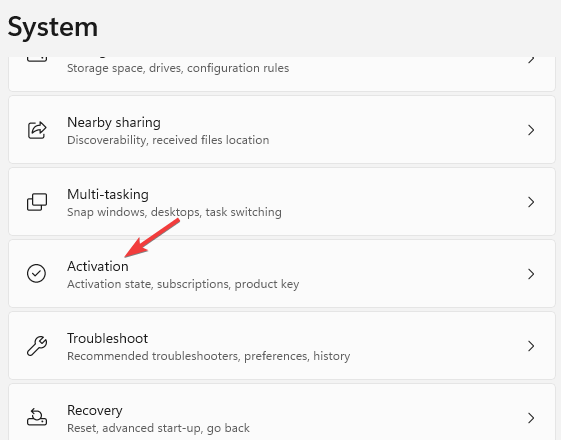
- Click on System on the left side of the pane.
- Next, on the right side, scroll down a bit and click on Activation.

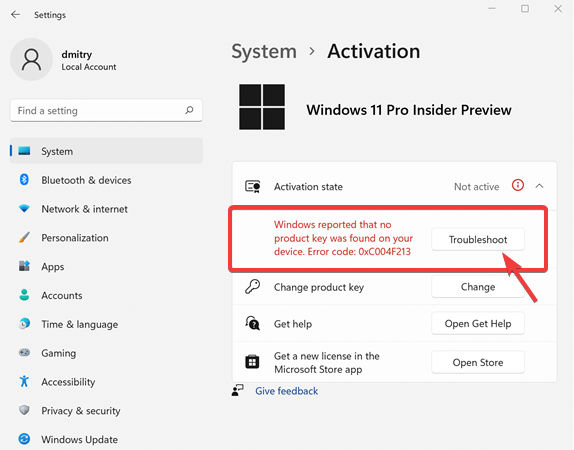
- Now, on the right side, under the Activation state, click on Troubleshoot.

- In the Windows activation dialog box, click on the I changed hardware on this device recently link.

- On the next screen enter your login details to sign in to your Microsoft account.
- Hit Enter when asked for the current Windows password.
- Select the This is the device I’m using right now option and click on Activate.

Windows is now successfully activated on your M1 Mac.
2.2. Activate with a new license
- Press the Win + I keys together to launch Windows Settings.
- Click on System on the left of the Settings app.
- Now, on the right, click on Activation.
- Click on Get a new license in the Microsoft Store app on the right.
- You will now see the Upgrade to Windows 10/11 Pro dialog box. Click on Buy to proceed with the purchase process.


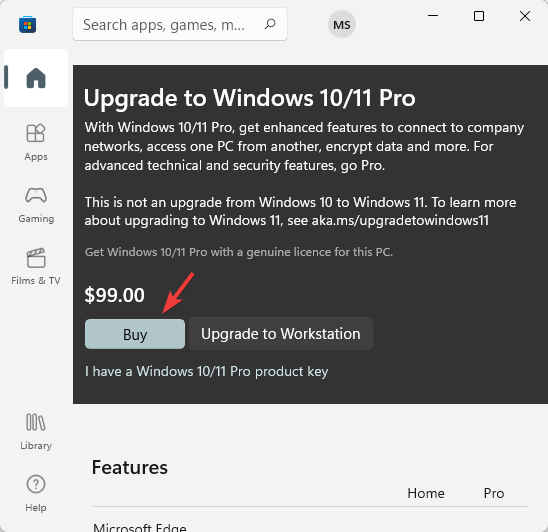
Windows will be automatically activated once the purchase is successful.
If you were wondering how to install a Windows 11 virtual machine on an M1 Mac for free, there is no need to wonder anymore. There you have it!
While you can download Windows 11 ISO from the UUP dump for non-supported ARM devices, to download & install Windows 11 ARM64 on M1 Mac, you need the Parallels Desktop.
If you are still facing any challenges to install Windows 11 on an ARM64 M1 Mac device, you can let us know in the comments box below.
Madhuparna Roy
A diploma holder in computers and with a keen interest in technology, Madhuparna is passionate about writing How-to guides and helping people solve the most intricate Windows issues.
It all started with the evolution of mobile phones and Google, and that has now settled with Windows.
Установить Windows на современные Mac – процесс не из очевидных. Bootcamp больше нет, а некоторые задачки всё ещё надо делать в привычной «винде».
Многие бегут ставить Parallels, затем бегут оттуда, увидев санкционные ограничения и то, что всё это дело стоит денег, ещё и не принимаемых с российских карт.
С сегодняшней ночи есть бесплатный путь: он почти ничем не хуже, мощный и функциональный. Это VMware Fusion 13 Pro, который стал бесплатным «в личных целях» для всех пользователей.
Сейчас расскажу, где скачать сам VMware Fusion 13 Pro бесплатно и как установить виртуальную Windows 11 на Mac с любым чипом (тоже бесплатно). Нарушать будете только, ну не знаю, страшные санкции США – но тут уж извините, нам альтернатив не предоставили.
Почему не Parallels?
Потому что у ребят перебор по жадности.
Я не люблю Parallels за то, как они ведут бизнес. Компания выпускает новую версию виртуализатора каждый год аккурат к релизу очередной macOS, затем забрасывает её через полгода, чтобы чудесным образом исправить накопившиеся баги в следующей (платной) версии. Старая, естественно, либо не работает на новой системе, либо глючит.
Относительно недавно у них появилась подписка на самую свежую версию, но с российских карт её не оплатить.
Тем временем VMware с годами становится лучше. А теперь вообще стал бесплатным. Да, не VMware Player, а именно VMware Fusion – ещё и версия Pro. Для игр «рельсы» по-прежнему чуть получше, но для всего остального больше нет никакого смысла ставить что-либо другое, кроме Fusion.
Как установить VMware Fusion Pro 13 бесплатно на Mac
Ууу, как страшно. Что же делать…
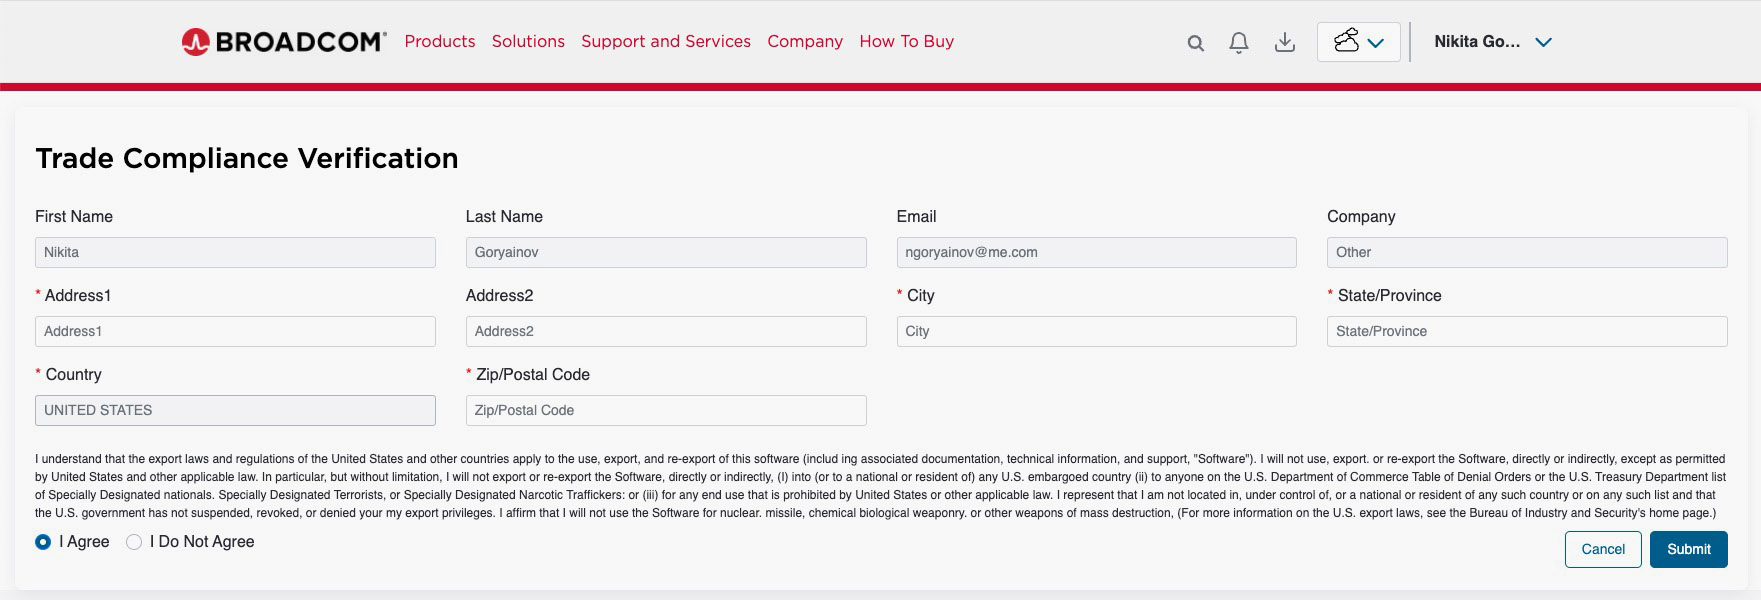
Есть два пути. Первый – очень долгий и неинтересный. VMware принадлежит Broadcom, а Broadcom чтит санкции. Чтобы скачать новый бесплатный VMware Fusion, нужно зайти на сайт технической поддержки Broadcom, пройти регистрацию с иностранного IP-адреса, подтвердить, что ты не нарушаешь санкции…
Второй путь, моментальный: качаем файл отсюда. Всё.
Далее держите инструкцию по установке VMware Fusion 13 Pro и виртуальной Windows 11 на Mac.

1. При первичной установке VMware запросит ключ активации. Выберите опцию I want to license… for Personal Use.
Персонально же будете использовать «винду»? Ну вот и всё. Значит, ух как легально мы всё делаем. Продолжаем.
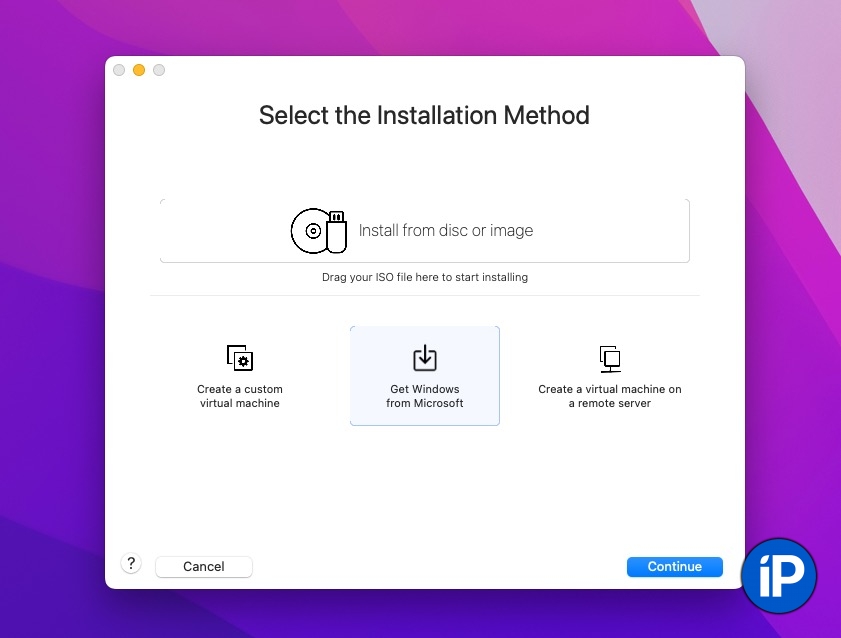
2. Дальше кликаем Get Windows from Microsoft.
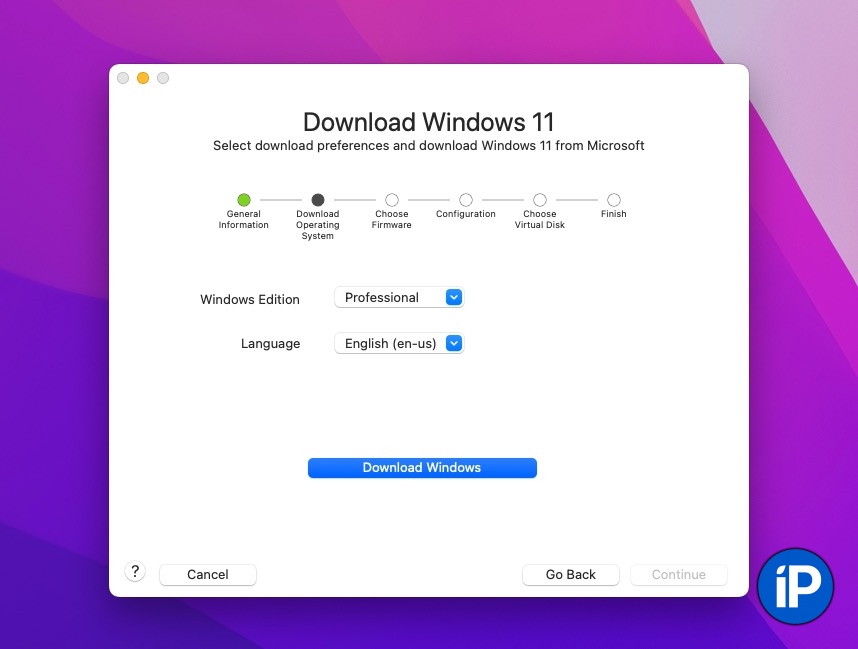
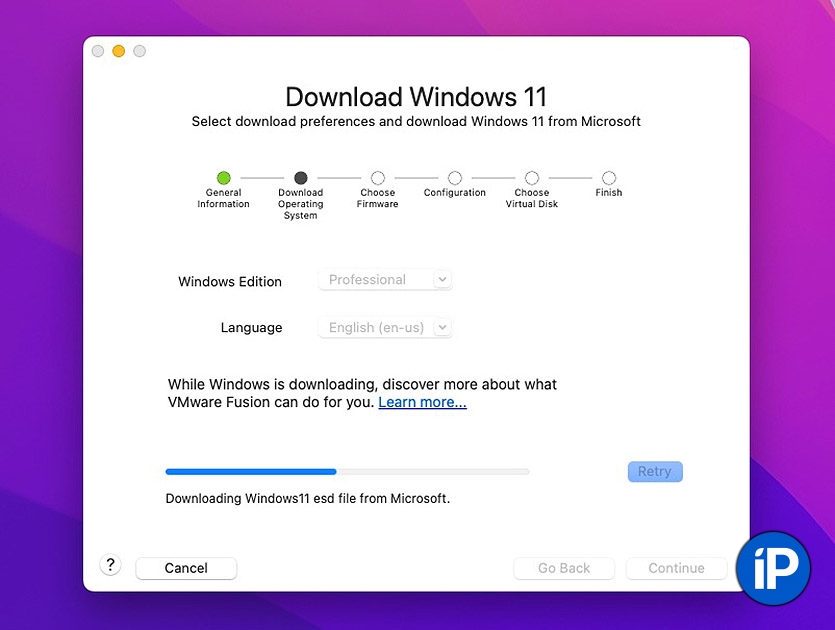
В окне выбора языка можно ничего не менять или выбрать русский язык (он не у всех доступен). После этого начнётся загрузка дистрибутива установки Windows 11 (около 4 ГБ).

3. В окне Choose firmware type ставим галку напротив UEFI Secure boot.
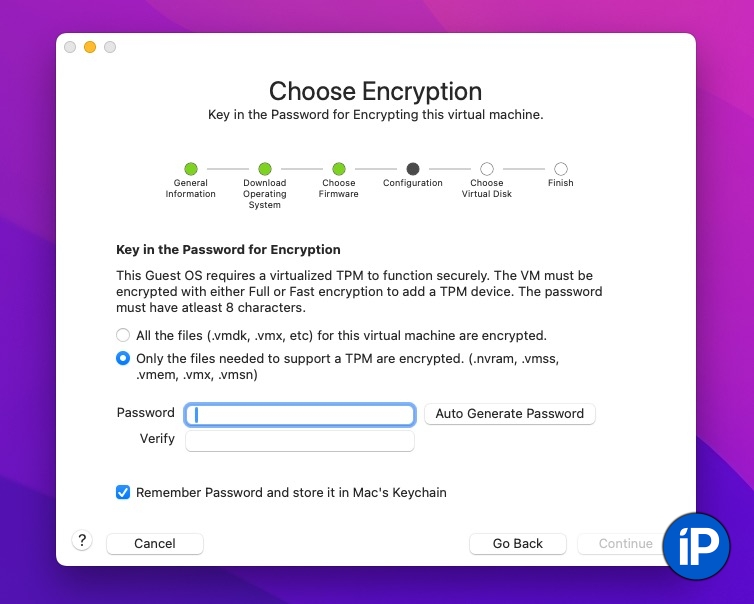
Далее, в окне Choose encryption жмём на Auto-generate Password. Он сохранится на Mac, запоминать не придётся.
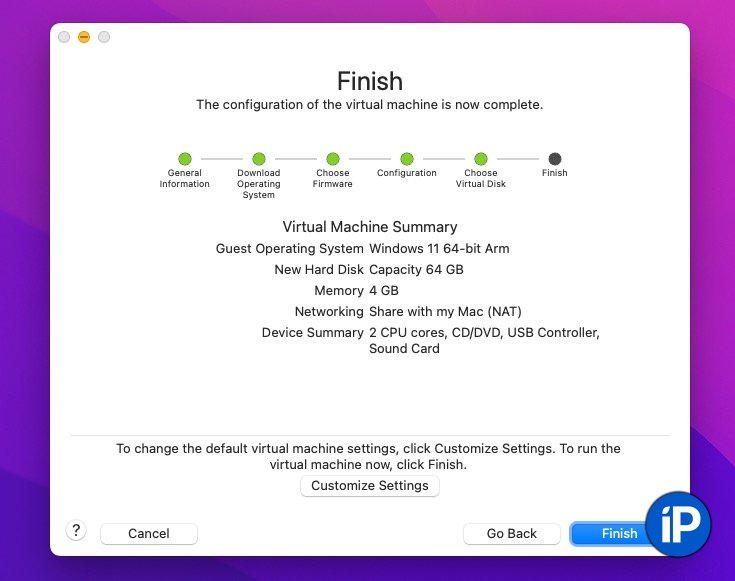
4. Когда дойдёте до меню Choose virtual disk, можно ничего не трогать. Ёмкость диска потом сможете увеличить до нужной, установке достаточно и 64 ГБ.
Наконец, жмём Finish.
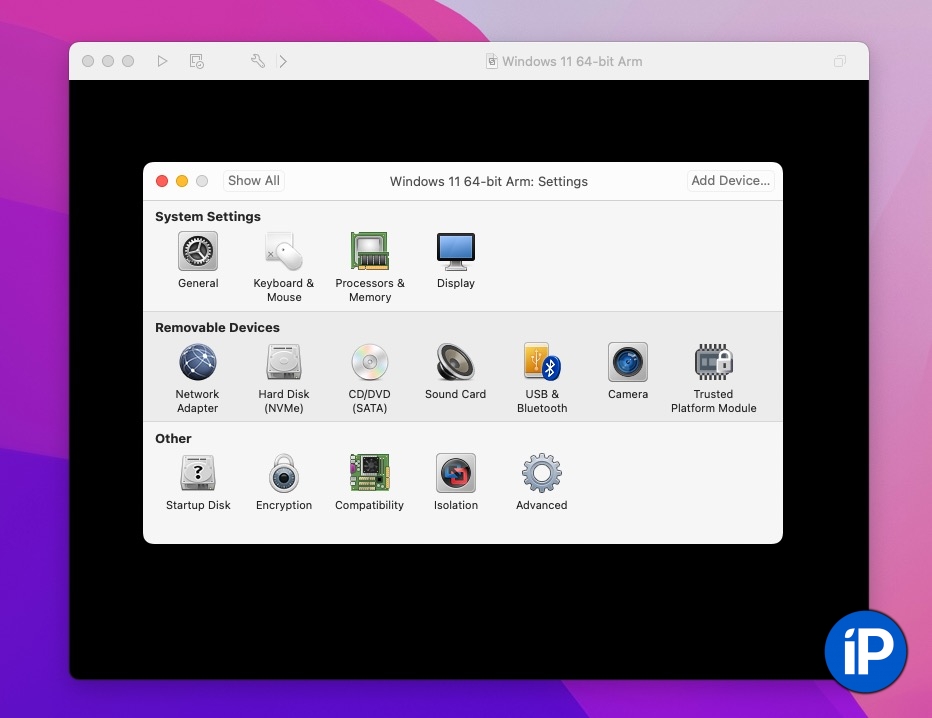

5. Откроется окно настроек виртуальной машины. Здесь можно перейти в меню Processors & Memory и уточнить, сколько ядер CPU и оперативной памяти вашего Mac нужно выделять для работы Windows 11.
Чем больше отдадите, тем медленнее будет работать macOS при запущенной виртуалке. На чипах серий Pro, Max и Ultra можно особо не мелочиться и отдавать «винде» от половины до 2/3 доступных ядер.

6. Всё готово для начала установки виртуальной Windows 11. Жмёте на иконку Play, затем на любую кнопку при появлении текста «Press any key to…».
Начинается обычная установка Windows 11. Если хоть раз в жизни это делали (а вы точно это делали), то разберётесь тут и без меня.

7. Через 20-30 минут у вас есть полностью готовая Windows 11 для любых рабочих задач.
С активацией разберётесь сами. 30 дней систему можно использовать без неё, а дальше начнутся классические для Microsoft «приколы».
Enjoy.
(74 голосов, общий рейтинг: 4.65 из 5)
iPhones.ru
Установить Windows на современные Mac – процесс не из очевидных. Bootcamp больше нет, а некоторые задачки всё ещё надо делать в привычной «винде». Многие бегут ставить Parallels, затем бегут оттуда, увидев санкционные ограничения и то, что всё это дело стоит денег, ещё и не принимаемых с российских карт. С сегодняшней ночи есть бесплатный путь: он…
Никита Горяинов
@ngoryainov
Главный редактор iPhones.ru. Спасибо, что читаете нас. Есть вопрос, предложение или что-то интересное? Пишите на [email protected].