
An «environment» in Python is the context in which a Python program runs that consists of an interpreter and any number of installed packages.
Note: If you’d like to become more familiar with the Python programming language, review More Python resources.
Types of Python environments
Global environments
By default, any Python interpreter installed runs in its own global environment. For example, if you just run python, python3, or py at a new terminal (depending on how you installed Python), you’re running in that interpreter’s global environment. Any packages that you install or uninstall affect the global environment and all programs that you run within it.
Tip: In Python, it is best practice to create a workspace-specific environment, for example, by using a local environment.
Local environments
There are two types of environments that you can create for your workspace: virtual and conda. These environments allow you to install packages without affecting other environments, isolating your workspace’s package installations.
Virtual environments
A virtual environment is a built-in way to create an environment. A virtual environment creates a folder that contains a copy (or symlink) to a specific interpreter. When you install packages into a virtual environment it will end up in this new folder, and thus isolated from other packages used by other workspaces.
Note: While it’s possible to open a virtual environment folder as a workspace, doing so is not recommended and might cause issues with using the Python extension.
Conda environments
A conda environment is a Python environment that’s managed using the conda package manager (see Getting started with conda).Choosing between conda and virtual environments depends on your packaging needs, team standards, etc.
Python environment tools
The following table lists the various tools involved with Python environments:
| Tool | Definition and Purpose |
|---|---|
| pip | The Python package manager that installs and updates packages. It’s installed with Python 3.9+ by default (unless you are on a Debian-based OS; install python3-pip in that case). |
| venv | Allows you to manage separate package installations for different projects and is installed with Python 3 by default (unless you are on a Debian-based OS; install python3-venv in that case) |
| conda | Installed with Miniconda. It can be used to manage both packages and virtual environments. Generally used for data science projects. |
Creating environments
Using the Create Environment command
To create local environments in VS Code using virtual environments or Anaconda, you can follow these steps: open the Command Palette (⇧⌘P (Windows, Linux Ctrl+Shift+P)), search for the Python: Create Environment command, and select it.
The command presents a list of environment types: Venv or Conda.

If you are creating an environment using Venv, the command presents a list of interpreters that can be used as a base for the new virtual environment.
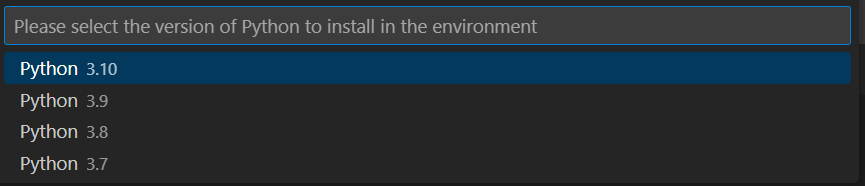
If you are creating an environment using Conda, the command presents a list of Python versions that can be used for your project.
After selecting the desired interpreter or Python version, a notification will show the progress of the environment creation and the environment folder will appear in your workspace.

Note: The command will also install necessary packages outlined in a requirements/dependencies file, such as
requirements.txt,pyproject.toml, orenvironment.yml, located in the project folder. It will also add a.gitignorefile to the virtual environment to help prevent you from accidentally committing the virtual environment to source control.
Create a virtual environment in the terminal
If you choose to create a virtual environment manually, use the following command (where «.venv» is the name of the environment folder):
# macOS/Linux
# You may need to run `sudo apt-get install python3-venv` first on Debian-based OSs
python3 -m venv .venv

# Windows
# You can also use `py -3 -m venv .venv`
python -m venv .venv
Note: To learn more about the
venvmodule, read Creation of virtual environments on Python.org.
When you create a new virtual environment, a prompt will be displayed in VS Code to allow you to select it for the workspace.
Tip: Make sure to update your source control settings to prevent accidentally committing your virtual environment (in for example
.gitignore). Since virtual environments are not portable, it typically does not make sense to commit them for others to use.
Create a conda environment in the terminal
The Python extension automatically detects existing conda environments. We recommend you install a Python interpreter into your conda environment, otherwise one will be installed for you after you select the environment. For example, the following command creates a conda environment named env-01 with a Python 3.9 interpreter and several libraries:
conda create -n env-01 python=3.9 scipy=0.15.0 numpy
Note: For more information on the conda command line, you can read Conda environments.
Additional notes:
-
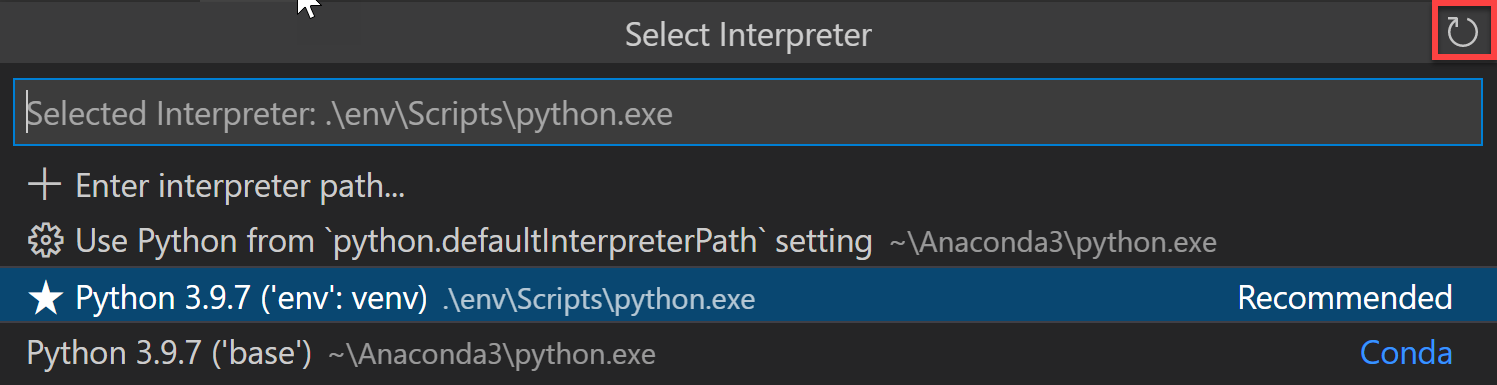
If you create a new conda environment while VS Code is running, use the refresh icon on the top right of the Python: Select Interpreter window; otherwise you may not find the environment there.

-
To ensure the environment is properly set up from a shell perspective, use an Anaconda prompt and activate the desired environment. Then, you can launch VS Code by entering the
code .command. Once VS Code is open, you can select the interpreter either by using the Command Palette or by clicking on the status bar. -
Although the Python extension for VS Code doesn’t currently have direct integration with conda
environment.ymlfiles, VS Code itself is a great YAML editor. -
Conda environments can’t be automatically activated in the VS Code Integrated Terminal if the default shell is set to PowerShell. To change the shell, see Integrated terminal — Terminal profiles.
-
You can manually specify the path to the
condaexecutable to use for activation (version 4.4+). To do so, open the Command Palette (⇧⌘P (Windows, Linux Ctrl+Shift+P)) and run Preferences: Open User Settings. Then setpython.condaPath, which is in the Python extension section of User Settings, with the appropriate path.
Working with Python interpreters
Select and activate an environment
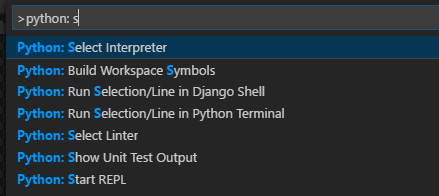
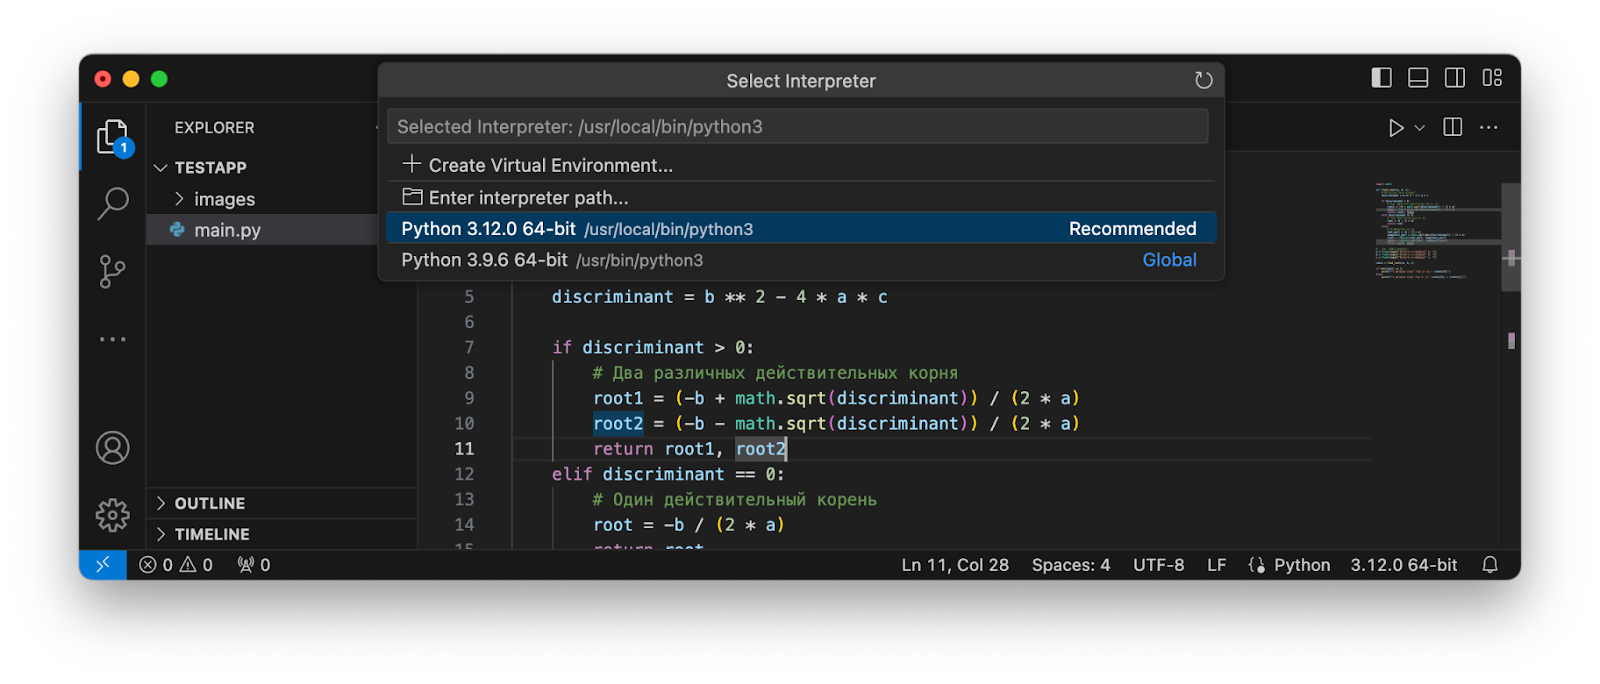
The Python extension tries to find and then select what it deems the best environment for the workspace. If you would prefer to select a specific environment, use the Python: Select Interpreter command from the Command Palette (⇧⌘P (Windows, Linux Ctrl+Shift+P)).
Note: If the Python extension doesn’t find an interpreter, it issues a warning. On macOS 12.2 and older, the extension also issues a warning if you’re using the OS-installed Python interpreter as it is known to have compatibility issues. In either case, you can disable these warnings by setting
python.disableInstallationChecktotruein your user settings.
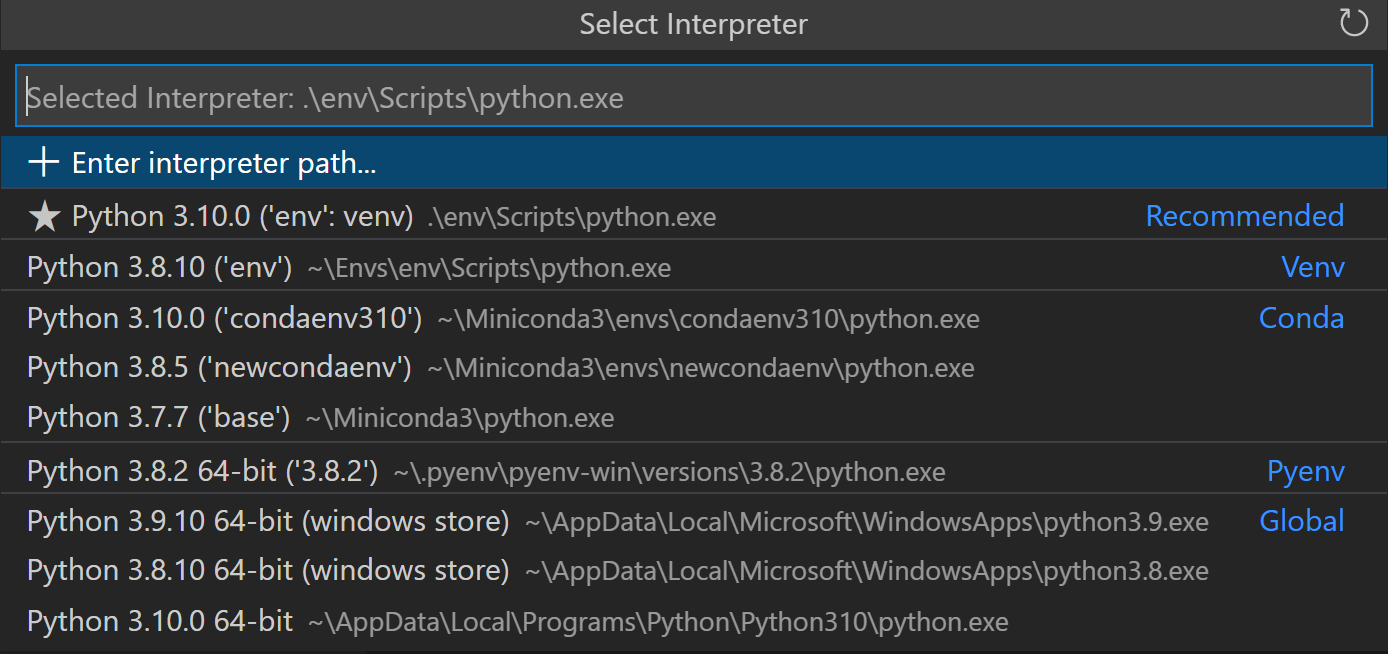
The Python: Select Interpreter command displays a list of available global environments, conda environments, and virtual environments. (See the Where the extension looks for environments section for details, including the distinctions between these types of environments.) The following image, for example, shows several Anaconda and CPython installations along with a conda environment and a virtual environment (env) that’s located within the workspace folder:
Note: On Windows, it can take a little time for VS Code to detect available conda environments. During that process, you may see «(cached)» before the path to an environment. The label indicates that VS Code is presently working with cached information for that environment.
If you have a folder or a workspace open in VS Code and you select an interpreter from the list, the Python extension will store that information internally. This ensures that the same interpreter will be used when you reopen the workspace.
The selected environment is used by the Python extension for running Python code (using the Python: Run Python File in Terminal command), providing language services (auto-complete, syntax checking, linting, formatting, etc.) when you have a .py file open in the editor, and opening a terminal with the Terminal: Create New Terminal command. In the latter case, VS Code automatically activates the selected environment.
Tip: To prevent automatic activation of a selected environment, add
"python.terminal.activateEnvironment": falseto yoursettings.jsonfile (it can be placed anywhere as a sibling to the existing settings).
Tip: If the activate command generates the message «Activate.ps1 is not digitally signed. You cannot run this script on the
current system.», then you need to temporarily change the PowerShell execution policy to allow scripts to
run (see About Execution Policies in the PowerShell documentation):
Set-ExecutionPolicy -ExecutionPolicy RemoteSigned -Scope Process
Note: By default, VS Code uses the interpreter selected for your workspace when debugging code. You can override this behavior by specifying a different path in the
pythonproperty of a debug configuration. See Choose a debugging environment.
The selected interpreter version will show on the right side of the Status Bar.

The Status Bar also reflects when no interpreter is selected.

In either case, clicking this area of the Status Bar is a convenient shortcut for the Python: Select Interpreter command.
Tip: If you have any problems with VS Code recognizing a virtual environment, please file an issue so we can help determine the cause.
Manually specify an interpreter
If VS Code doesn’t automatically locate an interpreter you want to use, you can browse for the interpreter on your file system or provide the path to it manually.
You can do so by running the Python: Select Interpreter command and select the Enter interpreter path… option that shows on the top of the interpreters list:
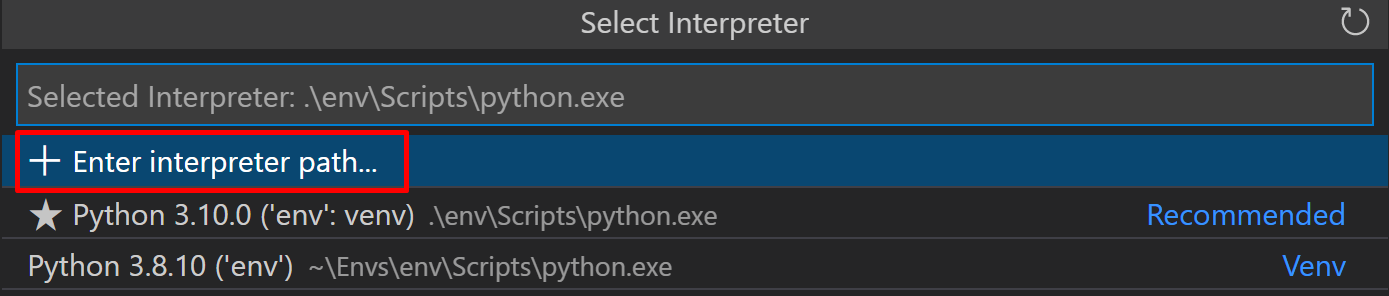
You can then either enter the full path of the Python interpreter directly in the text box (for example, «.venv/Scripts/python.exe»), or you can select the Find… button and browse your file system to find the python executable you wish to select.

If you want to manually specify a default interpreter that will be used when you first open your workspace, you can create or modify an entry for the python.defaultInterpreterPath setting.
Note: Changes to the
python.defaultInterpreterPathsetting are not picked up after an interpreter has already been selected for a workspace; any changes to the setting will be ignored once an initial interpreter is selected for the workspace.
Additionally, if you’d like to set up a default interpreter to all of your Python applications, you can add an entry for python.defaultInterpreterPath manually inside your User Settings. To do so, open the Command Palette (⇧⌘P (Windows, Linux Ctrl+Shift+P)) and enter Preferences: Open User Settings. Then set python.defaultInterpreterPath, which is in the Python extension section of User Settings, with the appropriate interpreter.
How the extension chooses an environment automatically
If an interpreter hasn’t been specified, then the Python extension automatically selects the interpreter with the highest version in the following priority order:
- Virtual environments located directly under the workspace folder.
- Virtual environments related to the workspace but stored globally. For example, Pipenv or Poetry environments that are located outside of the workspace folder.
- Globally installed interpreters. For example, the ones found in
/usr/local/bin,C:\\python38, etc.
Note: The interpreter selected may differ from what
pythonrefers to in your terminal.
If Visual Studio Code doesn’t locate your interpreter automatically, you can manually specify an interpreter.
Where the extension looks for environments
The extension automatically looks for interpreters in the following locations, in no particular order:
- Standard install paths such as
/usr/local/bin,/usr/sbin,/sbin,c:\\python36, etc. - Virtual environments located directly under the workspace (project) folder.
- Virtual environments located in the folder identified by the
python.venvPathsetting (see General Python settings), which can contain multiple virtual environments. The extension looks for virtual environments in the first-level subfolders ofvenvPath. - Virtual environments located in a
~/.virtualenvsfolder for virtualenvwrapper. - Interpreters created by pyenv, Pipenv, and Poetry.
- Virtual environments located in the path identified by
WORKON_HOME(as used by virtualenvwrapper). - Conda environments found by
conda env list. Conda environments which do not have an interpreter will have one installed for them upon selection. - Interpreters installed in a
.direnvfolder for direnv under the workspace folder.
Environments and Terminal windows
After using Python: Select Interpreter, that interpreter is applied when right-clicking a file and selecting Python: Run Python File in Terminal. The environment is also activated automatically when you use the Terminal: Create New Terminal command unless you change the python.terminal.activateEnvironment setting to false.
Please note that launching VS Code from a shell in which a specific Python environment is activated doesn’t automatically activate that environment in the default Integrated Terminal.
Note: conda environments cannot be automatically activated in the integrated terminal if PowerShell is set as the integrated shell. See Integrated terminal — Terminal profiles for how to change the shell.
Changing interpreters with the Python: Select Interpreter command doesn’t affect terminal panels that are already open. Thus, you can activate separate environments in a split terminal: select the first interpreter, create a terminal for it, select a different interpreter, then use the split button (⌘\ (Windows, Linux Ctrl+Shift+5)) in the terminal title bar.
Choose a debugging environment
By default, the debugger will use the Python interpreter chosen with the Python extension. However, if there is a python property specified in the debug configuration of launch.json, it takes precedence. If this property is not defined, it will fall back to using the Python interpreter path selected for the workspace.
For more details on debug configuration, see Debugging configurations.
Environment variables
Environment variable definitions file
An environment variable definitions file is a text file containing key-value pairs in the form of environment_variable=value, with # used for comments. Multiline values aren’t supported, but references to previously defined environment variables are allowed. Environment variable definitions files can be used for scenarios such as debugging and tool execution (including linters, formatters, IntelliSense, and testing tools), but aren’t applied to the terminal.
Note: Environment variable definitions files are not necessarily cross-platform. For instance, while Unix uses
:as a path separator in environment variables, Windows uses;. There is no normalization of such operating system differences, and so you need to make sure any environment definitions file use values that are compatible with your operating system.
By default, the Python extension looks for and loads a file named .env in the current workspace folder, then applies those definitions. The file is identified by the default entry "python.envFile": "${workspaceFolder}/.env" in your user settings (see General Python settings). You can change the python.envFile setting at any time to use a different definitions file.
Note: Environment variable definitions files are not used in all situations where environment variables are available for use. Unless Visual Studio Code documentation states otherwise, these only affect certain scenarios as per their definition. For example, the extension doesn’t use environment variable definitions files when resolving setting values.
A debug configuration also contains an envFile property that also defaults to the .env file in the current workspace (see Debugging — Set configuration options). This property allows you to easily set variables for debugging purposes that replace variables specified in the default .env file.
For example, when developing a web application, you might want to easily switch between development and production servers. Instead of coding the different URLs and other settings into your application directly, you could use separate definitions files for each. For example:
dev.env file
# dev.env - development configuration

# API endpoint
MYPROJECT_APIENDPOINT=https://my.domain.com/api/dev/

# Variables for the database
MYPROJECT_DBURL=https://my.domain.com/db/dev
MYPROJECT_DBUSER=devadmin
MYPROJECT_DBPASSWORD=!dfka**213=
prod.env file
# prod.env - production configuration

# API endpoint
MYPROJECT_APIENDPOINT=https://my.domain.com/api/

# Variables for the database
MYPROJECT_DBURL=https://my.domain.com/db/
MYPROJECT_DBUSER=coreuser
MYPROJECT_DBPASSWORD=kKKfa98*11@
You can then set the python.envFile setting to ${workspaceFolder}/prod.env, then set the envFile property in the debug configuration to ${workspaceFolder}/dev.env.
Note: When environment variables are specified using multiple methods, be aware that there is an order of precedence. All
envvariables defined in thelaunch.jsonfile will override variables contained in the.envfile, specified by thepython.envFilesetting (user or workspace). Similarly,envvariables defined in thelaunch.jsonfile will override the environment variables defined in theenvFilethat are specified inlaunch.json.
Use of the PYTHONPATH variable
The PYTHONPATH environment variable specifies additional locations where the Python interpreter should look for modules. In VS Code, PYTHONPATH can be set through the terminal settings (terminal.integrated.env.*) and/or within an .env file.
When the terminal settings are used, PYTHONPATH affects any tools that are run within the terminal by a user, as well as any action the extension performs for a user that is routed through the terminal such as debugging. However, in this case when the extension is performing an action that isn’t routed through the terminal, such as the use of a linter or formatter, then this setting won’t have an effect on module look-up.
Next steps
- Editing code — Learn about autocomplete, IntelliSense, formatting, and refactoring for Python.
- Debugging — Learn to debug Python both locally and remotely.
- Testing — Configure test environments and discover, run, and debug tests.
- Settings reference — Explore the full range of Python-related settings in VS Code.
More Python resources
- Getting Started with Python in VS Code — Learn how to edit, run, and debug code in VS Code.
- Virtual Environments and Packages (Python.org) — Learn more about virtual environments and packages.
- Installing Python Modules (Python.org) — Learn how to install Python modules.
- Python tutorial (Python.org) — Learn more about the Python language.
04/03/2025
Несмотря на то, что python это очень простой язык программирования (*с точки зрения синтаксиса и семантики), у некоторых возникают сложности на самом первом этапе — запуска созданной программы.
В этой статье я постараюсь максимально подробно описать все шаги для этого процесса. При этом мы будем использовать один из самых популярных IDE (Integrated Development Environment или Встроенная Среда Разработчика) — Visual Studio Code (В дальнейшем VSC).
Откройте VSC и нажмите на: File -> Open Folder (Файл -> Открыть Папку)
Далее необходимо создать новый терминал для запуска ваших программ, а также создания виртуального окружения. Для этого в шапке VSC выберите: Terminal -> New Terminal (Терминал -> Новый Терминал). Либо нажмите сочетание клавиш на клавиатуре: Ctrl + Shift + ` (Тильда)
В терминале вводим операцию: py -m venv env (Если использование py выдаст вам ошибку, то попробуйте вместе этой операции использовать одну из перечисленных: python, python3)
Данная операция создаст новое виртуальное окружение и позволит нам изолировать используемые модули в нашей программе.
Далее активируем виртуальное окружение: env\Scripts\activate
Тут важно использовать именно обратные слэши для операционной системы Windows. На Mac OS операция будет выглядеть следующим образом: source env/bin/activate
Если вы сделали все правильно, то увидите префикс (env) в консоли.
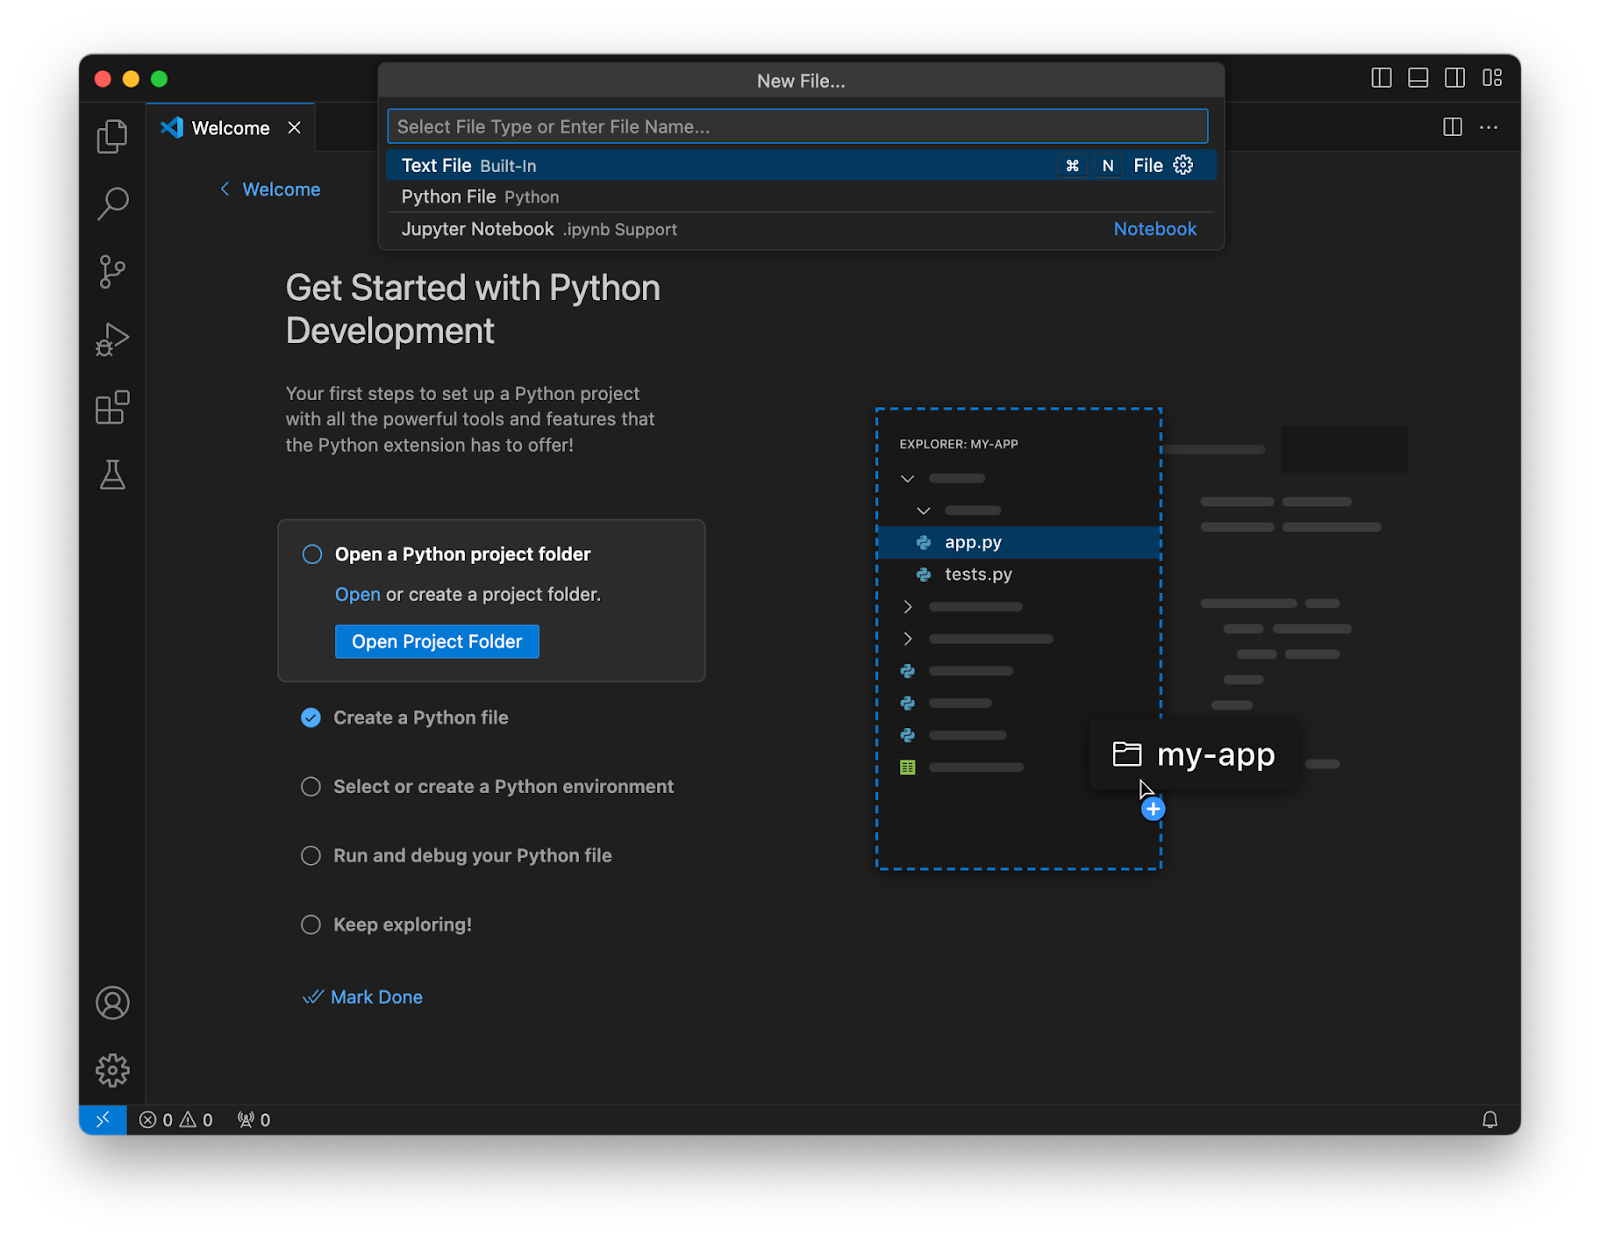
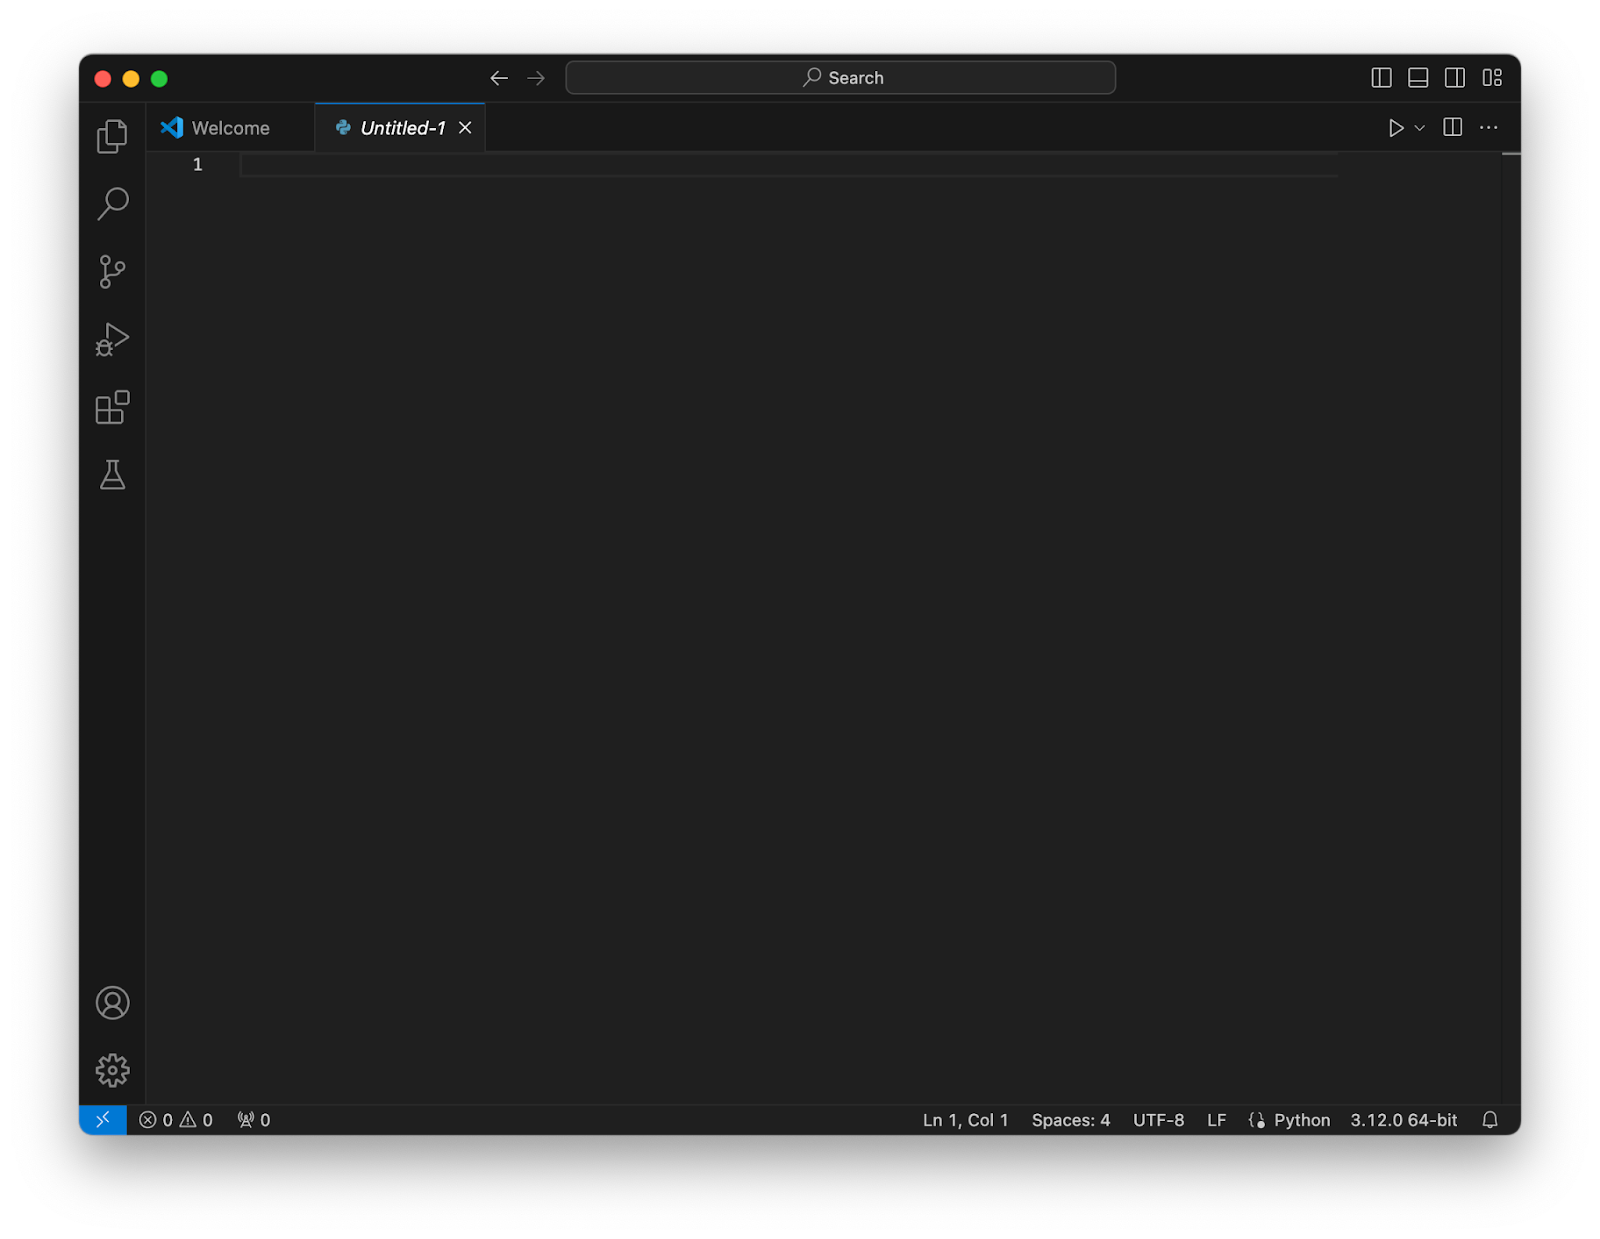
Далее переходим в закладку создания файлов на панели VSC (Это самая верхняя иконка). Внутри области с названием выбранной папки, нажмите на правую кнопку мышки и выберите: New File… (Новый файл…)
В этот файл вы можете начать писать вашу программу.
Для создания программы использующей модульный подход, необходимо организовывать файлы другим способом.
Михаил
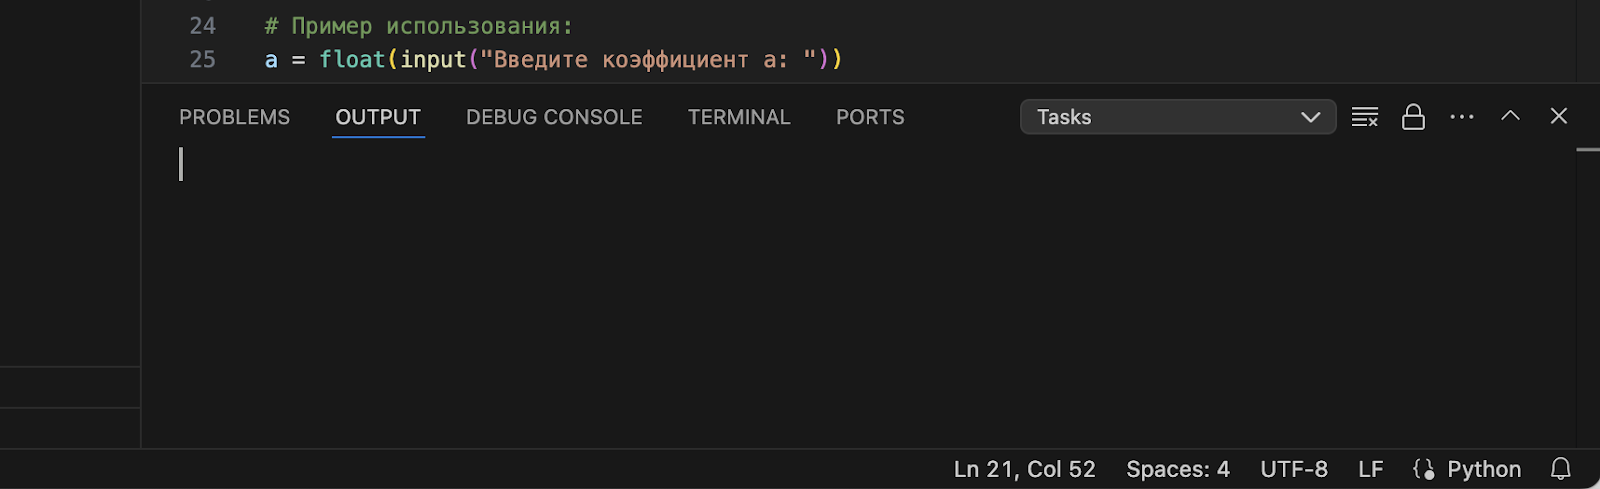
Далее останется только запустить созданную нами программу. Для этого вы можете либо вызвать операцию: py main.py в консоли
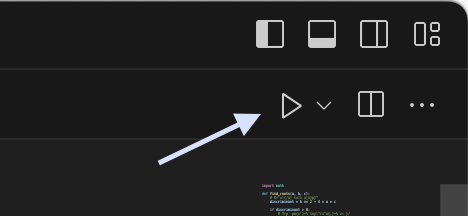
Либо нажать на кнопку «запуска» в правой верхней панели VSC интерфейса.
Надеюсь данная статья поможет вам в самом начале вашего пути разработчика. Если возникнут вопросы, буду рад ответить на них в комментариях.
Activating a virtual environment (venv) in VSCode is essential for Python development. This environment isolates your project dependencies, making it easier to manage and maintain them.
Visual Studio Code is a versatile, powerful Integrated Development Environment (IDE). It supports the seamless integration of various development tools and extensions, such as the Python extension and Git.
In this article, I’ll guide you through the straightforward process of activating a venv in VSCode. By the end, you will understand how to set up and activate your venv using the VSCode terminal, ensuring your Python projects run in the right environment.
- Setting Up the Virtual Environment: Creating and configuring a new Python
venv. - Activating the Environment in VSCode: Steps to initiate the
venvwithin the VSCode terminal. - Configuring VSCode Settings: Adjusting VSCode settings for optimal development.
You’ll be using key commands and scripts, plus I’ll explain how to manage common files like requirements.txt in your project directory. Let’s get started!
How to Activate Venv in VSCode for Python: Quick Workflow
Creating a Virtual Environment
- Open VSCode: Launch Visual Studio Code and open the folder where you want your project to reside.
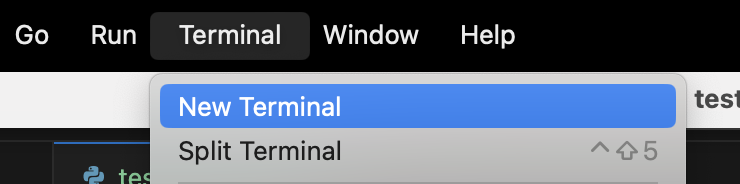
- Open the Terminal: Use the shortcut Ctrl + ` (backtick) or go to the menu and select Terminal > New Terminal.
- Create the Virtual Environment: In the terminal, run the command:
This creates a virtual environment named
.venvin your project folder.
Activating the Virtual Environment
For Windows
- Activate the venv: In the terminal, run:
You should see
(venv)at the beginning of your terminal prompt, indicating that the virtual environment is active.
For macOS/Linux
- Activate the venv: In the terminal, run:
source .venv/bin/activate
You will also see
(venv)in your terminal prompt.
Selecting the Python Interpreter
- Open Command Palette: Press Ctrl + Shift + P (or Cmd + Shift + P on macOS).
- Select Interpreter: Type
Python: Select Interpreterand select it. Choose the interpreter that corresponds to your virtual environment (it should show.venv).
Installing Packages
With the virtual environment activated, you can install packages using pip:
pip install <package_name>
For example, to install NumPy:
Verifying Activation
To confirm that your virtual environment is active and being used, check which Python executable is currently being used by running:
which python # On macOS/Linux
or
where python # On Windows
This should point to the Python executable within your .venv directory.
Additional Tips
- If you’re using Jupyter notebooks within VSCode, ensure that you install
ipykernelin your virtual environment to use it as a kernel:python -m pip install ipykernel
By following these steps, you can effectively create and activate a Python virtual environment in VSCode, allowing for better management of dependencies and project isolation.
Setting Up Visual Studio Code for Python Development
Installing Visual Studio Code
Downloading and Installing VS Code for Various Platforms
First step, grab Visual Studio Code. Head over to the official VS Code website. It’s cross-platform, so it works on Windows, macOS, and Linux. Click on the download button for your operating system. Follow the install wizard that guides you through the process.
Windows users, double-click the installer file and follow the prompts. Mac folks, drag the downloaded app to the Applications folder. Linux users, there’s a package for you too. You can use either DEB or RPM files, or follow their official repository instructions.
Initial Configuration and Setup
Once installed, fire up VS Code. You’ll be met with a clean, minimal interface. But let’s optimize it for Python development.
Hit Ctrl + , or go to File > Preferences > Settings to tweak your setup. Check for updates under Help > Check for Updates to ensure you’re on the latest version. Right off the bat, it’s a good idea to adjust your theme and font settings to your liking. Dark Mode is a lifesaver for late-night coding sessions.
Installing and Configuring the Python Extension
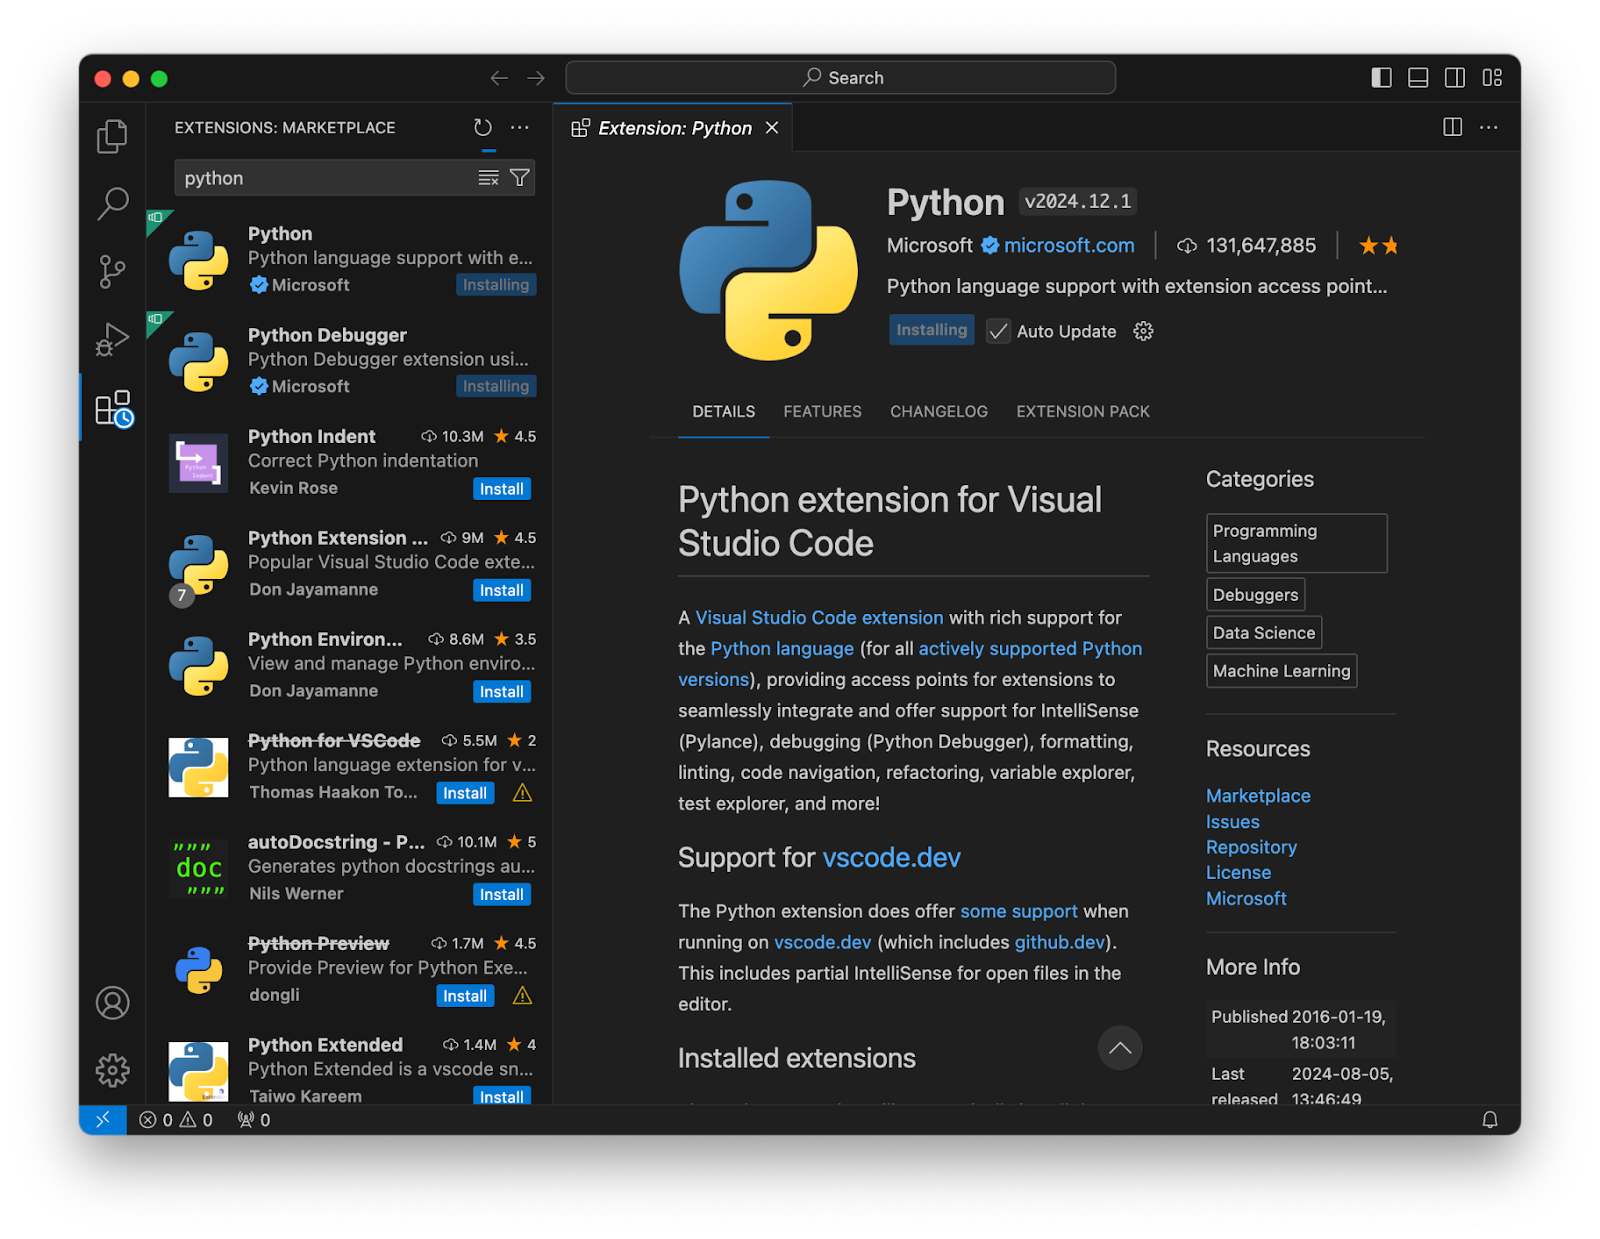
Downloading the Python Extension by Microsoft
To get started with Python, you need the Python extension by Microsoft. Go to the Extensions Marketplace (Ctrl + Shift + X) and search for “Python”. Install the extension by Microsoft, which is typically the first result. This extension is crucial for providing support for Python-specific features like IntelliSense, linting, and debugging.
Configuring Basic Settings in the Python Extension
Post-installation, configure the basic settings. Click on the gear icon for the Python extension and go to ‘Extension Settings’. Here, set your Python interpreter path to point to your Python executable (python, python3, or a specific location on your machine). This ensures VS Code knows which Python version to use.
Optimizing VS Code for Python Development
Overview of Key Shortcuts and Commands
Key shortcuts and commands save time. Here are a few:
Ctrl + Shift + P: Opens the Command Palette, your gateway to almost all features.Ctrl + P: Quick file open.Ctrl +: Integrated Terminal toggle. These shortcuts make navigating and managing your code seamless.
Configuring User and Workspace Settings
User and workspace settings can be adjusted to suit your preference. Access settings via File > Preferences > Settings or Ctrl + ,. Under the extensions tab, explore settings for Python like linting, formatting, and testing. Customize as needed based on your workflow.
Workspace settings allow you to maintain project-specific configurations. This is especially useful if you handle multiple projects with different needs. Create or modify .vscode/settings.json in your project folder to include project-specific settings.
Navigating the Extensions Marketplace for Additional Functionalities
The Extensions Marketplace is a goldmine for boosting productivity. Apart from the Python extension, consider installing:
- Pylance: For advanced IntelliSense capabilities.
- GitLens: Enhances Git integration, showing who changed what and why.
- Jupyter: If you work with Jupyter Notebooks.
Creating and Managing Virtual Environments in VS Code
Options for Creating Virtual Environments
Using venv (Python’s Built-In Module)
Open a terminal within Visual Studio Code. Type:
python -m venv myenv
Replace “myenv” with your preferred environment name. This command creates a folder that contains all the necessary files to run an isolated Python environment.
Using Conda for Environment Management
If you prefer Conda:
conda create --name myenv
Again, replace “myenv” with the desired environment name. Conda is powerful, especially if you’re managing complex dependencies or using multiple programming languages.
Choosing Between venv and Conda Based on Project Requirements
Choose venv if your needs are straightforward, mainly for Python. It’s lightweight and comes built-in.
Pick Conda for heavier, multi-language workflows, or when dealing with extensive data science projects. Conda’s package management goes beyond just Python, making it versatile.
Creating a Virtual Environment
Steps for Creating a venv Environment
In the terminal:
python -m venv projectenv
A new folder named projectenv appears in your project directory.
Steps for Creating a Conda Environment
For Conda:
conda create --name projectenv
Conda will set up everything and prompt you to activate the environment.
Activating and Deactivating Virtual Environments
Activating a Virtual Environment on Different Operating Systems
On Windows:
projectenv\Scripts\activate
On Mac/Linux:
source projectenv/bin/activate
Knowing how to activate venv in VSCode makes switching environments a breeze. Using Ctrl + Shift + P, open the Command Palette and select Python: Select Interpreter. Choose your virtual environment.
Deactivating the Environment When Work is Completed
When you’re done, simply type:
deactivate
This works for both venv and Conda environments.
Managing Multiple Environments in VS Code
Switching Between Virtual Environments Using the Command Palette
Open the Command Palette (Ctrl + Shift + P). Select Python: Select Interpreter and choose from the list of available environments.
Assigning Environment-Specific Configurations in VS Code
Create a .vscode folder in your project directory. Inside, place a settings.json file:
{
  "python.pythonPath": "projectenv/bin/python"
}
Adjust the path based on your environment location.
Best Practices for Managing Dependencies Across Multiple Environments
- Use
requirements.txt:pip freeze > requirements.txt - Install dependencies from
requirements.txt:pip install -r requirements.txtConfiguring Virtual Environments in VS Code for Jupyter Notebooks
Setting Up Jupyter Notebook in a Virtual Environment
Installing Jupyter Notebook in a Selected Virtual Environment
First, ensure your virtual environment is activated. This step varies depending on your setup but usually involves something like:
source myenv/bin/activate
or
myenv\Scripts\activate
Once you’re in the virtual environment, install Jupyter Notebook. Run:
pip install jupyter
This installs Jupyter within your isolated environment, keeping dependencies tidy and separate from your global setup.
Running Jupyter Notebooks in VS Code
To run Jupyter Notebooks directly within VS Code, you’ll need the Jupyter extension. Head to the Extensions Marketplace (Ctrl+Shift+X), search for “Jupyter”, and install it.
After installing, create a new Jupyter Notebook by using Ctrl+Shift+P to open the Command Palette. Select Jupyter: Create New Blank Notebook. You’ll see a new notebook interface that’s ready to use.
Ensuring Compatibility Between Jupyter and Virtual Environments
Selecting the Correct Python Interpreter for Jupyter
When you open a Jupyter Notebook in VS Code, it might not automatically pick up your virtual environment interpreter. Fix this by clicking on the Python version listed in the top-right corner of your notebook. This action opens up a list of available Python interpreters.
Choose the one corresponding to your virtual environment. This ensures your notebooks run using packages and settings from your isolated environment.
Configuring VS Code to Use the Virtual Environment Interpreter
To make this process smoother, configure your workspace settings. In the root of your project, create a .vscode directory if it doesn’t already exist. Inside it, create a settings.json file:
{
  "python.pythonPath": "myenv/bin/python",
  "jupyter.jupyterServerType": "local"
}
Adjust the path as necessary to point to your virtual environment’s Python executable. This step ensures that any Python processes in VS Code, including Jupyter Notebooks, run using your virtual environment settings.
Advanced Environment Configuration and Usage
Configuring VS Code to Recognize the Virtual Environment Interpreter
Setting Default and Project-Specific Python Interpreters
Go to your VS Code settings.
Set the default Python interpreter for all your projects:
{
    "python.pythonPath": "/path/to/your/virtualenv/bin/python"
}
For a project-specific interpreter, do this inside your project directory. Create a .vscode/settings.json file:
{
    "python.pythonPath": "${workspaceFolder}/venv/bin/python"
}
Customizing Interpreter Settings for Each Workspace
Each workspace can have its own settings. Use the Command Palette (Ctrl+Shift+P), type Python: Select Interpreter. Choose your virtual environment.
If your setup is more complex, adjust settings in .vscode/settings.json. Tweak to fit the project’s unique needs.
Installing and Managing Packages Within Virtual Environments
Using pip and conda to Install Packages
Activate your virtual environment. Install packages with pip:
pip install package_name
Or, if you’re using Conda:
conda install package_name
Both methods keep your environment isolated, ensuring clean dependency management.
Maintaining Version Consistency with requirements.txt
Freeze existing packages into a requirements.txt file:
pip freeze > requirements.txt
Consistency is key. When setting up a new environment, install everything listed in requirements.txt:
pip install -r requirements.txt
Using Package Management for Multiple Environments
Managing dependencies for multiple projects? Use package managers like pipenv or poetry. Both tools streamline handling virtual environments and dependencies across many projects:
pipenv install
or
poetry install
Linting and Formatting in Virtual Environments
Setting Up Linters (e.g., flake8, pylint) in the Environment
Install your linter inside the environment:
pip install flake8
pip install pylint
Set up VS Code to recognize these tools. Go to Settings and configure:
{
    "python.linting.flake8Enabled": true,
    "python.linting.pylintEnabled": true
}
Enabling Auto-Formatting (e.g., black, autopep8)
Auto-formatting keeps code tidy. Install a formatter:
pip install black
pip install autopep8
Enable and configure:
{
    "python.formatting.provider": "black", // or "autopep8"
    "editor.formatOnSave": true
}
Configuring VS Code to Use Linters and Formatters from the Virtual Environment
In settings.json, make sure linters and formatters point to the virtual environment’s paths:
{
    "python.linting.pylintPath": "${workspaceFolder}/venv/Scripts/pylint",
    "python.formatting.blackPath": "${workspaceFolder}/venv/Scripts/black"
}
Integrating Version Control with Virtual Environments in VS Code
Setting Up Git in VS Code
Installing and Configuring Git for Source Control
First, download and install Git from the official site. Installation is straightforward but be sure to include Git in your system’s PATH during installation.
In VS Code, navigate to the Source Control view by clicking the third icon on the sidebar or pressing Ctrl+Shift+G. If Git is correctly installed, you’ll see options to initialize or clone repositories directly from here.
Open the Command Palette (Ctrl+Shift+P) and type Git: Enable. This command ensures Git is active and ready for use in VS Code.
Initializing a Git Repository Within VS Code
To initialize a Git repository, go to your project directory. Click on the Source Control view and select “Initialize Repository” or run:
git init
in the integrated terminal (Ctrl +). This command creates a .git directory and initializes version control.
Managing Virtual Environment Files with Git
Excluding Virtual Environment Files (e.g., .venv) Using .gitignore
You don’t want to clutter your repository with virtual environment files. Create a .gitignore file in your project root and add:
.venv/
or whatever your virtual environment folder is named. This step keeps those bulky files out of your version control.
Best Practices for Version Control with Virtual Environments in Projects
Always commit your requirements.txt or environment.yml (for Conda). These files list dependencies and make recreating the environment easy. Run:
pip freeze > requirements.txt
periodically to ensure your dependency list is up-to-date.
Never commit the actual virtual environment directory. It bloats the repository and causes unnecessary merge conflicts. Stick to your .gitignore rule.
Recommended Git Extensions for Enhanced Management
GitLens for History and Blame Information
Install GitLens from the Extensions Marketplace. This tool supercharges the built-in Git capabilities of VS Code. It provides rich insights into your code’s history, showing who made what changes and why.
The inline blame annotations, history explorer, and commit search functionalities make it a must-have for any serious developer.
Additional Git Extensions for Collaboration
Beyond GitLens, other handy extensions include:
- Git History: Adds a visual git log to view commit history.
- Git Graph: Visualizes branching, merges, and commit history in a graph format.
For team collaboration, Live Share is invaluable. It enables real-time collaboration directly within VS Code, making code reviews and pair programming sessions a breeze.
Best Practices for Working with Virtual Environments in VS Code
Structuring Projects for Compatibility with Virtual Environments
Organizing Folders and Files in a Project
Split the project’s structure into manageable pieces. This helps with flexibility and clarity.
Example structure:
my_project/
├── .vscode/
│   ├── settings.json
├── myenv/
├── src/
│   ├── __init__.py
│   ├── main.py
├── tests/
│   ├── test_main.py
├── requirements.txt
├── .gitignore
└── README.md
The .vscode/ folder stores some VS Code environment configurations. myenv/ is the virtual environment folder. src/ contains the main codebase. tests/ holds your tests.
Keeping Environment-Specific Configurations Separated
Environment-specific configurations should sit in the .vscode/settings.json file such as:
{
    "python.pythonPath": "myenv/bin/python"
}
This makes it easier to maintain project settings without cluttering the main configuration.
Tips for Optimizing VS Code with Virtual Environments
Automating Environment Activation
Ensure your environment activates automatically. Add this snippet in .bashrc or .zshrc:
if [ -f myenv/bin/activate ]; then
    source myenv/bin/activate
fi
You can also configure VS Code tasks to automate this. Go to tasks.json:
{
    "version": "2.0.0",
    "tasks": [
        {
            "label": "Activate venv",
            "type": "shell",
            "command": "source myenv/bin/activate",
            "problemMatcher": []
        }
    ]
}
Configuring Workspace Settings for Streamlined Development
Use .vscode/settings.json to set environment-specific configurations like linting, formatting, or even specific interpreters. Keeps your project settings clean and neatly divided from personal dev configurations.
{
    "python.linting.enabled": true,
    "editor.formatOnSave": true,
    "python.formatting.provider": "black"
}
Common Errors and Troubleshooting
Addressing Common Issues with Virtual Environment Activation
If the environment fails to activate, double-check its path.
source myenv/bin/activate
Sometimes spaces or typos mess things up. Ensure the name and path are correct.
Troubleshooting Interpreter Selection Problems
Open Command Palette (Ctrl+Shift+P), and type Python: Select Interpreter. You might have multiple Python versions installed. Choose the correct one tied to your virtual environment.
Errors during package installations? Ensure pip is up-to-date:
pip install --upgrade pip
Dependencies conflicting? Use a requirements.txt file to maintain consistency:
pip freeze > requirements.txt
pip install -r requirements.txt
What is a virtual environment (venv) in Python?
A venv in Python is a self-contained directory that holds a separate version of Python and installed libraries. This isolation ensures project dependencies don’t interfere with one another.
It’s critical for managing libraries independently, avoiding version conflicts, and ensuring project reproducibility.
Why should I use a venv in VSCode?
Using a venv in VSCode helps keep your project dependencies isolated and organized. This matters for maintaining a clean development environment.
VSCode’s Python extension simplifies the management and activation of your venv, aiding in better dependency management and preventing conflicts across projects.
How do I create a new venv in VSCode?
To create a new venv in VSCode, open the terminal and run:
python -m venv your_venv_name
Replace your_venv_name with your desired environment name. This command sets up a venv directory within your project folder, which you can activate in the next steps.
How do I activate the venv in VSCode?
To activate your venv in VSCode, open the integrated terminal and run:
source your_venv_name/bin/activate  # For macOS/Linux
.\your_venv_name\Scripts\activate  # For Windows
This switches your environment to the venv, indicated in the terminal prompt.
How do I set the Python interpreter to the venv in VSCode?
In VSCode, press Ctrl+Shift+P, then type Python: Select Interpreter. Pick your venv from the list. This sets the VSCode environment to your venv, making it easy to run and debug your Python scripts using the specified environment.
Why isn’t my venv activating in VSCode?
If the venv isn’t activating, check paths in your terminal and ensure VSCode is using the right Python interpreter. Verify .venv settings in your .bash_profile or .zshrc. Sometimes, restarting VSCode or the terminal resolves these issues, ensuring everything is synchronized.
How do I check if my venv is activated in VSCode?
When the venv is active, your terminal prompt will typically show the venv name in parentheses. Additionally, running python --version and pip list within the VSCode terminal should reflect the Python and pip versions specific to your venv.
How do I install packages in a venv when using VSCode?
With the venv activated, use VSCode’s integrated terminal to install packages:
pip install package_name
This command installs the specified package_name within your venv. Dependencies are recorded, ensuring they are isolated from your global Python environment.
How do I ensure VSCode uses my venv for all projects?
To make sure VSCode uses your venv for all projects, consistently select the Python interpreter specific to your venv. Adjust workspace settings in VSCode if needed. This helps standardize the environment across different projects and workspaces.
Can I use multiple venvs for different projects in VSCode?
Absolutely. You can create and manage multiple venvs in VSCode by setting individual environments per project. Each project folder can host its own venv, ensuring isolated dependencies. Ensure to select the corresponding Python interpreter for each project to avoid conflicts.
Conclusion
Knowing how to activate venv in VSCode is crucial for efficient Python development. This process ensures that your dependencies are isolated and your project environment is clean. Follow these steps to streamline your workflow:
- Create the virtual environment: In the terminal, run
python -m venv venv_name, ensuring your virtual environment is set up correctly. - Activate the environment: Open VSCode’s integrated terminal and activate your venv:
- For macOS/Linux:
source venv_name/bin/activate - For Windows:
.\venv_name\Scripts\activate
- For macOS/Linux:
- Select Python interpreter: Use
Ctrl+Shift+P, thenPython: Select Interpreter, and choose the appropriate venv. This step aligns VSCode with your virtual environment.
With these steps, you have effectively established a dedicated Python environment for development using Visual Studio Code. It allows better dependency management, reduces errors, and enhances project reproducibility. Consistent use of venvs across different projects ensures that your development environment remains organized and efficient.
If you liked this article about how to activate venv in VSCode, you should check out this article about how to enable error squiggles in VSCode.
There are also similar articles discussing how to change font in VSCode, how to comment in VSCode, how to debug React app in VSCode, and how to install matplotlib in VSCode.
And let’s not forget about articles on how to view Markdown in VSCode, how to format code in VSCode, how to comment out multiple lines in Python in VSCode, and how to exit Zen mode in VSCode.
- Author
- Recent Posts
Bogdan is a seasoned web designer and tech strategist, with a keen eye on emerging industry trends.
With over a decade in the tech field, Bogdan blends technical expertise with insights on business innovation in technology.
A regular contributor to TMS Outsource’s blog, where you’ll find sharp analyses on software development, tech business strategies, and global tech dynamics.
Установка необходимого программного обеспечения
Прежде чем начать работу с Python в Visual Studio Code, вам необходимо установить два ключевых компонента: сам Python и редактор VS Code.
Установка Python
Python — это язык программирования, который должен быть установлен на вашем компьютере независимо от редактора кода. Существует множество курсов по Python-разработке, которые помогают изучить язык с нуля и стать опытным разработчиком, но вы также можете разобраться с Python самостоятельно. Вот краткая инструкция по установке:
- Windows: Перейдите на официальный сайт Python.org, скачайте последнюю версию и запустите установщик. Важно: убедитесь, что вы отметили опцию «Add Python to PATH» перед установкой.
- macOS: Можно установить через официальный установщик с сайта Python.org или использовать Homebrew, выполнив команду
brew install python в терминале. - Linux: В большинстве дистрибутивов Python уже предустановлен. Если нет, установите через менеджер пакетов, например:
sudo apt-get install python3для Ubuntu/Debian.
После установки проверьте, что Python успешно установлен, выполнив в командной строке или терминале:
python --version
или
python3 --version

Установка Visual Studio Code
VS Code — это бесплатный редактор кода от Microsoft, доступный для Windows, macOS и Linux:
- Перейдите на официальный сайт VS Code.
- Скачайте версию для вашей операционной системы.
- Запустите установщик и следуйте инструкциям (на Windows вы можете добавить действия в контекстное меню и добавить в PATH во время установки).
По окончании установки запустите VS Code. Теперь нам нужно настроить его для работы с Python.
Настройка Visual Studio Code для работы с Python
VS Code имеет модульную структуру, и для эффективной работы с Python вам потребуется установить специальное расширение.
Установка расширения Python
- Откройте VS Code.
- Нажмите на иконку расширений на боковой панели (или используйте сочетание клавиш
Ctrl+Shift+X). - В поле поиска введите «Python».
- Найдите официальное расширение от Microsoft (обычно первое в списке) и нажмите «Install».
Совет по работе: Расширение Python от Microsoft включает в себя множество полезных инструментов: подсветку синтаксиса, автодополнение кода, линтер и многое другое. Это базовое расширение, которое значительно улучшит ваш опыт работы с Python.
Выбор интерпретатора Python
После установки расширения важно указать VS Code, какой интерпретатор Python использовать, особенно если у вас установлено несколько версий:
- Откройте командную палитру, нажав
Ctrl+Shift+P(илиCmd+Shift+Pна macOS). - Введите «Python: Select Interpreter» и выберите эту команду.
- Выберите нужную версию Python из списка обнаруженных.
Выбранный интерпретатор будет отображаться в строке состояния в нижней части окна VS Code. Вы можете изменить его в любое время, повторив эти шаги.
Теперь, когда все настроено, давайте создадим наш первый файл Python в VS Code:
Создание нового файла
Есть несколько способов создать новый файл Python:
- Через меню: File → New File, затем сохраните его с расширением .py
- Через сочетание клавиш:
Ctrl+Nдля создания нового файла, затемCtrl+Sдля сохранения - Через проводник: Нажмите на иконку «New File» в панели Explorer
При сохранении файла убедитесь, что он имеет расширение .py, например, hello_world.py.
Пример простого Python скрипта
Давайте напишем простой скрипт для проверки нашей настройки. Вставьте следующий код в ваш новый файл:
# Мой первый Python скрипт в VS Code
print("Привет, VS Code и Python!")
# Простое математическое вычисление
result = 5 + 7
print(f"Результат сложения: {result}")
# Запрос ввода от пользователя
name = input("Как вас зовут? ")
print(f"Приятно познакомиться, {name}!")
Запуск Python файла
Существует несколько способов запустить Python файл в VS Code:
- Используя кнопку Play: В правом верхнем углу редактора вы увидите значок треугольника (Play). Нажмите на него, чтобы запустить текущий файл.
- Через контекстное меню: Щелкните правой кнопкой мыши в редакторе и выберите «Run Python File in Terminal».
- Клавиатурное сокращение:
F5запустит отладчик, или вы можете настроить свои комбинации клавиш.
После запуска внизу экрана откроется встроенный терминал, где вы увидите вывод вашей программы и сможете взаимодействовать с ней, если программа запрашивает ввод.
Работа с проектами и рабочими областями
Для более сложных приложений рекомендуется организовать работу в виде проектов или рабочих областей VS Code.
Создание рабочей области
Рабочая область в VS Code — это один или несколько каталогов, которые открываются в редакторе одновременно:
- Выберите «File → Open Folder» и укажите папку вашего проекта.
- Если у вас уже есть открытый каталог и вы хотите добавить еще один, выберите «File → Add Folder to Workspace».
- Чтобы сохранить конфигурацию рабочей области, выберите «File → Save Workspace As…» и укажите имя файла (с расширением .code-workspace).
Структура типичного Python проекта
Хорошо организованный Python проект обычно имеет следующую структуру:
my_project/
├── .venv/                  # Виртуальное окружение (часто игнорируется в системе контроля версий)
├── src/                    # Исходный код
│   ├── __init__.py
│   ├── main.py
│   └── utils/
│       ├── __init__.py
│       └── helpers.py
├── tests/                  # Тесты
│   ├── __init__.py
│   └── test_main.py
├── .gitignore              # Файлы, которые следует игнорировать в системе контроля версий
├── README.md               # Документация проекта
└── requirements.txt        # Зависимости проекта
Работа с виртуальными окружениями
Виртуальные окружения позволяют изолировать зависимости проекта от системных пакетов Python:
Создание виртуального окружения:
- Откройте терминал в VS Code: Terminal → New Terminal.
- Выполните команду для создания виртуального окружения:
python -m venv .venv
илиpython3 -m venv .venv - Активируйте виртуальное окружение:
Windows: .venv\Scripts\activatemacOS/Linux: source .venv/bin/activate
VS Code обычно автоматически определяет виртуальное окружение в проекте и предлагает использовать его. Если этого не произошло, выберите интерпретатор из виртуального окружения через командную палитру (Python: Select Interpreter).
| Сравнение подходов к созданию Python файлов | Одиночный файл | Проект с виртуальным окружением | Рабочая область с несколькими проектами | Jupyter Notebook |
| Сложность настройки | Низкая | Средняя | Высокая | Средняя |
| Изоляция зависимостей | Нет | Да | Да | Опционально |
| Подходит для | Скрипты, учебные примеры | Средние и большие приложения | Комплексные решения | Анализ данных, обучение |
| Удобство деплоя | Низкое | Высокое | Высокое | Среднее |
Расширенные возможности для работы с Python
VS Code предлагает множество дополнительных функций, которые могут значительно повысить вашу продуктивность при работе с Python файлами.
Отладка Python кода
Отладка — это мощный инструмент для поиска и исправления ошибок в коде:
- Установите точки останова, щелкнув на поле слева от номера строки (появится красная точка).
- Нажмите F5 или выберите «Run → Start Debugging».
- Используйте панель отладки для:
- Перехода по шагам (F10 — шаг с обходом, F11 — шаг с заходом)
- Просмотра значений переменных
- Оценки выражений в контексте выполнения
Пример конфигурации отладки: Если вам нужна специальная конфигурация отладки, вы можете создать файл launch.json в папке .vscode:
{
    "version": "0.2.0",
    "configurations": [
        {
            "name": "Python: Current File",
            "type": "python",
            "request": "launch",
            "program": "${file}",
            "console": "integratedTerminal",
            "args": ["--verbose"]
        }
    ]
}

Форматирование кода и линтинг
Соблюдение стиля кодирования важно для читаемости и поддерживаемости вашего кода:
Автоматическое форматирование:
- Установите дополнительное расширение, например, «Prettier» или используйте встроенные средства форматирования.
Настройте автоформатирование при сохранении в settings.json:
"editor.formatOnSave": true,
- «python.formatting.provider»: «autopep8», // или «black», «yapf»
- Форматируйте код вручную через командную палитру: «Format Document» или с помощью сочетания клавиш (Shift+Alt+F).
Линтинг кода:
Линтеры помогают выявить потенциальные проблемы и ошибки в коде:
- VS Code по умолчанию использует pylint. Вы можете установить дополнительные линтеры:
pip install pylint flake8 mypy
Настройте предпочитаемый линтер в settings.json:
"python.linting.enabled": true,
"python.linting.pylintEnabled": true,
"python.linting.flake8Enabled": false,
"python.linting.mypyEnabled": false
Управление зависимостями
Эффективное управление пакетами и зависимостями необходимо для любого Python проекта:
Установка пакетов:
- Откройте терминал в VS Code и убедитесь, что виртуальное окружение активировано.
- Установите нужные пакеты:
pip install package_name - Для фиксации зависимостей создайте requirements.txt:
pip freeze > requirements.txt
Установка зависимостей из файла:
pip install -r requirements.txt
Полезные расширения для Python разработки
Помимо основного расширения Python, есть много дополнительных расширений, которые улучшают опыт разработки на Python в VS Code:
Необходимые расширения
- Pylance: Сервер языка Python, который обеспечивает быструю и детальную статическую проверку типов, улучшенное автодополнение, и подсветку семантических ошибок.
- Python Test Explorer: Позволяет просматривать и запускать тесты Python через графический интерфейс.
- Python Docstring Generator: Автоматически генерирует шаблоны документации для функций и классов.
Дополнительные полезные расширения
- GitLens: Расширяет возможности Git в VS Code, показывая информацию о коммитах прямо в редакторе.
- Python Snippets: Добавляет полезные сниппеты кода для быстрого написания шаблонных конструкций.
- Visual Studio IntelliCode: Улучшенное автодополнение на основе машинного обучения.
- Better Comments: Улучшает форматирование и визуализацию комментариев в коде.
Распределение популярности расширений VS Code для Python
Python (Microsoft)75%Pylance58%
Python Docstring32%
Python Test Expl.28%
Python Snippets25%
Реальные сценарии использования
Рассмотрим несколько практических примеров, которые демонстрируют работу с Python файлами в VS Code в различных контекстах.
Пример 1: Создание простого скрипта для анализа данных
Предположим, у нас есть файл CSV с продажами, и мы хотим создать скрипт для его анализа:
- Создайте новый файл
sales_analysis.py
Добавьте следующий код:
import pandas as pd
import matplotlib.pyplot as plt# Загрузка данных
def load_sales_data(file_path):
try:
return pd.read_csv(file_path)
except FileNotFoundError:
print(f"Файл {file_path} не найден.")
return None# Анализ данных
def analyze_sales(data):
if data is None:
return# Базовый анализ
total_sales = data['amount'].sum()
avg_sales = data['amount'].mean()print(f"Общие продажи: {total_sales:.2f}")
print(f"Средние продажи: {avg_sales:.2f}")# Визуализация
monthly_sales = data.groupby('month')['amount'].sum()
monthly_sales.plot(kind='bar', title='Продажи по месяцам')
plt.tight_layout()
plt.savefig('monthly_sales.png')
plt.show()if __name__ == "__main__":
sales_data = load_sales_data('sales.csv')
analyze_sales(sales_data)
- Запустите скрипт через VS Code (вам понадобится установить pandas и matplotlib:
pip install pandas matplotlib)
Пример 2: Настройка веб-проекта с Flask
Рассмотрим, как настроить простой веб-сервер с использованием Flask:
- Создайте новую папку проекта и откройте её в VS Code
- Создайте виртуальное окружение и активируйте его
- Установите Flask: pip install flask
Создайте файл app.py со следующим содержимым:
from flask import Flask, render_template

app = Flask(__name__)

@app.route('/')
def home():
    return render_template('index.html', title='Домашняя страница')

@app.route('/about')
def about():
    return render_template('about.html', title='О нас')

if __name__ == '__main__':
    app.run(debug=True)
- Создайте структуру папок:
flask_project/
├── app.py
├── templates/
│   ├── index.html
│   └── about.html
└── static/
    ├── css/
    │   └── style.css
    └── js/
        └── script.js
- Добавьте базовые HTML шаблоны в папку templates
- Запустите приложение из VS Code и проверьте его работу на
http://127.0.0.1:5000/
После настройки VS Code обнаружит, что вы работаете с Flask приложением, и может предложить дополнительные инструменты и расширения, специфичные для веб-разработки.

Решение распространенных проблем
При работе с Python в VS Code вы можете столкнуться с различными проблемами. Вот решения для наиболее распространенных из них:
Проблема 1: VS Code не распознает установленный Python
Решение:
- Убедитесь, что Python корректно установлен и добавлен в системный PATH.
- Перезапустите VS Code после установки Python.
- Попробуйте указать полный путь к исполняемому файлу Python в настройках VS Code.
Проблема 2: Не работает автодополнение или подсветка ошибок
Решение:
- Убедитесь, что расширение Python установлено и активировано.
- Проверьте, выбран ли правильный интерпретатор Python.
- Установите Pylance для улучшенного языкового сервера.
- Очистите кэш расширения: Command Palette → Developer: Reload Window.
Проблема 3: Не удается использовать виртуальное окружение
Решение:
- Убедитесь, что виртуальное окружение правильно создано и активировано.
- Проверьте путь к виртуальному окружению в настройках проекта.
- Попробуйте вручную выбрать интерпретатор из виртуального окружения через Command Palette → Python: Select Interpreter.
Согласно статистике Stack Overflow, эти три проблемы составляют более 60% всех вопросов, связанных с настройкой Python в VS Code, что подчеркивает их распространенность среди разработчиков.
Ваш маршрут мастерства: от новичка к эксперту VS Code и Python
Освоение работы с Python в Visual Studio Code — это непрерывный процесс. Вот ваш план действий для развития навыков и максимально эффективного использования этой мощной среды разработки:
- Ежедневно практикуйтесь — даже 15-20 минут регулярной практики существенно ускорят ваш прогресс.
- Изучите горячие клавиши — инвестиция времени в запоминание сочетаний клавиш многократно окупится в повышении скорости работы.
- Персонализируйте среду — настройте темы, шрифты и другие аспекты VS Code под свои предпочтения для максимального комфорта.
- Расширяйте инструментарий — постепенно добавляйте новые расширения по мере роста ваших потребностей в функциональности.
- Участвуйте в сообществе — задавайте вопросы и делитесь опытом на форумах и в группах по VS Code и Python.
По данным опроса разработчиков, проведенного в 2023 году, 78% пользователей VS Code отмечают, что продуктивность их работы значительно возросла в течение первых 3 месяцев использования этого редактора, особенно после освоения базовых настроек и расширений.
Помните, что путь к мастерству — это не спринт, а марафон. Постепенно внедряйте новые техники и инструменты в вашу повседневную работу, и со временем вы заметите, как ваша эффективность как Python разработчика неуклонно растет.
Какой будет ваш следующий шаг в освоении этой мощной комбинации инструментов? Возможно, стоит глубже изучить интеграцию VS Code с системами контроля версий или погрузиться в продвинутые техники отладки?
Оцените статью
★
★
★
★
★
4.9
(128 оценок)
Установка VS Code
Минимальные системные требования для редактора: 1 ГБ оперативной памяти и процессор с частотой не ниже 1,6 ГГц.
Windows
С официального сайта необходимо скачать установочный файл. После этого редактор устанавливается с помощью мастера установки.
Linux
На сайте VS Code описаны способы установки редактора на различные дистрибутивы. Рассмотрим процесс на примере Ubuntu – одного из самых популярных дистрибутивов. Его можно установить одним из двух способов: использовать менеджер установки Ubuntu Software или же скачать дистрибутив с сайта. Во втором случае скачать его можно будет с помощью команды:
sudo apt install ./<file>.debmacOS
Аналогично другим ОС, необходимо скачать подходящий файл с сайта. После успешной установки нужно перенести VS Code в папку с приложениями и добавить программу в Dock. После установки и открытия приложения пользователь увидит окно, которое выглядит следующим образом:
Настройка для разработки на Python
VS Code & Python
В 2018 году для VS Code появилось расширение для Python, в связи с этим у редактора появились следующие возможности:
- Поддержка Python 3.4 и выше, а также Python 2.7;
- Автоматическое дополнение кода (используя IntelliSense);
- Линтинг – вид статического анализа кода;
- Отладка – процесс поиска и исправления ошибок или неполадок в исходном коде;
- Сниппеты – фрагменты кода программы;
- Модульное тестирование и другие опции, специализирующиеся на разных типах задач.
Также в VS Code есть функции, не связанные непосредственно с языком:
- Комбинации горячих клавиш;
- Темы оформления;
- Языковые пакеты, поддерживающие множество языков (в том числе русский).
А также существует множество расширений, позволяющих сделать разработку максимально комфортной и не использовать дополнительные инструменты для осуществления стандартных операций. Например, для использования Git и Docker.
Чтобы добавить расширения, необходимо нажать на иконку Extensions / Расширения на левой панели (либо использовать сочетание Ctrl + Shift + X). При поиске стоит использовать ключевые слова и сортировку результатов. Также с помощью этой панели можно просмотреть установленные расширения и добавить рекомендуемые.
Найдем расширение для Python, поставим его и продолжим конфигурацию.
Запуск редактора
Преимущество современных программ для разработки — фиксация последнего состояния перед закрытием программы. Благодаря этому при новом открытии он запускается в том же виде, в котором был закрыт.
Не стоит забывать о том, что VS Code представляет собой редактор, а не полноценную среду разработки. В этом есть и преимущества в виде отсутствия привязки к конкретному проекту, что позволяет изменять и добавлять файлы сразу после запуска.
Версия интерпретатора
В редакторе необходимо указать версию интерпретатора. Это можно сделать с помощью вызова палитры команд (Command Palette) – используем комбинацию Ctrl + Shift + P. Далее набираем Python: Select Interpreter и выбираем подходящую версию.

Еще один способ выбрать другую версию Python – нажать на панель активности в правом нижнем углу (расположение может меняться в зависимости от версии редактора):

После этого откроется раздел, в котором можно выбрать подходящую версию интерпретатора.
Файлы конфигурации
Главное преимущество редактора – в нем разработчик может настроить все так, как удобно ему. Существуют глобальные параметры для пользователя, а также настройки рабочей области, которые применяются только к конкретным папкам или проектам. Локальные параметры хранятся в файлах с расширением .json в директории .vscode.
Работа в Visual Studio Code
Создание рабочей области
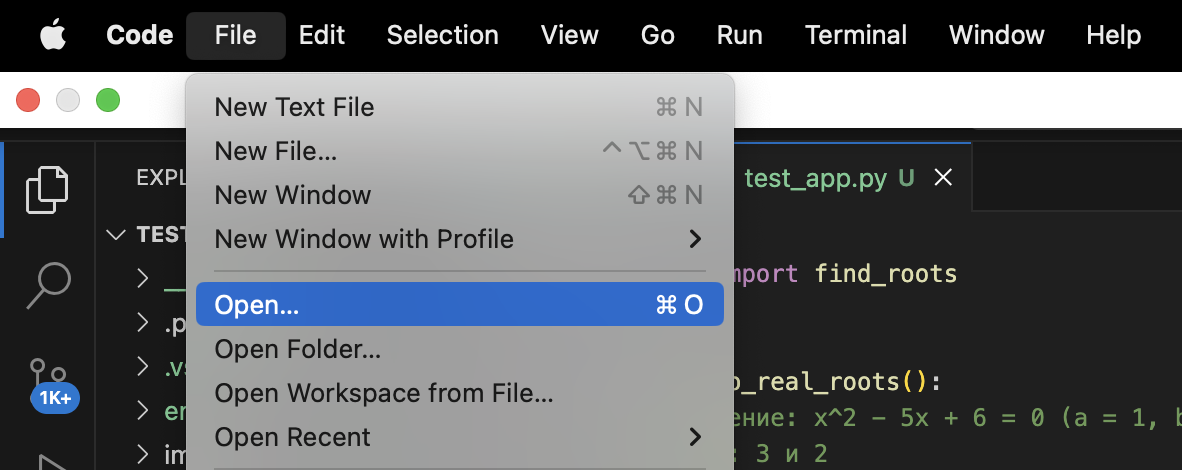
Чтобы выбрать рабочую область (папку), нужно перейти по следующему пути: Файл / File -> Открыть папку / Open Folder.

После этого создадим терминал для запуска своих файлов и добавления виртуального окружения. Для этого выберем Терминал / Terminal -> Новый терминал / New Terminal. Для того же результата можно использовать сочетание Ctrl + Shift + ` (символ “тильда”).
Создание и активация окружения
В терминале вводим следующую команду (может понадобиться вместо python3 написать python или py, если команда успешно не выполнится):
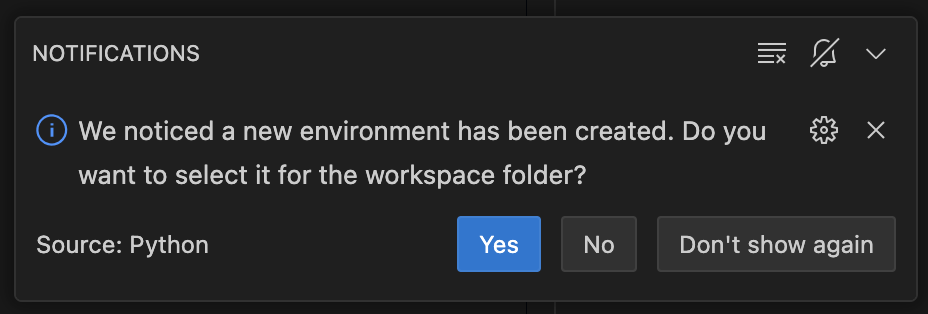
python3 -m venv envЭта команда создаст виртуальное окружение, и VS Cоde, обнаружив это, покажет такое уведомление:
Такое окружение может изолировать модули, используемые пользователем. Теперь необходимо активировать его с помощью команд:
source env/bin/activate – для macOS
env\Scripts\activate – для Windows
Если все этапы создания пройдут без ошибок, в консоли можно увидеть соответствующий префикс:

Новый проект на Python
Пройдем путь от создания до запуска файла. Для открытия пустого файла нужно выбрать в меню Файл / File и нажать на Создать / New File или нажать соответствующую комбинацию клавиш Ctrl + N. В появившемся меню можно выбрать тип файла.
Также файл можно создать через палитру команд с помощью команды File: New File. После этих действий откроется окно:
Создадим пустой Python-файл.
Теперь можно приступать к написанию кода программы.
Краткий обзор интерфейса
В VS Code максимизировано пространство для редактора, при этом оставлено достаточно пространства для проводника по проекту.

В области редактора происходит написание и изменение кода. На боковой панели находится проводник и другие представления. На строке состояния визуализируются рабочие сведения о текущем файле, а на панели активности располагаются вспомогательные вкладки (например, система контроля версий (vsc), дебаггер (debugger) и магазин плагинов).
Еще в нижней части можно открыть (и, соответственно, скрыть) мультипанель. На ней с помощью вкладок можно перемещаться между встроенным терминалом, разделом для дебага и информацией о возникающих ошибках и исключениях.
Запуск Python-кода
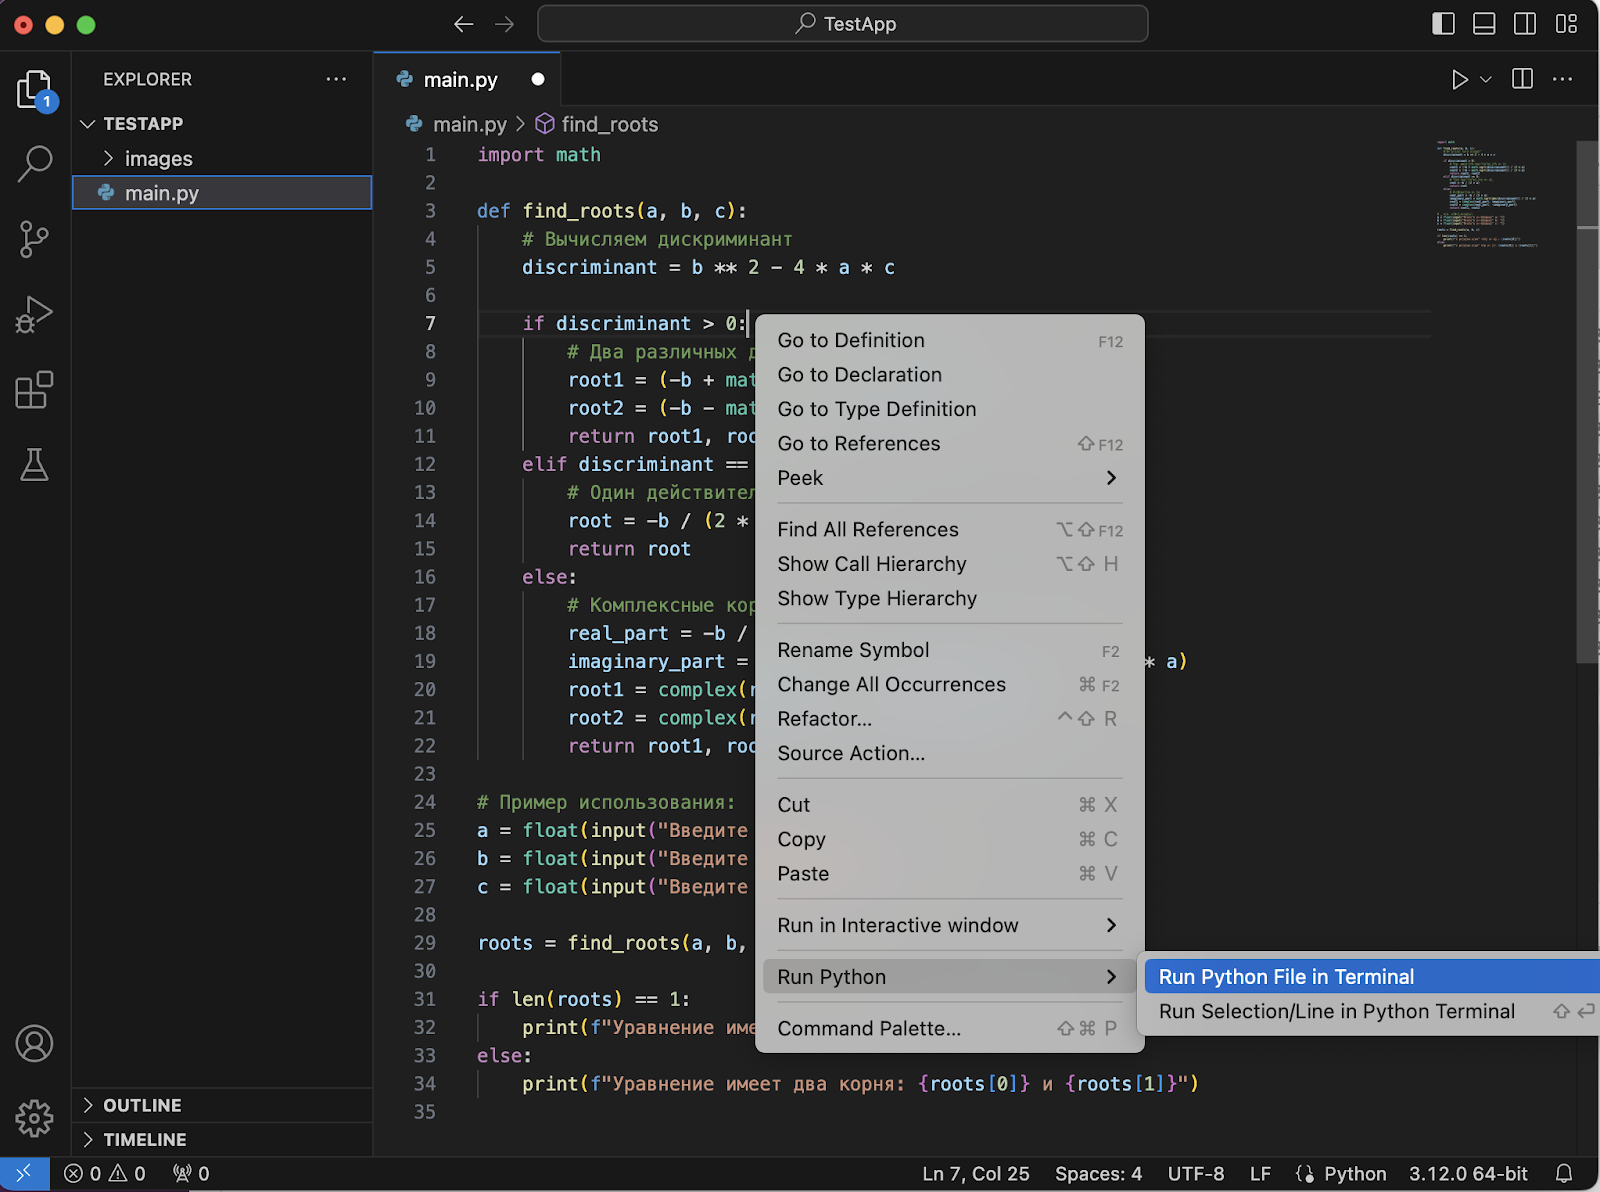
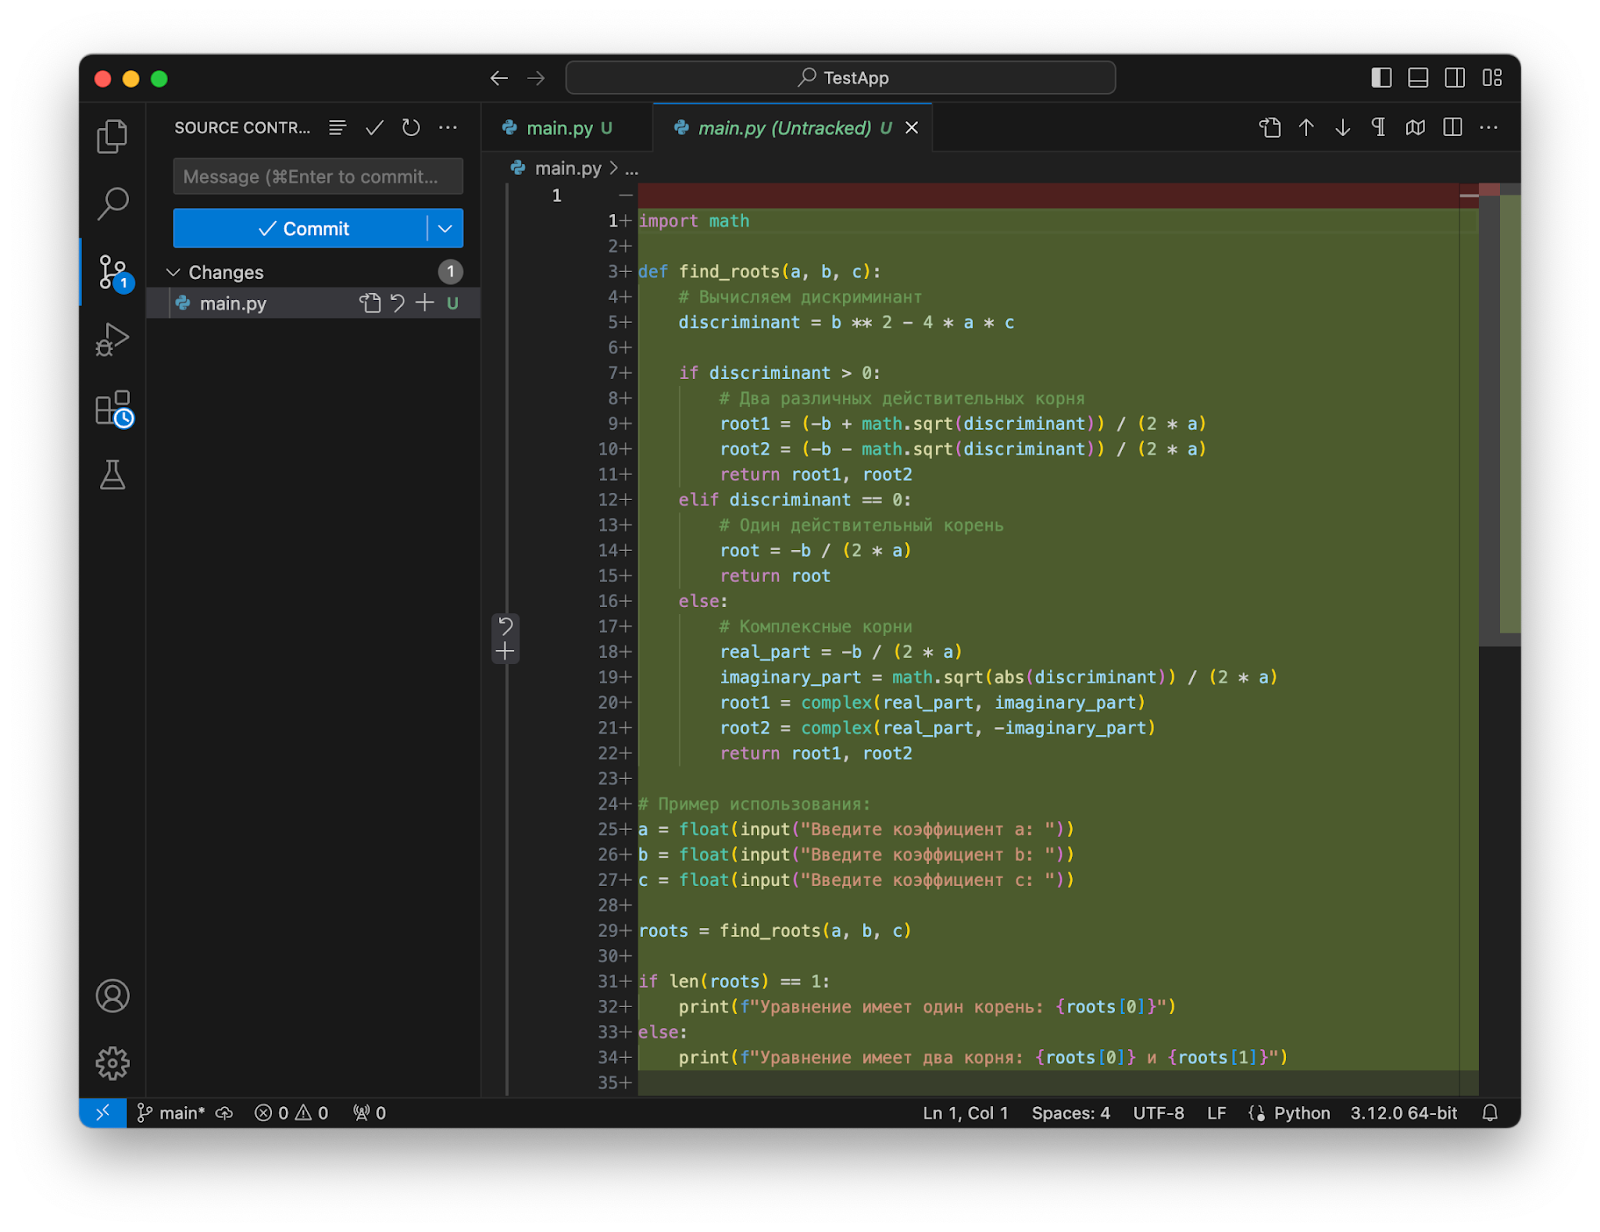
На приведенных выше скриншотах в файле main.py написана программа, находящая корни уравнения, принимающая на вход значения трех коэффициентов квадратного уравнения.
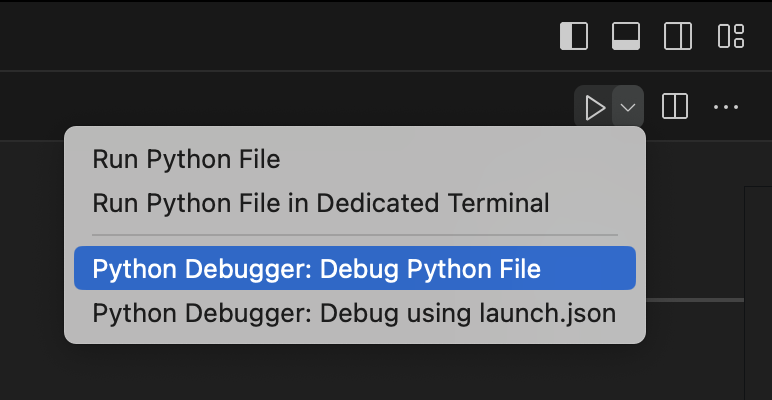
Для запуска этого кода есть несколько вариантов. Самый очевидный — нажать на соответствующую иконку Run в углу:
Еще можно использовать комбинацию Ctrl + Alt + N. Или нажать правой кнопкой мыши и запустить файл в терминале:
Линтинг
Линтер — анализатор исходного кода. Он помогает выявлять проблемы, структурные ошибки или стилевые недочеты. В Python важно тщательно следить за синтаксисом и оформлением кода, поэтому полезно использовать линтинг кода.
По умолчанию установленное расширение советует PyLint, однако доступны и многие другие: pep8 или flake8. При этом нужно учитывать, что линтер настраивается только для текущей области, не глобально.
Редактирование существующего проекта
На практике гораздо чаще программисты работают с уже имеющимся проектом, а не создают его с нуля. При этом реальные проекты часто имеют сложную структуру, состоящую из множества директорий и файлов. Также стандартная командная панель позволяет взаимодействовать с папками привычным способом:
Когда открывается папка в VS Code, по умолчанию также открываются последние использованные файлы. Однако это поведение можно настроить.
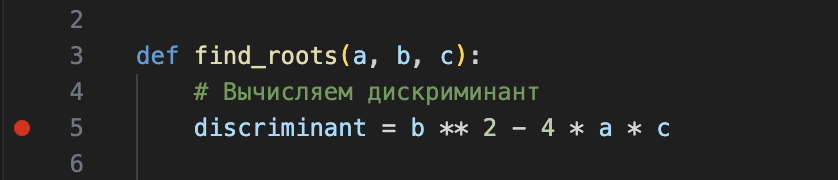
Отладка
Сложно представить отлавливание багов и исправление ошибок без полноценной отладки. Для открытия режима отладки, необходимо поставить точки останова (брейкпоинты) и нажать F5 (или запустить с помощью кнопки Run в режиме дебага):
Вся нужная информация выводится в панели отладчика:
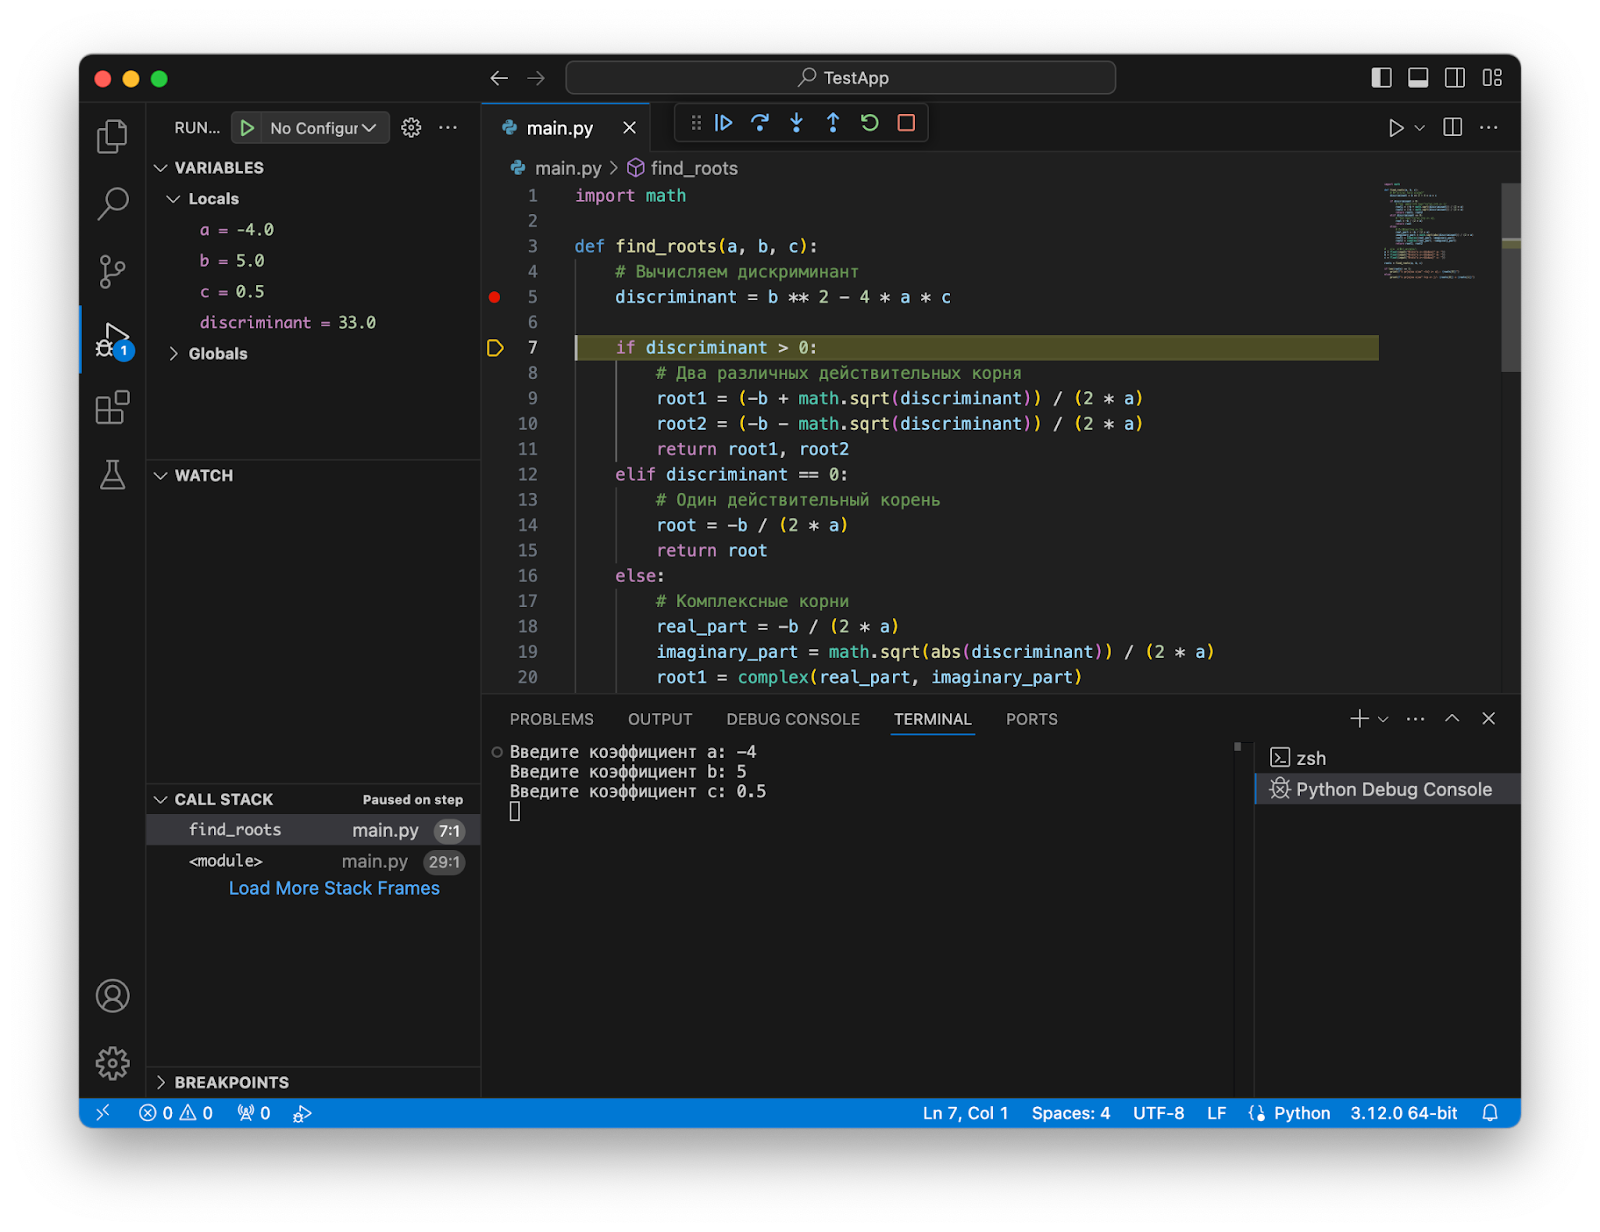
Панель разделена на 3 части: Variables (состояние переменных), Watch (отслеживаемые переменные) и Call stack (стек вызова). Также в верхней части располагается панель инструментов:

С помощью этих команд реализуется вся работа с отладкой. Рассмотрим их значение слева направо:
- continue (F5) — перемещает к следующей точке останова;
- step over (F10) — перемещает к следующему шагу (строке);
- step into (F11) — перемещает к следующему шагу (строке), заходя в вызываемую функцию;
- step out (Shift + F11) — выходит из функции, если в текущий момент в ней (после аналогично continue);
- restart (Ctrl + Shift + F5) — начинает отладку заново;
- stop (Shift + F5) — останавливает и выходит из отладки.
Тестирование
Помимо прочего VS Code поддерживает тестирование, хотя по умолчанию оно не включено. Для активации используется изученная комбинация Ctrl + Shift + P: в палитре нужно указать Python: Configure Tests.
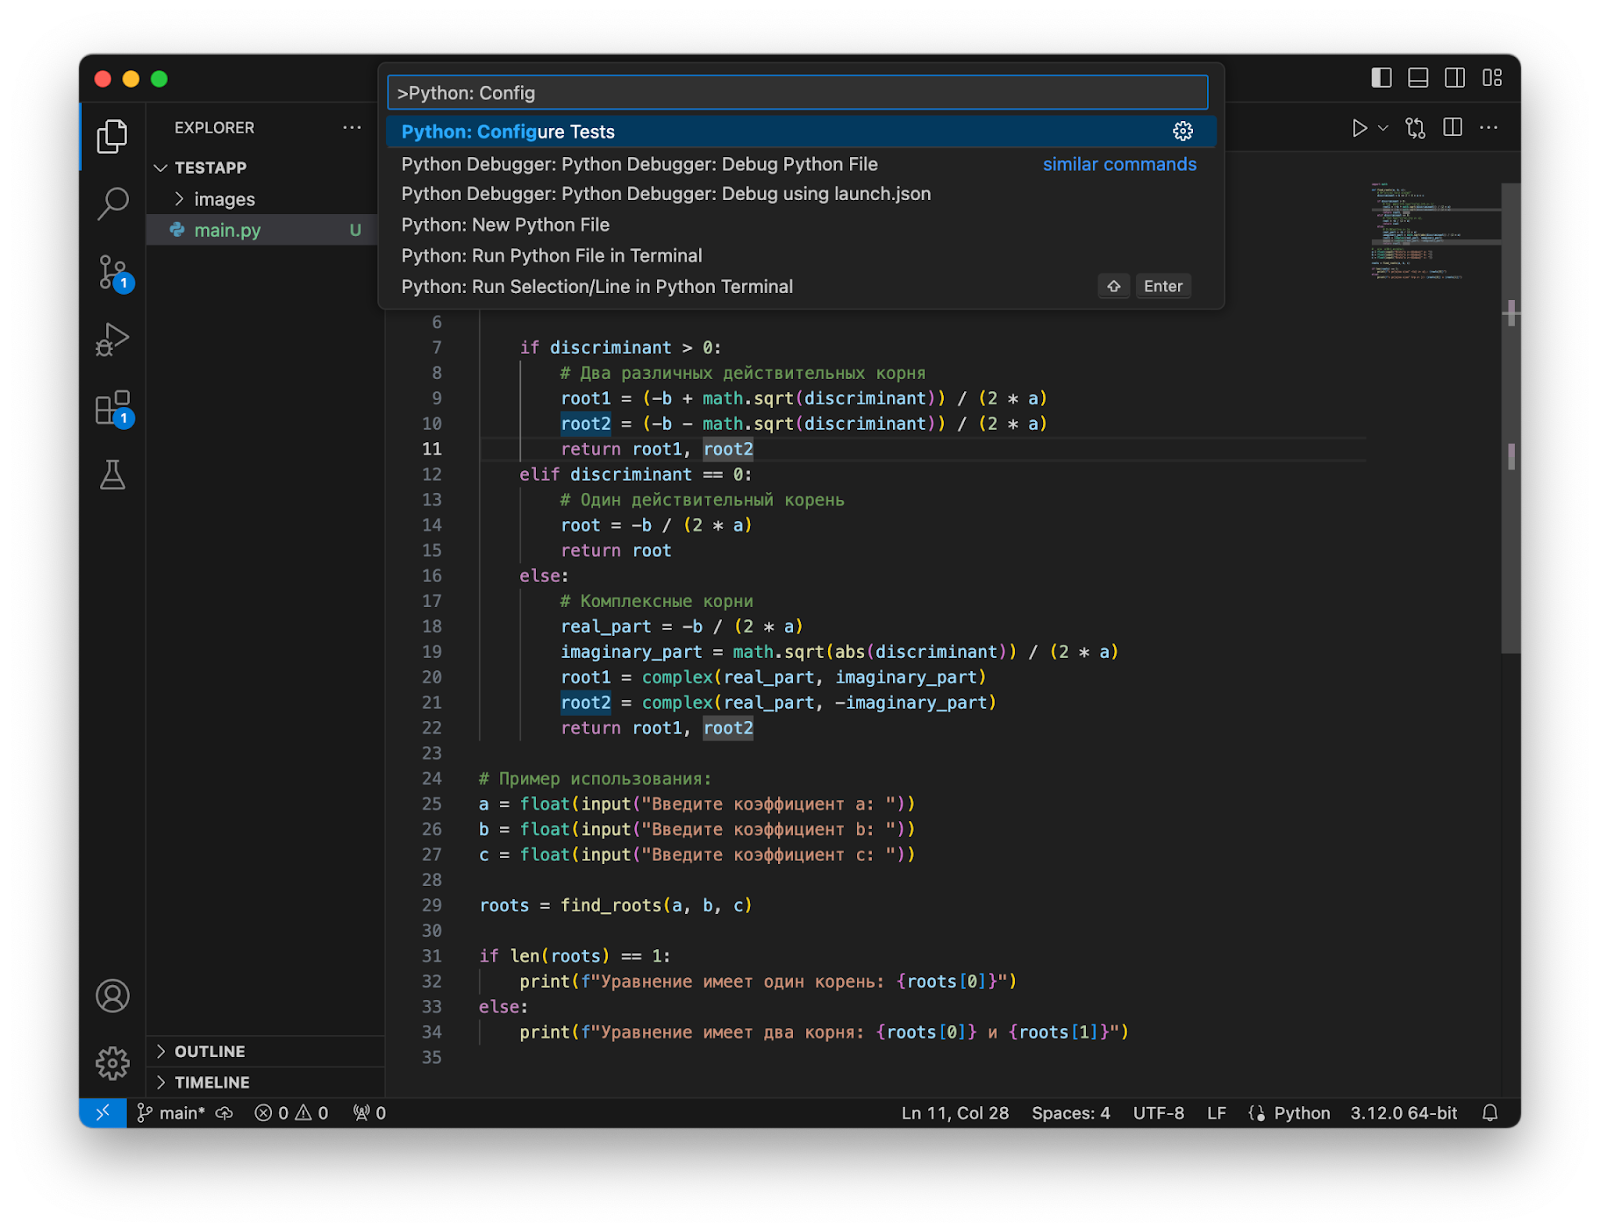
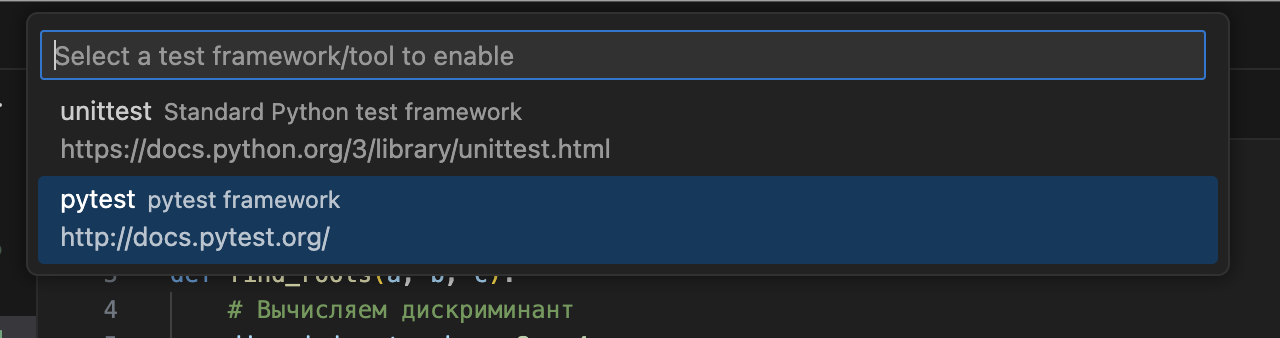
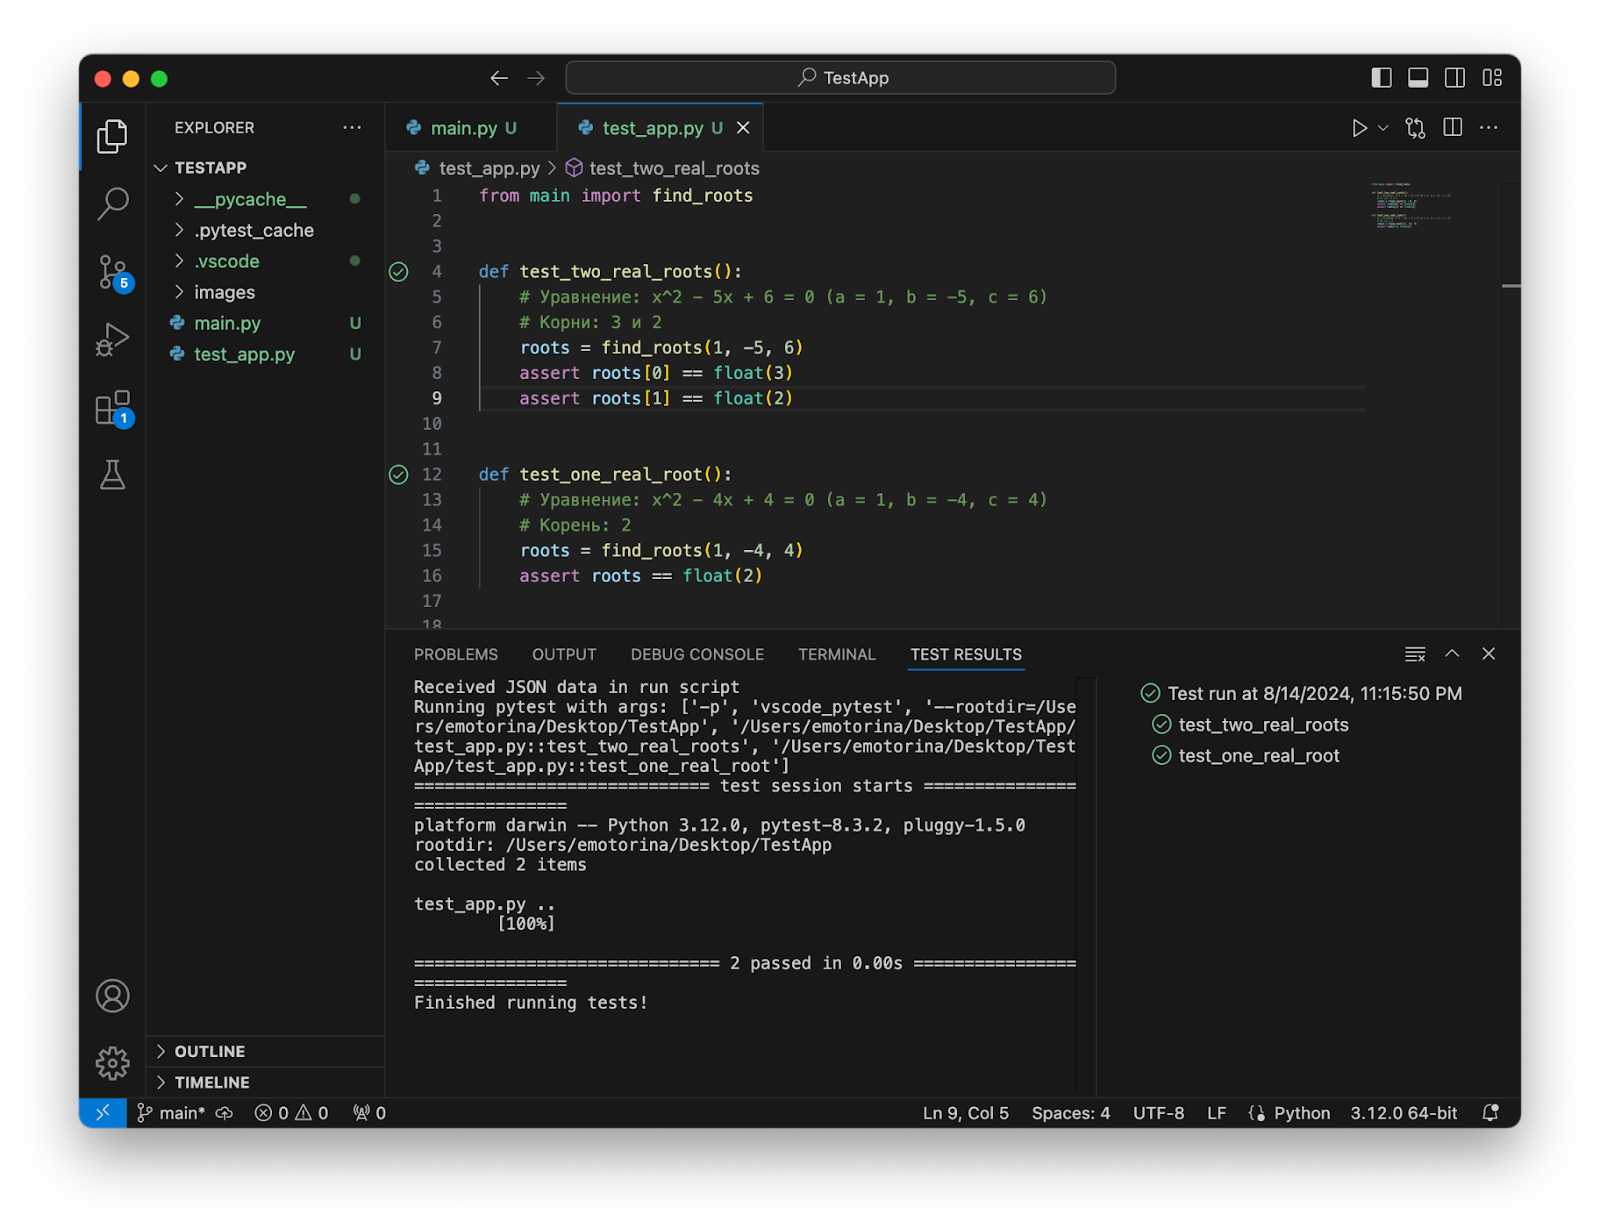
После этого нужно определиться с фреймворком для тестирования (выбираем pytest) и папку, в которой будут содержаться тесты (так как мы не создавали специализированной директории для тестов, то выбираем корневую).

После выбранный фреймворк для тестирования установится. Добавим новый файл, содержащий тесты, и запустим его, выбрав один из доступных пунктов для старта тестов.
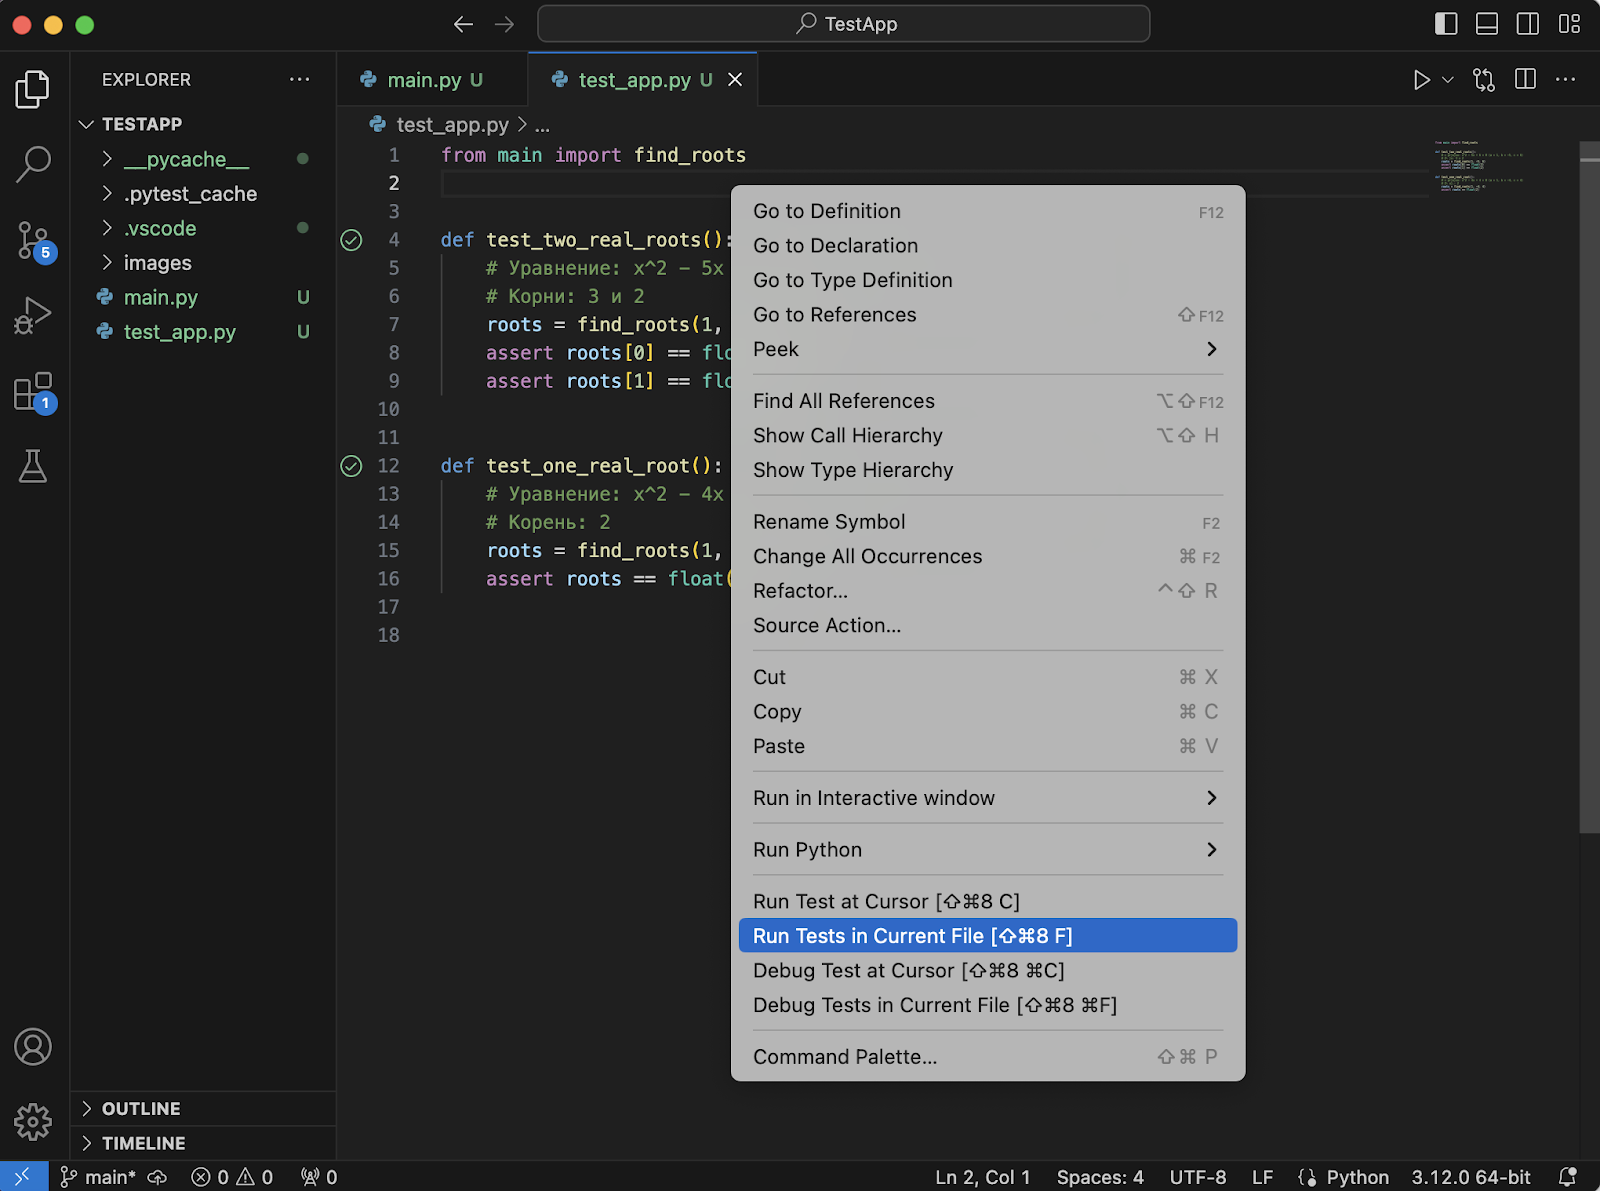
Результаты проведенного тестирования показаны во вкладке Test Results. В нашем случае все тесты прошли успешно.
Дополнительные возможности
Интеграция с Git
Чтобы настроить системы контроля версий, нужно открыть вкладку Source Control, находящуюся на панель активности слева (Ctrl + Shift + G). По умолчанию VS Code совместим с Git и Github, а другие системы можно поддержать с установкой дополнительных плагинов.
Чтобы связать текущий проект с конкретной системой, на компьютере должен быть установлен git. Тогда редактор сможет автоматически понять его расположение и синхронизация будет доступна.
Операции для использования контроля версий доступны из редактора. Это позволяет отказаться от написания команд в терминале вручную. Клонировать репозитории, коммитить и пушить изменения, создавать новые ветки и просматривать историю изменений можно прямо в VS Code.
Python с Azure
Пакет Azure SDK управляет службами в Azure и взаимодействует с ними. Поскольку командная строка Azure CLI реализована на Python, то большинство ее возможностей доступны и для программной реализации через пакет Python SDK. Чтобы установить пакет SDK для Azure Storage, применим следующее:
pip install azure-storageТакже могут понадобиться дополнительные пакеты, их нужно будет установить подобным образом. Установив пакет SDK, вы получите доступ к множеству служб. Они обеспечивают использование API для машинного обучения, размещение данных с глобальным распределением и многое другое.
Веб-приложения разворачиваются через специальную функцию Веб-приложение для контейнеров. Также есть возможность разворачивания Flask-приложения с помощью командной строки и запускать облачные блокноты Jupyter, что избавляет от необходимости локальной установки (к блокнотам можно предоставлять совместный доступ).
Лучшие плагины для VS Code
У VS Code много плагинов. Они удовлетворяют разные потребности разработчиков: начиная от создания удобных комментариев (Better Comments) и заканчивая широко используемыми решениями для работы с контейнерами (Docker VS Code).
Интересные плагины, которые могут принести дополнительные преимущества в выбор именно этого редактора:
- TabNine – ИИ-помощник для написания кода. Он генерирует и объясняет код и помогает с написанием модульных тестов, созданием документации и многим другим.
- Bracket Pair Colorizer – плагин, который подсвечивает несоответствующие друг другу скобки разными цветами для улучшения читаемости.
- Bookmarks – расширение, позволяющее добавлять закладки в коде, перемещаться между которыми можно с помощью комбинаций горящий клавиш.
Плагины в VS Code позволяют настроить рабочее окружение под нужды разработчика, добавляя функции, которые делают процесс разработки эффективнее и приятнее.
Заключение
Настройка и освоение Visual Studio Code способствуют успешной разработке на Python и открывают перед пользователями возможности для создания удобной и продуктивной среды программирования.
Используя различные расширения и встроенные функции, можно не только адаптировать редактор под свои нужды, но и глубже понять, как эффективно использовать его для решения разнообразных задач.
Освоение Visual Studio Code превращает простой текстовый редактор в полноценную среду разработки, которая помогает сосредоточиться на улучшении кода и решении сложных задач. Этот инструмент полезен как начинающим, так и опытным разработчикам, предоставляя возможности для обучения и повышения продуктивности на всех этапах работы с Python.