
-
Home
-
News
- Fix Windows Setup “Aka.ms/WindowsSysReq” Error in Windows 11
By Sandy |
Last Updated
When installing or upgrading to Windows 11, you may encounter various errors, including the Windows setup Aka.ms/WindowsSysReq error. This error occurs when installing Windows 11 on a system that doesn’t satisfy the requirements. You can resolve it by following the solutions discussed in this MiniTool article, without purchasing a new computer with Windows 11 pre-installed.
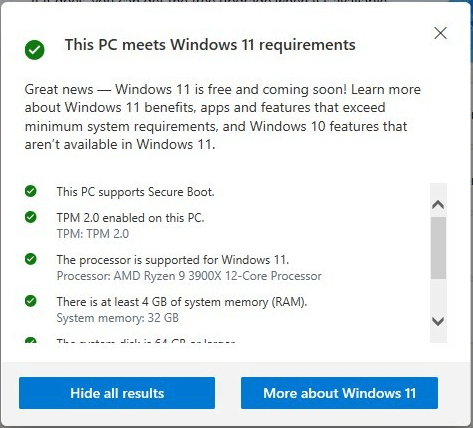
Help: According to the PC Health Check, “This PC meets Windows 11 requirements”: Windows Update says «Windows 11, Version 22H2 is ready and it’s free!» with a «Download and Install» button; but I want a clean install so I used the media creation tool to make a bootable USB drive and tried to install Windows 11 that way and it stops after selecting the version and says «This PC can’t run Windows 11» and says to go to https://aka.ms/WindowsSysReq. How do I figure out why only the clean installer thinks my computer can’t run it?answers.microsoft.com
From answers.microsoft.com
If your system doesn’t meet the minimum requirements and you installed Windows 11, it may result in compatibility issues. These compatibility issues may cause your device to malfunction.
Windows 11 Minimum Requirements
Ensuring that your system meets the minimum requirements for a Windows 11 upgrade is crucial to avoid complications during and after the upgrade:
- Processor: 1 gigahertz (GHz) or faster with two or more cores on a compatible 64-bit processor or System on a Chip (SoC).
- Storage: 64 GB or larger storage device.
- System firmware: UEFI should support Secure Boot.
- RAM: 4 gigabytes (GB).
- Graphics card: Compatible with DirectX 12 or later with WDDM 2.0 driver.
- TPM: Trusted Platform Module (TPM) version 2.0. Check here for instructions on enabling your PC to meet this requirement.
Suppose you want to upgrade to Windows 11, download and run the PC Health Check app to verify whether your computer is eligible. This tool assesses the fundamental parts of the PC to identify any components that do not satisfy the standards and provides links to specific instructions on how to fix the issues.
4 Methods to Fix Windows Setup Aka.ms/WindowsSysReq Error
If you encounter the Windows setup Aka.ms/WindowsSysReq error, you can try these methods to fix it.
Note:
If your PC is plugged into external hardware devices, including USB flash drives, scanners, printers, external hard drives, and so on, you should unplug all of them.
Method 1: Update Windows
It is important to ensure that your Windows 10 OS is kept up-to-date, as this can significantly impact the successful update to Windows 11. Accordingly, let’s see how to update your OS:
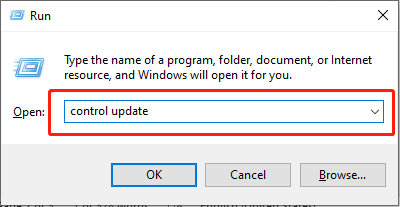
Step 1: Press Win + R simultaneously to open the Run line command window, type control update and press Enter.
Step 2: In the pop-up window, click the Check for Updates button in the right panel.
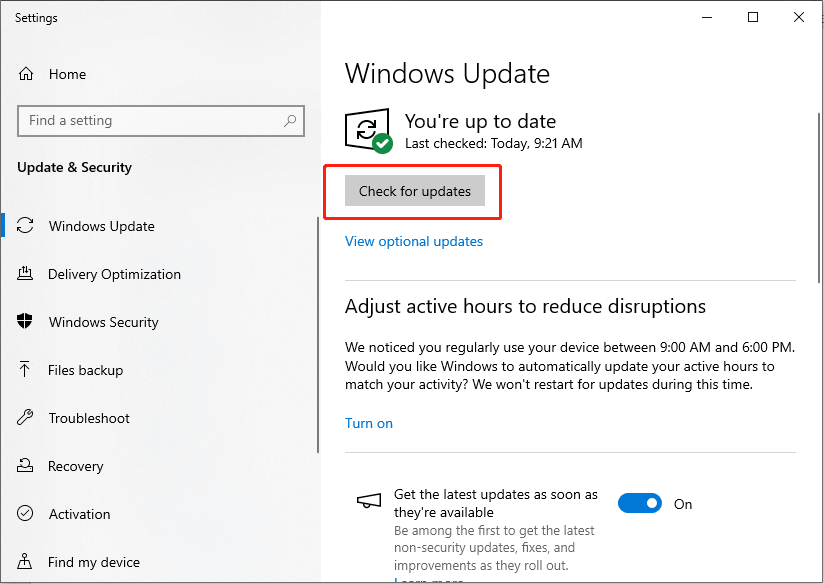
Step 3: Download and install the update if the Windows Update Tool finds you a new update by following the on-screen instructions.
After updating, restart your computer.
Method 2: Update Device Drives
Outdated drivers may also cause the Windows setup Aka.ms/WindowsSysReq error. Updating drivers manually can be a lengthy task, especially if multiple drivers need updating. So, if you decide to attempt this method, you will need to be patient.
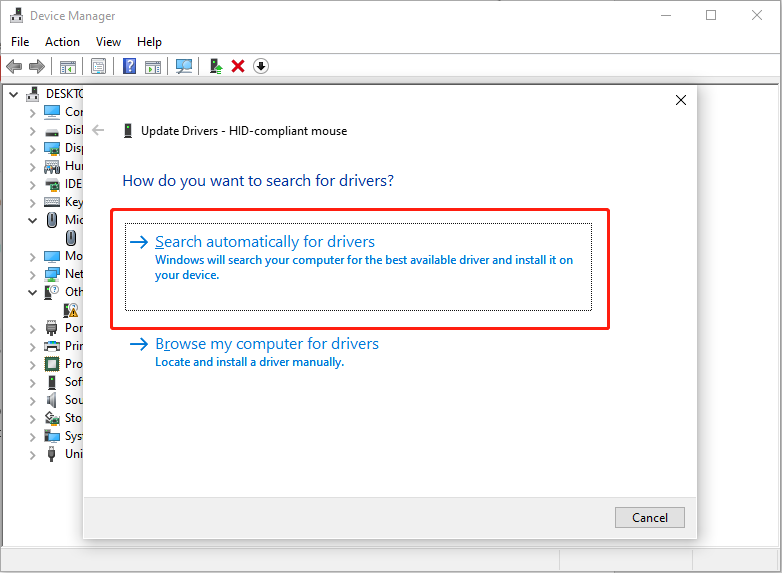
Step 1: Press Win + R together, type devmgmt.msc in the Run command line, and press Enter to open Device Manager.
Step 2: To update the outdated device, locate the device in the list of devices within the Device Manager. For example, we will update the mouse. Double-click Mice and other pointing devices to expand it, right-click on the HID-compliant mouse, and select Update driver.
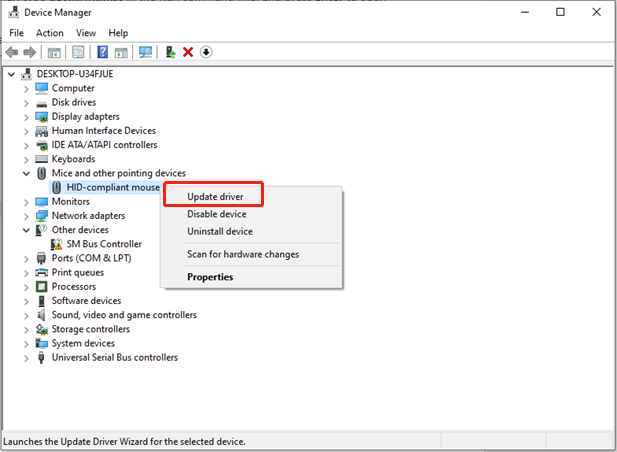
Step 3: In the following window, choose Search automatically for drivers, and then follow the subsequent prompts to install the new driver completely.
Method 3: Disk Cleanup
If your system has been in use for an extended period, it may contain obsolete and corrupted system files, which could be the underlying cause of the Windows setup Aka.ms/WindowsSysReq error. It is advisable to fix the Aka.ms/WindowsSysReq error by initiating a Disk Cleanup procedure.
Step 1: Type Disk Cleanup in the Windows Search bar and press Enter.
Step 2: In the pop-up window, select the drive you want to install Windows 11 OS to clean up and click OK. (C: drive e.g.)
Step 3: After scanning, choose Clean up system files in the Description section.
Step 4: Check the boxes in front of the files you want to delete in the files to delete section, and click OK.
If you delete important files inadvertently, you can use a professional data recovery tool to recover them. MiniTool Power Data Recovery can help you get rid of this annoying issue of data loss. Learn how to recover deleted files.
MiniTool Power Data Recovery FreeClick to Download100%Clean & Safe
In Conclusion
This post offers three methods to fix the Windows setup Aka.ms/WindowsSysReq error and a Powerful data recovery tool to rescue your data. Now you can go to fix your issue and try this free app. Have a nice day!
About The Author
Position: Columnist
Sandy became an English editor after graduation. She is devoted to finding effective solutions for diverse IT problems and provides articles on data recovery, data backup, and computer partitions and drives. In her spare time, she likes listening to music and playing games.
Readers help support Windows Report. We may get a commission if you buy through our links.
Read our disclosure page to find out how can you help Windows Report sustain the editorial team. Read more
During an installation or Windows 11 upgrade, there are many errors you may encounter. However, most common errors would require a few steps to fix. Before exploring fixes for a specific error code, you should try some of these general solutions.
The Windows 11 error aka.ms/windowssysreq will mostly be resolved using the fixes discussed in this article, without the need to buy a new computer with a pre-installed Windows 11 OS.
Ensuring that your system meets the minimum requirements for a Windows 11 upgrade is best to avoid complications during and after an upgrade.
How do you know if you PC meets the minimum requirements for an upgrade?
If you need to upgrade to Windows 11 and have Windows 10 already installed on your PC, you should download and run the PC Health Check app to verify that your computer can be upgraded.
This app accesses core components of the PC to identify which of them do not meet the requirements, and it links to some detailed procedures to make the PC meet minimum requirements.
Should you install Windows 11 on devices that do not meet the installation requirements?
It is not recommended to continue an installation or upgrade to Windows 11 if the computer does not meet the minimum requirements. Such an upgrade would cause errors due to compatibility issues.
One of the most significant drawbacks is the inability of such devices to receive updates, including important security updates.
In fact, from Microsofts disclaimer for updates done on non-compatible devices, you should expect that any damages that the upgrade causes will not be covered under the manufacturer’s warranty.
How can I fix the aka.ms/windowssysreq error in Windows 11?
1. Remove all external hardware
Unplug all external hardware devices. These could include printers, headphones, speakers, USB flash drives, scanners, and external hard drives.
If your laptop is plugged into a docking station, it should be undocked before the installation.
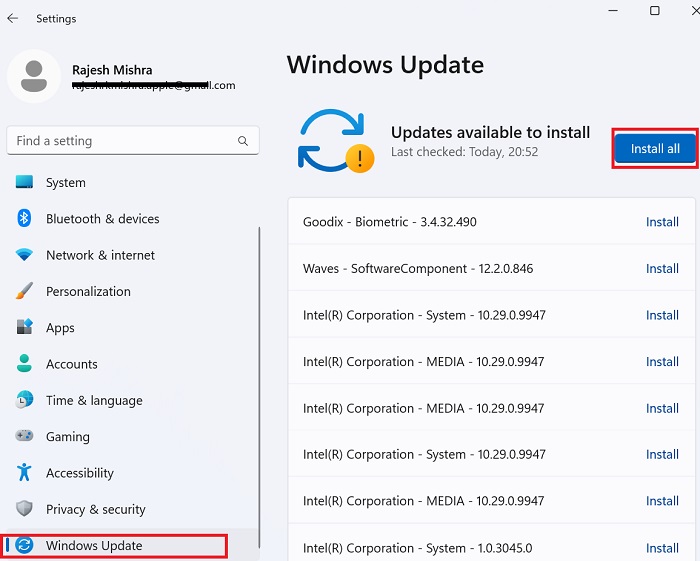
2. Update your OS
- Click on the start menu and select the Settings option (the litle gear icon).

- At the bottom of the Settings app, select the Update & Security option.

- On the left pane of the update home, select Windows Update, click the Check for Updates button on the right pane, and select the option to download and install updates.


3. Update hardware drivers
- Search for Device Manager in your start menu and click the first option.

- Click on the arrow in front of the device you need to update, to expand it.
- Rightclick on the option you want to update from the expanded view and click the Update driver option.

- In the update drivers popup, select the first option to search automatically for drivers.


Updating drivers manually can be a time-consuming process, especially if you need to update multiple drivers, but there are specialized tools that can make this tedious process a lot faster.
Outbyte Driver Updater is one of these applications, and it will scan your PC for outdated drivers and update all of them automatically.
4. Uninstall any non-Microsoft antivirus
- Open the start menu and search for Control Panel.

- Click on the antivirus in the control panel and click the uninstall tab. Click on uninstall again when prompted.

- In the antivirus window, check the options for McaFee livesafe and remove all files from this program (This step would be different if you do not use McAfee), then click remove.


Note that the process of uninstalling an antivirus may differ between manufacturers, but generally, you should be able to perform an uninstall from the control panel following the explained steps.
5. Uninstall old and nonessential software
- Open the start menu and search for Control Panel.
- From the list of applications, click on any outdated or nonessential software in the control panel and click the uninstall tab. Click on uninstall again when prompted.


Removing applications manually isn’t always the best option because sometimes certain files and registry entries are left behind.
These files can create issues in the future, so if you want to completely remove an application, we suggest using specialized uninstaller software.
6. Check and Free up disk space
6.1 Check available disk space
- Select the File Explorer in the taskbar.

- On the left pane, select This PC. Then from the Devices and drives section on the right pane, select the system drive (the drive with the Microsoft logo). If it is low on space, proceed to free up some space.


6.2 Free up disk space
- Search for disk cleanup in the start menu and select the first option.

- From the pop up window, select the drive you wish to clean.

- Under the description section of the Disc dialog box, select Clean up system files.
- In the files to delete section, check files you want to delete and click OK.


What do I do if Windows 11 malfunctions after an upgrade?
After an upgrade, you may experience some issues, especially if you have upgraded to a non-compatible PC. In such cases, you are recommended to downgrade back to Windows 10.
You will have this option available up to 10 days after the installation or upgrade was done. After this period, all files required for this process will be removed from your computer to free up additional space for other processes.
If you are curious to know what in-depth fixes apply to some specific installation failures, our guide on Windows 11 errors after an update should come in handy.
If you have any other questions about update errors on Windows 11, don’t hesitate to leave them in the comments section below, and we’ll be sure to check them out.
Vlad Turiceanu
Windows Editor
Passionate about technology, Windows, and everything that has a power button, he spent most of his time developing new skills and learning more about the tech world.
Coming from a solid background in PC building and software development, with a complete expertise in touch-based devices, he is constantly keeping an eye out for the latest and greatest!
На чтение 2 мин Просмотров 1.1к. Опубликовано
Бывают такие случаи, когда есть желание пользоваться новой операционной системой Windows 11 или хотя бы понять, есть ли смысл ставить ее на свой компьютер, но установка ОС невозможна из-за несовместимости старого оборудования с требованиями Windows 11.
Кстати о требованиях:
- Наличие чипа (модуля) TPM 2.0 (Trusted Platform Module).
- Включенные режимы UEFI + Secure Boot.
- Минимум 4 Гб оперативной памяти (RAM).
- Объем жесткого диска или SSD накопителя не меньше 64 Гб.
- Двухъядерный процессор с частотой 1 ГГц (обязательно совместимый с Windows 11, т.к. не все процессоры поддерживаются!).
Если компьютер не соответствует минимальным требованиям для Windows 11, то при установке ОС появится ошибка:
Запуск Windows 11 на этом компьютере не возможен. Этот компьютер не соответствует минимальным требованиям к системе для установки этой версии Windows. Дополнительные сведения см. на сайте aka.ms/WindowsSysReq
Но не будь обходного пути решения данной проблемы, не было бы и данной статьи. Поэтому давайте разбираться как все же поставить Windows 11 на нашу старенькую железку 
- Запускаем установку Windows 11 и доходим до момента окна с ошибкой «
Запуск Windows 11 на этом компьютере не возможен«. - Жмем Shift + F10 и запускаем терминал.
- Вводим команду regedit и жмем Enter, запуская таким образом редактор реестра.
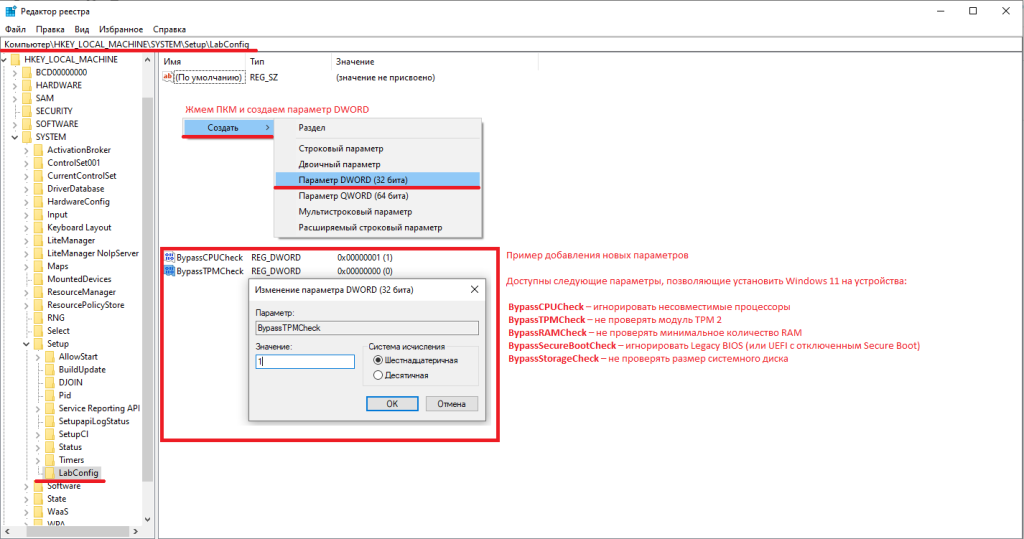
- Переходим по ветке HKEY_LOCAL_MACHINE\SYSTEM\Setup и создаем новый раздел с именем LabConfig
- В этом разделе реестра нужно создать новый параметр DWORD (32 бита) и зайдя в него присвоить значение 1 для тех проверок совместимости, которые хотим проигнорировать во время установки.
Доступны следующие параметры, позволяющие установить Windows 11 на устройства:
-
BypassCPUCheck– игнорировать несовместимые процессоры -
BypassTPMCheck– не проверять чип модуля TPM 2 -
BypassRAMCheck– не проверять минимальное количество RAM -
BypassSecureBootCheck– игнорировать Legacy BIOS или UEFI с отключенным Secure Boot -
BypassStorageCheck– не проверять размер системного диска
- После внесения всех необходимых изменений в реестр закрываем Regedit и возвращаемся на предыдущий этап установки как на скрине ниже:
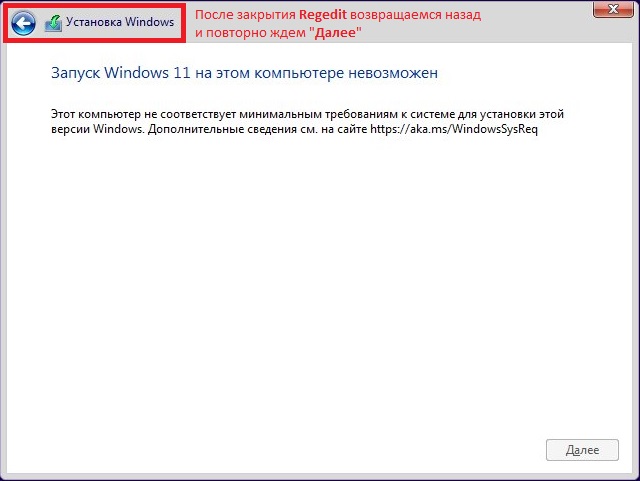
- Повторно жмем кнопку «Далее» и спокойной устанавливаем Windows 11 на наш старенький ПК.
Надеюсь вам помогло данное решение проблемы и вам удалось затратить минимум времени на решение данной задачи.
3.4
9
Голосов
Рейтинг записи
Run into the aka.ms/windowssysreq error on your Windows 11 device? Bother not! This issue crops up due to a number of factors such as the failed system update, compatibility issue, and missing system requirements. Having gone into the root cause of the problem and even encountered it a few times, I’d like to share the 15 reliable ways to fix aka.ms/windowssysreq error on PC. Read on…
So, what sort of roadblocks should you keep in mind when up against this issue? From malicious system files to corrupt drivers to decluttered RAM, there are quite a few usual suspects that you need to encounter including –
- Unsupported hardware
- Outdated drivers
- Insufficient RAM
- Low disk space
- Incompatible CPU
- Secure Boot off
- TPM 2.0 missing
- BIOS not updated
- Corrupt system files
- Windows version mismatch
The good thing is there are many viable tips that not only work in getting rid of the problem but also keeping it at a fair distance. And that’s where we’ve set our sights at.
1. Check System Requirements
Bear in mind that this error often crops up if your PC doesn’t meet Windows 11’s hardware requirements. Therefore, make sure to check the system requirements.
- To begin, visit aka.ms/windowssysreq to compare your specs with Microsoft’s official requirements.
2. Run Windows Update
Note that the outdated Windows version might be invoking the compatibility issues. Thus, ensure that your PC is updated with the latest version of the software.
- On your PC, head over to Settings > Windows Update > Check for updates and install any pending updates.
3. Enable TPM 2.0 in BIOS
It’s worth pointing out that Windows 11 requires TPM 2.0 for security. So, make sure to activate the TPM 2.O in BIOS.
- To get it done, restart your PC > enter the BIOS, and enable Trusted Platform Module (TPM) under security settings.
4. Enable Secure Boot
It’s also important to mention that the secure Boot ensures system integrity and prevents unauthorized OS modifications. So, try activating the secure boot on your PC.
- Access BIOS on your PC > find the Secure Boot option, and enable it.
5. Check for Corrupt System Files
The malicious files might be triggering the installation errors. Run the SFC and the DISM scans to detect and
- Open Command Prompt as Administrator and run:
sfc /scannow - After that, run this command:
DISM /Online /Cleanup-Image /RestoreHealth
6. Free Up Disk Space
The clogged-up disk space might be blocking Windows 11 from installing. Therefore, declutter your PC.
- Open Settings > Storage to remove unnecessary files.
7. Disconnect External Devices
Faulty USB drives or peripherals can interfere with Windows updates. So, disconnect the external devices.
- Unplug all unnecessary devices and retry the installation.
8. Update Drivers
Outdated drivers can cause compatibility issues.
- Launch the Device Manager on your Windows device > right-click each device, and select Update driver.

9. Disable Third-Party Antivirus
Some antivirus software can block Windows updates.
- Temporarily disable it and check if the issue persists.
10. Reset Windows Update Components
Corrupt update components can cause installation errors.
- Fire up the Command Prompt as Administrator and run the following commands one by one:
net stop wuauserv net stop cryptSvcnet stop bitsnet stop msiserverren C:\Windows\SoftwareDistribution SoftwareDistribution.oldren C:\Windows\System32\catroot2 catroot2.oldnet start wuauservnet start cryptSvcnet start bitsnet start msiserver
11. Check for Disk Errors
Bad sectors on your drive may cause installation failures.
- Open Command Prompt as Administrator and run: shCopyEdit
chkdsk /f /r- Restart your PC when prompted.
12. Perform a Clean Boot
Third-party services may interfere with the update process.
- Launch the Run (Win + R) dialog > msconfig > Services, check Hide all Microsoft services, and disable unnecessary ones.

13. Use Windows Installation Media
If updates fail, manually install Windows 11 using a bootable USB.
- Download the Media Creation Tool from Microsoft’s website and create installation media.
14. Reset Your PC
No solution as yet? The corrupt system files might be at the heart of the problem. Hence, it would be apt to reset Windows.
- On your PC, head over to Settings > System > Scroll down and choose Recovery.

- Click Reset this PC and choose Keep my files or Remove everything.
15. Contact Microsoft Support
If the issue continues to plague your device, it would be apt to contact Microsoft support.
- Visit support.microsoft.com or use the Get Help app in Windows.
Wrapping up…
There you have it! I guess you have resolved the aka.ms/windowssysreq error on your Windows PC. Which one of these tips has helped you drive this frustrating error away?
Для установки Windows 11 (или при обновлении с Windows 10), ваш компьютер должен соответствовать определённом минимальным системам требованиям: наличие чипа TPM 2.0 (Trusted Platform Module), режим UEFI + Secure Boot, 4 Гб RAM, 64 Гб диск и совместимый двухъядерный процессор 1 ГГц (не все процессоры поддерживаются!). Microsoft ограничивает установку Windows 11 на несовместимые компьютеры, выполняя проверку на соответствие системным требования перед началом установки Windows. В этой статье мы покажем, как установить Windows 11 на несовместимые устройства без проверки требований к CPU, TPM, Secure Boot (и т.д.)
Если компьютер не соответствует минимальным требованиям для Windows 11, то при установке ОС появится ошибка:
Запуск Windows 11 на этом компьютере не возможен
. Этот компьютер не соответствует минимальным требованиям к системе для установки этой версии Windows. Дополнительные сведения см. на сайте aka.ms/WindowsSysReq
This PC can’t run Windows 11
. This PC doesn’t meet the minimum system requirements to install this version of Windows. For more information, visit aka.ms/WindowsSysReq<
Чтобы понять, каким конкретно требованиям не соответствует вашим компьютер, нужно изучить лог ошибок установки Windows 11 setuperr.log. В этом файле содержаться только ошибки установки Windows (полный лог установки находится в файле setupact.log, но изучать его сложно из-за большого объема).
Чтобы открыть файл лога ошибок установки Windows, откройте командную строку прямо на экране установки, нажав
Shift + F10
и выполните команду:
notepad x:\windows\panther\setuperr.log
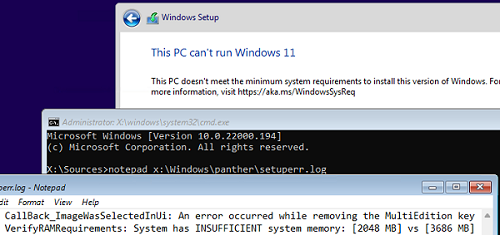
В нашем случае ошибка говорит, что на компьютере недостаточно оперативной памяти (всего 2 Гб вместо 3).
2021-11-11 10:57:51, Error VerifyRAMRequirements: System has INSUFFICIENT system memory: [2048 MB] vs [3686 MB]
Обратите внимание, что если ваш компьютер не соответствует нескольким системным требованиям для установки Windows, то в логе будет указана только первая из причин. Т.е. если вы исправили (или пропустили) одну из ошибок несовместимости, то при следующем запуске установки Windows 11 в логе будет содержаться следующая ошибка совместимости.
После того, как мы добавили RAM появилась другая ошибка:
2021-11-11 11:13:37, Error VerifyTPMSupported:Tbsi_GetDeviceInfo function failed - 0x8028400f[gle=0x0000007a]
Т.е. установщик определил, что на компьютере отсутствует TPM чип.
Если вы устанавливаете Windows 11 в виртуальную машину VMWare, вы можете добавить виртуальный TPM чип в соответствии с этой статьей. Для Hyper-V используется другая инструкция.
Однако вы можете продолжить установку Windows 11, просто игнорировал одно или все требования совместимости.
Для этого нужно в командной строке на экране установки Windows 11:
- Запустить редактор реестра
regedit.exe
; - Перейти в раздел HKEY_LOCAL_MACHINE\SYSTEM\Setup и создать новую ветку с именем LabConfig;
- В этой ветке нужно создать DWORD параметры со значением 1 для тех проверок совместимости, которые вы хотите пропустить при установке
Доступны следующие параметры, позволяющие установить Windows 11 на устройства:
-
BypassCPUCheck
– с несовместимыми процессорами; -
BypassTPMCheck
– без чипа TPM 2; -
BypassRAMCheck
– не проверять минимальное количество RAM -
BypassSecureBootCheck
–с Legacy BIOS (или UEFI с отключенным Secure Boot) -
BypassStorageCheck
– не проверять размер системного диска
Например, чтобы не проверять наличие TPM модуля при установке, нудно создать параметр реестра BypassTPMCheck со значением 1. Параметр можно создать с помощью графического редактора реестра или с помощью команды:
reg add HKLM\SYSTEM\Setup\LabConfig /v BypassTPMCheck /t REG_DWORD /d 1
Аналогичным образом нужно создать другие параметры для проверок, который вы хотите пропустить при установке Windows 11.
Затем вернитесь в окно установки Window 11, вернитесь на шаг назад и продолжите обычную установки без проверки совместимости.
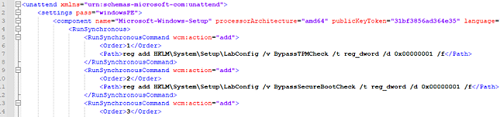
Вы можете модифицировать установочный ISO образ Windows 11, чтобы все эти проверки TPM, SecureBoot, диск, память, CPU) пропускались автоматически при установке ОС.
Для этого создайте текстовый файл AutoUnattend.xml со следующим содержимым:
<unattend xmlns="urn:schemas-microsoft-com:unattend">
<settings pass="windowsPE">
<component name="Microsoft-Windows-Setup" processorArchitecture="amd64" publicKeyToken="31bf3856ad364e35" language="neutral" versionScope="nonSxS" xmlns:wcm="http://schemas.microsoft.com/WMIConfig/2002/State" xmlns:xsi="http://www.w3.org/2001/XMLSchema-instance">
<RunSynchronous>
<RunSynchronousCommand wcm:action="add">
<Order>1</Order>
<Path>reg add HKLM\System\Setup\LabConfig /v BypassTPMCheck /t reg_dword /d 0x00000001 /f</Path>
</RunSynchronousCommand>
<RunSynchronousCommand wcm:action="add">
<Order>2</Order>
<Path>reg add HKLM\System\Setup\LabConfig /v BypassSecureBootCheck /t reg_dword /d 0x00000001 /f</Path>
</RunSynchronousCommand>
<RunSynchronousCommand wcm:action="add">
<Order>3</Order>
<Path>reg add HKLM\System\Setup\LabConfig /v BypassRAMCheck /t reg_dword /d 0x00000001 /f</Path>
</RunSynchronousCommand>
<RunSynchronousCommand wcm:action="add">
 <Order>5</Order>
<Path>reg add HKLM\System\Setup\LabConfig /v BypassCPUCheck /t reg_dword /d 0x00000001 /f</Path>
</RunSynchronousCommand>
<RunSynchronousCommand wcm:action="add">
<Order>4</Order>
<Path>reg add HKLM\System\Setup\LabConfig /v BypassStorageCheck /t reg_dword /d 0x00000001 /f</Path>
</RunSynchronousCommand>
</RunSynchronous>
<UserData>
<ProductKey>
<Key></Key>
</ProductKey>
</UserData>
</component>
</settings>
</unattend>
Если вы хотите отключить экран создания онлайн аккаунта Microsoft при установке Windows 11, добавьте в файл следующий секцию компонента:
<component name="Microsoft-Windows-Shell-Setup" processorArchitecture="amd64" publicKeyToken="31bf3856ad364e35" language="neutral" versionScope="nonSxS" xmlns:wcm="http://schemas.microsoft.com/WMIConfig/2002/State" xmlns:xsi="http://www.w3.org/2001/XMLSchema-instance">
<OOBE>
<HideOnlineAccountScreens>true</HideOnlineAccountScreens>
<HideWirelessSetupInOOBE>true</HideWirelessSetupInOOBE>
<ProtectYourPC>3</ProtectYourPC>
</OOBE>
</component>
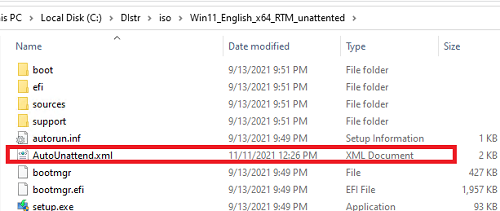
Скопируйте данный файл в корень установочной USB флешки с Windows 11.
Если вам нужно добавить файл ответов в ISO образ Windows 11, распаккуйте его содержимое в любую папку на компьютере, скопируйте в этот каталог файл AutoUnattend.xml и пересоберите ISO образ.
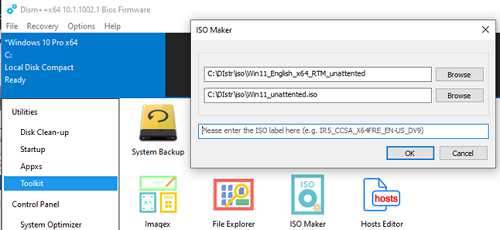
Я использовал для создания образа бесплатную утилиту DISM++ (Toolkit -> ISO maker).
Теперь никакие проверки совместимости не будут производится при установке Windows 11.
В новой версии утилиты Rufus, использующейся для создания загрузочных USB флешек, появилась специальная опция Extended Windows 11 Installation (no TPM/no Secure Boot/8Gb- RAM). Данная опция позволяет создать образ для установки Windows 11 без проверки TPM и Secure Boot:
