
AirServer app for Windows 10 – Learn how to download and install the AirServer 5.5.11 (64-bit) application on your Windows 10 PC for free. AirPlay/AirTunes audio, video, photo, slideshow and mirroring. Now, this File Transfer and Networking app is available for PC Windows 7 64 / Windows 8 64 / Windows 10 64.
AirPlay/AirTunes audio, video, photo, slideshow and mirroring
Table of Contents
AirServer 5.5.11 (64-bit) Overview
AirServer is a File Transfer and Networking application like Ares, GetGo, and ShowMyPC from App Dynamic ehf. It has a simple and basic user interface, and most importantly, it is free to download. AirServer is an efficient software that is recommended by many Windows PC users.
AirServer is a very fast, small, compact and innovative Trial File Transfer and Networking for Windows PC. It is designed to be uncomplicated for beginners and powerful for professionals. This app has unique and interesting features, unlike some other File Transfer and Networking apps. AirServer works with most Windows Operating System, including Windows 7 64 / Windows 8 64 / Windows 10 64.
Although there are many popular File Transfer and Networking software, most people download and install the Trial version. However, don’t forget to update the programs periodically. You can get AirServer free and download its latest version for Windows 7 64 / Windows 8 64 / Windows 10 64 PC from below.
AirServer 5.5.11 (64-bit) Technical Details
It’s better to know the app’s technical details and to have a knowledge background about the app. Therefore, you can find out if AirServer will work on your Windows device or not.
| App Name: | AirServer |
| Developer: | App Dynamic ehf |
| Version: | AirServer 5.5.11 (64-bit) LATEST |
| Updated: | February, 11th 2020 |
| Category | File Transfer and Networking |
| File Size: | 13.7 MB |
| File Type: | EXE file |
| Requirement: | PC/laptop/tablet running Windows (Windows 7 64 / Windows 8 64 / Windows 10 64) |
| License: | Trial |
Download AirServer 5.5.11 (64-bit) (latest version) free for Windows 10 PC/laptop/tablet. Safe Download and Install from the official link!
AirServer download features:
- AirServer direct, free and safe download
- Latest version update
- Compatible with Windows 10
- Download AirServer for your PC or laptop
AirServer Setup Installer
Download & install the latest offline installer version of AirServer for Windows PC / laptop. It works with Windows 7 64 / Windows 8 64 / Windows 10 64.
✔ Free & Safe Download for Windows PC/laptop – 13.7 MB
Safety (Virus) Test:
✔ Tested and is to download and install on your Windows 7 64 / Windows 8 64 / Windows 10 64 device (PC/laptop/tablet).
What is New in the AirServer Latest Version?
✓ Compatibilities improvement for new Windows update.
✓ Fixes bugs.
How to download and install AirServer for Windows 10 PC/laptop
Now let’s just move to the next section to share the steps you have to follow to download AirServer for Windows PC. So here we go:
- Download the AirServer installer file from the link above.
- Save the downloaded file to your computer.
- Double-click on the downloaded AirServer installer file.
- Now, a smart screen might appear and ask for a confirmation.
- Click “Yes” to confirm.
- Finally, follow the installation instructions until you get a confirmation notification of a successful installation process.
So those are all the processes that you have to follow to download AirServer for Windows PC. Then let’s go on to the next section where we will discuss AirServer itself. So you can understand the application and its features. So here we go:
Top Features of AirServer for Windows PC
AirServer is one of the most popular File Transfer and Networking alongside GetFLV, Intel Wireless, and Baidu WiFi. This app has its advantages compared to other File Transfer and Networking applications. AirServer is lightweight and easy to use, simple for beginners and powerful for professionals. AirServer application is free to download and offers easy-to-install, easy-to-use, secure, and reliable File Transfer and Networking applications.
This application’s primary functions are comprehensive and go beyond the features offered by others that can be considered as its rivals.
- AirServer for PC – fast, reliable, and robust by App Dynamic ehf.
- AirServer Free & Safe Download.
- AirServer latest version for the best experience.
- It works/compatible with almost all Windows versions, including Windows 7 64 / Windows 8 64 / Windows 10 64.
- Free of Cost!
- User-friendly Interface.
- Easy to Use.
- Privacy and Security!
- Lightweight and consume low resources.
- Best for File Transfer and Networking application.
- PC User’s choice!
How to uninstall AirServer in Windows PC?
Steps to uninstall AirServer in Windows 10 / Windows 8 / Windows 7 / Windows Vista
- Click the Windows Start menu.
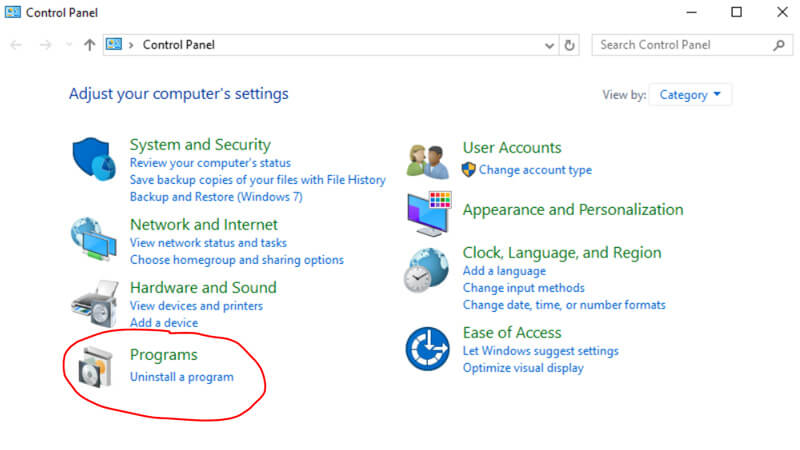
- Locate and select the Control Panel menu, then select Programs.
- Under Programs, click the Uninstall a Program.
- Select AirServer and then right-click, select Uninstall/Change.
- Then click Yes to confirm the AirServer uninstallation process.
Steps to uninstall AirServer in Windows XP
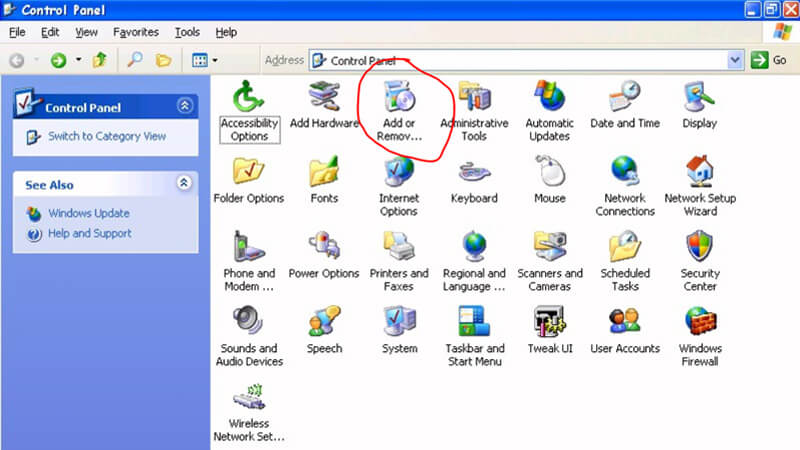
- Click the Windows Start menu.
- Locate and select the Control Panel menu, then select Add or Remove Programs icon.
- Select the AirServer and then click Remove/Uninstall.
- Then click Yes to confirm the AirServer uninstallation process.
Steps to uninstall AirServer in Windows 95, 98, Me, NT, 2000
- Click the Windows Start menu.
- Locate and select the Control Panel menu, then double-click the Add/Remove Programs icon.
- Select the AirServer and then right-click, select Uninstall/Change.
- Then click Yes to confirm the AirServer uninstallation process.
Best AirServer Alternative Apps for Windows
Isn’t AirServer what you were looking for? We prepared a list of alternatives below!
- GetFLV
- Intel Wireless
- Baidu WiFi
- AirServer
- XYplorerFree
GetFLV, Intel Wireless, and Baidu WiFi is the strong competitor of AirServer. Otherwise, AirServer and XYplorerFree also quite good as the alternative of this software. There are also other similar apps such as ShowMyPC, GetGo, and Ares that also need to try if you want to find the best alternative of AirServer.
In Conclusion
The AirServer for Windows PC is unquestionably the best File Transfer and Networking that you can find nowadays. It also is the most reliable when it comes to performance and stability. You can find that out for yourself. That is why a lot of PC users recommend this app.
Get superb and impressive experience using this AirServer application developed by App Dynamic ehf. AirServer nowadays are already getting better each time.
If you have some questions related to this app, feel free to leave your queries in the comment section. Or you can share with us your experience when using this AirServer on your Windows 10 PC. And if you know other people who want to experience AirServer for Windows PC, you can share this article to help them. Enjoy using AirServer for Windows PC.
Find other interesting articles that will help you how to download GetFLV for Windows 10 PC, install Intel Wireless for Windows 10, Baidu WiFi review, or about best AirServer alternative apps for Windows 10.
AirServer FAQ (Frequently Asked Questions)
Q: What is AirServer for PC?
A: For more information about this app, please go to the developer link on the above of this page.
Q: Is AirServer free? If not, how much does it price to download this app?
A: Absolutely no cost! You can download this app from official websites for free by this website—any extra details about the license you can found on the owner’s websites.
Q: How do I access the free AirServer download for Windows PC?
A: It is easy! Just click the free AirServer download button in the above of this page. Clicking the download button will start the installer to download AirServer free for a PC/laptop.
Q: Is this AirServer will typically run on any Windows?
A: Yes! The AirServer for PC will typically work on most recent Windows operating systems, including Windows 7 64 / Windows 8 64 / Windows 10 64.
Q: What’s the difference between 64-bit and 32-bit versions of AirServer?
A: The AirServer 64-bit version was specially designed for 64-bit Windows Operating Systems and performed much better on those. The AirServer 32-bit version was initially intended for 32-bit Windows Operating Systems, but it can also run on 64-bit Windows Operating Systems.
Q: What’s the importance of downloading the latest version of AirServer?
A: We recommend downloading the latest version of AirServer because it has the most recent updates, which improves the quality of the application.
Disclaimer
AirServer is an application that builds by App Dynamic ehf. All trademarks, product names, company names, and logos mentioned here are their respective owners’ property. This site (autotechint.com) is not affiliated with them directly. All information about applications, programs, or games on this website has been found in open sources on the Internet.
We don’t host or store AirServer on our servers. Downloads are done through the Official Site. We are firmly against piracy, and we do not support any sign of piracy. If you think that the application you own the copyrights is listed on our website and want to remove it, please contact us.
We are always compliant with DMCA regulations and respect the application owners. We are happy to work with you. Please find the DMCA / Removal Request page below.
This support article was last updated on Fri, 7 Jun, 2019 at 12:08 PM.
Unfortunately, AirServer will not run on Windows XP or Windows RT. There are no older builds that would be supported on Windows XP.
This is because AirServer uses Windows port completion for high performance networking, which is only available on machines running Windows Vista or newer. This delivers considerably better performance when mirroring.
If you would like to see the requirements for AirServer for PC, please click on the link below:
AirServer Universal for PC System Requirements
Did you find it helpful?
Yes
No
Send feedback
Sorry we couldn’t be helpful. Help us improve this article with your feedback.
Related Articles
Загрузить PDF
Загрузить PDF
IIS (Internet Information Services) – это набор серверов для некоторых служб интернета от компании Майкрософт. Он выступает в качестве аналога Apache, но с лучшим пользовательским интерфейсом.
-
После завершения установки запустите IIS (это непросто, так как у него нет ярлыков на рабочем столе или в меню «Пуск»).
- Откройте панель управления и нажмите Performance and Maintenance — Administrative Tools. (В Service Pack 3 сразу нажмите Administrative Tools.)

- Вы увидите Internet Information Services; запустите программу (и создайте ее ярлык на рабочем столе).
- Откройте панель управления и нажмите Performance and Maintenance — Administrative Tools. (В Service Pack 3 сразу нажмите Administrative Tools.)
-
Читайте дальше для получения информации по настройке программы.
-
-
Отобразится состояние сервера (работает он или нет), локальный IP-адрес, на который он настроен, и используемый порт (порт 80 используется по умолчанию, но вам, возможно, потребуется изменить его, так как порт 80 блокируется большинством интернет-провайдеров).
-
Теперь щелкните правой кнопкой мыши по Default Web site и в меню выберите Рroperties, а затем откройте вкладку Web site. Измените IP-адрес на ваш локальный IP-адрес (если он еще не установлен; чтобы узнать локальный адрес, нажмите Start — Run и введите CMD, а затем введите IPCONFIG. Посмотрите на цифры в строке IP-address).
-
Вы можете оставить порт 80, но только если ваш провайдер не блокирует его. Если вы решите изменить порт, то обратите внимание, что при переходе на ваш сайт синтаксис должен быть таким: domain.com:portnumber
-
После того, как вы определились с портом, необходимо открыть порт в маршрутизаторе. Для этого введите шлюз в адресной строке браузера.
-
Далее перейдите на вкладку Home Directory и введите локальный путь Буква_системного_диска:\Inetpub\wwwroot (эта папка была создана автоматически при установке программы).
-
Здесь вы можете установить документ по умолчанию, чтобы перенаправлять на него пользователей, если ни один документ не введен в URL. Для добавления в список нового документа нажмите Add, а затем введите имя файла (вам не нужно вводить путь, но файл должен находиться в домашней директории).
-
Закройте окно настроек и еще раз щелкните правой кнопкой мыши по Default Web Site. Нажмите New — Virtual Directory (это не обязательно делать, но это будет хорошей практикой). Введите имя вашего виртуального каталога, например, Root.
-
Теперь раскройте Default Web Site и вы увидите имя вашего виртуального каталога. Откройте каталог, чтобы просмотреть в нем файлы, хранящиеся в Home Directory.
-
-
- Откройте браузер и в адресной строке введите: http:// localIPaddress:port/virtualdirectory/ или введите http:// computername:port/virtualdirectory/ (если вы не меняли порт по умолчанию, введите: http:// computername/virtualdirectory/)
-
15
Чтобы получить доступ к сайту с другого компьютера, не входящему в вашу локальную сеть, введите: http:// externalIPaddress:port/virtualdirectory/ (если вы не меняли порт по умолчанию, введите: http:// externalIPaddress/virtualdirectory/)
-
-
17
Если описанный метод не сработал, обратитесь к разделу «Советы» этой статьи.
Реклама


Советы
- Сайту требуется большая пропускная способность, поэтому, если вы работаете из дома, сайт будет открываться медленно.
- Для проверки блокировки порта 80 нажмите Start – Run и введите CMD. В командной строке введите telnet google.com 80 (вы можете использовать любой веб-сайт). Если на экране отобразилось любое сообщение, кроме «Cannot connect error message», то порт 80 открыт.
- Ваши разрешения могут содержать ошибки. Если вы получили сообщение об ошибке 401, запустите мастер разрешений и внимательно перечитайте отображенную информацию.
- Убедитесь, что в IIS активирован «Default Web Site».
- Ваш сайт может не работать по причине блокирования порта 80. В этом случае измените порт в IIS и в маршрутизаторе.
- Возможно, вы неправильно перенаправляете порт.
- Откройте порт 80 в вашем брандмауэре.
- Если Apache запущен, закройте его, а также закройте все процессы Apache в Диспетчере задач.
- Для получения дополнительной помощи обратитесь к Microsoft (компания предоставляет широкую поддержку пользователям IIS).
- No-ip.com – это хороший сайт для бесплатной связи вашего IP-адреса с субдоменным именем.
Реклама
Предупреждения
- Не загружайте незаконные или защищенные авторскими правами файлы на ваш веб-сервер.
- Не открывайте полного доступа к вашему серверу, так как это приведет к несанкционированному доступу к вашим папкам или к заражению системы.
Реклама
Что вам понадобится
- Windows XP Pro или Media Center
- IIS 5.1
- Высокоскоростное подключение к интернету
- Базовые знания HTML
Об этой статье
Эту страницу просматривали 11 170 раз.
Была ли эта статья полезной?
This software works with Airplay, Google Cast and Miracast, which are the top platforms that use mirroring (allowing the screen on your phone to show up on your TV or computer). AirServer works with Intel processors to ensure that the CPU use is kept to a minimum. It also has 60 frames per second which allow for very smooth casting that will not be choppy or pixelated. It starts with a 14-day trial and I think that is a fair amount of time to see if it is something that will be of great use to you or not. This gives you ample time to test all of your devices.
Features:
- It has a Smart Layout which means it automatically detects the positioning of the screen that is being mirrored and correctly displays that on the computer screen, for example, if the screen is horizontal or vertical.
- It’s a one-stop shop, in that there is no need to install any other apps to assist with the mirroring process. Everything you need is already built into the AirServer app.
- It’s compatible with multiple operating systems, including IOS 12, Windows 10, and Chromebooks. So you are able to cast from your iPhone or iPad as well as the tabs on your Chromebook.
- This app is certified by Microsoft and every update is distributed through the Microsoft store so you don’t need to worry about a 3rd party vendor or getting updates from suspect providers.
I think AirServer is a great program that allows you to really utilize your desktop with all of your other devices that would normally require a multitude of apps, external hard drives, or purchasing more software for that one specific use. This app really rolls everything into smoothly and efficiently. Many of us do use devices from various providers and it can be a headache to find a way to make them all compatible and I think AirServer has definitely got that covered in terms of casting. There is a great value in the software for both personal and professional use.
This software is good because it allows you to mirror all devices using one piece of software instead of needed to download different software for different devices.
This software does require Windows 10 OS or higher and it will use 2GB of memory. The cost is $19.99 after the 14-day trial.
Allows wireless streaming from multiple devices simultaneously.
High resolution screen mirroring without lag.
Compatible with a variety of platforms.
Requires a stable and high-speed internet connection for optimal performance.
Certain features may not work with older operating systems.
Technical support responses might be slower than desired.
Aaron
Tue, Jan 30, 2024
Are you dreaming about wirelessly displaying your content? With AirServer you can easily do this and you won’t need a third party app.
AirServer is a mirroring app. It provides screen mirroring over Google Cast, AirPlay and Miracast. Users appreciate the fact that the content quality remains 1080p full HD.
The app is user-friendly and allows users access the AirServer app directly from the the home screen. Another cool thing about the app is that it doesn’t require internet to function.
AirServer supports MacOS, iOS, Windows and Android.
👨💻️ USER REVIEWS AND COMMENTS 💬
image/svg+xmlBotttsPablo Stanleyhttps://bottts.com/Florian Körner
Jack Ryan
AirServer is a really convenient, functional solution for getting all of your mirroring and casting services to work with a minimum of fuss. It’s especially helpful if you host a lot of parties or use services like ChromeCast in a professional setting — the last thing you want is to have your audience watching you fiddle with the software for 5 minutes.
image/svg+xmlBotttsPablo Stanleyhttps://bottts.com/Florian Körner
Chris Morgan
There is a generous trial and the price for what it states it does is reasonable if you have the need. I like that the updates go through Microsoft and their certification. The ability to cast from a Chromebook seems more practical than casting from a phone. I also like the fact that it works across multiple platforms. If I were a Chromebook user or perhaps a cellphone/tablet app developer this would be really handy for showing and working on things and casting them to potential clients or other workers in a presentation.
image/svg+xmlBotttsPablo Stanleyhttps://bottts.com/Florian Körner
Benjamin
AirServer for Windows provides an excellent quality streaming platform for all of your content streaming needs. Stream the Xbox in your bedroom to the big screen in your living room, or share the content of the screen on your tablet for tutorials and demos. AirServer has twice the features of AppleTV at less than half the cost. Whatever your content streaming needs, AirServer has you covered.
image/svg+xmlBotttsPablo Stanleyhttps://bottts.com/Florian Körner
Kai
AirServer provides a wide variety of uses, from education to gaming. Although the software is very simple, the basis of the program allows you to display your screen onto a projector. The mirroring is 60 FPS too, making it silky smooth unlike other programs which mirror at 30 FPS. Probably my favourite part is that everything is already built in so there’s no need to install any third party dodgy programs onto a client’s device, this ensures that displaying information is quick and easy. The program is overall great for both business and educational presentations.
image/svg+xmlBotttsPablo Stanleyhttps://bottts.com/Florian Körner
Samuel
AirServer Universal is a mirroring service that allows you to cast your device display onto another display. It works great and even has some Linux functionality. I fully recommend this.
image/svg+xmlBotttsPablo Stanleyhttps://bottts.com/Florian Körner
Hamish Demarr
AirServer is a software application for Mac and PC that allows users to stream audio, video, and pictures from their iOS, Android, and Windows devices to their computer screens. AirServer features AirPlay, Google Cast, and Miracast streaming protocols, allowing users to share content from their device to their computer with a few simple steps. AirServer also provides advanced features such as AirTunes audio streaming, AirPlay video streaming, and AirPlay photo streaming, allowing users to project their devices’ content wirelessly to the big screen.
image/svg+xmlBotttsPablo Stanleyhttps://bottts.com/Florian Körner
Leo Q*****u
I’ve used AirServer for a few years now, and it’s a great software. It’s easy to set up and use, and it has many features that make it a great choice for any business or home use. The ability to use AirPlay mirroring or cast media makes it a great choice for watching movies and shows. The support is also very helpful and responsive. Overall, it’s a great piece of software and I highly recommend it.
image/svg+xmlBotttsPablo Stanleyhttps://bottts.com/Florian Körner
Callum A******z
I recently tried out AirServer software and I was impressed with its performance. It allowed me to project my laptop’s screen onto a larger monitor with a few simple settings. I found the interface to be quite simple and user friendly. The audio and video quality was good even with a wireless connection. I also liked the fact that the software supports multiple platforms and that it can be used with a wide range of devices. I was also able to stream my laptop’s audio to the larger monitor which was really convenient. All in all, AirServer was an impressive software that I would recommend to anyone looking for a simple and reliable way to project their laptop’s screen.
image/svg+xmlBotttsPablo Stanleyhttps://bottts.com/Florian Körner
Finn C.
AirServer is a great way to wirelessly mirror your mobile device to your computr, however I find that the setup process can be a bit confusing and difficult to understand at times.
image/svg+xmlBotttsPablo Stanleyhttps://bottts.com/Florian Körner
Callum U******e
AirServer is a powerful screen mirroring software that provides seamless connections between devices, but its user interface could be more intuitive.
image/svg+xmlBotttsPablo Stanleyhttps://bottts.com/Florian Körner
Joseph C.
AirServer software allows wireless mirroring of screens and audio from various devices to a computer, with smooth and high-quality performance.
image/svg+xmlBotttsPablo Stanleyhttps://bottts.com/Florian Körner
William
AirServer is a powerful software that enables you to mirror your device screen to another using AirPlay, Google Cast, or Miracast. By transforming your computer into a universal mirroring receiver, it supports mirroring or casting from a variety of platforms. Its standout feature is its ability to receive and display multiple connections simultaneously.
image/svg+xmlBotttsPablo Stanleyhttps://bottts.com/Florian Körner
Oscar
Mirroring my iPhone screen on my computer has never been easier.
image/svg+xmlBotttsPablo Stanleyhttps://bottts.com/Florian Körner
Oliver
Effortless screen mirroring, reliable, high-quality streaming.
Smooth operation, user-friendly interface, consistent performance.
Excellent for interactive presentations, supports multiple devices.
Good audio quality, game streaming potential, minimal lag.
Excellent mirroring software, useful for education environments.
Supports various platforms, easy setup process, high resolution.
image/svg+xmlBotttsPablo Stanleyhttps://bottts.com/Florian Körner
Ryan
Efficient, seamless screen mirroring.
This article confidently delves into seamlessly running Windows XP on a state-of-the-art virtual machine using Microsoft Hyper-V virtualization software on the cutting-edge Windows 10 or 11 operating system.

How to Set Up Windows XP Pro x64 on Windows 10 OS using Hyper-V
After Microsoft released Windows XP on October 20, 2001, it started becoming a viral operating system among users. Since its release, it has been widely used in all workplaces and homes.
This operating system uses NT technology and micro-kernel architecture and has versions developed for various purposes. These versions are Professional, Home, Media Center (MCE), Tablet PC Edition, Starter Edition, and Home Edition (ULCPC – Ultra Low-Cost Personal Computer).
The Windows XP operating system, which has reached a large audience, is rarely used today. Since Microsoft ended support for this system on April 8, 2014, most users or institutions could not get new system updates, so they ended the use.
The XP system, which has received support for 12 years, will no longer accept new updates, as Microsoft stated in this article.
Despite the end of support for Windows XP, some system administrators may use this system for legacy applications or other scenarios in test environments. Instead of running XP on a physical PC, you can experience this system on a more powerful computer using HyperV, VMware Workstation, or VirtualBox virtualization software.
How to Create a New Virtual Machine for Windows XP OS
After successfully establishing Hyper-V on your Windows 10 system, with the assurance of virtualization support, you can effortlessly generate a new virtual PC and install either Windows or Linux operating systems in this virtual environment.
Step 1
After running the Hyper-V Client software, creating a new External Switch using Virtual Switch Manager before operating system installation is recommended. Because the Default Switch, which is enabled by default by the program, uses the NAT connection to expose the VM to the host network, which can cause network problems in many cases.
To minimize network problems, you can use your host’s adapter with an External Switch, and both get an IP address from the DHCP device in your local network and connect to the guest machine via remote desktop.
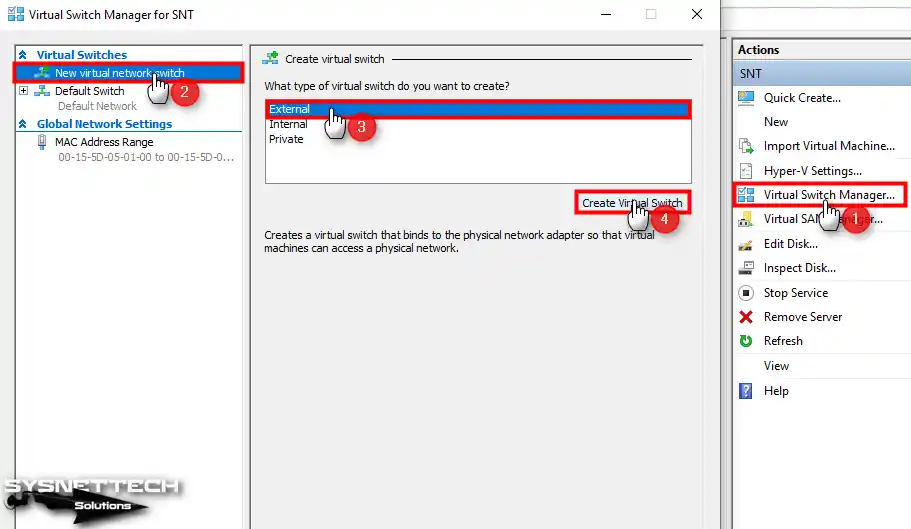
Step 2
After creating the External Switch, type a name according to your desire in the Name field, and then select the network adapter you use to access the Internet on your host in the External Network setting and click OK.

Step 3
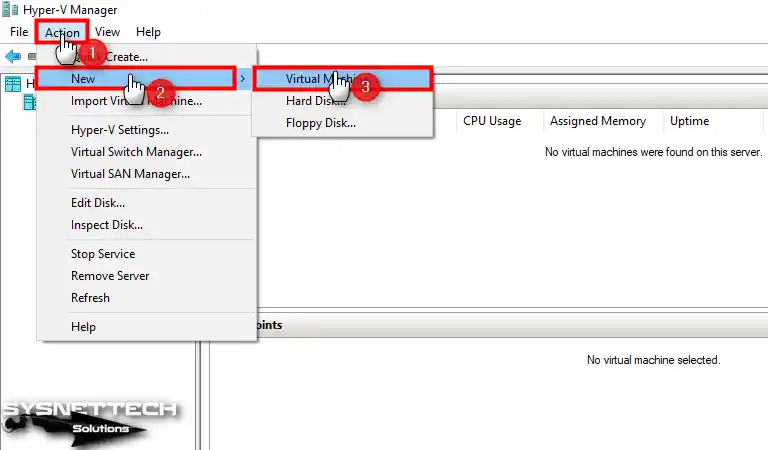
After configuring the Virtual Switch, click Action / New / Virtual Machine from the program tool menu to start the virtual machine setup wizard.
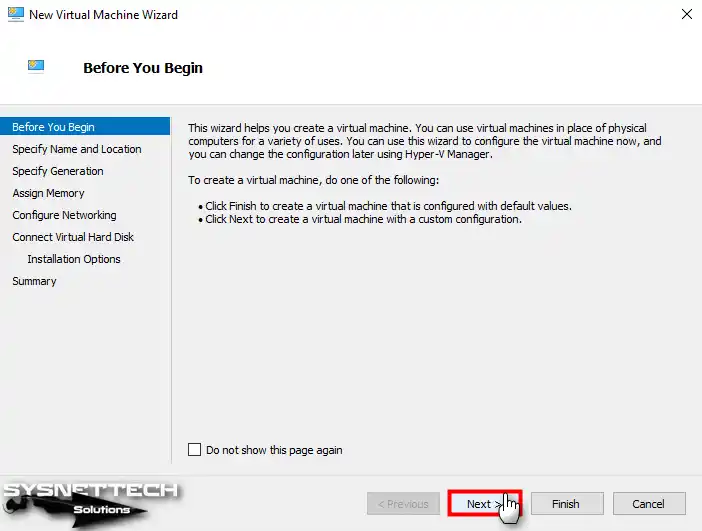
Step 4
You can quickly click Finish to create a virtual computer with the settings specified by the program in the VM wizard. Alternatively, you can continue by clicking the Next button to create a manual guest machine.
If you do not want this window to appear during the next VM creation, do not show this page again, and click Next.
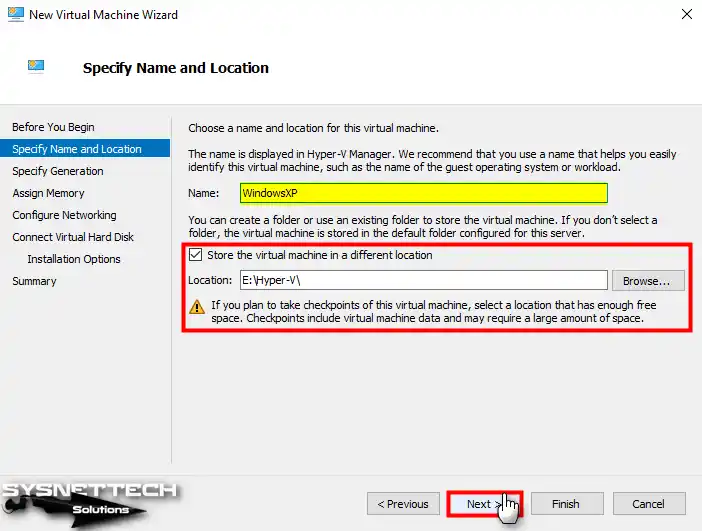
Step 5
After typing the name of the operating system you will install on the guest machine, it is recommended that the installation location of the VM be configured on an external disk to fill the capacity of your host disk appropriately.
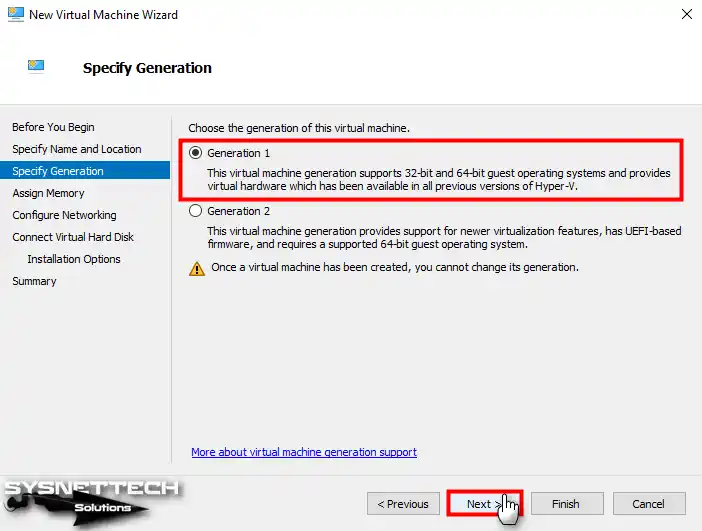
Step 6
When installing one of the old Windows operating systems, you need to choose Generation. You can select Generation 2 when you try to install a UEFI-supported OS. Still, if you install Windows XP, you should choose Generation 1, which supports BIOS firmware.
Step 7
Suppose you handle multiple VMs simultaneously using Hyper-V on your Windows system. In that case, you can create more efficient RAM resource management thanks to the Dynamic Memory feature. However, you are only going to use a single virtual computer. In that case, you can disable this feature and assign a specific RAM size to the VM for more performance gains.

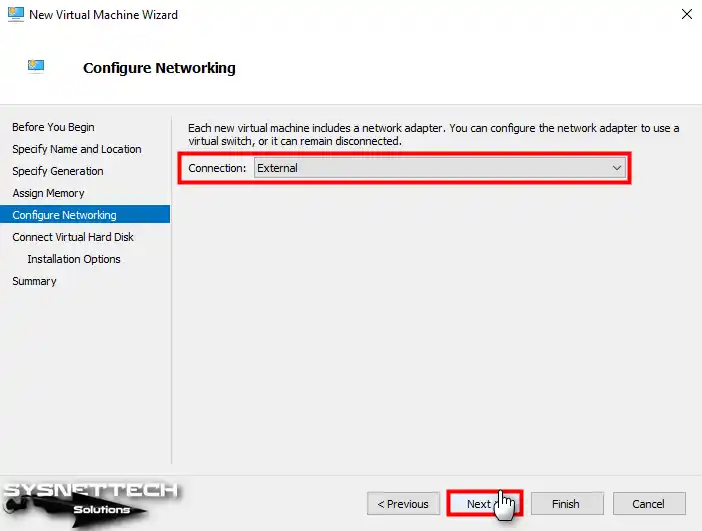
Step 8
For the virtual machine’s network settings, select the External Switch you created using the Virtual Switch Manager tool.
Step 9
You must create a new virtual disk while preparing a new guest system. Leverage the “Use an existing virtual hard disk” option to incorporate a pre-installed virtual disk from a VM seamlessly. This straightforward approach allows you to effortlessly integrate the desired virtual disk into your virtual machine setup.
In addition, you can change the virtual disk size automatically, as determined by the program, from the Size section as you wish.
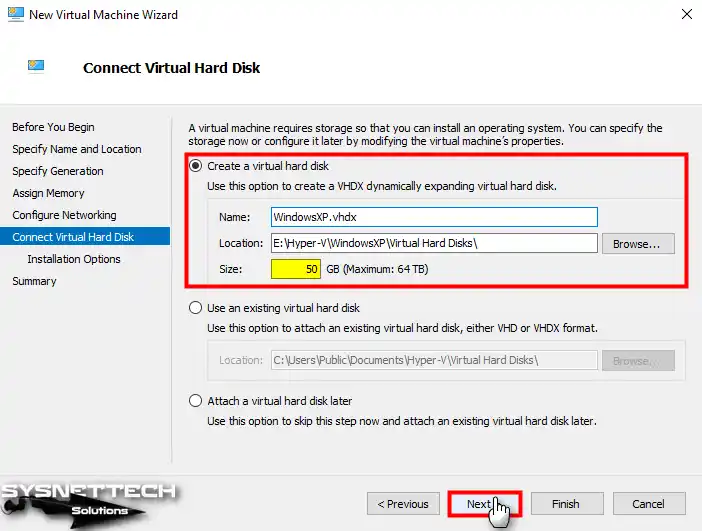
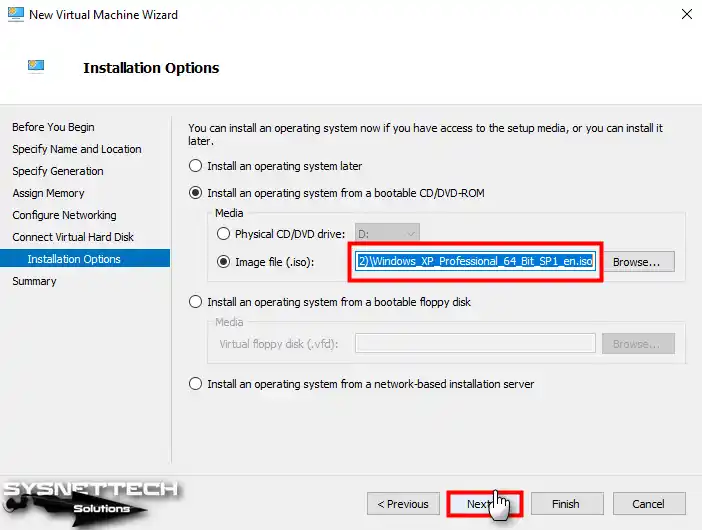
Step 10
To seamlessly incorporate the Windows XP ISO file into your virtual machine, confidently opt for the “Bootable CD/DVD-ROM” option. Subsequently, select the “Image File (.iso)” format and conveniently specify the ISO file’s location by utilizing the Browse button.

Step 11
Opt for the Windows XP Professional 64 Bit SP1 ISO file you have securely downloaded to your computer by following. Assertively click on the Open button to proceed with the selection process.

Step 12
After checking the location of the Windows image file, proceed to the next step with Next.
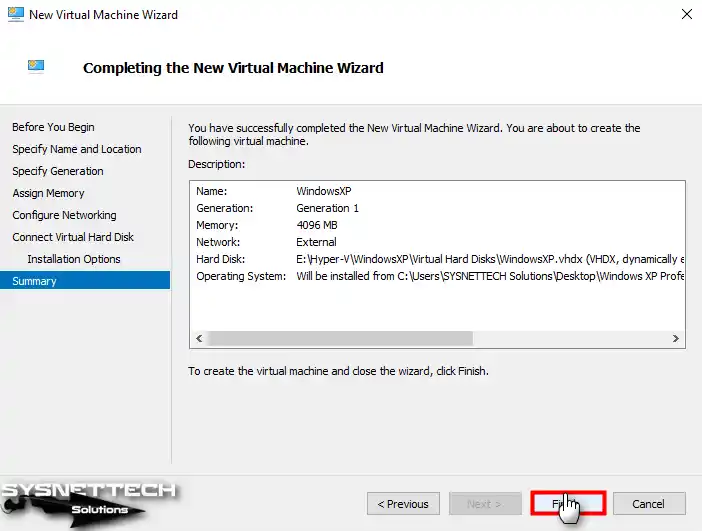
Step 13
You can check the settings you have made in the Virtual PC in the Summary window. Should there be a specific setting within the virtual machine that you wish to modify, you can conveniently navigate back to the corresponding settings by confidently utilizing the Previous button. This allows you to access and adjust the desired configurations as needed effortlessly.
Step 14
After preparing the Windows XP virtual machine, open its settings and increase the number of virtual processors according to the power of your host computer’s processor hardware.

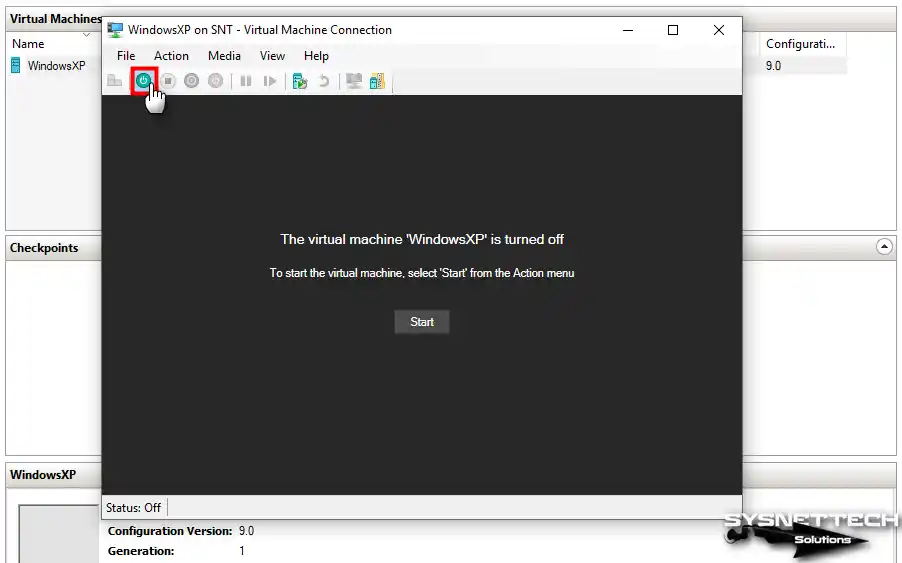
Step 15
Finally, click the correct button / connect option on the virtual machine created in the Virtual Machines section, click the Start button in the window that opens as in the image below, and proceed to the Windows installation.
How to Install Windows XP
Once you have completed the necessary preparations and initiated the virtual PC for Windows XP installation via Hyper-V, you can confidently proceed with the subsequent steps, mirroring the installation process as you would on a physical computer.
Step 1
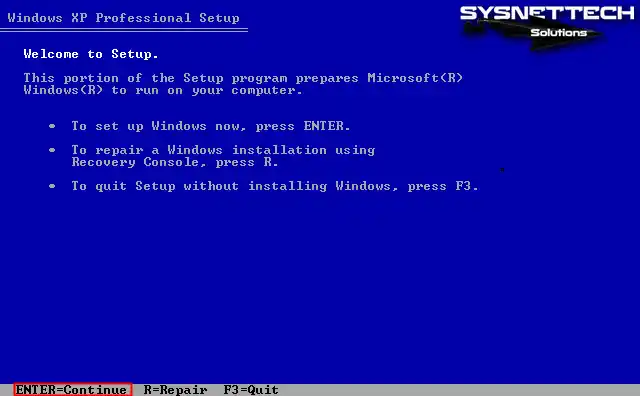
Press Enter on the Windows XP Professional Setup screen to start the installation immediately. Use Recovery Console by pressing R to repair your system.
Step 2
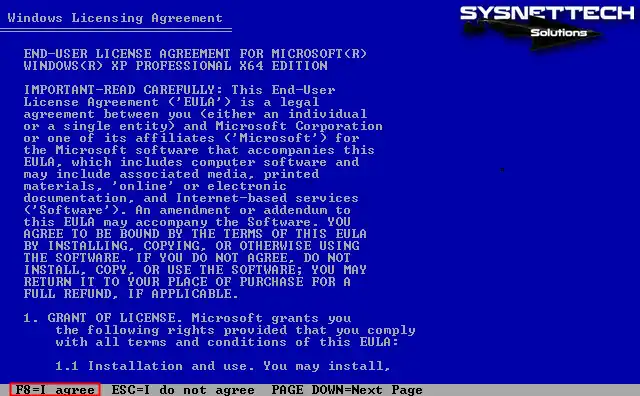
You can scroll down the page by pressing PAGE DOWN to read the full text of the Windows XP license agreement. After reading the license terms, press F8 to accept and continue.
Step 3
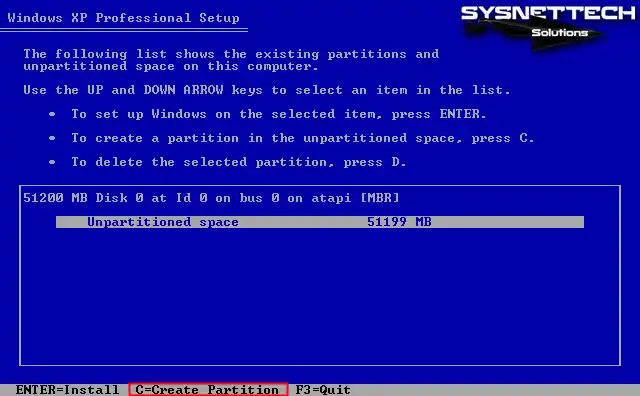
You can see the unallocated space in the disk configuration window. Press C to create a new partition on this disk space. Or, if you want the disk to be configured automatically by the installation wizard, press Enter directly and start the installation.
Step 4
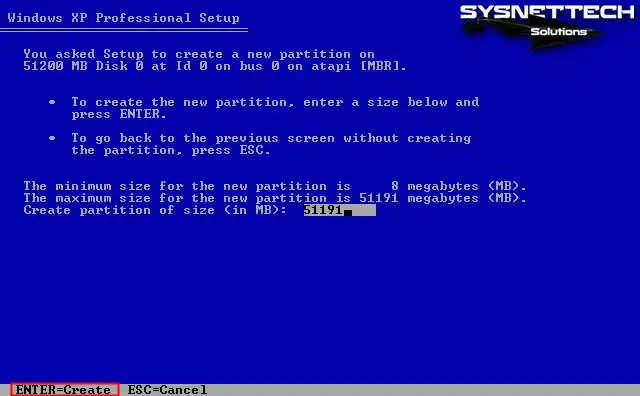
Press Enter to accept the automatically edited disk size and use all disk space.
Step 5
After creating the C drive on the virtual HDD, press Enter to start the Windows installation.

Step 6
Before installation, format the virtual disk using the NTFS file system.
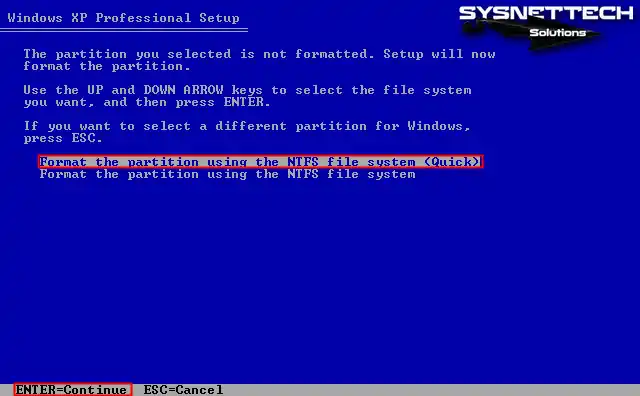
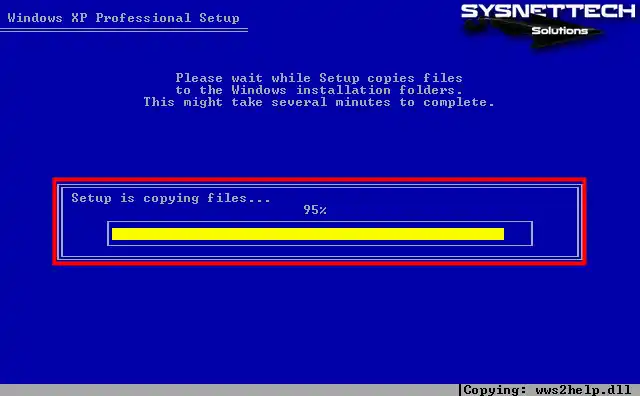
Step 7
After formatting the virtual disk, wait while the setup wizard copies the system files.
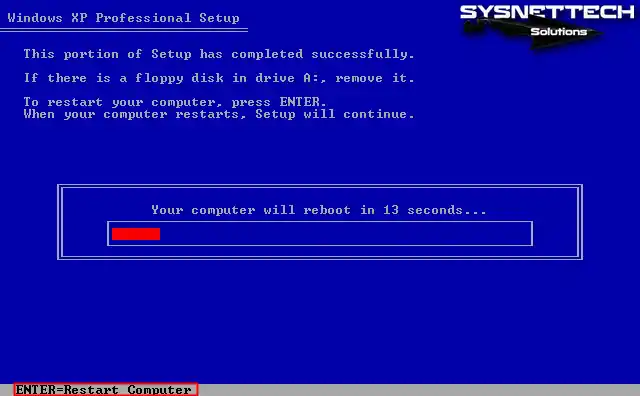
Step 8
After the first stage of Windows XP installation is completed, press Enter to reboot the guest machine.
Step 9
Wait while Microsoft Windows XP x64 Edition boots up.

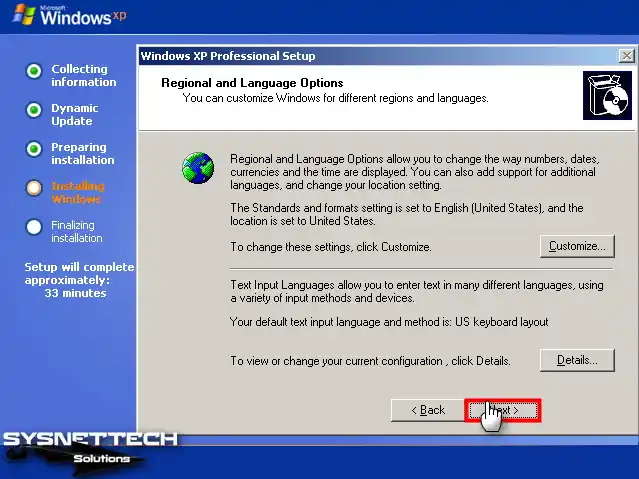
Step 10
Select your guest operating system’s display language and region setting in this window and continue.
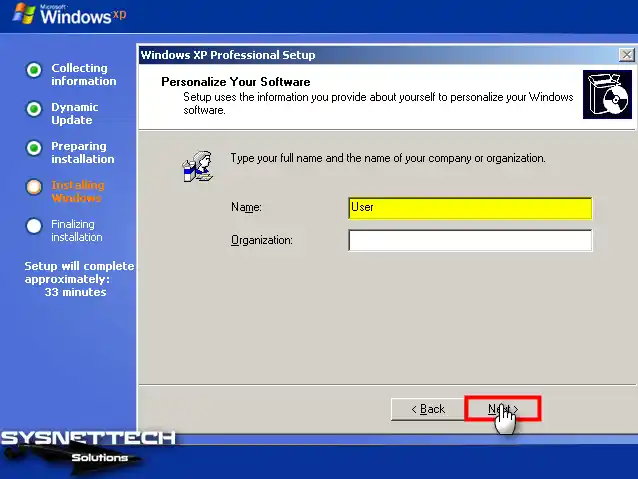
Step 11
Type a name for the user account of your virtual system. If you are using the VM in an organization, type the company name in the relevant section and click Next.
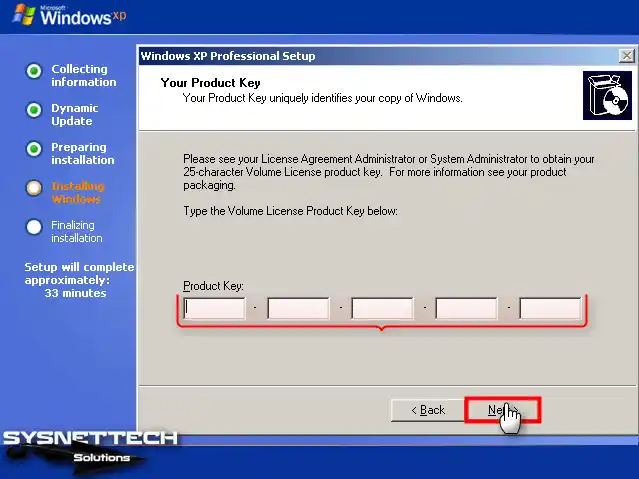
Step 12
Type your 25-character Windows XP Pro product key and click Next.
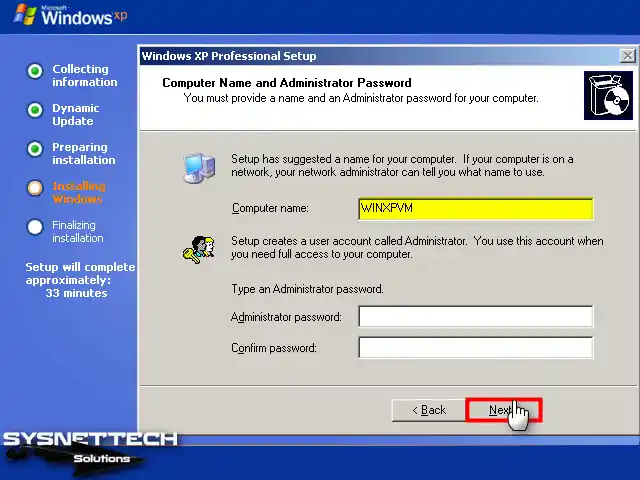
Step 13
When prompted, input a different computer name that differentiates it from other virtual or physical computers in your network environment. Furthermore, if you desire to establish a password for the administrator account, securely enter your preferred new password and proceed by clicking on the Next button.
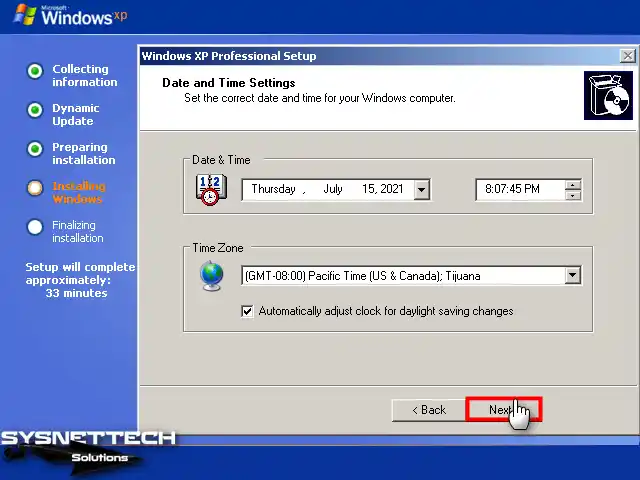
Step 14
Configure your guest operating system’s date and time settings according to where you live and continue.
Step 15
The installation will continue after editing system settings such as product key, region, and language settings.
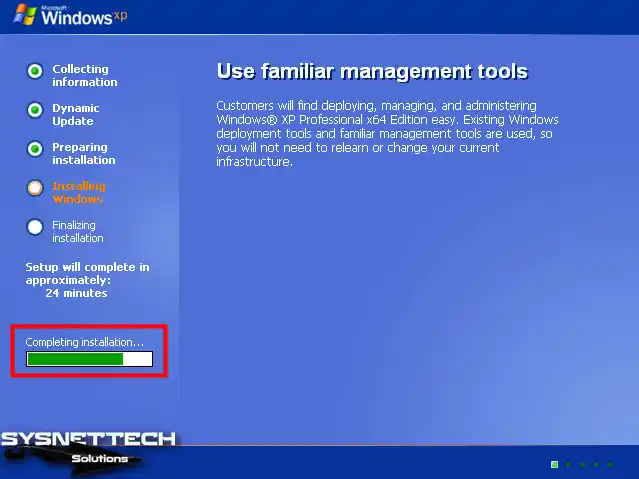
Step 16
After the setup wizard has copied the Windows XP system files, wait while the computer settings are applied.
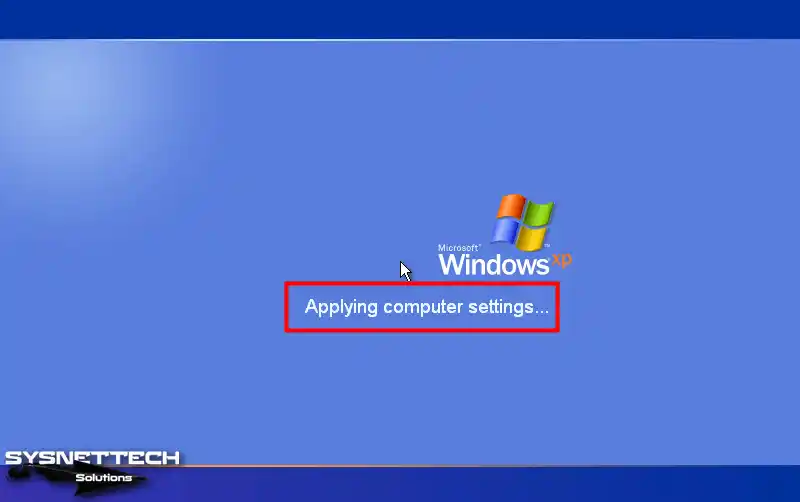
Step 17
After applying the computer settings, the Windows XP desktop will be ready.

How to Upgrade the Windows XP System SP1 to SP2
Once successfully establish Windows XP SP1 on the virtual device, you must upgrade your virtual system to Service Pack 2 (SP2) to install Integration Services. Nevertheless, if you have utilized an SP2 ISO, you can skip this stage, as it is optional.
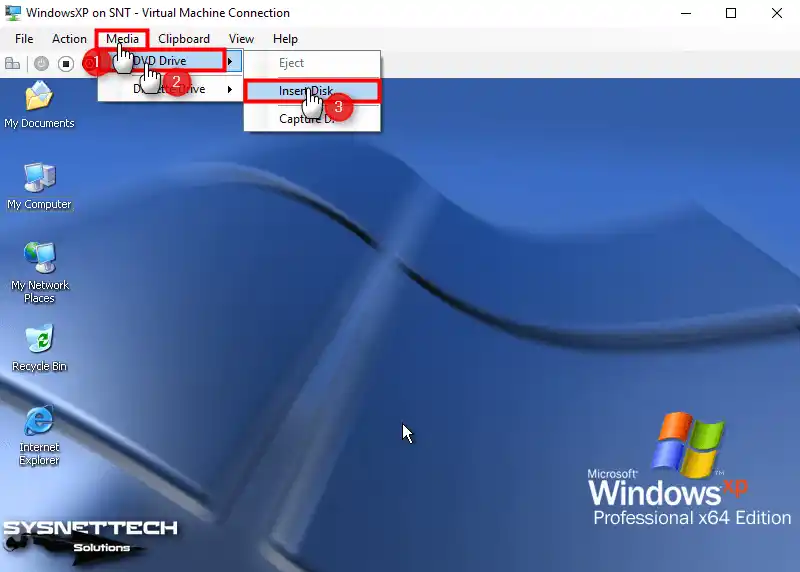
Step 1
Click Media / DVD Drive / Insert Disk in the guest machine’s tool menu to add the SP2 Upgrade ISO file.
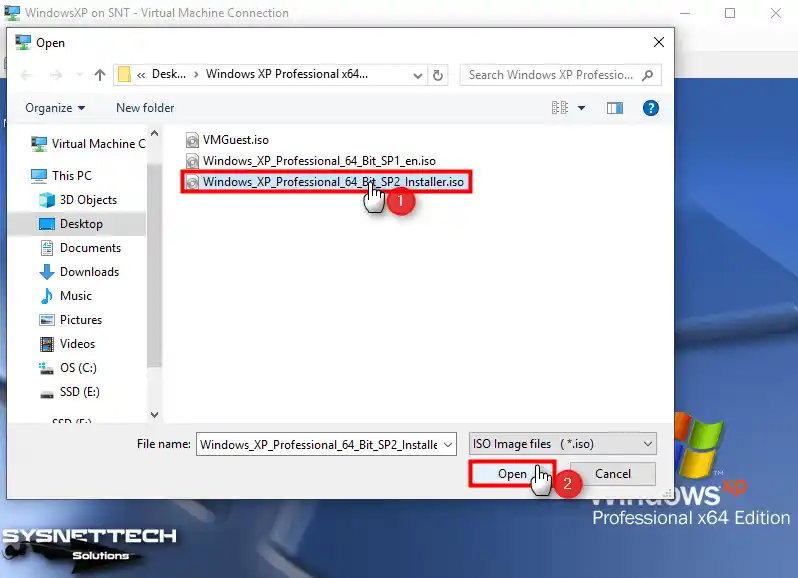
Step 2
Select the Windows XP 64 Bit SP2 Installer ISO file you downloaded to your PC and click Open.
Step 3
Open My Computer and right-click/open on the CD content, then double-click the SRSP2 command script to run it.
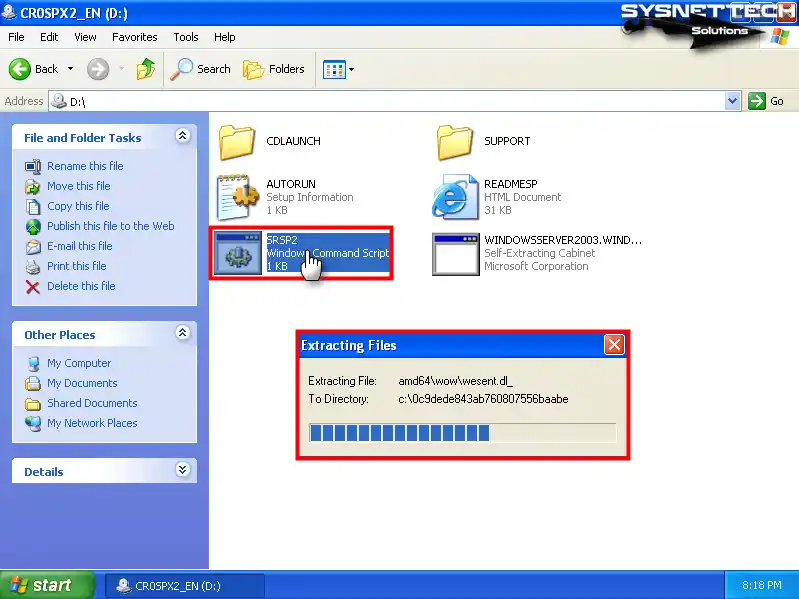
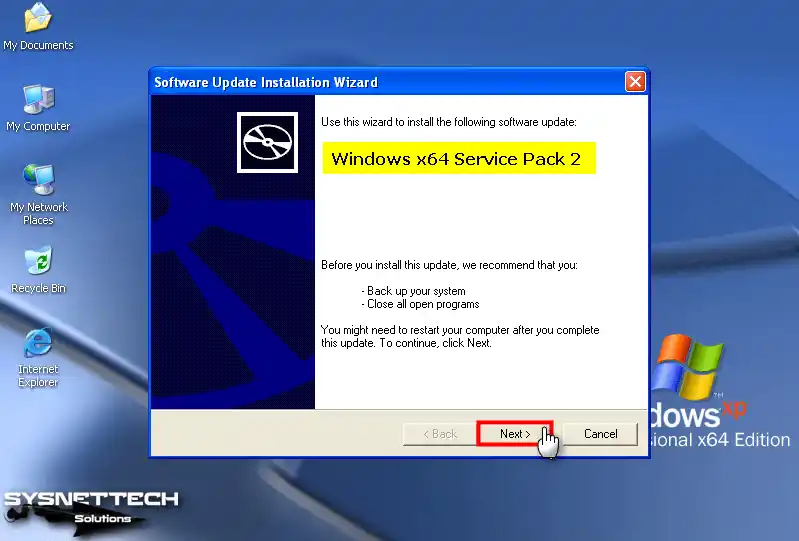
Step 4
After extracting the files, click Next in the Windows x64 Service Pack 2 wizard.
Step 5
Accept the Service Pack 2 (SP2) license agreement and click Next.

Step 6
Wait while Windows XP SP1 updates to SP2.

Step 7
After the system upgrade is complete, restart your guest operating system.

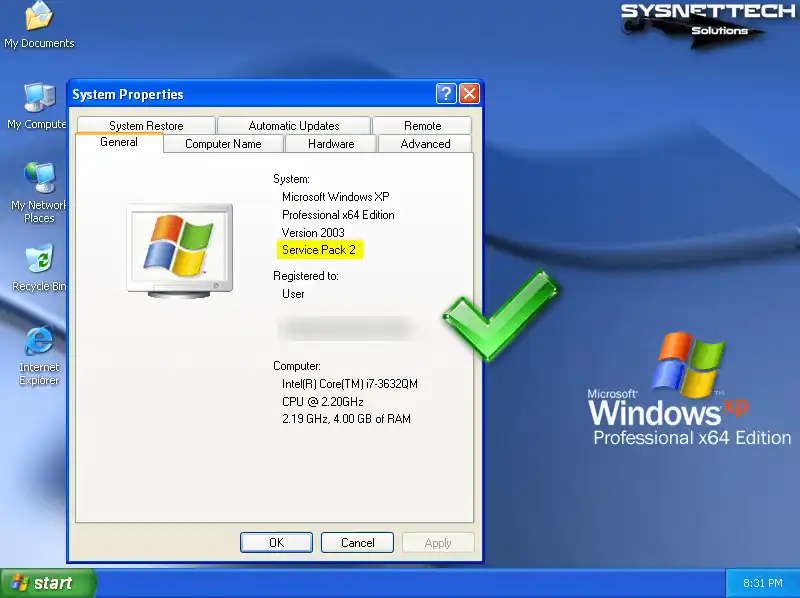
Step 8
After right-clicking on My Computer, click System Properties and check that Service Pack 2 is specified in the System section.
How to Install Hyper-V Integration Services
After you upgrade your Windows XP virtual system to SP2, you must install Integration Services to update or enable the VM’s display and network adapter.
First, download the Windows XP Integration Services (VMGuest.iso) ISO file to your computer, and then follow the installation steps.
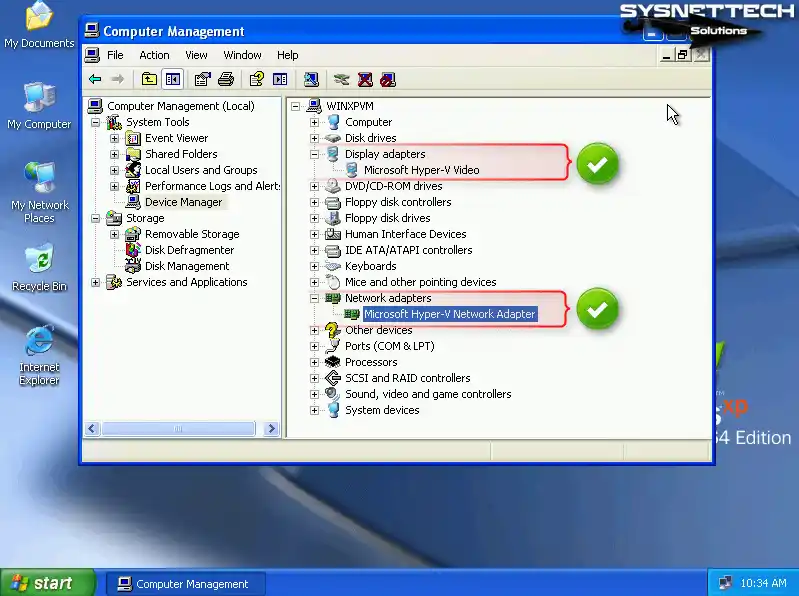
Step 1
Right-click My Computer on the guest machine, then click Manage and check that the display adapter is not enabled and that the network adapter is not defined in the Device Manager interface in the Computer Management window.

Step 2
Add the Integration Services (VMGuest.iso) ISO file to the Windows XP virtual machine.

Step 3
As soon as you add the VMGuest.iso file, Integration Services will be installed automatically on the virtual machine.

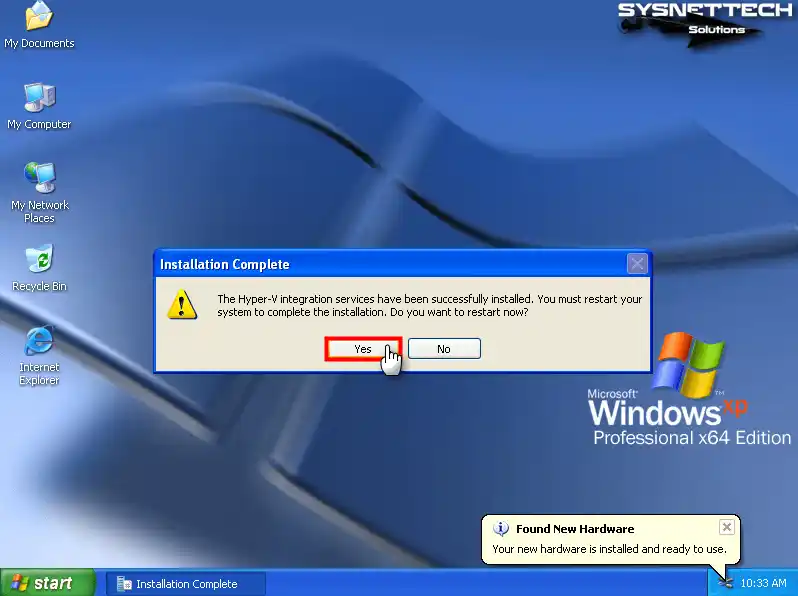
Step 4
After the Windows XP Integration Services installation is complete, restart your virtual system.
Step 5
Open Device Manager again and check that the display and network adapter is updated. With the Microsoft Hyper-V Network Adapter now enabled, you can seamlessly establish an Internet connection within the virtual appliance. This lets you connect and access online resources, ensuring a smooth and uninterrupted virtual experience.
How to Test Internet Connection
After enabling the Microsoft Hyper-V Network Adapter, you must check that the virtual system can access your local network and the Internet.
Step 1
In Windows XP virtual PC, press Windows Key + R to open Run, execute the CMD command, and ping Google servers by executing the ping 8.8.8.8 command and test network connectivity.
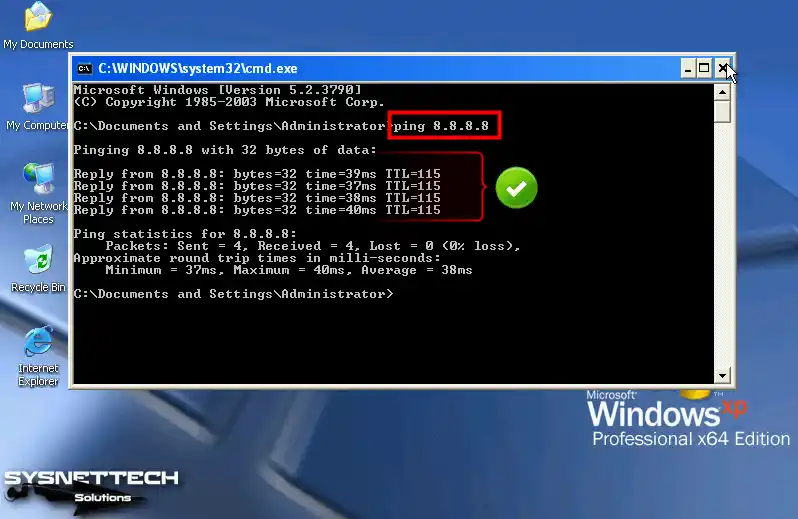
Step 2
If the ping to the Google servers is successful, open Internet Explorer and check the connection by visiting the search engine’s homepage.

How to Use the Virtual Machine in Full Resolution with Remote Desktop Connection
Even if you install Integration Services on the XP guest machine, you may not be able to use the VM in full-screen resolution. You can connect from the host to the VM using Remote Desktop Connection to use both the screen resolution and the audio device.
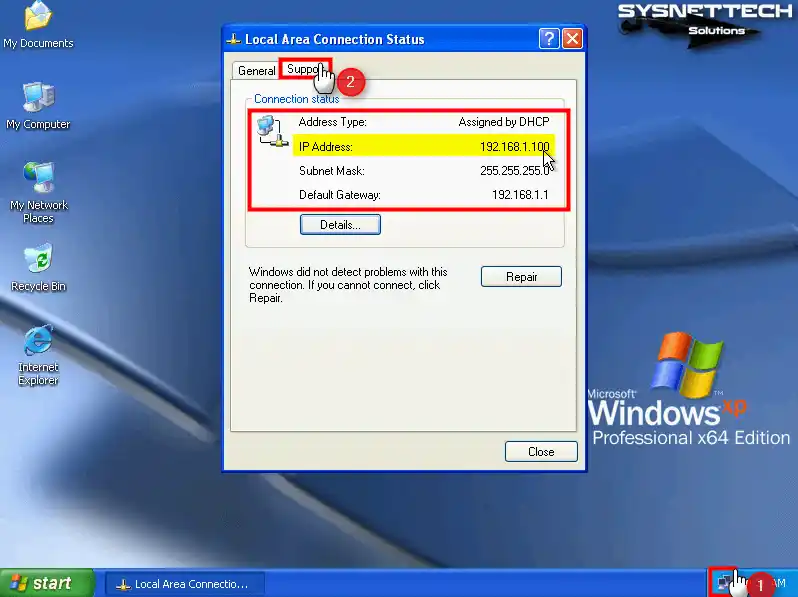
Step 1
To effortlessly establish a remote desktop connection with the VM, it is crucial to acquire the IP address of the guest machine. To accomplish this, confidently double-click the network icon in the lower right corner and inspect the IP address within the Support tab of the Local Area Connection Status window. This seamless process ensures you quickly obtain the necessary information to establish a remote desktop connection.
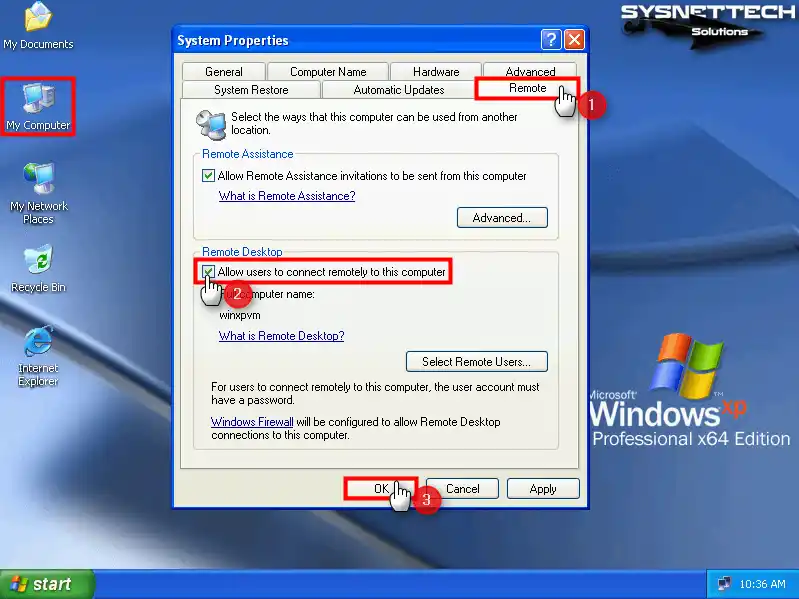
Step 2
Once you know the IP address of the virtual computer, you need to allow remote desktop connections. Proceed by right-clicking “My Computer” and navigating to the System Properties. Within the System Properties window, access the Remote tab. Next, under the Remote Desktop zone, determine the “Allow users to connect remotely” option. Finally, solidify your preference by hitting the OK button.
Step 3
After enabling remote desktop connection in Windows XP, you must create a password for the user account, as the password will be requested when connecting from the host to the VM.
Click Users under Local Users and Groups in the Computer Management window, right-click / Set Password on the Administrator account on the right, and click the Proceed button in the open window.
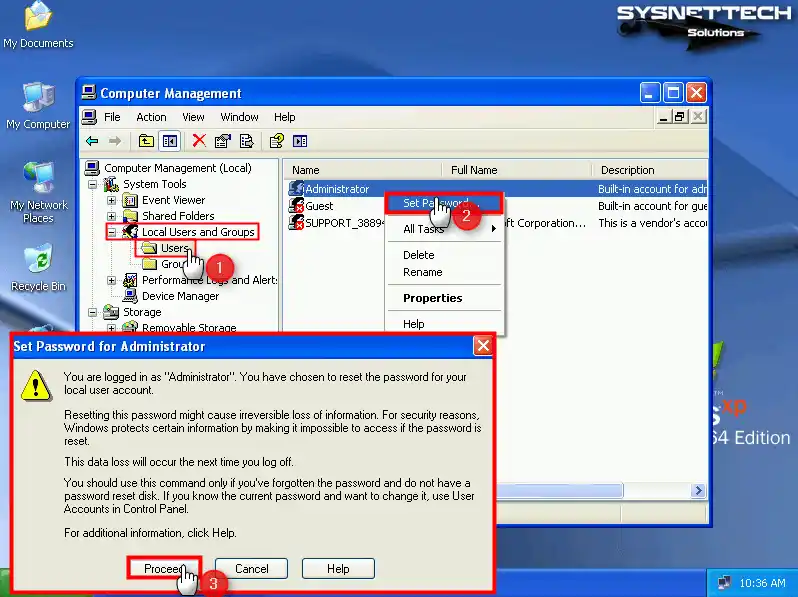
Step 4
Ensure you create a memorable password for your user account, followed by a decisive click on the OK button.

Step 5
Find and run the Remote Desktop Connection tool on your host operating system.

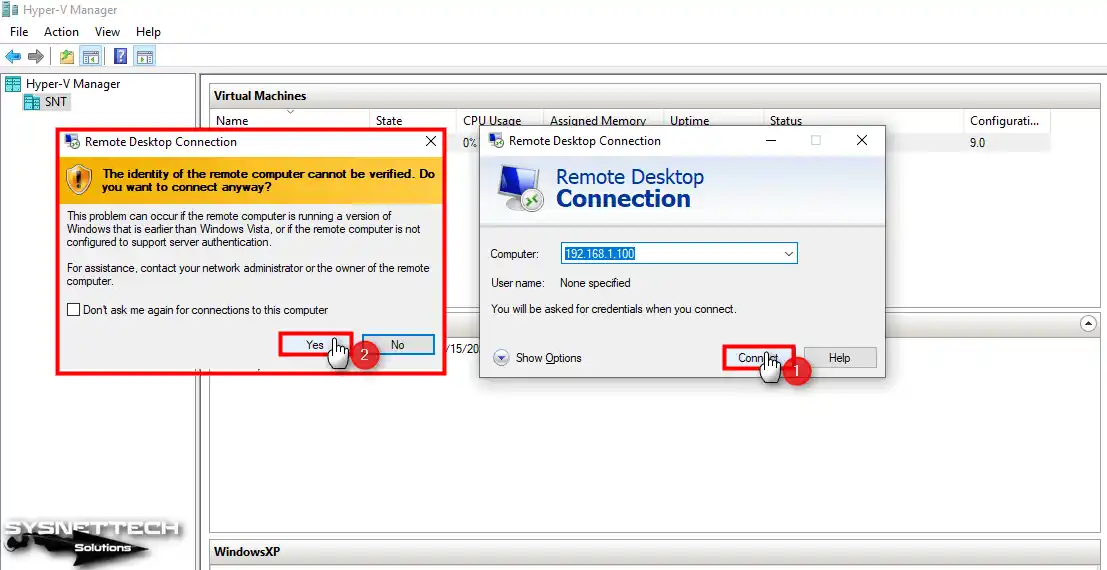
Step 6
Type the IP address of the virtual machine in the Computer section, and after clicking Connect, click Yes to skip the certificate warning.
Step 7
After connecting to the VM, type the user credentials of the virtual system and click OK.

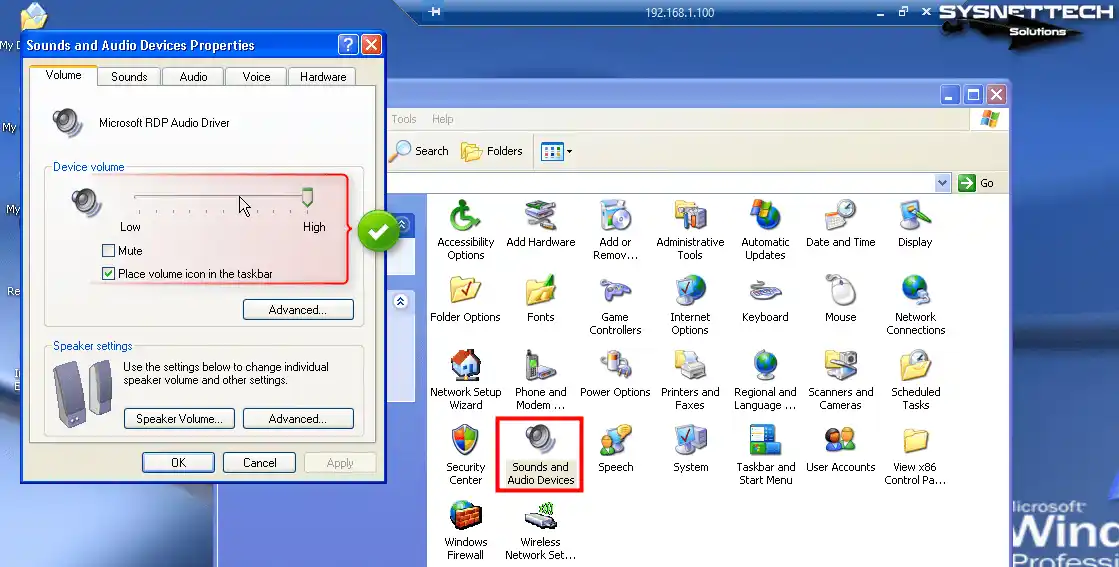
Step 8
You can now use the Windows XP virtual computer in full resolution and hear system sounds.
How to Use USB Flash Memory in Virtual Machine
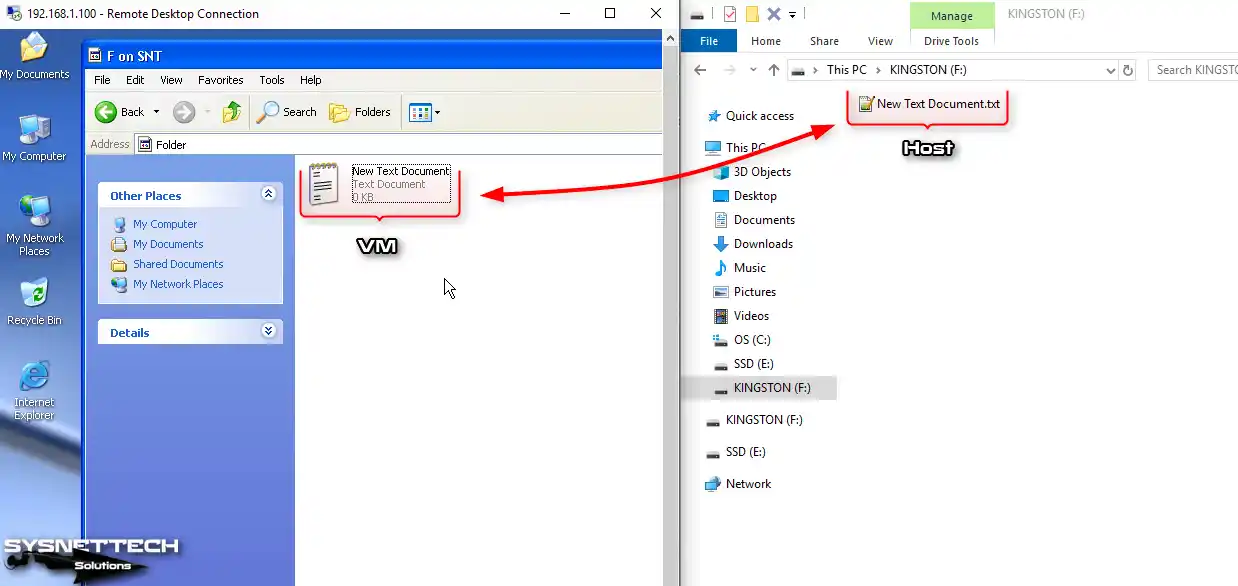
For expedient file transfer between the host and the virtual machine, leveraging a USB flash drive on the remote machine is the most straightforward approach. This method allows you to efficiently share your files with the VM, enabling swift and seamless data transfer.
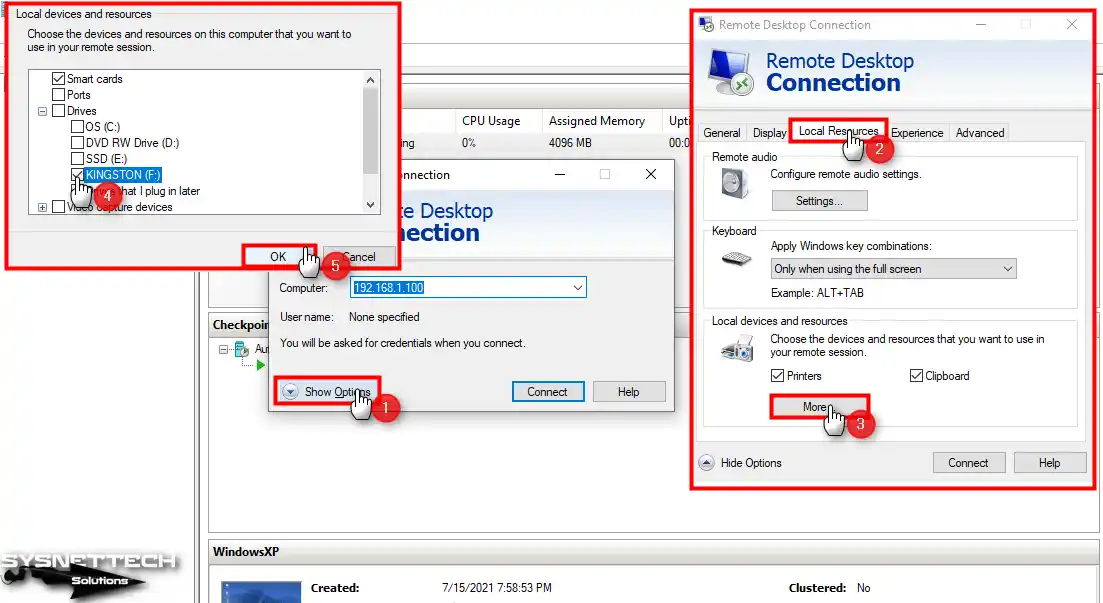
Step 1
Open the remote desktop tool again. After clicking Show Options, click the Local Resources tab in the open window, then click More.
In the Local Devices and Resources list, under Drives, tick the flash memory you will use in the VM and click OK.
Step 2
When you tick the flash memory and try to connect to the VM, click Connect again in the Do you trust remote connection warning window.

Step 3
Open My Computer in the VM and check that your USB stick is active under Other.

Step 4
Enabling flash memory on the VM simplifies transferring files between the host and the virtual device. By taking advantage of this functionality, you can seamlessly and effortlessly transfer
Video