
If you have a pair of AirPods Pro, you can squeeze them to toggle between Transparency Mode and Active Noise Cancellation. On the AirPods Max, use the Digital Crown to control the audio and the Noise Control button for Transparency Mode and Active Noise Cancellation.
Likewise, does AirPods Pro noise Cancelling work on Windows? Last year, updated the AirPods as well as announced an AirPods Pro model with better features and Active Noise Cancellation. While Apple AirPods were for Apple ecosystem, the earbuds do work with Windows as well.
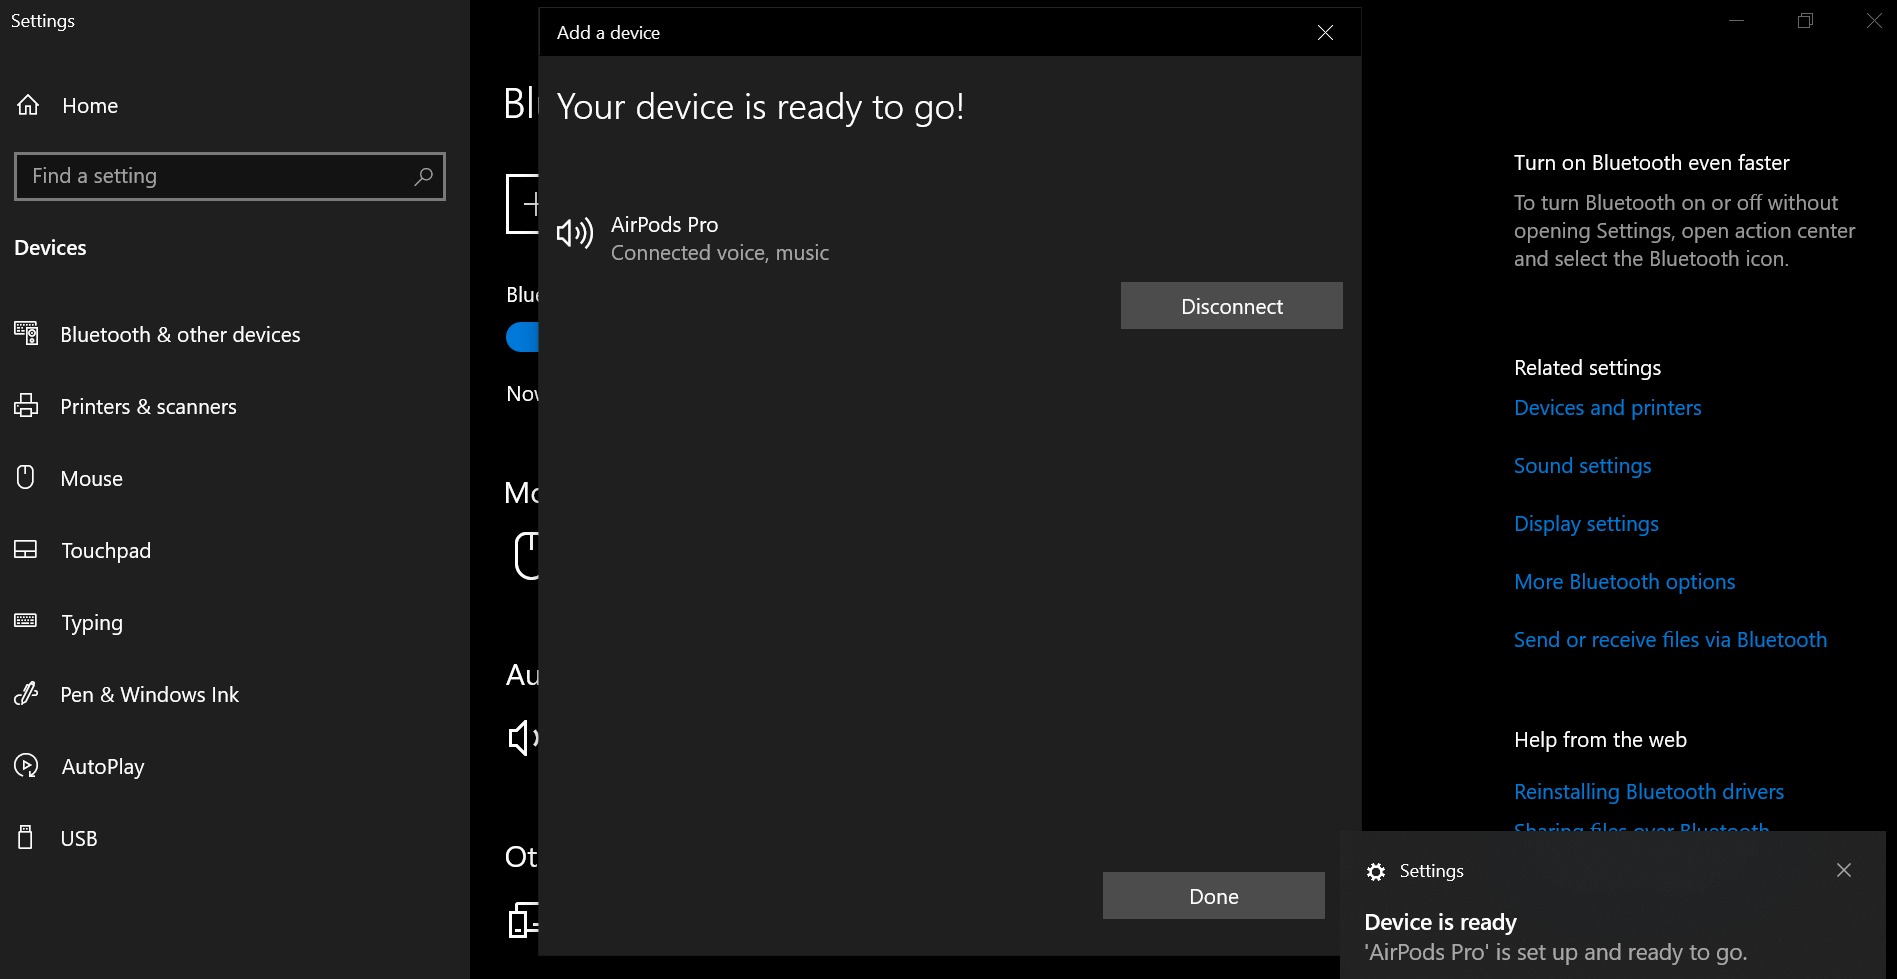
Also know, how do I control my AirPods Pro from my PC? To connect AirPods to a PC, put your AirPods in the case and press and hold the small button on the back until the status light starts blinking white. Your AirPods should then show up in the “Add a device” window in your PC’s Bluetooth settings, where you can click to pair and connect.
In this regard, do AirPods Pro work with Windows PC? Apple’s AirPods are perhaps best paired with iOS devices, or at least other Apple computers. However, because they use Bluetooth to connect wirelessly to tech gear, they work well with Windows PCs, Android phones, and other mobile devices, too.
Amazingly, why do AirPods Pro sound bad on Windows? One of the main reasons for Airpods Pro bad sound quality on Windows is the way Bluetooth technology works – it simply does not provide enough bandwidth for both to work effectively.Overall, noise cancellation in headphones doesn’t affect your hearing negatively. You may hear a slight hissing sound when you the ANC is turned on, but that’s about it. However, for some people this can be irritating and even result in dizziness. … Keep in mind, that this hissing sound does not damage hearing.
How do I know if my noise Cancelling is working AirPods Pro?
AirPods Pro Press and hold the force sensor on the stem of an AirPod until you hear a chime. When you’re wearing both AirPods, press and hold the force sensor on either AirPod to switch between Active Noise Cancellation and Transparency mode.
How many devices can AirPods connect to?
Though Apple AirPods cannot receive audio input from two different devices simultaneously, they can be simultaneously connected to both an Apple Watch and an iPhone. When they are connected with both devices, the audio input will switch between the two devices depending on the user’s interactions.
Why wont my AirPods connect to my windows?
If your Apple AirPods stop working on your Windows PC, try these fixes: Disable Bluetooth on other devices. If you’ve paired your AirPods with your iPhone, it could interfere with the connection to your PC, so try temporarily turning off Bluetooth on other devices. Open the charging case lid.
Can I use AirPods with Windows 10 laptop?
Yes – just like regular AirPods, AirPods Pro and AirPods Max also work on Windows 10 laptops, complete with support for transparency and ANC modes.
How do I use AirPods pro mic on Windows 10?
How well do AirPods work with Windows 10?
Best answer: Even if you’re away from an iPhone or iPad, the AirPods will behave like regular Bluetooth headphones, which means you can use them with your Windows 10 PC.
Can AirPods connect to Samsung?
On your Android device, go to Settings > Connections/Connected Devices > Bluetooth and make sure Bluetooth is on. Then open the AirPods case, tap the white button on the back and hold the case near the Android device. … Tap the AirPods name on the screen and you should be good to go.
Why is the AirPods mic so bad?
So, Why Is Airpods Pro Mic Bad? The poor sound quality of the Airpod’s mic is caused by the Airpods active 8 to 16 kHz SCO Codec. The function of this SCO Codec is that it is in charge of audio transmission using your Airpods Microphone and it is the default codec used across the entire Mac devices.
Why is my AirPods audio so bad?
The most common cause of muffled sound in your AirPods comes from dirty speakers. Since they sit directly inside your ear canal, earwax and other material can build up over time, reducing the quality of the sound. Other reasons could include Bluetooth interference or the fact that your AirPods need to be reset.
How do I increase the volume of my Airpod on my computer?
- Type mmsys. cpl and click on OK.
- Under Playback tab, double click on the sound device that you are using.(
- Click on Enhancements tab.
- Toggle the checkbox for Loudness Equalization.
- Click on OK.
Is Active noise-cancelling worth it?
Are noise-cancelling headphones worth it? Yes. If you wish to protect your hearing, reduce environmental distractions, and enjoy a better audio experience, then this technology will surprise you with its impactful results.
Noise Cancellation
Published: November 3, 2023
Learn how to disable noise cancellation on AirPods Pro when using them with a Windows device. Discover step-by-step instructions to turn off this feature for a better audio experience.
(Many of the links in this article redirect to a specific reviewed product. Your purchase of these products through affiliate links helps to generate commission for AudioLover.com, at no extra cost. Learn more)
Table of Contents
- Introduction
- Method 1: Adjusting AirPods Pro settings on Windows
- Method 2: Using third-party software to disable noise cancellation
- Conclusion
Introduction
Noise cancellation technology has revolutionized the way we listen to music and interact with our devices. From headphones to earbuds, this feature helps to drown out external sounds and immerse us in our audio experience. One popular product that offers noise cancellation capabilities is the AirPods Pro by Apple.
While noise cancellation can be a fantastic feature for many, there are times when you may prefer to turn it off—whether you want to hear your surroundings more clearly or simply conserve battery life. If you’re a Windows user and are wondering how to disable noise cancellation on your AirPods Pro, you’ve come to the right place.
In this article, we will explore two different methods that you can use to turn off noise cancellation on AirPods Pro while using them with a Windows device. Whether you’re working in a noisy environment or just prefer to have more ambient sound, these methods will help you regain control over your audio experience.
Method 1: Adjusting AirPods Pro settings on Windows
If you’re using AirPods Pro on a Windows device, you can easily adjust the noise cancellation settings directly from your computer. Here’s how:
- Make sure your AirPods Pro are connected to your Windows device via Bluetooth. You can do this by going to the Bluetooth settings on your computer and pairing your AirPods Pro.
- Once your AirPods Pro are connected, right-click on the volume control icon in your taskbar and select “Open Sound settings.”
- In the Sound settings window, you will see a list of available output devices. Locate your AirPods Pro from the list and click on them to open the device properties.
- In the device properties window, you will find a section for “Enhancements.” Click on it.
- Scroll down until you find the “Noise suppression” option. By default, it is set to “Automatic.” Click on the drop-down menu and select “Off.”
- Click “Apply” to save the changes.
That’s it! You have successfully turned off noise cancellation on your AirPods Pro. You can now enjoy your audio experience without the noise-cancelling effect.
It’s worth noting that these settings are specific to the Windows device you are using. So, if you connect your AirPods Pro to another Windows device, you would need to repeat the above steps to adjust the noise cancellation settings again.
Method 2: Using third-party software to disable noise cancellation
If you’re looking for an alternative method to disable noise cancellation on your AirPods Pro, you can consider using third-party software. These software applications offer additional customization options and control over your AirPods Pro settings. Here’s how you can use third-party software to turn off noise cancellation:
- Start by downloading and installing a third-party software application that supports AirPods Pro customization. One popular option is “EarTrumpet,” which is available for free on the Microsoft Store.
- Once you have installed the software, open it and locate your AirPods Pro from the list of connected devices. It should show up with the name “AirPods Pro” or something similar.
- Click on the AirPods Pro device to access its settings. Look for an option related to noise cancellation or audio enhancements.
- Within the settings, you should find a toggle or option to disable noise cancellation. Simply turn it off to disable this feature on your AirPods Pro.
- Exit the software and enjoy your AirPods Pro without noise cancellation.
Using third-party software gives you more flexibility and control over your AirPods Pro settings. You can customize other audio aspects such as equalizer settings, sound enhancements, and volume control, depending on the software you choose.
Keep in mind that third-party software may not be officially supported by Apple, and it’s always a good idea to research and read reviews before downloading and installing any software on your computer.
By following these steps, you can easily disable noise cancellation on your AirPods Pro using third-party software, providing you with an alternative solution for managing your audio experience.
Conclusion
Noise cancellation can be a fantastic feature for immersing yourself in your audio, but there are times when you may want to disable it. Whether you’re working in a noisy environment, prefer to hear your surroundings, or want to conserve battery life, being able to turn off noise cancellation on your AirPods Pro is essential.
In this article, we explored two different methods for disabling noise cancellation on AirPods Pro while using them with a Windows device. Firstly, adjusting the AirPods Pro settings on Windows allows you to turn off noise cancellation directly from your computer’s sound settings. Simply follow the steps outlined in Method 1 to customize your AirPods Pro properties and disable noise cancellation.
Alternatively, you can use third-party software like EarTrumpet to gain additional control over your AirPods Pro settings. By following the steps provided in Method 2, you can download and install a compatible software application, access your AirPods Pro settings, and disable noise cancellation.
It’s important to note that both methods require a Windows device for configuration, and the settings may not carry over if you use the AirPods Pro with a different device. Therefore, if you switch to another Windows device, you may need to repeat the steps to adjust the noise cancellation settings again.
Remember, noise cancellation is a personal preference, and it’s up to you to decide whether or not to use this feature. By following the methods outlined in this article, you can effortlessly disable noise cancellation on your AirPods Pro, giving you more control over your audio experience.
So go ahead and choose the method that best suits your needs, and enjoy your AirPods Pro without the noise-cancelling effect whenever you prefer!
Как включить Шумоподавление в AirPods Pro на Windows
Если вы используете наушники AirPods Pro и хотите включить режим шумоподавления в Windows, то вам нужно выполнить лишь несколько простых шагов. Однако, перед тем как начать, убедитесь, что на вашем устройстве установлена последняя версия программного обеспечения.
- Запустите «Настройки», откройте Bluetooth и выберите «Мои устройства».
- Найдите AirPods Pro в списке устройств и откройте его.
- Там же вы найдете раздел «Управление шумом», в котором будет доступна вся необходимая функциональность.
- Шаг 1: Запустите «Настройки» и откройте раздел «Bluetooth»
- Шаг 2: Выберите свои наушники в разделе «Мои устройства»
- Шаг 3: Откройте раздел «Управление шумом»
- Шаг 4: Включите шумоподавление и настройте его уровень
- Как включить и выключить шумоподавление в AirPods Pro
- Возможные решения, если шумоподавление не работает на AirPods Pro
- Полезные советы и выводы
Для того чтобы включить функцию Шумоподавление на наушниках AirPods Pro на компьютере с Windows, необходимо зайти в настройки системы, выбрать раздел «Bluetooth» и в списке сопряженных устройств открыть наушники AirPods Pro. После этого откроется раздел «Управление шумом», который содержит все нужные функции для управления звуком наушников. В этом разделе можно включить или выключить режим Шумоподавление, а также выбрать уровень шумоподавления в зависимости от вашего окружения и потребностей. Если вы хотите насладиться превосходным качеством звука и полностью погрузиться в музыку или видео, то использование режима Шумоподавление на наушниках AirPods Pro является оптимальным решением.
✅✅✅ Подробнее… ✅✅✅
Как включить Шумоподавление на Windows 10
Если вы хотите включить режим шумоподавления в Windows 10, то нужно выполнить следующие действия:
- Зайдите в настройки через «Панель управления» или просто нажав Win + I.
- В разделе «Звук» выберите нужное устройство, отрегулируйте его громкость.
- Выберите один из вариантов шумоподавления, называемый «оптимизированный звук Zoom».
✅✅✅ Подробнее… ✅✅✅
Как включить режим шумоподавления на AirPods Pro
Если вы имеете iPhone или iPad, то включить режим шумоподавления на AirPods Pro можно следующим образом:
- Зайдите в «Настройки» > «Универсальный доступ» > «Аудиовизуализация» > «Адаптация наушников».
- Убедитесь, что параметр «Адаптация наушников» включен.
- Коснитесь «Режим прозрачности», включите «Режим настройки прозрачности» и затем включите «Шумоподавление».
✅✅✅ Подробнее… ✅✅✅
Почему не включается Шумоподавление на AirPods Pro
Если Шумоподавление на AirPods Pro не работает, то для того, чтобы завести его, нужно выполнить следующие действия:
- Убедитесь, что на подключенном устройстве установлена последняя версия программного обеспечения.
- Вставьте оба наушника AirPods Pro в уши и убедитесь, что режим «Активное шумоподавление» включен.
✅✅✅ Подробнее… ✅✅✅
Как настроить AirPods Pro на Windows 10
Если вы хотите настроить AirPods Pro на Windows 10, то выполните следующие действия:
- Зайдите в настройки Windows, выберите «Устройства» и нажмите «Bluetooth и другие устройства».
- Включите Bluetooth и нажмите «Добавление Bluetooth и других устройств».
- Нажмите «Bluetooth», откройте кейс AirPods и удерживайте кнопку на корпусе для сопряжения до готовности.
✅✅✅ Подробнее… ✅✅✅
Полезные советы
- Если вы хотите получить максимальную производительность шумоподавления, то закройте все окна и двери, чтобы изолировать помещение от шума.
- Проверьте, что наушники находятся в хорошем состоянии, и вы используете их правильно.
- Если возникнут проблемы с использованием AirPods Pro на Windows 10, попробуйте выключить Bluetooth и включить его снова.
- Следите за обновлениями программного обеспечения для устройств, чтобы получить максимальную производительность и исправить ошибки.
✅✅✅ Подробнее… ✅✅✅
Выводы и заключение
Использование шумоподавления на AirPods Pro в Windows 10 очень просто и не требует особой настройки. Для максимальной производительности и удобства обязательно следуйте нашим советам и не забывайте обновлять программное обеспечение вашего устройства. Мы надеемся, что эта статья помогла вам настроить шумоподавление на AirPods Pro и наслаждаться музыкой в чистом звуке, неотвлекаясь на окружающие звуки.
Как работает печка в режиме авто в машине
Как оформить подписку на Бусте
Как настроить режим в чехле
Сколько человек может пользоваться подпиской премьер
Airpods Pro — это Bluetooth-наушники, разработанные и произведённые технологическим гигантом Apple. В первую очередь, они предназначены для всех устройств производителя, включая настольные компьютеры / ноутбуки MacOS, iPhone, iPad и т. д. Однако? многие их используют вместе с компьютерами с Windows 10.
Несмотря на то, что гарнитура отлично работает на компьютерах Mac, а также с любой системой, в которой включена функция Bluetooth (Android, Linux и т. п.), многие пользователи жалуются на плохое качество звука на ПК с Windows. Таким образом можно сделать вывод, что проблема заключается именно в конфигурации и совместимости этой системы.
Одна из основных причин, по которой возникают эти несовместимости и аналогичные проблемы с наушниками Bluetooth, связана с тем, как Windows обрабатывает эту технологию. Система настраивает два отдельных устройства — одно для наушников, а другое для гарнитуры. После подключения качество звука устанавливается на 1 канал, 16 бит, 8000 Гц, это является качеством, сравнимым с телефонной связью.
Как исправить плохое качество звука Airpods Pro в Windows
Чтобы исправить плохое качество звука Airpods Pro, необходимо зайти в настройки конфигурации Windows и сделать соответствующие изменения. Также важно отметить, что плохое качество звука может быть связано с другими проблемами на самом ПК, включая несовместимые или повреждённые звуковые драйверы, нарушенные системные файлы и другие проблемы.
Прежде чем начинать вносить правки в систему, рекомендуется выполнить диагностику специализированными программами, чтобы выявить возможные проблемы с ОС и автоматически исправить их всего за несколько минут. Ну, а далее можно приступать к ручным методам.
Способ 1. Обновите драйверы
Качество звука может сильно пострадать, если на устройстве установлены устаревшие драйверы. Поэтому сначала следует попробовать обновить звуковые и аудиодрайверы:
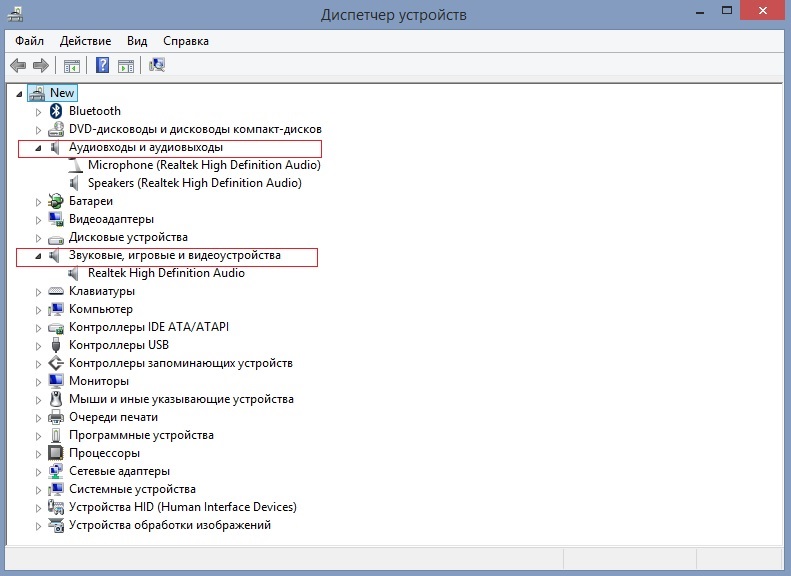
- Щелкните ПКМ по значку Пуск и выберите «Диспетчер устройств».
- В новом окне разверните раздел «Аудиовходы и аудиовыходы».
- Нажмите правой кнопкой по доступной гарнитуре и выберите «Обновить драйвер».
- Далее нажмите на пункт «Автоматический поиск драйверов» и обновите их.
- После этого разверните раздел «Звуковые, игровые и видеоустройства» и обновите драйверы тем же способом.
- Дождитесь загрузки и установки драйверов, а затем перезагрузите компьютер.
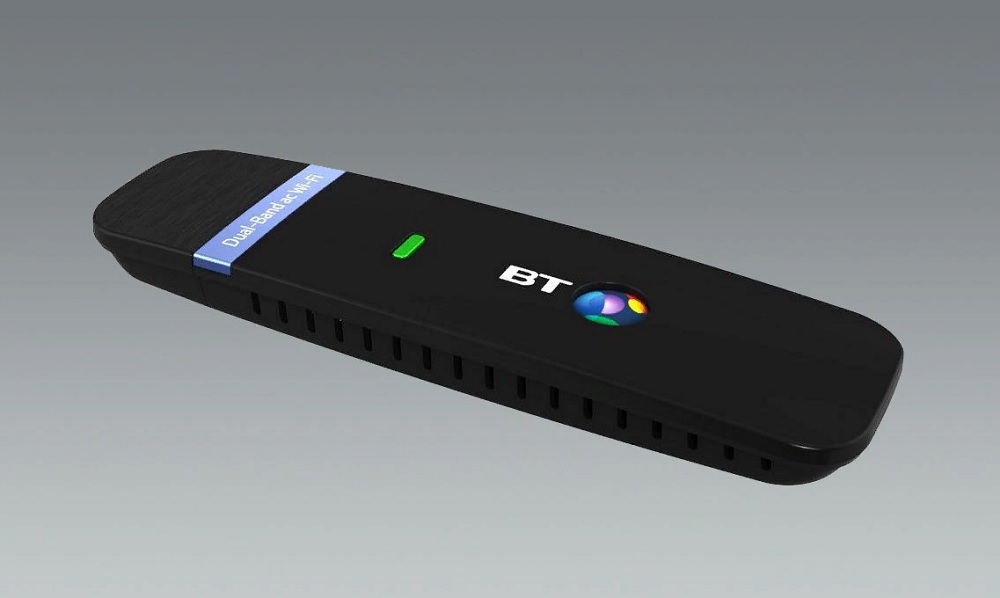
Способ 2. Используйте двухдиапазонный адаптер
Одна из основных причин плохого качества звука Airpods Pro в Windows заключается в том, как работает технология Bluetooth — она просто не обеспечивает достаточной пропускной способности для эффективной работы наушников. В этом случае может помочь двухдиапазонный адаптер — он хорошо работает с диапазонами 2,4 и 5 ГГц, обеспечивая гораздо лучшее качество передачи для вашей гарнитуры.
Проблема в том, что адаптер — это дополнительное оборудование, которое придётся покупать отдельно. Однако те, кто готов потратить немного лишних денег на удобство, будут довольны лучшим качеством звука.
Способ 3. Установите Airpods Pro в режим наушников
Этот метод самый эффективный, хотя он не позволит вам использовать микрофон. Однако, если это не требуется, то проблема решается всего в несколько кликов. На панели задач, внизу экрана, рядом со временем и датой есть значок динамика. Щёлкнув по нему при подключённых Airpods отобразится список устройств воспроизведения:
- Гарнитура (Airpods Pro Hands-Free AG Audio)
- Наушники (AirPods Pro Stereo)
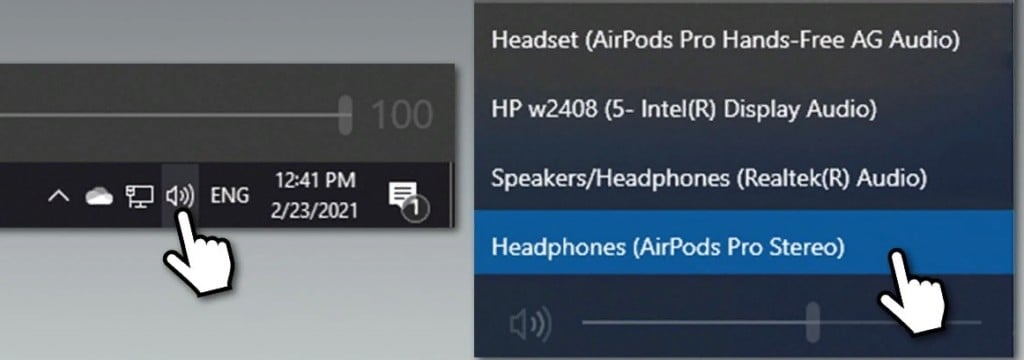
Всё, что нужно сделать, это выбрать наушники (AirPods Pro Stereo), нажав на них один раз. На случай, если понадобится микрофон, придётся подключать отдельное устройство. Также на ноутбуках есть встроенный микрофон.